How to Set Up SSH Certificate Authentication
 Keytos Team |
SSH Certificates Are the Way to Go
Did you know most SSH endpoints have around 200 SSH keys and 90% of them are not used? Well, if you’ve read our blog outlining the problems with using SSH keys, then you know that keys are so last season, and that SSH certificates are the way to go when it comes to adhering to the highest standards of cybersecurity/authentication. You can check out our blog detailing how SSH certificates work for a more detailed overview on that front, but the gist of why they are so trustworthy is as follows: when you employ SSH certificates for your authentication needs, the key that the CA uses is the key that is trusted by your server, thus indicating that any SSH key that the CA signs is inherently trusted. This removes the need for you to manually add and remove SSH keys from your servers.
How Do SSH Certificates Work?
Before we just jump in and create the first SSH certificate let’s talk about how SSH certificates work. In the simplest terms, an SSH certificate is the public part of an SSH key and extra metadata information signed by another SSH key (The certificate authority). You are probably thinking, “this sounds a lot like X509 Certificates” and you are correct! It is essentially the same concept. That being said, SSH certificates are simpler with less fields, making it easier for SSH endpoints to read them. This allows you to use them in almost any SSH endpoint (including IoT devices, network devices, and more).
What Are the Fields of an SSH Certificate?
As mentioned above, SSH certificates only have the necessary fields to identify the user and enable the authentication into the endpoint. These fields are:
Public Key: This is the engineer’s public key that you would want to sign. This allows the machine to validate the sign in request.
Key ID: This is simply an ID that you can give to the key.
Valid Principals: These are the Linux principals that the user can SSH as – for instance, should you want to gain access as a root, you’d need to add “root” to this section.
Valid After: This is the Unix time from when it’s valid from. The certificate will not be accepted at any time before this.
Valid Before: This is just the expiration date. We like to set ours as a few hours, but this can honestly be set as far out or close as your organization wishes.
Signature Key: This is the CA’s public key. It is used by the server to verify that the CA is a trusted CA.
Signature: This is the hash of all the certificate fields signed by the certificate authority private key.
How To Create an SSH Certificate
Now that we know about the parts of the SSH Certificate, we can create an SSH certificate. First, we must create our SSH Certificate Authority. We recommend setting up a machine with the sole purpose of being a CA. This will help you protect your signing keys. If possible, we also recommend having your CA keys protected by a Hardware Security Module (HSM).
How To Create Your SSH CA Key
Once you have your machine set up, create your CA key:
ssh-keygen -f ca
Enter a strong passphrase to protect your private key. This will create two files, a “ca” file and “ca.pub” file. DO NOT share the “ca” file with anyone. That is your private key.
Now your SSH Certificate Authority has been created. Now we have to add the CA to our endpoints, so they accept SSH Certificates signed by this CA.
How to Enable SSH Certificate Authentication Into Your Endpoint
Now that we have the SSH Certificate we are going to copy it to the SSH endpoint you want to authenticate to. I will assume you copied it to a file named “/etc/ssh/trusted_ca_keys.pub” so now we can add to our sshd_config to trust certificates signed by the key saved in “/etc/ssh/trusted_ca_keys.pub” We do this by running the following command:
echo "TrustedUserCAKeys /etc/ssh/trusted_ca_keys.pub" >> /etc/ssh/sshd_config
This will let any SSH certificate signed by this CA authenticate to this server. For these changes to take effect, run the following command to restart the ssh service in the server.
service ssh restart
Now this server will use the principal from the certificate to validate that it is a valid user and will authenticate users with keys signed by our CA. Next, we will create our first SSH certificate.
How to Create an SSH Key for an SSH Certificate
Now, in your laptop we create the SSH key that we will use for the first certificate. We do this by simply creating a regular SSH Key.
ssh-keygen
This will create an id_rsa and id_rsa.pub files in your .ssh folder. NEVER SHARE your “id_rsa” file with anyone, this contains your private key.
Copy the “id_rsa.pub” to the CA. On the CA run the following:
ssh-keygen -s ca -I YourUserName -n root -V +1d -z YOURSERIALNUMBER id_rsa.pub
This will create a certificate signed by your CA. This certificate will have: your user name as the “Key ID”, root as the “Valid Principal”, and will be valid for 1 day.
Copy the id_rsa-cert.pub into the users .ssh folder.
You can also see the values of the certificate by yourself by running:
ssh-keygen –Lf id_rsa-cert.pub
How to Authenticate with an SSH Certificate
Since in this case we created the SSH key and added the SSH certificate to the SSH folder, your SSH agent will know to offer the keys in that folder. Meaning that a simple SSH command like this one will work:
"ssh root@YOURENDPOINT"
However, if you did not store the keys and certificates in that folder, you can specify to use your key you can pass a -i with the key location for example:
"ssh -i myKeyLocation root@YOURENDPOINT"
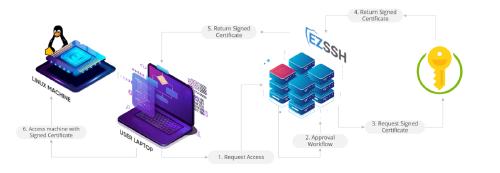
And as simple as that, we have created your first SSH certificate and authenticated it to your endpoint. While this is great for a proof of concept, manually issuing certificates for users does not scale for an organization. This is why we have created EZSSH! This SSH certificate authority abstracts the certificate issuance. EZSSH uses your existing AAD (Azure Active Directory) identity and groups and even Azure RBAC (Role Based Access Control) for Azure hosted VMs (virtual machines) and issues a short term SSH certificate to the user to enable just in time access to your endpoints. See the video below to see how easy it is to SSH using EZSSH: