How SSH Certificates Work
 Keytos Team |
On our last blog we discussed the evolution of SSH, which includes SSH keys and SSH certificates and how EZSSH improves the challenges associated with SSH management, improves user experience and security. The purpose of this blog is to discuss how SSH certificates work, but before we do that, we have to understand the basics of public key authentication. Public Key authentication consists of cryptographic key pairs that have a public key and a private key. These two keys are mathematically related in a way that with the public key you can verify that someone has the private key without knowing the private key.
Now that we have covered, let’s talk about how SSH works. First, you have a server and a client, the server has all the public keys that are allowed to authenticate to it in the “authorized_keys” file. When a user wants to authenticate to the server the following (very oversimplified) steps will happen behind the scenes:
- 1. The user's computer (or client) sends a list of all the public keys that the user has.
- 2. The server checks if any of those keys are in the "authorized_keys" file.
- 3. If there is a match, the server creates a challenge.
- 4. The user's computer uses the private key to complete the challenge and send the response to the server.
- 5. The server validates the returned value, if valid the session starts.
While this is a great option to protect your home server, or any endpoint that might have a few engineers authenticating to it, it does not scale. When we are talking about cloud scale, adding and maintaining the keys of authorized parties (typically engineers, devops, security engineers, etc.) that might need access to a server, across the thousands or millions of servers a company might have, it becomes a full time job that is left unfilled. This is why SSH Certificates were created: to make the management across large enterprises easier.
How SSH Certificates work
The main difference between SSH Key authentication and SSH Certificate authentication, comes down to what a server trust. As mentioned in the previous section about SSH keys, each key has to be added to all servers and since they do not expire, they also have to be removed when the engineer no longer needs access to the endpoint. When using SSH Certificate authentication, the Certificate authority’s key is the one trusted by the server, meaning that any SSH key signed by the CA’s key will be trusted. Sounds confusing, but once you understand it, makes life way simpler by solving all the problems SSH keys have.
Let’s first talk about the setup experience:
- 1. A Certificate Authority (CA) is created. This is just an SSH key-pair that will be used to sign other SSH keys.
- 2. The CA's public key is added to a "trusted_ca_keys.pub" file in the server.
- 3. The sshd_config file is modified to look at the "trusted_ca_keys.pub" file as the source of truth for SSH CAs.
These steps make the server trust any SSH key that is signed by the CA key that is trusted. This removes the need of life cycling each engineer’s key on each endpoint.
Now that the CA is trusted, each engineer will simply have to request their own certificate. Before we look at that, let’s take a look at some the certificate properties. See the full certificate specification.
- 1. Public Key: This is the engineer's public key that you would want to sign.
- 2. Key ID: This is just an ID you can give the key, EZSSH uses this field to add the user's AAD Identity to make it easier for security teams to cross reference audit logs.
- 3. Valid Principals: These are the Linux principals that the user will be able to ssh as. for example, if you want to have access as root, you would have to add root to this section.
- 4. Valid After: This is the Unix time from when it is valid from, any time before this, the certificate won't be accepted.
- 5. Valid Before: This is the expiry date, in Keytos we set ours to a few hours but this can be set to be as far out as you want.
- 6. Signature Key: This is the CA's public key. used by the server to validate if the CA is a trusted CA.
- 7. Signature: This is the hash of all the certificate fields, signed by the CA private key.
Using a Certificate Authority has many benefits:
- 1. Only one key has to be added to each server.
- 2. User's SSH Keys now have an expiration date.
- 3. The CA can give just enough access (JEA) to the user each time the user requests access.
- 4. Easier to correlate each key with their owner.
- 5. If short term certificates are used, organizations have reduced exposure to SSH key theft due to SSH key mismanagement.
- 6. Quicker user onboarding.
Now, let’s look at how SSH Certificate Authentication would look behind the scenes.
- 1. The user's computer (or client) sends a list of all the certificates that the user has.
- 2. The server checks if any of those certificates are signed by a CA in the "trusted_ca_keys.pub" file.
- 3. The server checks if the certificate is valid (it hasn't expired, it has a principal that is allowed to access the server, etc.).
- 4. If there is a match, the server creates a challenge.
- 5. The user's computer uses the private key of the certificate to complete the challenge and send the response to the server.
- 6. The server validates the returned value, if valid the session starts.
This moves all the key management out of the hundreds or thousands of servers, and puts it into a single Certificate Authority.
How to Create a CA
First select the machine that will be your Certificate Authority. We recommend setting a machine that its only purpose is being a CA. This will help you protect your signing keys, if possible, we also recommend having your CA keys protected by a Hardware Security Module (HSM).
Once you have your machine setup, create your CA key:
ssh-keygen -f ca
Enter a strong passphrase to protect your private key. This will create two files, a “ca” file and “ca.pub” file. DO NOT share the “ca” file with anyone. That has your private key used to sign your certificates. Copy the ca.pub to all your servers, EZSSH saves it in a file called: “/etc/ssh/trusted_ca_keys.pub” in the servers. Then run the following line on the server you are setting up to accept certificates from this CA:
echo "TrustedUserCAKeys /etc/ssh/trusted_ca_keys.pub" >> /etc/ssh/sshd_config
This will let any SSH certificate signed by this CA to authenticate to this server. Run the following command to restart the ssh service in the server.
service ssh restart
Now your server is ready to accept SSH Certificates.
Now a user can create an SSH key using:
ssh-keygen
This will create an id_rsa and id_rsa.pub files in your .ssh folder. NEVER SHARE your “id_rsa” file with anyone, this contains your private key.
Copy the “id_rsa.pub” to the CA. On the CA run the following:
ssh-keygen -s ca -I YOURNAME -n root -V +1d -z YOURSERIALNUMBER id_rsa.pub
This will create a certificate signed by your CA. This certificate will have: your name as the “Key ID”, root as the “Valid Principal”, and will be valid for 1 day.
Copy the id_rsa-cert.pub into the users .ssh folder. Now that you have a certificate you will be able to authenticate to your endpoint by running
"ssh root@YOURENDPOINT"
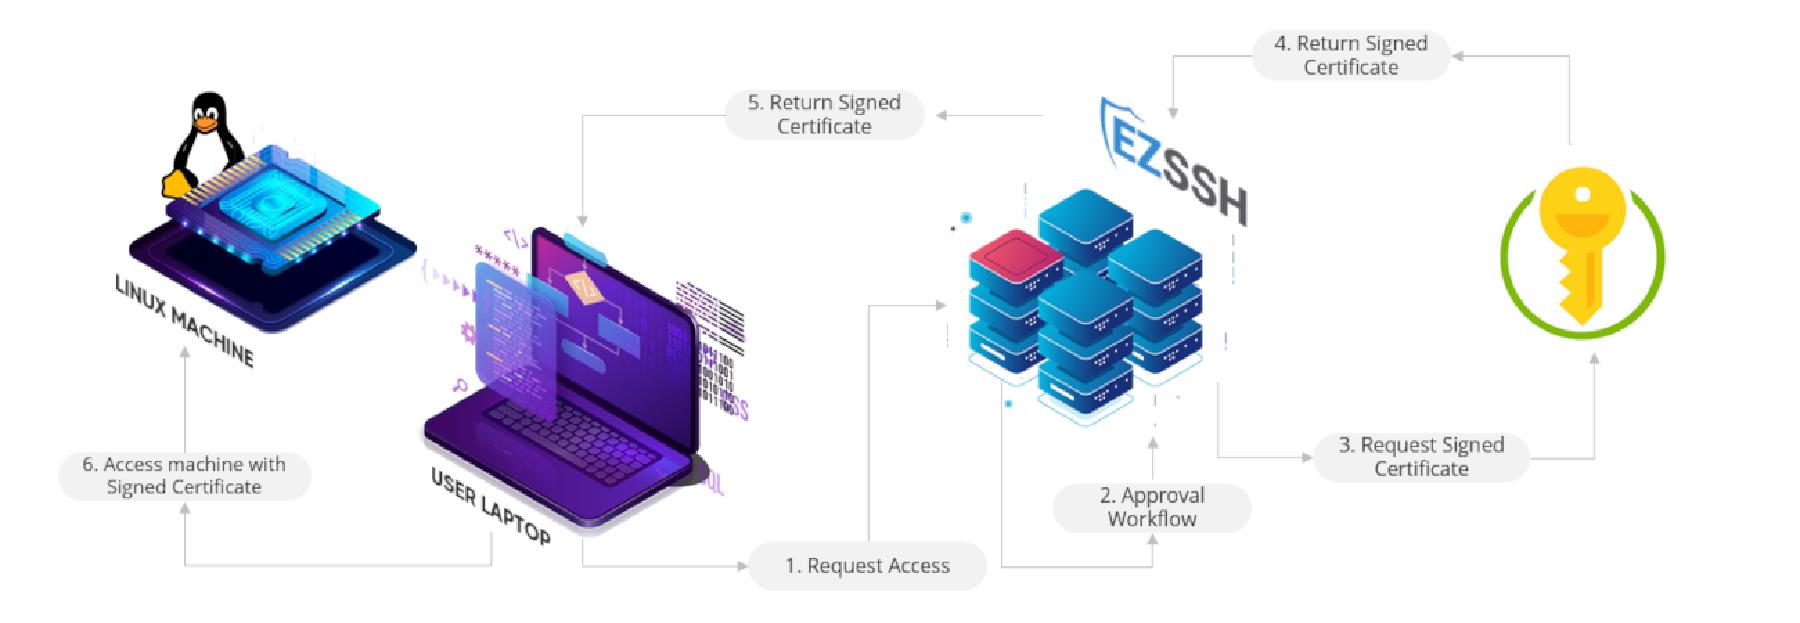
How EZSSH Can Make it Even Easier to Manage
EZSSH removes the complexity of creating and running your own SSH CA by offering HSM backed SSH CAs as a service. All you have to do is create a policy specify who has access to the endpoints, EZSSH will create a new CA for your policy and will also create scripts you can run on your endpoints to trust the policy. If a user needs access to the endpoint all the user has to do is run the following command:
"ezssh ssh -e LINUXPRINCIPAL@YOURENDPOINT"
Where LINUXPRINCIPAL is the principal the user wants to use for authentication and YOURENDPOINT is the endpoint that the user wants to authenticate to. EZSSH will:
- 1. Use the user's corporate identity to see if the user has access.
- 2. Create a one time use SSH key for the user.
- 3. Request a certificate on behalf of the user.
- 4. Create a short term certificate.
- 5. SSH the user to the endpoint.