Using IoT Device Certificates to Authenticate into Azure IoT Hub
Something we’ve been hearing more frequently is, “Can I use IoT device certificates to authenticate in Azure?” The TL;DR here is: yes, you absolutely can. But before we dive in, let’s start at the beginning and define the terms associated with Azure IoT CBA…
What is an IoT Device Certificate?
An IoT device certificate is type of cert that authenticates device identity and secures communications between devices with PKI (Public Key Infrastructure). IoT device certificates have exceptionally strong encryption and ensure data integrity throughout the device’s lifecycle. In the simplest terms, these certificates convert data into a format that is impossible to decrypt without the corresponding private key. Consequently, devices can identify other trusted devices and servers. As you can imagine, these are one of the most commonly used and important tools for Azure IoT Hub security best practices.
An IoT device certificate typically includes:
Device Identity Information: Device name, model, and manufacturer details.
Public Key: A cryptographic key used to validate the device identity.
Issuer Information: Details about the Certificate Authority (CA) that issued the certificate.
Validity Period: Amount of time for which the certificate is valid.
How to Create a CA for Azure IoT
Creating your CA for Azure IoT is essentially “square one” of this whole process and in the hierarchy of Azure IoT security best practices. You’re probably familiar with the concept of deploying a CA in Azure at this point, which is an excellent start! If you’re not, please refer to our docs where we provide step-by-step photo and video tutorials on the entire process of creating an issuing CA in Azure. For the visually inclined, here’s a quick video for your viewing pleasure.
How Do I Create an Azure IoT Certificate?
Without question, the most complicated part of this song-and-dance is adding the first certificate to the IoT device. This is why we have created a code sample in addition to our exceptionally detailed documents section on creating your first IoT device certificate.
Creating an IoT SSL Certificate in the Factory
-
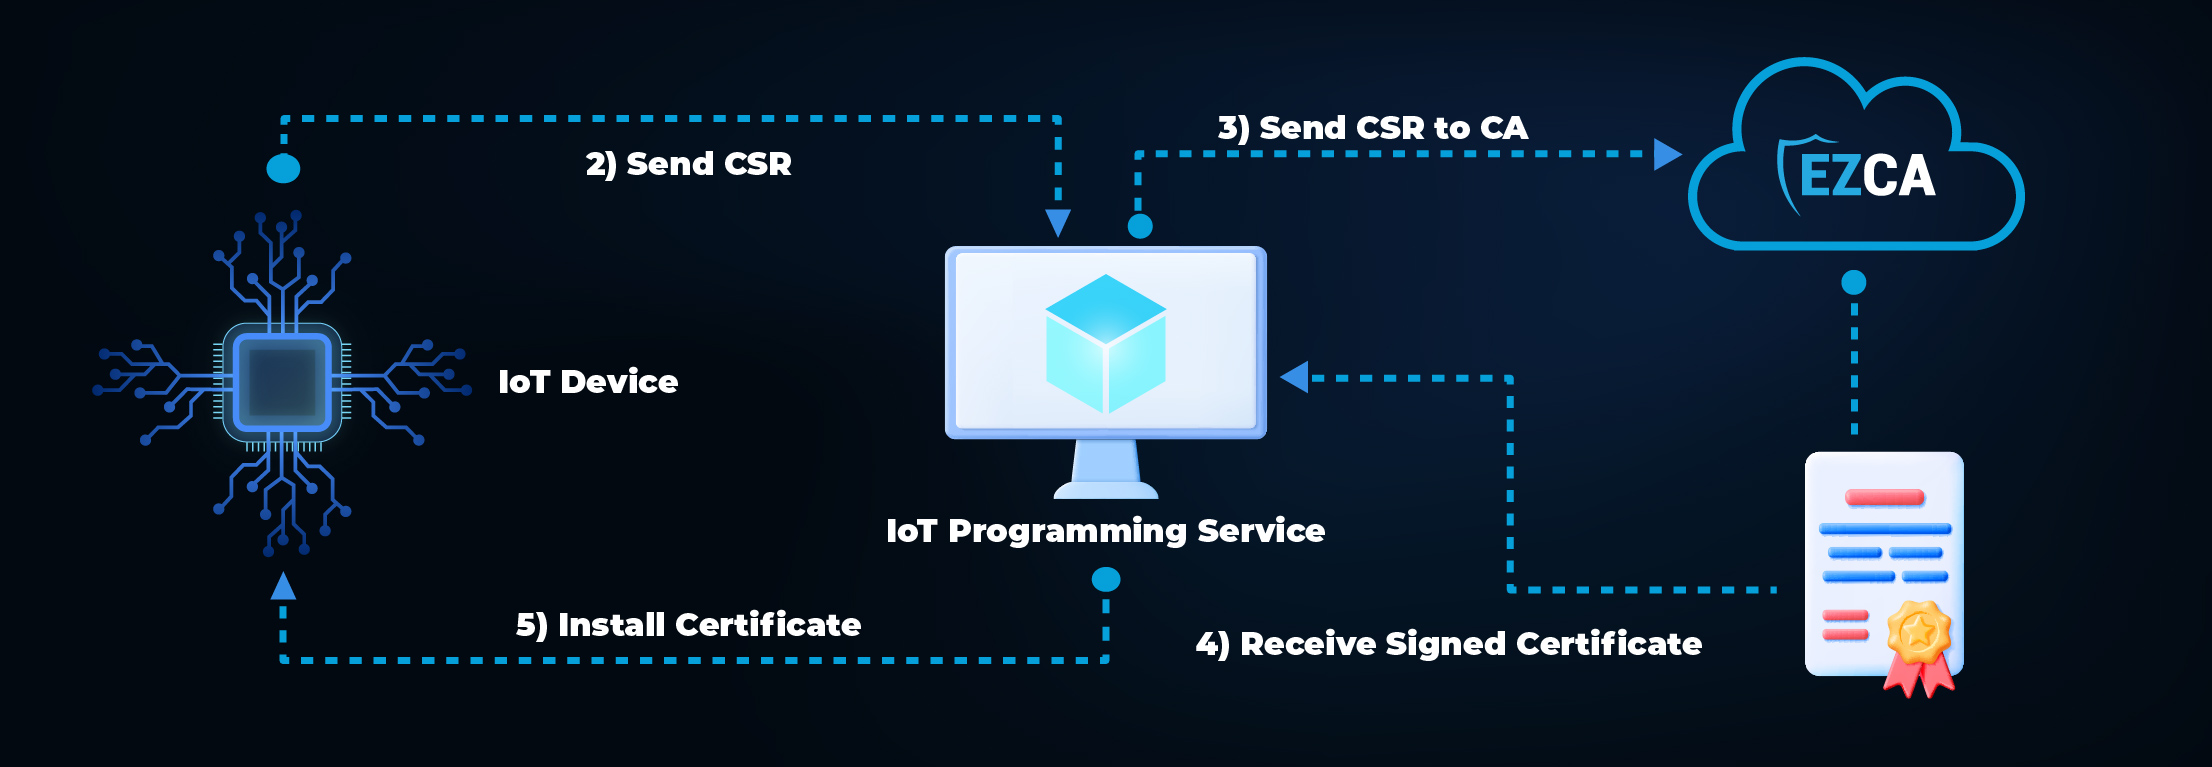
The IoT device creates a private key and uses it to create a certificate signing request (CSR) with its unique device ID.
-
The CSR is then transferred to the IoT programming service. It is important to note that since there is no authentication between the IoT device and the IoT Programming Service, this has to be done over a secure bus where it would be physically impossible for another device to impersonate an IoT device.
-
The IoT Programming Service sends the request to the CA.
-
The CA returns a signed certificate.
-
The certificate is installed in the IoT device.

How to Authenticate with Device Certificates to Azure IoT
Registering and Connecting an IoT Device to Azure IoT Hub
Note: Connecting to Azure does not need to happen in the factory – once the certificate is loaded, the IoT device can use that certificate to register itself in Azure once the IoT device is going to be used.
-
IoT Hub is set to use Certificate based authentication with a Certificate Authority.
-
The IoT device uses that certificate to authenticate with Azure IoT Hub.
-
The IoT device starts communicating with the Azure IoT Hub.
Secure Your Azure IoT Devices with X509 Certificates Using EZCA
Understanding and implementing IoT device certificates is absolutely essential in modern cybersecurity. Whether you’re working with Azure IoT or other platforms, the principles of device authentication remain the same. EZCA allows you to run and scale your own highly available private CA service without the upfront investment and ongoing maintenance costs of operating a private CA or private CA hierarchy. EZCA gained popularity in the IoT space due to our amazing guides as our easy-to-use API’s and NuGet package making IoT certificate issuance and management as easy as possible.


