




How To Do Certificate-Based Wi-Fi Authentication for Jamf-Managed Apple Devices - The Ultimate Guide
 Aaron Crawfis |
If you’re managing a fleet of Macs, iPhones, and iPads with Jamf Pro, Jamf Now, or Jamf School, you know the struggle: getting devices onto your WPA Enterprise Wi-Fi network shouldn’t require IT tickets, user calls, or manually entering your account details into a system prompt. Your Apple devices should just “magically” connect to your Wi-Fi without any user friction.
That’s where Keytos EZRADIUS and EZCA come in. This guide will walk you through setting up zero-touch EAP-TLS certificate-based Wi-Fi authentication so your Apple devices connect automatically the moment they’re enrolled. No password prompts, no user friction, and no IT overhead.
We’ll cover the complete journey:
- How to create a SCEP profile in Jamf to issue certificates with EZCA Cloud PKI
- How to add Wi-Fi authentication with EZRADIUS Cloud RADIUS
- How to deploy Wi-Fi profiles to your entire fleet.
By the end, you’ll have a seamless, secure network enrollment experience that scales from 10 devices all the way to 10,000 and beyond.
Why Use EAP-TLS Certificate-Based Wi-Fi Authentication for Jamf-Managed Devices?
If you’re currently managing Wi-Fi credentials through shared passwords, manual setup profiles, or user-driven enrollment, certificate-based authentication solves the biggest pain point: zero friction at connection time. Your users turn on their newly enrolled device which contains their unique certificate, they connect to Wi-Fi, and they’re instantly online without ever needing to know the Wi-Fi password or interact with any prompts.
Here’s why Jamf admins choose EAP-TLS certificate-based Wi-Fi:
- Zero-Touch Setup - Devices connect to WPA Enterprise automatically after Jamf enrollment completes. No additional configuration needed.
- Scalability - Each device gets a unique certificate. Add 1000 new devices? They all provision and connect without manual intervention.
- Security - Passwords are replaced with cryptographic certificates. No credential sharing, no password resets, no “what’s the Wi-Fi password?” messages.
- Compliance - EAP-TLS certificate-based auth meets regulatory requirements for sensitive environments (healthcare, finance, government).
- Device Revocation - If a device is lost or stolen, you revoke its certificate. No more worrying about changing shared Wi-Fi passwords and reconfiguring every device.
How Much Will WPA Enterprise Wi-Fi with EAP-TLS Certificates Cost Me in Jamf?
One of the biggest misconceptions about EAP-TLS certificate-based Wi-Fi is that it requires expensive on-premises PKI infrastructure. Modern cloud PKI solutions like Keytos EZCA eliminate that overhead. You can set up a fully managed certificate authority in the cloud for a fraction of the cost of traditional solutions. For a low flat rate you can issue unlimited certificates to your Jamf-managed devices and scale up to thousands or even hundreds of thousands of devices without worrying about infrastructure, maintenance, or capacity planning. No cost per certificate and no hidden fees.
Plus, with Keytos EZRADIUS, you get a fully managed RADIUS server for Wi-Fi authentication without the need to maintain your own infrastructure. You only pay for the devices that actually connect to your network each month, ensuring that you only pay for what you use and can scale up or down as needed.
For most organizations this means you can implement certificate-based Wi-Fi for your entire Jamf fleet for only the cost of a CA and a dollar or less per user per month. In most cases this will be less than the cost of a cloud virtual machine to run your own PKI and RADIUS servers, and eliminates the need for IT resources to maintain that infrastructure.
Can I Use Certificate-Based Wi-Fi for All My Jamf-Enrolled Apple Devices?
Absolutely. Keytos EZCA and Cloud RADIUS support all Apple devices that can enroll in Jamf Pro, Jamf Now, or Jamf School. This includes:
- macOS - Full support for certificates and EAP-TLS authentication (10.14+)
- iOS - Full support for certificates and EAP-TLS authentication (13.0+)
- iPadOS - Full support for certificates and EAP-TLS authentication (13.0+)
If you’re managing a mixed fleet of Macs, iPhones, and iPads, they can all securely connect to your WPA Enterprise network using the same certificate-based authentication workflow. Jamf will handle the device-specific profile deployment, and Keytos EZCA will issue certificates that work across all your Apple devices.
Setting Up Certificate-Based Wi-Fi for Jamf-Managed Apple Devices - Video Walkthrough
Want to follow along with a video walkthrough of the entire setup process? Check out our step-by-step video guide where we show you exactly how to configure your EZCA CA, set up SCEP in Jamf, create your Cloud RADIUS policy, and configure your Wi-Fi network for EAP-TLS authentication.
Certificate-Based Wi-Fi Authentication with Jamf Pro - Step-By-Step Guide
Setting up EAP-TLS certificate-based Wi-Fi authentication for your Jamf-managed devices might look complex at first: configuring certificates, SCEP servers, and RADIUS policies. However, we’ve broken it into easy to follow steps. You’ll be done in under an hour.
Prerequisites for EAP-TLS Certificate-Based Wi-Fi in Jamf
Before you begin setting up EAP-TLS certificate-based Wi-Fi authentication in Jamf, make sure you have:
- Jamf Administrator Account - You’ll need admin access to create SCEP profiles, Wi-Fi profiles, and deployment groups.
- Entra ID Global Administrator Account - To set up the Keytos integration, install the Keytos app, and create your RADIUS server.
- A Test Device - A Mac, iPhone, or iPad running a recent OS to validate the end-to-end flow before fleet deployment.
Step 1: Create EZCA Cloud Certificate Authority with Static SCEP
The first step to setting up EAP-TLS certificate-based Wi-Fi authentication in Jamf is to set up your cloud-based certificate authority (CA) with static SCEP enabled. Keytos EZCA is a managed PKI service that integrates directly with Jamf via SCEP, allowing your devices to request and receive certificates automatically during enrollment.
When you create your EZCA tenant, enable Static SCEP Challenge. This gives you a fixed SCEP endpoint and challenge password that you’ll configure in Jamf.
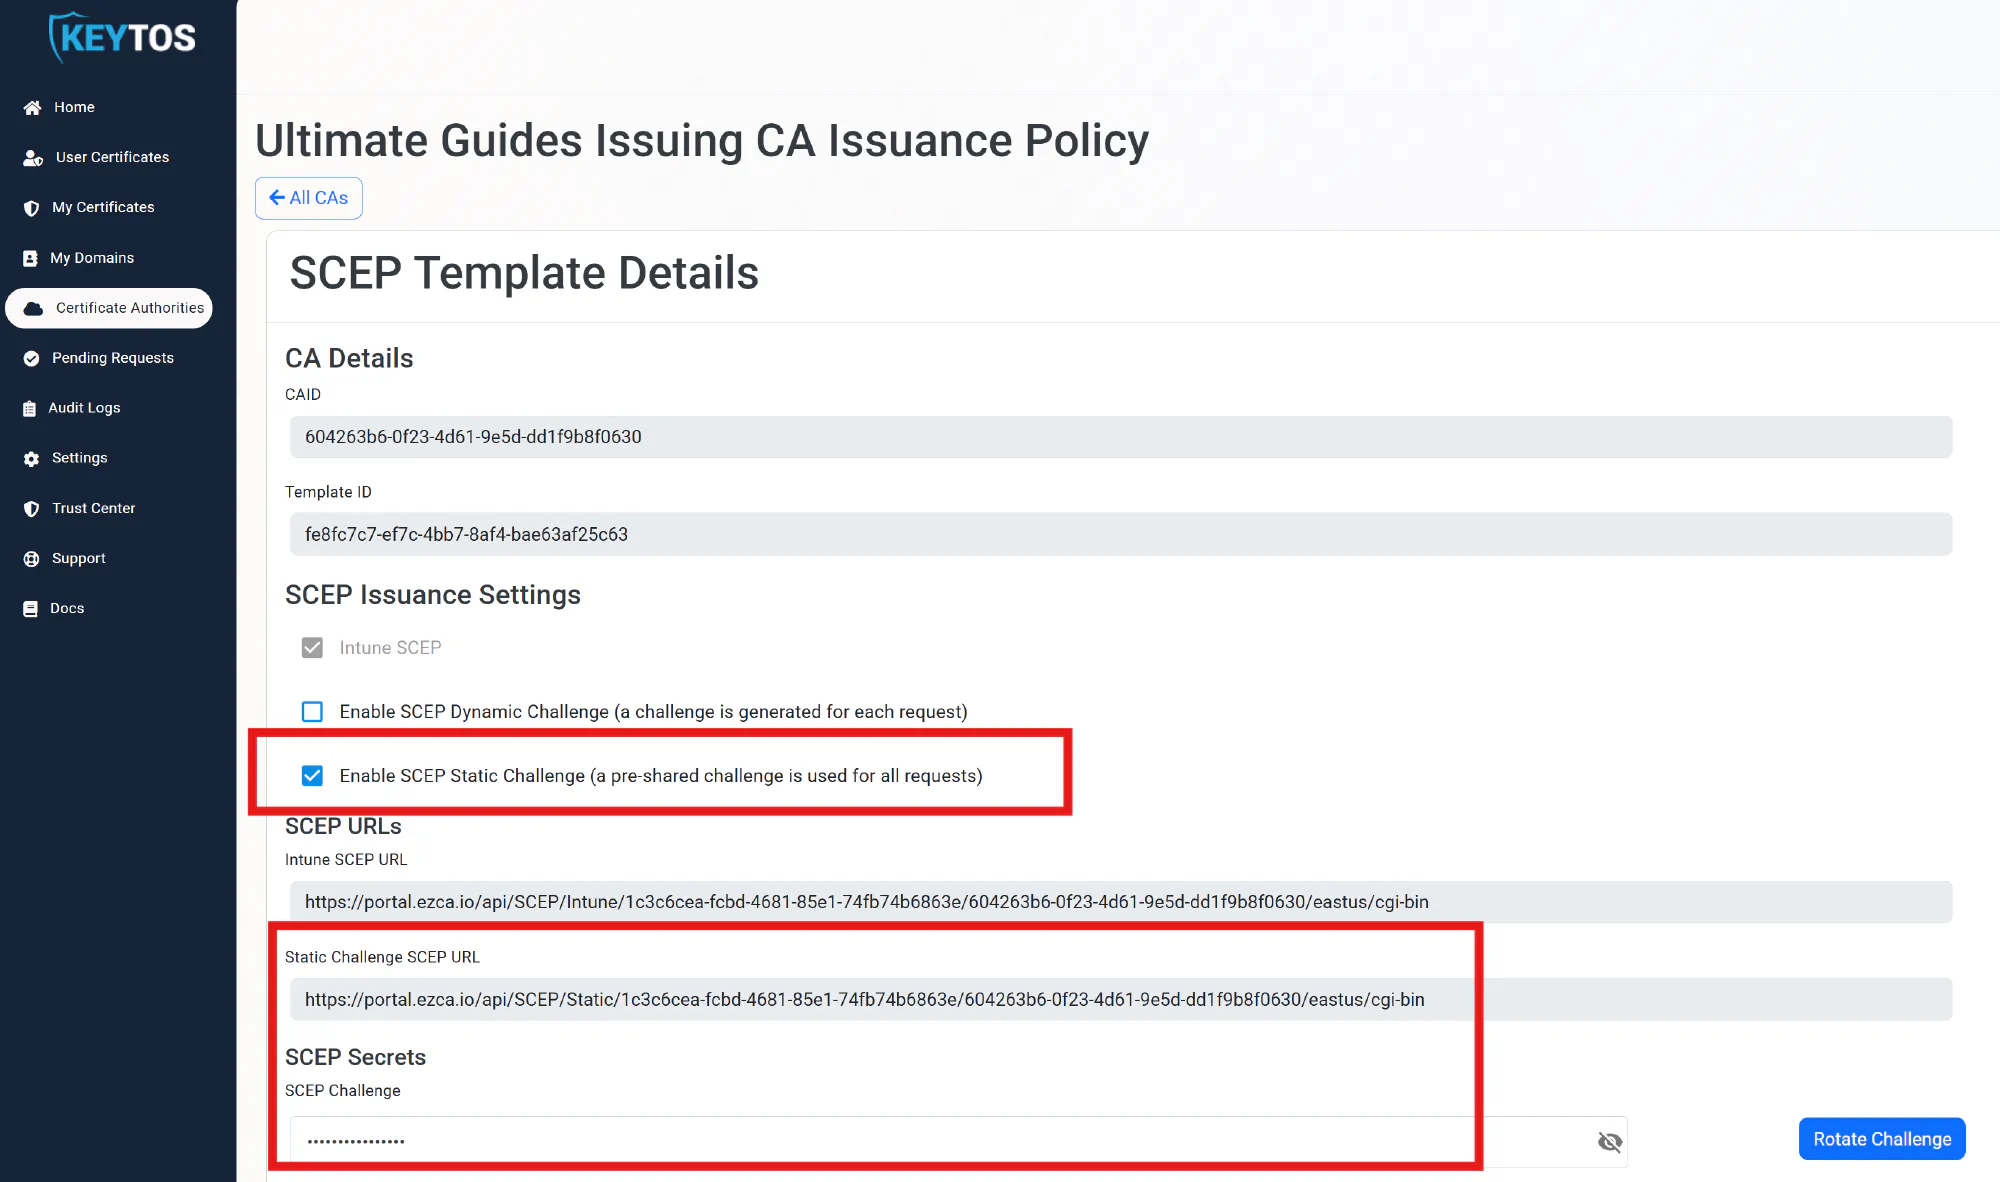
For a full step-by-step walkthrough of creating your EZCA CA with static SCEP, check out our Jamf guides for SCEP CAs.
Deploy a SCEP CA for JamfStep 2: Create Jamf Pro Profile with CA Trust and SCEP
Once you have your EZCA Certificate Authority (CA) set up with static SCEP, the next step is to create a configuration profile in Jamf that does two things:
- Trusts the EZCA CA - This ensures that certificates issued by EZCA are trusted by your Apple devices.
- Configures SCEP - This tells your devices how to request their unique certificates from EZCA using the static SCEP endpoint.
How to configure this depends on which Jamf product you’re using:
Jamf Pro natively supports configuration profiles with both certificate payloads and SCEP settings, making it easy to set up EAP-TLS authentication for your devices. You’ll configure two payloads in your Jamf Pro profile:
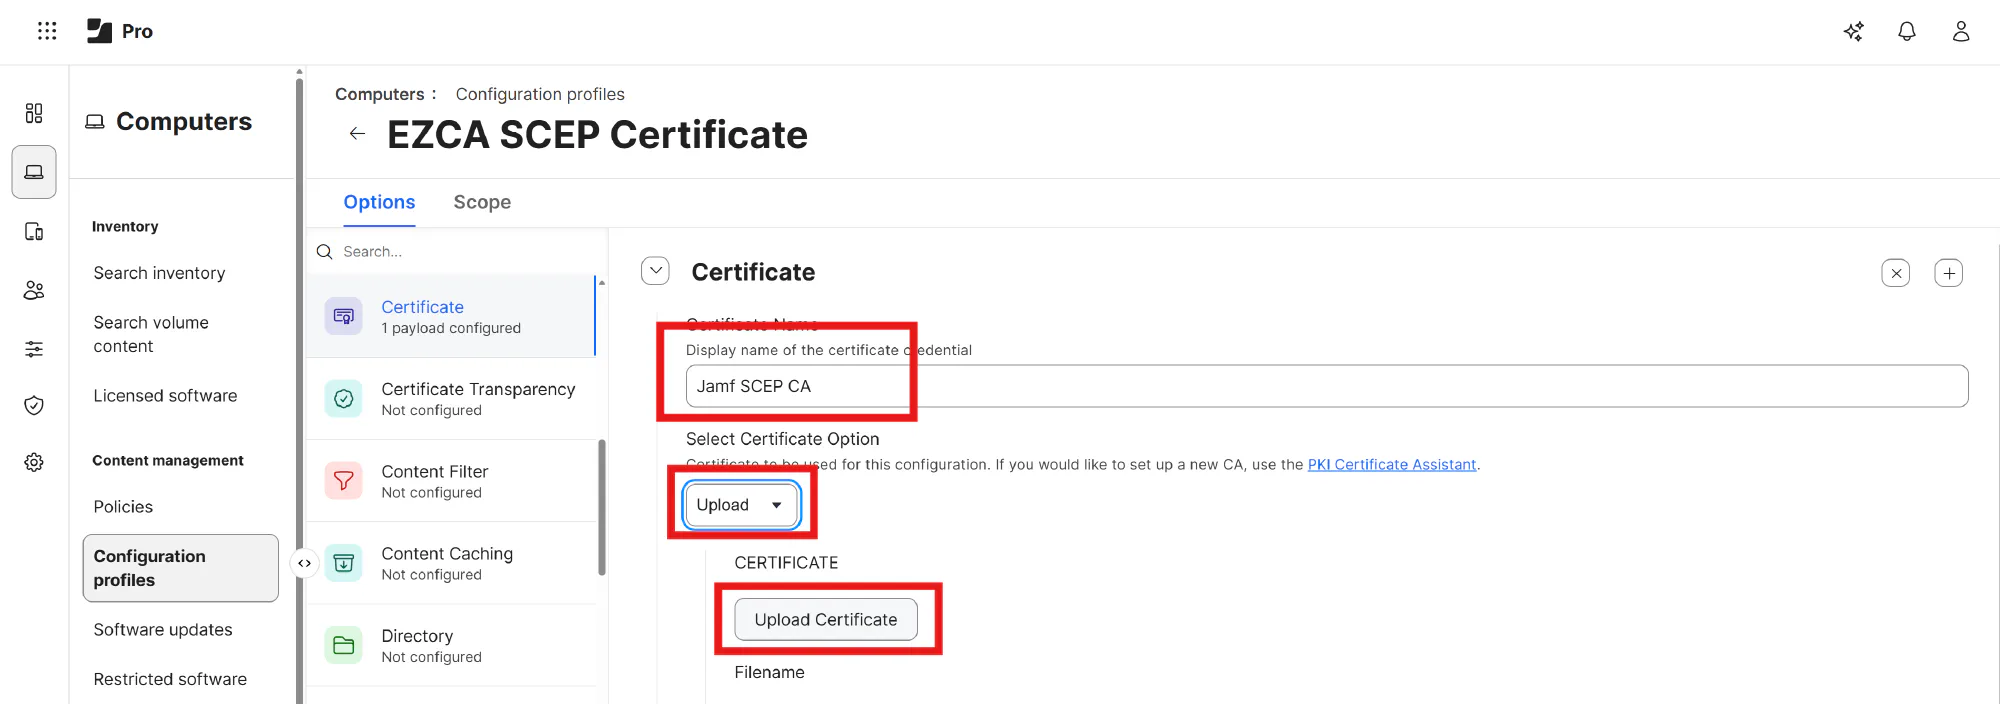
Payload 1: Trusted Certificate(s)
First, add the EZCA CA root certificate to your Apple devices so they trust certificates issued by EZCA. Under the Certificate payload in Jamf Pro, upload the root certificate from your EZCA CA (available in your EZCA dashboard), as well as any intermediate certificates, if applicable.
Payload 2: SCEP
Next, create a SCEP payload in Jamf Pro that tells your Apple devices how to request certificates from EZCA using static SCEP.
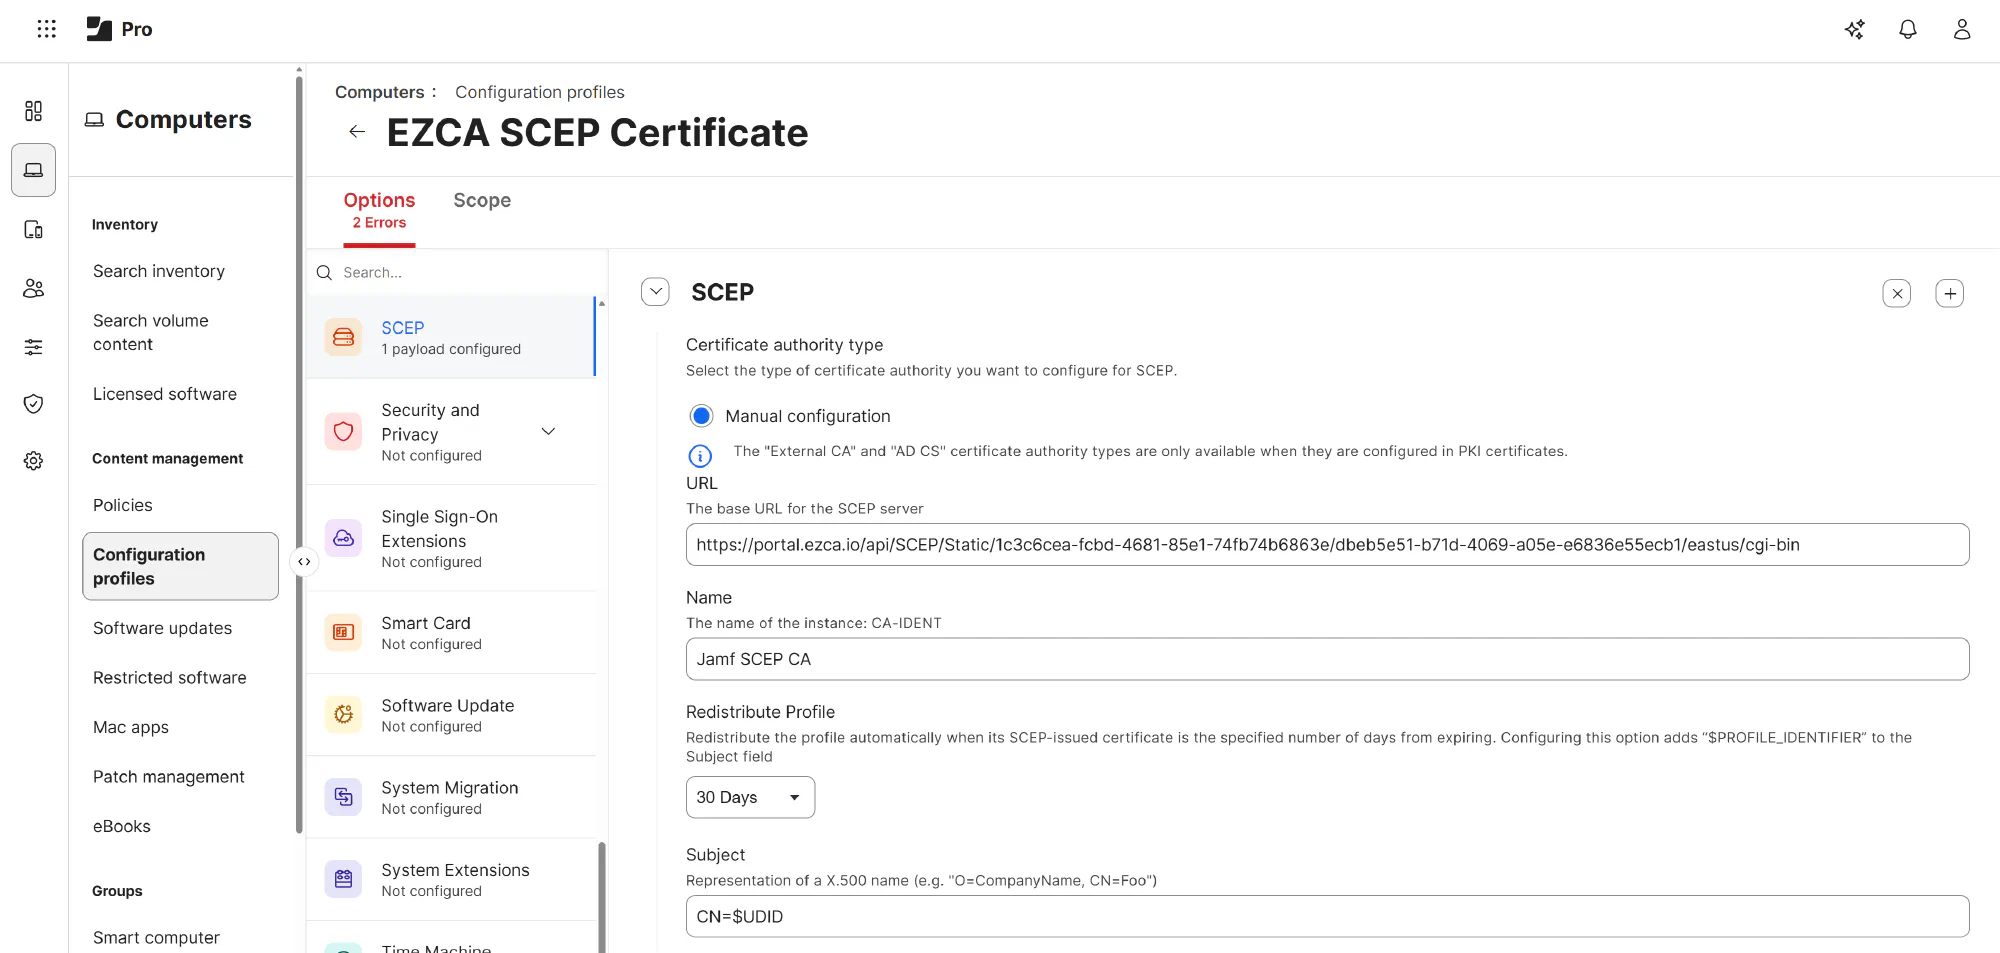
Your SCEP profile should include:
- URL: Paste the Static Challenge SCEP URL from your EZCA portal.
- Redistribute Profile: Specify how often Jamf Pro should redistribute the profile to devices, such as every 30 days.
- Subject Name: Use the available variables and any static values you want to build the subject name for the certificate. You can see the full list of Jamf supported dynamic values here. For example, you could use CN=$UDID to set the Common Name of the certificate to the device’s unique device identifier.
- Subject Alternative Name: Optionally use the available variables and any static values you want to build the subject alternative name for the certificate.
- Challenge Type: Ensure that this is set to Static.
- Challenge: Paste the SCEP Challenge from your EZCA portal.
- Verify Challenge: Paste the SCEP Challenge again to verify.
- Retries: Set this to 2 to have Jamf Pro attempt to retry 2 times if the SCEP server is unavailable.
- Retry Delay: Set this to 30 to have Jamf Pro wait 30 seconds between retries.
- Certificate Expiration Notification Threshold: Set this to 14 to have Jamf Pro notify users 14 days before their certificate expires (if automatic renewal fails).
- Key Size: Set this to 4096 for a stronger key.
- Key Usage: Select Digital Signature and Key Encipherment.
- Allow export from keychain: Uncheck this option to prevent the private key from being exportable from the device’s keychain.
- Allow all apps access: Only check this box if you have a 3rd party VPN or Wi-Fi solution that requires access to the certificate. If you are using the certificate for Jamf Pro and Apple’s built-in Wi-Fi or VPN, you do not need to check this box.
- Upload Certificate: Click on the Upload Certificate button and select the same issuing CA certificate you downloaded earlier. This allows Jamf Pro to validate the SCEP response from EZCA and ensure the certificate is issued by your trusted CA.
Assign the Profile
Once you’ve configured both payloads, assign the profile to a test device or a smart group that includes your test device. This will allow you to validate that the SCEP certificate is issued correctly and that the device trusts the EZCA CA before you deploy to your entire fleet.
Jamf Now doesn’t have a built-in certificate or SCEP payload like Jamf Pro, but you can still set up certificate-based Wi-Fi by creating a custom configuration profile with the necessary payloads and uploading it to Jamf Now.
Begin by opening Apple Configurator 2 on a Mac and creating a new profile. In this profile, add the following payloads:
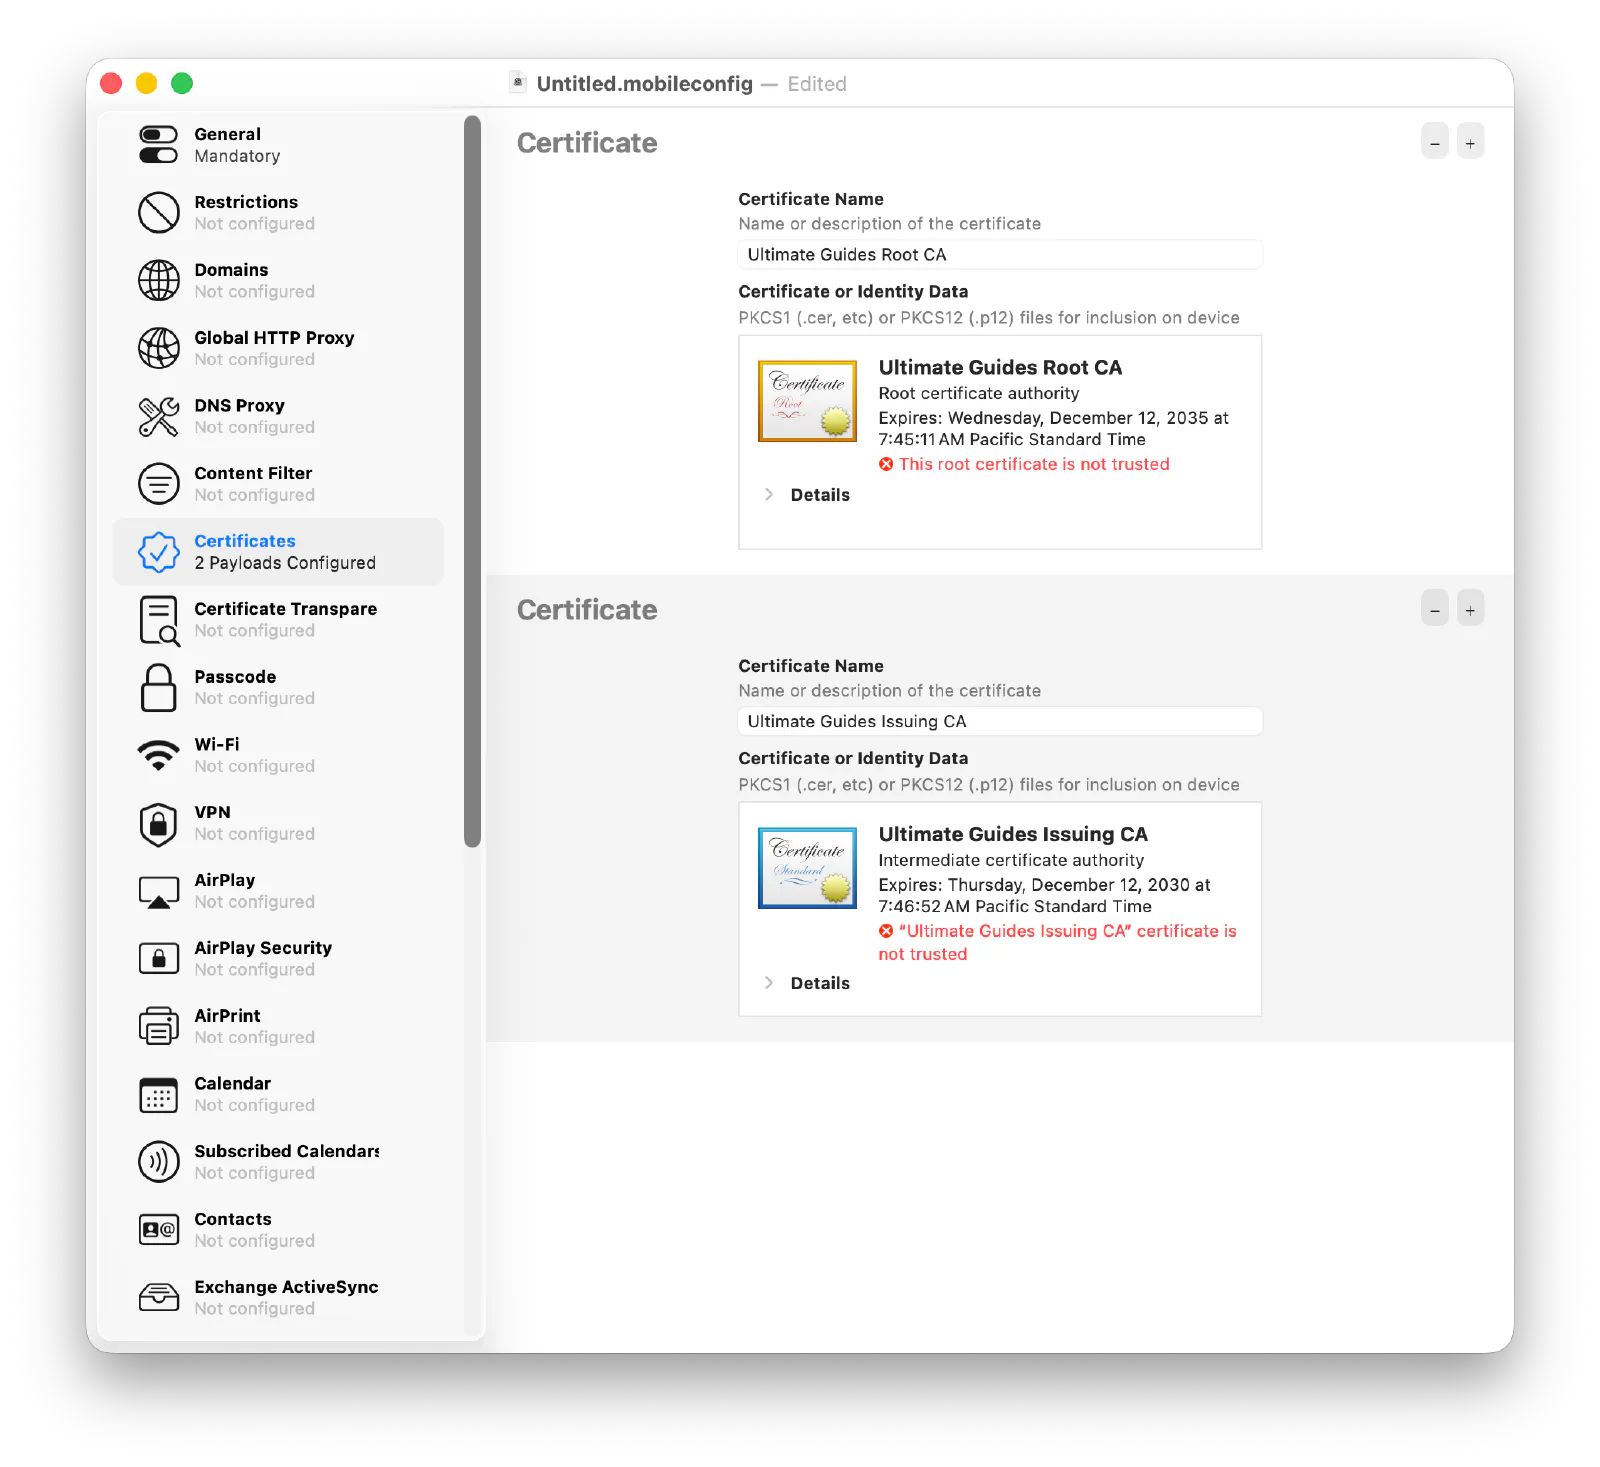
Payload 1: Trusted Certificate(s)
First, add the EZCA CA root certificate to your Apple devices so they trust certificates issued by EZCA. Under the Certificate payload in Apple Configurator, upload the root certificate from your EZCA CA (available in your EZCA dashboard), as well as any intermediate certificates, if applicable.
Payload 2: SCEP
Next, add a SCEP payload in Apple Configurator that tells your Apple devices how to request certificates from EZCA using static SCEP.
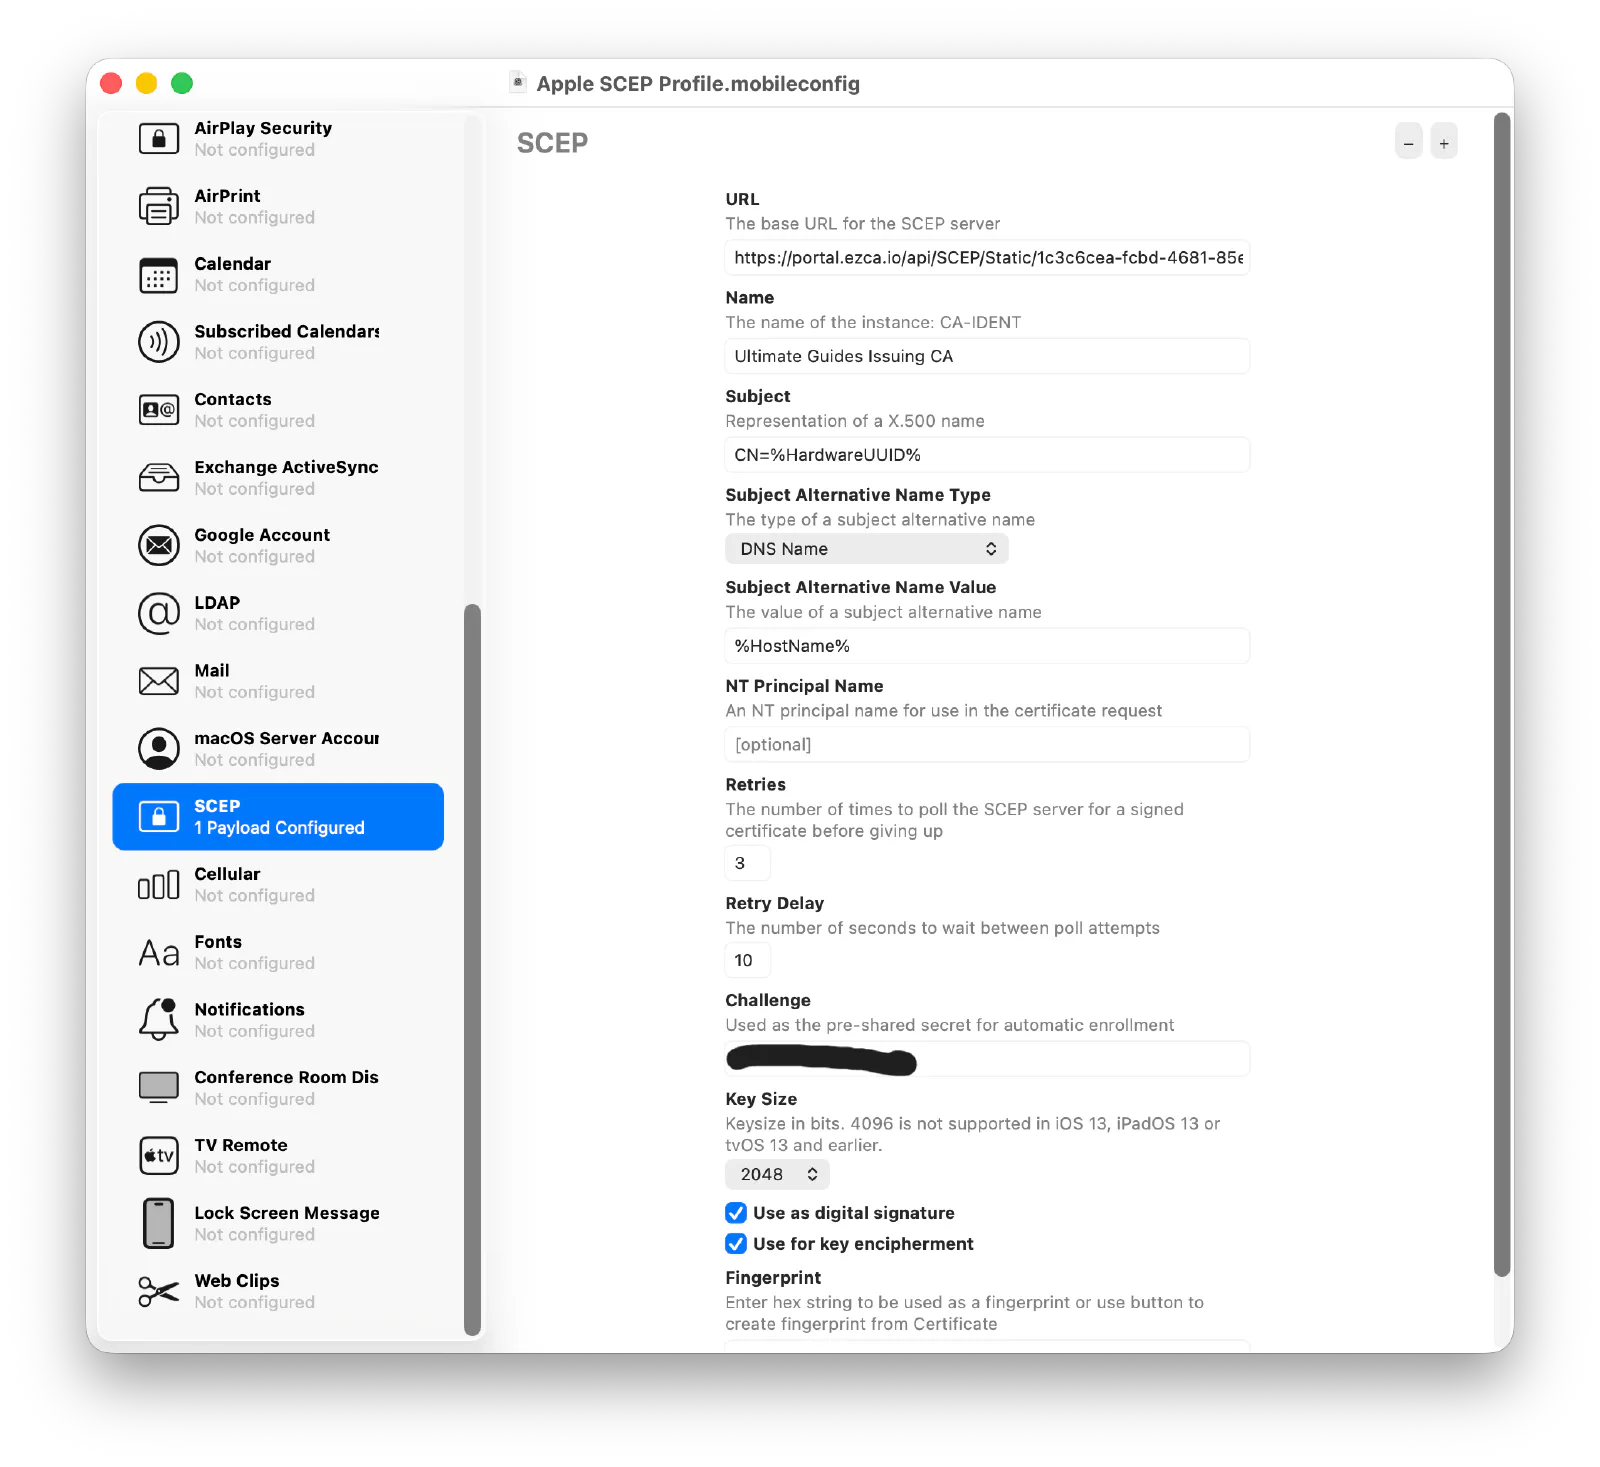
Your SCEP payload should include:
- Name: Set as the name of your SCEP CA
- Subject: Use a static value or Apple’s built-in variables (e.g. CN=%HardwareUUID%)
- Subject Alternative Name Type: Set as DNS Name
- Subject Alternative Name Value: Use a static value or Apple’s built-in variables (e.g. %HostName%)
- Key Size: Set as 2048 or higher.
- Key Usage: Set as “Sign” and “Key Encipherment”.
Upload Configuration Profile to Jamf Now
Once you’ve created the configuration profile in Apple Configurator, export it as a .mobileconfig file. Then, in Jamf Now, upload the .mobileconfig file as a Custom Profile in one of your Blueprints. Assign that Blueprint to a test device to validate that the SCEP certificate is issued correctly and that the device trusts the EZCA CA before you deploy to your entire fleet.
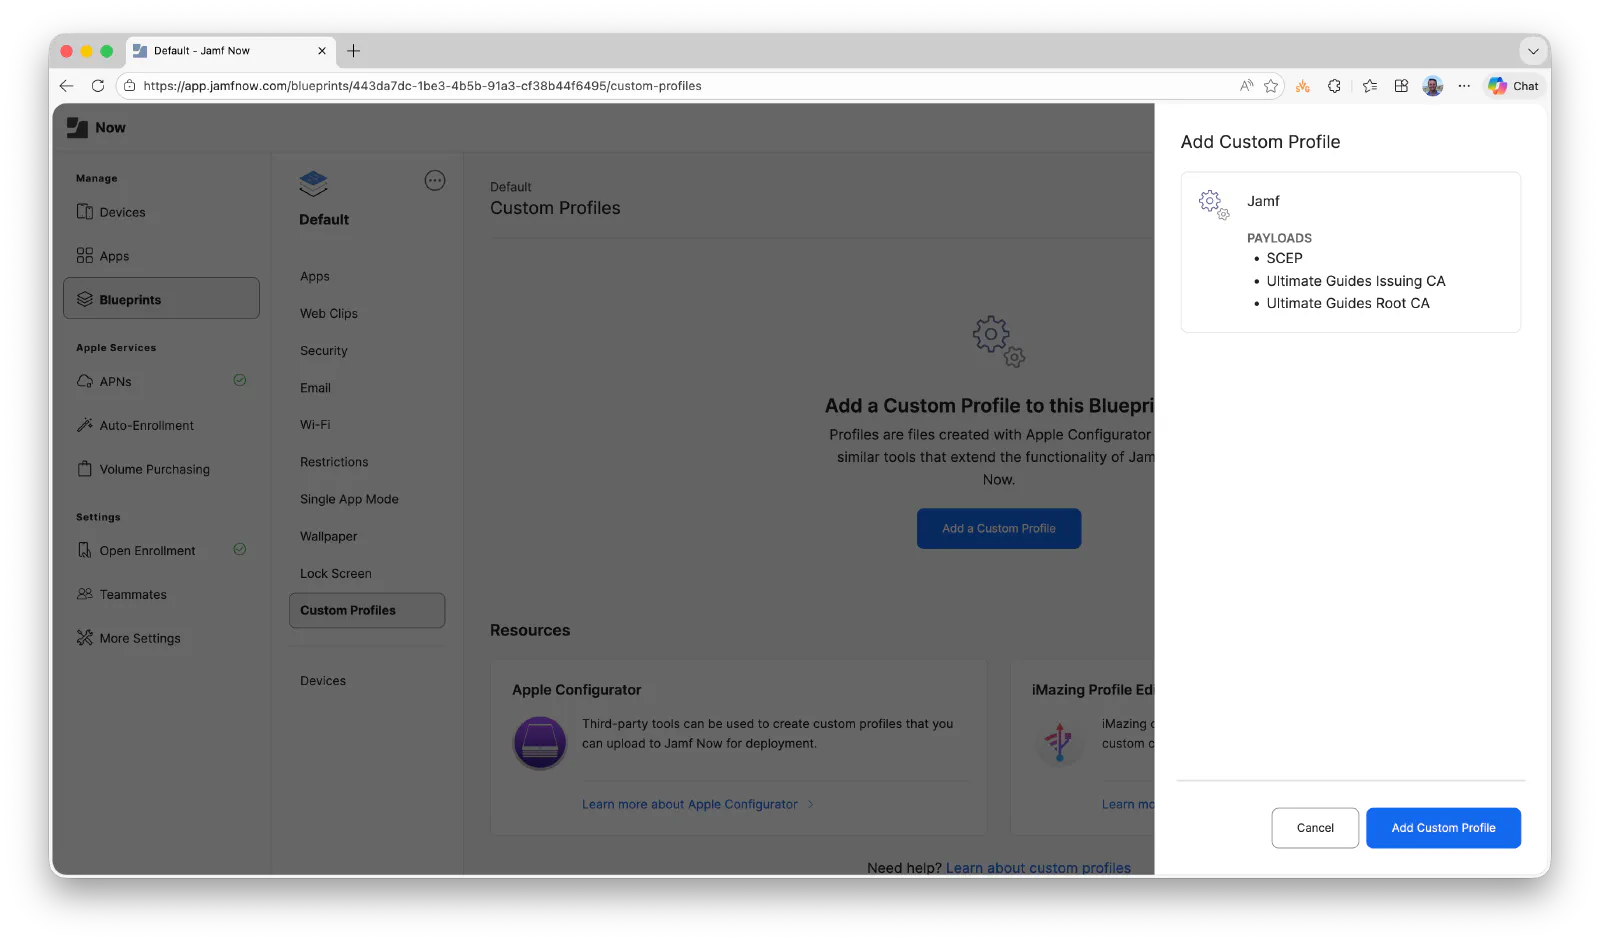
Jamf School has built-in support for SCEP and certificate profiles, making it easy to set up EAP-TLS authentication for your devices. You’ll configure two payloads in your Jamf School profile:
Payload 1: Trusted Certificate(s)
First, add the EZCA CA root certificate to your Apple devices so they trust certificates issued by EZCA. Under the Certificate payload in Jamf School, upload the root certificate from your EZCA CA (available in your EZCA dashboard), as well as any intermediate certificates, if applicable.
Payload 2: SCEP
Next, create a SCEP payload in Jamf School that tells your Apple devices how to request certificates from EZCA using static SCEP. Make sure to include the following settings in your SCEP payload:
- URL: Paste the Static Challenge SCEP URL from your EZCA portal.
- Redistribute Profile: Specify how often Jamf Pro should redistribute the profile to devices, such as every 30 days.
- Subject Name: Use the available variables and any static values you want to build the subject name for the certificate. You can see the full list of Jamf supported dynamic values here. For example, you could use CN=$UDID to set the Common Name of the certificate to the device’s unique device identifier.
- Subject Alternative Name: Optionally use the available variables and any static values you want to build the subject alternative name for the certificate.
- Challenge Type: Ensure that this is set to Static.
- Challenge: Paste the SCEP Challenge from your EZCA portal.
- Verify Challenge: Paste the SCEP Challenge again to verify.
- Retries: Set this to 2 to have Jamf Pro attempt to retry 2 times if the SCEP server is unavailable.
- Retry Delay: Set this to 30 to have Jamf Pro wait 30 seconds between retries.
- Certificate Expiration Notification Threshold: Set this to 14 to have Jamf Pro notify users 14 days before their certificate expires (if automatic renewal fails).
- Key Size: Set this to 4096 for a stronger key.
- Key Usage: Select Digital Signature and Key Encipherment.
- Allow export from keychain: Uncheck this option to prevent the private key from being exportable from the device’s keychain.
- Allow all apps access: Only check this box if you have a 3rd party VPN or Wi-Fi solution that requires access to the certificate. If you are using the certificate for Jamf Pro and Apple’s built-in Wi-Fi or VPN, you do not need to check this box.
- Upload Certificate: Click on the Upload Certificate button and select the same issuing CA certificate you downloaded earlier. This allows Jamf Pro to validate the SCEP response from EZCA and ensure the certificate is issued by your trusted CA.
Step 3: Create EZRADIUS Subscription and Configure Cloud RADIUS Policies
Once you have set up your EZCA CA and configured SCEP in Jamf, the next step for setting up EAP-TLS certificate-based Wi-Fi authentication in Jamf is to set up Keytos Cloud RADIUS for Wi-Fi authentication. This will require you to:
- Create a Cloud RADIUS subscription to get your cloud RADIUS server up and running.
- Create a RADIUS policy that validates certificates issued by EZCA for Wi-Fi authentication.
Create a Cloud RADIUS Subscription
Begin by creating an EZRADIUS Cloud RADIUS subscription. This will give you a fully managed RADIUS server that integrates directly with your EZCA CA to validate certificates for Wi-Fi authentication. With EZRADIUS, you don’t need to maintain any on-premises infrastructure or worry about scalability—Keytos handles all of that for you. You can choose between direct payment (credit card, invoice) or use your existing Azure subscription for billing.
Create a Cloud RADIUS SubscriptionCreate an EAP-TLS Certificate RADIUS Policy
Establish Trust Between EZRADIUS and Your EZCA CA
Once your subscription is active, create a RADIUS policy that validates certificates from your EZCA certificate authority. EZRADIUS integrates directly with your EZCA CA, so you can select your CA from a dropdown and easily add it to your RADIUS policy.
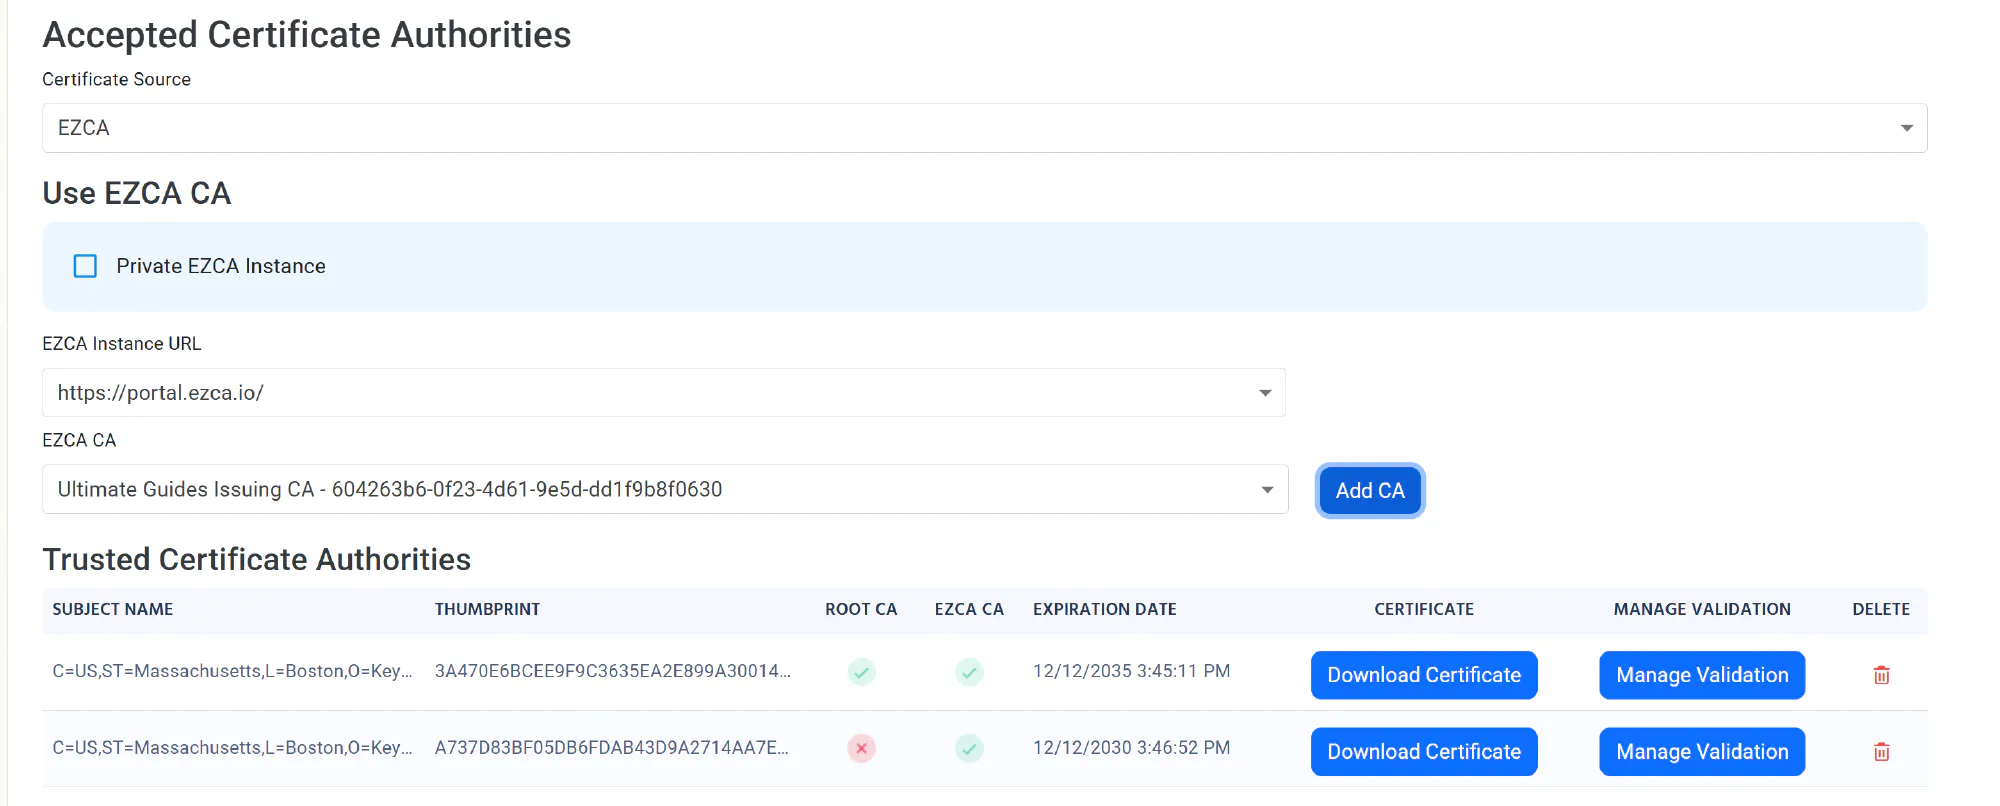
Create your EZRADIUS Server Certificate
After you add your EZCA CA to your cloud RADIUS policy, the next step is to create a server certificate for your EZRADIUS RADIUS server. This certificate will be used by your access points to establish a secure connection with the RADIUS server during Wi-Fi authentication. When you create the server certificate, make sure to select your EZCA CA as the issuing CA so it simplifies trust between your access points and RADIUS server.
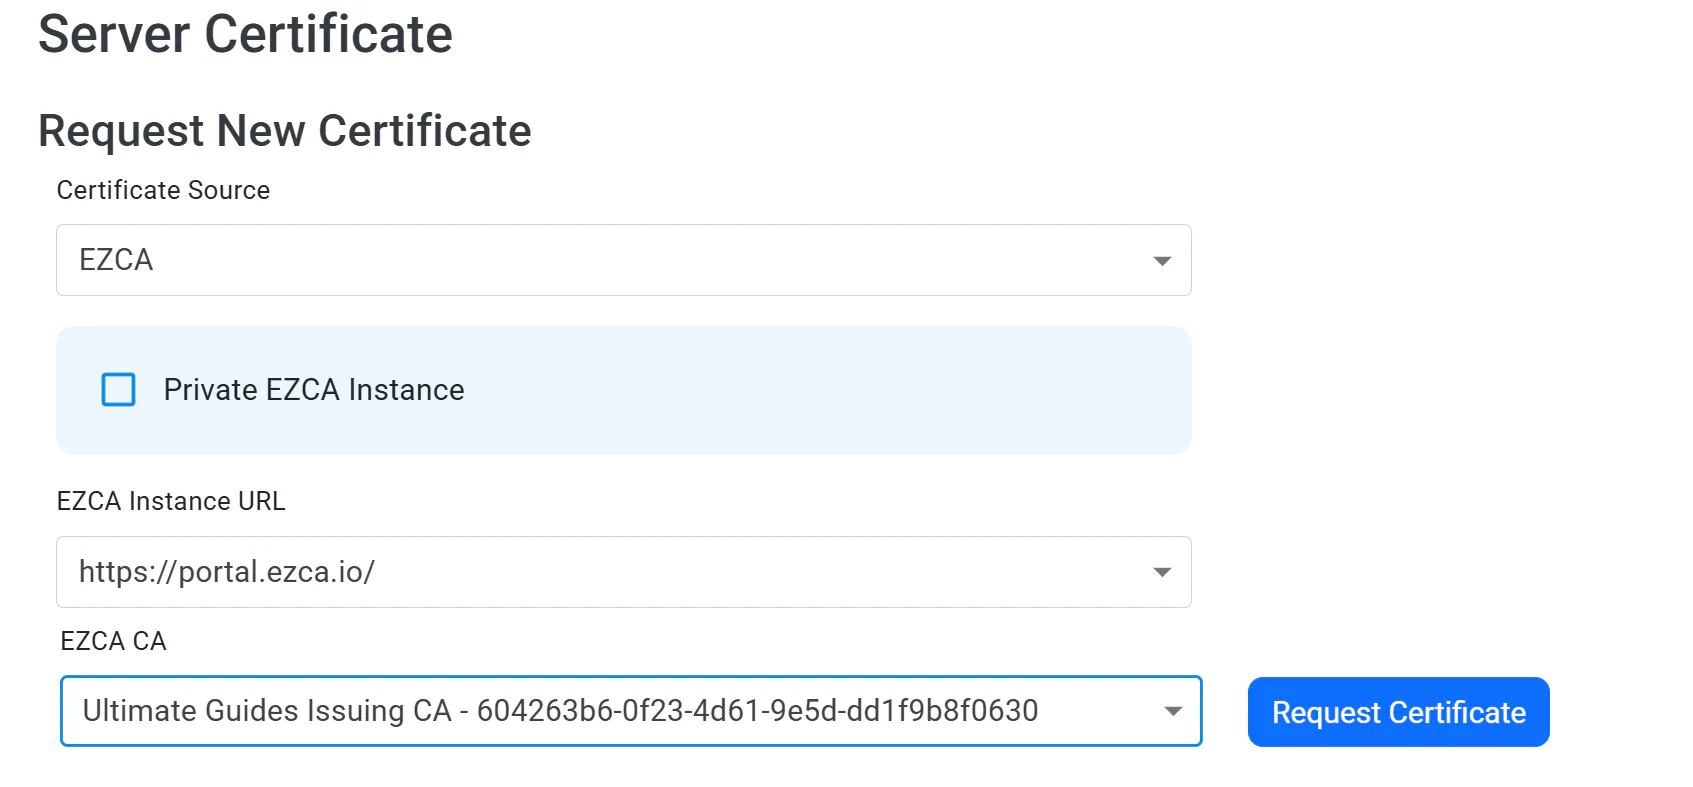
If you use an Auto-Generated certificate instead, you’ll need to download and push a separate CA certificate to your Apple devices. By using your existing EZCA CA to issue the server certificate, you can use the same CA certificate that you already uploaded in your Jamf SCEP profile for trusting the RADIUS server, which simplifies deployment and maintenance.
Download the EZRADIUS Server Certificate
After you create your server certificate, make sure to download the server certificate to your machine. You’ll need this in an upcoming step when you configure your Wi-Fi profile in Jamf to ensure that your devices trust the RADIUS server during authentication.
Create a RADIUS Access Policy for Your Jamf Devices
Within your RADIUS access policies, add a new policy for your Jamf devices. Make sure to leave password authentication disabled and leave “Match with Entra ID Objects” disabled as well (since Jamf-managed devices won’t have corresponding objects in Entra ID). You can optionally configure your VLAN settings or other RADIUS attributes in this policy as well.
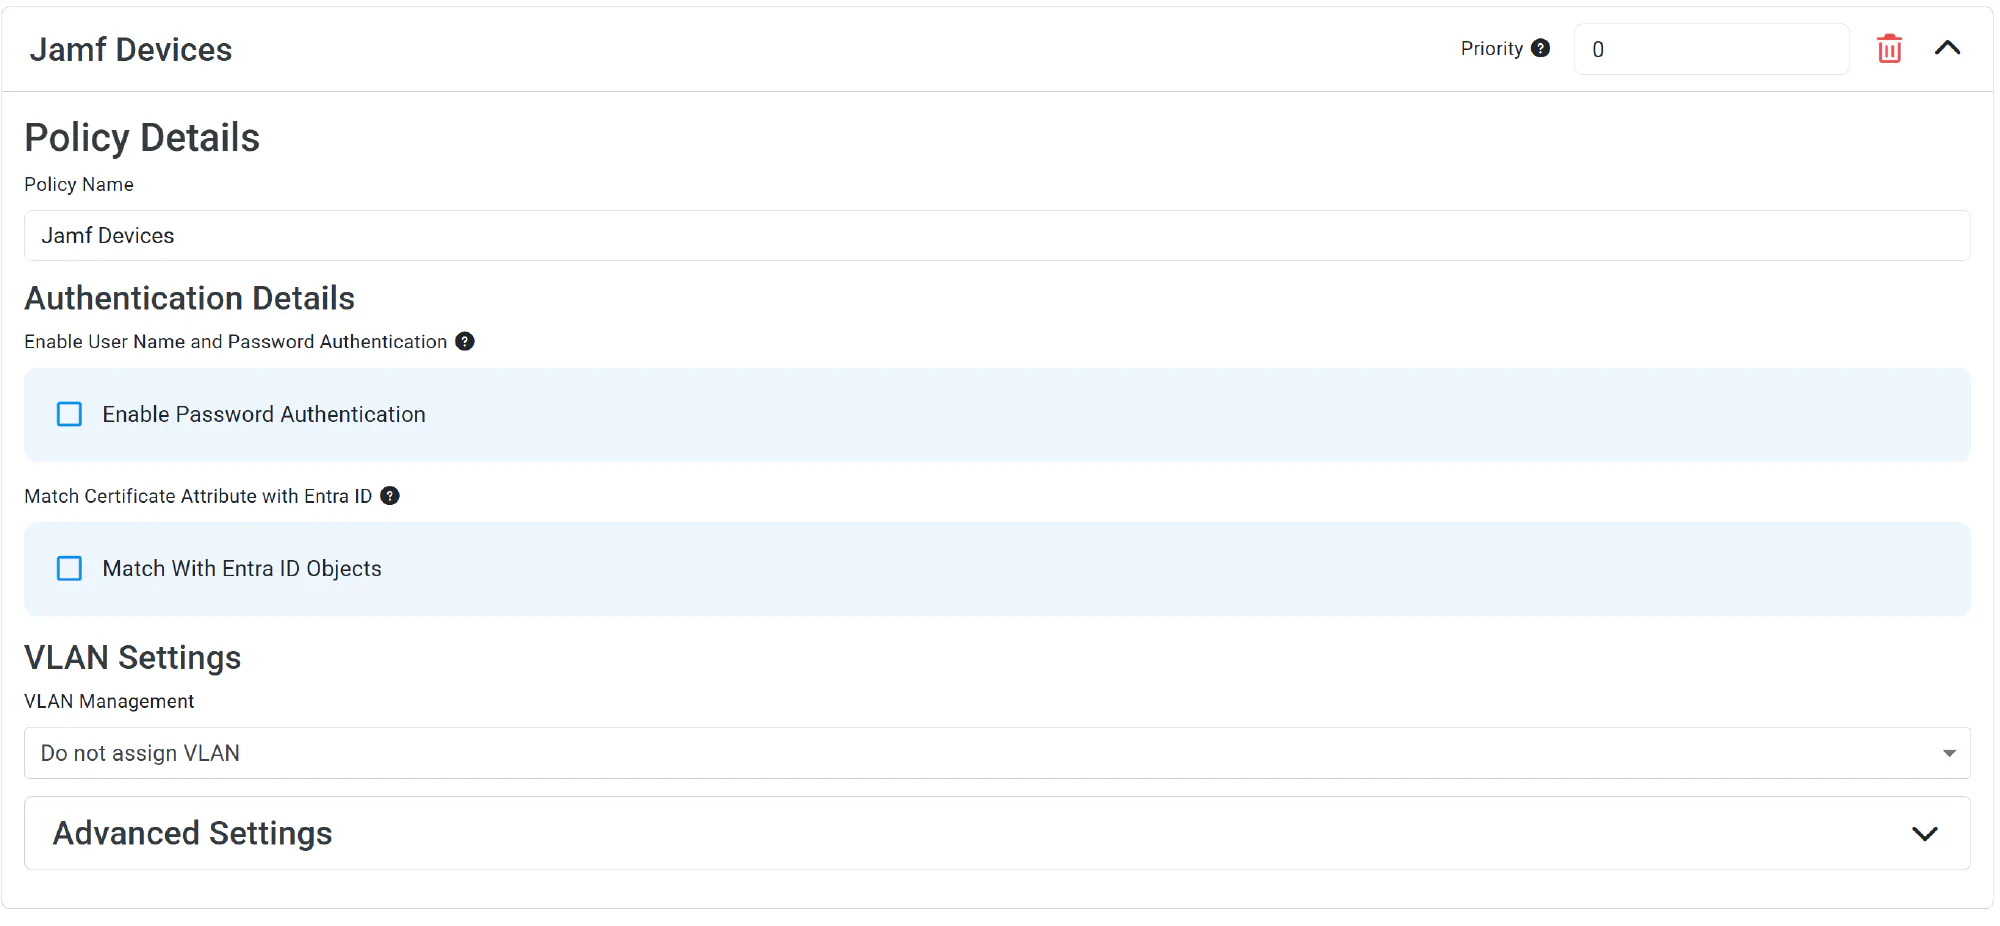
Configure your Network Controller to Use Cloud RADIUS with EZRADIUS
Now that your RADIUS policy is set up to validate certificates from your EZCA CA, the next step is to configure your access points or wireless controller to use EZRADIUS for RADIUS authentication. This typically involves entering the EZRADIUS server IP address, port, and shared secret into your AP/controller’s RADIUS settings.
You can get your RADIUS server IP addresses and shared secret from your EZRADIUS policy. Make sure to enter one IP address from each region for redundancy, and use the shared secret from your EZRADIUS policy settings that corresponds to your public IP address.
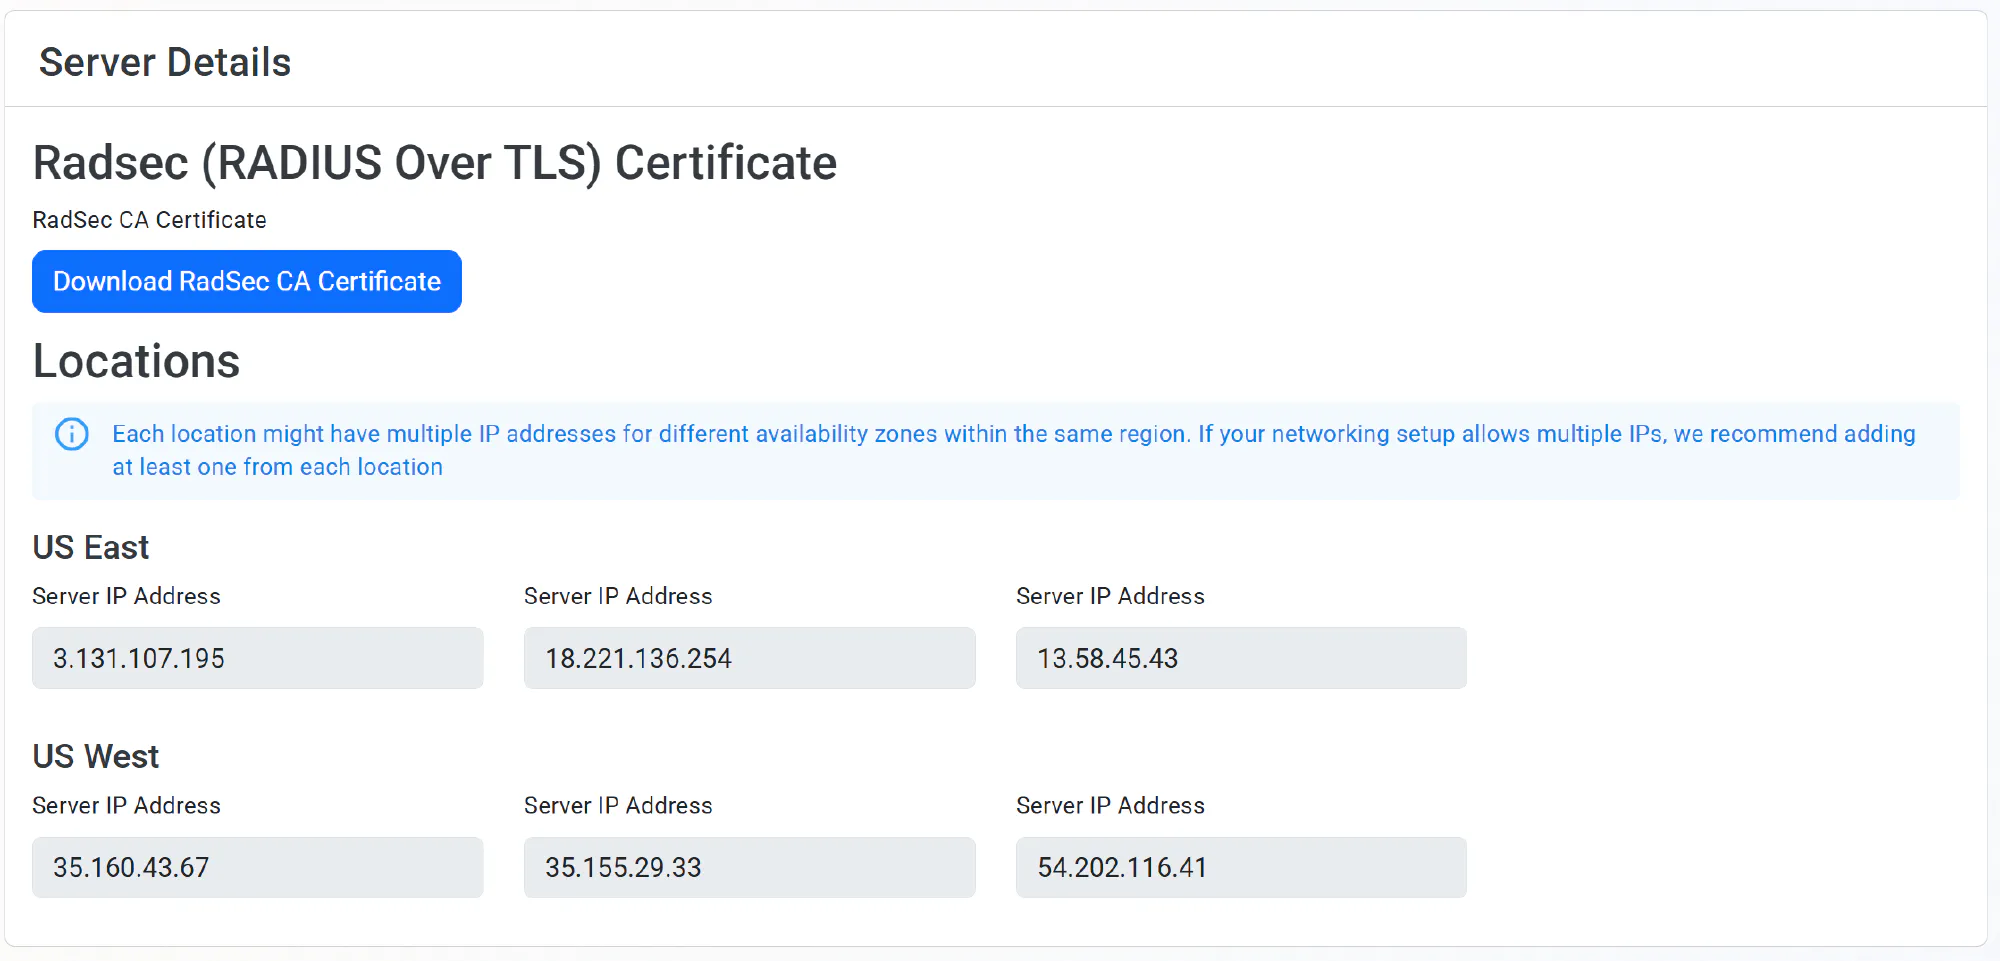
You can refer to our network configuration guides for specific instructions on how to configure popular access point vendors to work with EZRADIUS.
Explore Network Configuration GuidesStep 4: Configure Your Wi-Fi Network for WPA Enterprise With RADIUS Authentication
At your access point or wireless controller, configure your Wi-Fi network to use WPA Enterprise with RADIUS authentication. The exact steps vary by vendor, but the general setup is:
- SSID - Create or update your WPA Enterprise network
- Security - WPA2/WPA3 Enterprise
- RADIUS Server - Enter your Cloud RADIUS endpoint (EZRADIUS provides this in your dashboard)
- RADIUS Port - 1812 (standard)
- RADIUS Secret - Enter the shared secret from EZRADIUS (found in your policy settings)
We have a wide range of documentation for specific access point vendors if you need help with this step:
Explore Network Configuration GuidesStep 5: Add Wi-Fi Profile to Your Jamf Configuration
The final step to configuring EAP-TLS certificate-based Wi-Fi authentication in Jamf is to create a Wi-Fi profile that tells your Apple devices how to connect to your WPA Enterprise network. This profile references the SCEP certificate from Step 2.
Within your existing configuration profile that contains your SCEP settings, add a new payload for Wi-Fi.
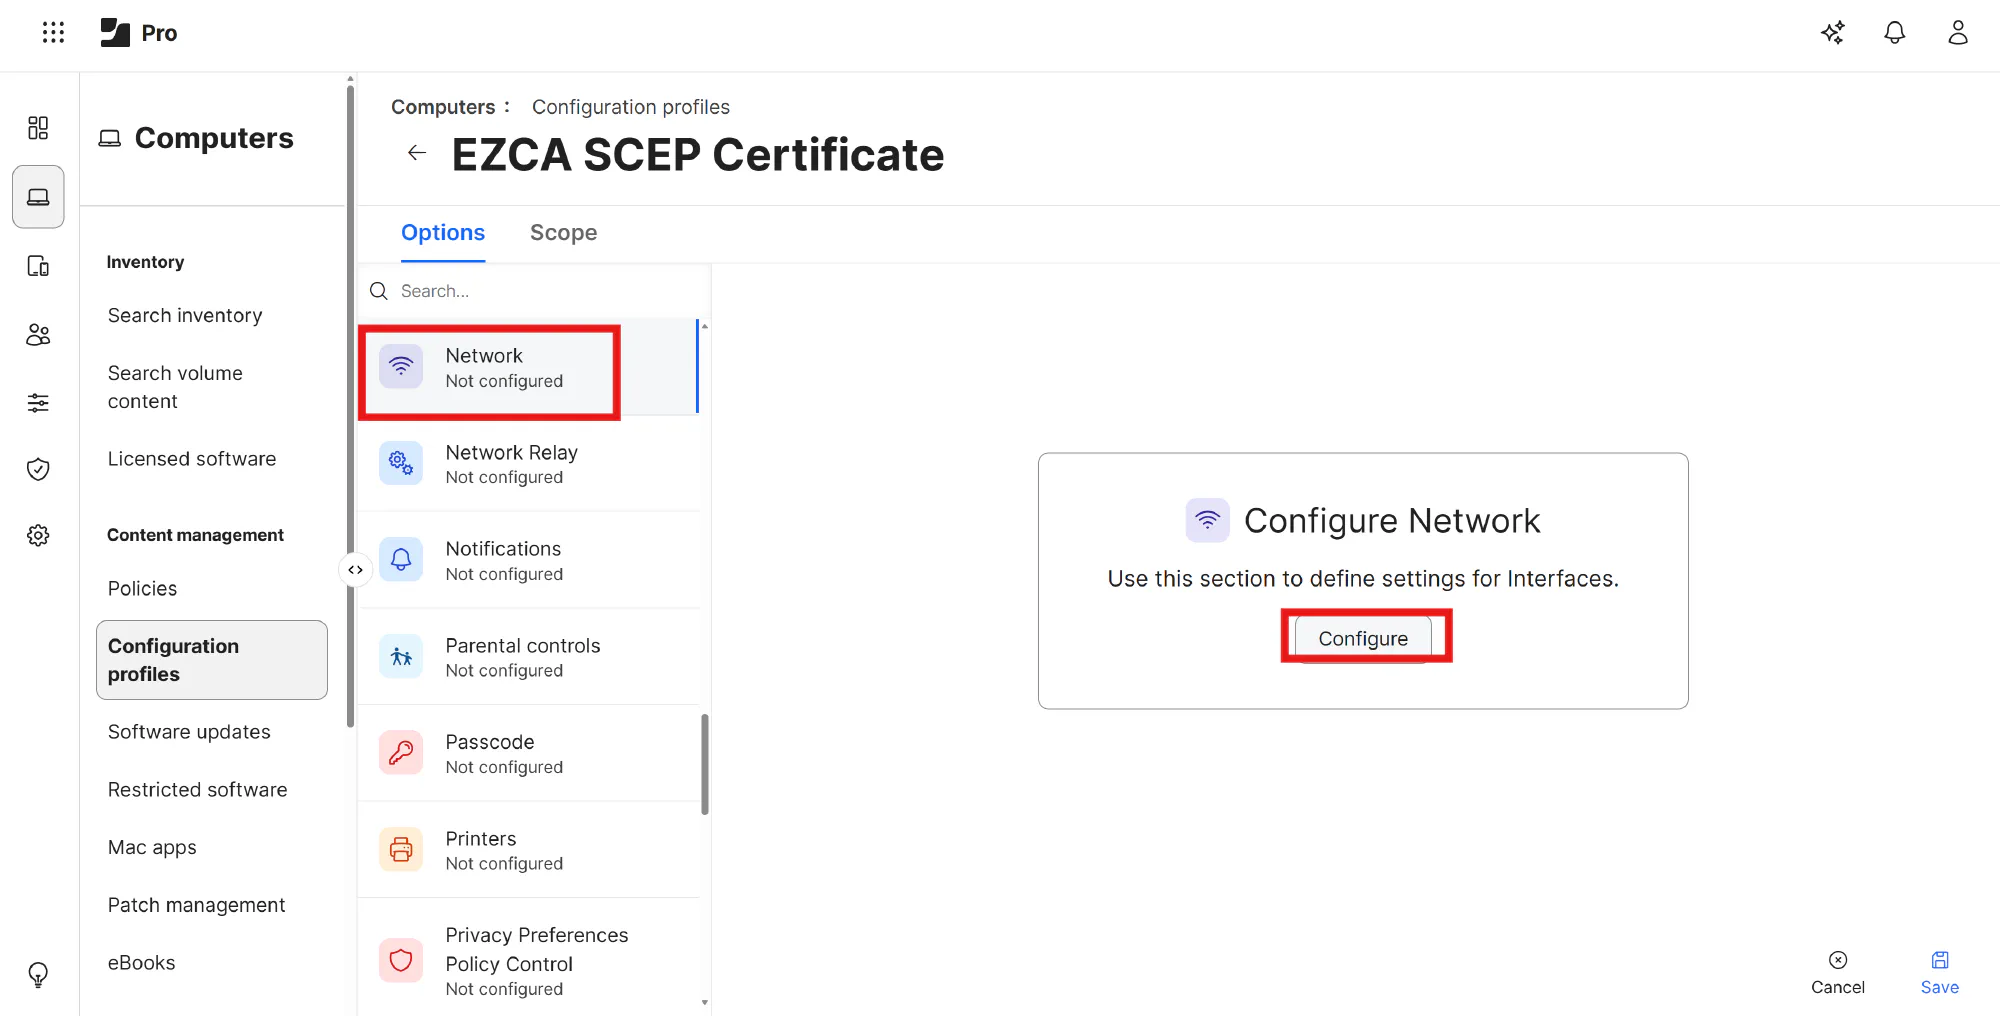
In this payload, configure the following settings:
- Network Interface: Keep as Wi-Fi
- SSID: Set this to the exact name of your Wi-Fi network (case sensitive)
- Security Type: Set this to your Wi-Fi security type (e.g. WPA2/WPA3 Enterprise)
- Protocols: Under the Protocols tab set Accepted EAP Types to EAP-TLS
- Protocols > Identity Certificate: Select the SCEP certificate that you configured in the previous step. It should be prefixed with “SCEP” and then the name of your configuration profile.
- Trust: Under the Trust tab, set the following values:
- Trusted Certificates: Check the box for your EZRADIUS Server CA certificate. Since we issued the EZRADIUS server certificate from your existing EZCA CA, you already have this certificate uploaded in the previous step when you configured the SCEP payload, so you should see it available to select here as well.
- Trusted Server Certificate Names: Open the EZRADIUS Server Certificate (not the CA certificate) that you downloaded in the previous step and copy the Subject and every Subject Alternative Name (SAN) value into this list. You should have at least 4-7 values to add to this list, and it is important to add all of them to ensure that your devices can connect successfully.
- Username: Set this to anonymous or leave blank (this value is not used for EAP-TLS authentication)
Save the profile and assign it to a test device or smart group that includes your test device to validate the end-to-end flow before deploying to your entire fleet.
Learn more about configuring Wi-Fi profiles in Jamf Pro in our step-by-step guide for Jamf Pro.
Within your existing .mobileconfig profile that you previously created, add a new payload for Wi-Fi.
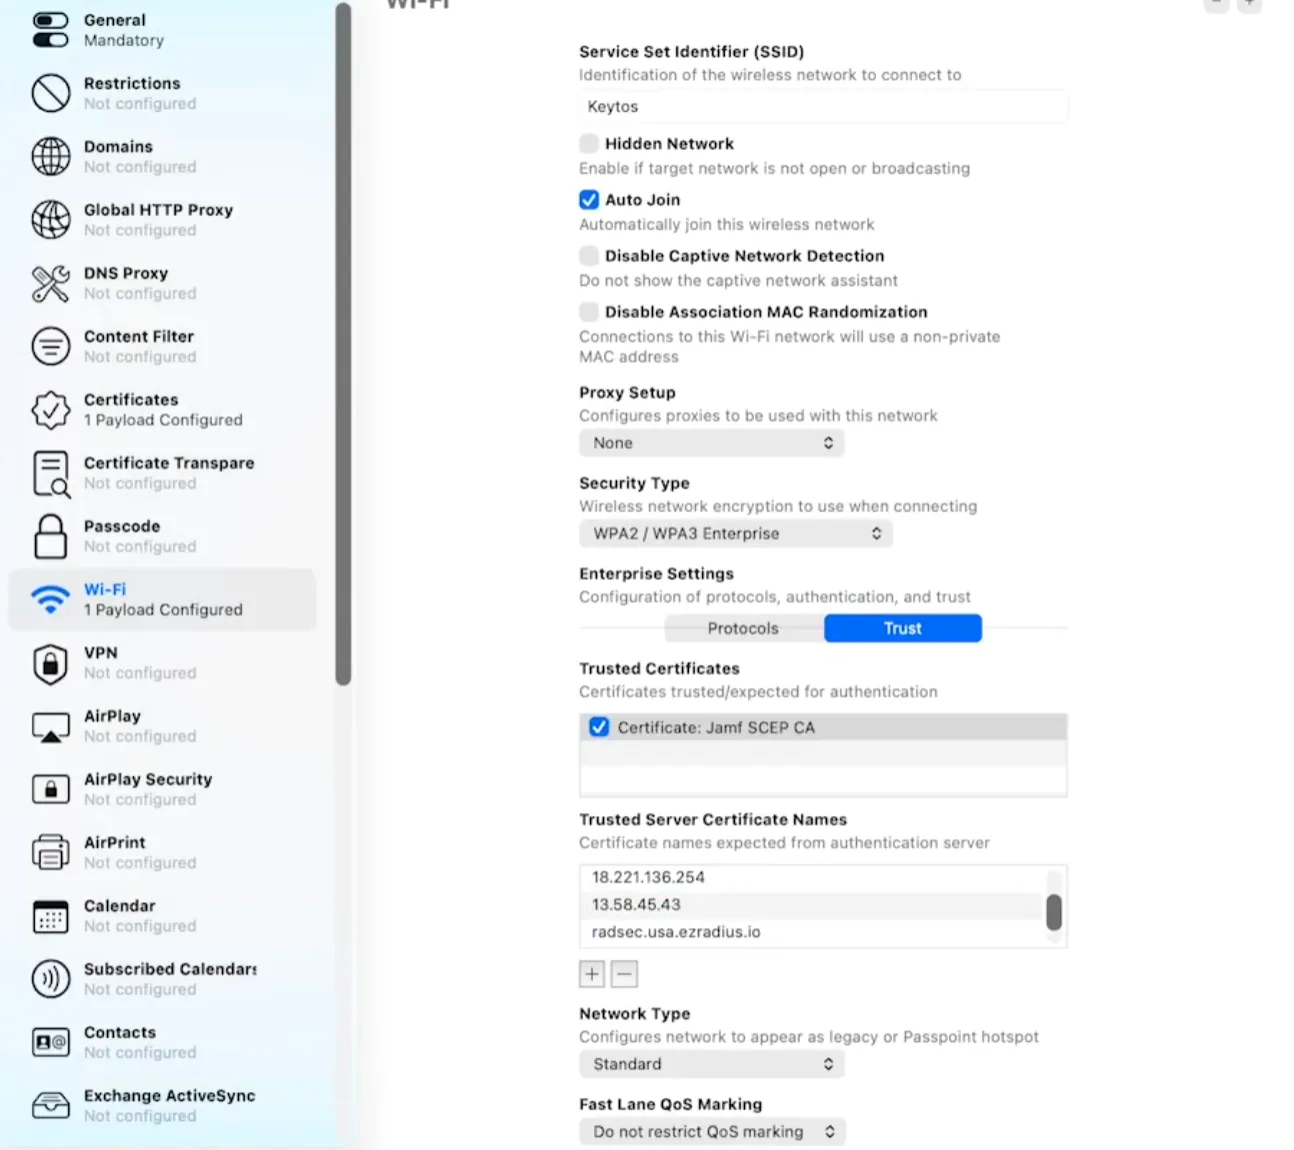
Make sure to configure the following settings in your Wi-Fi payload:
- SSID: Set this to the exact name of your Wi-Fi network (case sensitive)
- Security Type: Set this to your Wi-Fi security type (e.g. WPA2/WPA3 Enterprise)
- Protocols > EAP Type: Set this to EAP-TLS
- Protocols > Identity Certificate: Select the SCEP certificate that you configured in the previous step
- Trust > Trusted Certificates: Check the box for your EZRADIUS Server CA certificate. Since we issued the EZRADIUS server certificate from your existing EZCA CA, you already have this certificate uploaded in the previous step when you configured the SCEP payload, so you should see it available to select here as well.
- Trust > Trusted Server Certificate Names: Open the EZRADIUS Server Certificate (not the CA certificate) that you downloaded in the previous step and copy the Subject and every Subject Alternative Name (SAN) value into this list. You should have at least 4-7 values to add to this list, and it is important to add all of them to ensure that your devices can connect successfully.
Save the profile in Apple Configurator, export it as a .mobileconfig file, and then re-upload the updated .mobileconfig file to Jamf Now as a Custom Profile in your Blueprint. Assign that Blueprint to a test device to validate the end-to-end flow before deploying to your entire fleet.
Just like Jamf Pro, within your existing configuration profile that contains your SCEP settings, add a new payload for Wi-Fi.
In this payload, configure the following settings:
- SSID: Set this to the exact name of your Wi-Fi network (case sensitive)
- Security Type: Set this to your Wi-Fi security type (e.g. WPA2/WPA3 Enterprise)
- Protocols > EAP Type: Set this to EAP-TLS
- Protocols > Identity Certificate: Select the SCEP certificate that you configured in the previous step. It should be prefixed with “SCEP” and then the name of your configuration profile.
- Trust > Trusted Certificates: Check the box for your EZRADIUS Server CA certificate. Since we issued the EZRADIUS server certificate from your existing EZCA CA, you already have this certificate uploaded in the previous step when you configured the SCEP payload, so you should see it available to select here as well.
- Trust > Trusted Server Certificate Names: Open the EZRADIUS Server Certificate (not the CA certificate) that you downloaded in the previous step and copy the Subject and every Subject Alternative Name (SAN) value into this list. You should have at least 4-7 values to add to this list, and it is important to add all of them to ensure that your devices can connect successfully.
Save the profile and assign it to a test device or smart group that includes your test device to validate the end-to-end flow before deploying to your entire fleet.
Zero-Touch Wi-Fi Authentication for Apple Devices: What Your Users Will Experience
Now that you’ve configured everything, here’s what happens when a user receives a newly enrolled Mac, iPhone, or iPad:
- Device Enrolls in Jamf - User completes Jamf enrollment (ADE, manual, or DEP).
- SCEP Certificate Auto-Provisions - Jamf automatically requests a certificate from EZCA via SCEP. This happens in the background without user interaction.
- Wi-Fi Profile Deploys - Jamf pushes the Wi-Fi profile to the device, which references the newly issued certificate.
- Device Connects to Wi-Fi - The device uses the certificate to authenticate with your WPA Enterprise network
From here on out your users are online without ever needing to know the Wi-Fi password or interact with any prompts, all while their connection is encrypted using their unique certificate via EAP-TLS.
Troubleshooting EAP Certificate-Based Wi-Fi on Jamf
Issues connecting your managed Apple devices to your WPA Enterprise network? Here are the most common issues and solutions:
SCEP Certificate Not Issued to Jamf Managed Device
Problem: Device enrolled in Jamf but SCEP certificate wasn’t issued
Causes & Solutions:
- SCEP profile not assigned to the device → Check Jamf device page, verify SCEP profile is in the assigned profiles list
- SCEP server unreachable → Verify EZCA SCEP endpoint is publicly accessible and not blocked by firewall
- Invalid challenge password → Confirm the challenge password in Jamf SCEP profile matches your EZCA configuration
- Device OS too old → Ensure device is running a supported OS (macOS 10.14+, iOS 13+)
If you’re unsure if the device is receiving a SCEP certificate, open Keychain Access on macOS or the Settings > General > Profiles & Device Management on iOS/iPadOS to check for the presence of the certificate and profile.
On macOS, you can also check the system logs for SCEP enrollment errors using the Console app and filtering for “scep”:
log show --info --debug --last 1h | grep scep
Device Has Certificate But Won’t Connect to Wi-Fi
Problem: Device has a valid certificate but won’t connect to Wi-Fi
Causes & Solutions:
- Wi-Fi profile not deployed → Check Jamf device page, ensure Wi-Fi profile is assigned
- Wi-Fi profile misconfigured → Verify the profile references the correct SCEP certificate and SSID
- RADIUS policy not trusting EZCA certificates → Check EZRADIUS policy settings, ensure EZCA certificate chain is trusted
- Access point RADIUS configuration incorrect → Verify AP has correct RADIUS server IP, port, and shared secret from EZRADIUS
- Certificate revoked or expired → Check EZCA certificate status; if revoked, re-enroll device in Jamf
On macOS, you can also check the Wi-Fi logs for authentication errors using the Console app and filtering for “airportd”:
log show --info --debug --last 1h | grep airportd
Intermittent Wi-Fi Connectivity on Jamf-Managed Device
Problem: Device connects to Wi-Fi but frequently disconnects
Causes & Solutions:
- Certificate renewal failing → Check EZCA certificate renewal settings; increase renewal window before expiration
- RADIUS server intermittency → Monitor Cloud RADIUS service health; check for authentication timeouts in EZRADIUS logs
- Wi-Fi profile cache issue → Remove and re-deploy Wi-Fi profile to device
- Device time skew → Ensure device system time is accurate; if off by >5 minutes, certificate validation fails
Device Stuck on Wi-Fi Prompt
Problem: Device asks for password repeatedly despite certificate being issued
Causes & Solutions:
- SCEP profile not marked as “Trusted” → In Jamf Pro, ensure SCEP profile is deployed with “Trust” enabled
- Certificate not in device trust store → Check if certificate is installed in device keychain; re-deploy SCEP profile if missing
- Wi-Fi profile EAP setting incorrect → Verify Wi-Fi profile is set to EAP-TLS, not EAP-TTLS or other methods
- Super user credentials required → On macOS, sometimes requires user to approve certificate; provide users with instructions to accept certificate
Deeper Troubleshooting of RADIUS Authentication Issues
For deeper troubleshooting, check the Keytos documentation:
Full Troubleshooting GuideConclusion - Zero-Touch Wi-Fi for Your Entire Jamf Fleet
Certificate-based EAP-TLS Wi-Fi authentication transforms the device enrollment experience for Jamf admins. Instead of managing shared passwords, handling manual credential entry, or fielding Wi-Fi support tickets, you get a fully automated, secure, scalable solution: devices enroll, get certificates, and connect to Wi-Fi—all without user intervention.
Ready to deploy zero-touch certificate-based Wi-Fi for your Jamf-managed devices? Start with a free trial of Keytos EZCA and EZRADIUS to try it out in your own environment to see just how easy it is.
Want to talk to an expert about your specific use case? Book a free consultation with our team to discuss how certificate-based Wi-Fi can work for your Jamf environment.
Talk to an Identity Expert