How-To: Troubleshoot Cloud RADIUS Entra ID Authentication
Sometimes things don’t go as planned. This guide will help you troubleshoot your Cloud RADIUS configuration for Entra ID Wifi Authentication in EZRADIUS.
If you have an error message you’re troubleshooting, start with a Ctrl + F or Cmd + F to find the specific error in this document.
If you’ve configured EZRADIUS but nothing is showing up in Authentication Logs, work through this checklist before diving deeper:
Authentication service only supports processing Access-Request datagrams.udp port 1812) on a machine in the path to confirm RADIUS packets are leaving your network. If packets leave but no logs appear, a firewall may be blocking the return path.If you have checked all the above and still see no logs, see the dedicated section below for additional diagnostics including Windows Event Viewer instructions.
If you have setup your Cloud RADIUS instance and are having trouble authenticating users, this guide will help you troubleshoot your Cloud RADIUS configuration for EAP-TLS or Entra ID Wifi Authentication in EZRADIUS.
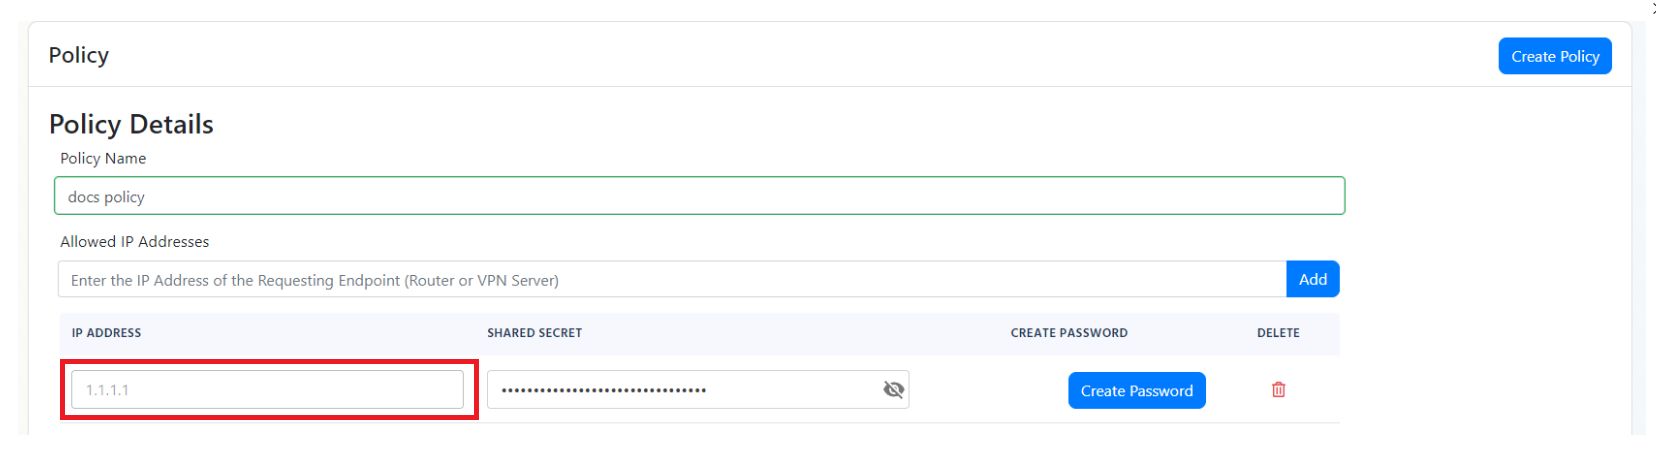
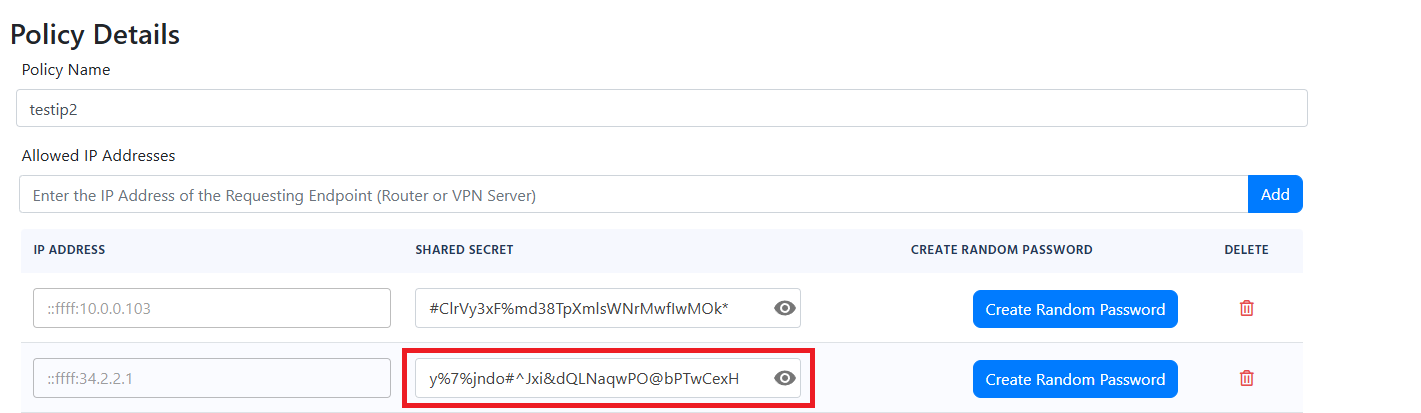
If you have checked all the previous steps and you are still not seeing any logs in your EZRADIUS portal, it might be due your traffic being NATed and therefore the IP address that is reaching EZRADIUS is not the one you have configured in your RADIUS policy. To solve this issue, we have added a feature that allows you to add any IP address that connects to the RADIUS server with a specific shared secret. To use this feature, you must go to your RADIUS policy and click the Enable IP Auto-Discovery for 10 minutes checkbox and save the policy. This will give you a new shared secret that you can use in your access point. Any IP address that connects to the RADIUS server with this shared secret will be automatically added to the allowed IP addresses in your RADIUS policy for 10 minutes.
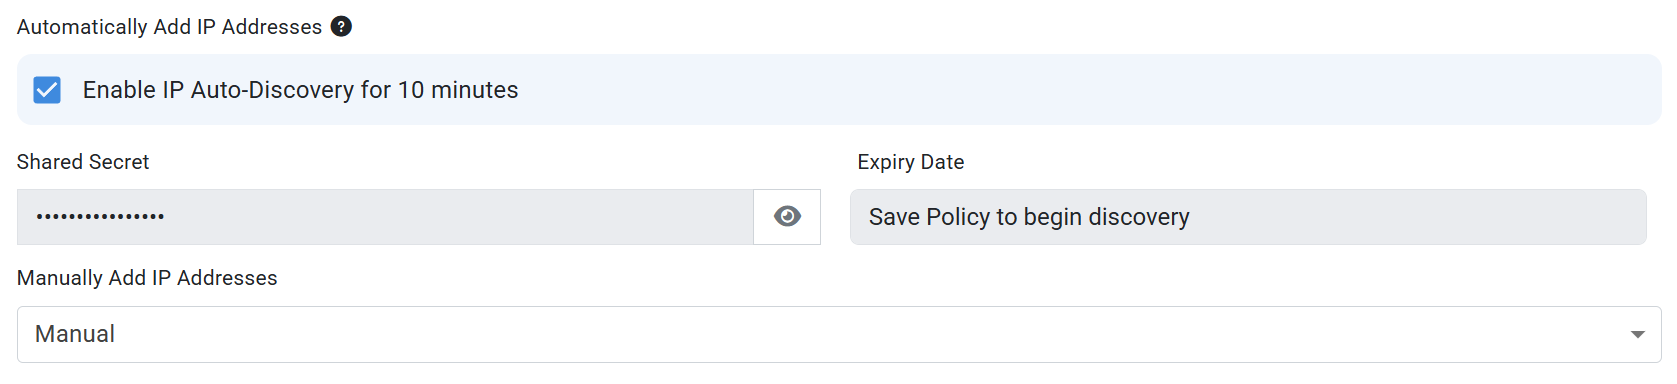
NOTE: In our basic plan this is limited to 10 minutes, but if you have a private or enterprise instance this can be enabled permanently allowing you to automatically add locations with dynamic IP addresses.
The wrong shared secret was used to connect your network to EZRADIUS please check your configuration
Incorrect Shared Secret
If you see the error The wrong shared secret was used to connect your network to EZRADIUS please check your configuration or Incorrect Shared Secret, it means that the shared secret configured in your access point is incorrect:
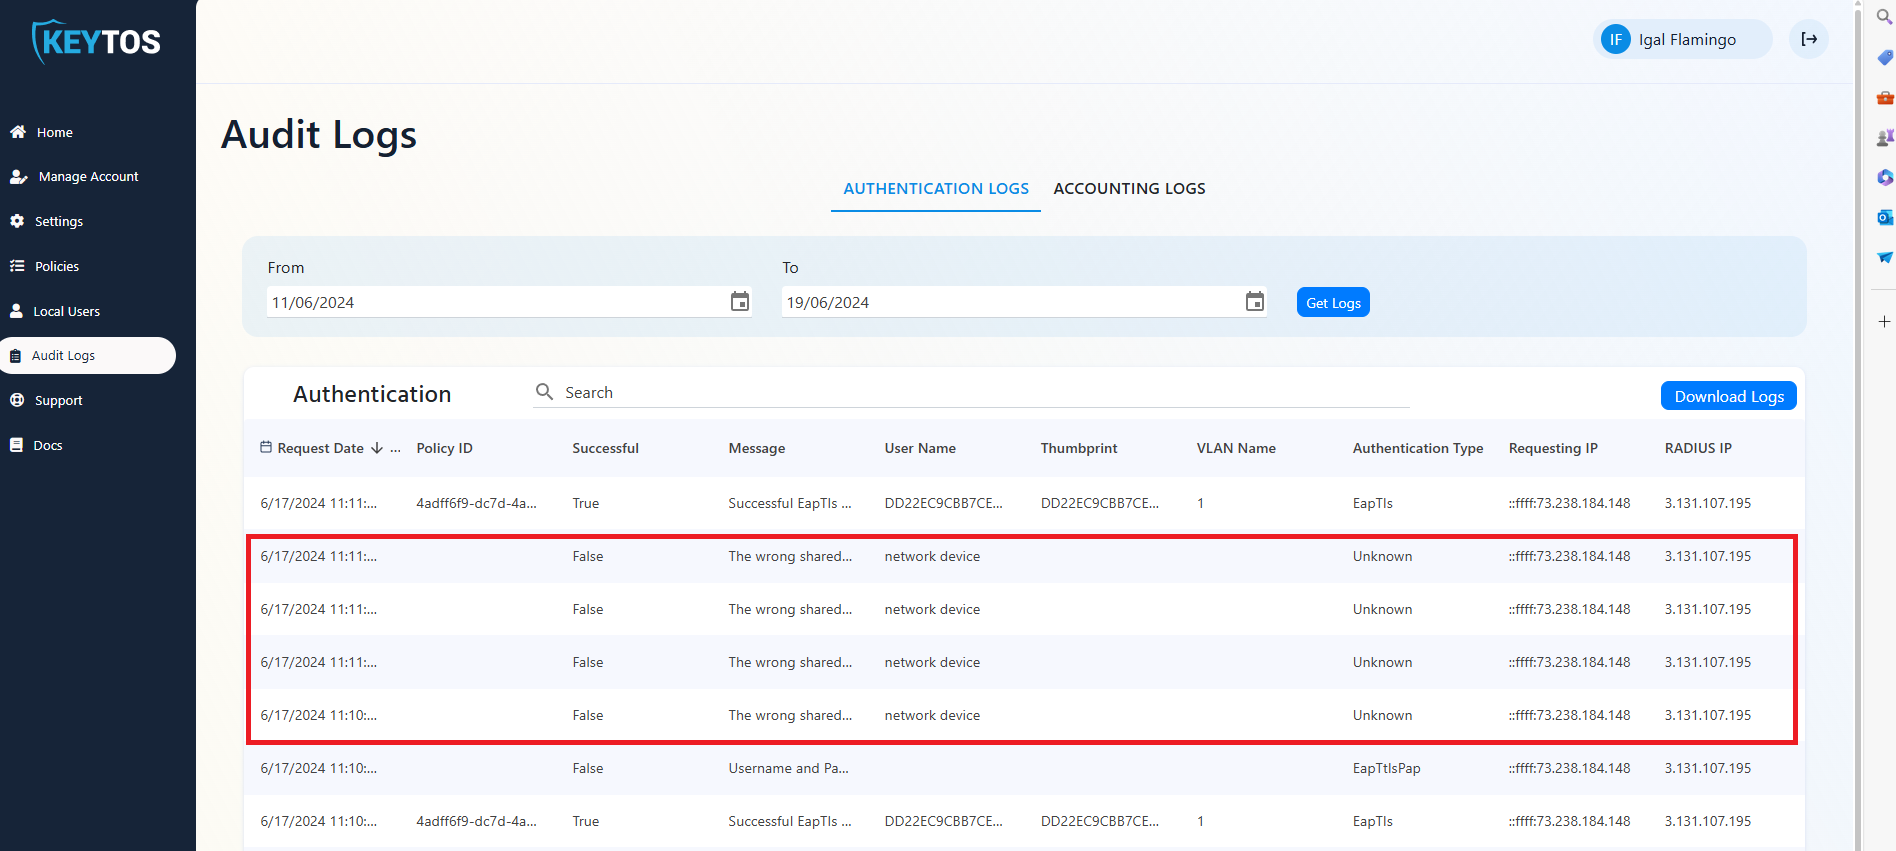
There are three common issues that might be causing this error:
A RADIUS server certificate is used to establish a secure, encrypted connection between the client and the RADIUS server during EAP-TLS and EAP-TTLS authentication. If there is an issue with the RADIUS server certificate, the client will not be able to establish a secure connection with the RADIUS server and the authentication will fail.
If you see the following error:
There is an issue retrieving your server certificate please manually renew it in the portal
This means your server certificate is expired, corrupted, or missing. To solve this issue, you can renew your server certificate:
Since your new server certificate will be issued by the same Certificate Authority (CA) as your existing certificate, you will not need to push any new trusted CA to your devices, as they will already trust the new server certificate. They will automatically trust the new certificate once it is issued.
In EAP-TLS authentication, the client sends a certificate to the RADIUS server. The RADIUS server validates the certificate and if it is valid, it sends an Access-Accept message to the client. If the certificate is invalid, the RADIUS server sends an Access-Reject message to the client. There are many issues that might be causing the EAP-TLS authentication to fail. Here are some common issues and how to troubleshoot them.
Most of them start with the same error message so it is important to read the error message carefully to understand the root cause of the issue.
Failed to build and validate certificate (XXXX): RevocationStatusUnknown: unable to get certificate CRL OfflineRevocation: unable to get certificate CRL UntrustedRoot: self-signed certificate in certificate chain
If you see the error Failed to build and validate certificate (XXXX): RevocationStatusUnknown: unable to get certificate CRL OfflineRevocation: unable to get certificate CRL UntrustedRoot: self-signed certificate in certificate chain, it means that one of the certificates in the certificate chain is invalid. Please ensure that all the certificates in the certificate chain are part of your Policy Trusted Certificate Authorities.
Failed to build and validate certificate (XXX): NotTimeValid: certificate has expired
If you see error Failed to build and validate certificate (XXX): NotTimeValid: certificate has expired, it means that the certificate has expired. Using your existing PKI infrastructure, please renew the certificate and push it to your devices.
Failed to build and validate certificate (XXX): UntrustedRoot: self-signed certificate in certificate chain
Invalid certificate: Failed to build certificate chain to a valid CA
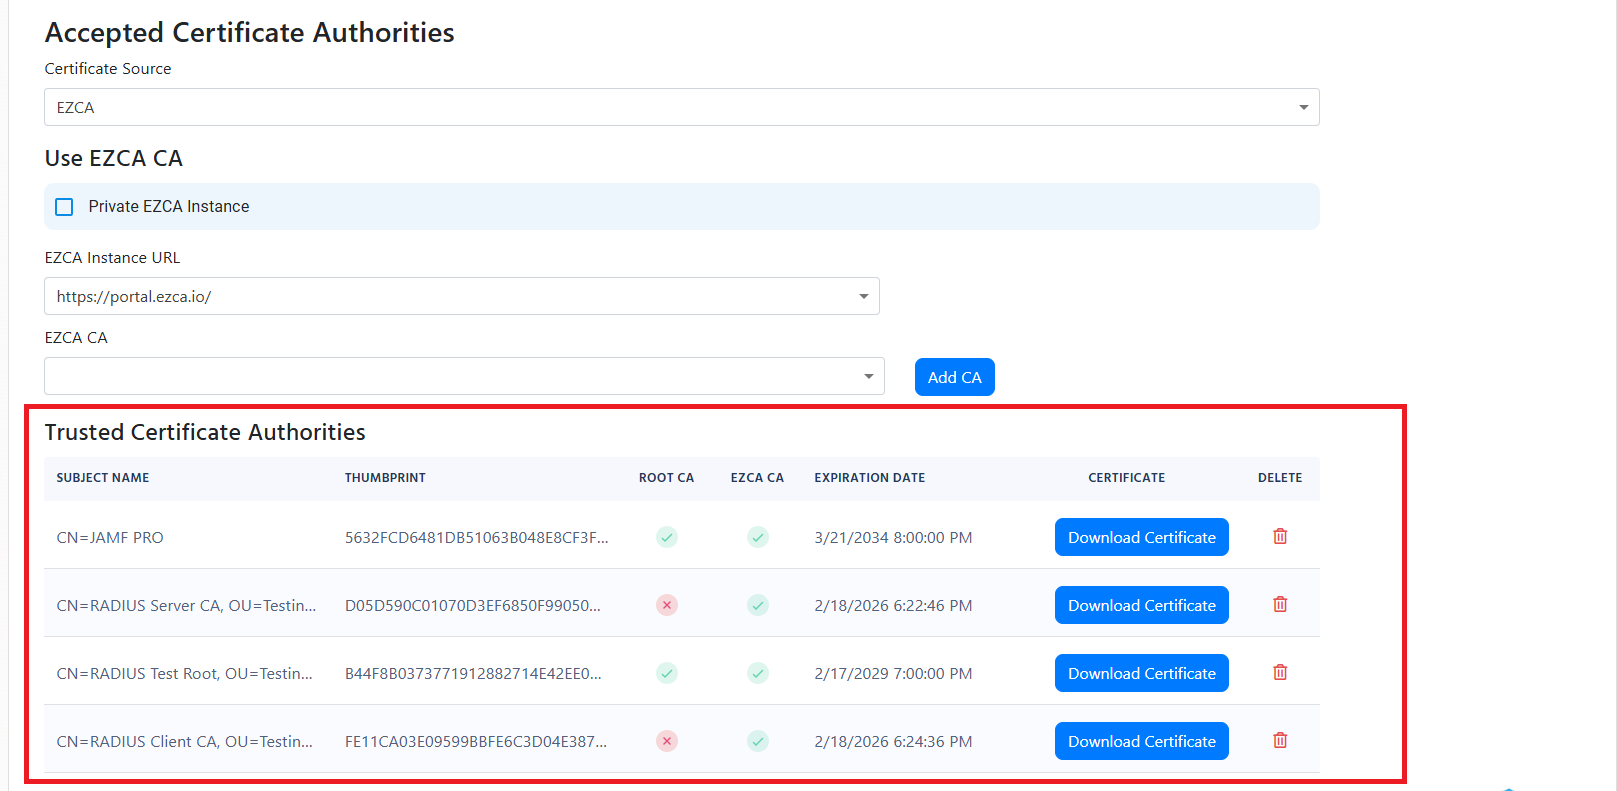
If you see the error Failed to build and validate certificate (XXX): UntrustedRoot: self-signed certificate in certificate chain or Invalid certificate: Failed to build certificate chain to a valid CA, it means that the certificate is not trusted. Please ensure that the certificate is part of your Policy Trusted Certificate Authorities:
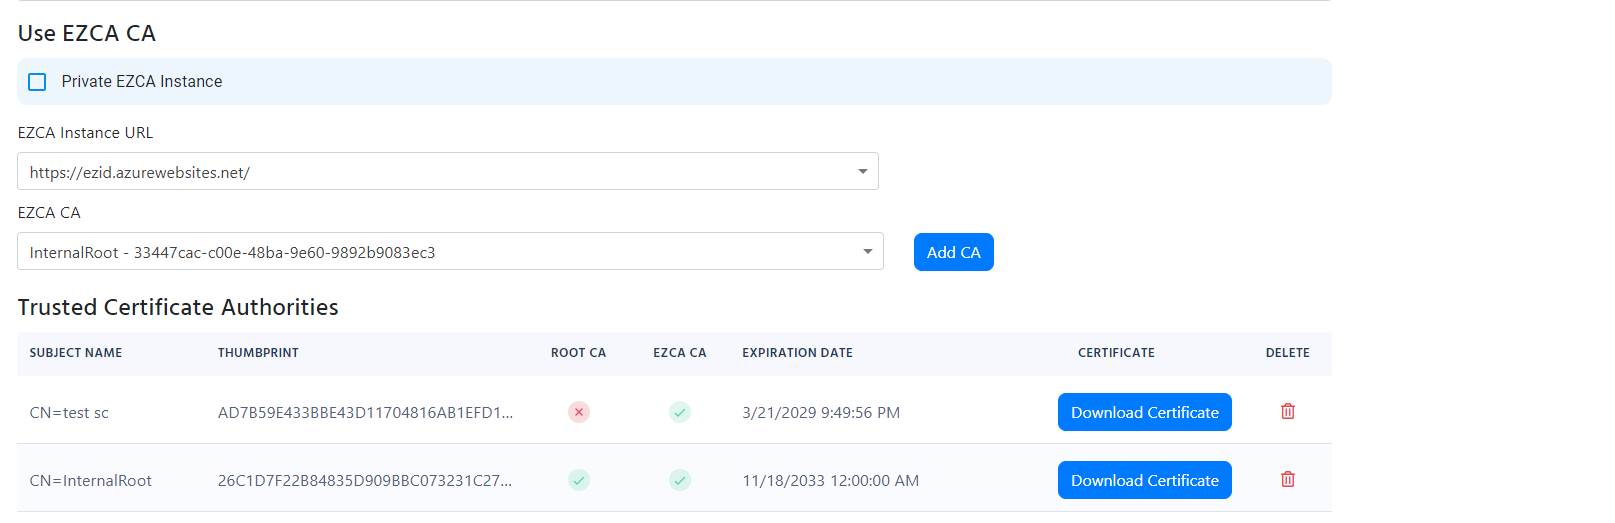
Another common issue that might cause this error is that the certificate that Windows (or whatever device you are using) is using to authenticate to the RADIUS server is not the one you expect and therefore it is not trusted by the RADIUS server. To solve this issue, you must ensure that the certificate being used by the client is the one you expect. You can do this by going to your Audit logs and ensuring that the certificate thumbprint matches the one you expect.
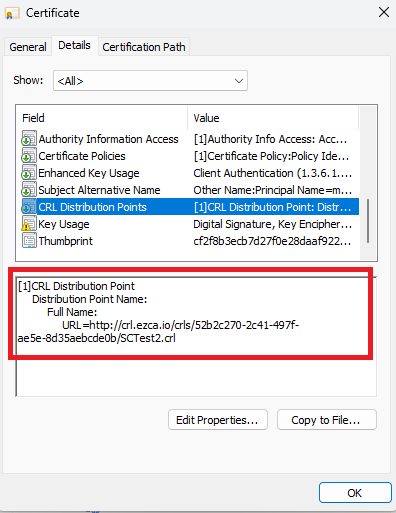
Exception occurred when validating the CRL
If you see the error “Exception occurred when validating the CRL” it means that the Certificate Revocation List (CRL) was not accessible by EZRADIUS. Please ensure that the certificates you are using have a valid CRL accessible through http (this is for the full chain, so it might also be the Root CA CRL).
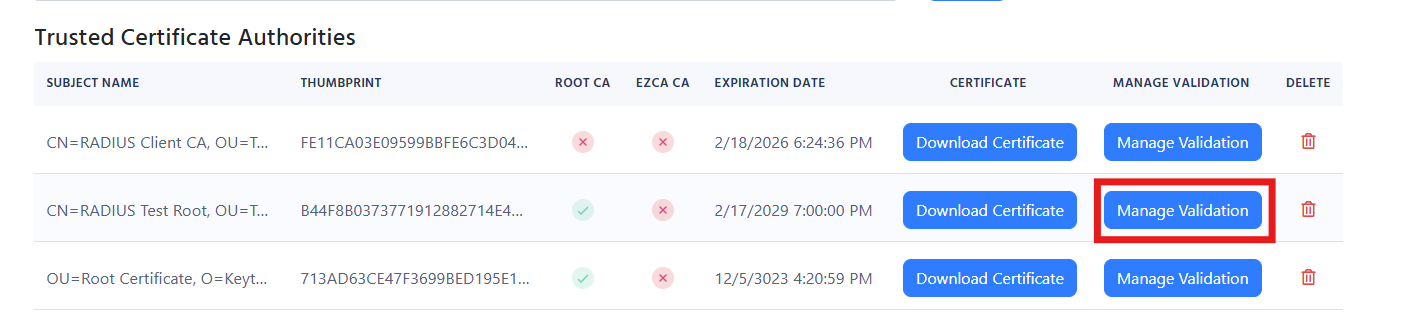
If your CRL is not accessible by EZRADIUS, you can either bypass the CRL or set an alternative CRL URL. To do this, go to your RADIUS policy and select the Certificate Authority that does not have a CRL accessible by EZRADIUS and select the “Manage Validation” Button.
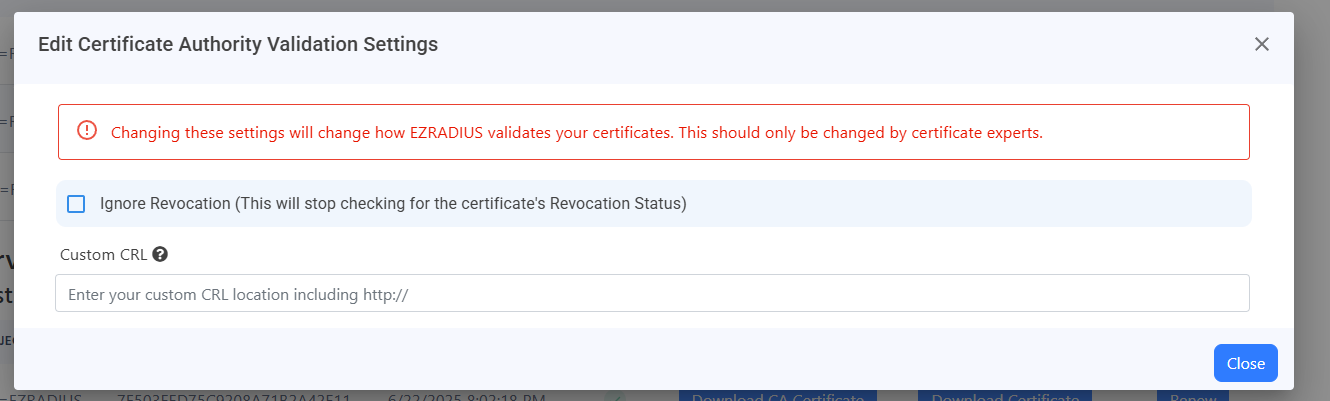
In here you can select the “Ignore Revocation” option to bypass the CRL check or set an alternative CRL URL that is accessible by EZRADIUS.
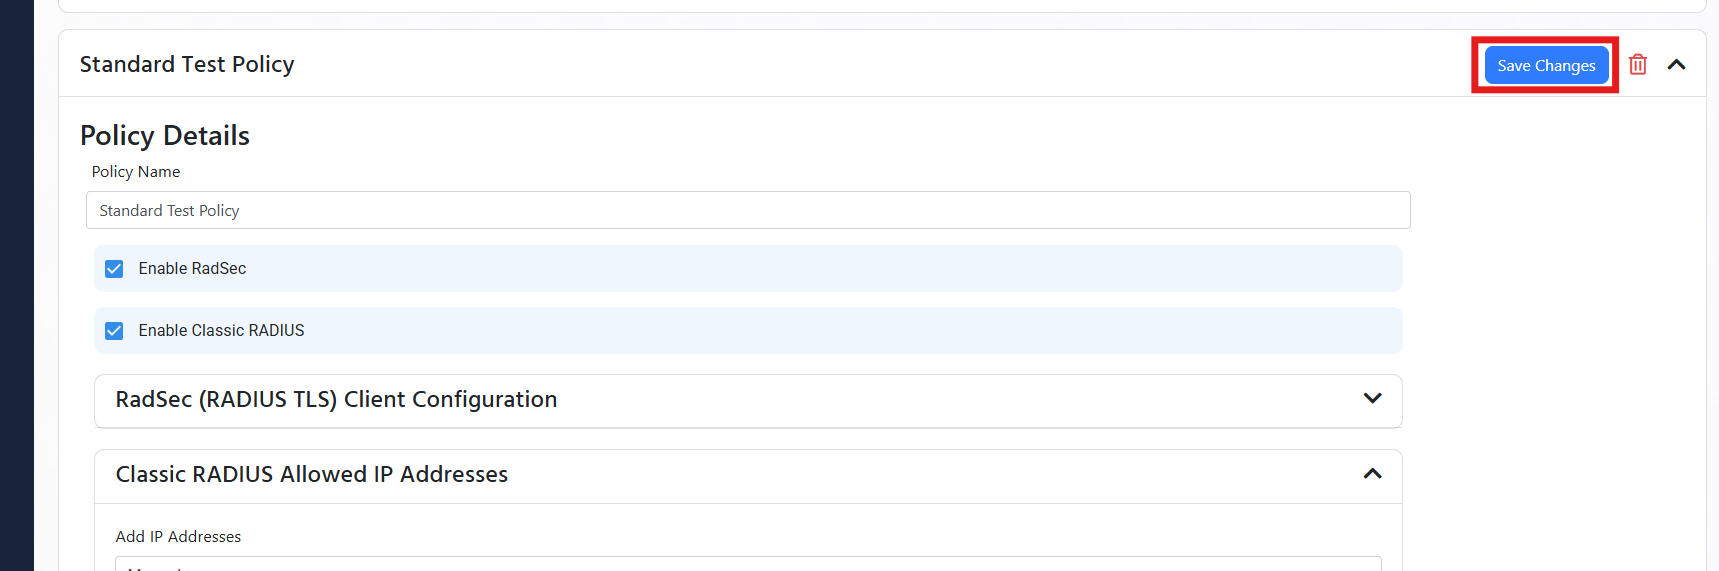
Once you have set your revocation settings, for all your CAs, you can go back to your RADIUS policy and select the “Save” button at the top to save your changes.
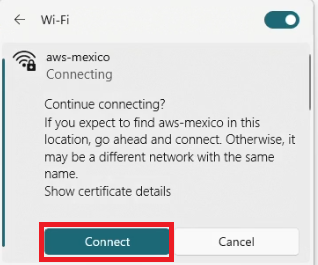
Continue connecting?
If you expect to find <SSID> in this location, go ahead and connect. Otherwise, it might be a different network with the same name.
This error usually occurs when the client and the server cannot agree on the cryptographic tunnel to start the authentication. The most common issue with this is the client not trusting the server certificate. For this you must ensure that the server certificate is trusted by the client (if you are testing you can click Connect and continue).
When using an MDM you must distribute the Root Certificate Authority, (found under “Server Certificate in your RADIUS Policy) to your devices. and Add the subject name and IP address of the RADIUS server to the wifi profile.

The other issue is if the client does not support the cryptographic tunnel that the server is trying to use. In this case, we recommend looking at the device logs to see what is the issue.
For this you must ensure that the server certificate is trusted by the client (if testing manually just accept when it as).
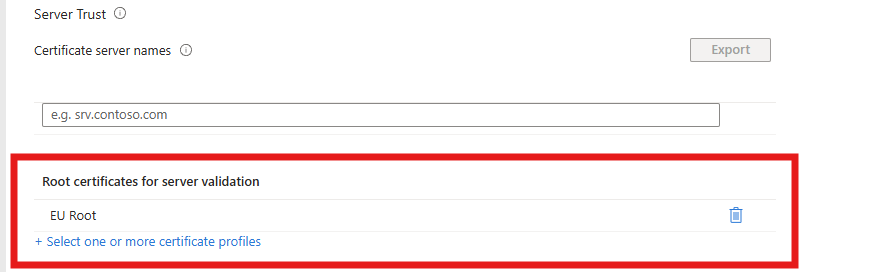
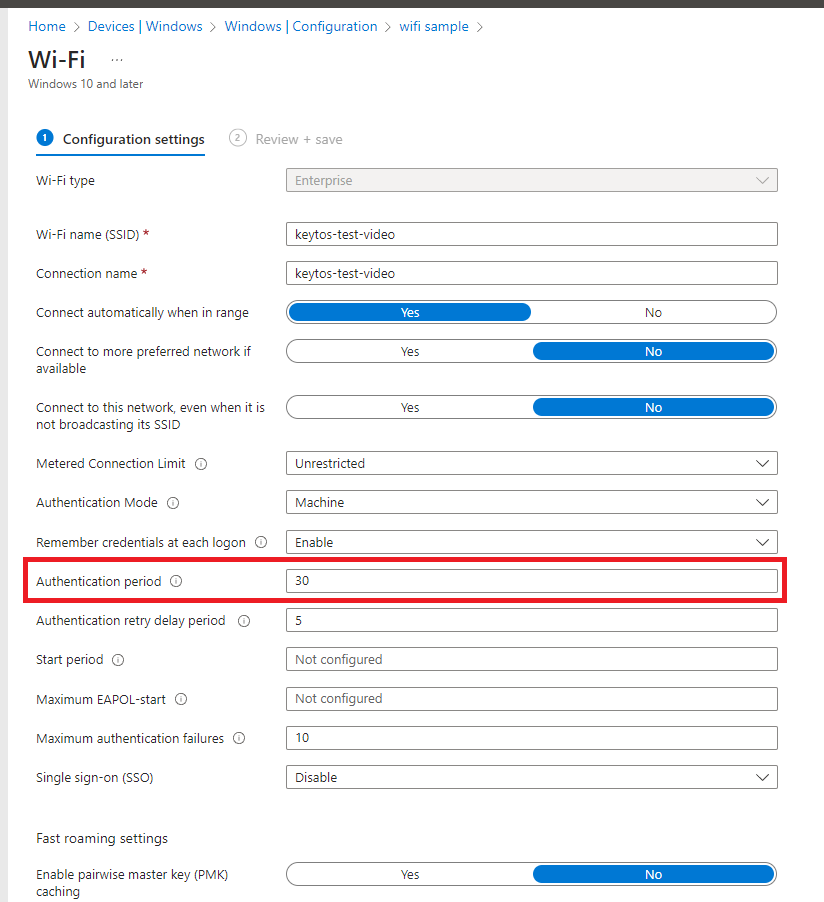
When using an MDM you must distribute the Root Certificate Authority, (found under “Server Certificate in your RADIUS Policy) to your devices and add the subject name and Subject alternate name of the RADIUS server certificate to the Wifi profile.
For example, if I was using Intune I would (assuming we already added the Root CA for the RADIUS server as a trusted Root In Intune):
I would go to Intune and open my wifi Profile:
In the server trust I would add the Root CA for the RADIUS server.
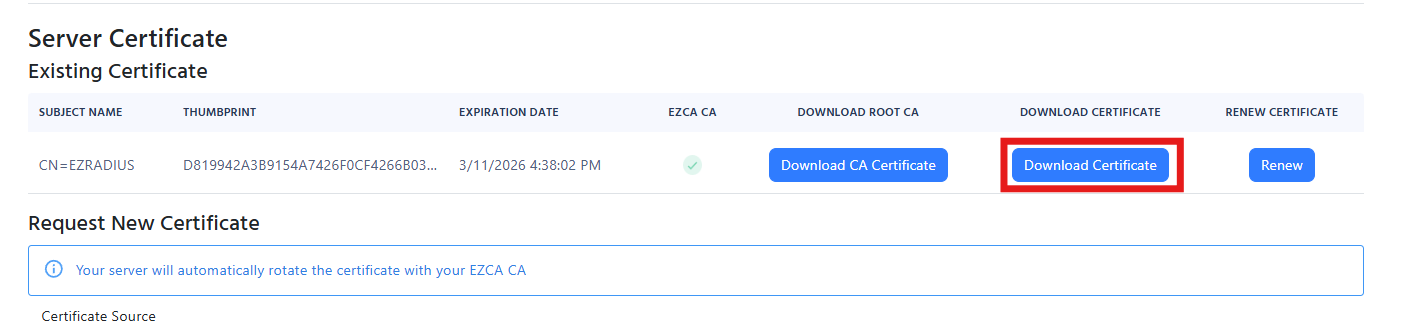
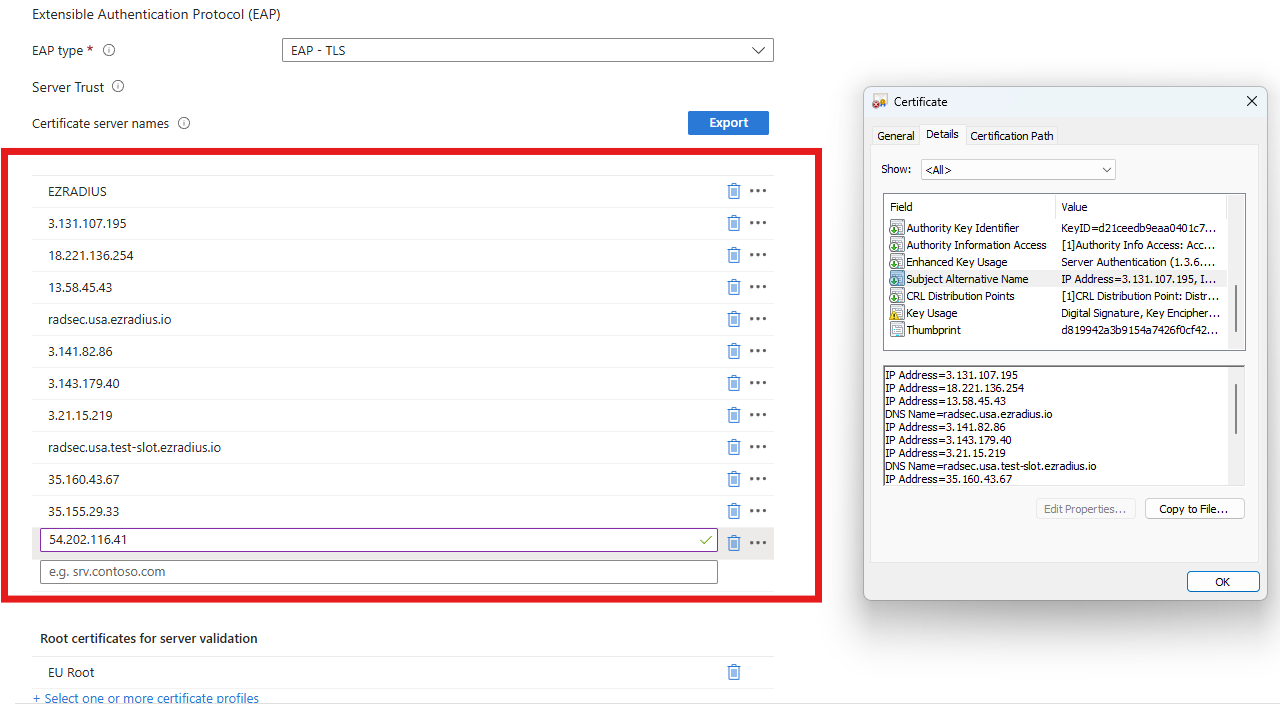
Get the server certificate from the RADIUS policy in EZRADIUS.
Open the Certificate and get the Subject Name (This one is usually EZRADIUS) and Subject Alternate Names that are found in the details tab.
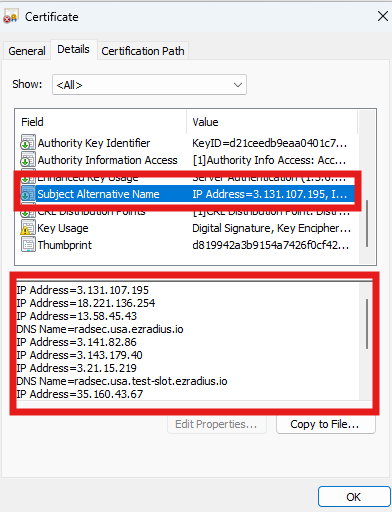
Add the Subject Name and Subject Alternate Names to the Wifi Profile in Intune Note the ones for your certificate will be different don’t just copy the ones here.
If you have ensured that the certificate is trusted by the device and you are still getting the “Handshake Failure” and you are on a Windows device, this might be due to the TPM having some issues with signing the TLS handshake. To solve this issue, you can try the following:
If your Windows devices are trusting the server certificate but your macOS or iOS devices are not, while they have the exact same MDM profile, this is probably due to the macOS or iOS being stricter when it comes to certificate validation for the RADIUS server certificate. To solve this issue, ensure that both the Subject Name and Subject Alternate Names of the RADIUS server certificate are added to the MDM profile as trusted server names. As well as all the CAs in the certificate chain are added as trusted CAs in your MDM Wi-Fi profile.
certificate-based authentication (TLS) timed out due to client retry, external service time-out, or misconfigured RADIUS client
This error means that either the Access Point (AP) or the client device stopped responding during the EAP-TLS authentication process.
This can happen for several reasons, including:
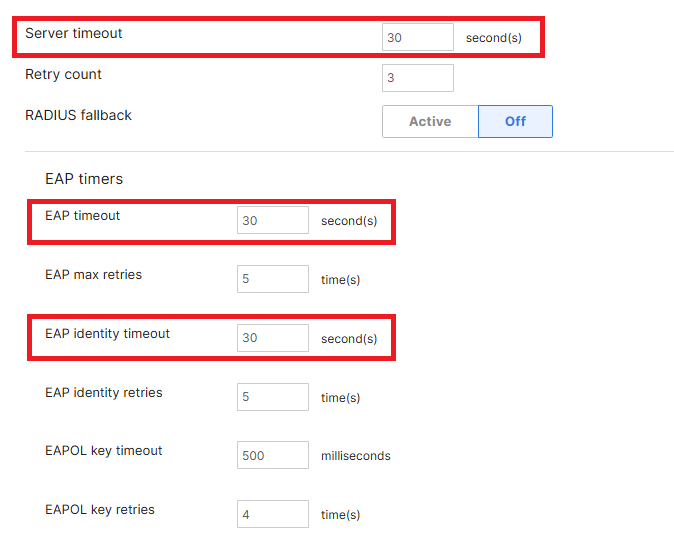
For cloud RADIUS deployments, we recommend configuring client timeout settings to:
The RADIUS server timeout is set to 30 seconds.
The first step is determining which side stopped responding:
We recommend starting with the client device.
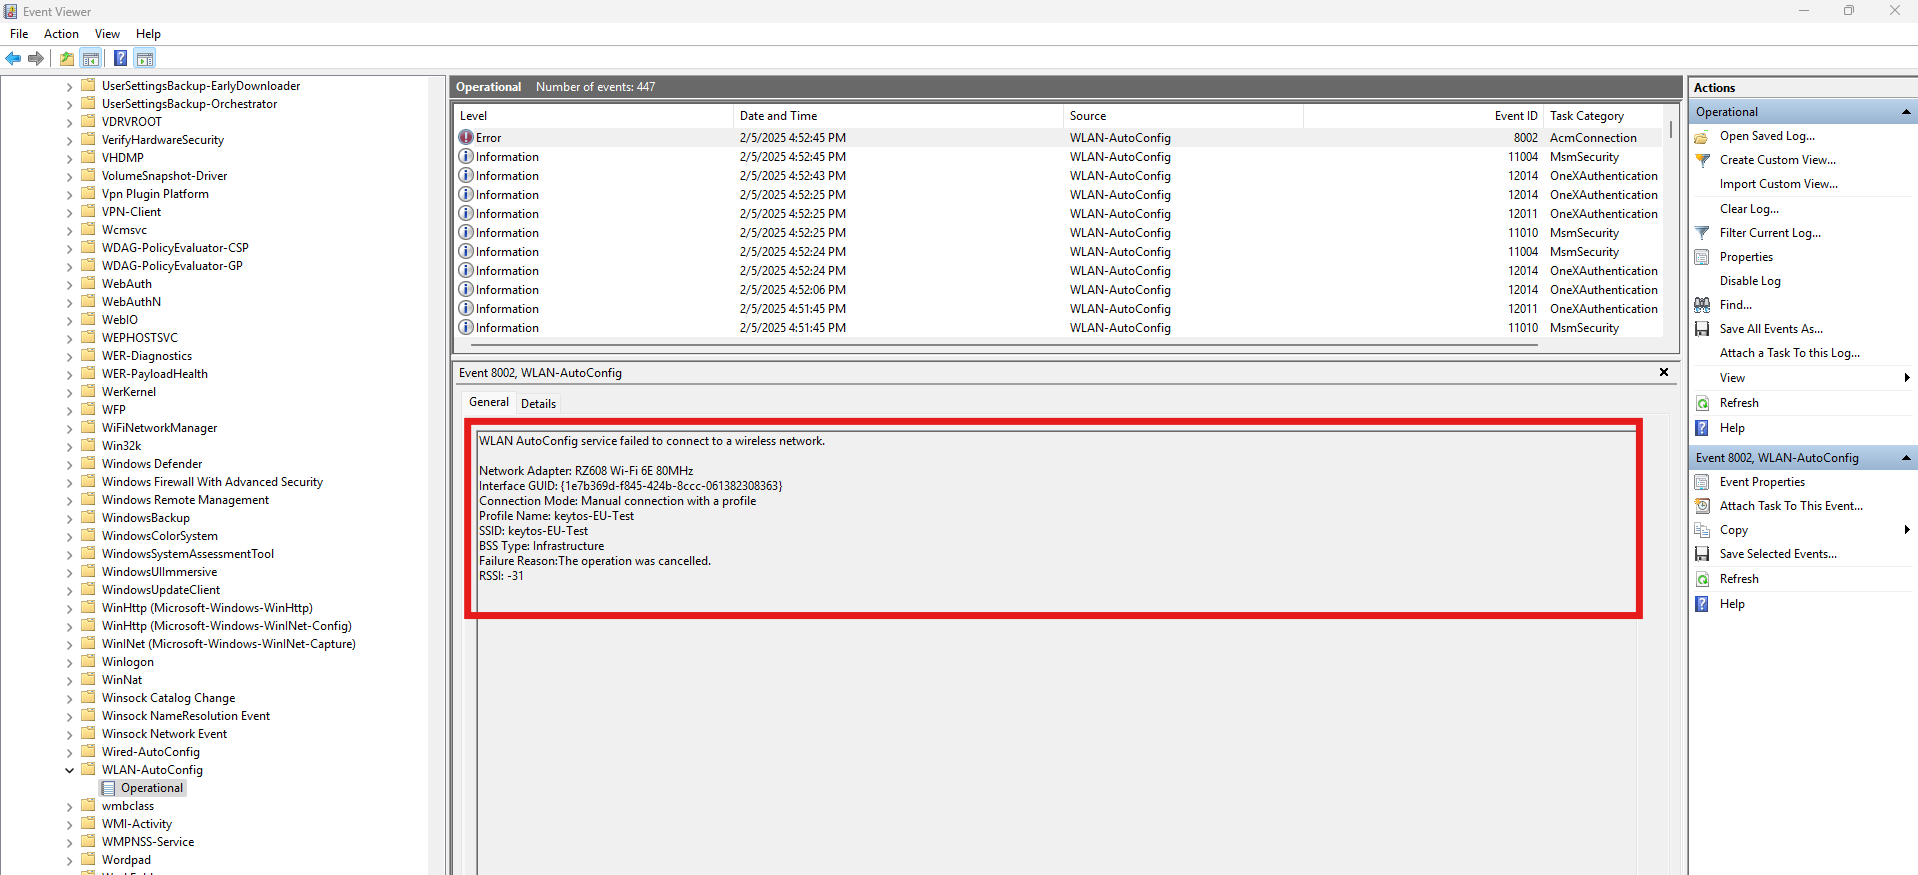
On Windows devices, review the WLAN AutoConfig logs:
Services Logs → Microsoft → Windows → WLAN-AutoConfig → Operational
Look for authentication-related errors that could explain the behavior.
Once you identify the specific error, follow the troubleshooting steps associated with that error message.
If there are no relevant errors on the client device, the issue is usually caused by the Access Point timing out during the authentication process.
In that scenario:
Username and Password authentication failed. Error password expired
If you see the error “Username and Password authentication failed. Error password expired” it means that the password has expired. Please reset the password in the EZRADIUS portal.
EAP Session was lost
The error “EAP Session was lost” is a common issue when troubleshooting RADIUS, it usually means that the client device did not respond to the RADIUS server in time. This can be caused due to many reasons, here are the most common ones:
If your device (laptop, phone, etc) has the timeout set too low, it might timeout before the RADIUS server responds. causing it to stop responding to the RADIUS server. To troubleshoot this increase the timeout on your device, if you are using and MDM such as Intune, then you can increase the timeout in the wifi profile (EZRADIUS times out after 30 seconds, so we recommend setting it to 30 seconds):
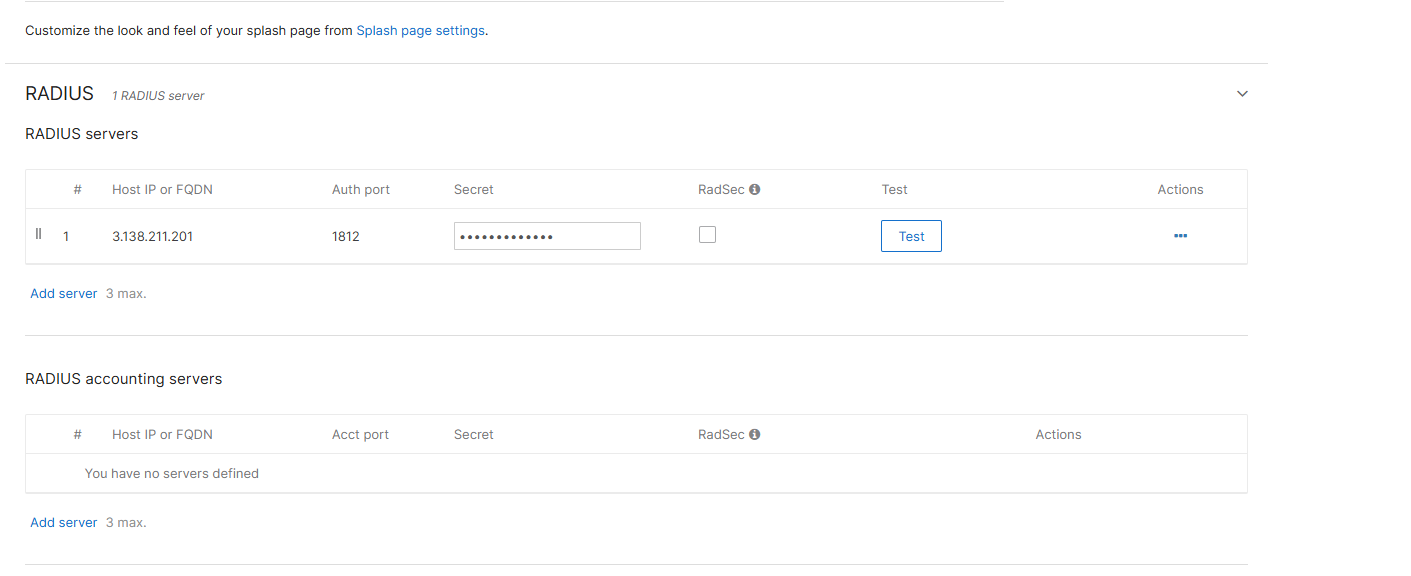
By default, most networking devices have the RADIUS timeout set to 5 seconds, if the RADIUS server does not respond in 5 seconds the networking device will stop responding to the RADIUS server, this does not account for RADIUS servers not hosted in your network, so we recommend increasing the timeout to 30 seconds. Here is a sample on how to setup the RADIUS timeout under RADIUS Advanced Settings a Cisco Meraki device:
We have seen some networking devices (mostly Cisco (including Meraki) and Fortinet) that have issues when there are multiple IP addresses in the RADIUS (they will send the request to the first IP address and then the second IP address, but the second IP address will not respond since the first IP is the one that started the authentication). If you are facing this issue, we recommend removing the second IP address from the RADIUS configuration (don’t worry while it is only one IP address that does not mean it is one server we have multiple servers per availability zone).
When there are no logs or the logs are ambiguous such as “EAP session lost”, it is usually due to the RADIUS server not receiving the request. This can be caused due to many reasons, some of them are network related, but some others can be caused by the Windows device not trusting the RADIUS server certificate or the network to see these logs in Windows you must:
Open the Event Viewer.
Go to Applications and Services Logs → Microsoft → Windows → WLAN-AutoConfig → Operational.
In here you can find Error logs that will help you troubleshoot the issue:
Invalid secret for the server
If you are using Fortinet devices, and you updated to Fortigate 7.2.10 you are probably getting the ‘Invalid secret for the server’ error.
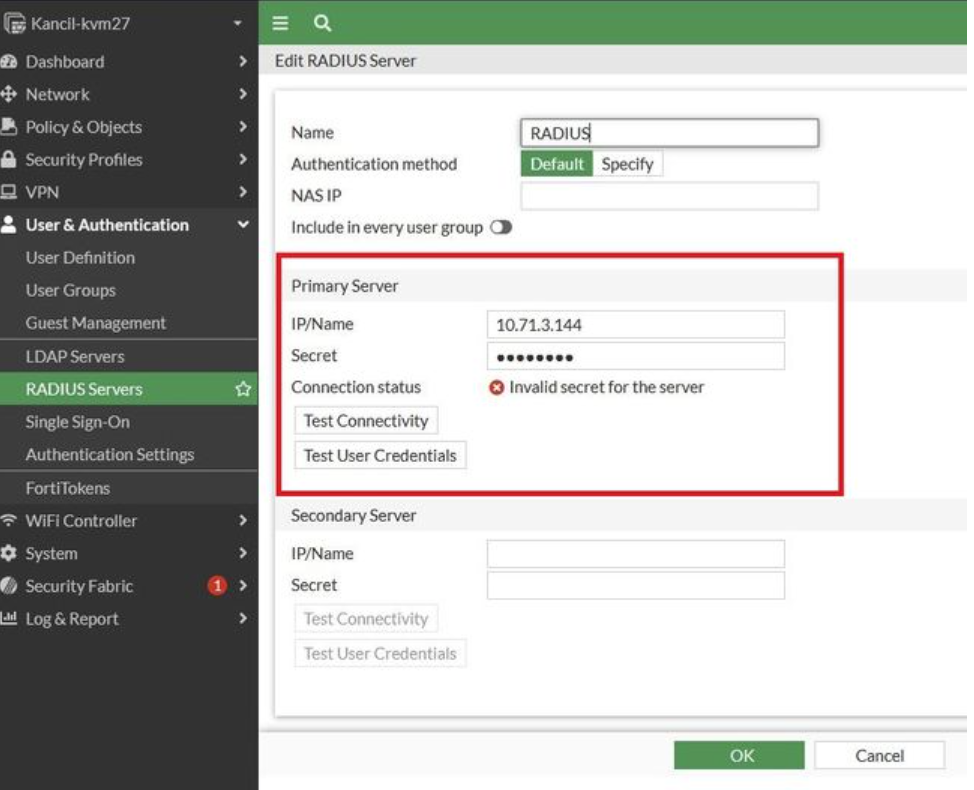
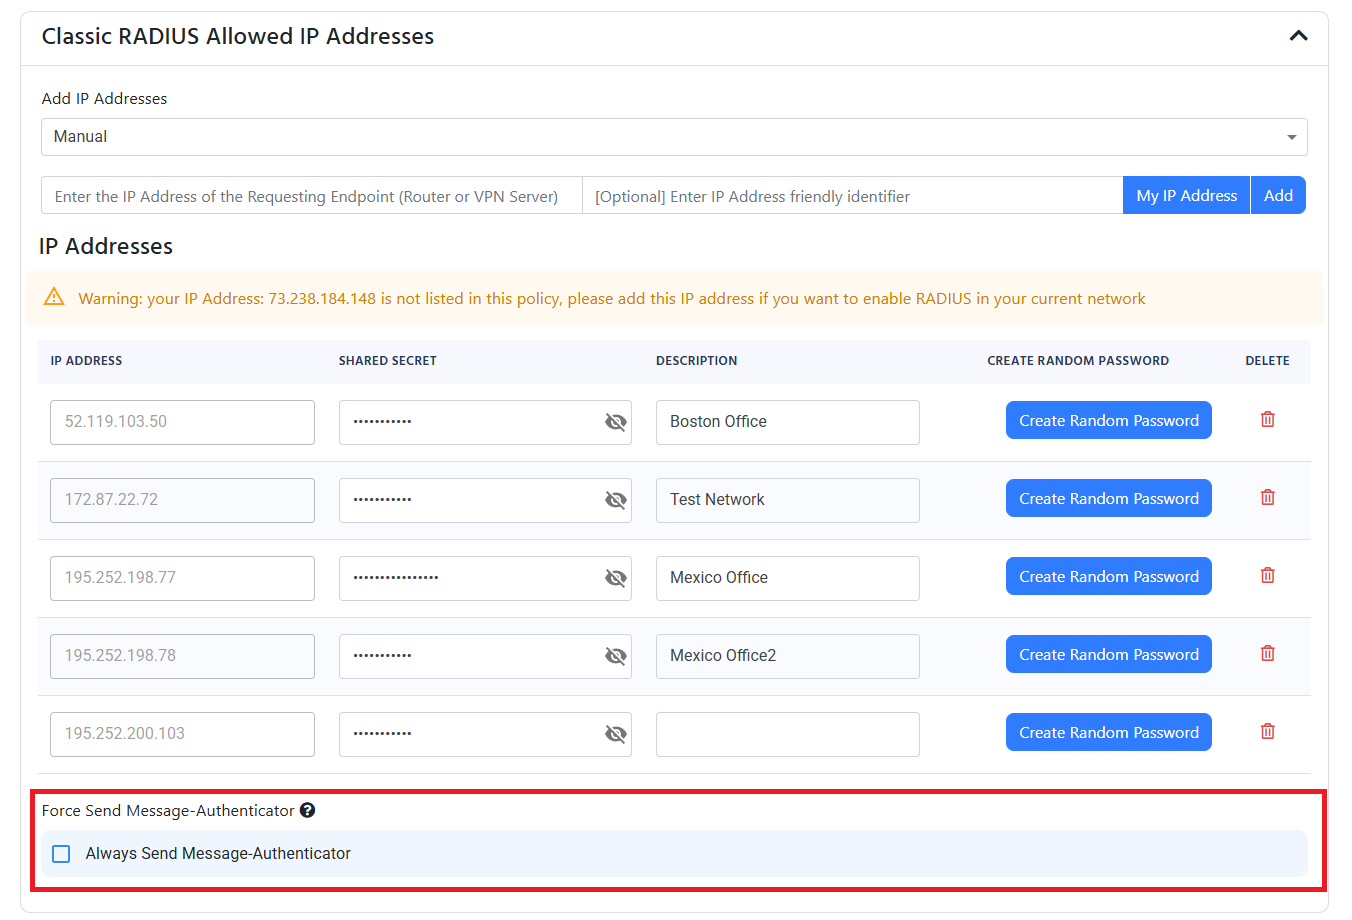
This is due to the Fortigate now requiring the Message Authenticator attribute in the RADIUS request (while not sending it in the initial request). To fix this you must enable the Always Send Message Authenticator in your RADIUS policy in EZRADIUS.
No matching access policies
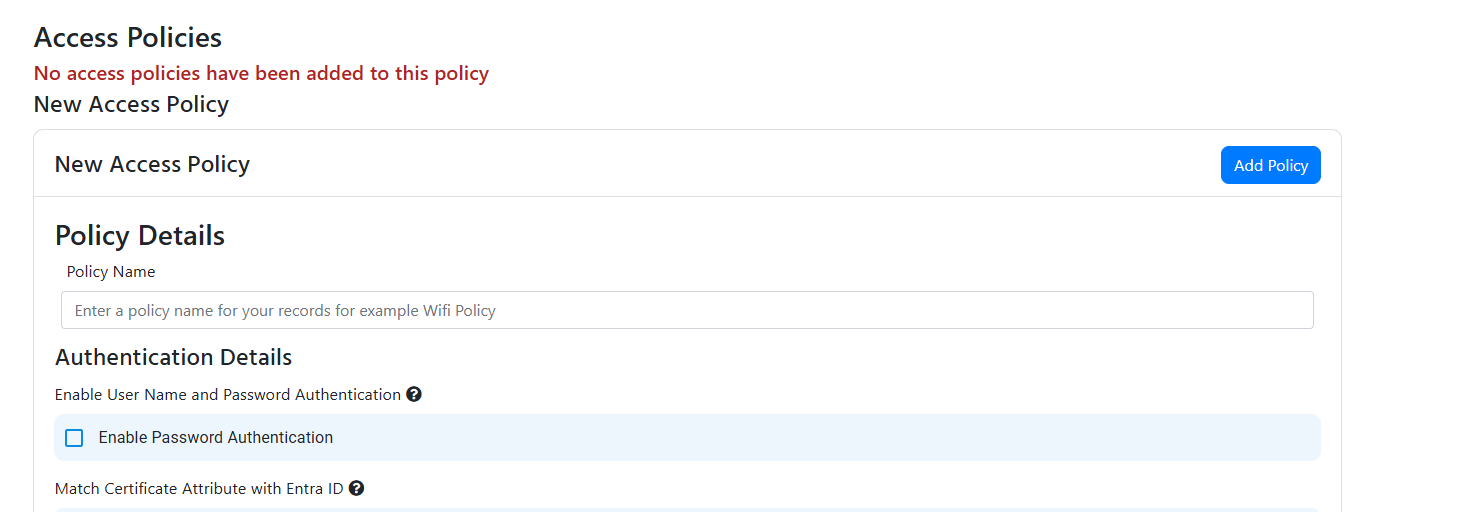
If you see the error “No matching access policies” it means that we couldn’t find any access policies that match your requirements this can be caused due to two reasons:
The Access Policies were not saved, ensure that you have saved the Access Policies in the EZRADIUS portal.
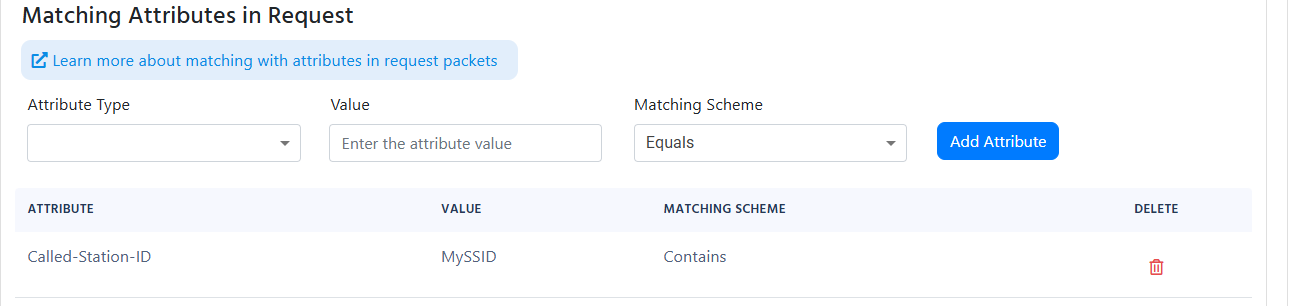
Your “Matching Attributes in Request” under advanced settings is too strict, we recommend setting the Matching Scheme to “Contains” since some networking devices may add more information to the field you are checking:
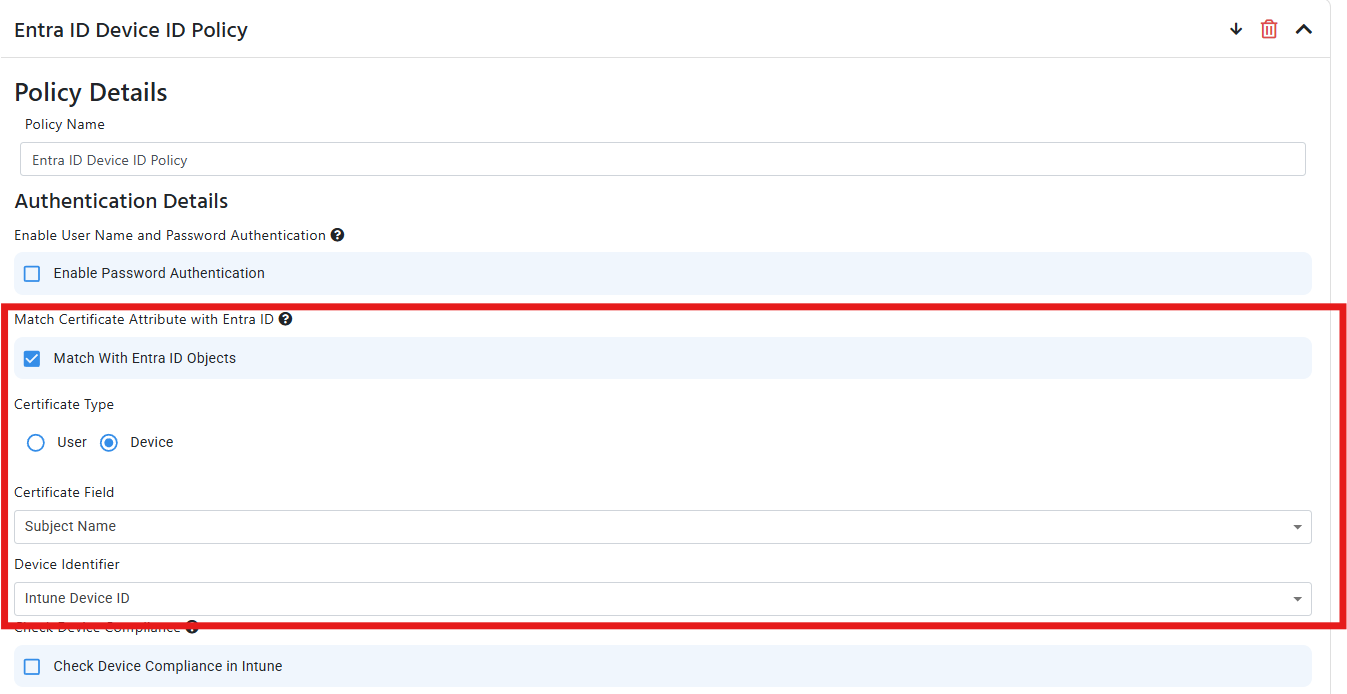
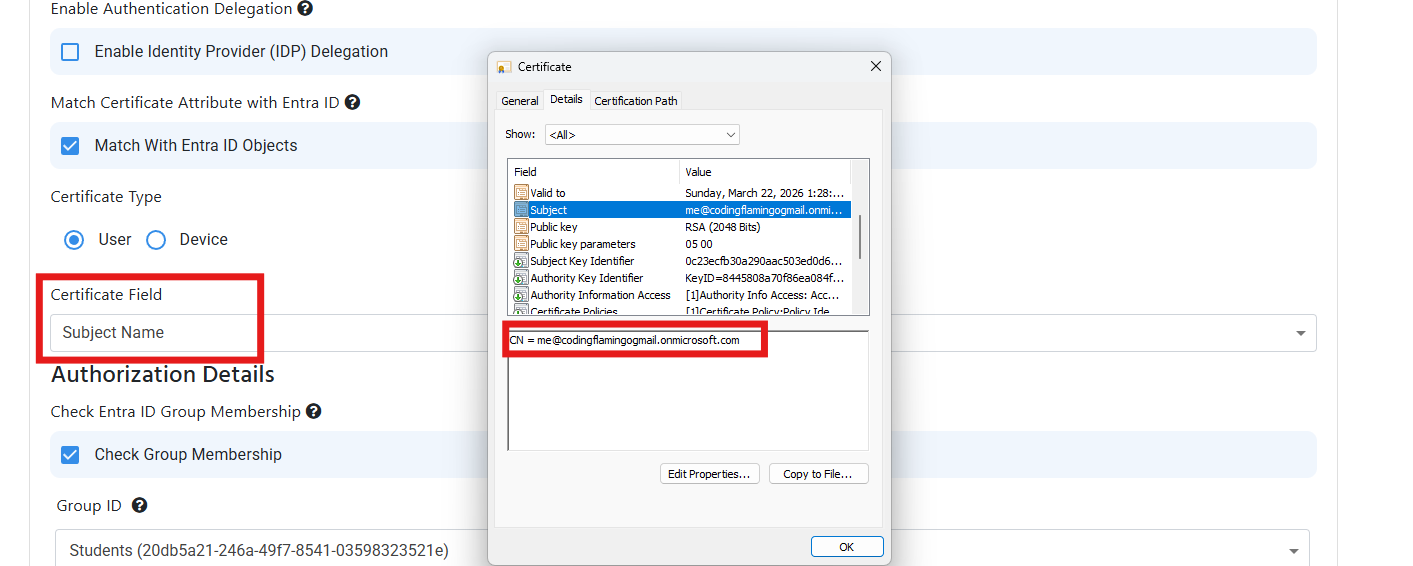
If you see the thumbprint showing up as the username in the logs, it means that EZRADIUS is performing the basic certificate validation on the certificate and it is not doing some of the more advanced checks such as Entra ID or Intune matching. To enable these checks you must enable the Match with Entra ID Objects in the RADIUS policy and tell EZRADIUS where to find the username or device ID:
Unauthorized certificate: Failed to get ID from certificate
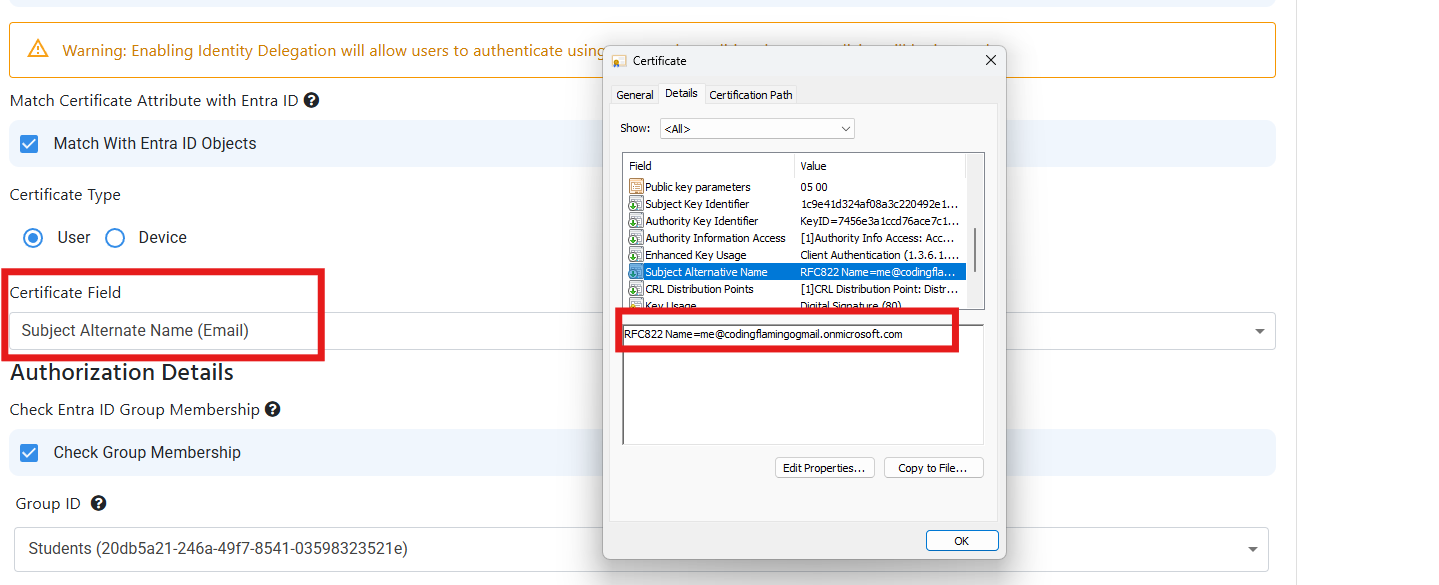
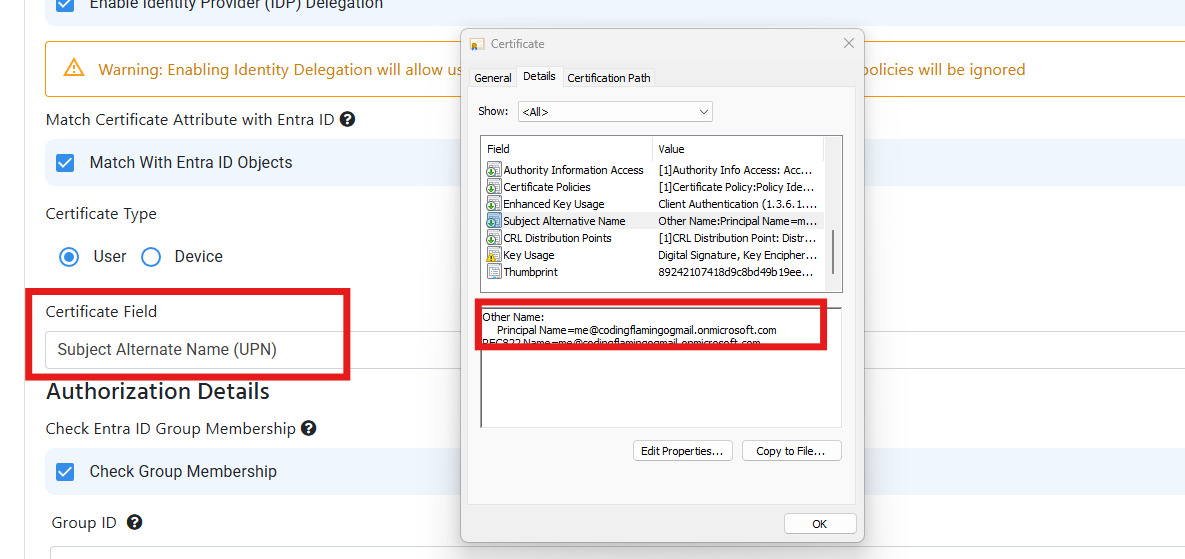
This error usually occurs when a certificate is issued by a CA that is trusted by EZRADIUS but we were not able to get the User Email or Device ID from the certificate. This is usually caused due to the certificate not having the User Email or Device ID in field you specified in the RADIUS policy. To solve this issue, you must ensure that the certificate has the User Email or Device ID in the field you specified in the RADIUS policy. You can do this by going to your RADIUS access policy and check under the Match Certificate Attribute with Entra ID section and ensure that the field you specified in the RADIUS policy matches the field in the certificate. Below are some examples of the fields you can use to match the certificate with Entra ID:
If you are using Meraki MS Switches and you are not able to authenticate to RADIUS, it is probably due to the switch marking the RADIUS server as “unhealthy” and never connecting to it again this seems to be a known issue that requires RADIUS Monitoring to be enabled from the backend. To solve this, you must enable “RADIUS Testing” in your RADIUS server configuration in the Meraki portal.
Trying to troubleshoot RadSec issues can be tricky since if the RadSec authentication fails, we do not know which customer made the request so we cannot log it in your RADIUS authentication logs. However, if you add your public IP address to the Classic RADIUS section of your RADIUS policy, you will be able to see the failed RadSec requests that come from that IP address in your RADIUS authentication logs. This way, you can troubleshoot the issue and then remove the IP address from the Classic RADIUS section once you have resolved the issue.
Because RadSec attributes a request to an EZRADIUS instance based on the certificate used to authenticate the request, a certificate authority can only be used by one EZRADIUS policy. It cannot be shared between multiple policies. If you are trying to use the same certificate authority in multiple RADIUS policies, you will get the error “Error: Certificate Authority already claimed by someone else”. To solve this issue, you must ensure that each certificate authority is only used in one RADIUS policy.
If you need different behavior for different access points, we recommend using one RADIUS policy with different Matching Request Attributes under Advanced Settings to differentiate the access points.
RadSec is tricky to diagnose, because if the RadSec authentication fails, we do not know which customer made the request so we cannot log it in your RADIUS authentication logs. However, if you add your public IP address to the Classic RADIUS section of your RADIUS policy, you will be able to see the failed RadSec requests that come from that IP address in your RADIUS authentication logs. This way, you can troubleshoot the issue and then remove the IP address from the Classic RADIUS section once you have resolved the issue.
If you’re seeing the following error:
Authentication service only supports processing Access-Request datagrams
This usually means that you are sending Accounting logs to port 1812 instead of port 1813. Make sure you configure your network controller to send Accounting logs to port 1813 and Authentication logs to port 1812.
Sometimes things don’t go as planned. This guide will help you troubleshoot your Cloud RADIUS configuration for Entra ID Wifi Authentication in EZRADIUS.
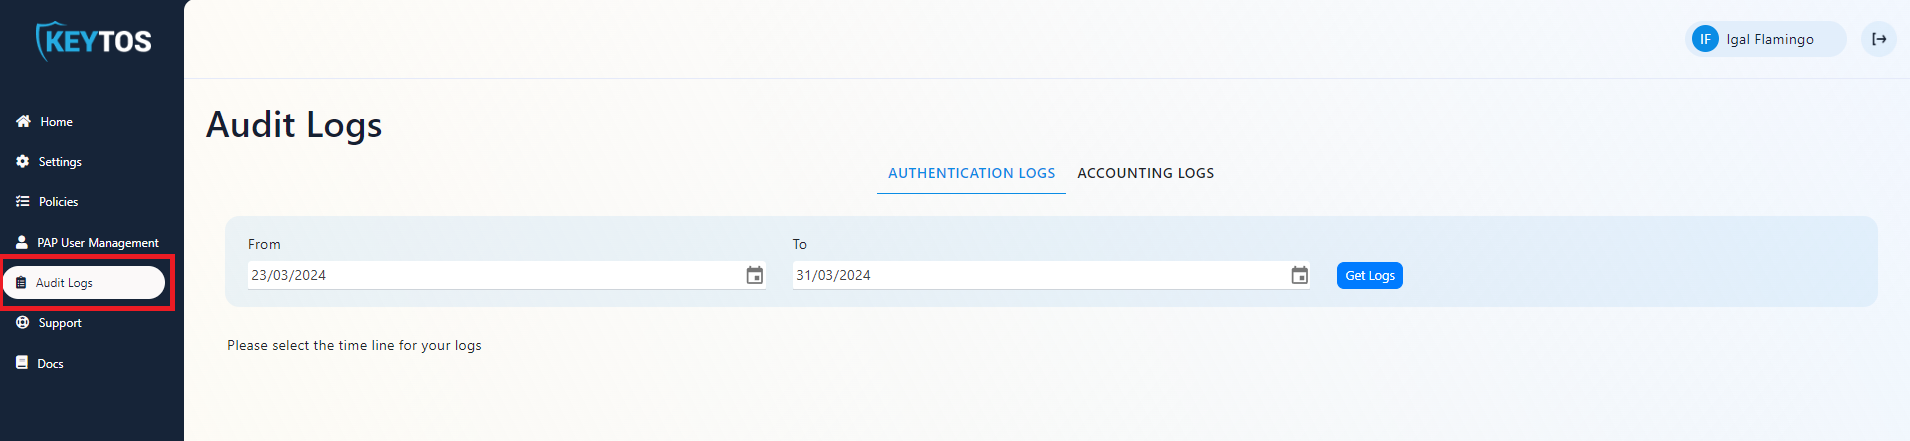
EZRADIUS allows you to view audit logs of your Cloud RADIUS instance. In this page we will go through how to view these logs.