How To Create Domain Controller Certificates For Windows Hello Hybrid
How to go passwordless with Windows Hello for Business for Hybrid
If you are trying to go passwordless, you might have setup Azure passwordless onboarding however, nothing beats the convenience of having hello for business as an authentication method, in this page we will go through how to achieve this with hybrid key trust deployment.
EZCA enables you to create this without the need of running ADCS (Active Directory Certificate Services) offloading all your PKI needs to Azure.
Prerequisites
- Create a SCEP CA. By default the CA will have the required EKUs. However, if you change this, please make sure you have the KDC Authentication, Smart Card Logon, Client Authentication, and Server Authentication.
Creating the Domain Controller Certificate
Once your CA is created we are ready to create certificates for domain controllers. First we must trust the CA certificate in AD for Kerberos Authentication, then we will create the certificate and set it up for automatic rotation.
1 Trusting the new CA Certificate
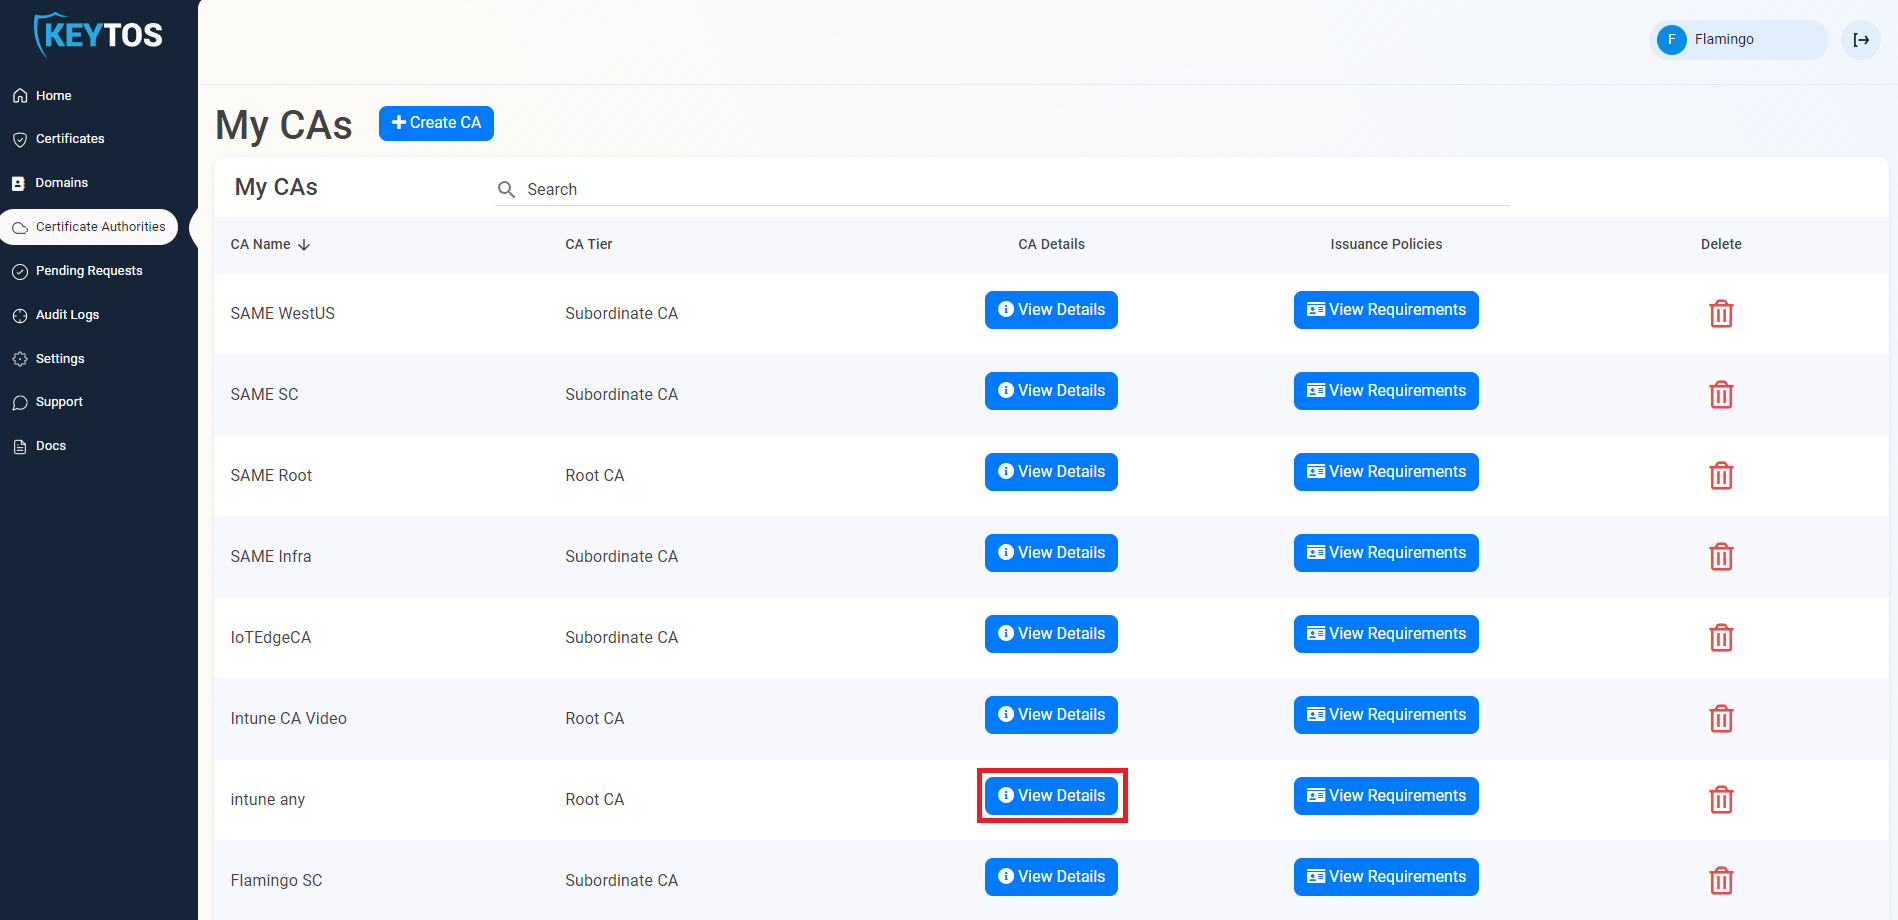
The first step step is to add the CA certificate to the NTAuth Store. This will enable the certificate to be sued for authentication in Active Directory. First we must get the CA certificate from EZCA:
- navigate to the EZCA portal (If you have your private instance go to that specific portal)
- Login with an account that is registered as a PKI Admin in EZCA.
- Navigate to Certificate Authorities.
- Select Your CA by clicking the View Details Button.
- Click download certificate.
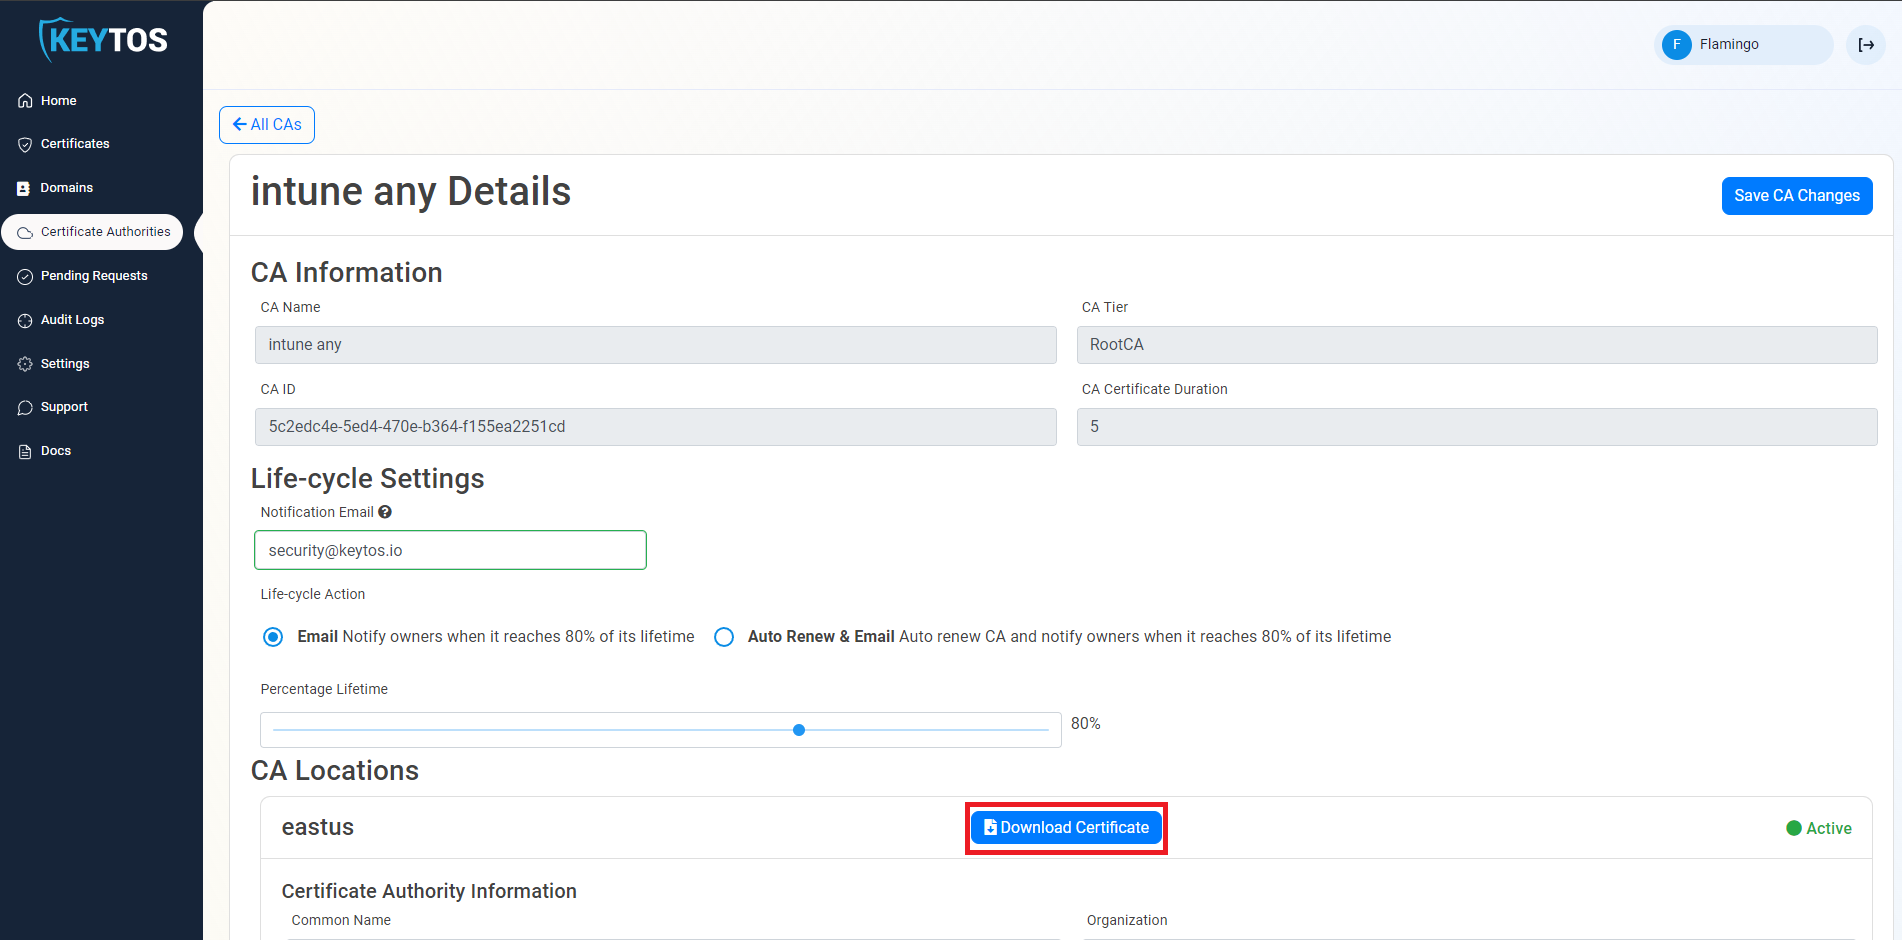
- Now that we have the certificate, we will run the following command (from an account with enterprise administrator rights) to add it to the NTAuth Store to enable certificate issued by this CA to be used for authentication in AD.
certutil -f -dsPublish ca-cert.cer NTAuthCA
- Then we must add the certificate chain to the Windows trusted store. To do this, run the following command (If the root certificate you used to sign the EZCA CA is already trusted by this domain you do not have to do this step).
certutil -f -dsPublish ca-root.cer RootCA
- It can take several hours for this to replicate, to speed up the process you can run
gpupdate /forcein the domain controllers and any machine that you want this to take effect sooner.
2 Create the Certificate
Now that we have established the domain trust, we have to create certificates for the domain controllers (This must be repeated on each domain controller). The first certificate must be created by a PKI administrator and can be either created on the EZCA portal or using our open source certificate management application
Using The Portal
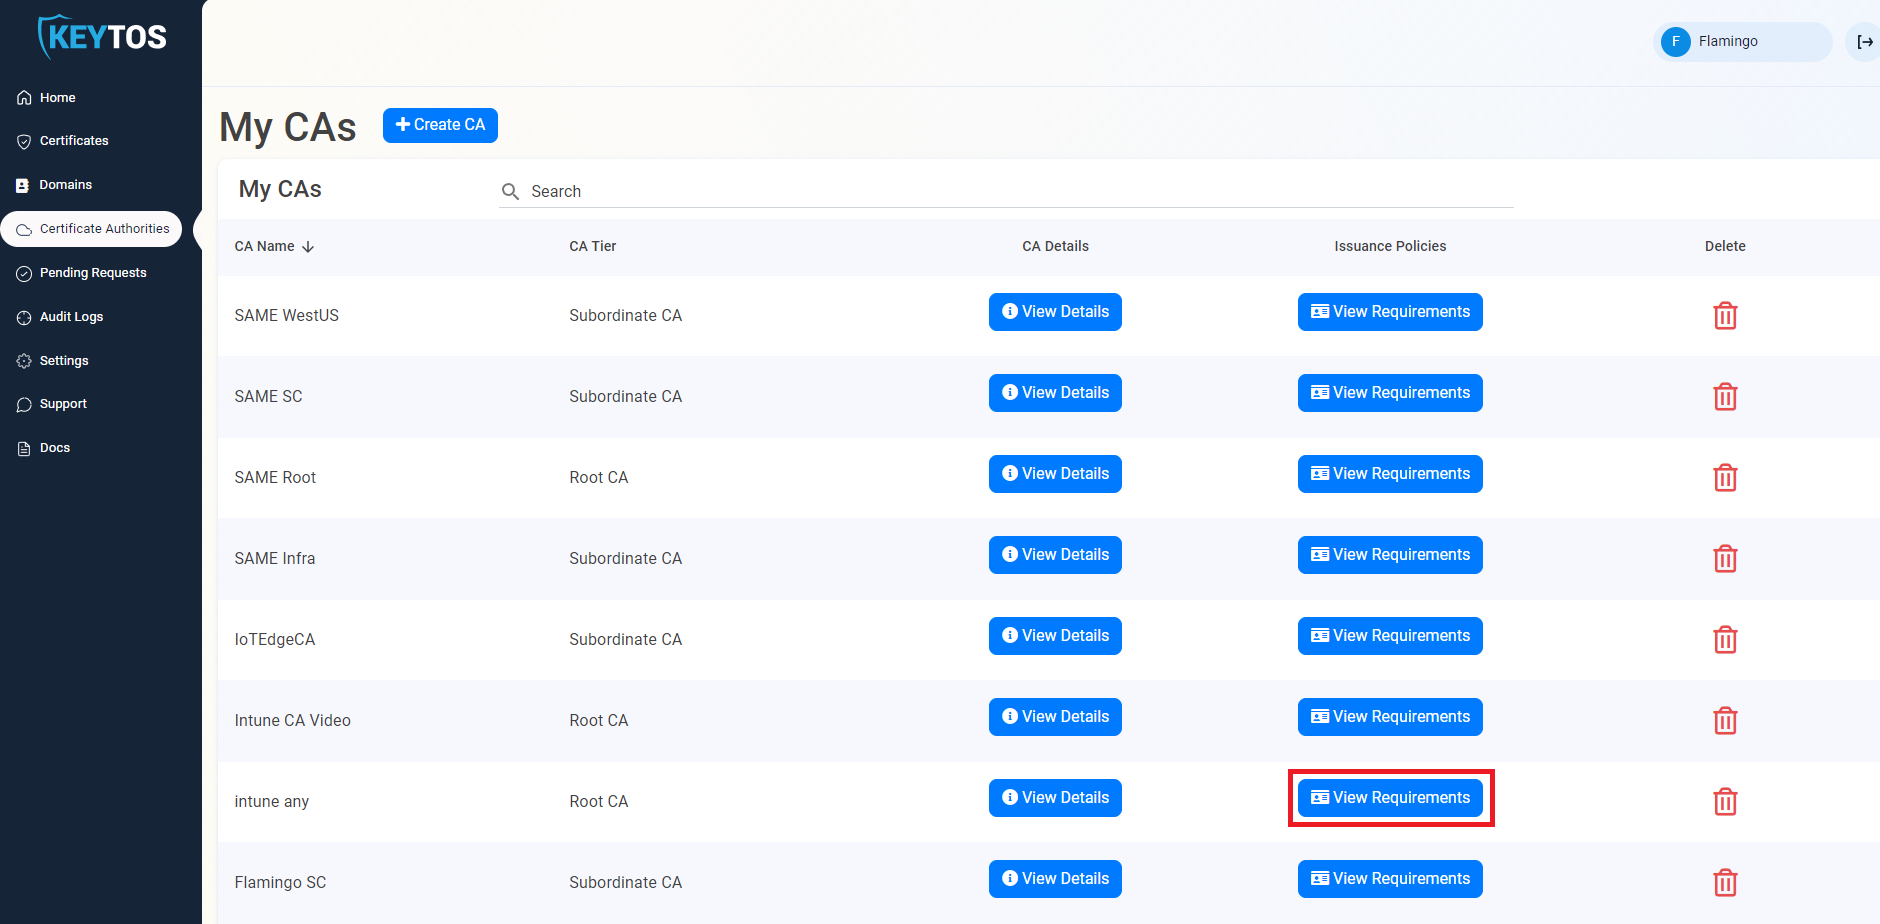
- navigate to the EZCA portal (If you have your private instance go to that specific portal)
- Login with an account that is registered as a PKI Admin in EZCA.
- Navigate to Certificate Authorities.
- Select the “View Requirements” button for your CA
- Select the “Request Domain Controller Certificate” Button
- Enter The Subject Name in format
CN=server1.contoso.com OU=Your OU DC=contoso DC=com - If SMTP replication is used in your domain enter your Domain Controller GUID learn how to get your GUID
- Enter your host name.
- Select the validity lifetime of your certificate.
- Follow the instructions to create your CSR.
- Request the certificate.
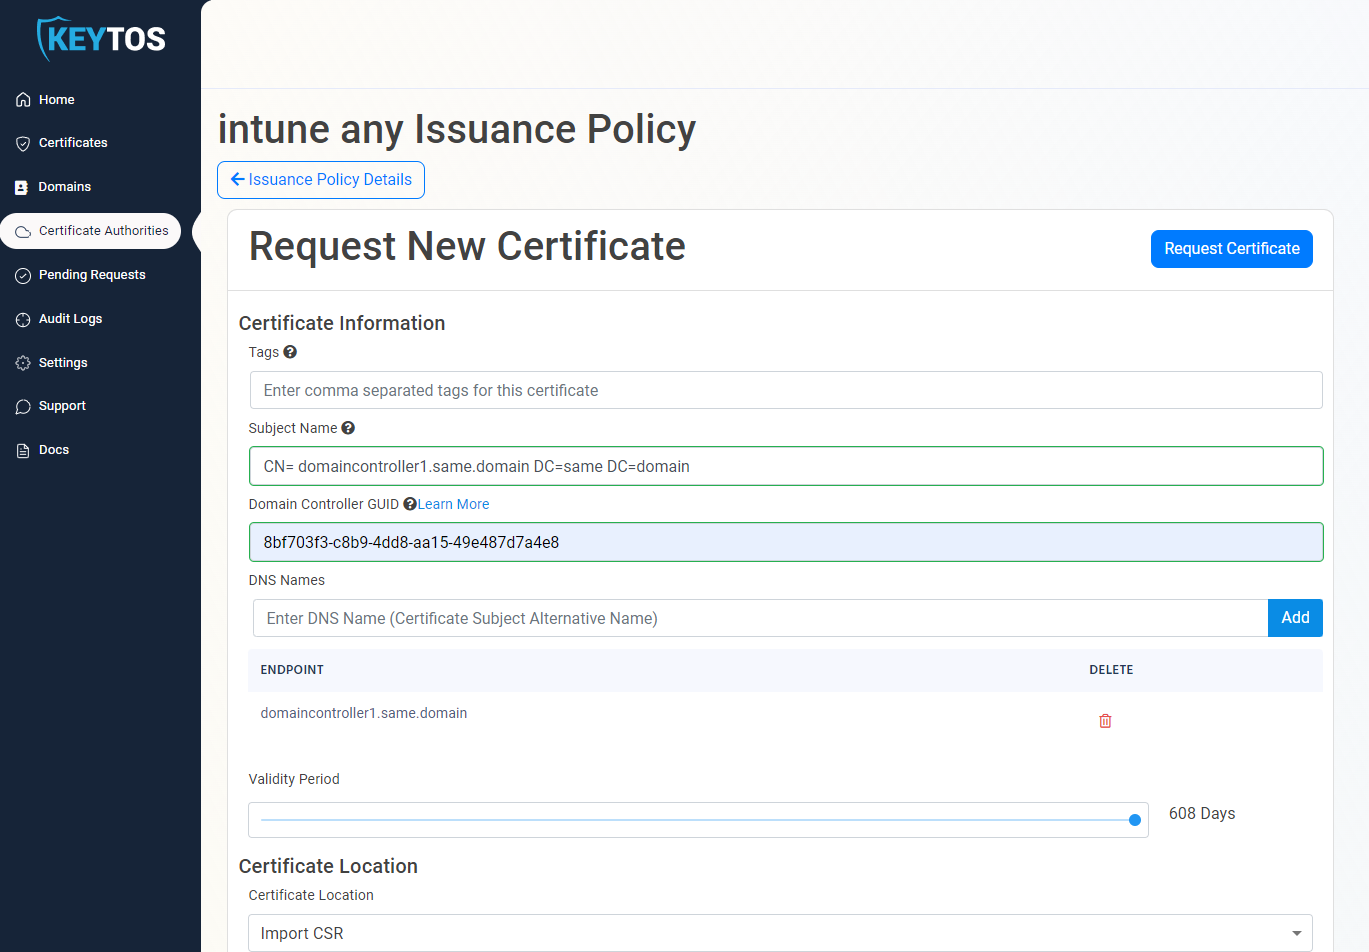
- Download an Install the certificate.
Using The Application
- navigate to the EZCA portal (If you have your private instance go to that specific portal)
- Login with an account that is registered as a PKI Admin in EZCA.
- Navigate to Certificate Authorities.
- Select the “View Requirements” button for your CA
- From this page, copy the CAID and Template ID.
- Now Download our open source certificate renewal tool (Signed Version) and request the certificate by running the following command:
.\EZCACertManager.exe createDC --caid yourCAIDFromThePortal --TemplateID YourTemplateIDFromThePortal -v 20
If you prefer to set the subject name and domain controller FQDN manually, you can use the following command:
.\EZCACertManager.exe createDC -s \"CN=server1.contoso.com OU=Domain Controllers, DC=contoso DC=com\" -d your.fqdn --caid yourCAIDFromThePortal --TemplateID YourTemplateIDFromThePortal -v 20
the following options are available for this command:
   -d, --DNS             Required. DNS Entry for this Domain Controller

  -s, --SubjectName     Required. Subject Name for this certificate for example: CN=server1.contoso.com OU=Domain
                        Controllers DC=contoso DC=com

  --caid                Required. CA ID of the CA you want to request the certificate from

  --TemplateID          Required. Template ID of the template you want to request the certificate from (Note: Only SCEP
                        templates are supported)

  -v, --Validity        Required. Certificate validity in days

  -g, --DCGUID          Domain Controller GUID. This is only required if SMTP replication is used in your domain. Learn
                        more:
                        https://learn.microsoft.com/en-US/troubleshoot/windows-server/windows-security/requirements-doma                        in-controller#how-to-determine-the-domain-controller-guid

  --AppInsights         Azure Application Insights connection string to send logs to

  -e, --EZCAInstance    (Default: https://portal.ezca.io/) EZCA instance url

  --EKUs                (Default: 1.3.6.1.5.5.7.3.2,1.3.6.1.5.5.7.3.1,1.3.6.1.4.1.311.20.2.2,1.3.6.1.5.2.3.5) EKUs
                        requested for the certificate

  --AzureCLI            (Default: false) Use Azure CLI as authentication method
Validate that the Domain Controller Certificate is being used
To validate that the domain controller certificate is being used, you can run the following command on a machine that is joined to the domain:
openssl s_client -showcerts -connect <DOMAIN Controller FQDN>:636 -servername <DOMAIN Controller FQDN>
Set for Automatic Rotation
Once you have created your first certificate for the domain controller, we have to set a schedule task to run the renewal command:
.\EZCACertManager.exe renew -s \"CN=server1.contoso.com\" --LocalStore
the following options are available for this command:
   -r, --RDP             (Default: false) whether this certificate should be added as the computer's RDP certificate

  -s, --SubjectName     Required. SubjectName for the certificate you want to renew

  --AppInsights         Azure Application Insights connection string to send logs to

  -e, --EZCAInstance    (Default: https://portal.ezca.io/) EZCA instance url

  --LocalStore          (Default: false) If the certificate should be stored in the computers Local Store. If false certificate will be stored in the user store

  -t, --Template        (Default: ) Certificate Template Name

  -i, --Issuer          (Default: ) Certificate Issuer Name

  --help                Display this help screen.

  --version             Display version information.
If you have multiple certificates with the same subject name we recommend using the Issuer name or template name to specify the certificate you want to renew.
How To Phase Out An Existing ADCS Internal PKI for Domain Controller Certificates
Once you have created the certificates for all your domain controllers, you can start phasing out your existing ADCS PKI. To do this, please ensure that your internal PKI do not enroll Domain Controller certificates anymore. You can do this by removing the Domain Controller template from the CA. Otherwise, the domain controller might use the domain controller certificate from your ADCS instead of the one from EZCA.