How To Create SCEP PKI in Azure

Prerequisites

  1. Registering the application in your tenant
  2. Create EZCA Resource In Azure
  3. If you are connecting it to Intune, you also need to register Intune Application in Azure Tenant

Do I Need a Root CA?

One of the most common questions we get in our free PKI assessments is if they need to create Root CA for their SCEP CA or if they should create the SCEP CA as the Root CA. PKI Best practices recommend a two tier PKI where you have your offline Root CA and then your online issuing CAs that each issued a different type of certificate (this is to prevent impersonation by someone issuing a certificate for a different purpose). This allows you to push the Root to all your devices and don’t have to manually trust each individual CA. 
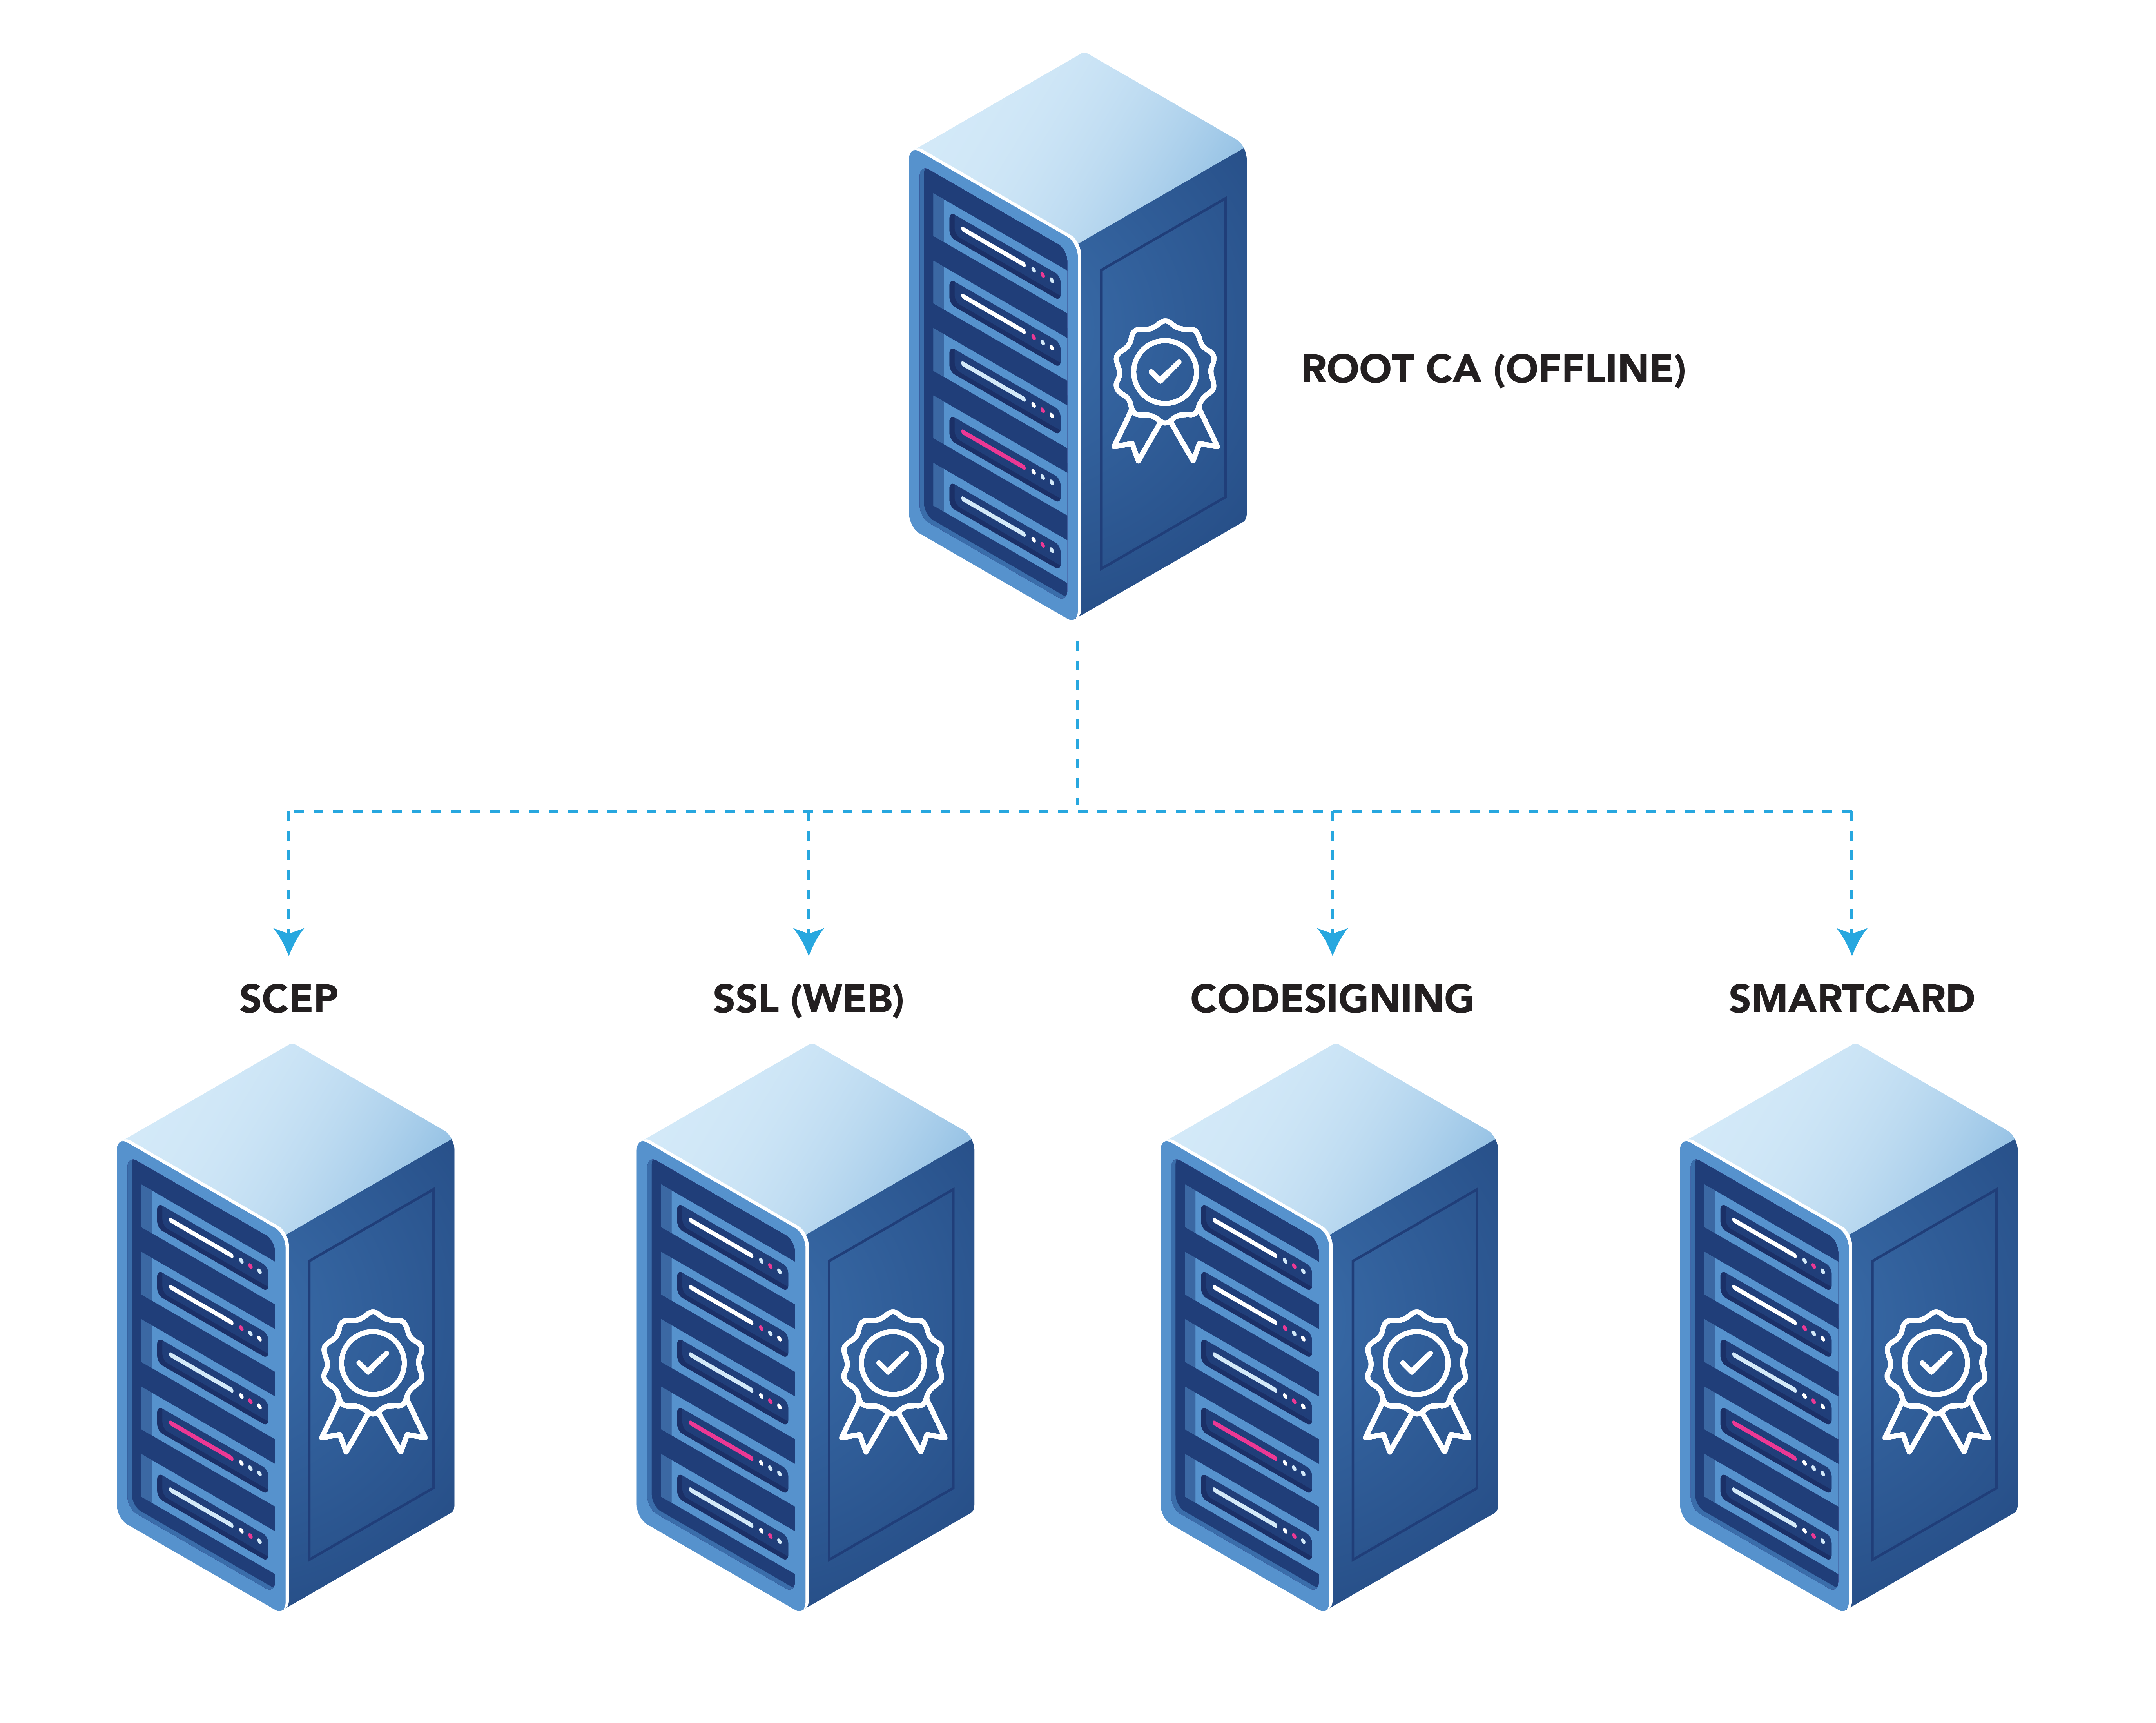
However, if you are cost constrained and you are not issuing certificates for different purposes in the future (remember CAs last up to 10 years), you can create a single tier PKI where your SCEP CA is your Root CA. Two Tier PKI with Root CA, SCEP CA, Smartcard CA and SSL CA

How To Create Intune SCEP CA - Video Version

In this video we are creating a Root CA that is going to be the issuing CA, this was to make it easier for organizations that are getting started as well as to avoid certain issues that might be caused do to certain networking devices not being able to build a CA chain and requiring a single CA hierarchy, To follow PKI hierarchy best practices we recommend Creating a Root CA or chaining to your existing root CA.

How to Create Azure CA for Intune

  1. navigate to the EZCA portal (If you have your private instance, or you are in our EU Version go to that specific portal)
  2. Login with an account that is registered as a PKI Administrator in EZCA.
  3. Navigate to Certificate Authorities. CA Menu View all your Azure Certificate Authorities
  4. Click on the “Create CA” Create SCEP CA in Azure PKI
  5. Select the CA Tier that you are going to use.

    In this documentation we are creating a Root CA that is going to be the issuing CA, this was to make it easier for organizations that are getting started as well as to avoid certain issues that might be caused do to certain networking devices not being able to build a CA chain and requiring a single CA hierarchy, To follow PKI hierarchy best practices we recommend Creating a Root CA or chaining to your existing root CA. If you are chaining to a Root CA, please select Subordinate CA. Select Issuing CA

    Select Root CA
  6. Click Next

Entering SCEP CA Information

  1. Enter Common Name: This is the name of the CA how it will appear in the certificate.
  2. (Optional) Enter CA Friendly Name This is the name that will appear in the EZCA portal, by default we will use the Common Name
  3. (Optional) Enter the Organization The Organization field is an optional certificate field that usually has the company name.
  4. (Optional) Enter the Organization Unit The Organization Unit field is an optional certificate field that usually contains the unit that runs this CA (For example: IT or HR).
  5. (Optional) Enter the Country Code The Country Code field is an optional certificate field that identifies the country where this CA is located.
  6. Click Next. CA Details - create cloud based SCEP PKI

Cryptographic Requirements

  1. Unless you have specific compliance or security requirements, leave the default cryptographic values for best security and compatibility.

    Intune SCEP (and most MDMs) only support RSA keys for the issuing certificate authority.

    Select your SCEP Certificate Authority cryptographic details

Set the SCEP CA Certificate Validity Period

  1. Select your Validity Period Learn more about Validity Period best practices
  2. Enter a Notification Email this email address (as well as the PKI Administrators) will get all the notifications for the lifecycle of the CA.
  3. Leave the lifecycle Action as Email, this will send an email to the PKI Administrators and the Notification Email when the CA is about to expire. Allowing you to renew it, and push it to your MDM and devices.
  4. Select the percentage of lifetime of the certificate when you want EZCA to start taking Lifecycle actions. Azure PKI Lifecycle Details

Setup CA Certificate Revocation List

  1. Select if you want this CA should issue a CRL (Highly recommended)
  2. If you are not changing any CRL details, click Next. Certificate Authority Certificate Revocation List (CRL) Details

CA Certificate Revocation List Advance Settings (Optional)

Changes to this section are only recommended for PKI experts with specific requirements.

  1. Click the expand button CRL Details
  2. Enter the desired CRL Validity Period in days
  3. Enter the desired CRL Overlap Period in hours
  4. (Optional) Enter the CRL endpoint where you will publish your CRLs

    Custom CRL endpoints are supported by EZCA by adding the CRL endpoint as the CRL endpoint in the certificate. However, your PKI admins are responsible from getting the CRL from EZCA and posting it in that specific endpoint.

How To Enable OCSP (Online Certificate Status Protocol) For Your CA

Inside the CA Revocation advanced settings, you can enable OCSP for this CA. OCSP is only recommended if you have specific requirements for OCSP. While OCSP allows quicker revocation it increases the CA the cryptographic load and can limit the scalability of the CA (Basic CA allows 1 cryptographic activity per second, Premium CA 20 cryptographic activities per second, Isolated CA 160 cryptographic activities per second). Learn more about OCSP vs CRL

  1. If you want to enable OCSP, select the “Enable OCSP” option. Enable OCSP for your Azure PKI
  2. Enabling the OCSP will create an OCSP endpoint for this CA in the same region you select for your OCSP (this is included with the price of your CA). If you require extra scalability you can create multiple OCSPs for your certificate authority in different regions. Note: Each extra OCSP will be charged as an extra Certificate Authority. Enable OCSP secondary location
  3. Once you have setup your certificate revocation, click Next. Revocation Setting Details
  4. Click Next.

Certificate Issuance Policy

  1. Change the Issuing Certificate Type to “SCEP Template”
  2. Set the certificate lifetime for the certificate that will be issued.

    This value will override any value that you set in your MDM.

    Select SCEP Certificate Template
  3. Depending on your MDM, you might have to enable SCEP Dynamic Enrollment. If you are using Intune, you can leave this disabled. Enable SCEP Dynamic Enrollment a) This will create create a SCEP user name and a SCEP password that you will need to enter in your MDM, your MDM will then use those credentials to contact EZCA and request a new challenge for each certificate.
  4. Another simpler option is having your MDM use a static SCEP challenge, this challenge encrypted and passed to EZCA to validate that the request came from a managed device. Enable SCEP Static Challenge a) This will create a SCEP challenge that you will need to enter in your MDM, your MDM will then use that challenge to contact EZCA and request a new certificate. This challenge will be available after you create the CA by going to your CA and clicking “View Issuance Requirements”
  5. Once you have enabled the SCEP features needed (you can always go to your CA’s Issuance Requirements and update these values), click Next.

Select Location

  1. Select the location where you want your CA to be created.
  2. If needed you can add secondary locations to your CA. Please note that each additional location will be charged as an additional CA.
  3. Click Create Create Intune CA

Chain to Root CA (Option 1)

If you created a Subordinate/Issuing CA you must chain this certificate to a root CA. Follow these instructions to chain to an offline CA. Or the following steps to chain to an EZCA Root CA.

  1. If your desired Root CA is an EZCA CA, Select it from the dropdown and click create CA. Chain to EZCA Root CA
  2. Repeat this step for each location.

Chaining to Offline Root CA (Option 2)

If you prefer to chain your CA to an offline Root CA, follow these steps.

  1. Once the CA is requested, a Certificate Signing Request (CSR) will be created for each location. CSR Created
  2. Click the “Save CSR” Button. Save CA CSR
  3. Once the CSR is download, follow your internal guidance to transfer that CSR to your offline Root CA.
  4. Open your “Certificate Authority” in Windows. Windows ADCS Root CA
  5. Right click the CA.
  6. Select All Tasks -> Submit new Request. Submit new CA Request to ADCS
  7. Select the downloaded CSR. Add Your CSR to Windows PKI
  8. Click on pending requests. See Windows PKI Pending CA Requests
  9. Right click on the newly created request.
  10. Select All Tasks -> Issue.
  11. Click on Issued Certificates. Issue your CA certificate in ADCS
  12. Double click on the newly created certificate. Export Certificate From Windows ADCS
  13. Click on Details. View Certificate Details in Windows
  14. Click on the “Copy ti File…” Button. Copy Windows Certificate to File
  15. Click next
  16. Select the “Base-64 encoded X.509 (.CER) option. Export Certificate as Base 64
  17. Click next.
  18. Select where you want to save the newly created certificate. Save the Exported Certificate
  19. Click next.
  20. Click Finish. Finish the certificate exportation in windows
  21. This should create a .cer file in the location you selected. view certificate in windows
  22. Follow you PKI team’s guidance on transferring the certificate file out of the offline CA into an internet connected computer.
  23. Once you have the certificate in an internet connected computer, go to https://portal.ezca.io/
  24. Login with an account that is registered as a PKI Admin in EZCA.
  25. Navigate to Certificate Authorities. CA Menu
  26. Click View details of the CA you want to import the certificate for. View your pending CA
  27. Scroll down to the location you want to import, and click the “Upload CA Certificate” button. Import CA Certificate for Cloud PKI
  28. Select the newly created certificate file. Select the created certificate
  29. Click on the “Save Certificate” button Finish your Subordinate CA creation
  30. Repeat these steps for each location.
  31. Your CA is ready to be used!

Download Certificate

  1. Once the CA is created download the CA certificate. Download CA Cert
  2. Now you are ready to connect your MDM to EZCA and start issuing SCEP certificates

    If you created a Subordinate/Issuing CA, you will also need the certificate from the Root CA.