How-To: Enable Cloud RADIUS with Entra ID Authentication in Ruckus Unleashed
Ruckus APs can operate in Unleashed mode or in controller-based mode. This guide focuses on Ruckus Unleashed, which is Ruckus’s controller-less WiFi solution for small to medium-sized businesses. For more information on setting up RADIUS with Ruckus in controller-based mode, refer to Ruckus’s official documentation such as the SmartZone docs or Ruckus cloud docs.
Introduction - How to Protect Your Ruckus Unleashed Network with Cloud RADIUS
Having a single Wi-Fi password for your network is a security nightmare. It’s impossible to know who has access to your network, and it’s nearly impossible to change the password regularly without causing major outages. The best way to secure your Ruckus Unleashed network is to use WPA-Enterprise with either certificates or individual user accounts for authentication.
To protect your Ruckus Unleashed network using certificates or Entra ID accounts, you will need a RADIUS server to handle authentication requests. EZRADIUS is a cloud-based RADIUS as a Service that integrates directly with Entra ID to provide secure authentication for your Ruckus Unleashed network without needing to manage any RADIUS servers or infrastructure. Simply add EZRADIUS as a RADIUS server in your Ruckus Unleashed Controller, and your users can log in using either passwordless certificates or their Entra ID username and password.

Prerequisites for Setting Up Cloud RADIUS for Ruckus Unleashed
How to Create an EZRADIUS Subscription
An EZRADIUS billing subscription is required to create your cloud-based RADIUS server for your Ruckus Unleashed network. If you do not already have an EZRADIUS subscription, follow this guide to create one.
Create an EZRADIUS Subscription
How to Set Up User Credentials for Cloud RADIUS
If you haven’t configured your authentication method yet, make sure to set that up before proceeding. This ensures that your users can authenticate properly when they connect to your Ruckus Unleashed network.
How to Set Up Passwordless Certificate Authentication with RADIUS
Certificates are the best way to authenticate users or devices without the need for any passwords. Simply connect to the network and the certificate will handle the authentication for you. This is the most secure and user-friendly way to authenticate users in your Ruckus Unleashed network.
While EZRADIUS supports any X.509 certificate such as ADCS and Microsoft Cloud PKI, the easiest way to create and manage certificates for your users is to use Keytos EZCA, a cloud-based PKI service that integrates directly with EZRADIUS. It only takes a few minutes to get started with EZCA and begin issuing certificates for passwordless Wi-Fi access in your Ruckus Unleashed network.
How to Set Up Entra ID Users to Authenticate with RADIUS
Don’t want to manage certificates? No problem! You can authenticate your existing Entra ID users using their username and password without needing to manage any PKI infrastructure.
Note that if you have conditional access policies set up in Entra ID (such as MFA), you will need to add an exception for EZRADIUS in order for username/password authentication to work. View this page for more details on adding this exception.
How to Set Up Local Users to Authenticate with RADIUS
Have legacy devices or non-Entra ID users? You can also create local users directly in EZRADIUS and authenticate them using their username and password. Check out this page for more information on creating local users in EZRADIUS or letting your Entra ID users self-register local RADIUS accounts if needed.
How to Set Up MAC Address Bypass for Non-Authenticating Devices
Some devices do not support secure authentication methods like EAP-TLS or EAP-TTLS. In these cases, you can use MAC Address Bypass (MAB) to allow these devices to connect to your Ruckus Unleashed network without needing to authenticate. Note that MAC Address Bypass is not secure and should only be used for devices that do not support other authentication methods, and you should always be aware of the security risks involved. View this guide for more information on setting up MAC Address Bypass in EZRADIUS.
How to Set Up Your Cloud RADIUS Access Policies for Entra ID Authentication
An EZRADIUS Access Policy defines how EZRADIUS will authenticate users when they connect to your Ruckus Unleashed network. You will need to create at least one access policy in EZRADIUS before you can connect your Ruckus Unleashed network to EZRADIUS.
How to Create a Passwordless Certificate Access Policy
A certificate access policy allows you to accept X.509 certificates for authentication and determine which users or devices are allowed to connect to your Ruckus Unleashed network. View this guide to learn how to create a certificate access policy in EZRADIUS if you have not already done so.
How to Create an Entra ID Username and Password Access Policy
An Entra ID username and password access policy allows you to authenticate your Entra ID users using their existing credentials. View this guide to learn how to create an Entra ID username and password access policy in EZRADIUS if you have not already done so.
How to Create a Local Username and Password Access Policy
A local username and password access policy allows you to authenticate users that you have created directly in EZRADIUS. View this guide to learn how to create a local username and password access policy in EZRADIUS if you have not already done so.
Step-by-Step Guide to Setting Up Cloud RADIUS for Ruckus Unleashed
The following steps will guide you through the process of setting up Cloud RADIUS for your Ruckus Unleashed network using EZRADIUS.
How to Add EZRADIUS as a RADIUS Server in Ruckus Unleashed
Now that you have your EZRADIUS subscription and access policy set up, you can add EZRADIUS as a RADIUS server in your Ruckus Unleashed Controller.
How to Add a Cloud RADIUS Server to Ruckus Unleashed
-
Begin by logging into your Ruckus Unleashed admin interface. You can do this by entering the IP address of your Ruckus Unleashed device into a web browser and logging in with your admin credentials.
-
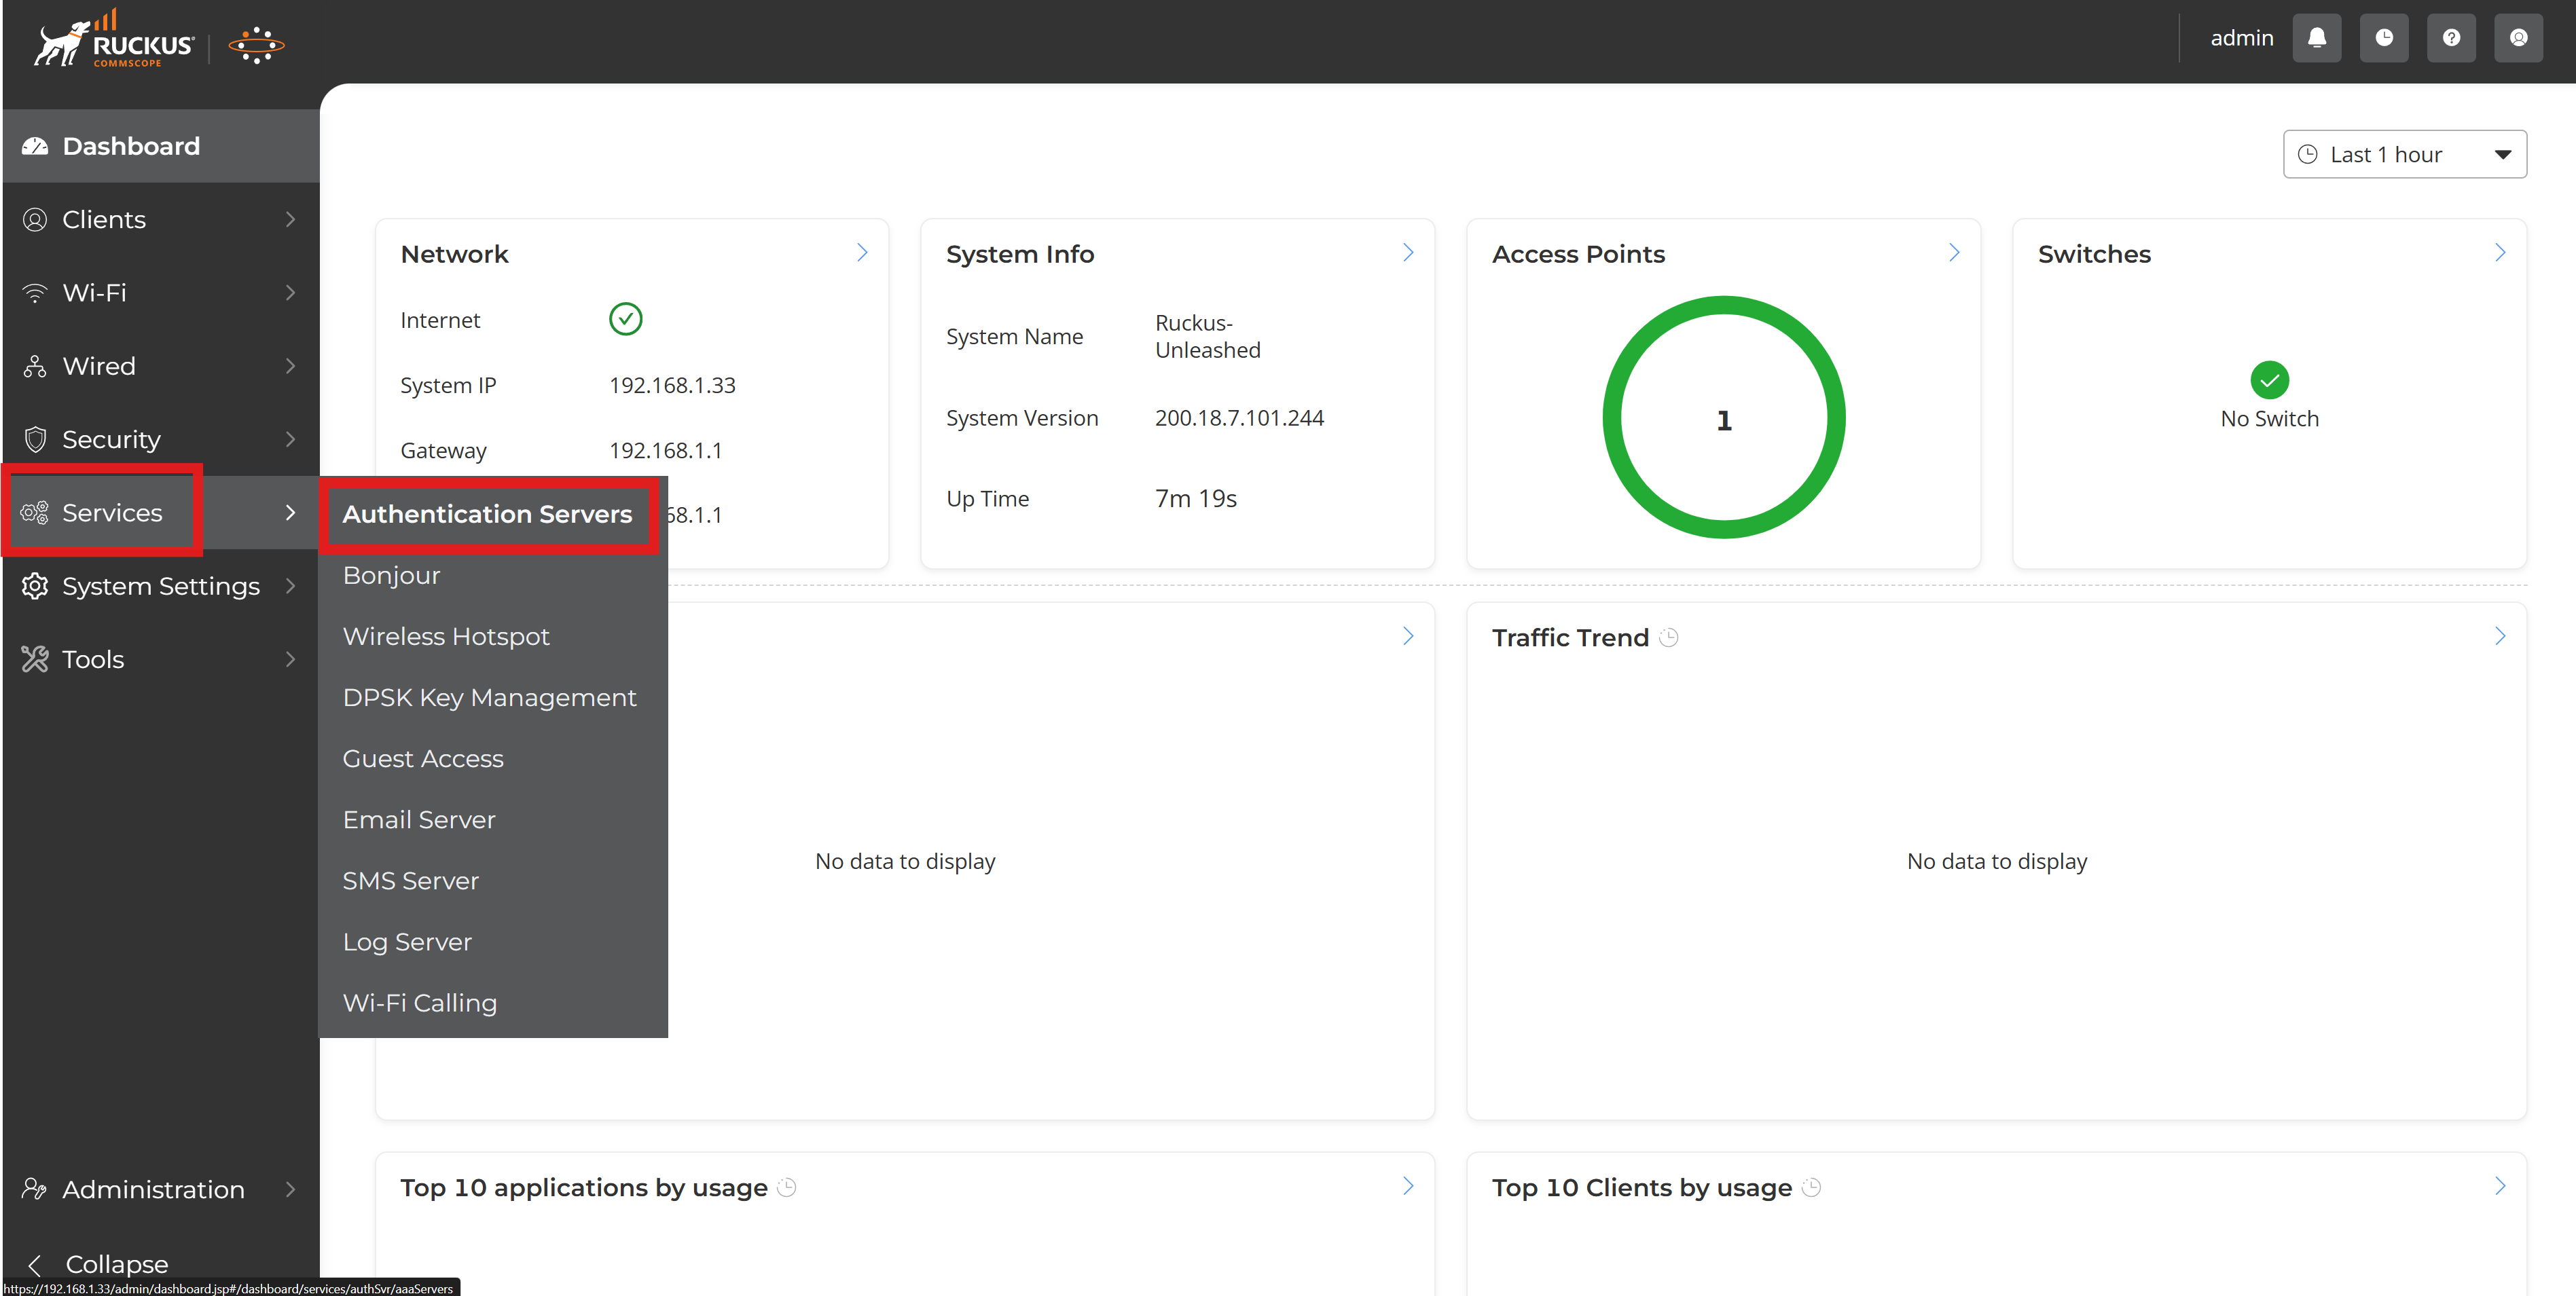
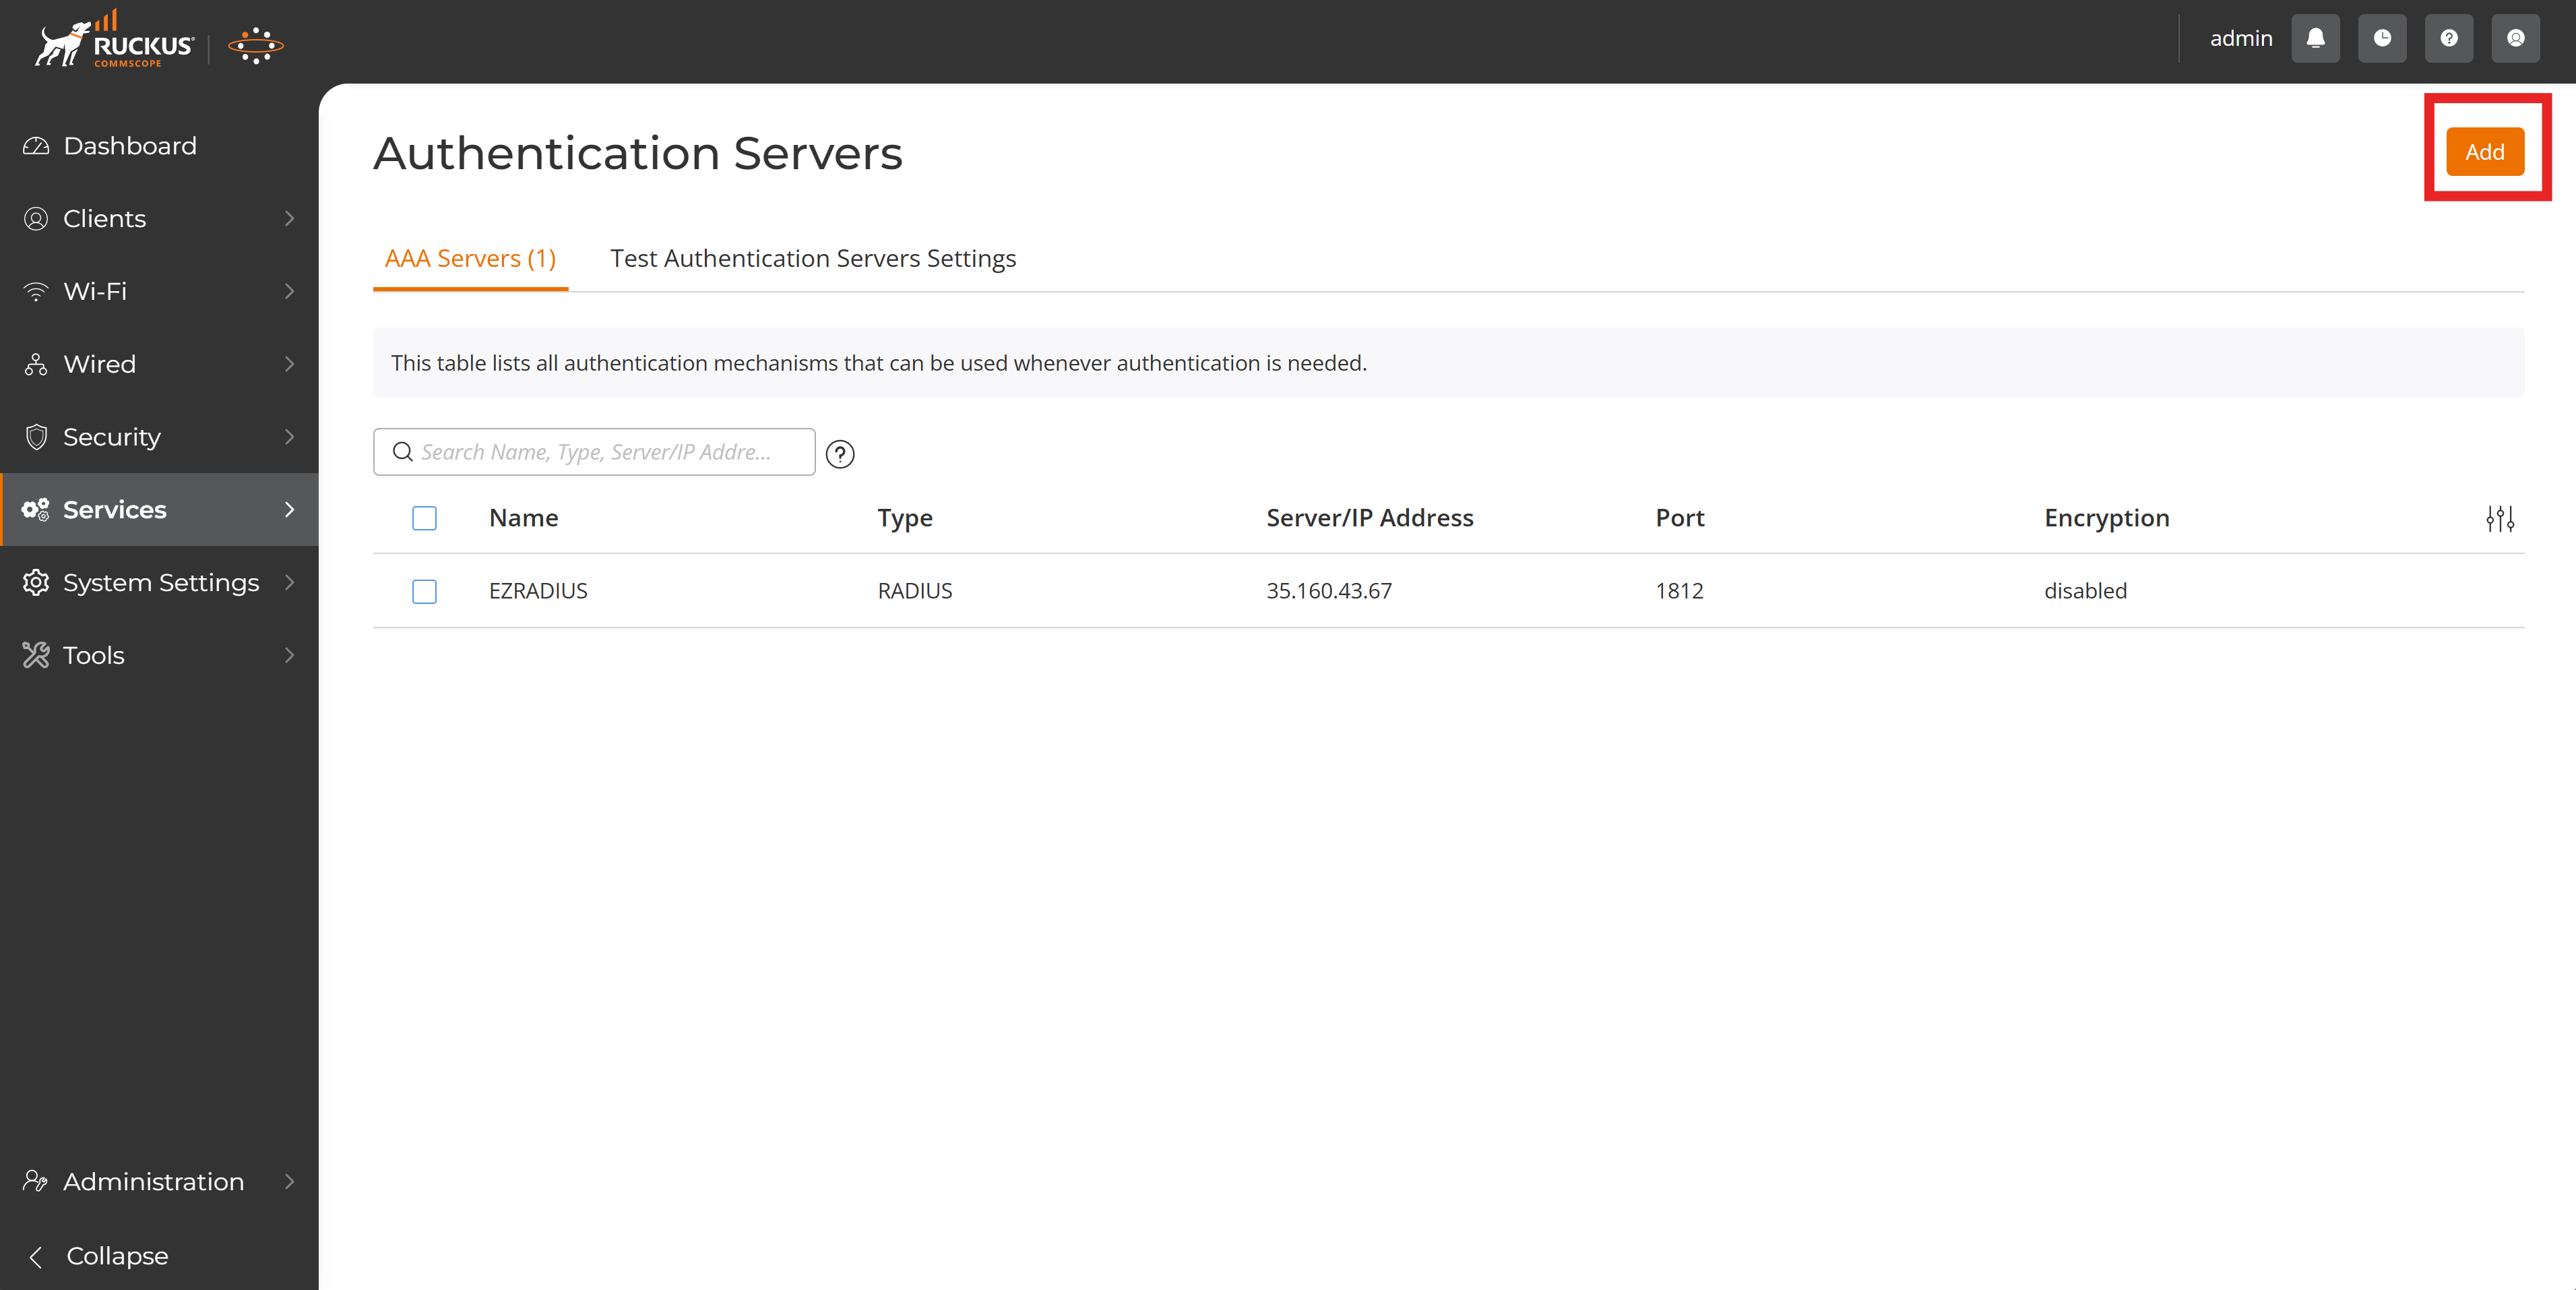
Under Services, navigate to Authentication Servers.
-
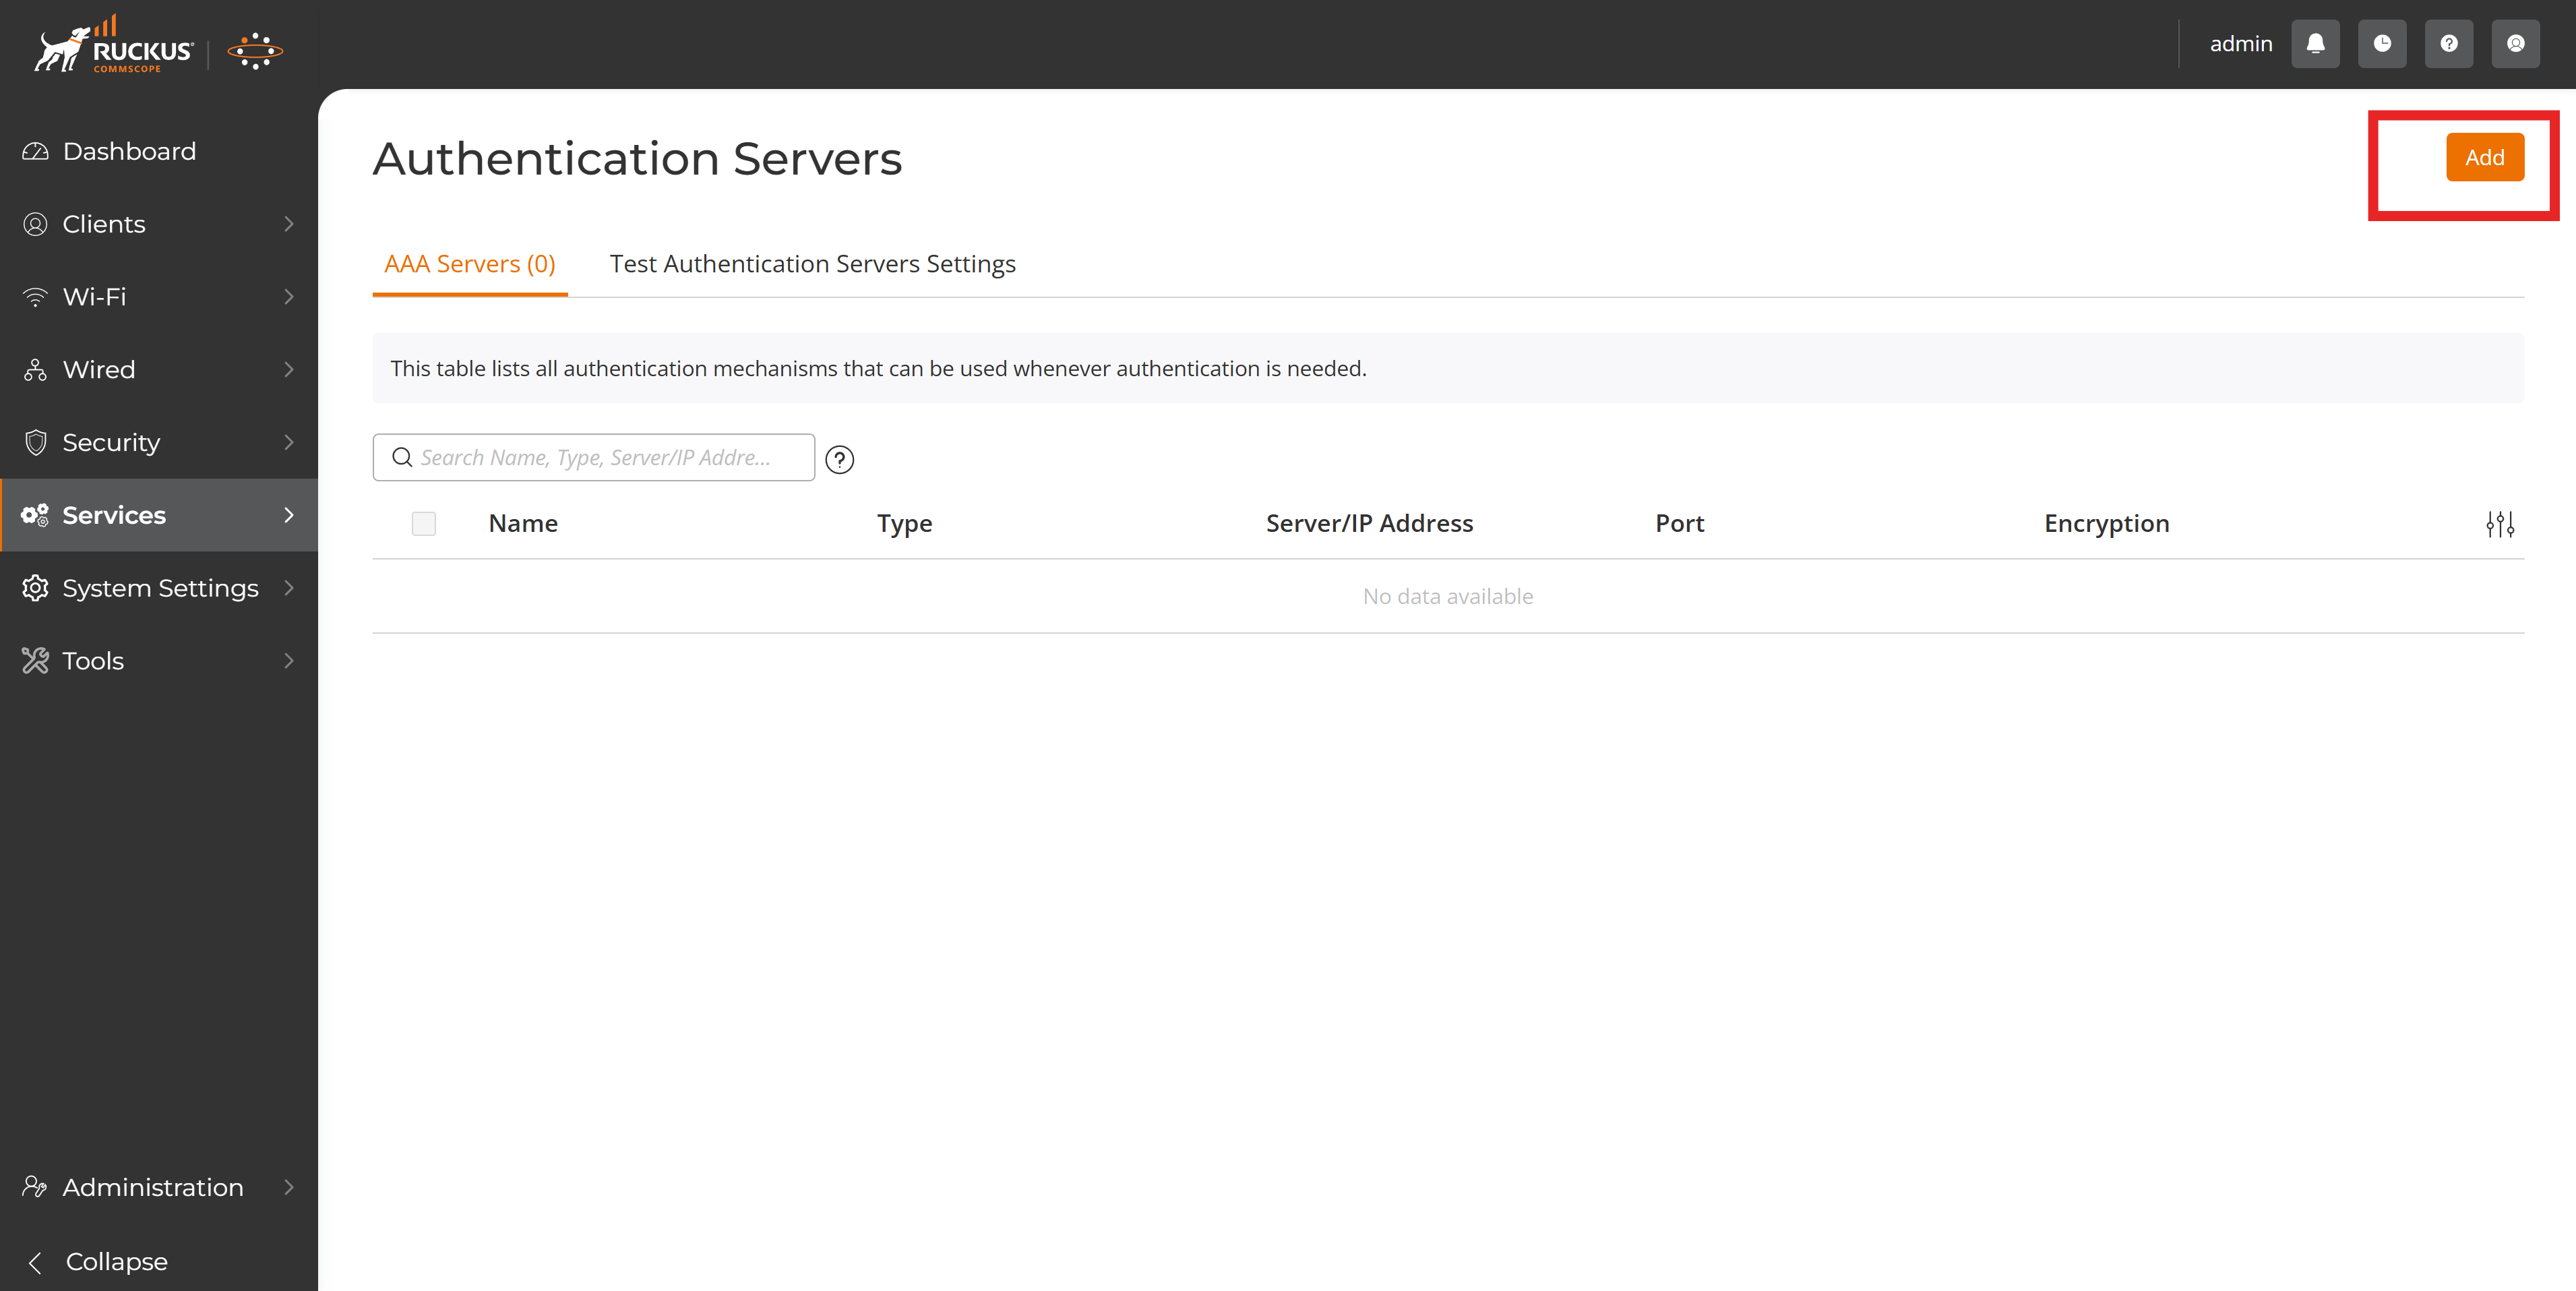
Click on Add to create a new RADIUS server entry.
-
Fill in the RADIUS server basics:
- Name: Enter a name for your RADIUS server (e.g., “EZRADIUS”).
- Type: Select RADIUS.
- Encryption: Leave TLS unchecked for classic RADIUS.
- Auth Method: Select PAP.
- Backup RADIUS: Check the box for Enable Backup RADIUS support, as EZRADIUS provides multiple servers for redundancy.
How to Get Your EZRADIUS Server IP Addresses for Ruckus Unleashed RADIUS
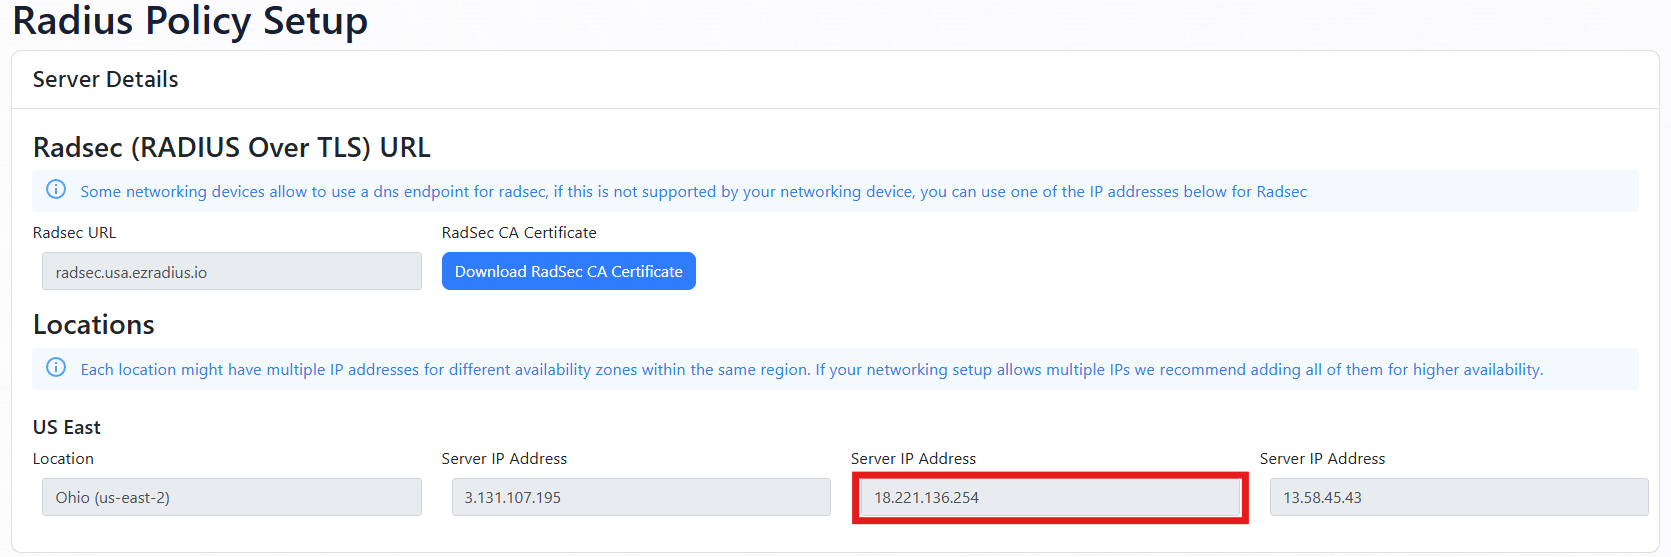
You can get your EZRADIUS Server IP addresses from the EZRADIUS dashboard. These IP addresses are needed to configure your network controller to communicate with the EZRADIUS service.
-
Navigate to the EZRADIUS Policies page from the left-hand menu.
-
At the top of the Policies page, you will find the EZRADIUS Server IP addresses. Copy one of the IP addresses from the region closest to your network controller (you’ll add the others later).
How to Add EZRADIUS RADIUS Servers in Ruckus Unleashed
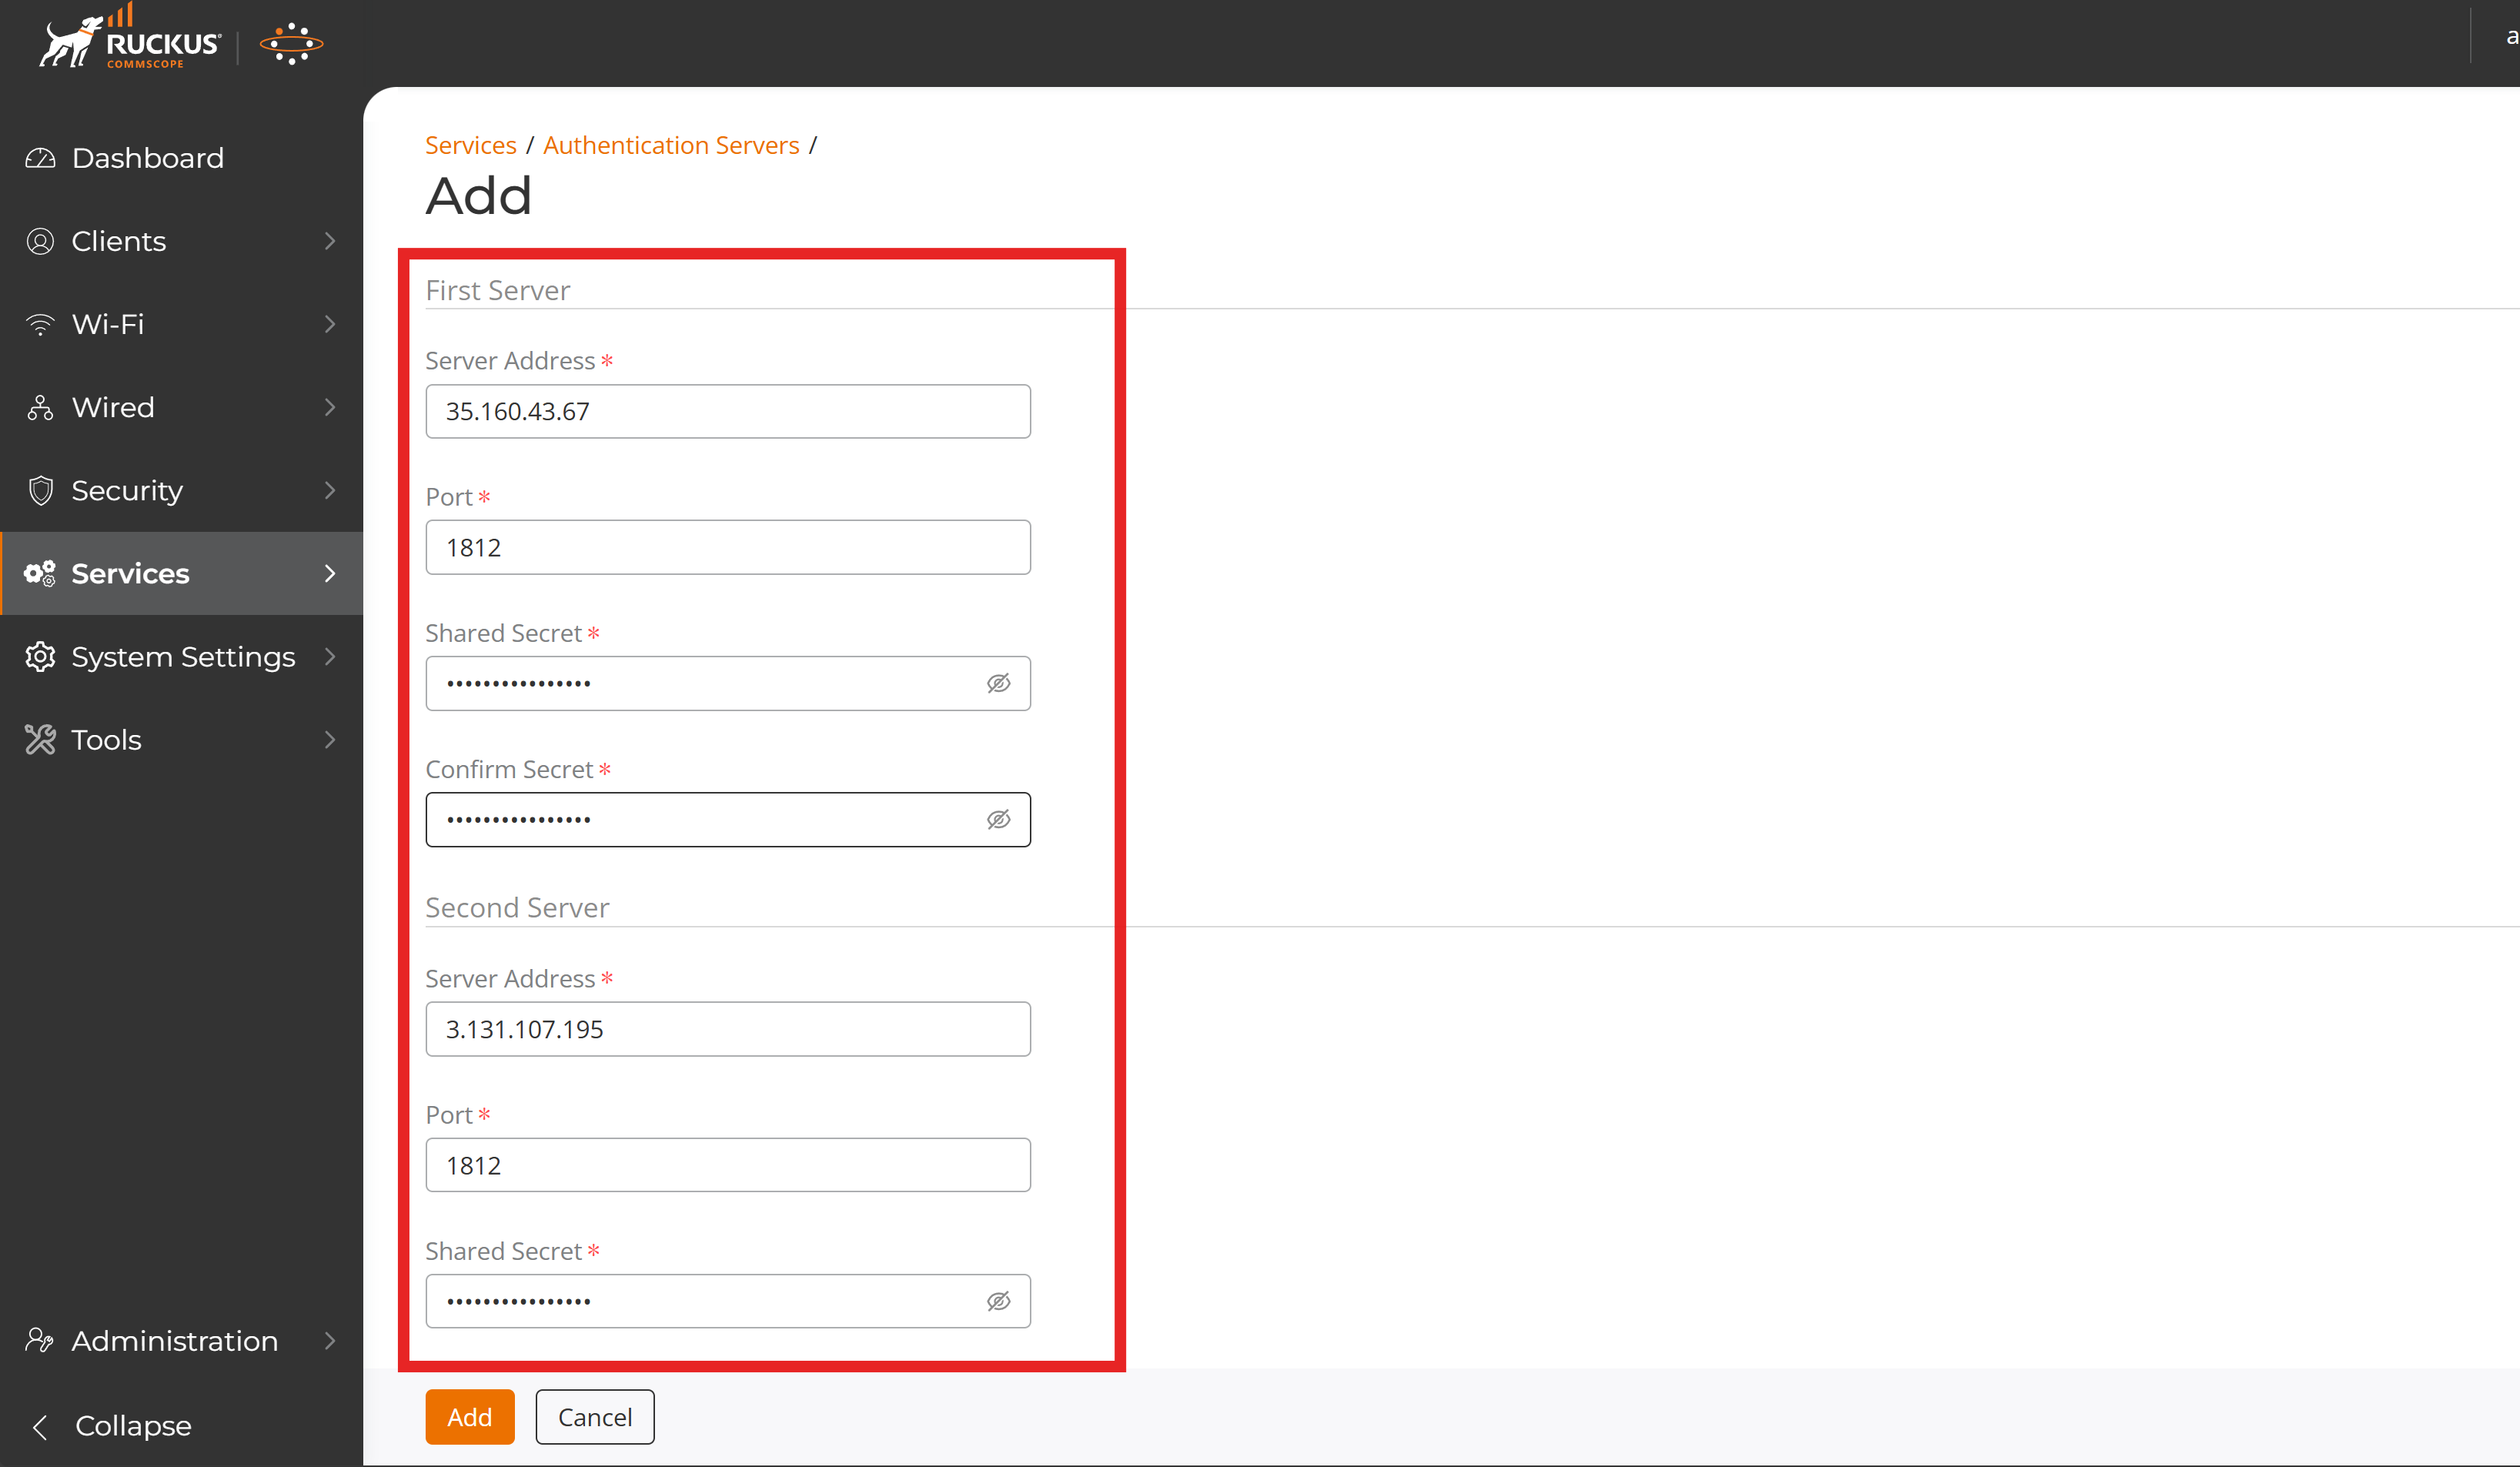
- Back in your Ruckus Unleashed admin interface, fill in the details for the First Server:
- IP Address: Paste the RADIUS server IP address you copied from the EZRADIUS portal.
- Port: Leave as default (1812).
How to Get Your EZRADIUS Shared Secret for Ruckus Unleashed RADIUS
When you added your public IP address to your EZRADIUS policy, a shared secret was automatically generated for you. This shared secret is used to authenticate your network controller (RADIUS client) to the EZRADIUS server.
-
In the EZRADIUS portal, navigate to the EZRADIUS Policies page from the left-hand menu.
-
Scroll down to your RADIUS policy and find the Classic RADIUS Allowed IP Addresses section.
-
For your public IP address, click on the eye icon to reveal the shared secret.

How to Complete Adding EZRADIUS RADIUS Servers in Ruckus Unleashed
- Under Shared Secret, paste the shared secret you copied from the EZRADIUS portal.
- Set Confirm Secret to the same shared secret.
How to Configure Additional RADIUS Server Settings in Ruckus Unleashed
-
For the Second Server, repeat the previous step using another geography from the EZRADIUS portal for redundancy.
-
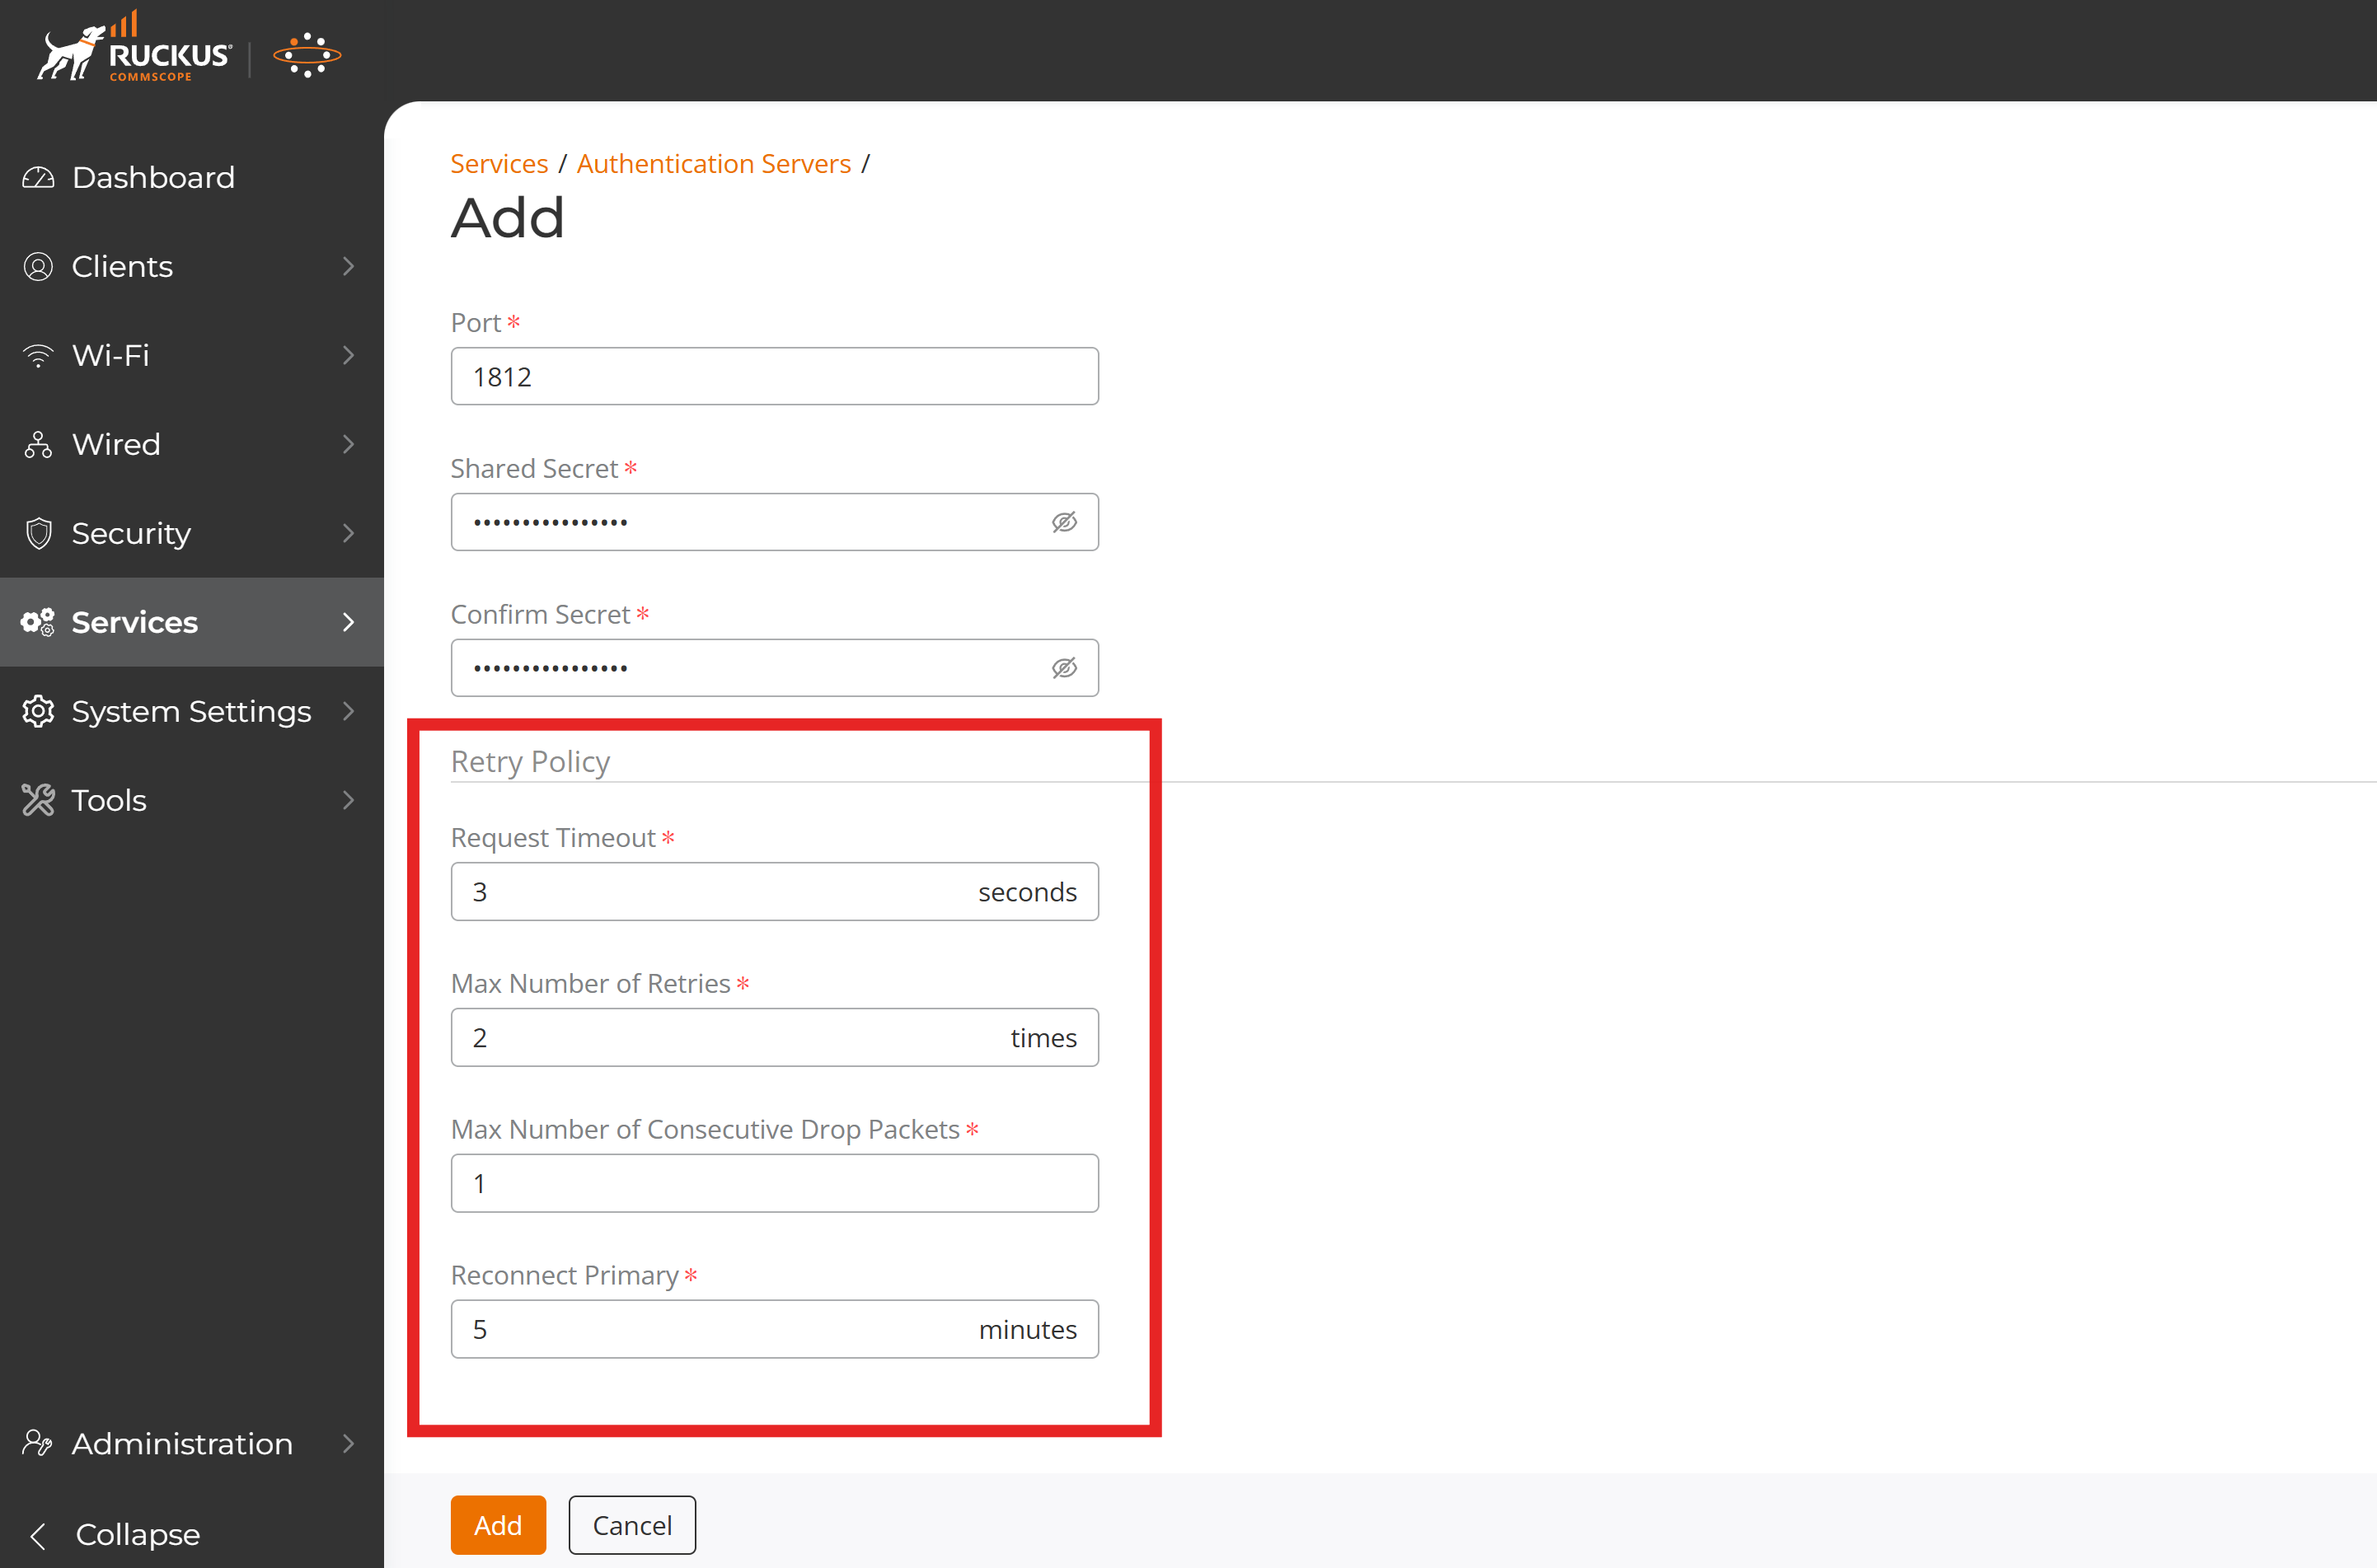
Under Retry Policy, set the following:
-
Retry Timeout: Set to the highest value of 20 seconds to account for the round-trip time to the EZRADIUS servers.
-
Max Number of Retries: Set to 5 to ensure multiple attempts before failing over to the backup server.
-
Max Number of Consecutive Drop Packets: Set to 5 to allow for some packet loss without immediately failing the authentication.
-
Reconnect Primary: Set to 5 minutes to allow the system to attempt to reconnect to the primary server periodically.
-
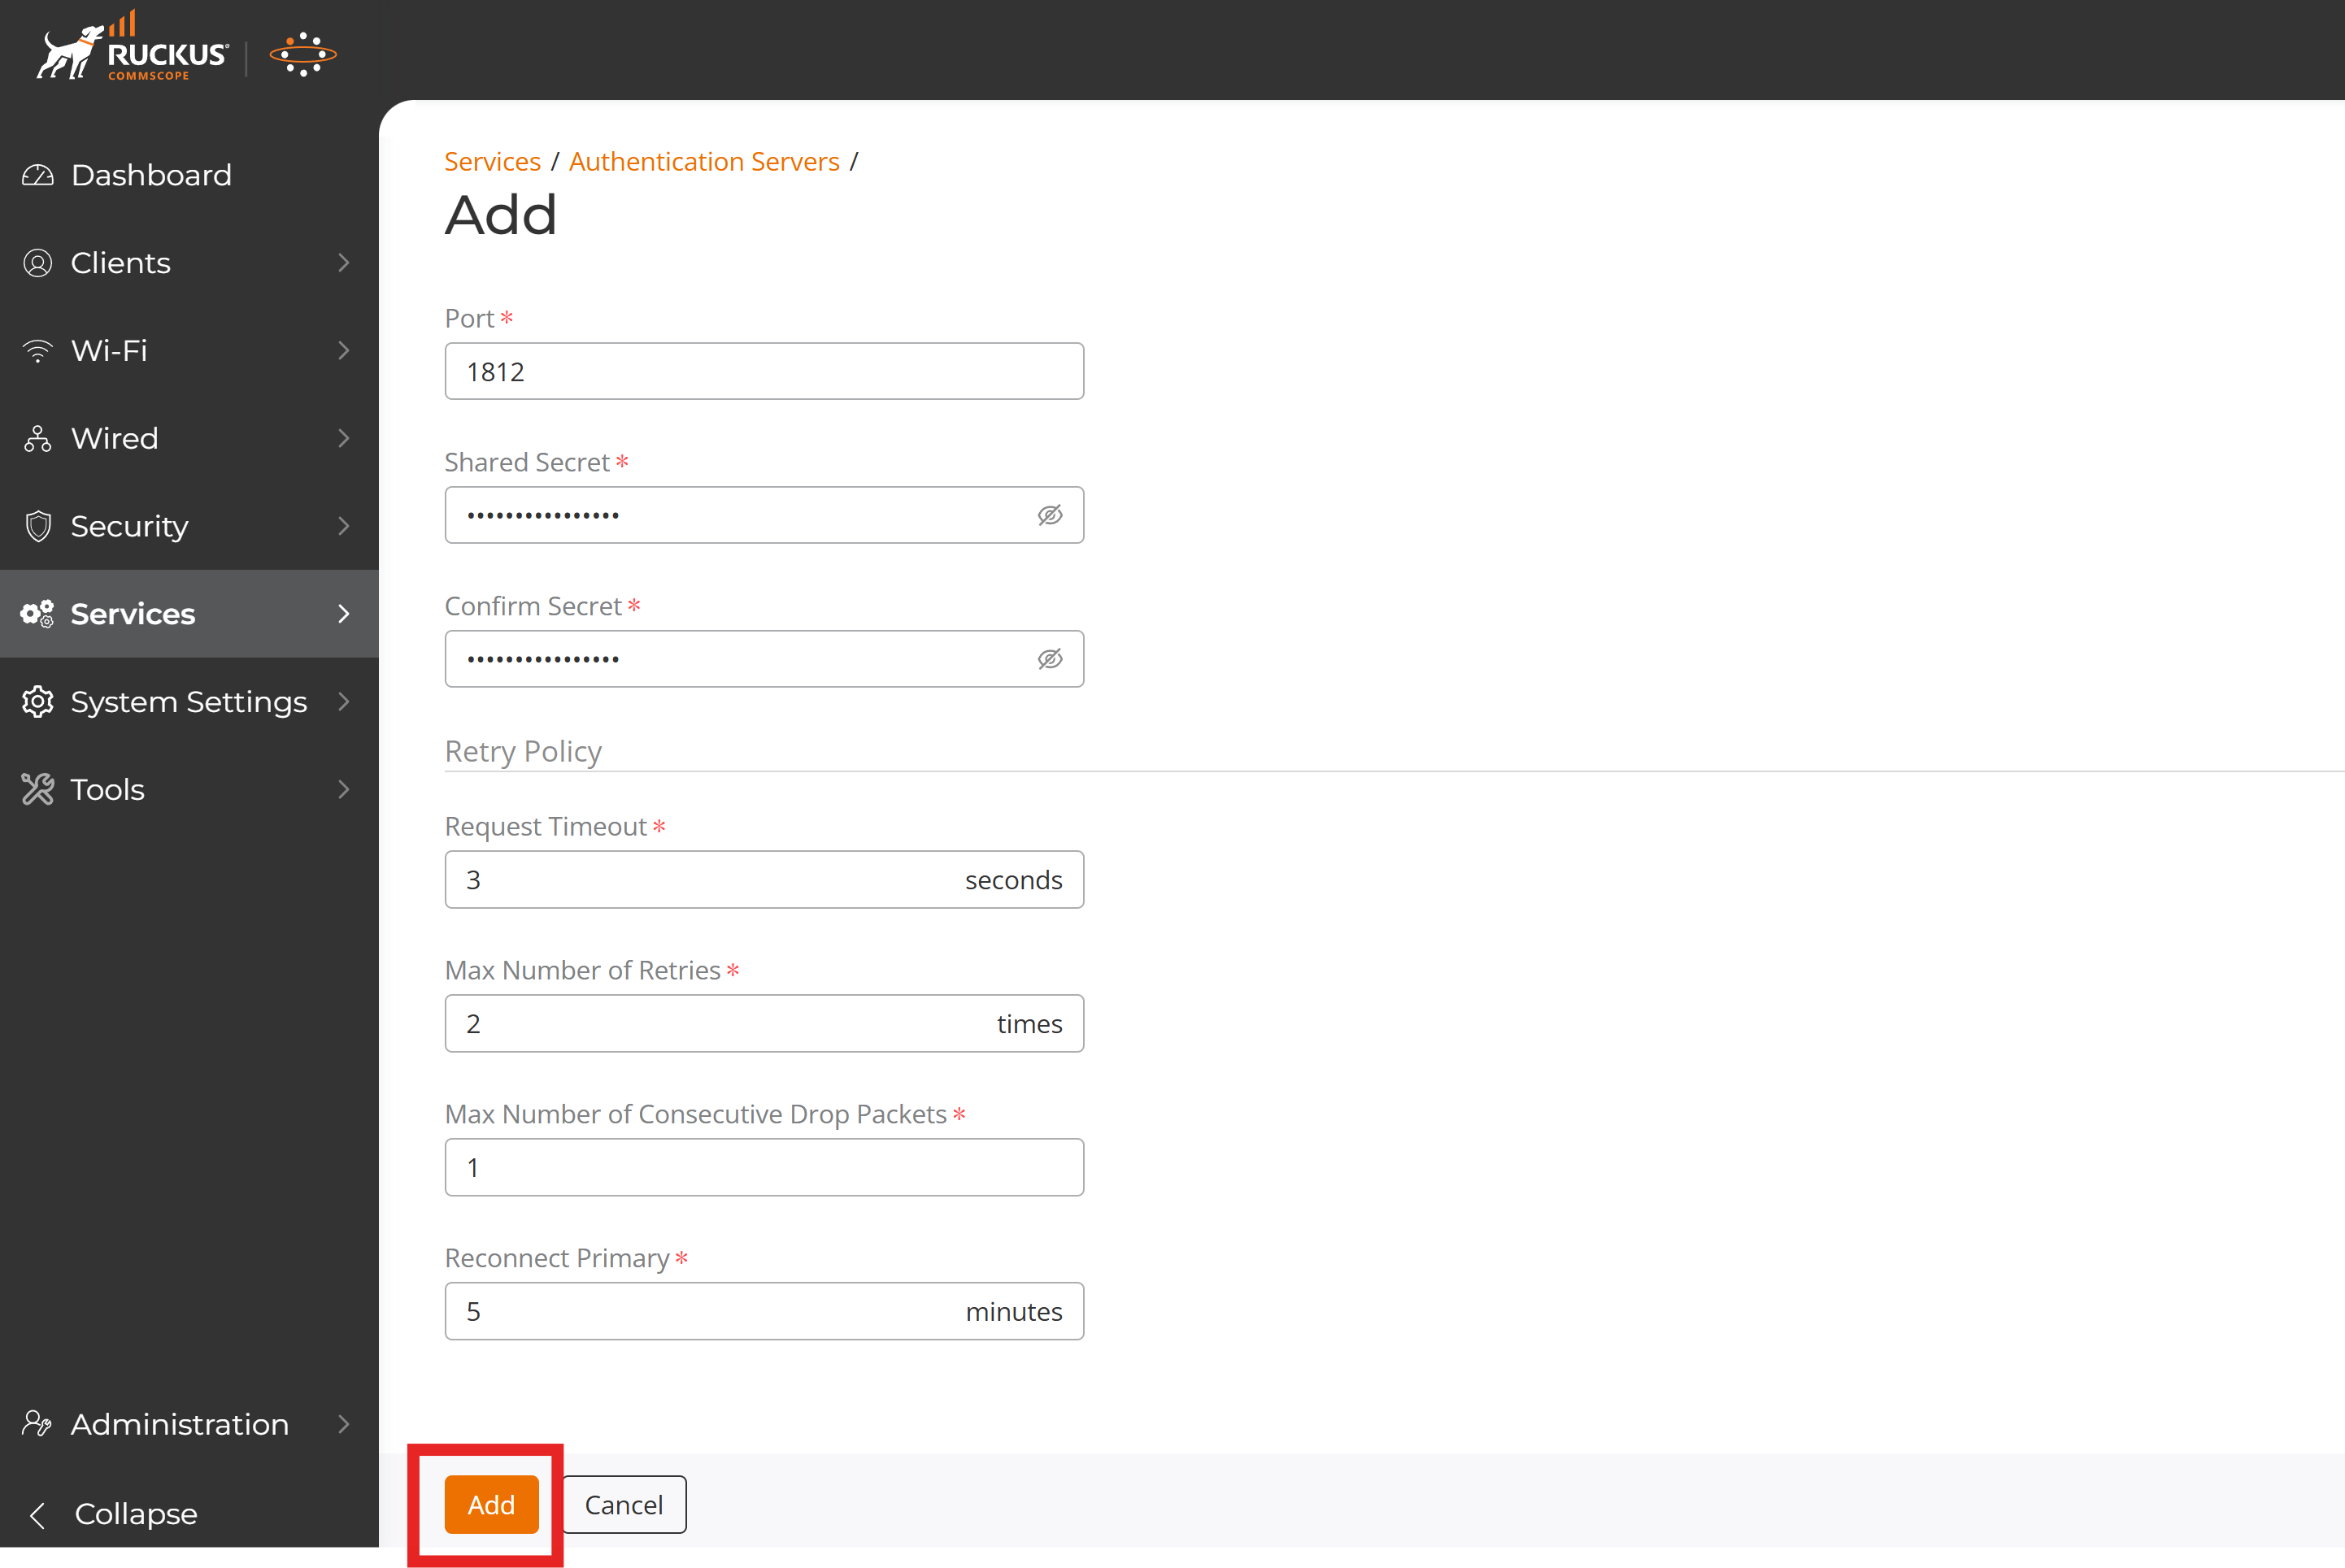
-
Click Add to save the RADIUS server configuration.
How to Add RADIUS Accounting Servers in Ruckus Unleashed
-
To set up RADIUS Accounting, click Add again.
-
Repeat the previous steps to add the same RADIUS servers for accounting.
- Name: Enter a name for your RADIUS accounting server (e.g., “EZRADIUS Accounting”).
- Type: Select RADIUS Accounting.
- Encryption: Leave TLS unchecked.
- Backup RADIUS: Check the box for Enable Backup RADIUS Accounting support.
- Fill in the First Server and Second Server details as before, but use port 1813 for accounting.
- Set the Request Timeout to 20 seconds.
- Set the Max Number of Retries to 5.
- Set the Max Number of Consecutive Drop Packets to 5.
- Set the Reconnect Primary to 5 minutes.
-
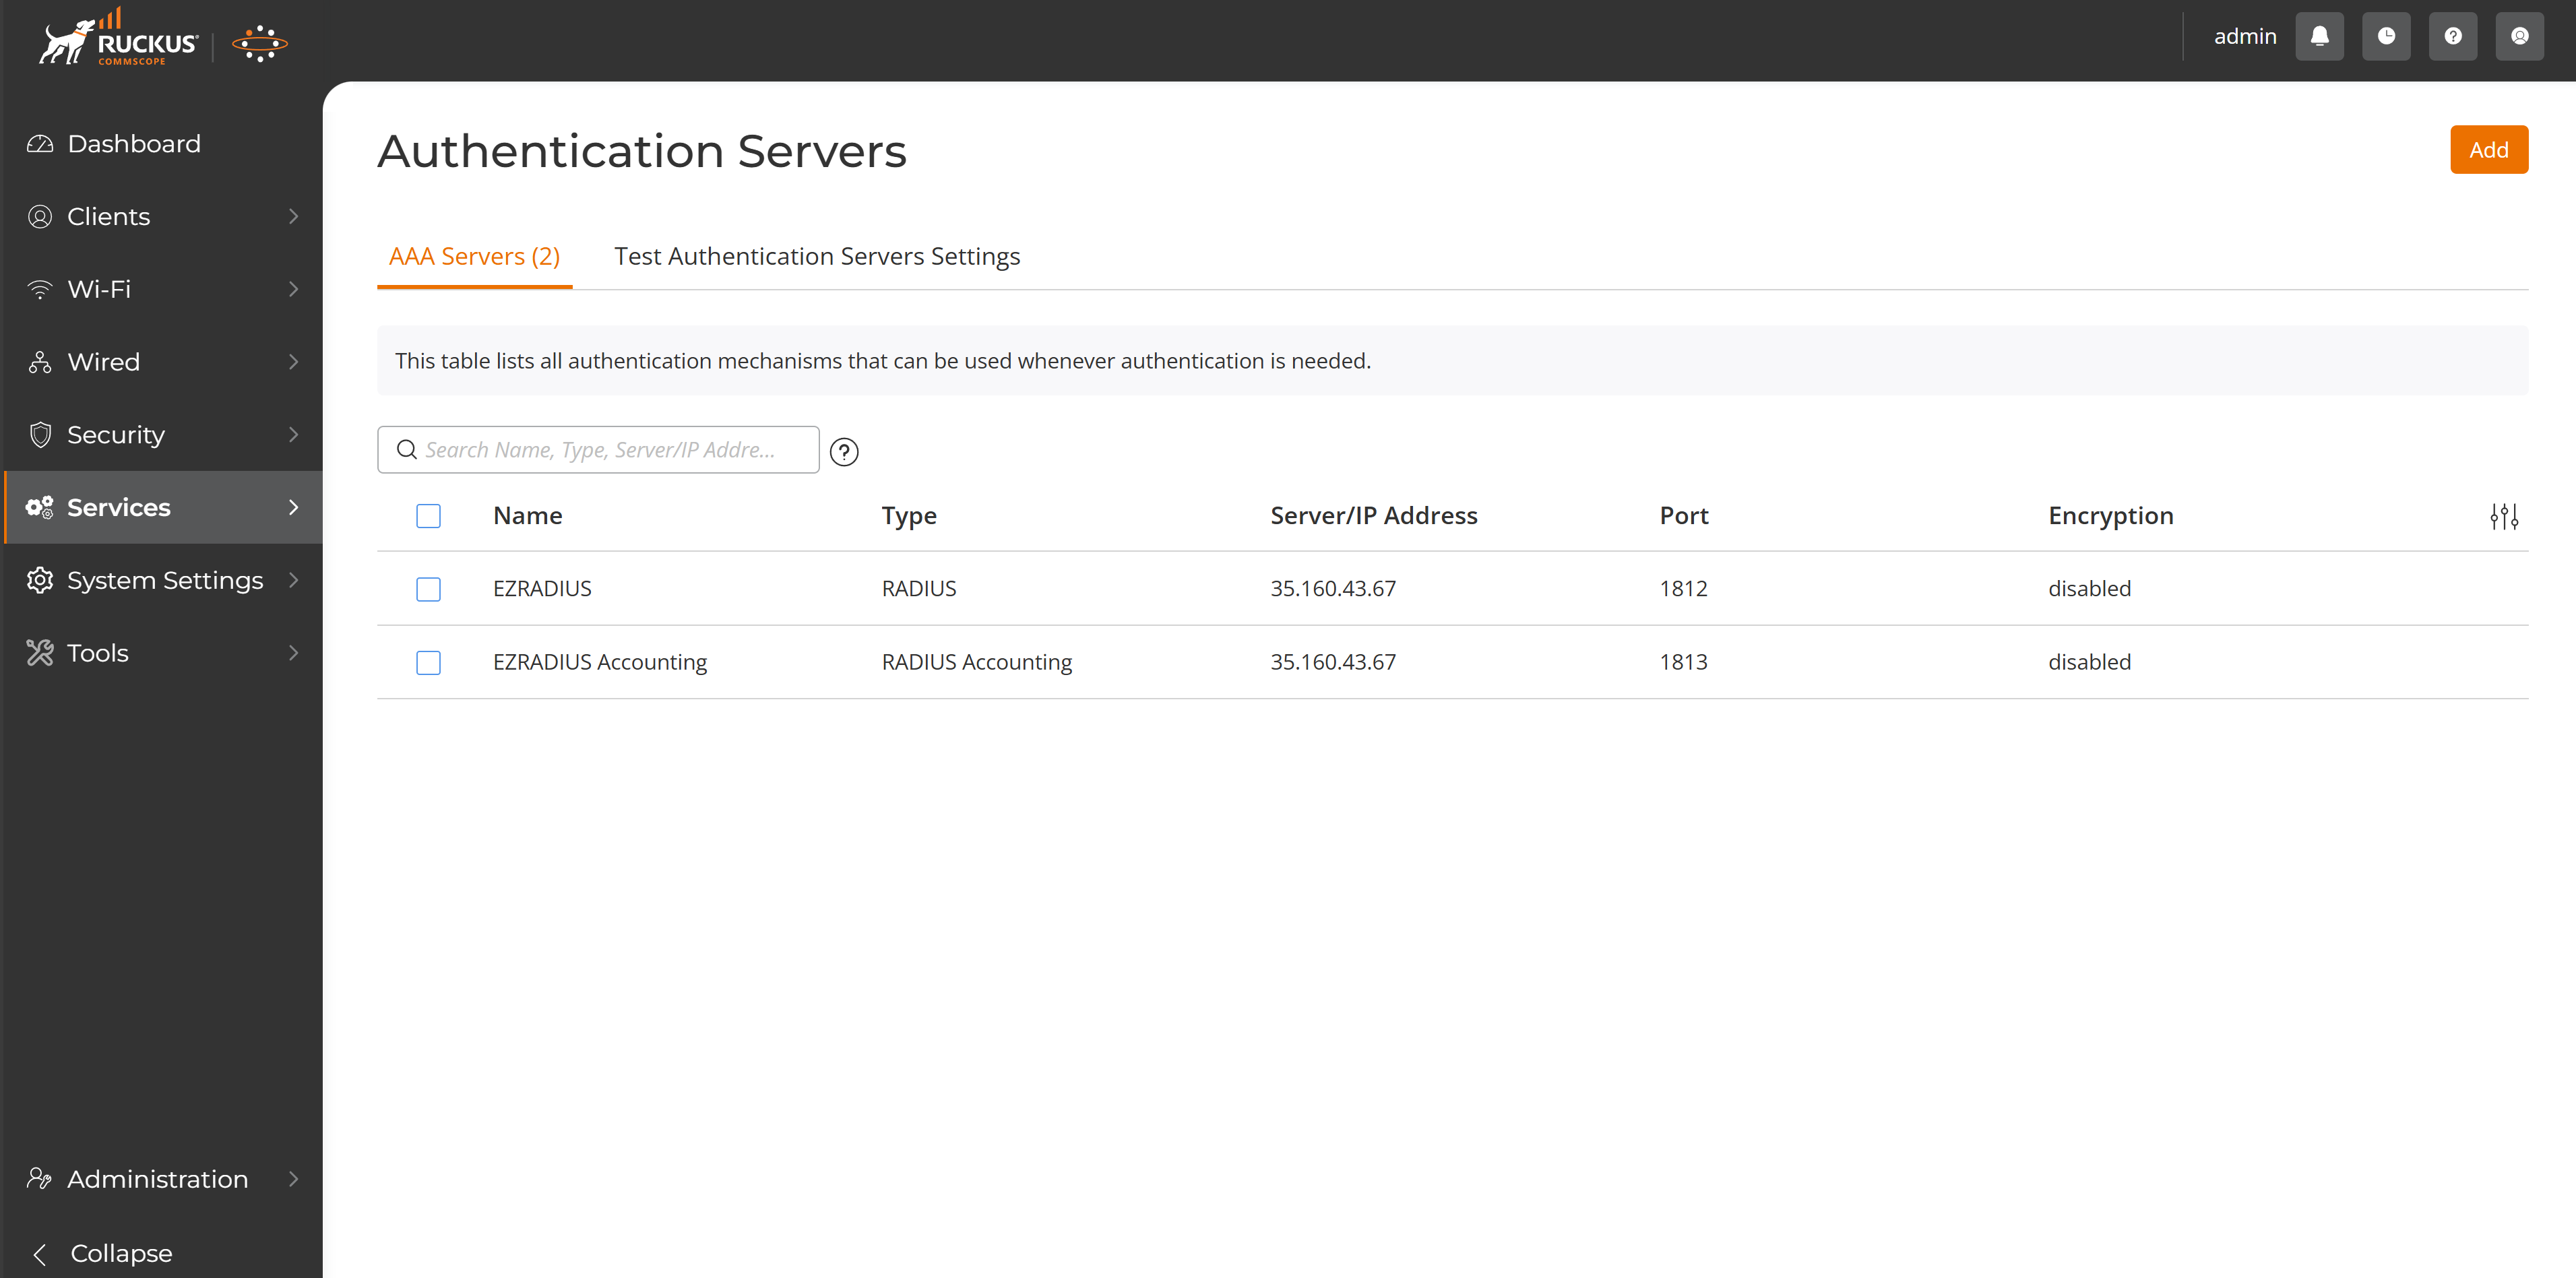
Click Add to save the RADIUS accounting server configuration.
-
You should now see both your RADIUS Servers and Accounting Servers listed.
How to Add a RADIUS Server to a Ruckus Unleashed Network
Now that you have added EZRADIUS as a RADIUS server within Ruckus Unleashed, you can add it to your network so that when users connect to that network, they will be authenticated via EZRADIUS.
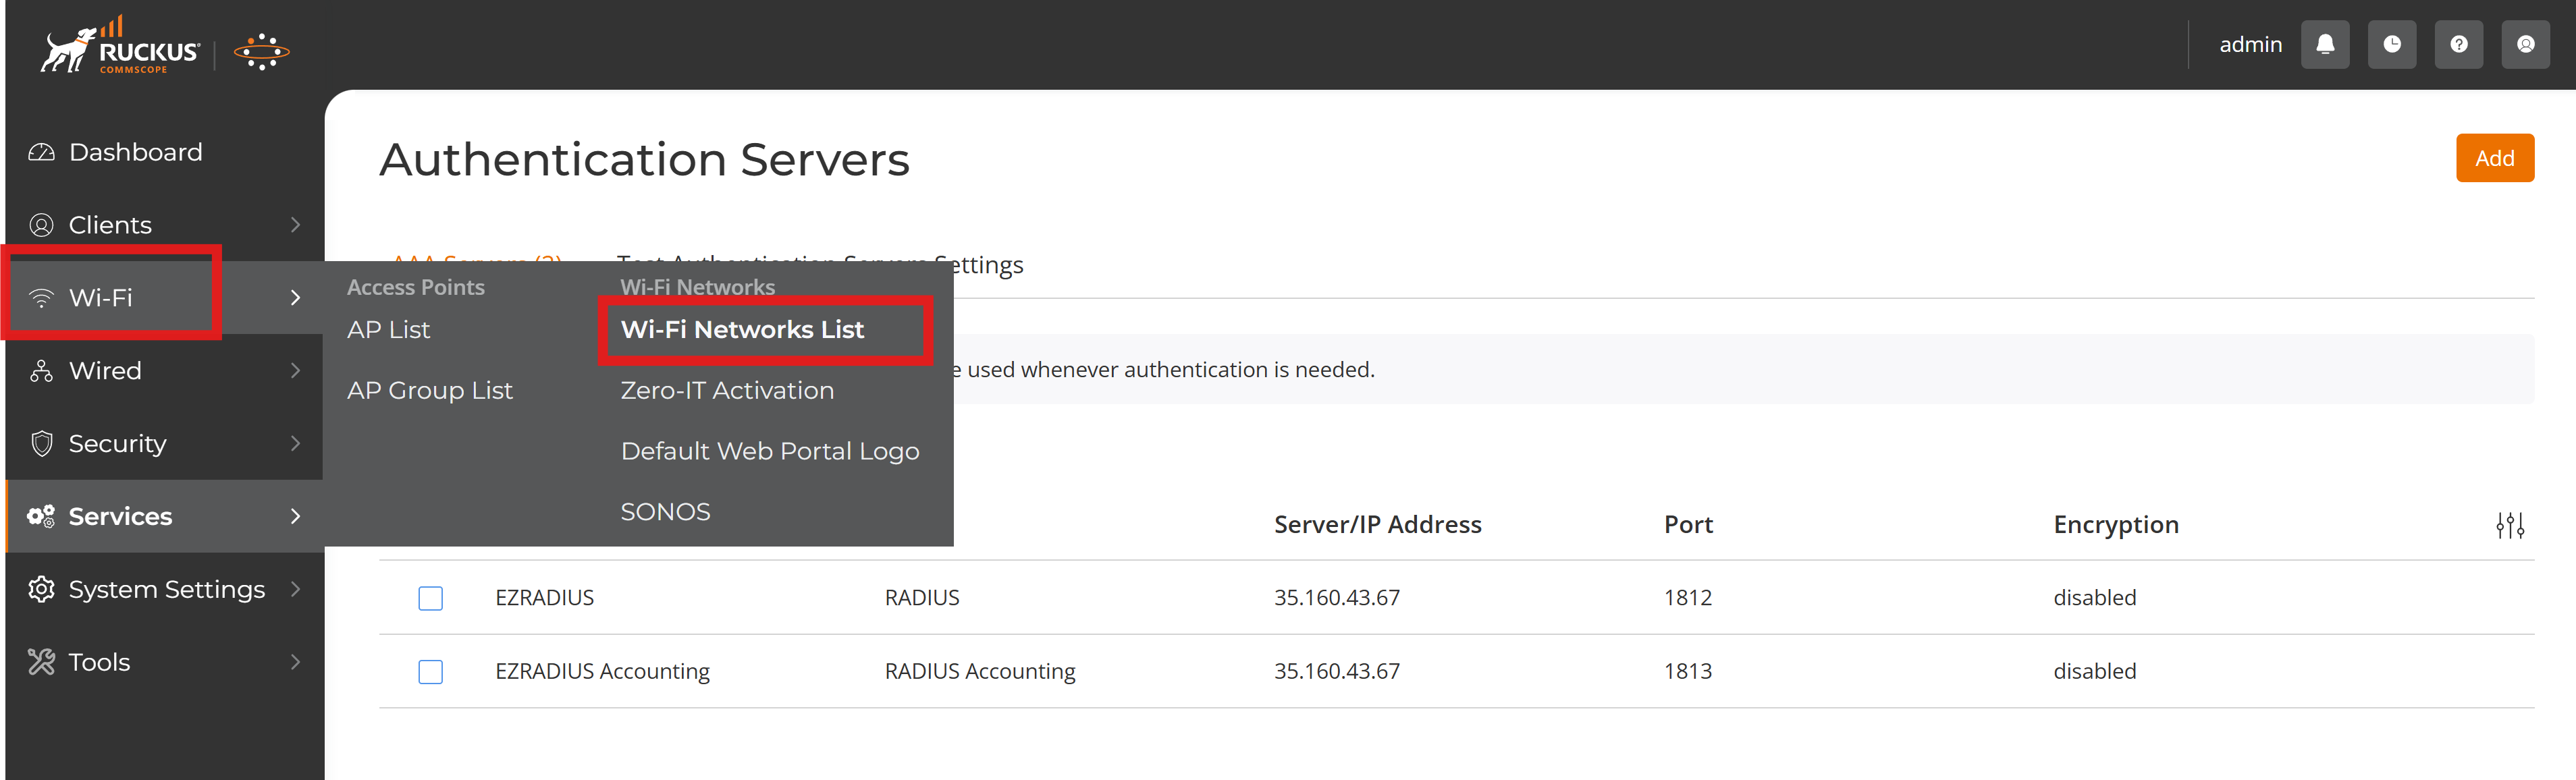
How to Add RADIUS to a Ruckus Unleashed Wi-Fi Network
-
Under the Wi-Fi menu, navigate to Wi-Fi Networks List.
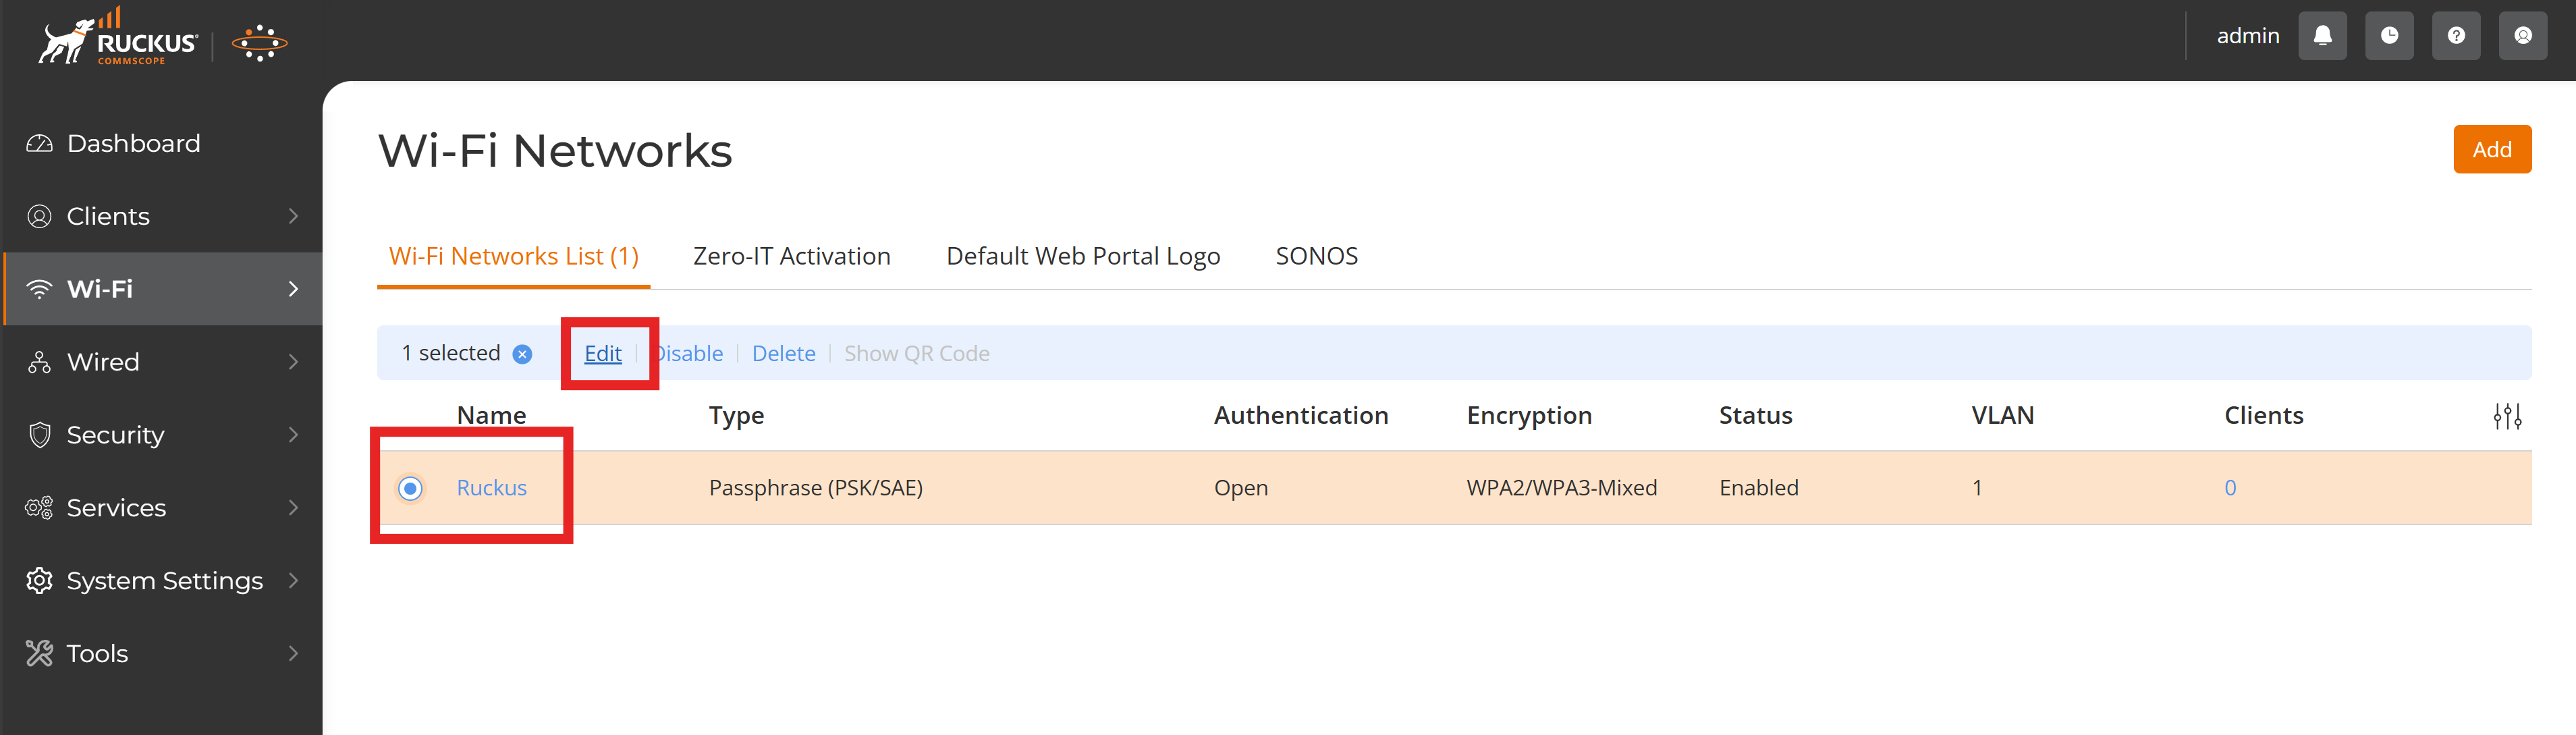
-
Select your SSID and click Edit.
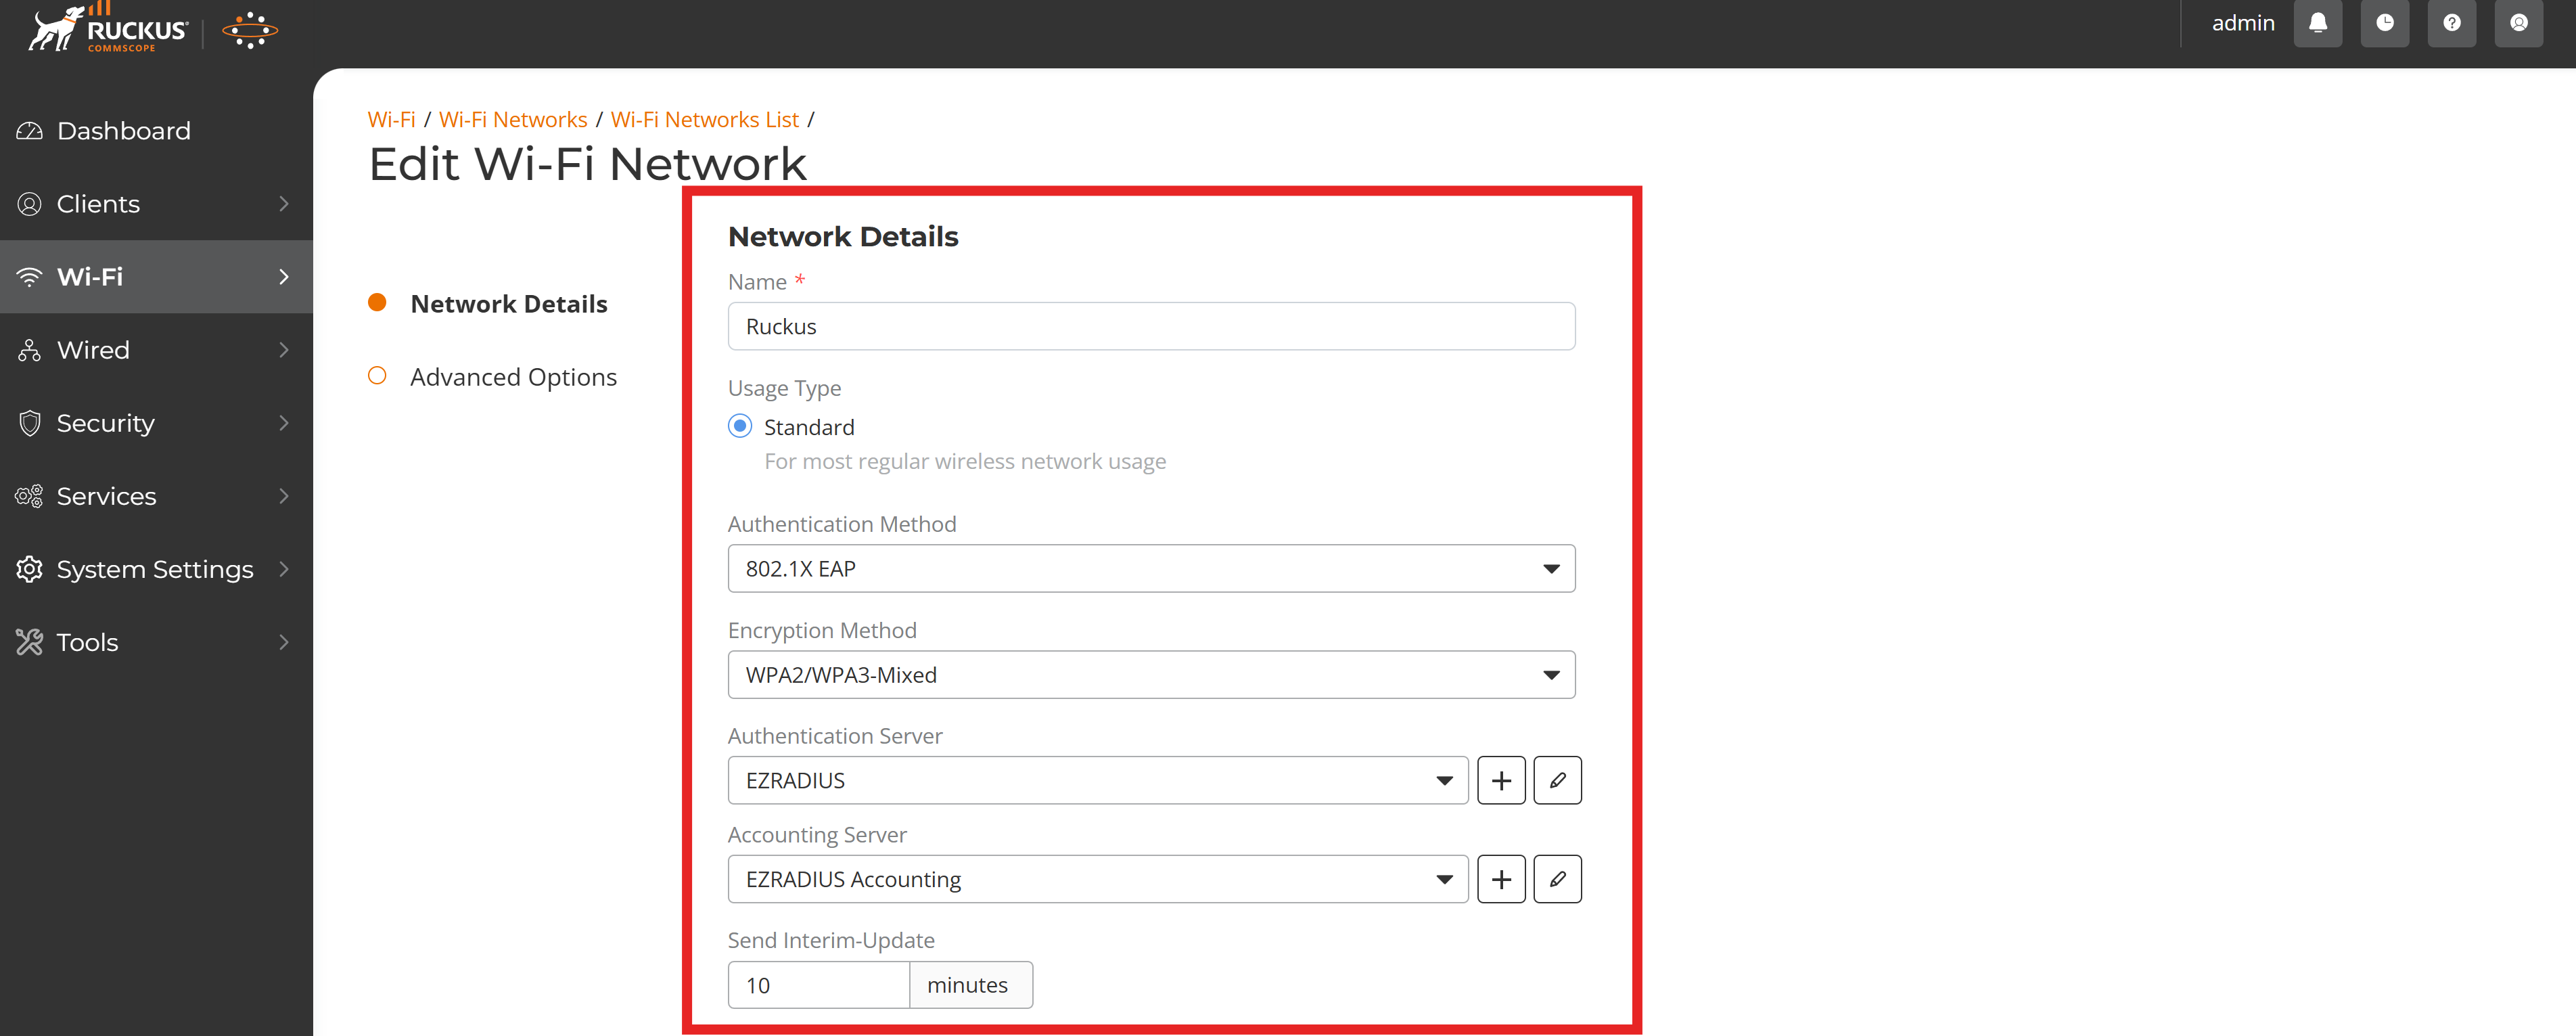
-
Fill in the following Network Details:
-
Authentication Method: Select 802.1X EAP from the dropdown menu.
-
Encryption Method: Select your desired encryption method (WPA2, WPA3, or WPA2/WPA3 Mixed).
-
Authentication Server: Select the RADIUS server you created earlier from the dropdown menu.
-
Accounting Server: Select the RADIUS accounting server you created earlier from the dropdown menu.
-
Send Interim-Update: Keep this as the default value of 10 minutes.
-
-
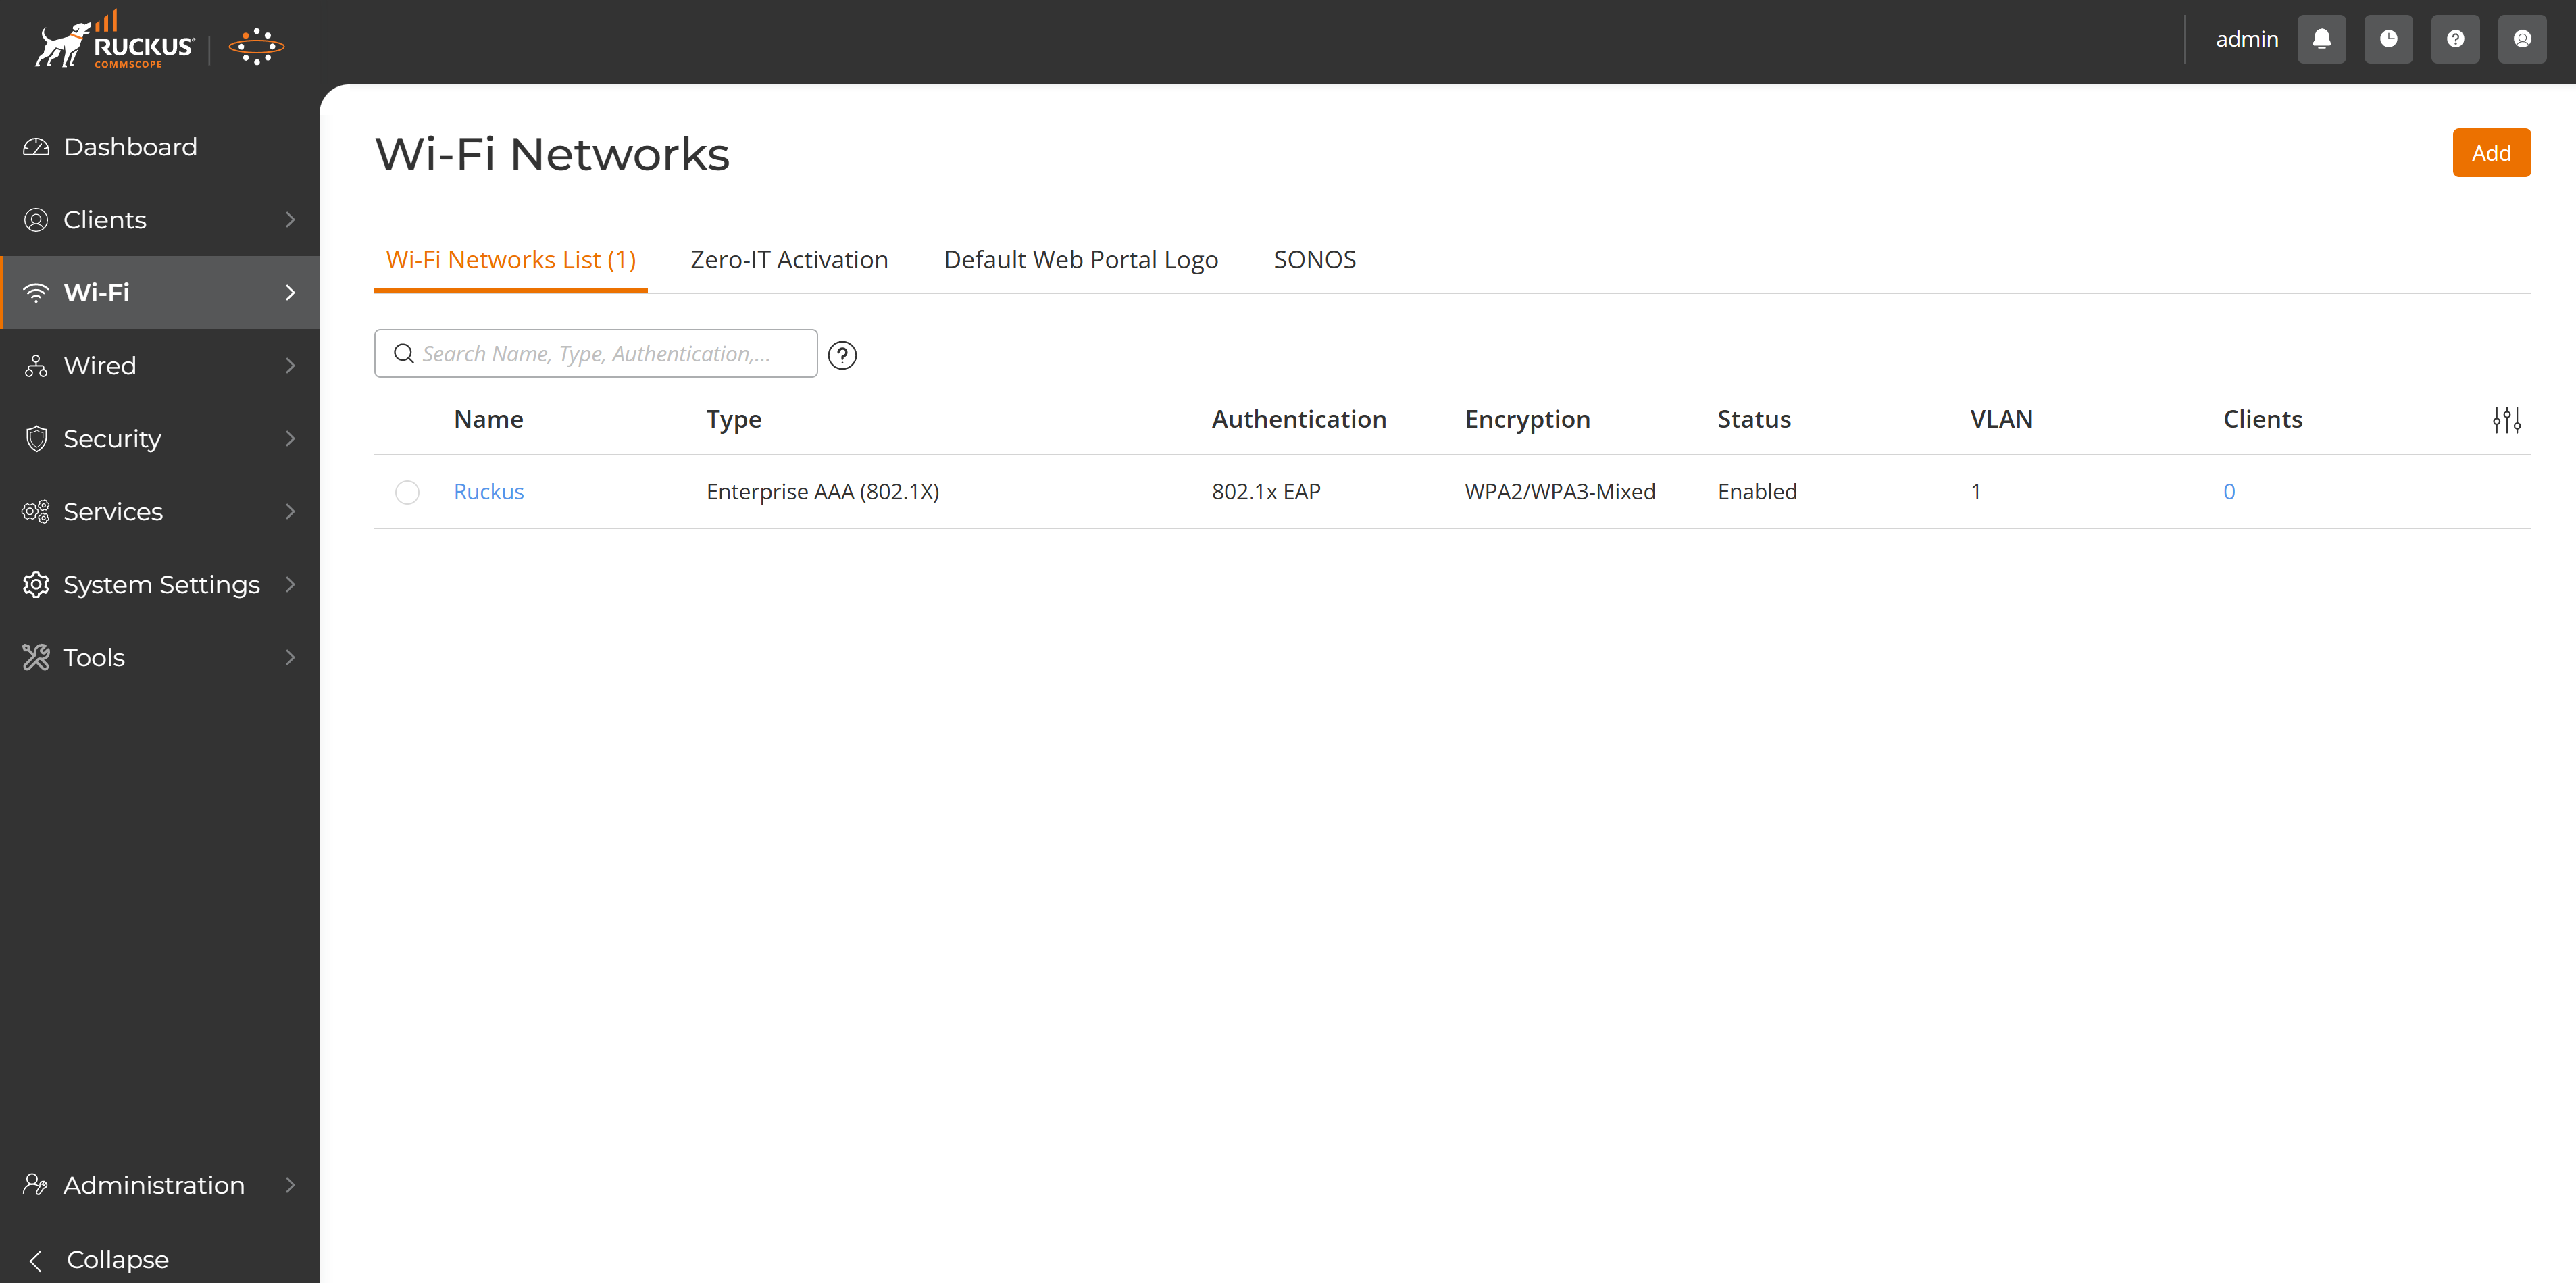
Click Apply to save the SSID configuration.
-
Done! You’ve successfully configured RADIUS authentication in your Ruckus Unleashed network using Entra ID via EZRADIUS.
How to Configure Your Devices to Use Cloud RADIUS with Ruckus Unleashed
Now that you have set up Cloud RADIUS for your Ruckus Unleashed network, there are a few more steps to ensure your users’ devices can connect seamlessly. By default, devices won’t be able to connect using Cloud RADIUS until you configure the appropriate network profile and RADIUS CA certificate. Make sure to follow the instructions below to push the necessary configurations to your users’ devices.
How to Push the RADIUS CA Certificate and Wi-Fi Profile Using Microsoft Intune
Follow these Intune step-by-step guides to push the required CA certificate and Wi-Fi profile to your users’ devices so they can seamlessly connect to your Ruckus Unleashed network using Cloud RADIUS.
How to Push the RADIUS CA Certificate and Wi-Fi Profile Using Jamf Pro
Follow these Jamf Pro step-by-step guides to push the required CA certificate and Wi-Fi profile to your users’ devices so they can seamlessly connect to your Ruckus Unleashed network using Cloud RADIUS.
How to Manually Configure the RADIUS CA Certificate and Wi-Fi Profile on Your Devices
Follow these manual configuration step-by-step guides to manually configure the required CA certificate and Wi-Fi profile on your users’ devices so they can connect to your Ruckus Unleashed network using Cloud RADIUS.
How to Troubleshoot Cloud RADIUS Issues in Ruckus Unleashed
Not able to connect to your Ruckus Unleashed network after setting up EZRADIUS? Refer to this troubleshooting guide to help diagnose and resolve common issues when using Cloud RADIUS with Ruckus Unleashed.
Troubleshooting GuideWe also have a detailed video guide to help you troubleshoot common Cloud RADIUS issues with Ruckus Unleashed below: