

















How-To: Create Cloud RADIUS Network Policies for Local User Authentication
Prerequisites
- The Keytos Entra applications are registered in your tenant
- You have an active EZRADIUS plan
- You are a Subscription Owner or Network Administrator on your EZRADIUS plan
Introduction to Managing Cloud RADIUS Network Policies in EZRADIUS
The Policies page in EZRADIUS allows you to create and manage your Cloud RADIUS network policies. Each policy defines the conditions under which a user or device can connect to your network, including authentication methods, accepted certificate authorities, and access policies.
Visit the Manage RADIUS Policies guide to learn more about the Policies page layout and features.
How to Create Cloud RADIUS Network Policies with Local User Authentication
Now that you are familiar with the layout of the Policies page in EZRADIUS, you can set up a new RADIUS network policy that uses local users for authentication. These are commonly used with PAP, MSCHAPv2, and EAP-TTLS authentication methods for legacy devices or users without certificates. The following steps will guide you through the process.
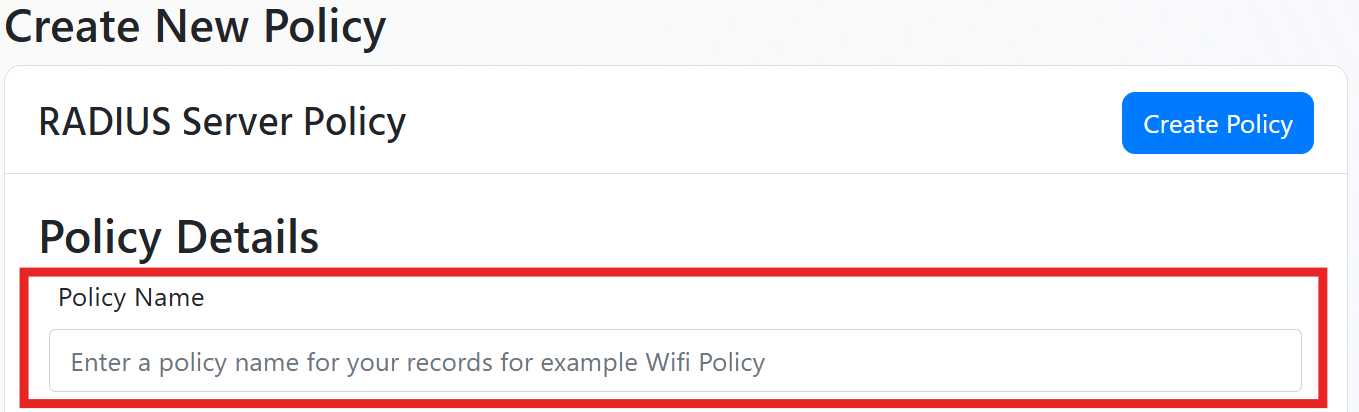
Step 1: Name Your RADIUS Server Policy
Begin by entering a friendly name for your RADIUS server policy. This name is for your records to help you identify the policy later. Behind the scenes, EZRADIUS will create a unique identifier for the policy, so feel free to choose a name that makes sense to you.
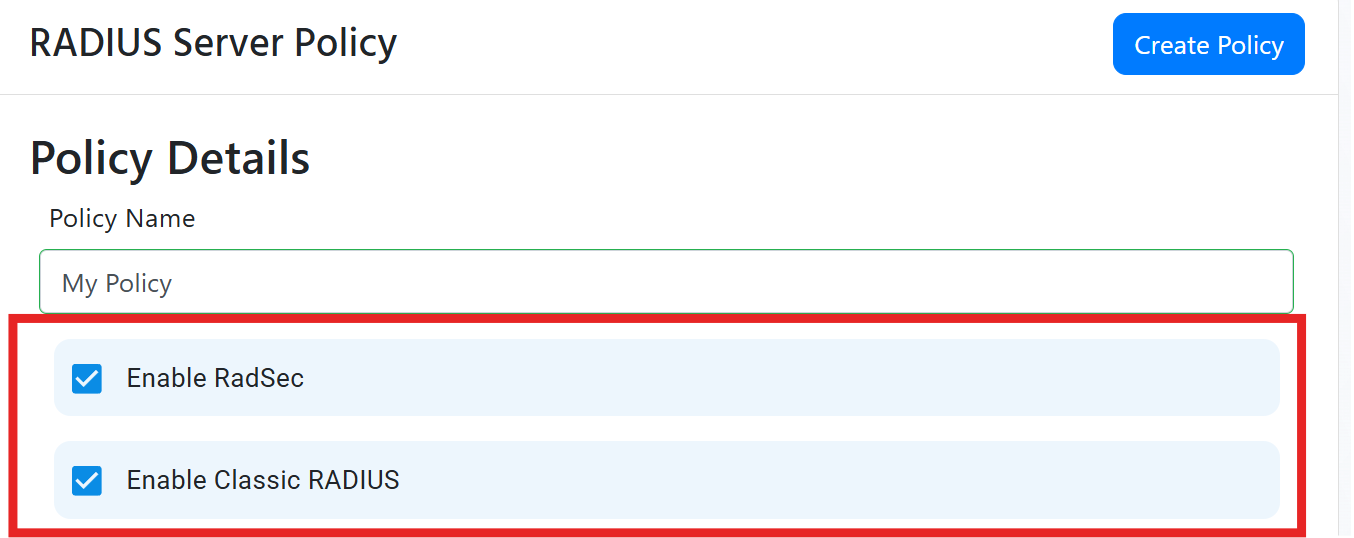
Step 2: Enable RadSec and/or Classic RADIUS
Next we have to enable which authentication methods you are going to use, you can use RadSec, Classic RADIUS, or both.
How to Set Up Classic RADIUS for Cloud RADIUS
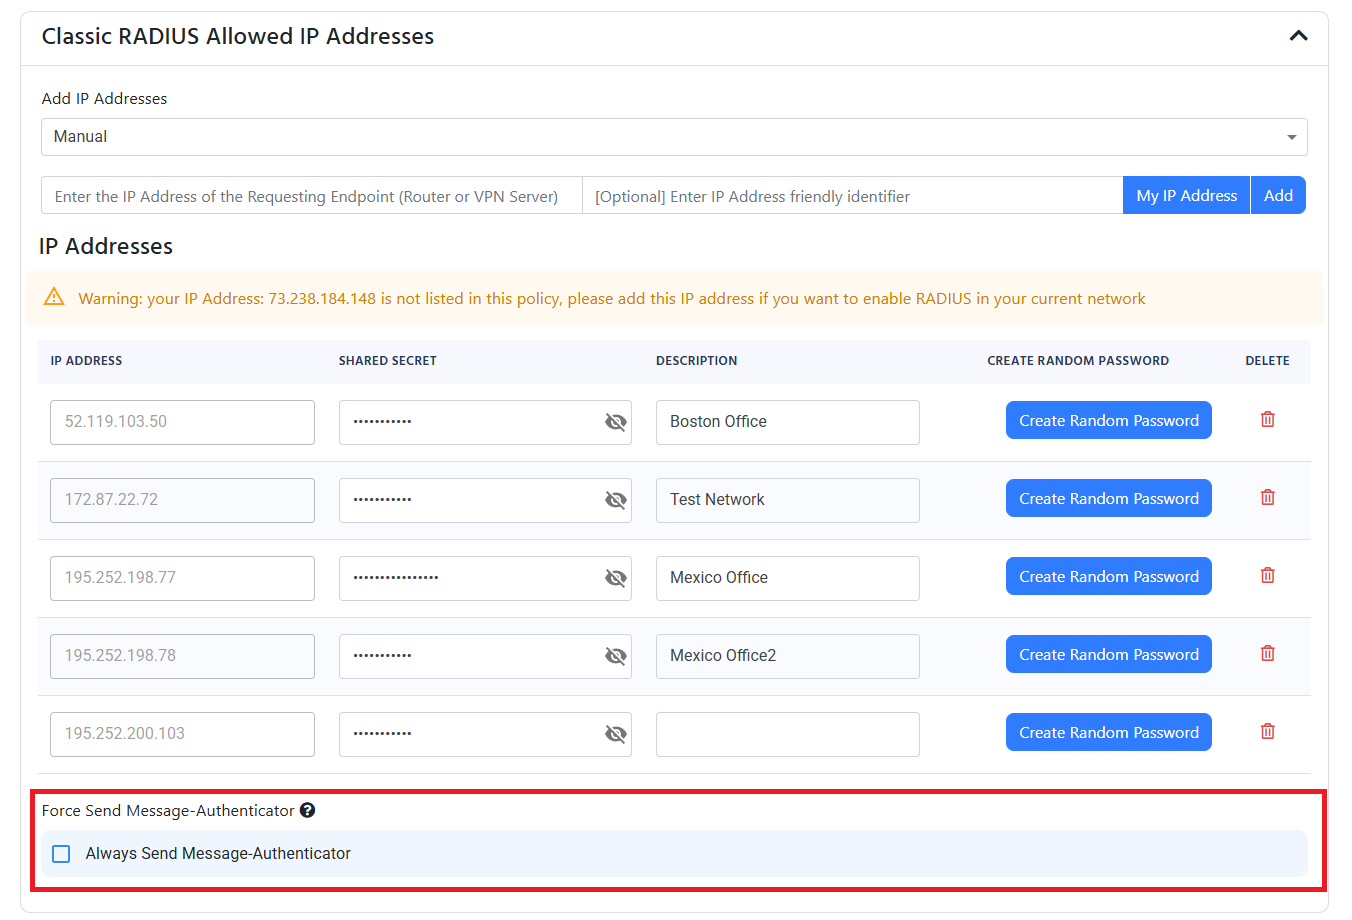
(optional) Always Send Message Authenticator
Depending on your networking device, you may need to enable the “Always Send Message Authenticator” option. This is required by some devices to ensure proper RADIUS communication, especially for devices from Fortinet.
If using Fortinet devices, After Fortigate 7.2.10 you will need to enable the “Always Send Message Authenticator” option in the RADIUS server settings.
How to Configure RadSec for Cloud RADIUS
If you enabled RadSec, you have to add a certificate authority or certificate that is accepted by the RADIUS server. This is dependant on your networking device (for example, if you are using a Cisco device, you will need to add the Root CA of the certificate that signed the certificate of the device. If you are using a Ubiquiti device, it allows you to upload your own certificate from your CA).
Each EZRADIUS policy can only be claimed by one RadSec CA. If you are a Managed Service Provider (MSP) or have multiple customers sharing a public IP address, each customer must use a distinct CA in their EZRADIUS policy. EZRADIUS identifies which policy a RadSec request belongs to by the CA that signed the client certificate — so two policies using the same CA cannot coexist. The recommended MSP topology is to issue each customer’s network devices certificates from a separate CA (one CA per EZRADIUS policy). All customers can share the same public IP and EZRADIUS region — EZRADIUS routes each request to the correct policy based on the CA used by the connecting device.
Add Certificate Authorities to RadSec Using EZCA
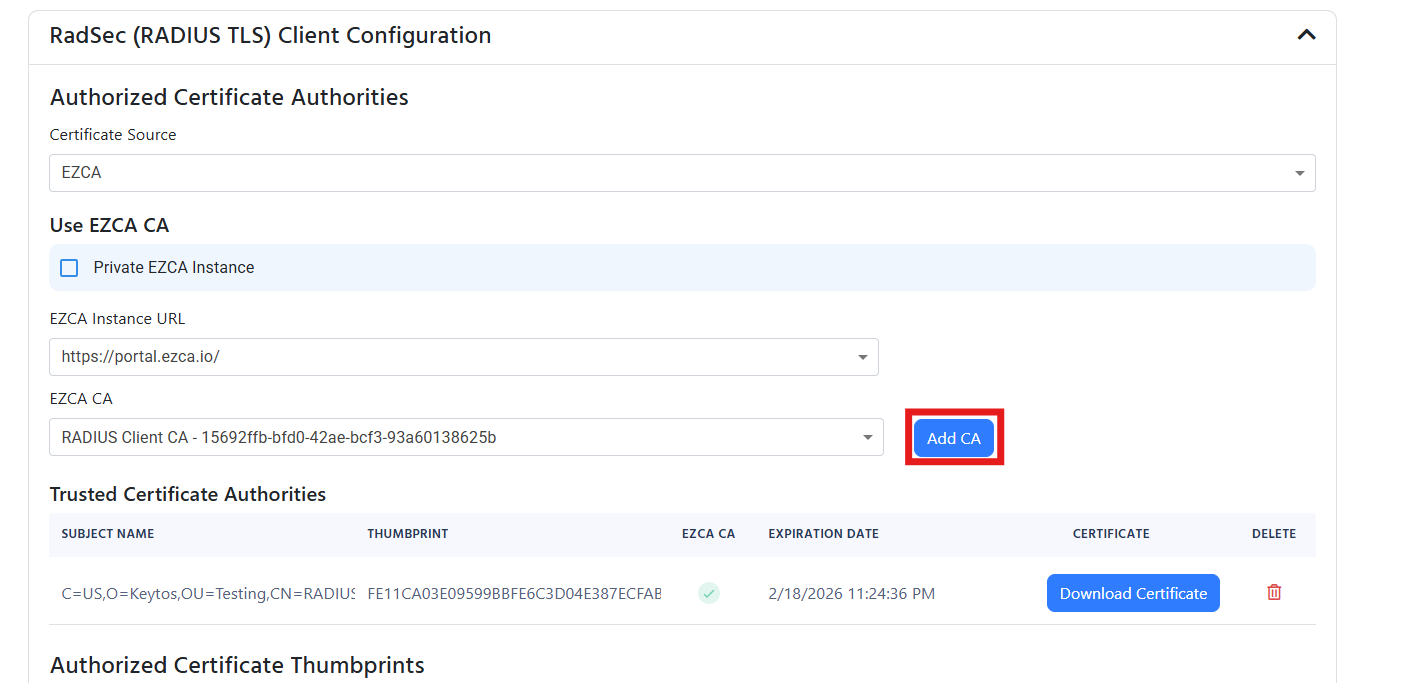
If your RadSec certificate is issued by your EZCA Certificate Authority, then you can easily add the CA to the cloud RADIUS server by:
- From the “Certificate Source” dropdown, select “EZCA”.
- Under the “EZCA Instance URL” dropdown , select your EZCA instance.
- Under the “EZCA CA” dropdown, select the CA you want to add.
- Click Add CA to add the CA to the RADIUS server.
- Your CA will now be listed under the “Trusted Certificate Authorities” section.
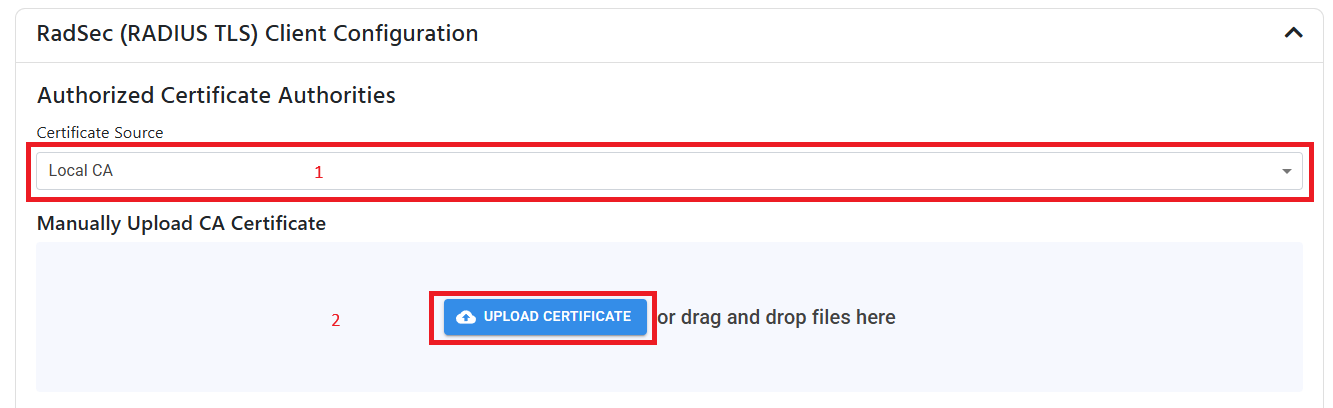
Add Certificate Authorities to RadSec Using 3rd Party CA
If your device uses a certificate from a 3rd party CA, you can add the CA to the cloud RADIUS server by:
- From the “Certificate Source” dropdown, select “Local CA”.
- Upload your CA certificate in PEM format.
- Your CA will now be listed under the “Trusted Certificate Authorities” section.
Add Self-Signed Certificate to RadSec
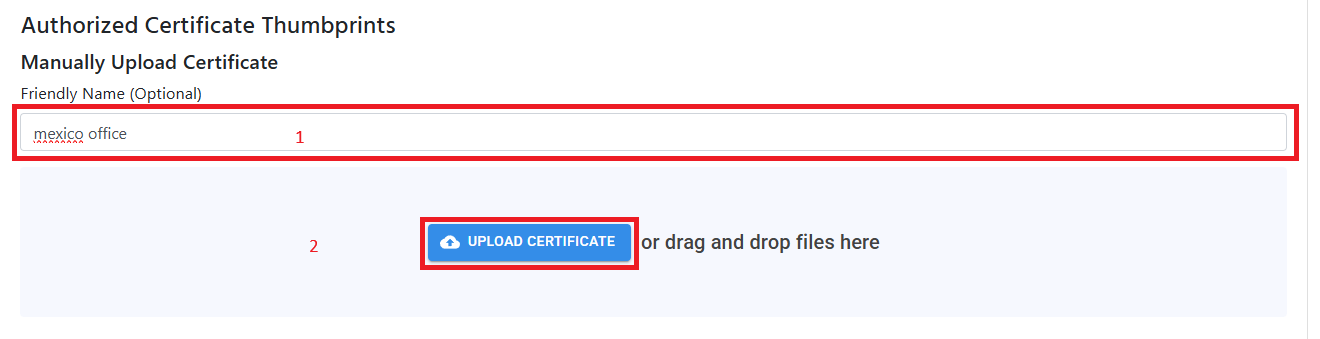
If your networking device only supports self-signed certificates for RadSec, you can upload the single certificate to your cloud RADIUS policy by:
- Leave the “Authorized Certificate Authorities” section empty. You don’t need to add any CAs for self-signed certificates.
- Under “Authorized Certificate Templates”, enter a certificate Friendly Name (This is just for your records, useful if have multiple locations).
- Upload the certificate in PEM format.
- Your certificate will now be listed under the “Trusted Certificates” section.
Step 3: Add Certificate Authorities to RADIUS for Certificate Authentication
Because local user authentication does not use certificates, you can skip this step and move to the server certificate section.
Step 4: Add Server Certificate to RADIUS
A certificate is required to uniquely identify the RADIUS server to the devices connecting to the network. Without it, your clients will not be able to connect and will return errors. There are three ways to add a server certificate:
- Use a free, auto-generated certificate
- Use EZCA to create and manage the certificate
- Upload a certificate from a 3rd party CA.
Create a Free Certificate with EZRADIUS’ Integrated Certificate Authority
If you do not have a your own CA, you can use EZRADIUS’ integrated CA to create a free certificate. The certificate will be automatically created and renewed by EZRADIUS.
- From the ‘Certificate Source’ dropdown, select Auto-Generated Certificate.

Add Server Certificate to RADIUS Using EZCA
If you are already an EZCA customer, you can leverage your existing EZCA CA to issue a RADIUS server certificate.
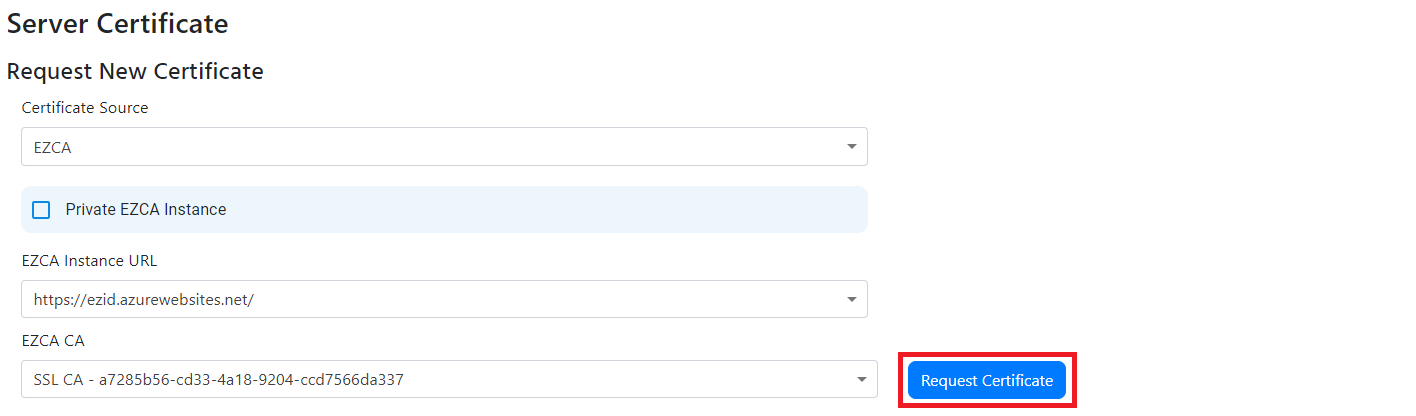
- From the ‘Certificate Source’ dropdown, select EZCA.
- If you are using an EZCA private instance, select the Private Instance checkbox and enter your EZCA Issuance URL.
- From the ‘EZCA CA’ dropdown with the certificates authorities you have in your EZCA instance, select the CA you want to use.
- Click Request Certificate to create a new RADIUS server certificate. EZRADIUS will automatically create the certificate for you. You do not need to specify an existing certificate or create a CSR. The certificate will be automatically renewed before it expires.
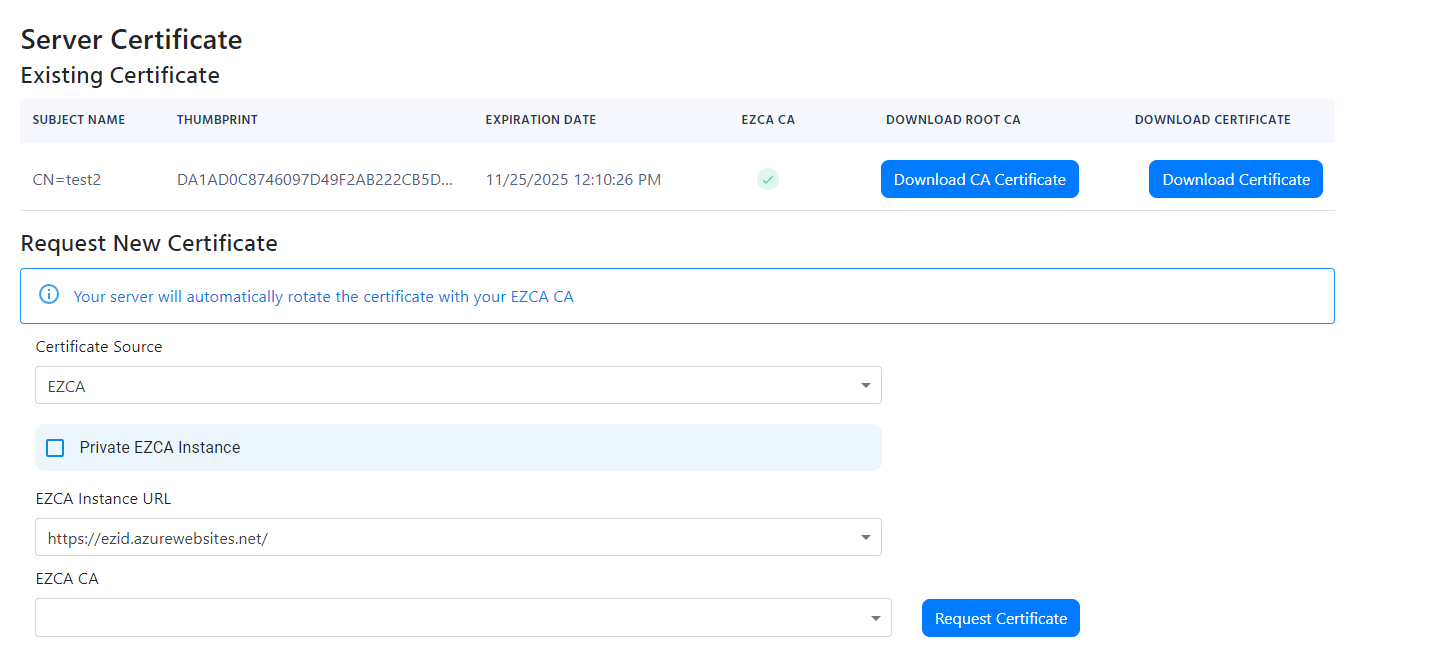
- You should now see the certificate in the list of certificates:
Add Server Certificate to RADIUS Using 3rd Party CA
If you are using a 3rd party CA, you can generate a CSR in EZRADIUS, submit it to your CA, and then upload the signed certificate back to EZRADIUS.
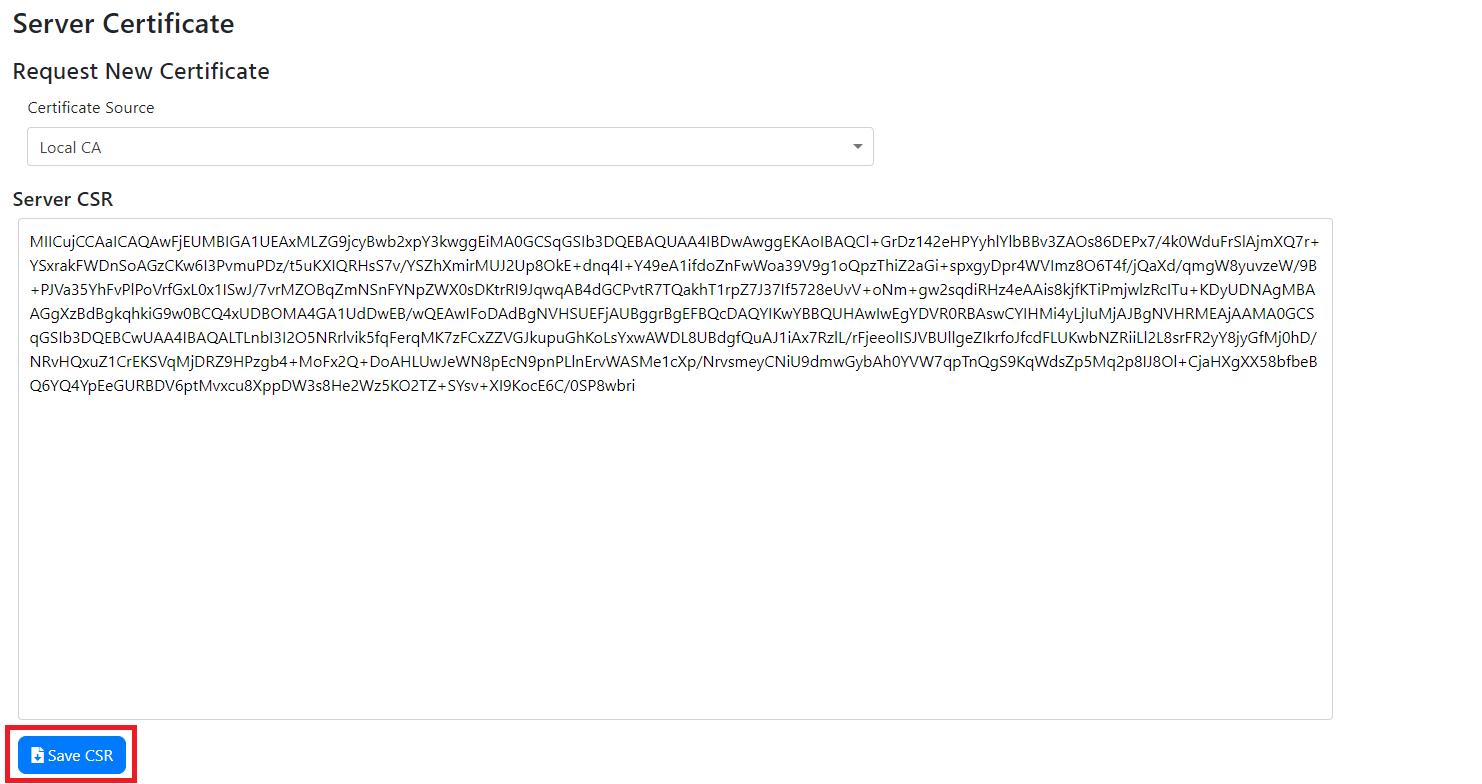
- From the ‘Certificate Source’ dropdown, select Local CA.
- Click the Create CSR button.

- Download the CSR by clicking the Save CSR button.
- Submit the CSR to your CA and download the certificate.
- Also download the certificate of your root CA.
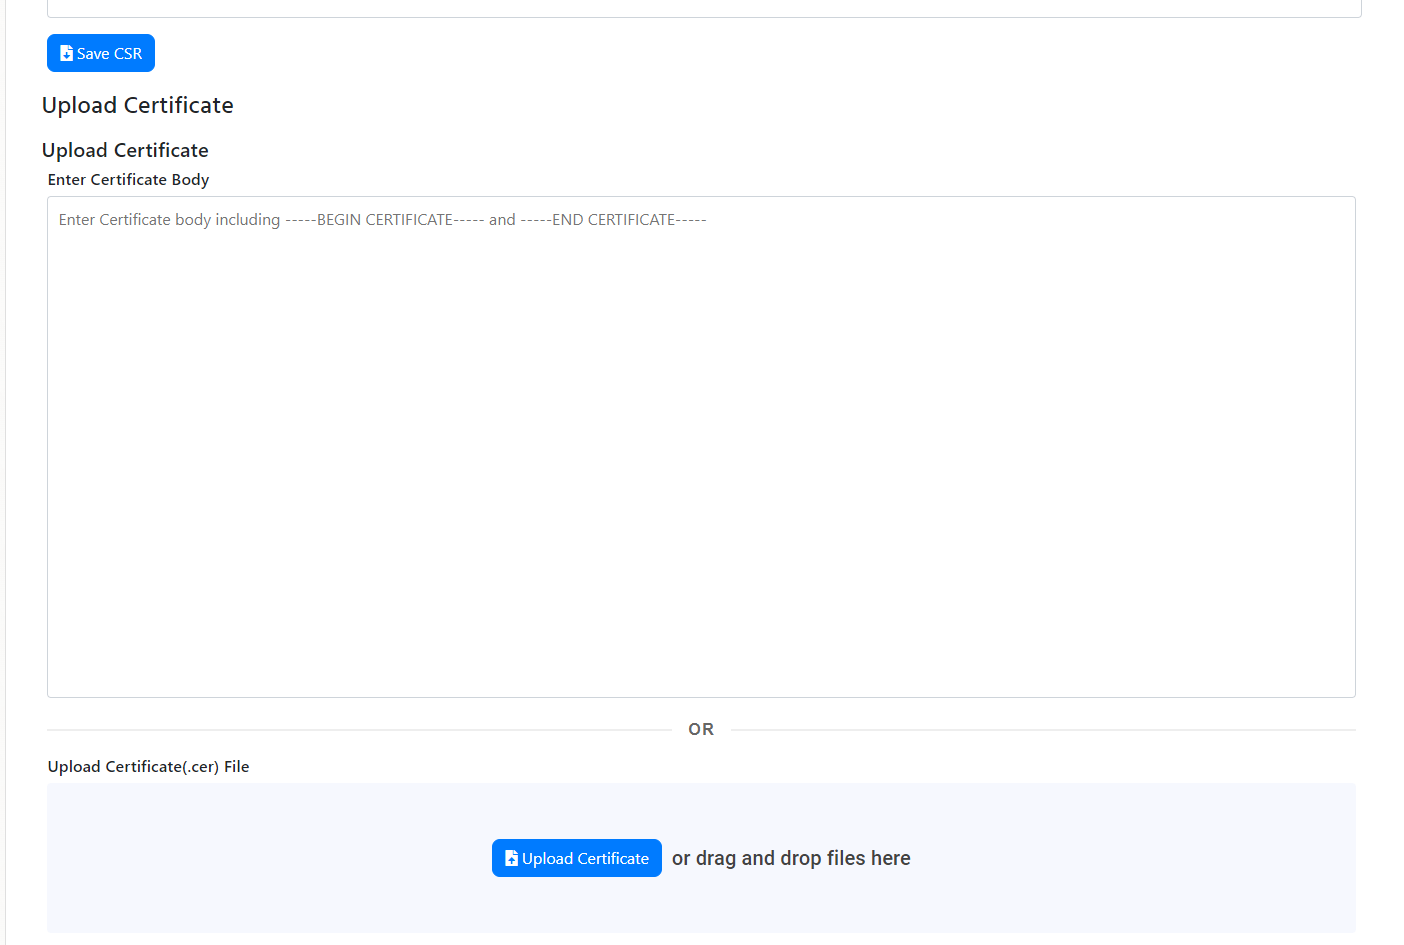
- Once you have the certificate, scroll down and either copy and paste the certificate PEM content or click on Upload Certificate and select the certificate in PEM format.
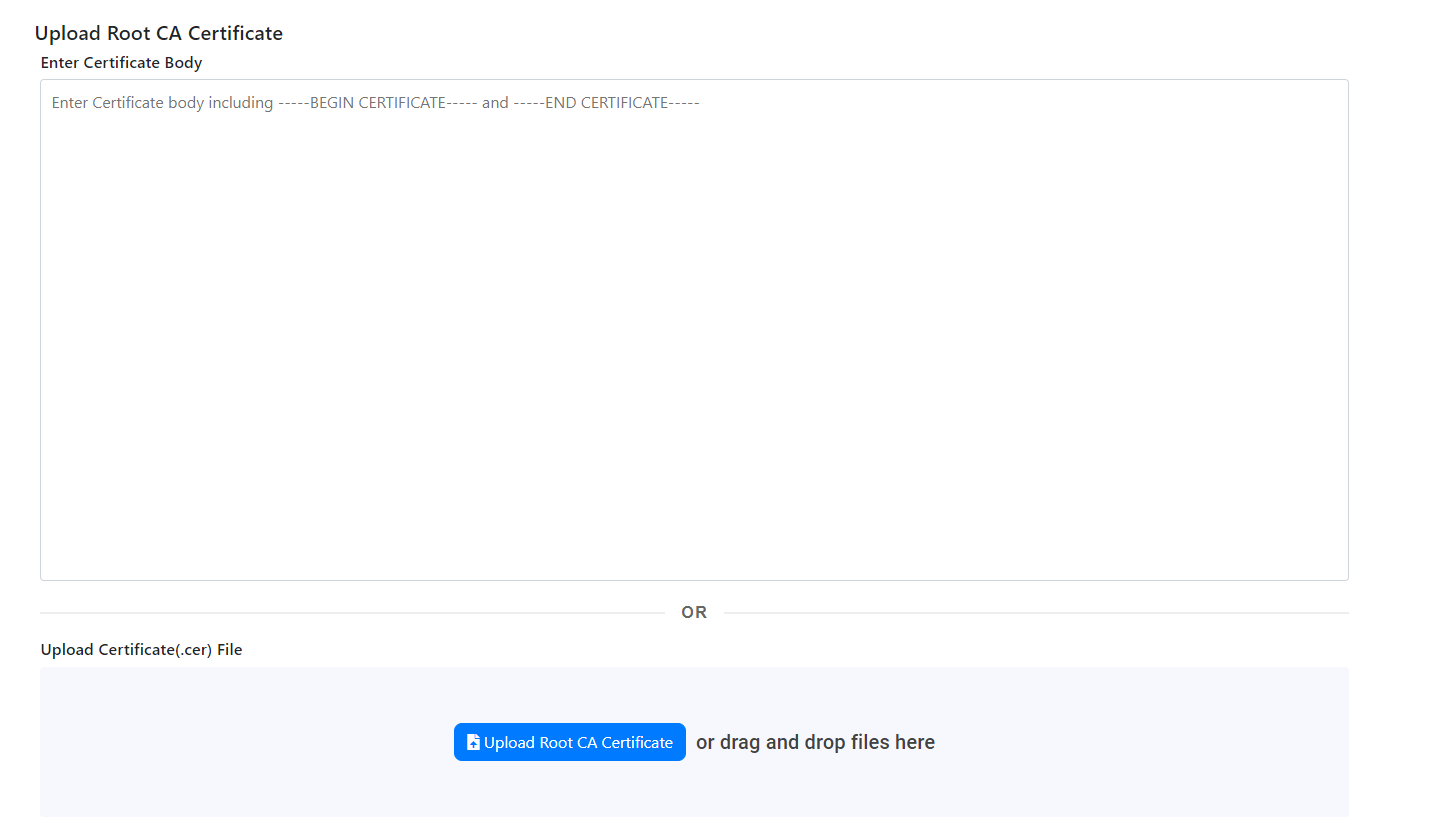
- After you upload your certificate, you must upload the certificate of the Root CA that signed the certificate. Scroll down and either copy and paste the certificate PEM content or click on Upload Root CA Certificate and select the certificate in PEM format.
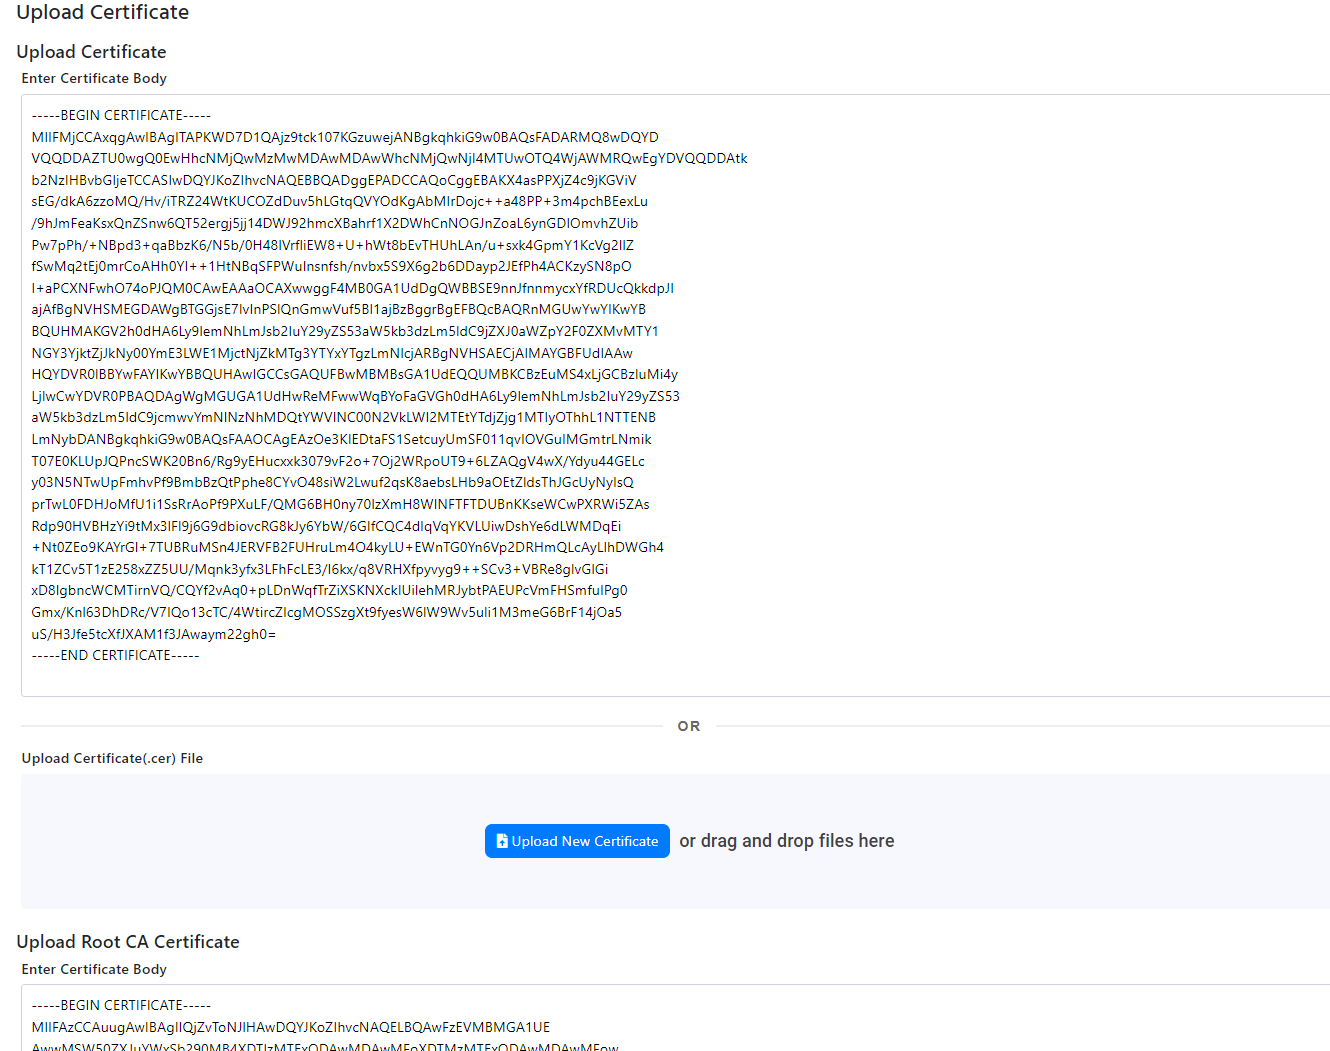
- You will now have both the RADIUS server certificate and the Root CA certificate listed under your certificates.
Step 5: Add Local User Access Policy to RADIUS Network Policy
If you want your users to authenticate to your network directly using local user accounts and legacy protocols, you will need to create an access policy that enables local user authentication.
How to Create a Local User Access Policy
Follow the steps below to configure such an access policy:
-
Click Add Access Policy to create a blank access policy.
-
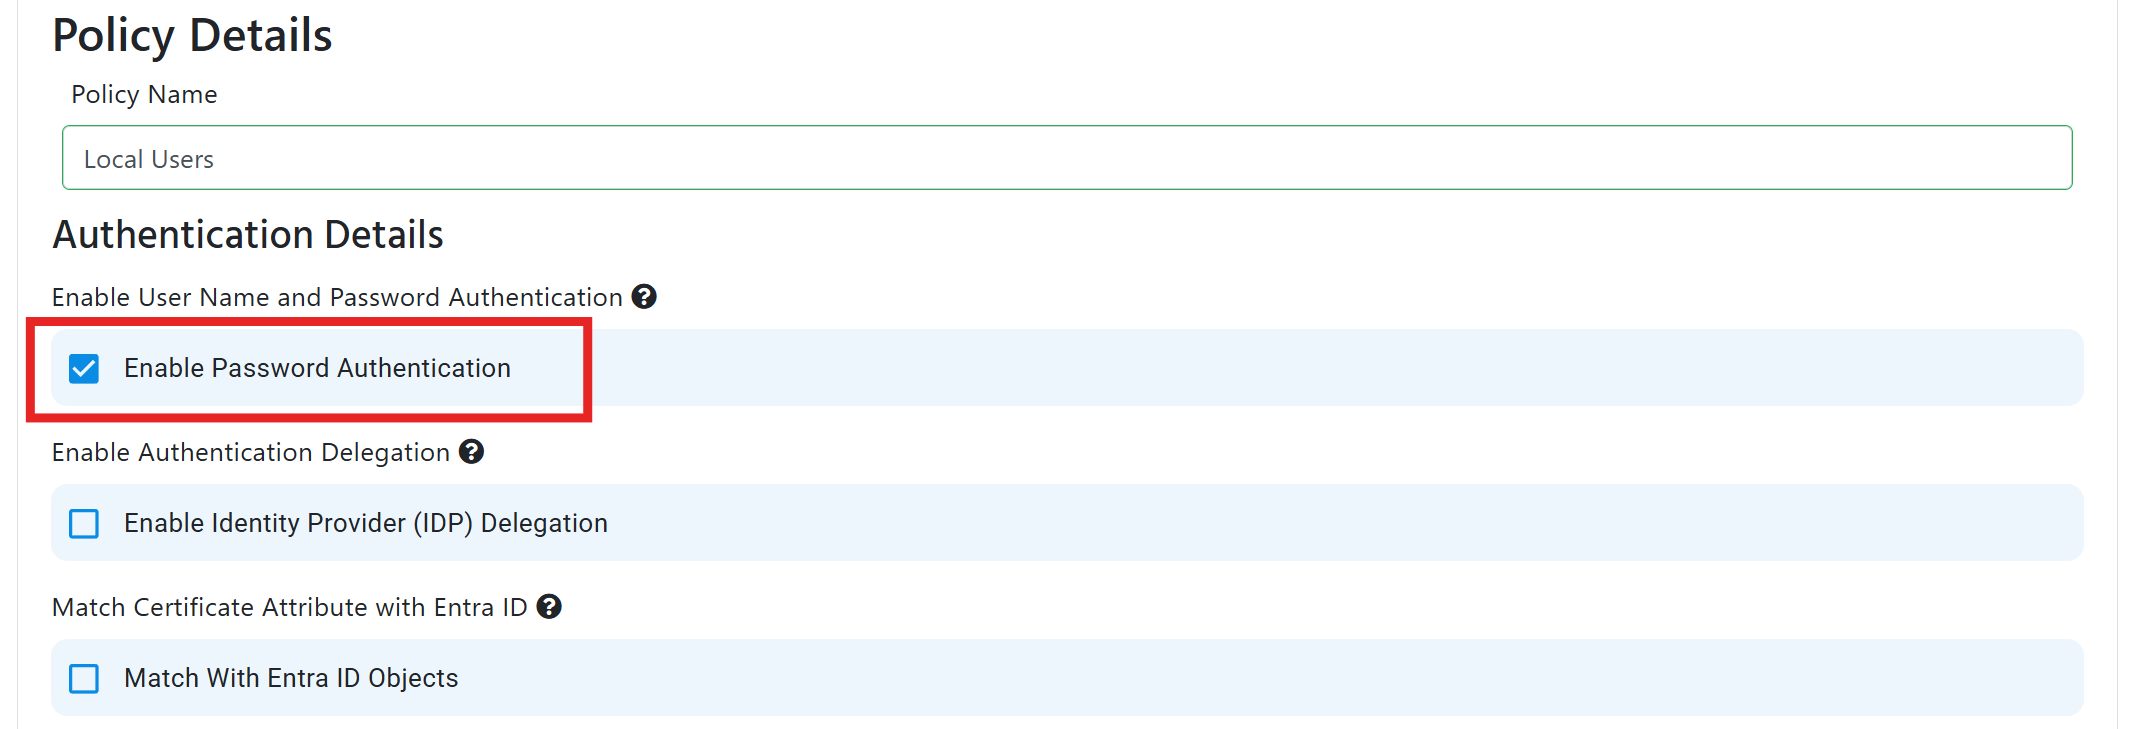
Provide a Policy Name, such as “Local Users”.
-
Check the box for Enable Password Authentication, which will allow PAP, PEAP-MSCHAPv2, and EAP-TTLS RADIUS methods to be used for authentication.
-
Leave Enable Identity Provider (IDP) Delegation unchecked, as this is only needed when using Entra ID for authentication.
Done!
You have successfully created a Cloud RADIUS network policy that uses local users for authentication. Make sure to test the configuration with a device to ensure everything is working as expected.Advanced Settings
If you have more advanced requirements for your access policies, you can configure them by expanding the Advanced Settings tab and configuring the available options.
Advanced Access Policy Settings
Optionally configure advanced settings for your access policies
If you want to bypass authentication for devices based on their MAC address, you can:
- Check the box for Enable MAC Authentication Bypass (MAB).
- Either directly add your MAC addresses, or enable Bulk Upload Addresses to add multiple MAC addresses at once.
Collapses this section and completes the checkmark.
EZRADIUS checks CRLs (Certificate Revocations Lists) by default but if you also want to check OCSP, you can check the Enable OCSP checkbox. you can read more about the difference between CRL and OCSP here
Collapses this section and completes the checkmark.
If you want to require that the certificate being used for authentication has specific Extended Key Usages such as “Client Authentication”:
- Check the box for Require Extended Key Usage.
- Either select an EKU from Predefined Extended Key Usages, or enter a custom EKU in the Custom Extended Key Usage > Name and Object Identifier fields.
- Click Add Extended Key Usage to add the EKU configuration.
Collapses this section and completes the checkmark.
If you want to match attributes in the request (for example, matching the SSID name sent as a called station ID), you can add the attributes in the Match Attributes in Request and enter the value and the matching scheme (either contains or equals). Some common attributes to match are:
- Called-Station-ID: Usually set-up to contain the SSID of the network or the MAC address of a device when carrying out MAC-Authentication-Bypass.
- NAS Identifier (NAS-ID): Usually set-up to contain the SSID of the network or the MAC address of a device when carrying out MAC-Authentication-Bypass.
Collapses this section and completes the checkmark.
If you want to send attributes in the response (for example, sending the Filter-Id to the device), you can add the attributes in the Sent Attributes in Response and enter the value. Supported attributes are:
- Filter-Id: Can be used to assign a pre-defined access control list (ACL) to the user that successfully authenticates with the access policy
- Cisco-AVPair: Cisco-specific attribute
Collapses this section and completes the checkmark.
Priority Order of Access Policies
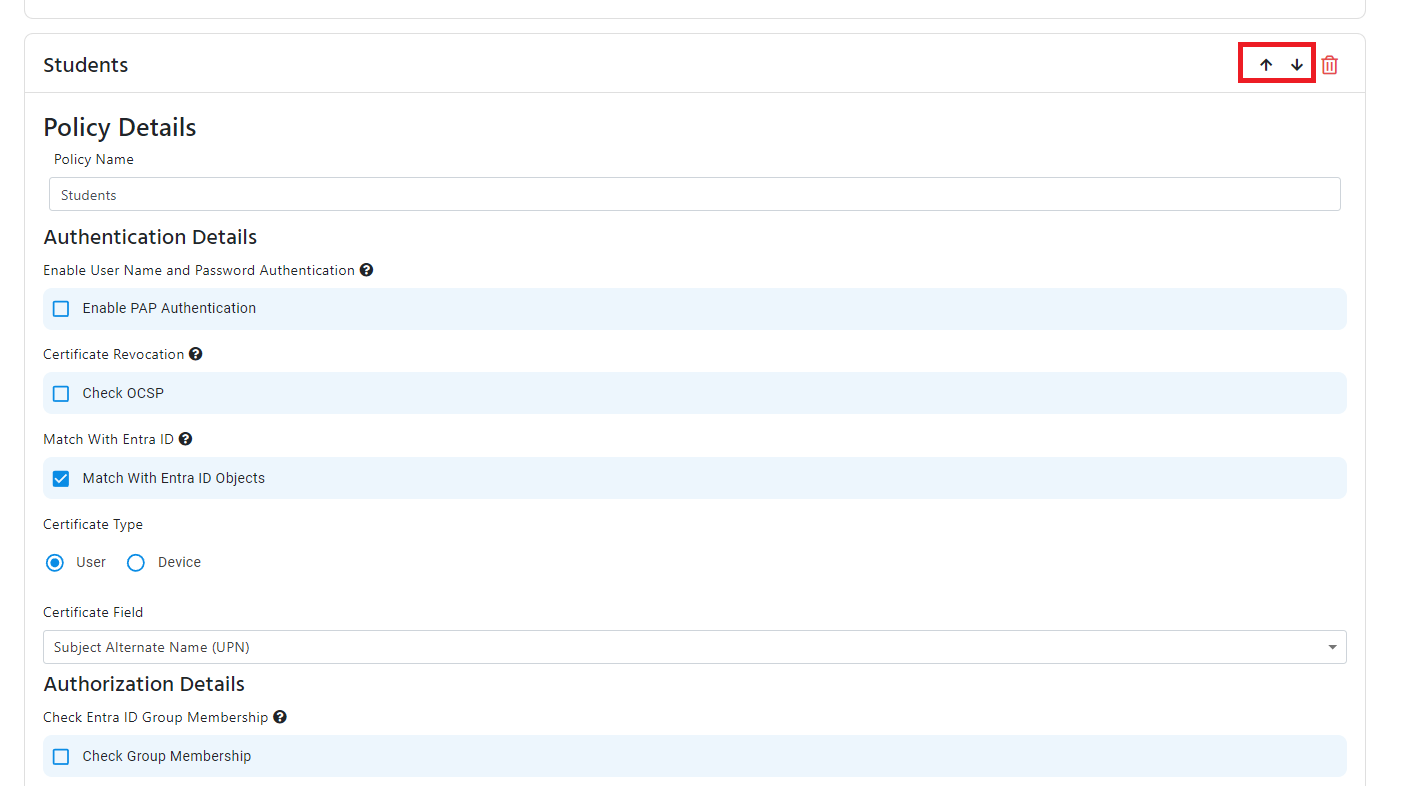
The access policies are checked in the order they are sorted, you can change the order of the access policies by clicking on the up and down arrows on the right side of the access policy.
- Once your policy is ready, save the policy.