How-To: Assign Domain Ownership for Certificate Management
EZCA enables full accountability for certificate ownership by assigning owners to each domain registered in EZCA. To register a new domain follow these steps.
A Subordinate or Issuing CA is critical on any PKI hierarchy this is the Certificate Authority in charge of issuing end certificates. In this page we will guide you on how you can create your own SSL CA and chain it up to a Root CA (EZCA Root or Offline Root).
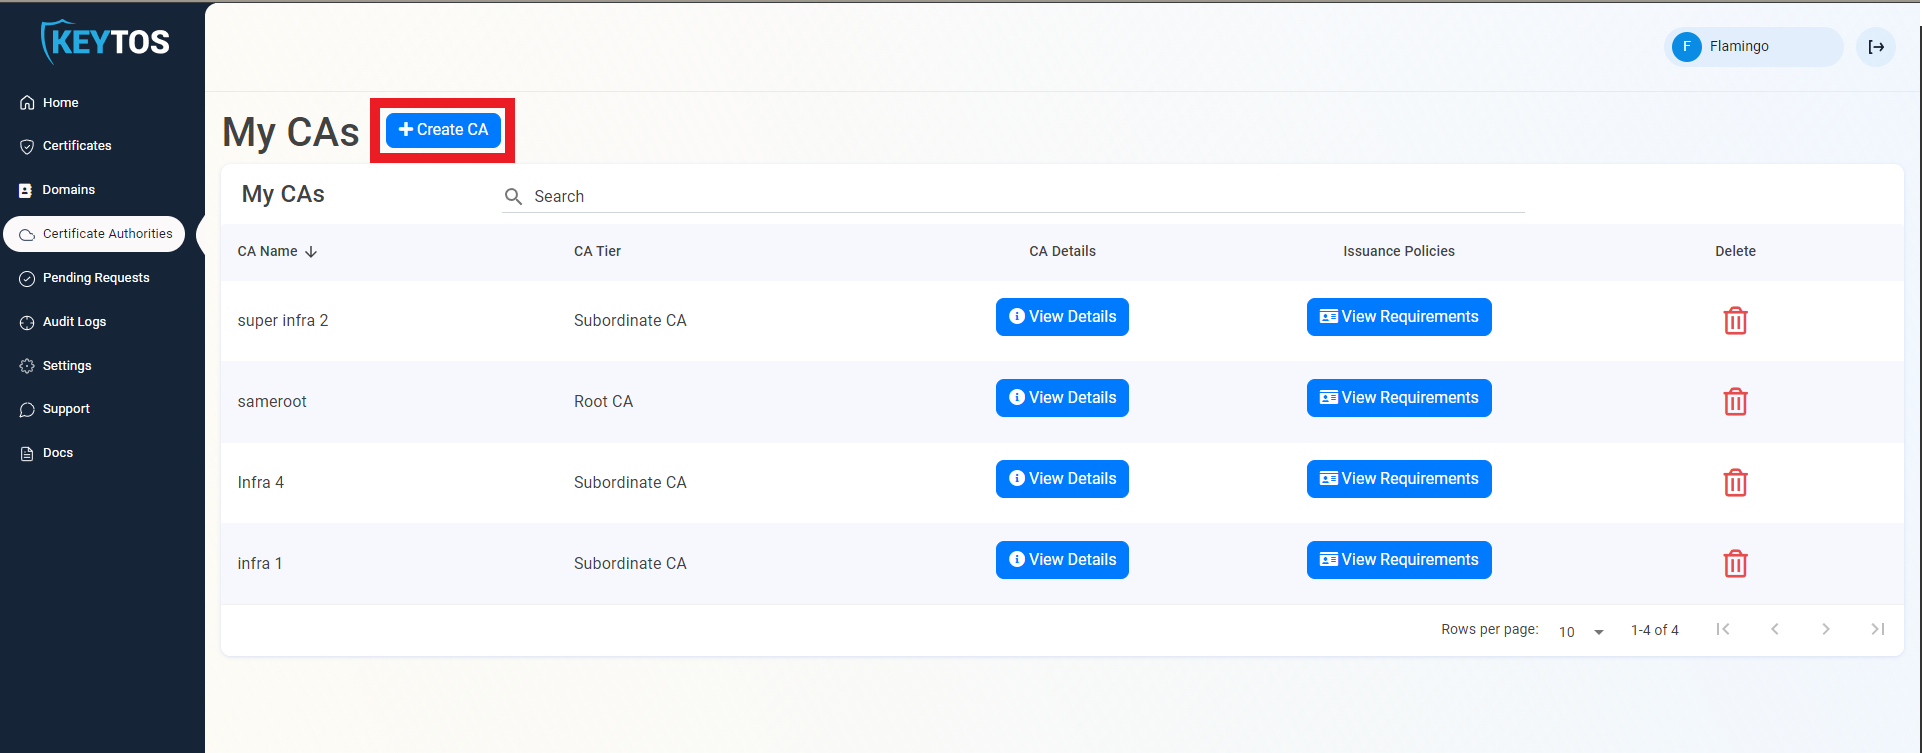
Go to https://portal.ezca.io/
Login with an account that is registered as a PKI Admin in EZCA.
Navigate to Certificate Authorities.
Click on the “Create CA”
Select Subordinate/Intermediate CA.
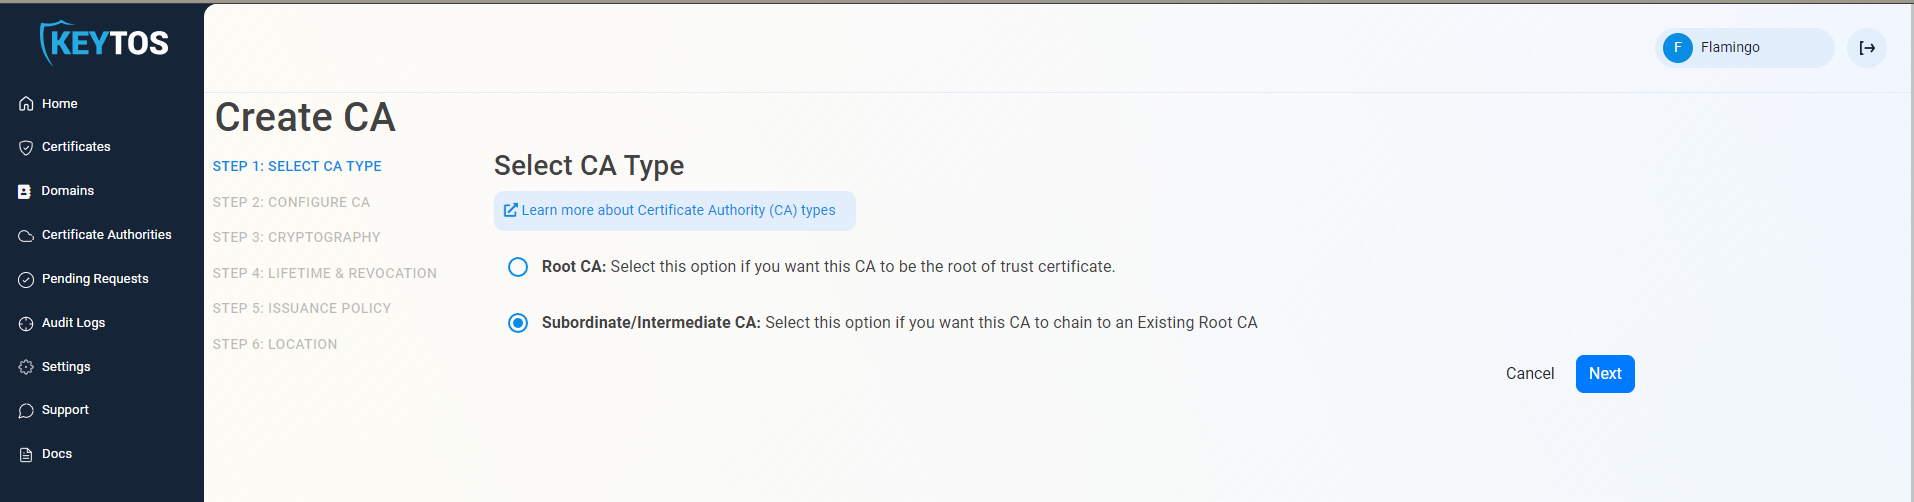
Click Next
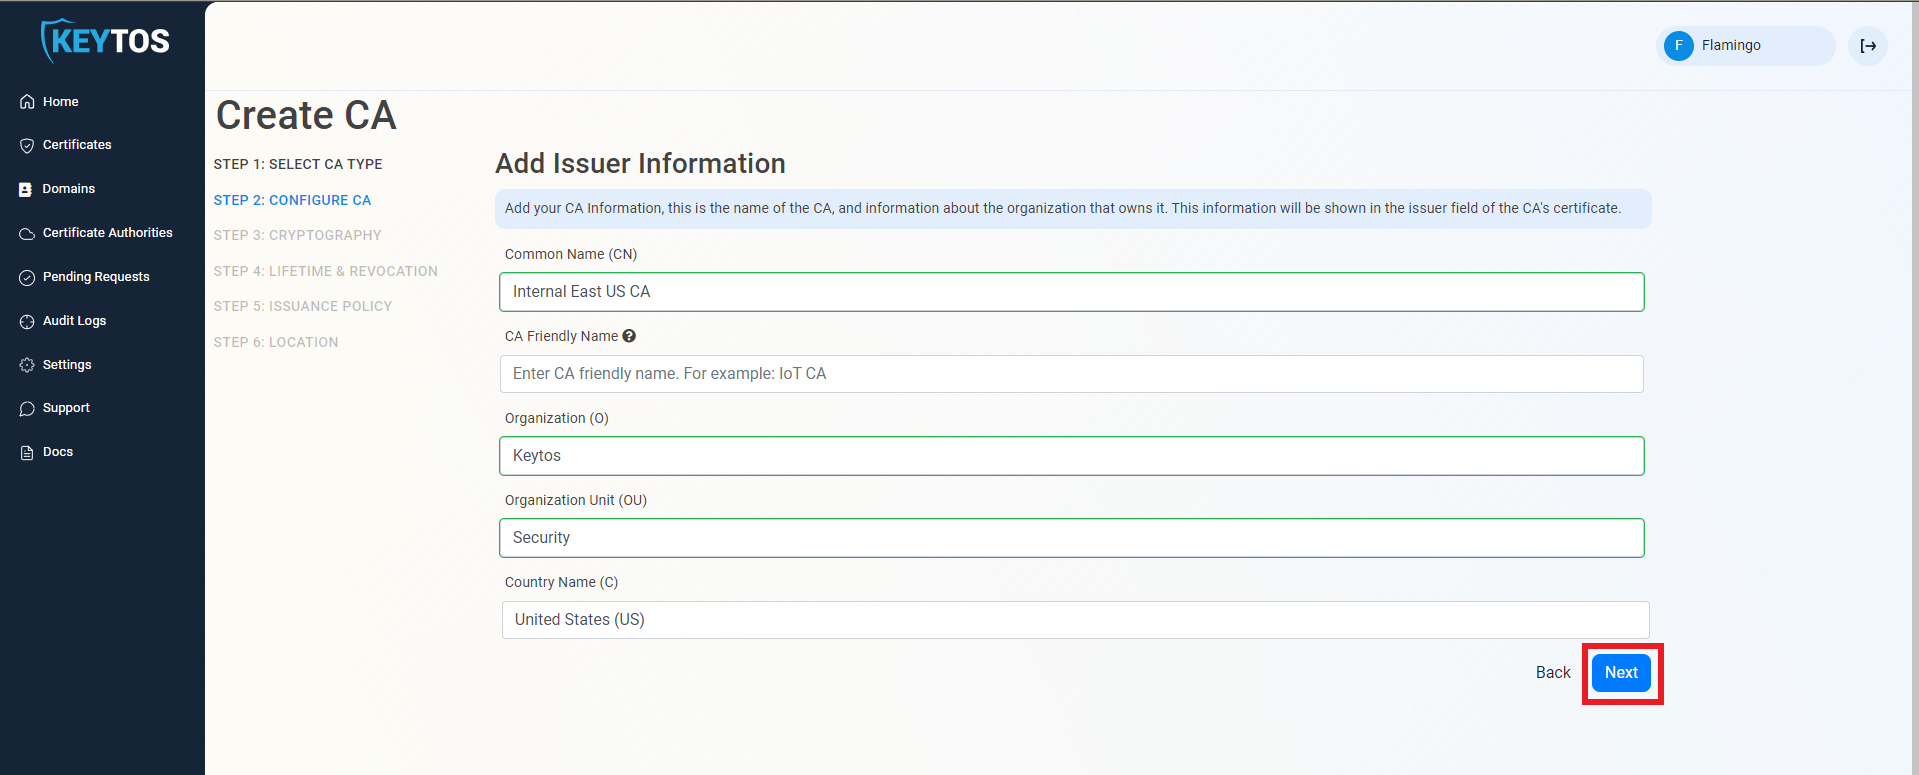
Enter Common Name: This is the name of the CA how it will appear in the certificate.
(Optional) Enter CA Friendly Name This is the name that will appear in the EZCA portal, by default we will use the Common Name
(Optional) Enter the Organization The Organization field is an optional certificate field that usually has the company name.
(Optional) Enter the Organization Unit The Organization Unit field is an optional certificate field that usually contains the unit that runs this CA (For example: IT or HR).
(Optional) Enter the Country Code The Country Code field is an optional certificate field that identifies the country where this CA is located.
Click Next.
Unless you have specific compliance or security requirements, leave the default cryptographic values for best security and compatibility.
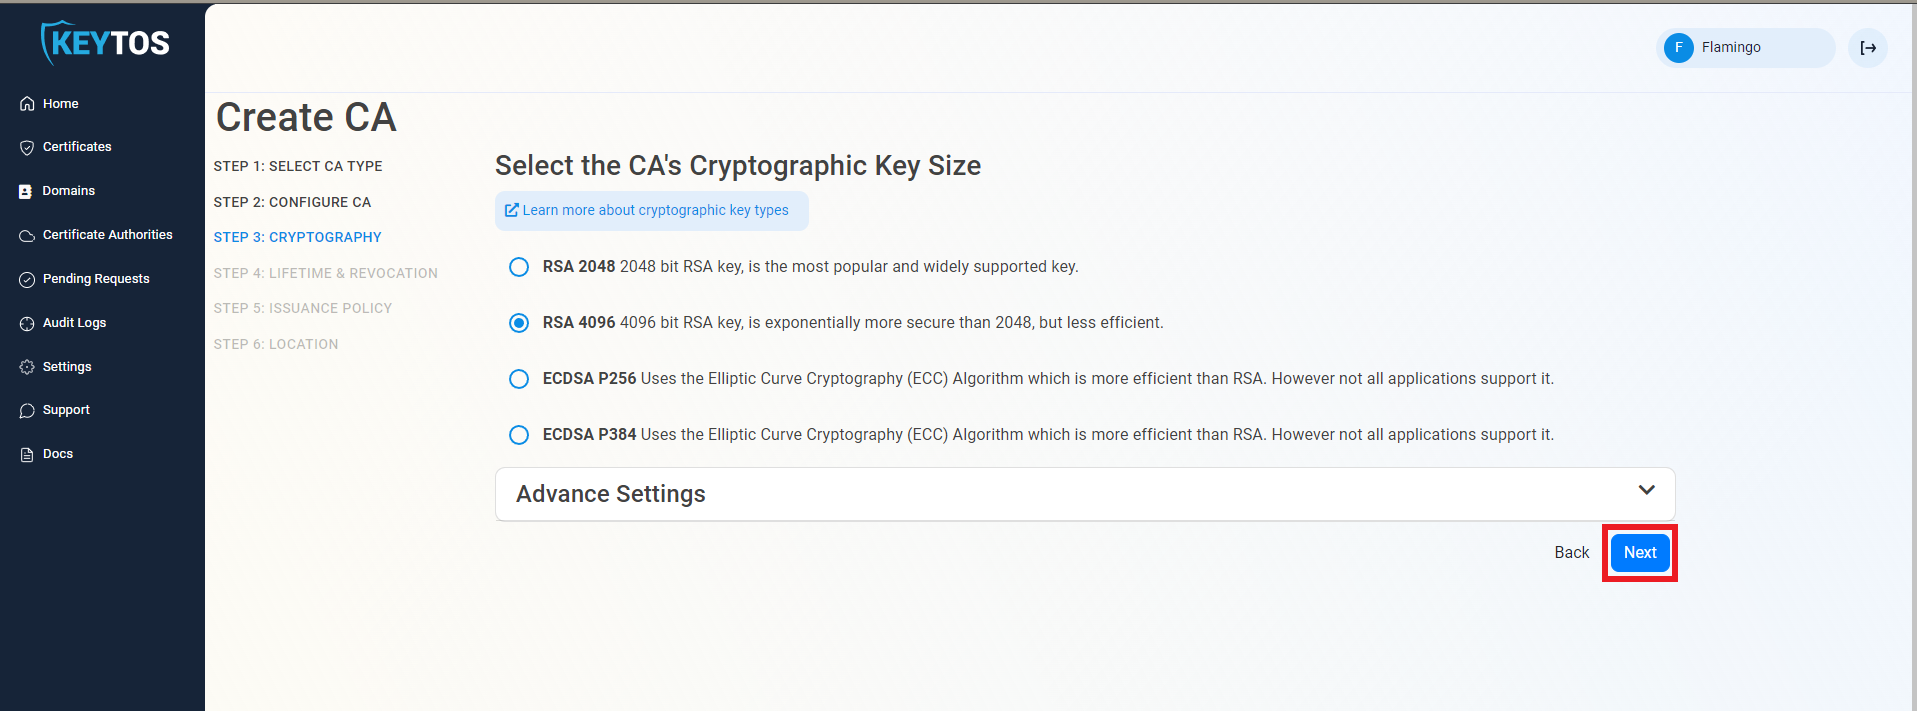
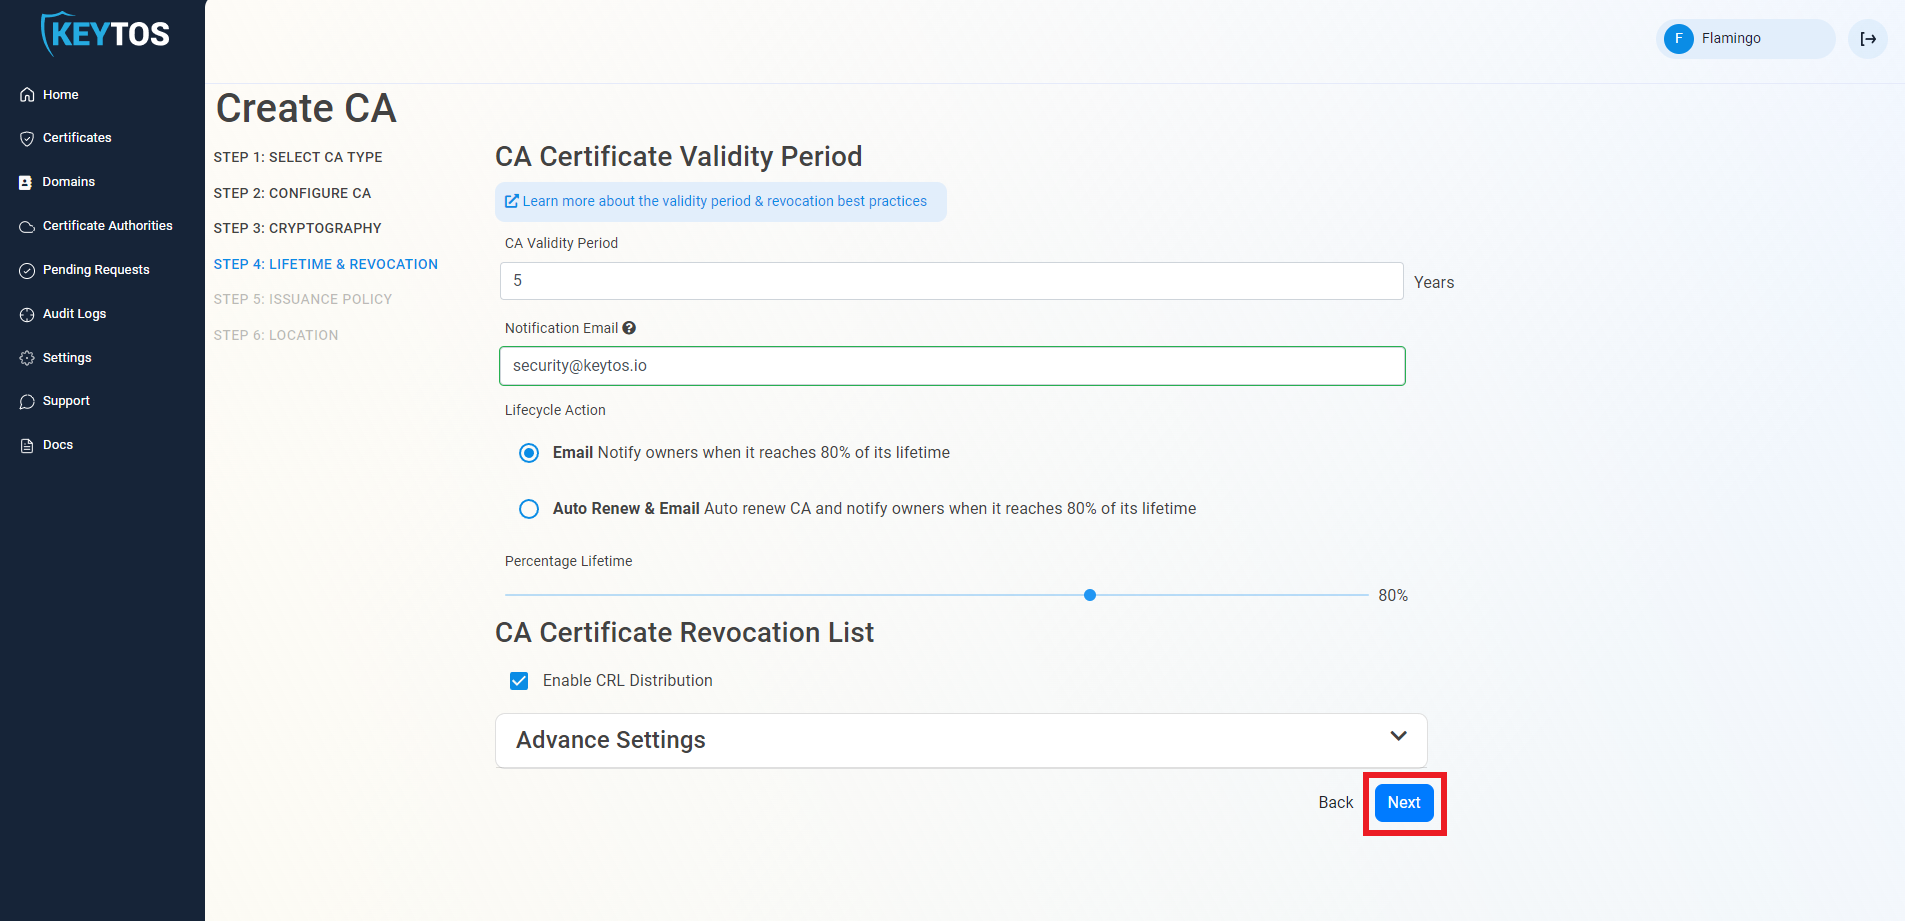
Select your Validity Period Learn more about Validity Period best practices
Enter a Notification Email this email address (as well as the PKI Administrators) will get all the notifications for the lifecycle of the CA.
Select the lifecycle action you want EZCA to take when expiry of the CA is approaching
Select the percentage of lifetime of the certificate when you want EZCA to start taking Lifecycle actions.
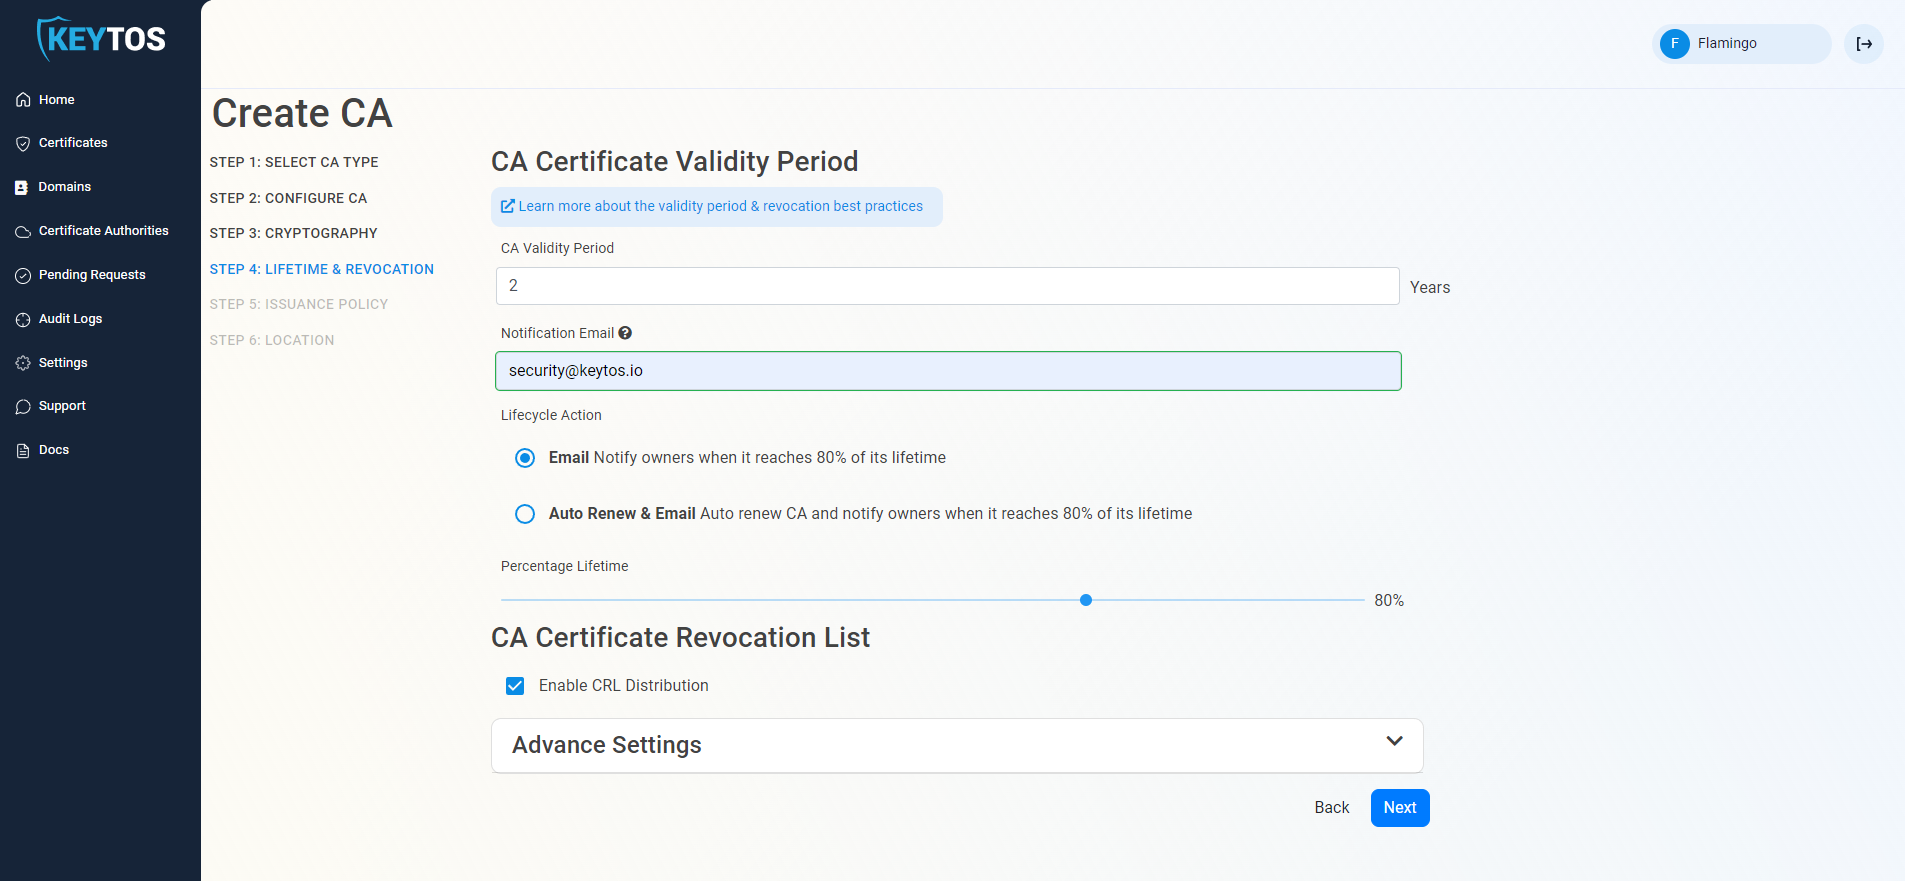
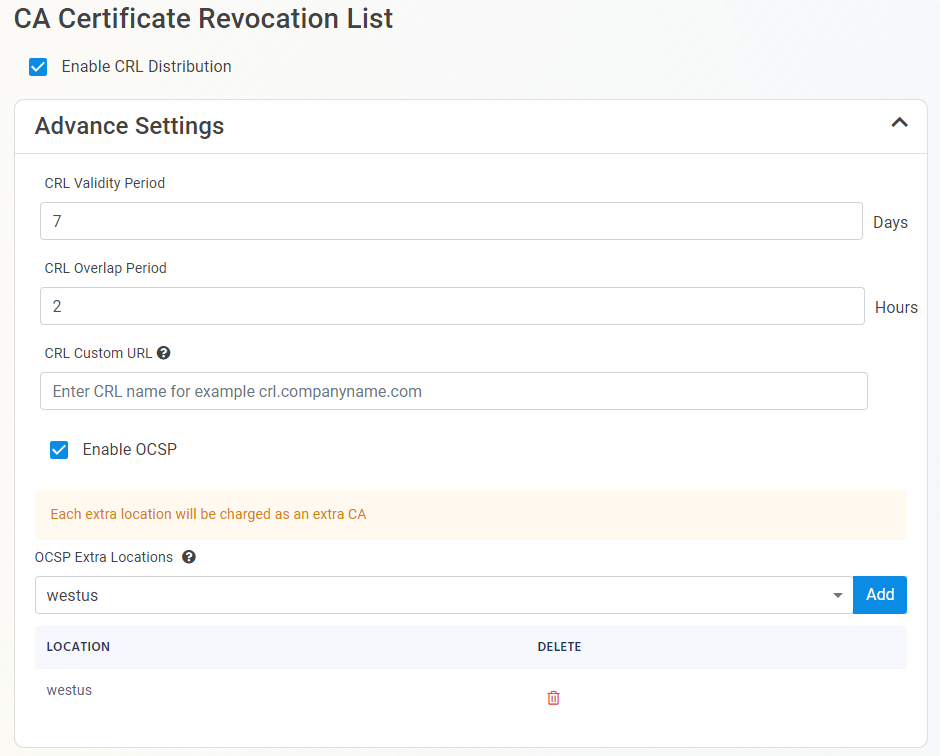
Select if you want this CA should issue a CRL (Highly recommended)
Click Next.
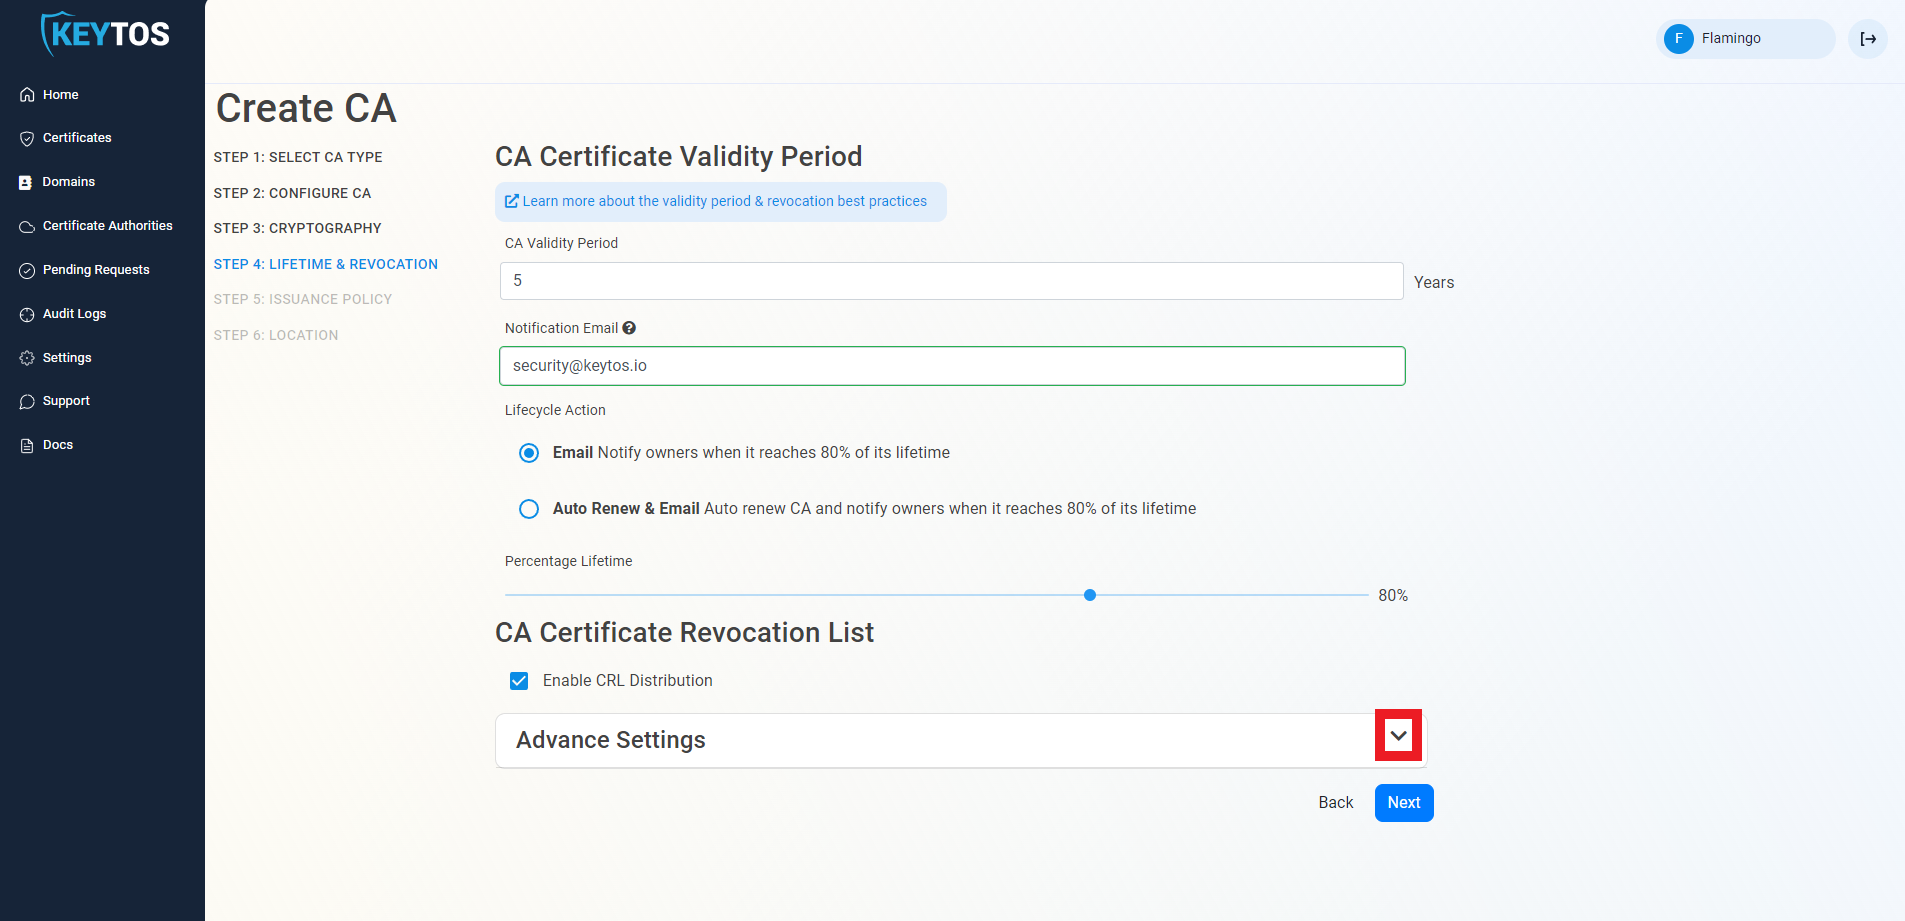
Changes to this section are only recommended for PKI experts with specific requirements.
Click the expand button
Enter the desired CRL Validity Period in days
Enter the desired CRL Overlap Period in hours
(Optional) Enter the CRL endpoint where you will publish your CRLs
Custom CRL endpoints are supported by EZCA by adding the CRL endpoint as the CRL endpoint in the certificate. However, your PKI admins are responsible from getting the CRL from EZCA and posting it in that specific endpoint.
Inside the CA Revocation advanced settings, you can enable OCSP for this CA. OCSP is only recommended if you have specific requirements for OCSP. While OCSP allows quicker revocation it increases the CA the cryptographic load and can limit the scalability of the CA (Basic CA allows 1 cryptographic activity per second, Premium CA 20 cryptographic activities per second, Isolated CA 160 cryptographic activities per second). Learn more about OCSP vs CRL
If you want to enable OCSP, select the “Enable OCSP” option.

Enabling the OCSP will create an OCSP endpoint for this CA in the same region you select for your OCSP (this is included with the price of your CA). If you require extra scalability you can create multiple OCSPs for your certificate authority in different regions. Note: Each extra OCSP will be charged as an extra Certificate Authority.
Once you have setup your certificate revocation, click Next.
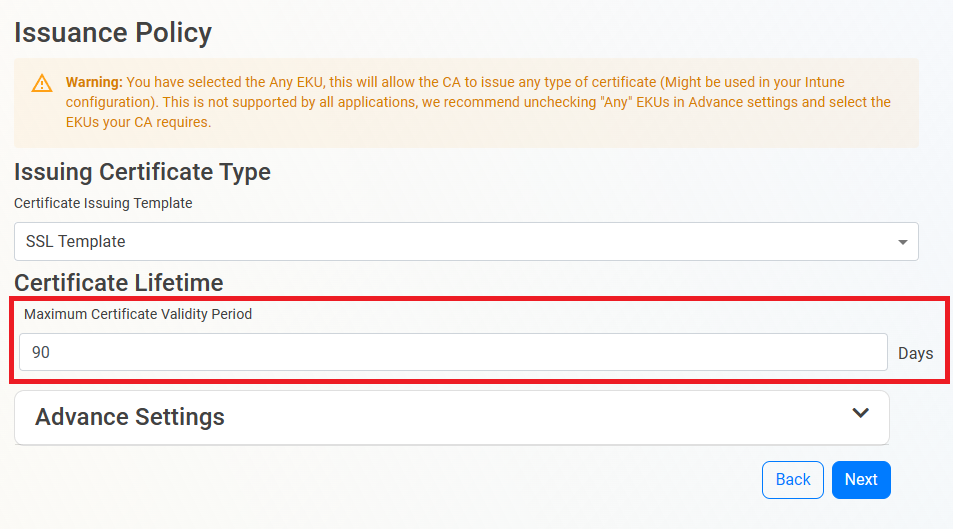
The first thing we must select is what type of CA we want to create, in this example we are creating an “SSL CA” which can be used for Azure IoT our integrated Azure Key Vault, ACME or any other SSL/TLS use case. If you need a different type of CA, for example scep for an mdm or root CA, select the appropriate template.
Certificate Authorities can only have a single template. If you need to issue different types of certificates, such as SCEP, we recommend creating multiple CAs for each use case. See our FAQ for more information
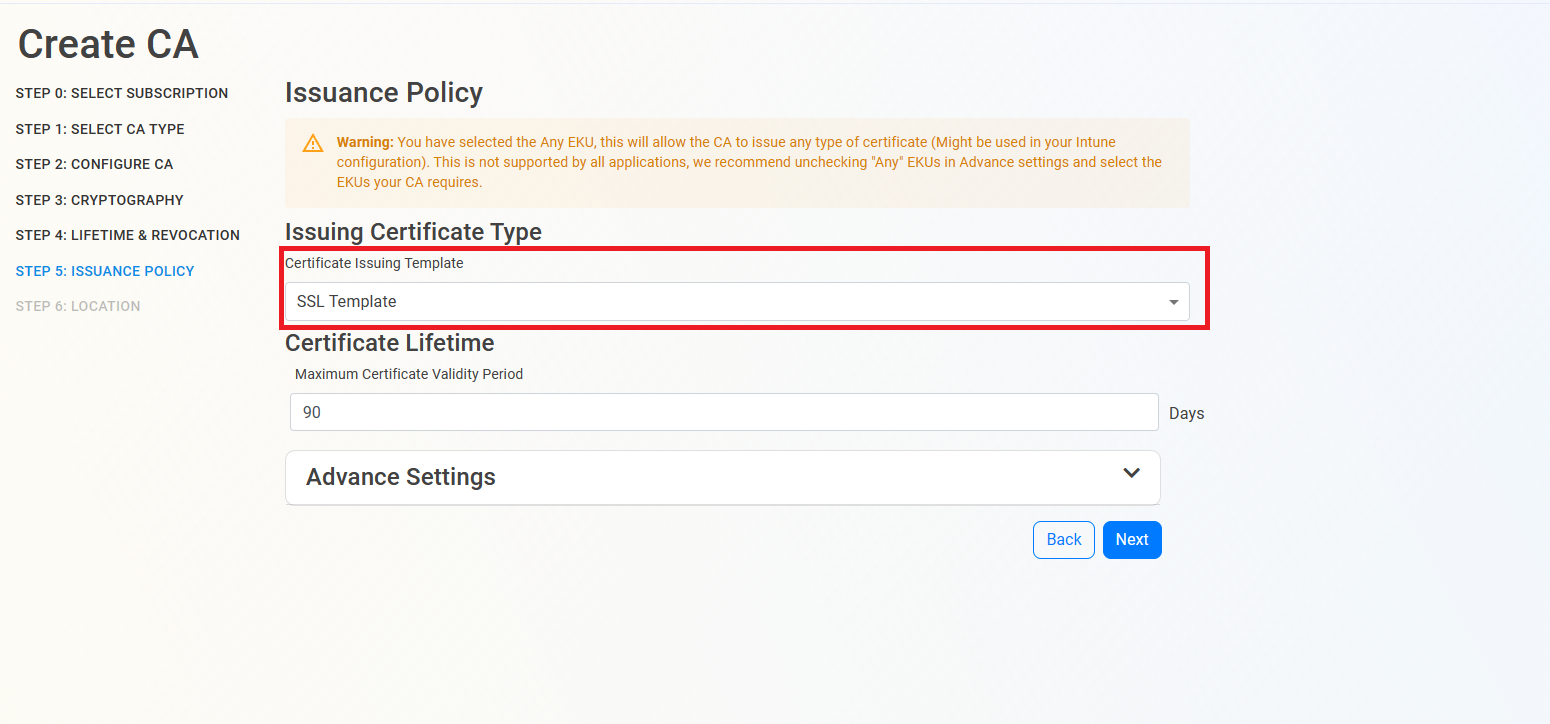
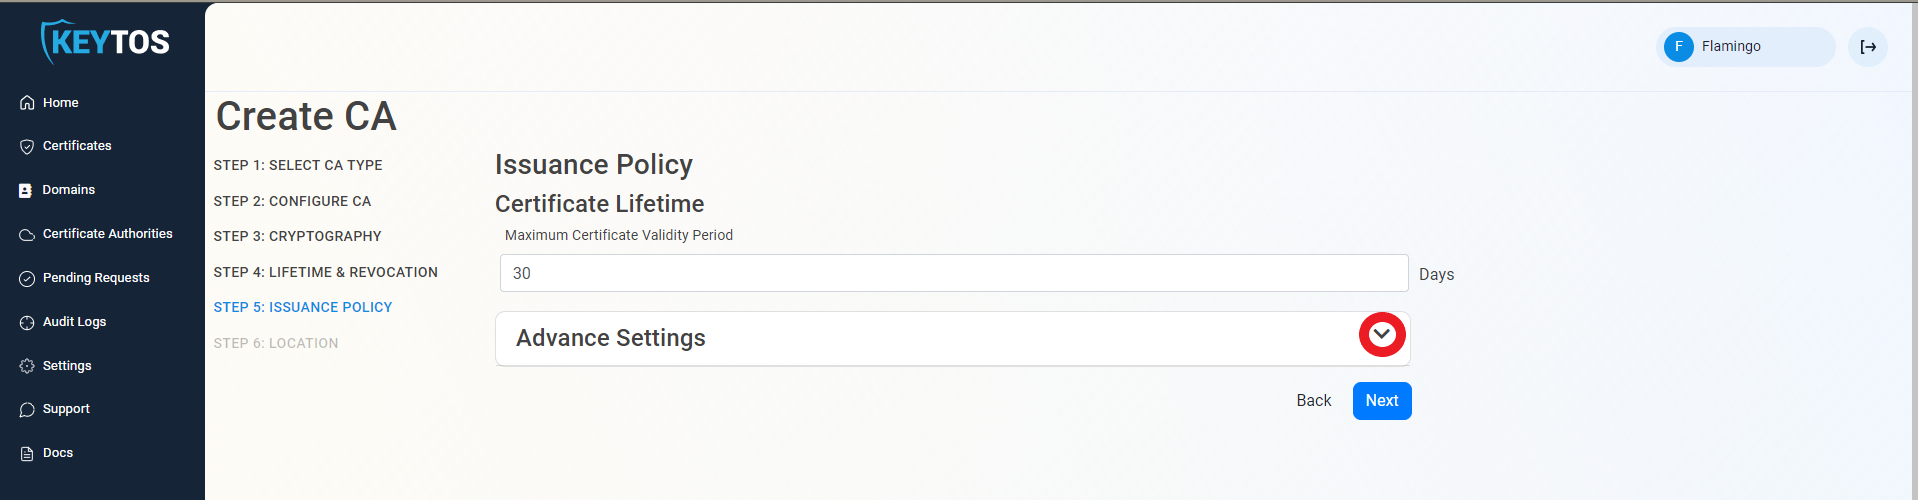
Then, Enter the largest certificate lifetime that this CA can issue. EZCA automatically calculates the recommended maximum based on CA lifecycle best practices.
as you can see at the top of the page there is a waring about the EKUs, by default EZCA will enable the “all” EKU, which means that this CA can issue certificates for any use case. However, there are some libraries such as OpenSSL that do not support this EKU type. If you want to change the EKUs for a specific use case, you can do so by expanding the advanced settings and selecting the desired EKUs (unselect any before making other selections).

This section gives you grater granularity on who can request. This is not required for most organizations.
Click the expand button
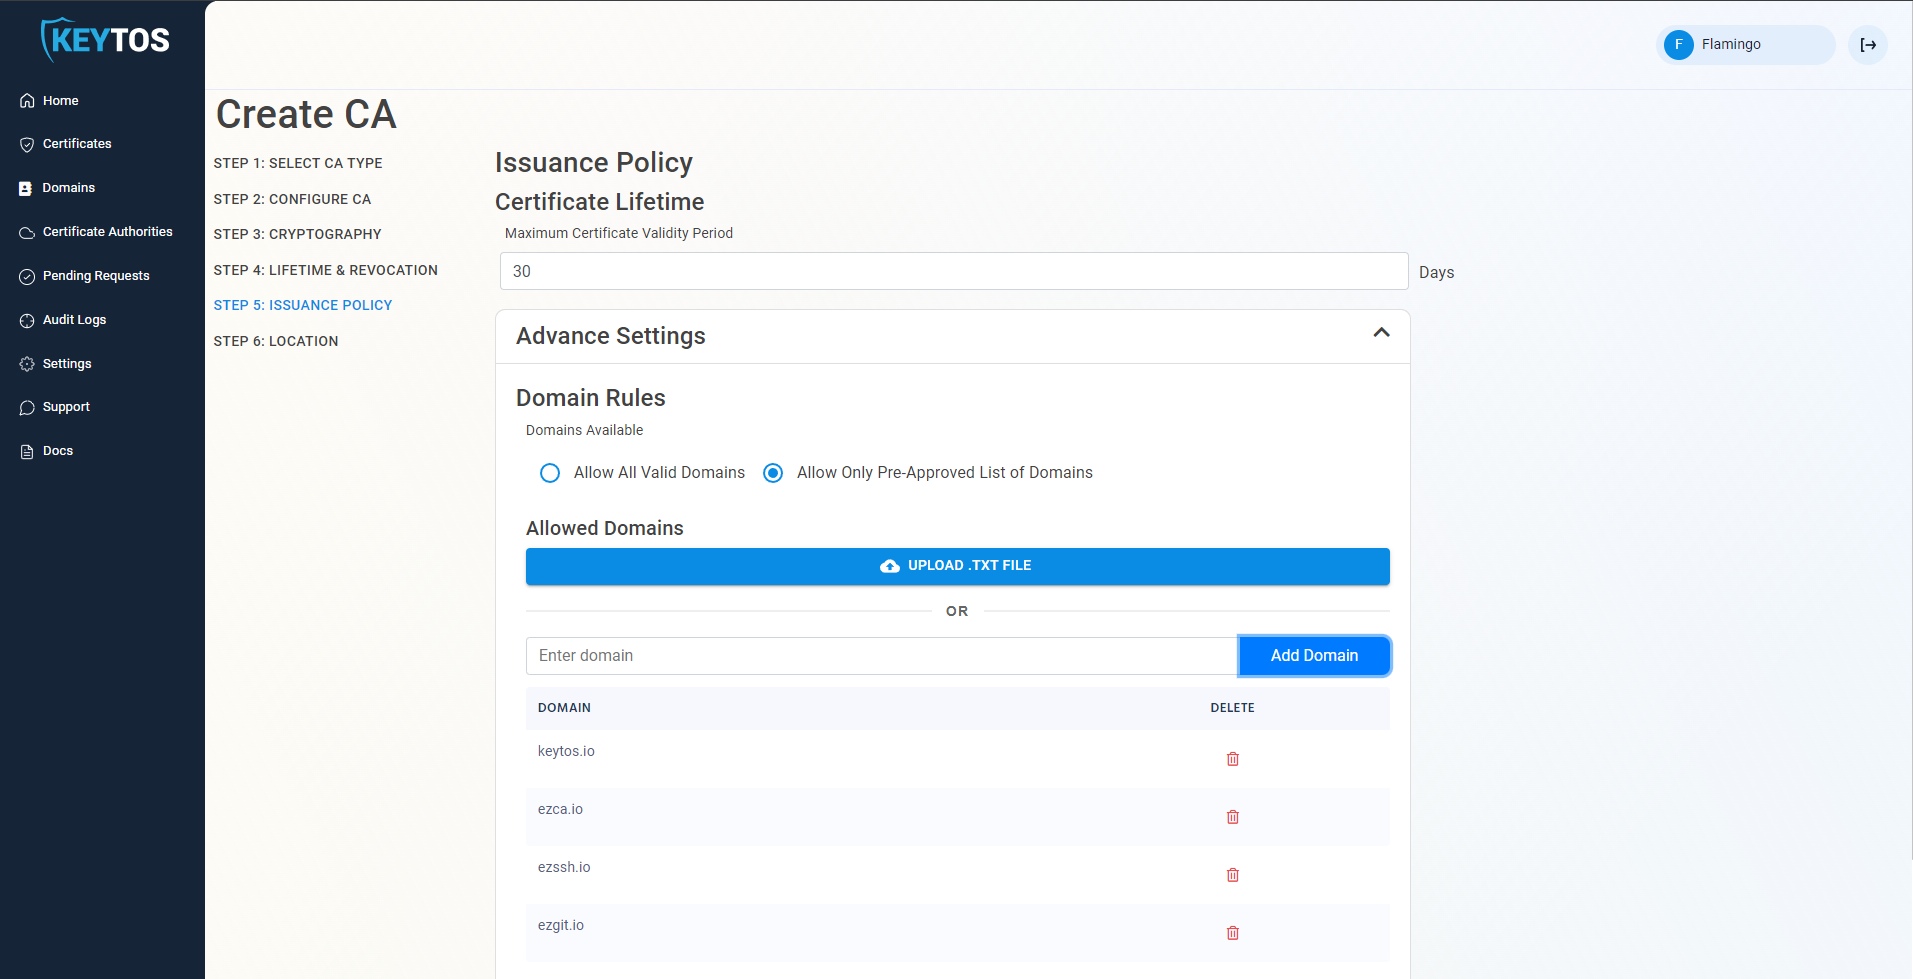
Since this is not a publicly trusted CA, by default EZCA will allow requesters to register any domains. If you want to limit which domains can this CA issue, Select the “Allow Only Pre-Approved List of Domains” option.
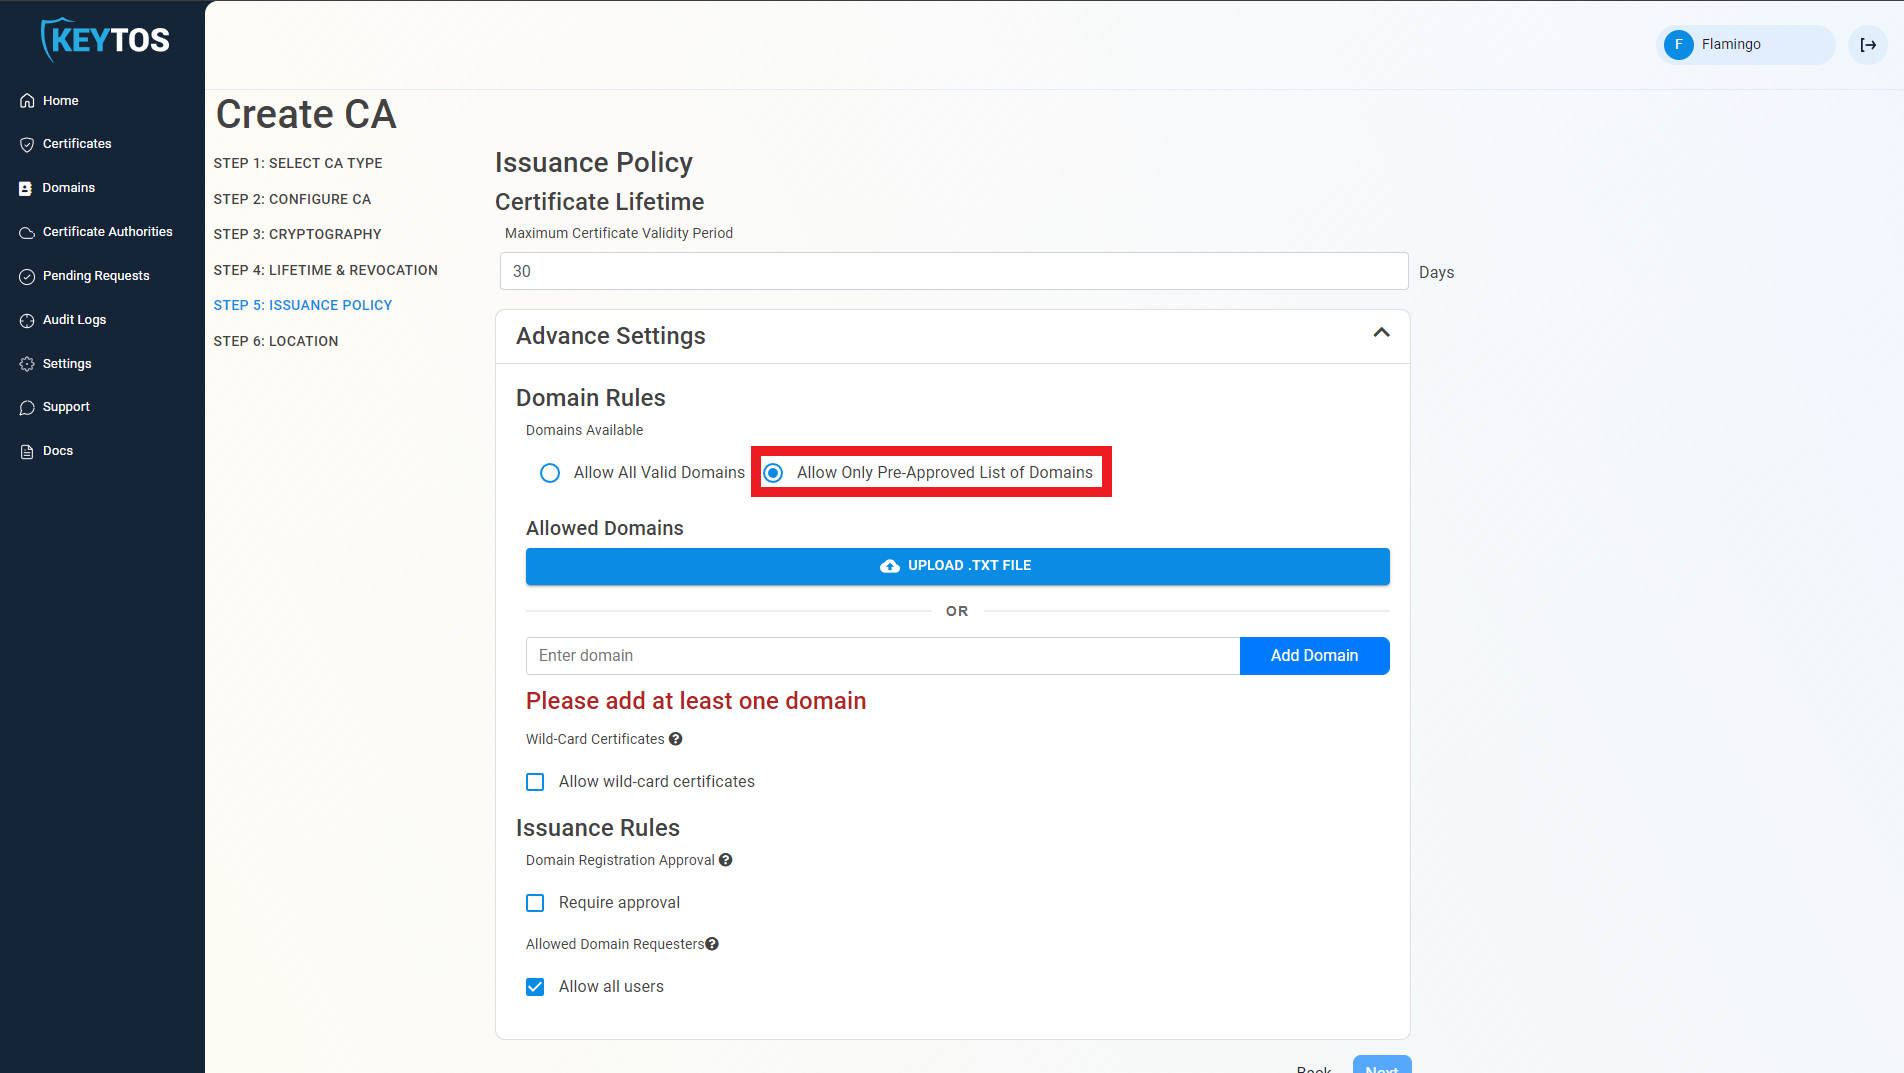
Upload a .txt file with your Pre-Approved domains (one per line), or enter them in the portal.
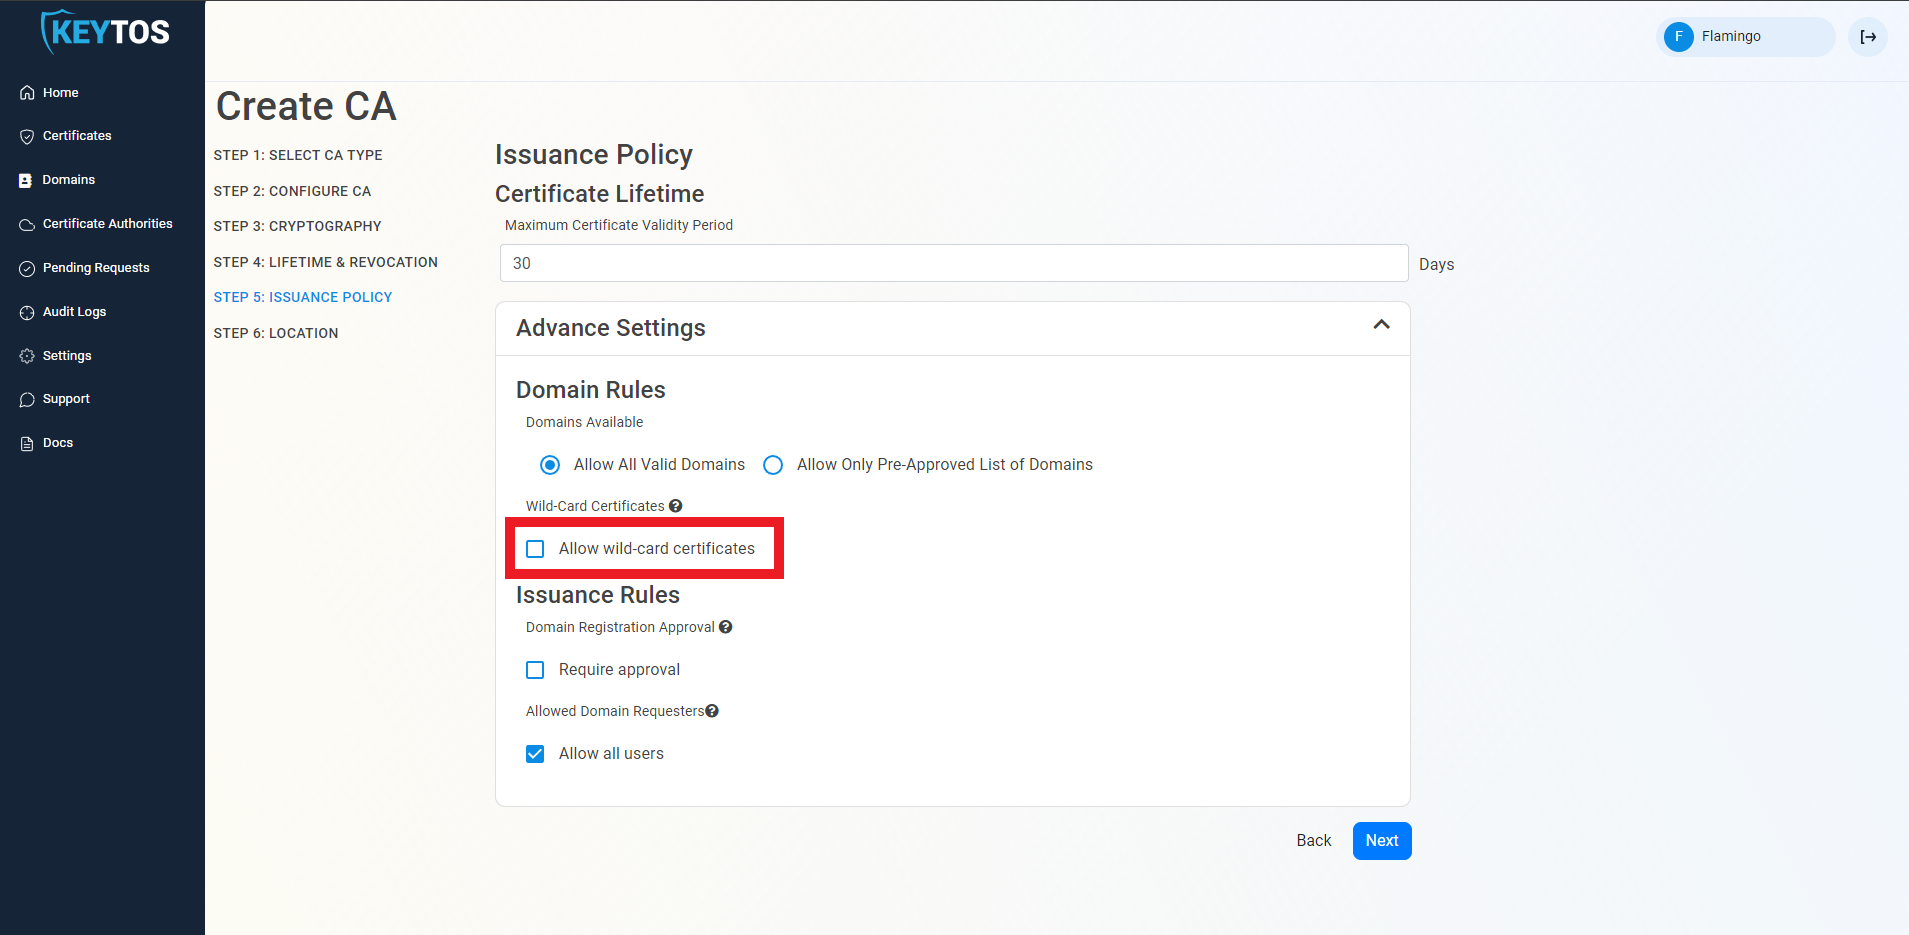
By default EZCA does not allow users to request certificates with wildcard domains (a domain that starts with *. which allows you to use that same certificate for all other subdomains). If you want EZCA to issue wildcard certificates, select the “Allow wild-card certificates” option.
This setting cannot be changed after the CA is created. If you need to change this setting you will need to create a new CA. This is done to ensure the security and integrity of the CA’s configuration, as allowing changes to wildcard issuance could potentially lead to security vulnerabilities or misconfigurations that could lead to unauthorized certificate issuance or outages.
To enable more granular control who can request domain ownership in EZCA, we created to extra knobs PKI administrators can adjust to control domain ownership.
Require domain registration approval. This option enables PKI administrators to set a group of approvers that must approve each domain registration before a user or group of users are registered as domain owners.
To enable this option select the “require approval” option.
Enter the users or AAD groups that can approve domain requests.

The second way PKI administrators can control the registration of domains is to only allow specific users to request domains. This option enables PKI administrators to set a list of users that can request domains for this CA.
To enable this option deselect the “Allow all users” option.
Enter the users or AAD groups that can register domains.

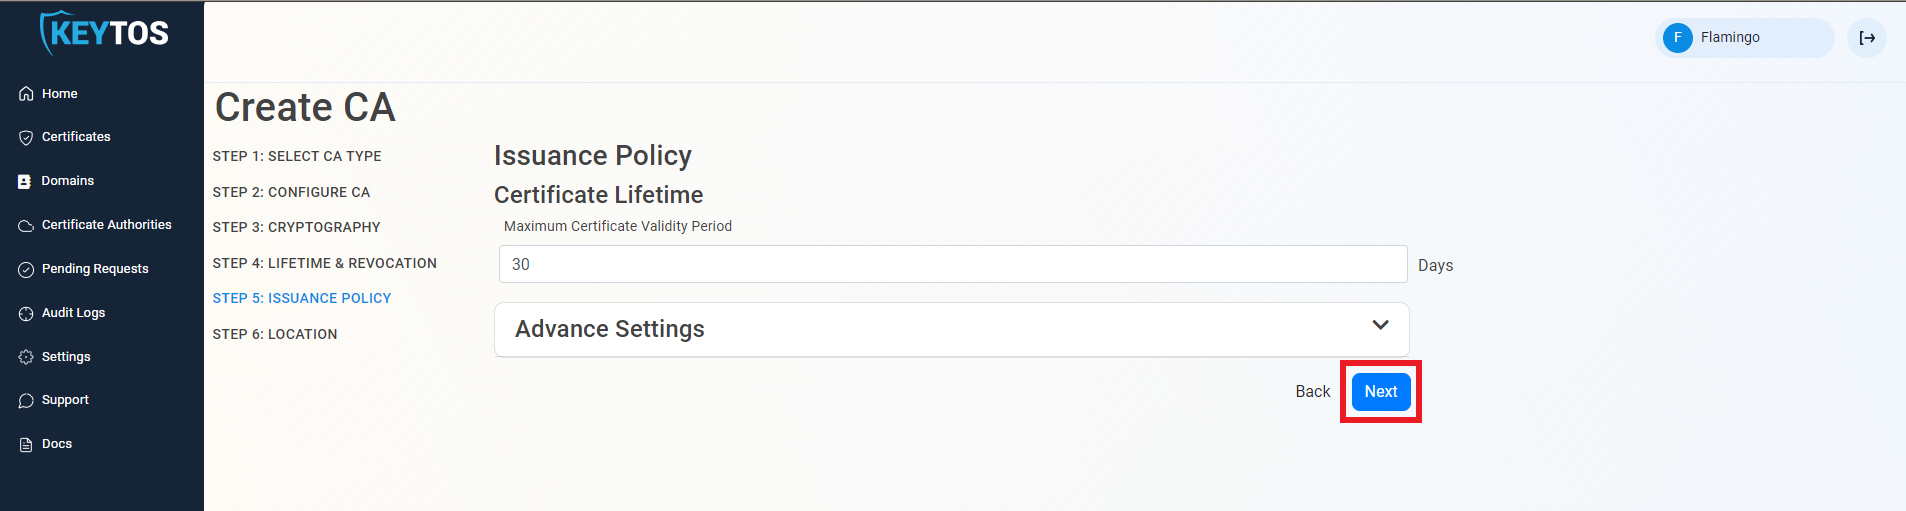
Once you are done setting up your issuance policy, click Next.
Select the location where you want your CA to be created.
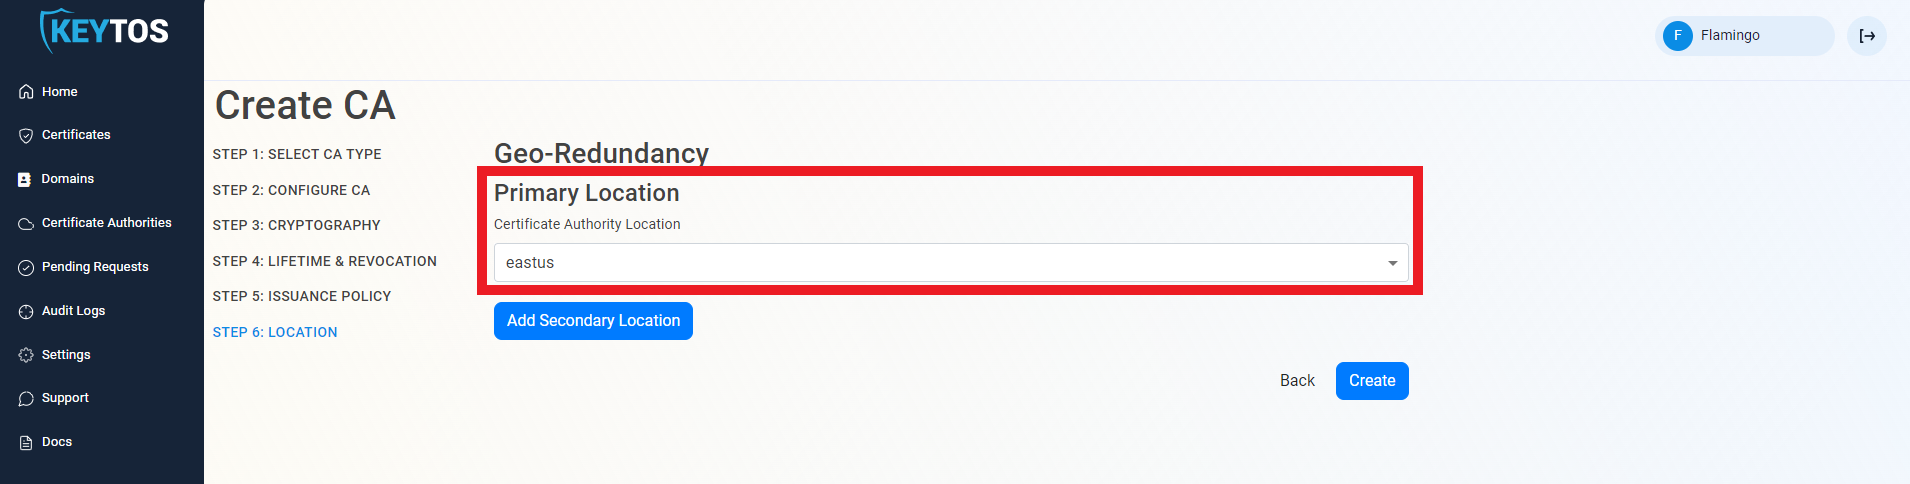
EZCA Allows you to create multiple CAs across many regions to create Geo-Redundancy.
Each location will be charged as an extra Certificate Authority.
Click the “Add Secondary Location” Button.

Enter the Location information.
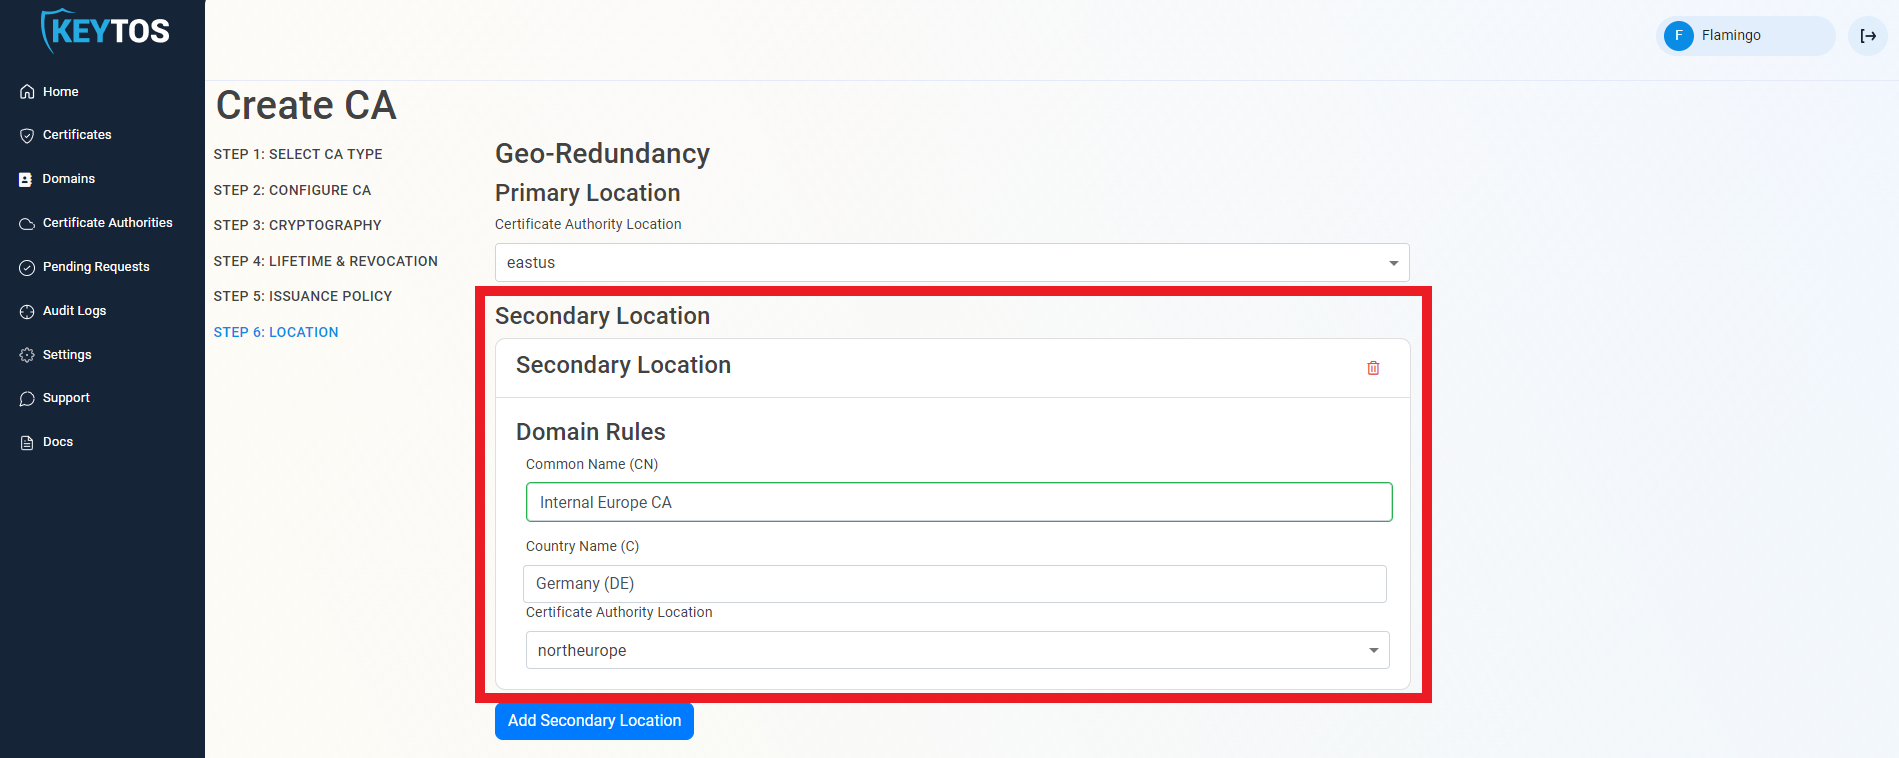
Add as many locations as needed.
Click Create.
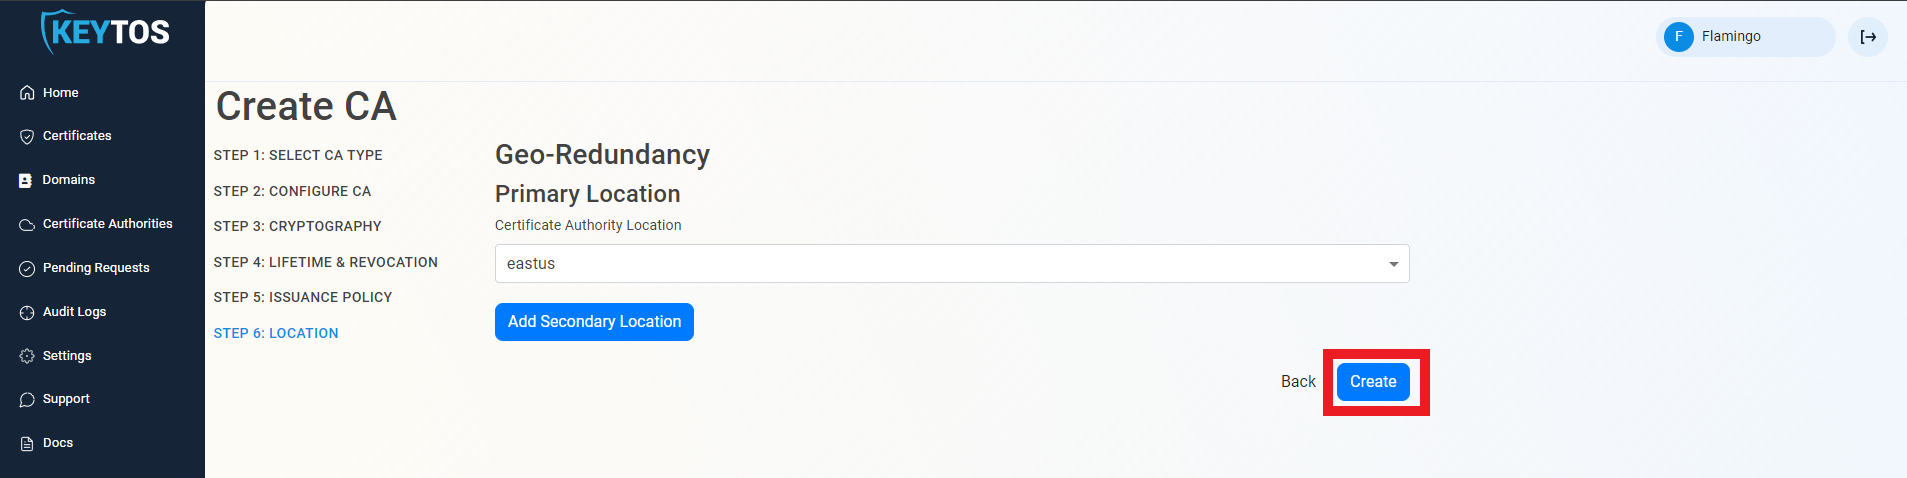
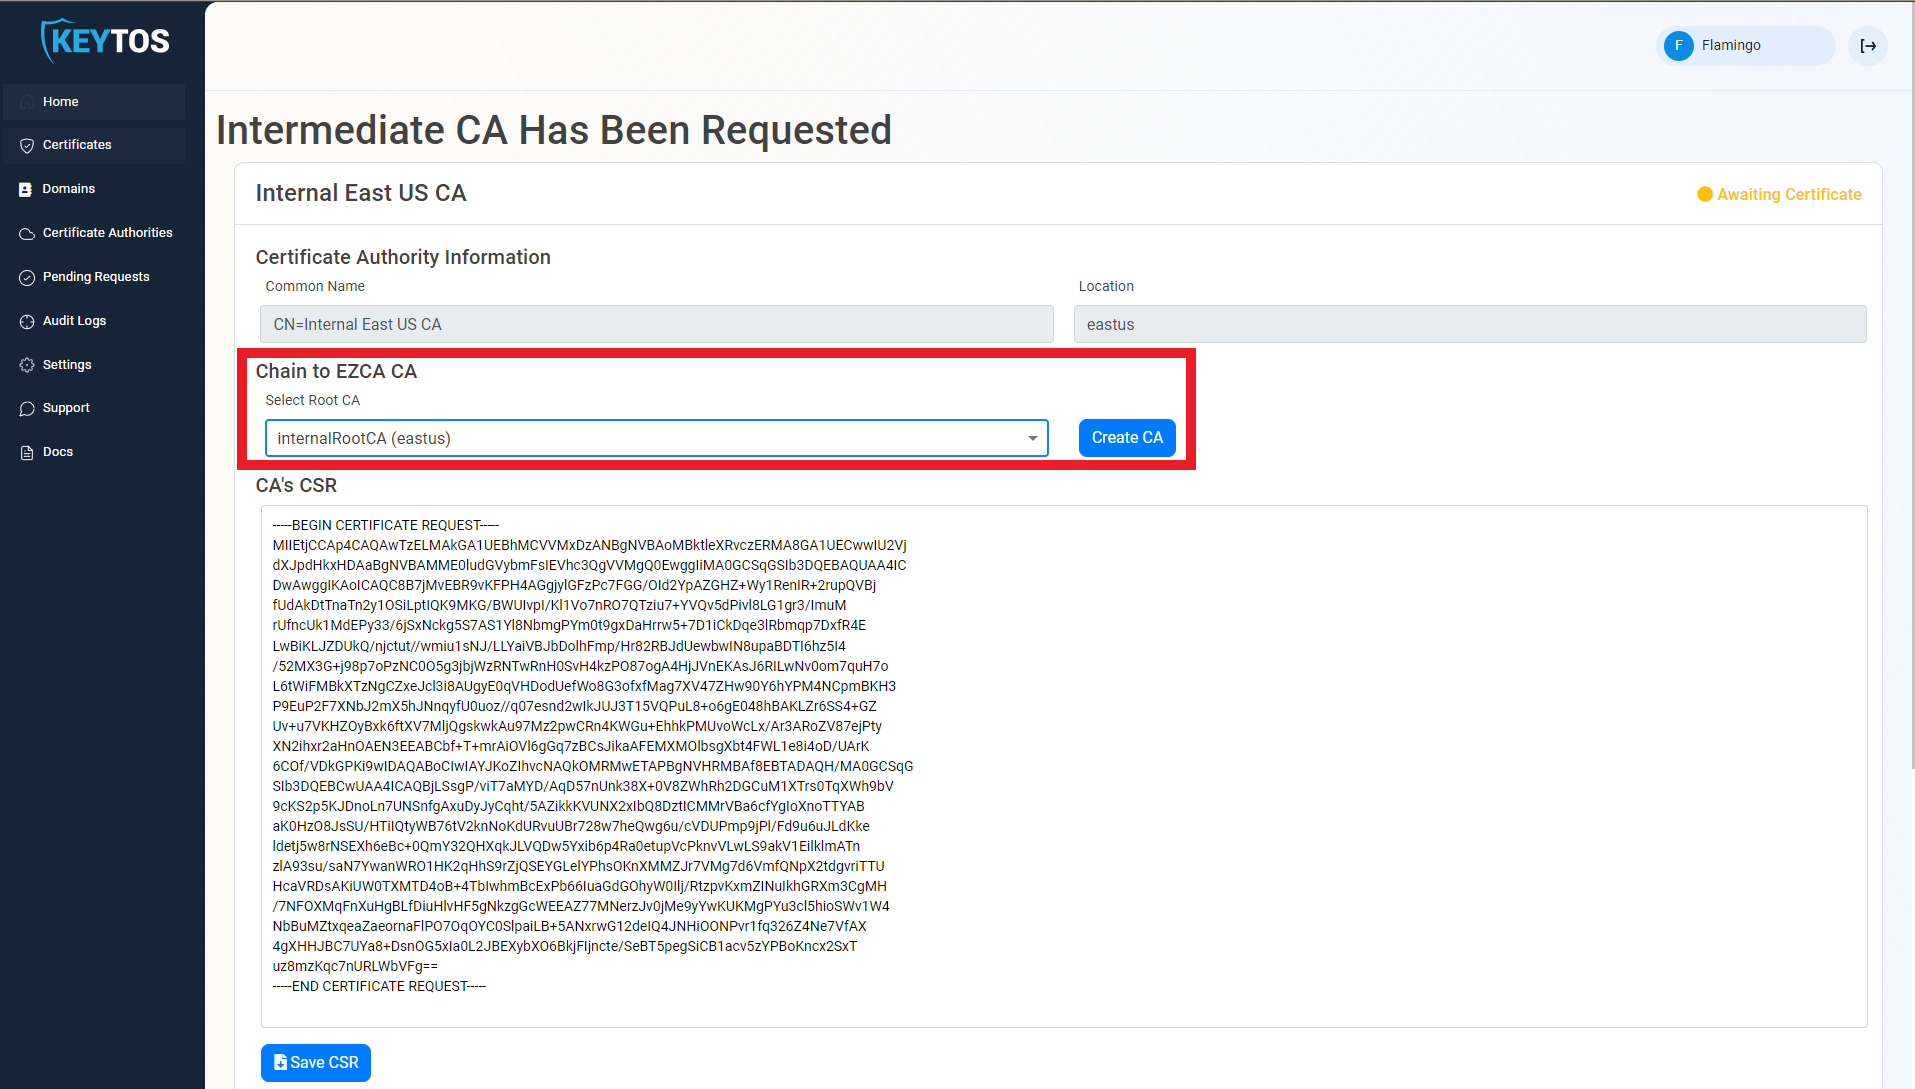
Once the CA is requested, a Certificate Signing Request (CSR) will be created for each location.
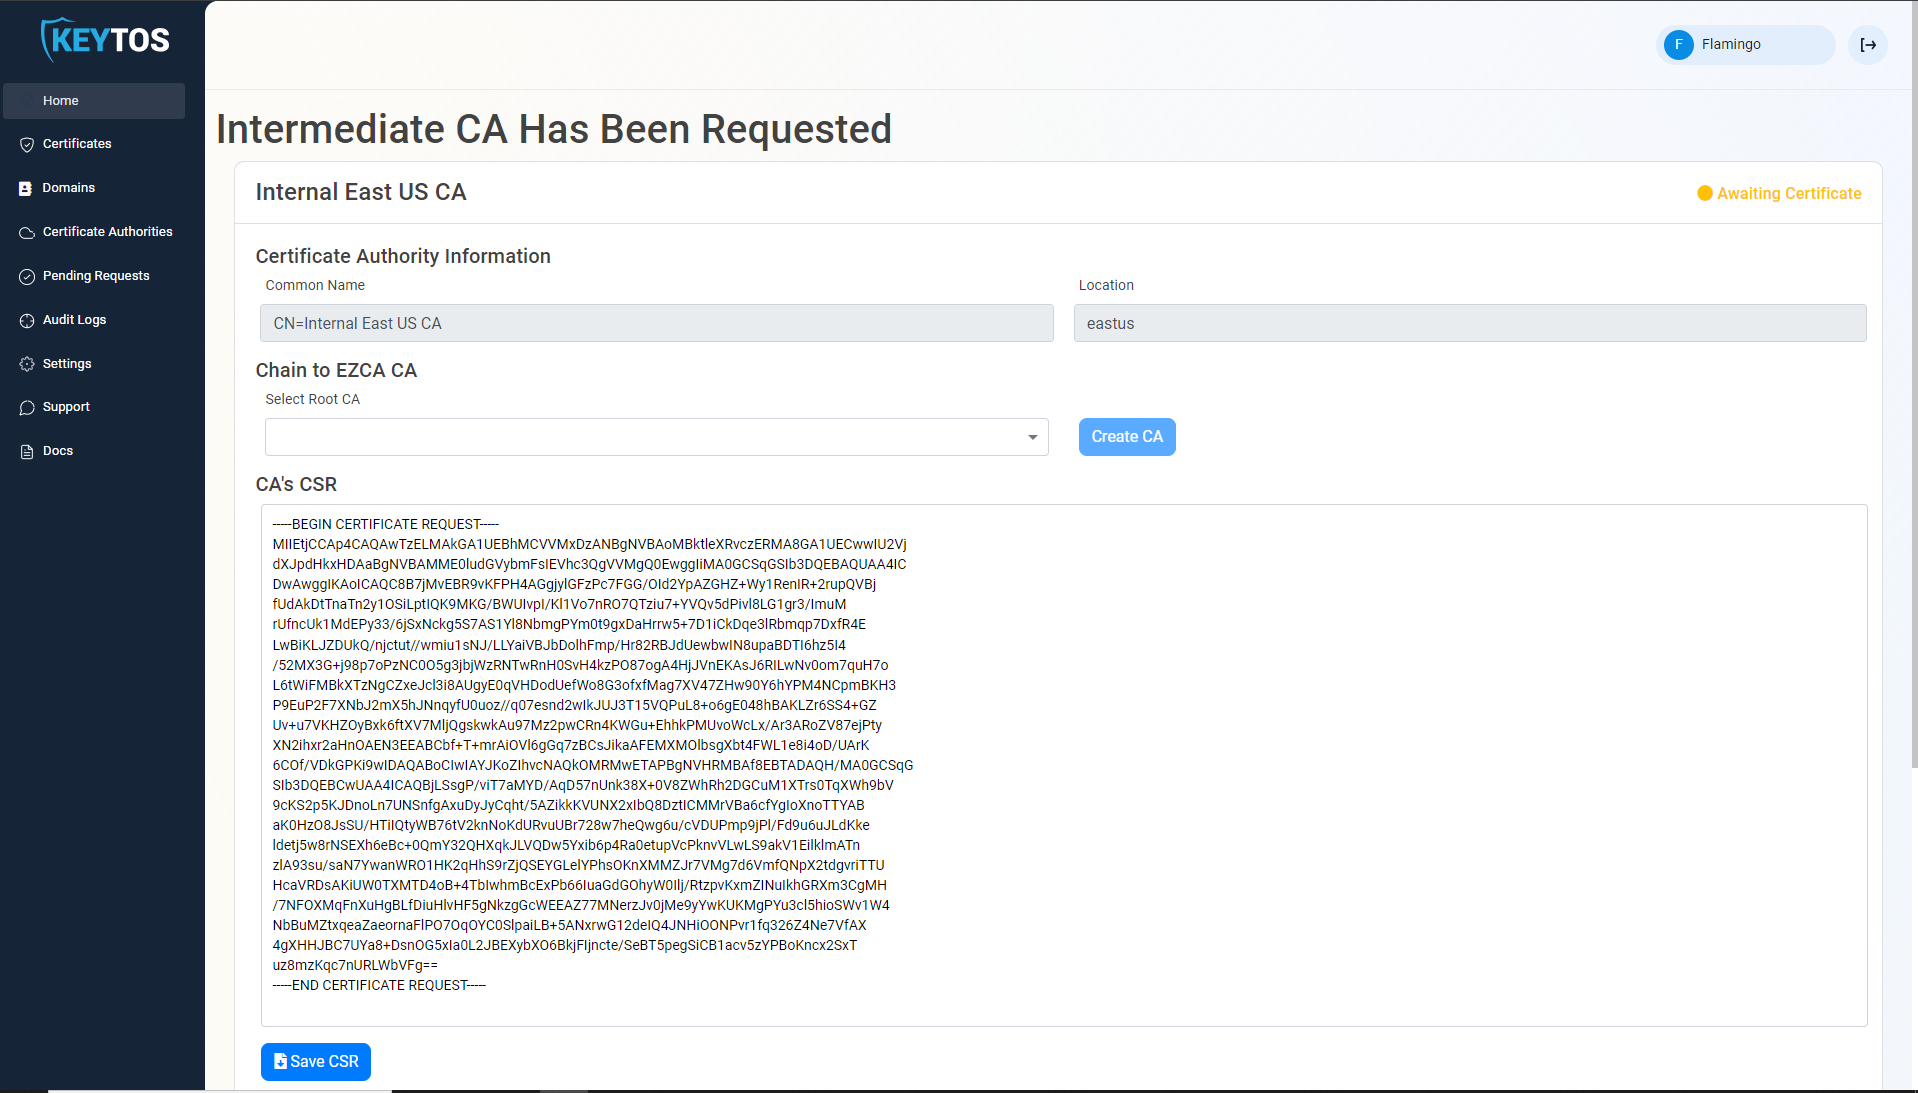
If your desired Root CA is an EZCA CA, Select it from the dropdown and click create CA.
Repeat these steps for each location.
Your CA is ready to be used!
Next step: Register your first domain
If you prefer to chain your CA to an offline Root CA, follow these steps.
Once the CA is requested, a Certificate Signing Request (CSR) will be created for each location.
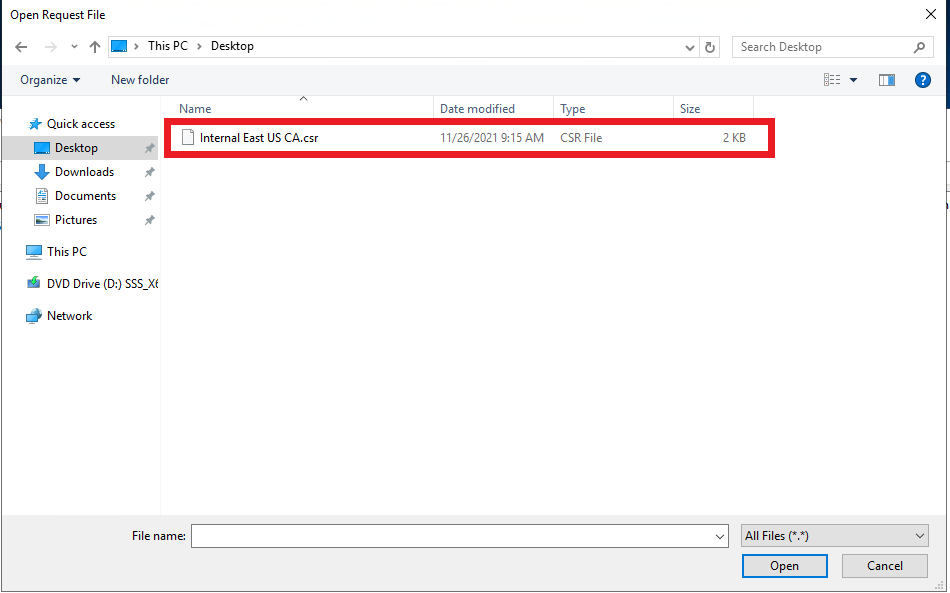
Click the “Save CSR” Button.
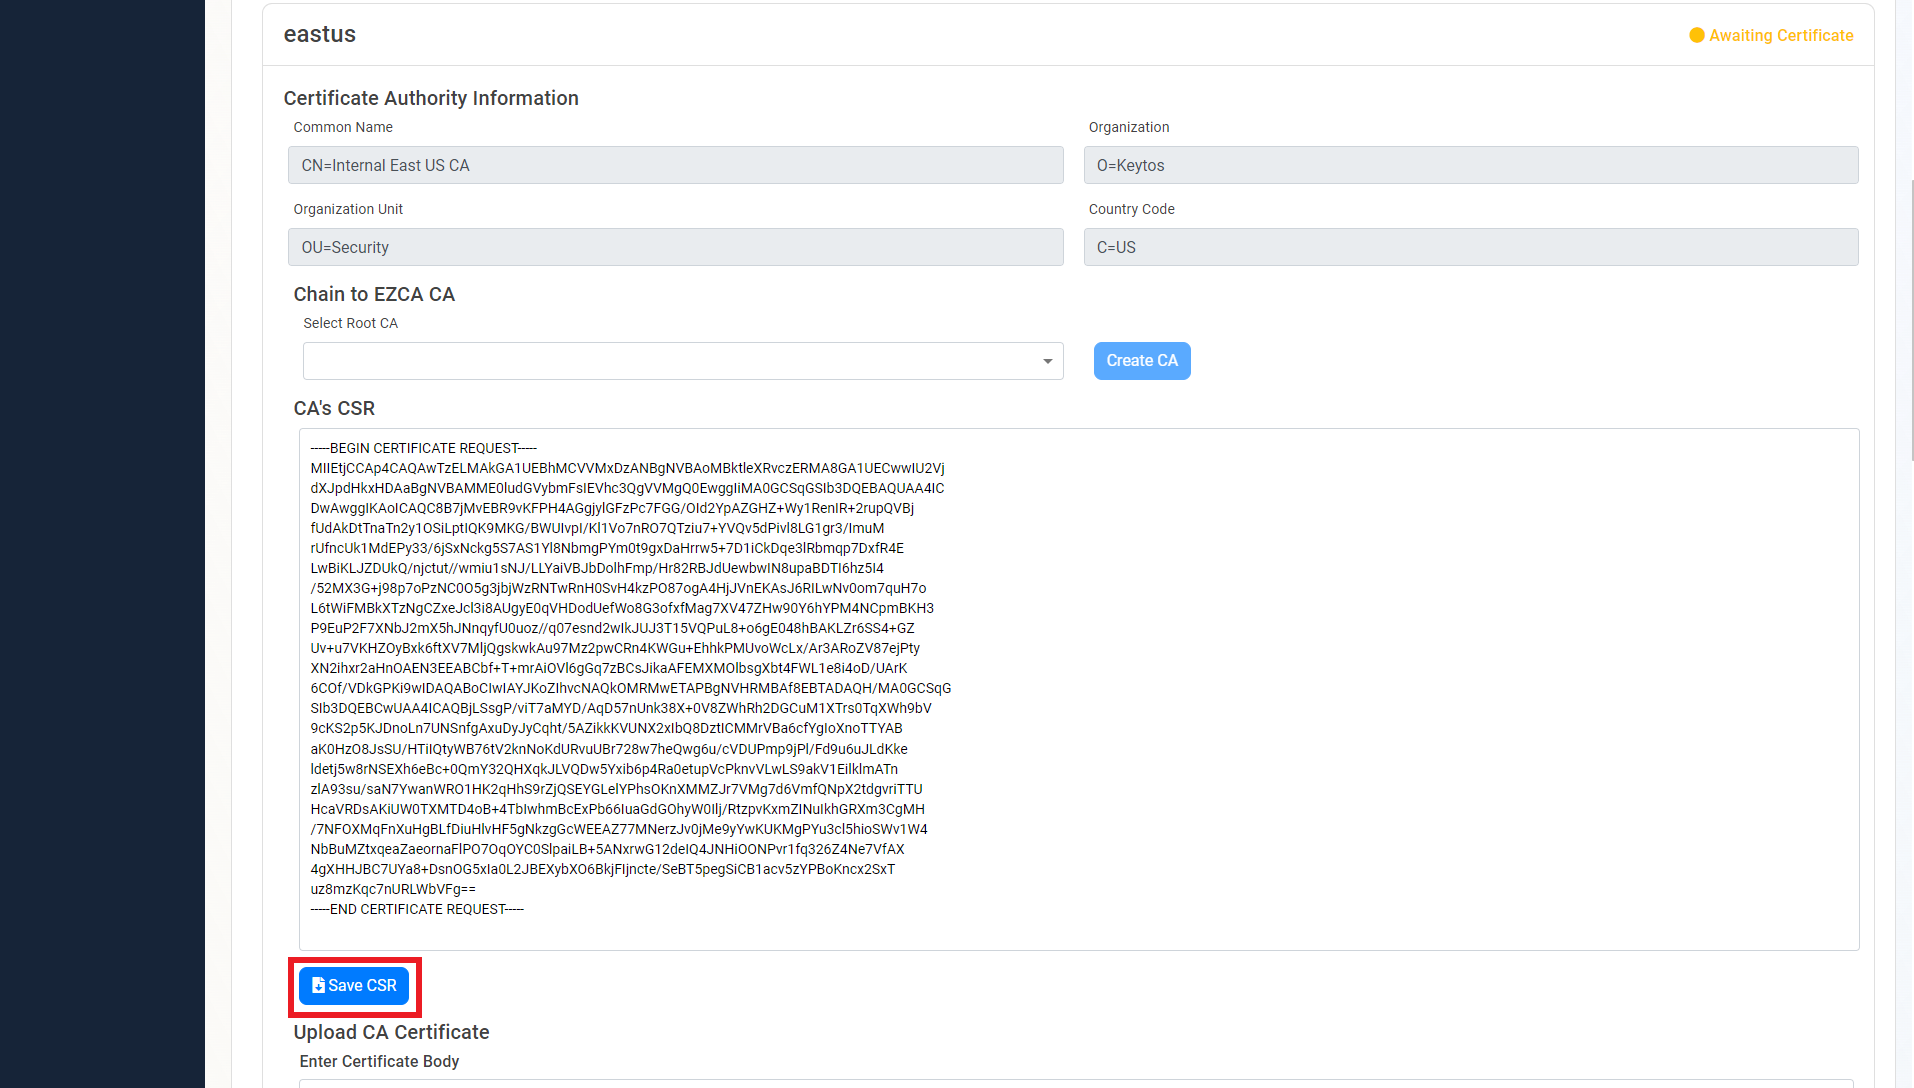
Once the CSR is download, follow your internal guidance to transfer that CSR to your offline Root CA.
Open your “Certificate Authority” in Windows.
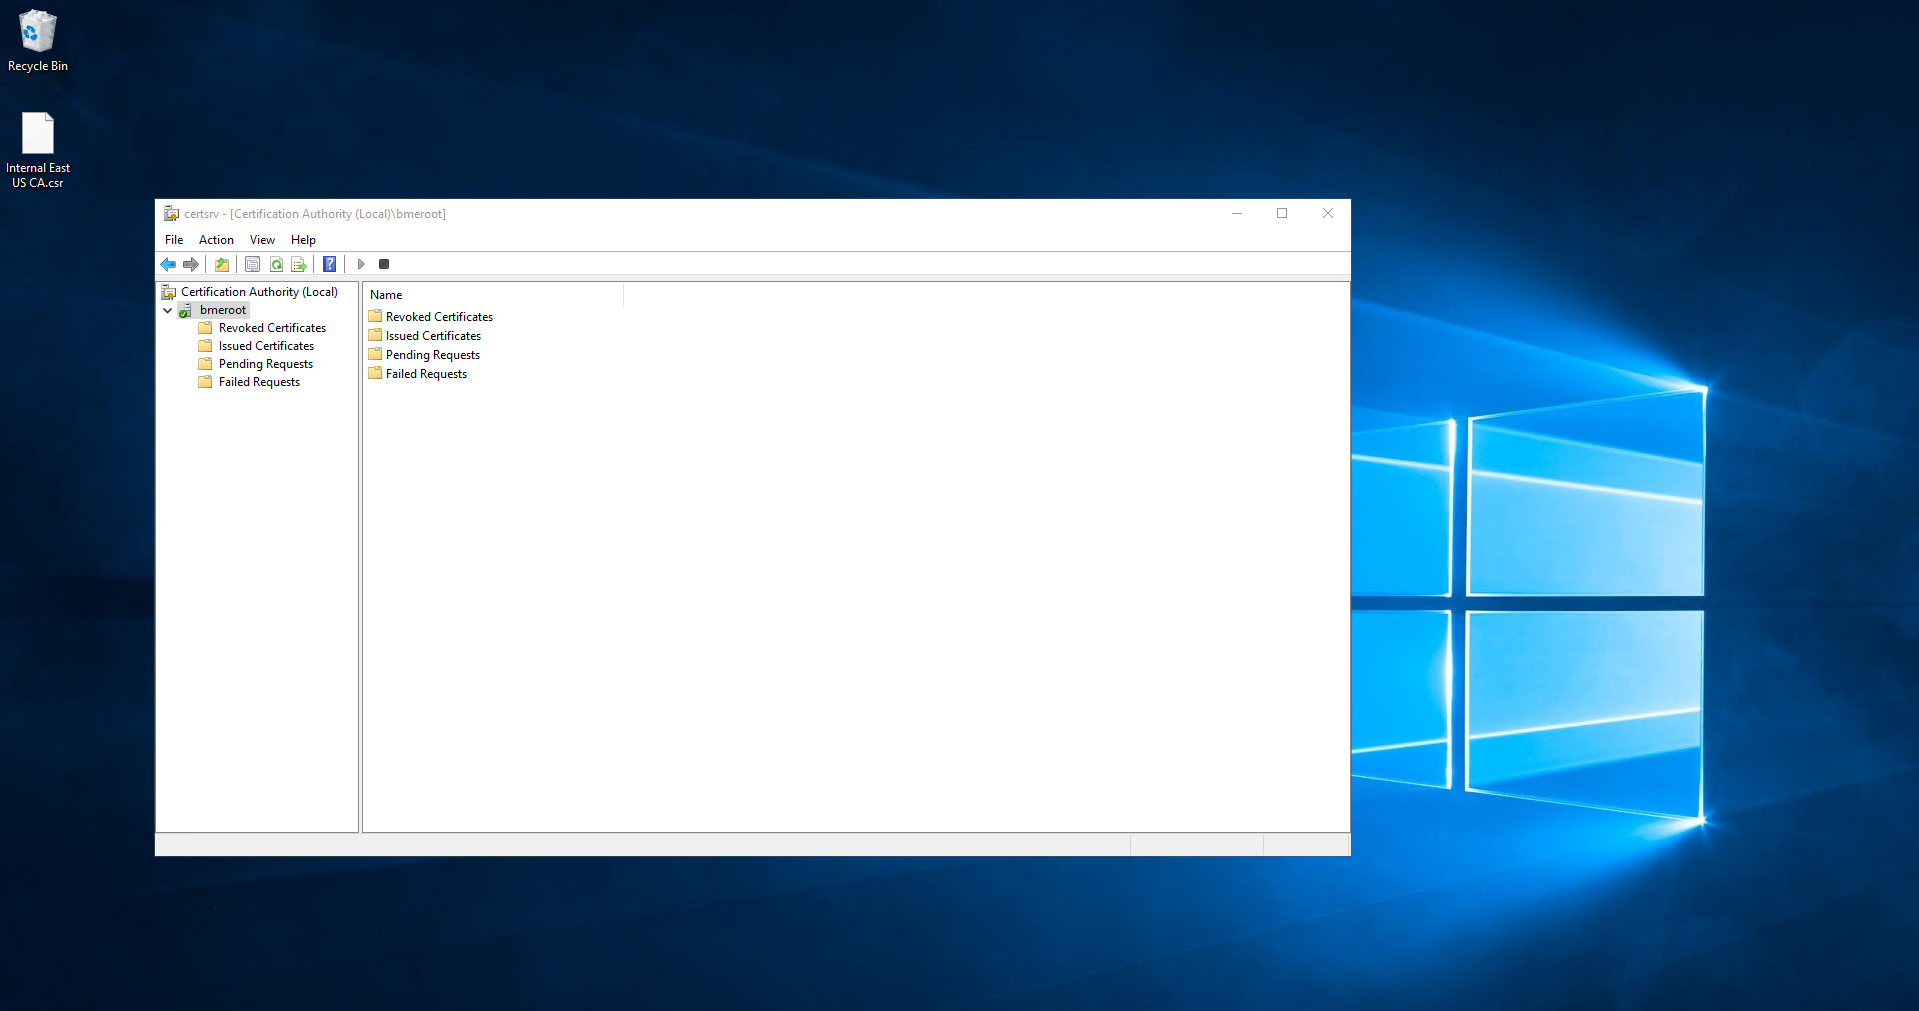
Right click the CA.
Select All Tasks -> Submit new Request.
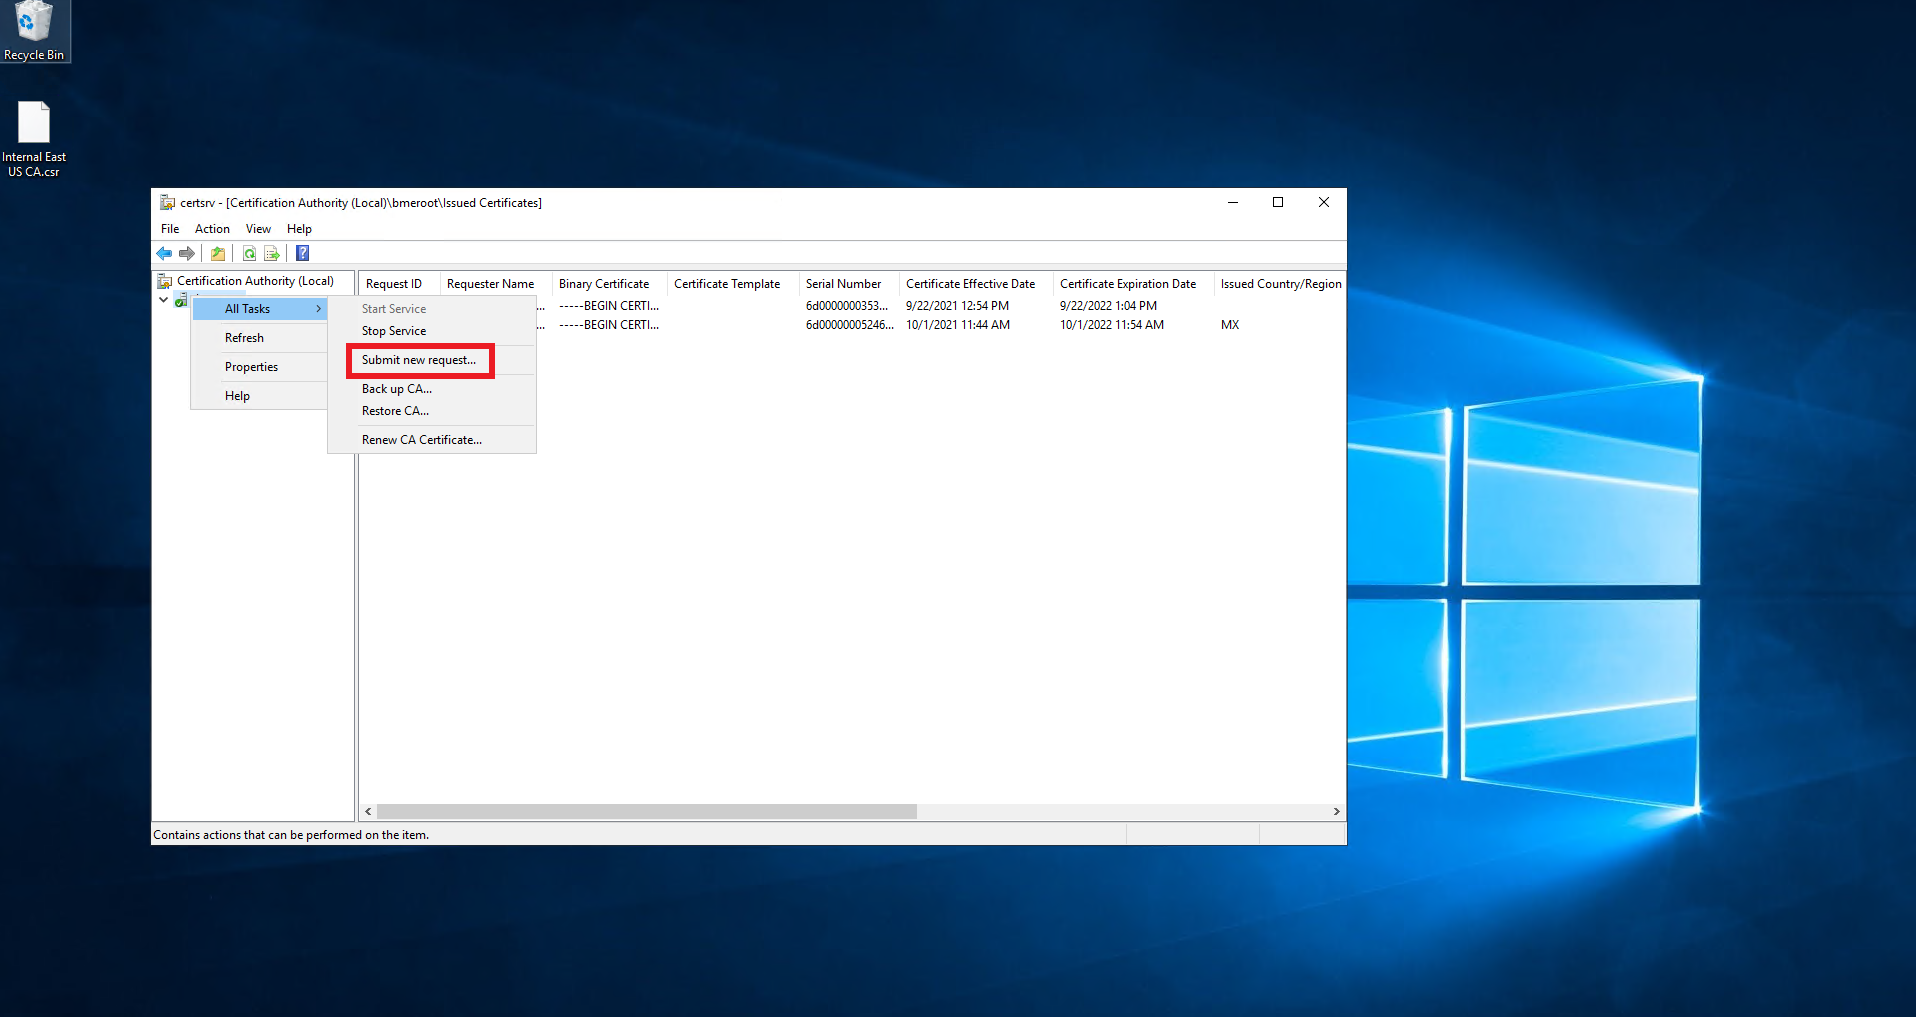
Select the downloaded CSR.
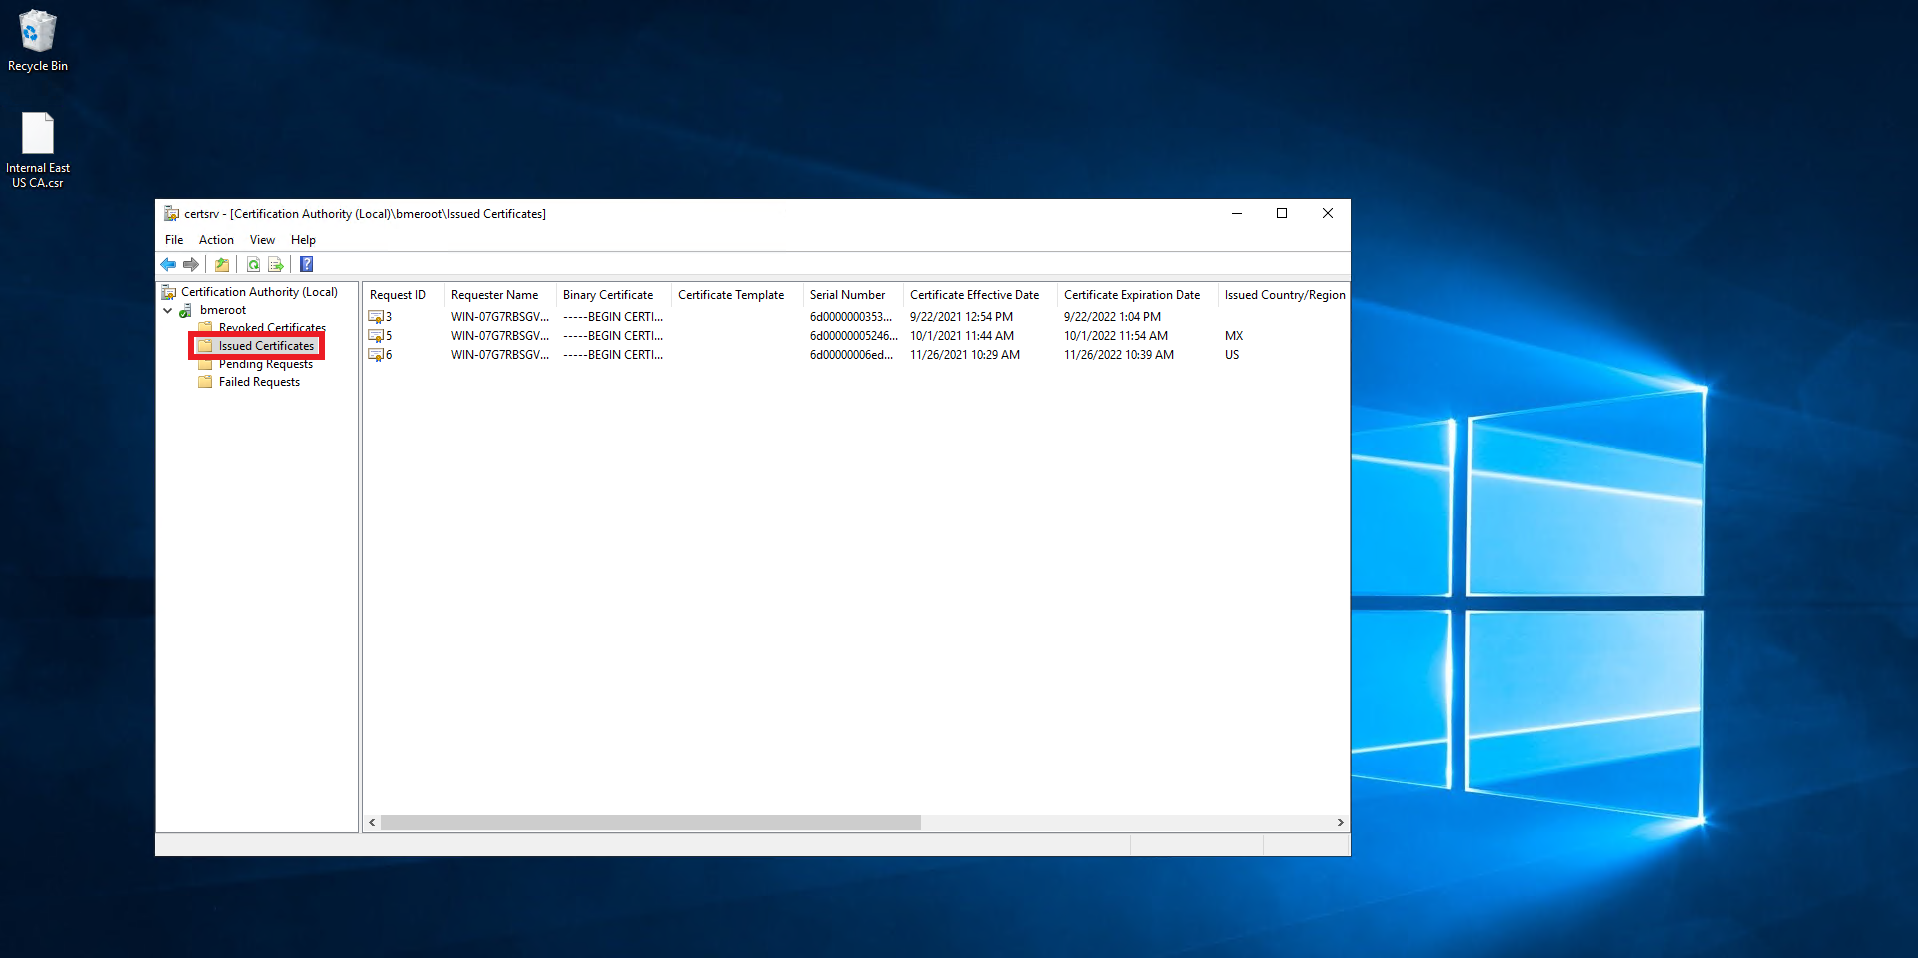
Click on pending requests.

Right click on the newly created request.
Select All Tasks -> Issue.
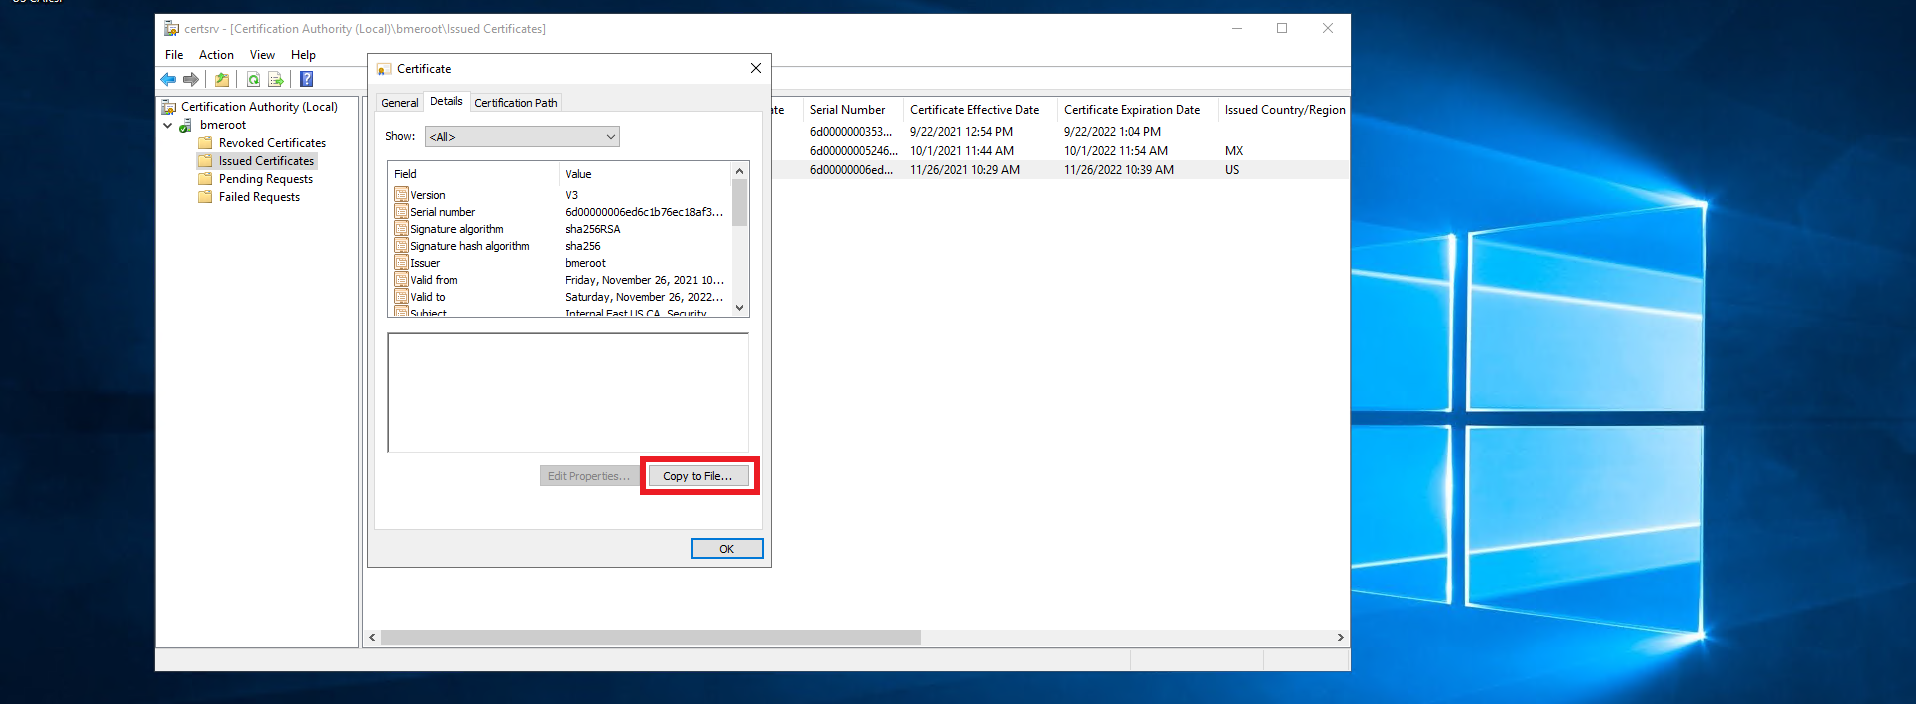
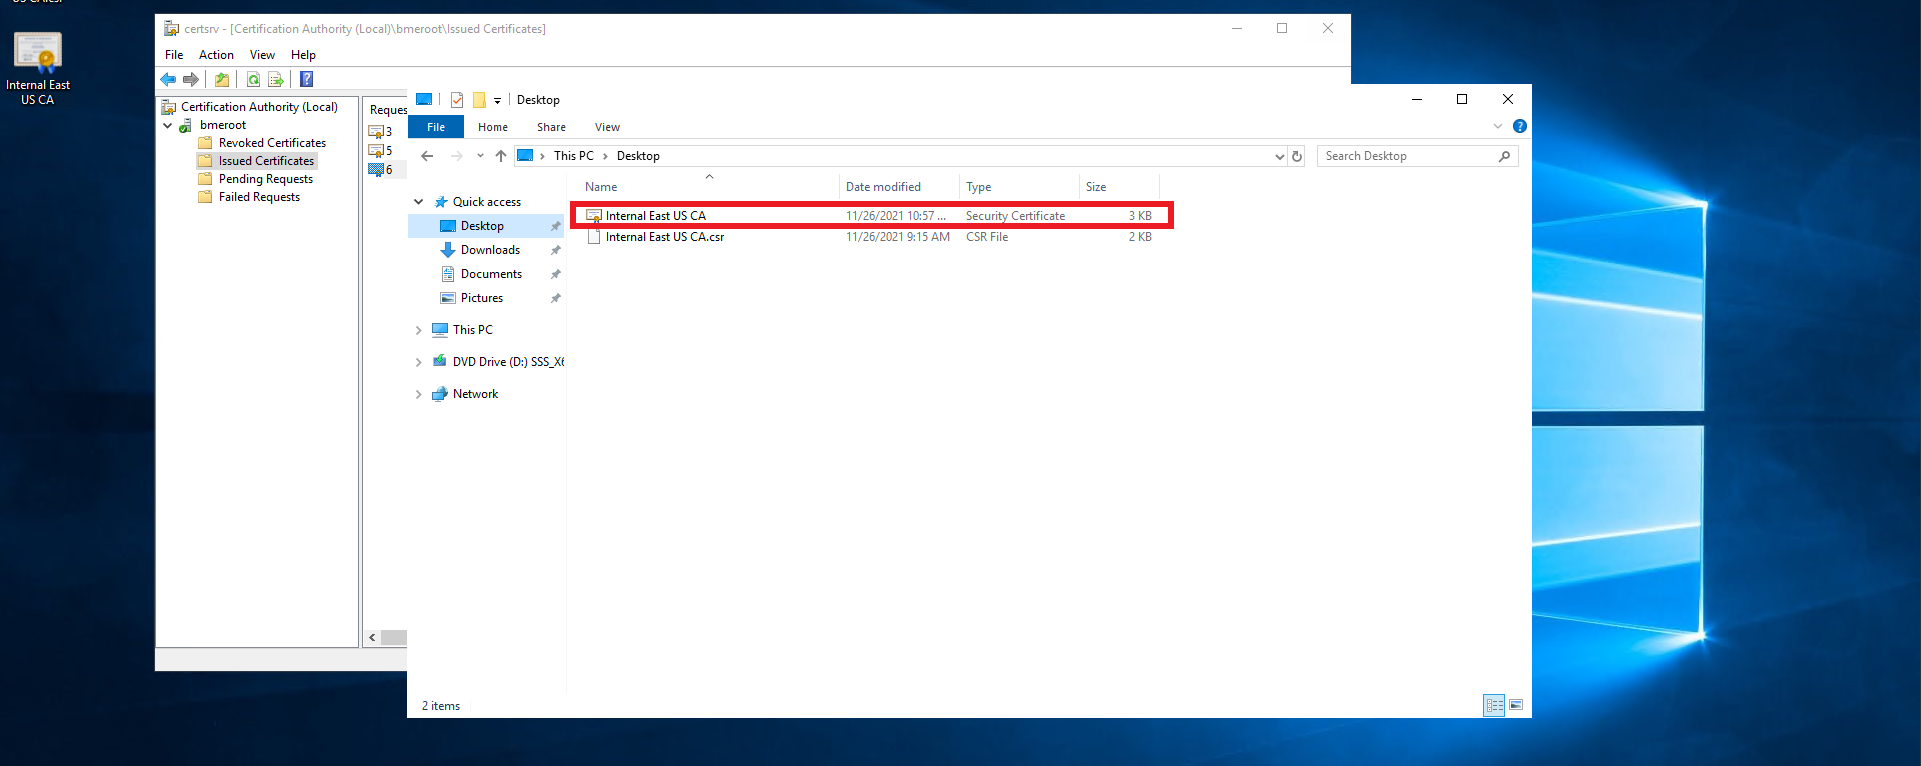
Click on Issued Certificates.
Double click on the newly created certificate.
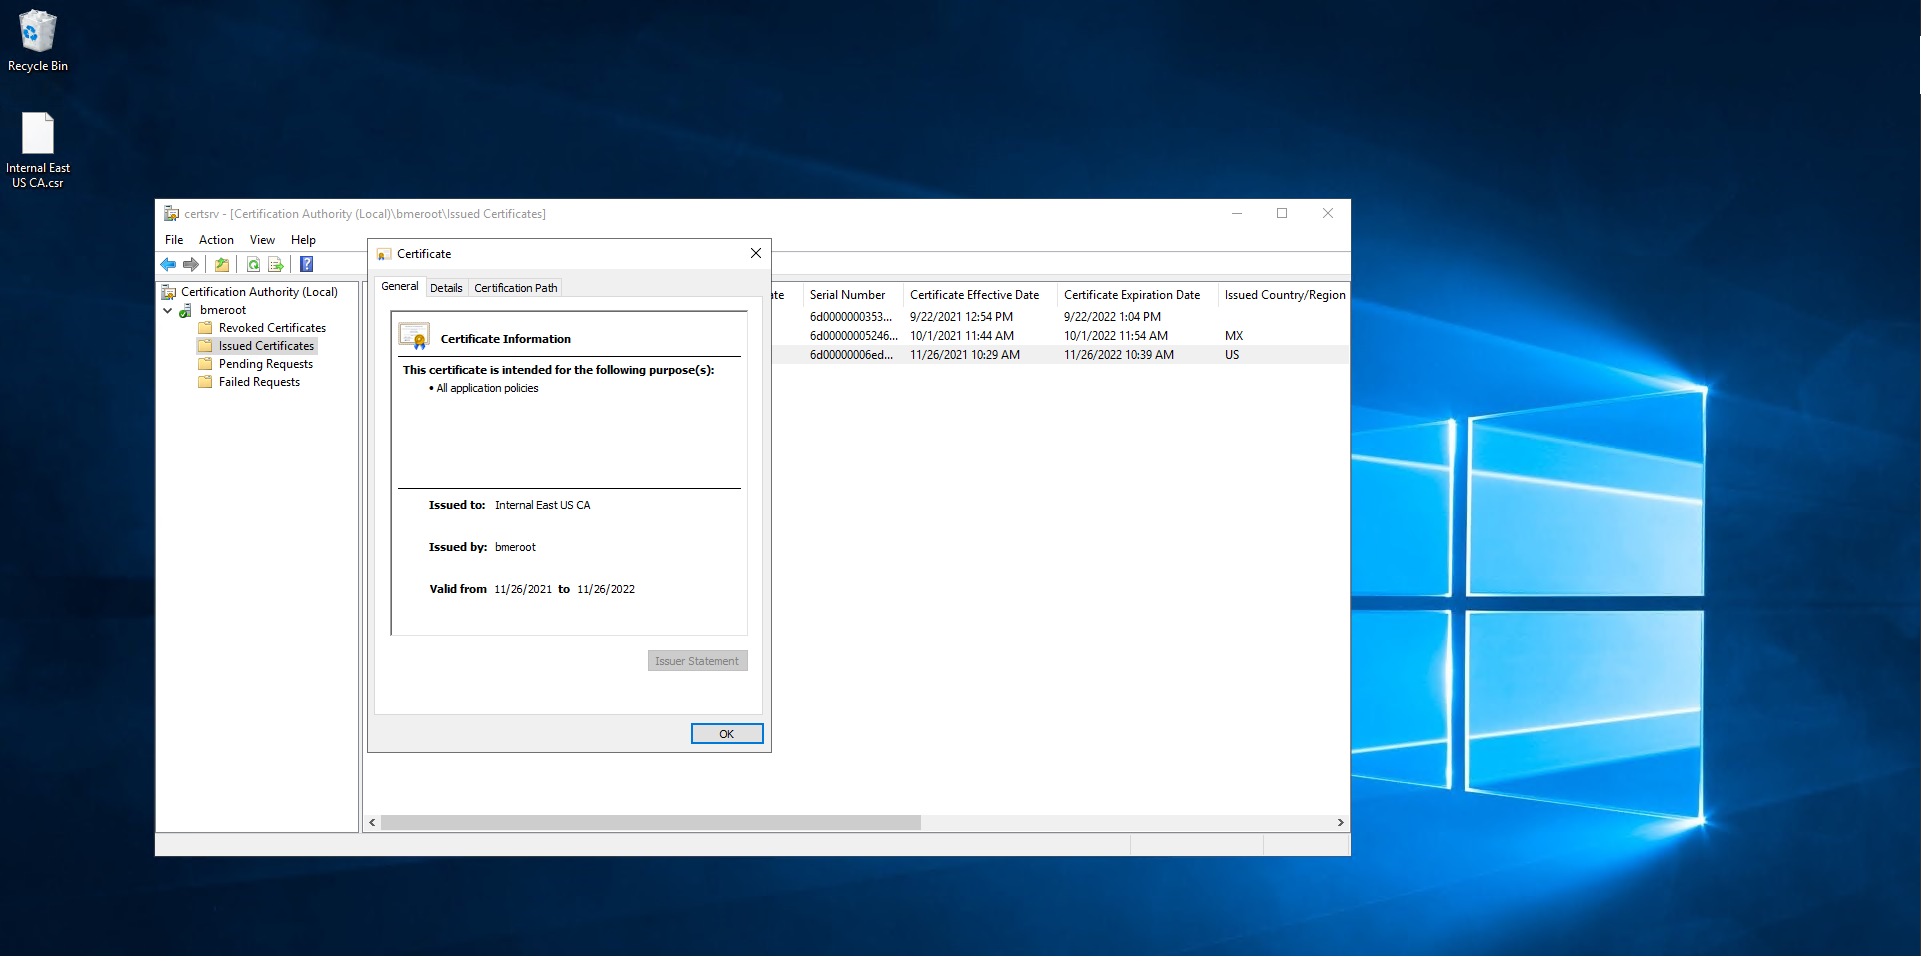
Click on Details.
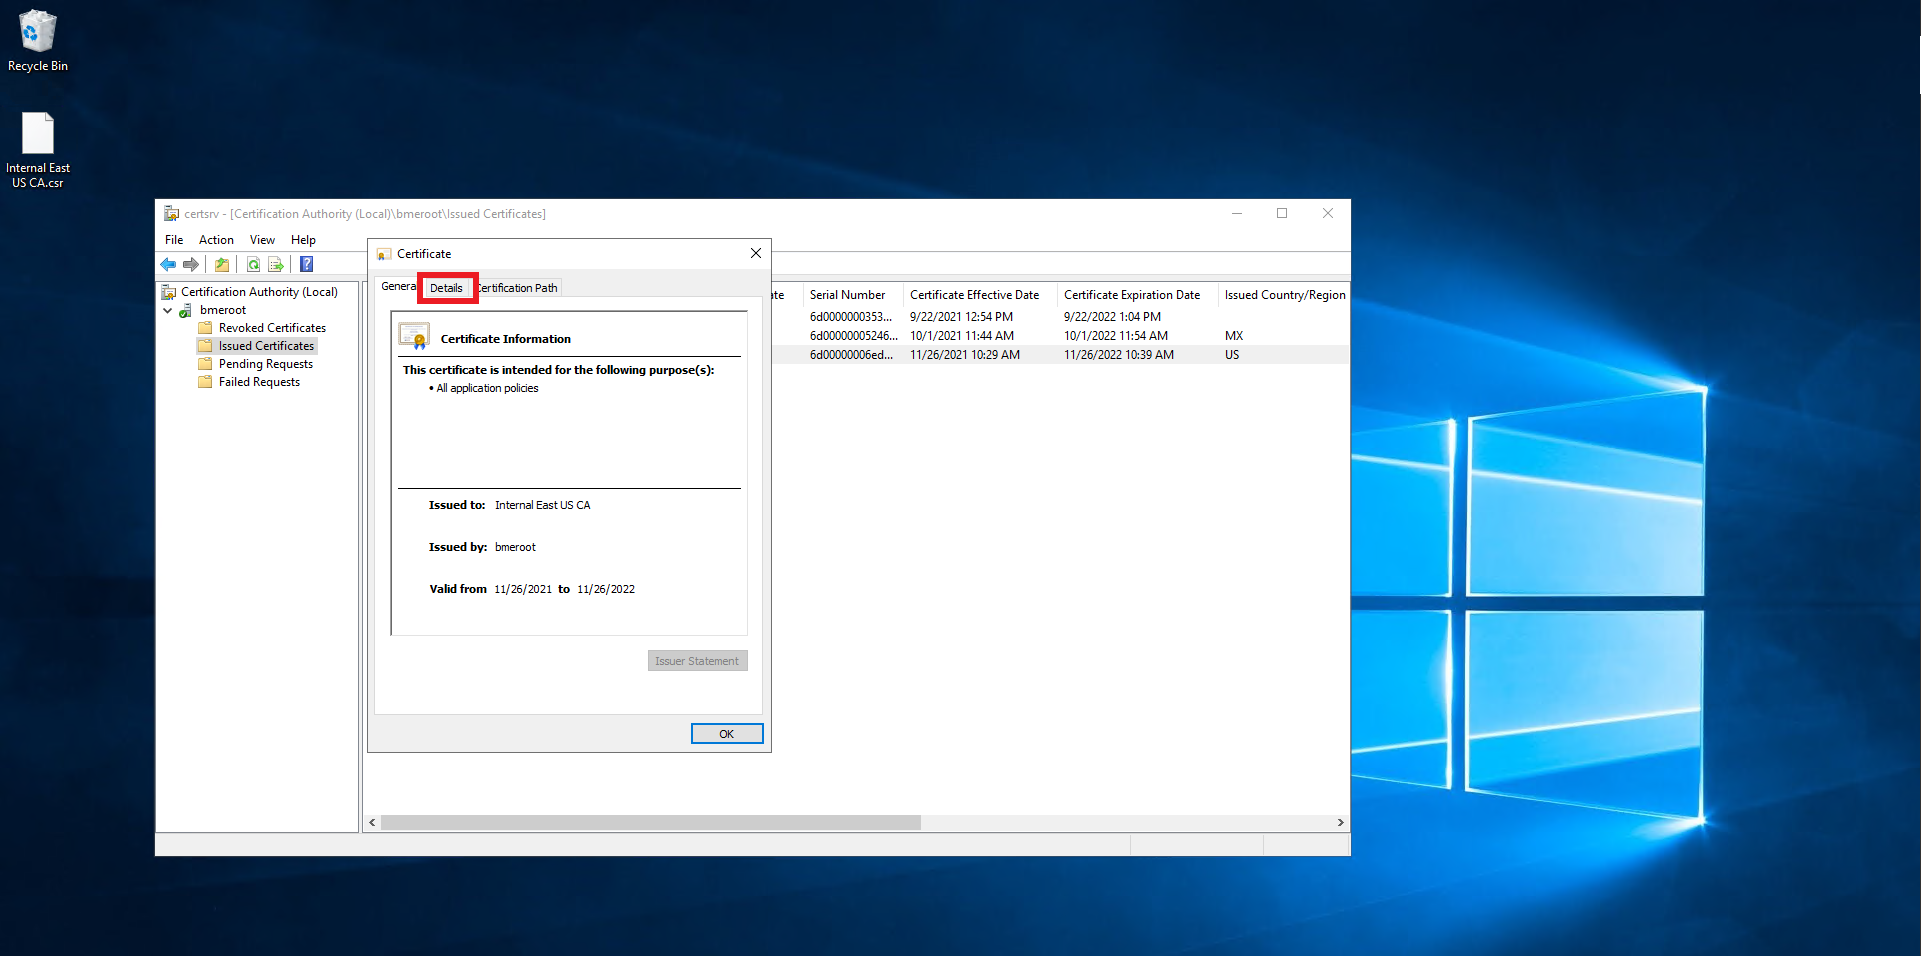
Click on the “Copy ti File…” Button.
Click next
Select the “Base-64 encoded X.509 (.CER) option.
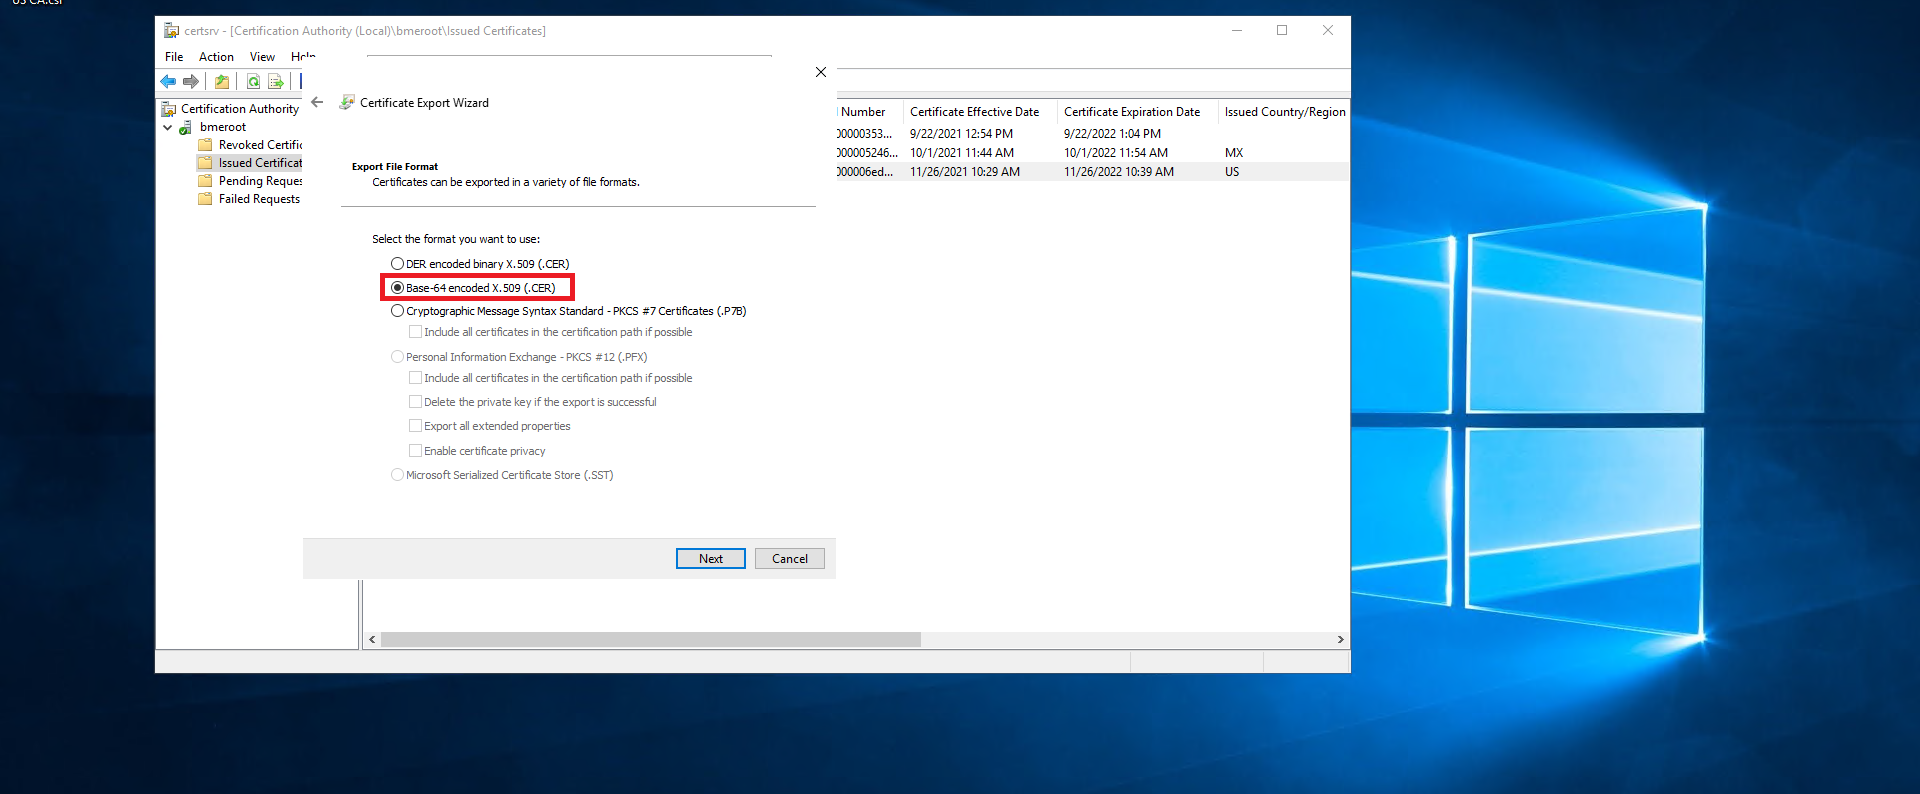
Click next.
Select where you want to save the newly created certificate.
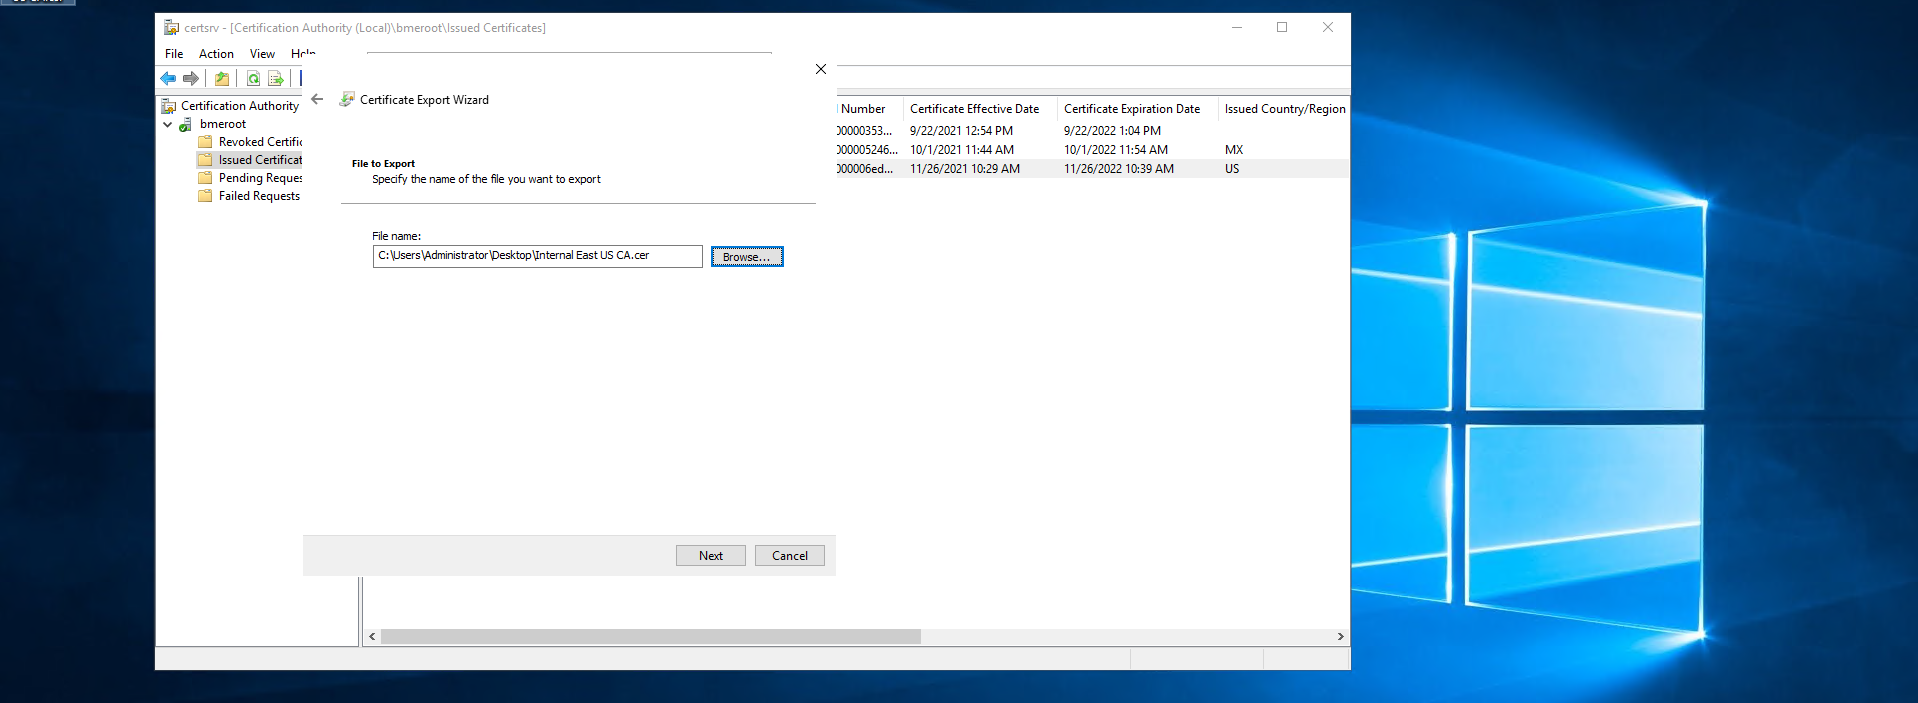
Click next.
Click Finish.
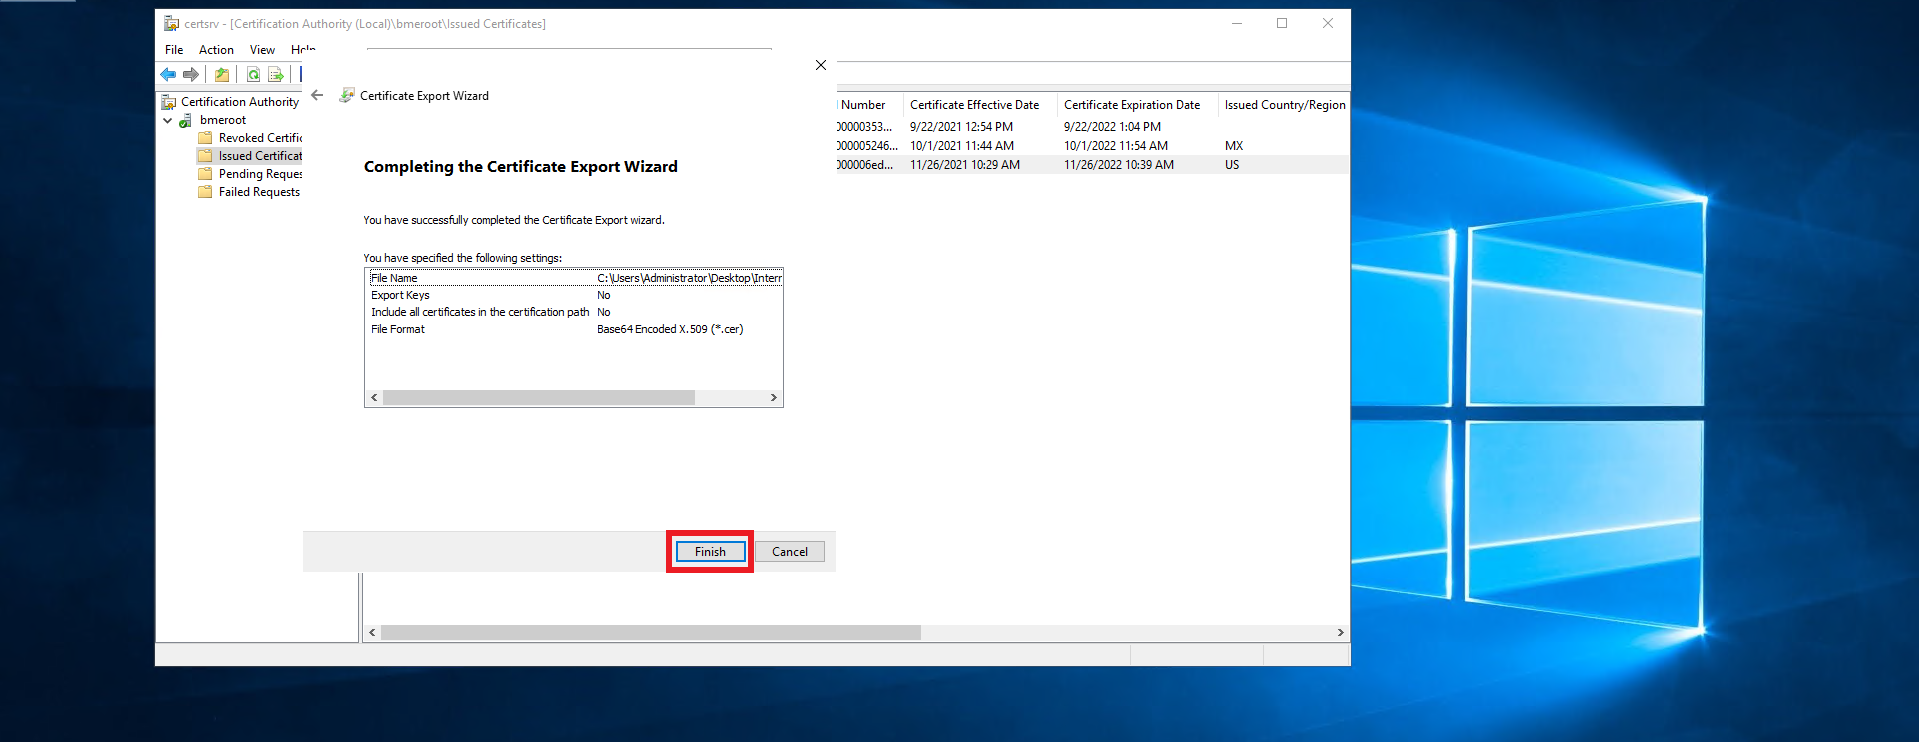
This should create a .cer file in the location you selected.
Follow you PKI team’s guidance on transferring the certificate file out of the offline CA into an internet connected computer.
Once you have the certificate in an internet connected computer, go to https://portal.ezca.io/
Login with an account that is registered as a PKI Admin in EZCA.
Navigate to Certificate Authorities.
Click View details of the CA you want to import the certificate for.

Scroll down to the location you want to import, and click the “Upload CA Certificate” button.
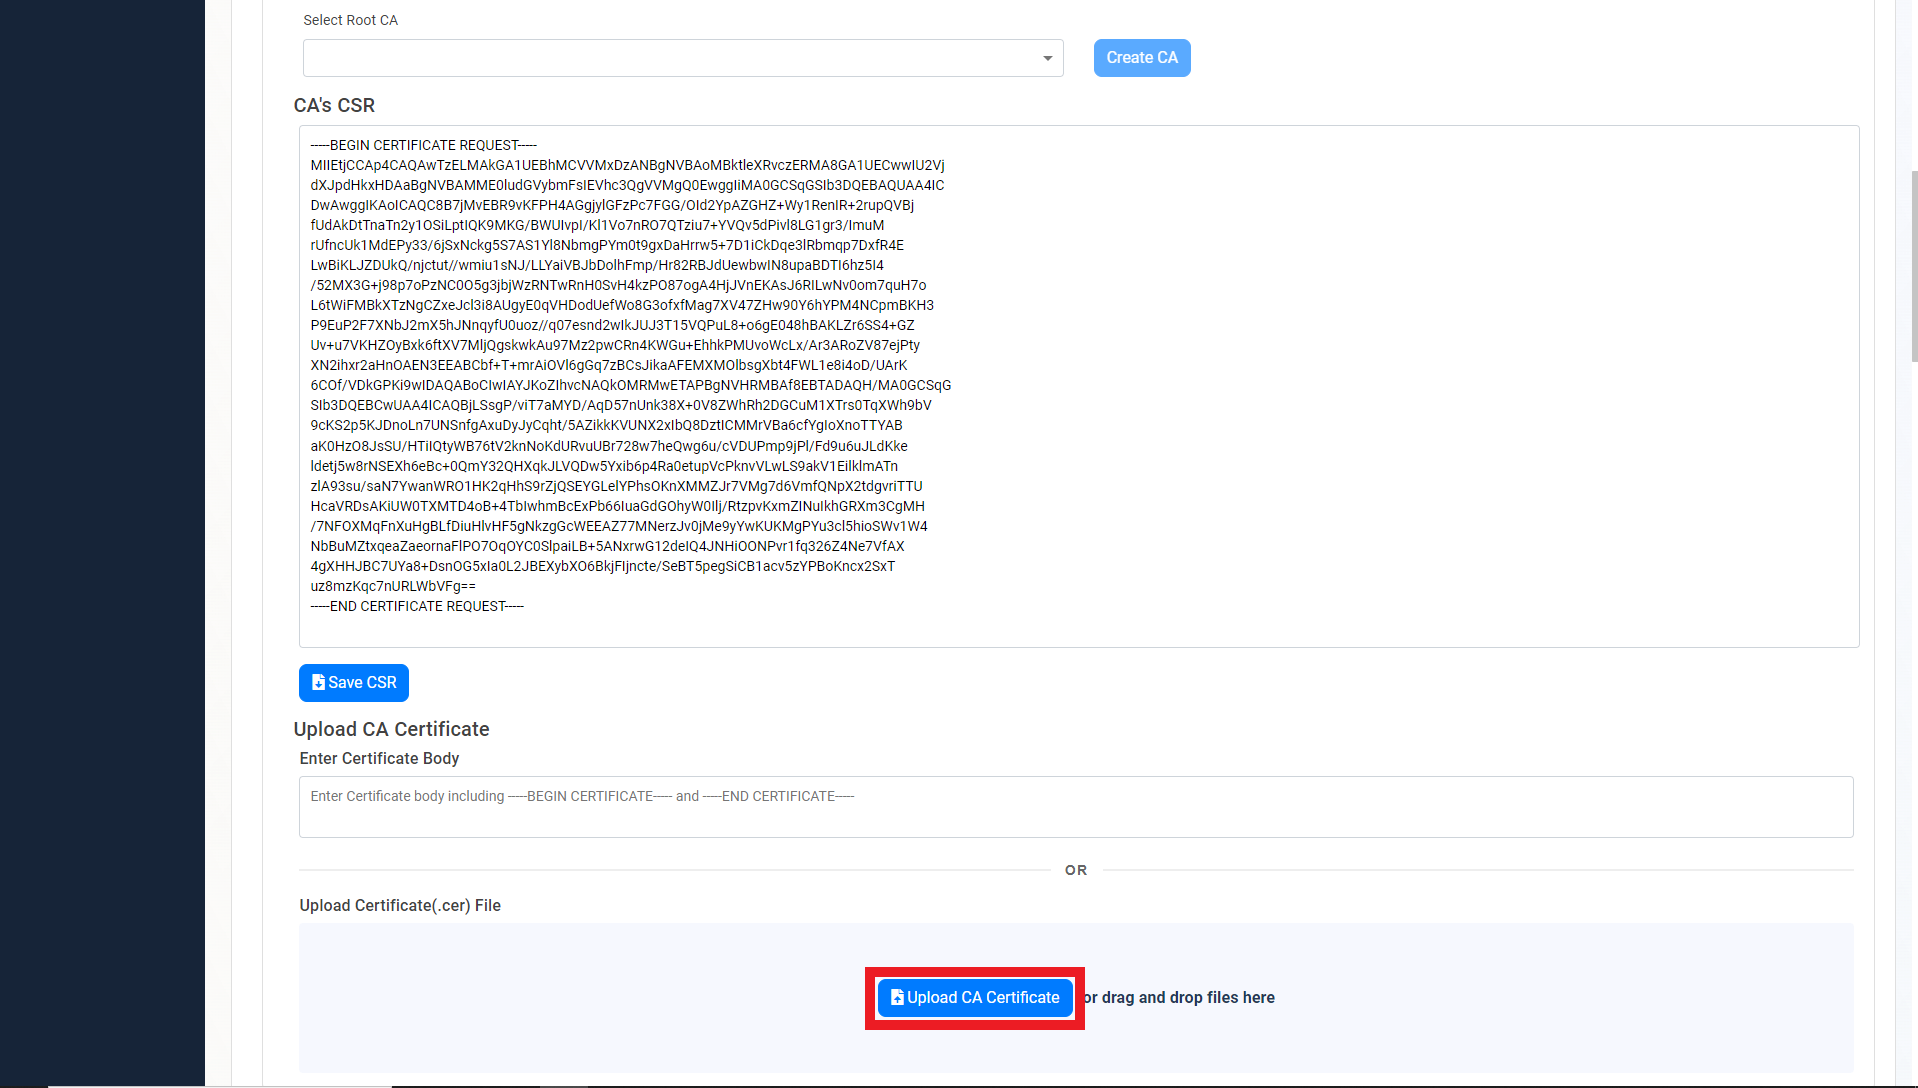
Select the newly created certificate file.

Click on the “Save Certificate” button

Repeat these steps for each location.
Your CA is ready to be used!
Next step: Register your first domain
We hope you’re enjoying using EZCA to issue your SSL certificates! If you have a moment, we would greatly appreciate it if you could leave us a review on G2. Your feedback helps other IT professionals discover EZCA and helps us continue to improve our service. Thank you for your support!
EZCA enables full accountability for certificate ownership by assigning owners to each domain registered in EZCA. To register a new domain follow these steps.
EZCA enables you to create certificates in multiple ways. Azure Key Vault automatic integration, create certificates locally in your PC, and in your browser as well as on click renewals
Once you have created and issued SSL certificates in EZCA, you can easily view and manage them through the EZCA portal.
By design, certificates have an expiration date. When a certificate is approaching its expiration date, it is necessary to renew it. EZCA one-click SSL certificate renewal allows you to quickly rotate your certificates.
This guide provides step-by-step instructions on how to revoke an SSL certificate in EZCA, which adds it to the Certificate Revocation List (CRL) to ensure it is no longer trusted.
This guide will take you through the necessary steps install your newly created certificate into your Windows PC.
In this page we go through how to set up our ACME agent allowing you to issue ACME certificates in your private Certificate Authority.
This guide will walk you through the steps required to give EZCA access to your Azure Key Vault(s) to enable automated certificate rotation without manual intervention.
Achieve cryptographic agility by automating your Azure AD application certificate rotation for free with EZCA’s automatic AAD application certificate rotation service.
X509 Certificates are the most secure way for IoT devices to authenticate with Azure. EZCA enables your to issue and manage IoT device certificates, and enable passwordless IoT authentication.
EZCA enables you to modernize your Windows Active Directory Certificate Services (ADCS) by connecting to EZCAs cloud based certificate management solution.
Learn how to troubleshoot common issues when creating an issuing CA in Azure with EZCA, including how to sign and chain your CA to another EZCA CA or an external CA, and what to do if your EZCA Root CA is not showing up.