How-To: Setup EZCA ACME Agent
Introduction - Setup Internal ACME Agent To Issue Certificates To Your Local Network
For EZCA to validate the local domain ownership, we have to install a local agent in your network. This web service will receive all ACME requests and validate the domain ownership on behalf of EZCA. In this step we will set up the agent.
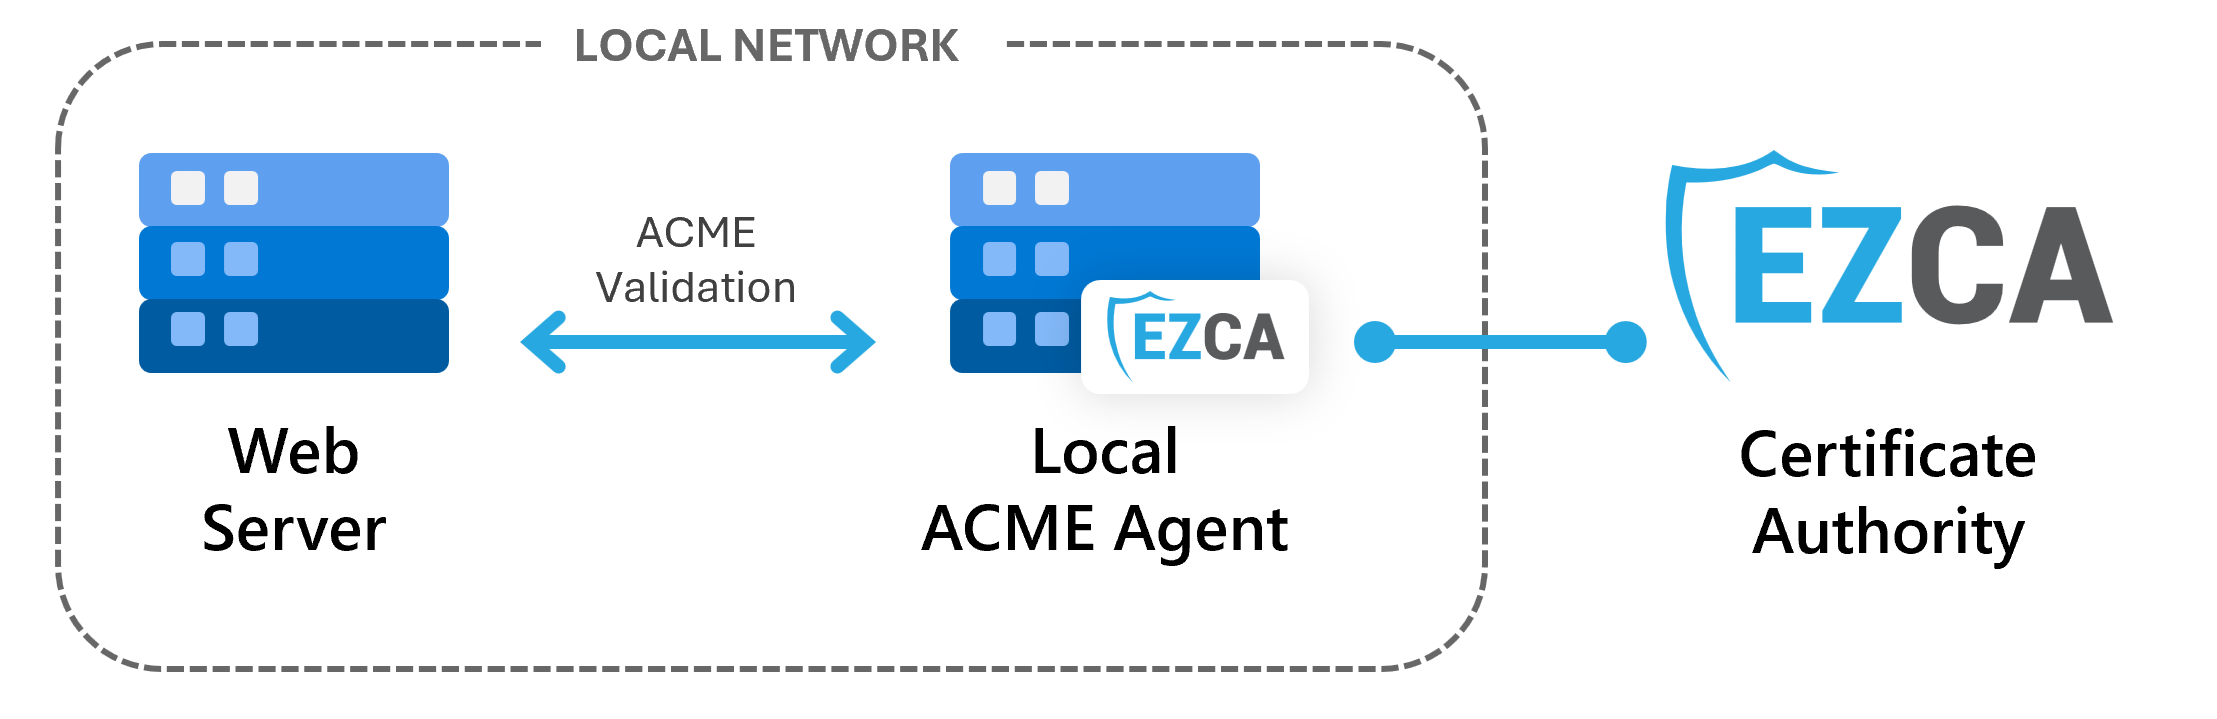
In this step, we will set up the ACME agent in your local network, allowing it to communicate with EZCA and issue certificates from your CA. We will go through how to set up the server, how to create the authentication certificate, and how to configure the agent to communicate with EZCA.
Prerequisites - What You Need Before Setting Up Your ACME Agent
Before setting up your internal ACME agent, make sure you have completed the following prerequisites:
- You have registered your ACME agent in EZCA
- You have a Windows Server available to host the ACME agent within your local network (can be a VM in Azure or on-premises)
How To Set Up Your ACME Agent - Video Walkthrough
Follow along with this video walkthrough to set up your internal ACME agent:
How To Set Up a Local EZCA ACME Agent - Step-by-Step Guide
The EZCA ACME Agent is a web service that runs on Internet Information Services (IIS). To set up the agent, you first need to install IIS on your Windows Server, then you will install the ACME agent web application, and finally configure it to communicate with EZCA.
How to Install Internet Information Services (IIS) on Windows Server
The EZCA ACME Agent is a web service that runs on Internet Information Services (IIS). To set up the agent, you first need to install IIS on your Windows Server. You can do this through the Server Manager or by using PowerShell.
In your Windows Server open an Administrator PowerShell window and run the following command:
Install-WindowsFeature -name Web-Server -IncludeManagementTools
How to Install IIS Web Deploy
Once IIS is installed, you will install web-deploy from the official Microsoft site and open the installer. Web Deploy is a Microsoft tool that simplifies the deployment of web applications and services to IIS. It allows us to easily deploy the ACME agent web application to our IIS server.
-
Download Web Deploy from the official Microsoft site and open the installer.
-
Once the installer is open, click Next on the first page.
-
Read and accept the Terms and Conditions.
-
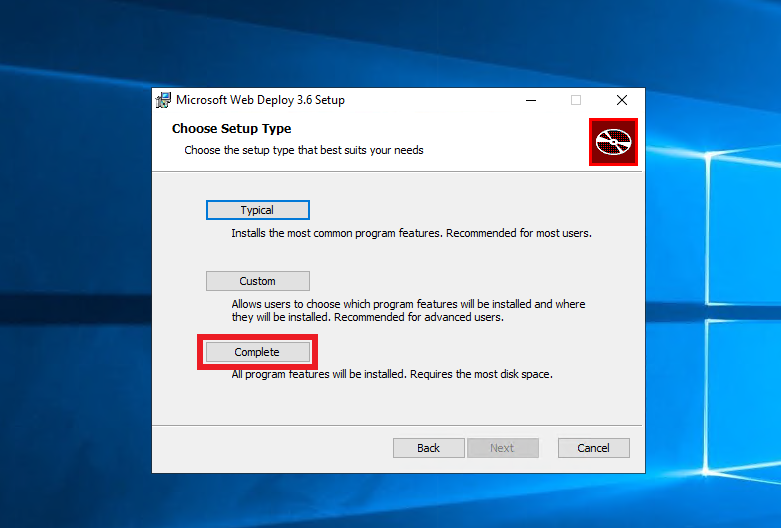
For Choose Setup Type, select Complete to install all features of Web Deploy, which are required for the ACME agent to function properly.
-
Click Install to begin the installation process.
How to Install .NET Hosting Bundle
The EZCA ACME Agent is built on .NET, so you need to install the .NET Hosting Bundle on your server to run the agent. The hosting bundle includes the .NET runtime and the ASP.NET Core module for IIS, which allows IIS to host .NET applications.
- Download the latest .NET hosting bundle from Microsoft.
- Click Install.
How To Setup the ACME Agent Certificate
The EZCA ACME Agent requires a certificate to authenticate to EZCA and issue certificates on behalf of your CA.
If you previously enabled health checks when registering your agent in EZCA, this certificate will be automatically rotated by the health API, meaning once it is setup, you will not have to manually renew it. If you did not enable automatic health checks, you will have to manually call the health API (https://YOURACMEAgent/api/Health/Overall) periodically to check the health of your agent and renew the certificate before it expires. If you do not periodically check this endpoint your agent’s certificate may expire without your knowledge, causing all ACME requests to fail.
To create a new certificate for the ACME agent in EZCA, follow these steps:
The certificate must be issued by the CA that this ACME agent will be connected to. You cannot use a certificate from a different CA or from an external CA.
-
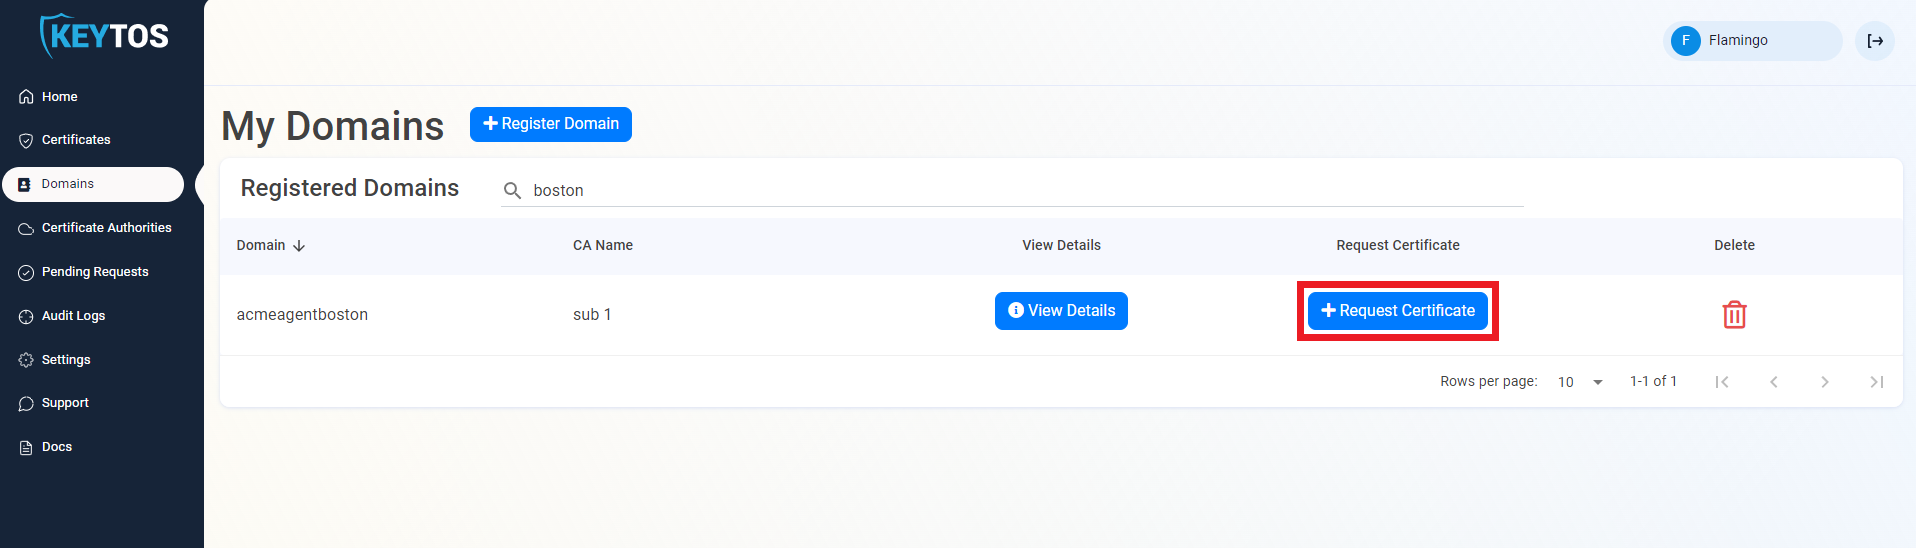
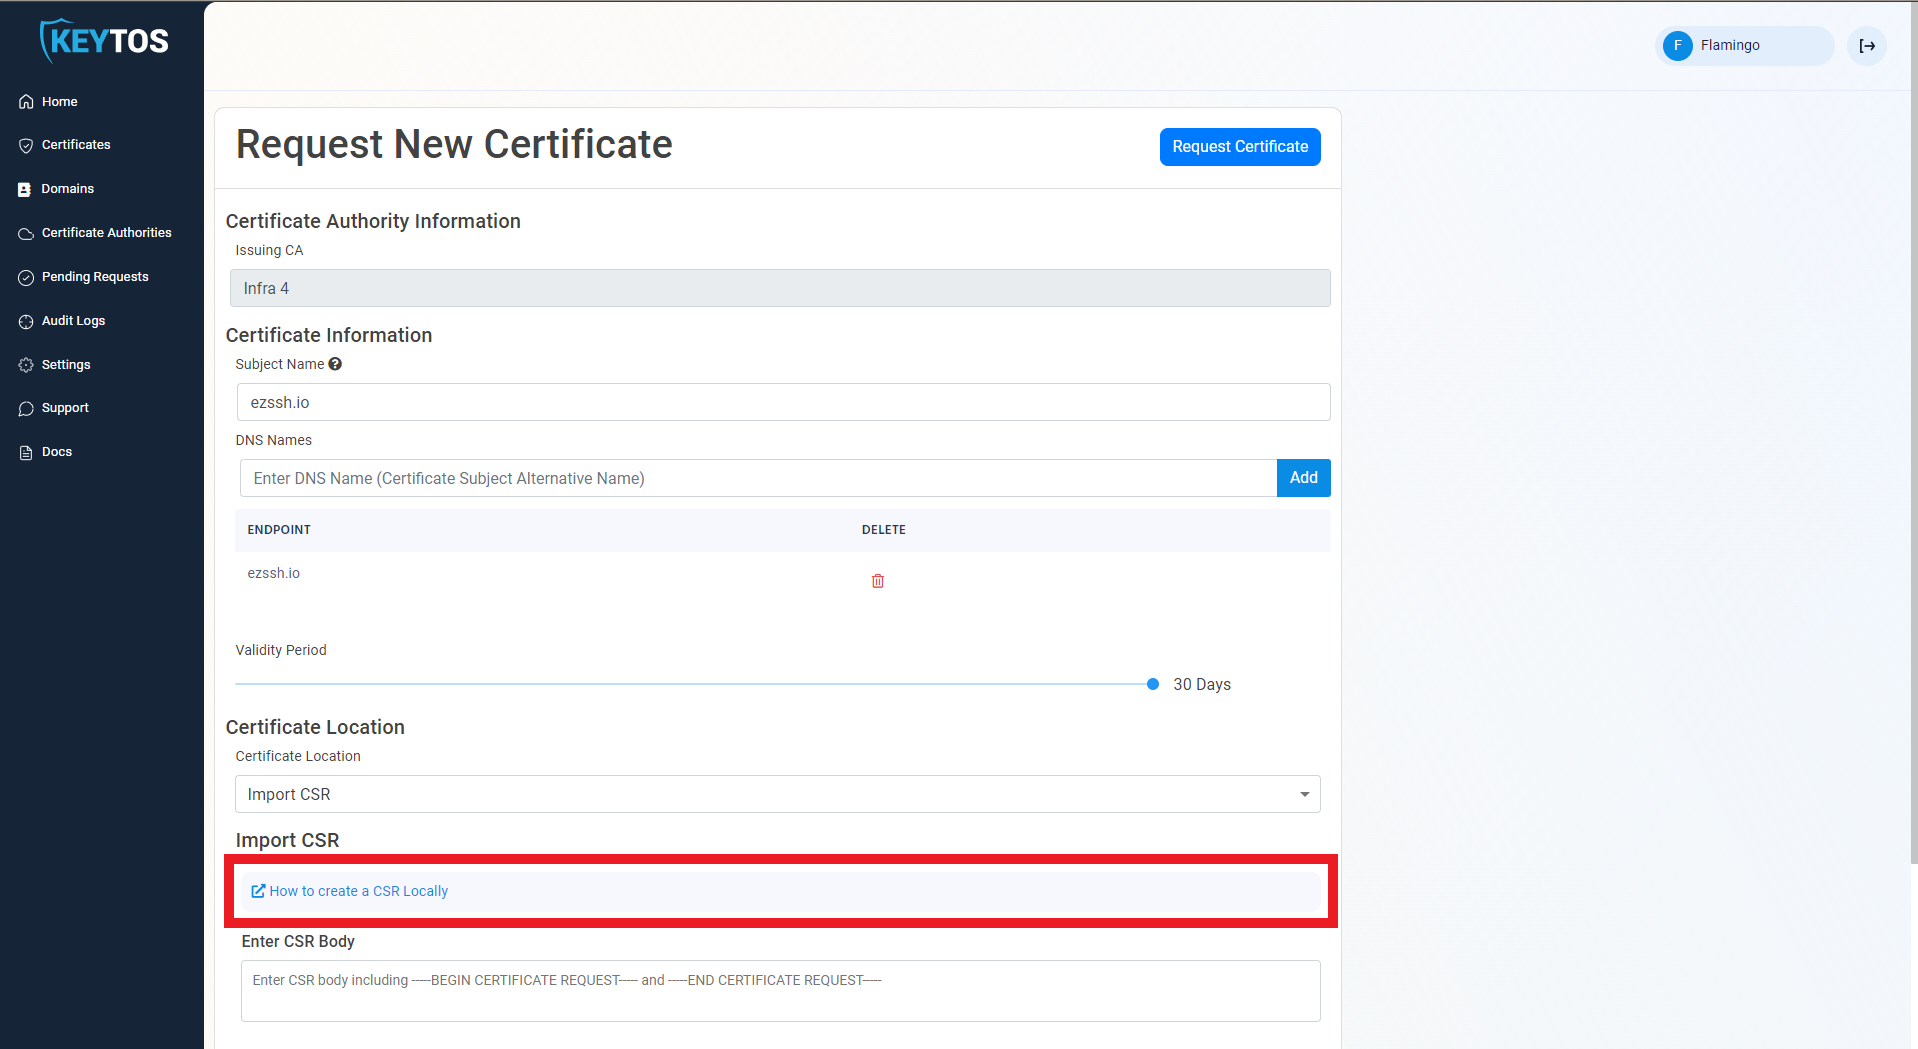
In the EZCA portal, navigate to Domains.

-
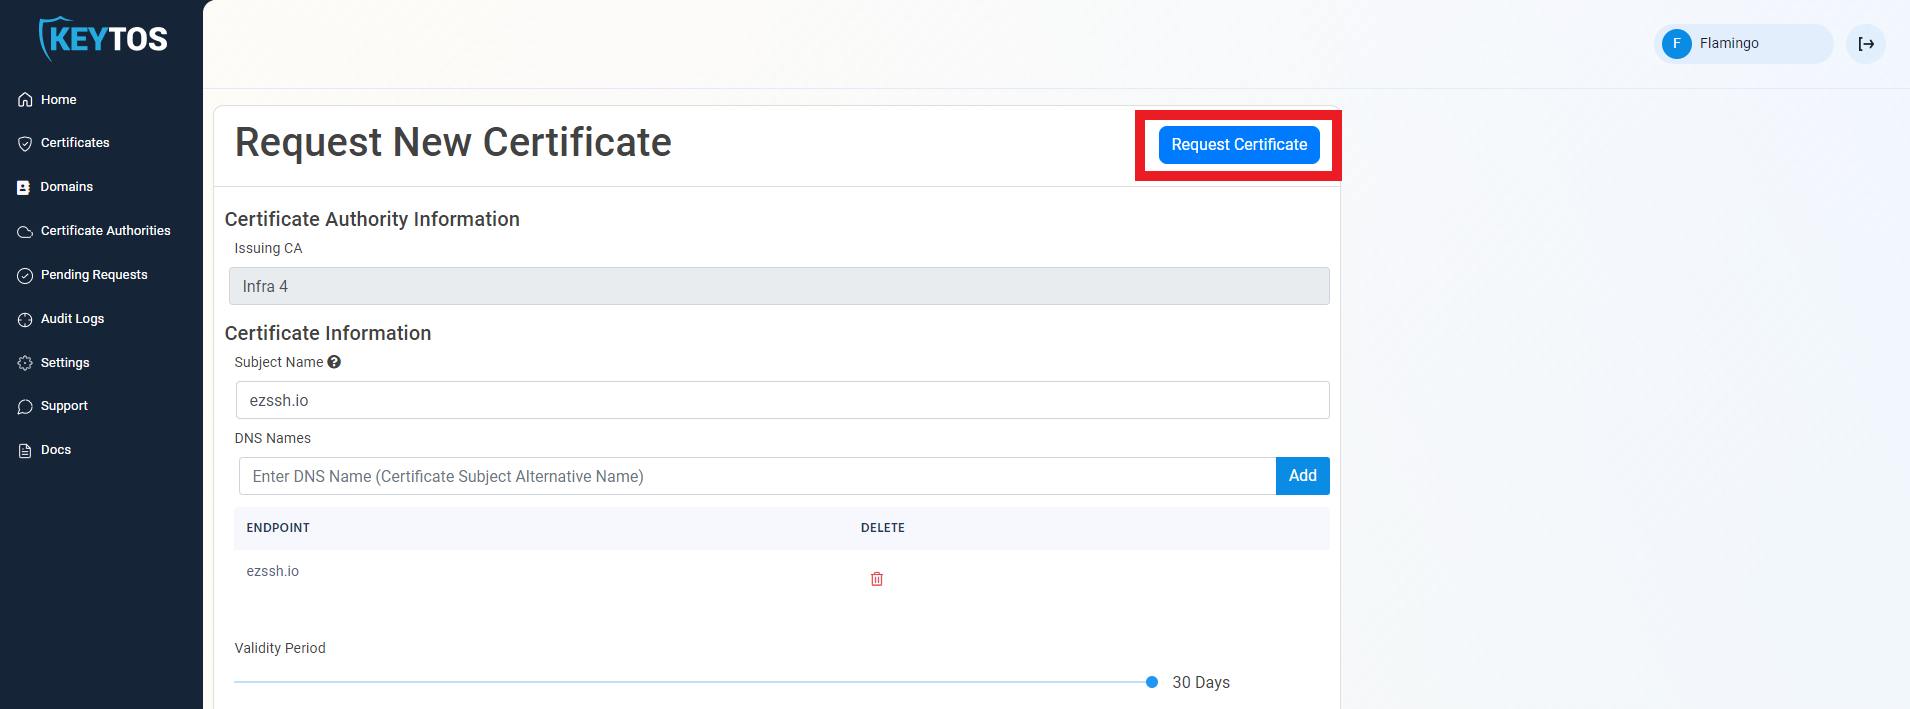
When you registered your ACME agent, you had to provide a domain name for it. Find that domain in the list and click on the Request Certificate button for that domain.
-
The Subject Name and DNS Names will be pre-populated with the domain name you provided when registering your agent in EZCA.

-
If this certificate requires more subject alternate names (for other domains that might use this certificate), add them in the DNS Names section.
-
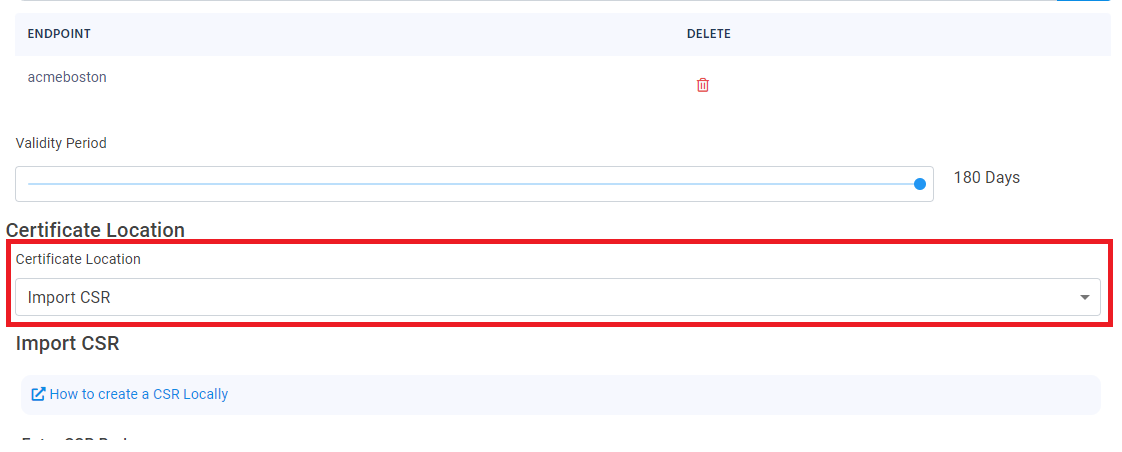
By default, EZCA will request the certificate to be the maximum Validity Period allowed by your CA and PKI Admins. If you want to decrease the lifetime of the certificate, optionally adjust the validity slider.
-
Under Certificate Location, select Import CSR.
-
Click How to create a CSR Locally:
-
Select Windows.
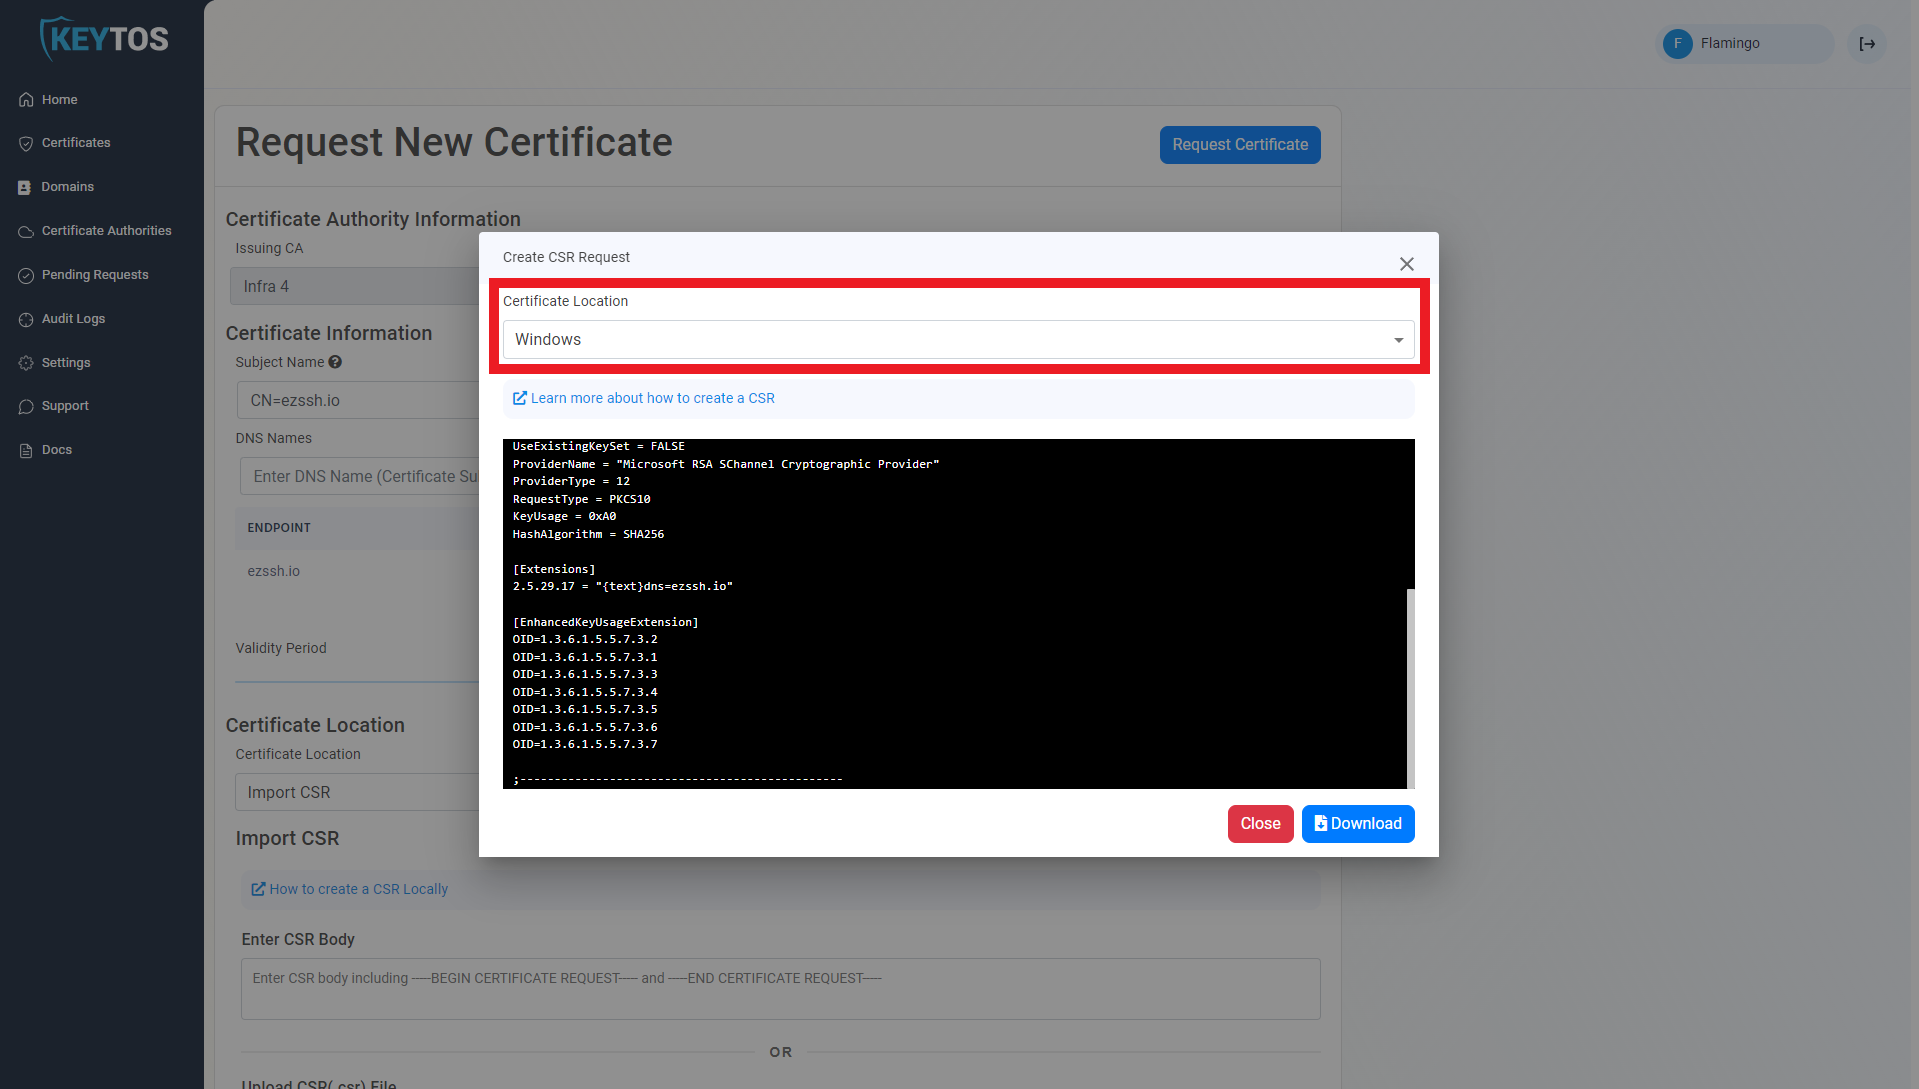
-
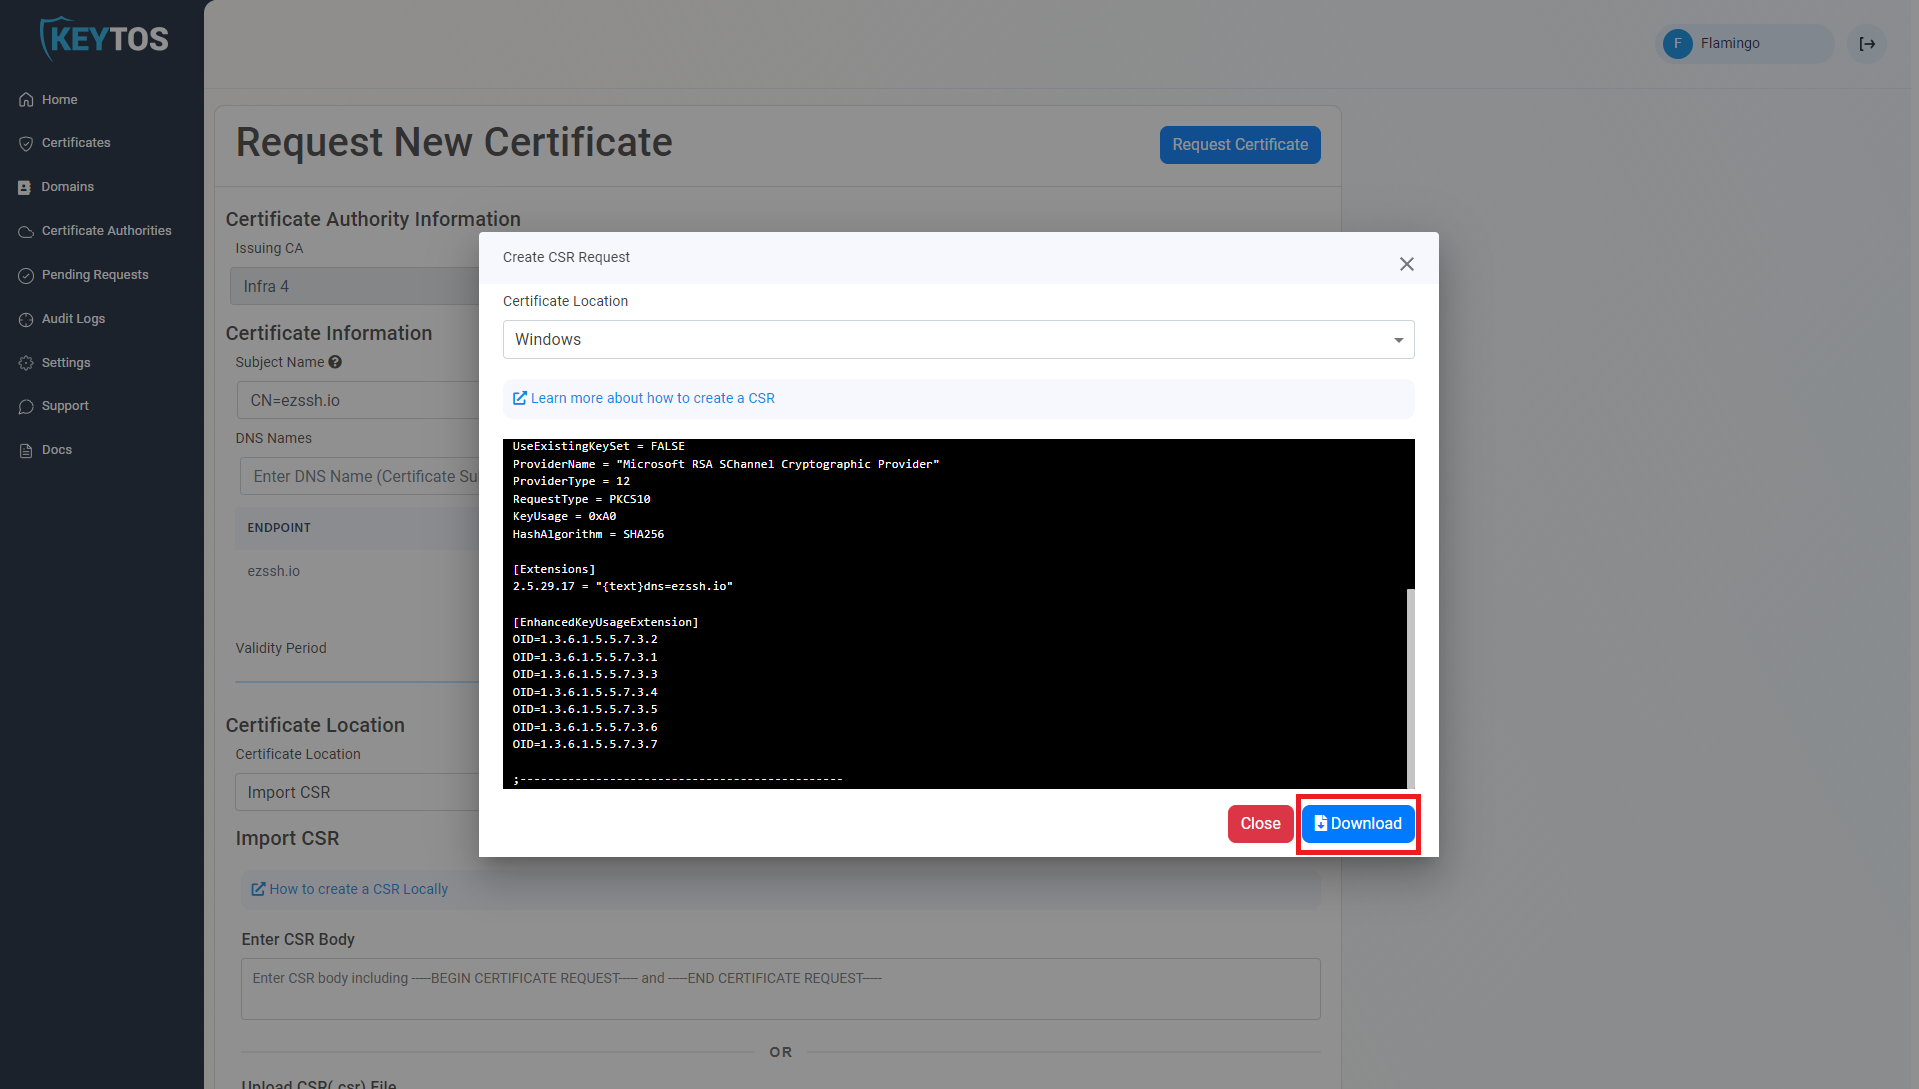
Click Download to download the .inf file for the CSR request.
-
Edit the following values in the .inf file you just downloaded:
Exportable = FALSE MachineKeySet = TRUE -
Open cmd.exe as an Administrator.
ImportantMake sure to run this on the Windows Server machine where you will run your ACME agent. This cannot be run on a separate machine.
-
Navigate to your downloads folder and run the following command where
<INFFILENAME>is the file name you just downloaded:certreq.exe -new <INFFILENAME>.inf acme.csr -
Go back to the EZCA portal and close out the instructions dialog.
-
Click on the Upload CSR button.
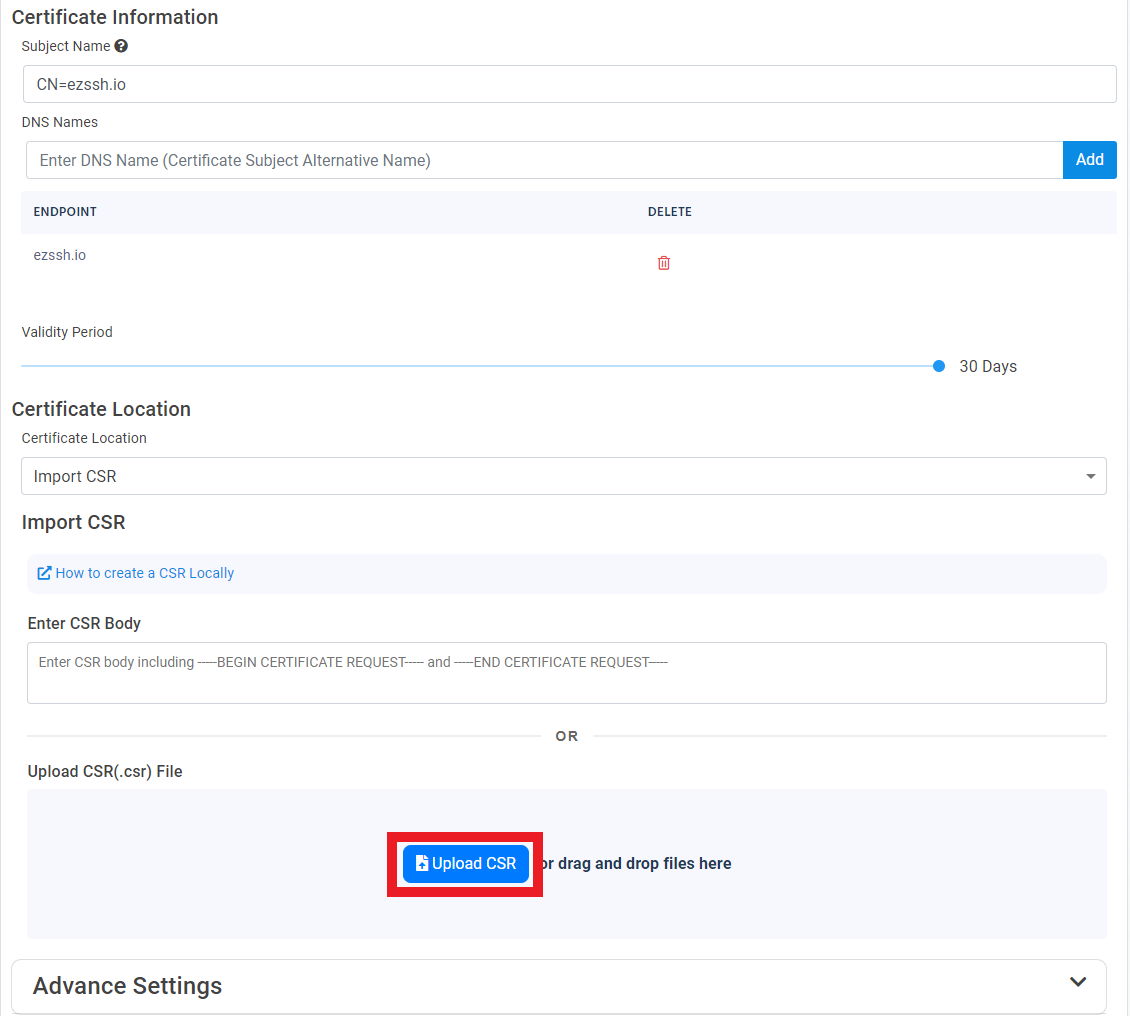
-
Select your newly created CSR file,
acme.csr: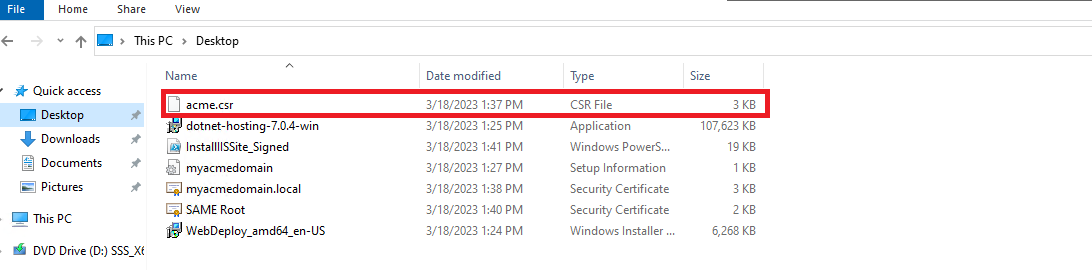
-
Click the Request Certificate button at the top right of the form.
-
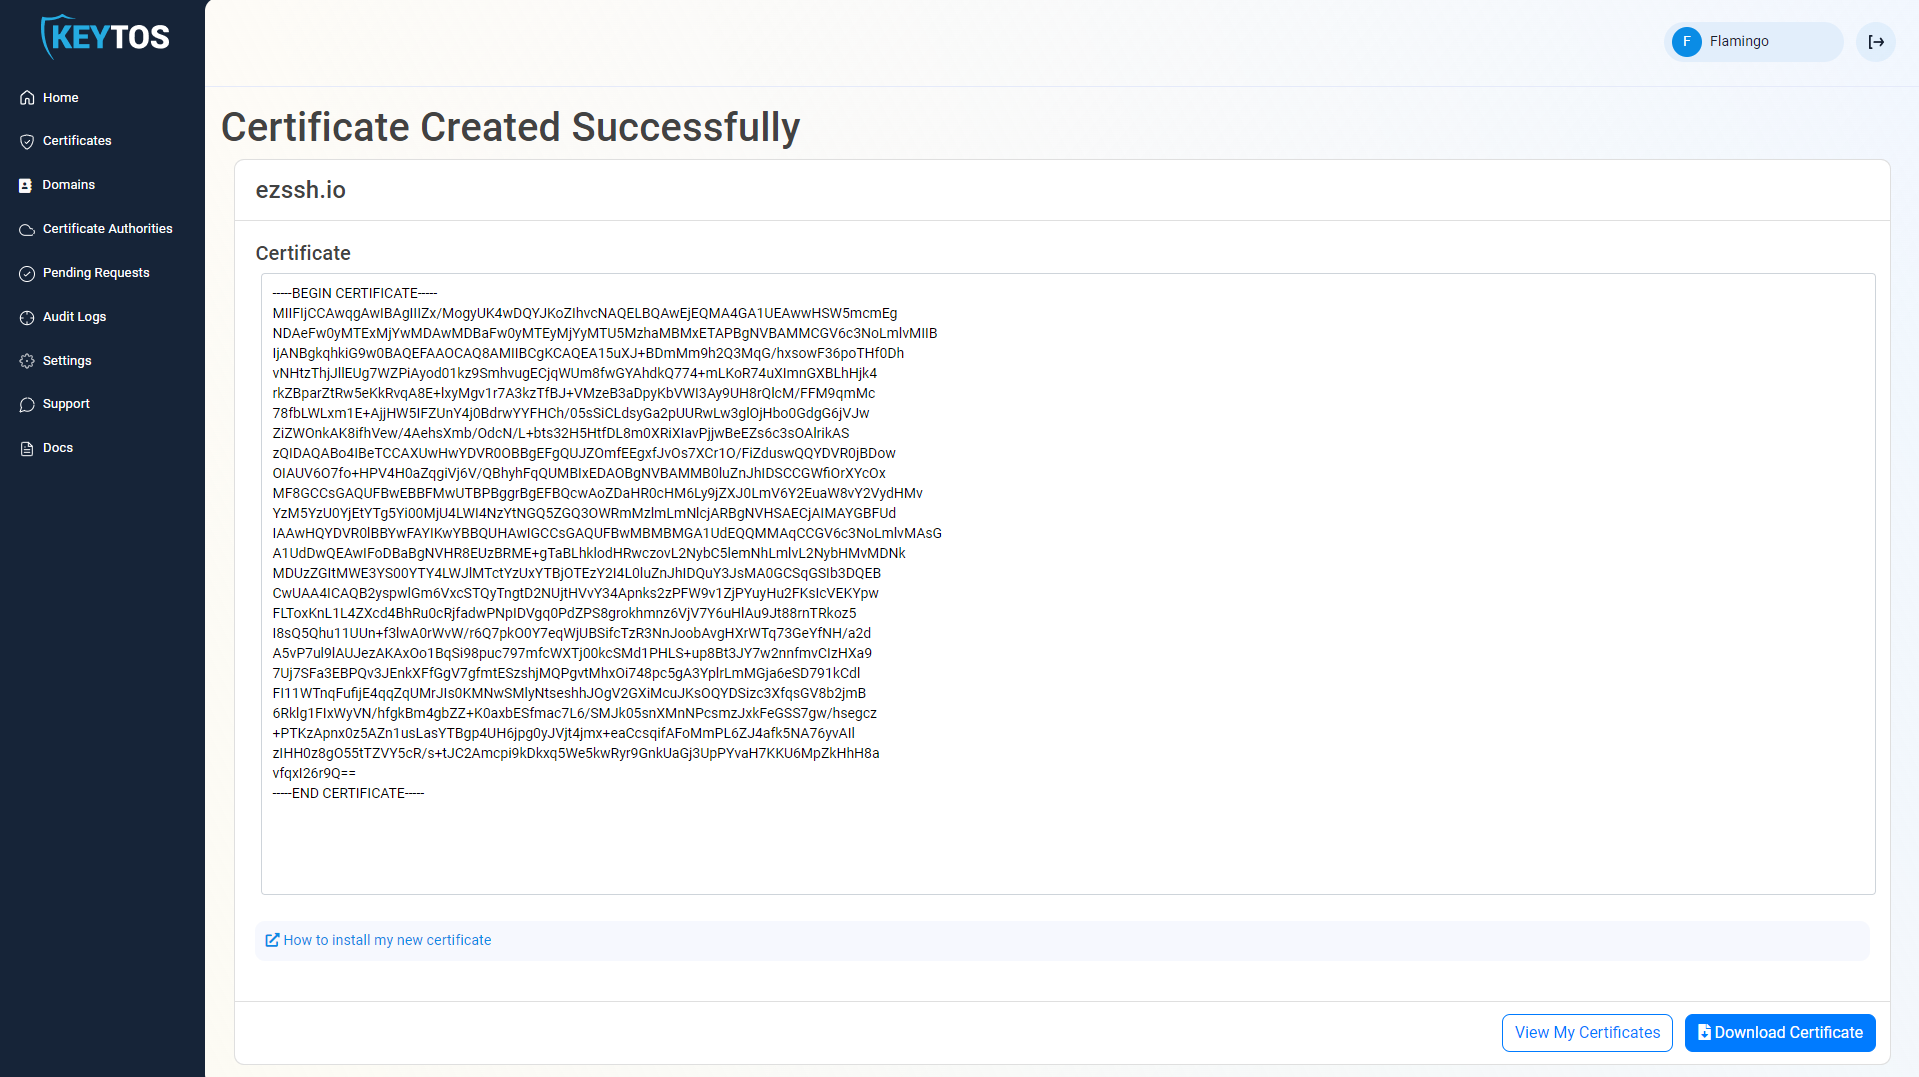
Your ACME Agent certificate has been created successfully. Click Download Certificate to download the certificate file.
-
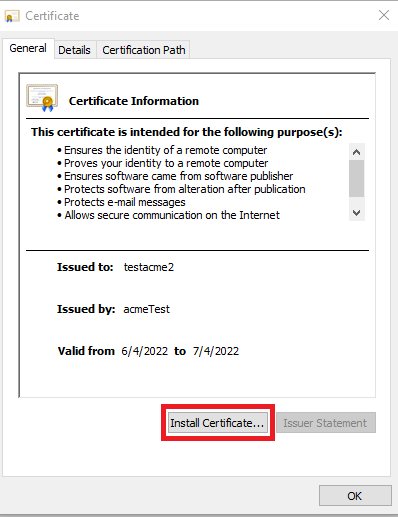
Open the downloaded certificate on your Windows Server where you’ll run your ACME agent.
-
Click Install Certificate to start the Certificate Import Wizard.
-
Select Local Machine.
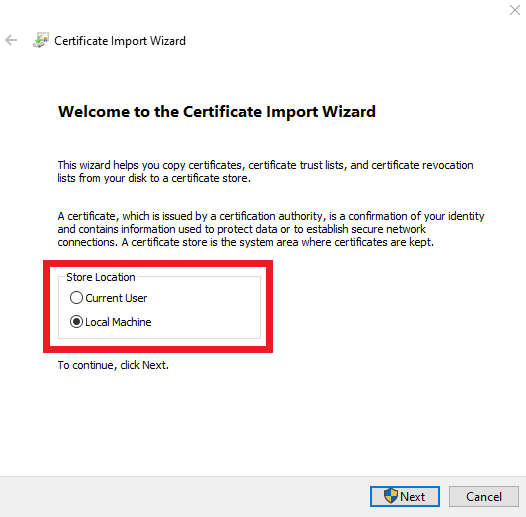
-
Click Next and complete the wizard to install the certificate in the Local Machine certificate store.
How To Create the ACME CA Agent Site and Deploy the Web Application
Now that the ACME Agent certificate is installed to your Windows Server local machine certificate store, you will create an IIS site for the ACME agent and bind it to this certificate. You will also deploy the ACME agent web application to this site and configure it to communicate with EZCA.
-
Download the signed IIS setup script.
-
Open a PowerShell terminal as an administrator on the Windows Server where you want to host your ACME agent.
-
Run the following command to execute the script and set up your IIS site and deploy the ACME agent web application. Make sure to replace the parameters with the appropriate values for your environment.
- certificateSubject: The subject name of the SSL Certificate for your IIS site. (acmeagent.yourdomain.com). This certificate must be different than the authentication certificate you created in the previous step. If your site is going to be public facing, this certificate needs to be issued by a public CA. If your site is internal, this certificate can be issued by your private CA.
- acmeCertificateSubject: The subject name of the SSL Certificate we created in the previous step to authenticate with EZCA. (acmeboston). This is the certificate that will be used by the ACME agent to authenticate to EZCA and request certificates on behalf of your CA.
- appInsights: The connection string for the Application Insights where you want this agent to report the telemetry. If you don’t want to use Application Insights, you can leave this parameter empty and the agent will run without telemetry.
- agentURL: The URL where computers on your network can find this agent.
$certificateSubject = "acmeagent.yourdomain.com" $acmeCertificateSubject = "acmeboston" $appInsights = "YourAppInsightsConnectionString" $agentURL = "https://acmeagent.yourdomain.com" .\InstallIISSite.ps1 -certificateSubject $certificateSubject -acmeCertificateSubject $acmeCertificateSubject -appInsights $appInsights -agentURL $agentURL -
Verify the site is up by going to
https://YourSite/api/Health/Overall. You should see a JSON response with the overall health status of the agent.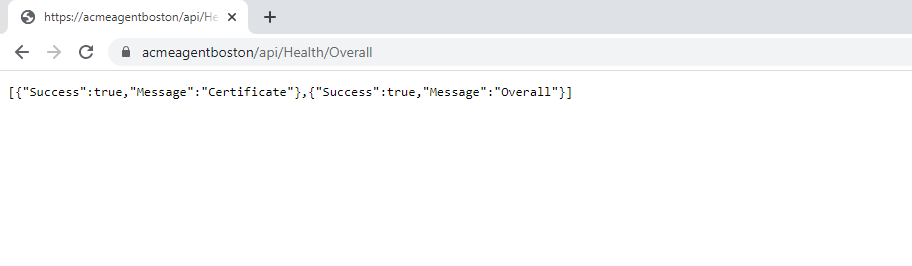
-
Done! Now that the agent is up and running you are ready to start requesting ACME certificates.
Next Steps - Request ACME Certificates from Your CA Using the Agent
Now that you have your ACME agent set up and running, the next step is to start requesting ACME certificates from your CA using the agent. You can do this from any computer in your network by using an ACME client such as Win-ACME. Learn how to do this in the next page.
🚀 Request ACME Certificates Using Your AgentTroubleshooting ACME Agent Setup
Below you will find common exceptions or errors when setting up the EZCA ACME agent and how to fix them.
Domain Validation Failure
ACME validation is carried out through DNS, ensure that the ACME Server has http access into the server requesting the certificate.
Exception ‘Keyset does not exist’
If when creating a new ACME account the request fails with an internal server error and when looking at the Application Insights you see a Cryptographic Exception “Keyset does not exist” this means that the identity running the application pool in IIS does not have permission to read the certificate’s private key. Please ensure that the Application’s pool identity has the correct permissions.
Certificate Not Being Available When Calling The Test API
If when calling the test API you get an error that the certificate is not available, and you have verified that it is in the right store and that the application running the pool in IIS (by default IIS_IUSRS) has permission to the certificate, make sure that the certificate chain (including the root certificate) is in the trusted root store.