How-To: Automate Azure Key Vault Certificate Rotation with EZCA
Overview - How to Issue and Rotate Certificates in Azure Key Vault with EZCA
EZCA can automate the process of rotating certificates stored in Azure Key Vault. This ensures that your applications always have access to valid certificates without manual intervention. In order to enable this feature, you need to grant EZCA access to your Azure Key Vault(s) via Azure RBAC and/or Key Vault Access Policies, and then you can issue certificates through EZCA that are automatically issued and renewed in your Key Vault.
This guide will walk you through the steps required to give EZCA access to your Azure Key Vaults to enable automated certificate rotation.
What Permissions Are Required for EZCA to Rotate Certificates in Azure Key Vault?
Azure Key Vault automatic certificate issuance and rotation requires EZCA to have access to your Key Vaults via two sets of permissions:
- Permission to read authorized users
- EZCA requires an RBAC
Readerrole to verify the user requesting the certificate has access to the Key Vault.
- EZCA requires an RBAC
- Permission to manage certificates
- EZCA also requires either an Access Policy with
Get,Update, andCreate, or an RBACKey Vault Certificates Officerrole to manage the certificates in the Key Vault.
- EZCA also requires either an Access Policy with
How to Connect EZCA To Your Azure Key Vault - Video Tutorial
Follow along with our video tutorial to see how to give EZCA access to your Azure Key Vault for automated certificate rotation:
How to Connect EZCA To Your Azure Key Vault - Step-by-Step Guide
Follow these steps to give EZCA access to your Azure Key Vault and to issue your first certificate with EZCA that is automatically renewed in your Key Vault.
Prerequisites for Automated Certificate Rotation in Azure Key Vault with EZCA
- Ensure the EZCA application is registered in your Azure tenant
- Ensure you have an active EZCA subscription
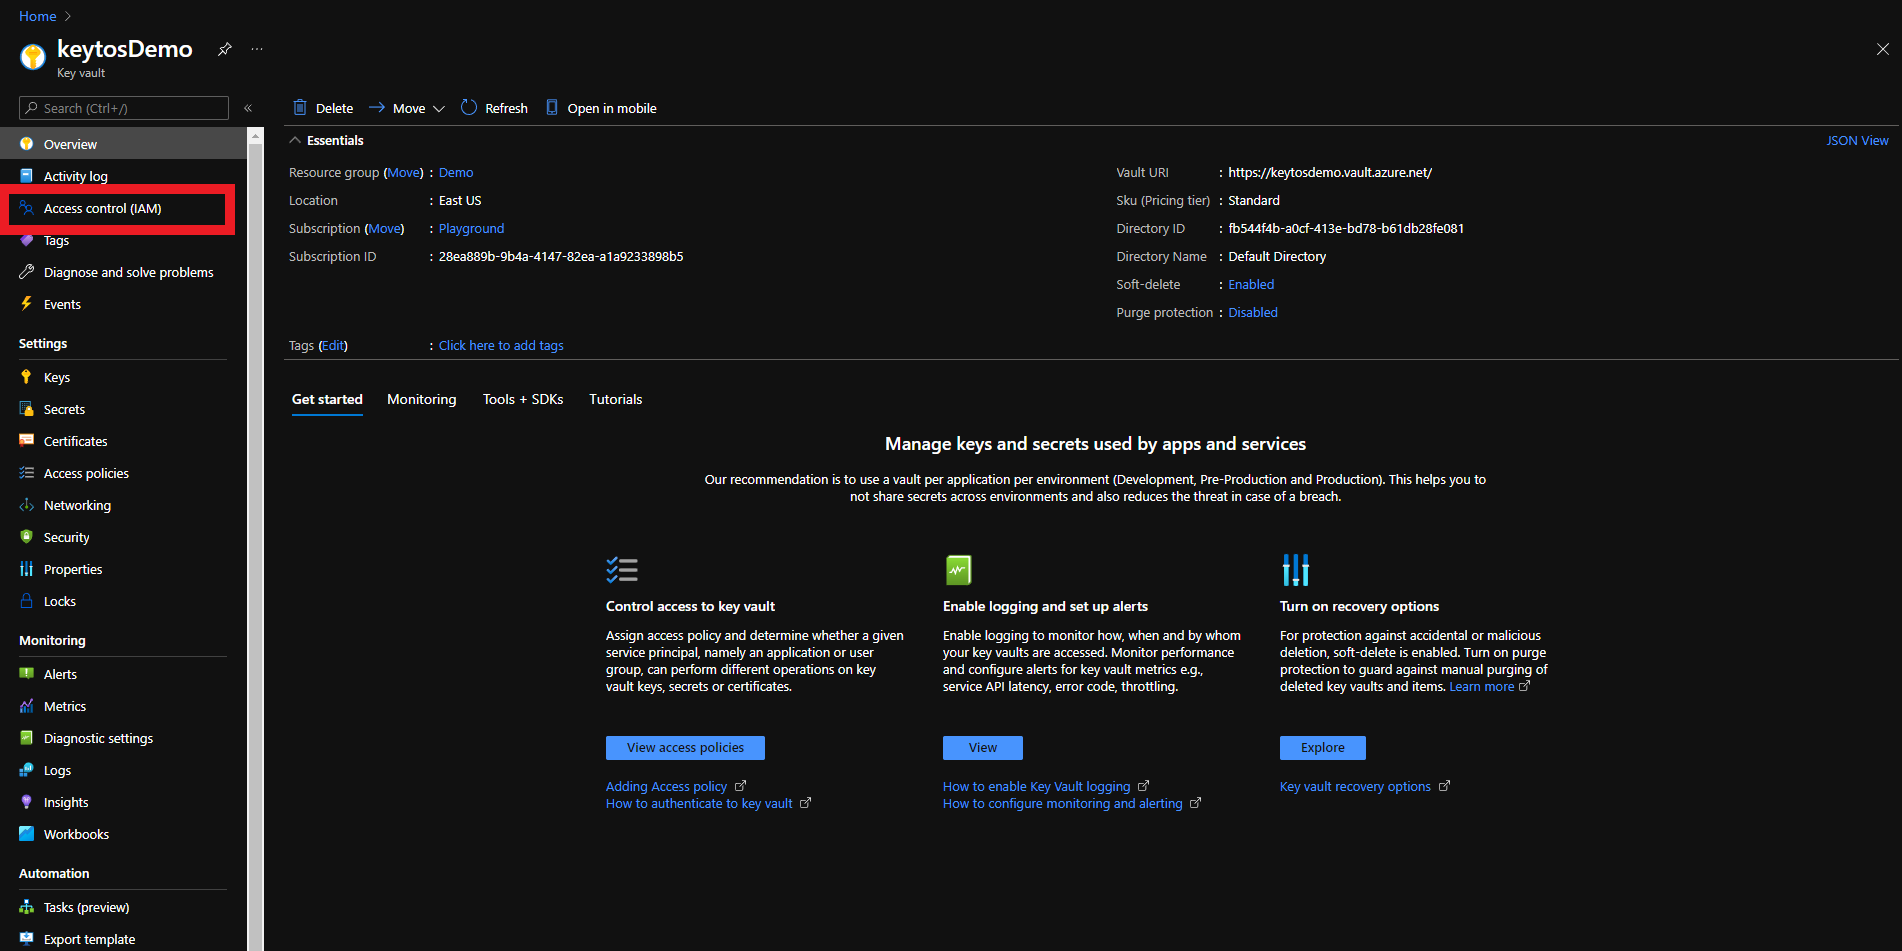
Step 1 - How To Assign the RBAC Reader Role to Key Vault
The first step is to give EZCA the Reader role on the Key Vault. This will allow EZCA to read the list of authorized users for the Key Vault to verify that the user requesting the certificate has access to the Key Vault.
-
Login to https://portal.azure.com
-
Navigate to the Key Vault you want EZCA to manage.
-
Click on the Access control (IAM) menu option
-
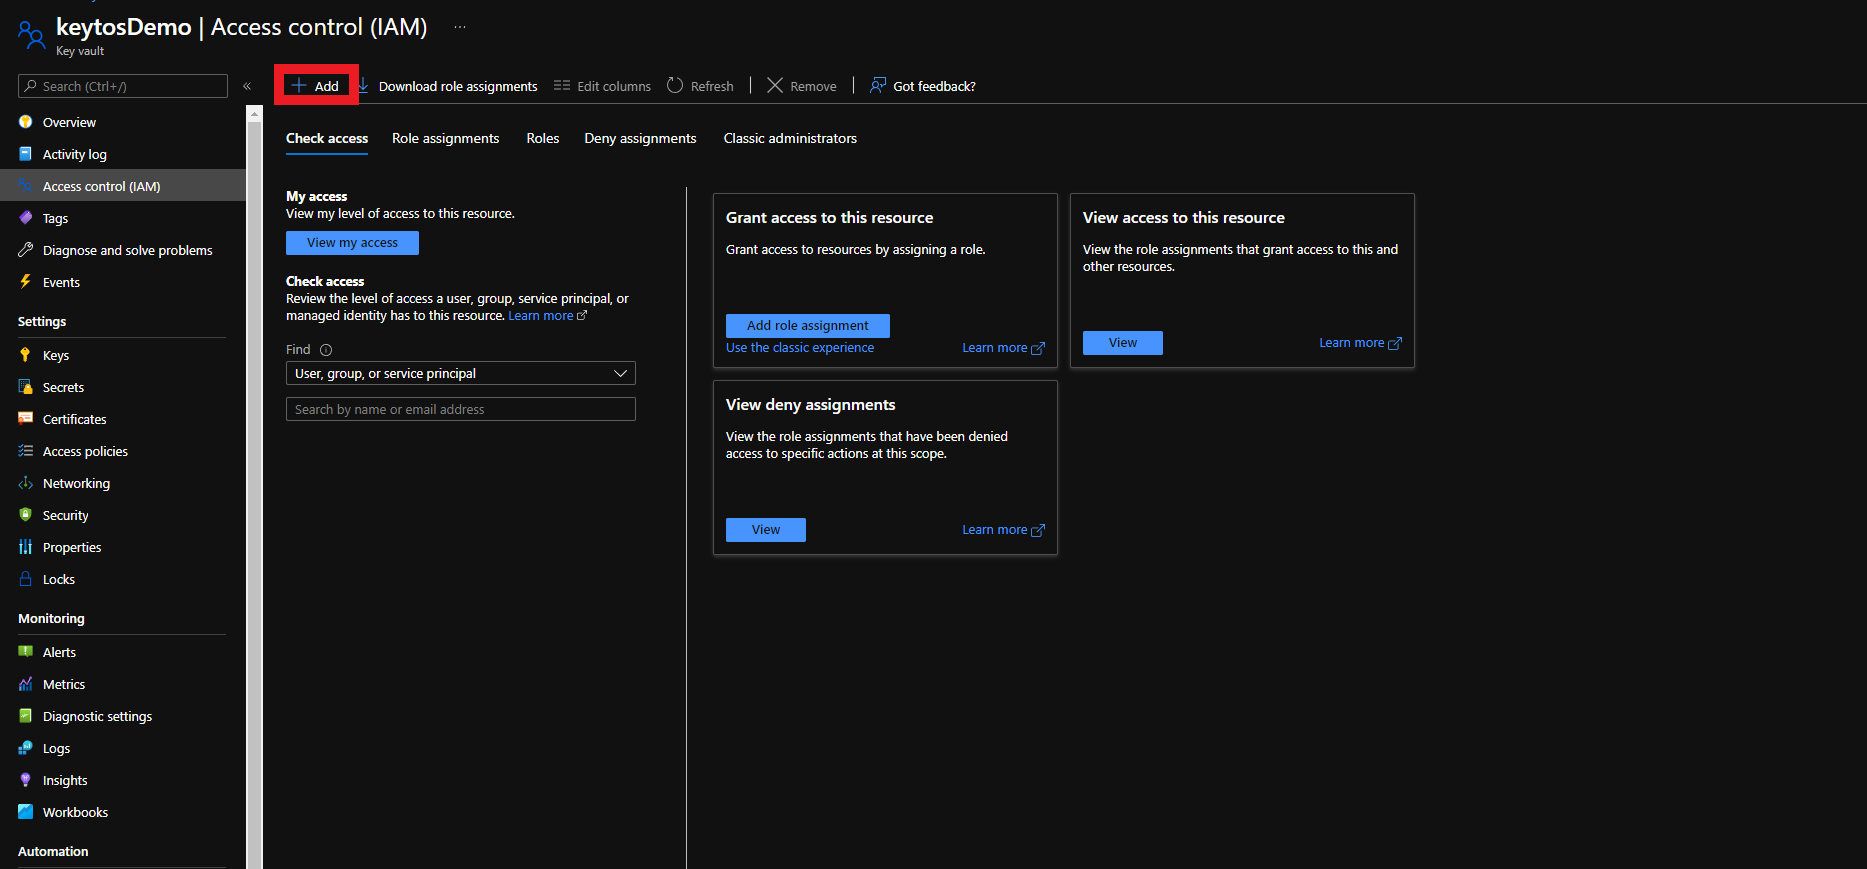
Click on + Add
-
Select the Add Role Assignment Option
-
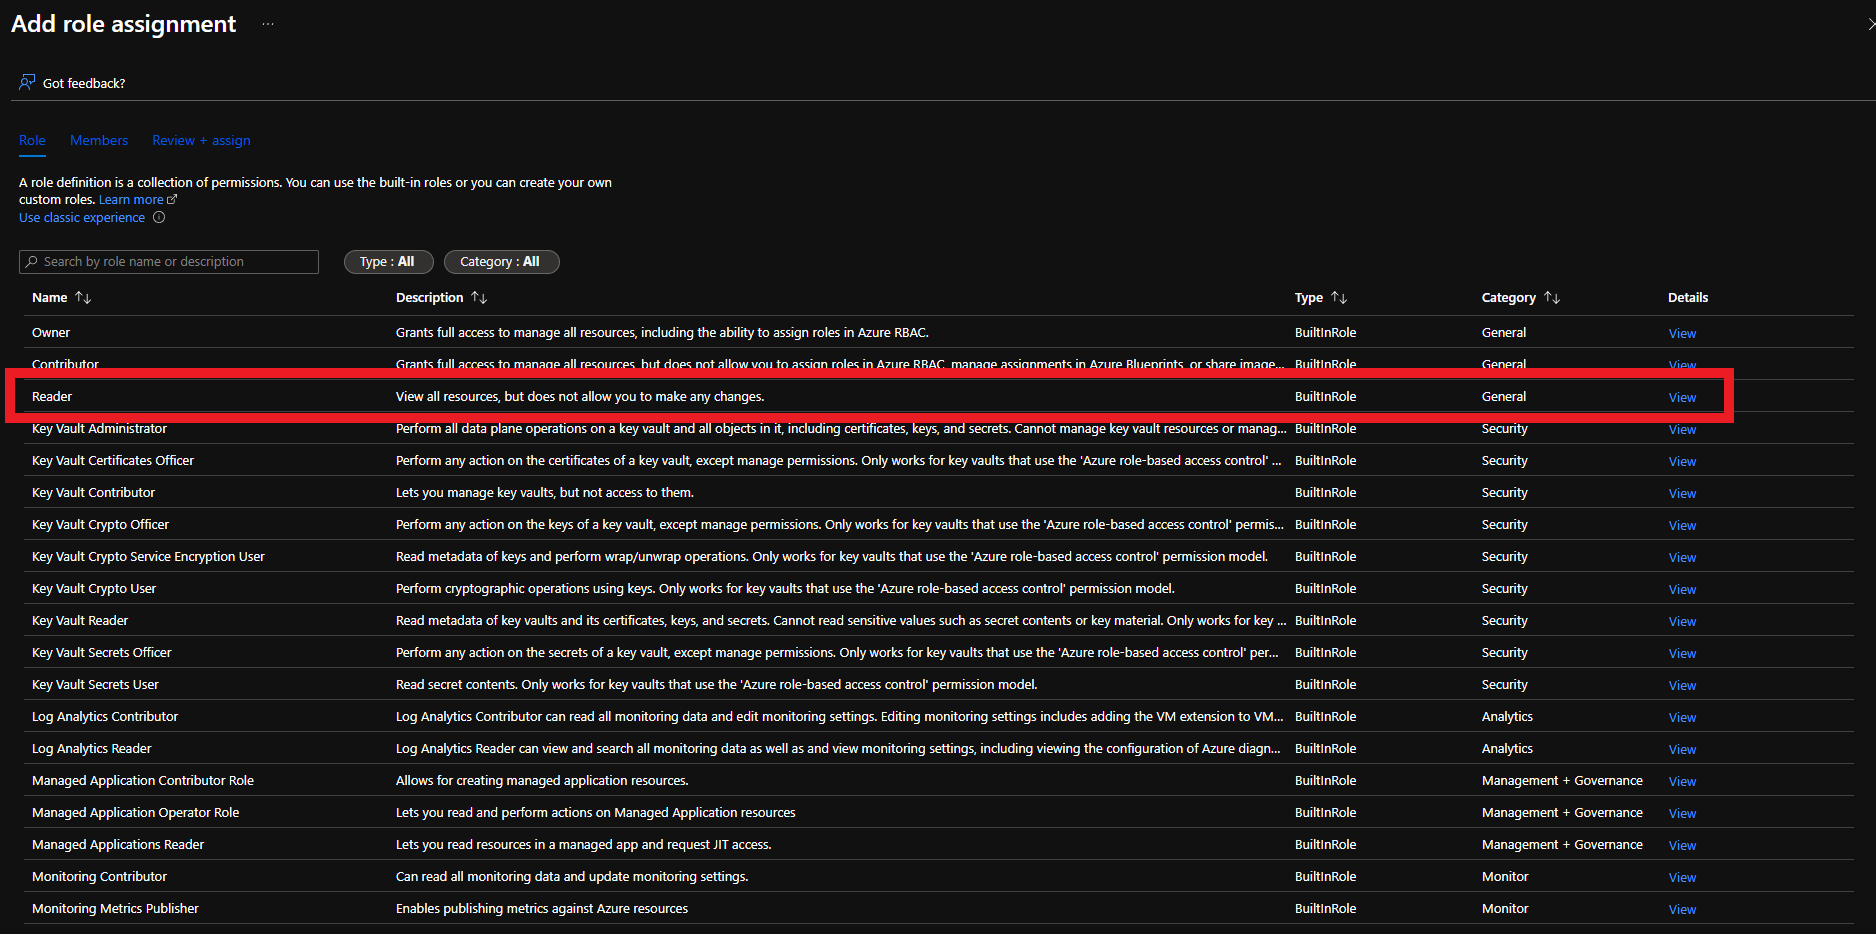
Select the Reader role
-
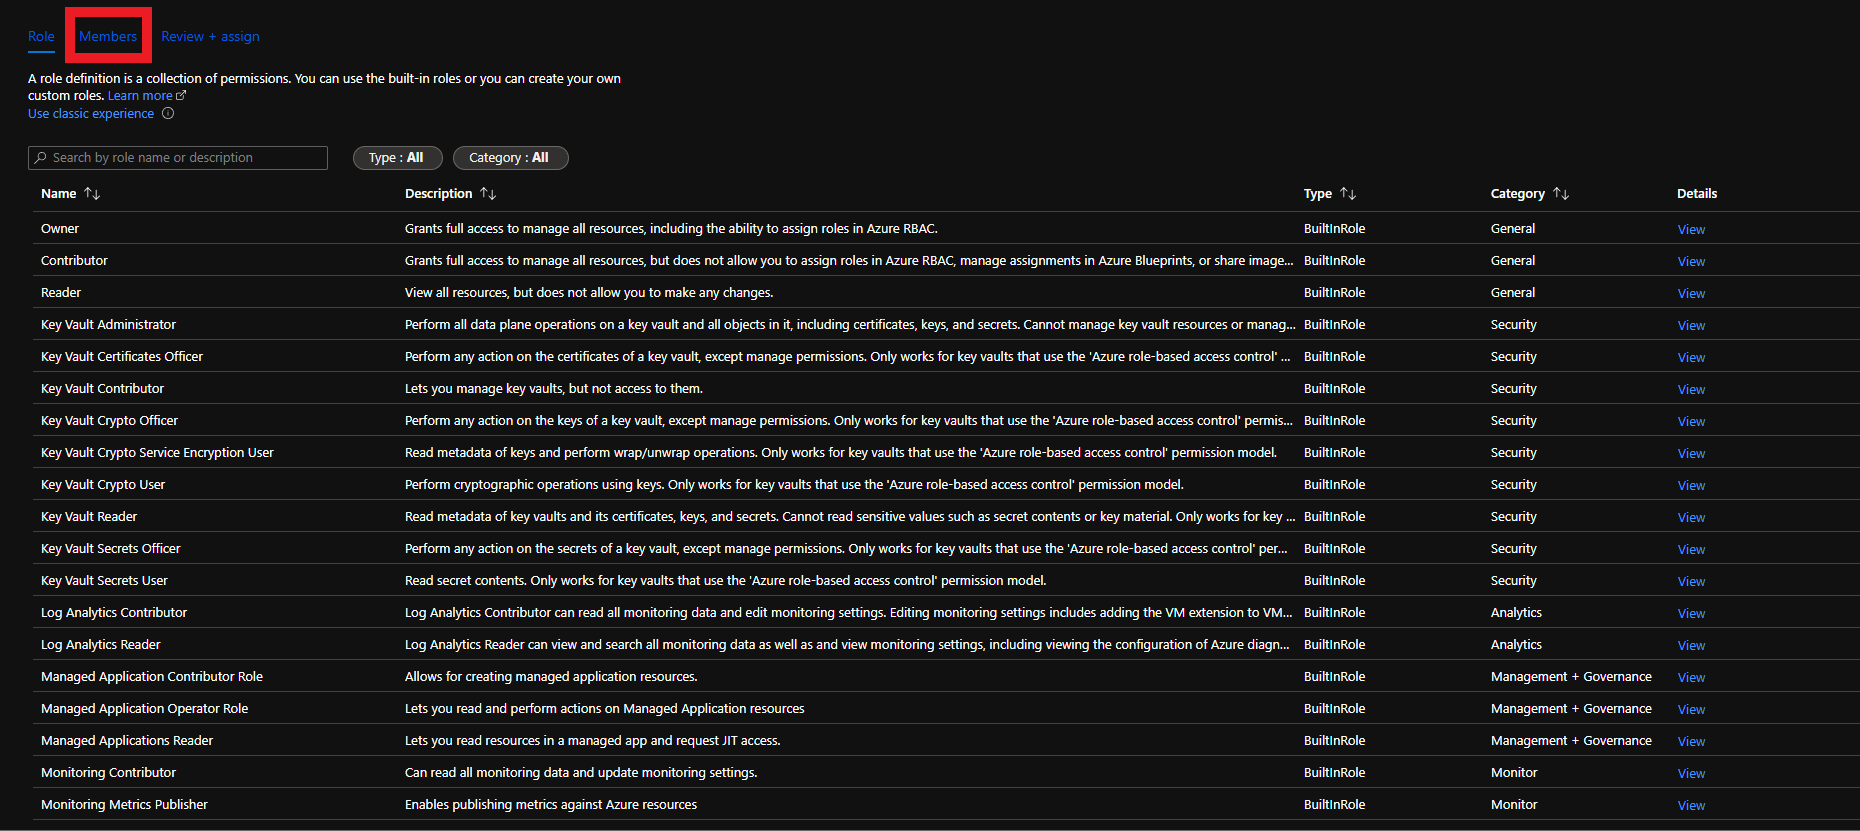
Click on Members
-
Click on + Select members
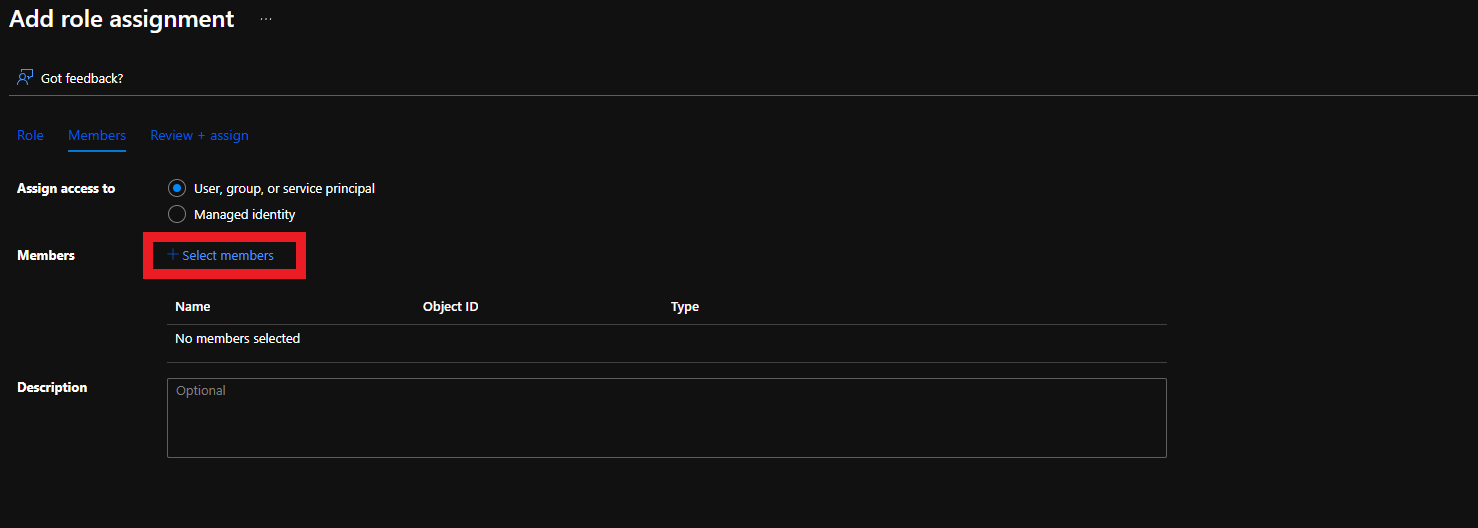
-
Search for “keytos” and select the Keytos application
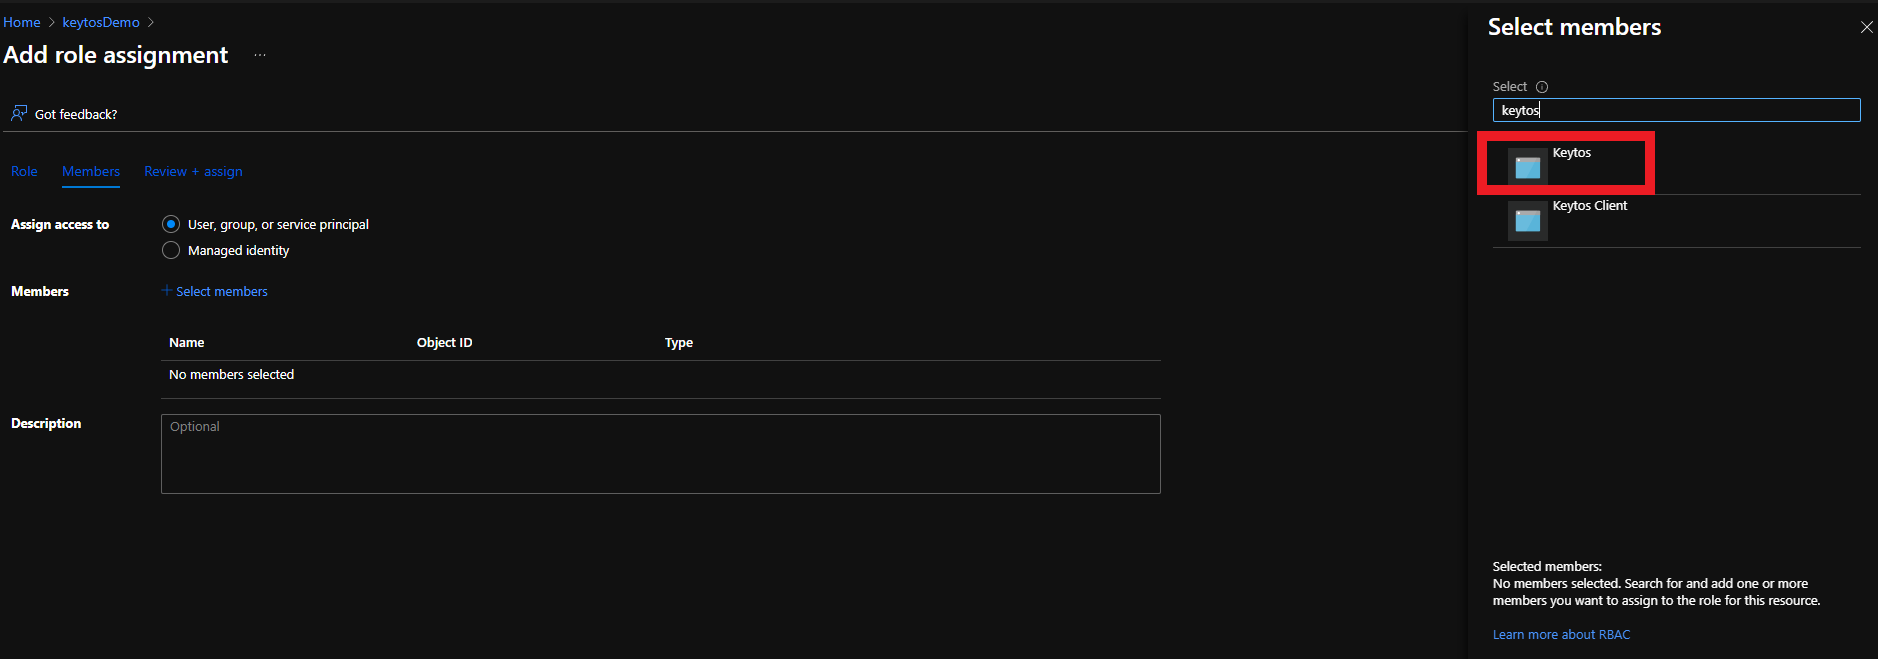
-
Click the Select button
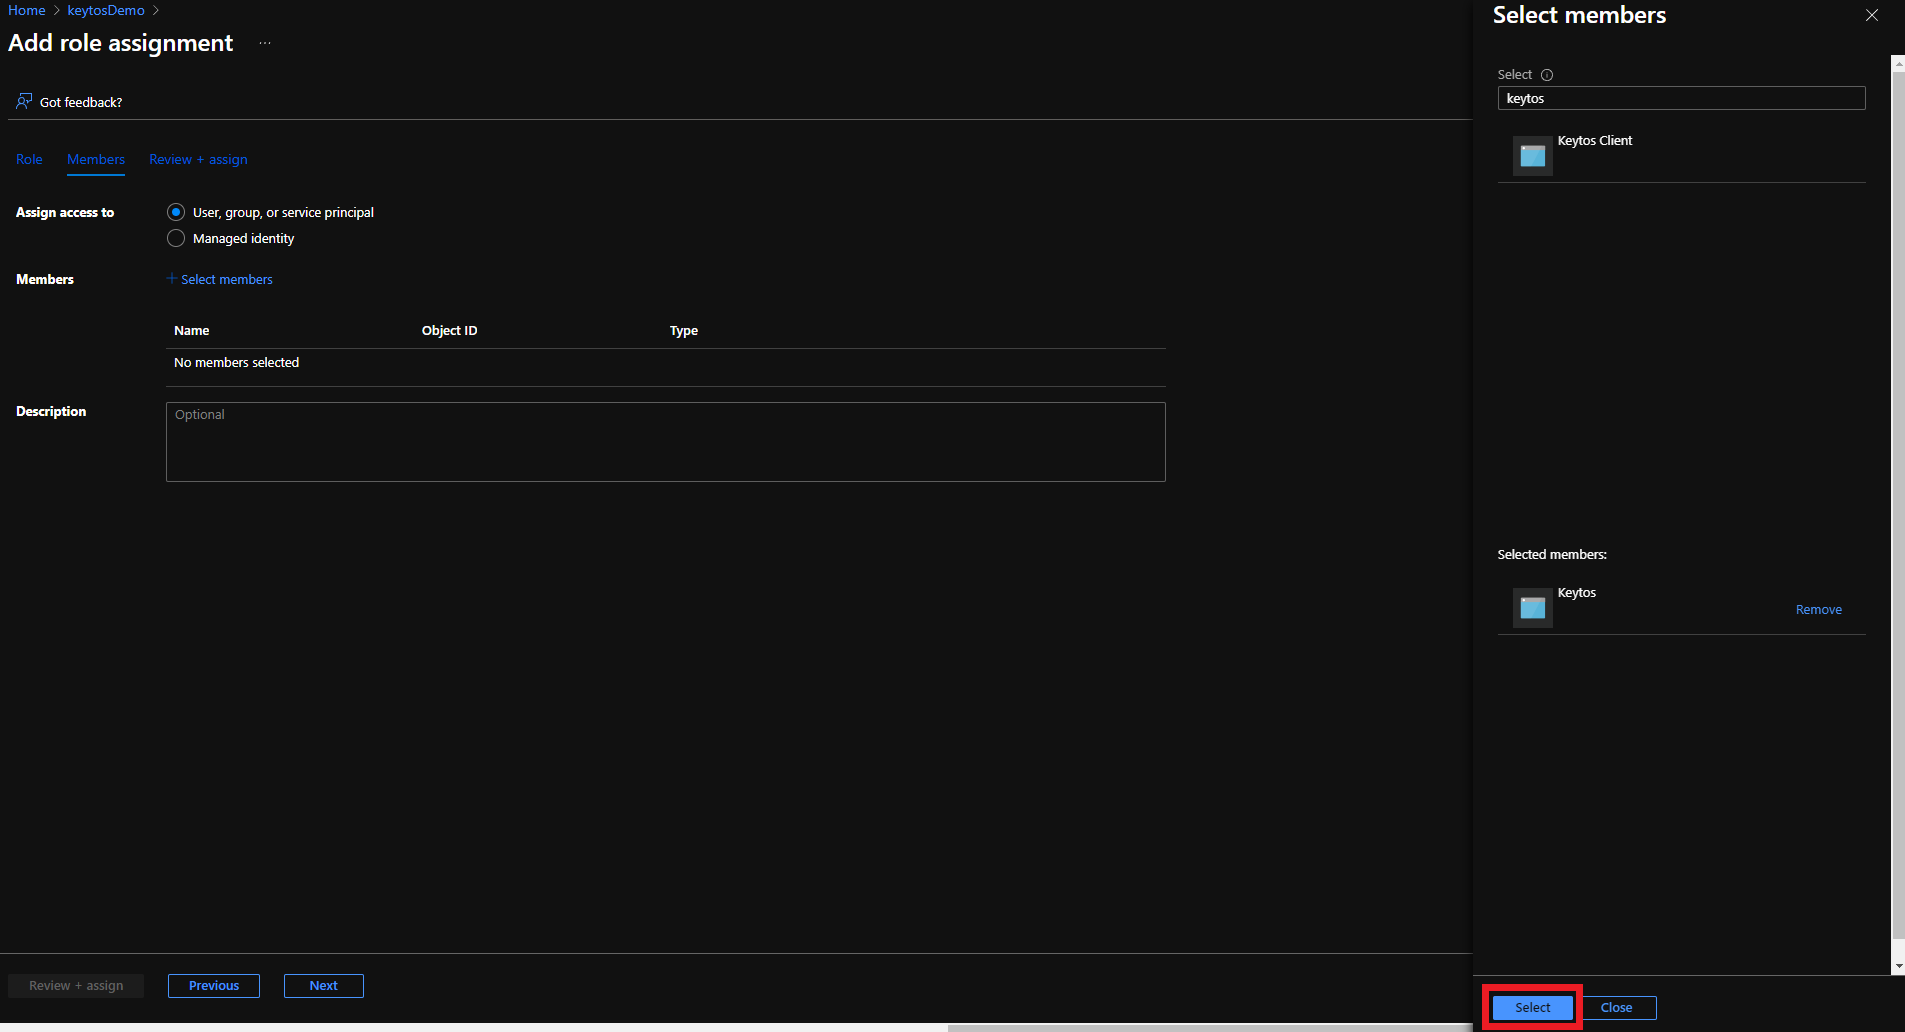
-
Click the Review + assign button

-
Click the Review + assign button

-
Done. EZCA now has Reader access to your Key Vault and can verify users have access to the Key Vault when they request a certificate.
Step 2 - How To Add Certificate Management Access to Key Vault for EZCA
There are two ways to give EZCA access to manage certificates in your Key Vault. You can either use Key Vault Access Policies or Azure RBAC, depending on your Key Vault configuration. If you have previously disabled Access Policies on your Key Vault, you must use Azure RBAC to grant access.
Make sure to only use the option below which matches your existing Key Vault configuration. If you’re unsure, refer to the Access configuration section in your Azure Key Vault:

How to Grant Certificate Management Access to EZCA with RBAC
-
Login to the Azure portal.
-
Navigate to the Key Vault you want EZCA to manage.
-
Click on the Access control (IAM) menu option
-
Click on + Add
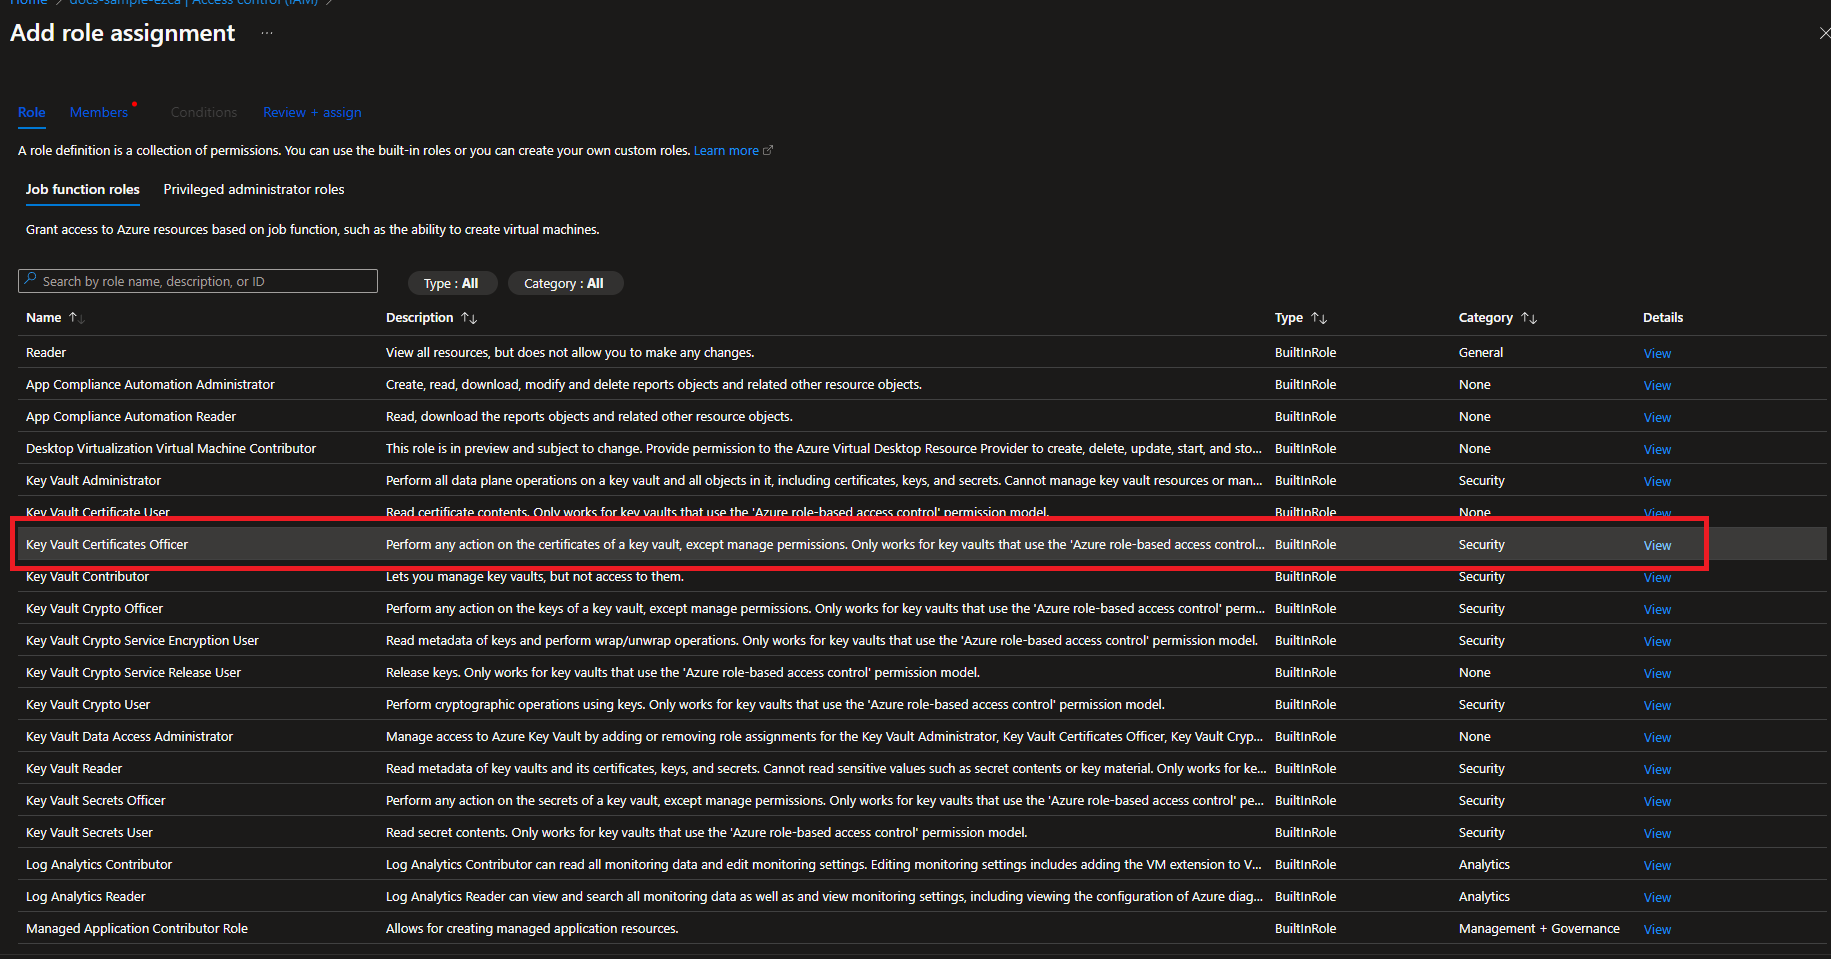
-
Select the Key Vault Certificates Officer Role
-
Click on Members
-
Click on Select Members
-
Search for “keytos” and select the Keytos application
-
Click the Select button
-
Click the Review + assign button

-
Click the Review + assign button
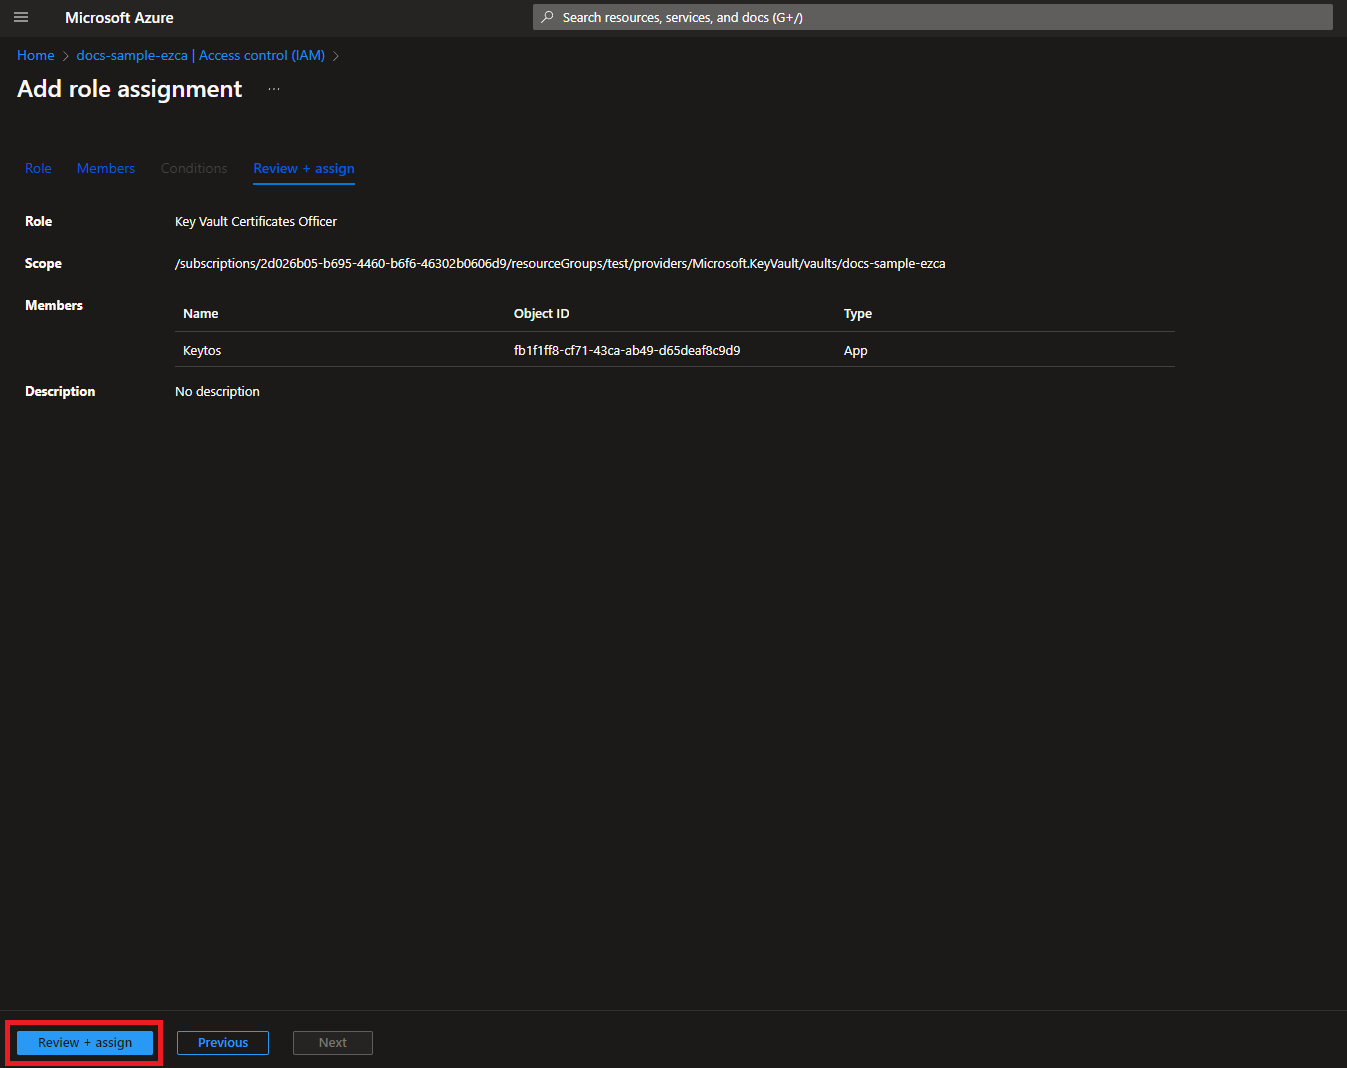
At this point you should have two role assignments for the Keytos application: Reader and Key Vault Certificates Officer. If you are missing any of these role assignments, EZCA will not be able to rotate your certificates. Please review the steps above to ensure you have assigned both roles to the Keytos application.
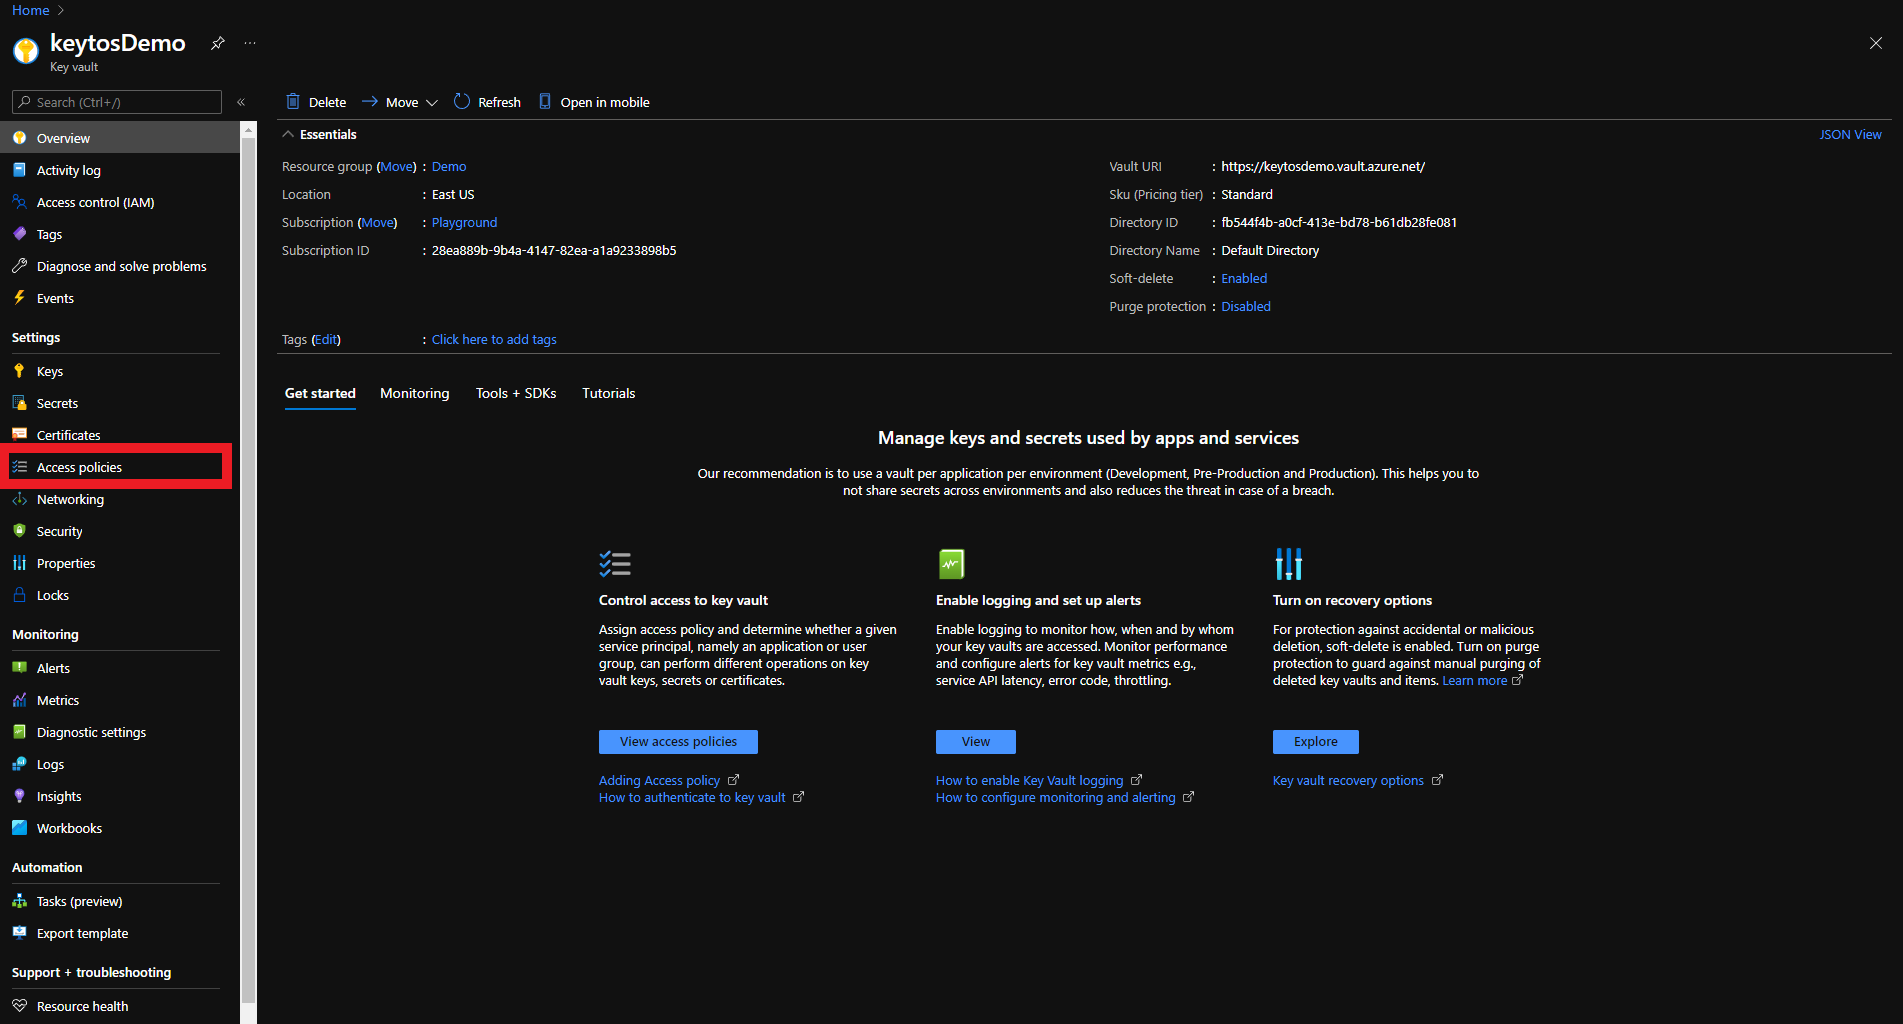
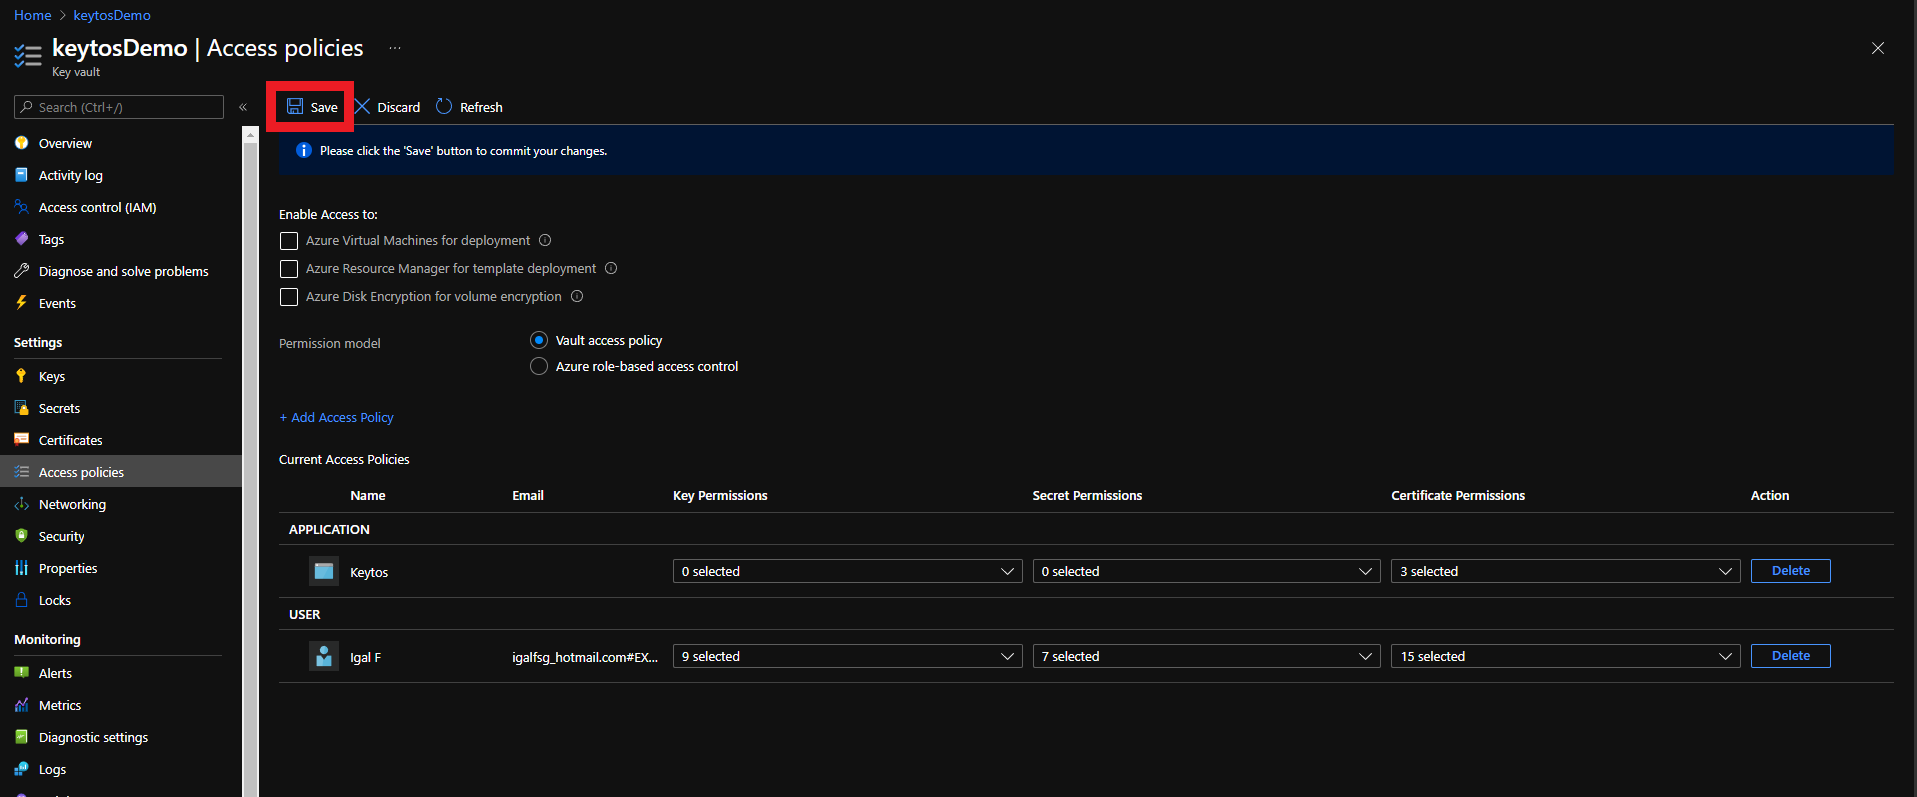
How to Grant Certificate Management Access to EZCA with Access Policies
While you can use Access Policies to grant EZCA permissions to manage certificates in your Key Vault, we recommend using RBAC as it is the more modern and flexible approach. Access Policies are a legacy method of managing permissions in Key Vault and are no longer the default option for new Key Vaults.
Check your Key Vault settings to see which mode it is using and consider switching to RBAC if you are currently using Access Policies. If you choose to use Access Policies, make sure to select the correct permissions as shown in the steps below.
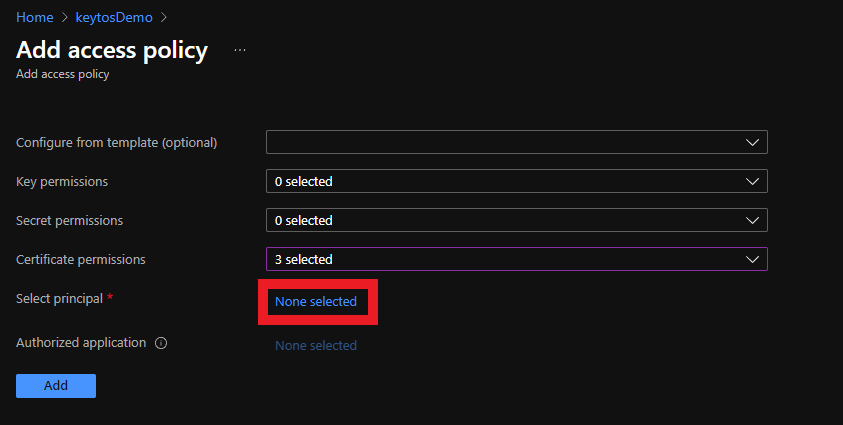
-
Login to https://portal.azure.com
-
Navigate to the Key Vault you want EZCA to manage.
-
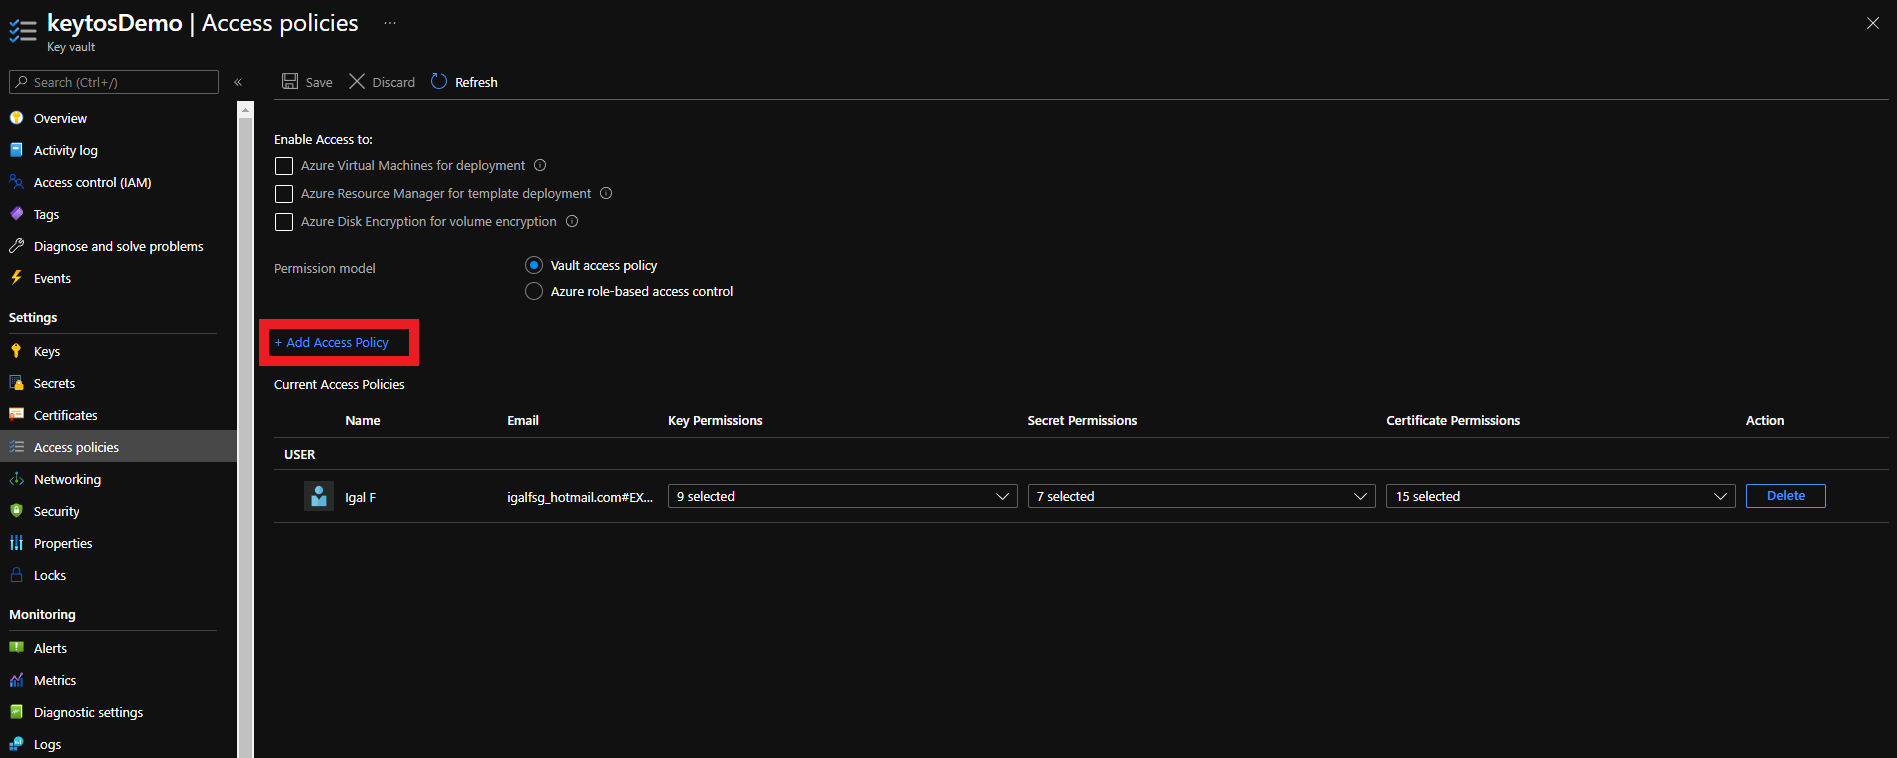
Click on the Access policies menu option
-
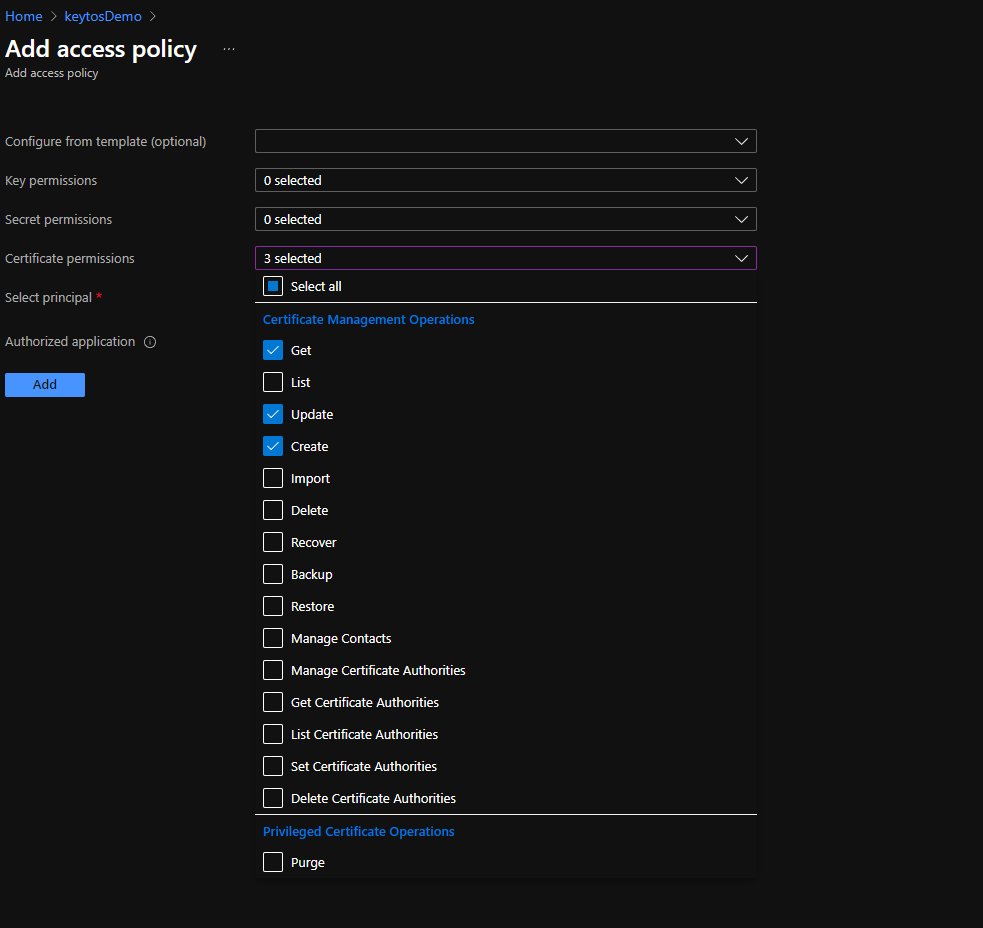
Click on + Add Access Policy
-
Under Certificate permissions select: Get, Update, and Create.
-
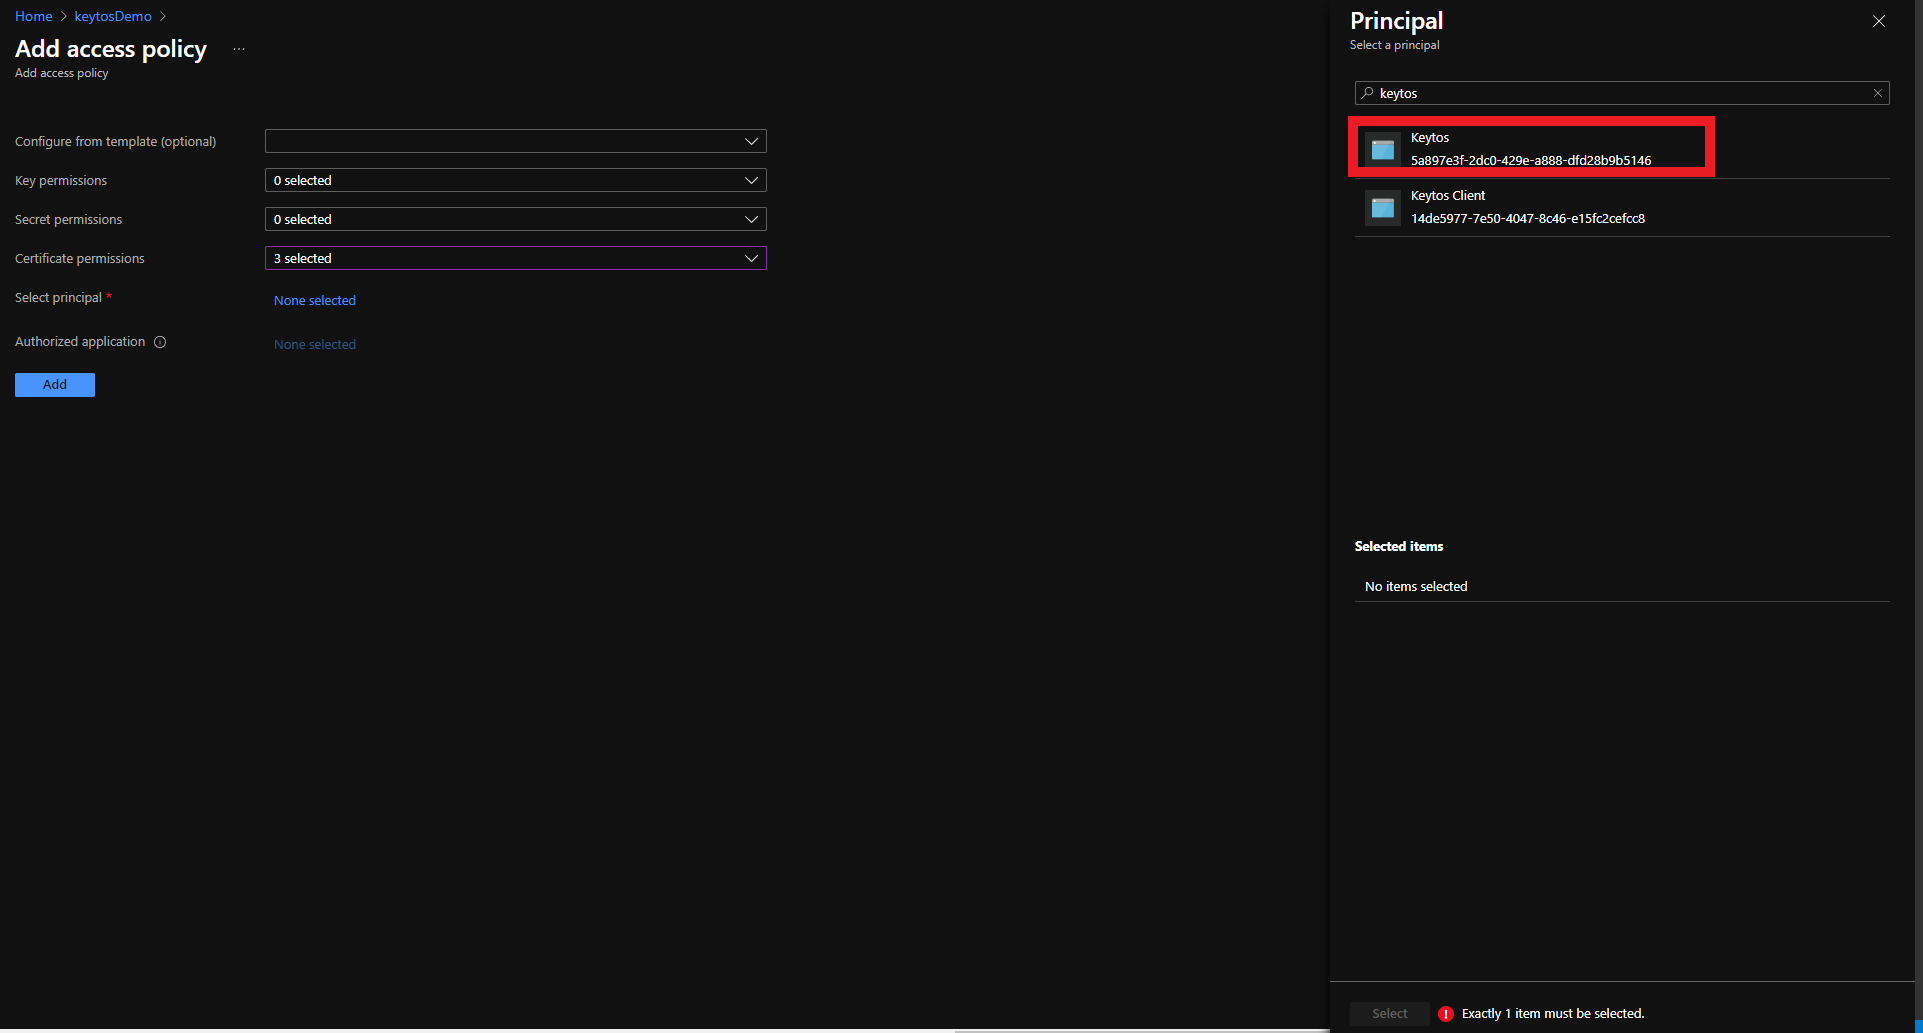
Under Select principal, click on the None selected link to choose the application you want to give these permissions to.
-
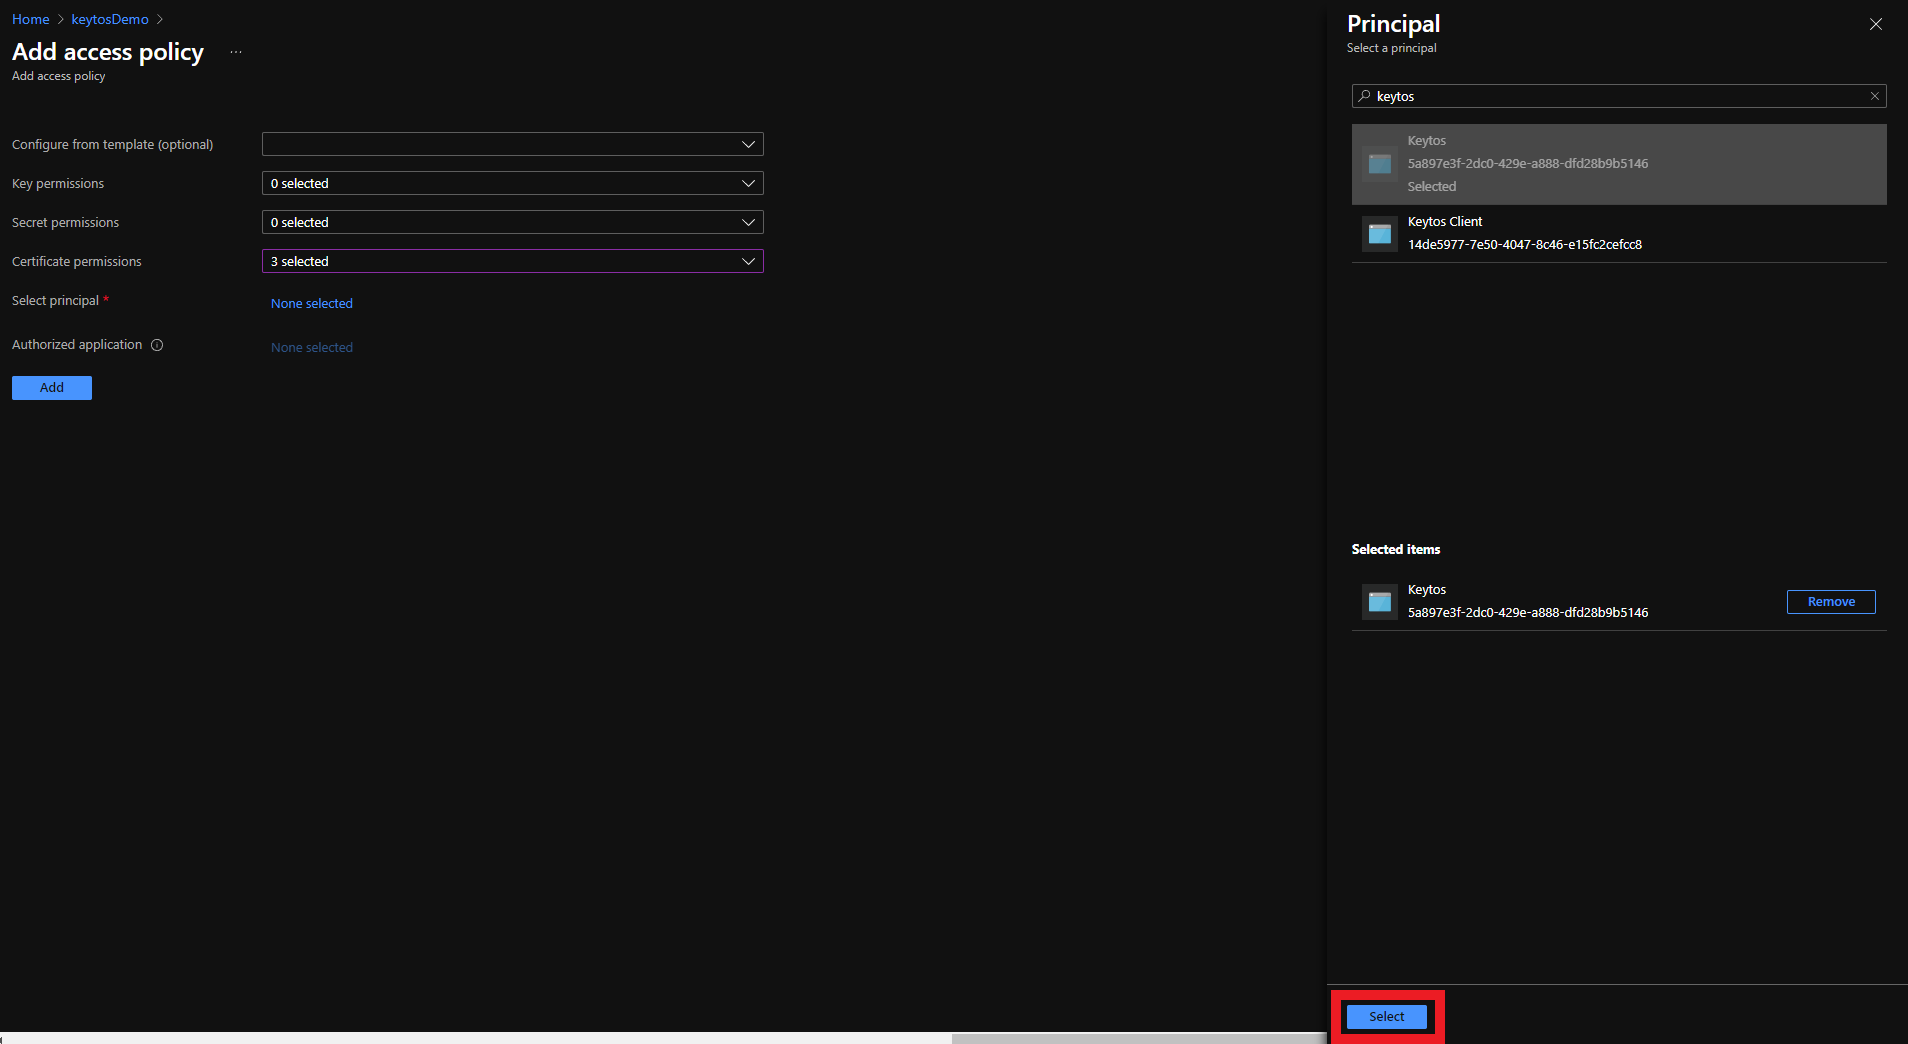
Search for “keytos” and select the Keytos application
-
Click the Select button
-
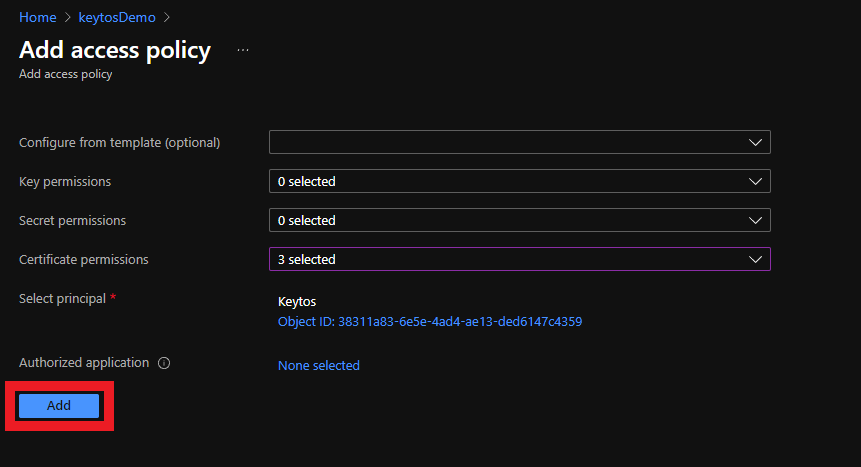
Click the Add button
-
Click the Save button
Step 3 - How to Add EZCA To Your Key Vault Firewall Configuration
If your Key Vault has a firewall enabled, you will need to add the EZCA IP address to the Key Vault firewall to allow EZCA to manage the certificates in the Key Vault.
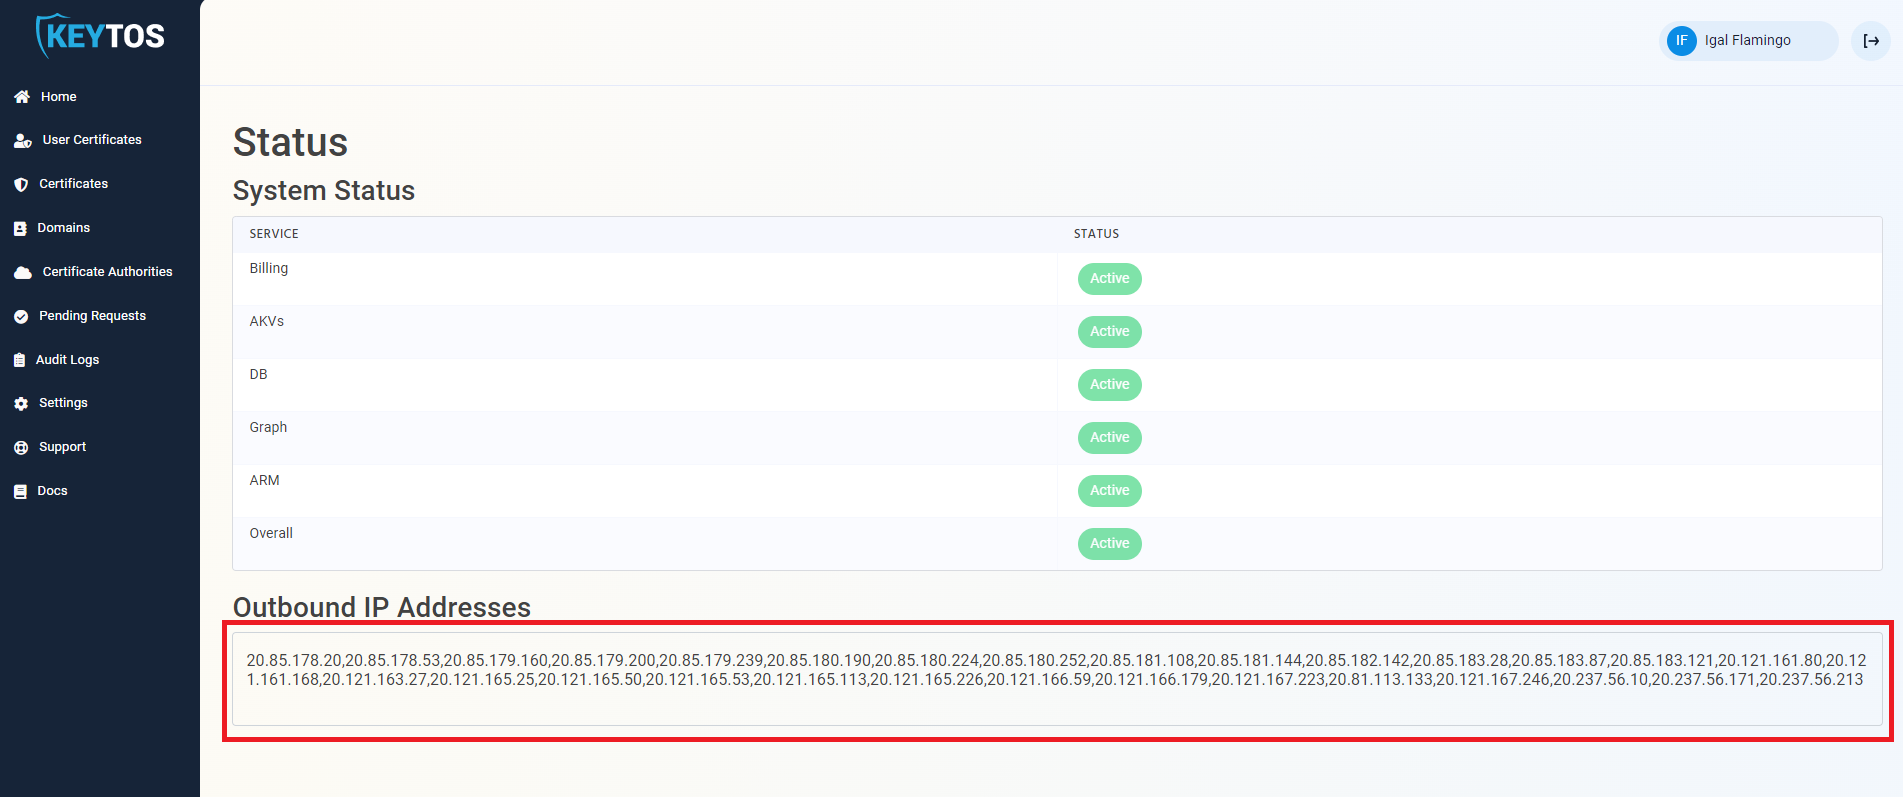
How To Retrieve the EZCA IP Addresses
To find the EZCA IP addresses, go to the EZCA portal status of your instance for example: https://portal.ezca.io/status and copy the IP addresses from the Outbound IP Addresses section.
How To Add the EZCA IP Addresses to the Key Vault Firewall
You can now add the IP addresses to the Key Vault firewall. Since the EZCA IP addresses are subject to change, we recommend adding the entire IP range to the Key Vault firewall. To do this, you can use the following PowerShell script to add the IP range to the Key Vault firewall. Replace the $ipRange variable with the IP range from the EZCA portal status page:
Connect-AzAccount
$ipRange = ""
$resourceGroupName = "" # Replace with your resource group name
$keyVaultName = "" # Replace with your Key Vault name
$ipArr = $ipRange.Split(",")
Add-AzKeyVaultNetworkRule -VaultName $keyVaultName -ResourceGroupName $resourceGroupName -IpAddressRange $ipArr
How to Issue Your First Certificate with EZCA in Azure Key Vault
Now that you have given EZCA access to your Azure Key Vault, you can issue your first certificate with EZCA that will be automatically renewed in your Key Vault. Follow the steps in our guide on How To Create a Certificate in Azure Key Vault with EZCA to create your first certificate and see automated certificate rotation in action!
How To Create a Certificate in Azure Key Vault with EZCAFrequently Asked Questions about Using EZCA with Azure Key Vault
Does EZCA Support Key Vaults Without Public Access?
EZCA supports Key Vaults without public access enabled only in our self-hosted tier due to restrictions on Private Link Endpoints. If you are interested in using EZCA with Key Vault Private Link, please contact our sales team at sales@keytos.io to discuss your use case and options.
If you wish to lock down access to your Key Vault from only trusted IP addresses, you can add the EZCA IP addresses to the Key Vault firewall as described in the section above.
Enjoying EZCA? Leave Us a Review!
We hope you’re enjoying using EZCA to issue your SSL certificates! If you have a moment, we would greatly appreciate it if you could leave us a review on G2. Your feedback helps other IT professionals discover EZCA and helps us continue to improve our service. Thank you for your support!