

















How to Inspect TLS Traffic with Azure Firewall and EZCA
Overview - How TLS Inspection Works in Azure Firewall
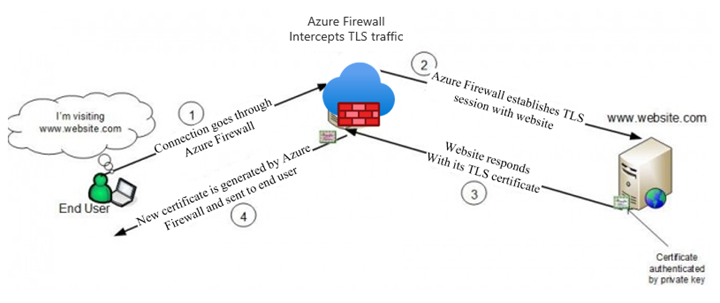
Azure Firewall Premium can intercept outbound HTTP/S traffic and auto-generate a server certificate for www.website.com. This certificate is generated using the Intermediate CA certificate that you provide. End-user browser and client applications (IaaS, PaaS and other workloads) must trust your organization Root CA certificate or intermediate CA certificate for this procedure to work.
How Does EZCA Help with TLS Inspection in Azure Firewall?
As the Azure Firewall Premium Certificates documentation states, for production workloads you should use a certificate issued by a trusted Root CA. This guide will take you through the necessary steps to issue TLS certificates for Azure Firewall using our Azure Based PKI.
Basically we must create an Intermediate CA certificate that will be used by Azure Firewall to generate the TLS certificates for the websites that are being accessed by the clients behind the firewall. Since this is a CA certificate, the private Key should never leave the HSM or the secure environment where it was created. To achieve this we will use the Azure Key Vault to create the CSR, sign the certificate by your Root CA in EZCA and return the signed certificate to Key Vault.
No, you do not need to create a new Intermediate CA in EZCA specifically for Azure Firewall. You will be creating a new Intermediate CA certificate in Azure Key Vault, and this certificate will be signed by your existing Root CA in EZCA. This allows you to leverage your existing PKI infrastructure while securely issuing certificates for Azure Firewall. You will not incur any additional costs in EZCA as certificates are free to issue from your existing CAs.
How to Set Up TLS Inspection in Azure Firewall - Step-by-Step Guide
Prerequisites for Issuing TLS Certificates for Azure Firewall
Before you can issue TLS certificates for Azure Firewall, you need to have the following prerequisites in place:
How To Enable TLS Inspection in Azure Firewall
The first step is to enable TLS Inspection in Azure Firewall. This is done by creating a TLS Inspection Profile in the Azure Firewall Policy. This profile will be used to inspect the traffic and generate the TLS certificates for the websites that are being accessed by the clients behind the firewall.
-
Go to the Azure Portal and navigate to your Azure Firewall Policy.
-
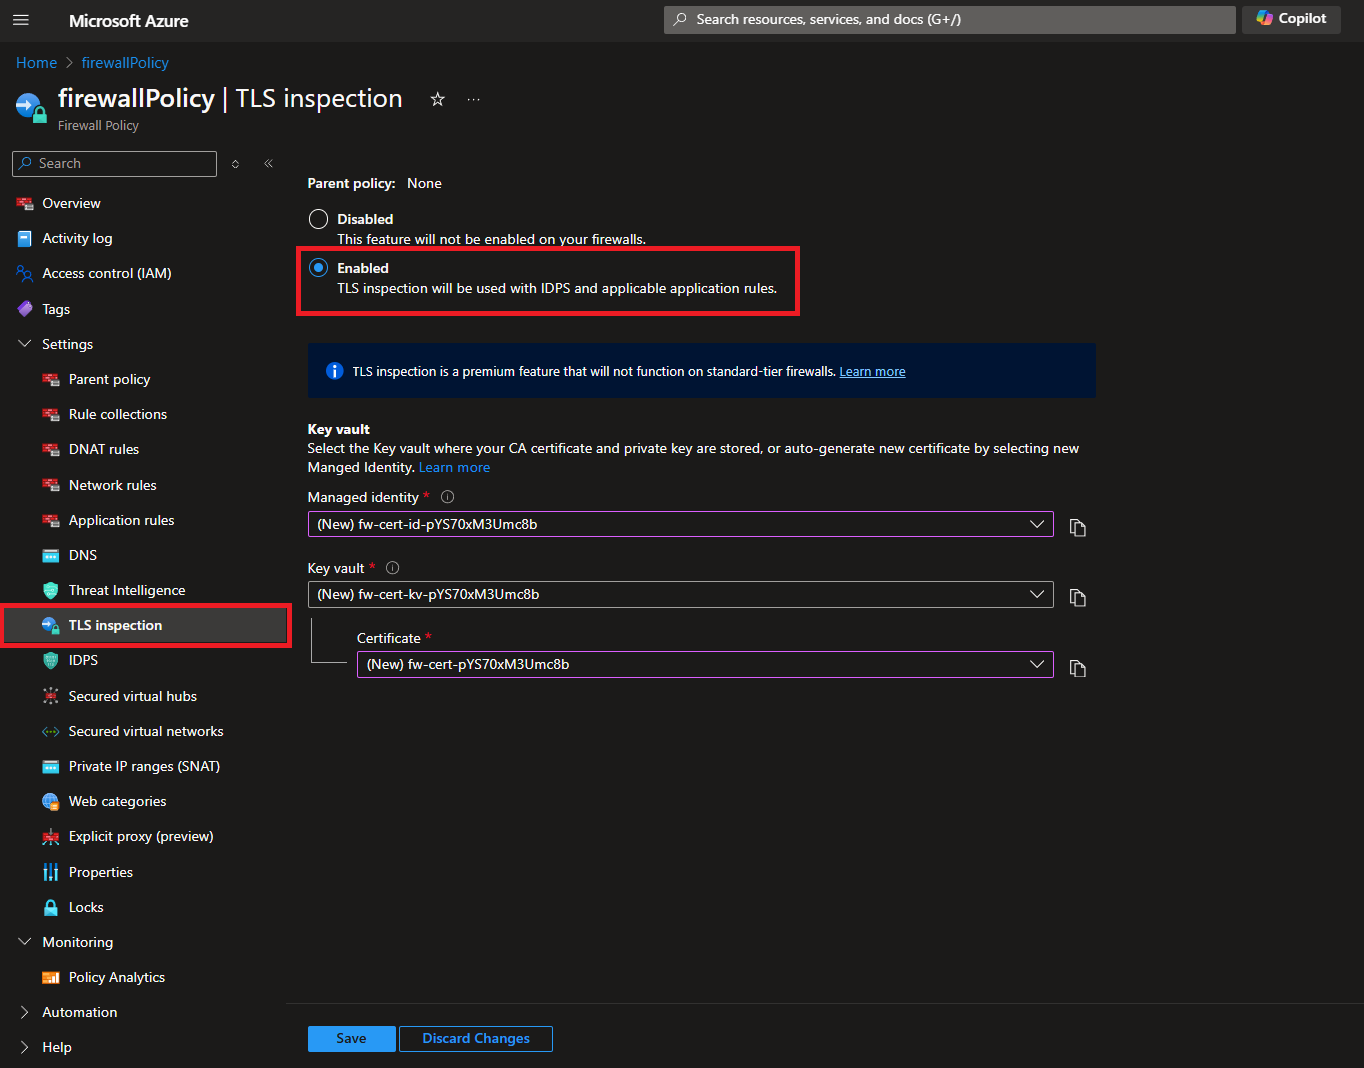
Click on the TLS Inspection menu and enable the TLS Inspection.
-
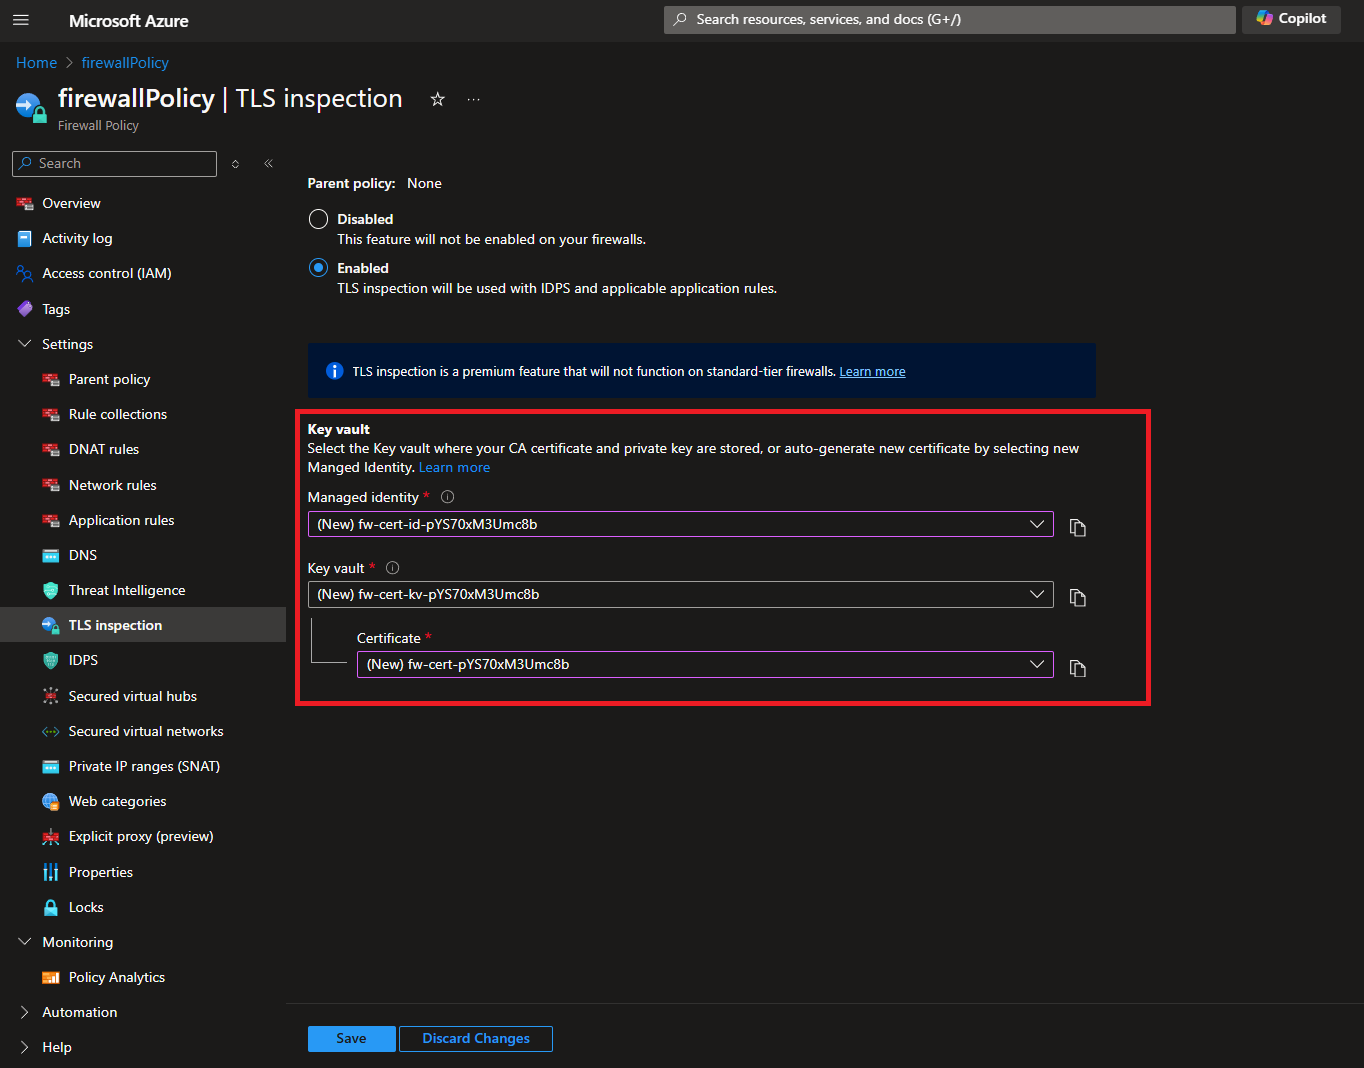
By default a new Managed Identity (this is the identity that the profile will use to access the key vault), and a new Key Vault with a new self signed certificate will be added.
-
Click Save on the bottom of the page. This will create the MSI, Key Vault, and the self signed certificate.
How to Configure Permissions in Azure Key Vault
Before we can create the Intermediate CA certificate, we need to configure the permissions in Azure Key Vault to allow us to import the signed certificate from EZCA.
-
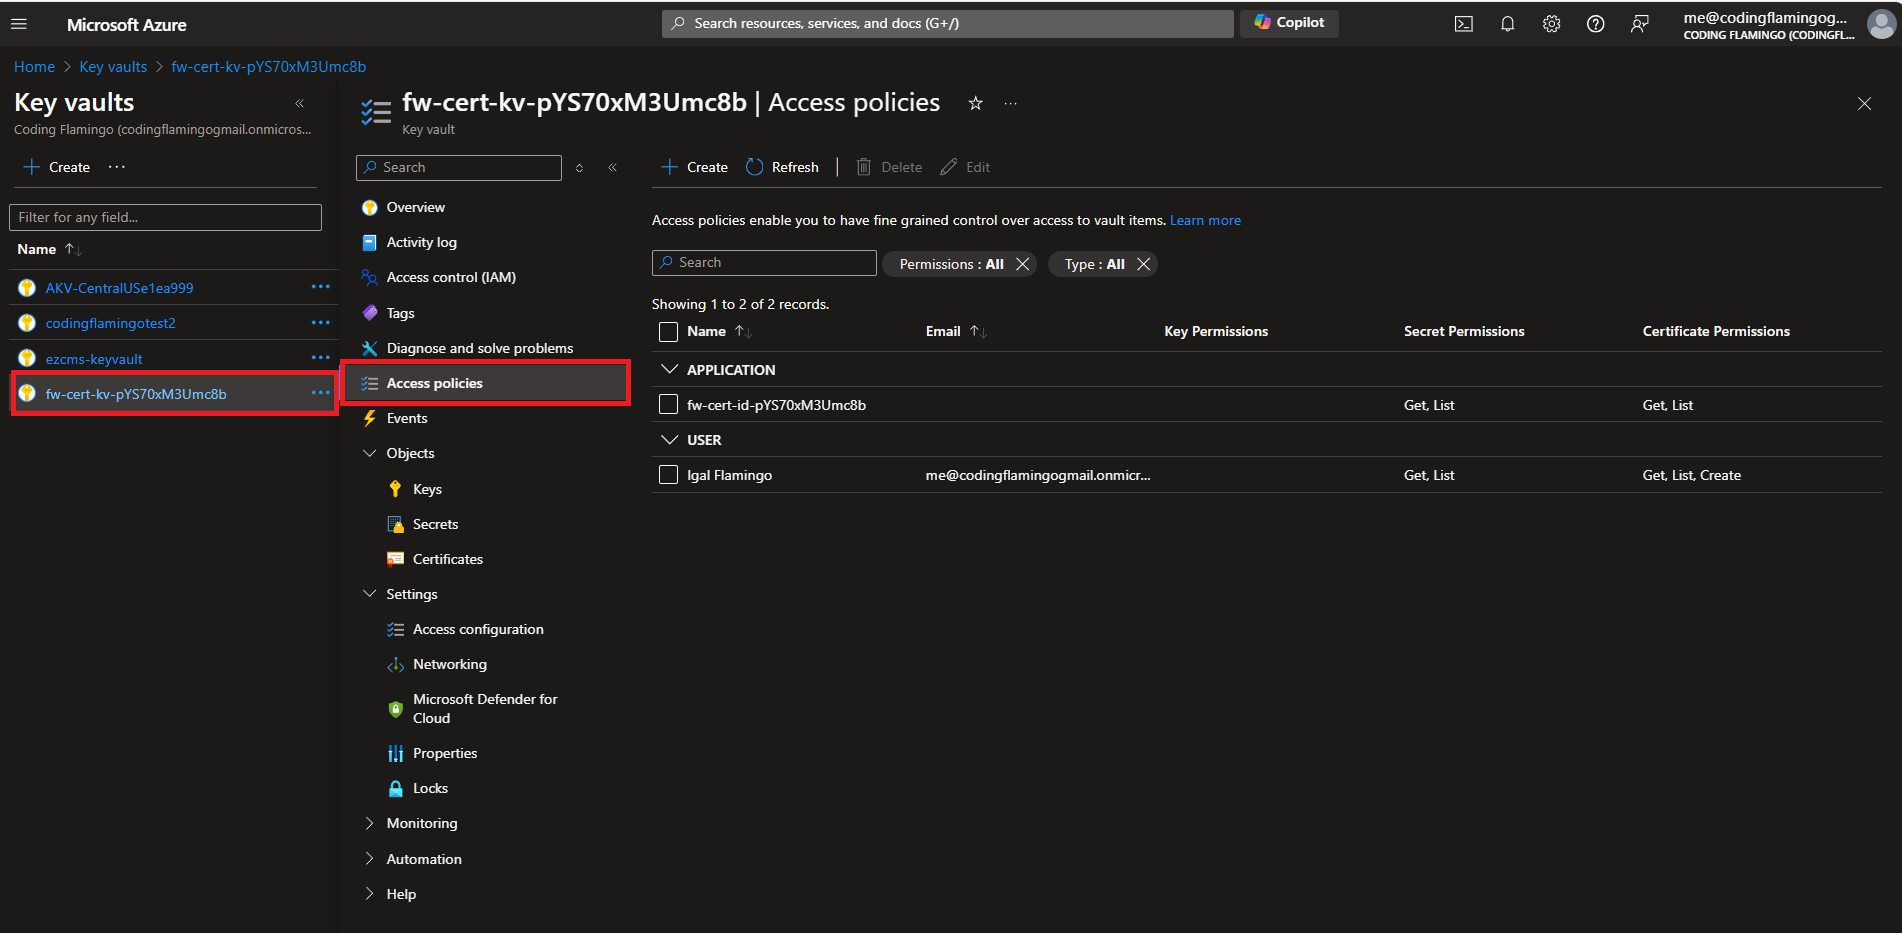
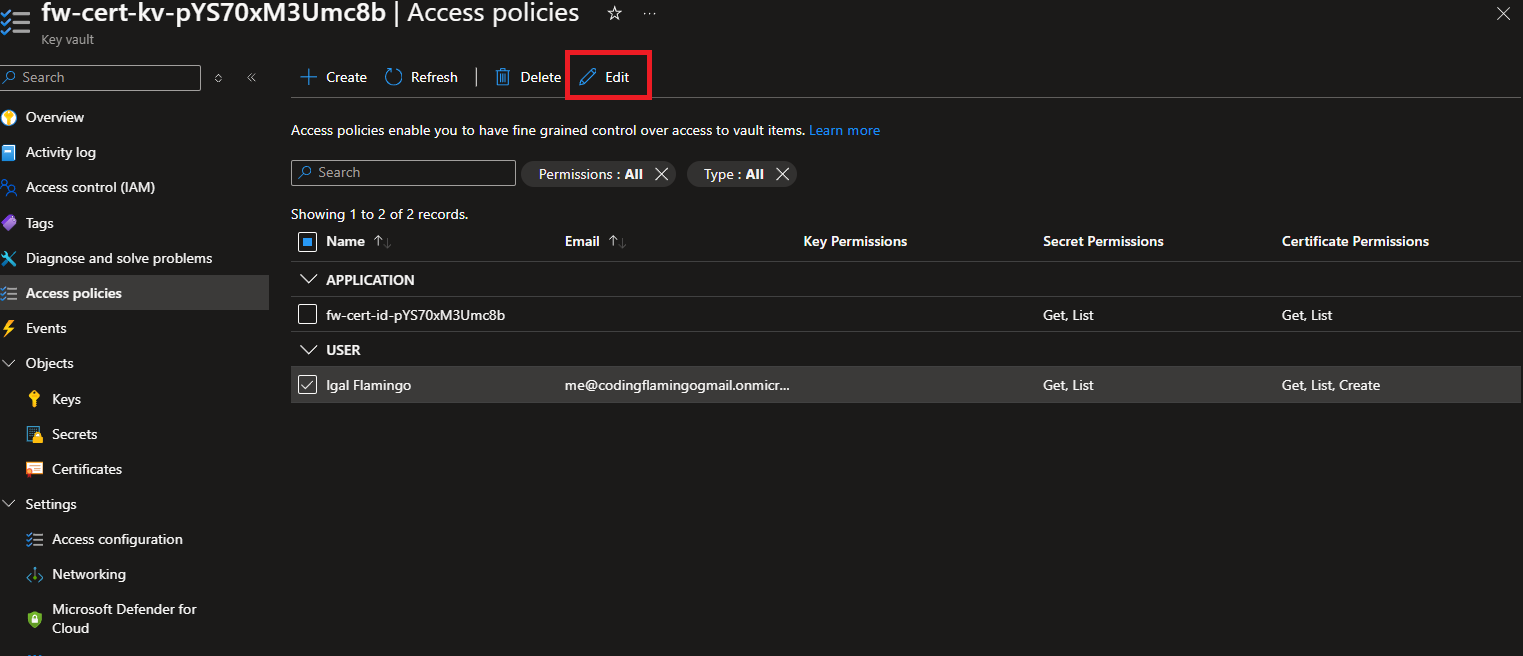
Go to the Azure Key Vault that was generated and click on Access Policies.
-
Click on your user and the edit button at the top.
-
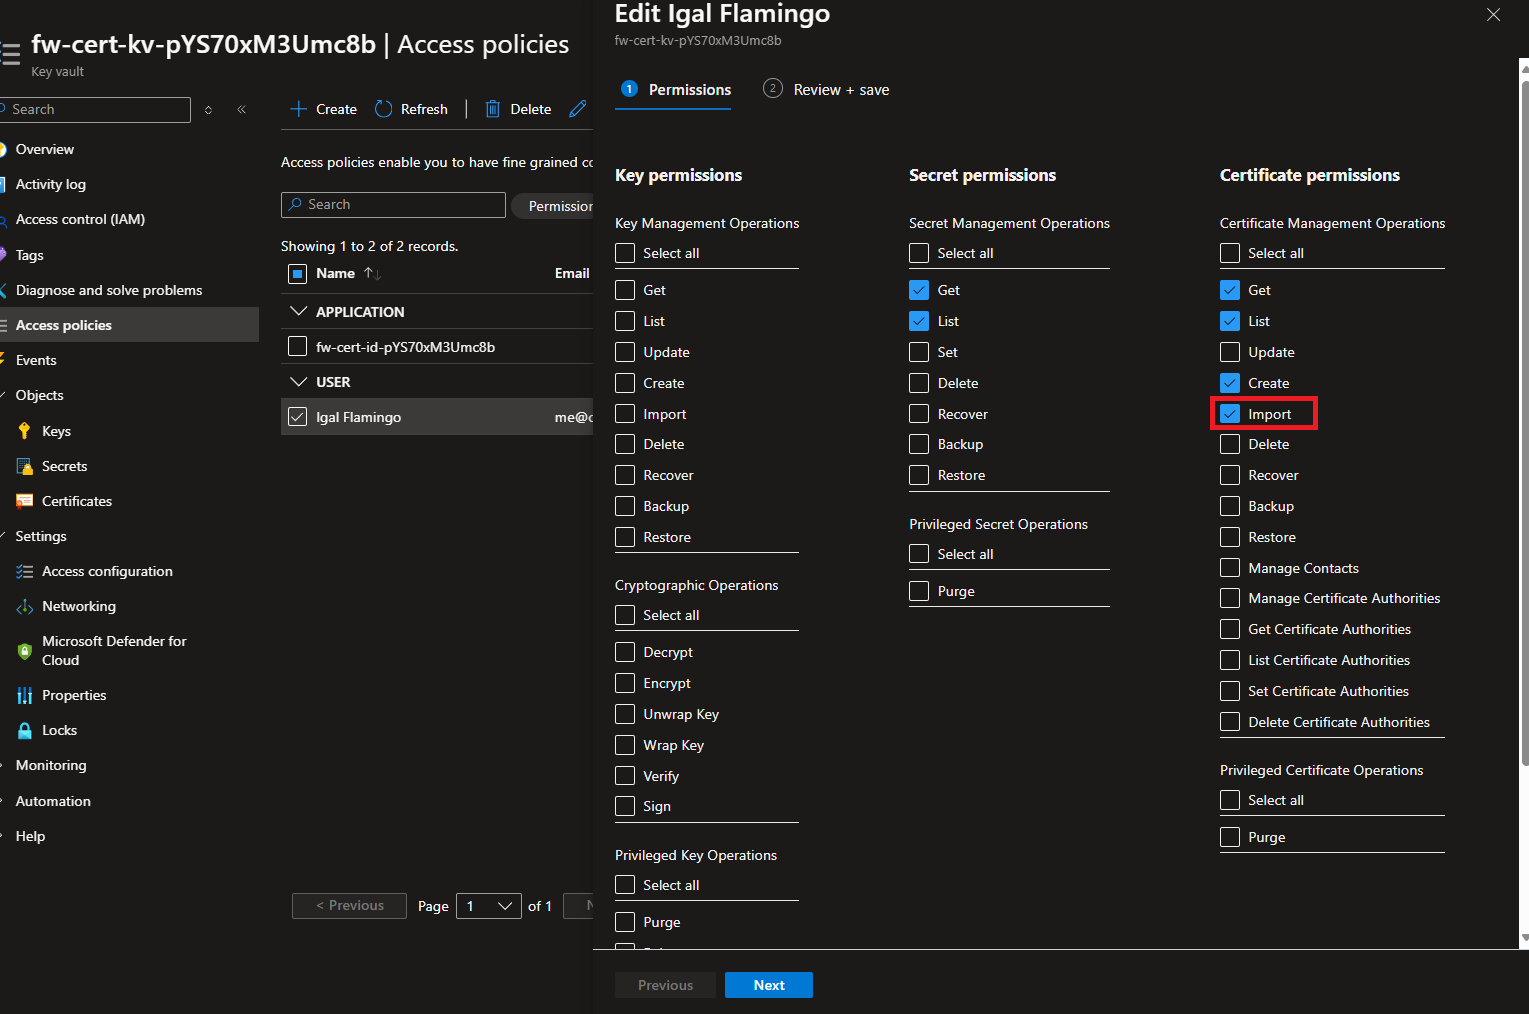
Add the Import permission to the Key Vault. and click Next > Save.
How to Generate the Intermediate CA Certificate in Azure Key Vault
Now that we have the import permission we can create the Intermediate CA certificate.
-
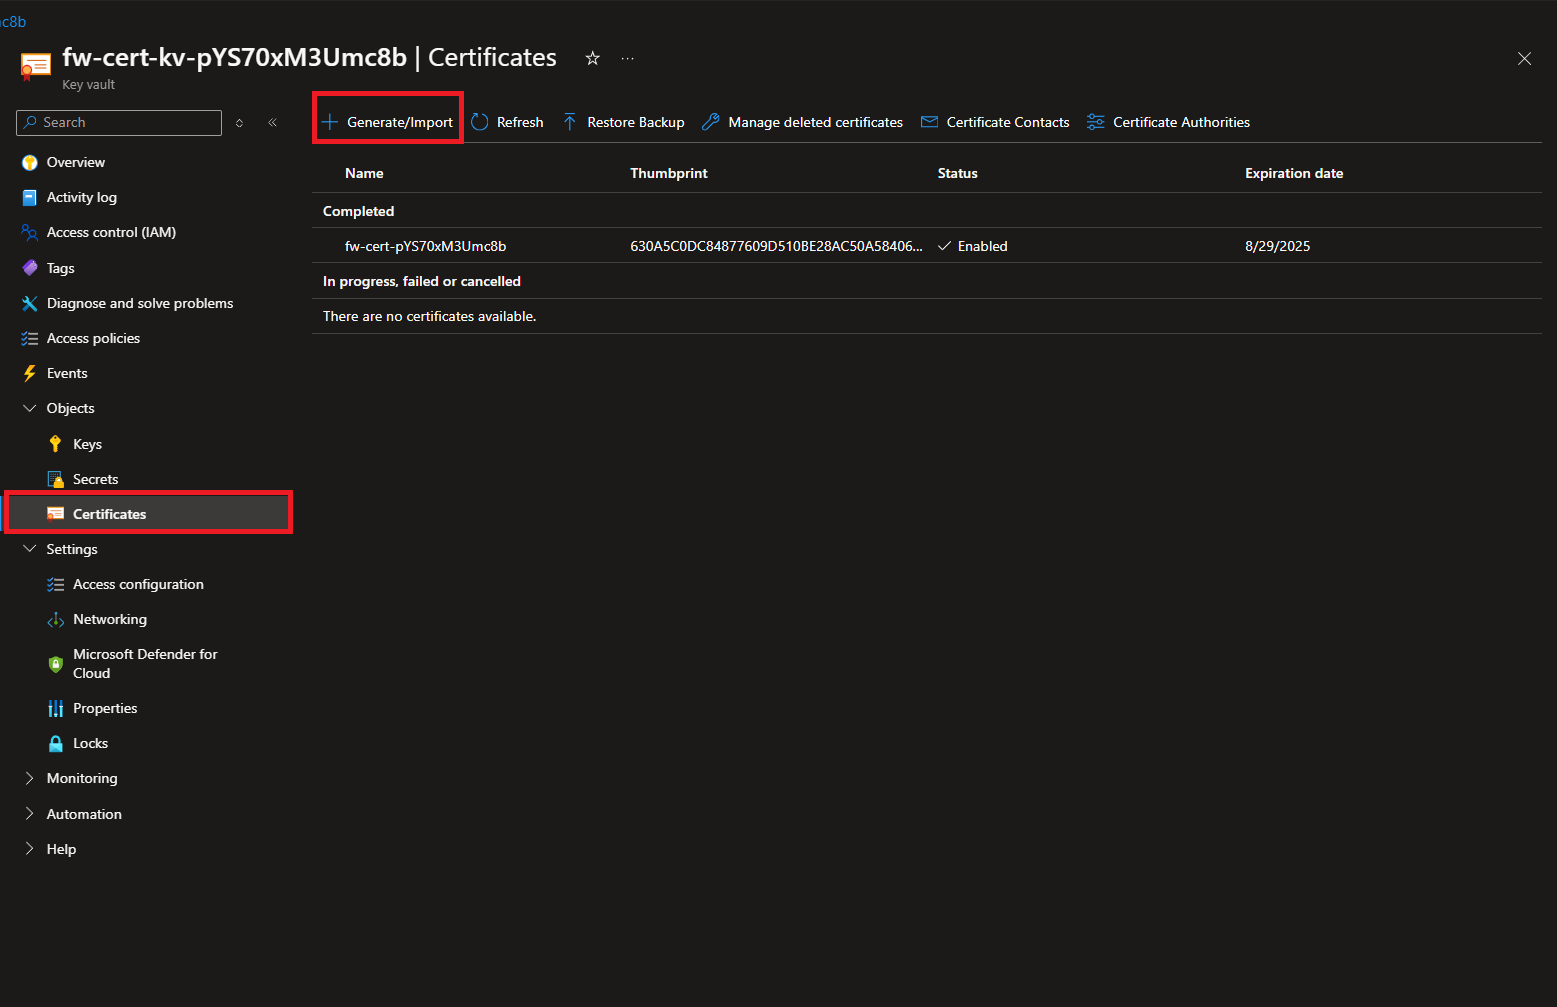
Go to Certificates > Generate/Import.
-
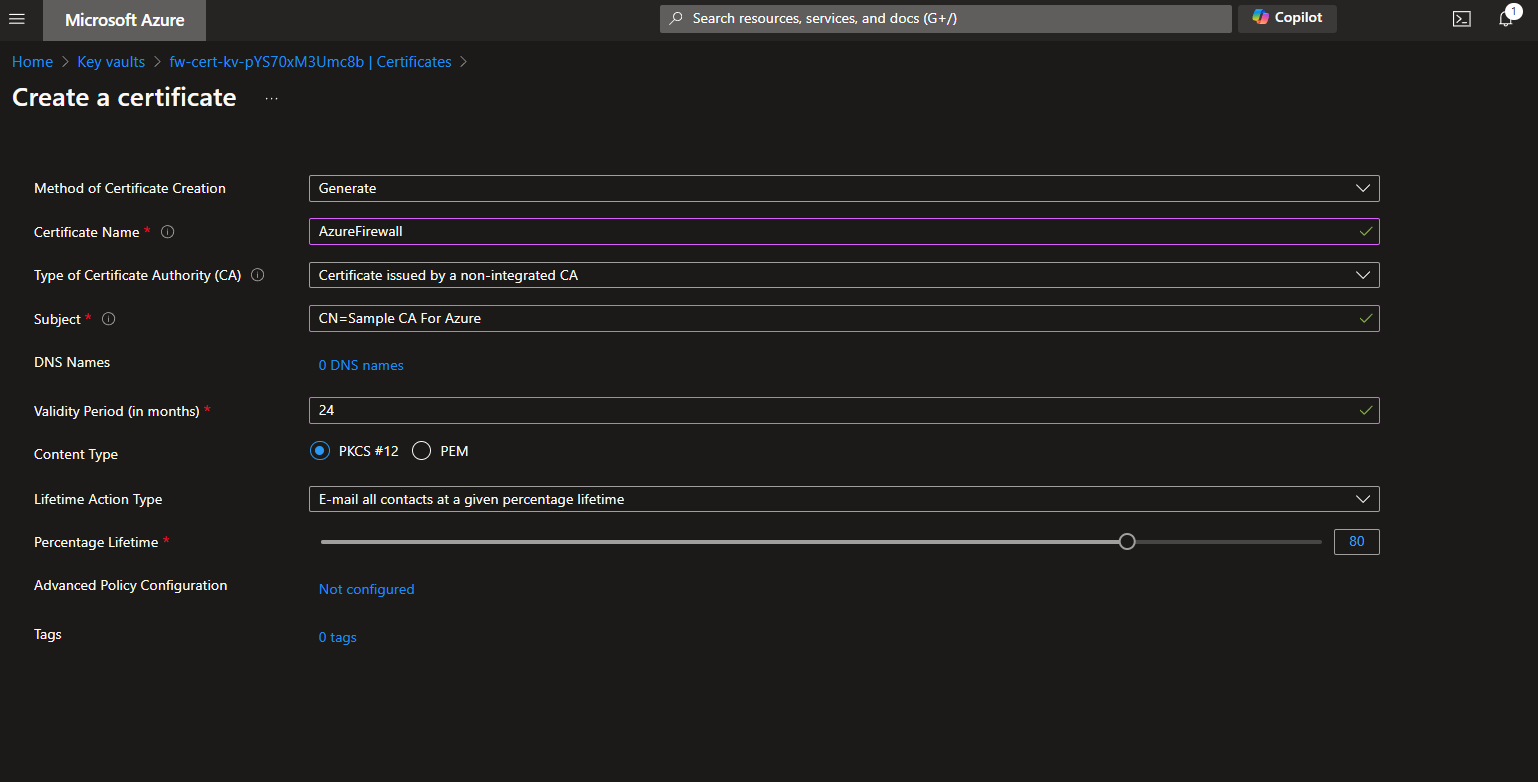
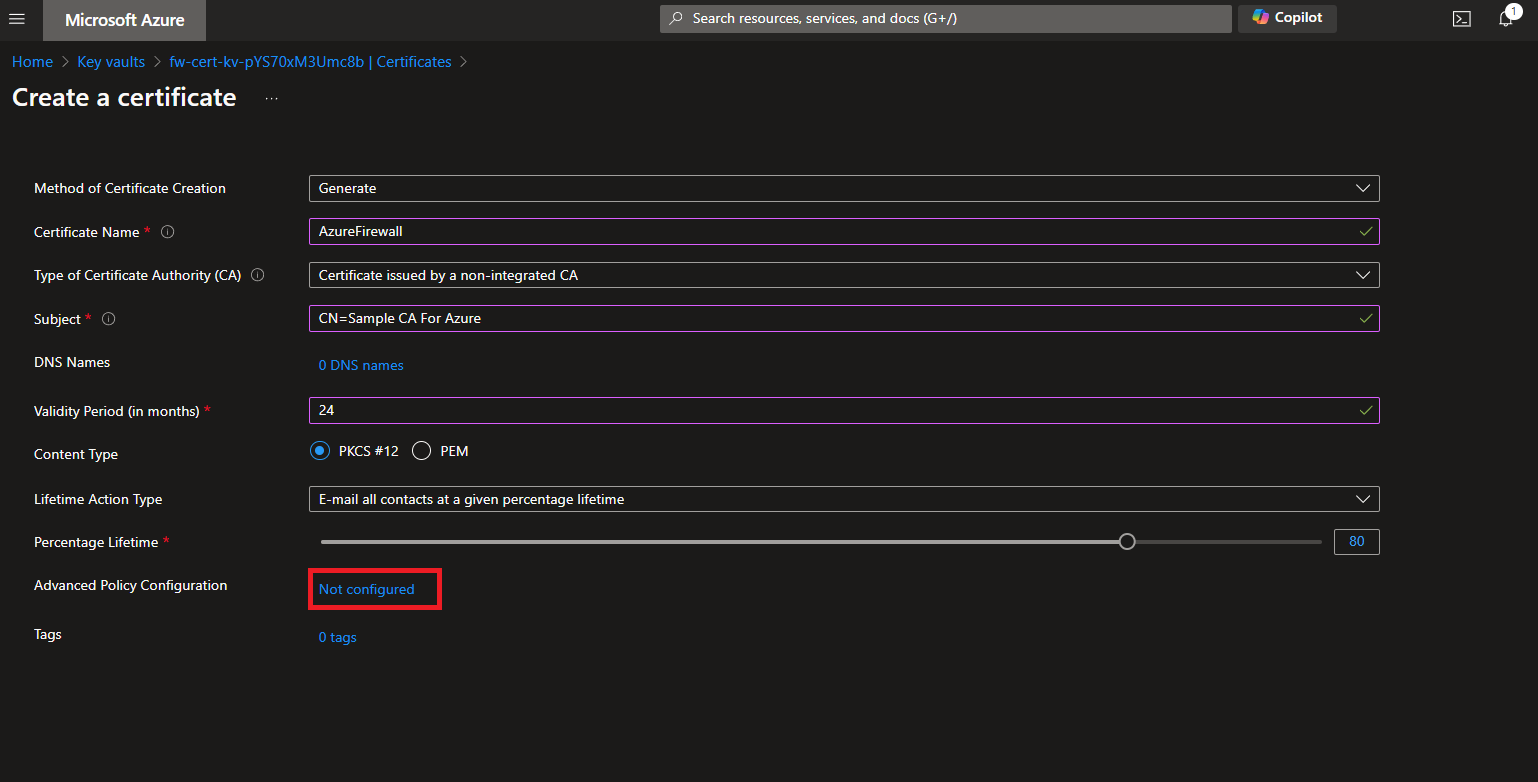
Enter the Certificate name and the subject name.
-
Change the Type of Certificate Authority to “Certificate issued by a non-integrated CA”.
-
Select the certificate lifetime.
-
Your fields should look something like this:
-
Now we are going to click on the “Not configured” link under “Advanced Policy Configuration”.
-
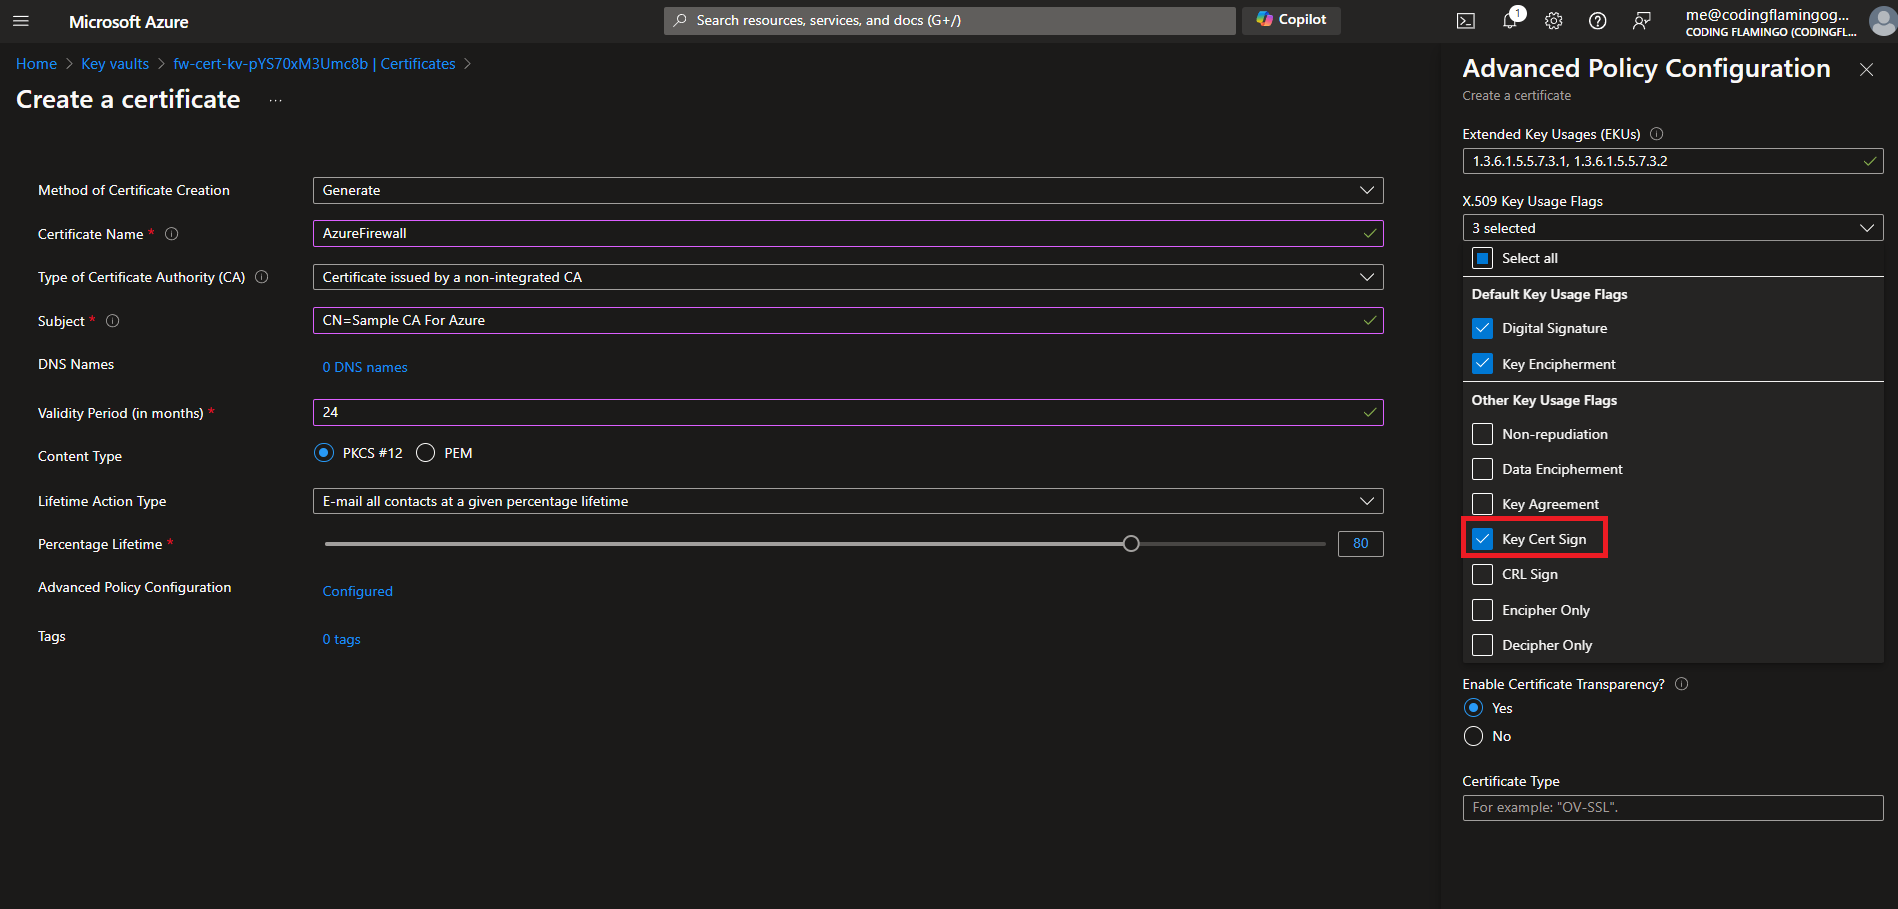
We are going to click the Key Usages dropdown and select “Key Cert Sign”.
-
Change the Key Size to 4096.
-
Click OK.
-
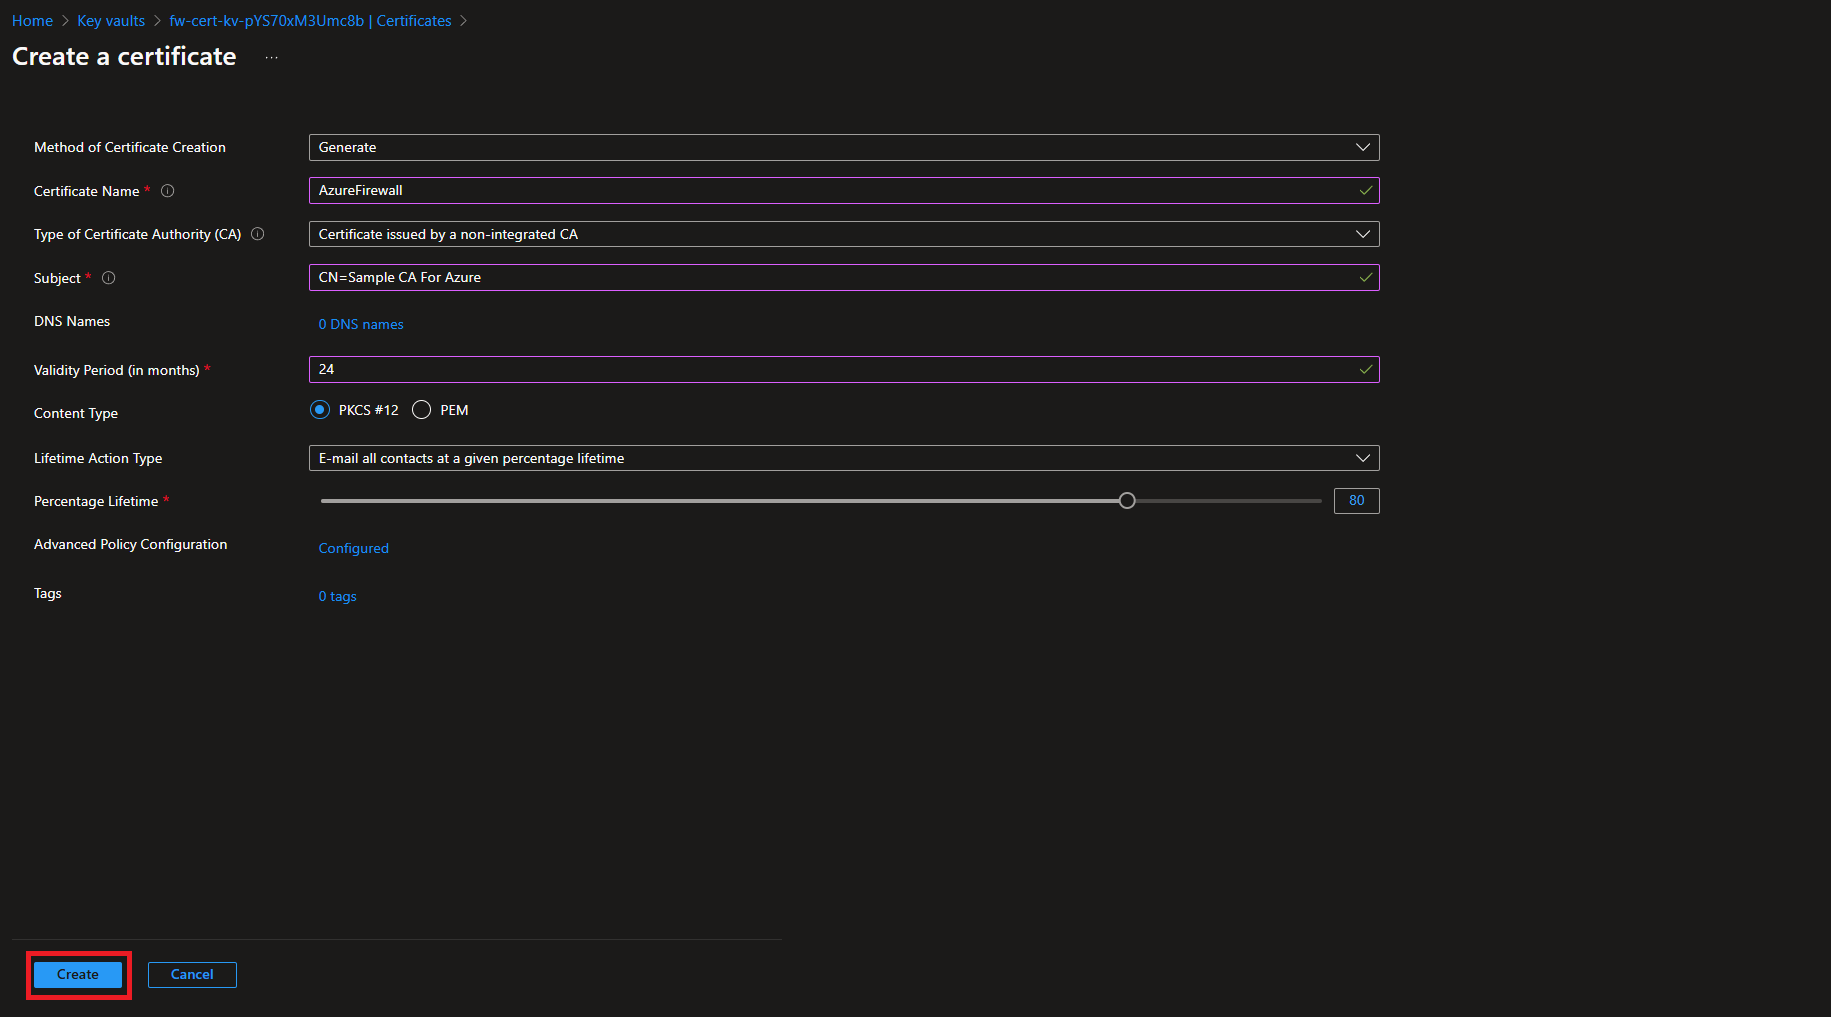
Click Create.
-
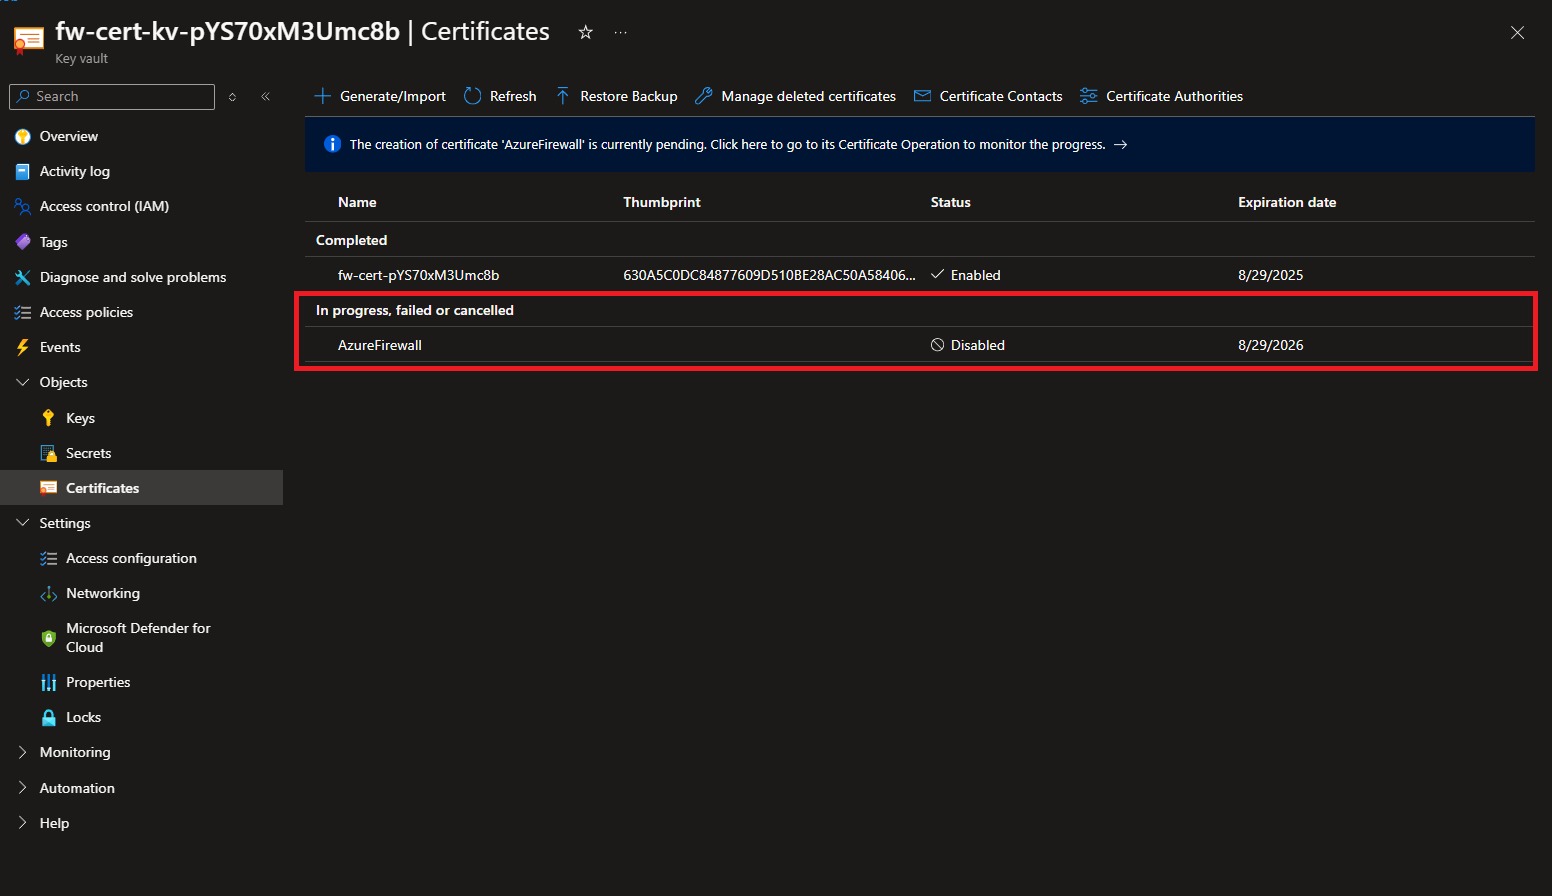
This will set your certificate in the “In Progress” state. Click on the certificate.
-
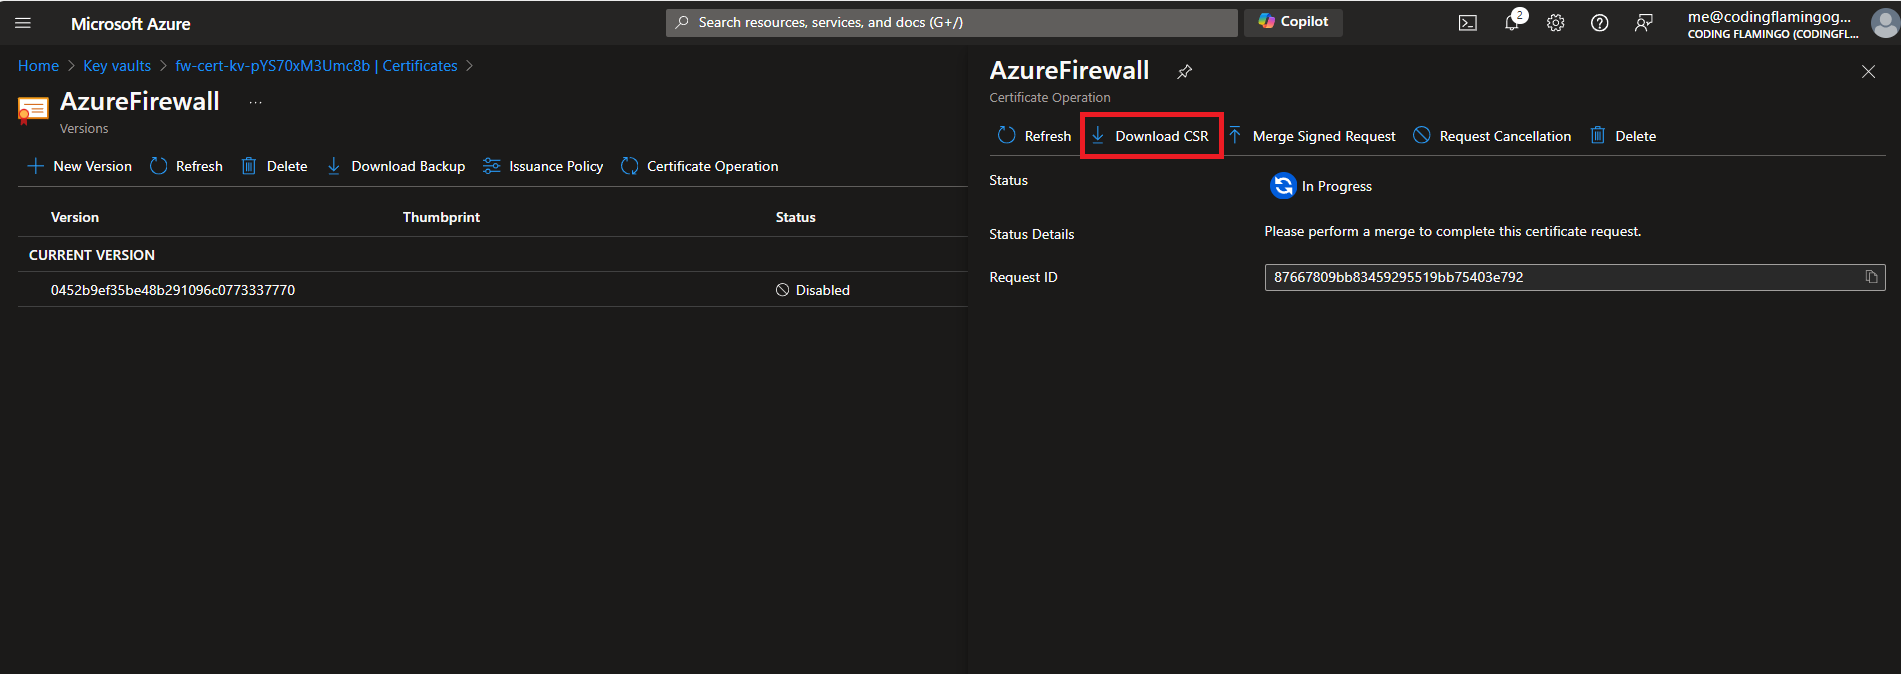
Click on “Certificate Operation”.

-
Click on “Download CSR”. This will download the Certificate Signing Request which is a request that you can send to your CA.
How to Sign the Intermediate CA Certificate in EZCA
Now that we have downloaded the CSR, we can go to the EZCA portal and sign the certificate.
-
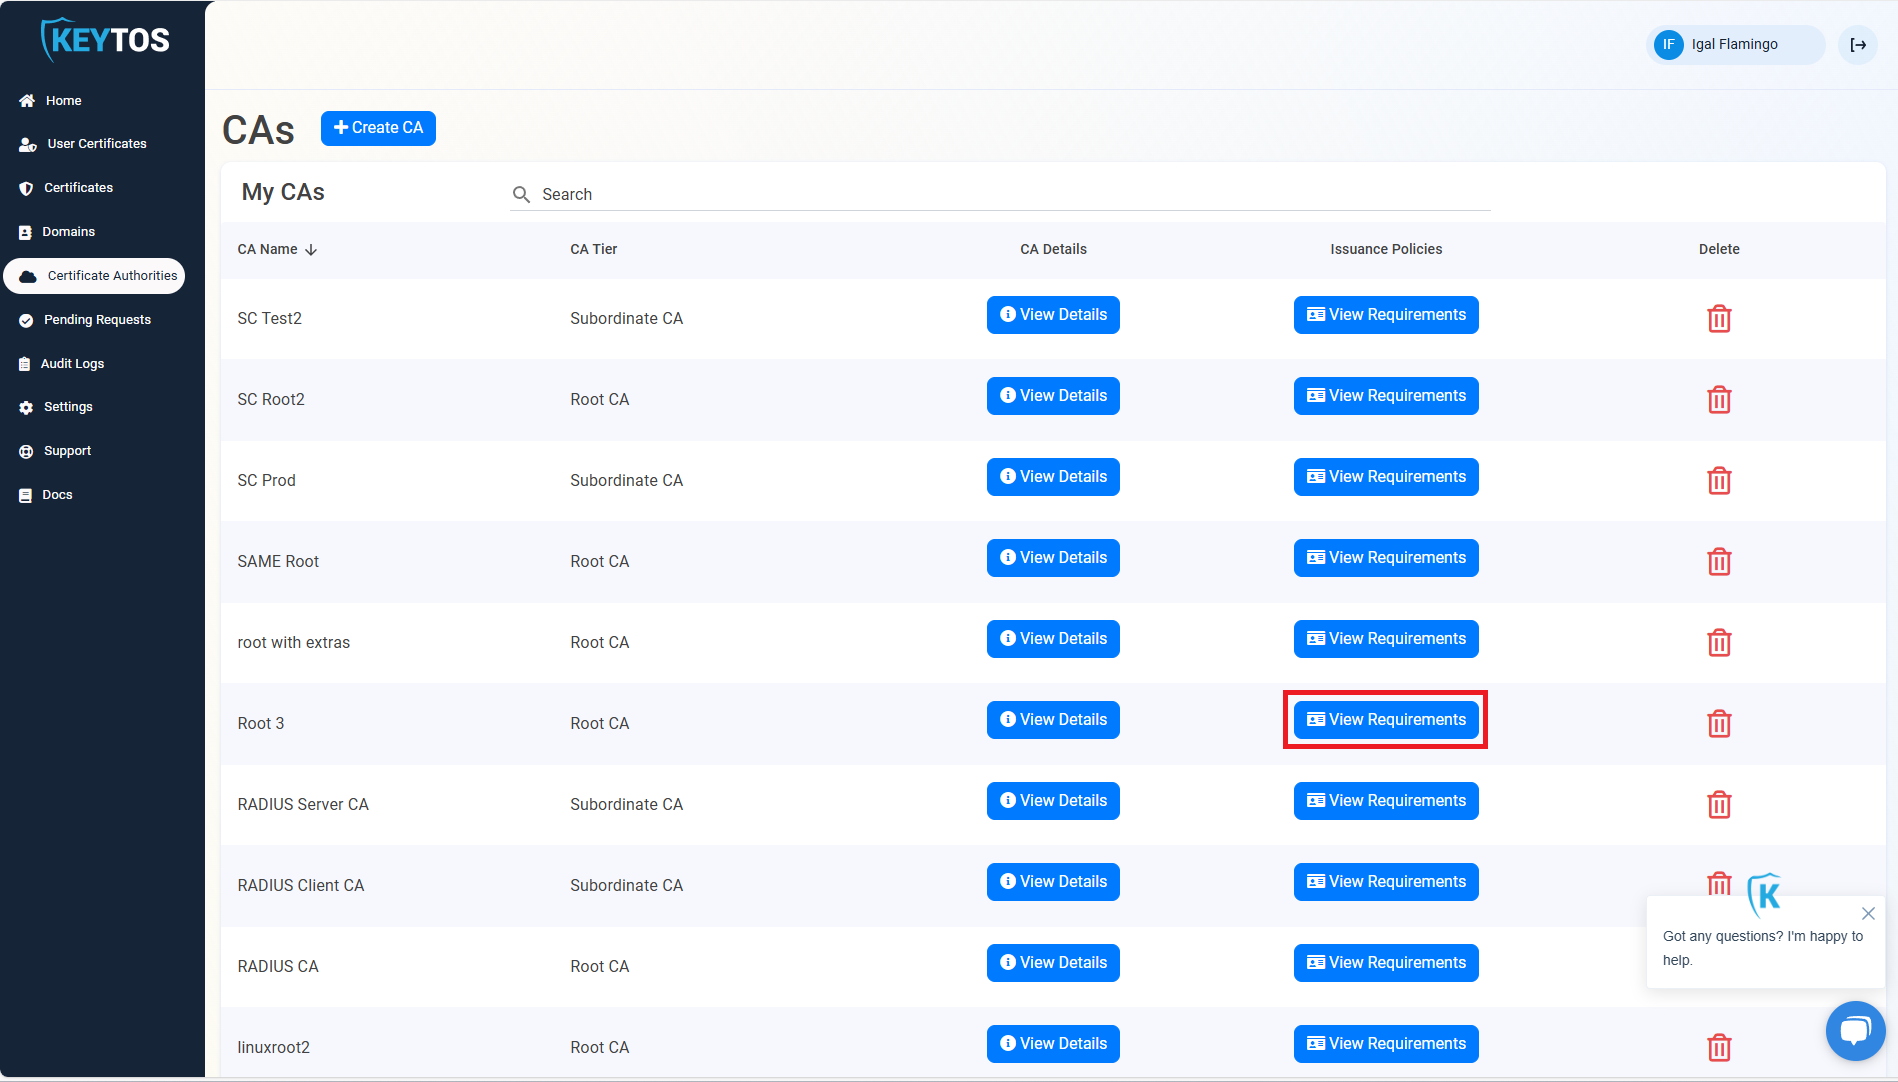
Navigate to your EZCA portal and go to the Certificate Authorities page.
-
Click on View Requirements for your Root CA.
-
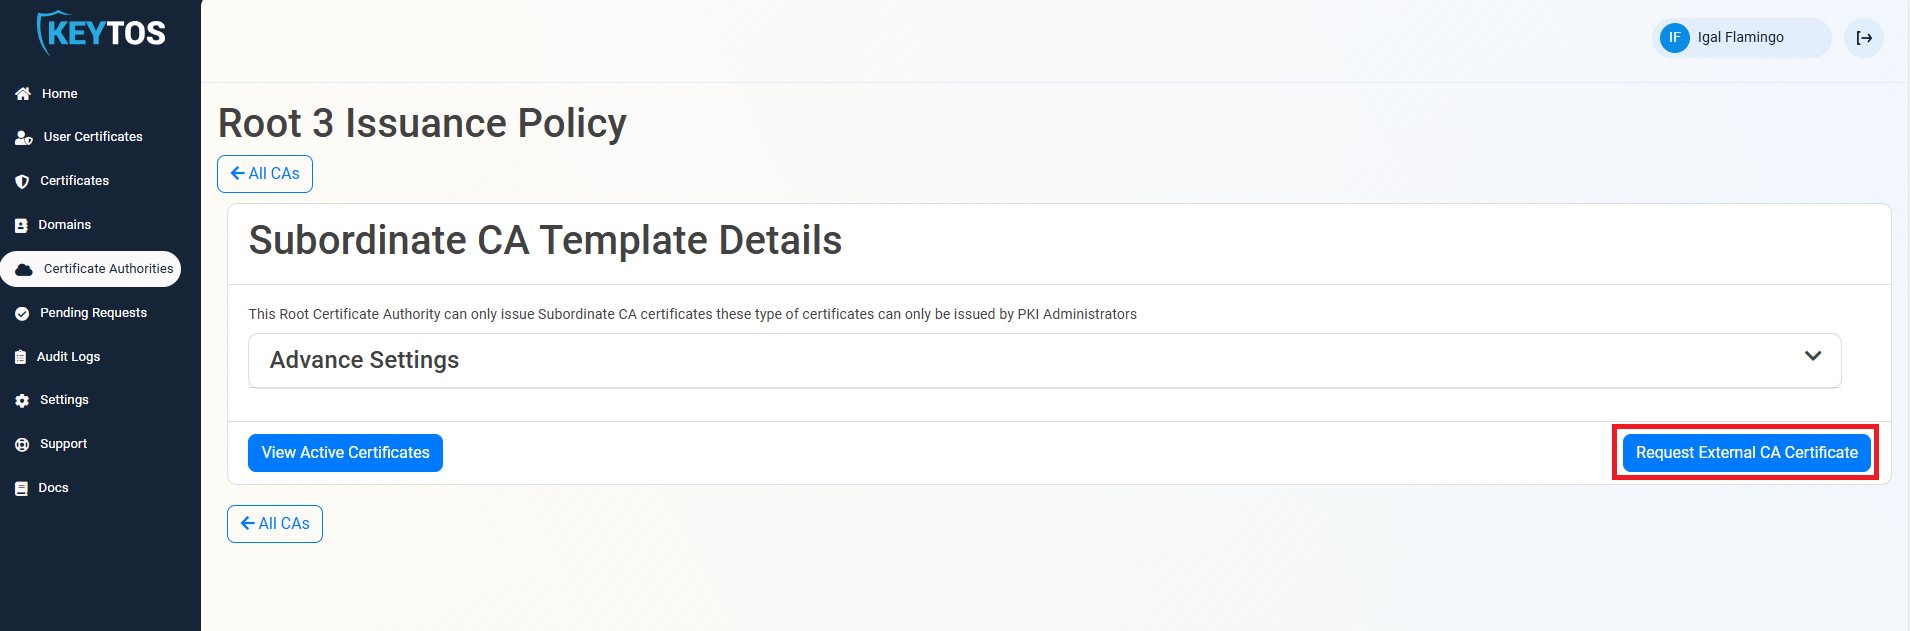
Click on Request External CA Certificate
-
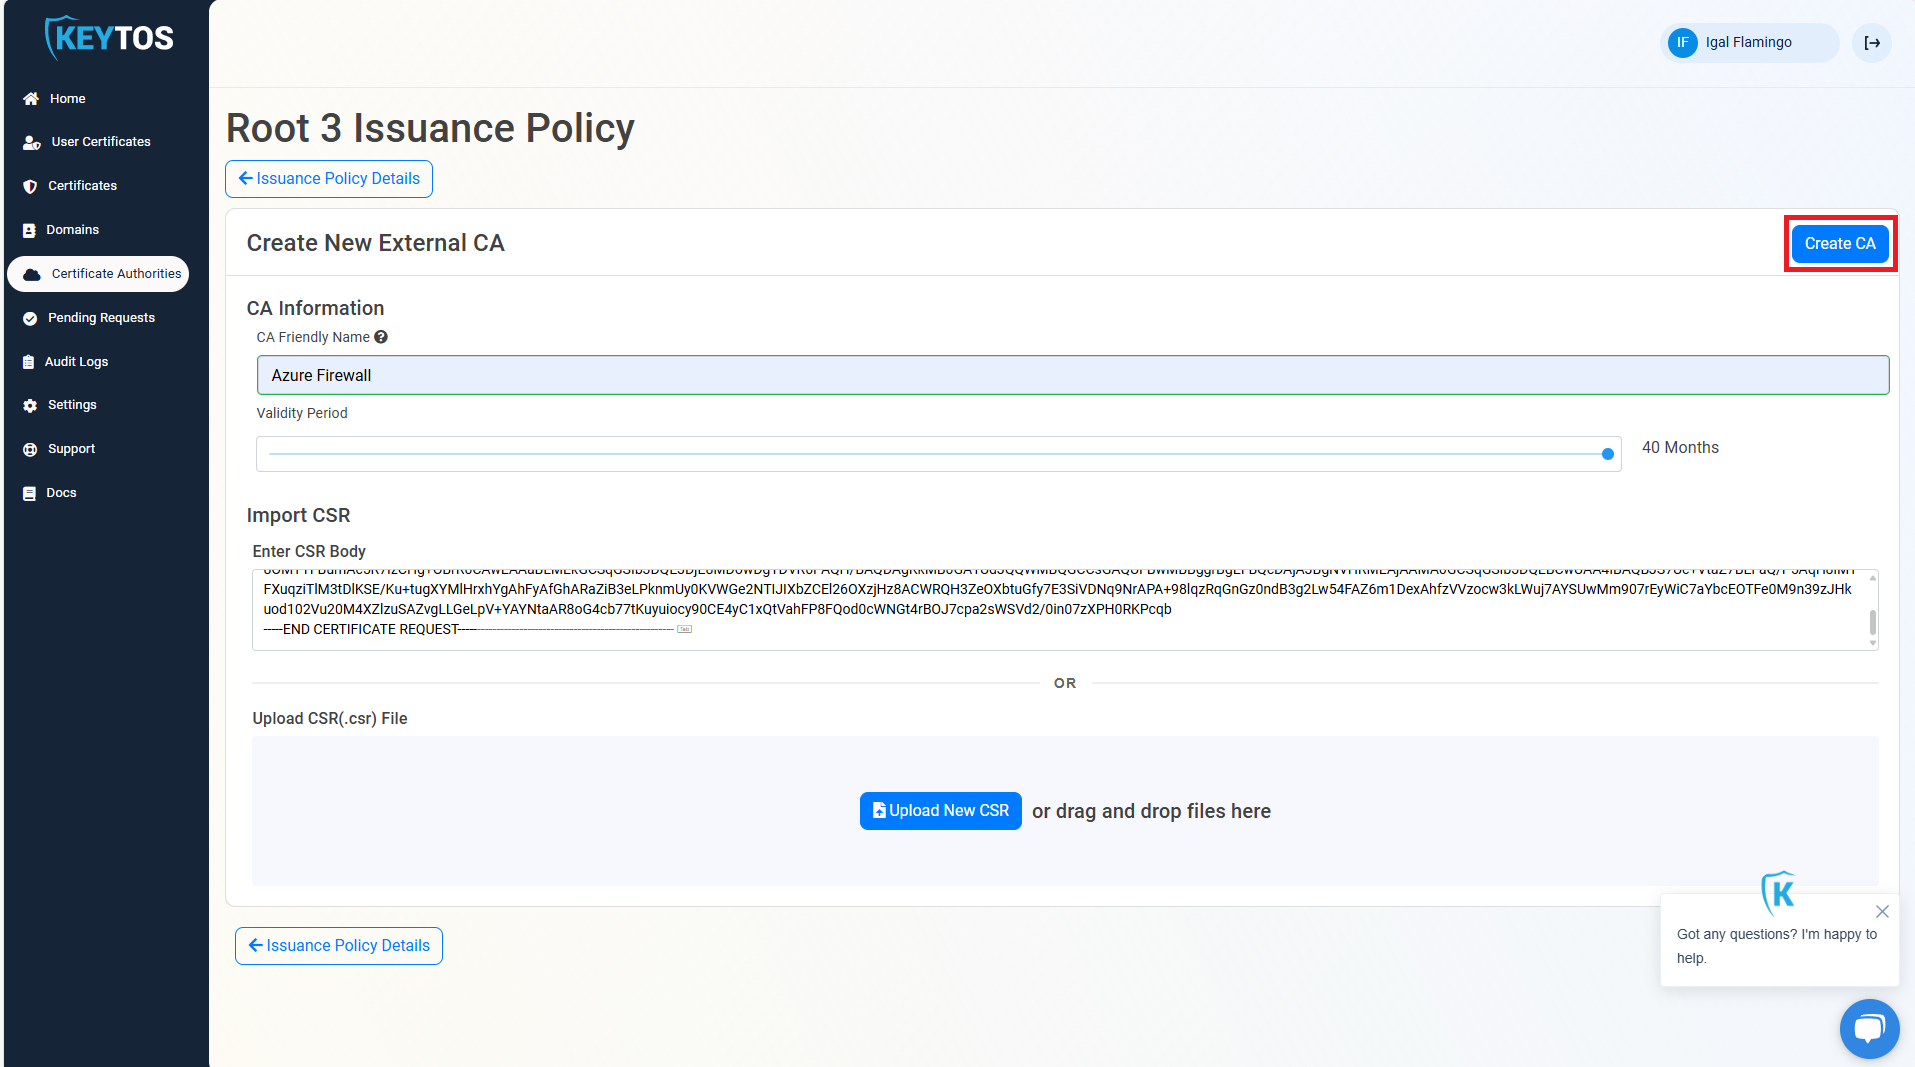
Enter the friendly name for this CA (this is the name it will have in EZCA), select the validity period of the CA, and upload the CSR that you downloaded from the Key Vault (you can also copy paste the text in the text field).
-
Click Create CA.
-
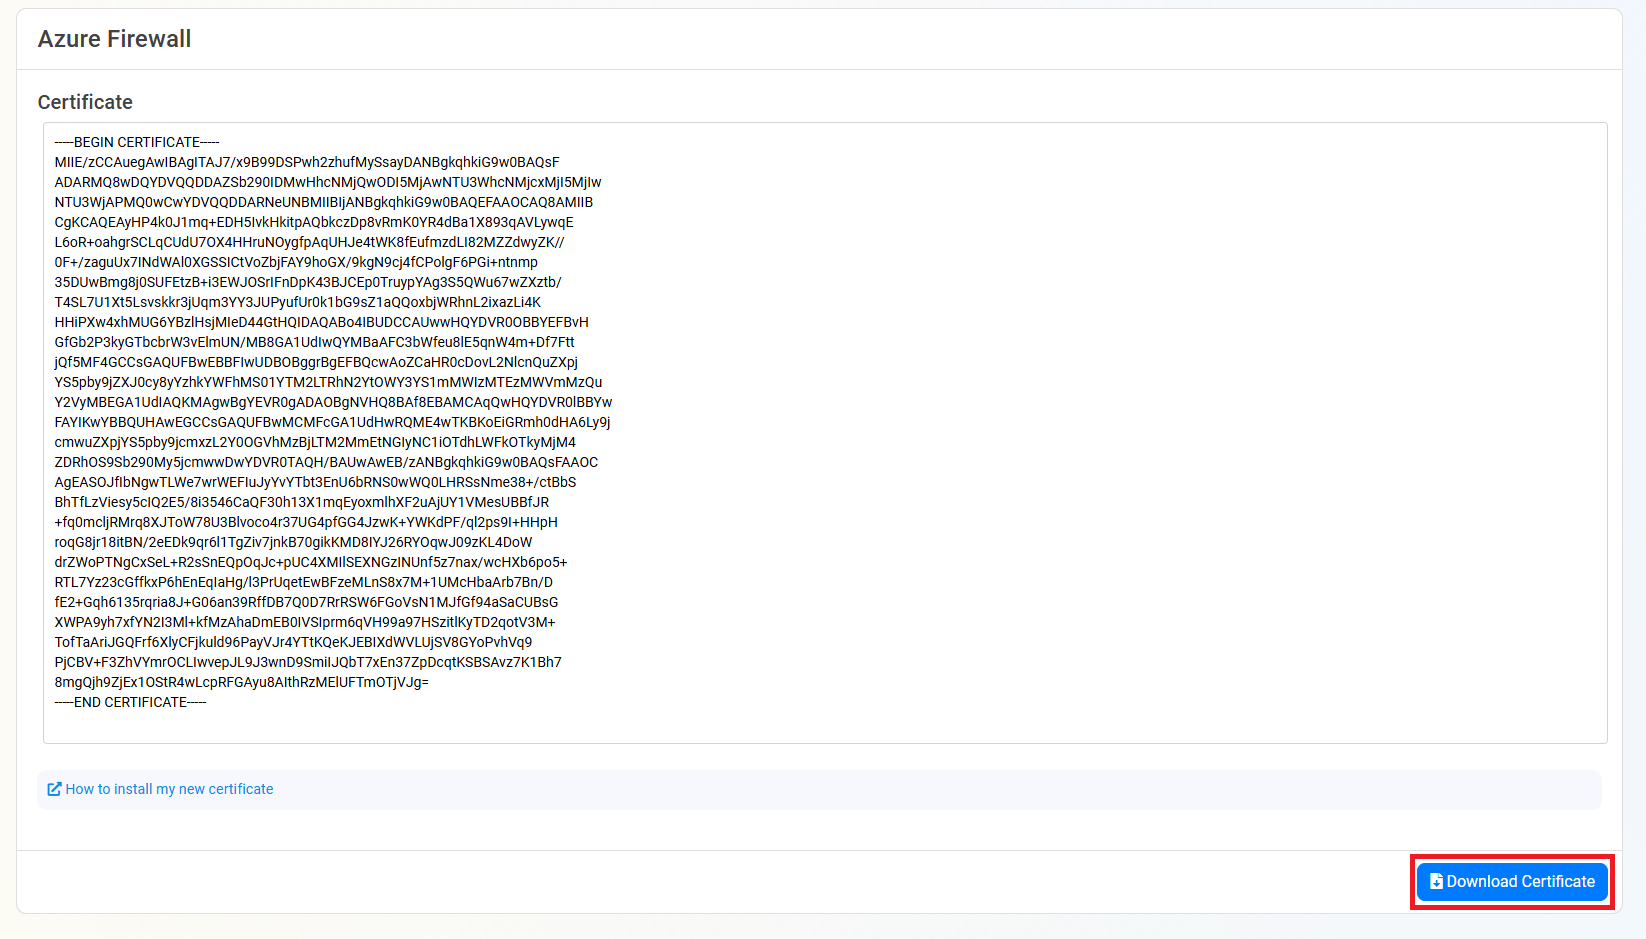
This will create the CA certificate in EZCA, now we need to download the certificate. Click on the Download Certificate button.
How to Merge the Signed Intermediate CA Certificate in Azure Key Vault
-
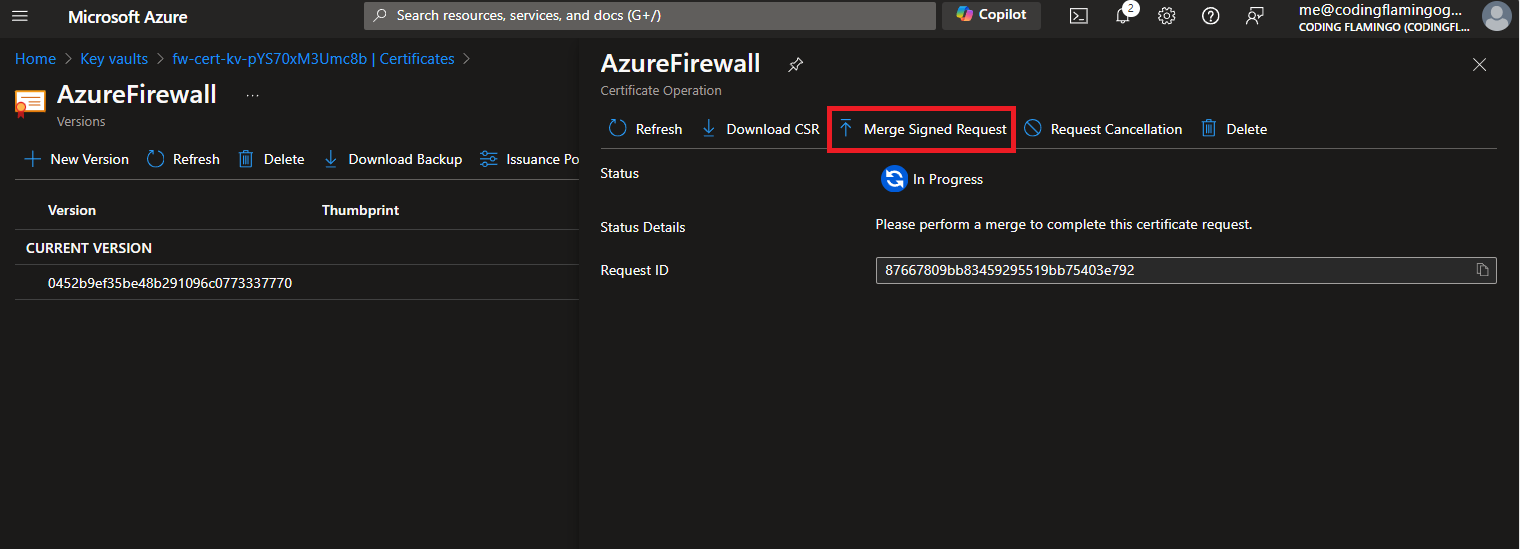
Now that we have the certificate, we need to upload it to the Key Vault. Go back to the Key Vault tab and inside the Certificate Operations click on “Merge Signed Request”.
-
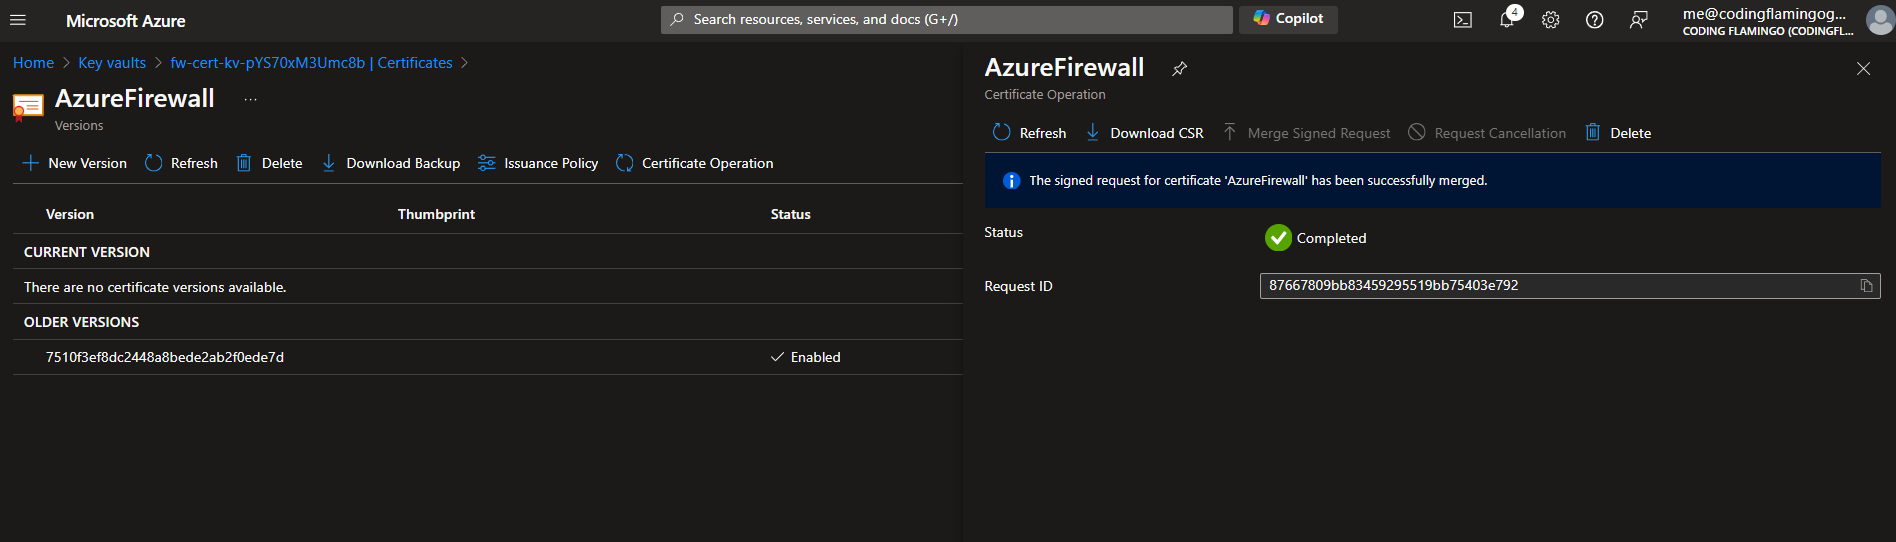
Upload the certificate that you downloaded from EZCA. Click Merge. Now your CA certificate is ready to be used by Azure Firewall.
-
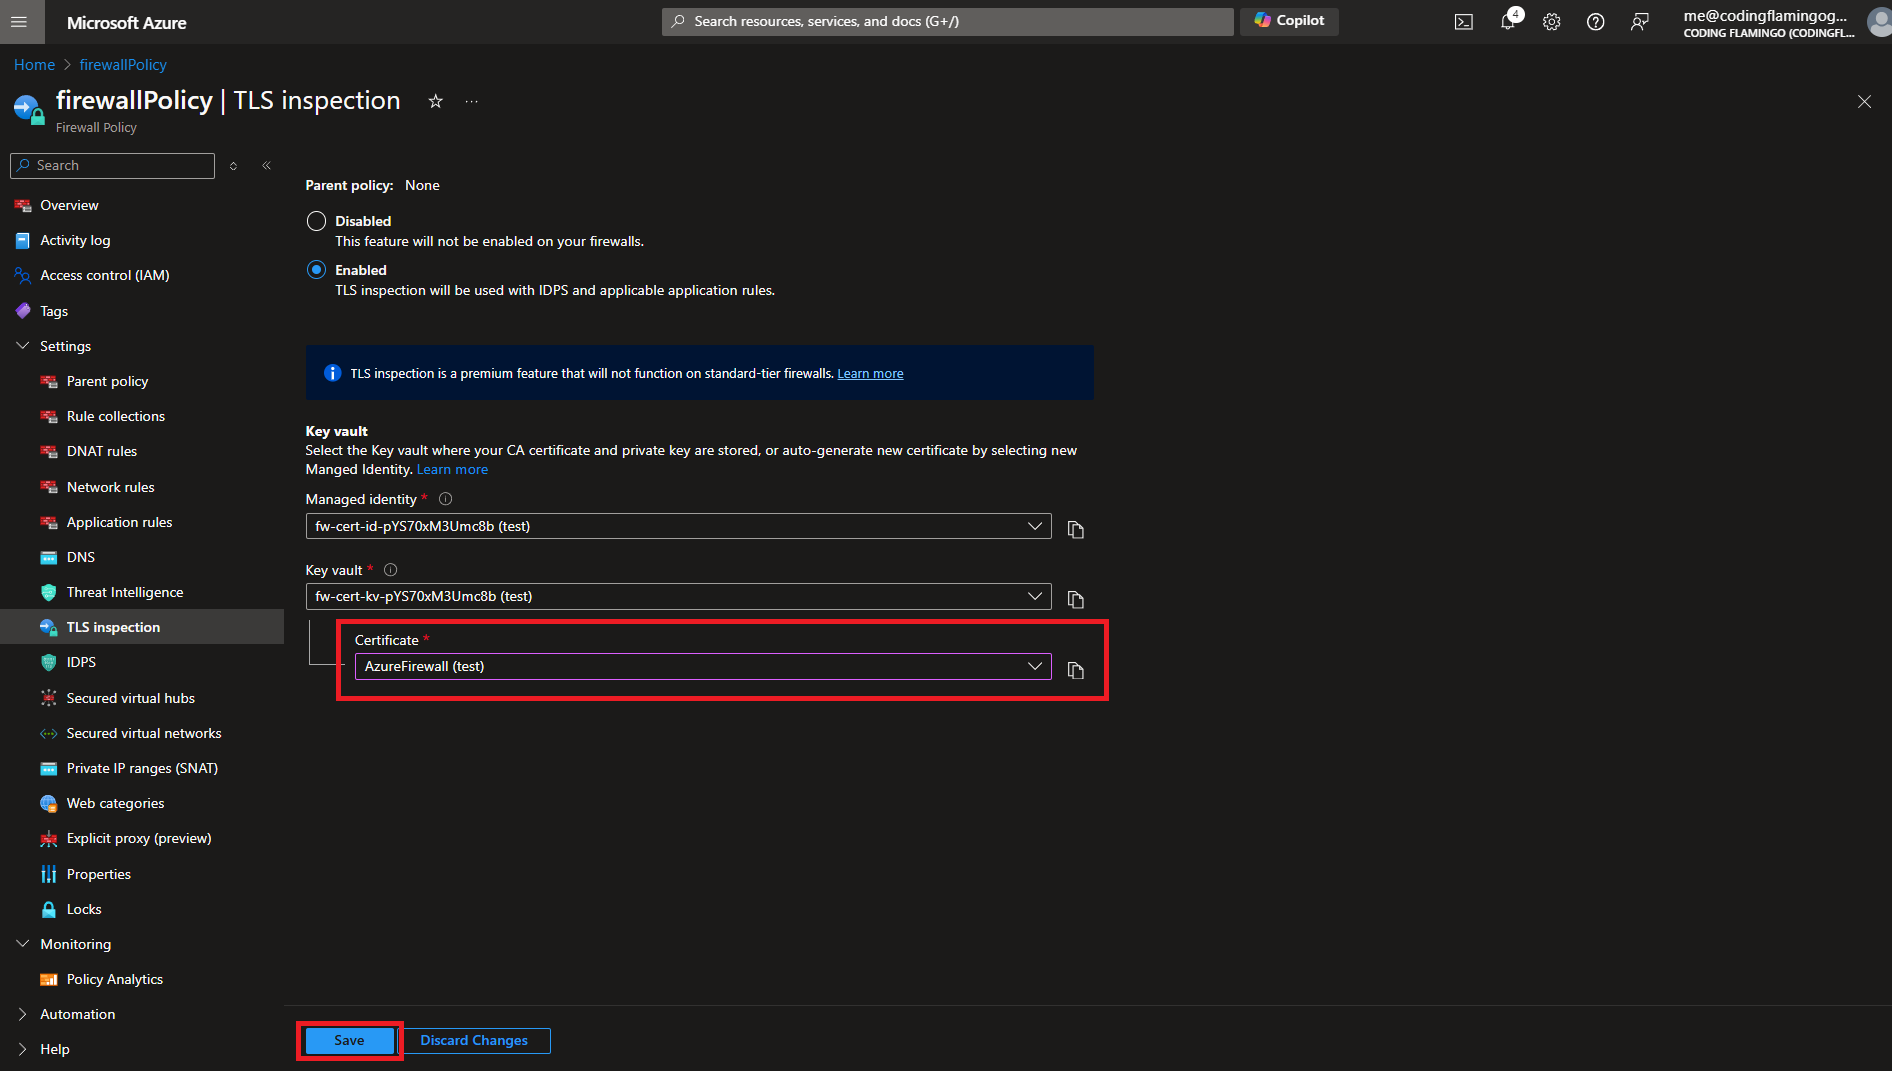
Last we have to go back to the Azure Firewall Policy and click on the TLS Inspection Profile and select the certificate that we just uploaded from the dropdown and click Save.
Next Steps - How to Configure TLS Inspection in Azure Firewall
Now that you have successfully issued and configured the Intermediate CA certificate for Azure Firewall, you can proceed to configure TLS inspection rules to control and inspect encrypted traffic. For more information on configuring TLS inspection in Azure Firewall, refer to the Azure Firewall Premium documentation.