How-To: Enable Cloud RADIUS with Entra ID Authentication in Fortinet FortiOS
Fortinet provides documentation on how to set up RADIUS on their website, which you can refer to for additional CLI commands and configuration options. This guide provides a basic overview of the steps involved in setting up RADIUS authentication with Fortinet devices.
Introduction - How to Protect Your Fortigate Network with Cloud RADIUS
Having a single Wi-Fi password for your network is a security nightmare. It’s impossible to know who has access to your network, and it’s nearly impossible to change the password regularly without causing major outages. The best way to secure your Fortigate network is to use WPA-Enterprise with either certificates or individual user accounts for authentication.
To protect your Fortigate network using certificates or Entra ID accounts, you will need a RADIUS server to handle authentication requests. EZRADIUS is a cloud-based RADIUS as a Service that integrates directly with Entra ID to provide secure authentication for your Fortigate network without needing to manage any RADIUS servers or infrastructure. Simply add EZRADIUS as a RADIUS server in your Fortigate Controller, and your users can log in using either passwordless certificates or their Entra ID username and password.

Prerequisites for Setting Up Cloud RADIUS for Fortigate
How to Create an EZRADIUS Subscription
An EZRADIUS billing subscription is required to create your cloud-based RADIUS server for your Fortigate network. If you do not already have an EZRADIUS subscription, follow this guide to create one.
Create an EZRADIUS Subscription
How to Set Up User Credentials for Cloud RADIUS
If you haven’t configured your authentication method yet, make sure to set that up before proceeding. This ensures that your users can authenticate properly when they connect to your Fortigate network.
How to Set Up Passwordless Certificate Authentication with RADIUS
Certificates are the best way to authenticate users or devices without the need for any passwords. Simply connect to the network and the certificate will handle the authentication for you. This is the most secure and user-friendly way to authenticate users in your Fortigate network.
While EZRADIUS supports any X.509 certificate such as ADCS and Microsoft Cloud PKI, the easiest way to create and manage certificates for your users is to use Keytos EZCA, a cloud-based PKI service that integrates directly with EZRADIUS. It only takes a few minutes to get started with EZCA and begin issuing certificates for passwordless Wi-Fi access in your Fortigate network.
How to Set Up Entra ID Users to Authenticate with RADIUS
Don’t want to manage certificates? No problem! You can authenticate your existing Entra ID users using their username and password without needing to manage any PKI infrastructure.
Note that if you have conditional access policies set up in Entra ID (such as MFA), you will need to add an exception for EZRADIUS in order for username/password authentication to work. View this page for more details on adding this exception.
How to Set Up Local Users to Authenticate with RADIUS
Have legacy devices or non-Entra ID users? You can also create local users directly in EZRADIUS and authenticate them using their username and password. Check out this page for more information on creating local users in EZRADIUS or letting your Entra ID users self-register local RADIUS accounts if needed.
How to Set Up MAC Address Bypass for Non-Authenticating Devices
Some devices do not support secure authentication methods like EAP-TLS or EAP-TTLS. In these cases, you can use MAC Address Bypass (MAB) to allow these devices to connect to your Fortigate network without needing to authenticate. Note that MAC Address Bypass is not secure and should only be used for devices that do not support other authentication methods, and you should always be aware of the security risks involved. View this guide for more information on setting up MAC Address Bypass in EZRADIUS.
How to Set Up Your Cloud RADIUS Access Policies for Entra ID Authentication
An EZRADIUS Access Policy defines how EZRADIUS will authenticate users when they connect to your Fortigate network. You will need to create at least one access policy in EZRADIUS before you can connect your Fortigate network to EZRADIUS.
How to Create a Passwordless Certificate Access Policy
A certificate access policy allows you to accept X.509 certificates for authentication and determine which users or devices are allowed to connect to your Fortigate network. View this guide to learn how to create a certificate access policy in EZRADIUS if you have not already done so.
How to Create an Entra ID Username and Password Access Policy
An Entra ID username and password access policy allows you to authenticate your Entra ID users using their existing credentials. View this guide to learn how to create an Entra ID username and password access policy in EZRADIUS if you have not already done so.
How to Create a Local Username and Password Access Policy
A local username and password access policy allows you to authenticate users that you have created directly in EZRADIUS. View this guide to learn how to create a local username and password access policy in EZRADIUS if you have not already done so.
Step-by-Step Guide to Setting Up Cloud RADIUS for Fortigate
The following steps will guide you through the process of setting up Cloud RADIUS for your Fortigate network using EZRADIUS.
How to Add EZRADIUS as a RADIUS Server in Fortigate
Now that you have your EZRADIUS subscription and access policy set up, you can add EZRADIUS as a RADIUS server in your Fortigate Controller.
If you’re using multiple ISPs with SD-WAN, you will have multiple WAN public IP addresses that will need to be configured in your EZRADIUS Server Policy. There are two ways to handle this:
- Add all of your WAN IP addresses to the EZRADIUS Server Policy, and update their shared secrets to all match the shared secret you will use in Fortinet.
- You can drop into the Fortigate CLI and manually configure separate RADIUS servers, each with their own shared secret, via the
source-ipparameter. This allows you to have different shared secrets for each WAN IP address, which can be more secure but requires more manual configuration and maintenance.
How to Add a Cloud RADIUS Server to Fortigate
-
Begin in your Fortinet admin console.
-
In the left-hand menu, expand User & Device and select RADIUS Servers.
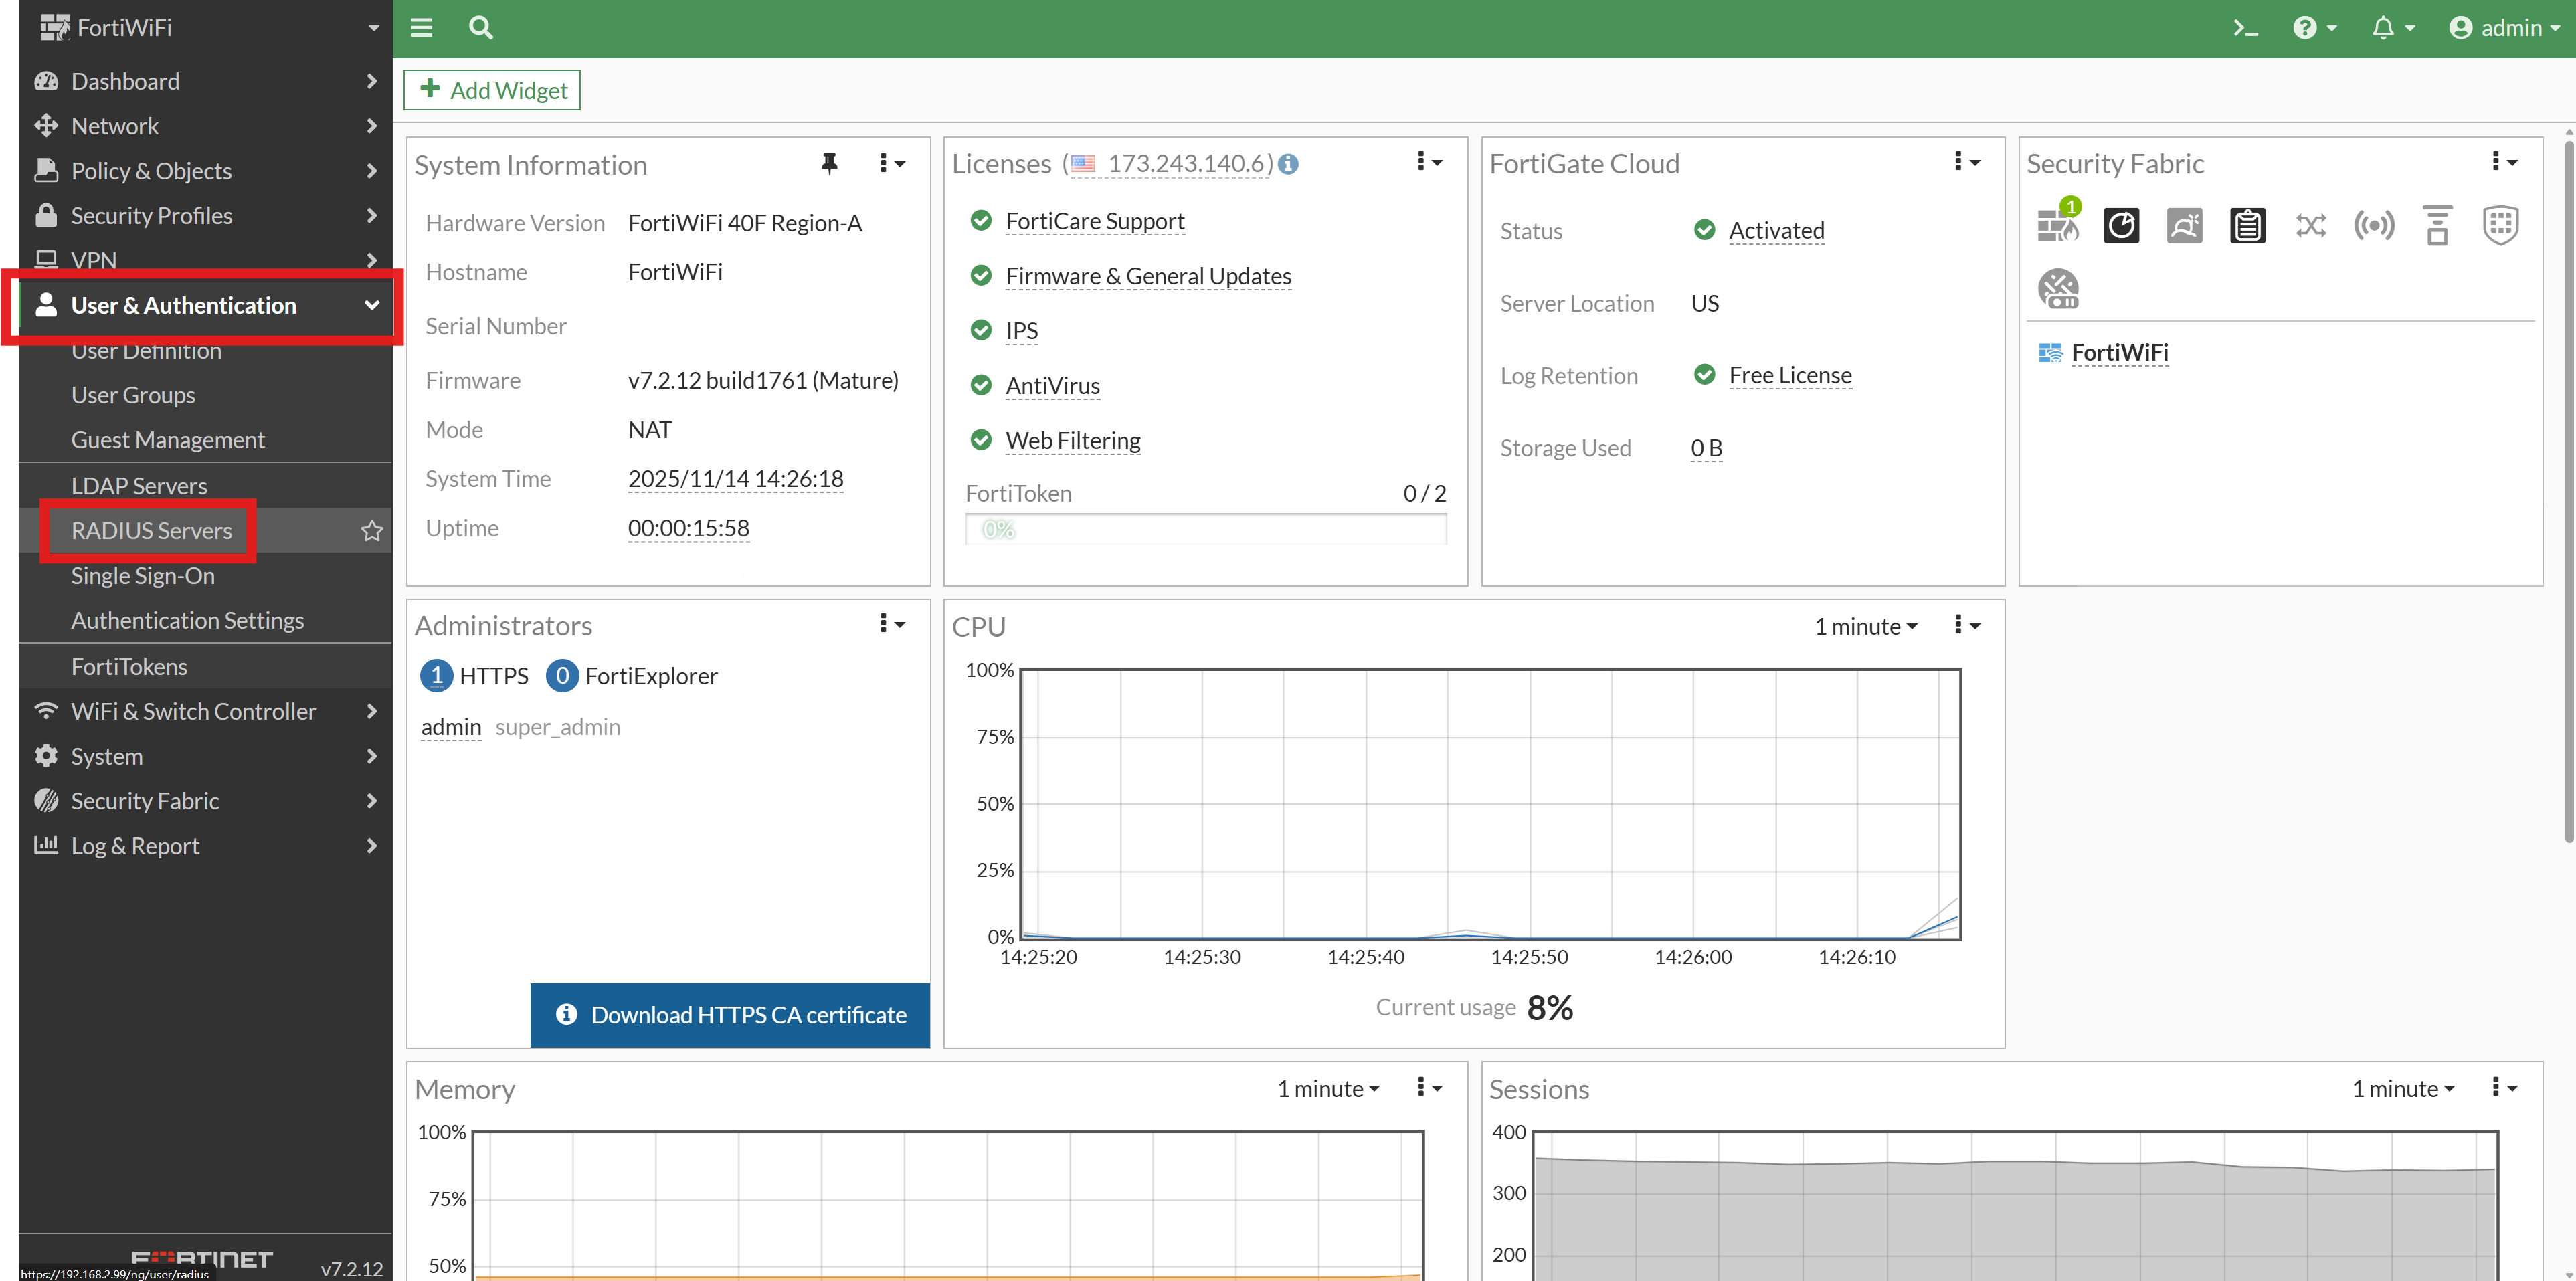
-
Click the + Create New button to add a new RADIUS server.
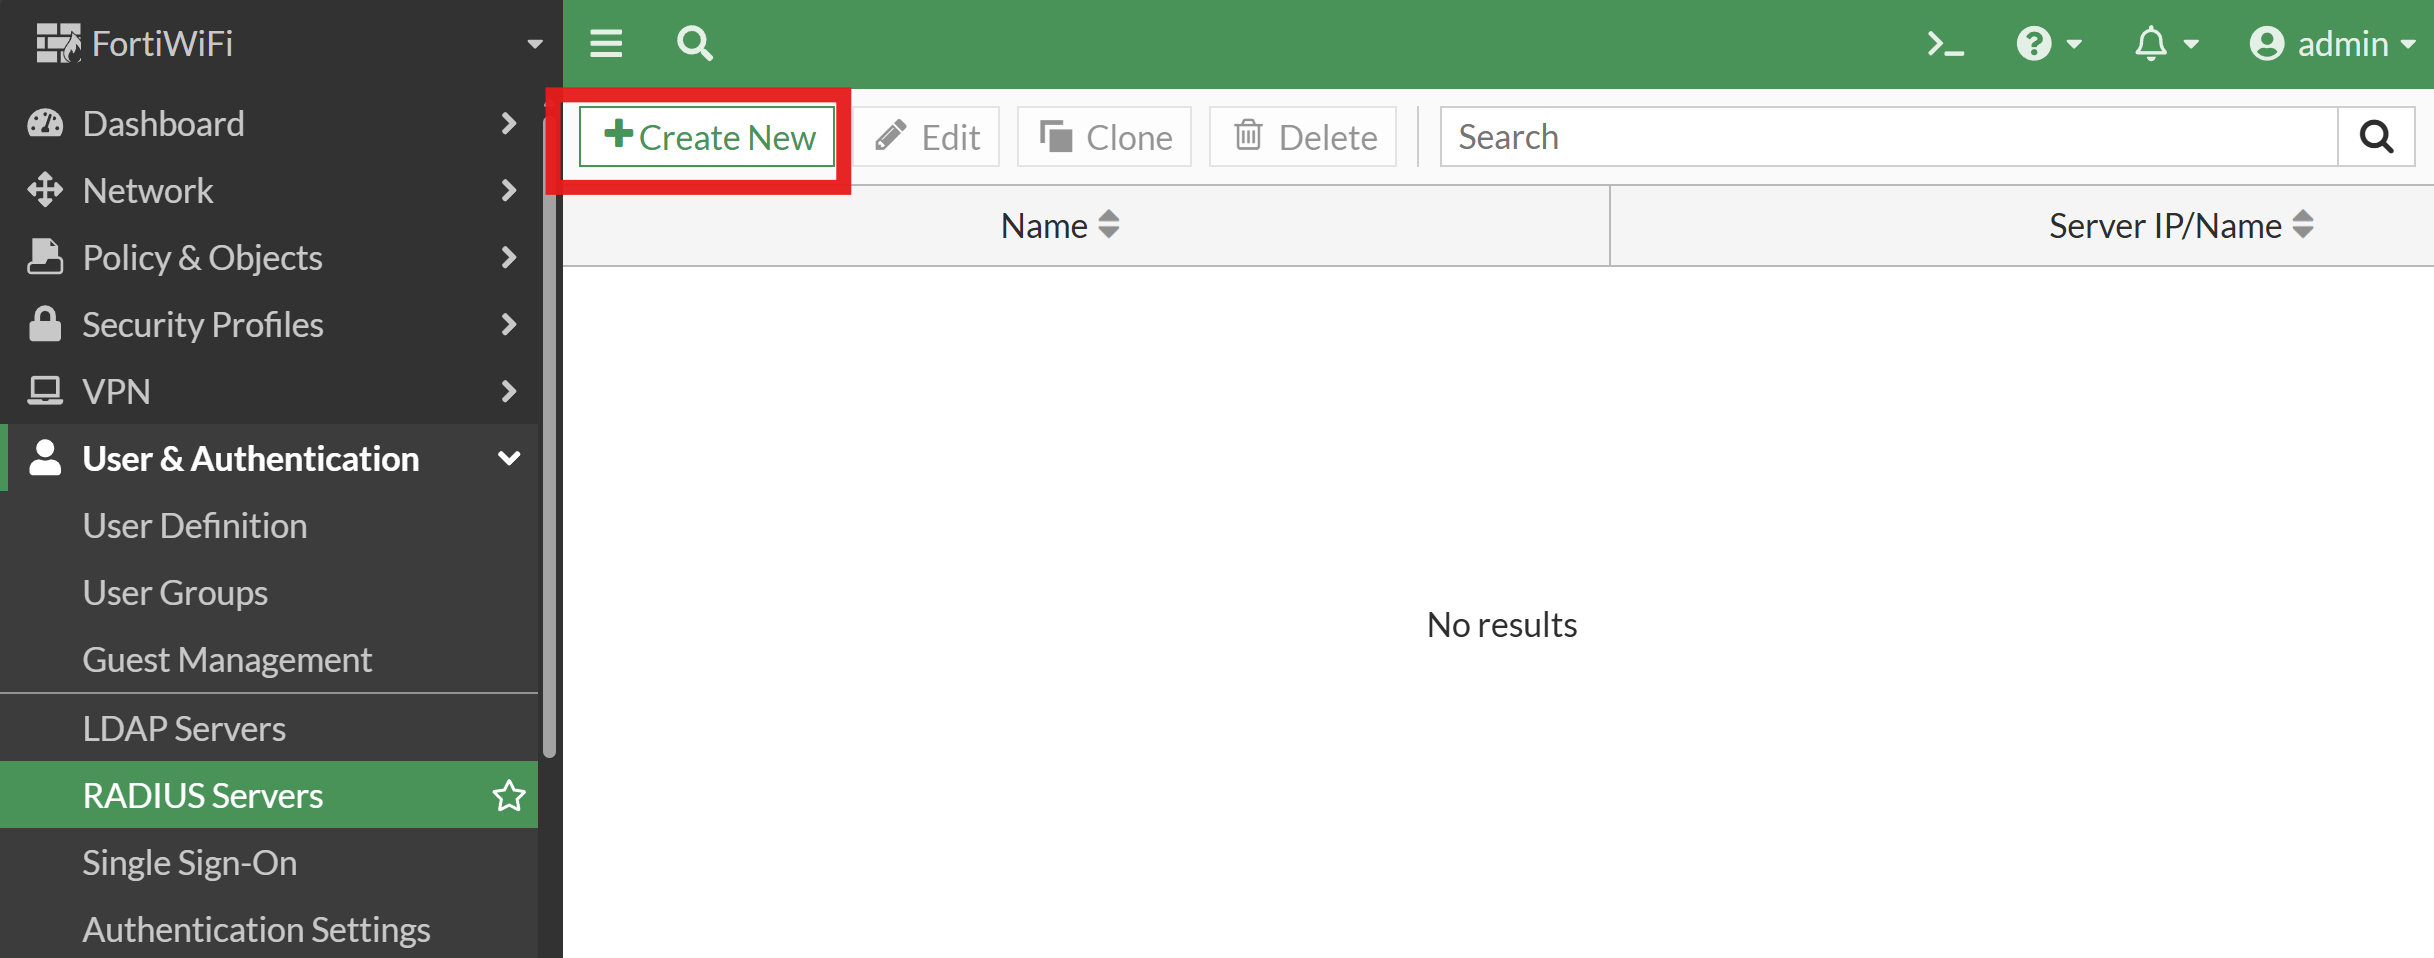
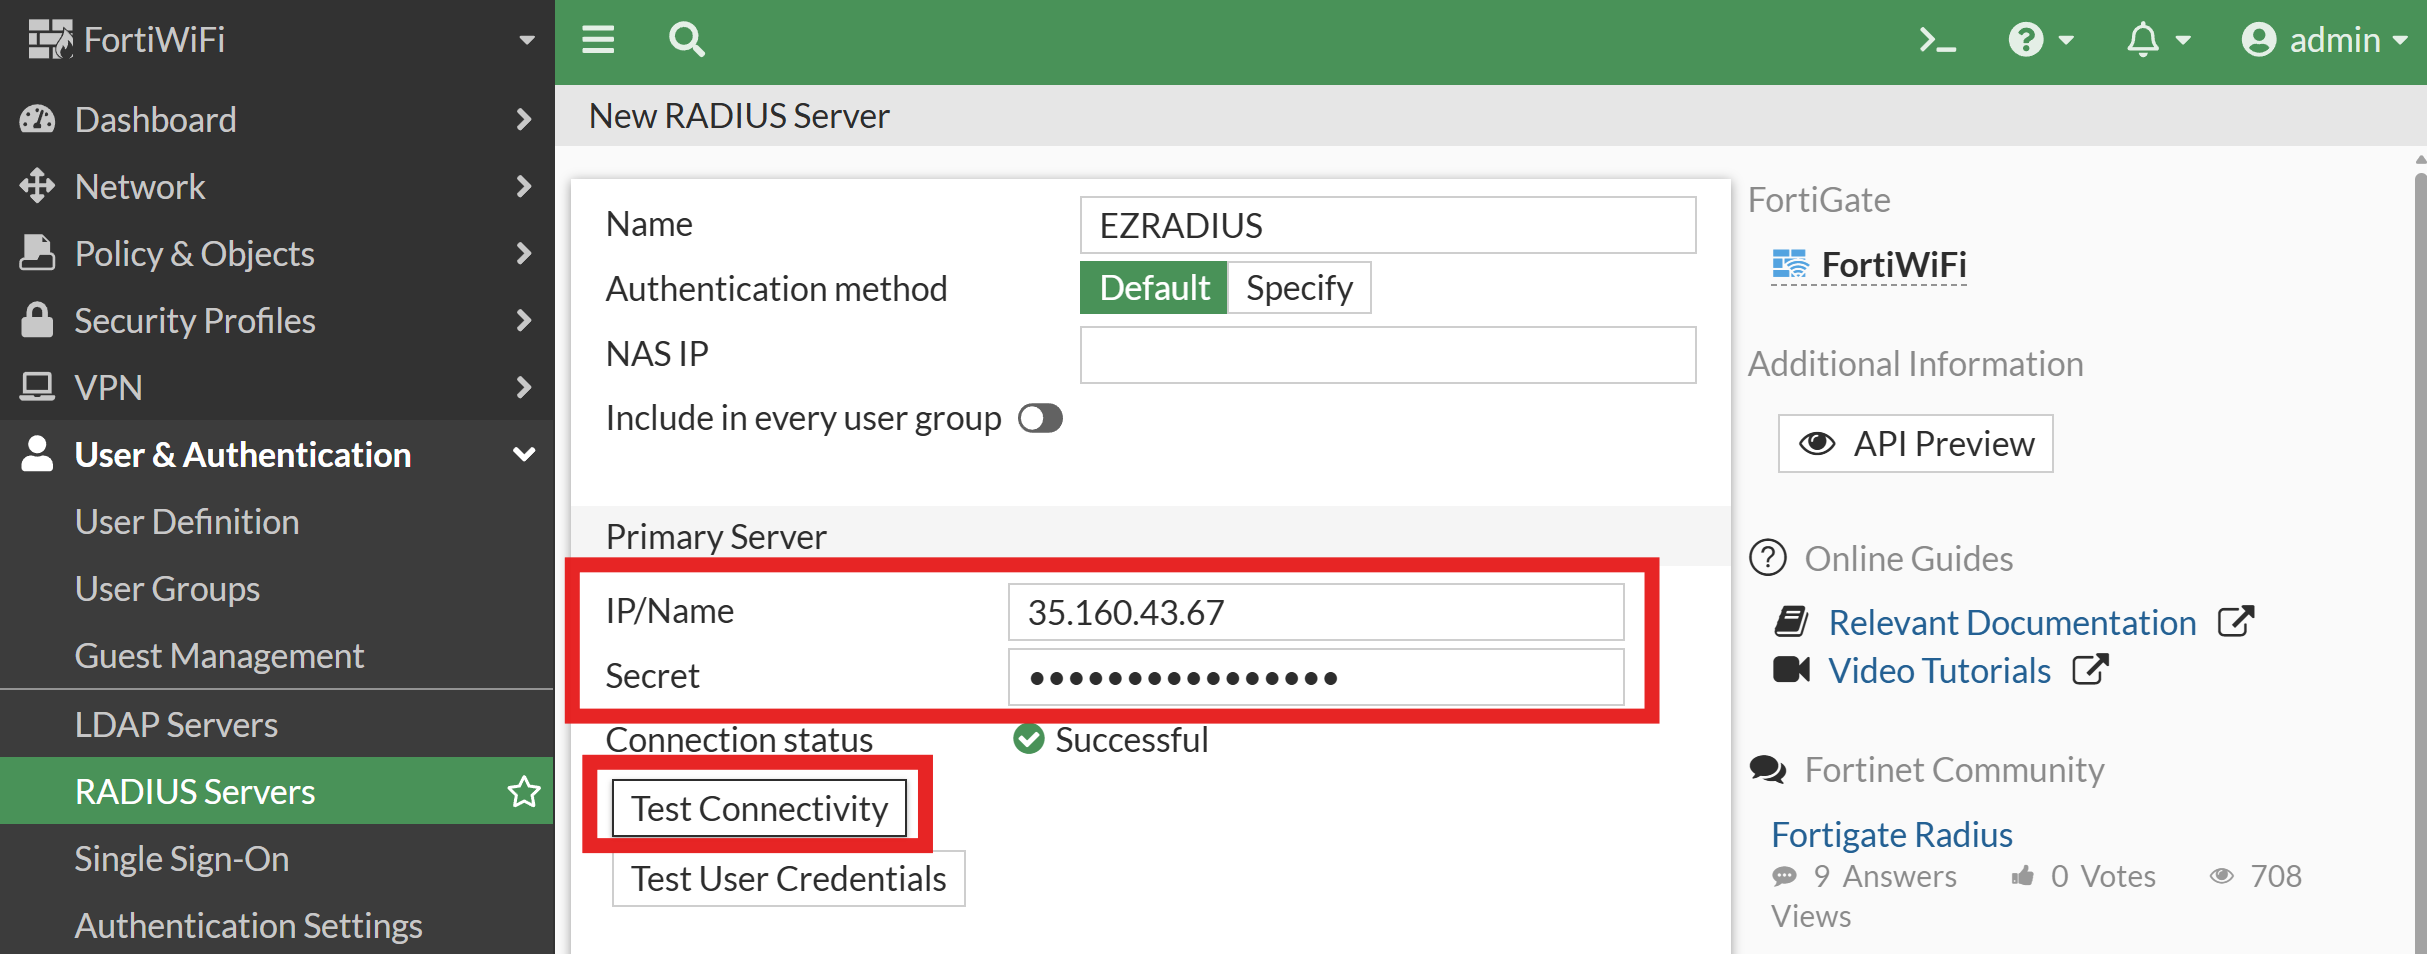
How to Add EZRADIUS Server IP Addresses to Fortinet
- Navigate back to your Fortinet admin console.
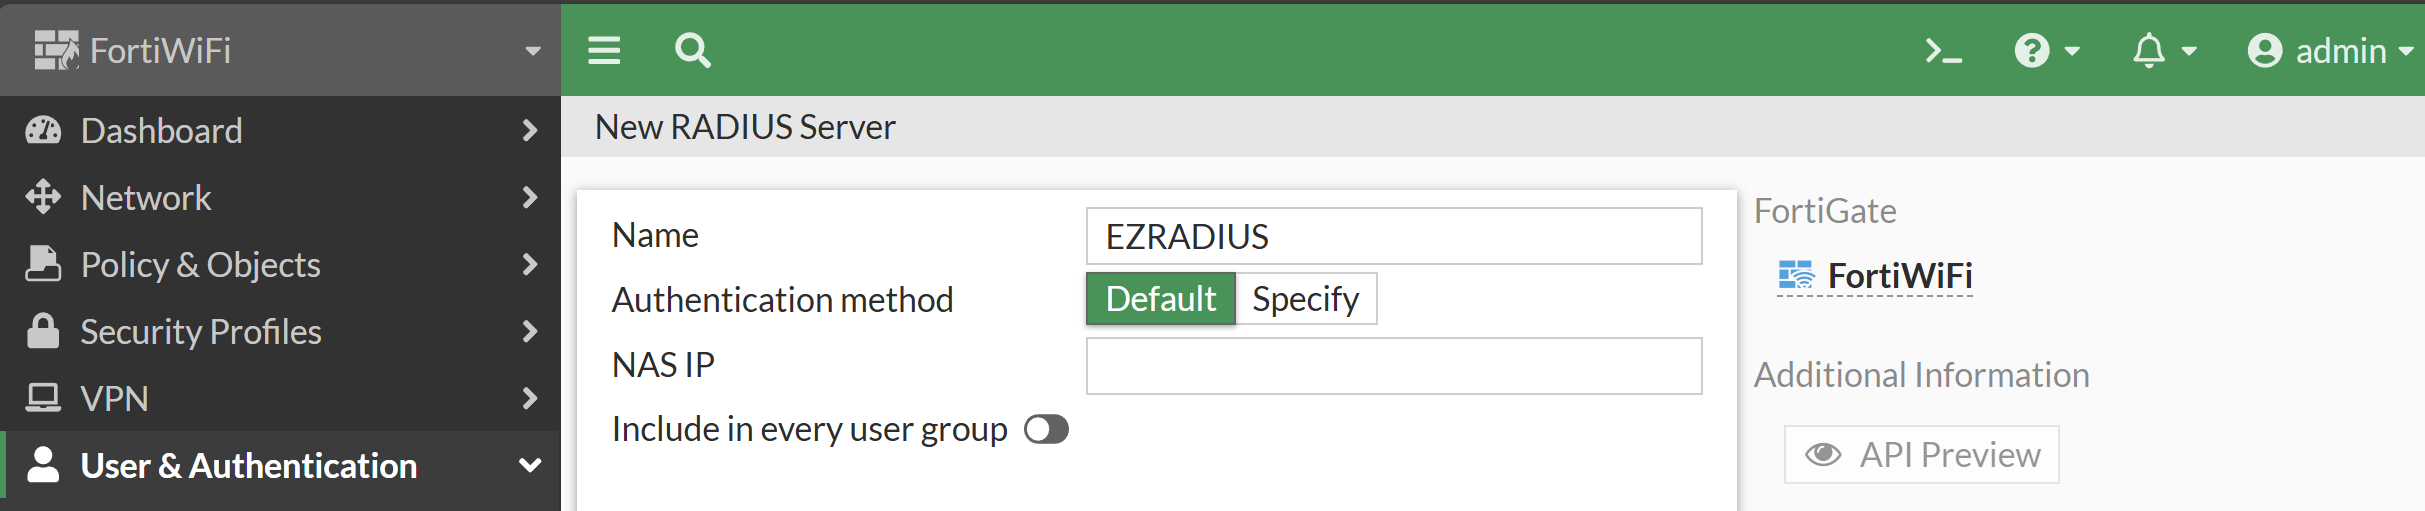
- In the first section, enter the following details:
-
Name: Enter a name for the RADIUS server (e.g., “EZRADIUS”)."
-
Authentication method: Leave as Default.
-
NAS IP: Leave blank. It will automatically use the IP of the RADIUS server below.
-
Include in every user group: Leave unchecked.
-
How to Get Your EZRADIUS Server IP Addresses for Fortinet RADIUS
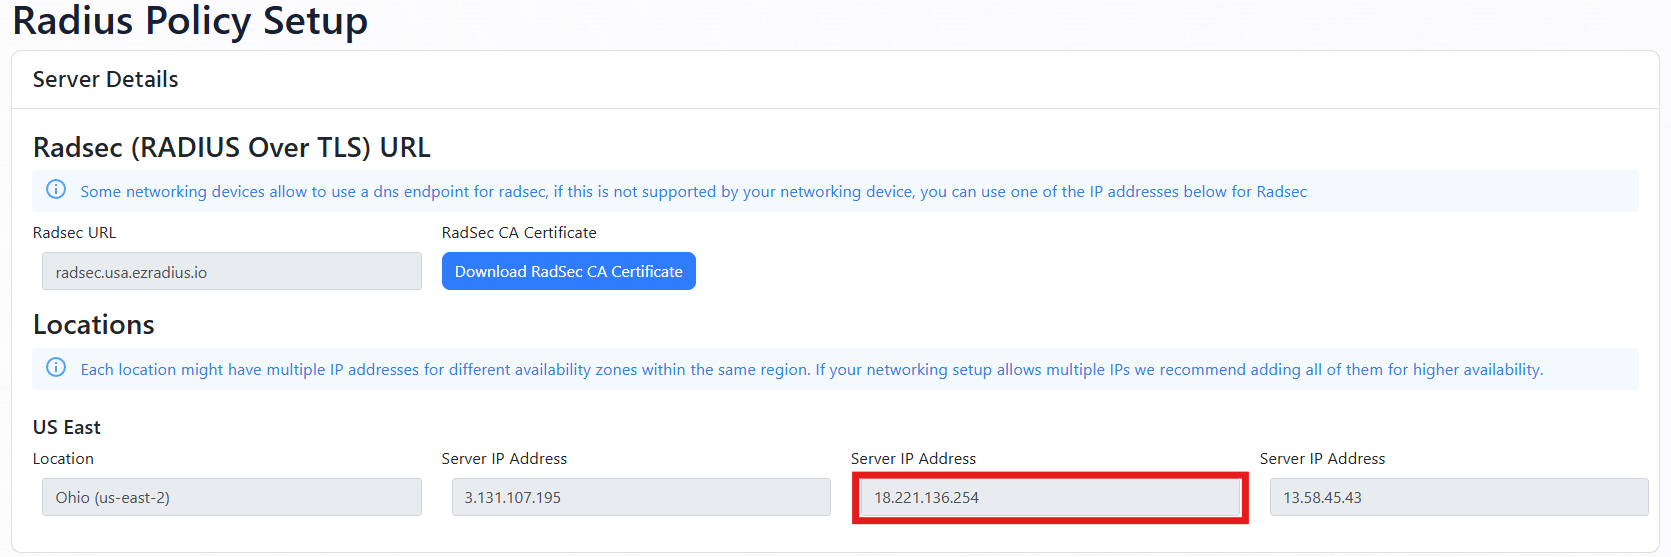
You can get your EZRADIUS Server IP addresses from the EZRADIUS dashboard. These IP addresses are needed to configure your network controller to communicate with the EZRADIUS service.
-
Navigate to the EZRADIUS Policies page from the left-hand menu.
-
At the top of the Policies page, you will find the EZRADIUS Server IP addresses. Copy one of the IP addresses from the region closest to your network controller (you’ll add the others later).
How to Add EZRADIUS RADIUS Servers in Fortinet
- Back in your Fortinet admin console, enter the IP/Name by pasting the RADIUS server IP address you just copied from the EZRADIUS portal.
How to Get Your EZRADIUS Shared Secret for Fortigate RADIUS
When you added your public IP address to your EZRADIUS policy, a shared secret was automatically generated for you. This shared secret is used to authenticate your network controller (RADIUS client) to the EZRADIUS server.
-
In the EZRADIUS portal, navigate to the EZRADIUS Policies page from the left-hand menu.
-
Scroll down to your RADIUS policy and find the Classic RADIUS Allowed IP Addresses section.
-
For your public IP address, click on the eye icon to reveal the shared secret.

How to Add the EZRADIUS Shared Secret to Fortigate
- Back in the Fortinet admin console, enter the Secret with the value of the Shared Secret you copied from the EZRADIUS portal.
How to Test and Save the EZRADIUS RADIUS Server in Fortinet
-
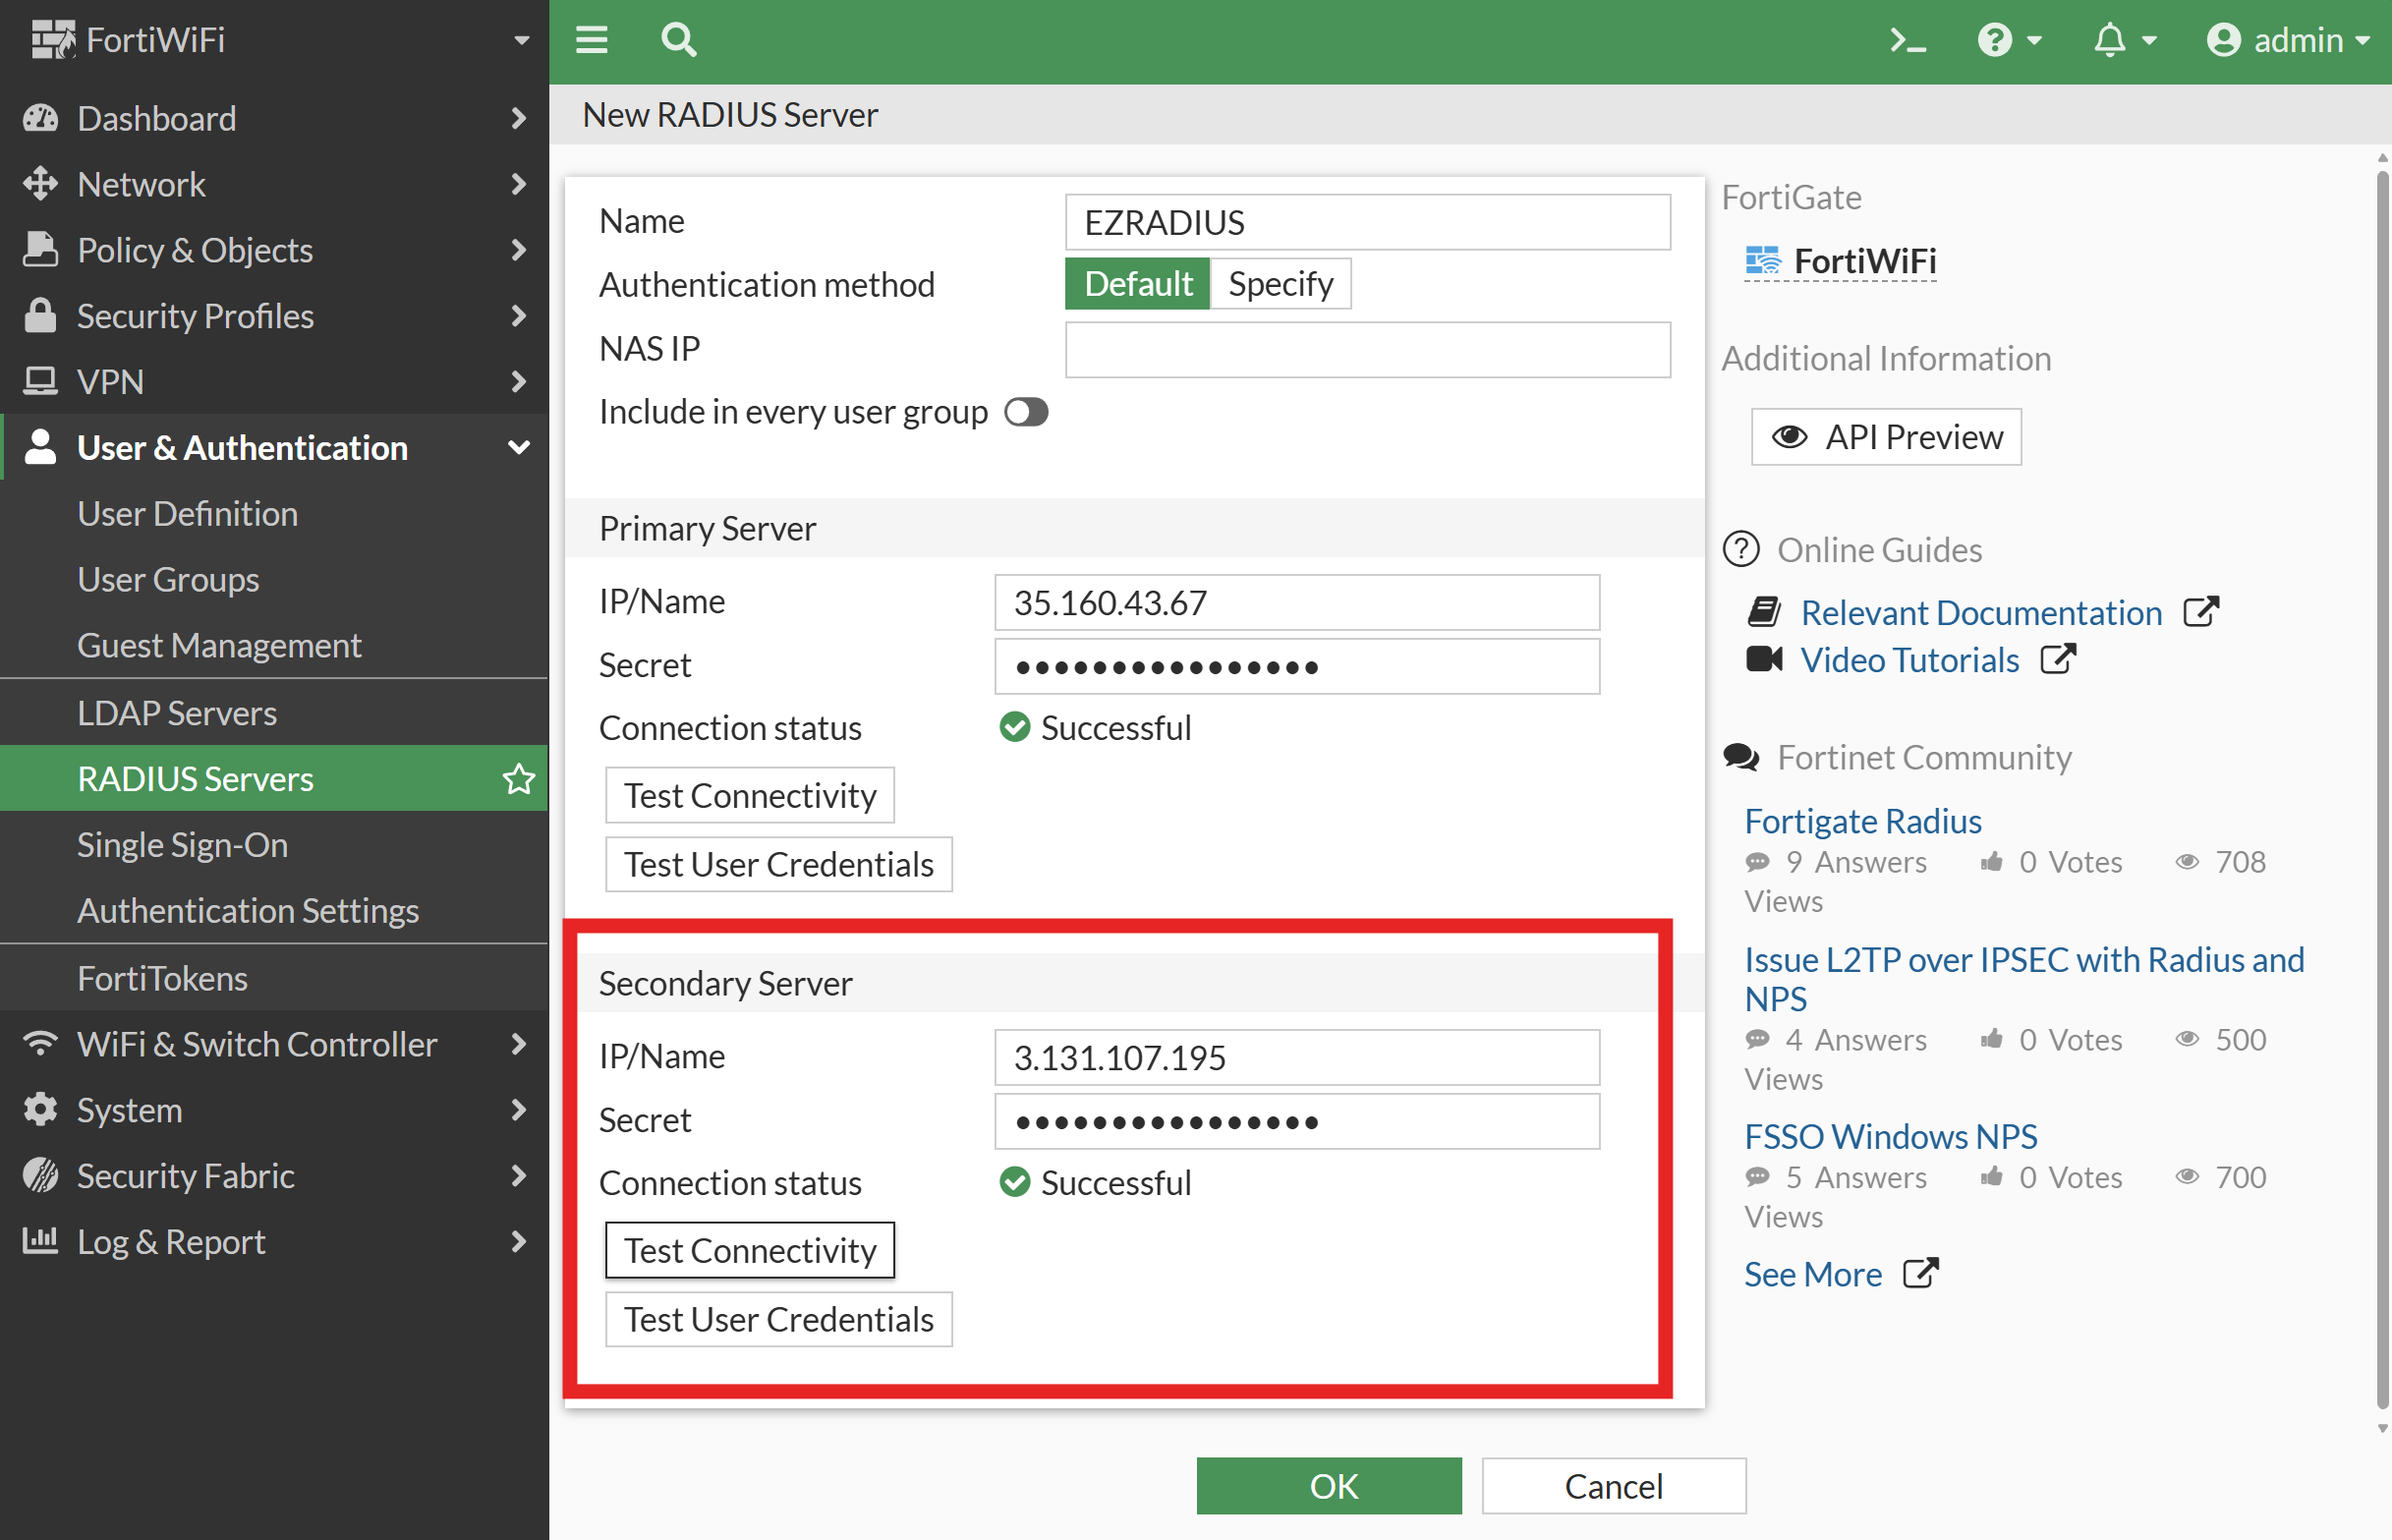
Click Test Connectivity to ensure the Fortinet device can communicate with the RADIUS server.
-
Repeat the previous steps to add and test a Secondary Server using another geography from the EZRADIUS portal for redundancy.
-
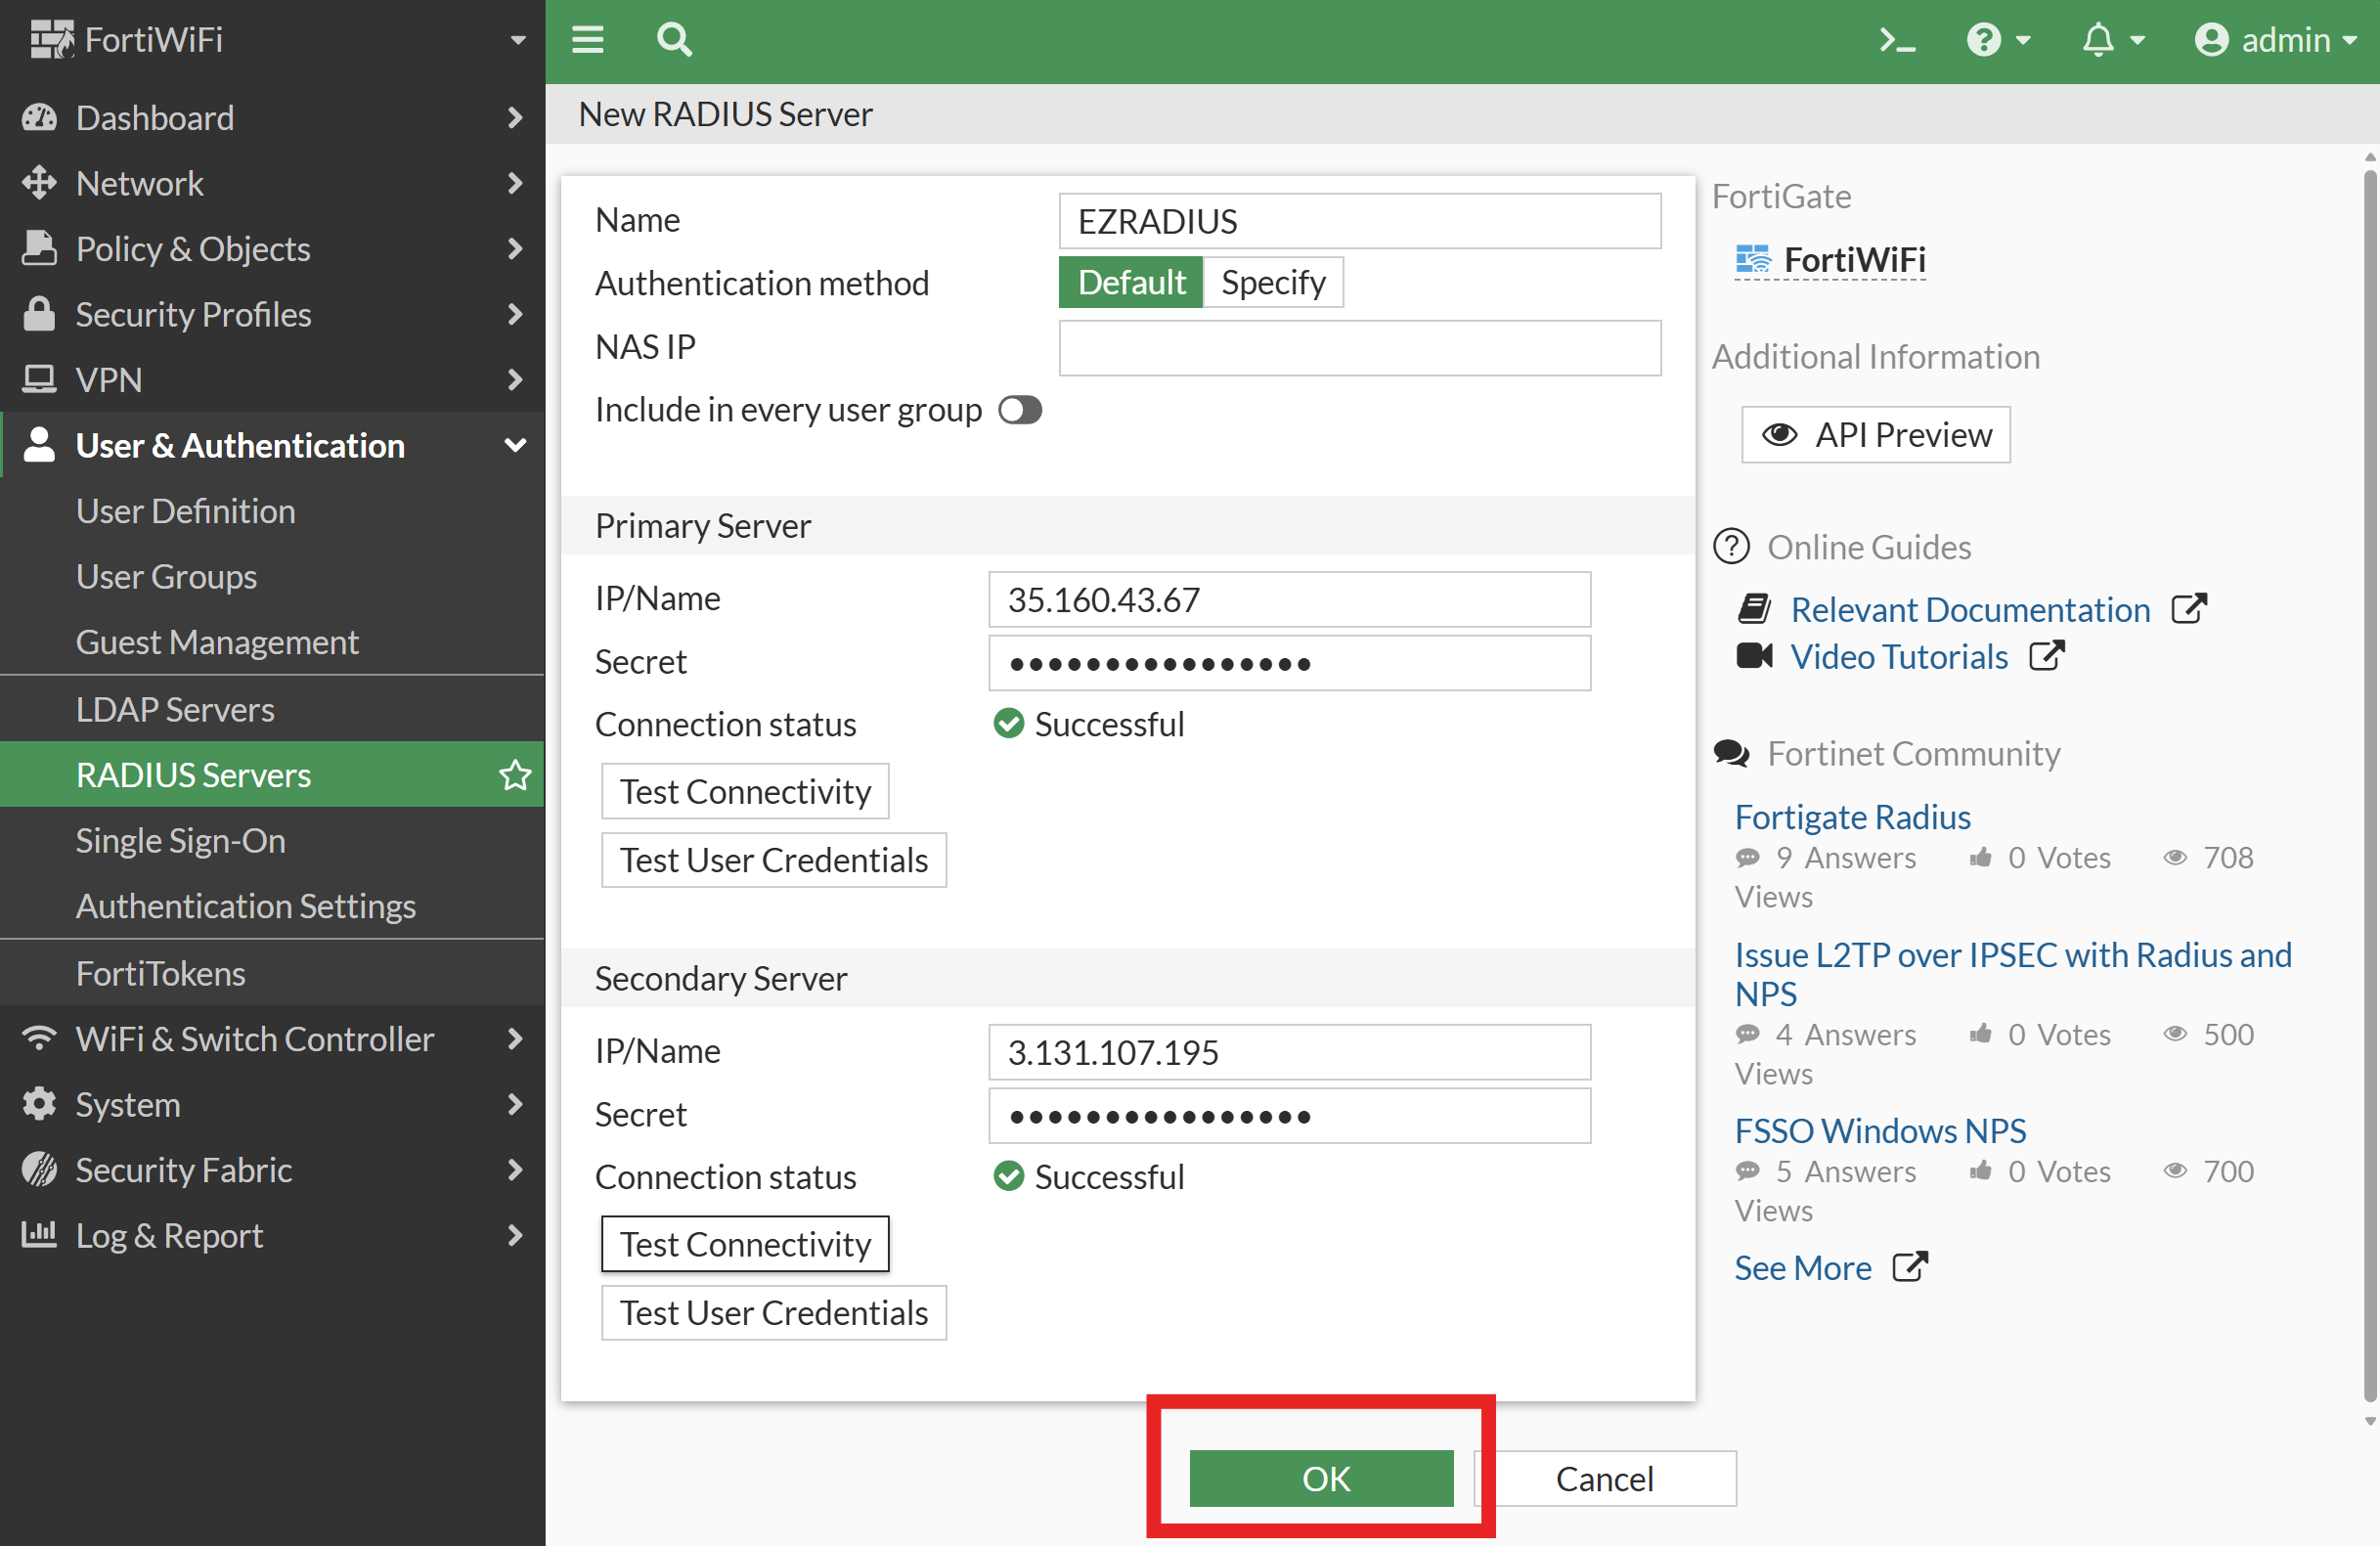
Click OK to save the RADIUS server configuration.
How to Add a Cloud RadSec Server to Fortinet
Fortinet FortiOS also supports RadSec (RADIUS over TLS) for secure RADIUS communication. However, at the time of writing they only support CLI configuration for RadSec. Refer to this guide from Fortinet for more information on how to set up RadSec using the CLI.
When configuring RadSec with EZRADIUS, you will need to create a client certificate and private key for your Fortinet device, and also upload the EZRADIUS RadSec CA certificate to your Fortinet device so that it can trust the EZRADIUS RadSec server. Below are the steps to do this.
How to Create a RadSec Certificate and Private Key for Fortinet RadSec
A RadSec Client Certificate is required to authenticate your network controller (RADIUS client) to the EZRADIUS server over a secure TLS connection. You can create a RadSec Client Certificate using EZCA or a 3rd Party Certificate Authority.
How to Create a RadSec Client Certificate Using EZCA
EZRADIUS is integrated with EZCA to make it easy to generate a new RadSec Certificate directly in your browser.
-
First, make sure you’ve added your EZCA Certificate Authority to your EZRADIUS policy under RadSec (RADIUS TLS) Client Configuration > Trusted Certificate Authorities and saved the policy.
-
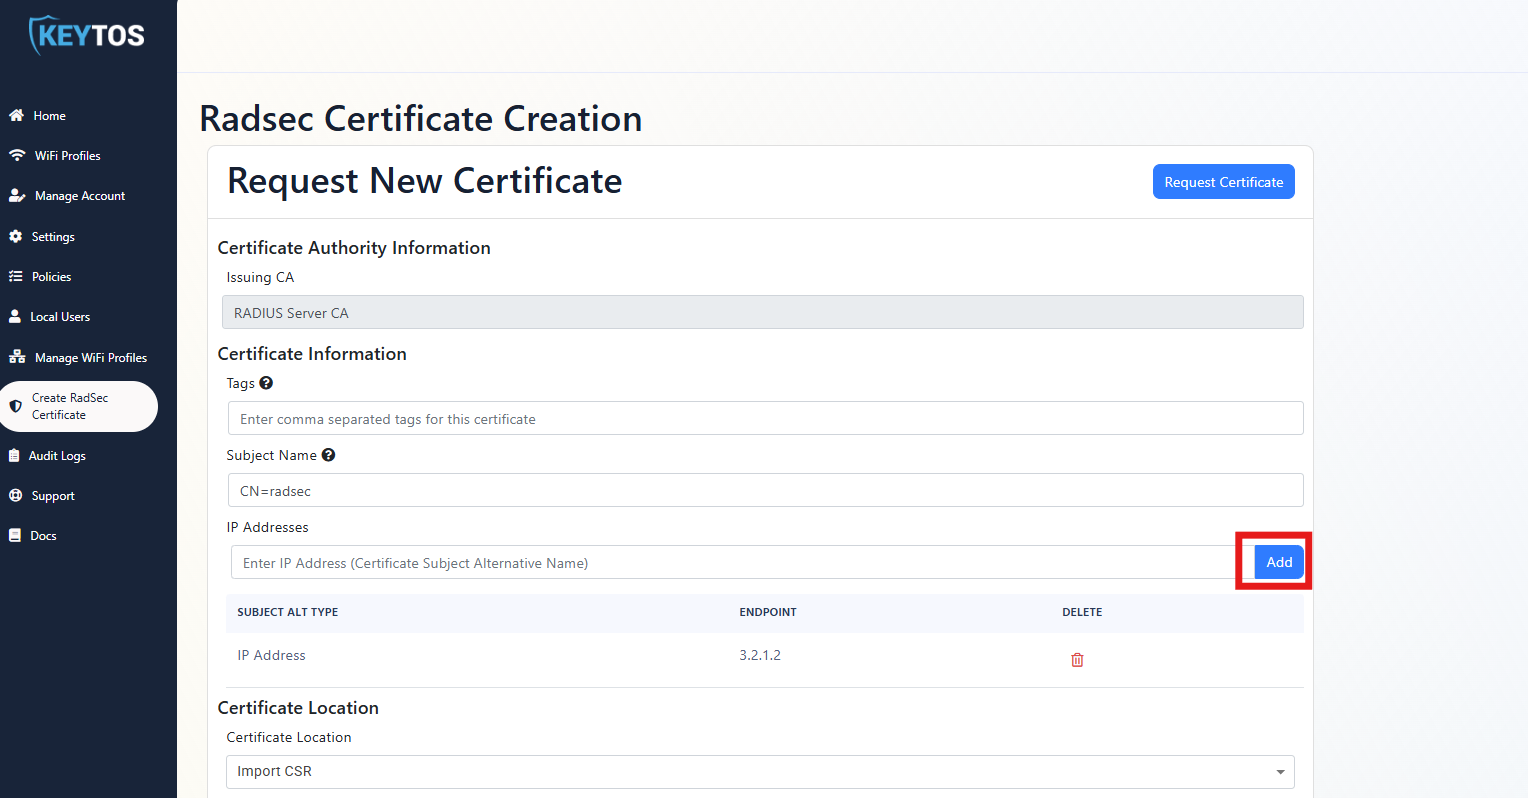
In the EZRADIUS dashboard, from the left-hand menu click on Create RadSec Certificate. (If you don’t see this option, make sure you have added an EZCA Certificate Authority to your policy as mentioned in the previous step.)
-
Under the Issuing CA dropdown, select the EZCA Certificate Authority you previously added to your EZRADIUS policy. If you just have one, it will be selected by default.
-
Optionally add Tags for your certificate to help identify it later.
-
Keep the Subject Name as CN=radsec.
-
Enter at least one IP address of your network controller in the IP Address field and click Add. This field isn’t used for RadSec authentication so even if you have a dynamic IP, you can still proceed with your current IP.
-
In the Certificate Location dropdown, select Generate Locally.
-
Click on Request Certificate. It will take a few seconds to generate the certificate.
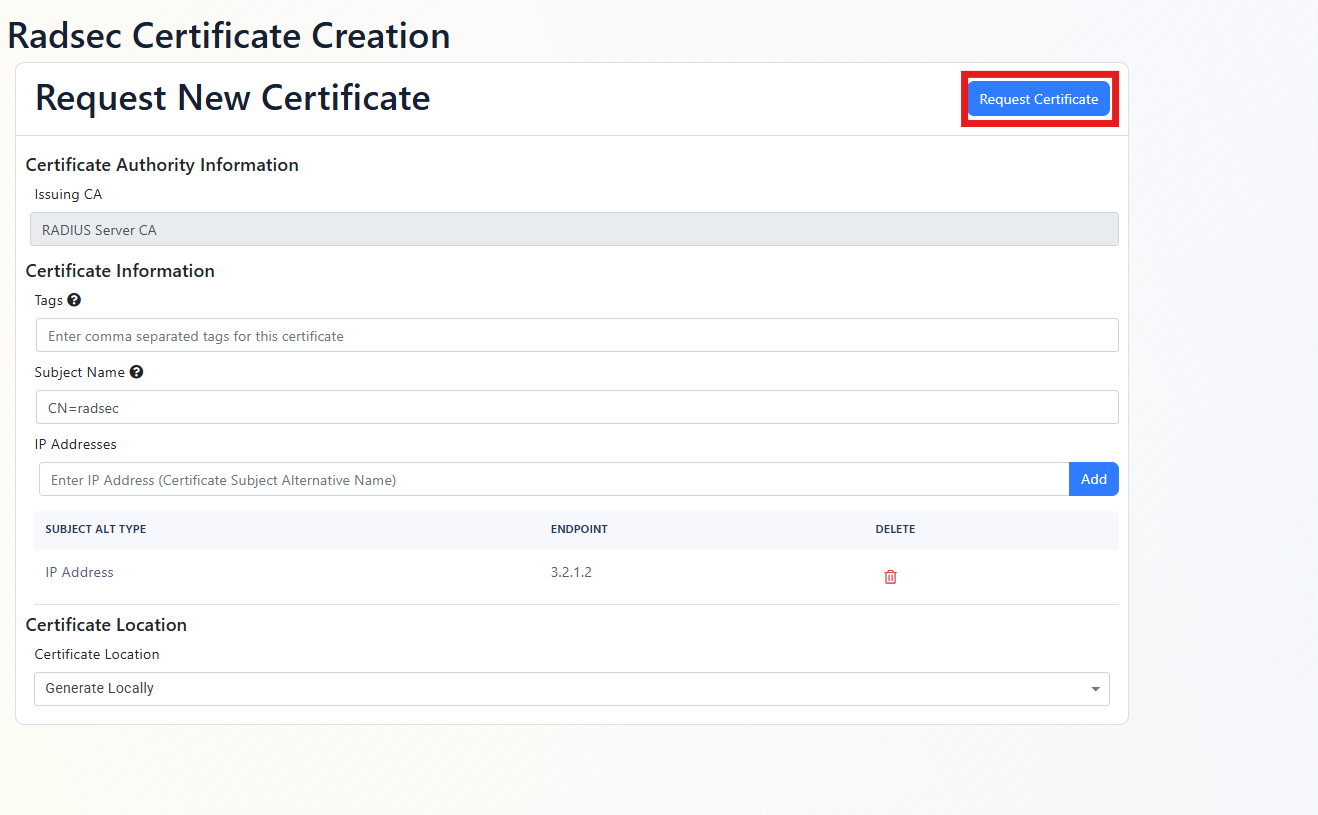
-
Click on Download Full Certificate.
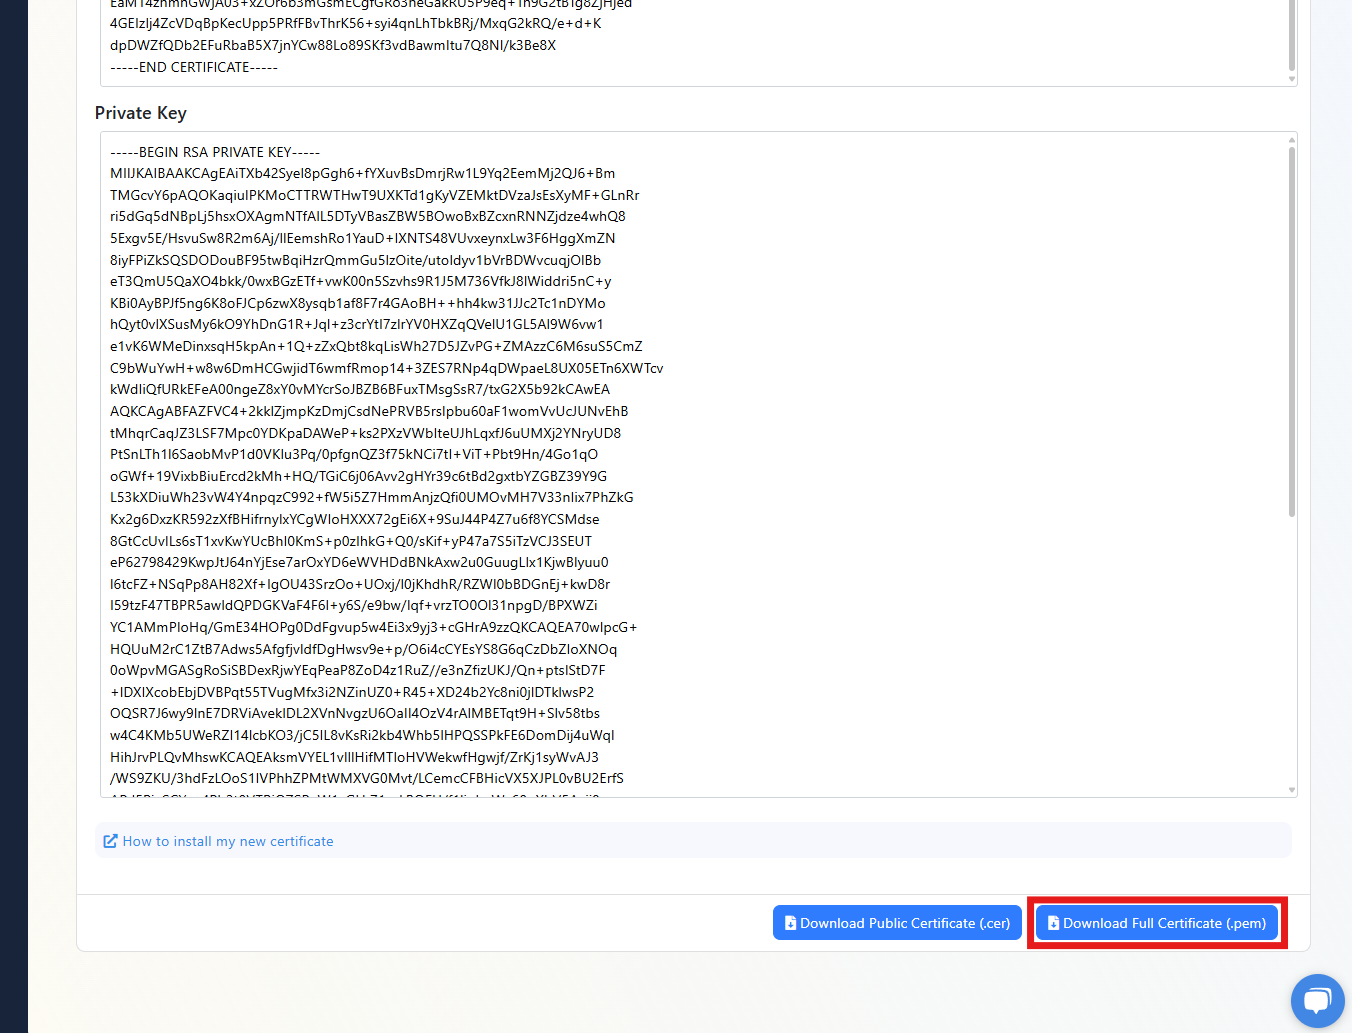
-
This will download 2 files. The
.keyfile is the private key and the.pemfile is the certificate.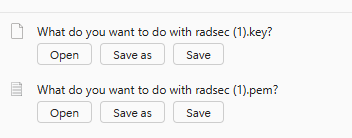
How to Create a RadSec Client Certificate Using a 3rd Party Certificate Authority
Refer to your PKI documentation for creating a new RadSec Client Certificate. You will need both the certificate (.pem) and the private key (.key) files.
Any 3rd Party Certificate Authority that can generate a certificate with the appropriate fields can be used to create a RadSec Client Certificate.
- First, make sure you’ve added your 3rd Party Certificate Authority to your EZRADIUS policy under RadSec (RADIUS TLS) Client Configuration > Trusted Certificate Authorities and saved the policy.
- Refer to your PKI documentation for creating a new RadSec Client Certificate. You will need both the certificate (
.pem) and the private key (.key) files.
How to Get the RadSec CA Certificate from EZRADIUS
The RadSec CA Certificate is used by your network controller to verify the identity of the EZRADIUS server when establishing a secure TLS connection. You can download the RadSec CA Certificate directly from the EZRADIUS dashboard.
-
Navigate to the EZRADIUS Policies page from the left-hand menu.
-
Click Download RadSec CA Certificate and save it to your local machine. It should be named
radsec_ca.cer, or similar.
How to Add a RADIUS Server to a Fortigate Network
Now that you have added EZRADIUS as a RADIUS server within Fortinet, you can add it to your network so that when users connect to that network, they will be authenticated via EZRADIUS.
How to Add RADIUS to a Fortinet Wi-Fi Network
-
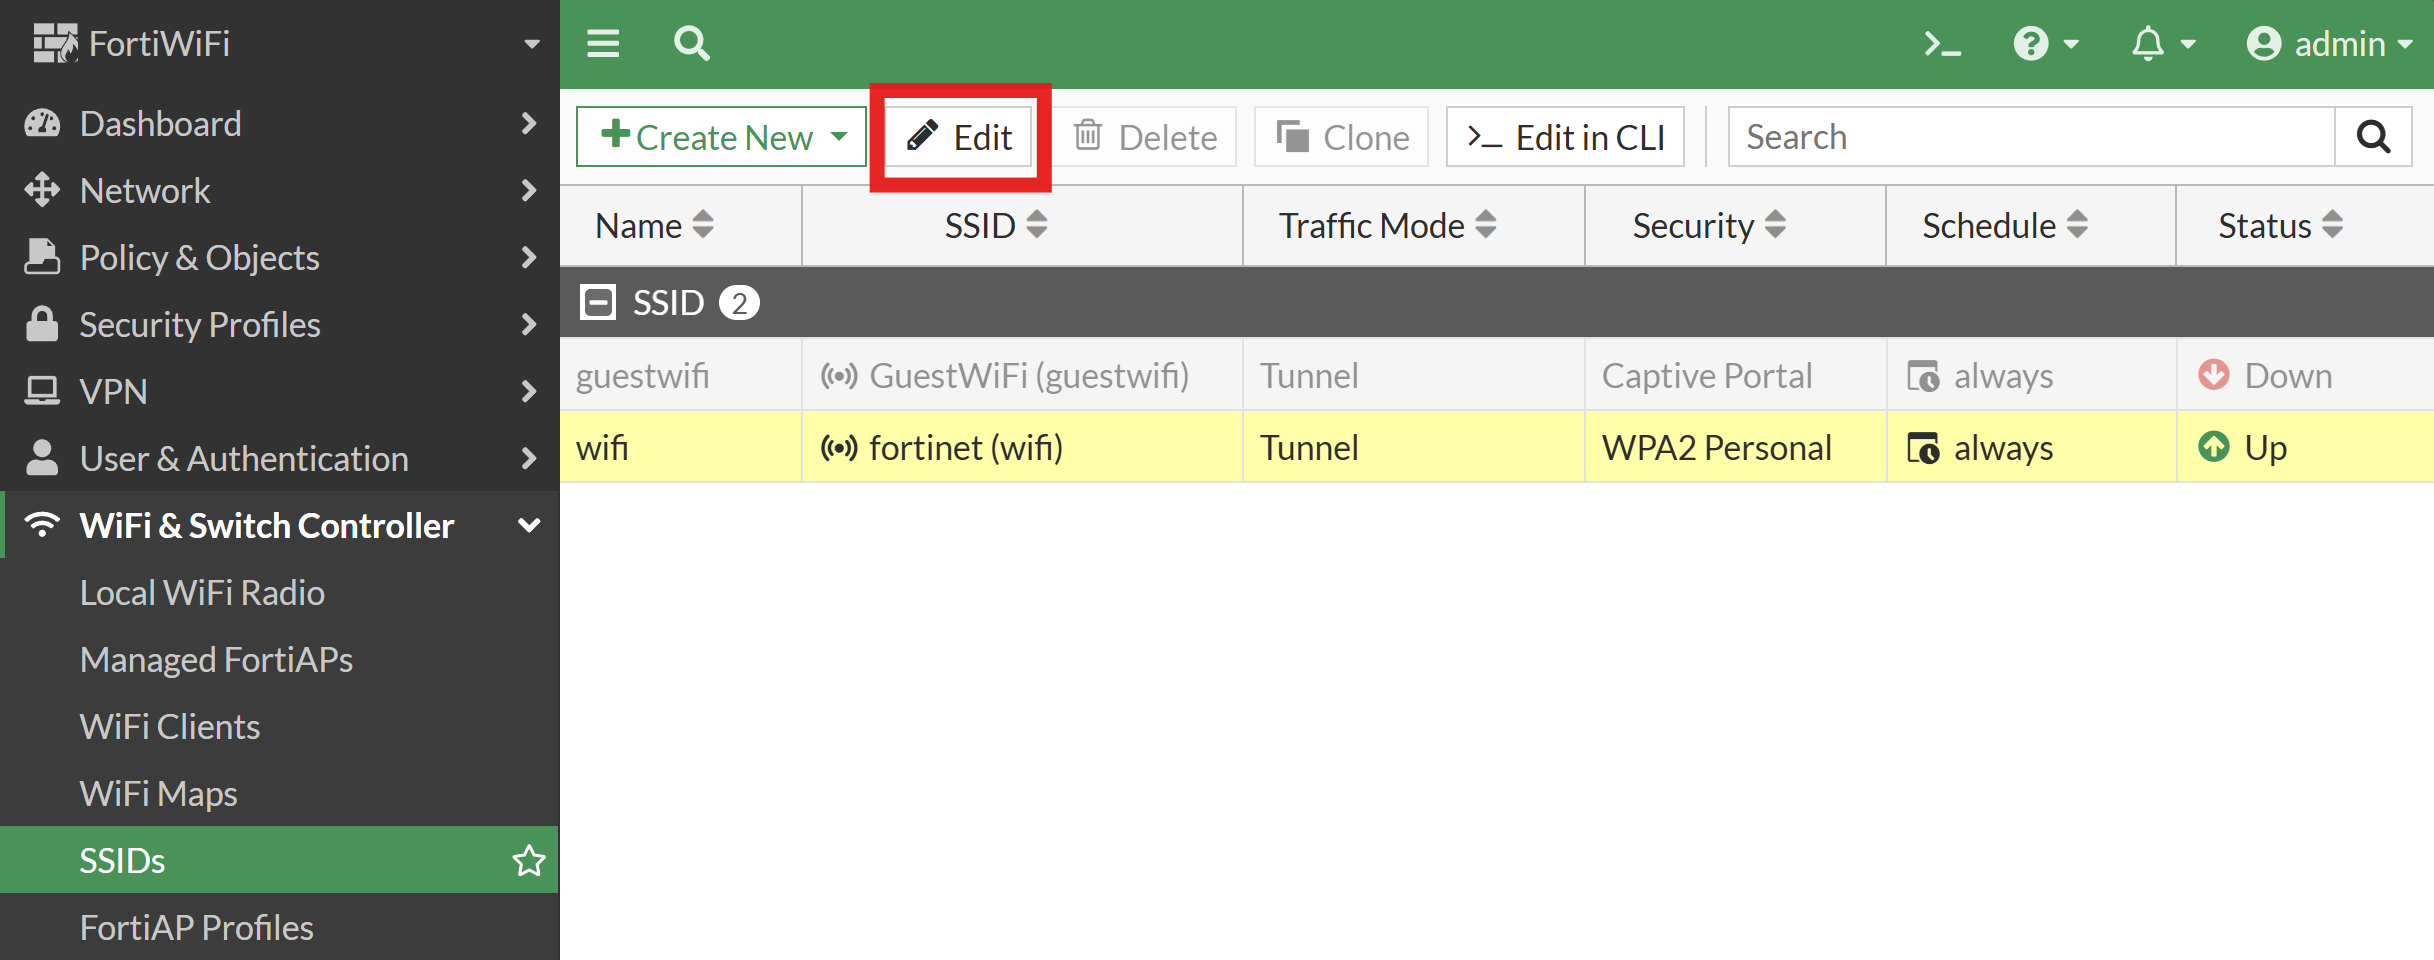
From the left-hand menu, expand WiFi & Switch Controller and select SSIDs.
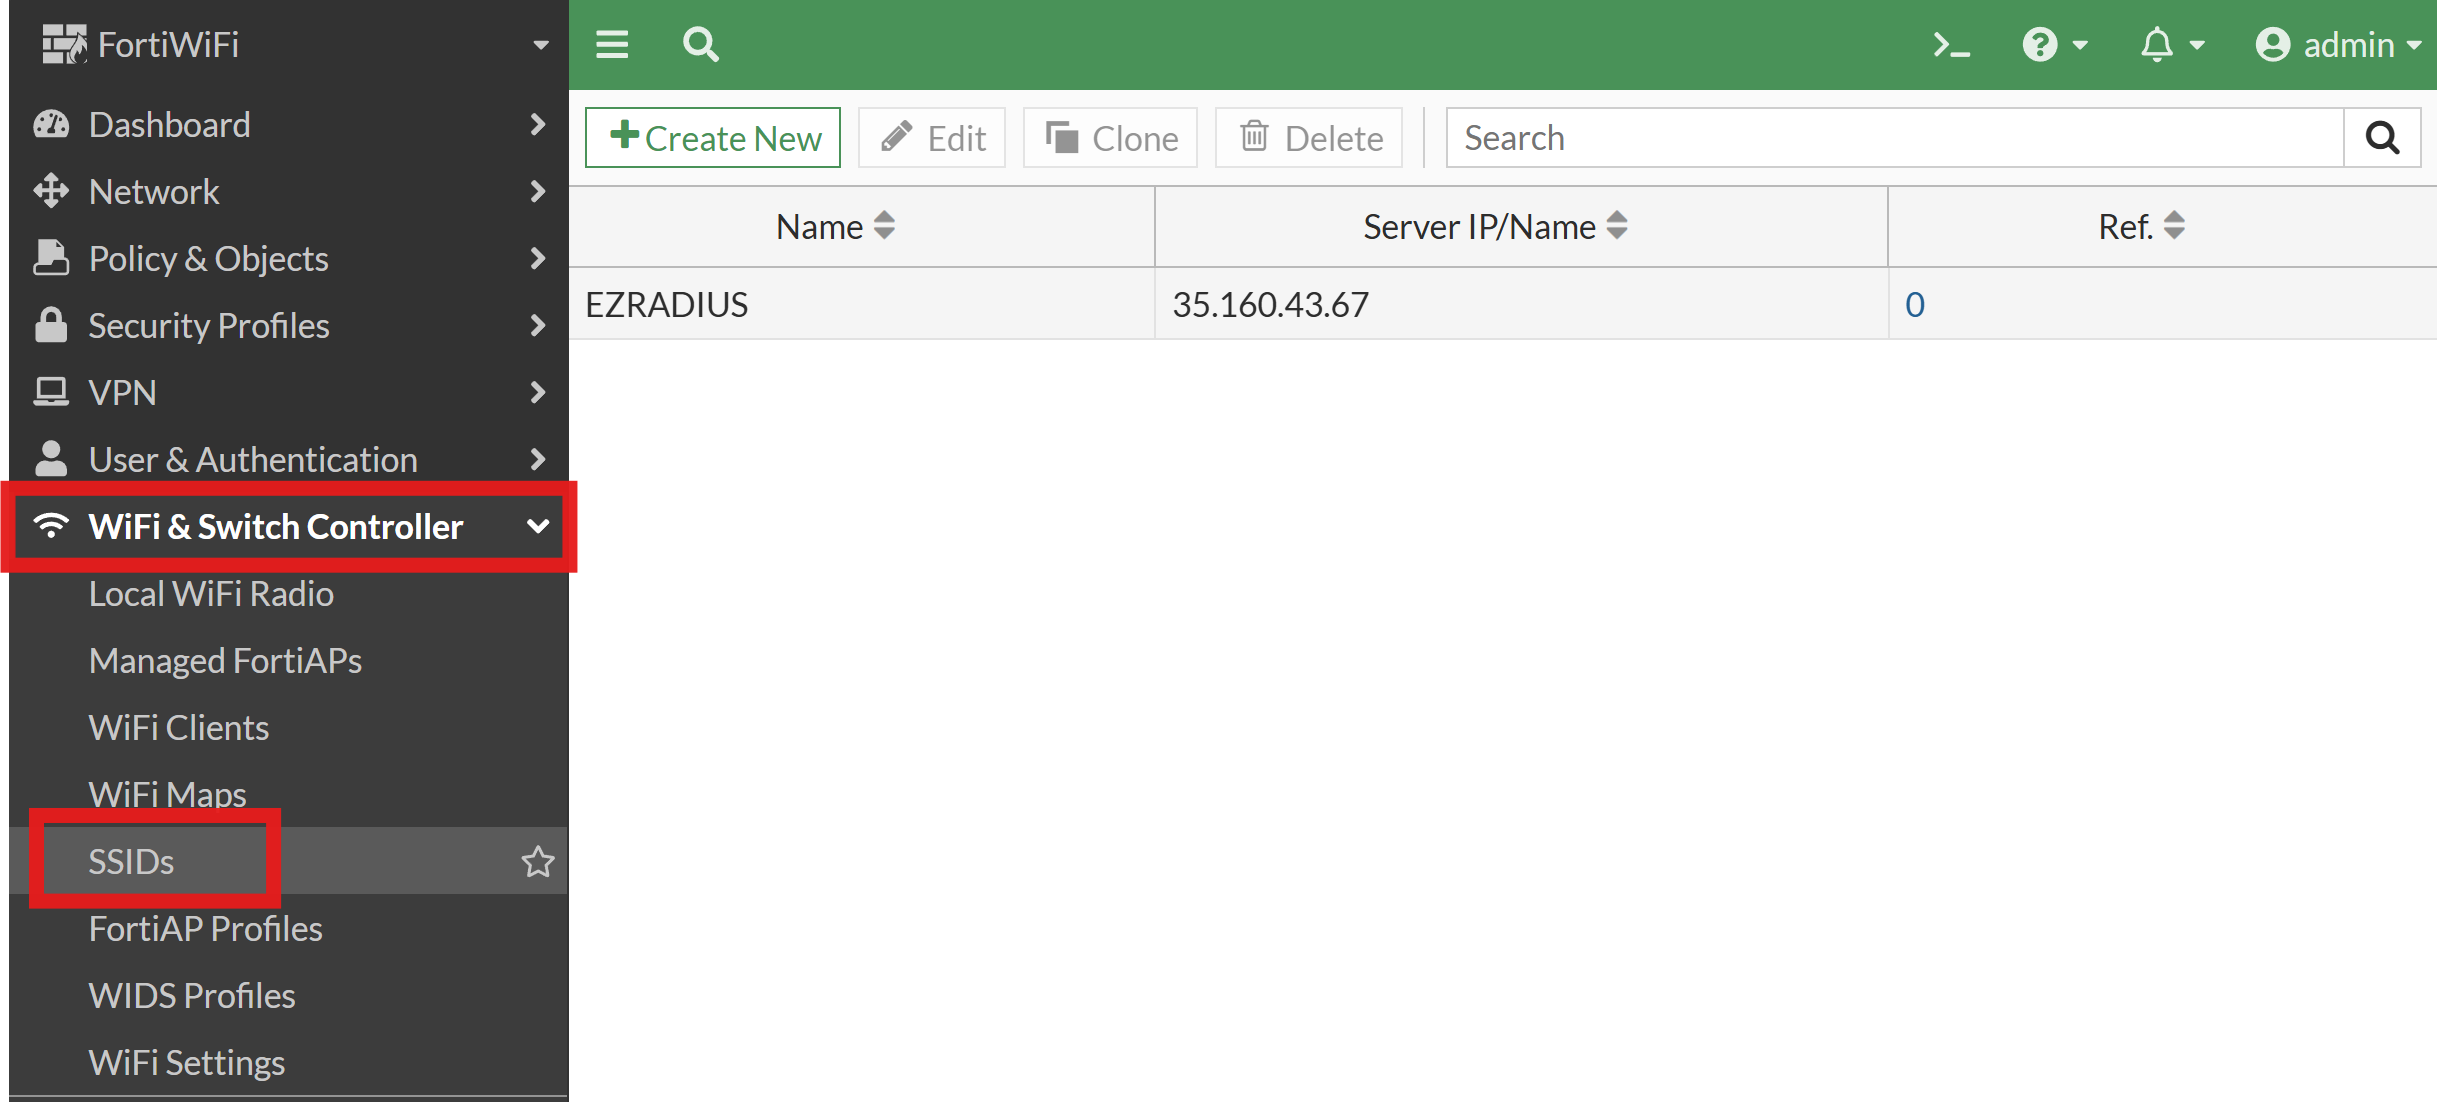
-
Select your SSID and click Edit.
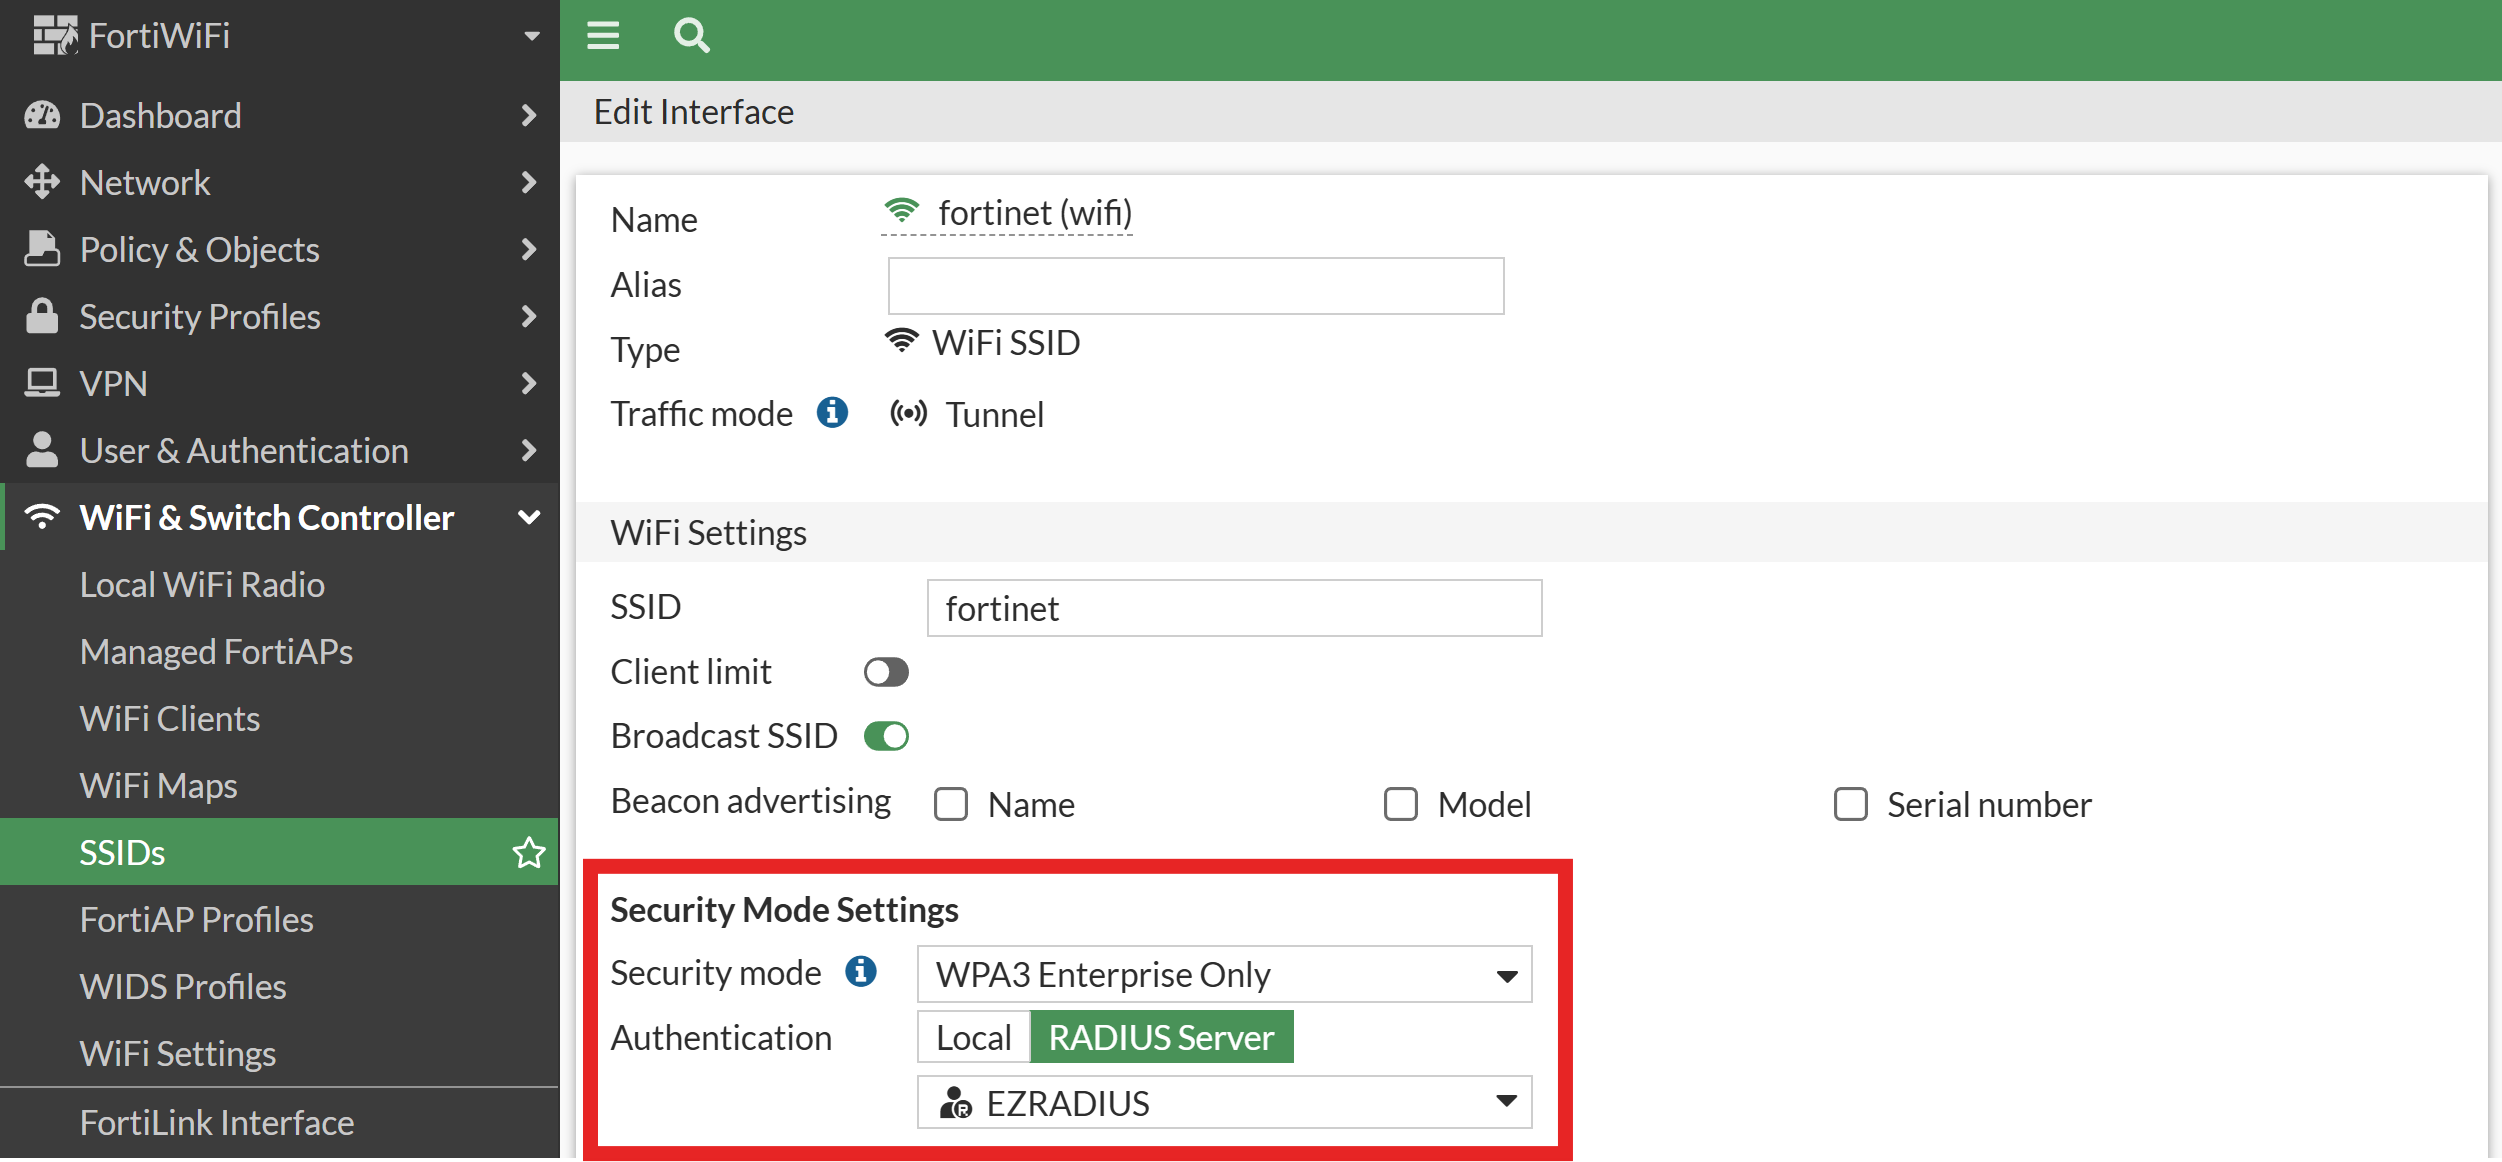
-
Under Security Mode Settings:
-
Set Security Mode to WPA3-Enterprise Only or WPA2-Enterprise depending on your requirements.
-
For Authentication, select RADIUS Server and choose the RADIUS server you created earlier from the dropdown menu.
-
-
Click OK to save the SSID configuration.
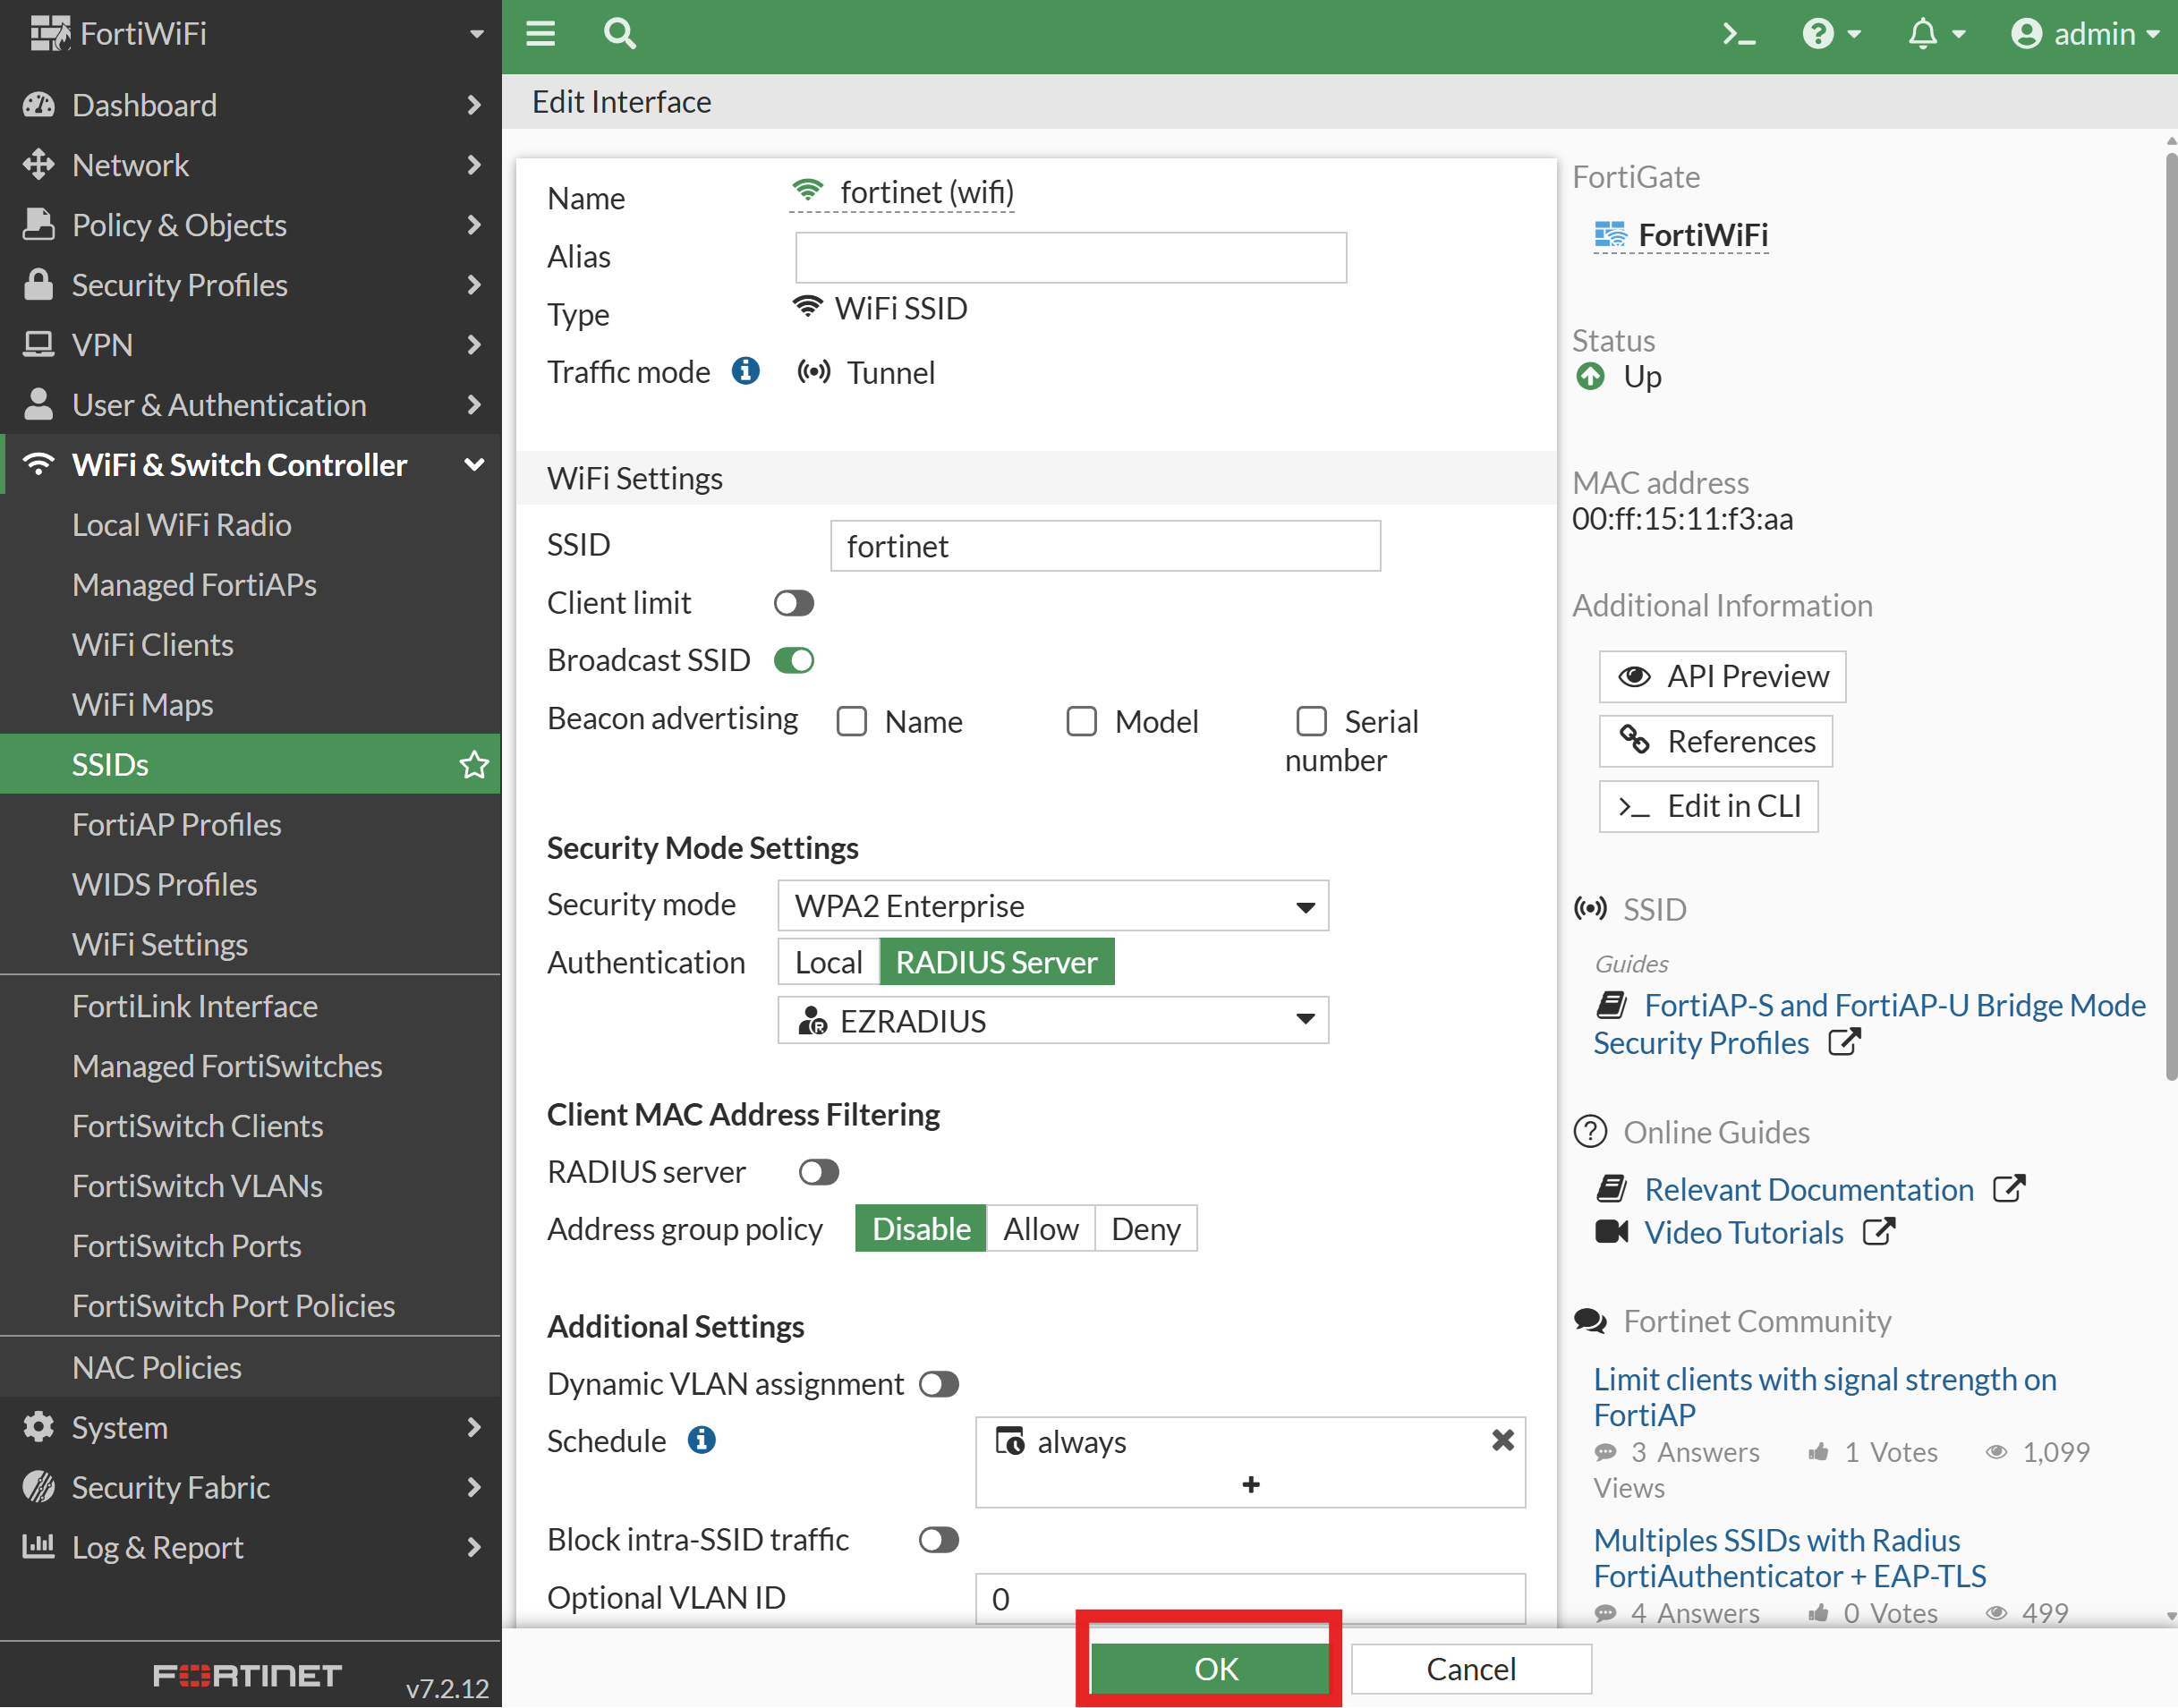
-
Wait for the Fortinet device to apply the changes. Your Fortinet network should now be configured to use RADIUS authentication with Entra ID via EZRADIUS.
How to Configure Your Devices to Use Cloud RADIUS with Fortigate
Now that you have set up Cloud RADIUS for your Fortigate network, there are a few more steps to ensure your users’ devices can connect seamlessly. By default, devices won’t be able to connect using Cloud RADIUS until you configure the appropriate network profile and RADIUS CA certificate. Make sure to follow the instructions below to push the necessary configurations to your users’ devices.
How to Push the RADIUS CA Certificate and Wi-Fi Profile Using Microsoft Intune
Follow these Intune step-by-step guides to push the required CA certificate and Wi-Fi profile to your users’ devices so they can seamlessly connect to your Fortigate network using Cloud RADIUS.
How to Push the RADIUS CA Certificate and Wi-Fi Profile Using Jamf Pro
Follow these Jamf Pro step-by-step guides to push the required CA certificate and Wi-Fi profile to your users’ devices so they can seamlessly connect to your Fortigate network using Cloud RADIUS.
How to Manually Configure the RADIUS CA Certificate and Wi-Fi Profile on Your Devices
Follow these manual configuration step-by-step guides to manually configure the required CA certificate and Wi-Fi profile on your users’ devices so they can connect to your Fortigate network using Cloud RADIUS.
How to Troubleshoot Cloud RADIUS Issues in Fortigate
Not able to connect to your Fortigate network after setting up EZRADIUS? Refer to this troubleshooting guide to help diagnose and resolve common issues when using Cloud RADIUS with Fortigate.
Troubleshooting GuideWe also have a detailed video guide to help you troubleshoot common Cloud RADIUS issues with Fortigate below:
Enjoying EZRADIUS? Leave Us a Review!
We hope you’re enjoying using EZRADIUS to secure your Fortinet network! If you have a moment, we would greatly appreciate it if you could leave us a review on G2. Your feedback helps other IT professionals discover EZRADIUS and helps us continue to improve our service. Thank you for your support!