How-To: Setup Meraki Network Entra ID Authentication Using RadSec
Introduction - How Entra ID Authentication Works in Meraki Networks and EZRADIUS
For your Meraki Network network to authenticate users with Entra ID, you need to enable RADIUS authentication and connect it to a RADIUS service that supports Entra ID. This guide will show you how to enable RADIUS authentication in WPA-Enterprise with Meraki and EZRADIUS. (Note: This can be achieve with Entra ID username and password but we recommend using EAP-TLS with Entra ID for a more secure and easier authentication method, while EAP-TLS might sound intimidating, here is a 20 minute video on setting up everything from the RADIUS server to the Certificate Authority).
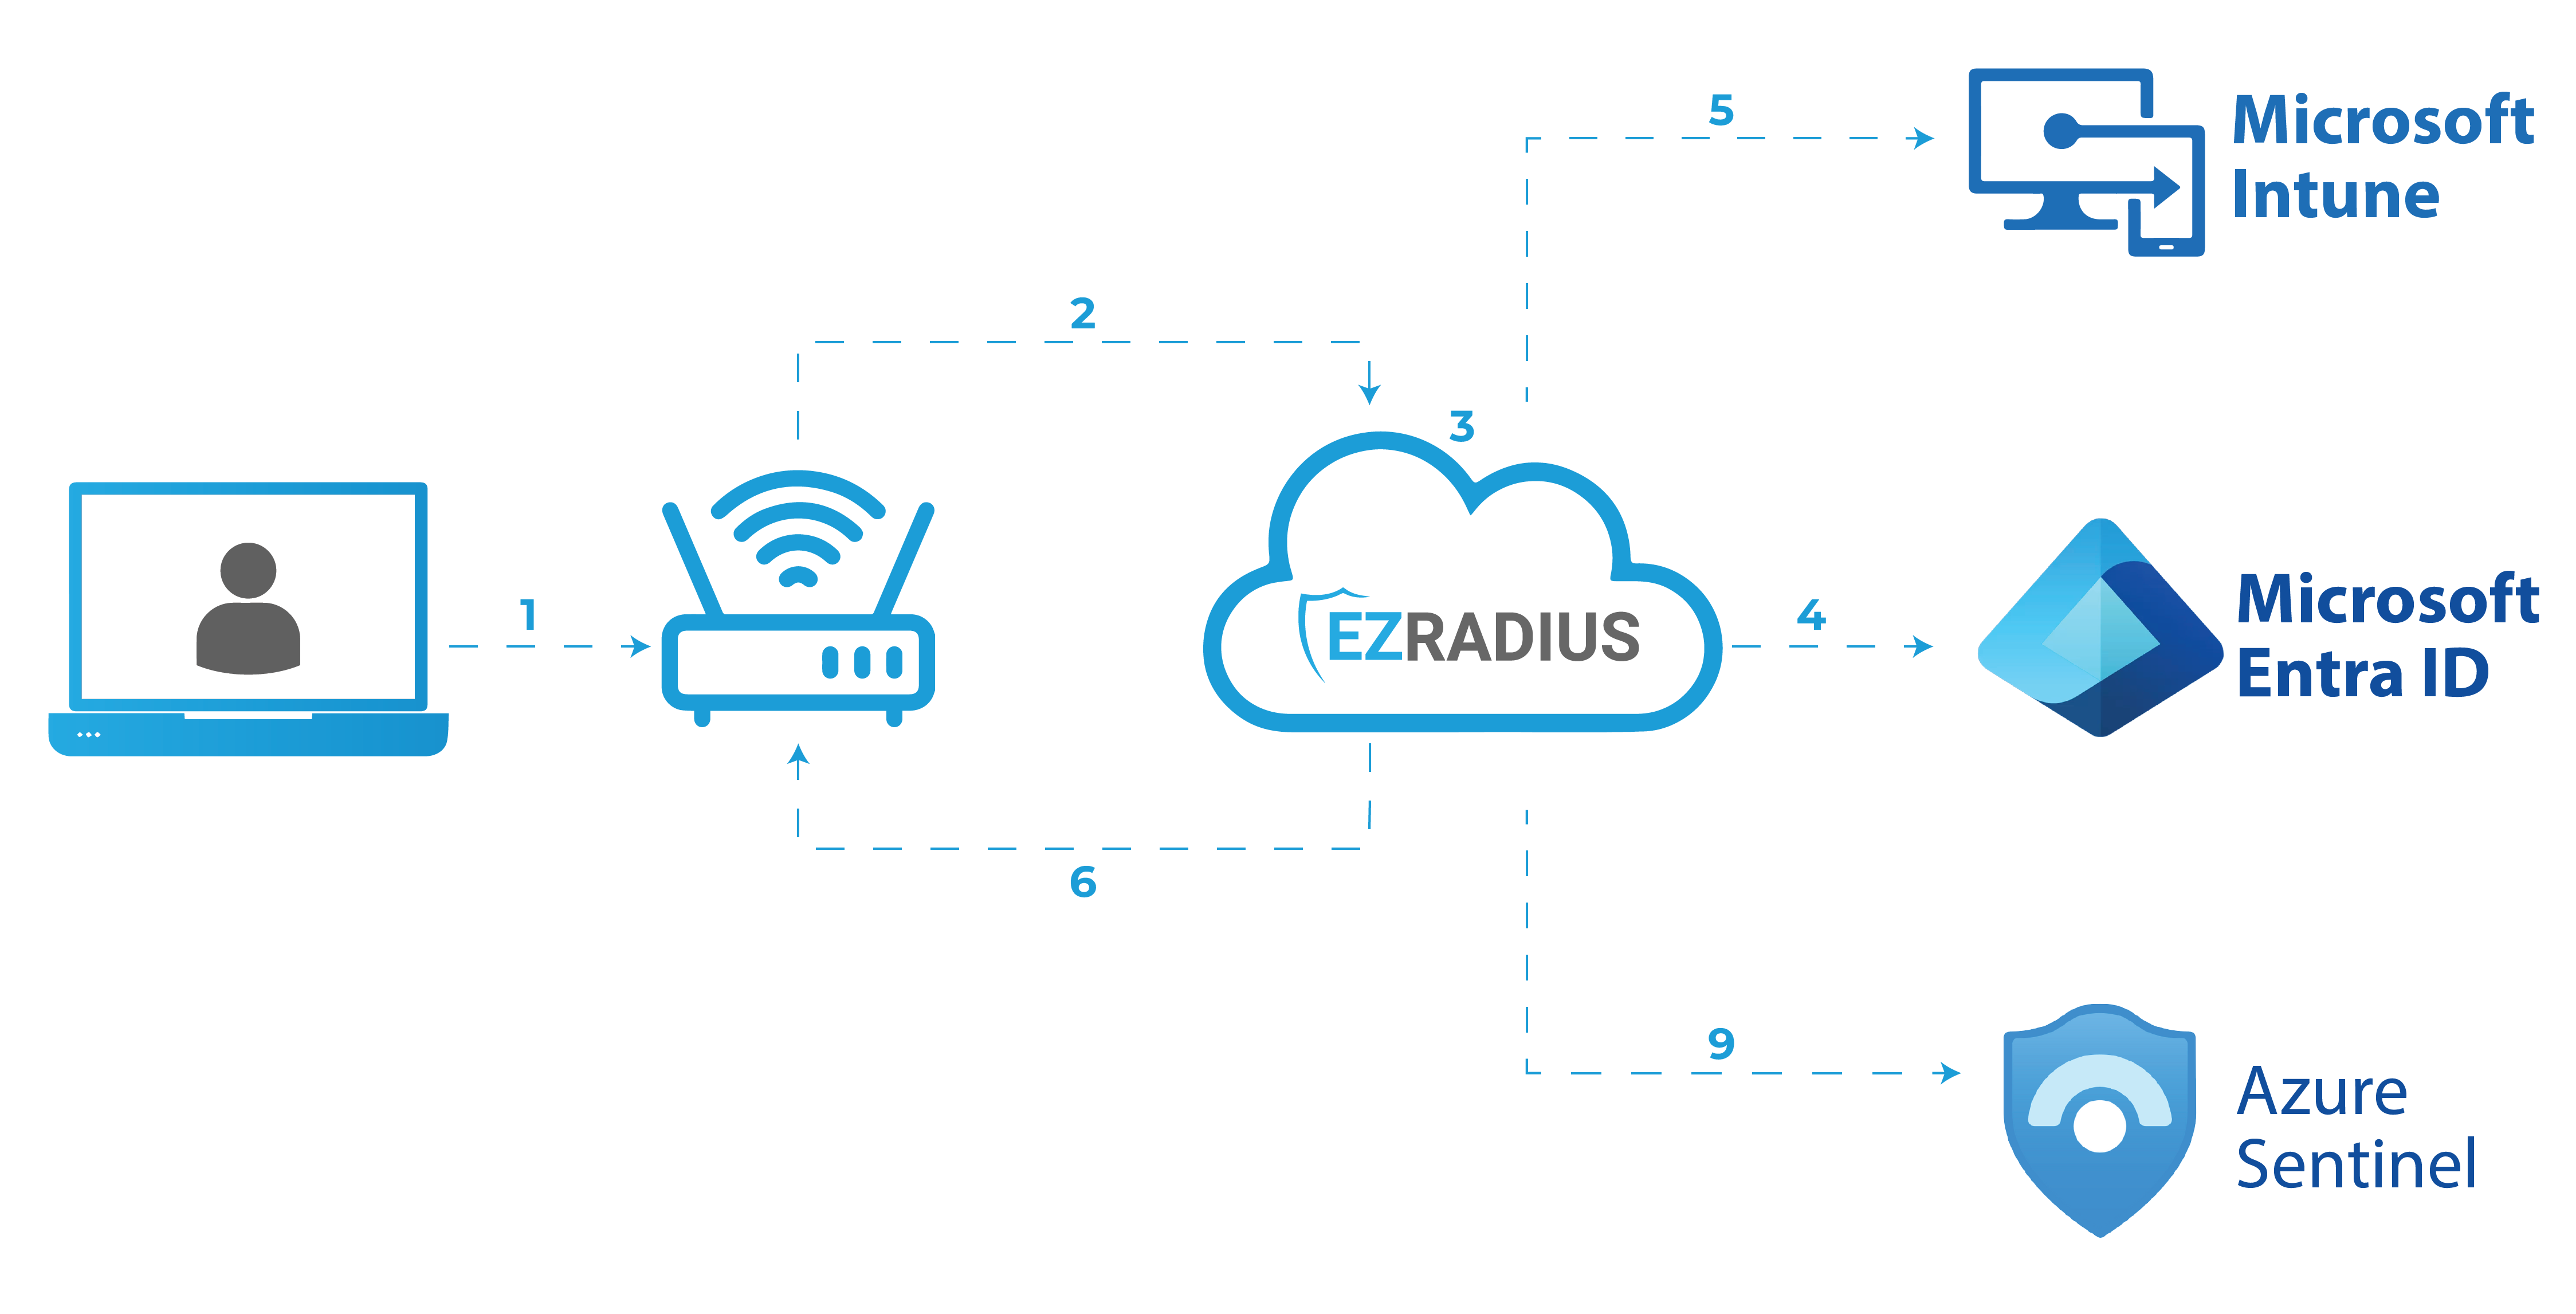
- A user/device attempts to connect to the network, usually a WiFi network using WPA Enterprise.
- The network controller sends a RADIUS authentication request to the EZRADIUS server using RadSec (RADIUS over TLS).
- EZRADIUS receives the request and matches it against a RADIUS policy, which controls how to handle the request.
- If the policy is configured with Microsoft Entra ID, EZRADIUS verifies the username + password.
- If the policy is configured with Microsoft Intune, EZRADIUS verifies the compliance of the device.
- EZRADIUS sends the authentication response back to the network controller.
- Logs of the authentication are sent to a SIEM solution for monitoring and analysis.
Prerequisites for Setting Up Entra ID Authentication With RadSec in Meraki Network
- Register the application in your tenant
- Create a Cloud Radius Instance
- You Are a Subscription Owner, Network Administrator or Log Reader
- You Are on Meraki Firmware 31.1.1 or higher
How to Enable RADIUS Authentication In Your Meraki Network Using RadSec - Step by Step
-
Go to your Meraki Network Controller.
-
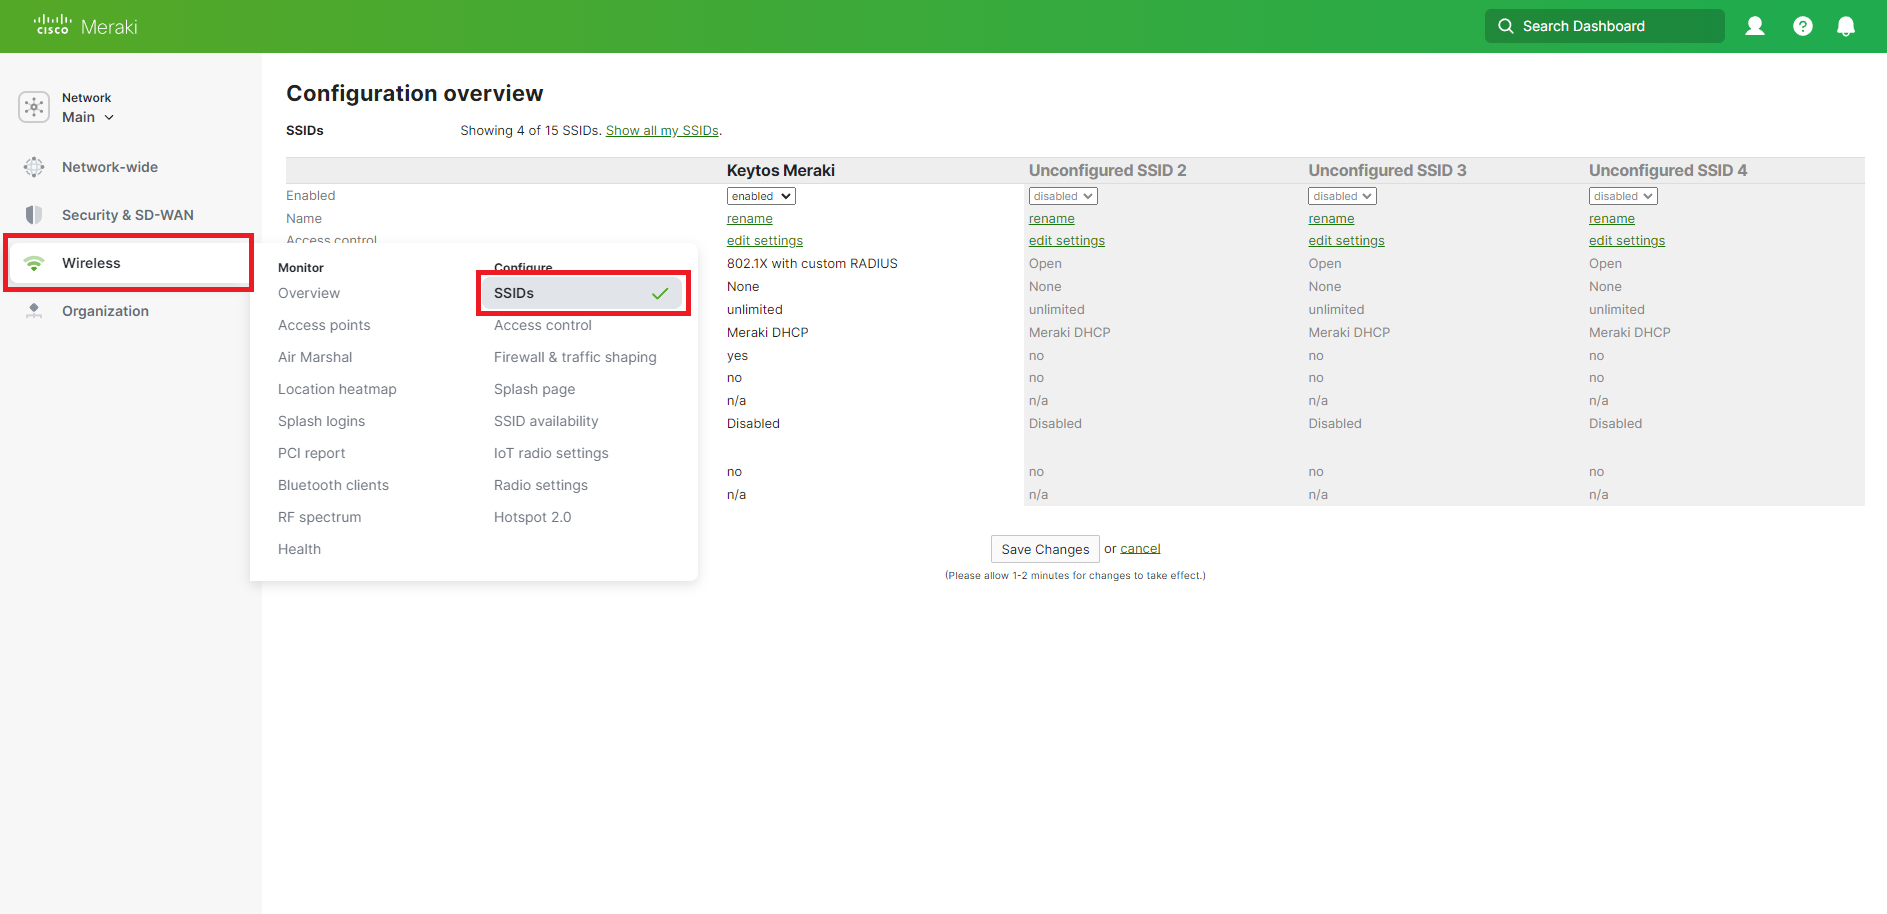
Click on Wireless on the left menu and Select SSIDs.
-
If you already have an existing network, click on edit settings on the network you want to add RADIUS authentication to. If you don’t have a network, select enabled on the network you want to add RADIUS authentication to. (In this case, I am going to use the “Keytos Docs” network).

-
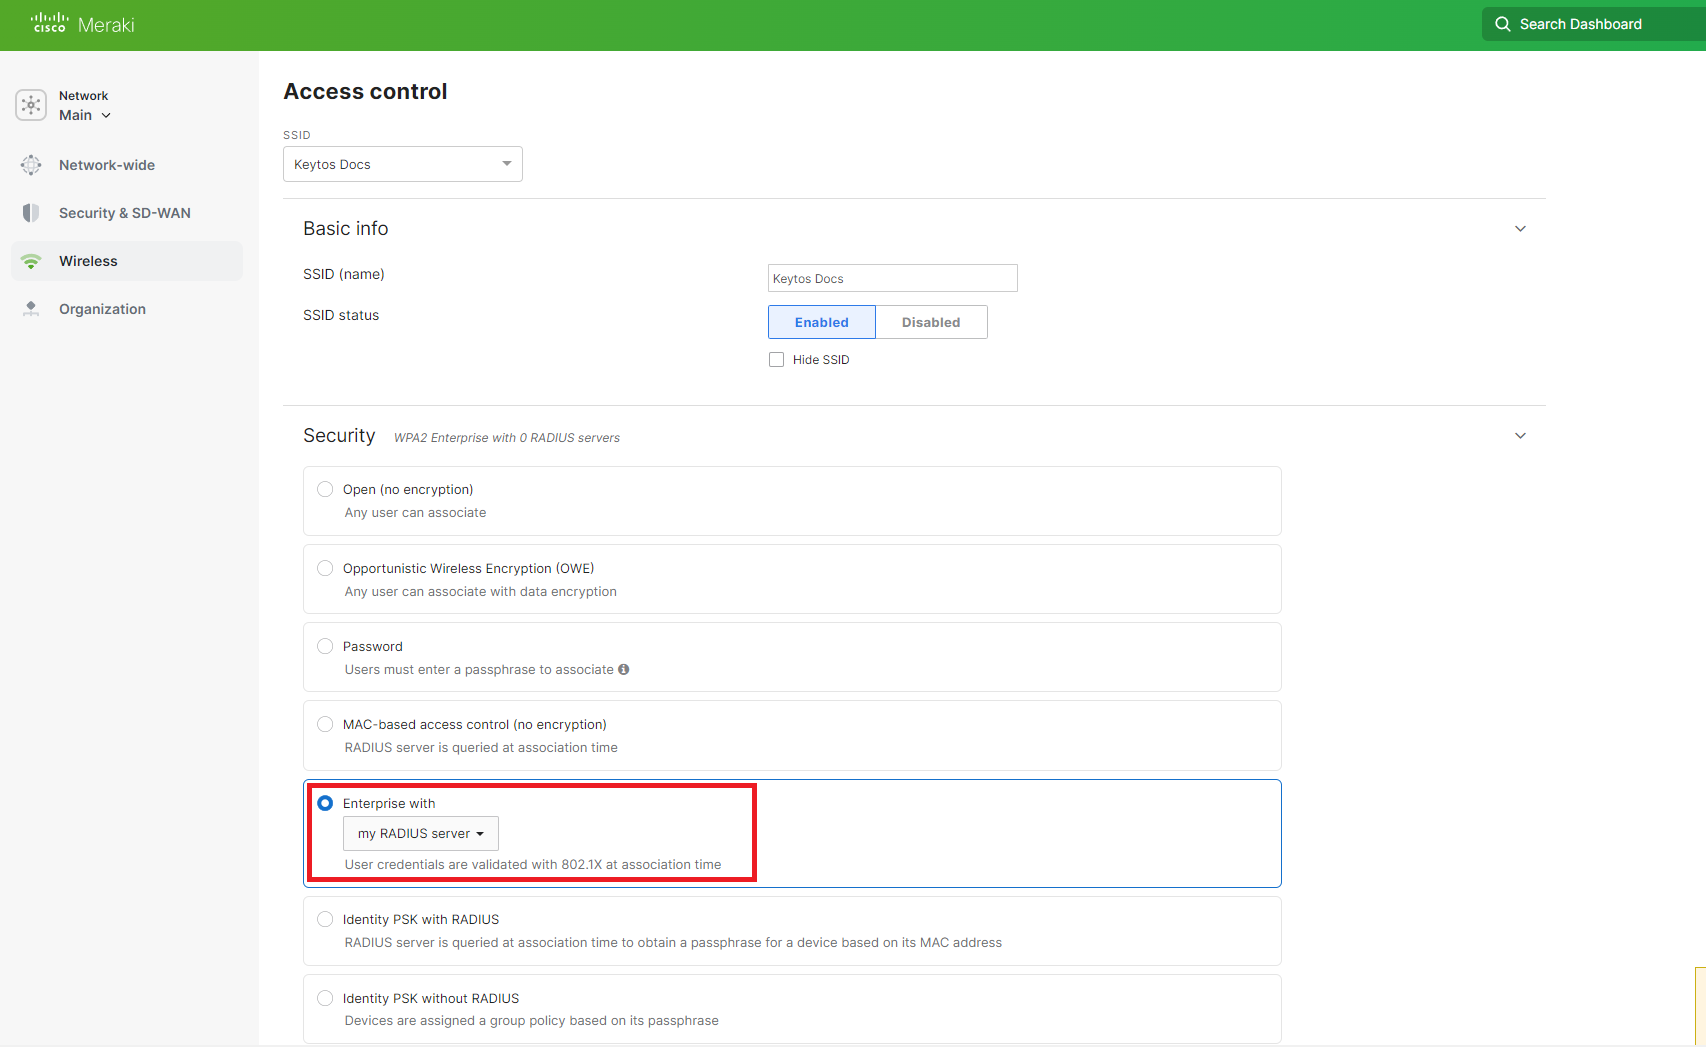
Next we are going to select Enterprise with in the Security menu and select my RADIUS server in the dropdown.
-
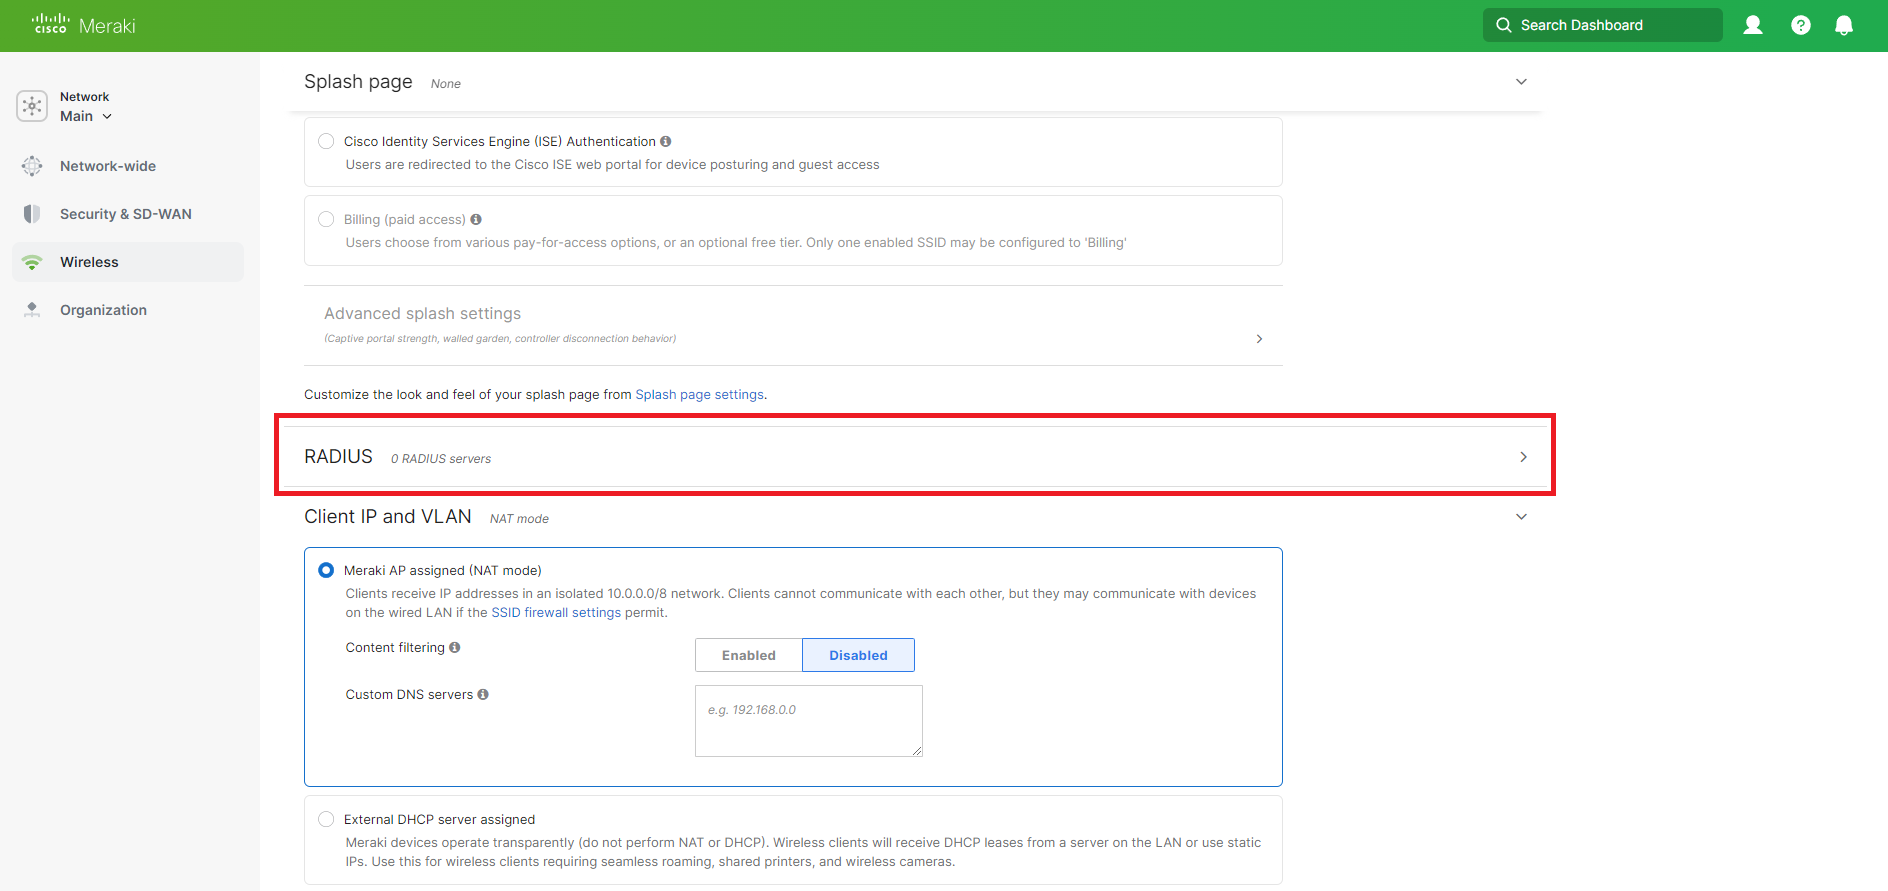
Scroll down to the RADIUS section. You can keep the default settings for all the other sections or change them to your liking.
-
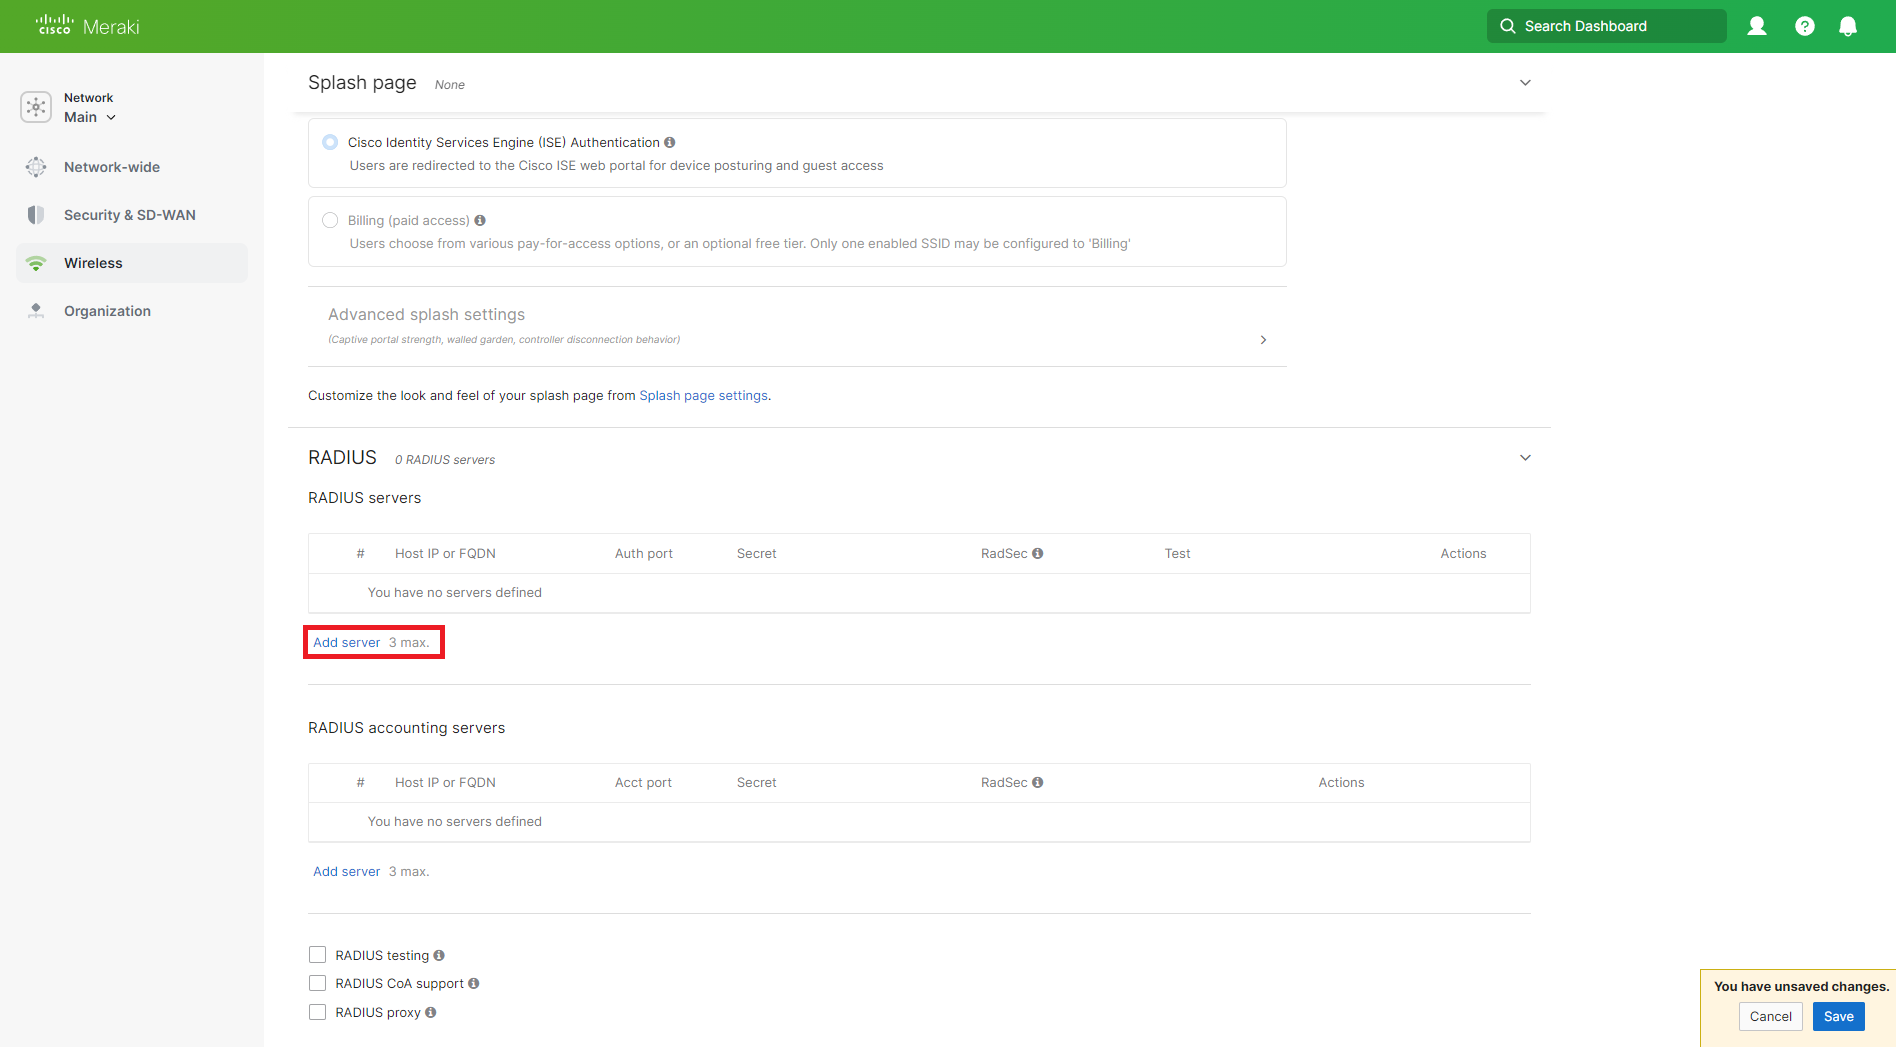
Now click on the Add server link.
-
In another Tab, go to your EZRADIUS dashboard and copy a Server IP address. Select the region closest to your Meraki Network controller for the best performance.

-
Now we will go back to the Meraki Network Network Controller and paste:
- In the Host IP or FQDN field, enter the copied Server IP address from EZRADIUS.
- In the Port field, enter “2083”.
- In the Secret field, enter “radsec”.
-
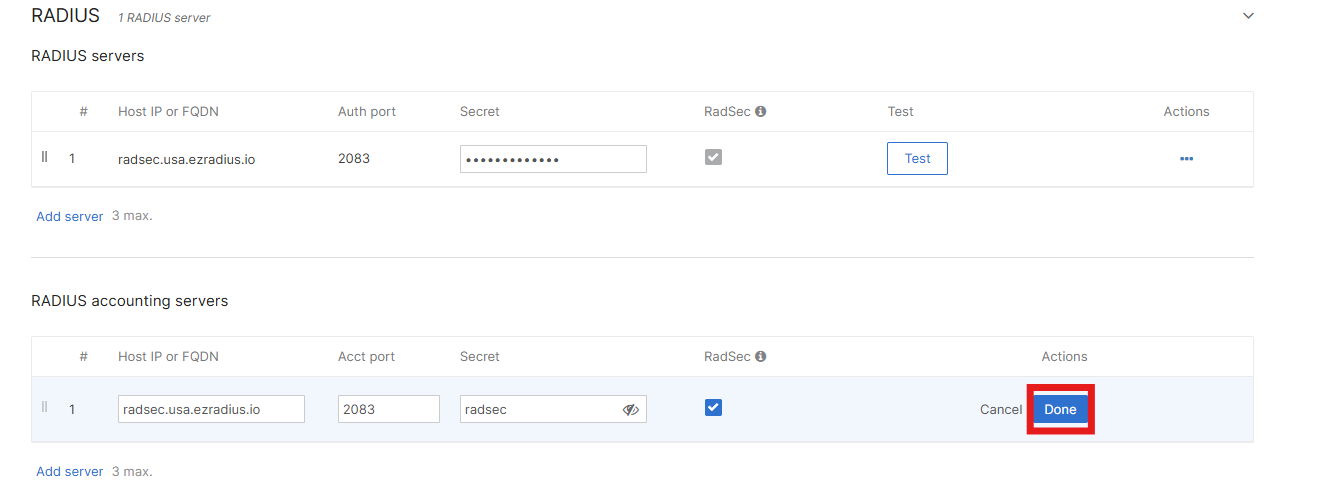
Click on Done.

-
Repeat the previous 3 steps add a second RADIUS server for redundancy. Make sure to select an IP address from a different region than the first one you added.
-
If you want to enable RADIUS Accounting logs (which gives you more information about each session such as data used, connection time, etc.), you can do so by filling out the RADIUS accounting servers section with:
- In the Host IP or FQDN field, enter the copied Server IP address from EZRADIUS.
- In the Port field, enter “2083”.
- In the Secret field, enter “radsec”.
-
Enable Radius testing. This will ensure Meraki tests the connection to the RADIUS servers and selects the best one available.
-
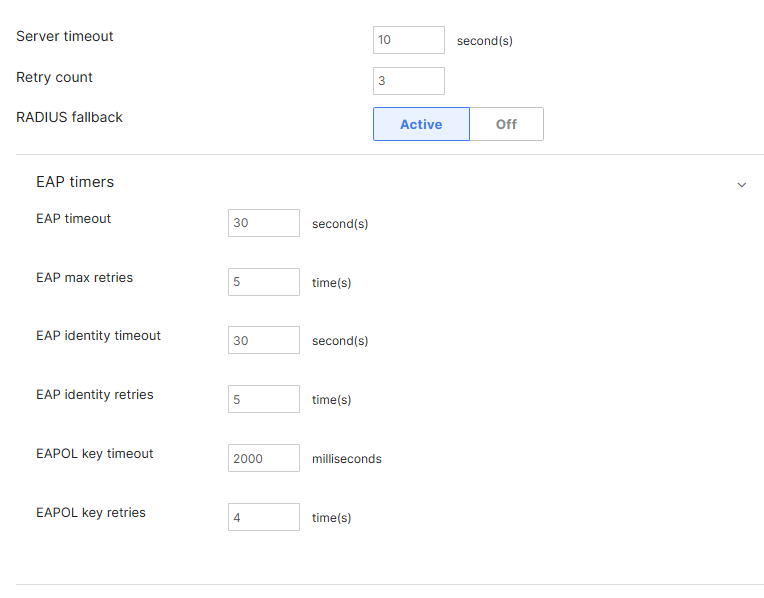
Scroll down to the Advanced RADIUS section and fill out the following fields (these settings are recommended to ensure a stable connection with EZRADIUS):
- Server timeout of 10 seconds.
- Retry count of at least 3 times.
- RADIUS fallback set to Active.
- EAP Timeout of 30 seconds.
- EAP max retries of 5 times.
- EAP identity timeout of 30 seconds.
- EAP identity retries of 5 times.
- EAPOL key timeout of 2000 milliseconds.
- EAPOL key retries of 4 times.
If you have setup your EZRADIUS with Filter-ID or VLANs, you can setup the filter ID or VLAN in their respective fields.
-
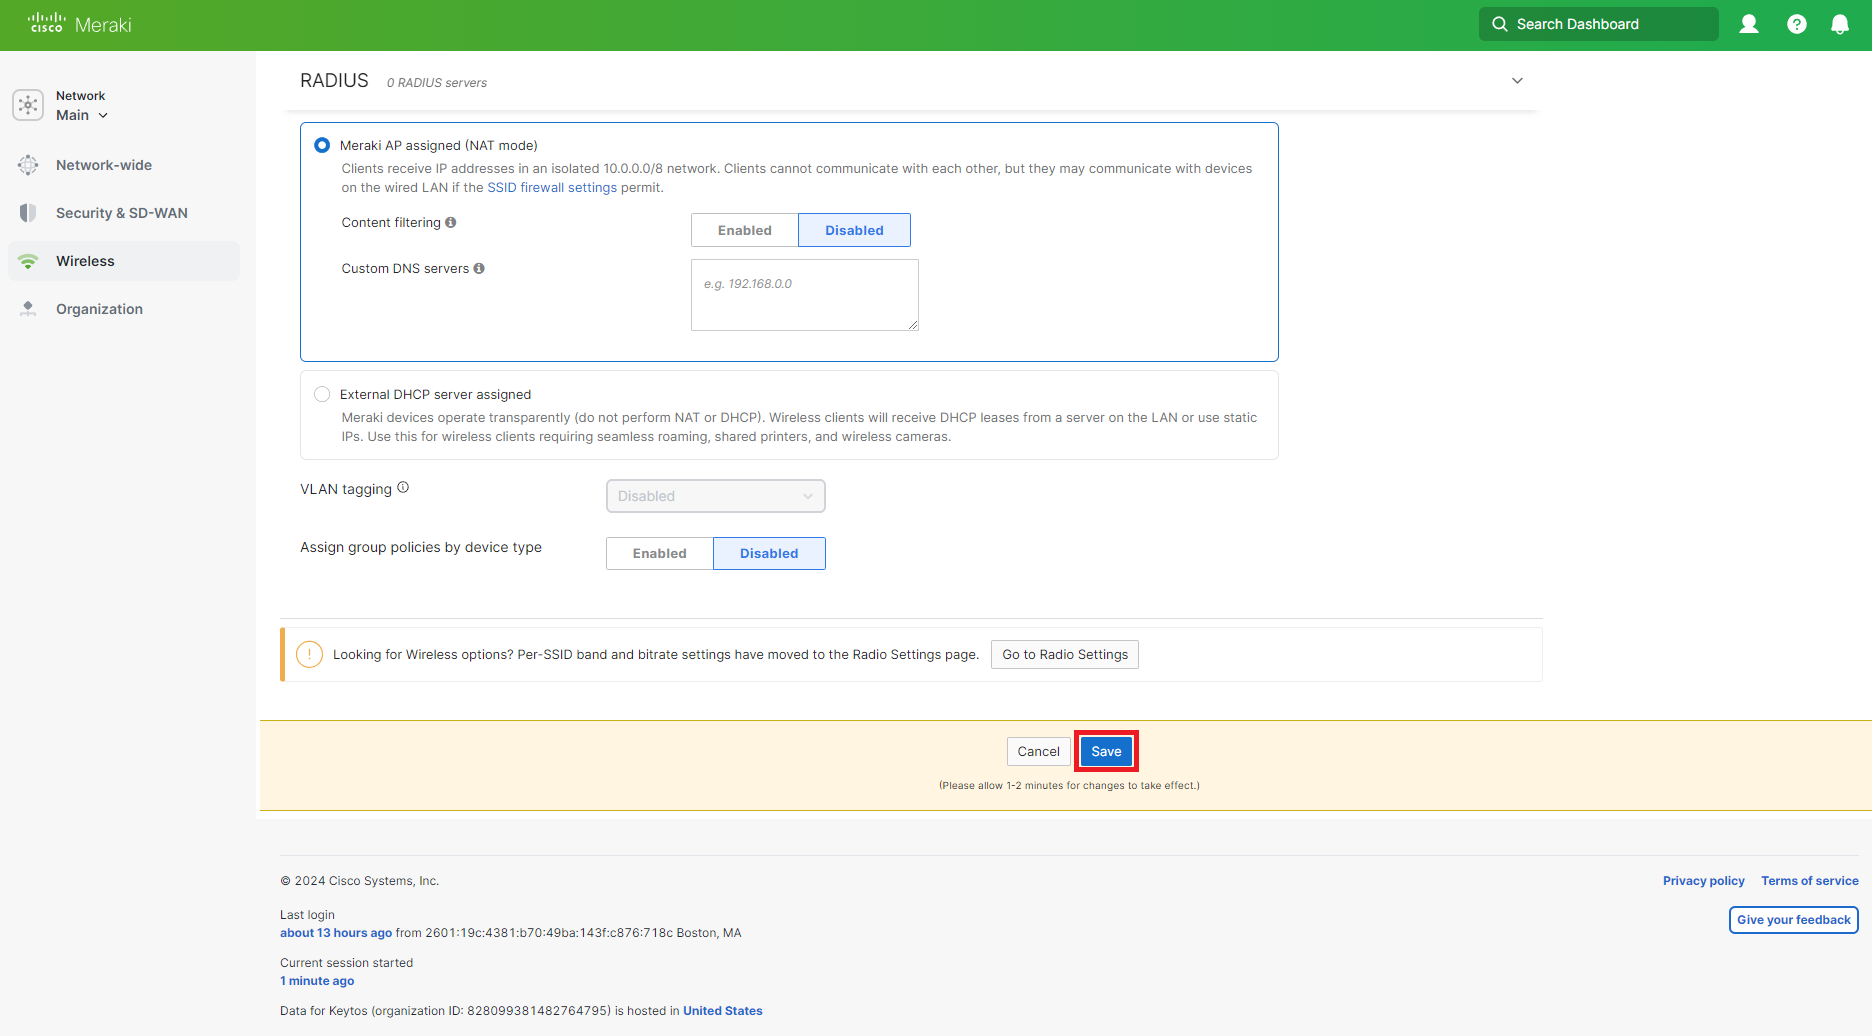
Scroll to the bottom and click on “Save Changes”.
How to Create the RadSec Trust in Meraki
So right now we just setup the server, but we have not gotten the certificate from Meraki for our cloud RADIUS to trust your device (and we also have to add the server certificate so Meraki trusts the cloud RADIUS).
-
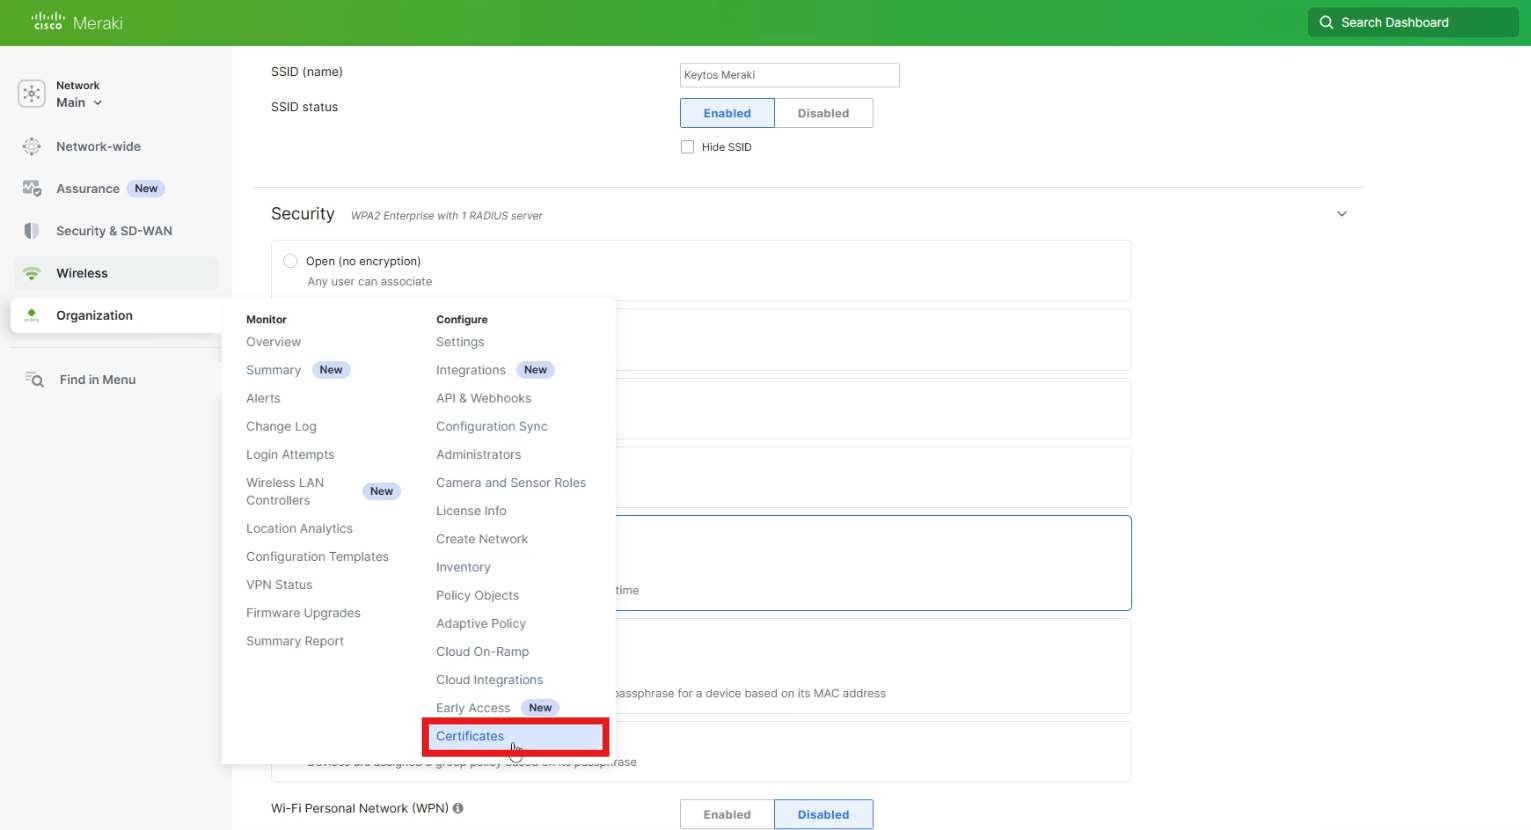
We will go to the “Organization” menu and click on Certificates.
-
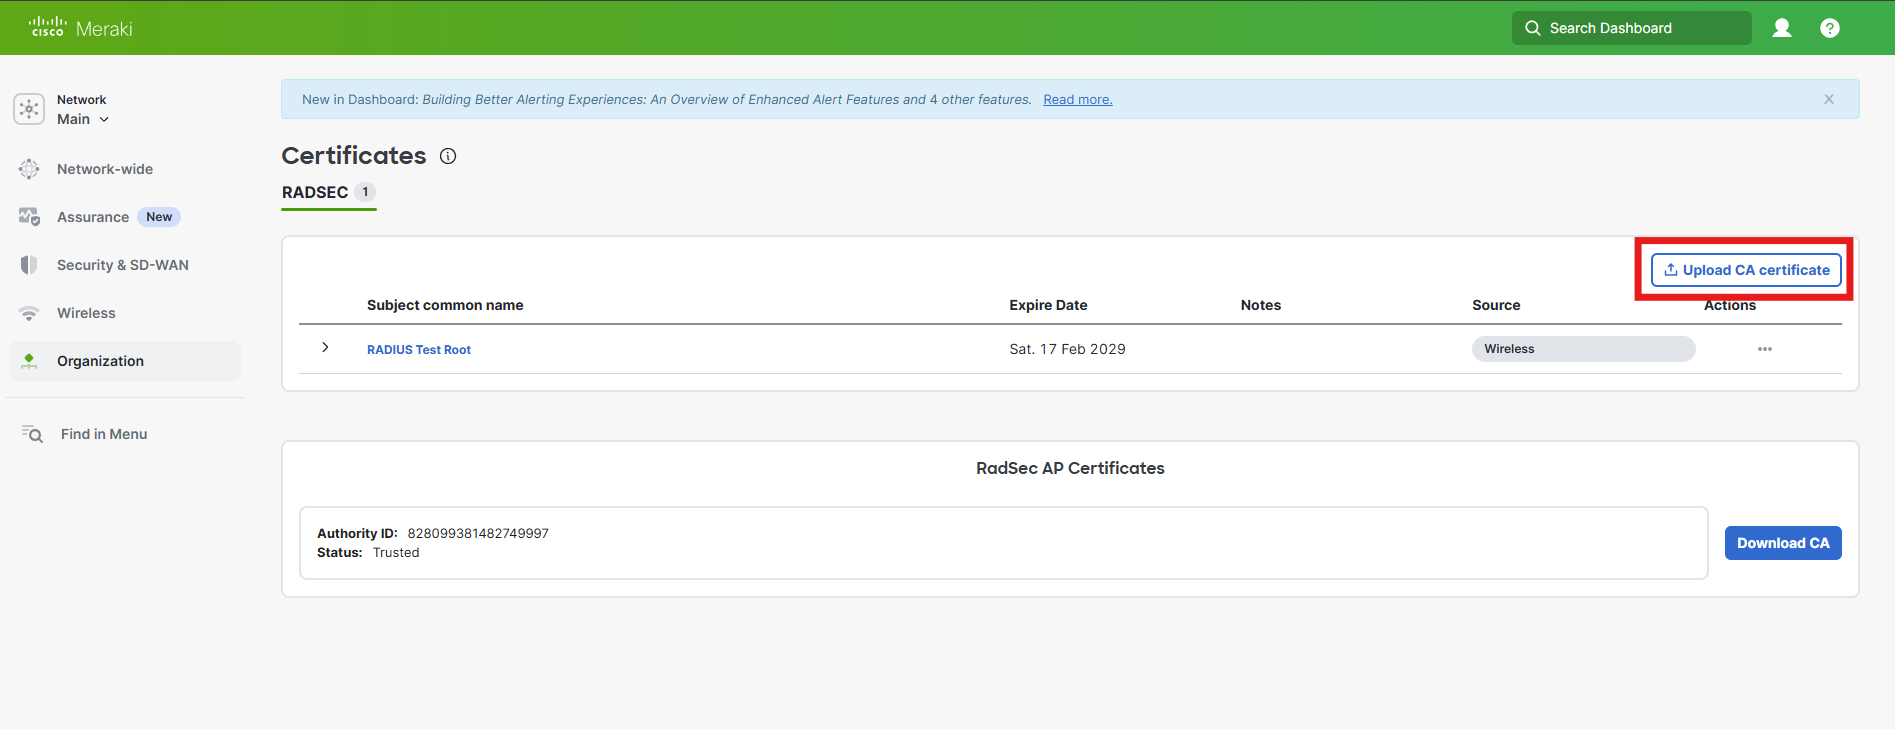
On the top we need to add the RadSec CA Certificate, to do that we first must download the certificate from the cloud RADIUS dashboard.
-
Go to your EZRADIUS dashboard and click on “Policies” and then Click the “Download RadSec CA Certificate” button.

-
Now we will go back to the Meraki Tab and click on “Upload CA Certificate”.
-
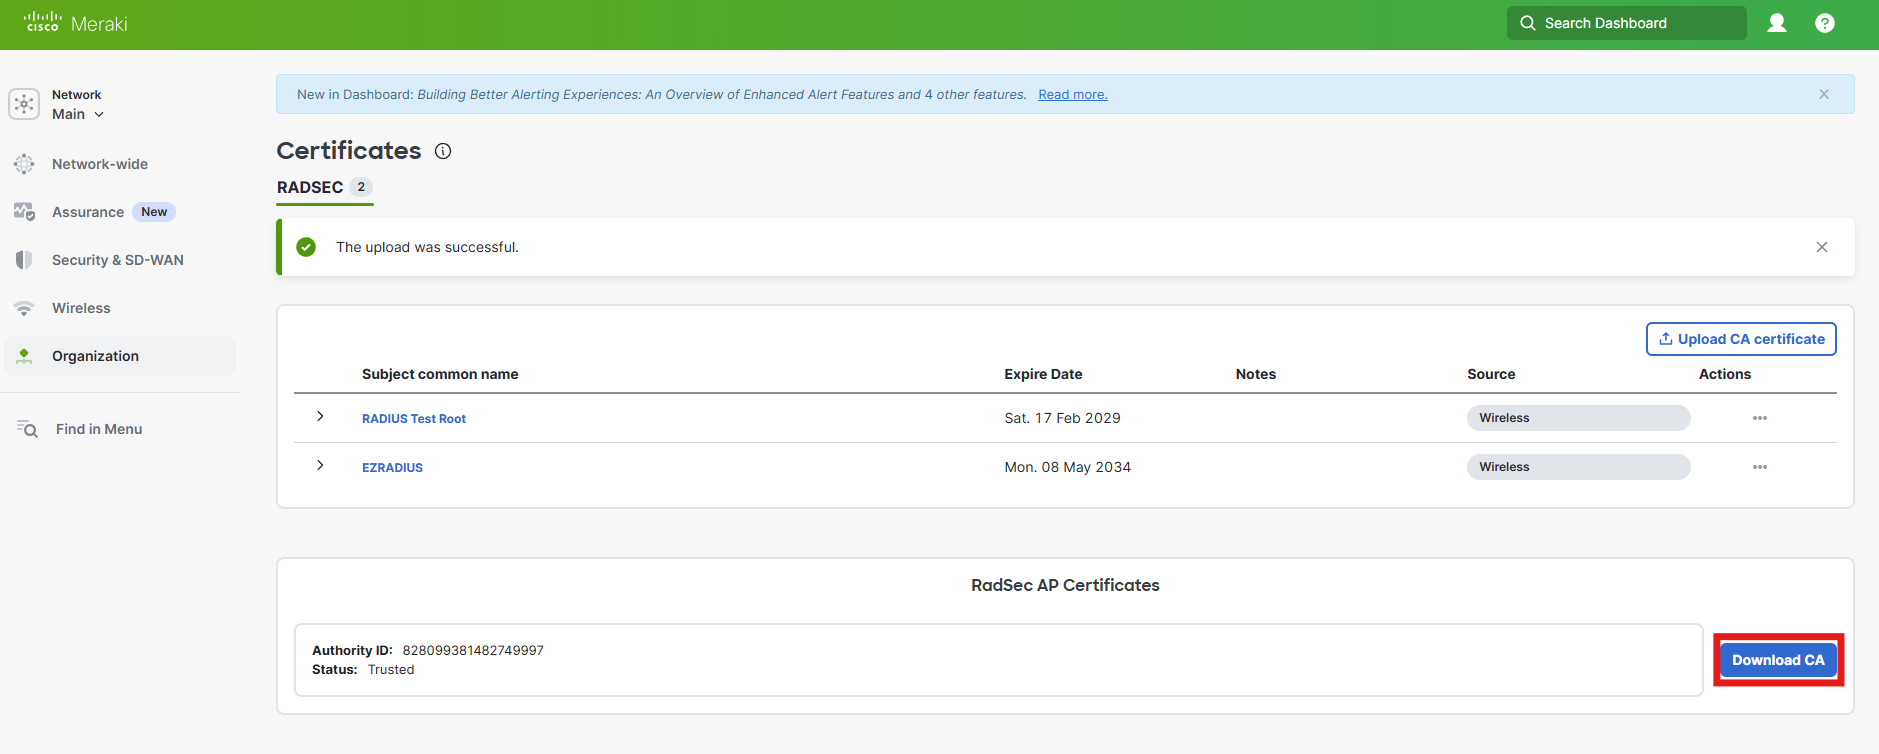
Now that we have uploaded the CA Certificate, we need to download the CA Certificate from Meraki (it gets automatically created and don’t worry it lasts 70 years so they are expecting we die before we have to renew it).
-
Click on “Download CA” and save it to your computer.
-
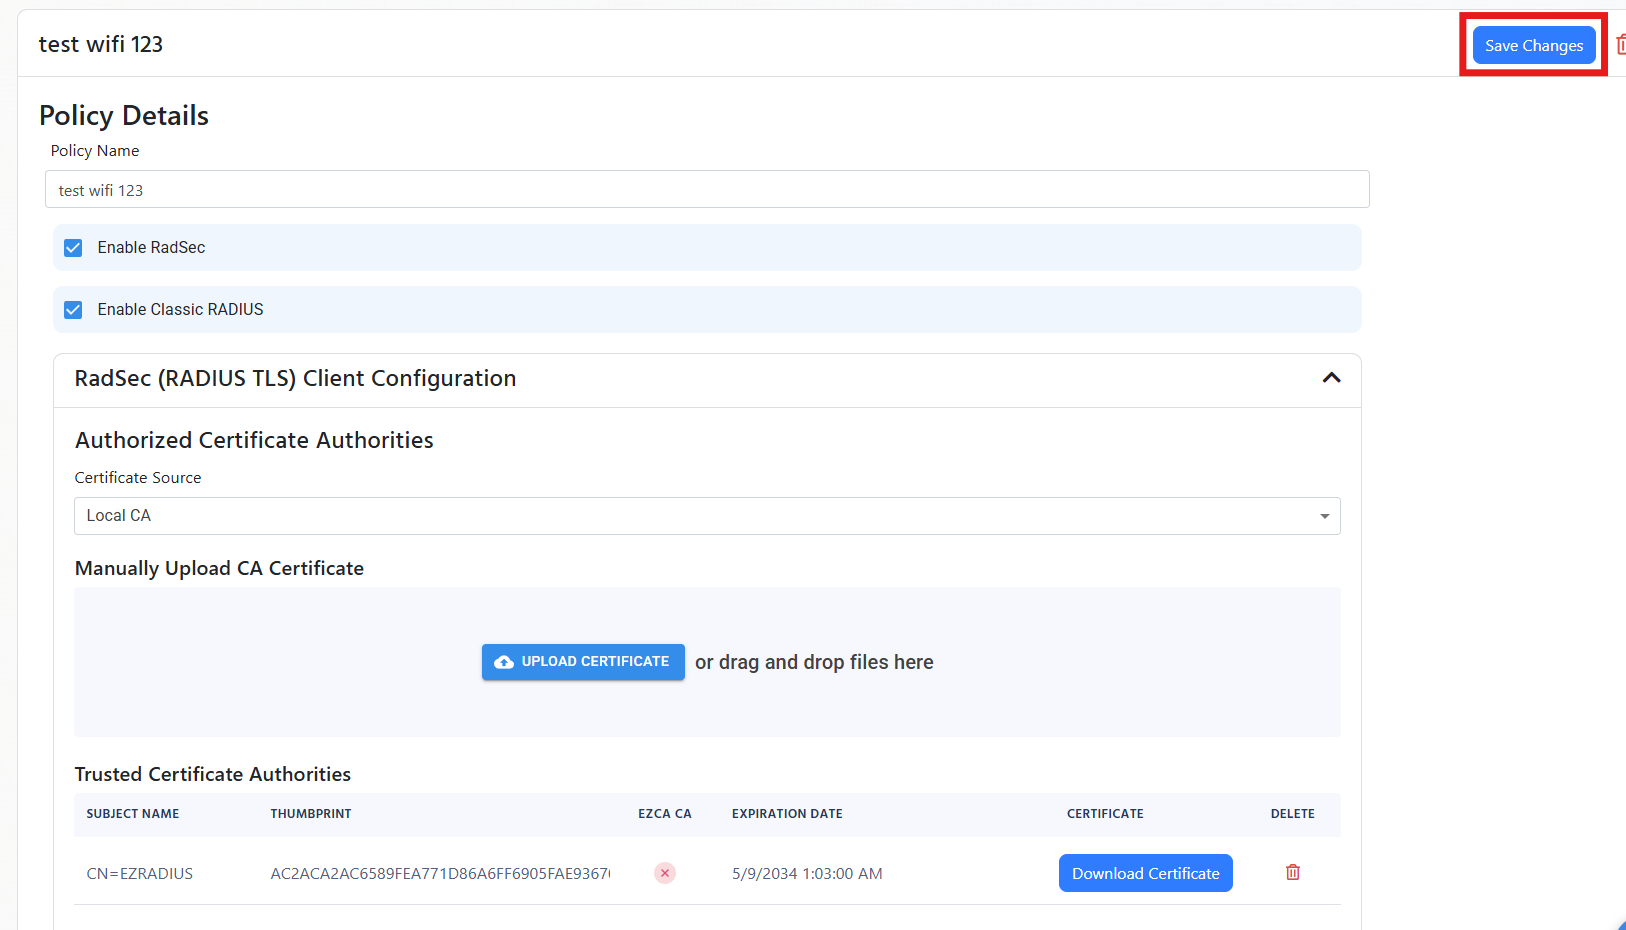
Now we will go back to the EZRADIUS tab and scroll down to your policy with RadSec enable and upload this certificate as a trusted RadSec Certificate.
-
First change the certificate source to “Local CA”
-
Click on “Upload Certificate” and select the CA Certificate you downloaded from Meraki.

-
Scroll to the top of the policy and click on “Save Changes”.
-
Now we have setup the RadSec trust between Meraki and EZRADIUS, you can now connect your devices to the network using certificate authentication.
How to test Wifi Certificate Authentication in Meraki Network
Now that we have setup the RADIUS authentication in your Meraki Network, we recommend manually testing the authentication to make sure everything is working as expected before dealing with Intune or any other MDM. If you are using EZCA, first you will want to enable self service certificates and manually create a certificate, once you have created the certificate and installed it in your user store, you can test the wifi authentication using the certificate.
How to Troubleshoot Certificate Authentication in EZRADIUS
The best way to troubleshoot certificate authentication in EZRADIUS is to check the logs. You can do this by going to the “Audit Logs” page in your EZRADIUS dashboard and filtering the logs by the user you are trying to authenticate. You can read more troubleshooting tips in our troubleshooting guide.
How to Connect Devices to Meraki Network with Entra ID Certificate Authentication
Now that you have setup your Meraki Network with RADIUS authentication, now you can distribute your certificates using Intune and automatically authenticate your users to the network. If you are not using certificates, you can follow this guide to setup your devices to authenticate with their Entra ID username and password.
How to Setup RADIUS Authentication for Wired Ethernet Authentication in Meraki Network
At the time of writing of this documentation, Meraki does not support RadSec for wired ethernet authentication. Please use the standard RADIUS protocol for wired ethernet authentication.
Meraki RADIUS FAQs and Troubleshooting
Below are some common questions and troubleshooting tips for setting up RADIUS authentication in Meraki networks.
When setting up RadSec in Meraki and testing the connection to the RADIUS server, what credentials should I use?
The credentials you use doesn’t really matter, as the authentication will fail anyway since Meraki uses legacy authentication (PEAP-MSCHAPV2) to do the test.
However, running the test will tell you whether your Meraki network can connect to EZRADIUS and if EZRADIUS responds. If EZRADIUS does not respond it is usually caused by a firewall rule blocking access to port 2083.