How-To: Use EZRADIUS Cloud RADIUS with Microsoft Intune Cloud PKI
How Can I Use My Cloud PKI Certificates with RADIUS for Passwordless Wi-Fi Authentication?
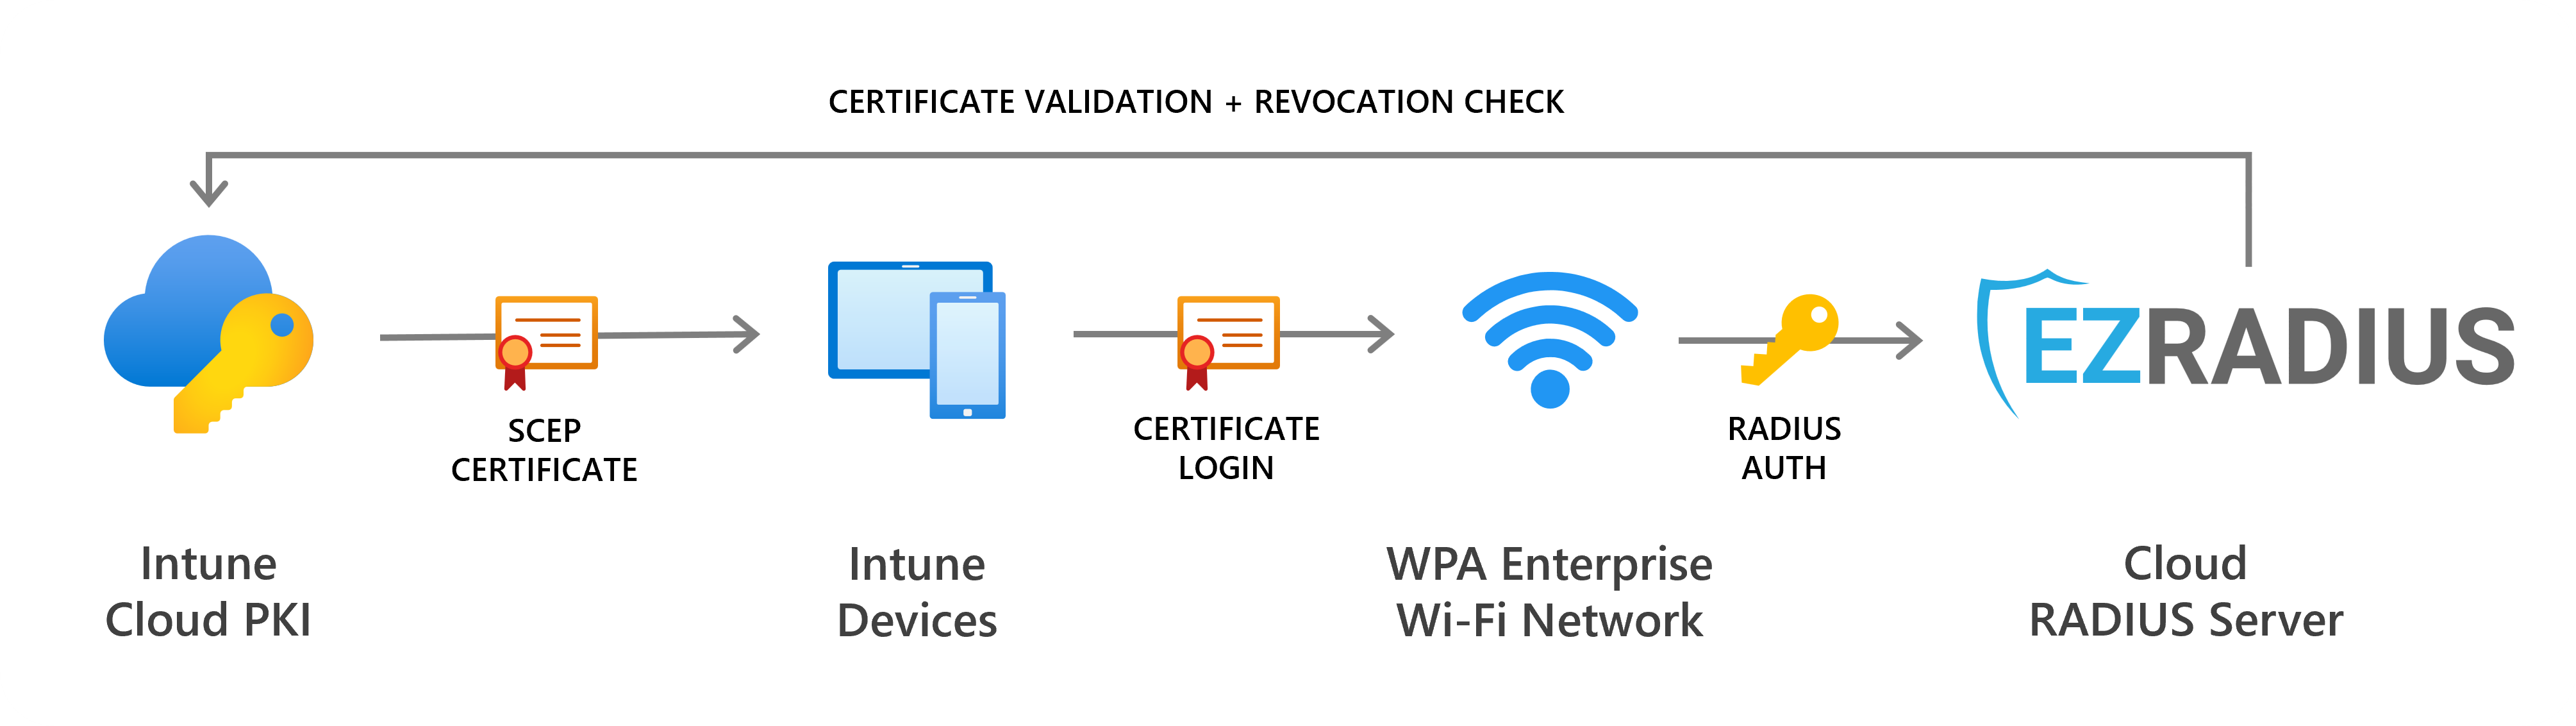
Microsoft Cloud PKI allows you to issue certificates to your Intune-managed devices. But once you have certificates on your devices, how can you use them for Wi-Fi authentication?
EZRADIUS Cloud RADIUS natively supports certificate-based authentication, making it easy to leverage your Cloud PKI certificates for secure, passwordless Wi-Fi access. No more passwords or complex on-premises RADIUS servers. Just configure EZRADIUS to trust your Cloud PKI and you’re set.
How to Set Up EZRADIUS with Microsoft Intune Cloud PKI - Video Version
It’s easy to get up and running with EZRADIUS and Microsoft Intune Cloud PKI in under 30 minutes with our step-by-step video guide:
How to Set Up EZRADIUS with Microsoft Intune Cloud PKI - Step-by-Step Guide
Follow these steps to configure EZRADIUS Cloud RADIUS to work with your Microsoft Intune Cloud PKI for passwordless Wi-Fi authentication:
How to Create your Cloud PKI Certificate Authorities (CAs)
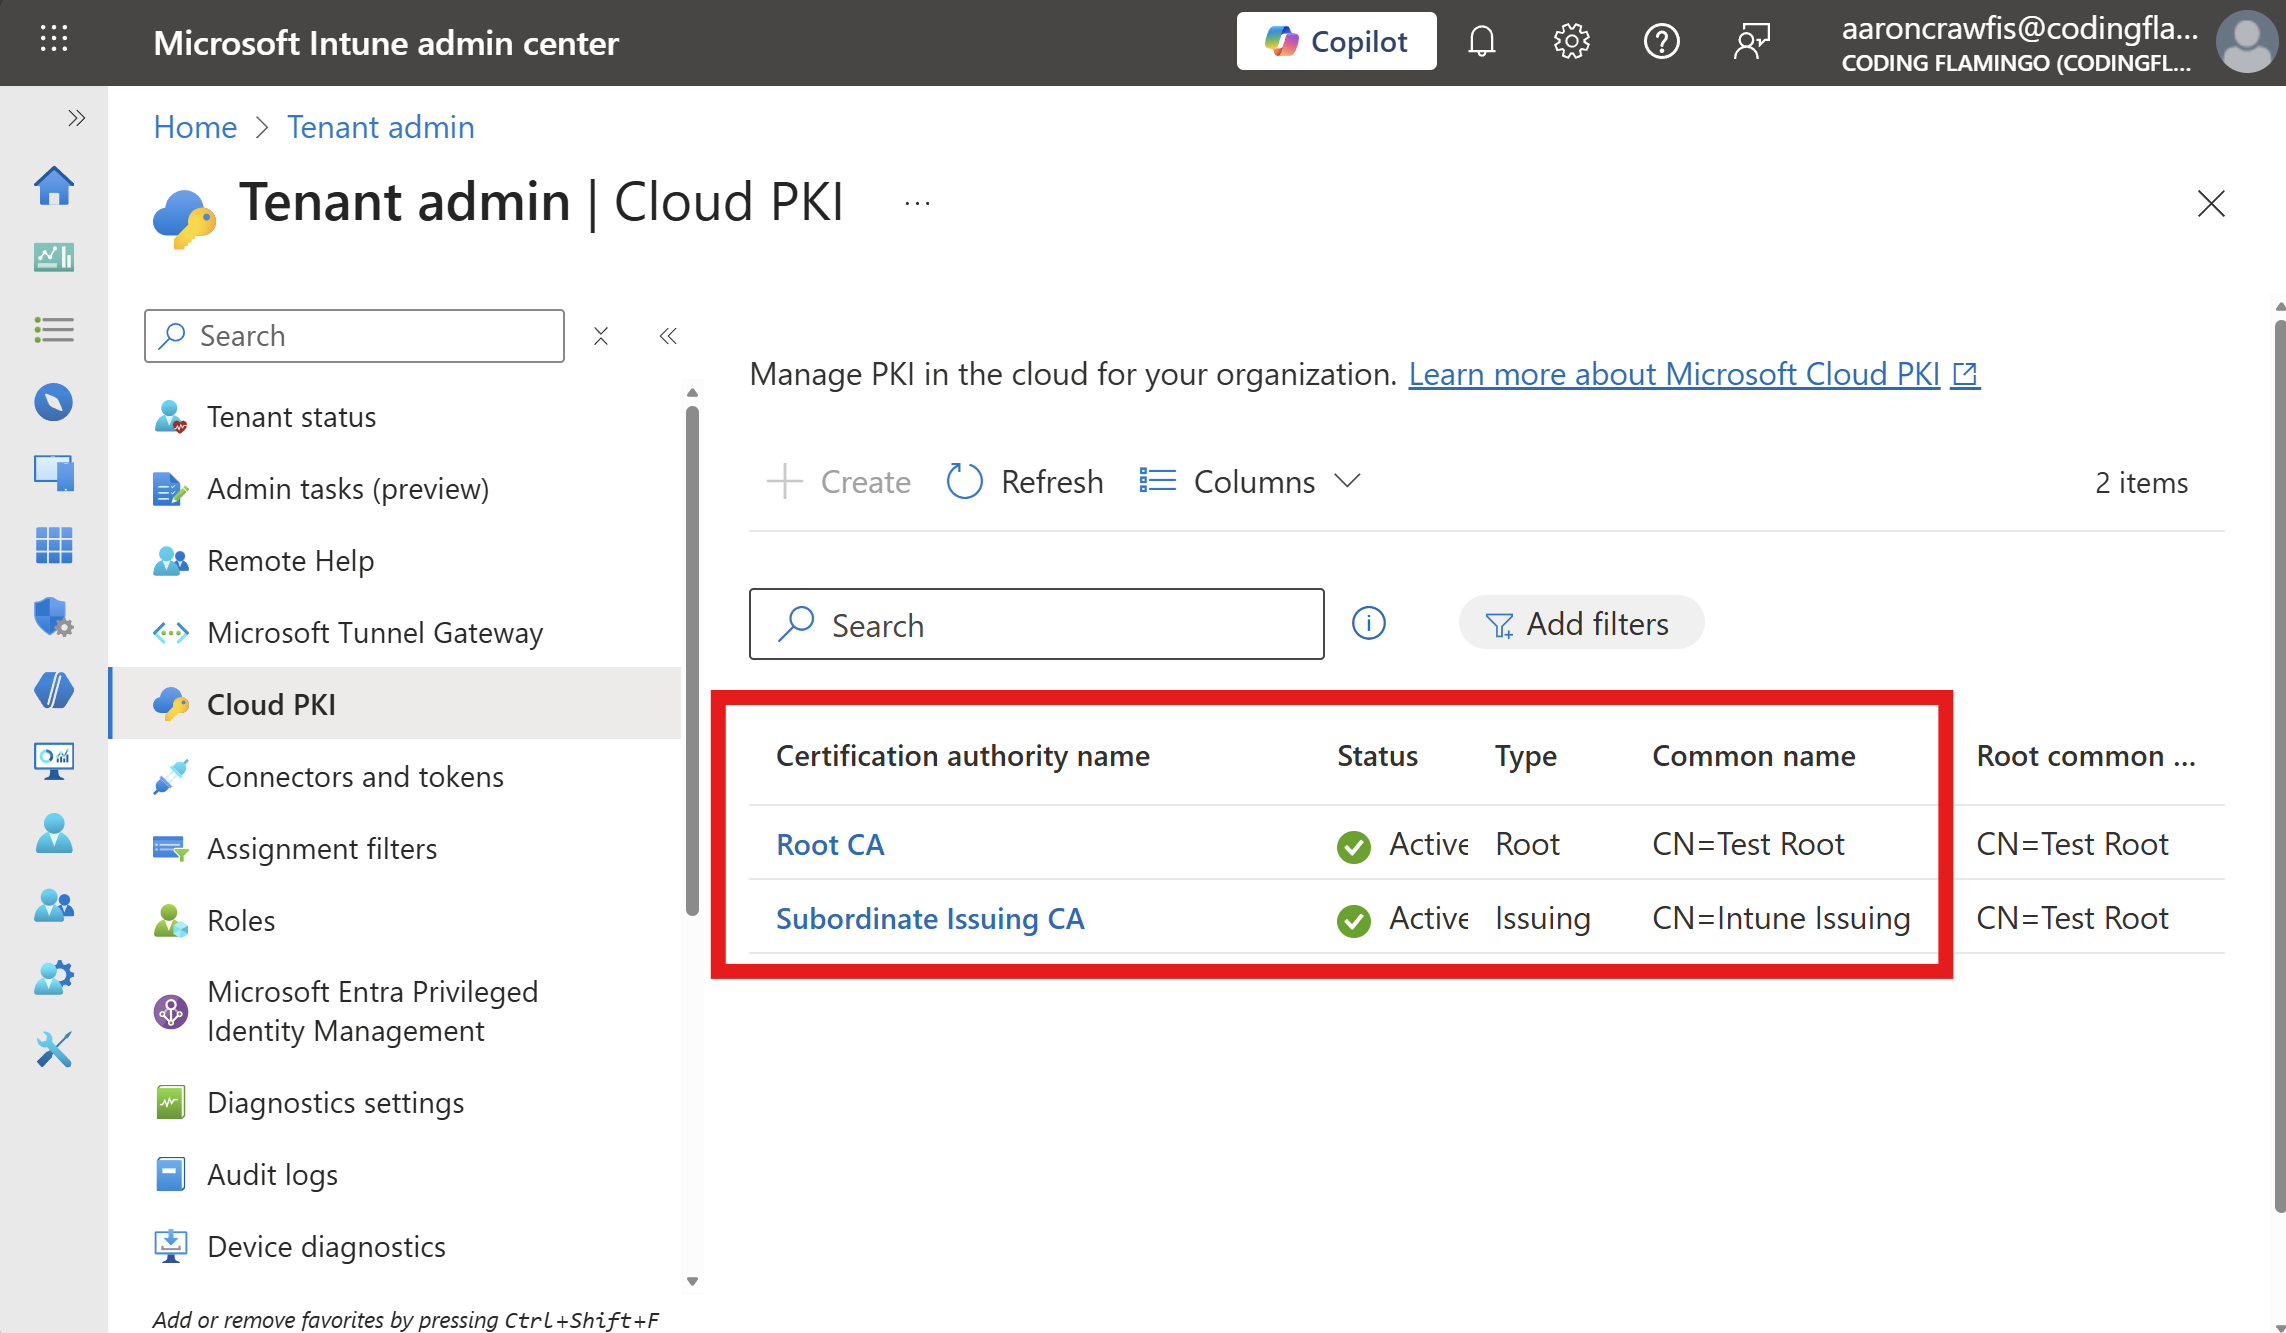
The first step to password-less WiFi is to create your Cloud PKI Certificate Authorities (CAs) in Microsoft Intune. These CAs will issue the certificates that your users and devices will use to authenticate to Wi-Fi via EZRADIUS.
🚀 Set Up Cloud PKIWhile EZRADIUS supports both single-tier and two-tier PKI architectures, Microsoft Intune Cloud PKI requires a two-tier PKI setup. This means you’ll need both a Root CA and an Issuing CA configured in your Intune Cloud PKI.
After completing these steps, you should have one or more certificate authorities (CAs) configured in Intune Cloud PKI that issue certificates to your users/devices.
How to Push Your CA Certificates to Your Devices
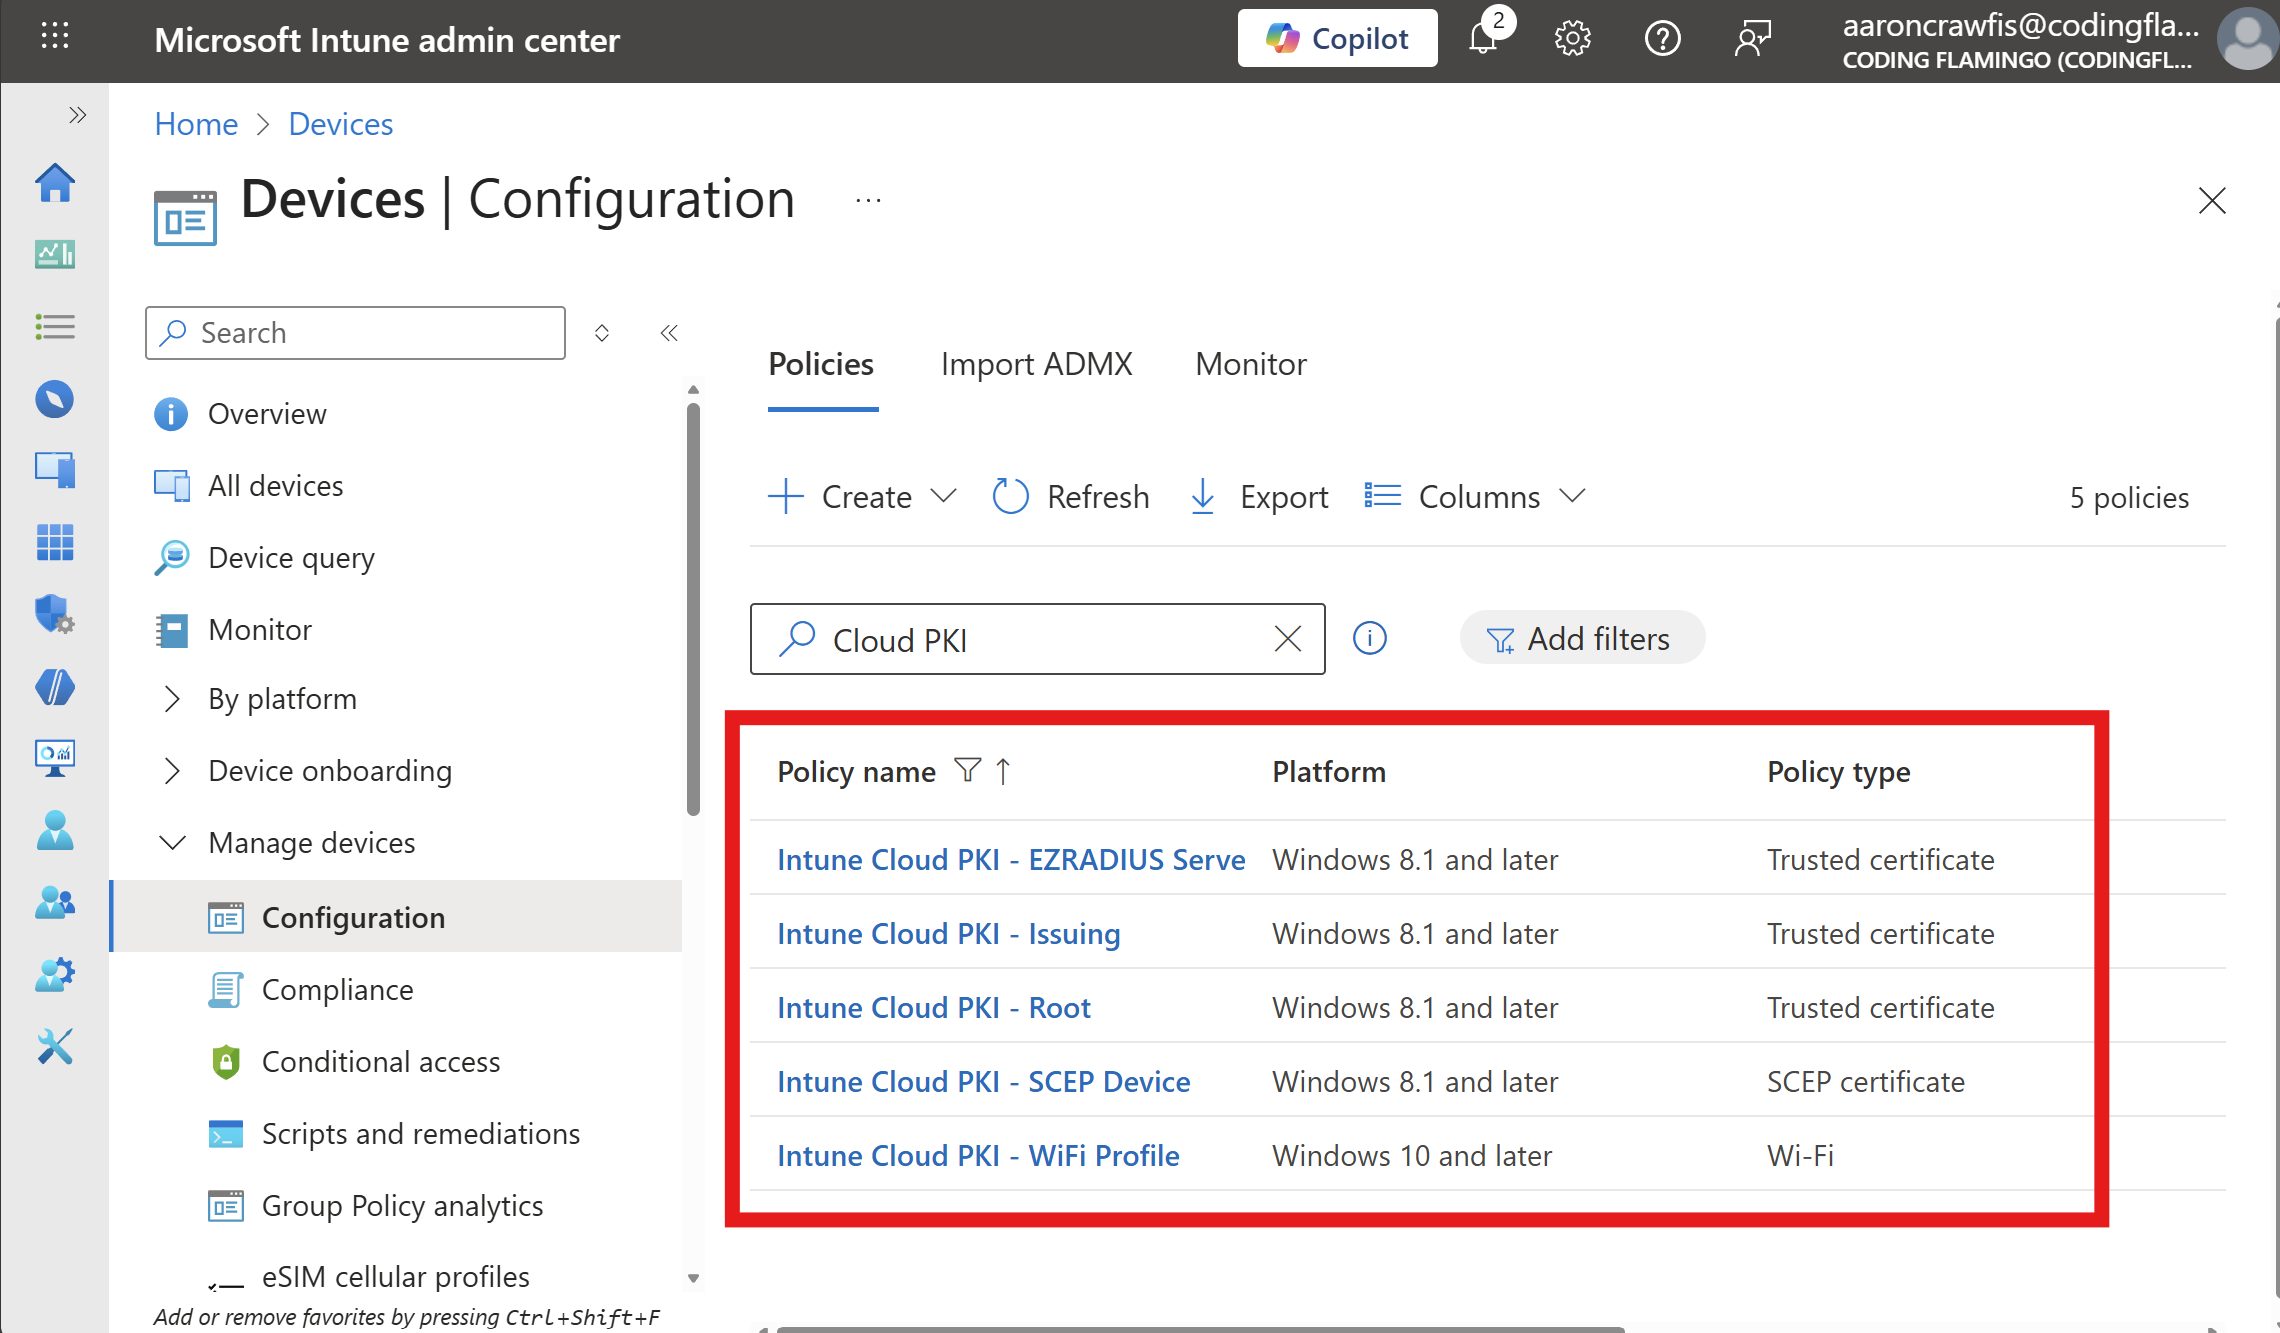
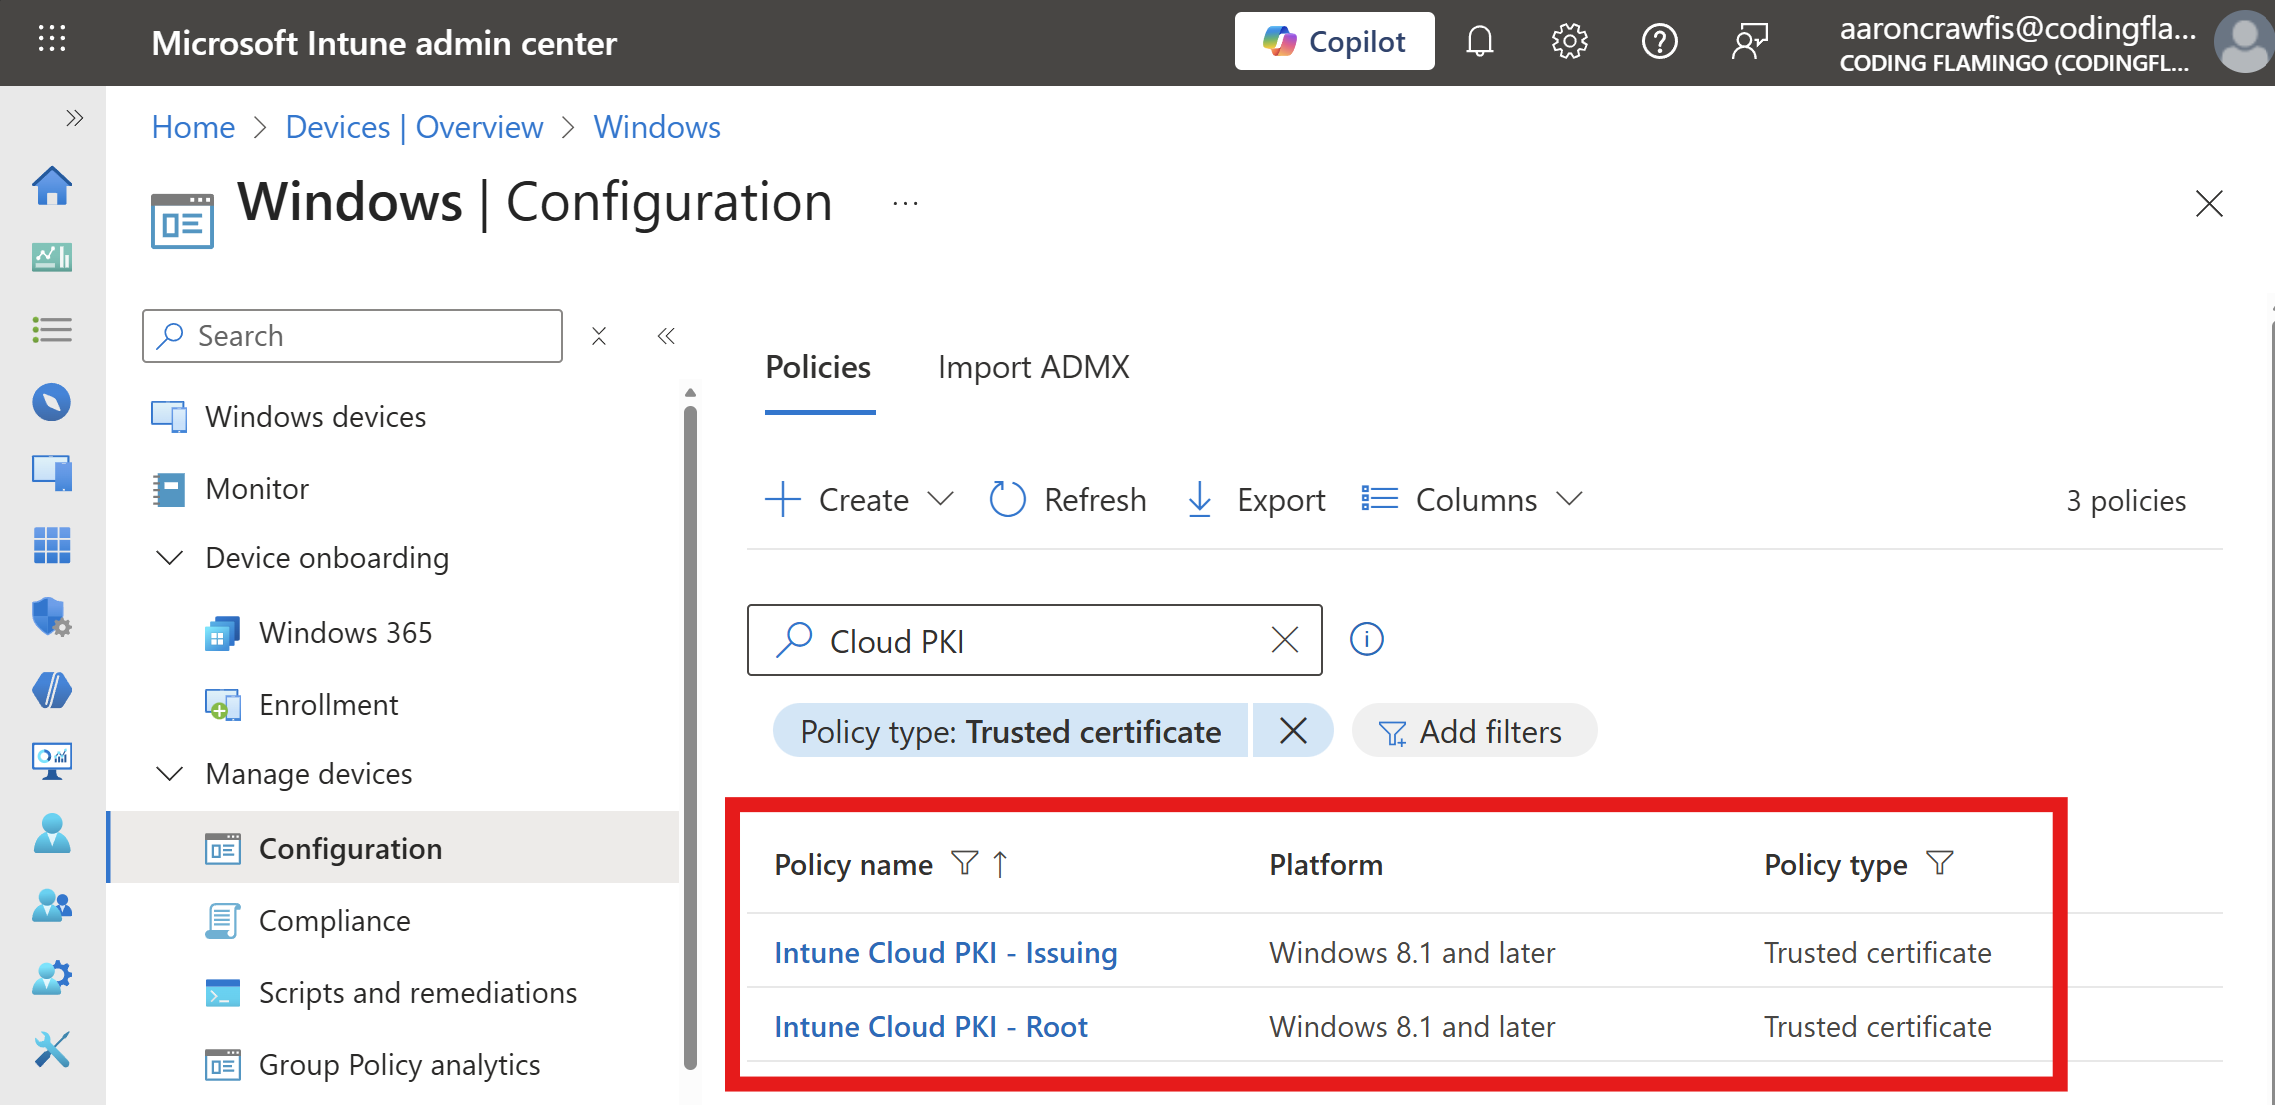
Now that you have your Cloud PKI CAs set up, the next step is to ensure that the CA certificates are pushed to your users’ devices. This is crucial so that your devices can trust the certificates issued by your Cloud PKI.
🗝️ Configure Trusted CA CertificatesYou should now see your Trusted Certificate configurations in Intune:
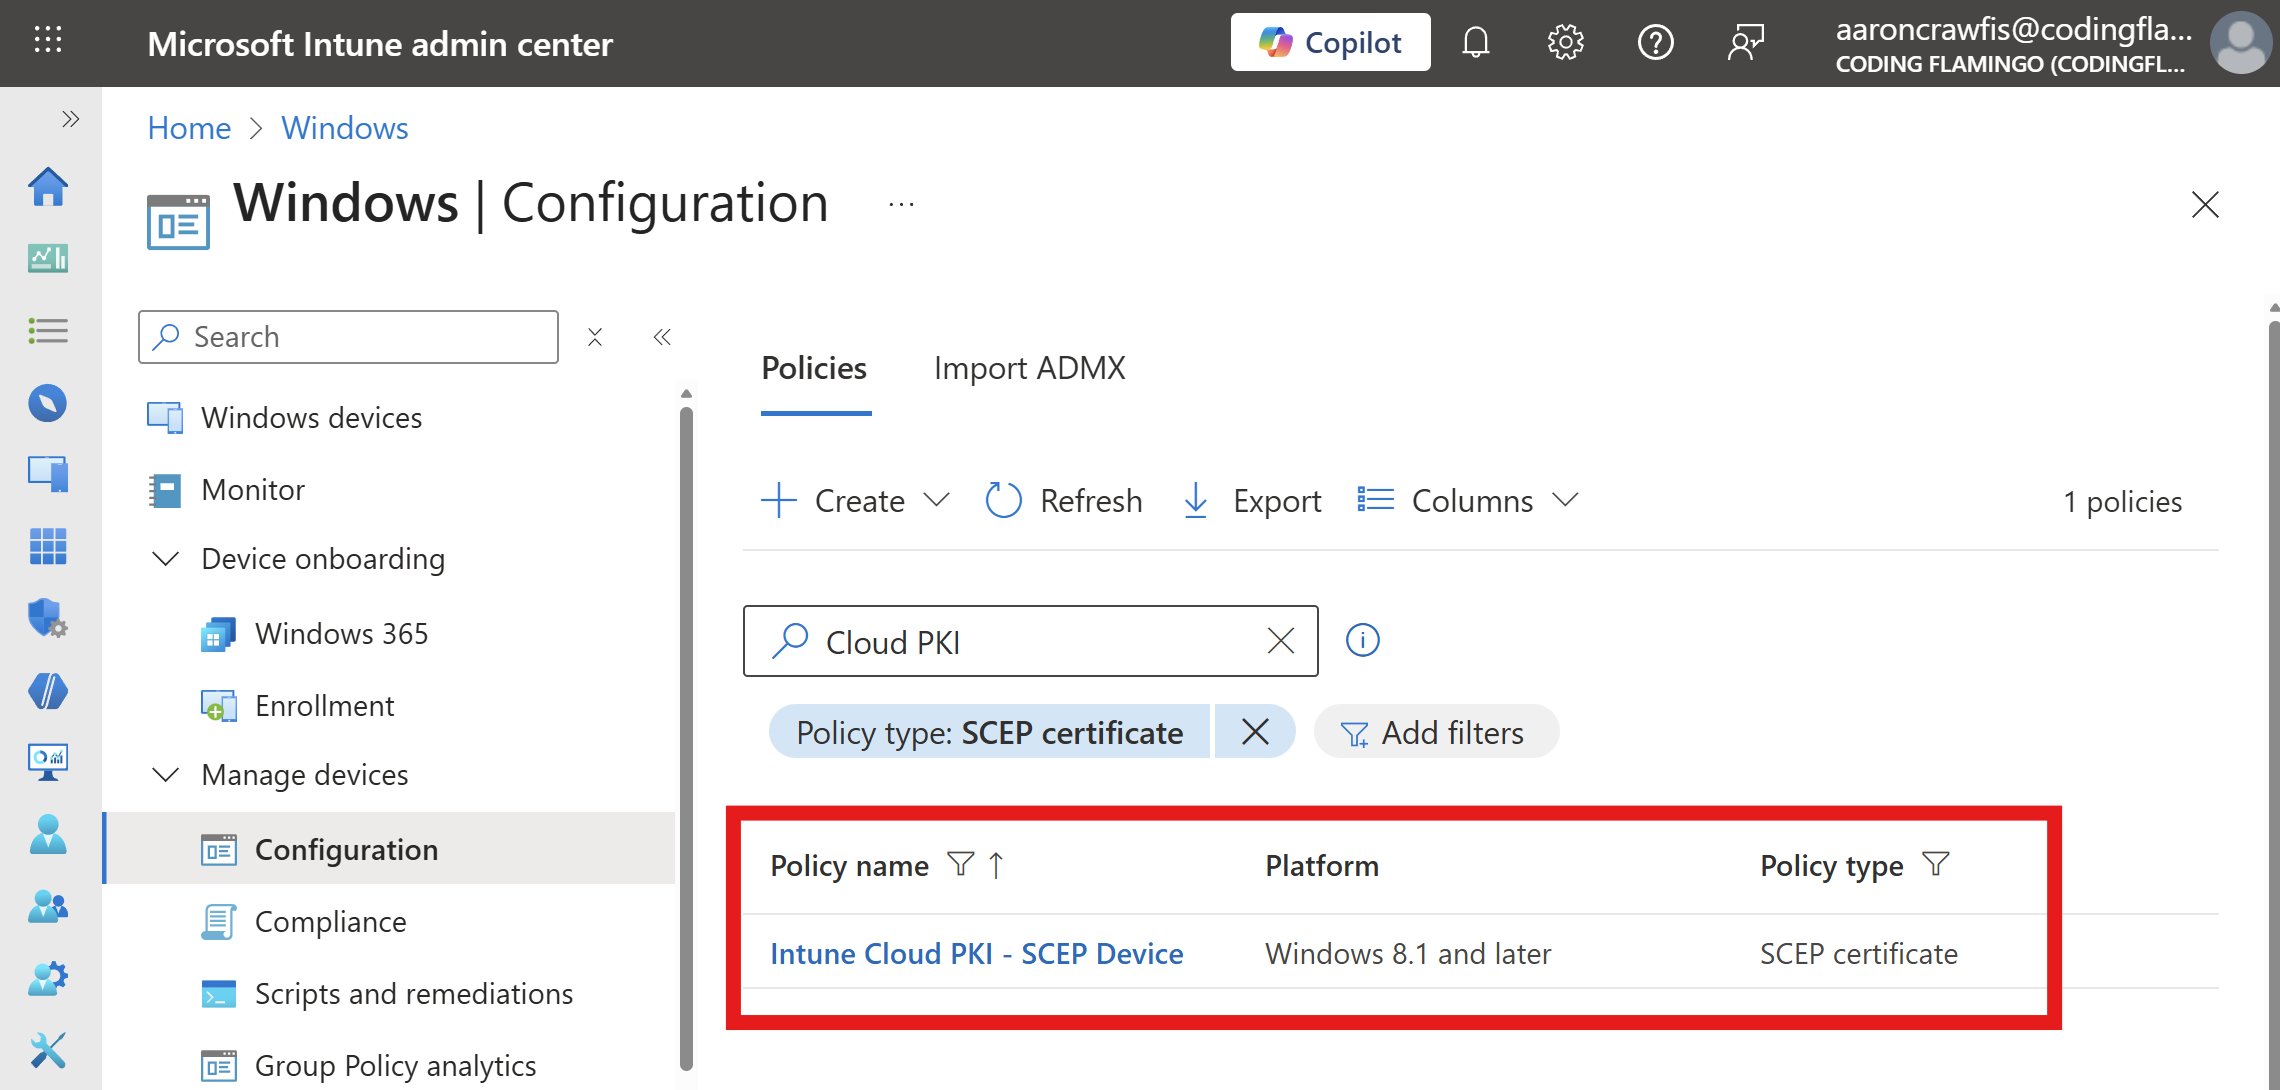
How to Generate SCEP Certificates with Cloud PKI
The benefit of certificate-based authentication is that each user and/or device gets their own unique certificate. To generate these certificates using your Cloud PKI, you’ll need to set up SCEP certificate profiles in Intune.
When configuring SCEP certificate profiles, you have the option to issue either user certificates or device certificates. User certificates are tied to individual users and are ideal for scenarios where you want to control access on a per-user basis. Device certificates, on the other hand, are associated with the device itself and are useful for device-centric authentication such as shared devices or kiosks. Choose the option that best fits your organization’s authentication needs.
After completing these steps, you should see your SCEP certificate profiles in Intune:
How to Configure EZRADIUS to Use Intune Cloud PKI Certificates
At this point your Cloud PKI is set up and issuing certificates to your devices. You can now configure EZRADIUS to use these certificates for Wi-Fi authentication.
-
Navigate to your EZRADIUS portal and go to the Policies page.
-
Scroll down to your existing RADIUS policy or begin creating a new one.
-
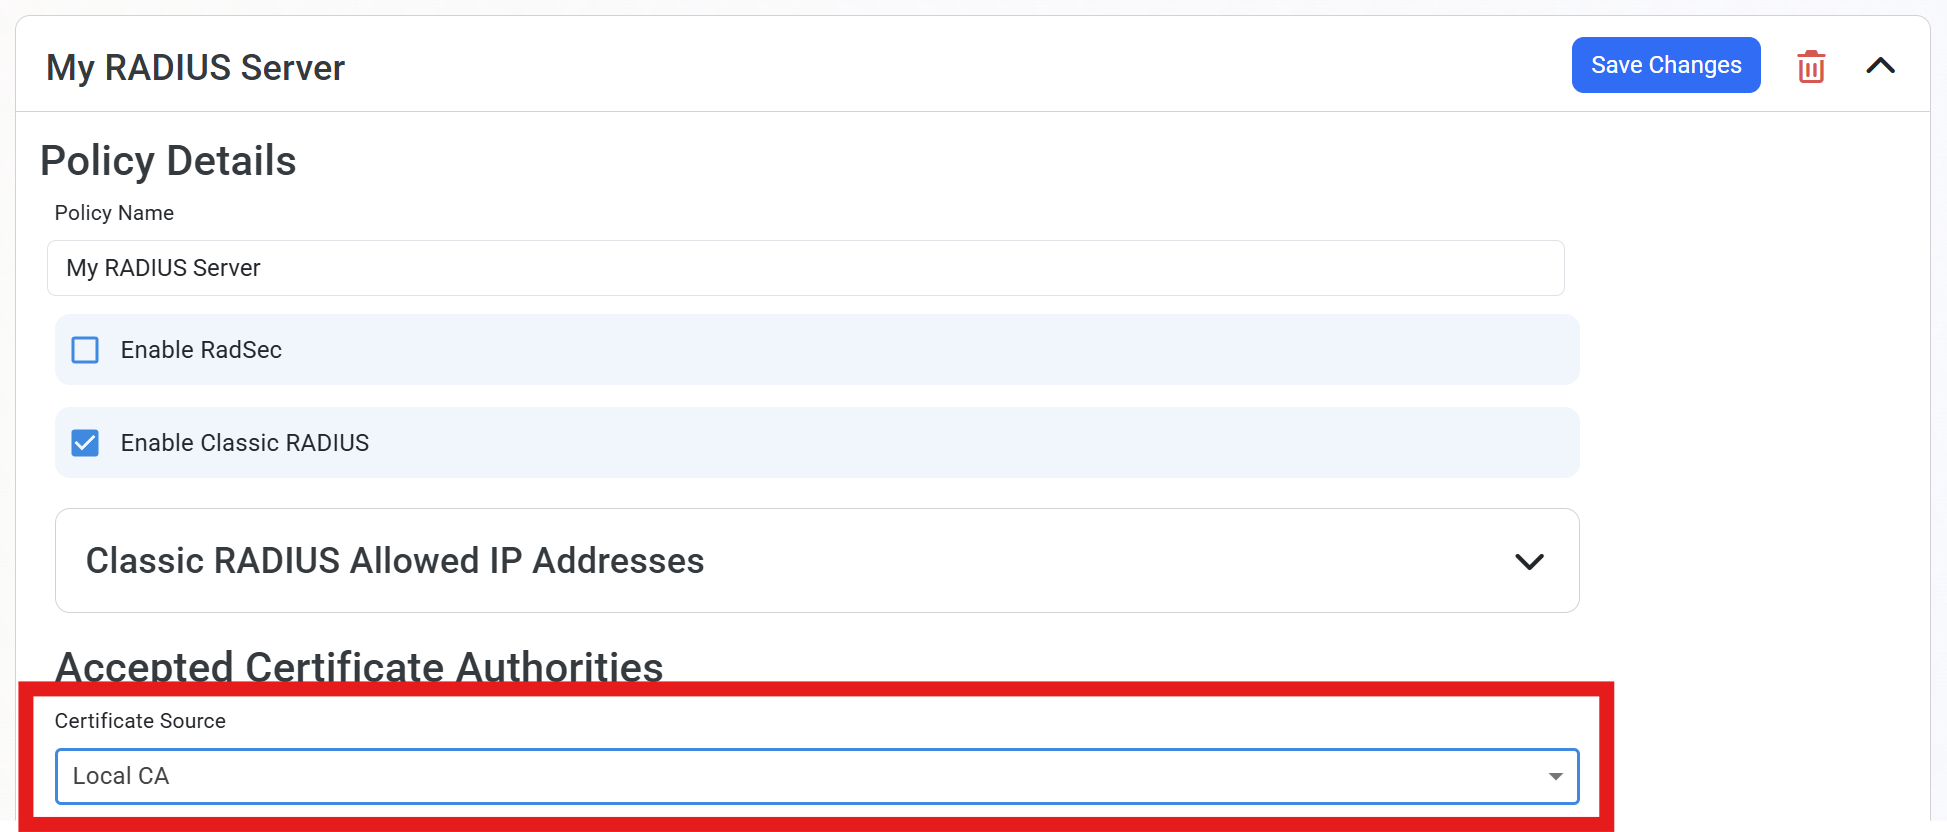
Under the Accepted Certificate Authorities section, dropdown the Certificate Source and select Local CA.
-
In your Intune Cloud PKI page, download the certificates for both your Root and Issuing CAs.
- For Root CA: Click on the Root CA name, then click Download to download the certificate.
- For Issuing CA: Click on the Issuing CA name, click Properties, then click Download to download the certificate.
-
Both certificates will download as
.cerfiles in DER format. You will need to convert them to Base64 format for EZRADIUS. You have a few options to do this:- Use certutil (Windows):
certutil -encode "Input_Certificate.cer" "Output_Certificate.cer" - Use OpenSSL (Linux/macOS/WSL):
openssl x509 -inform DER -in "Input_Certificate.cer" -outform PEM -out "Output_Certificate.cer"
- Use certutil (Windows):
-
Back in the EZRADIUS portal, check the Is Root CA box and upload the Base64-encoded Root CA certificate.
-
Uncheck the Is Root CA box and upload the Base64-encoded Issuing CA certificate. You should now see both CAs listed under Trusted Certificate Authorities.

-
For the Server Certificate, leave as Auto-Generated Certificate, as Intune Cloud PKI does not issue server certificates (if you have separate PKI for server certificates, you can still upload them here instead).
-
Click Create Policy to save your changes and generate your RADIUS server certificate.
How to Configure a RADIUS Access Policy for Certificate WiFi Authentication
Now that you have established the initial trust between EZRADIUS and your Intune Cloud PKI, the next step is to create Access Policy rules to define how users will authenticate to Wi-Fi using their Cloud PKI certificates.
-
Within your EZRADIUS policy, scroll down to the Access Policies section.
-
Under New Access Policy, give your policy a friendly name such as “Cloud PKI WiFi Access”.
-
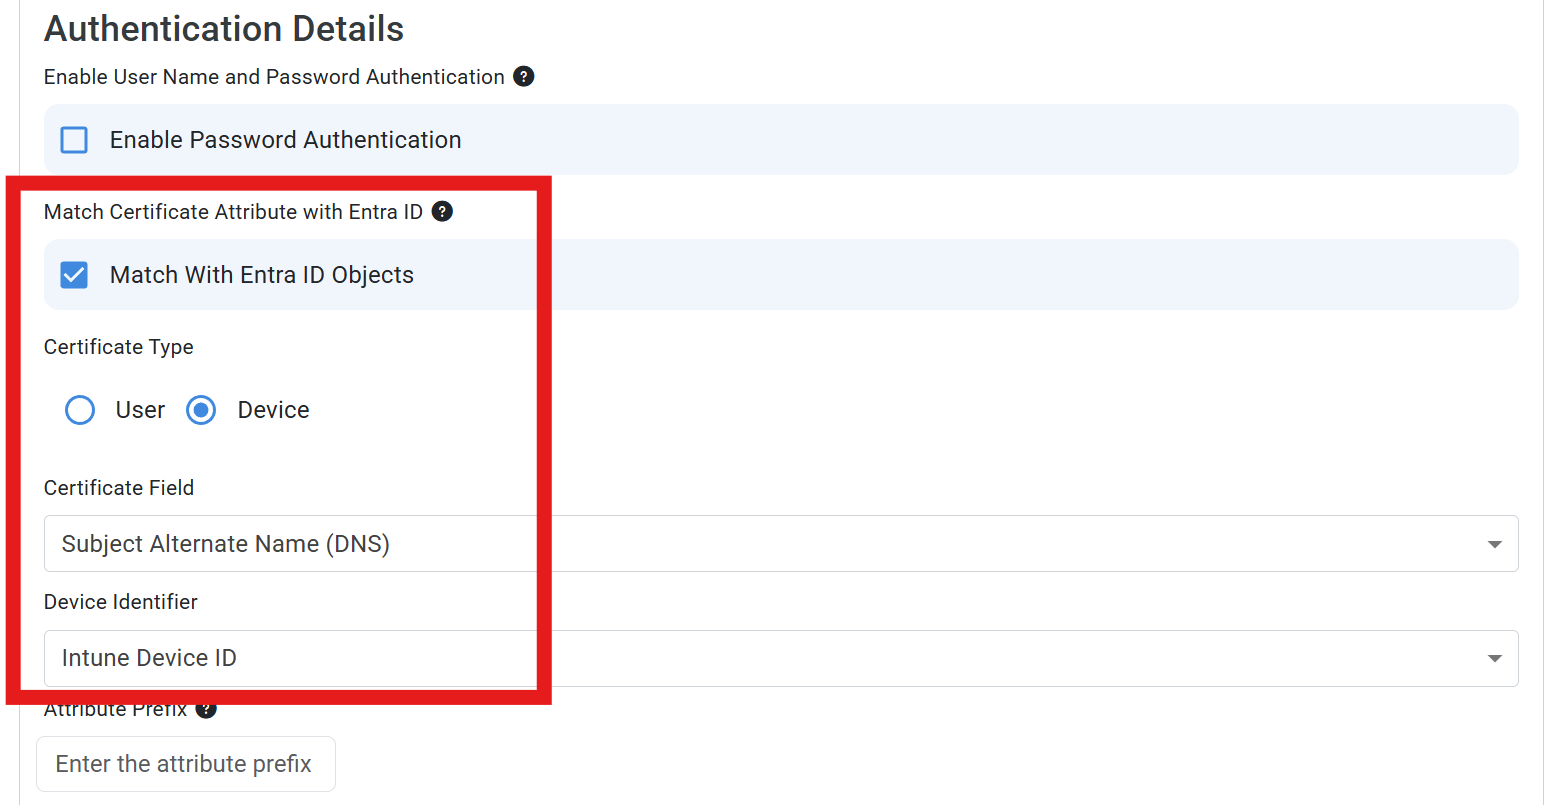
Leave Enable Password Authentication unchecked, as we are using certificate-based authentication.
-
Check the Match With Entra ID Objects box if you want to restrict access to specific users or groups in your Entra ID tenant. If you leave this unchecked, all users with valid Cloud PKI certificates will match this policy and be granted access.
-
Select the Certificate Type to match the type of certificate you are issuing via Cloud PKI, either User or Device. This is configured in your Intune SCEP Certificate profile. For this example, we will select Device.
-
For Certificate Field, select which field should be used to match the certificate to the device in Entra ID. This is configured in your SCEP certificate profile as well. In this example, we will select Subject Alternative Name (DNS).
-
For Device Identifier, enter the value that will be present in the selected certificate field and be matched to the device. In this example, we will use Intune Device ID.
-
Optionally enter an Attribute Prefix if you have configured one in your SCEP certificate profile (we don’t have one configured in this example).
-
If you want to restrict access to only compliant devices, check the Check Device Compliance in Intune box.
-
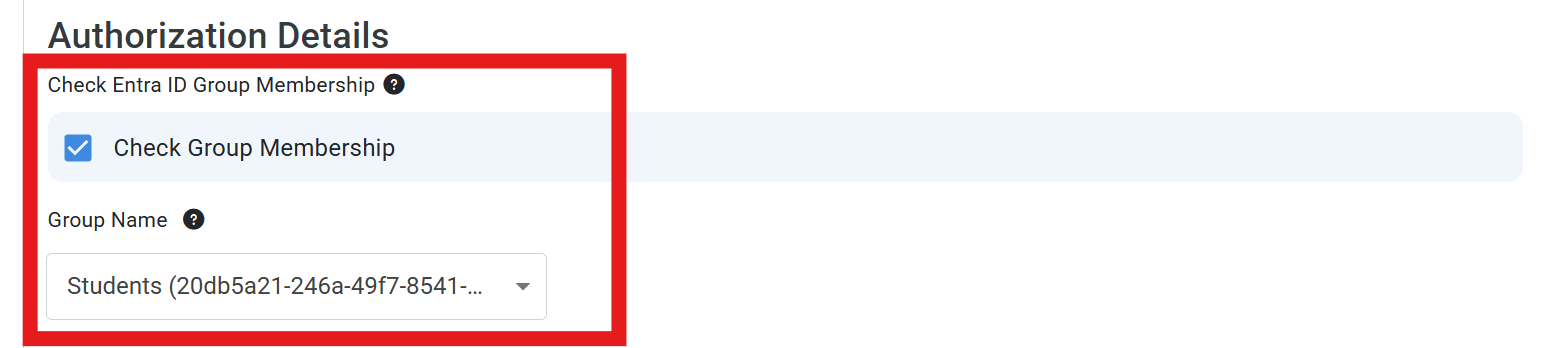
Now that you have matched the certificate to the device, you can restrict this RADIUS Access Policy to specific Entra ID security groups by clicking Check Group Membership.
-
Begin typing the name of the security group you want to restrict access to and select it from the dropdown.
-
Optionally configure a VLAN for devices that match this policy, either statically or via attributes in the certificate.
-
Click Save Changes at the top of the Access Policy to save your policy.
-
Done! Your users can now connect to Wi-Fi using their Intune Cloud PKI certificates for passwordless authentication.
How to Push the RADIUS Server CA Certificate to Your Devices in Intune
To ensure that your users’ devices can trust EZRADIUS, you’ll need to push the RADIUS server’s CA certificate as a trusted certificate to your devices via Intune.
-
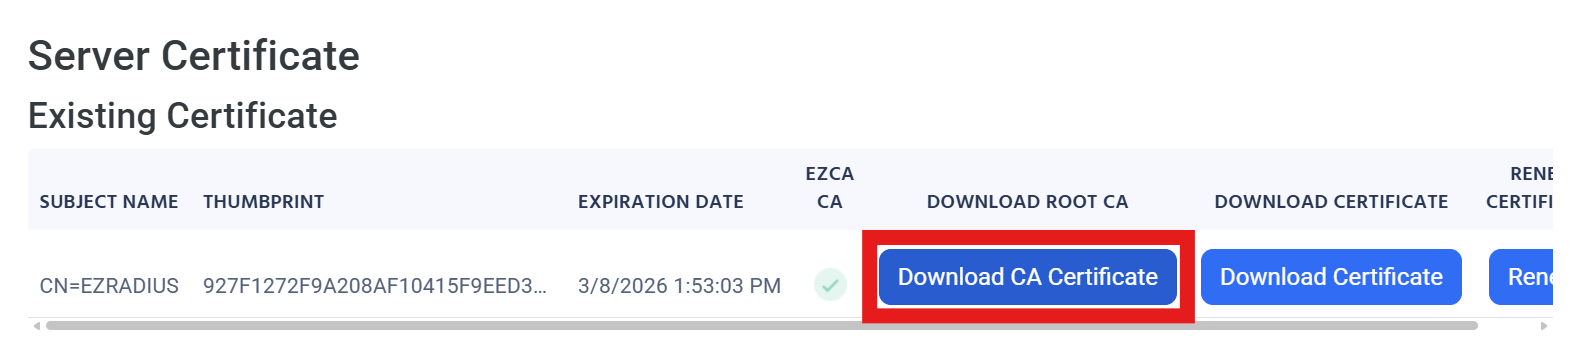
In the EZRADIUS portal, navigate to the Policies page and find your RADIUS policy.
-
Under Server Certificate, click on the Download CA Certificate link to download the RADIUS server’s CA certificate.
-
Navigate to the Intune Admin Center and go to Devices > Configuration.
-
Click + Create and select New Policy.
-
For Platform, select the appropriate platform (e.g., Windows 10 and later, iOS/iPadOS, Android).
-
For Profile type, select Templates.
-
Under Template name, select Trusted certificate.
-
Click Create.
-
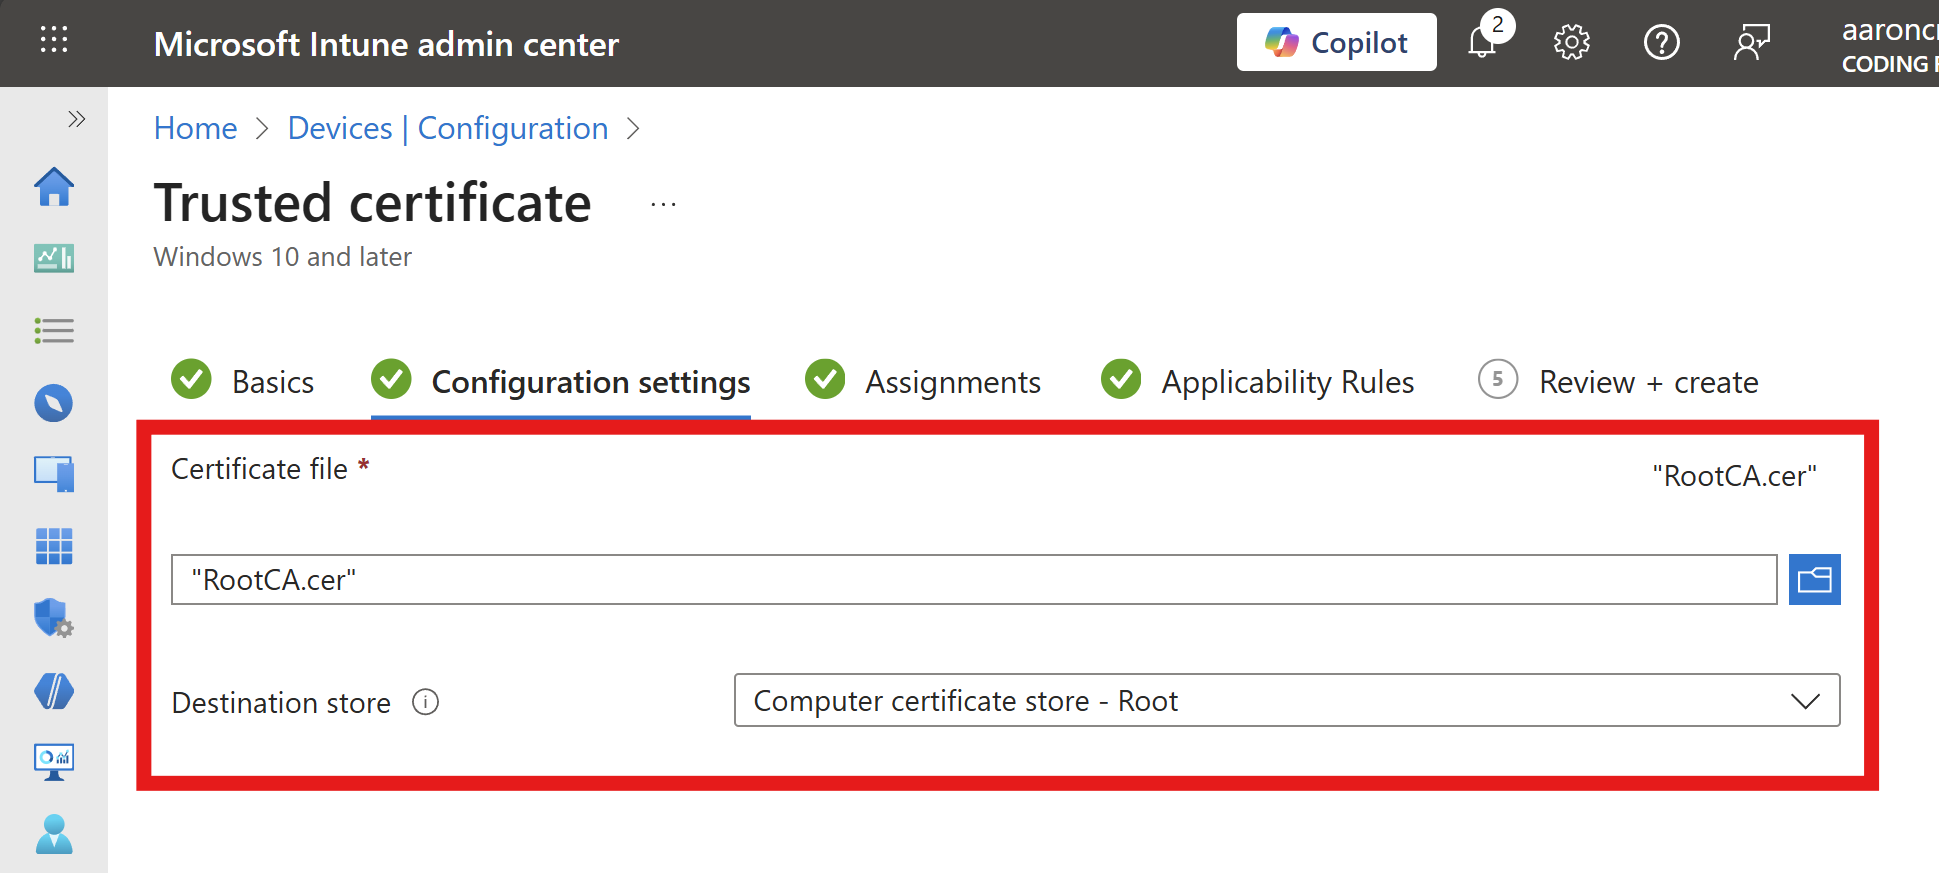
Give your profile a name, such as “EZRADIUS RADIUS Server CA”.
-
Under Certificate file upload the RADIUS server CA certificate you downloaded from EZRADIUS.
-
For Destination store, select Computer certificate store - Root.
-
Click Next and assign the profile to the appropriate groups of users and/or devices.
-
Click Next and optionally add Applicability Rules if needed.
-
Click Next and review your settings.
-
Click Create to create the profile.
-
Repeat these steps for each platform you need to support (e.g., Windows, iOS, Android).
-
Done! The RADIUS server CA certificate will now be pushed to your users’ devices, allowing them to trust the EZRADIUS server for WiFi authentication.
How to Push WiFi Profiles in Intune to Automatically Connect Using Cloud PKI Certificates
The final step is to ensure that your users’ devices can automatically connect to your Wi-Fi network using their Cloud PKI certificate. You can do this by pushing Wi-Fi profiles via Intune.
-
In the Intune Admin Center, navigate to Devices > Configuration.
-
Click + Create and select New Policy.
-
For Platform, select the appropriate platform (e.g., Windows 10 and later, iOS/iPadOS, Android).
-
For Profile type, select Templates.
-
Under Template name, select Wi-Fi.
-
Click Create.
-
Give your profile a name, such as “Enterprise WiFi with Cloud PKI”.
-
Click Next to configure the Wi-Fi settings:
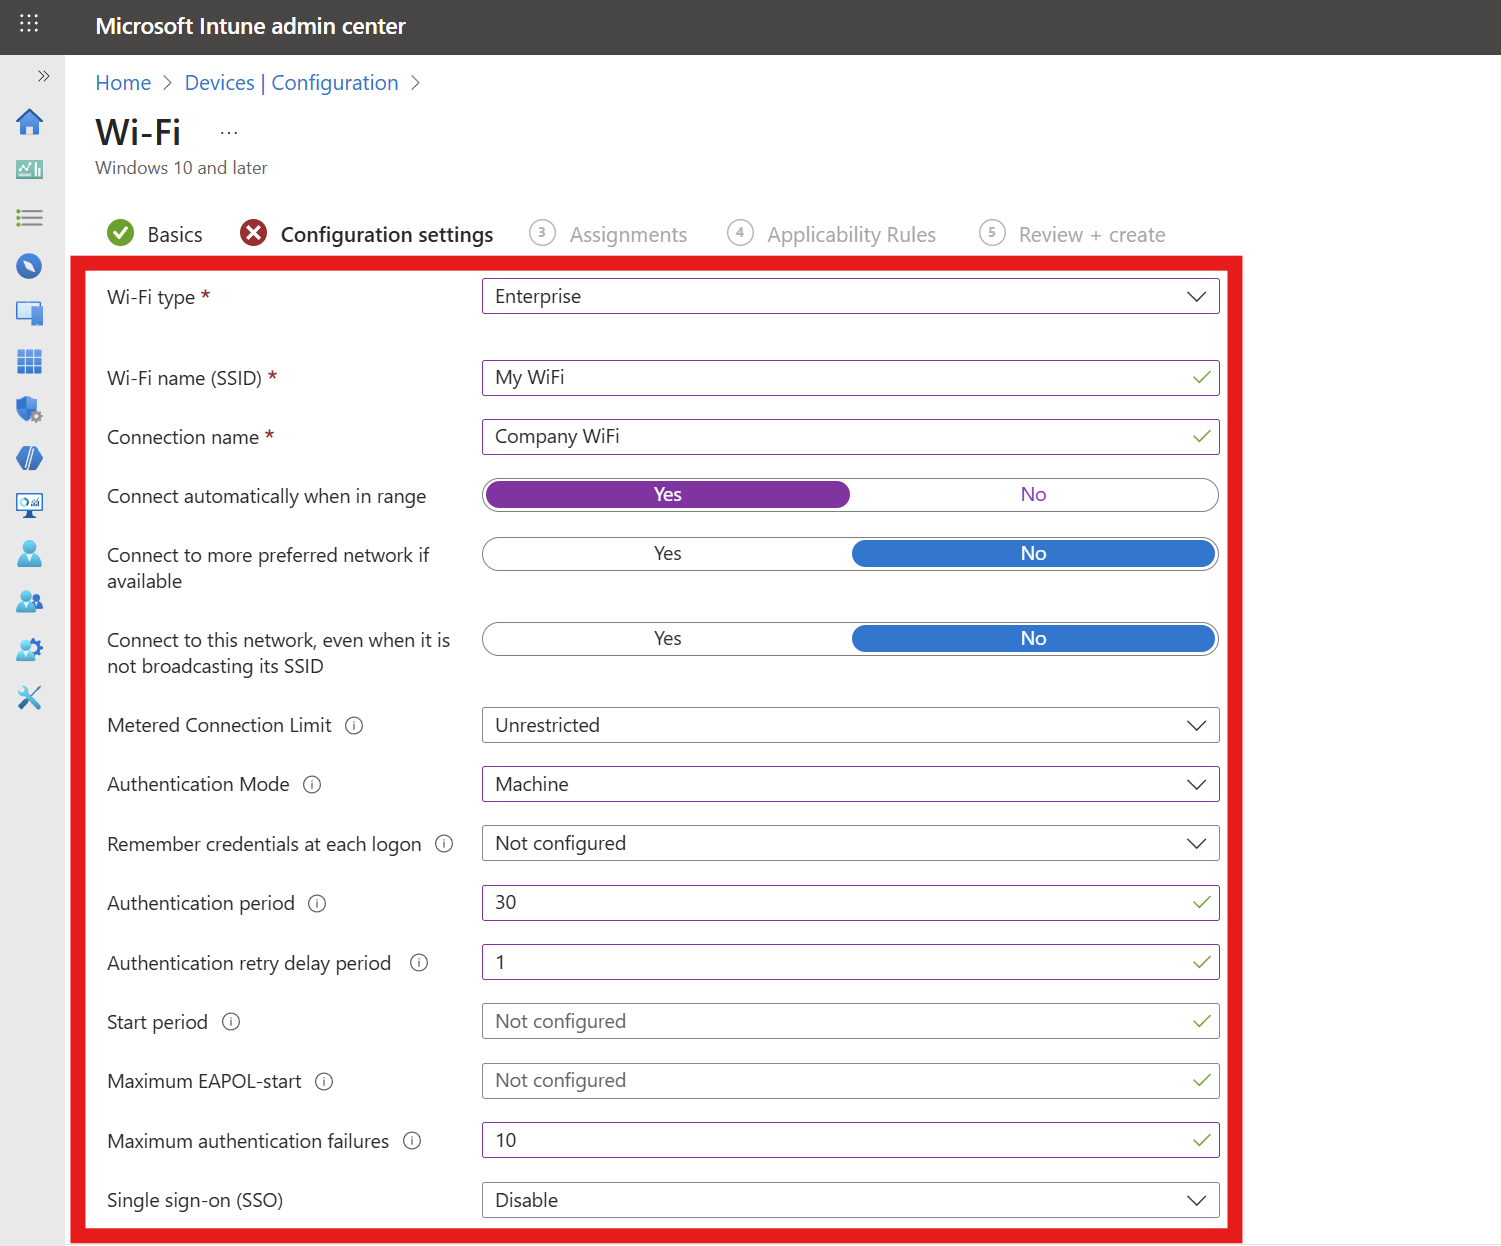
- Wi-Fi type: Enterprise
- Wi-Fi name (SSID): Your Wi-Fi Network SSID (Case Sensitive)
- Connection name: Friendly name for your users
- Authentication mode: If using device certificates, select Machine; if using user certificates, select User.
- Remember credentials: Set to No (Not needed for certificate authentication).
- Authentication period: 30 seconds is a recommended value we’ve seen work well for most environments.
- Authentication retry delay: 1 second is a recommended value we’ve seen work well for most environments.
- Maximum authentication failures: 10 is a recommended value we’ve seen work well for most environments.
- Single sign-on (SSO): Disable
-
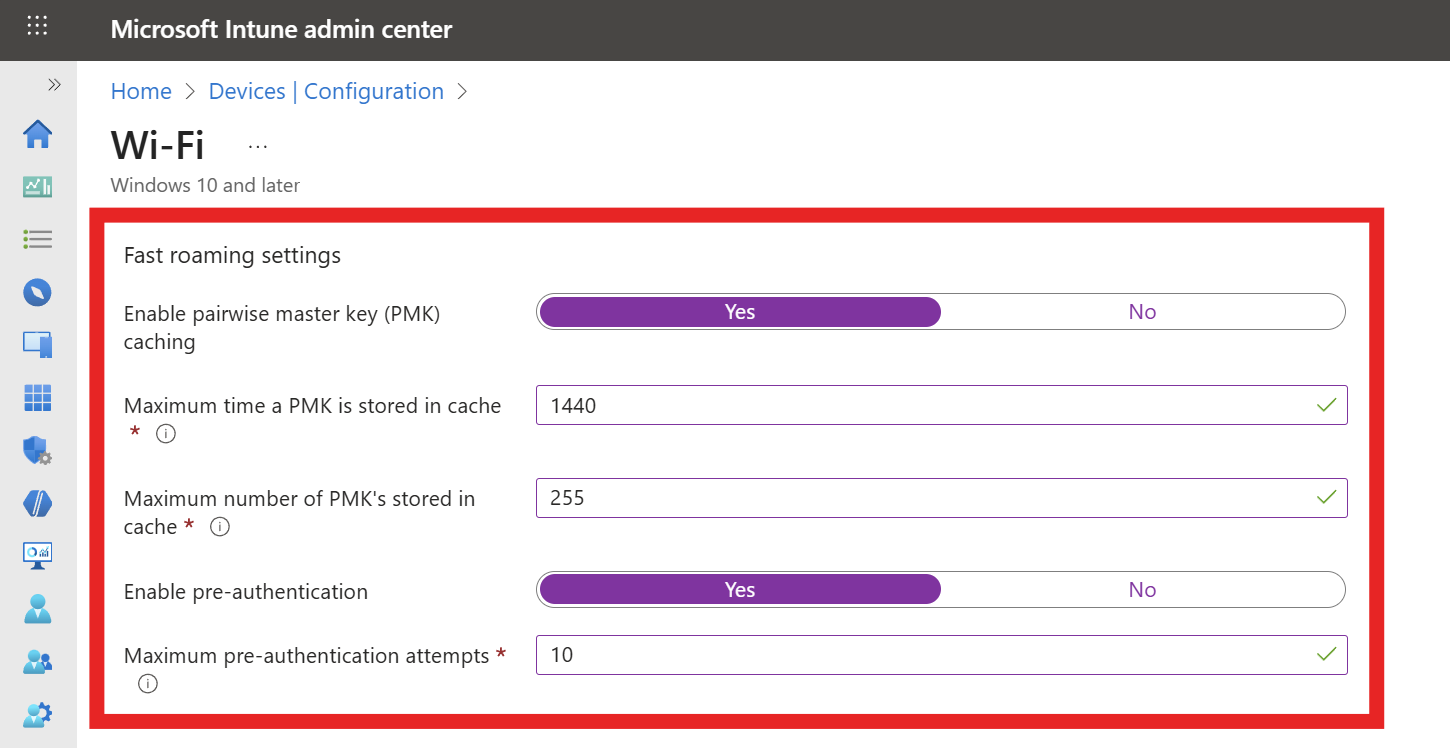
If your network controller supports Fast Roaming, fill out the Fast Roaming settings section with the following settings:
- Enable pairwise master key (PMK) caching: Yes
- Max PMK time stored in cache: We recommend setting this to the maximum (1440 minutes) to improve user experience.
- Max number of PMKs in cache: We recommend setting this to the maximum (255) to improve user experience.
- Enable pre-authentication: Yes
- Max pre-authentication attempts: 10 is a recommended value we’ve seen work well for most environments.
-
In a separate tab open EZRADIUS and navigate to the Policies page. Scroll down to your Radius Policy.
-
Under Server Certificate section, click Download Certificate to download your RADIUS server certificate.
-
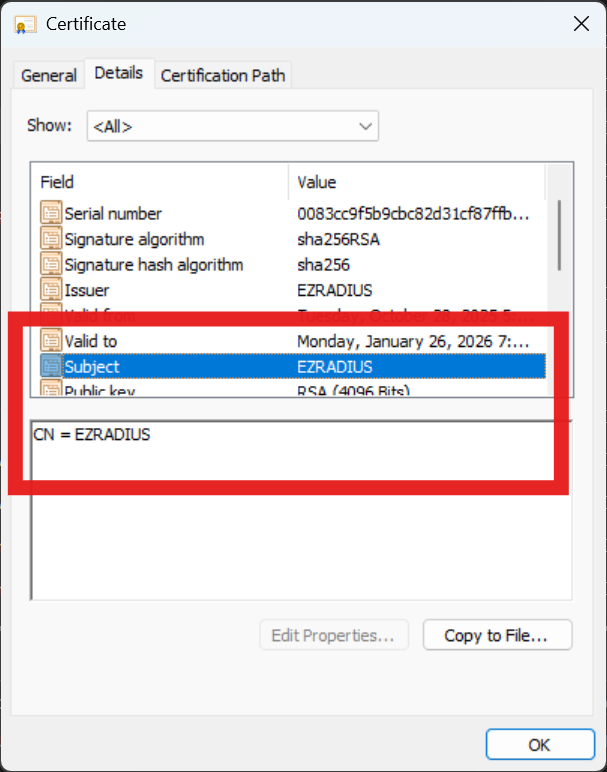
Open the downloaded RADIUS server certificate in your OS certificate viewer and note the Common Name (CN) and any Subject Alternative Names (SANs) listed in the certificate. You will need these values in the next step.

-
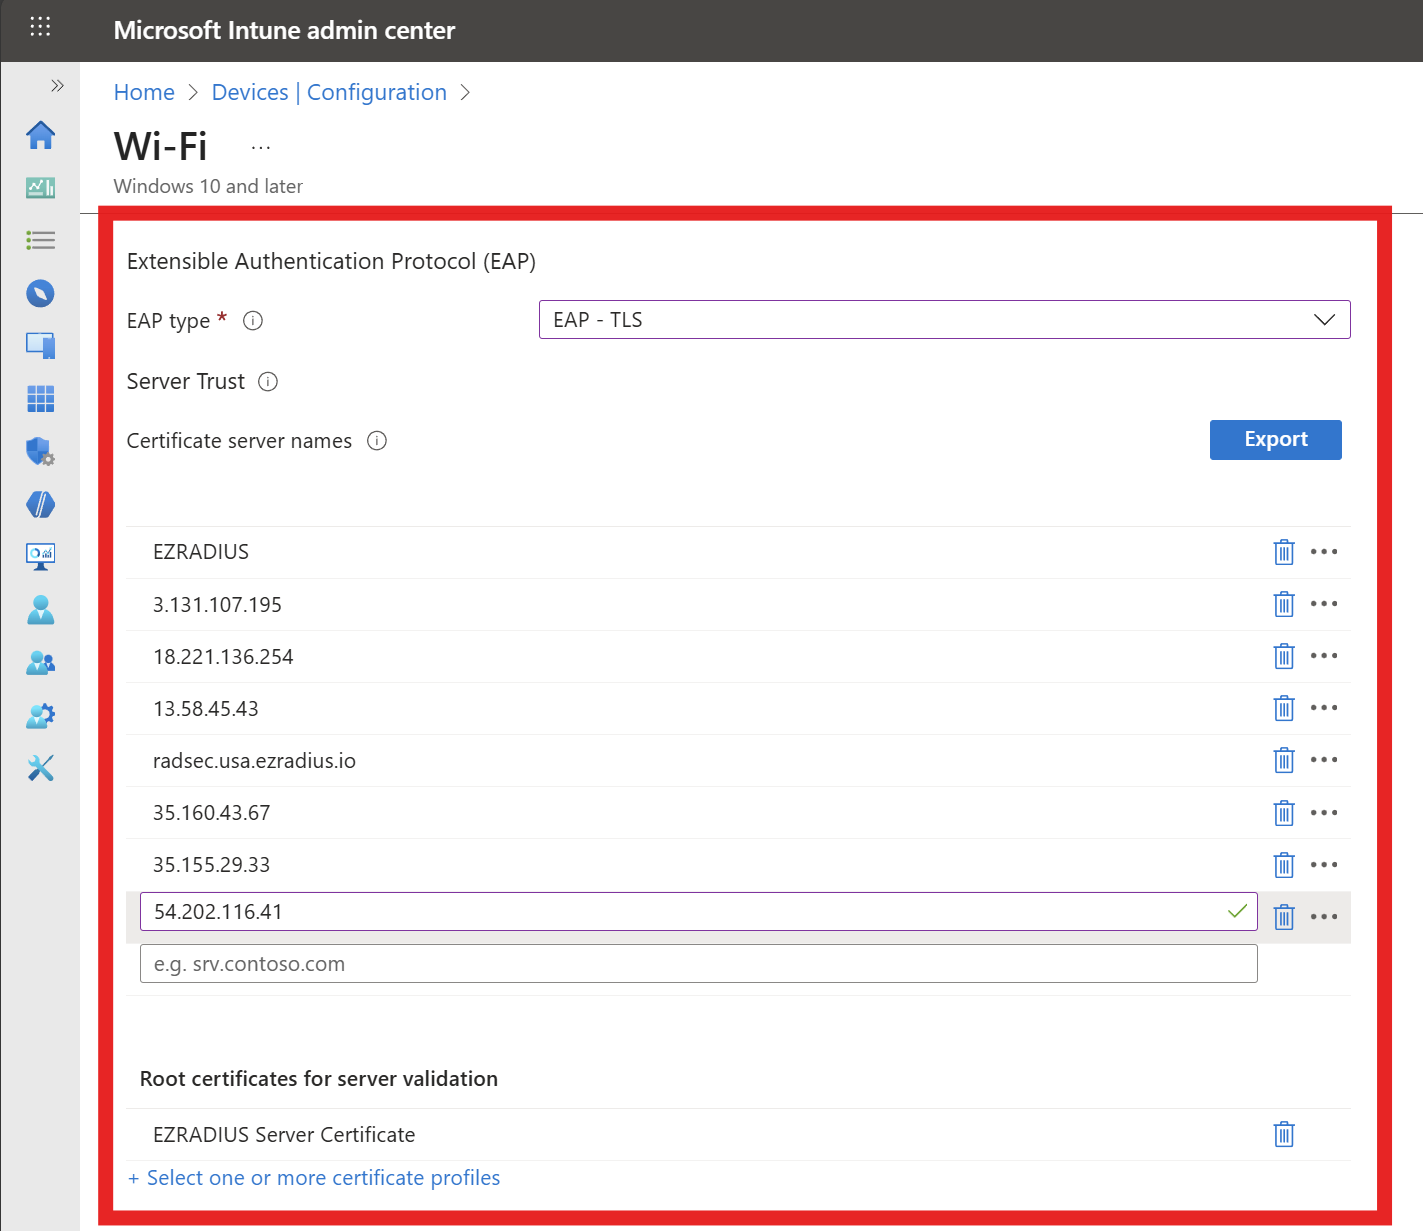
Back in Intune, fill out the Server Trust section with the following settings:
- EAP type: EAP-TLS
- Certificate server names: Enter the CN and SAN values from your RADIUS server certificate that you noted earlier. Remove
CN=,DNS Name=, andIP Address=prefixes when entering the values. - Root Certificates for server validation: Click on “+ Select one or more certificate profiles” and select the CA certificate profile(s) you created earlier to distribute your RADIUS server CA certificate(s).
-
Click on Next.
-
Select the users, groups or devices you want to deploy this profile to and click Next.
-
Add any applicability rules if needed, then click on Next.
-
Review your settings and click on Create.
-
Done! Your WiFi profile is now created and will be pushed to your devices. Once the profile is applied, users will be able to connect to the WiFi network using their Cloud PKI-issued certificates.
What Intune Configuration is Needed to Use EZRADIUS Cloud RADIUS with Intune Cloud PKI?
To recap the steps above, you will need to configure the following in Intune:
- Trusted Certificate policies for your Cloud PKI Root and Issuing CA certificates. This ensures that your devices trust the certificates issued by your Cloud PKI.
- SCEP Certificate profile to issue user or device certificates from your Cloud PKI. This allows your users/devices to obtain the certificates they will use for Wi-Fi authentication and other purposes.
- Trusted Certificate policy to push the EZRADIUS RADIUS server CA certificate to your devices. This ensures that your devices trust the EZRADIUS server when connecting to Wi-Fi.
- WiFi Profile to configure devices to connect to your WiFi network using the Cloud PKI certificates. This automates the Wi-Fi connection process for your users.