How To Setup RADIUS Authentication in Jamf Pro
Introduction to Wi-Fi Authentication in Jamf Pro with Cloud RADIUS
With EZRADIUS Cloud RADIUS you can easily connect to a WPA Enterprise Wi-Fi network using either Entra ID credentials (with EAP-TTLS) or certificates (with EAP-TLS) for authentication. This guide will walk you through the steps to set up RADIUS authentication in Jamf Pro using Cloud RADIUS for both EAP-TTLS and EAP-TLS authentication methods. By the end of this guide, you will have a fully configured Wi-Fi profile in Jamf Pro that uses Cloud RADIUS for authentication.
How to Configure Wi-Fi Profiles in Jamf Pro with Cloud RADIUS - Step by Step Guide
The following section will guide you through the steps to set up RADIUS authentication in Jamf Pro using Cloud RADIUS. The steps will vary slightly based on the authentication method you choose (EAP-TLS or EAP-TTLS). Follow the instructions for your preferred authentication method.
Prerequisites for Setting Up RADIUS Authentication in Jamf Pro
Before you begin, ensure that you:
- Registered the Keytos and EZRADIUS applications in your Entra ID tenant
- Created an EZRADIUS billing plan/subscription
- Are a Subscription Owner or Network Administrator of your EZRADIUS subscription
- You are a Jamf Pro administrator
How To Create an EZRADIUS Policy for Cloud RADIUS Authentication
The first step to set up cloud RADIUS for Jamf Pro devices is to create an EZRADIUS policy that defines how authentication requests from Jamf Pro devices will be handled. Refer to the following guides for the specific steps to configure your cloud RADIUS policy.
How to Create a Passwordless Certificate Access Policy
A certificate access policy allows you to accept X.509 certificates for authentication and determine which users or devices are allowed to connect to your network. View this guide to learn how to create a certificate access policy in EZRADIUS if you have not already done so.
How to Create an Entra ID Username and Password Access Policy
An Entra ID username and password access policy allows you to authenticate your Entra ID users using their existing credentials. View this guide to learn how to create an Entra ID username and password access policy in EZRADIUS if you have not already done so.
How To Configure Your Jamf Pro Configuration Profile for WPA Enterprise Wi-Fi
Now that EZRADIUS is configured to authenticate your users, the next step is to configure your Jamf Pro Wi-Fi profile to use RADIUS authentication with EZRADIUS. The configuration will vary based on the authentication method you choose (EAP-TLS or EAP-TTLS). Follow the instructions for your preferred authentication method.
How To Issue SCEP Certificates to Jamf Pro Devices for EAP-TLS Authentication
Before you can configure a Wi-Fi profile in Jamf Pro you will need to first issue SCEP (Simple Certificate Enrollment Protocol) certificates to your managed devices. Any valid X509 certificate with a Client Authentication EKU will work for cloud RADIUS. If you’re looking for an easy solution for SCEP certificates, EZCA is a great option. Follow this guide to learn how to create and issue SCEP certificates to your Jamf Pro devices.
Create SCEP Certificates in Jamf Pro
To continue with the Wi-Fi profile configuration, you will need a Jamf Pro Configuration Profile with SCEP configured:
How to Download and Push Your EZRADIUS Server CA Certificate
This step is only required if your EZRADIUS server CA certificate is different than the CA certificate used for your SCEP issued client certificates. If you selected Auto-Generated Certificate when creating your EZRADIUS policy, then the server CA certificate will be different than your SCEP CA certificate and you will need to complete this step. If you selected EZCA and chose your SCEP CA, then the server CA certificate will be the same as your SCEP CA certificate and you can skip this step.
For your devices to trust the Cloud RADIUS server, you will need to ensure that the EZRADIUS Server CA certificate is installed on your devices. Follow these steps to download the EZRADIUS Server CA certificate and push it to your devices using a Jamf Pro Configuration Profile.
-
In a new tab, navigate to your EZRADIUS portal.
-
Go to the Policies page and scroll down to the Server Certificates > Existing Certificate section.
-
Click on the Download CA Certificate button to download your server CA certificate.

-
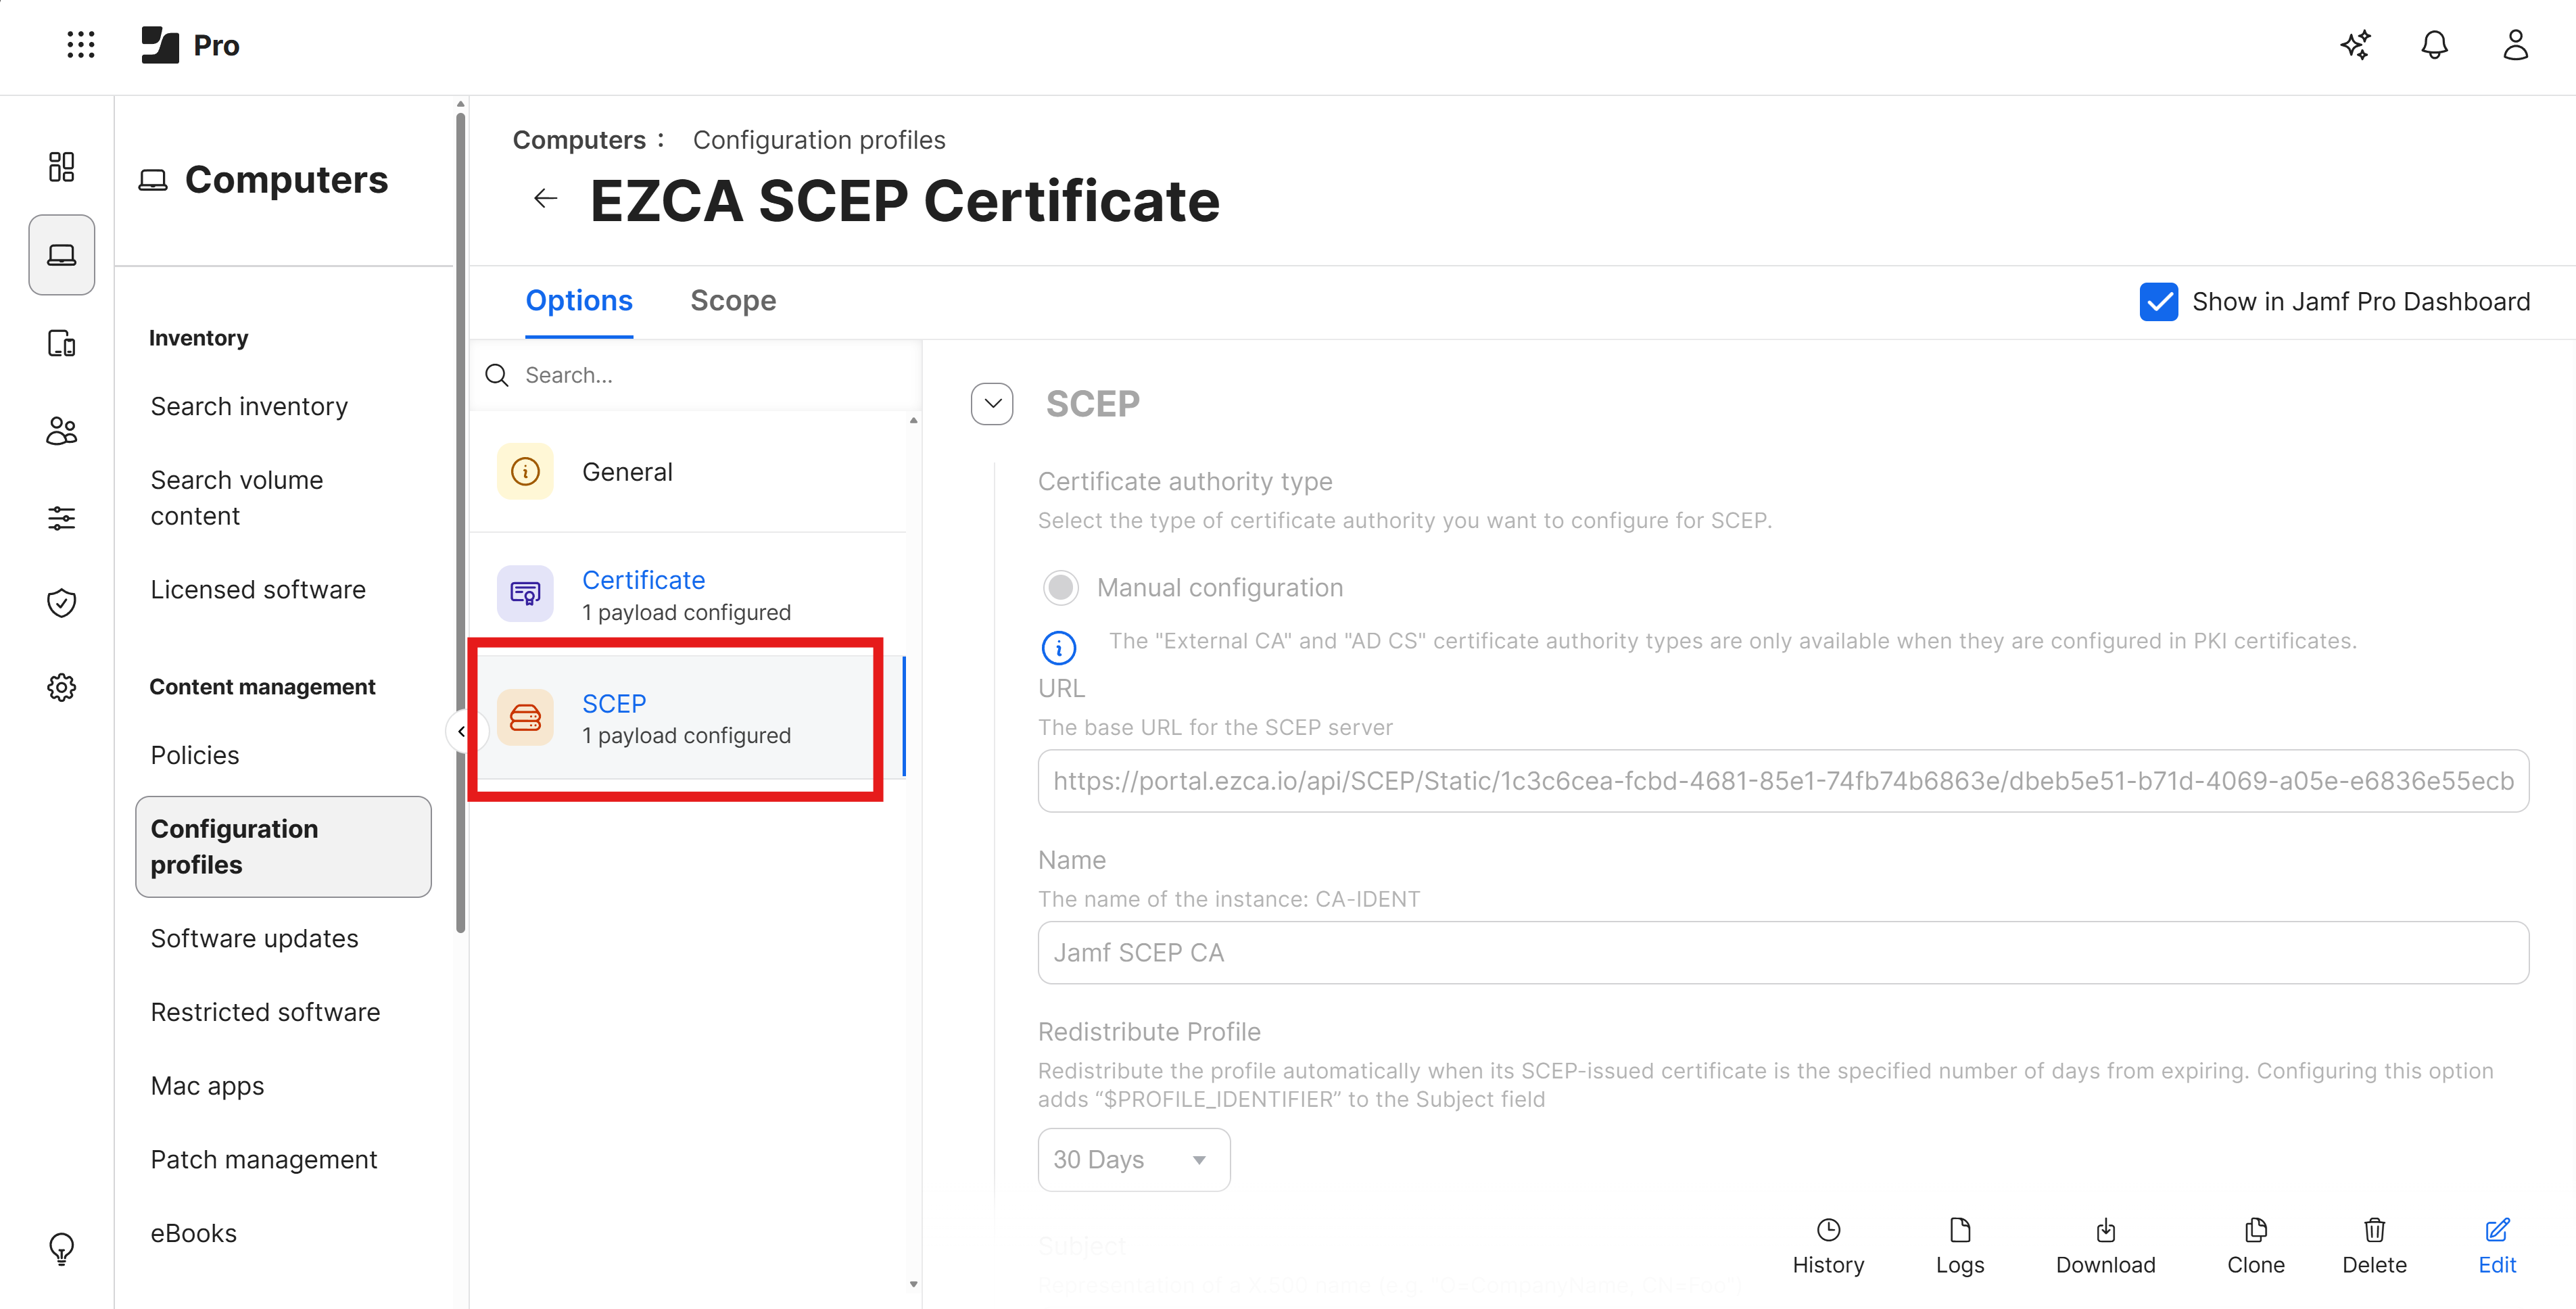
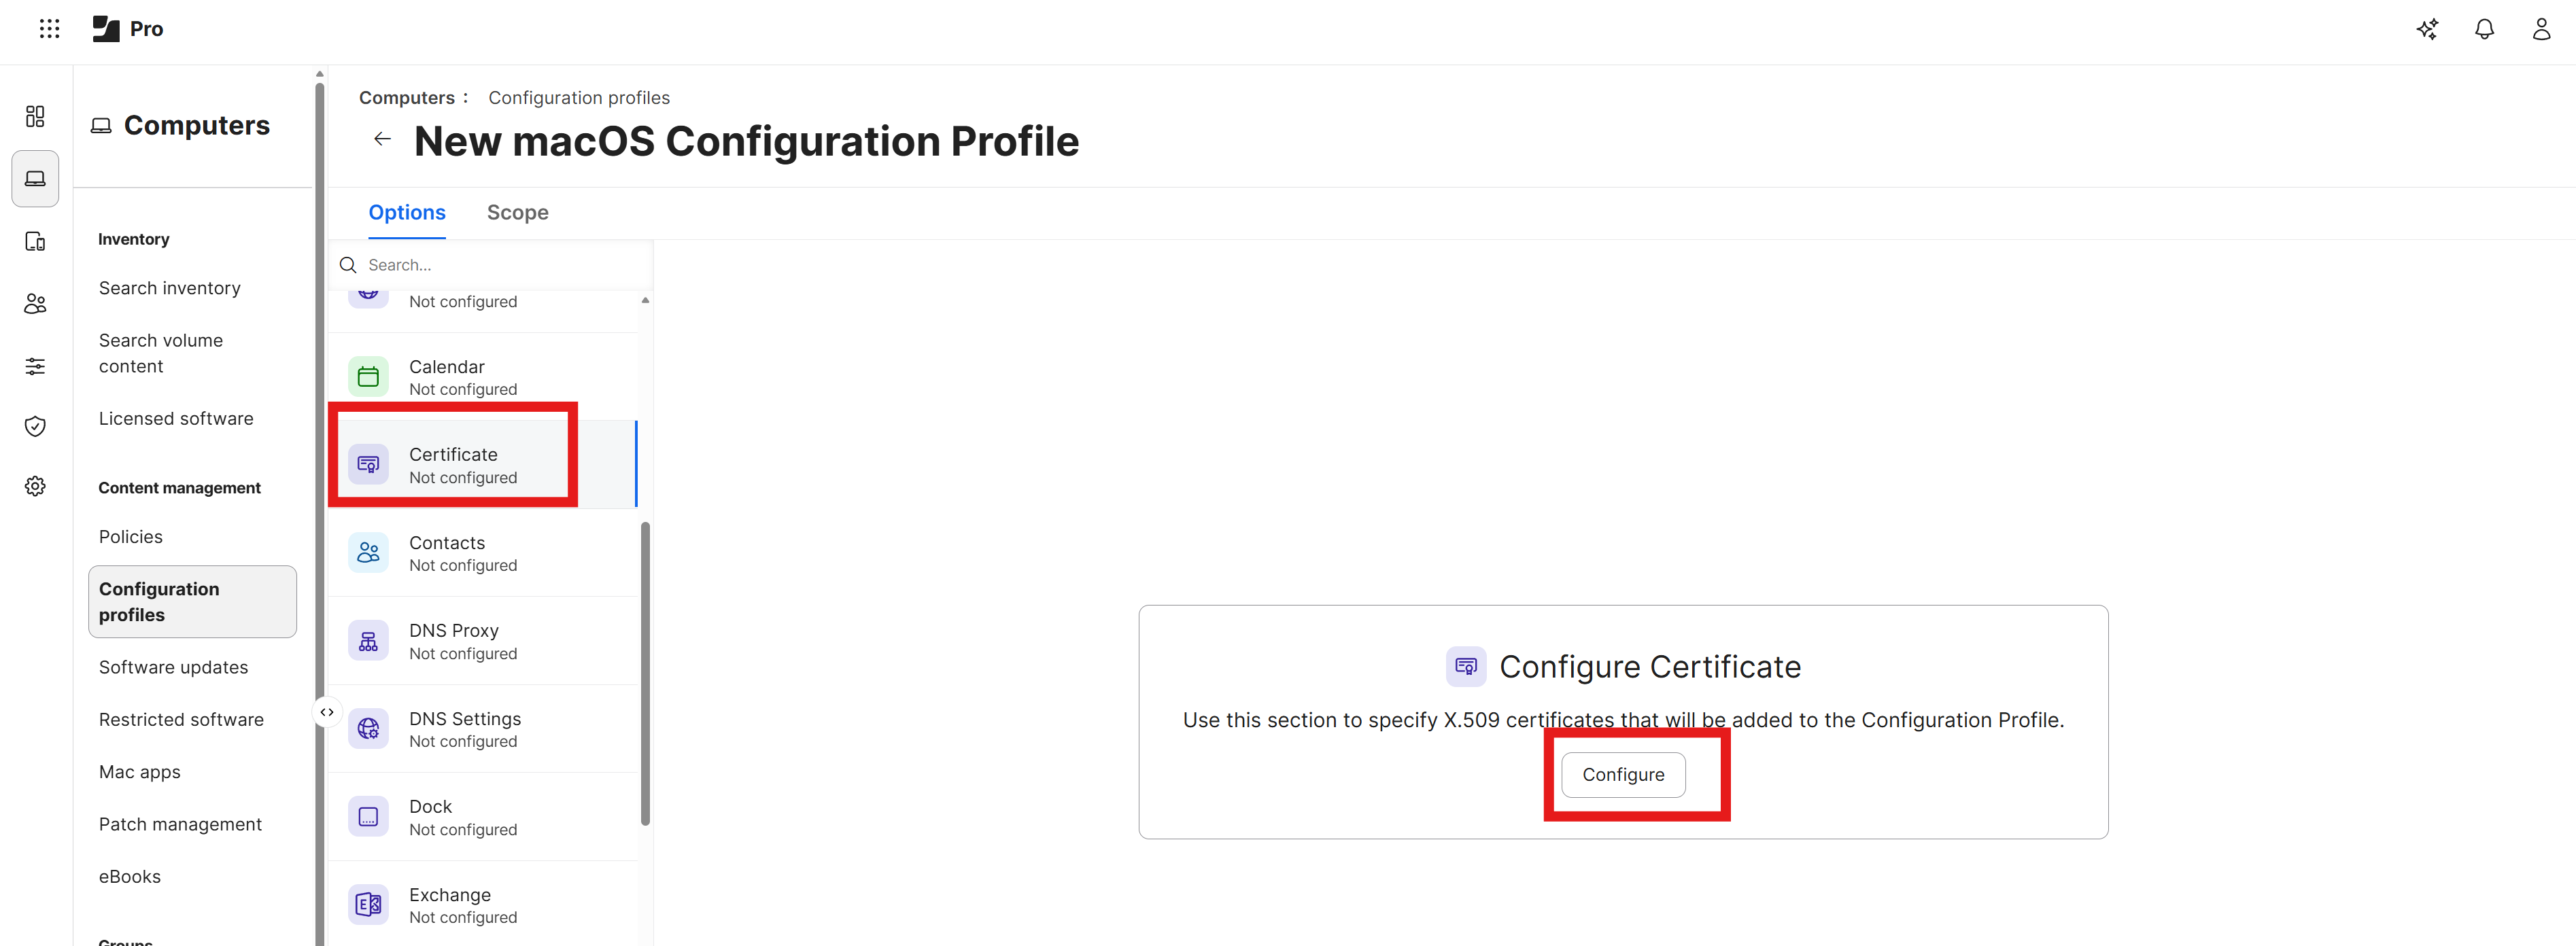
Back in your Jamf Pro portal, go to Computers > Configuration Profiles.
-
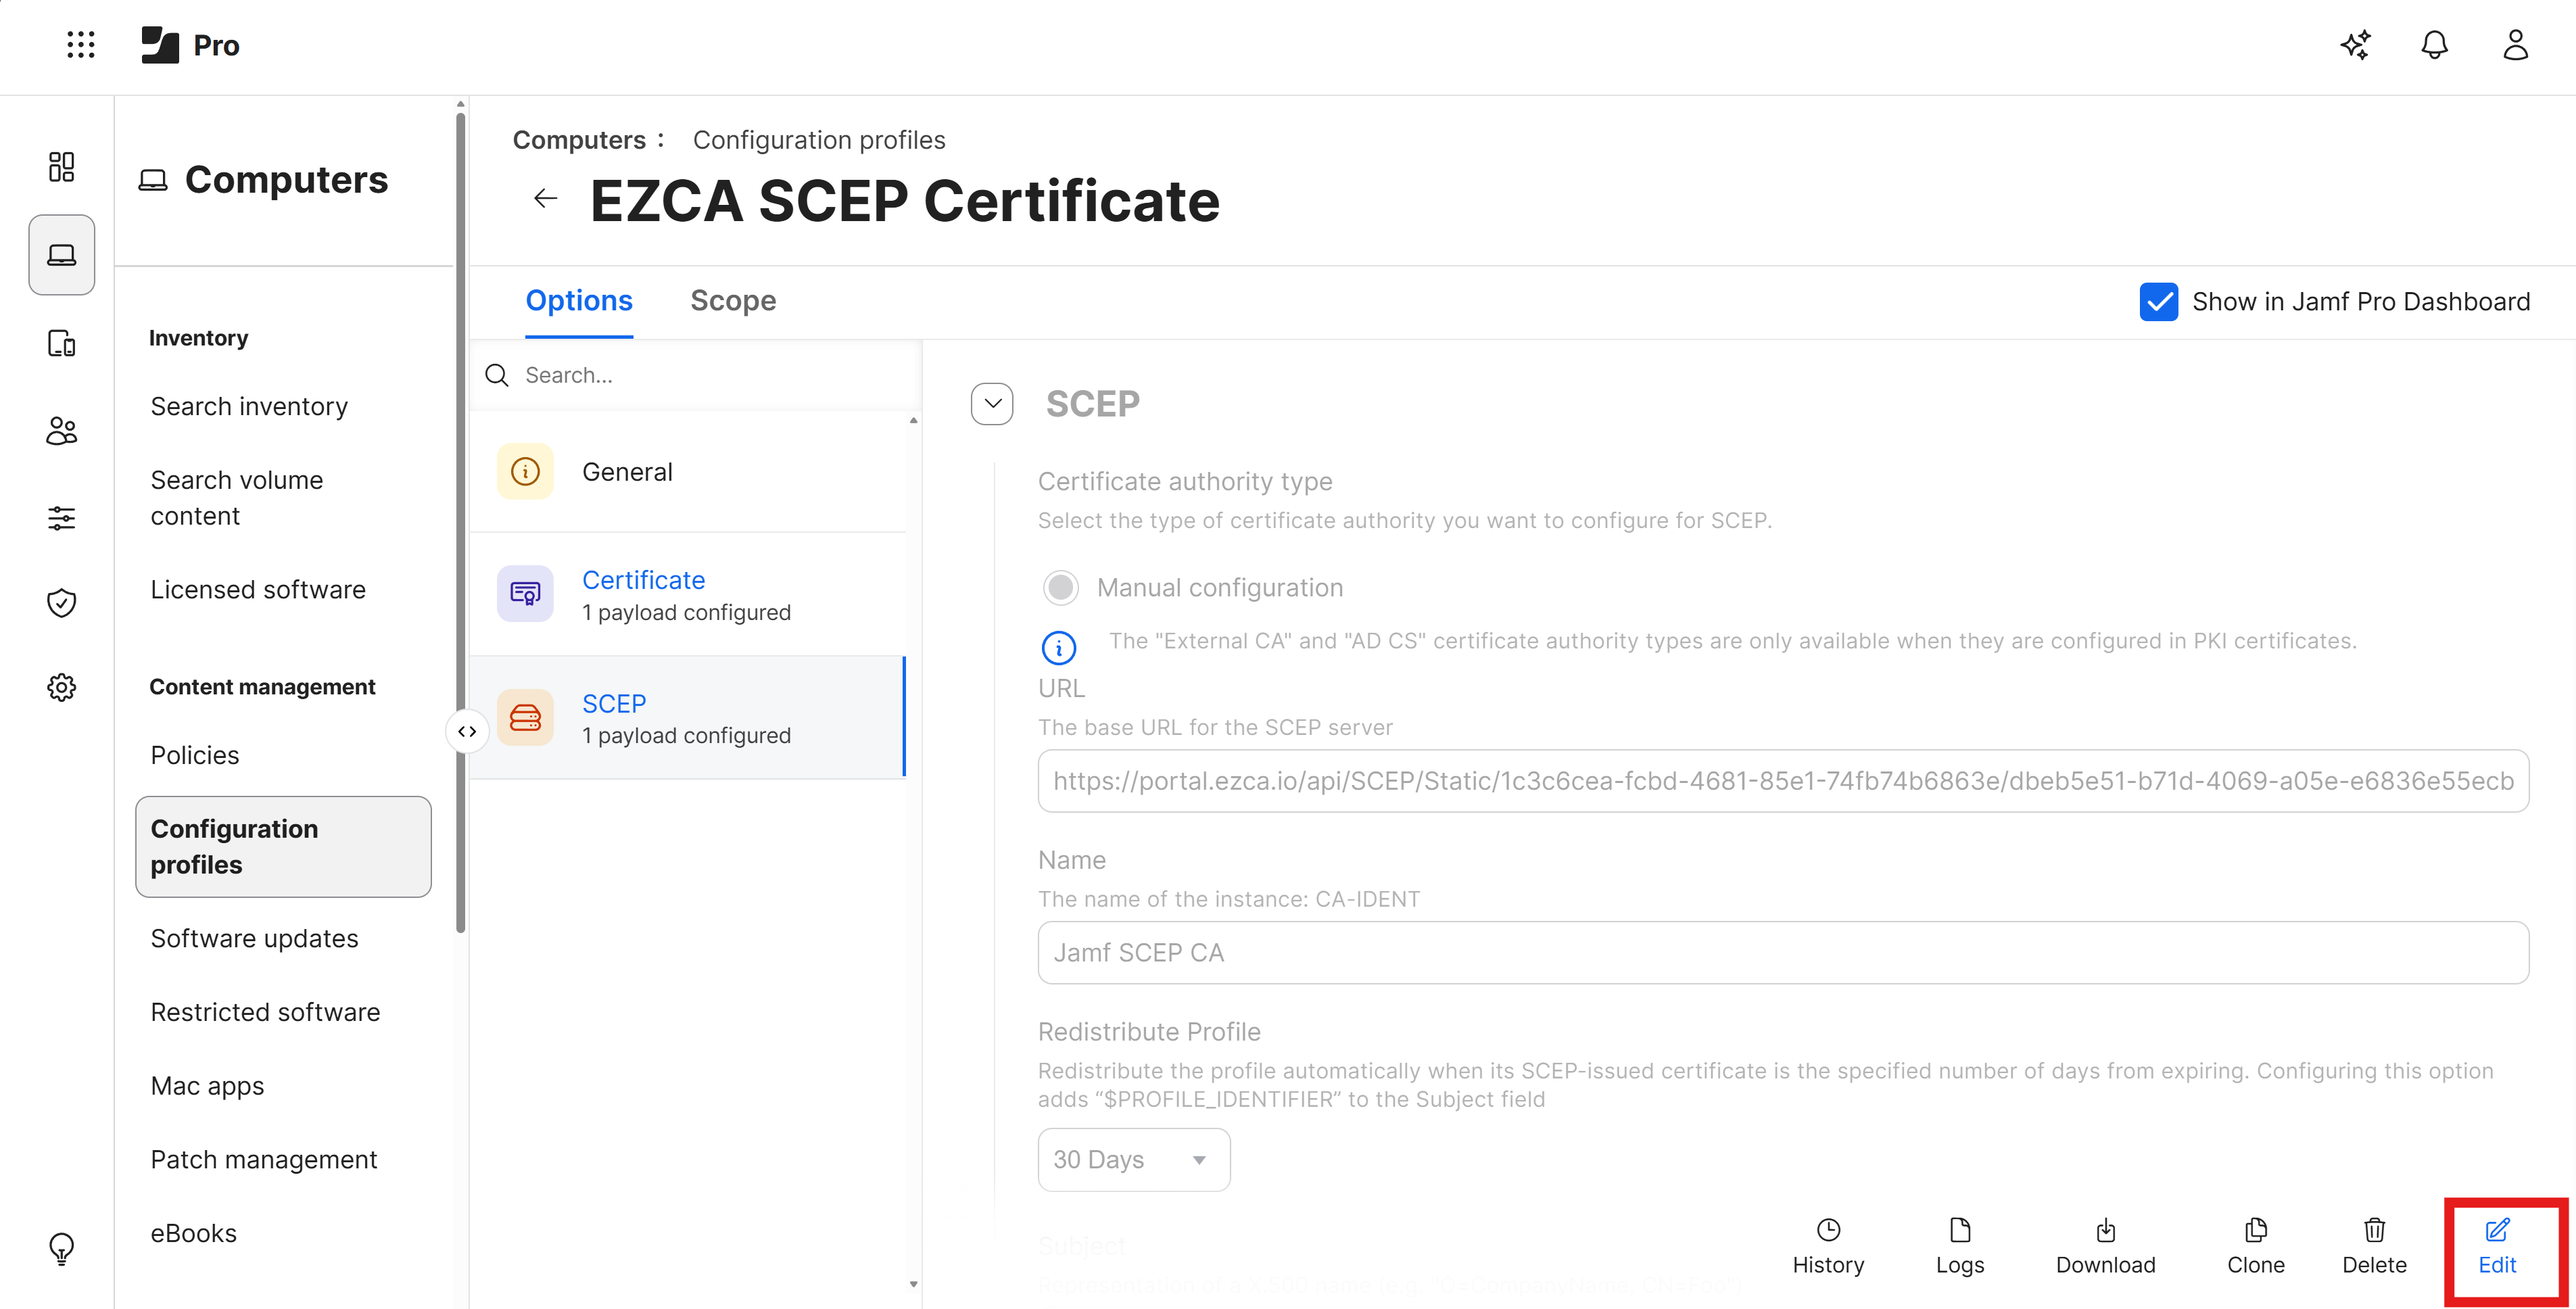
Click on the name of the Configuration Profile that has SCEP configured.
-
Click on the Edit button.
-
Scroll down to the Certificates section and click the + button to add a new certificate.
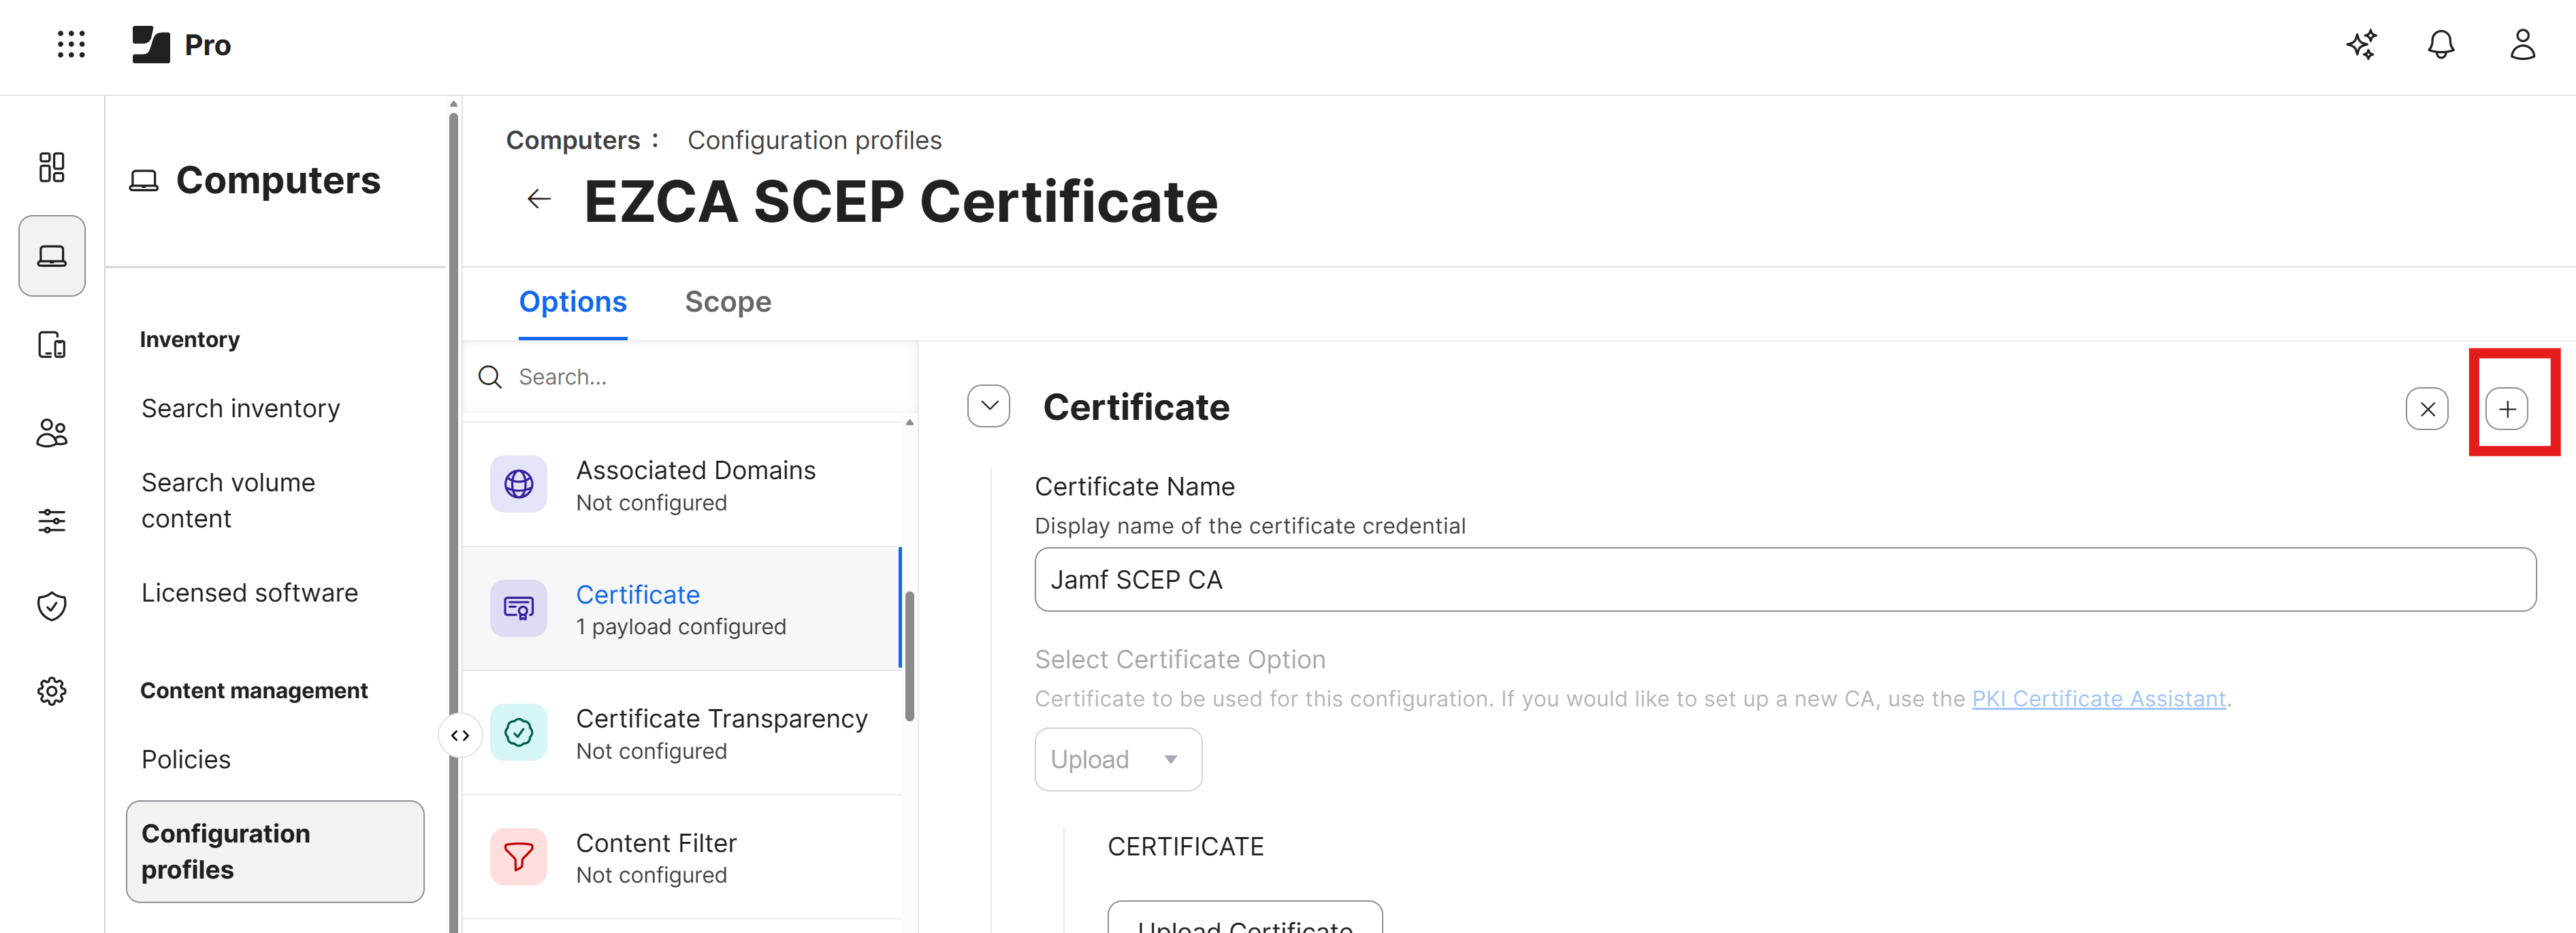
-
Enter a name for your certificate such as EZRADIUS Server CA and click Upload Certificate. You should now have two certificates, one for your SCEP CA and one for your EZRADIUS Server CA.

-
Click Save to save the Configuration Profile with the new certificate and push it to your devices.
How to Download Your EZRADIUS Server Certificate
To ensure that your Jamf Pro devices can trust the Cloud RADIUS server, we will later configure all the possible server certificate names in the Wi-Fi profile. To do this, you will need to download your EZRADIUS server certificate from the EZRADIUS portal.
-
In a new tab, navigate to your EZRADIUS portal.
-
Go to the Policies page and scroll down to the Server Certificates > Existing Certificate section.
-
Click on the Download button to download your server certificate.

-
Save the certificate file to a location on your computer where you can easily access it for the next step.
How To Add a Wi-Fi Profile in Jamf Pro for EAP-TLS Authentication
In this step we will be updating your existing Configuration Profile to add a Wi-Fi payload configured for EAP-TLS authentication with Cloud RADIUS.
An existing configuration profile is required to add the Wi-Fi payload, because you will need to select the SCEP certificate you issued in the previous step in the Wi-Fi payload configuration. If you do not have an existing configuration profile with SCEP configured, you can create a new one and add the Wi-Fi payload during creation.
-
Navigate to your Jamf Pro portal.
-
Go to Computers > Configuration Profiles.
-
Click on the name of the Configuration Profile that has SCEP configured.
-
Click on the Edit button.
-
Scroll down to the Network payload and click on the Configure button.
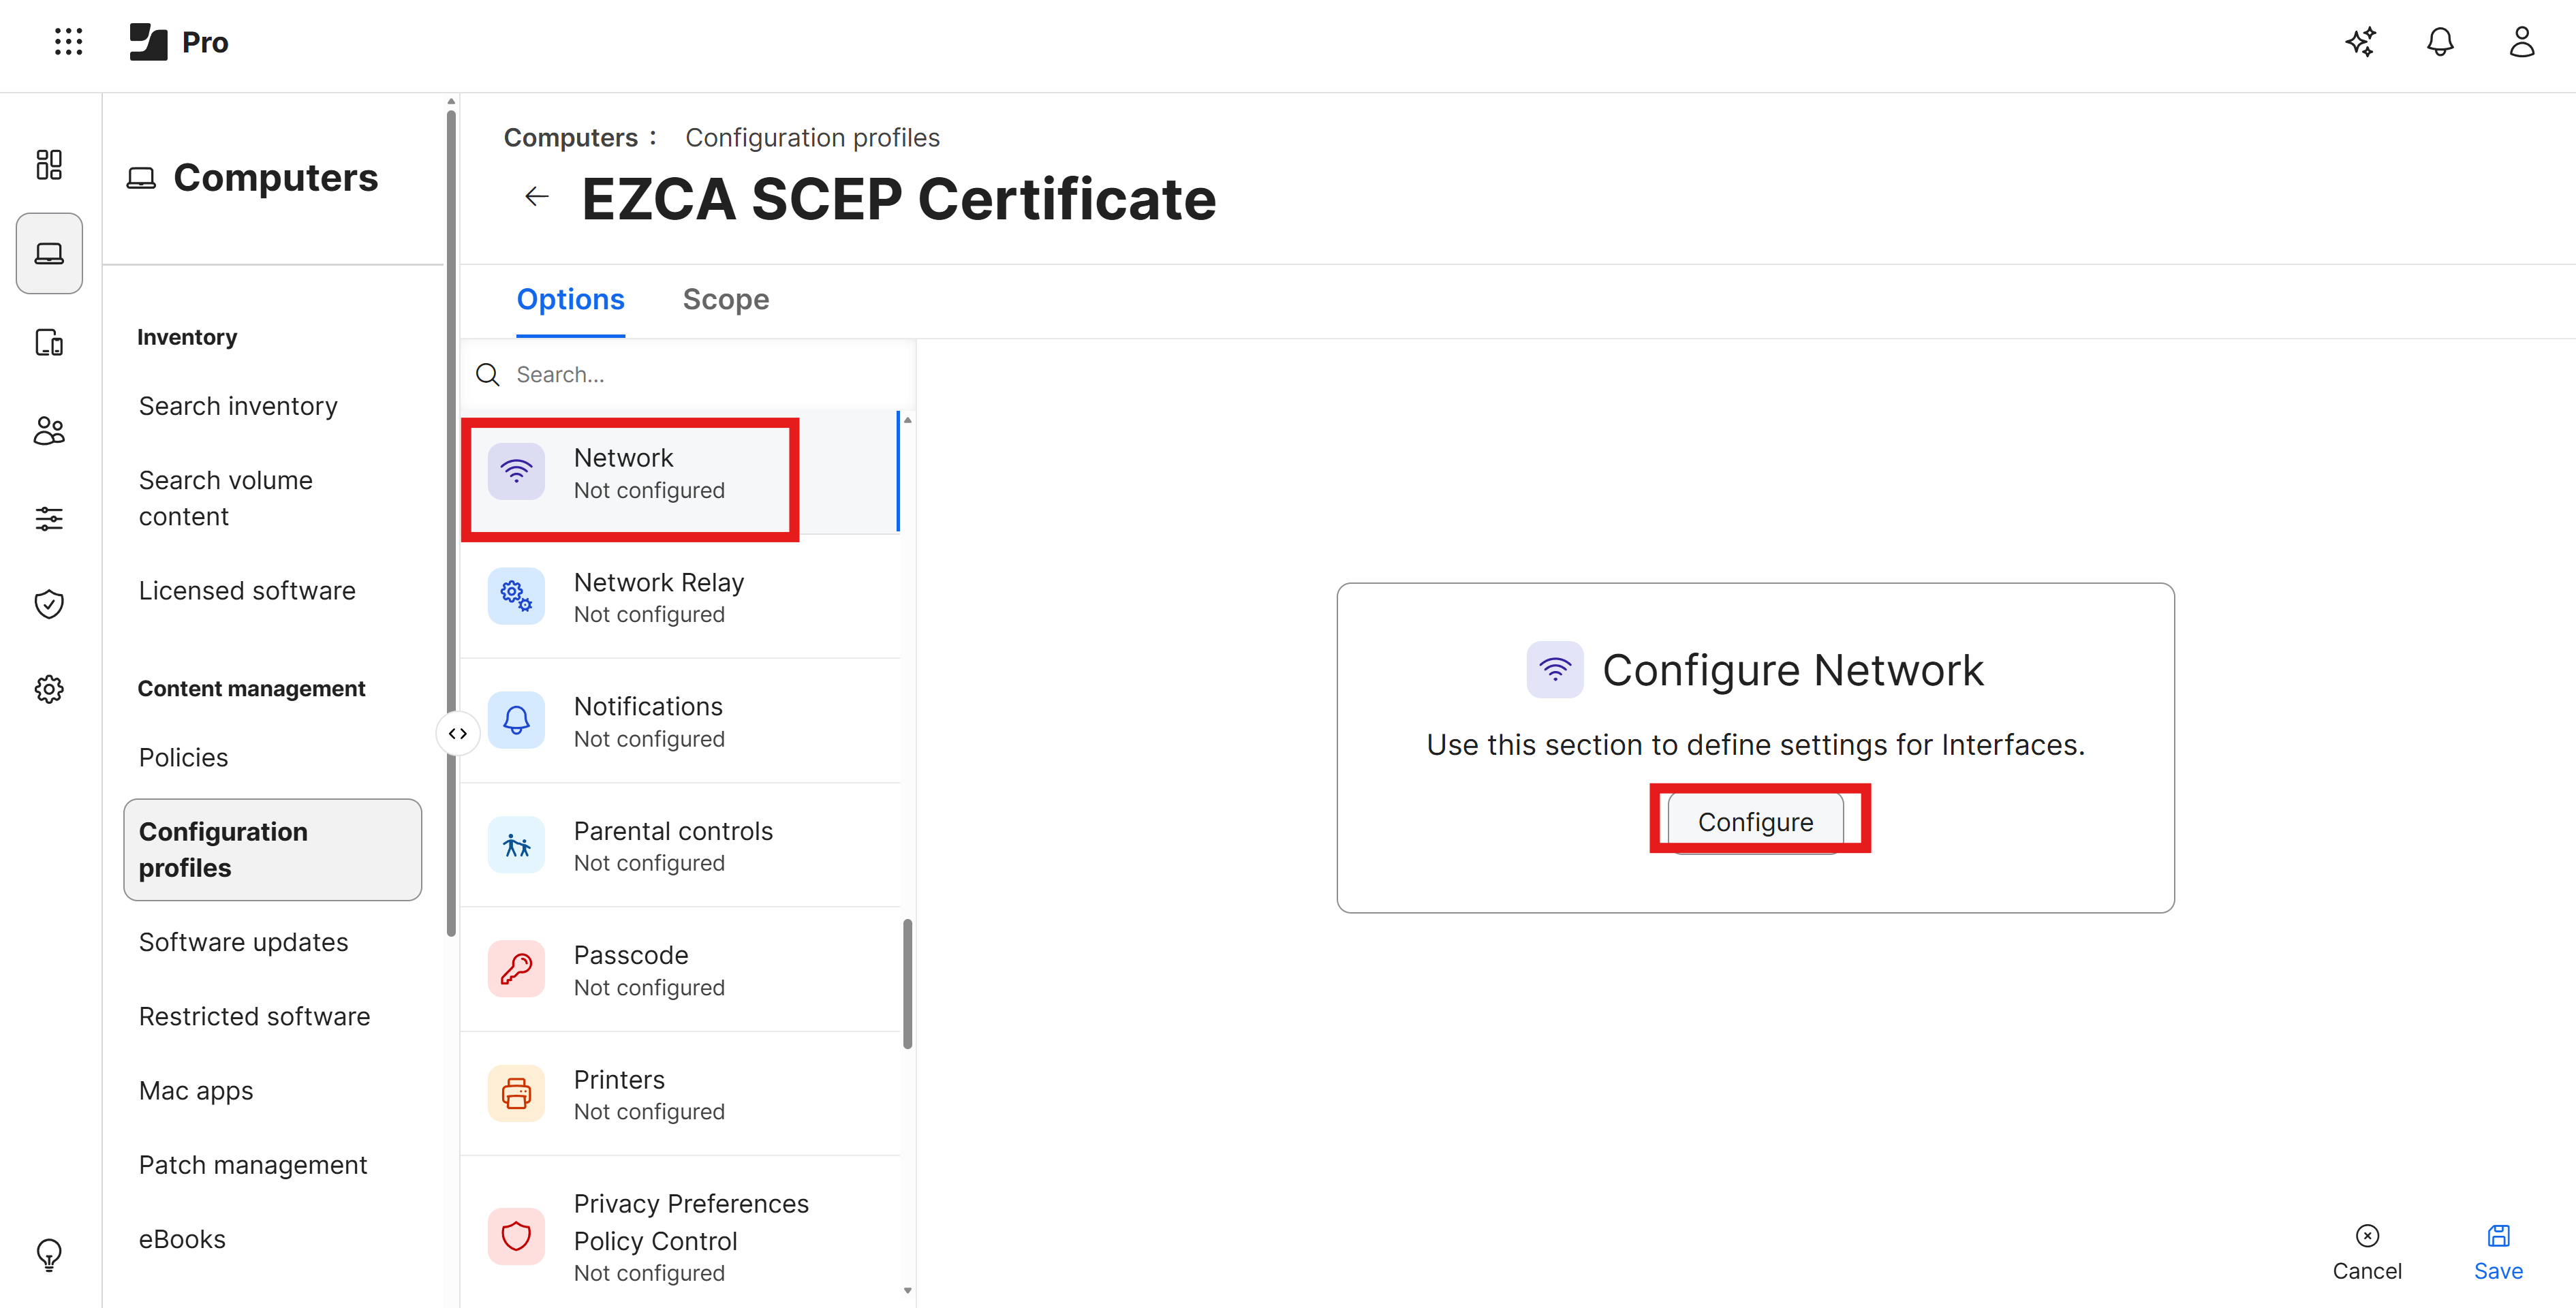
-
Set the following values:
- Network Interface: Keep as Wi-Fi
- SSID: Set this to the exact name of your Wi-Fi network (case sensitive)
- Security Type: Set this to your Wi-Fi security type (e.g. WPA2/WPA3 Enterprise)
-
Under the Protocols tab set Accepted EAP Types to EAP-TLS
-
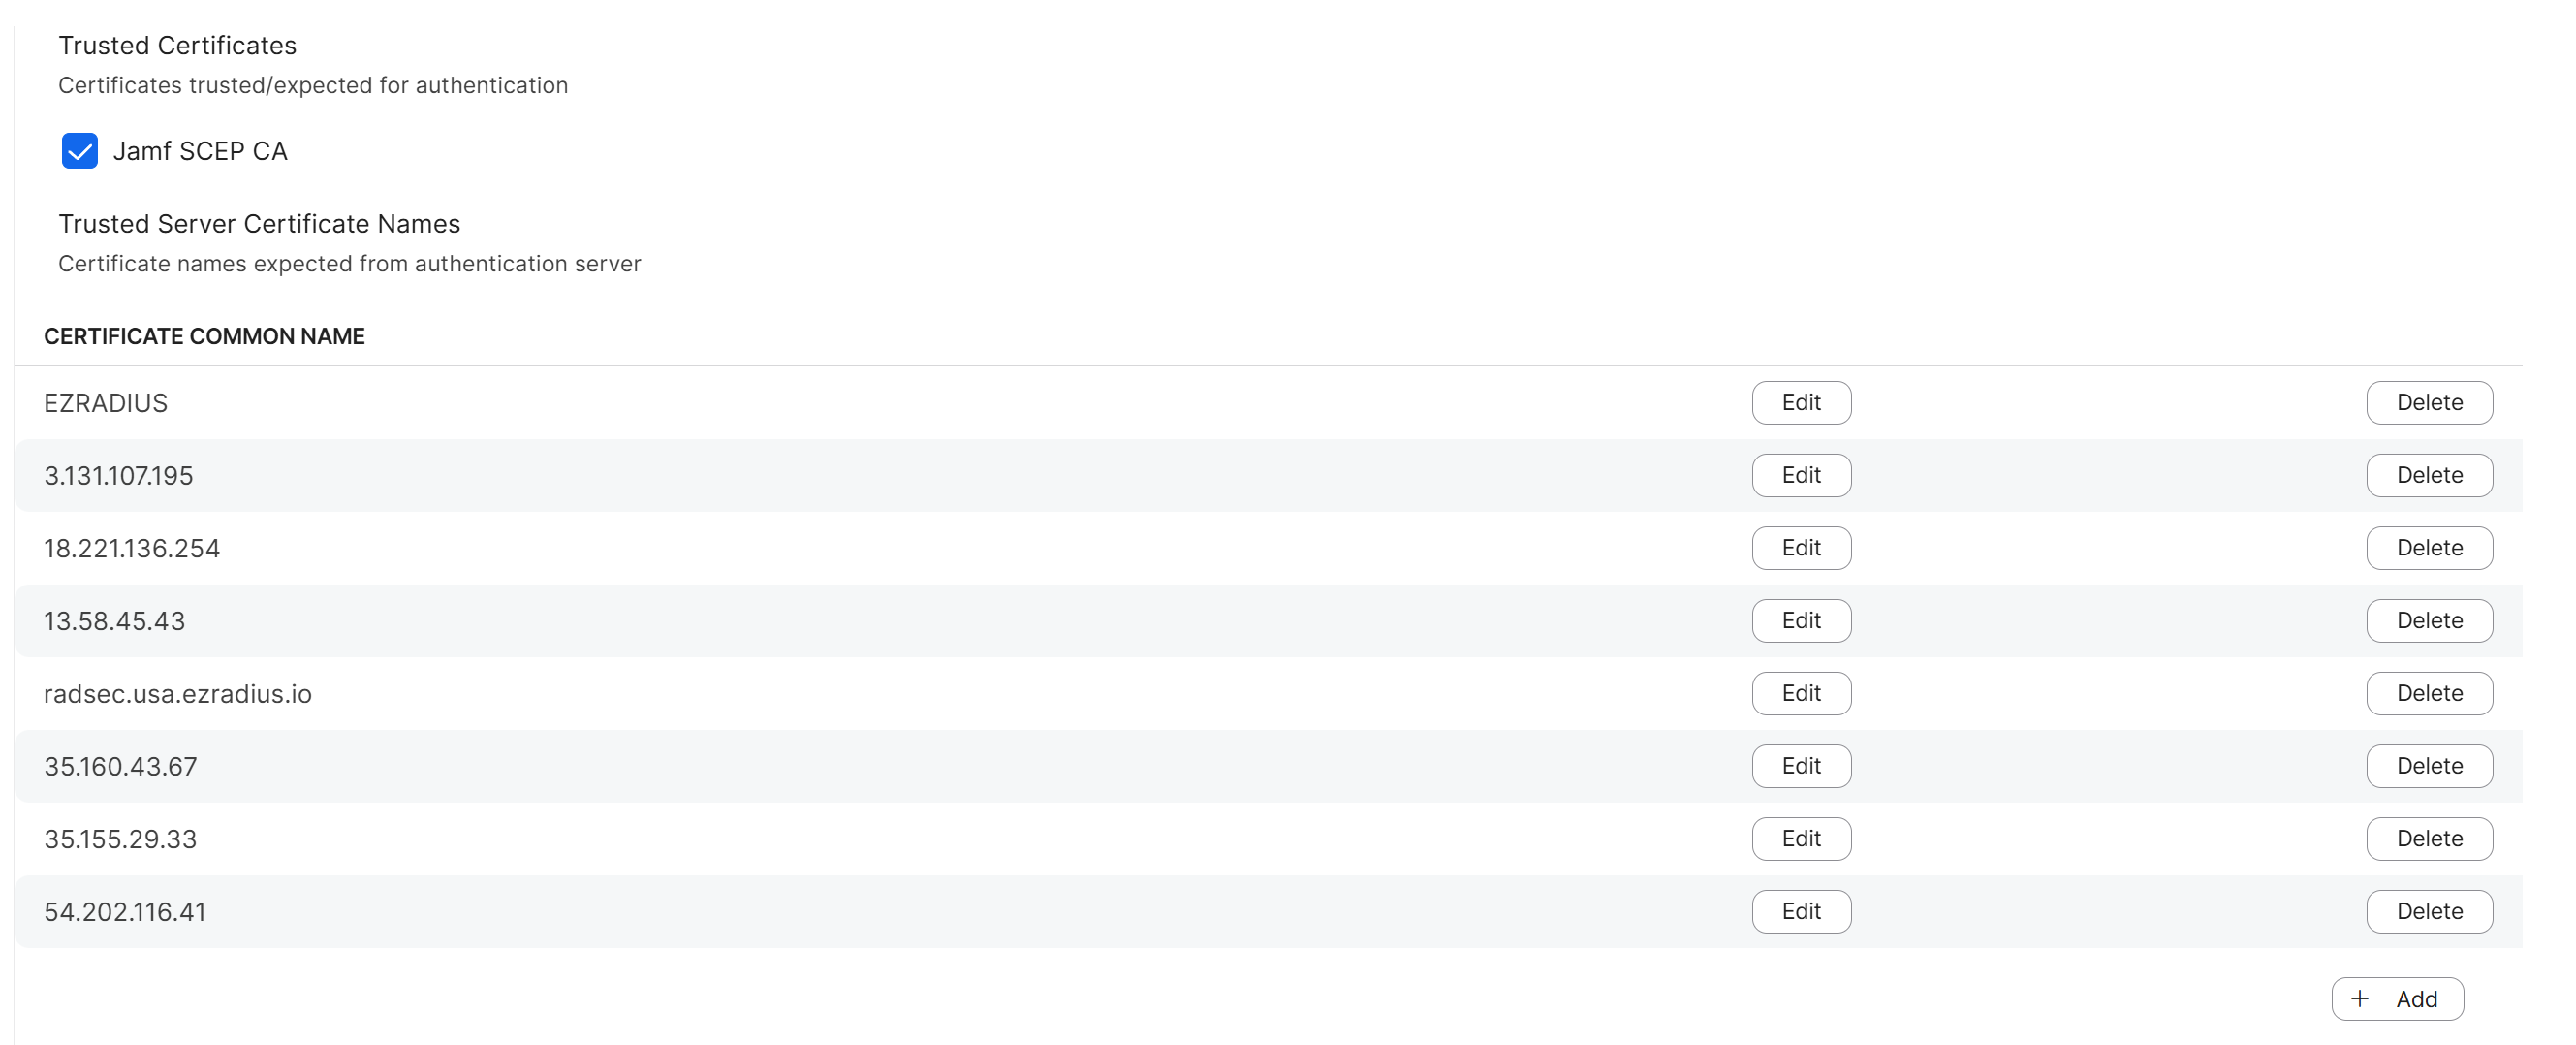
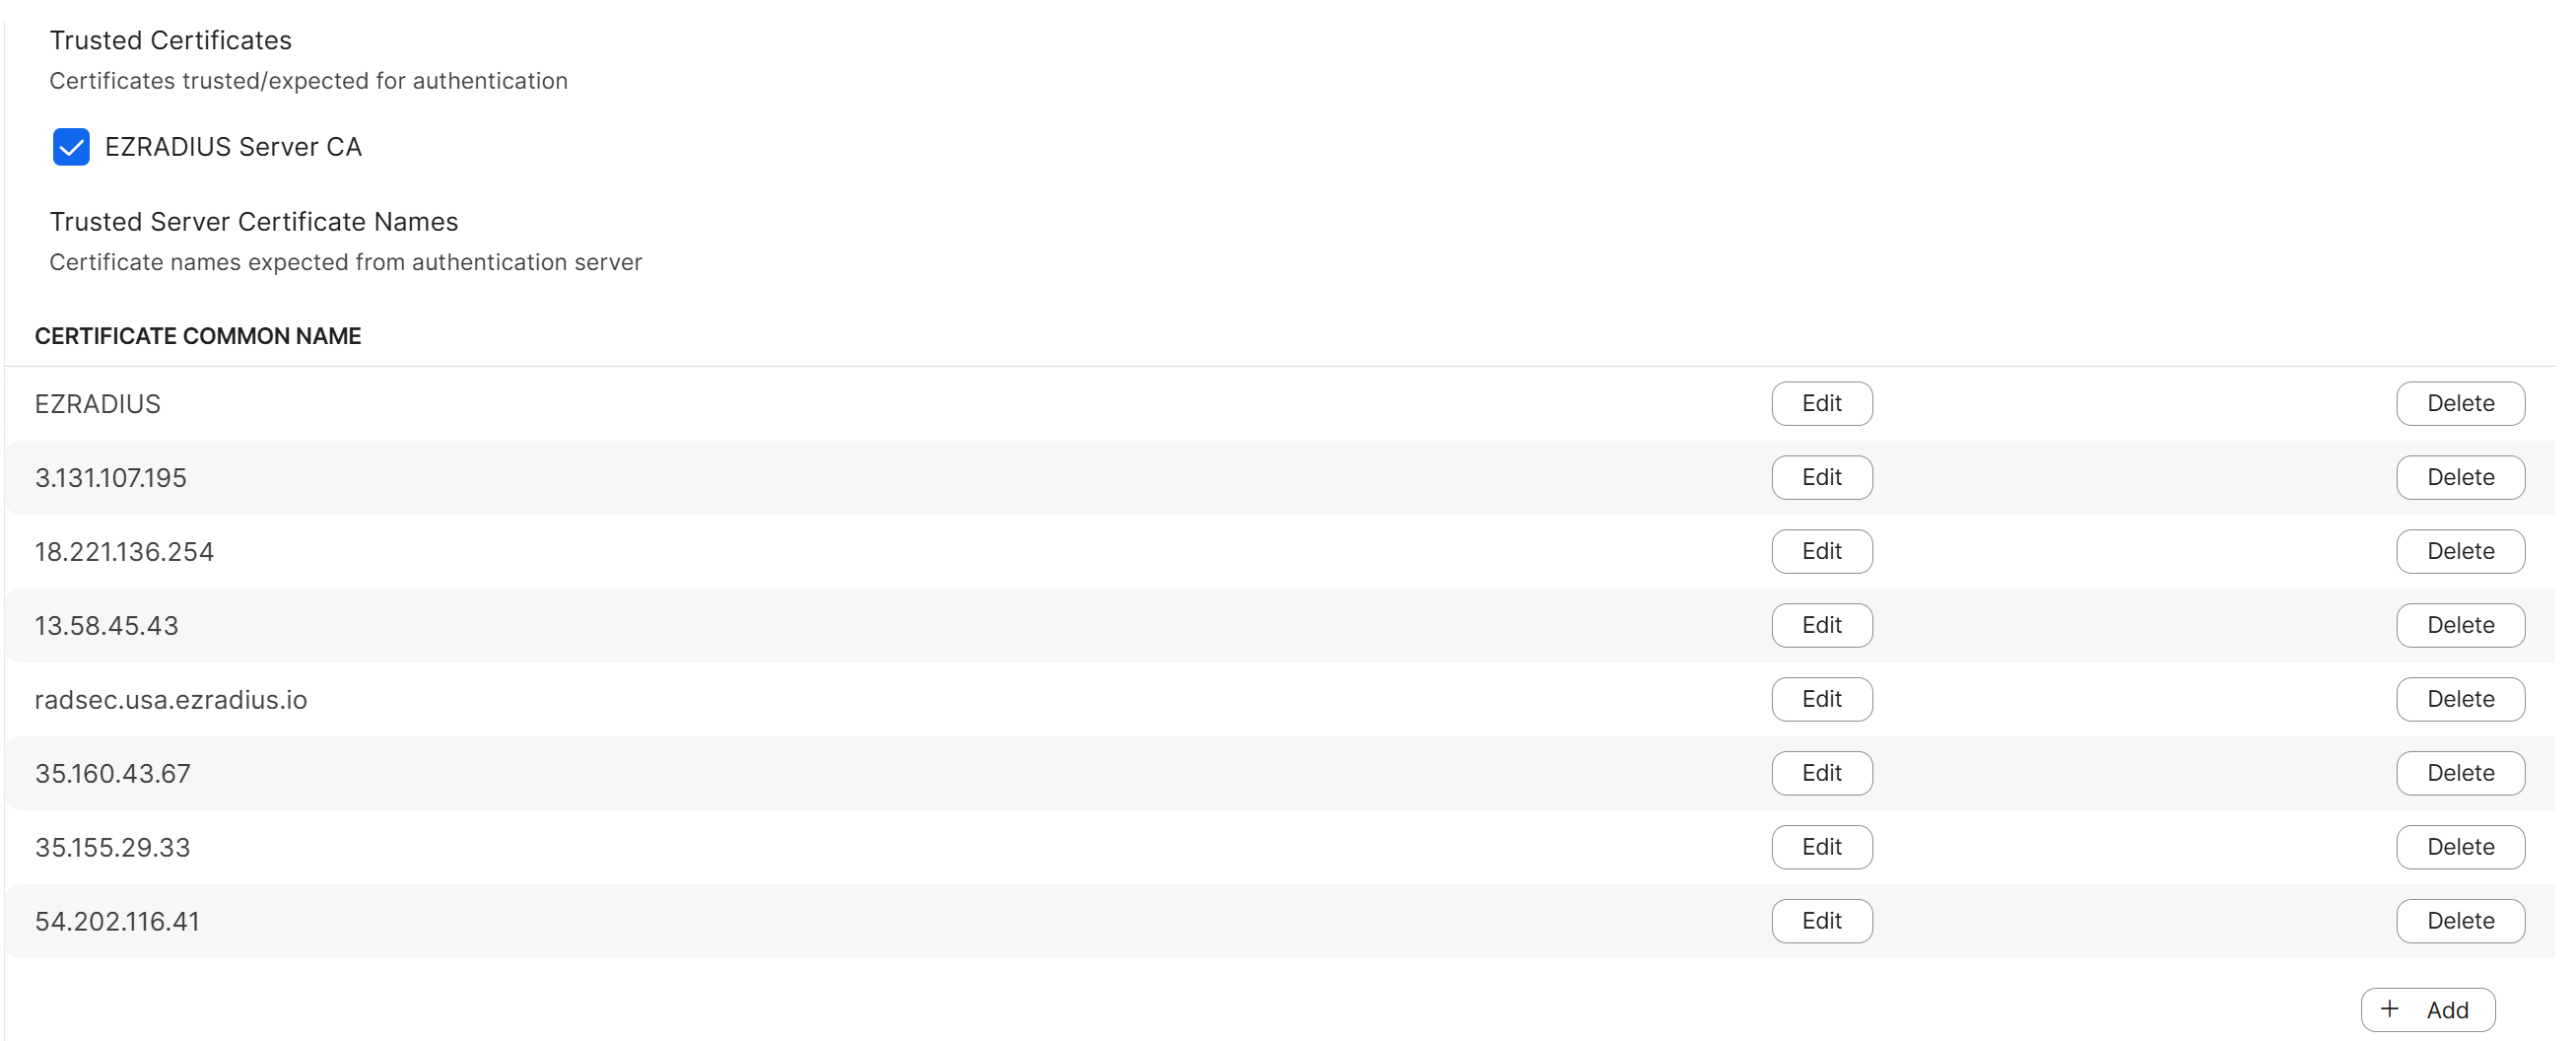
Under the Trust tab, set the following values:
-
Trusted Certificates: Check the box for your EZRADIUS Server CA certificate. If you use the same certificate for your SCEP CA and your EZRADIUS Server CA, then you only need to check the box for that one certificate. If you have a different certificate for your SCEP CA and your EZRADIUS Server CA, then you will need to check the box for your EZRADIUS Server CA certificate that you uploaded in the previous step.
-
Trusted Server Certificate Names: Open the EZRADIUS Server Certificate (not the CA certificate) that you downloaded in the previous step and copy the Subject and every Subject Alternative Name (SAN) value into this list. You should have at least 4-7 values to add to this list, and it is important to add all of them to ensure that your devices can connect successfully.
-
-
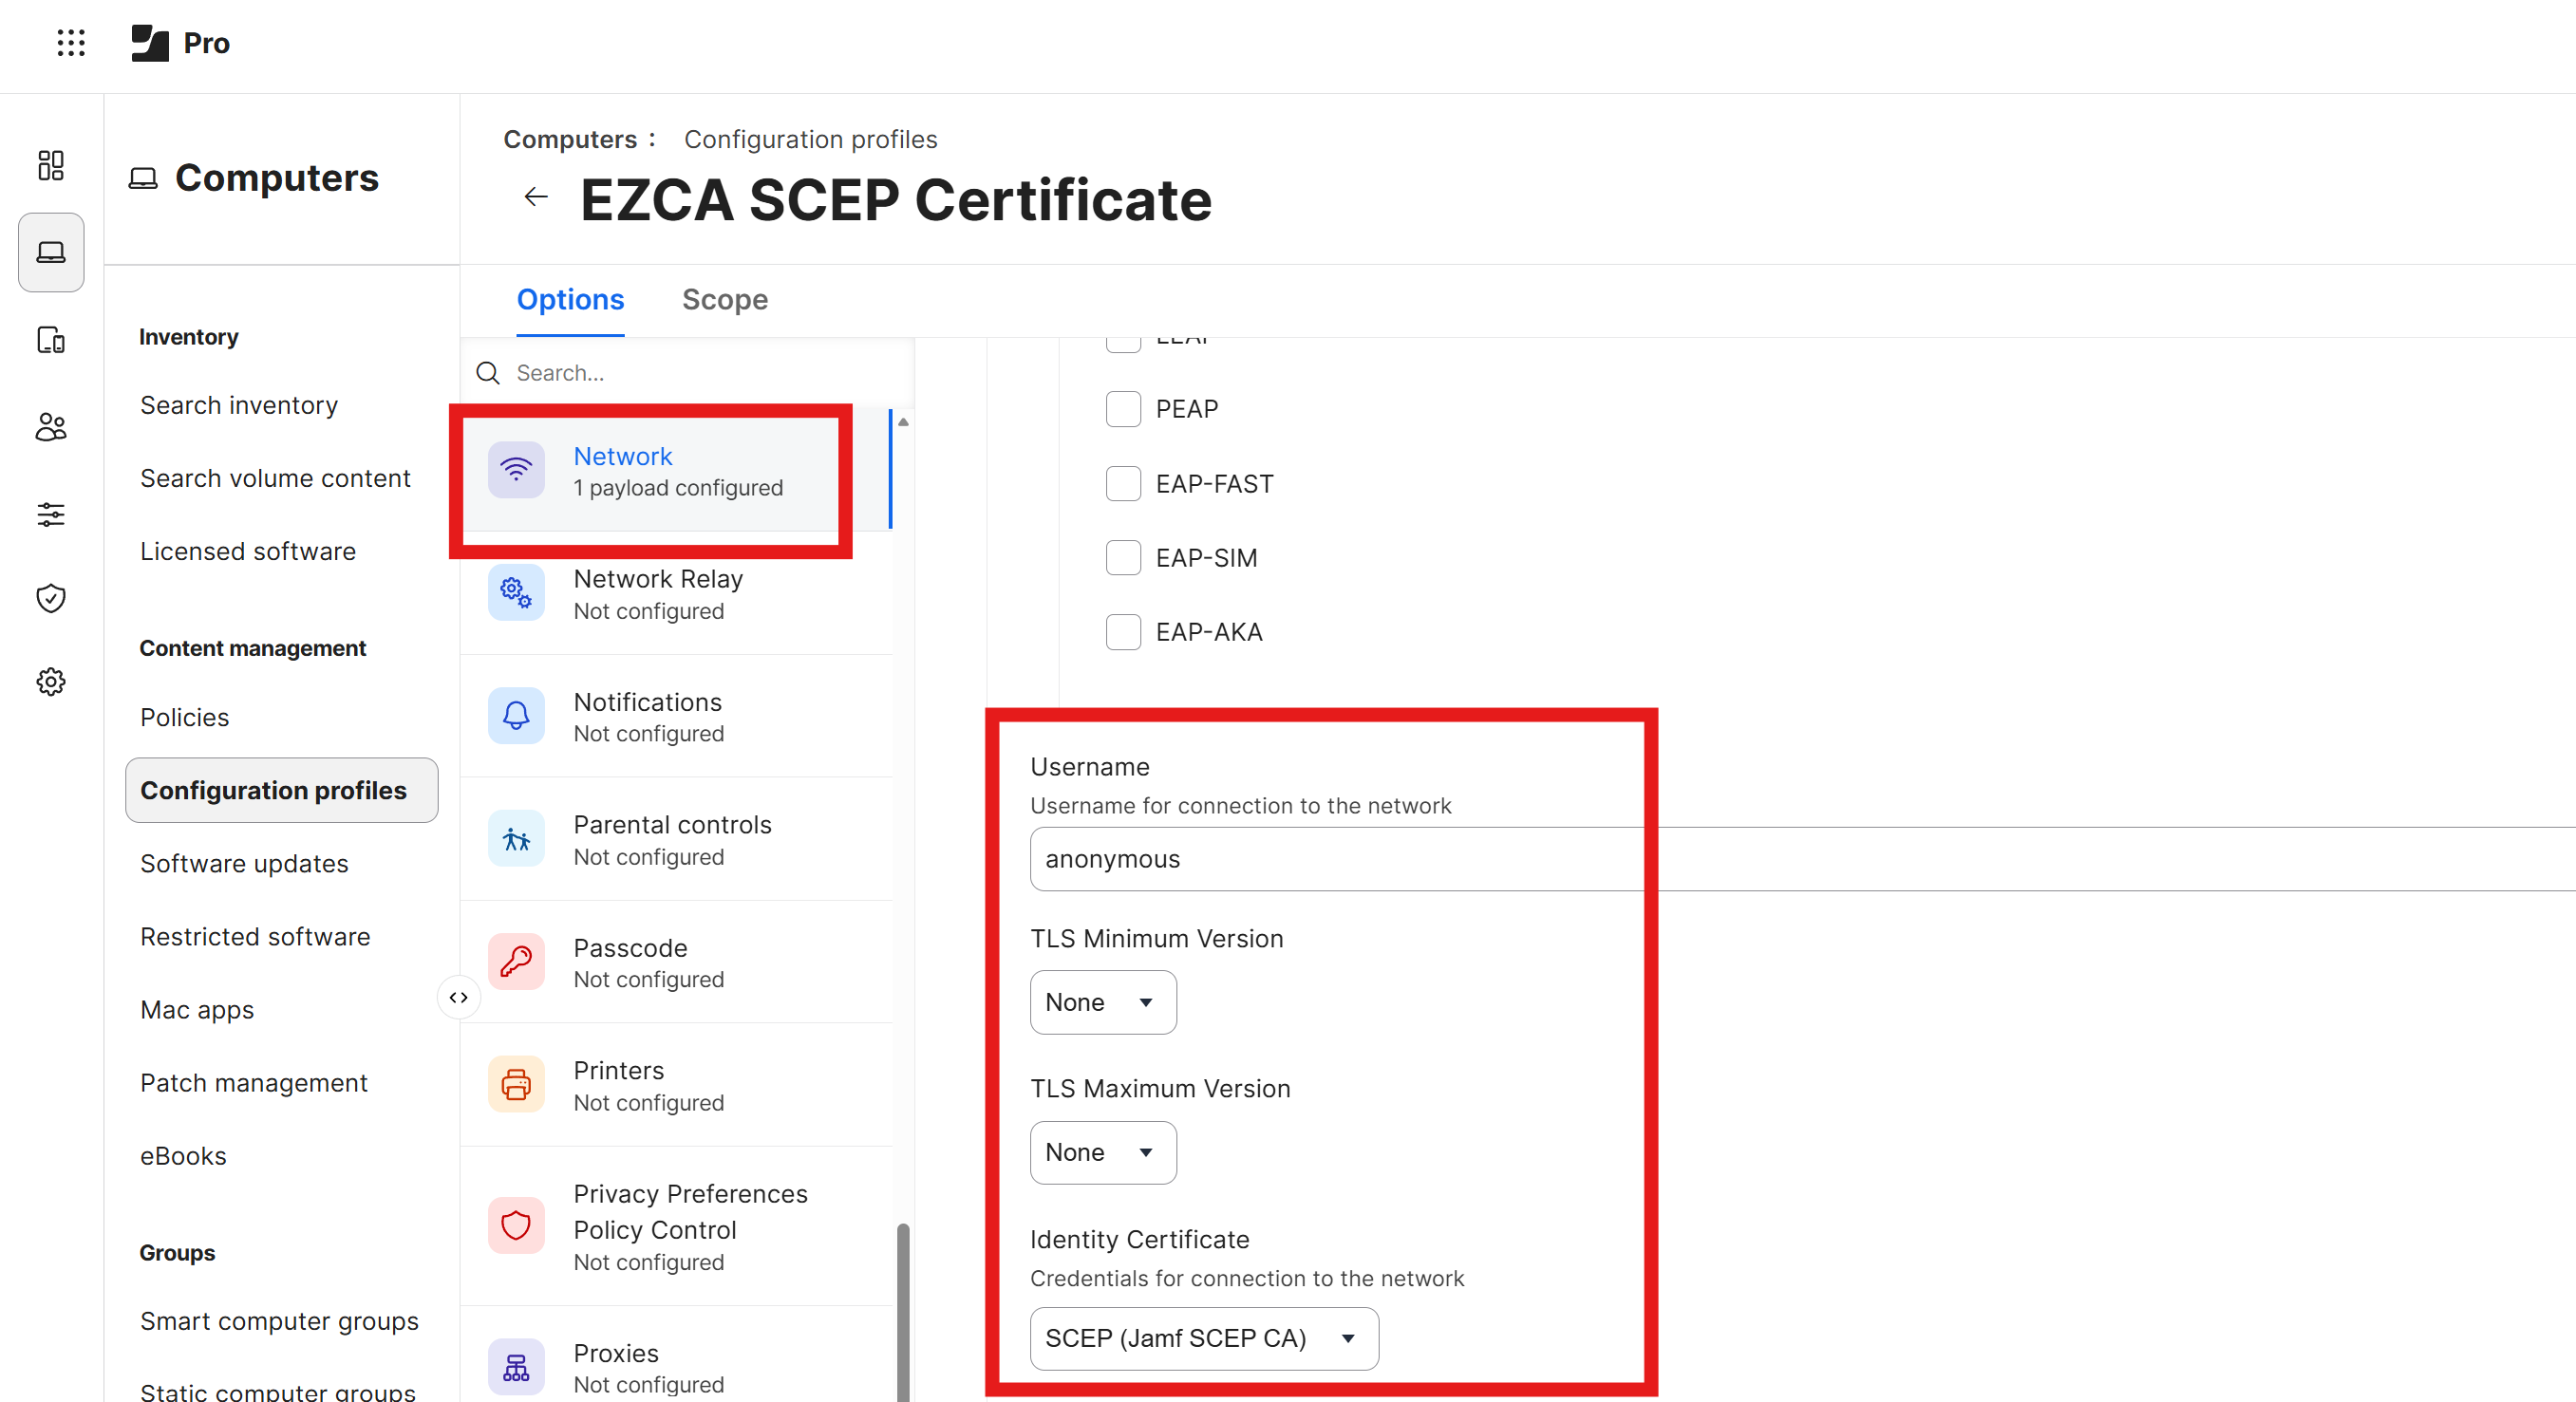
Configure the remaining settings as follows:
-
Username: Set this to
anonymousor leave blank (this value is not used for EAP-TLS authentication) -
Identity Certificate: Select the SCEP certificate that you configured in the previous step. It should be prefixed with “SCEP” and then the name of your configuration profile.
-
-
Click Save to save the Wi-Fi payload configuration and push it to your devices.
How To Test Your Wi-Fi Configuration in macOS
Now that you have configured your Jamf Pro Wi-Fi profile to use Cloud RADIUS for authentication, the next step is to test the configuration on a managed macOS device. Follow these steps to test your Wi-Fi configuration:
-
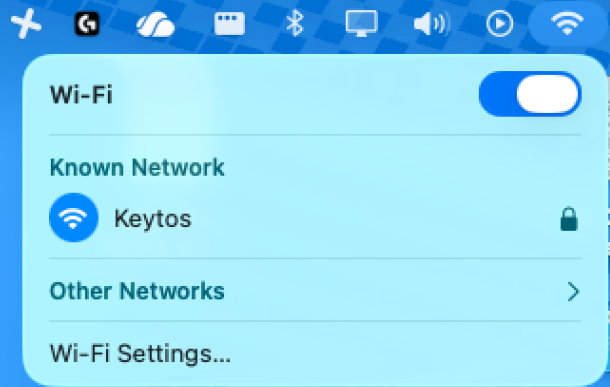
On a managed macOS device, click on the Wi-Fi icon in the menu bar and select the Wi-Fi network that you configured in your Jamf Pro Wi-Fi profile.
-
You might see a prompt asking you to select a certificate for authentication. If so, select the SCEP certificate that was issued to the device and click Continue.
-
If your configuration is correct, the device should successfully connect to the Wi-Fi network.
How to Create a New Configuration Profile in Jamf Pro for EAP-TTLS Authentication
To configure EAP-TTLS authentication with Entra ID credentials in Jamf Pro, you will need to create a new Configuration Profile with a Wi-Fi payload configured for EAP-TTLS. Follow these steps to create a new Configuration Profile for EAP-TTLS authentication:
- Navigate to your Jamf Pro portal.
- Go to Computers > Configuration Profiles.
- Click on the + New button to create a new Configuration Profile.
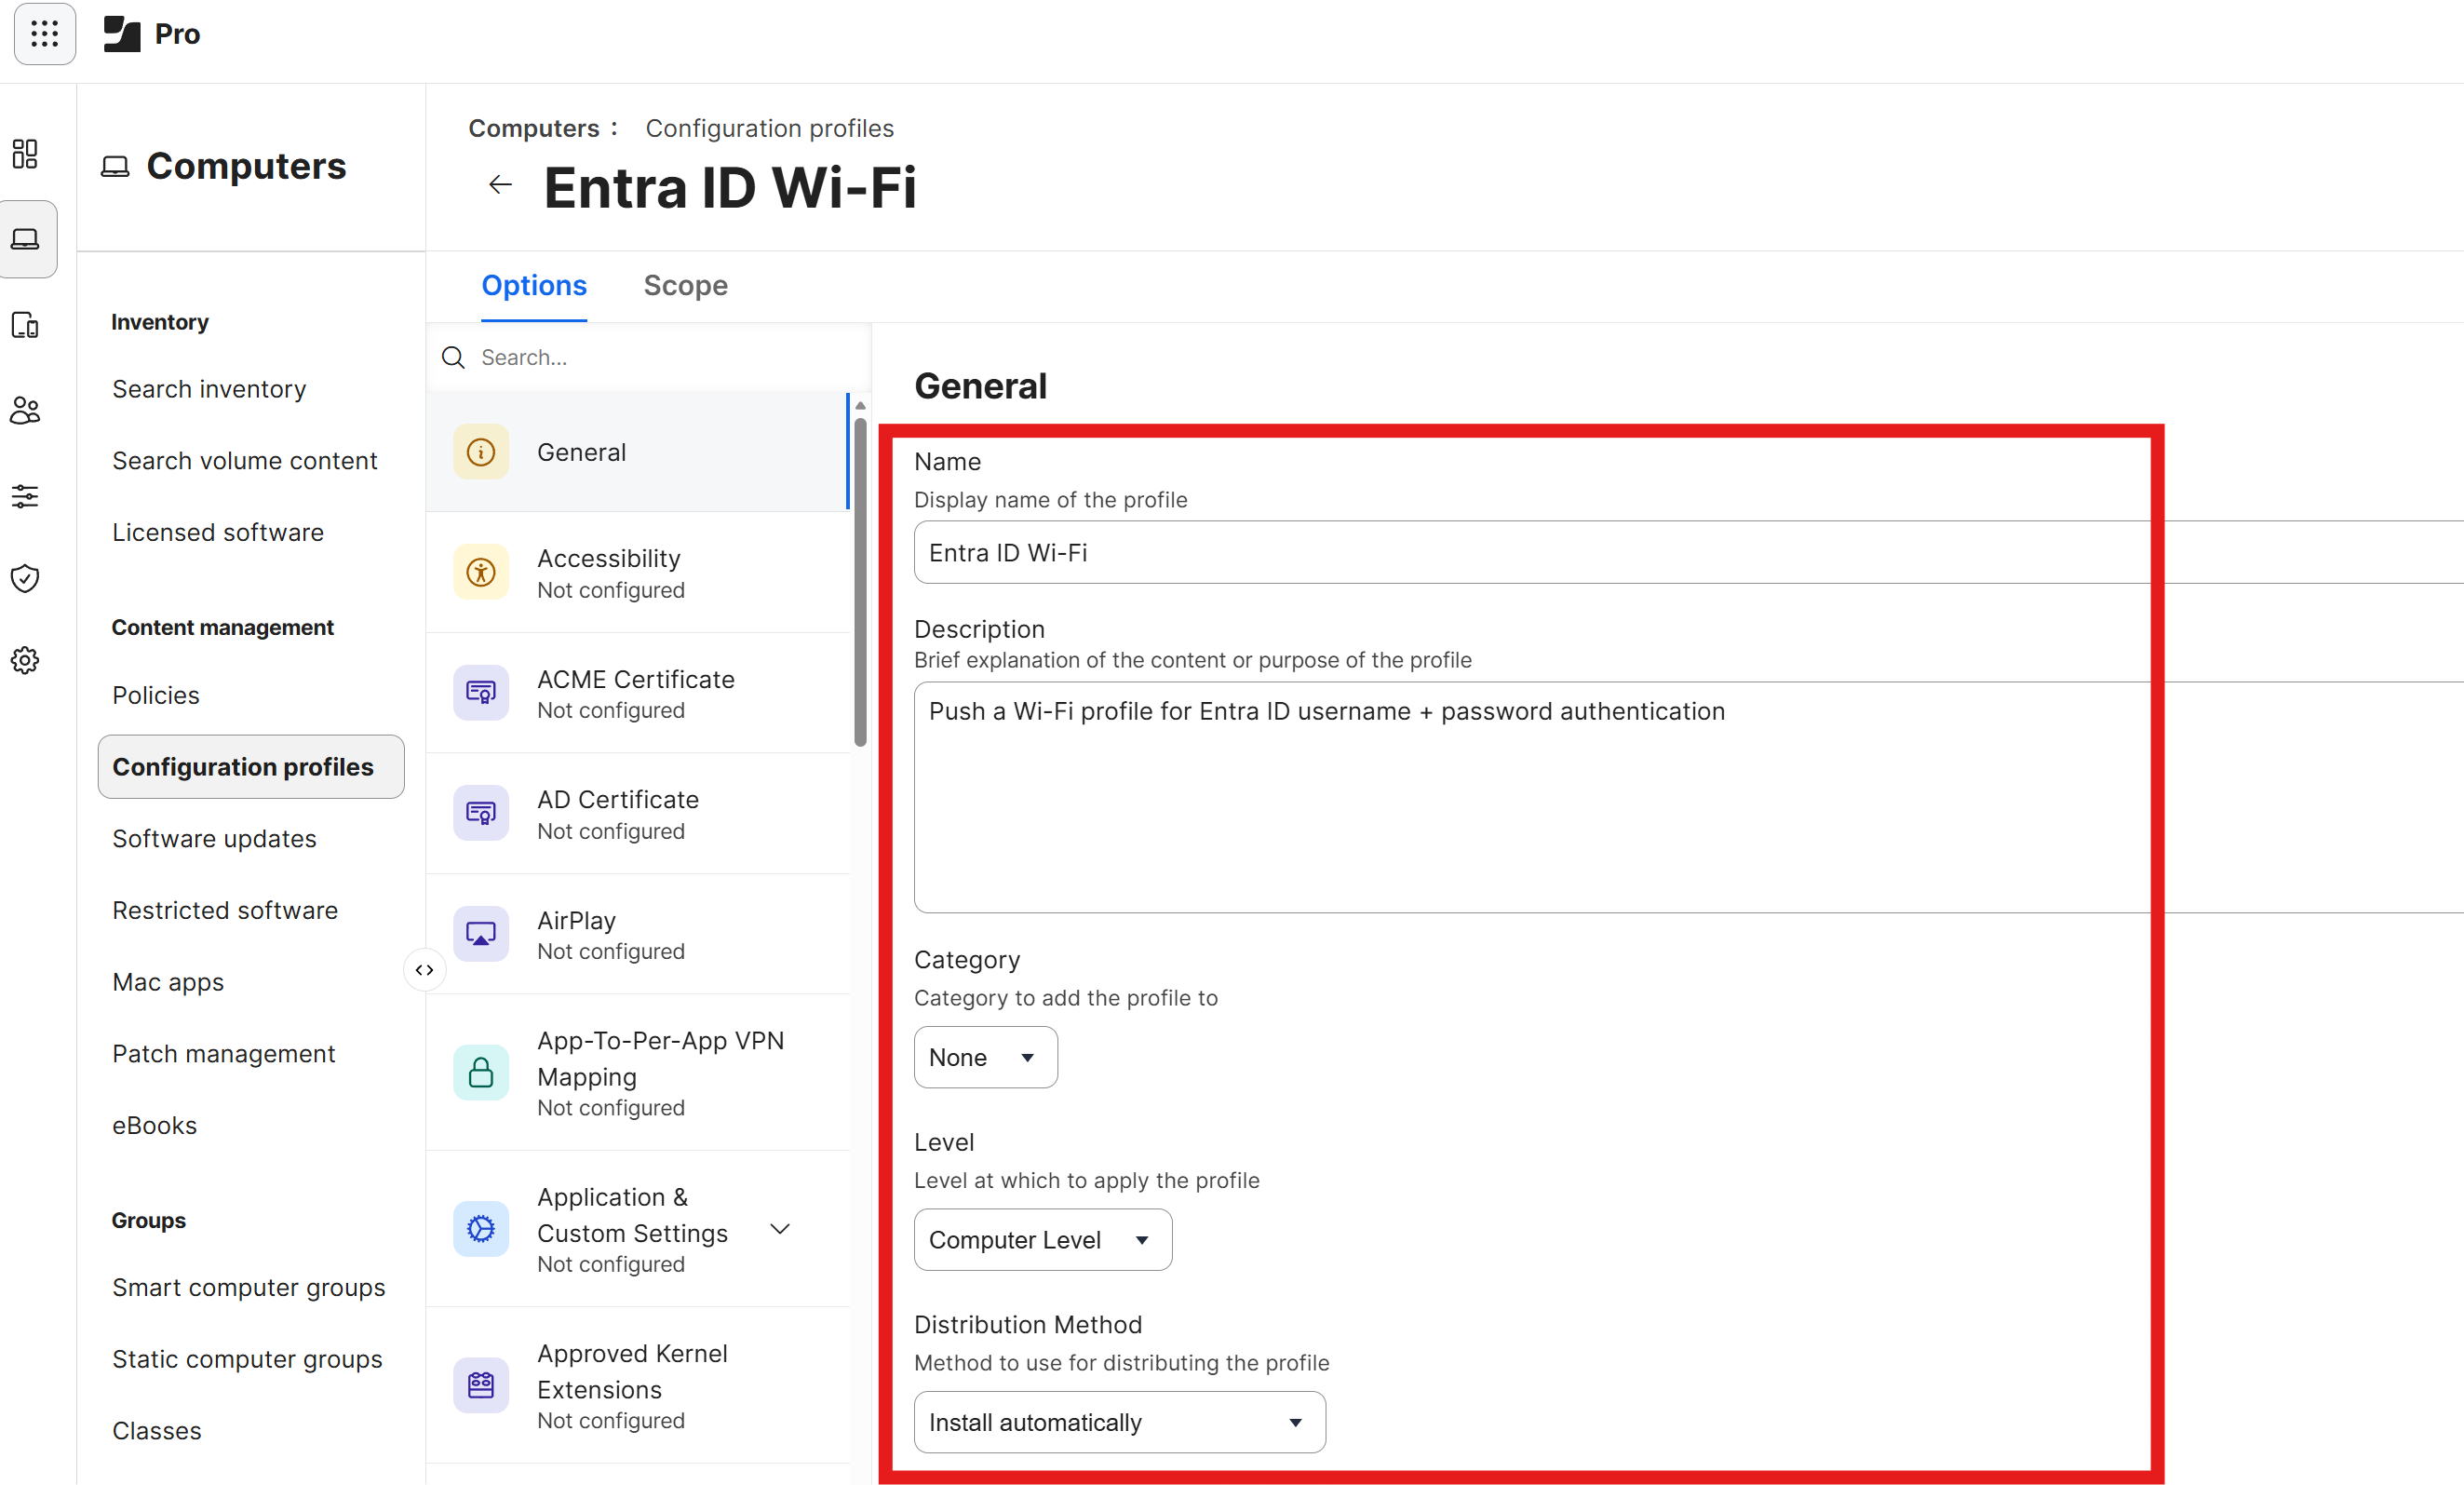
- Under General, enter the following:
-
Name: Enter a friendly name such as Entra ID Wi-Fi
-
Description: Optionally enter a description
-
Level: Set this to Computer Level
-
Distribution Method: Set this to Install Automatically to ensure that the profile is automatically installed for your users.
-
How to Download and Push Your EZRADIUS Server CA Certificate
For your devices to trust the Cloud RADIUS server, you will need to ensure that the EZRADIUS Server CA certificate is installed on your devices. Follow these steps to download the EZRADIUS Server CA certificate and push it to your devices using a Jamf Pro Configuration Profile.
-
In a new tab, navigate to your EZRADIUS portal.
-
Go to the Policies page and scroll down to the Server Certificates > Existing Certificate section.
-
Click on the Download CA Certificate button to download your server CA certificate.
-
Back in your Jamf Pro portal, scroll down to the Certificates section and click the Configure button to add a new certificate.
-
Enter a name for your certificate such as EZRADIUS Server CA and click Upload Certificate. Select the EZRADIUS Server CA certificate that you downloaded in the previous step to upload it to your configuration profile. You should now have the EZRADIUS Server CA certificate added to your configuration profile.
How to Download Your EZRADIUS Server Certificate
To ensure that your Jamf Pro devices can trust the Cloud RADIUS server, we will later configure all the possible server certificate names in the Wi-Fi profile. To do this, you will need to download your EZRADIUS server certificate from the EZRADIUS portal.
-
In a new tab, navigate to your EZRADIUS portal.
-
Go to the Policies page and scroll down to the Server Certificates > Existing Certificate section.
-
Click on the Download button to download your server certificate.
-
Save the certificate file to a location on your computer where you can easily access it for the next step.
How To Add a Wi-Fi Profile in Jamf Pro for Entra ID EAP-TTLS Authentication
In this step we will be adding a Wi-Fi payload to our new Configuration Profile to configure EAP-TTLS authentication with Entra ID credentials.
-
Scroll down to the Network payload and click on the Configure button.
-
Set the following values:
- Network Interface: Keep as Wi-Fi
- SSID: Set this to the exact name of your Wi-Fi network (case sensitive)
- Security Type: Set this to your Wi-Fi security type (e.g. WPA2/WPA3 Enterprise)
-
Under the Protocols tab set Accepted EAP Types to EAP-TTLS
-
Under the Trust tab, set the following values:
-
Trusted Certificates: Check the box for your EZRADIUS Server CA certificate which you uploaded in the previous step.
-
Trusted Server Certificate Names: Open the EZRADIUS Server Certificate (not the CA certificate) that you downloaded in the previous step and copy the Subject and every Subject Alternative Name (SAN) value into this list. You should have at least 4-8 values to add to this list, and it is important to add all of them to ensure that your devices can connect successfully.
-
-
Configure the remaining settings as follows:
- Username: Set this to
$EMAILto use the user’s Entra ID email as the username for authentication - Password: Leave this blank, the user will be prompted to enter their Entra ID password when they connect to the Wi-Fi network
- Inner Authentication: Set this to PAP
- Outer Identity: Set this to
anonymousor leave blank (this value is not used for EAP-TTLS authentication)
- Username: Set this to
How to Scope Your Configuration Profile to Users
Now that you have configured all of the Options in your new Configuration Profile, the next step is to set the Scope for which users and devices will receive this profile.
-
Click on the Scope tab at the top of the page.
-
Under Target Computers and Target Users, select the users and devices that you want to receive this Wi-Fi configuration. For this example we’ll select All Users and All Computers.
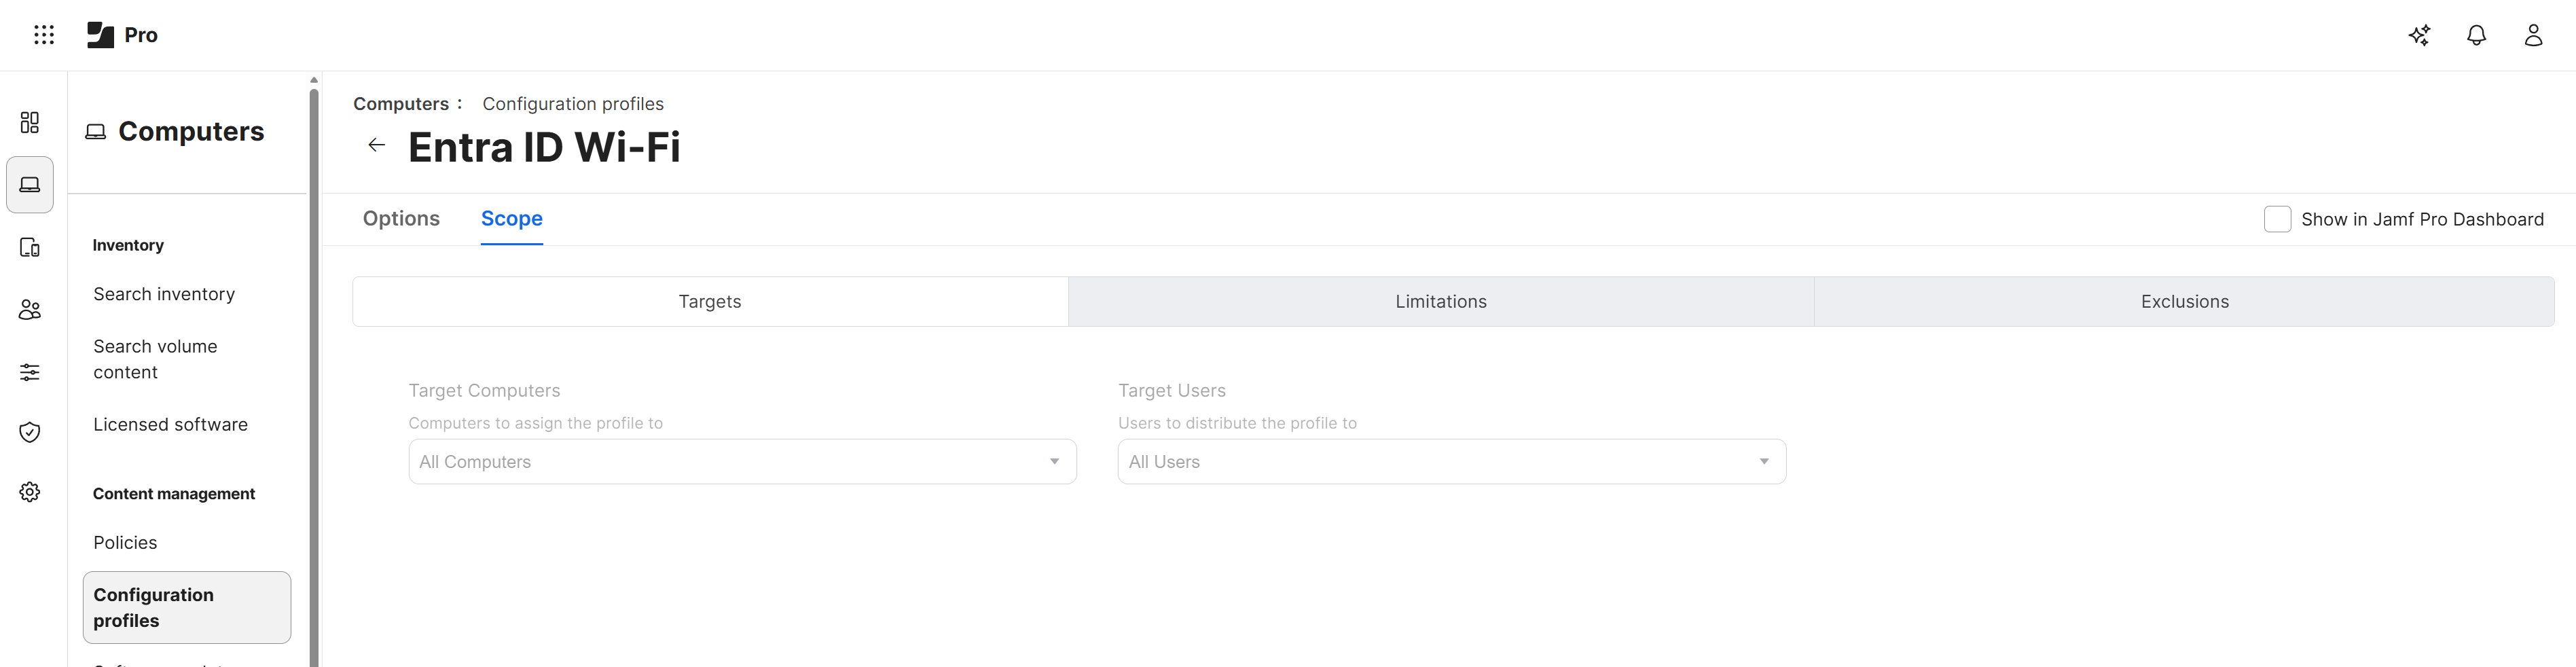
-
Click Save to save the Configuration Profile with the new Scope settings.
How To Test Your Wi-Fi Configuration in macOS
Now that you have configured your Jamf Pro Wi-Fi profile to use Cloud RADIUS for authentication, the next step is to test the configuration on a managed macOS device. Follow these steps to test your Wi-Fi configuration:
-
On a managed macOS device, click on the Wi-Fi icon in the menu bar and select the Wi-Fi network that you configured in your Jamf Pro Wi-Fi profile.
-
You will be prompted to enter your Entra ID username and password. Enter your Entra ID email address as the username and your Entra ID password, then click OK.
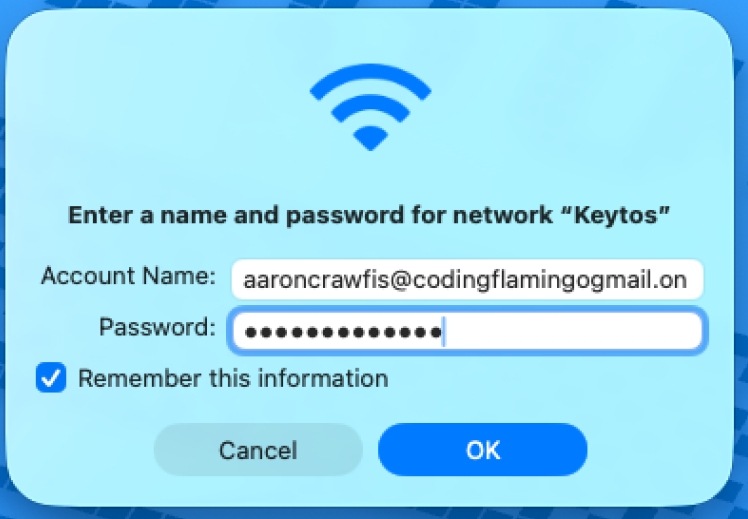
-
If your configuration is correct, the device should successfully connect to the Wi-Fi network.
Now when the user connects to the Wi-Fi network, they will be prompted for their Entra ID password.