

















How-To: Issue ACME or SCEP Certificates in Jamf Pro
How To Configure Jamf Pro ACME and SCEP Certificate Authority - Video Guide
The following video will guide you through all the steps from start to finish to create an ACME or SCEP profile in Jamf Pro using your EZCA SCEP CA.
How to Configure Jamf Pro SCEP Certificate Authority - Step by Step Guide
The following steps will walk you through the process of configuring Jamf Pro to issue SCEP certificates using your EZCA SCEP CA.
Prerequisites for Issuing ACME or SCEP Certificates in Jamf Pro
Before you can begin issuing ACME or SCEP certificates to your Apple devices using Jamf Pro, you will need to have the following prerequisites in place:
- You have registered the Keytos applications in your Entra ID tenant
- You have created a SCEP CA in EZCA
How to Create a New Configuration Profile in Jamf Pro
A Configuration Profile in Jamf Pro is a collection of settings that can be applied to devices. To issue SCEP certificates to your Apple devices, you can follow these steps to create a new Configuration Profile in Jamf Pro:
-
Log in to your Jamf Pro instance as an administrator.
-
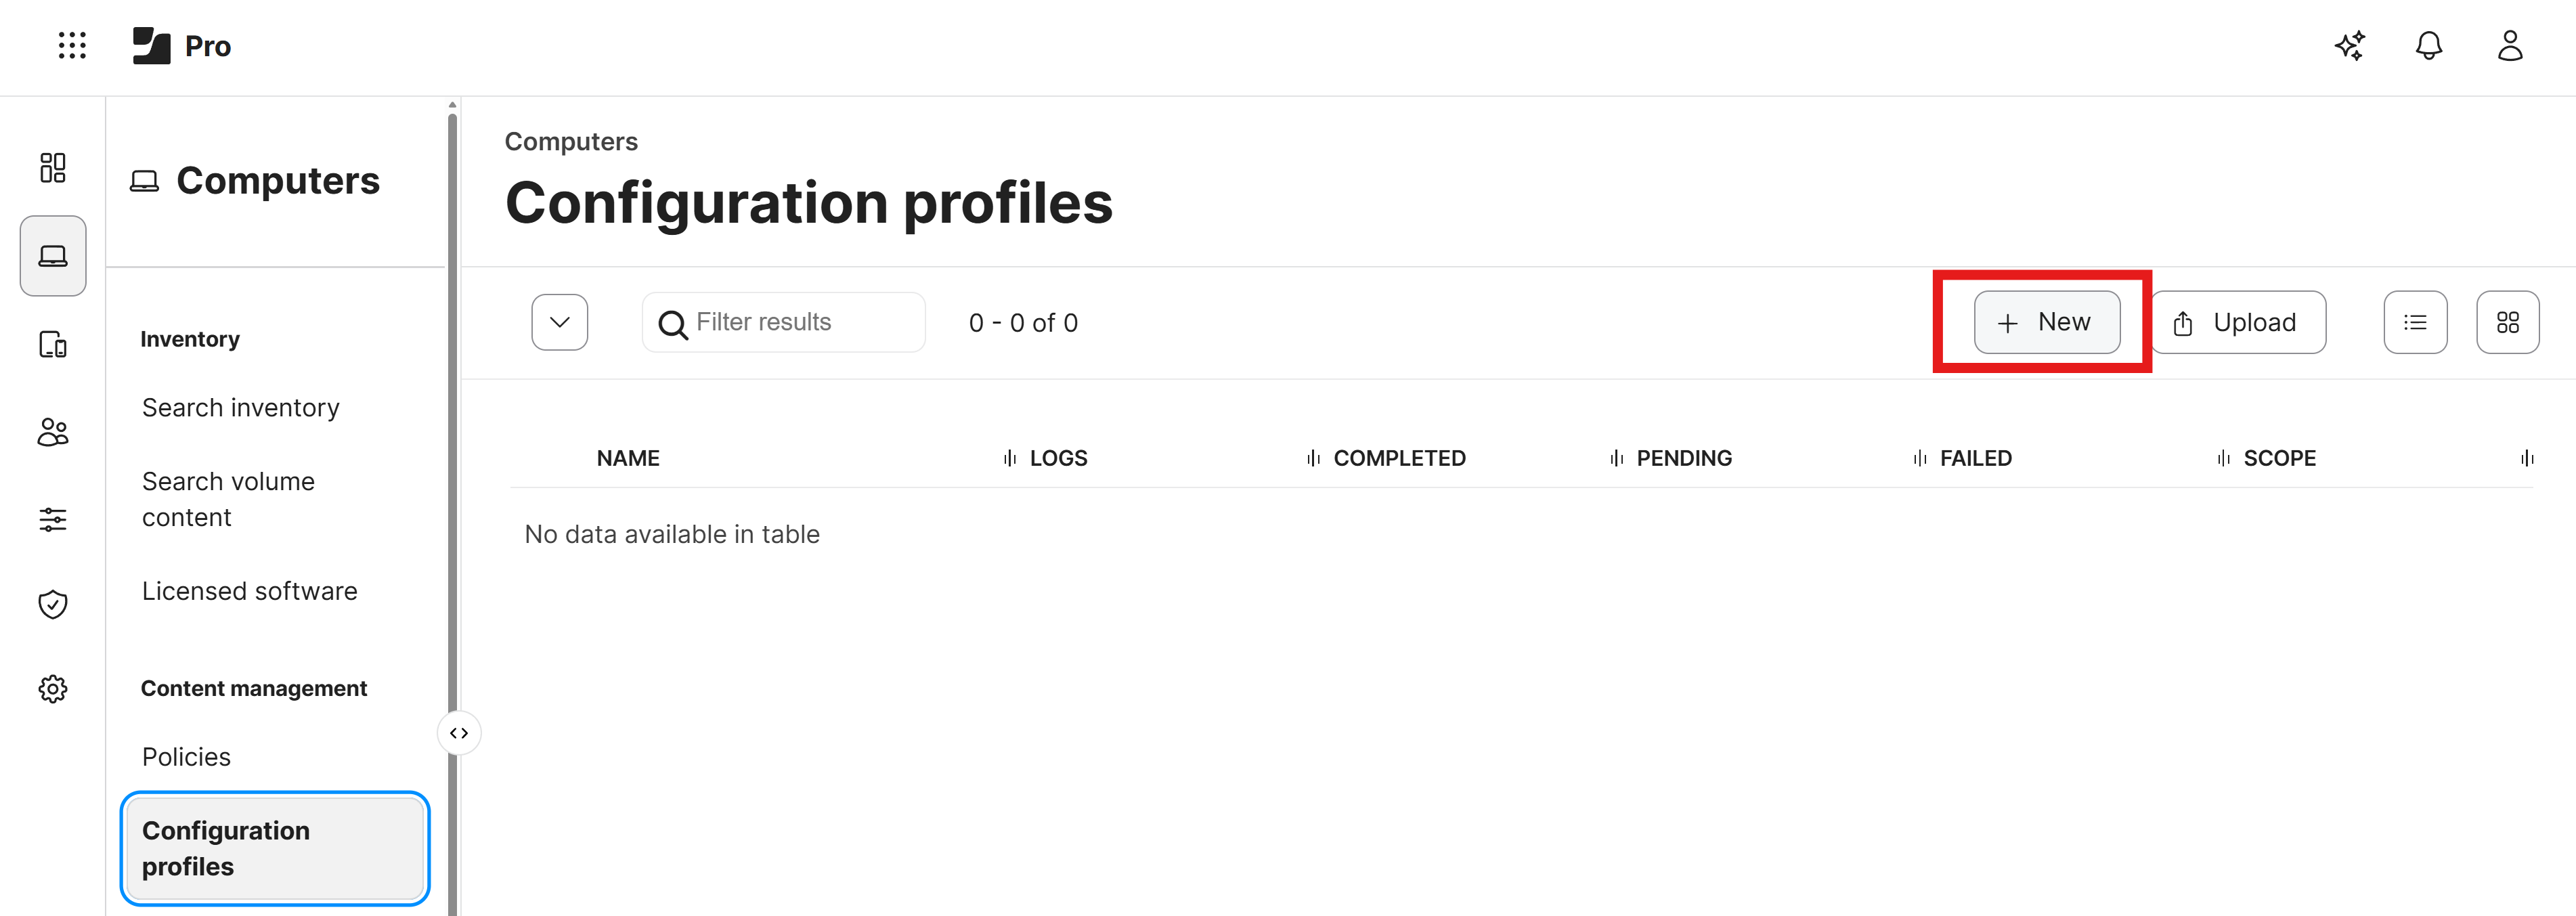
Click on the Computer Icon in the top menu and select Configuration Profiles from the dropdown menu.

-
Click on the + New button to create a new Configuration Profile.
-
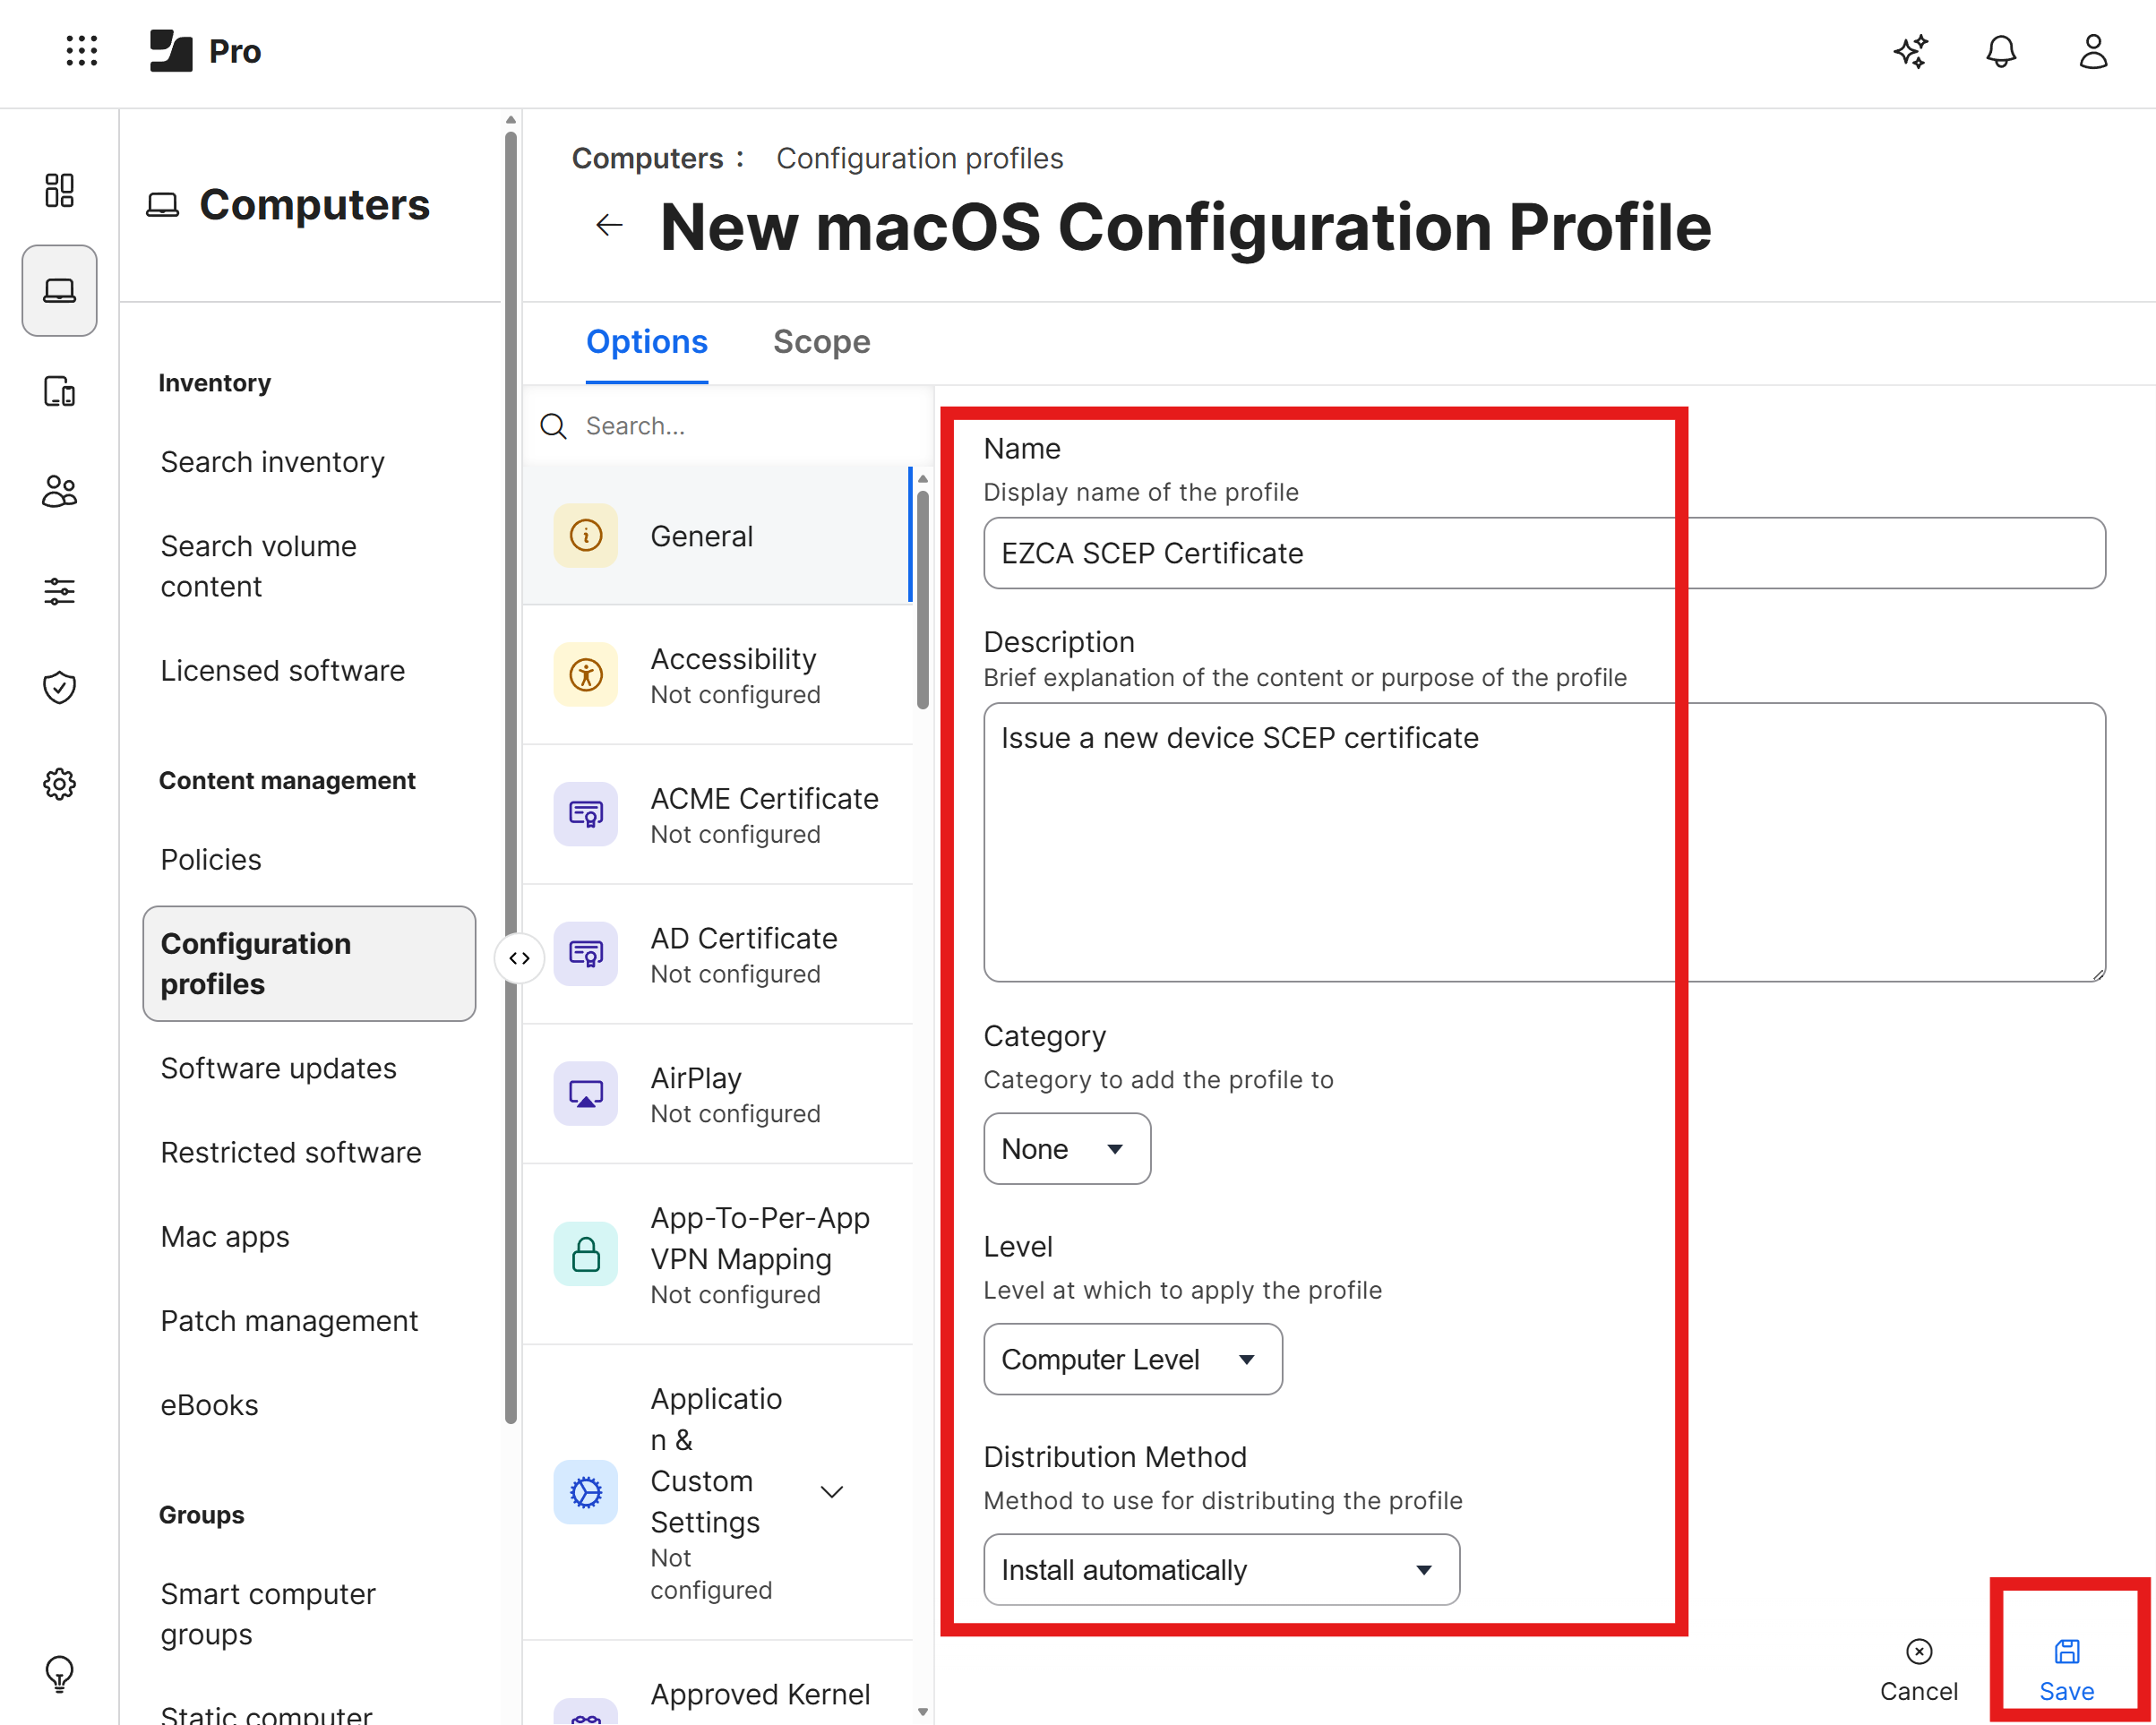
Under the General tab, enter the following information:
- Name: A name for the profile (e.g., “SCEP Certificate Profile”).
- Description: A description for the profile (e.g., “Profile to issue SCEP certificates to Apple devices”).
- Level: Ensure that Computer Level is selected.
- Distribution Method: Select Install Automatically.
How to Download Your CA Certificate from EZCA
You will need your SCEP CA’s certificate from EZCA which you will add to your Jamf Pro configuration profile as a trusted certificate. To download your CA certificate from EZCA, follow these steps:
-
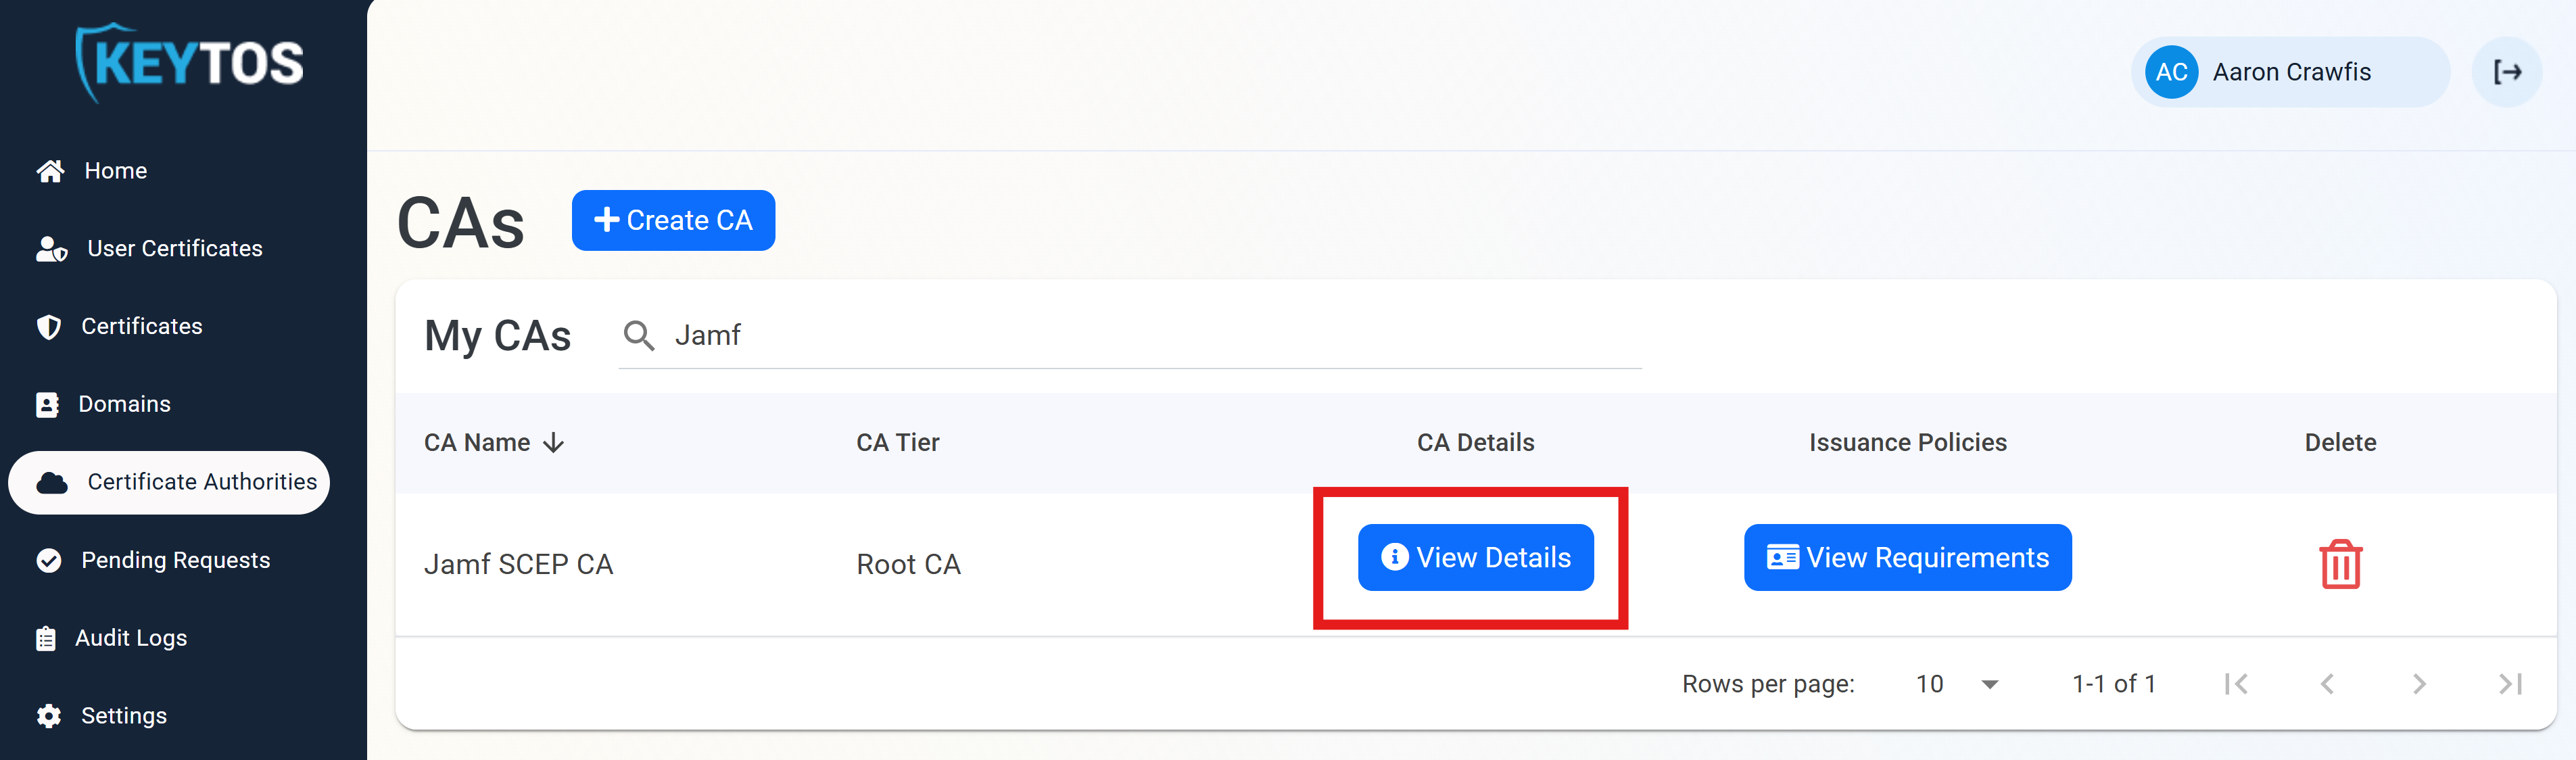
In a separate tab, navigate to your EZCA portal and click on Certificate Authorities.
-
Click on View Details for your SCEP CA.
-
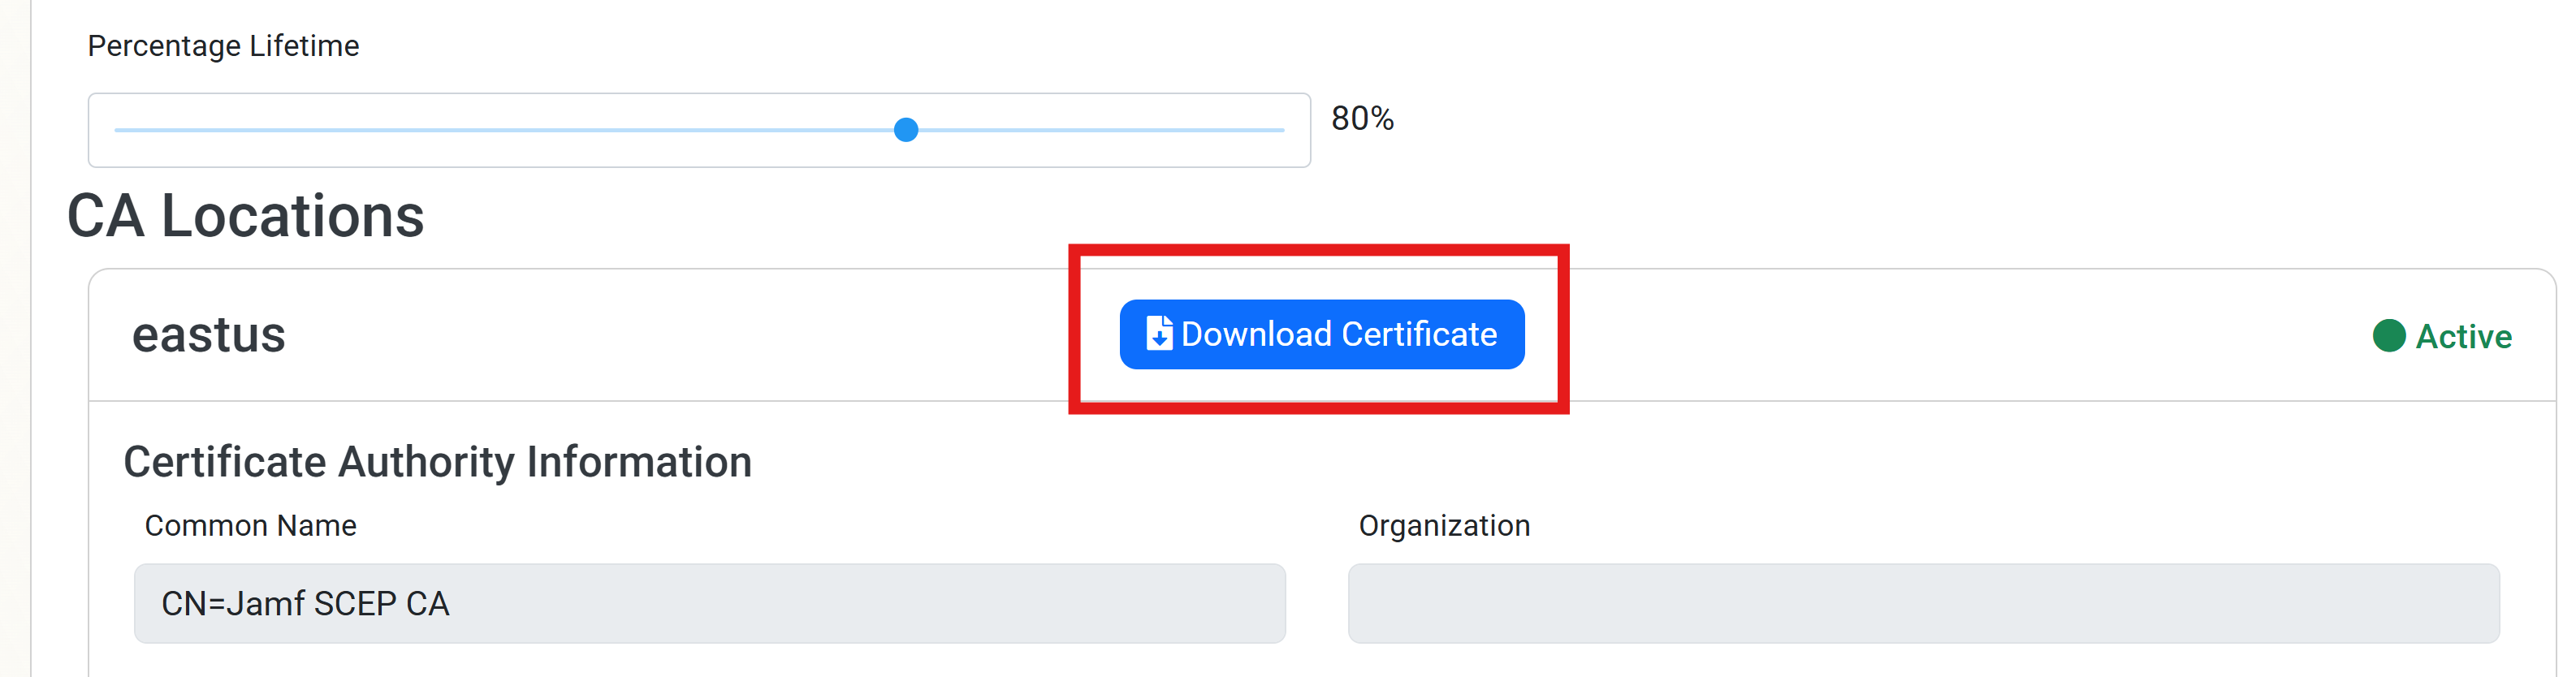
For your CA Location(s), click on the Download Certificate button to download the CA certificate to your computer.
-
If your SCEP CA is a subordinate (issuing) CA, repeat these steps to also download your Root CA certificate. You will add both certificates to your configuration profile so that devices trust the full chain.
How to Add Your CA Certificate to Your Jamf Pro Configuration Profile
-
Navigate back to your Jamf Pro tab.
-
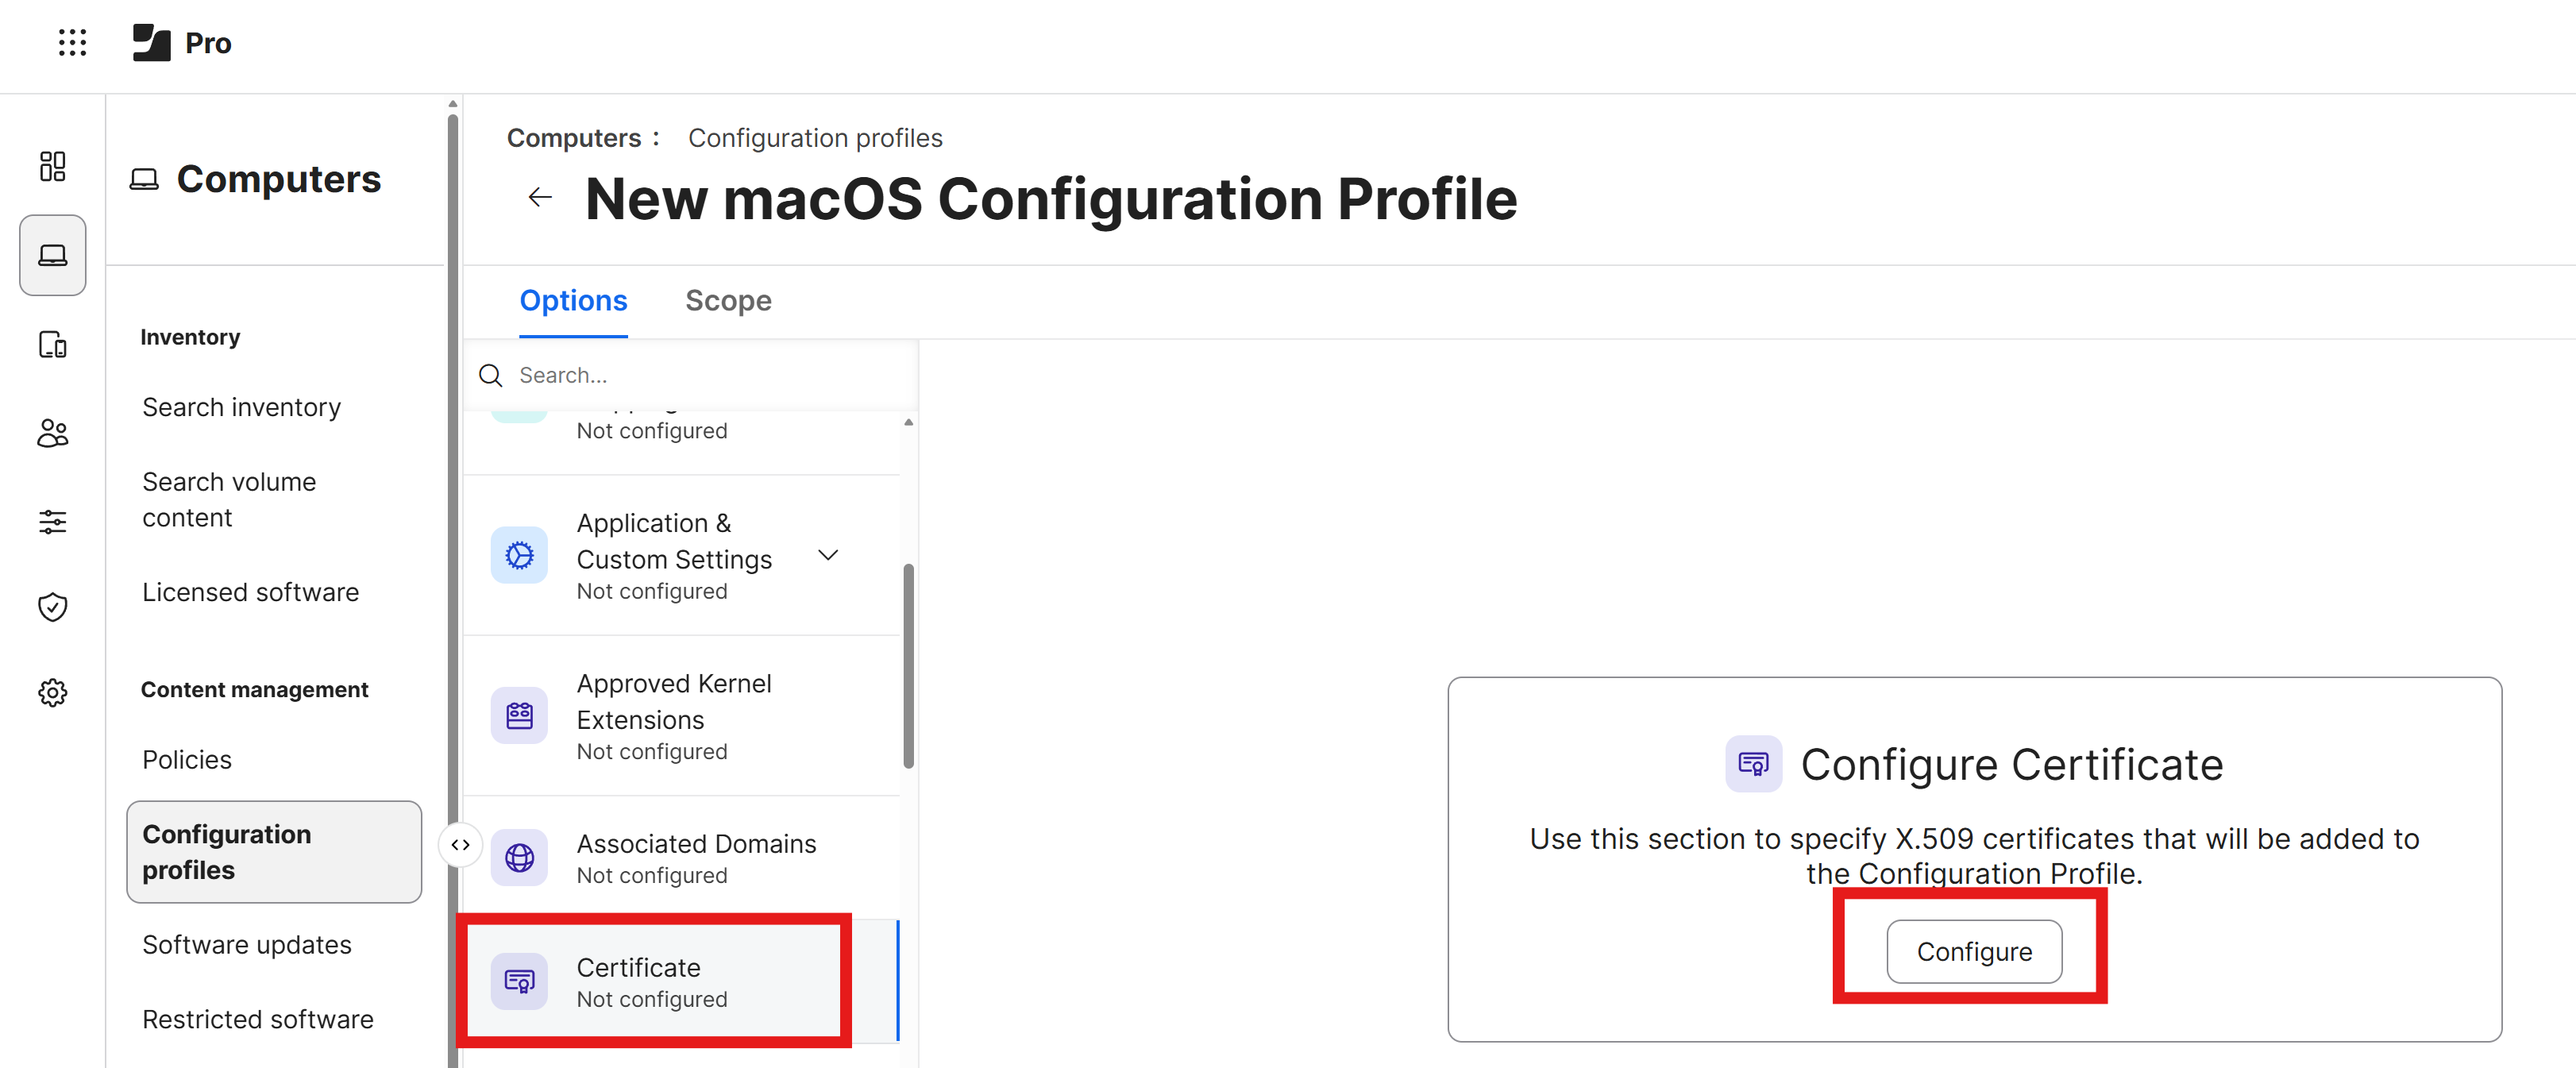
Scroll down to the Certificate section and click on the Configure button to add a new certificate.
-
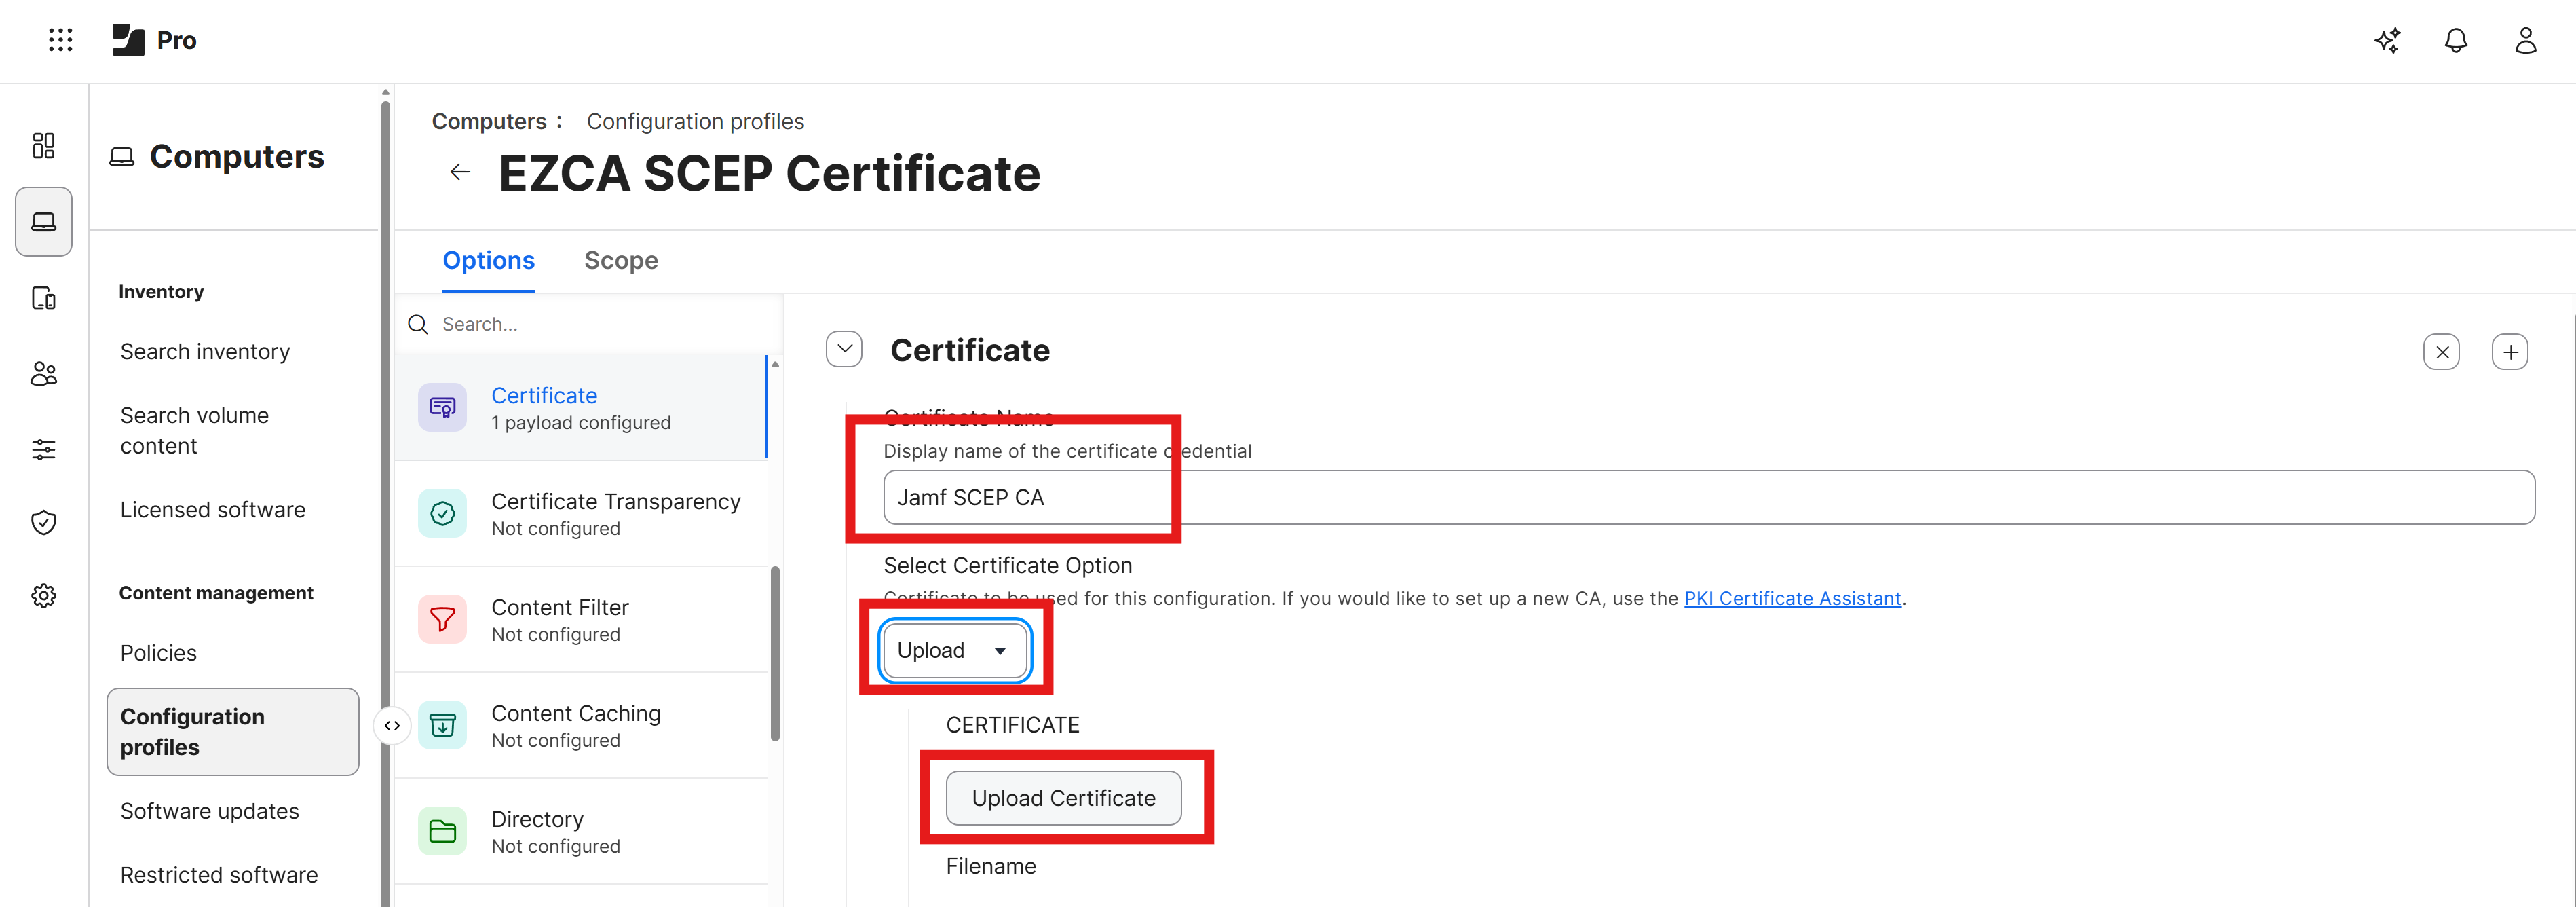
Enter your CA certificate information:
- Name: A name for the certificate (e.g., “EZCA SCEP CA Certificate”).
- Upload: Click on the Upload button and select the CA certificate you downloaded from EZCA.
- Password: Leave this field blank.
- Allow all apps access: Leave this unchecked.
- Make the certificate exportable: Since this is a CA certificate without a private key, this option is not applicable, so you can leave it checked.
-
If you downloaded a Root CA certificate as well, click the + button in the Certificate section and repeat the previous step to add it.
How to Issue Certificates to Your Apple Devices in Jamf Pro
There are two ways to issue certificates to your Apple devices in Jamf Pro: using SCEP or using ACME device attestation. Depending on your use case and the devices you are managing, you can choose the method that best fits your needs.
How to Create a Service Connection in Jamf Pro for ACME Device Attestation
EZCA needs to be able to communicate with your Jamf Pro instance so it knows which devices are enrolled in Jamf Pro and can receive certificates. To allow EZCA to communicate with your Jamf Pro instance, you will need to create a Service Connection in Jamf Pro for ACME device attestation. Follow these steps to create a Service Connection:
-
Navigate to your Jamf Pro instance.
-
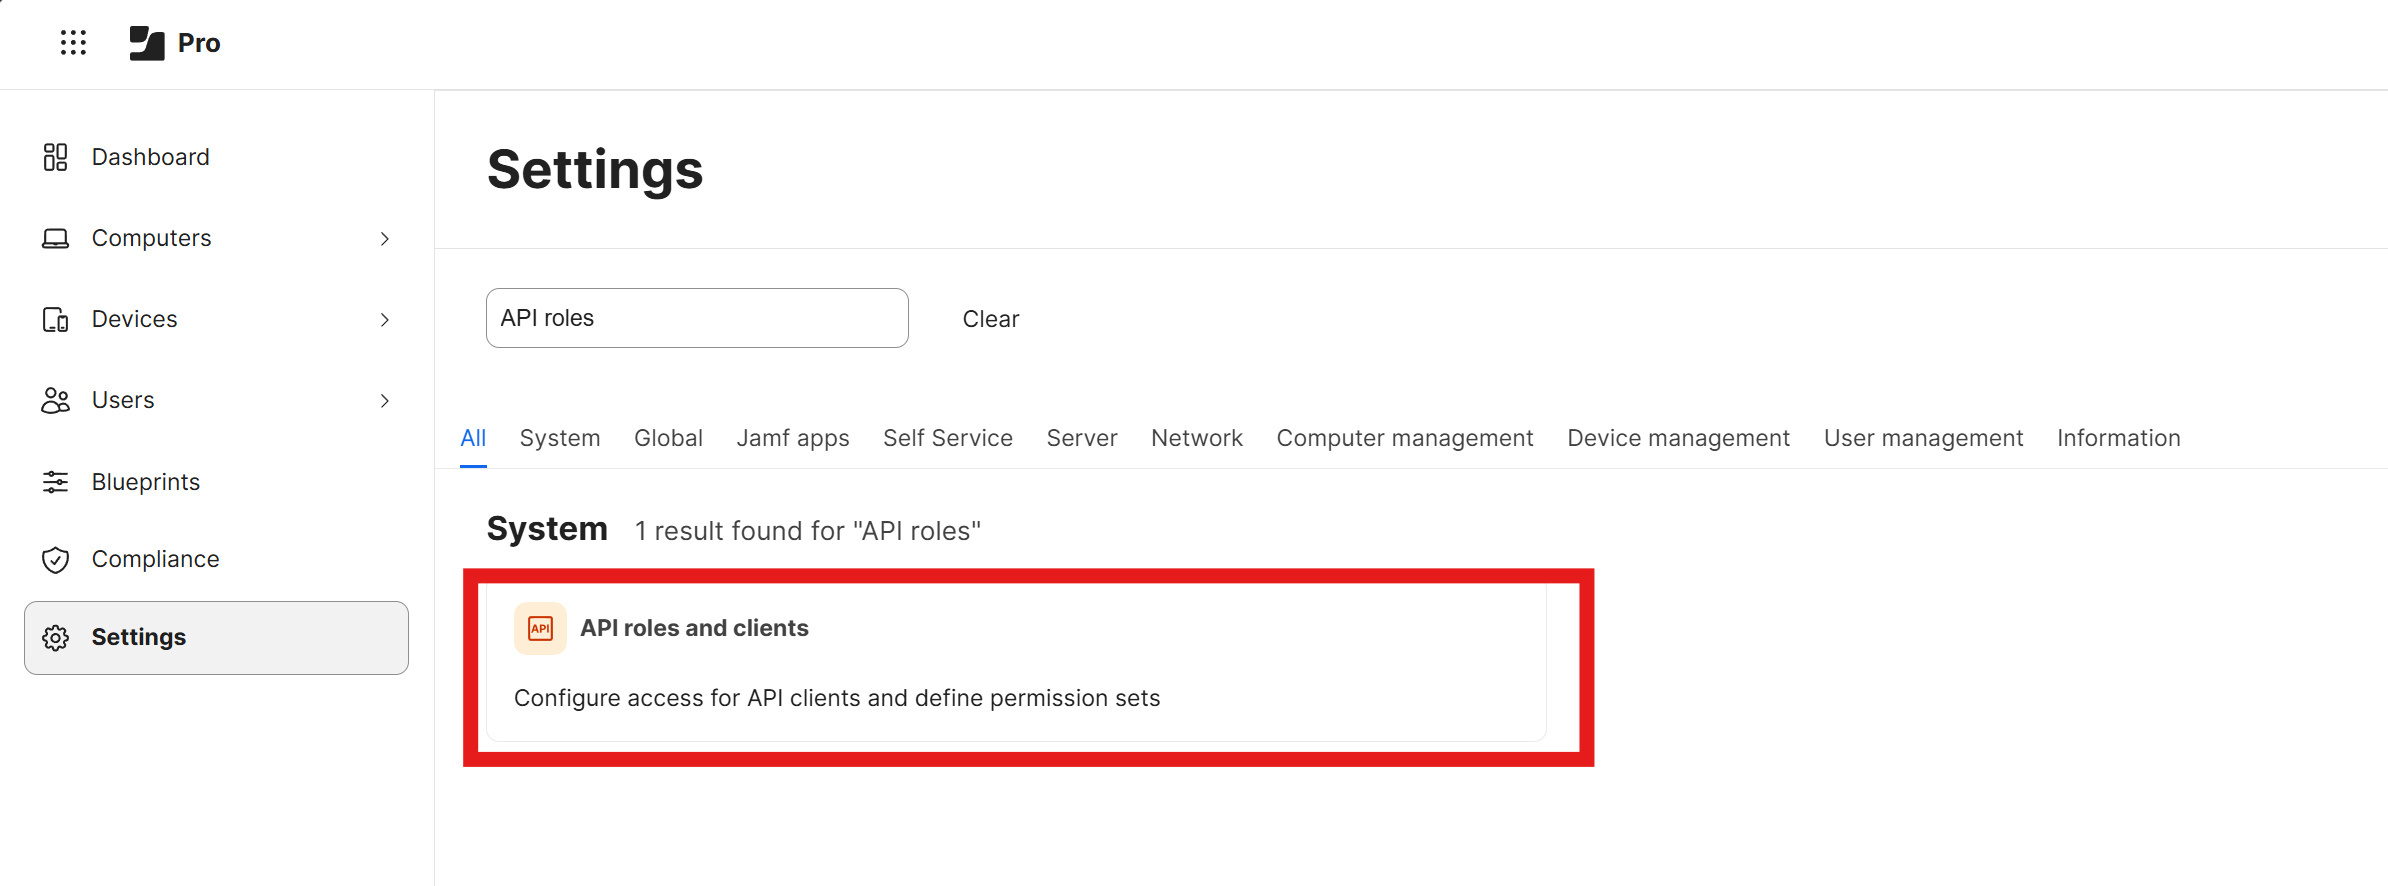
From the left-hand menu, click on Settings and open API roles and clients.
-
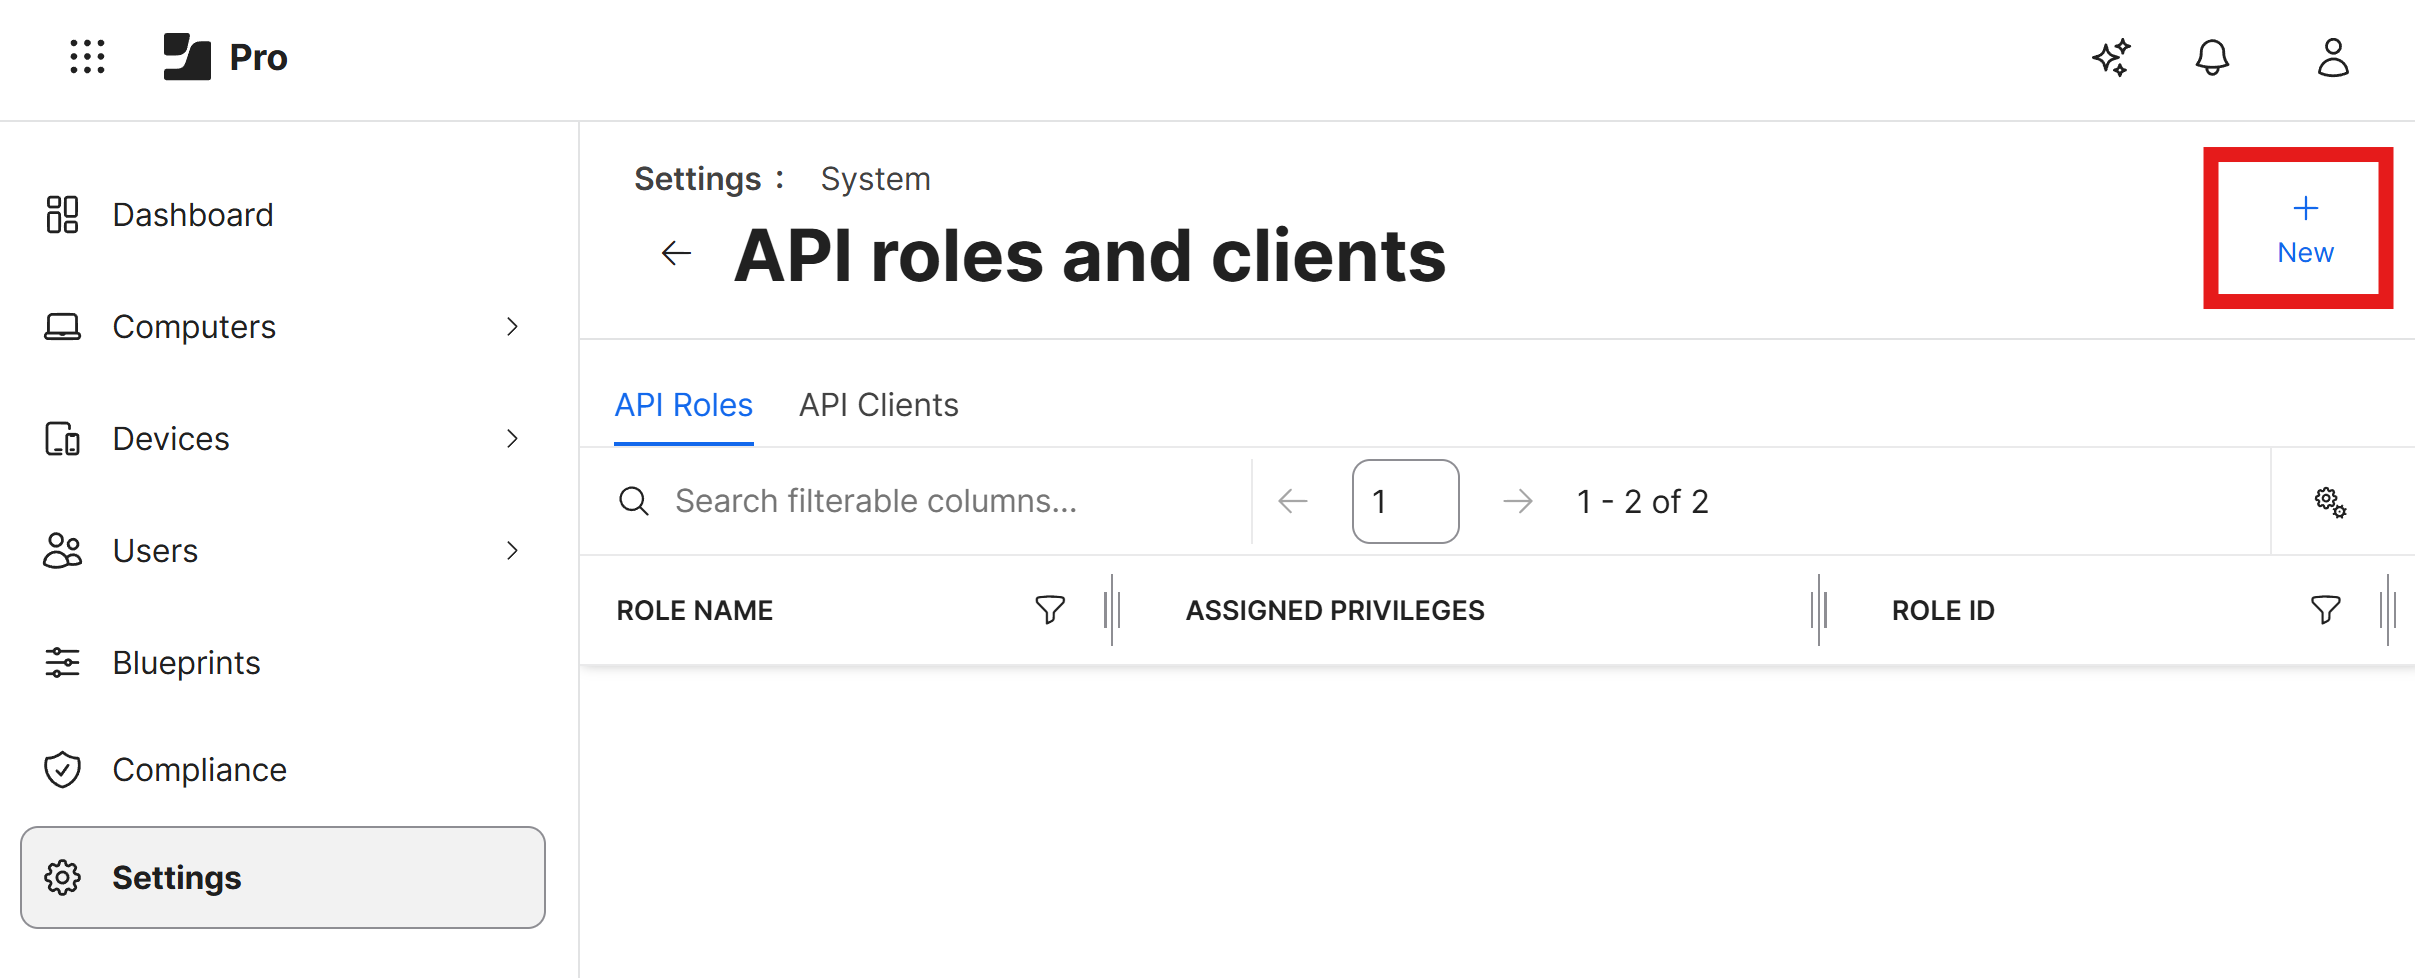
Under the API Roles tab, click on the + New button to create a new API role.
-
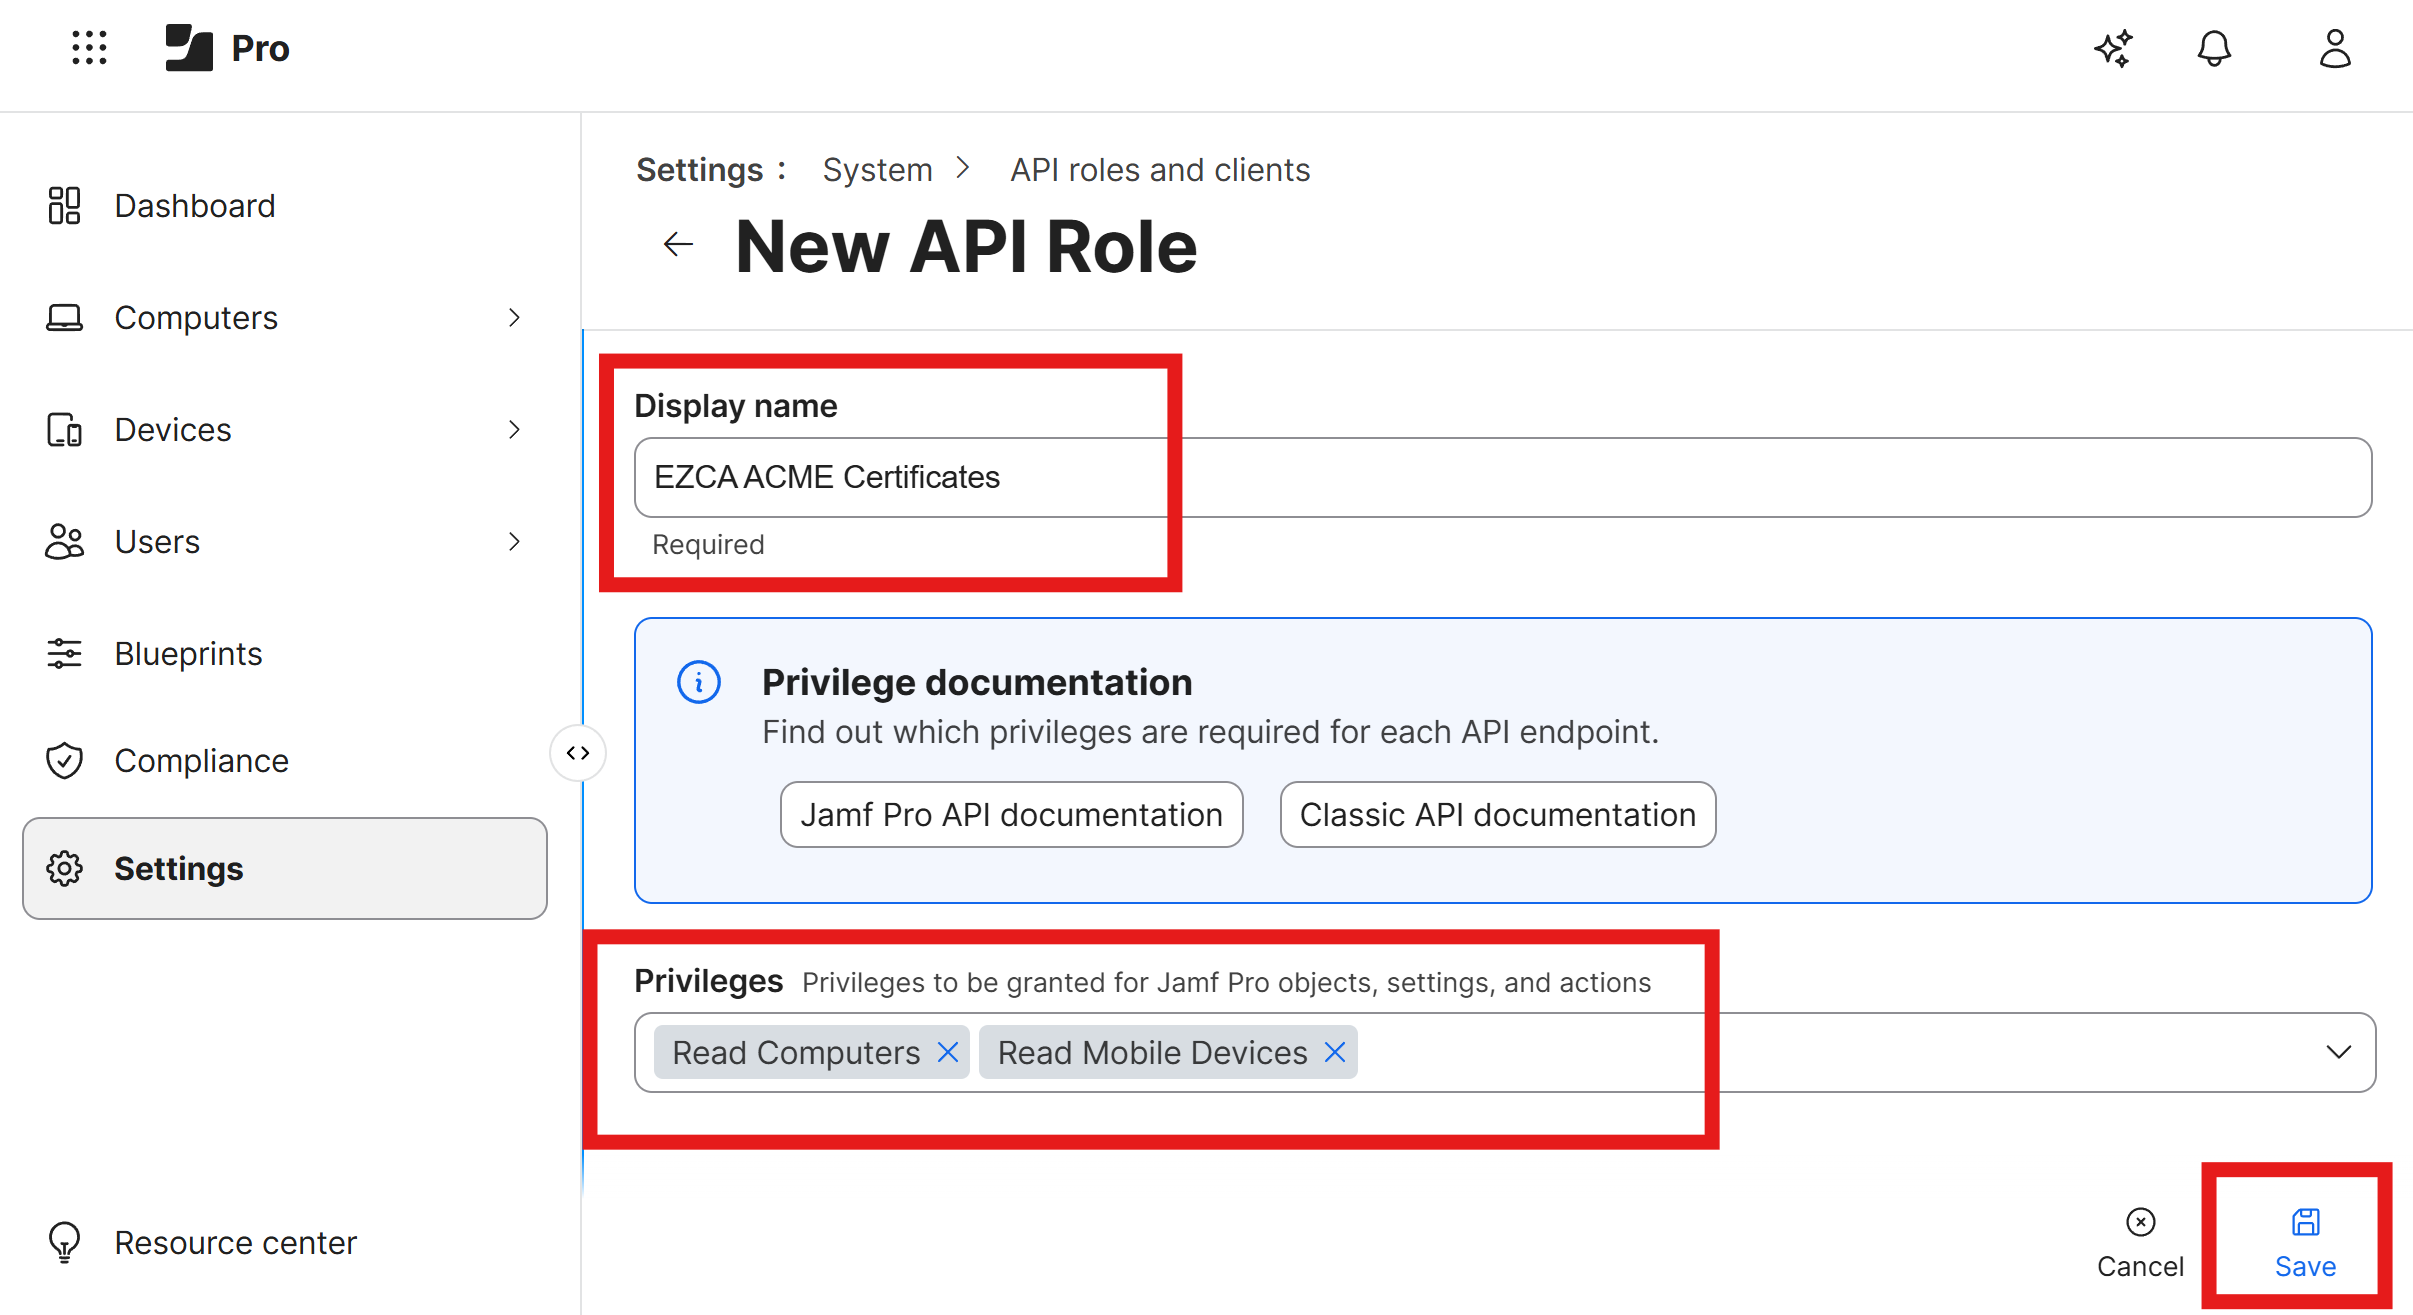
Enter the following information for your new API role:
- Name: A name for the API role (e.g., “EZCA ACME Certificates”).
- Privileges: Select Read Computers and Read Mobile Devices. These privileges allow EZCA to read the list of enrolled devices in your Jamf Pro instance.
-
Click Save to create the new API role.
-
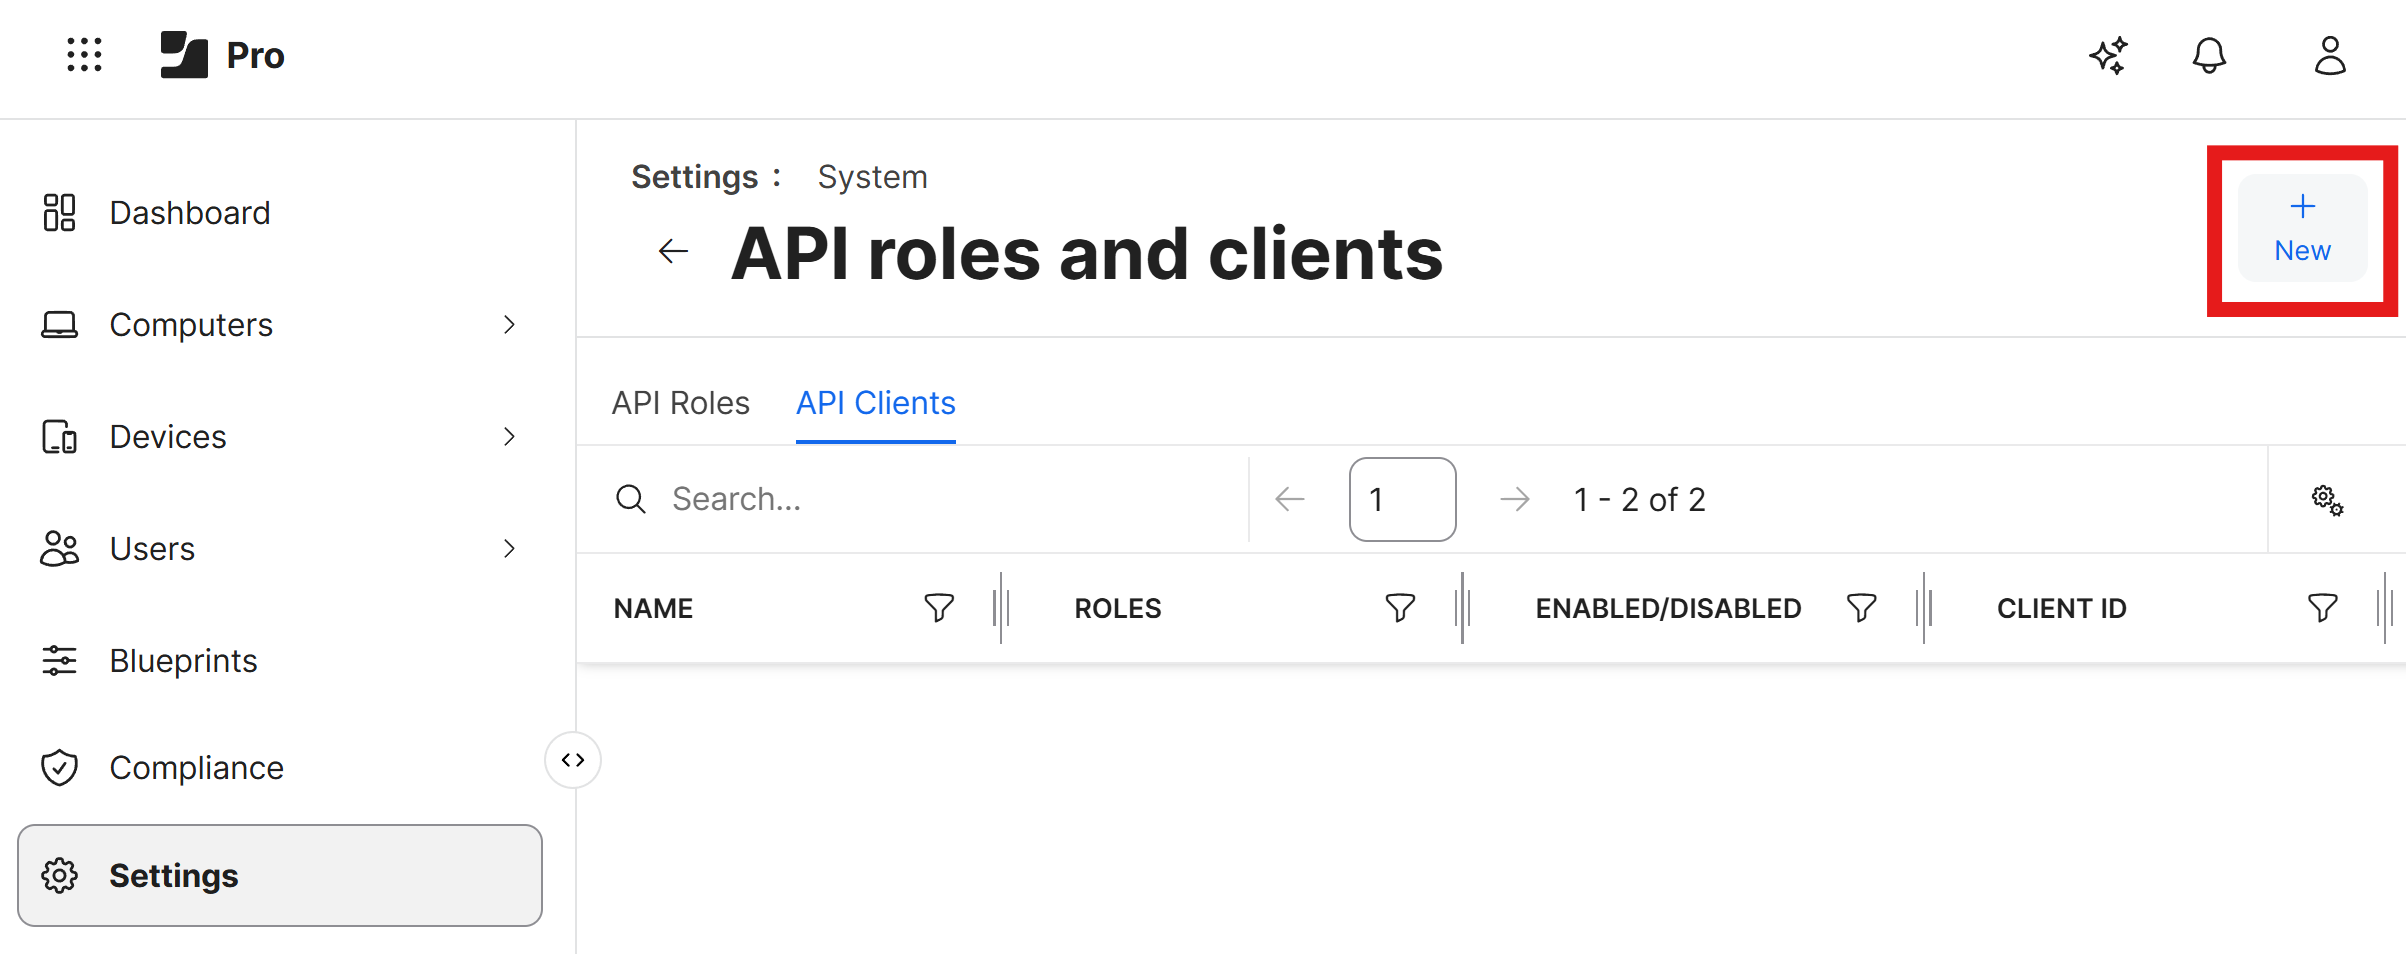
Click the back arrow to return to the API Roles and Clients page, and then click on the API Clients tab.
-
Click on the + New button to create a new API client.
-
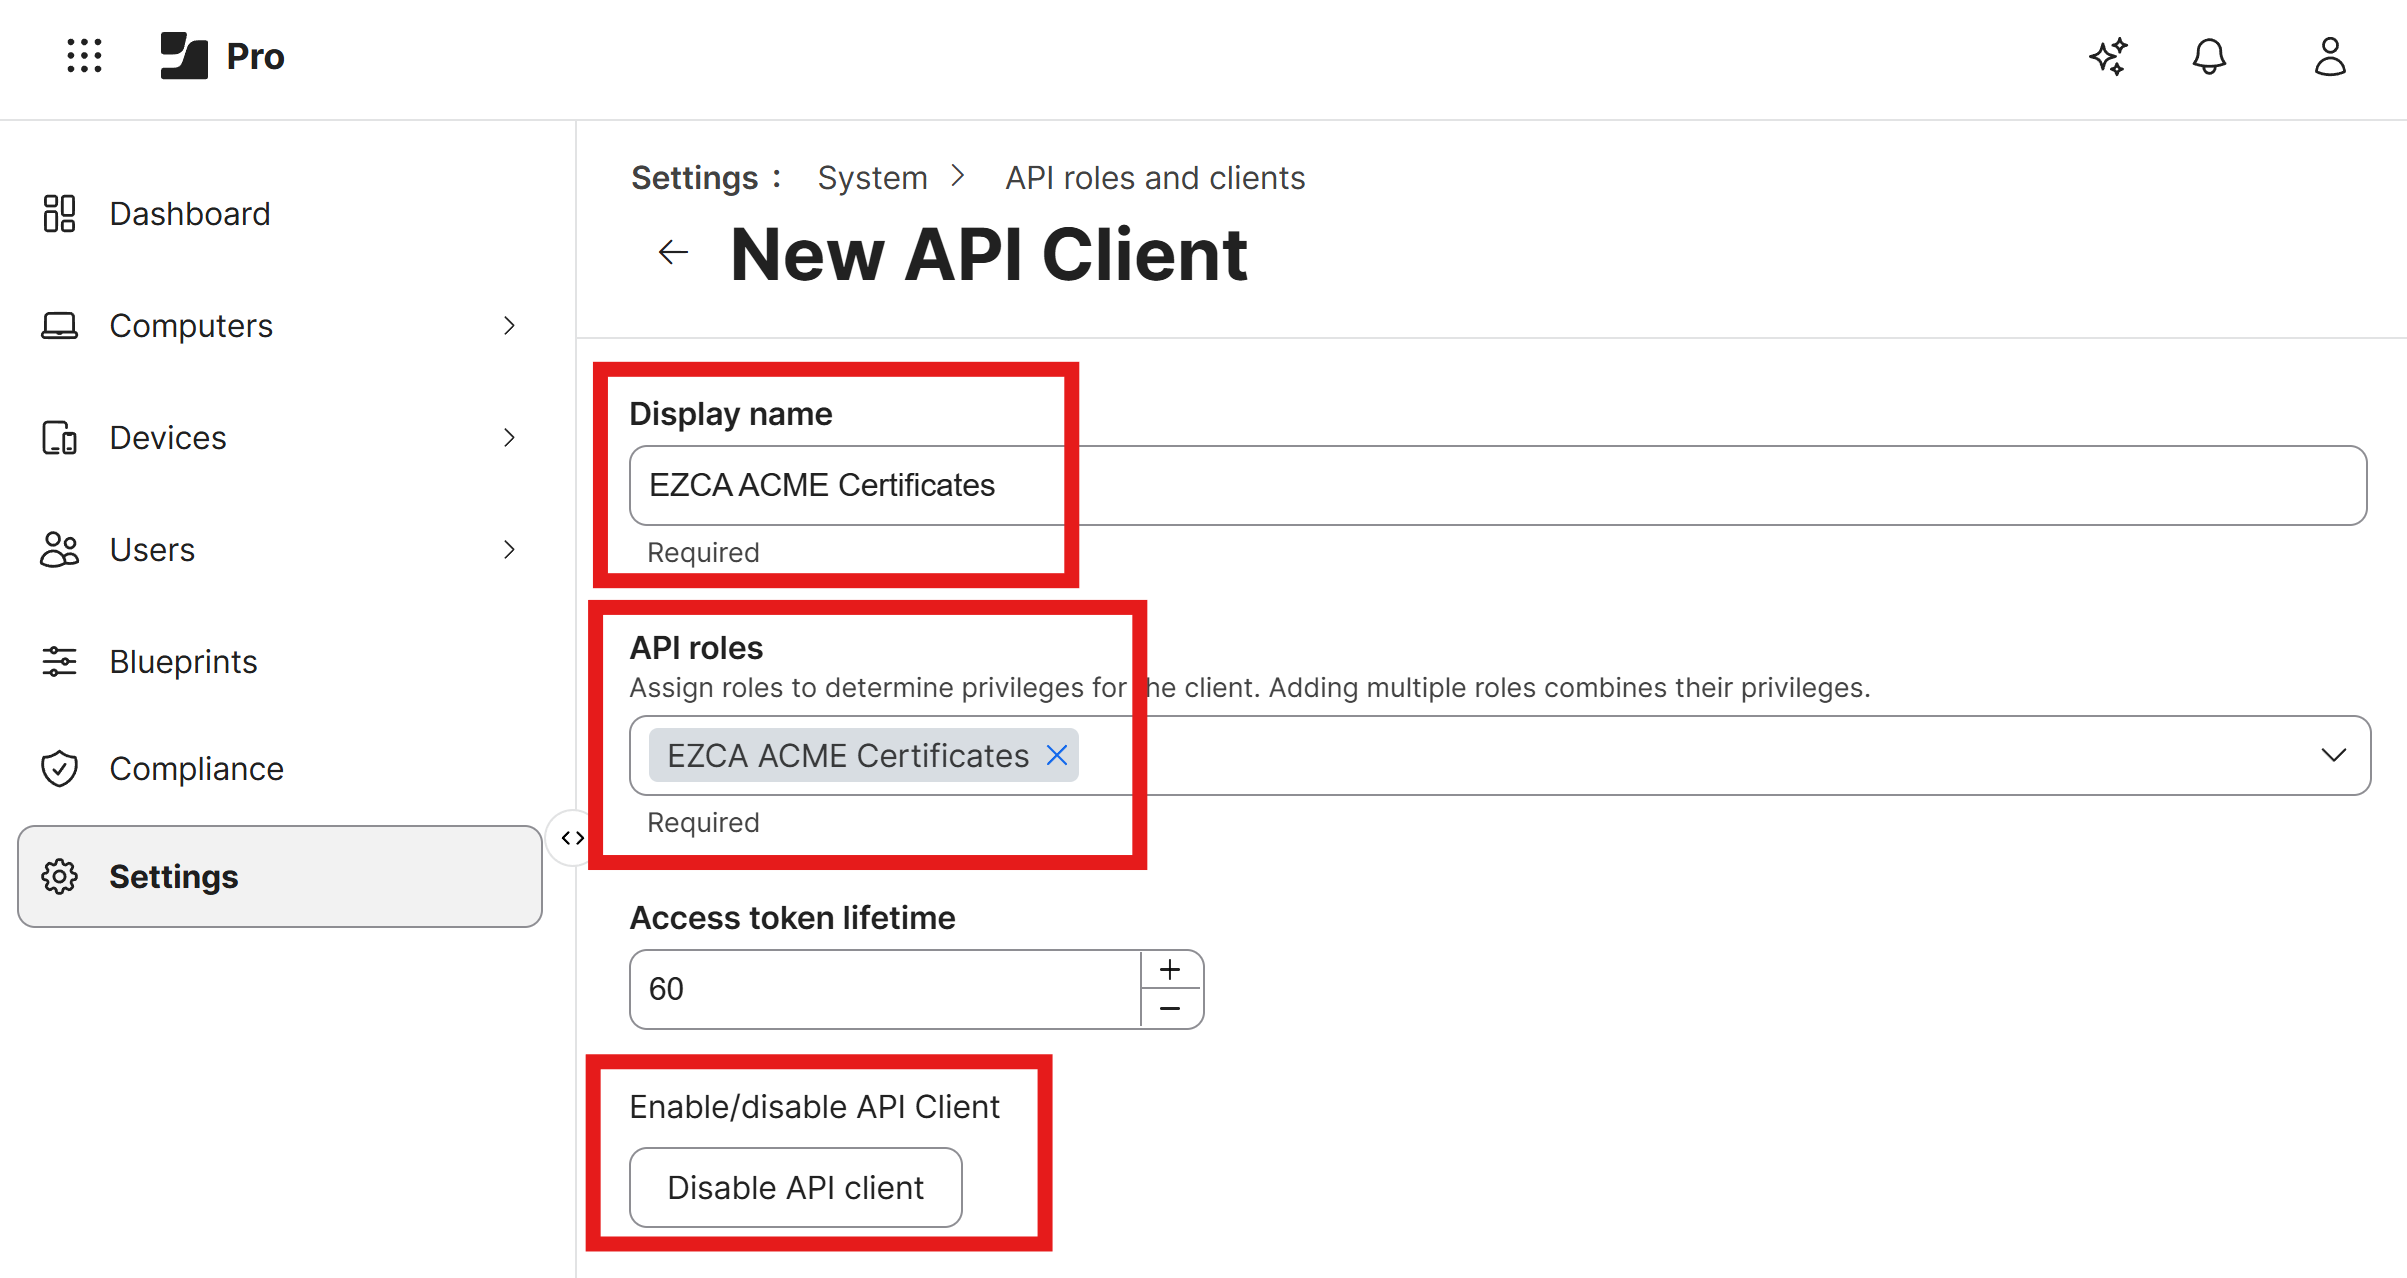
Enter the following information for your new API client:
-
Display name: A name for the API client (e.g., “EZCA ACME Certificates”).
-
API roles: Select the API role you created earlier (e.g., “EZCA ACME Certificates”).
-
Access token lifetime: Keep this as its default value of 60.
-
Click the Enable API client button to enable the API client.
-
-
Click Save to create the new API client.
-
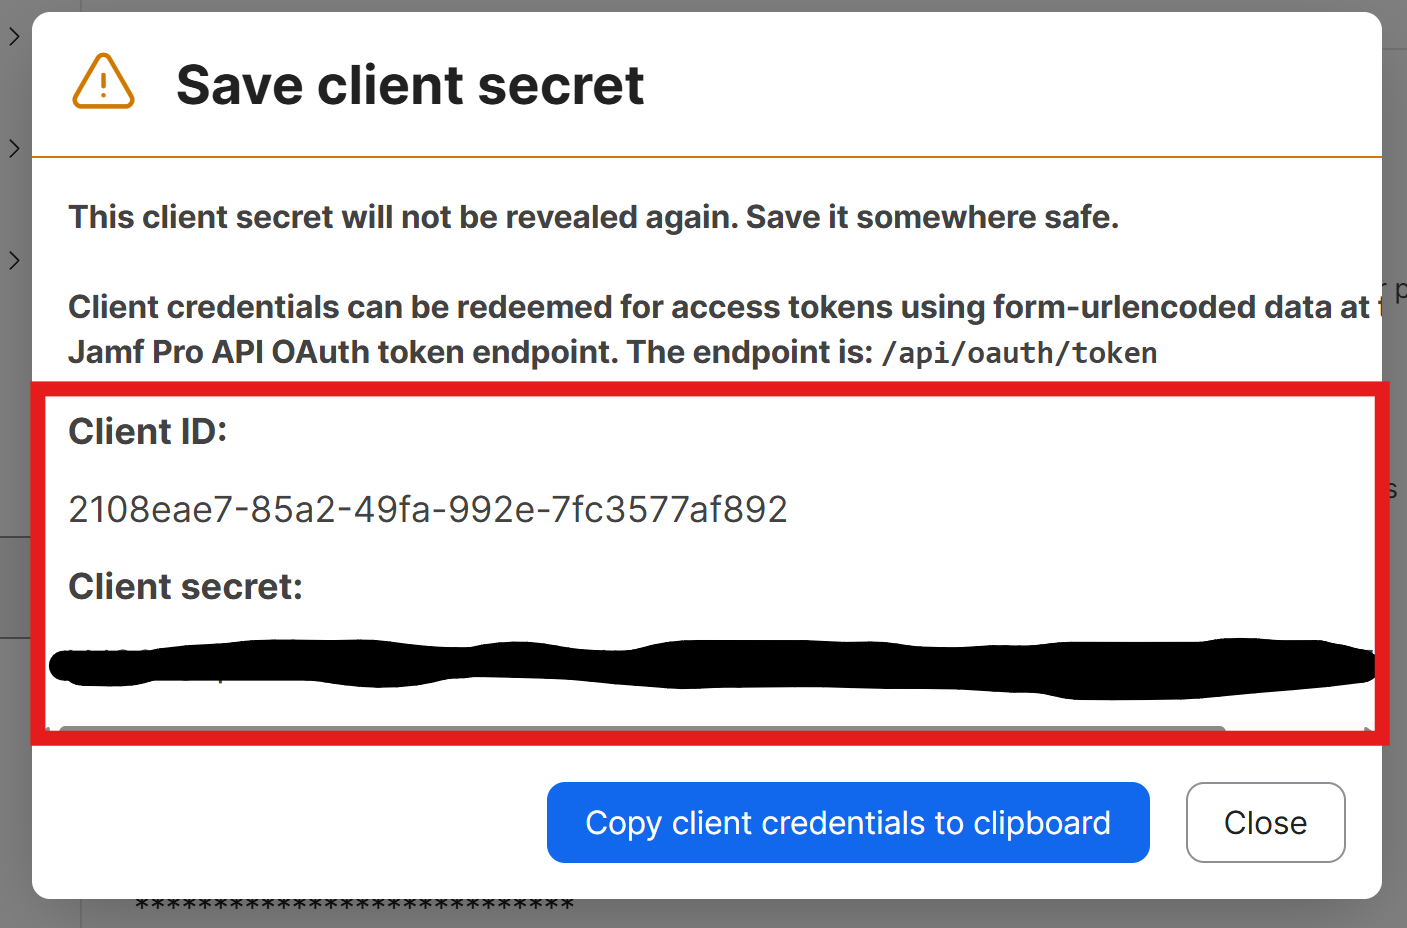
Click Generate client secret to generate a new client secret for the API client. You will need this value, along with the Client ID, in the next step.
How to Enable ACME Device Attestation in Your EZCA SCEP CA
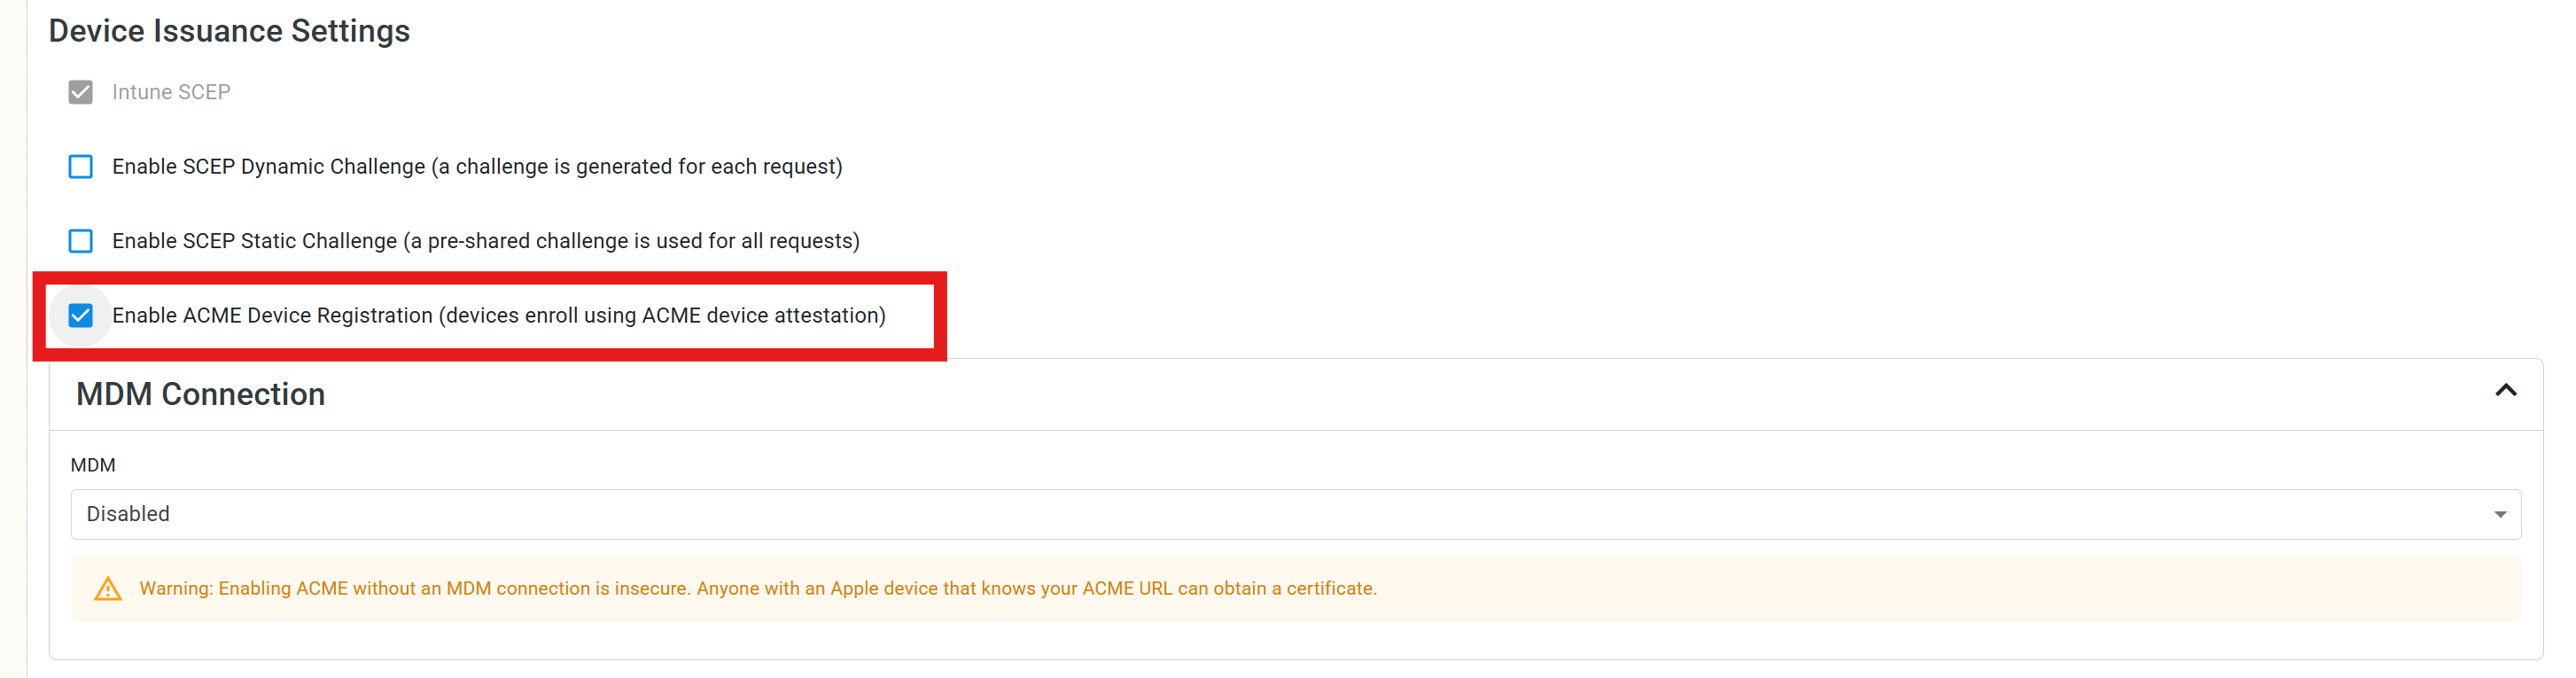
ACME device registration is disabled by default in new EZCA SCEP CAs. To issue certificates to your Apple devices using ACME device attestation, you will need to enable ACME device registration in your EZCA SCEP CA. Follow these steps to enable ACME device attestation:
-
Navigate to your EZCA portal and click on Certificate Authorities.
-
Click on View Requirements for your SCEP CA.

-
Check the box for Enable ACME Device Registration.
-
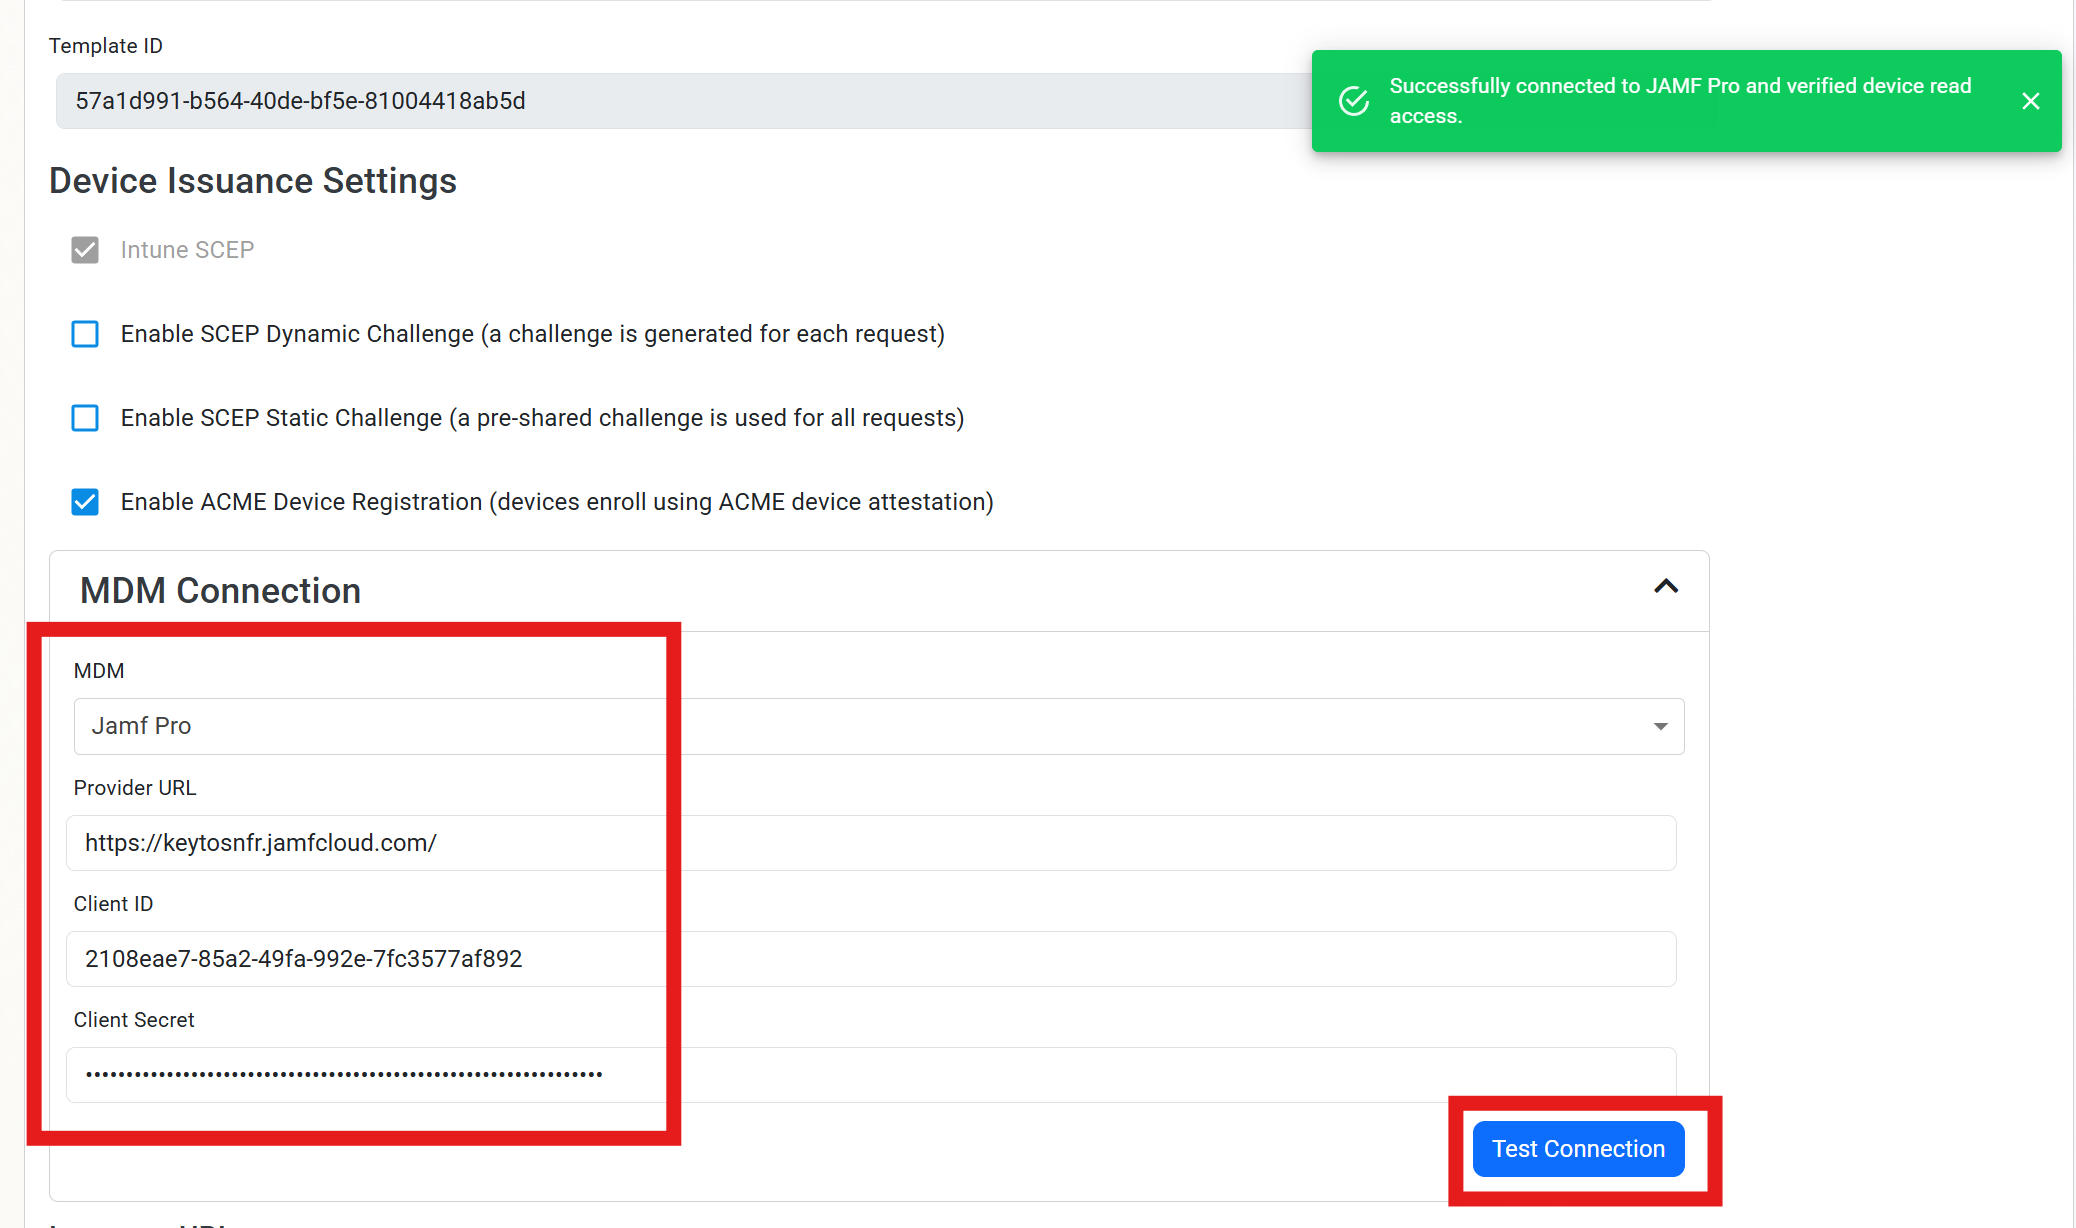
Under MDM Connection, change MDM to Jamf Pro.
-
Enter the following information for your Jamf Pro instance:
- Provider URL: The URL of your Jamf Pro instance (e.g.,
https://yourcompany.jamfcloud.com). - Client ID: The Client ID you generated when creating the API client in Jamf Pro.
- Client Secret: The Client Secret you generated when creating the API client in Jamf Pro.
- Provider URL: The URL of your Jamf Pro instance (e.g.,
-
Click Test Connection to ensure that EZCA can communicate with your Jamf Pro instance. If the test is successful, you will see a green checkmark and a message indicating that the connection was successful.
-
Make sure to click Save Changes to save your changes and enable ACME device attestation in your EZCA SCEP CA.
-
Note the ACME Device Registration URL from your EZCA SCEP CA. You will need this in the next step when configuring your Jamf Pro ACME profile.

How to Issue ACME Certificates to Apple Devices in Jamf Pro
Now that you have enabled and configured ACME registration, you can now configure Jamf Pro to issue ACME certificates to your Apple devices using your EZCA SCEP CA. Follow these steps to configure Jamf Pro to issue ACME certificates:
-
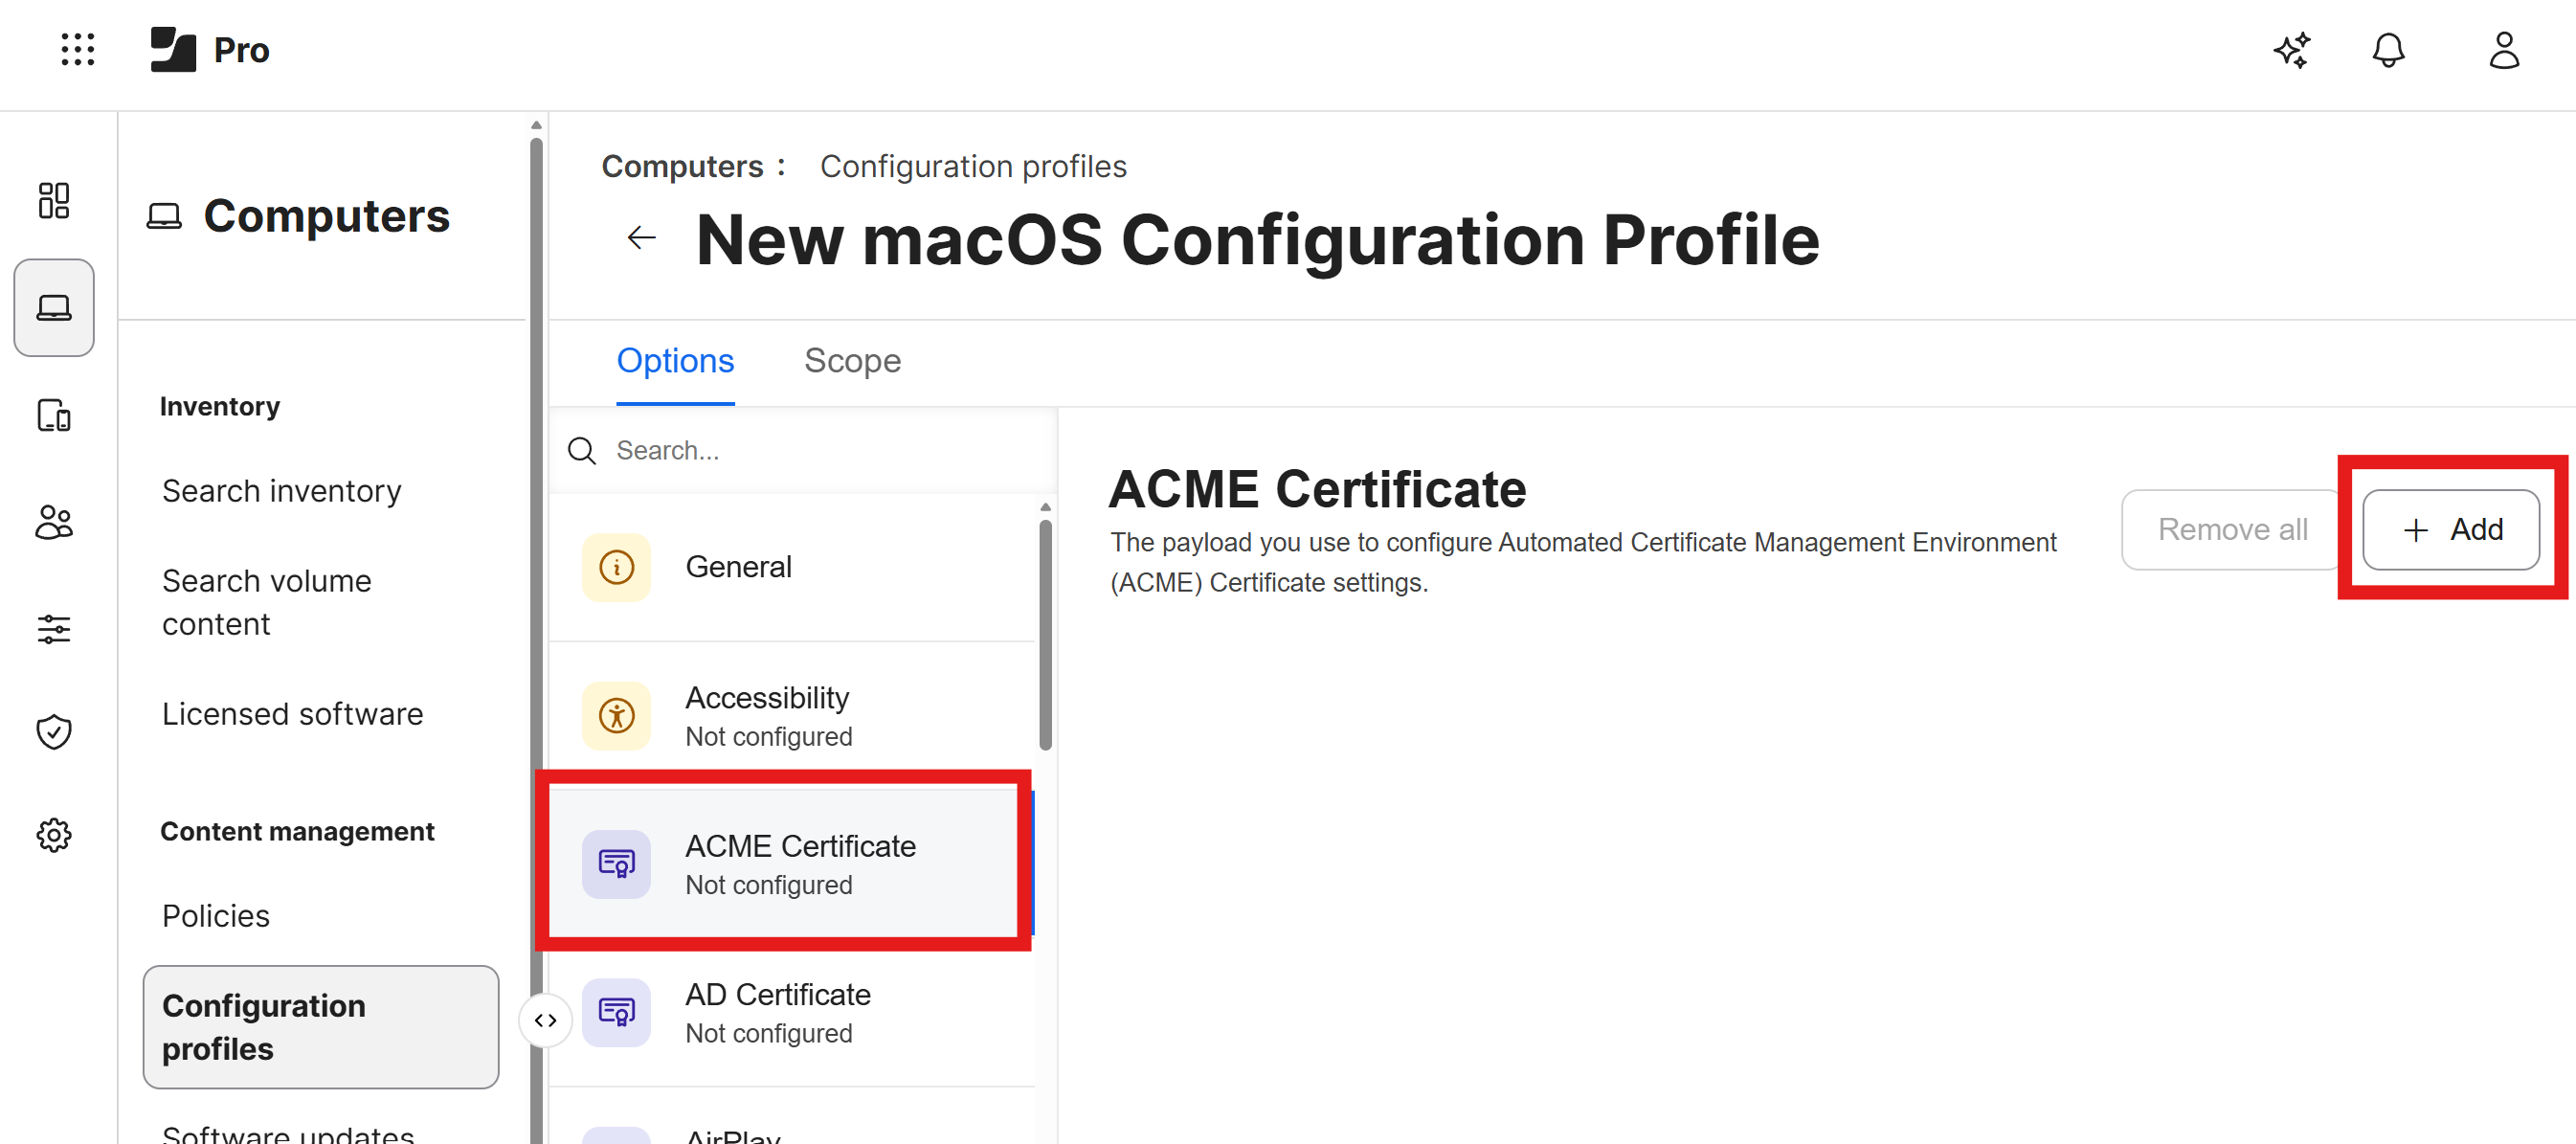
Navigate back to your Jamf Pro tab where you were configuring your Configuration Profile, and scroll up to the ACME Certificate section.
-
Click on the + Add button to add a new ACME certificate.
-
Enter the following information for your ACME certificate:
- ACME directory URL: Paste the ACME URL you copied from your EZCA portal (labeled ACME Device Registration URL in EZCA and ACME URL in Keytos Shield).
- Client identifier: Set this to
$SERIALNUMBERto use the device’s serial number as the client identifier. - Key Size: Set this to 384 for a strong, elliptic curve key that is hardware bound. You can set this as needed based on your use case and device support.
- Key Type: Set this to ECSECPrimeRandom
- Hardware Bound: Set this to true so the device’s secure enclave is used to generate the key and store it securely on the device.
- Redistribute Profile: Specify the days from expiration that Jamf Pro should redistribute the profile to devices. We’ll set this to 15 days.
- Subject Name: Use the available variables and any static values you want to build the subject name for the certificate. You can see the full list of Jamf supported dynamic values here. For example, you could use
CN=$UDIDto set the Common Name of the certificate to the device’s unique device identifier orCN=$USERNAMEto set the Common Name of the certificate to the user or device’s username. - Subject Alt Name: Set the following recommended SAN values:
- RFC822Name:
$EMAILADDRESS(if issuing user certificates) - DNS*:
$HOSTNAME(if issuing device certificates)
- RFC822Name:
- Extended Key Usage:
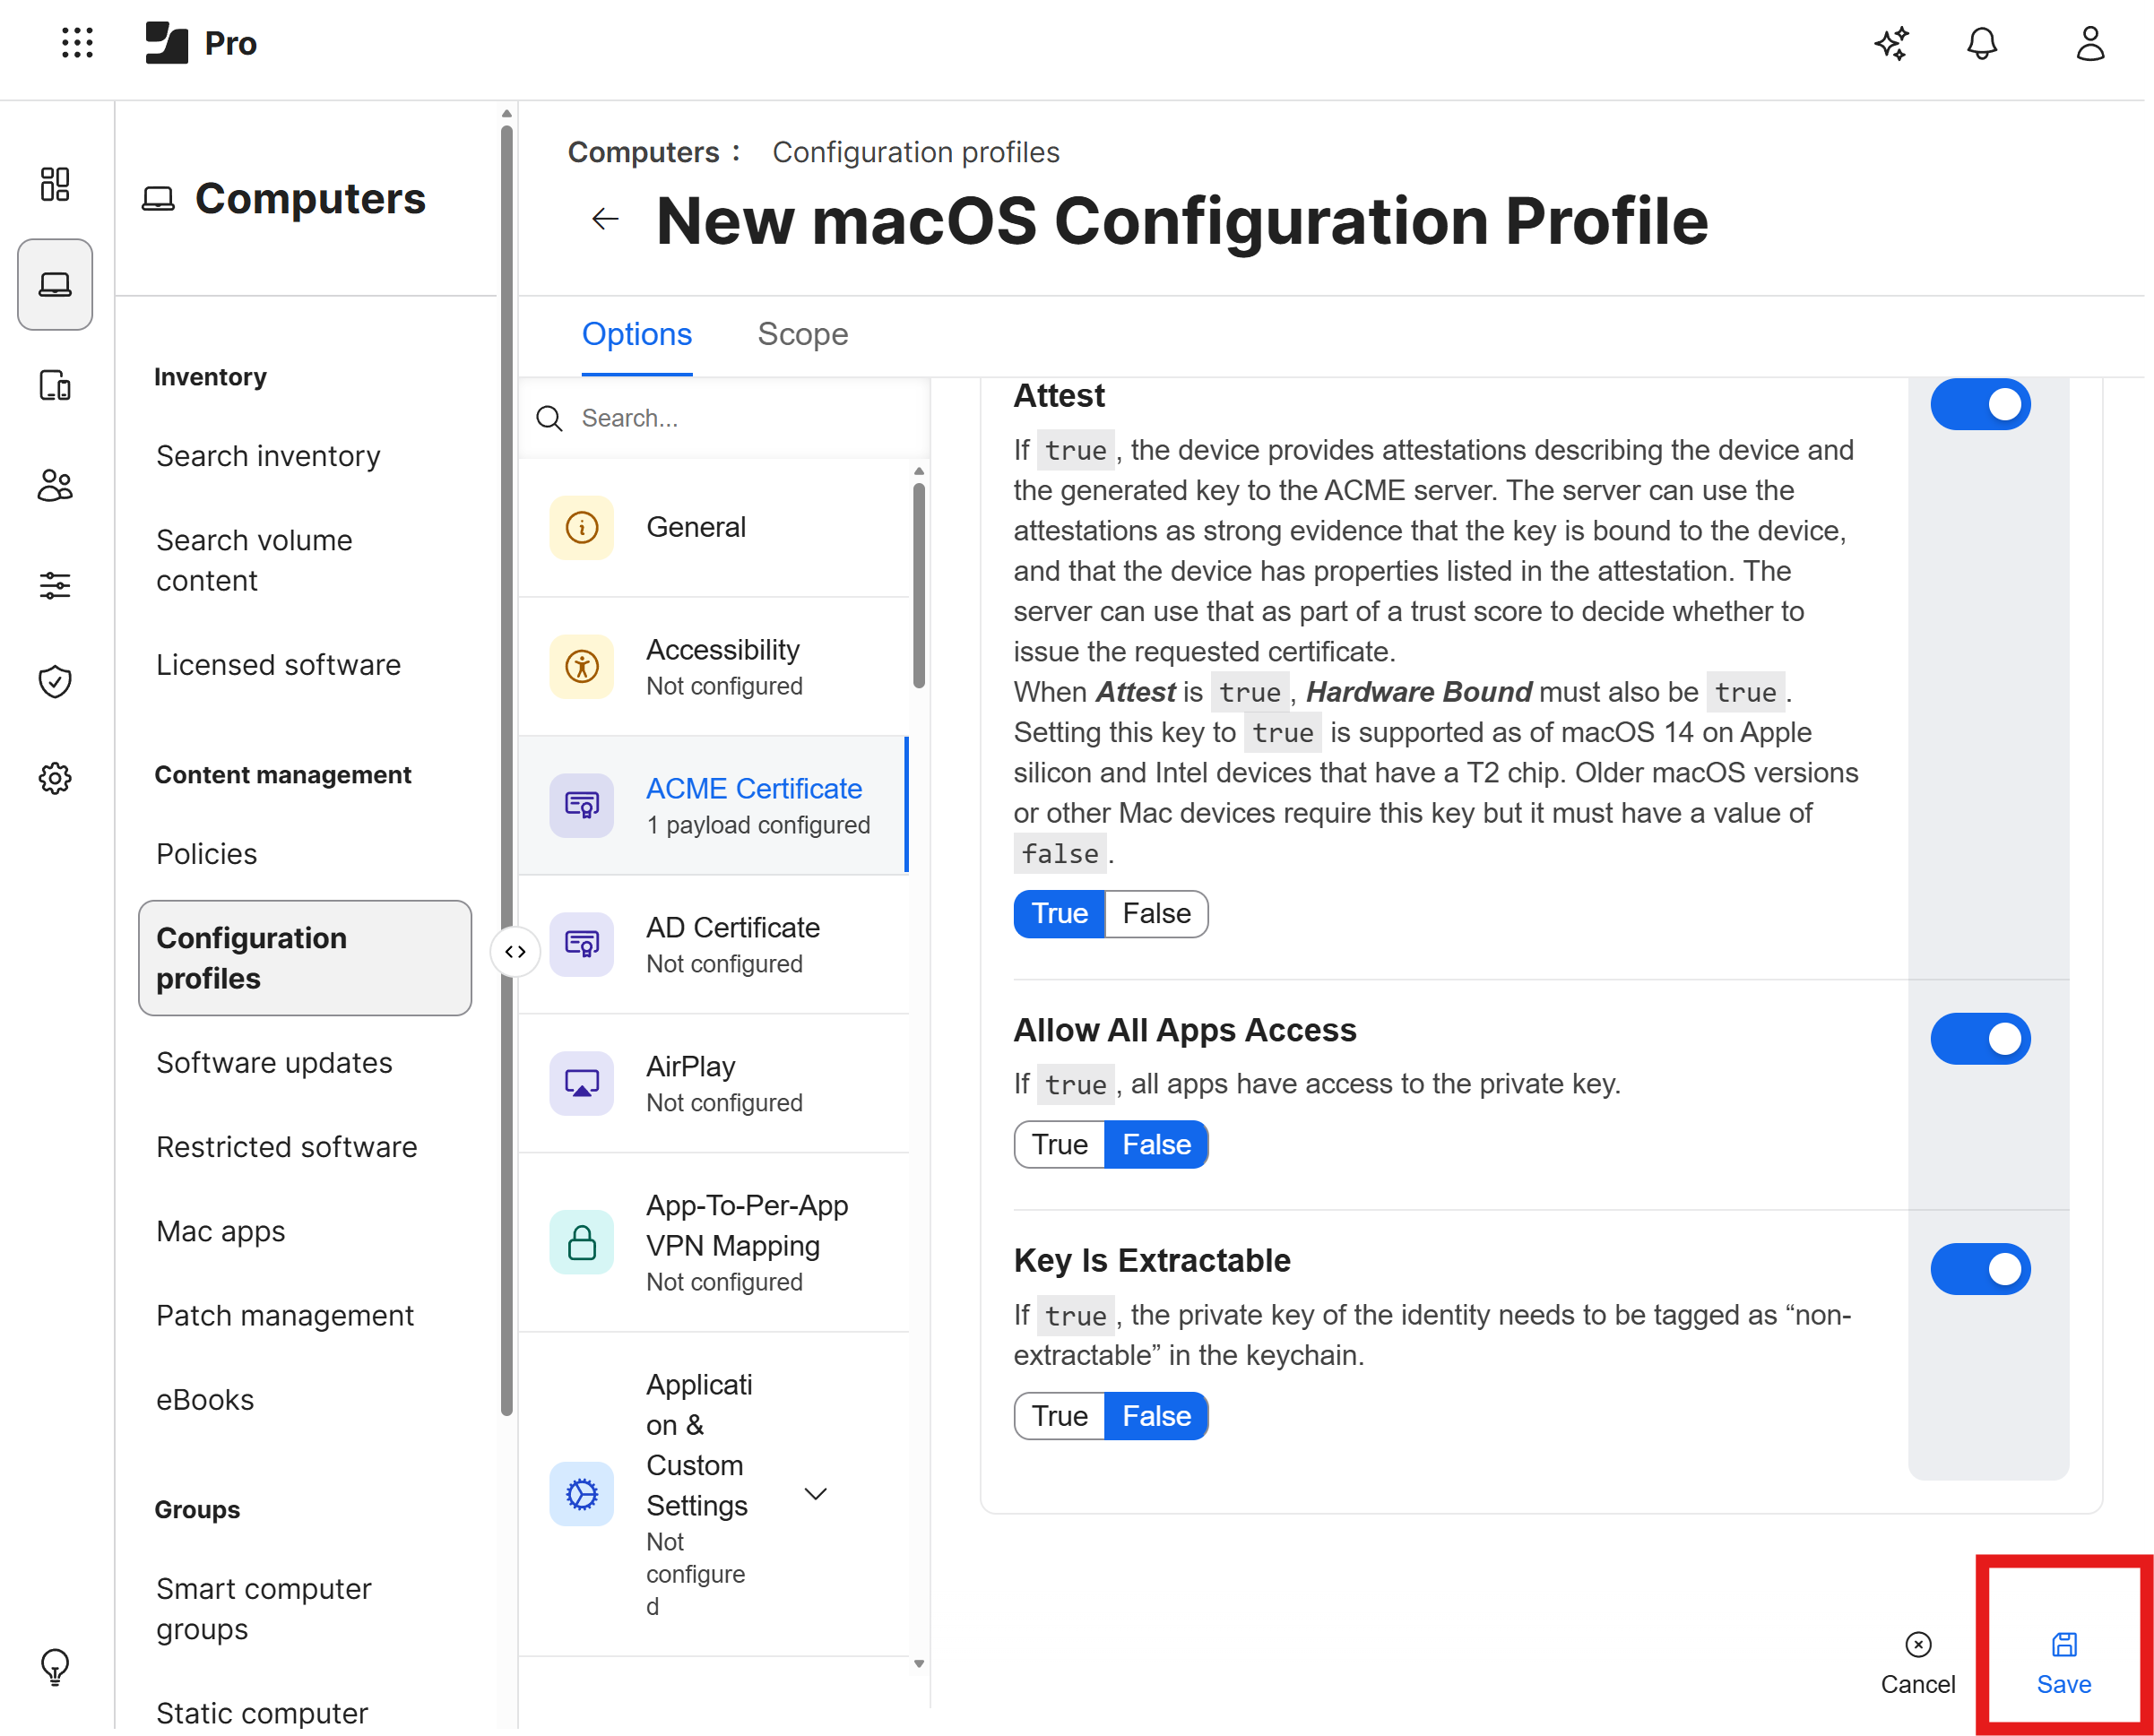
1.3.6.1.5.5.7.3.2for client authentication. You can add additional EKU values as needed for your use case. - Attest: We recommend setting this to True.
- Allow All Apps Access: Set this to false, unless you have specific 3rd party apps (VPNs) that require access to the certificate. If you are using the certificate for Jamf Pro and Apple’s built-in Wi-Fi or VPN, you do not need to check this box.
- Key Is Extractable: Set this to false to prevent the private key from being exportable from the device’s secure enclave.
-
Click Save to save your ACME certificate configuration.
How to Enable Static Challenge in Your EZCA SCEP CA
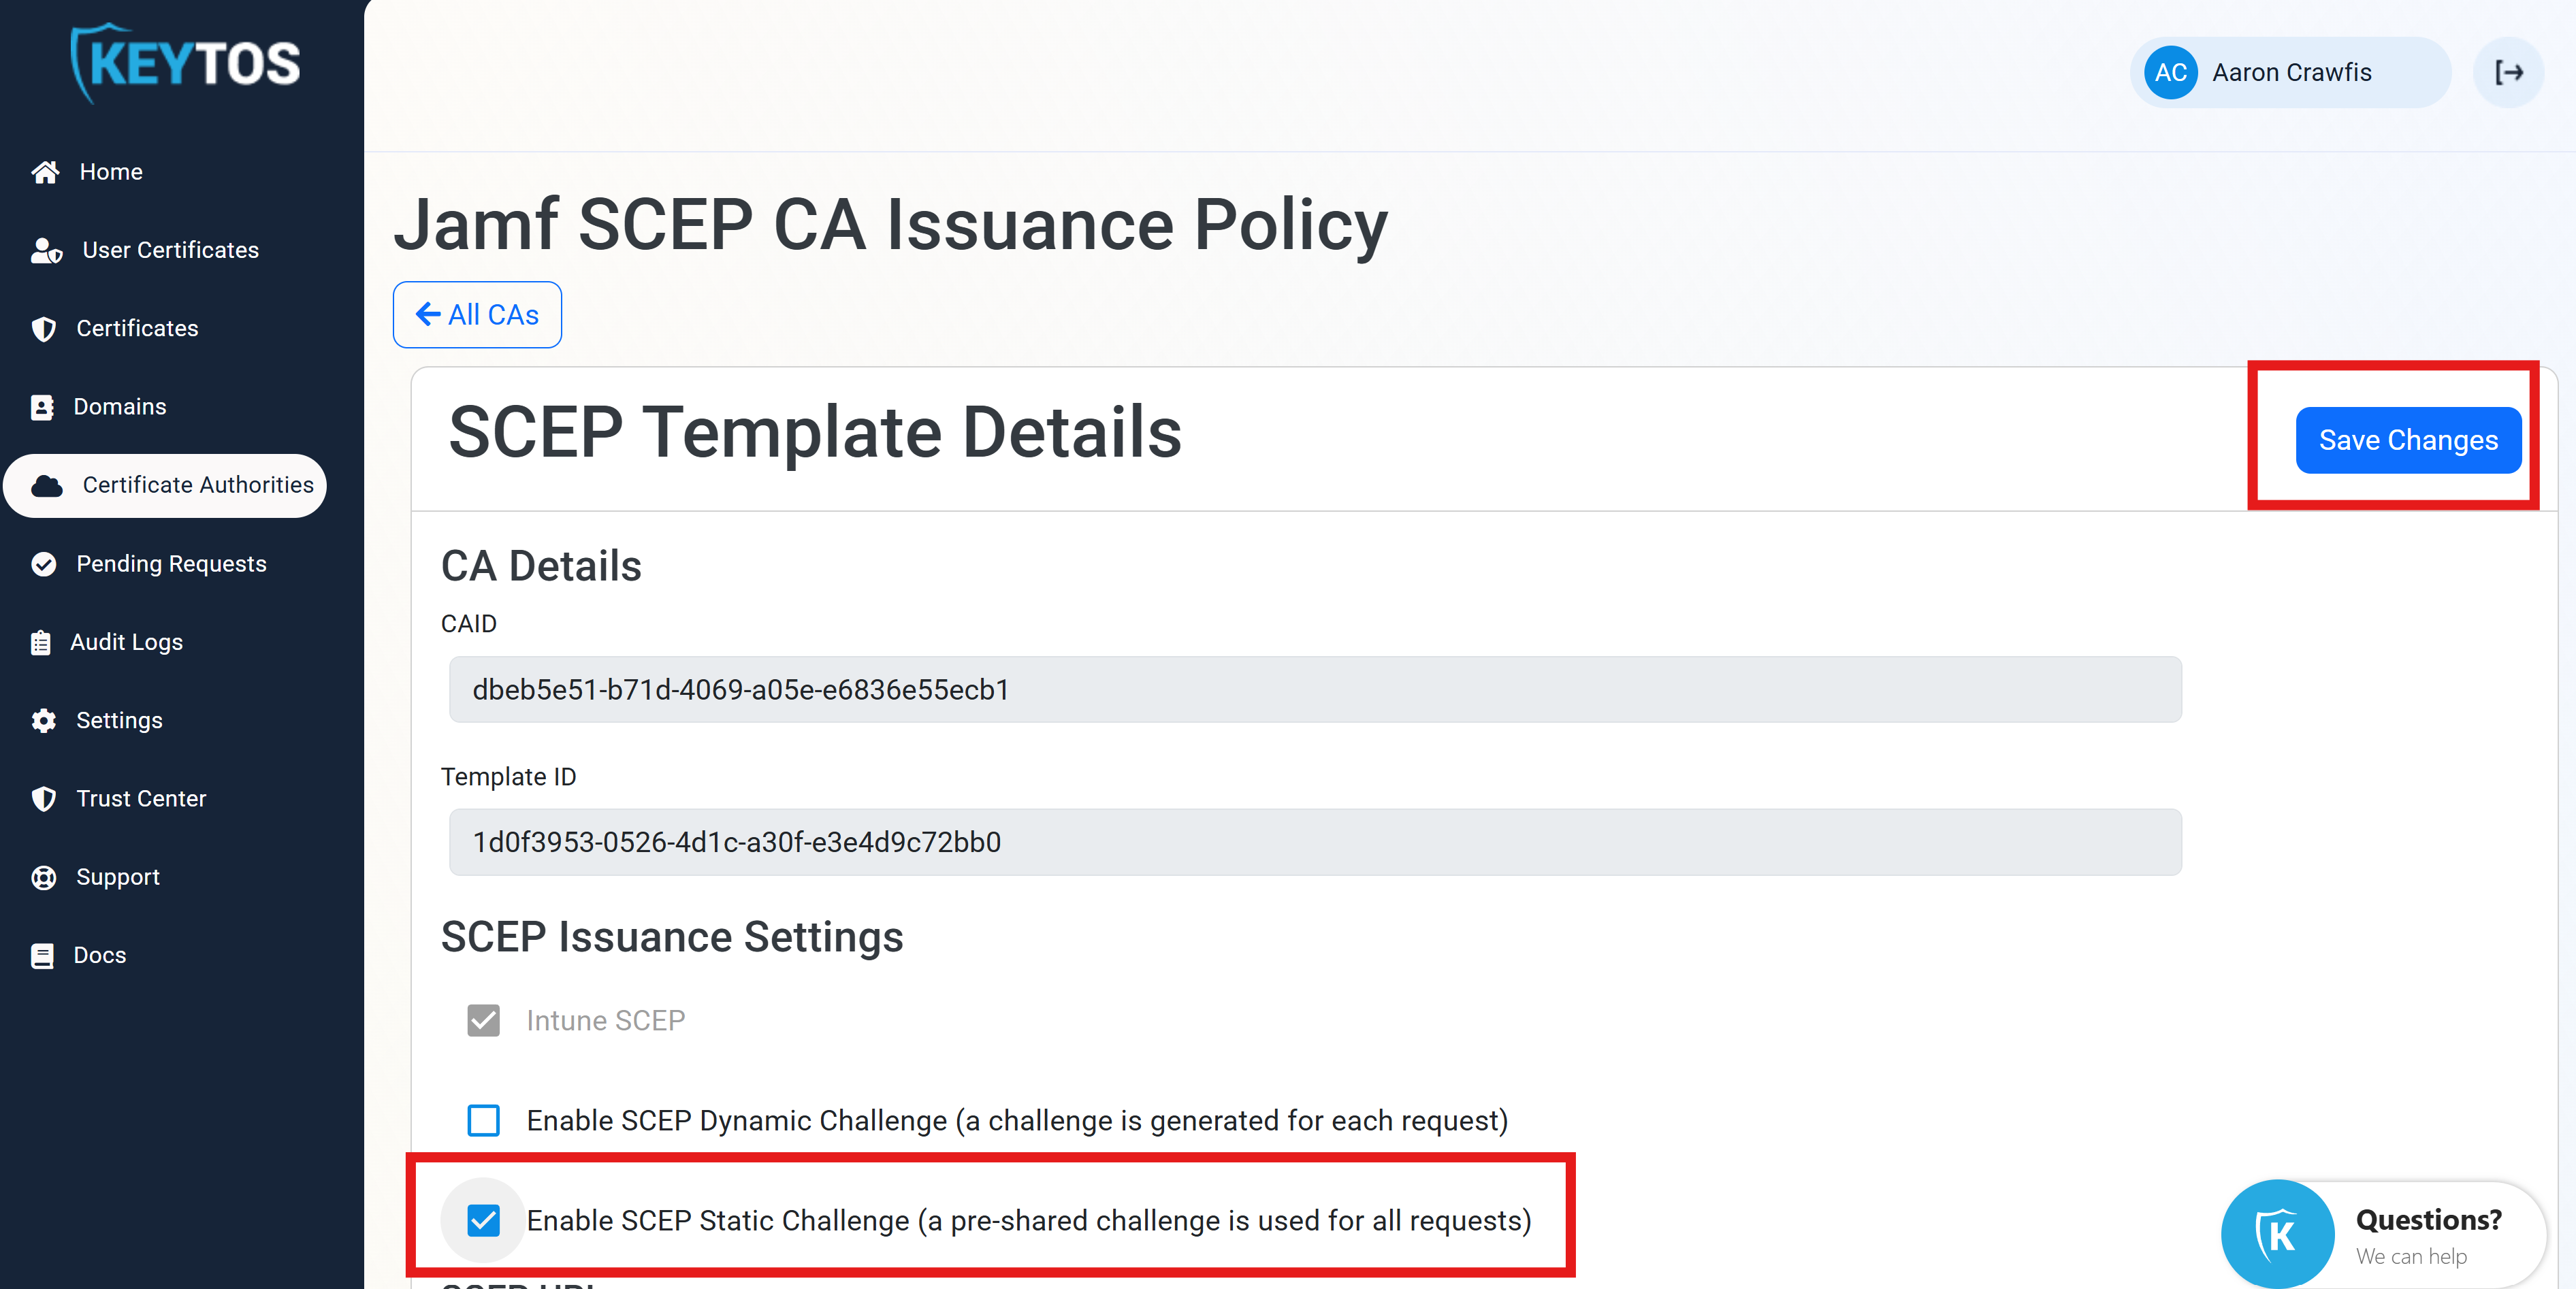
To issue certificates to your Apple devices using Jamf Pro, you will need to ensure that your SCEP CA is configured to use a static challenge. By default, EZCA SCEP CAs have static challenge disabled, so you will need to enable it before you can use the SCEP CA with Jamf Pro.
-
Navigate to your EZCA portal and click on Certificate Authorities.
-
Click on View Requirements for your SCEP CA.
-
Check the box for Enable SCEP Static Challenge and click Save Changes.
-
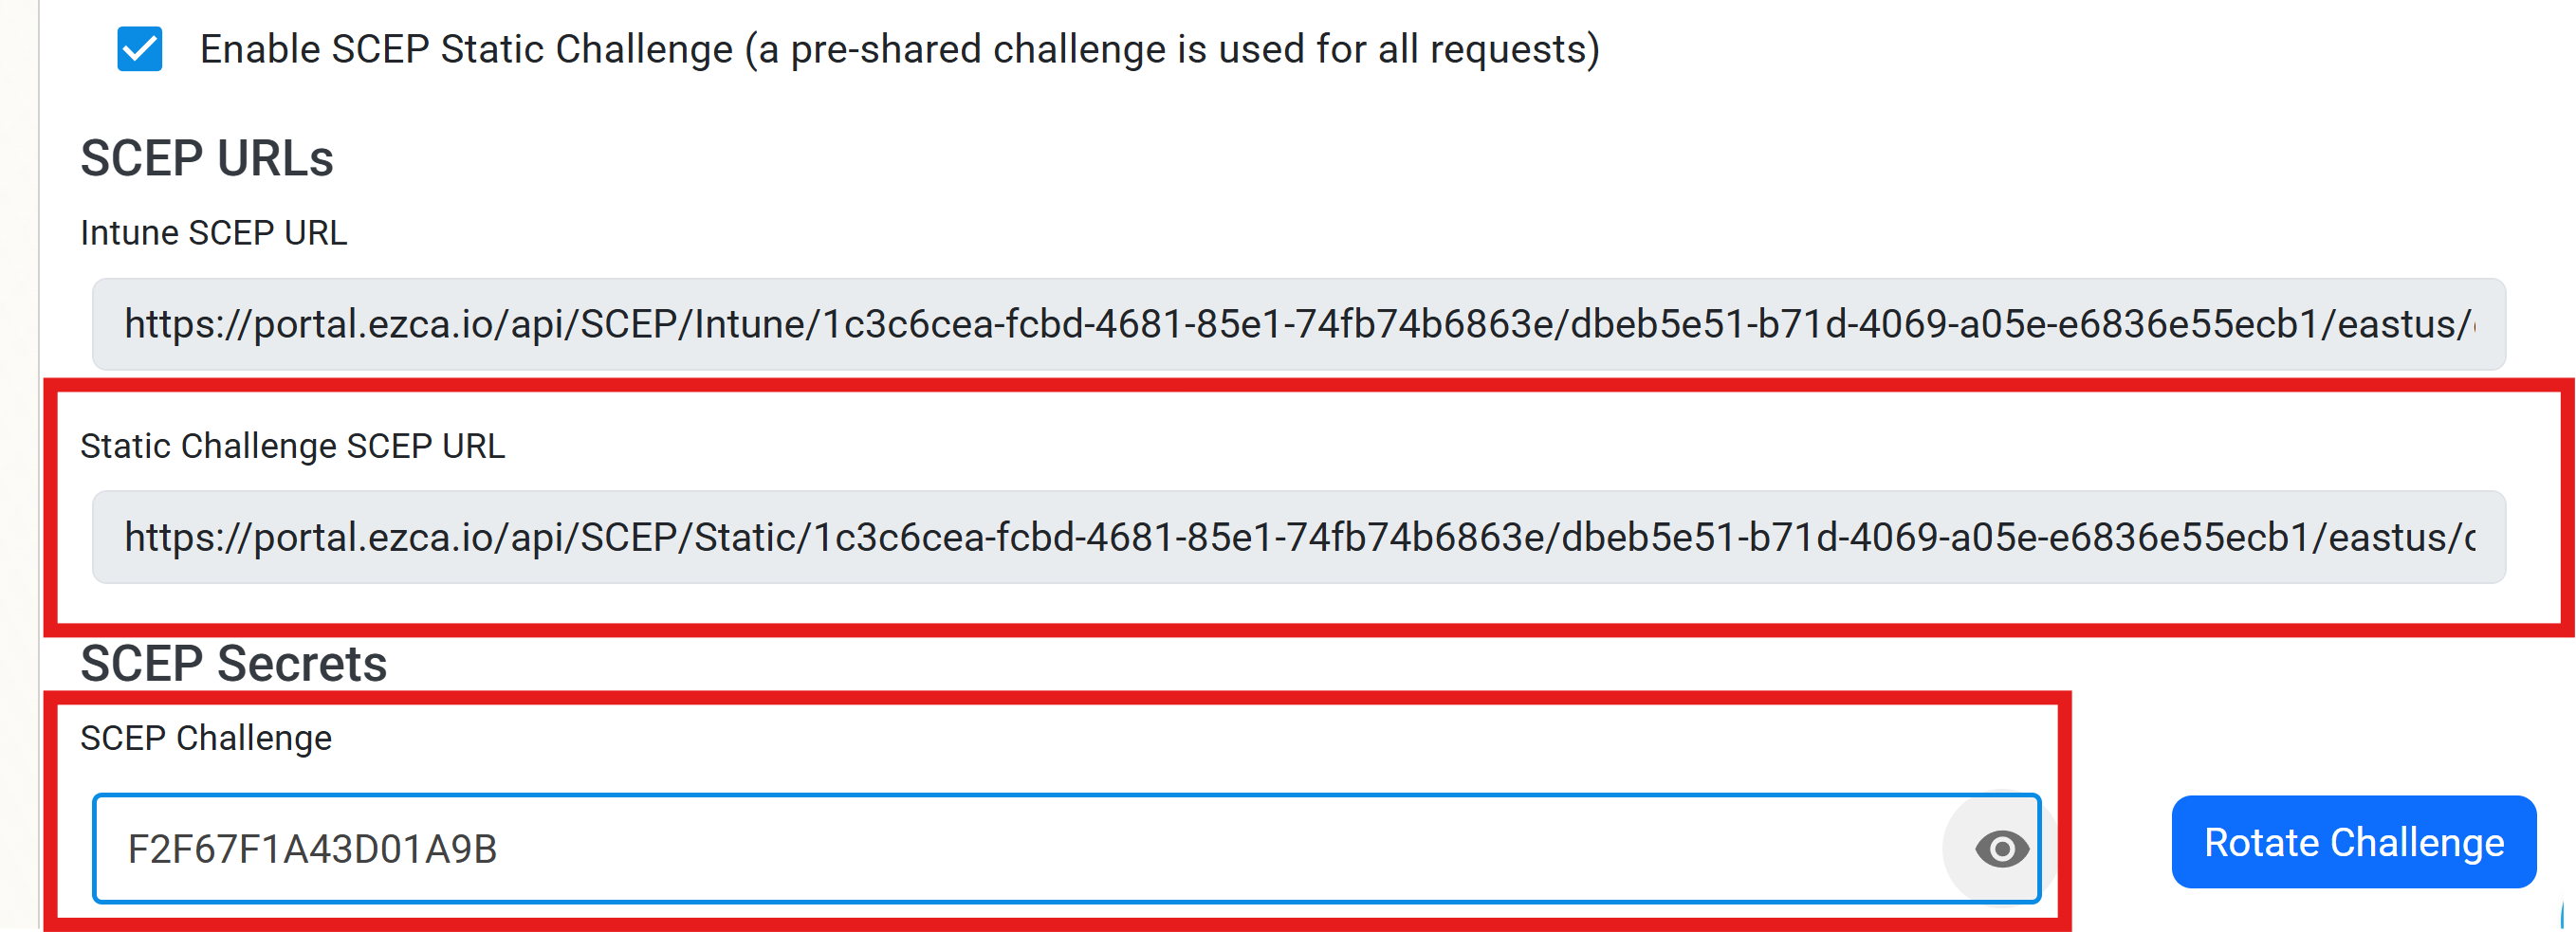
When the page refreshed, you will now see your Static Challenge SCEP URL and your SCEP Challenge. You will need both of these values to configure Jamf Pro.
How to Issue SCEP Certificates to Apple Devices in Jamf Pro
Now that you have enabled static SCEP, you can now configure Jamf Pro to issue SCEP certificates to your Apple devices using your EZCA SCEP CA. Follow these steps to configure Jamf Pro to issue SCEP certificates:
-
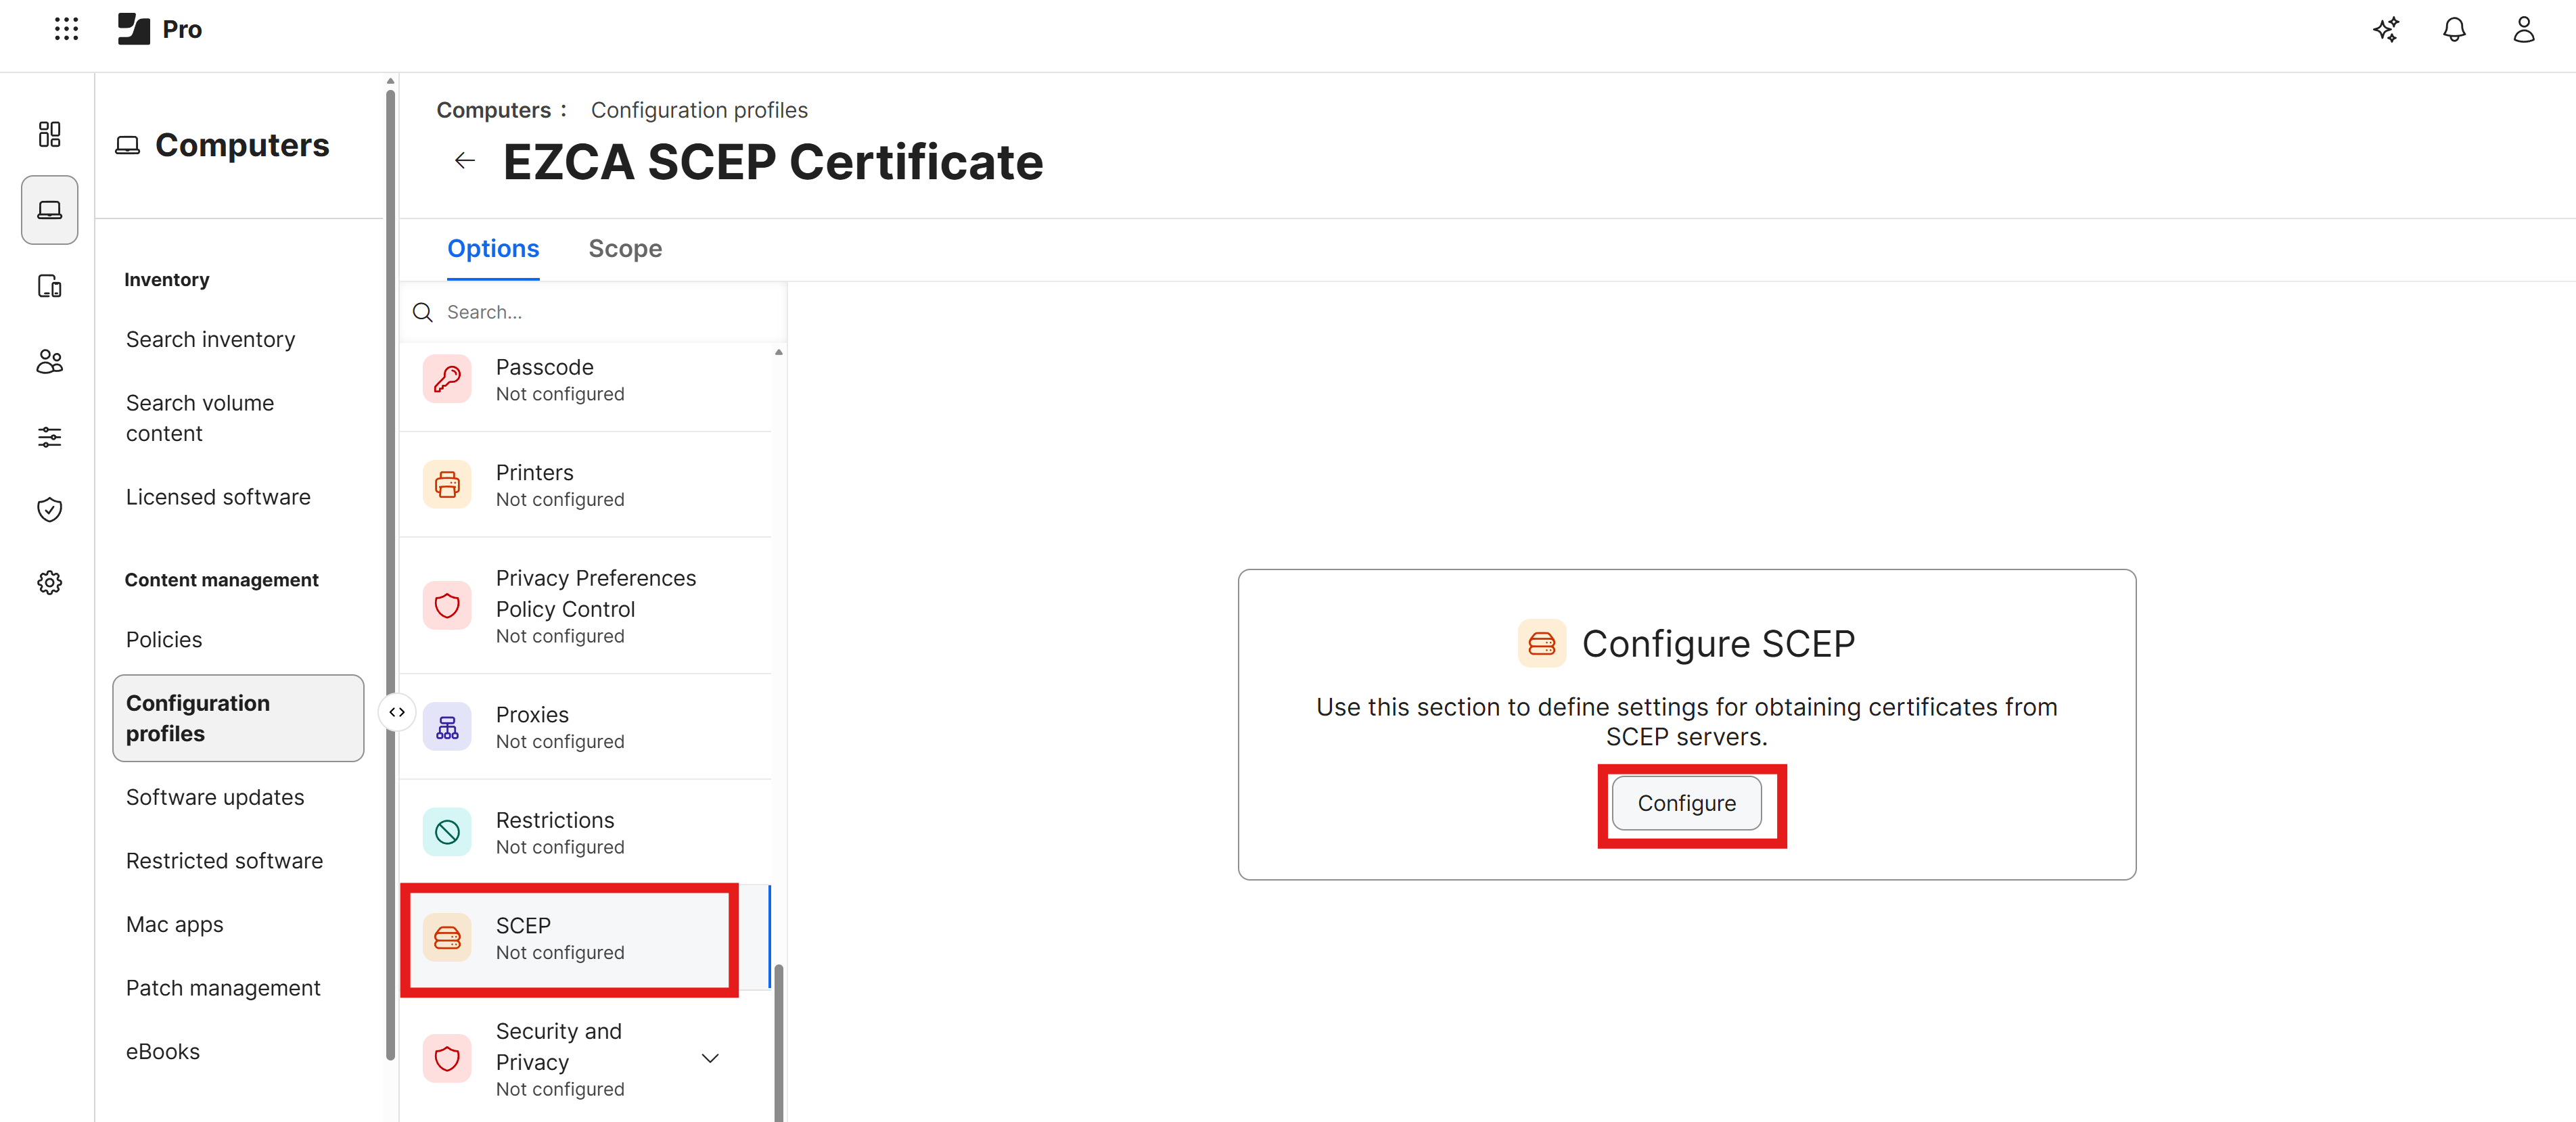
Navigate back to your Jamf Pro tab and scroll down to the SCEP section.
-
Click on the Configure button to add a new SCEP profile.
-
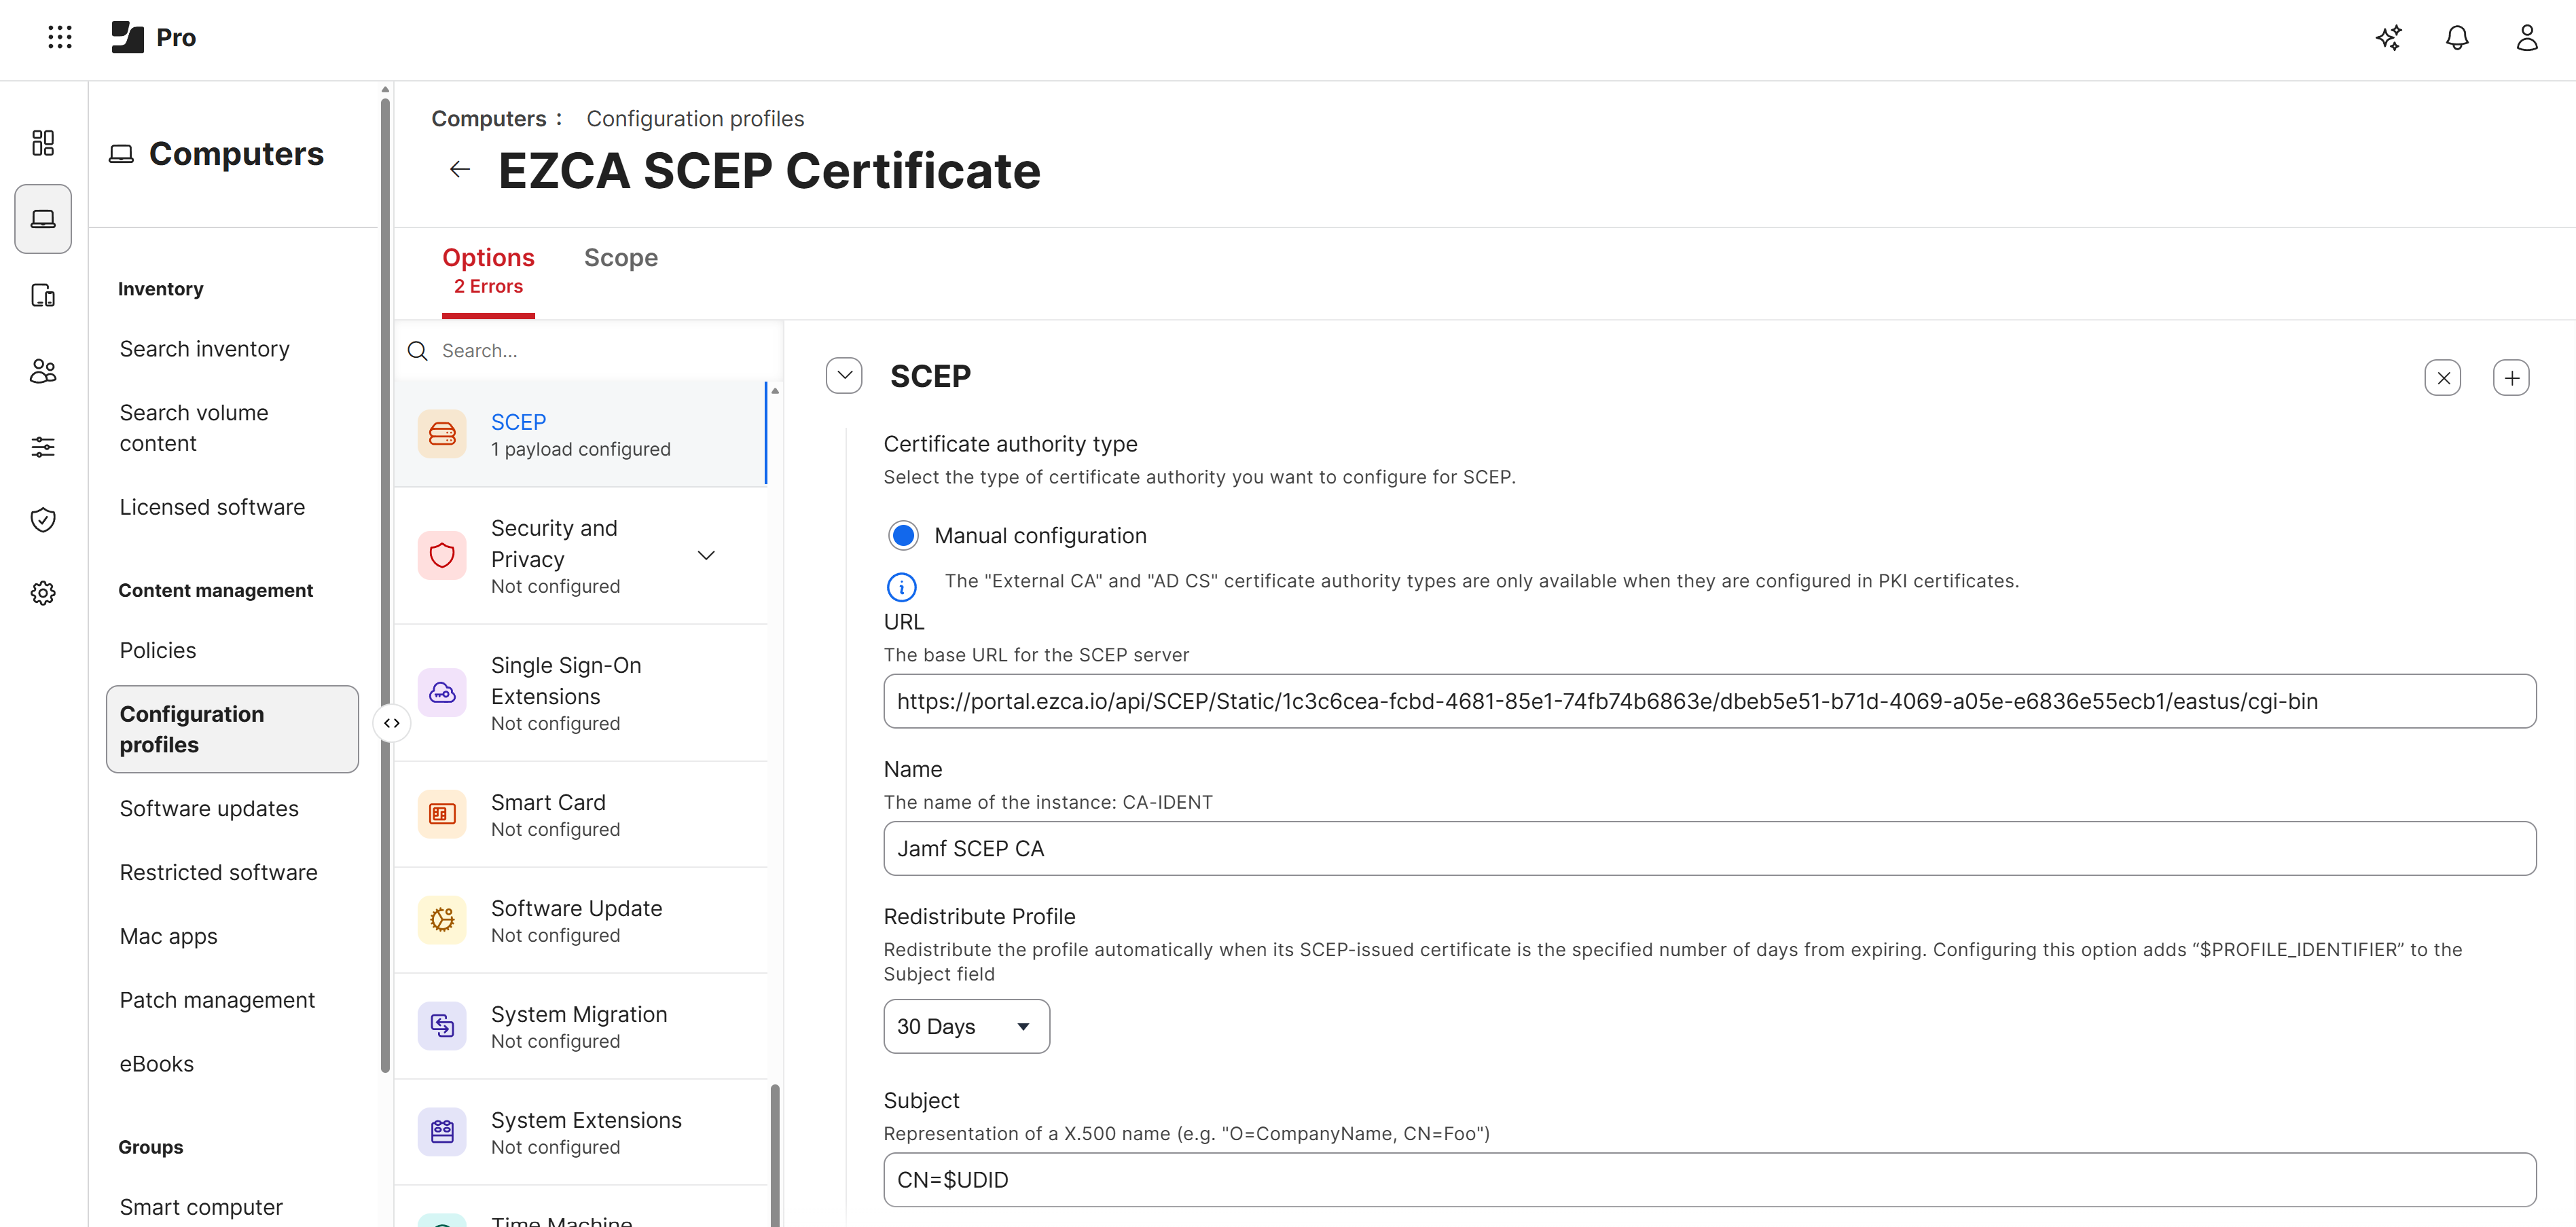
Enter the following information for your SCEP profile:
-
URL: Paste the Static Challenge SCEP URL from your EZCA portal.
-
Name: A name for the CA (e.g., “EZCA SCEP CA”).
-
Redistribute Profile: Specify how often Jamf Pro should redistribute the profile to devices. We’ll set this to 30 days.
-
Subject Name: Use the available variables and any static values you want to build the subject name for the certificate. You can see the full list of Jamf supported dynamic values here. For example, you could use
CN=$UDIDto set the Common Name of the certificate to the device’s unique device identifier. -
Subject Alternative Name: Optionally use the available variables and any static values you want to build the subject alternative name for the certificate. We’ll leave this blank in our example.
-
Challenge Type: Ensure that this is set to Static.
-
Challenge: Paste the SCEP Challenge from your EZCA portal.
-
Verify Challenge: Paste the SCEP Challenge again to verify.
-
Retries: Set this to 2 to have Jamf Pro attempt to retry 2 times if the SCEP server is unavailable.
-
Retry Delay: Set this to 30 to have Jamf Pro wait 30 seconds between retries.
-
Certificate Expiration Notification Threshold: Set this to 14 to have Jamf Pro notify users 14 days before their certificate expires (if automatic renewal fails).
-
Key Size: Set this to 4096 for a stronger key.
-
Key Usage: Select Digital Signature and Key Encipherment.
-
Allow export from keychain: Uncheck this option to prevent the private key from being exportable from the device’s keychain.
-
Allow all apps access: Only check this box if you have a 3rd party VPN or Wi-Fi solution that requires access to the certificate. If you are using the certificate for Jamf Pro and Apple’s built-in Wi-Fi or VPN, you do not need to check this box.
-
Upload Certificate: Click on the Upload Certificate button and select the same CA certificate you downloaded earlier.
-
How to Scope Your ACME or SCEP Profile to Devices in Jamf Pro
Now that you have created your ACME or SCEP profile in Jamf Pro, you will need to scope the profile to the devices you want to receive the certificate. To scope your profile to devices in Jamf Pro, follow these steps:
-
While still in your profile, click on the Scope tab.
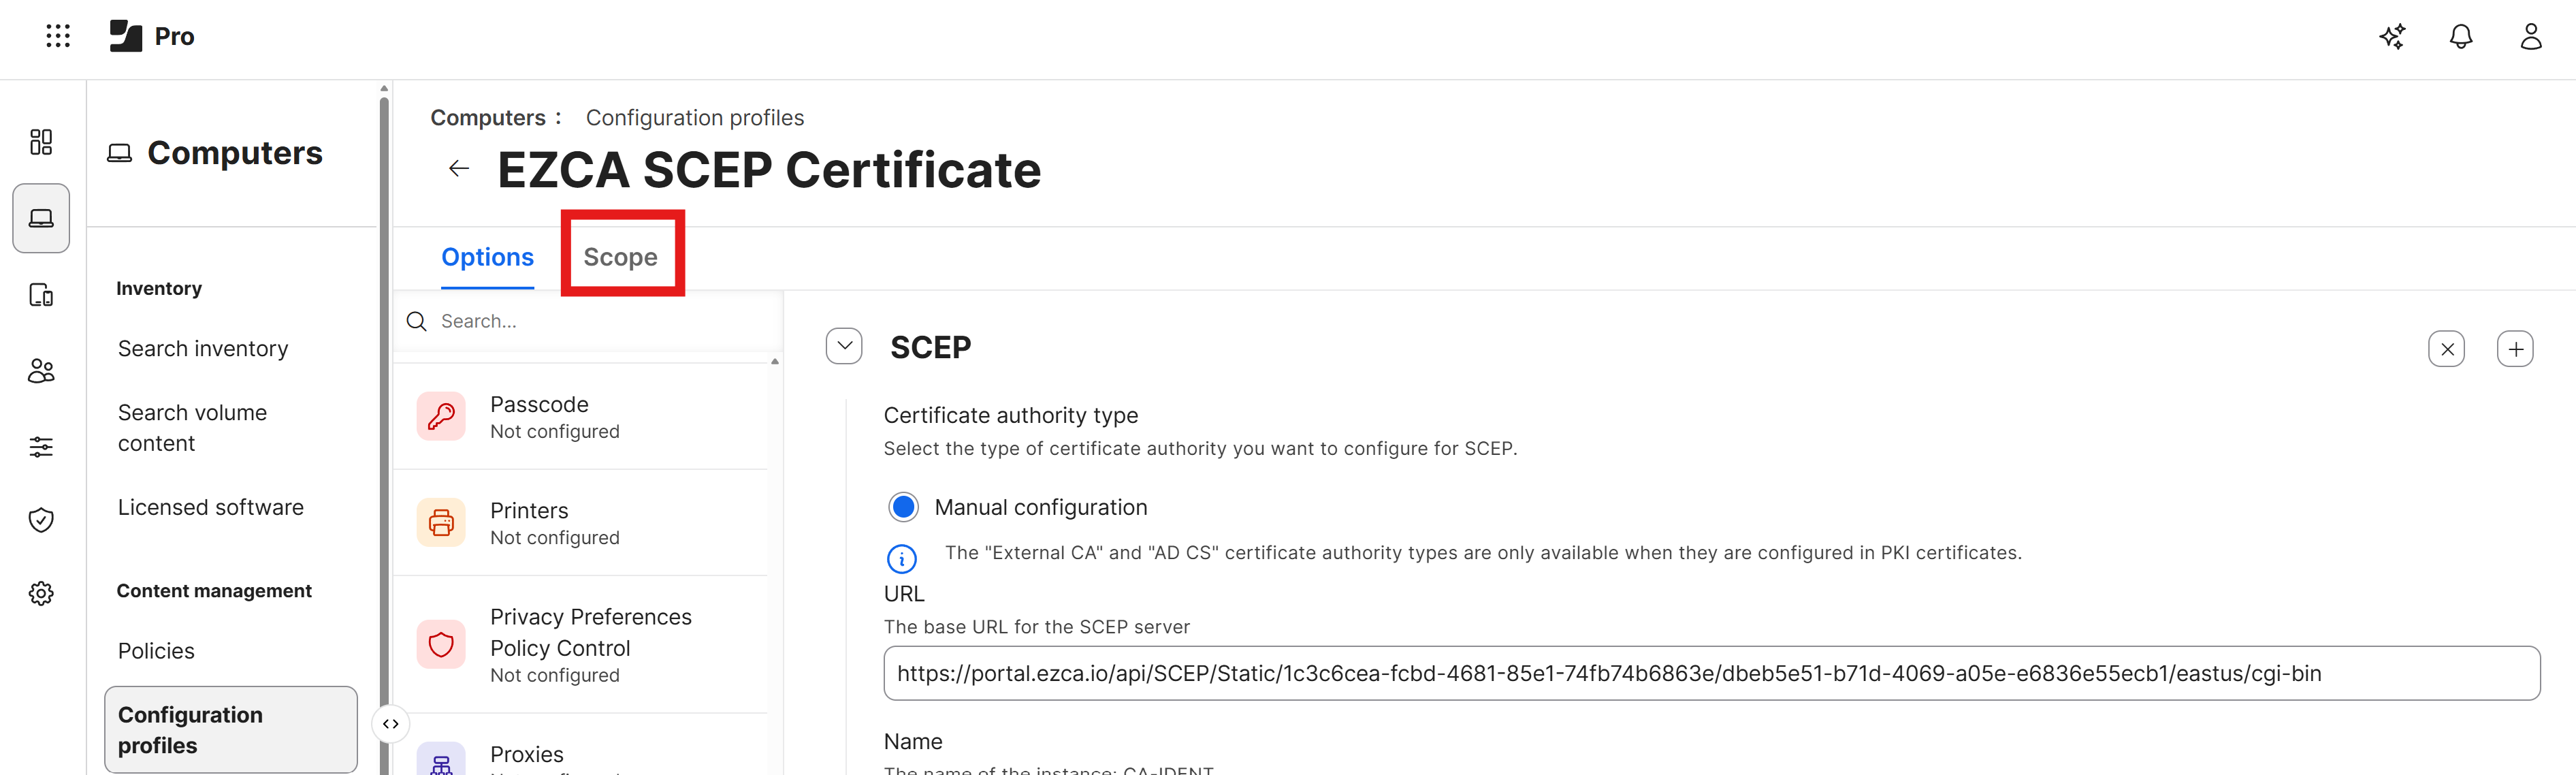
-
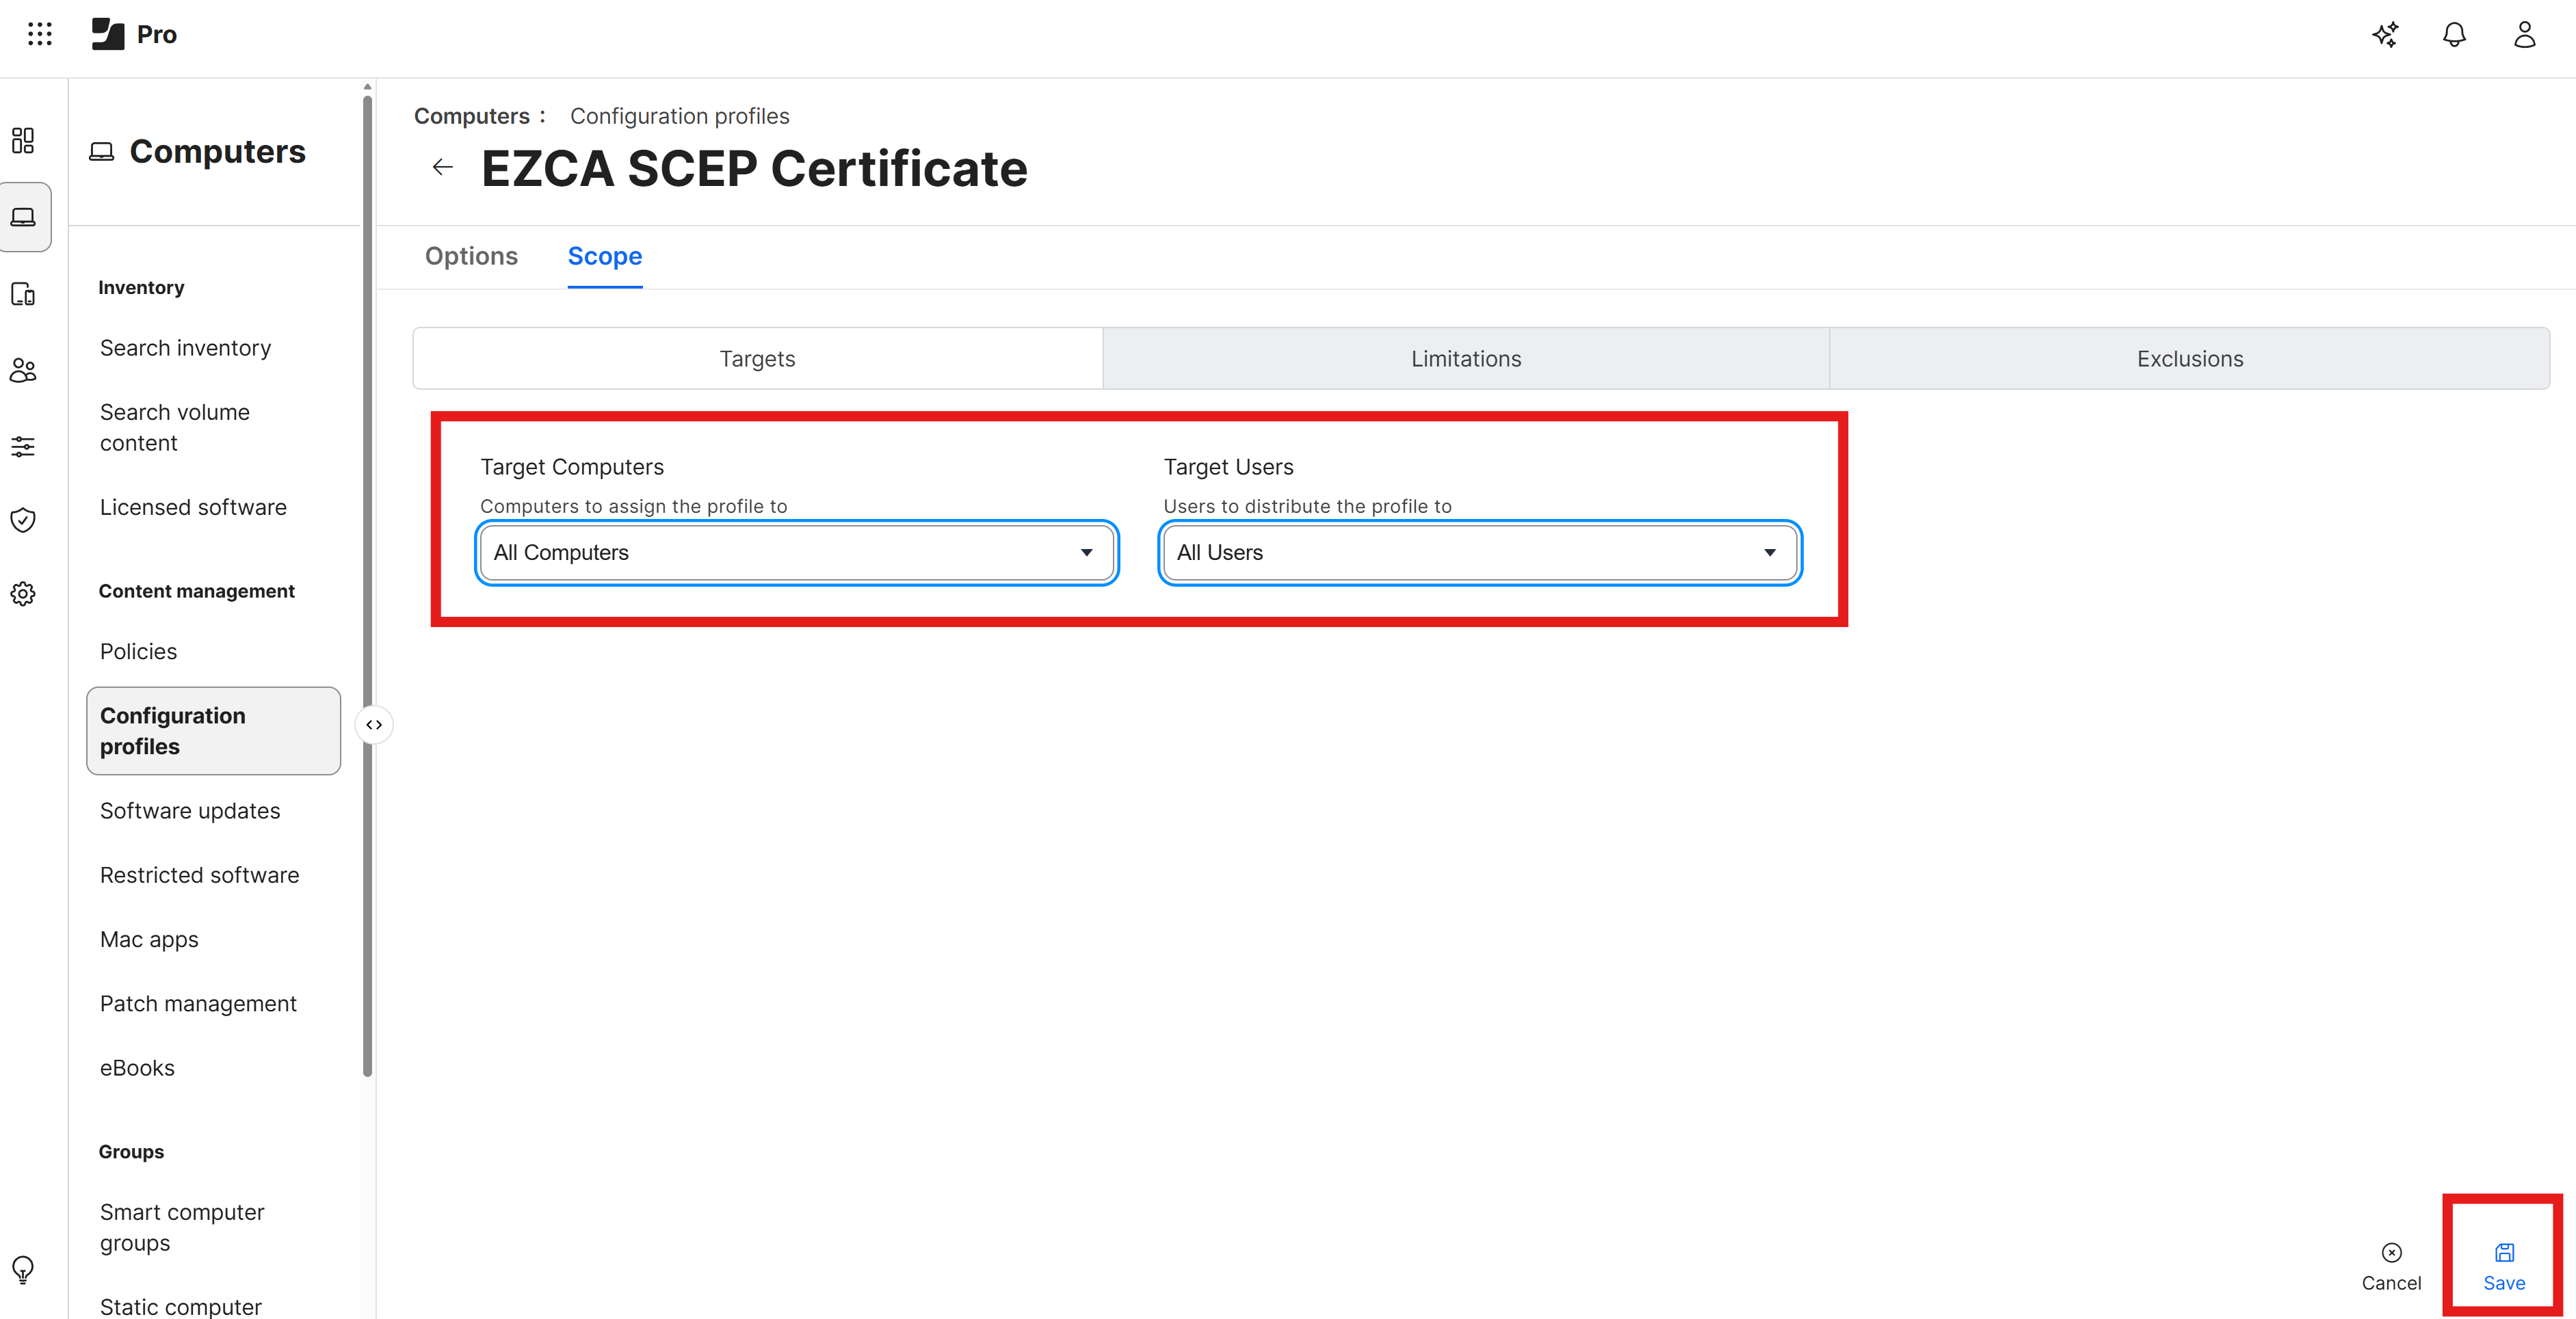
Select the Target Computers and/or Target Users you want to receive the certificate. For this example we will scope it to All Computers and All Users.
-
Click Save to save the profile. You should now see a completed profile with General, Certificate, and ACME/SCEP sections completed.
How to View Issued ACME or SCEP Certificates in macOS Keychain
To view the issued ACME or SCEP certificates on a macOS device, you can use the Keychain Access application. Follow these steps to view the issued certificates:
-
On the macOS device that is enrolled in Jamf Pro and scoped to receive the ACME/SCEP profile, open the Keychain Access application. You can find this application in the Utilities folder within the Applications folder, or you can search for it using Spotlight.
-
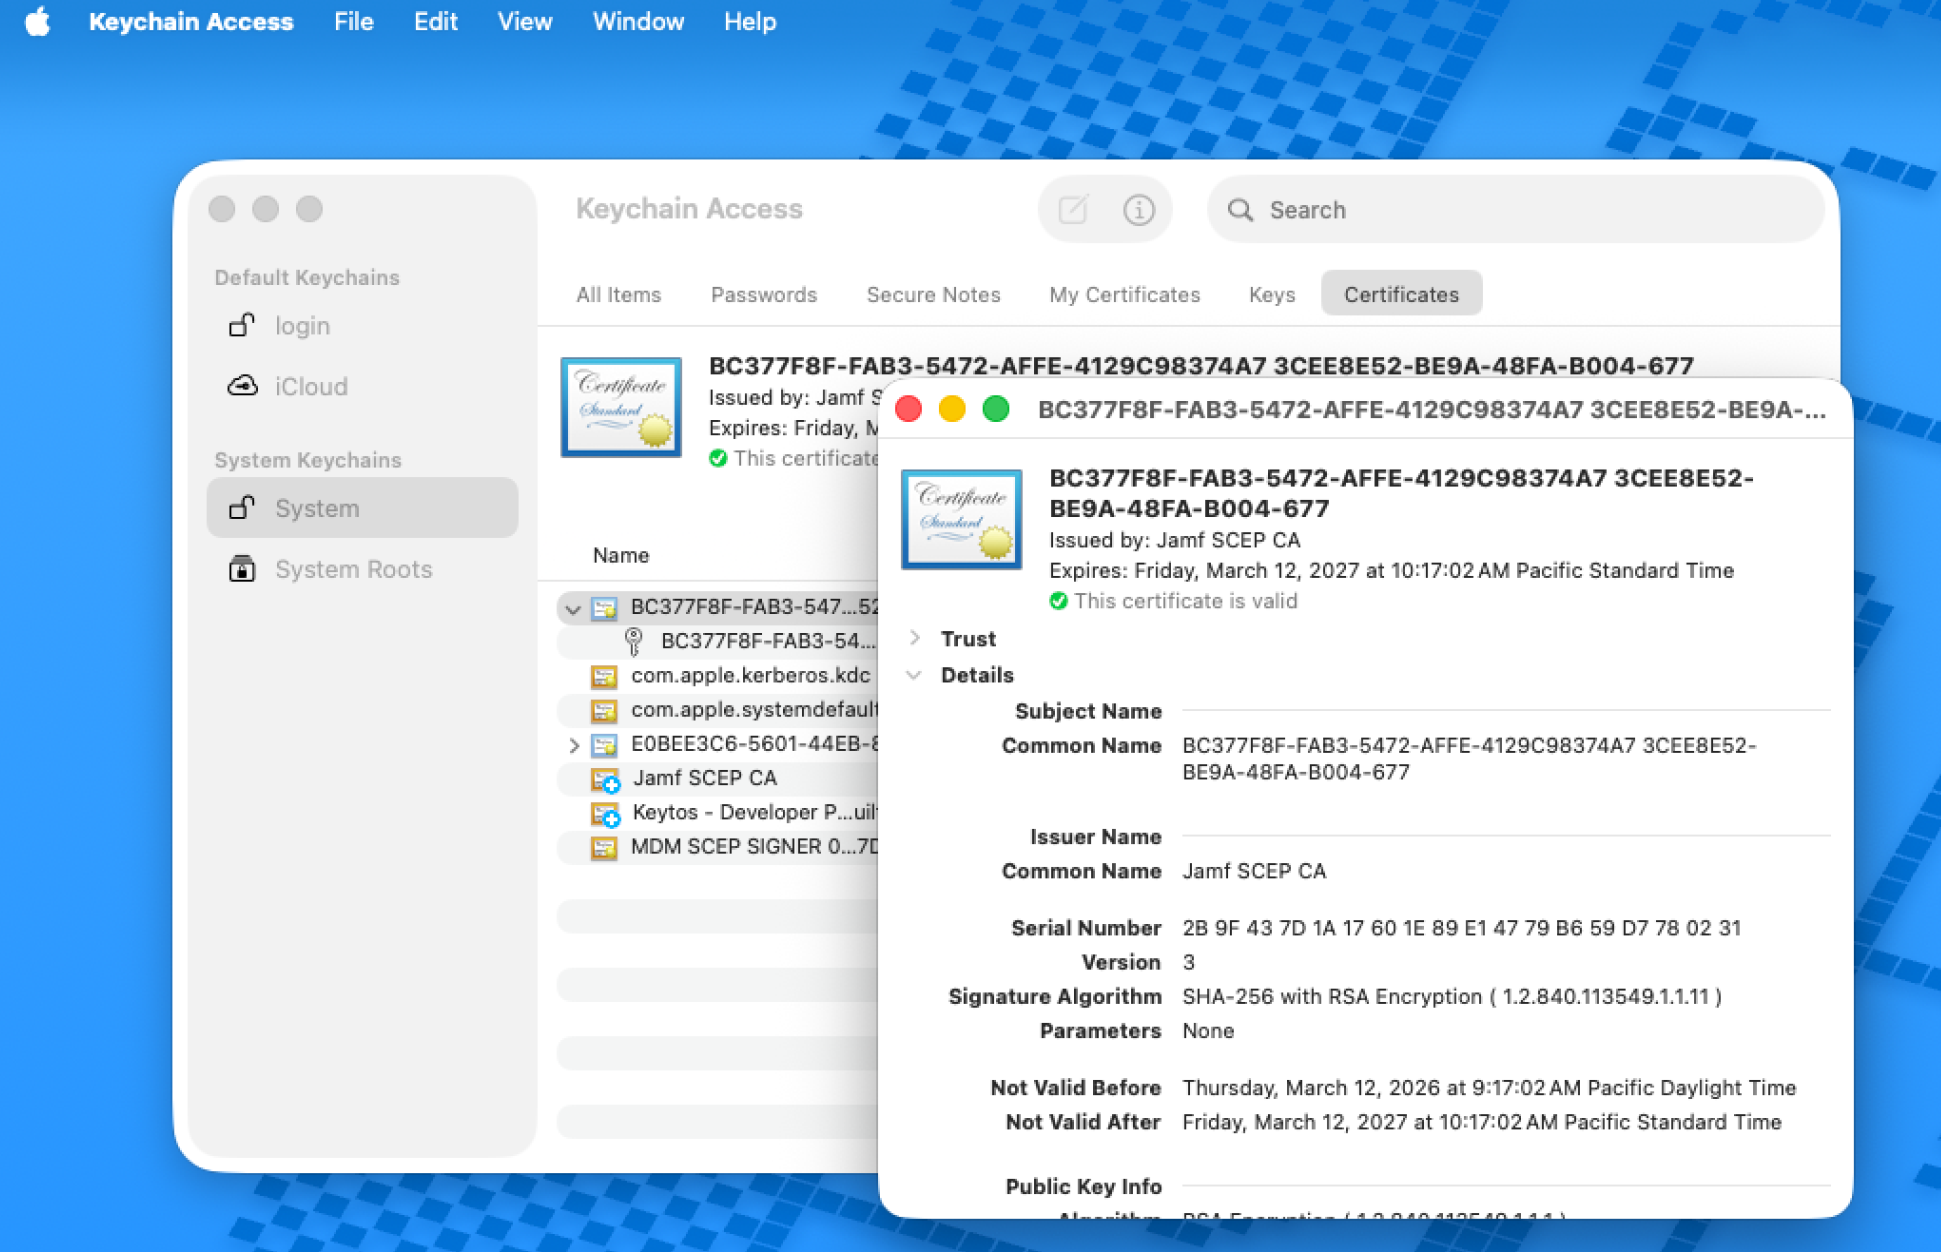
In Keychain Access, select the System keychain from the left sidebar.
-
You should see the issued SCEP certificate in the list of certificates. The certificate will have the name you specified in the profile (e.g., “JAMF SCEP CA”) and will indicate that it is issued by your EZCA SCEP CA.
Congratulations! You have successfully configured Jamf Pro to issue ACME or SCEP certificates to your Apple devices using your EZCA SCEP CA. You can now use these certificates for various purposes such as Wi-Fi authentication, VPN authentication, or email signing and encryption.
How to Use an ACME or SCEP Certificate for Wi-Fi Authentication in Jamf Pro
Now that you have issued ACME or SCEP certificates to your Apple devices using Jamf Pro, you can use these certificates for Wi-Fi authentication. To configure a Wi-Fi profile in Jamf Pro that uses the certificate for authentication, follow the steps outlined in this guide.
Set Up WPA Enterprise Wi-Fi with SCEP CertificatesFrequently Asked Questions (FAQ) About ACME and SCEP Certificates in Jamf Pro
Are Certificates Automatically Renewed in Jamf Pro?
Yes, as long as you enable the Redistribute Profile option in your ACME or SCEP profile, Jamf Pro will automatically renew the certificate before it expires. The device will request a new certificate from the EZCA SCEP CA and replace the old certificate with the new one.
Are Certificates Automatically Revoked in Jamf Pro If a Device is Removed from Jamf Pro?
Only for ACME certificates. If a device is removed from Jamf Pro, the ACME certificate will be automatically revoked by EZCA. However, SCEP certificates are not automatically revoked when a device is removed from Jamf Pro. You will need to manually revoke the SCEP certificate in EZCA if you want to prevent the device from using the certificate.
Why Do I Need To Create a Client ID and Client Secret in Jamf Pro for ACME Device Attestation?
An MDM connection from EZCA to Jamf Pro is required so EZCA knows which devices are enrolled in your Jamf Pro instance and can receive certificates. The Client ID and Client Secret are used to authenticate EZCA with your Jamf Pro instance and allow it to read the list of enrolled devices.
Enjoying EZCA? Leave Us a Review!
We hope you’re enjoying using EZCA to issue your SCEP certificates! If you have a moment, we would greatly appreciate it if you could leave us a review on G2. Your feedback helps other IT professionals discover EZCA and helps us continue to improve our service. Thank you for your support!