How-To: Create a SCEP CA with EZCA Cloud PKI
Prerequisites for Creating a SCEP CA in Azure
- You have registered the Keytos Entra ID applications
- You have created an EZCA subscription
- If you plan to use Intune, you have registered the Intune application
How To Create a SCEP CA in EZCA Cloud PKI - Video Tutorial
Want to follow along with our video tutorial? Check out our video tutorial below where we walk you through how to create a SCEP CA in EZCA:
Note that in this video we are creating a Root CA that will be the Issuing SCEP CA. If you want to build a multi-tier CA hierarchy, refer to our PKI hierarchy best practices and Root CA guide.
How to Create a SCEP CA in EZCA Cloud PKI - Step by Step Guide
Follow these steps to create your SCEP CA in EZCA Cloud PKI:
-
Navigate to the EZCA portal (If you have your private instance, or you are in our EU Version go to that specific portal)
-
Login with an account that is registered as a PKI Administrator in EZCA.
-
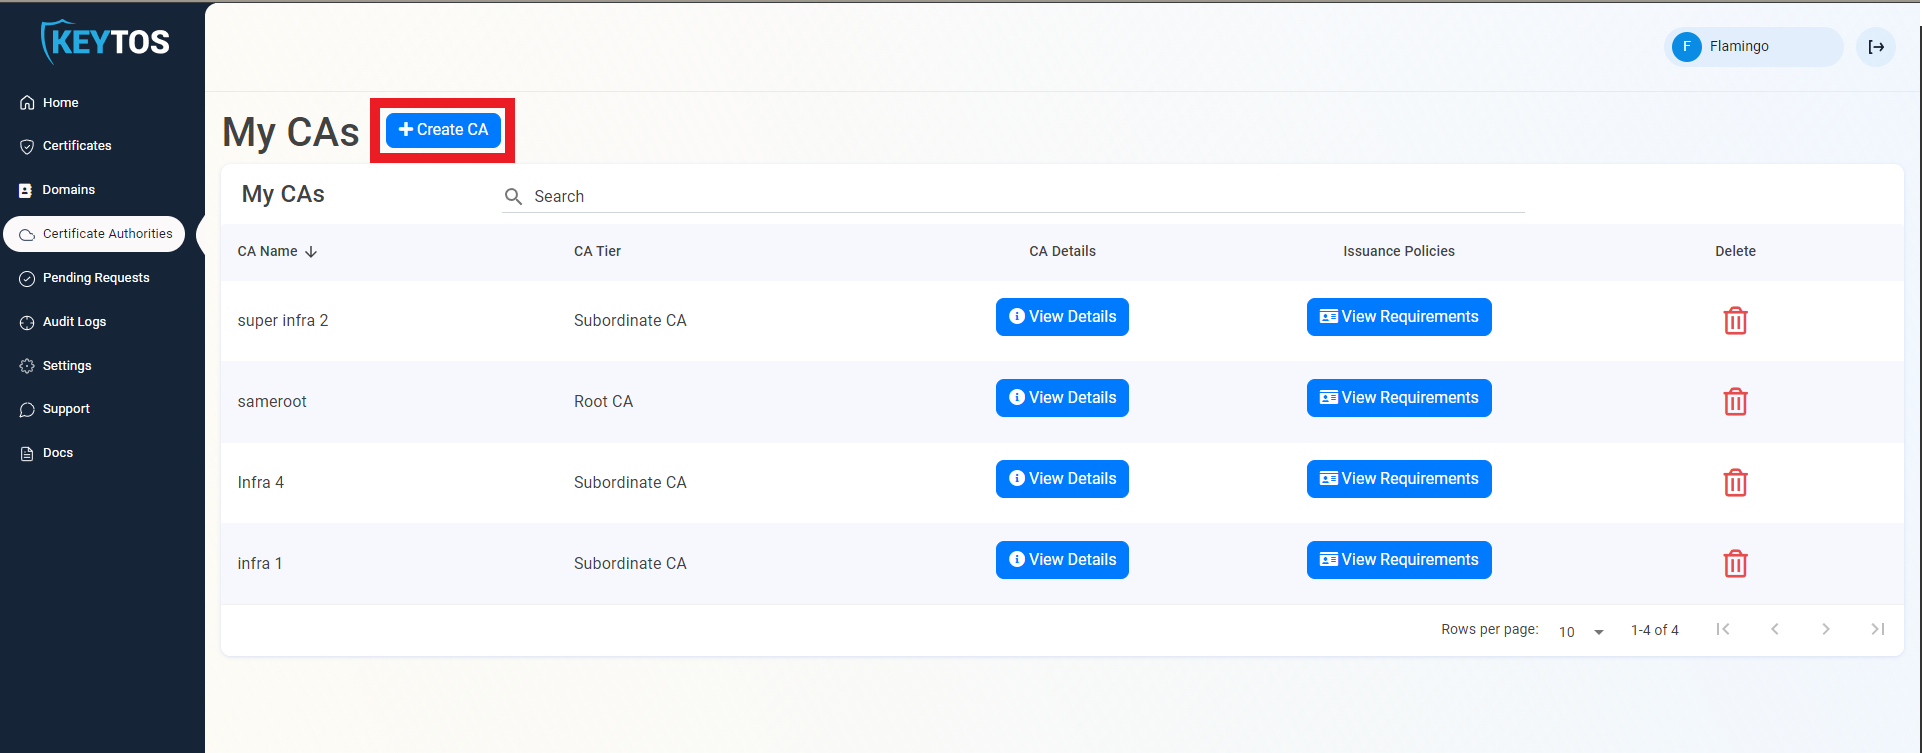
From the left-hand menu, navigate to Certificate Authorities.
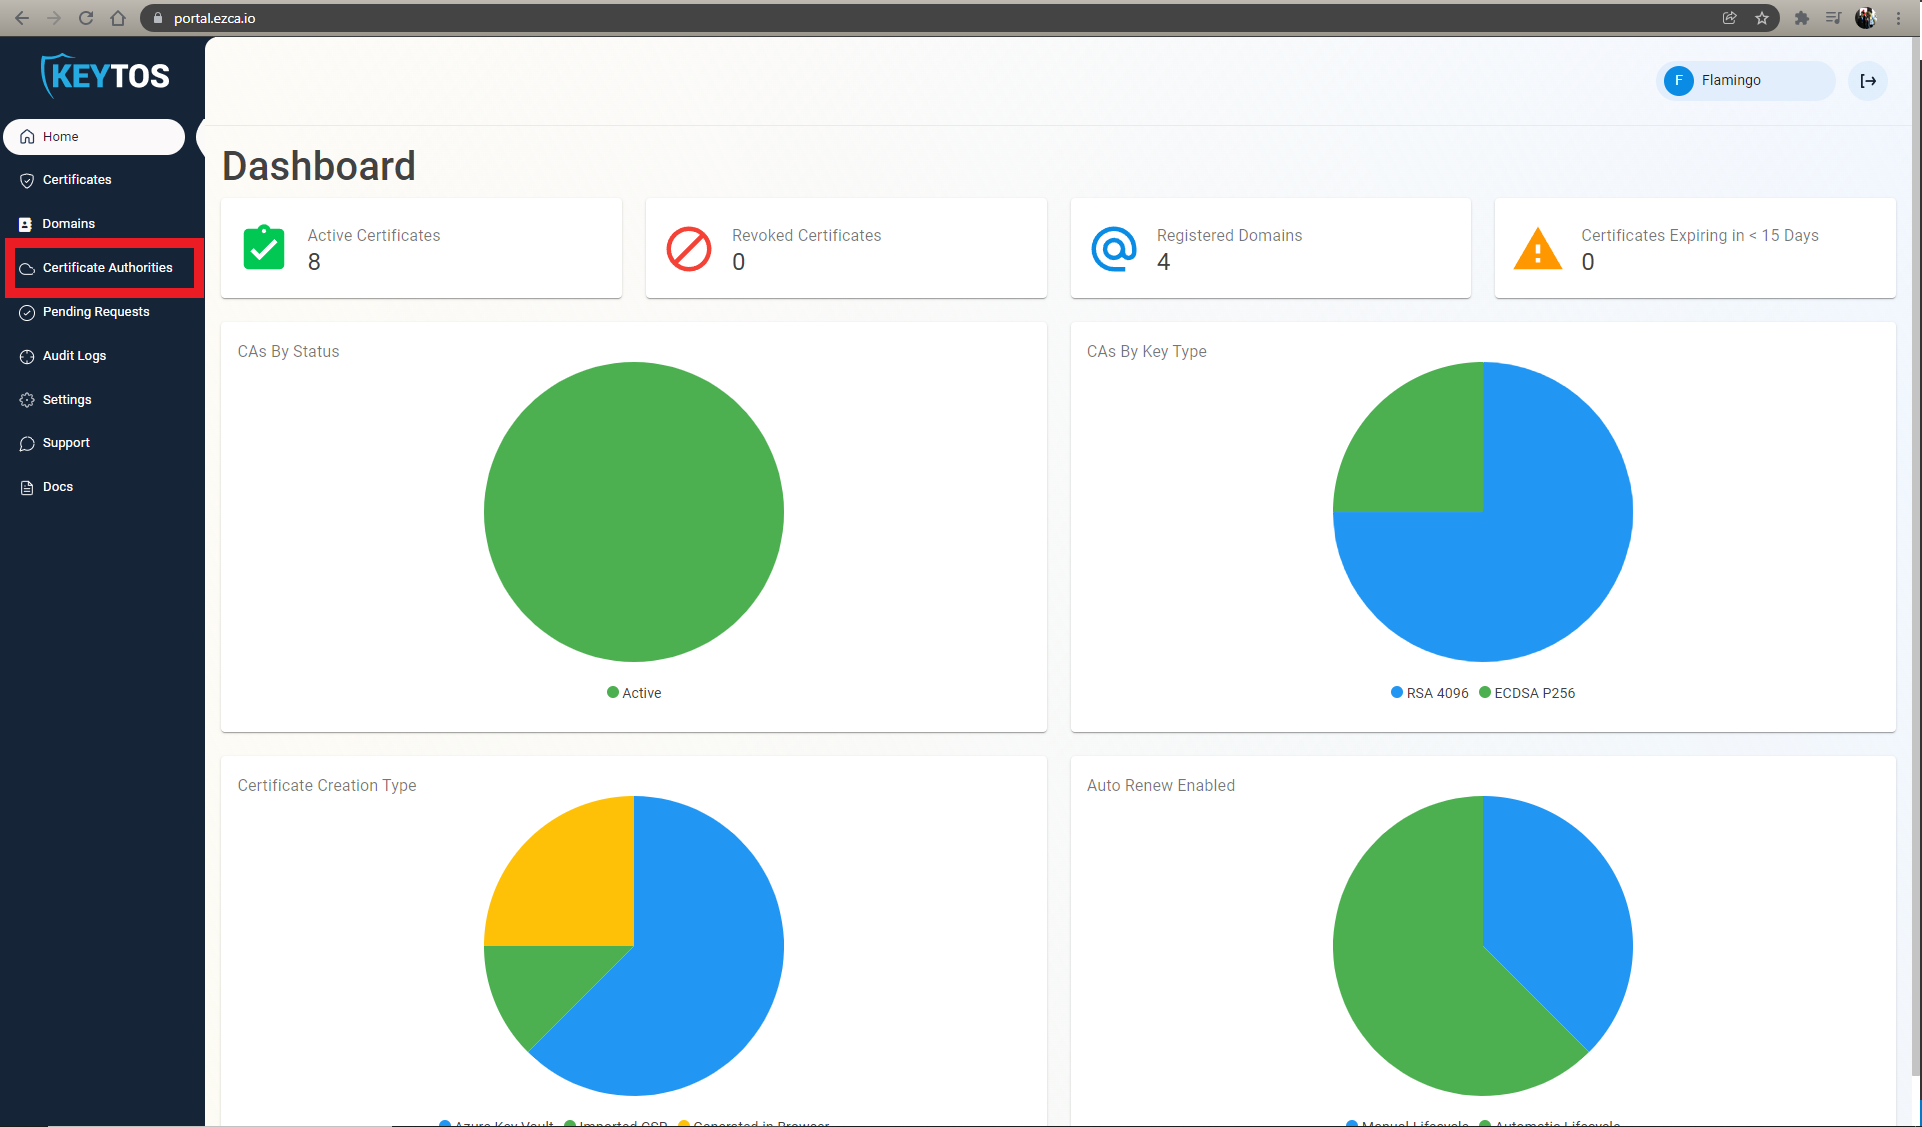
-
Click on Create CA to begin creating a new CA.
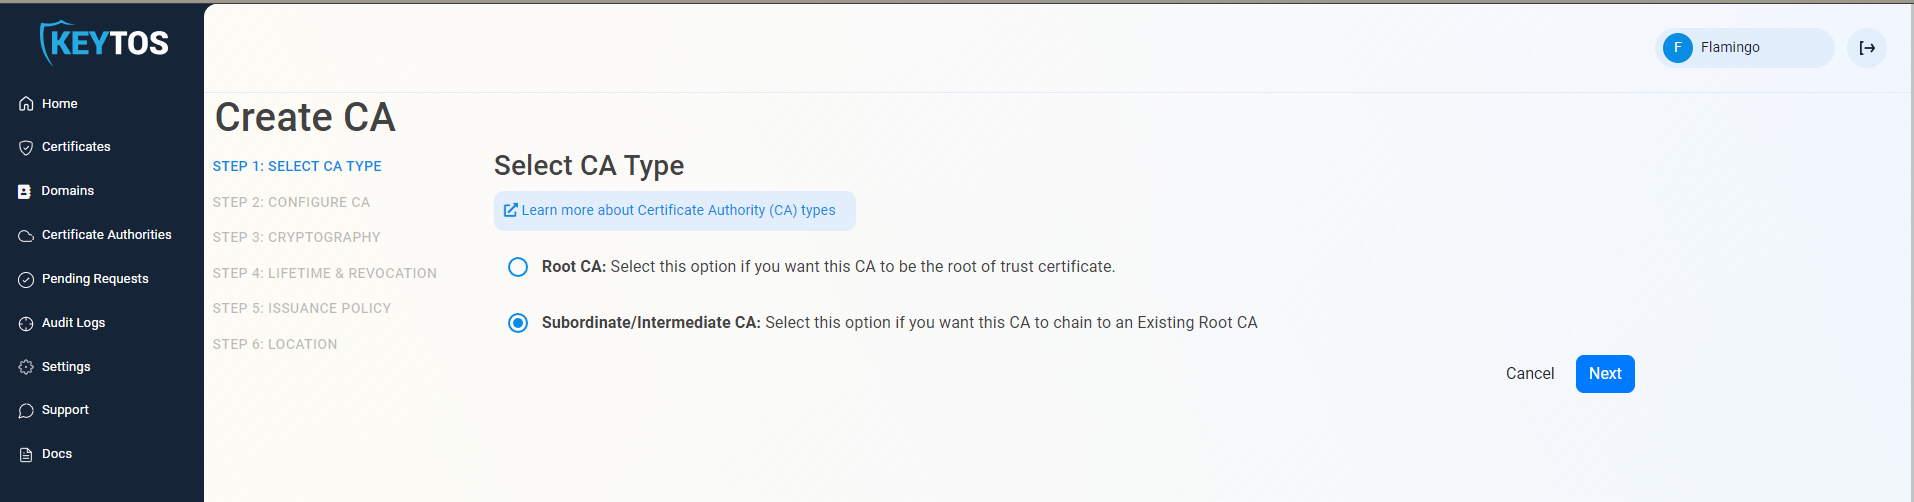
Step 1: How to Select the CA Type for Your SCEP CA
In the first page, you will choose which type of CA you want to create. For a SCEP CA, you can select either Root CA or Subordinate/Issuing CA depending on your needs.
-
Select the CA Type that you want to create (Root CA or Subordinate/Issuing CA).
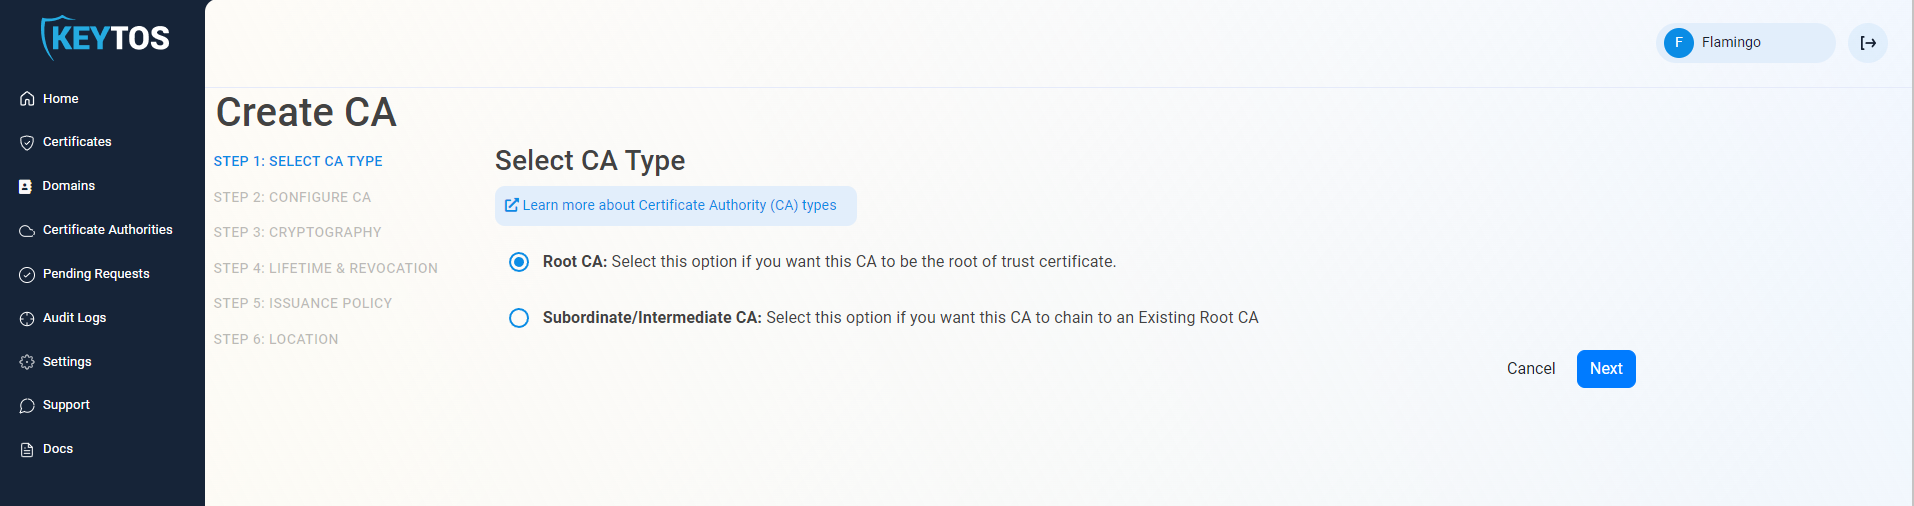 Root vs Subordinate CA
Note that in this guide we are creating a Root CA that will be the Issuing SCEP CA (single tier hierarchy). If you want to build a multi-tier CA hierarchy, refer to our PKI hierarchy best practices and Root CA guide.
If you want to chain up to an existing Root CA, select Subordinate/Issuing CA.
-
Click Next
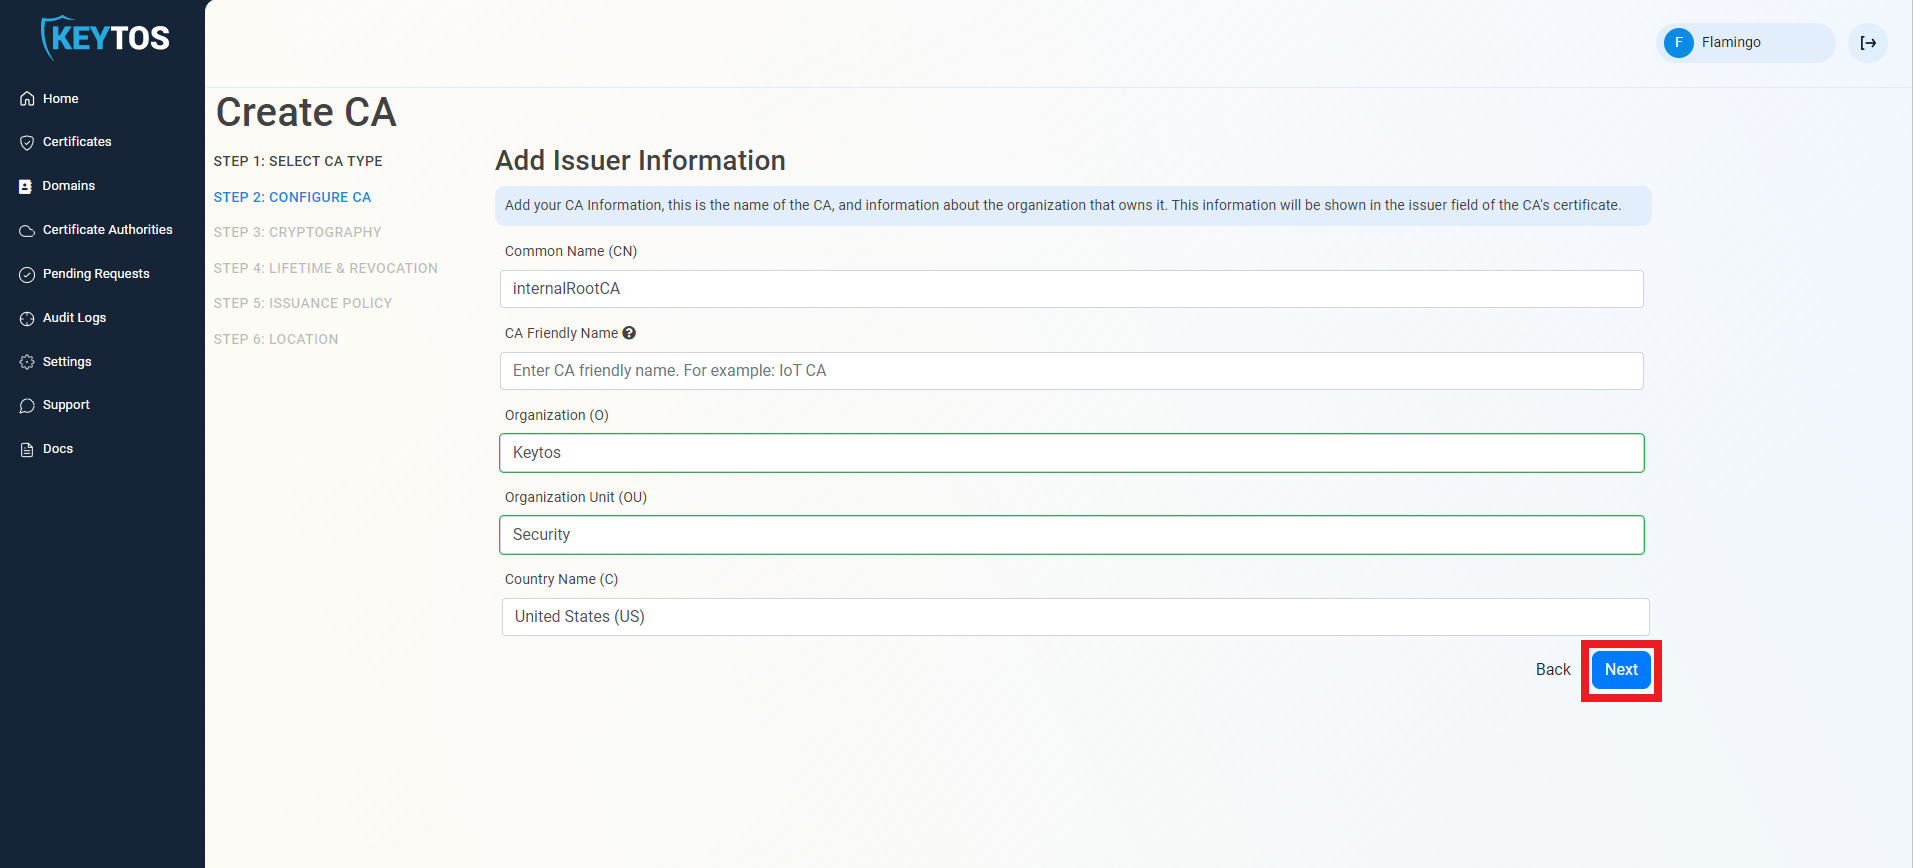
Step 2: How to Configure Your CA Information
In the next page you will enter the information for your CA such as the Common Name, Organization, Country Code, and other details.
-
Enter Common Name: This is the name of the CA how it will appear in the certificate.
-
(optional) Enter the CA Friendly Name, which is the name that will appear in the EZCA portal, by default we will use the Common Name
-
(optional) Enter the Organization, which is an optional certificate field that usually has the company name.
-
(optional) Enter the Organization Unit, which is an optional certificate field that usually contains the unit that runs this CA (i.e. IT or HR).
-
(optional) Enter the Country Code, which is an optional certificate field that identifies the country where this CA is located.
-
Click Next.
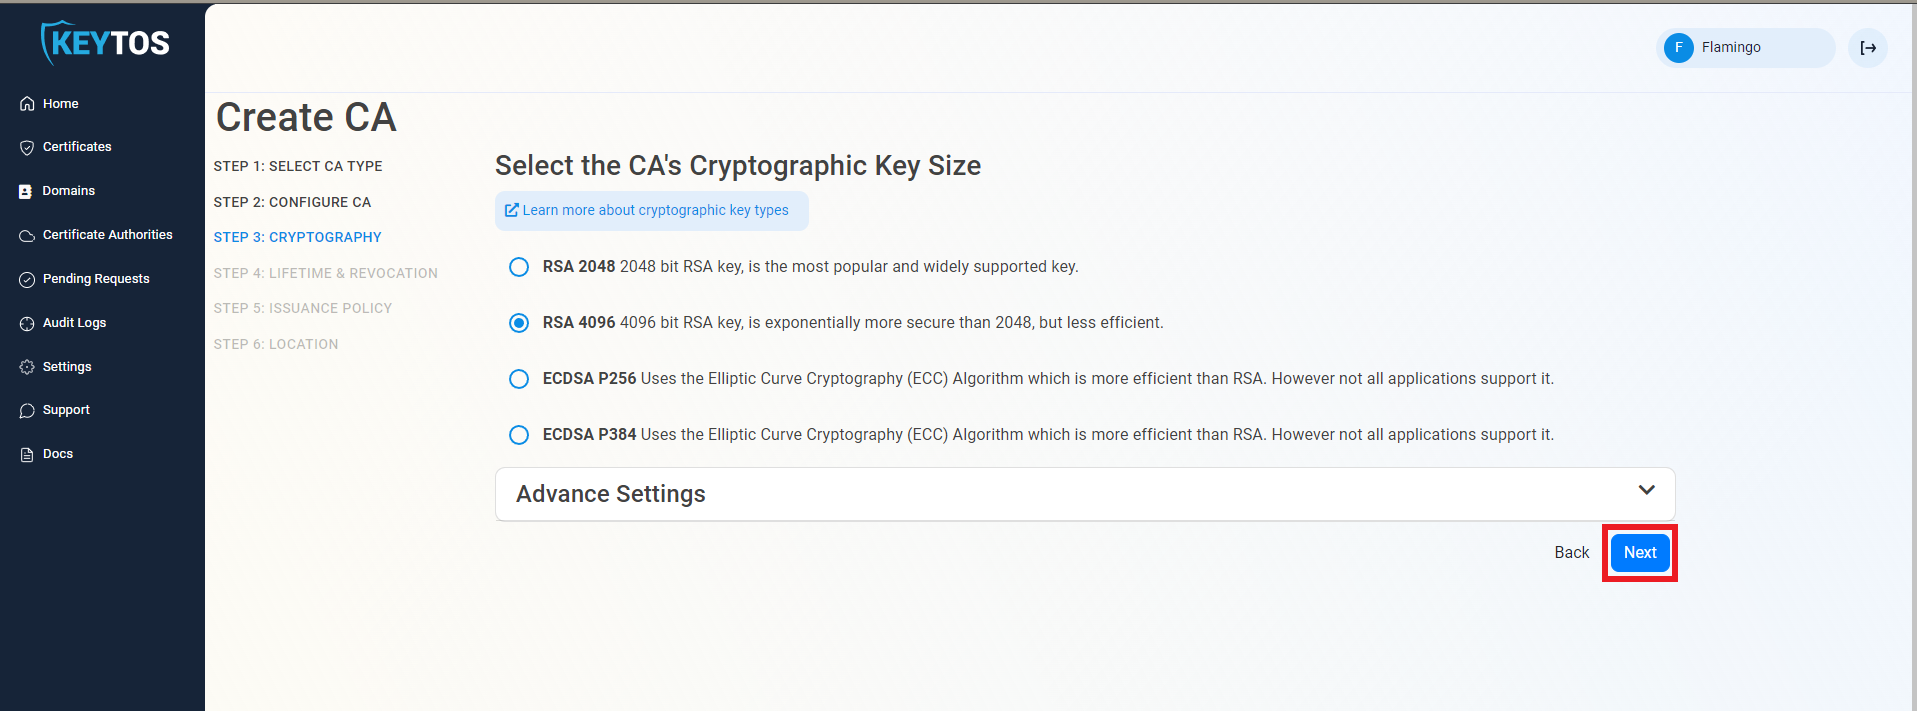
Step 3: How to Set Your Cryptographic Requirements
The cryptographic settings will determine the type of keys that your CA will use to sign certificates and CRLs. We recommend using the default values for best security and compatibility, but you can change these values if you have specific requirements.
-
Unless you have specific compliance or security requirements, leave the default cryptographic values for best security and compatibility.
RSA Keys Usually RequiredIntune SCEP (and most MDMs) only support RSA keys for the issuing certificate authority.
-
Click Next.
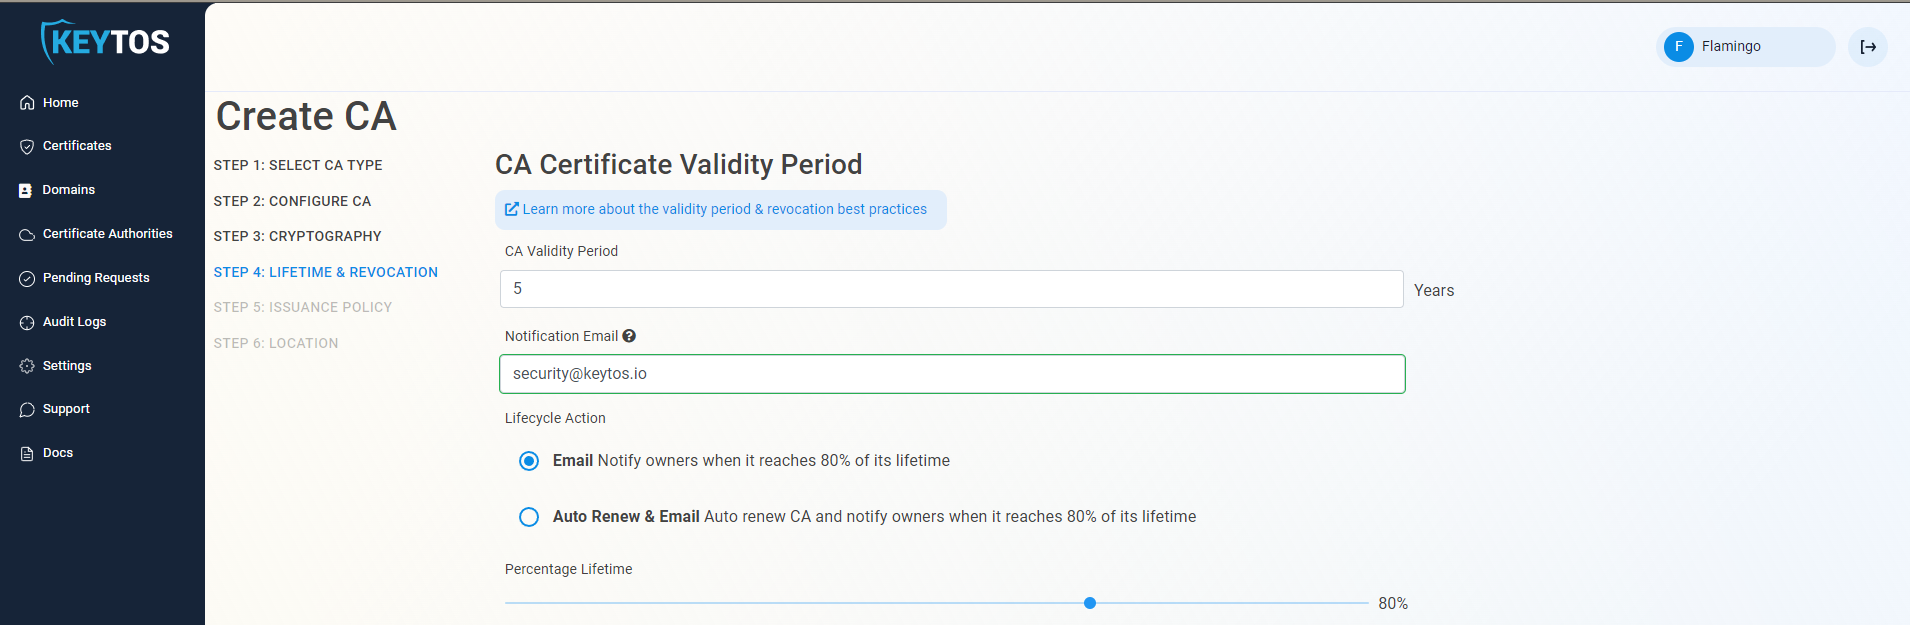
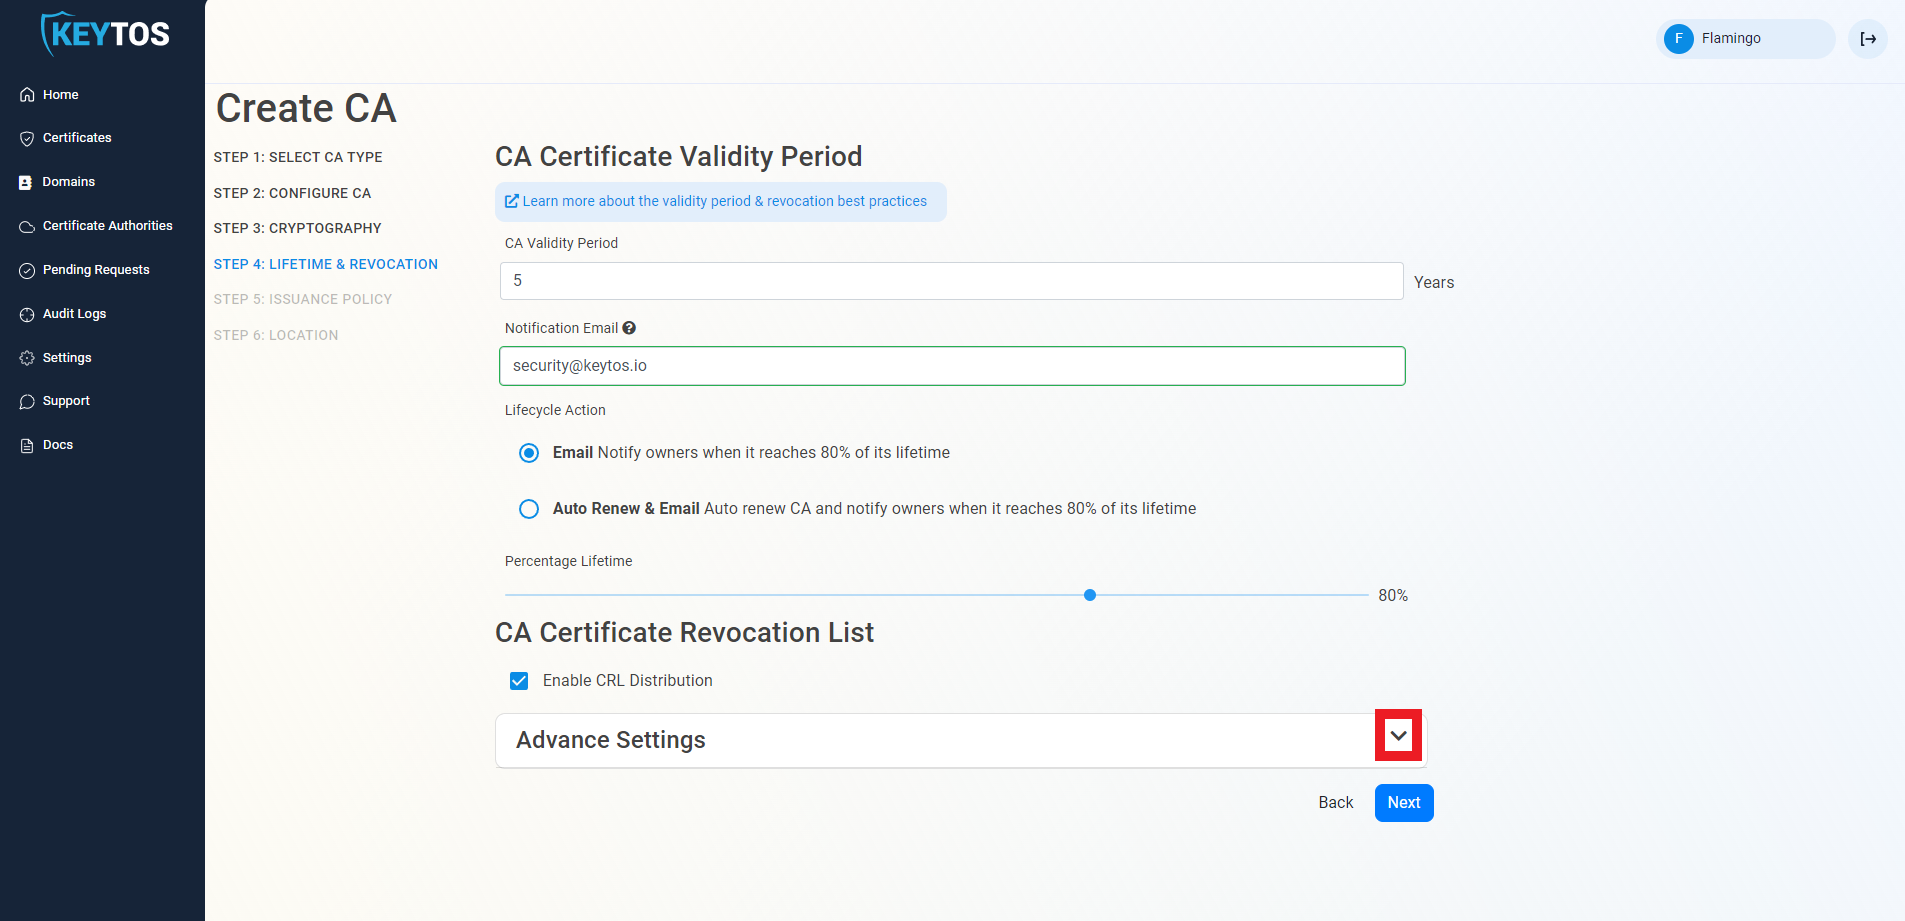
Step 4: Set the Lifetime & Revocation
-
Select your CA Validity Period for the CA itself. If you’re unsure what to set, refer to our validity period best practices.
-
Enter a Notification Email. This email address (as well as the PKI Administrators) will get all the notifications for the lifecycle of the CA.
-
Leave the Lifecycle Action as Email. This will send an email to the PKI Administrators and the Notification Email when the CA is about to expire.
-
Select the Percentage Lifetime of the certificate when you want EZCA to start taking Lifecycle actions.
-
By default, EZCA will automatically publish the Certificate Revocation List (CRL) for this CA. Unless you have specific requirements, we recommend keeping this enabled to ensure that your devices can check for revoked certificates.
-
If you are not changing any CRL details, click Next and proceed to the Step 5.
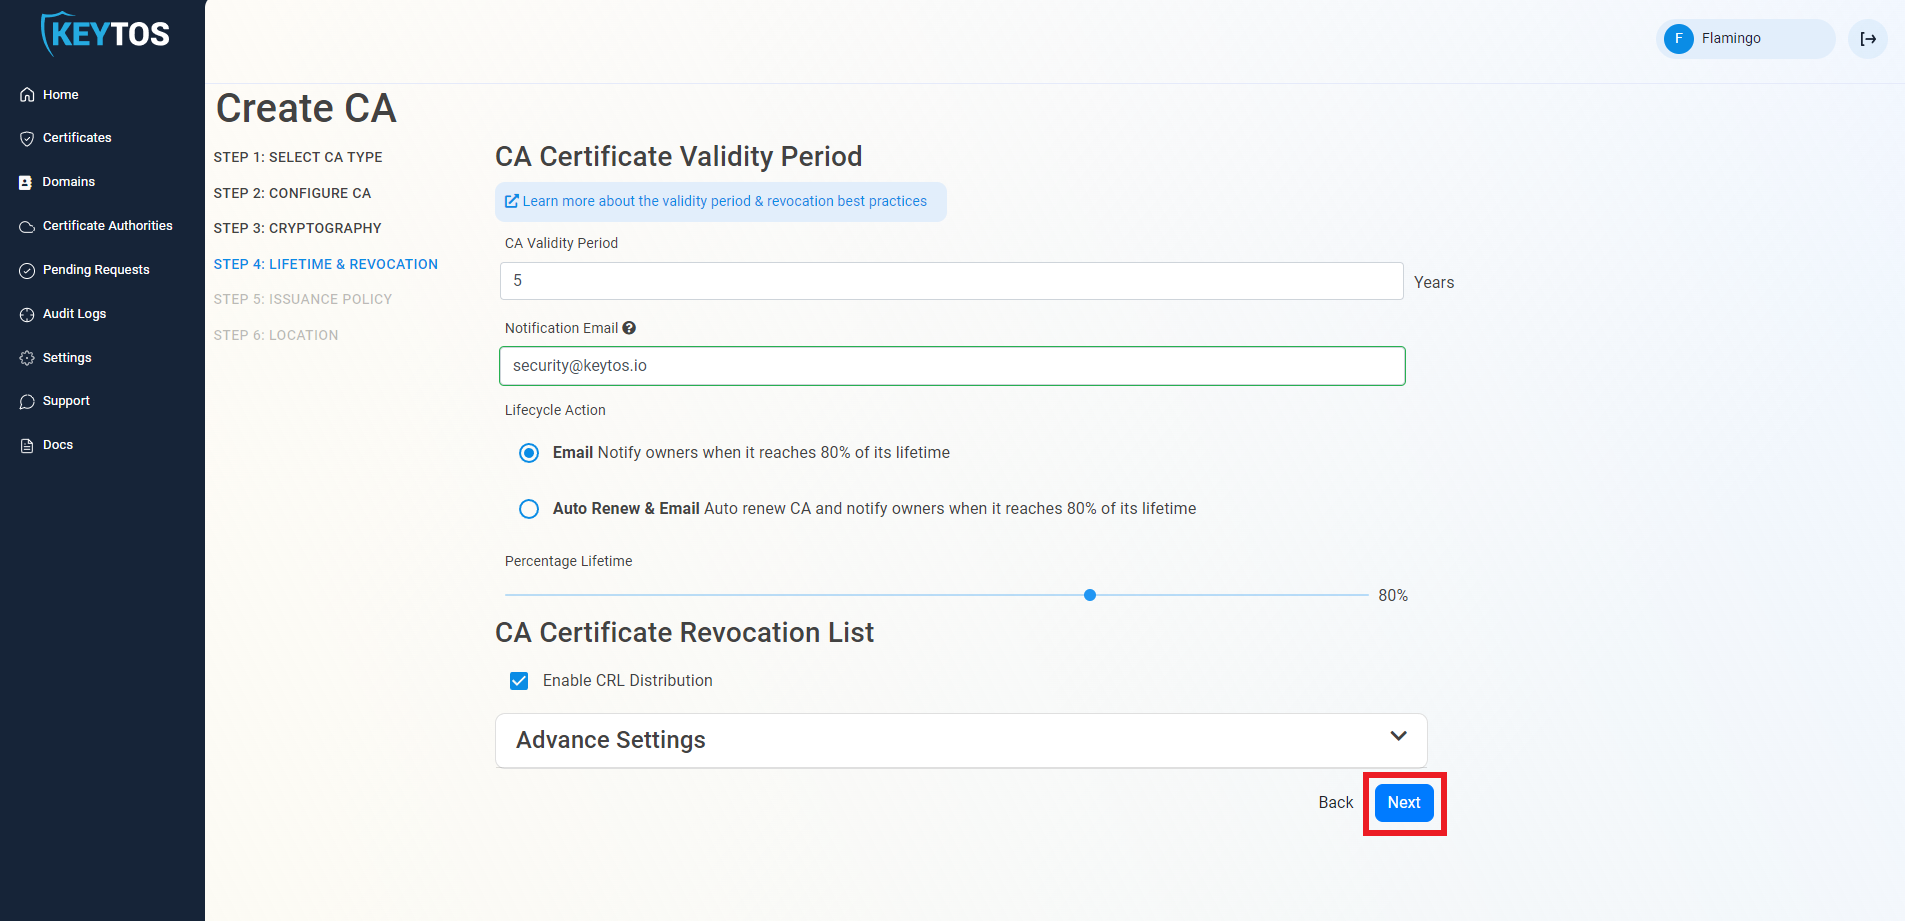
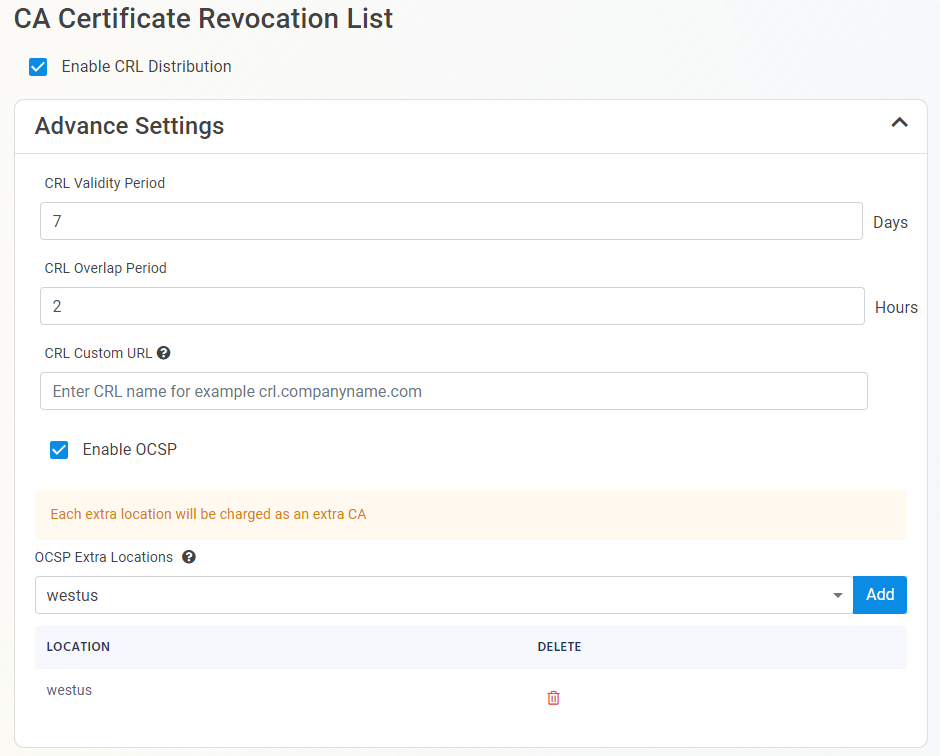
(optional) How to Configure CA Certificate Revocation List Advanced Settings
If you have specific requirements for your CRL, you can click the expand button on Advanced Settings and change the CRL validity period, overlap period, and CRL distribution points. If you are not sure about these values, we recommend keeping the default values.
Click here to learn more about CRL Advanced Settings
Changes to this section are only recommended for PKI experts with specific requirements. Proceed with caution as incorrect values can lead to certificate revocation issues in your environment.
-
Under Advanced Settings, click the expand button
-
Enter the desired CRL Validity Period in days
-
Enter the desired CRL Overlap Period in hours
-
(optional) Enter the CRL endpoint where you will publish your CRLs
WarningCustom CRL endpoints are supported by EZCA by adding the CRL endpoint as the CRL endpoint in the certificate. However, your PKI admins are responsible from getting the CRL from EZCA and posting it in that specific endpoint.
(optional) How To Enable Online Certificate Status Protocol (OCSP) For Your CA
Inside the CA Revocation advanced settings, you can enable OCSP for this CA. OCSP is only recommended if you have specific requirements for OCSP.
Click here to learn more about OCSP
While OCSP allows quicker revocation it increases the CA the cryptographic load and can limit the scalability of the CA (Basic CA allows 1 cryptographic activity per second, Premium CA 20 cryptographic activities per second, Isolated CA 160 cryptographic activities per second). Learn more about OCSP vs CRL
-
If you want to enable OCSP, select the Enable OCSP option.

-
Enabling the OCSP will create an OCSP endpoint for this CA in the same region you select for your OCSP (this is included with the price of your CA). If you require extra scalability you can create multiple OCSPs for your certificate authority in different regions. Note: Each extra OCSP will be charged as an extra Certificate Authority.
-
Once you have setup your certificate revocation, click Next.
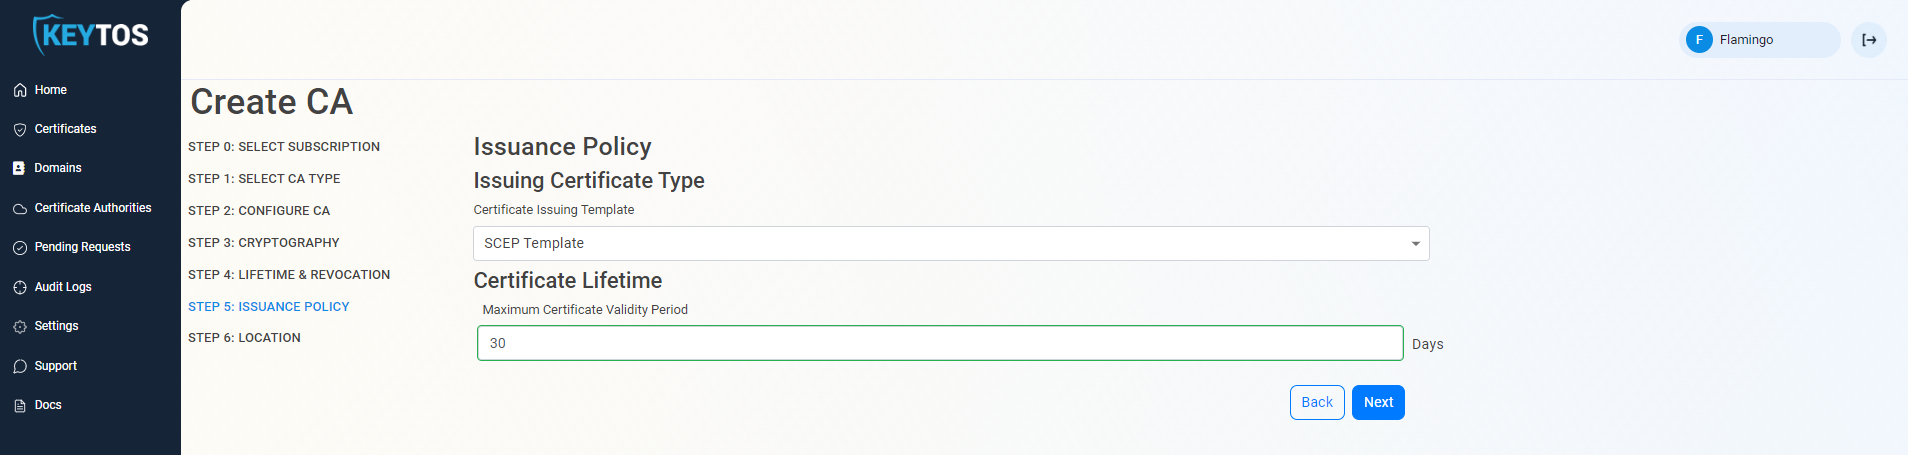
Step 5: How to Set a Certificate Issuance Policy
A certificate issuance policy allows you to set specific requirements for the certificates that will be issued from this CA. For a SCEP CA, you will need to select the “SCEP Template” as the issuance policy.
-
Change the Issuing Certificate Type to SCEP Template
CA TemplatesCertificate Authorities can only have a single template. If you need to issue different types of certificates (SCEP, SSL, server, etc.) we recommend creating different CAs for each purpose. See our FAQ for more information and additional details on manually issuing SSL and server certificates from a SCEP CA as a PKI Administrator.
-
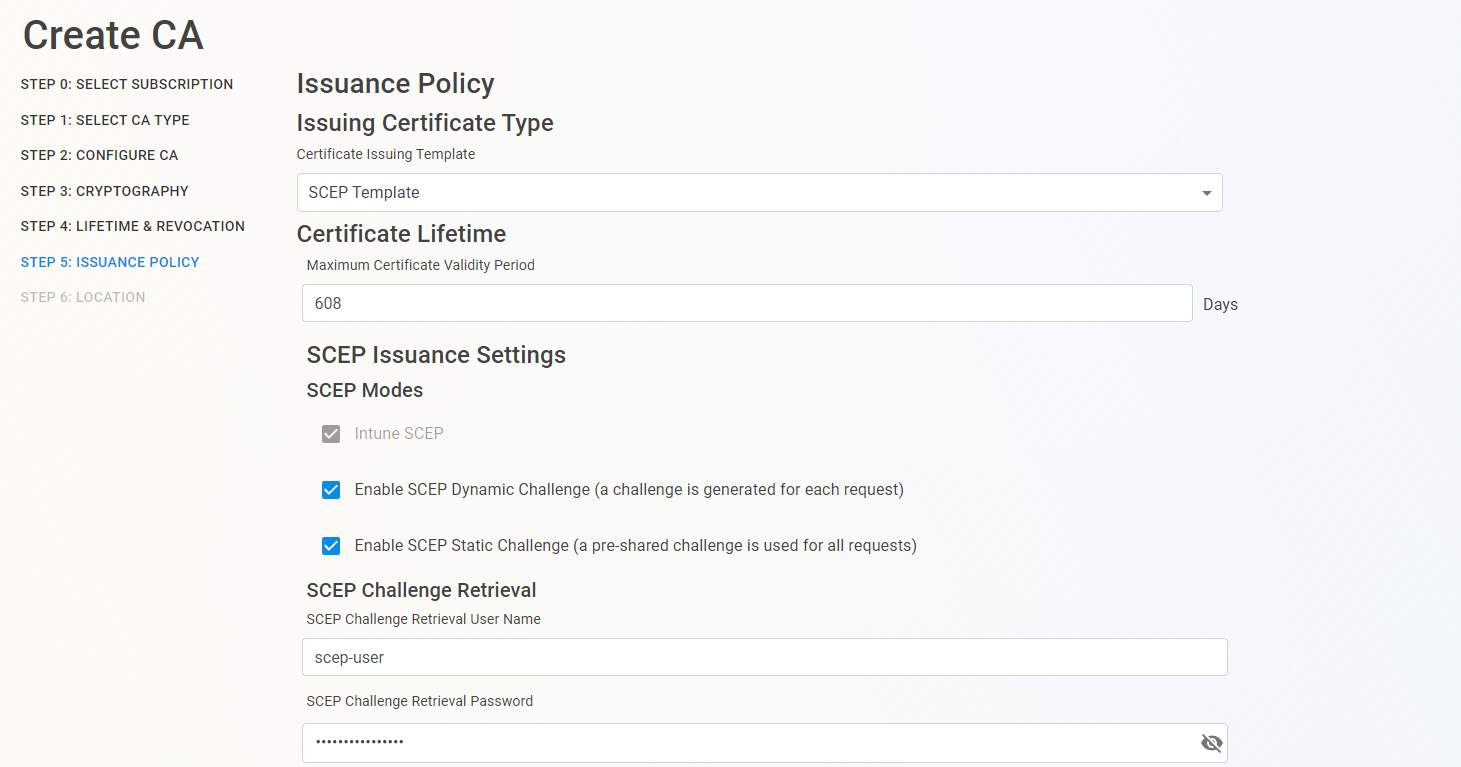
Set the Maximum Certificate Validity Period for the certificates issued from this CA. This value will be the maximum validity period that any certificate issued from this CA can have, if a certificate request comes in with a longer validity period, EZCA will automatically adjust it to match this value.
-
Depending on your MDM, you might have to enable SCEP Dynamic Challenge and/or SCEP Static Challenge in addition to Intune SCEP.
- If you are only using Microsoft Intune, you can leave both disabled.
- If you are using Jamf or ManageEngine Plus, you will need to enable the SCEP Static Challenge. After creating the CA, you can go to the CA’s Issuance Requirements and retrieve the static challenge URL and value to input in your MDM.
- For all other MDMs, refer to your MDM documentation to see if they require Dynamic SCEP, Static SCEP, or if they support both. If they support both, we recommend using Dynamic SCEP for better security. Once enabled, you can retrieve the Dynamic Challenge URL and challenge from the CA’s Issuance Requirements to input in your MDM.
-
Once you have enabled the SCEP types you need, click Next.
You can always come back to your CA and enable or disable the SCEP types as needed.
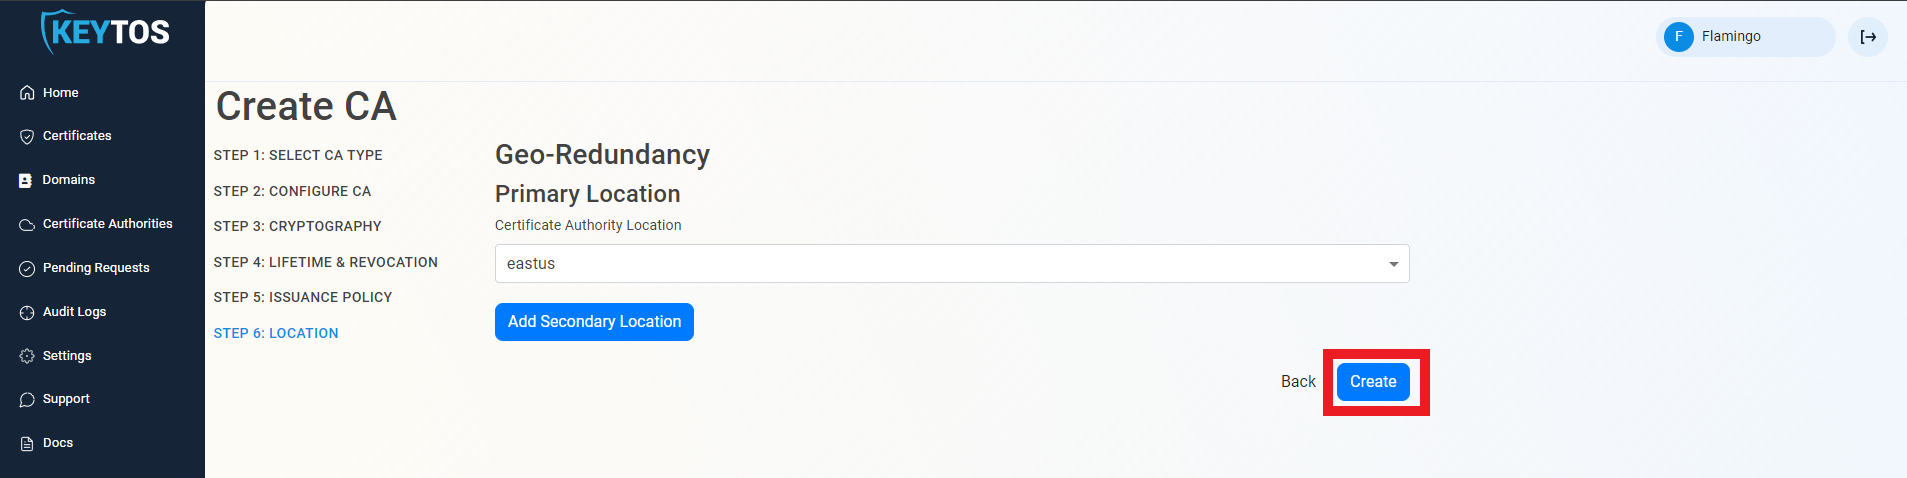
Step 6: How to Select a CA Location
The final step is to choose which region(s) you want to create your CA in. We recommend creating your CA in the same region as your MDM if possible for better performance, but you can create your CA in any region regardless of where your MDM is located.
-
Select the Certificate Authority location where you want your CA to be created.
-
If needed you can click Add Secondary Location to add an additional location to your CA. Please note that each additional location will be charged as an additional CA.
Cost of Multiple LocationsEach additional location will be charged as an additional CA. Please refer to our pricing page for more details on CA costs.
-
Click Create to create your CA.
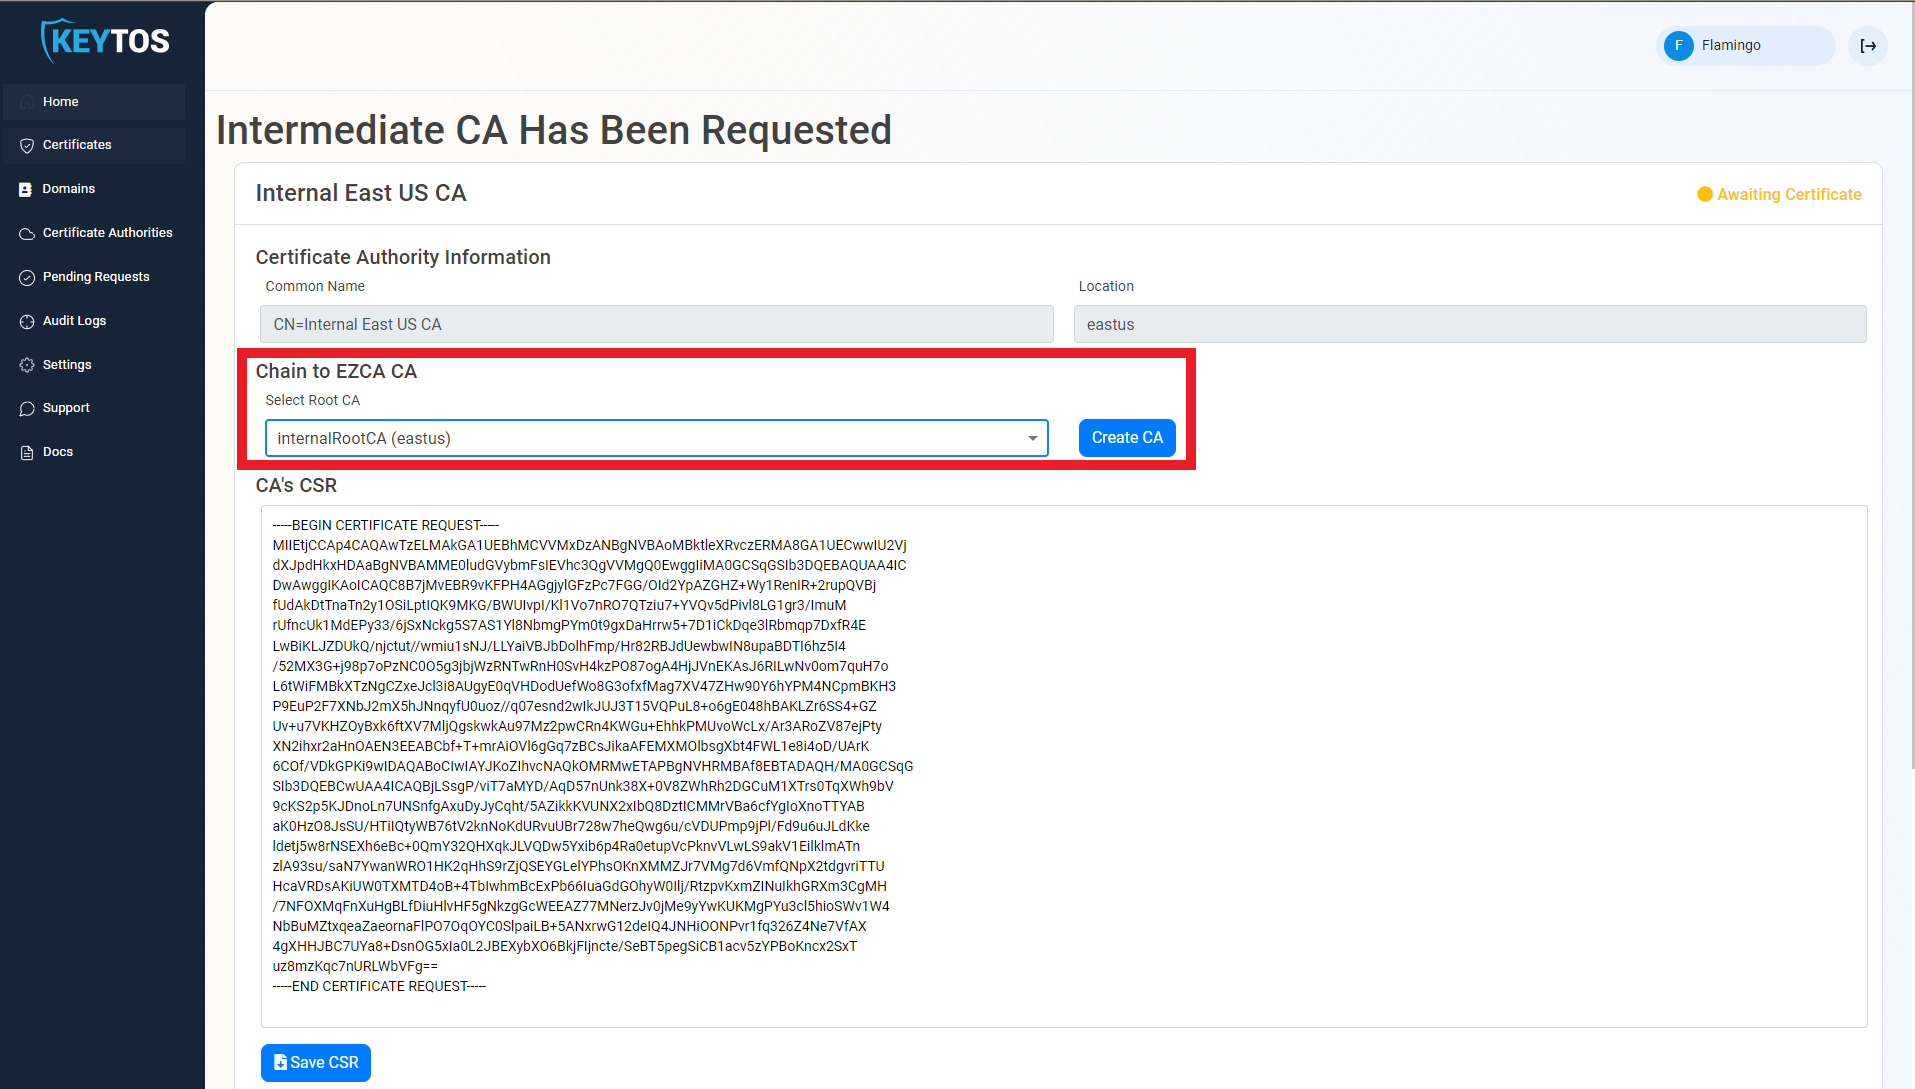
How to Chain a Subordinate/Issuing CA to a Root CA
If you created a Subordinate/Issuing CA you must chain your new SCEP CA to a Root CA. You can either chain to an existing EZCA Root CA or you can chain to your own offline Root CA. Follow the steps below for each option.
If you created a Root CA, you can skip down to How to Download Your CA Certificate.
How to Chain Your SCEP CA to an EZCA Root CA
If your desired Root CA is an EZCA Root CA, you can easily chain your new SCEP CA to that Root CA from the EZCA portal. Follow these steps:
-
From the Select Root CA dropdown, select the Root CA you want to chain to. This dropdown will only show Root CAs.
-
Click Create CA to finish creating your Subordinate/Issuing CA chained to the selected Root CA.
-
Repeat this step for each location.
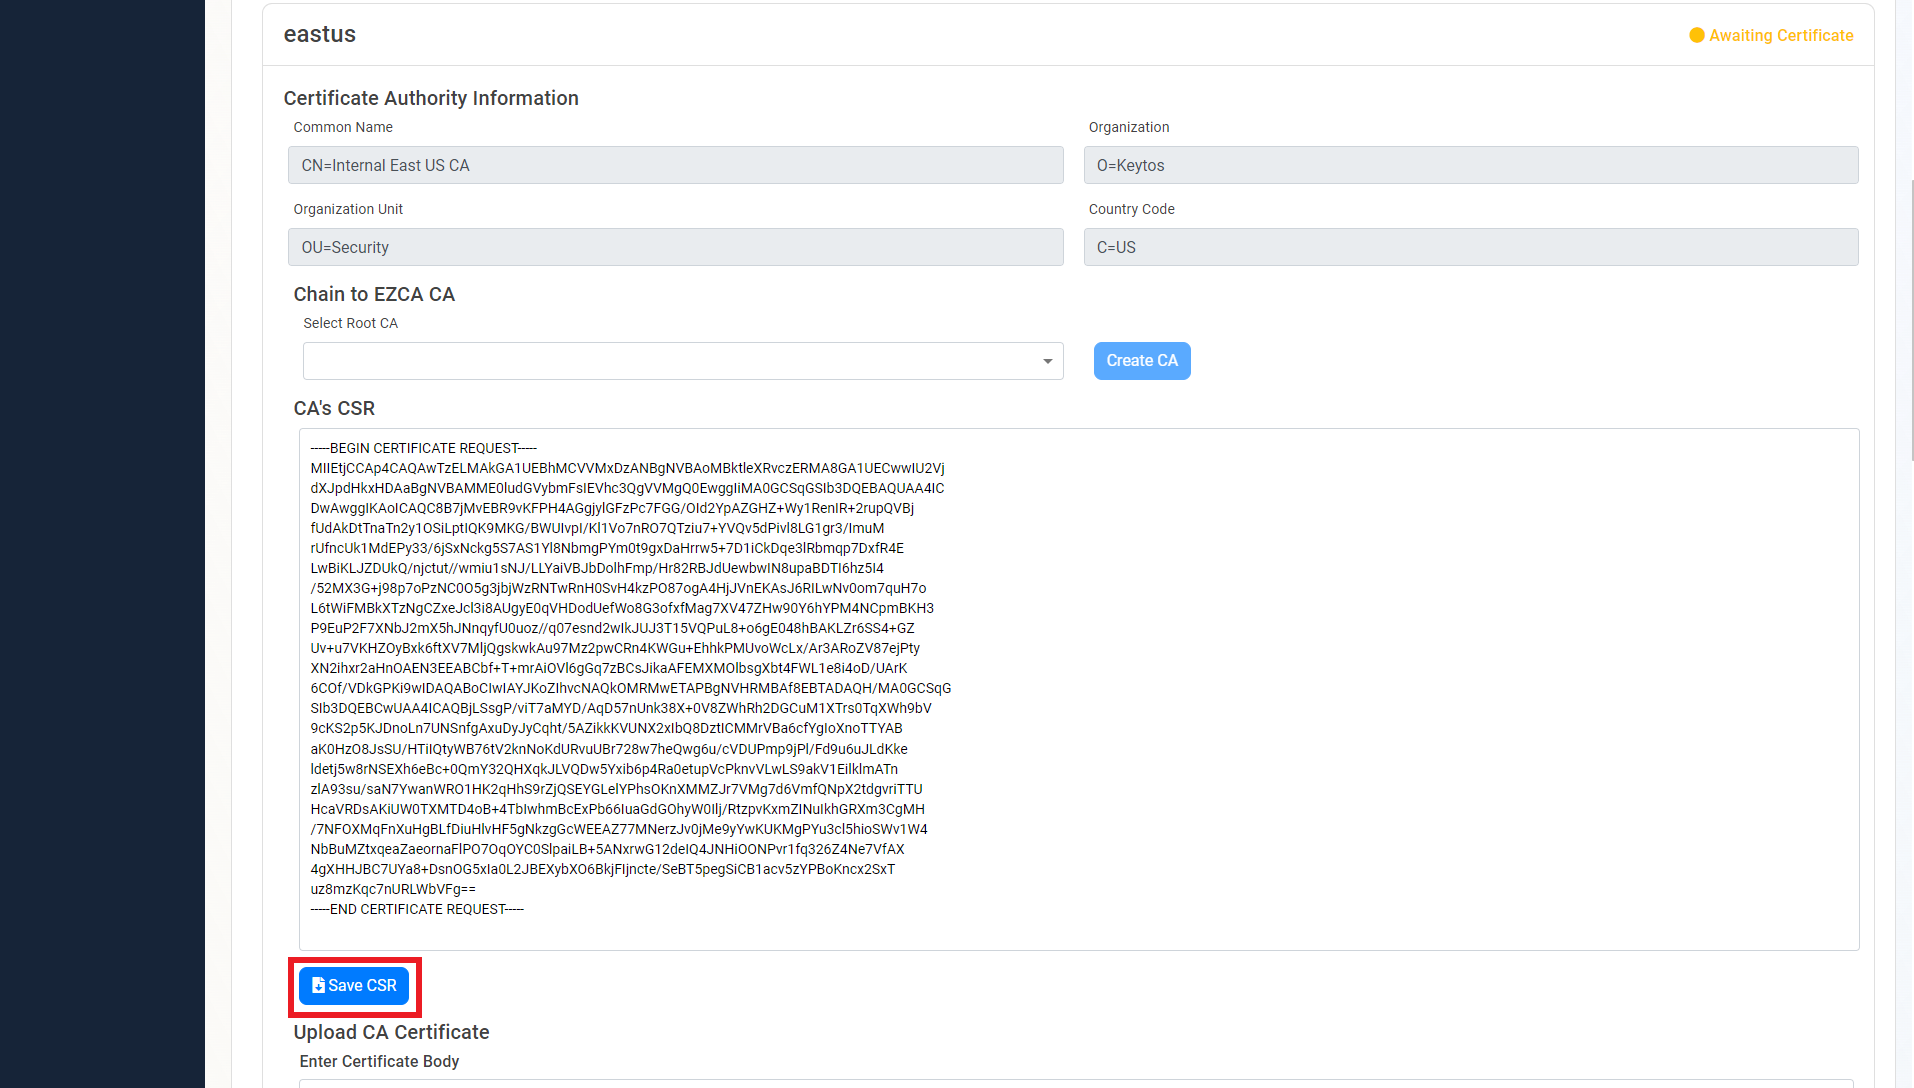
How to Chain Your SCEP CA to an Offline or On-Premises Root CA
If your desired Root CA is an offline or on-premises Root CA, you will need to manually submit the CSR to your Root CA, get the signed certificate, and then upload it back to EZCA. Follow these steps:
-
Copy or click Save CSR under the CA’s CSR.
-
Once the CSR is downloaded, follow your internal guidance to transfer that CSR to your offline Root CA.
-
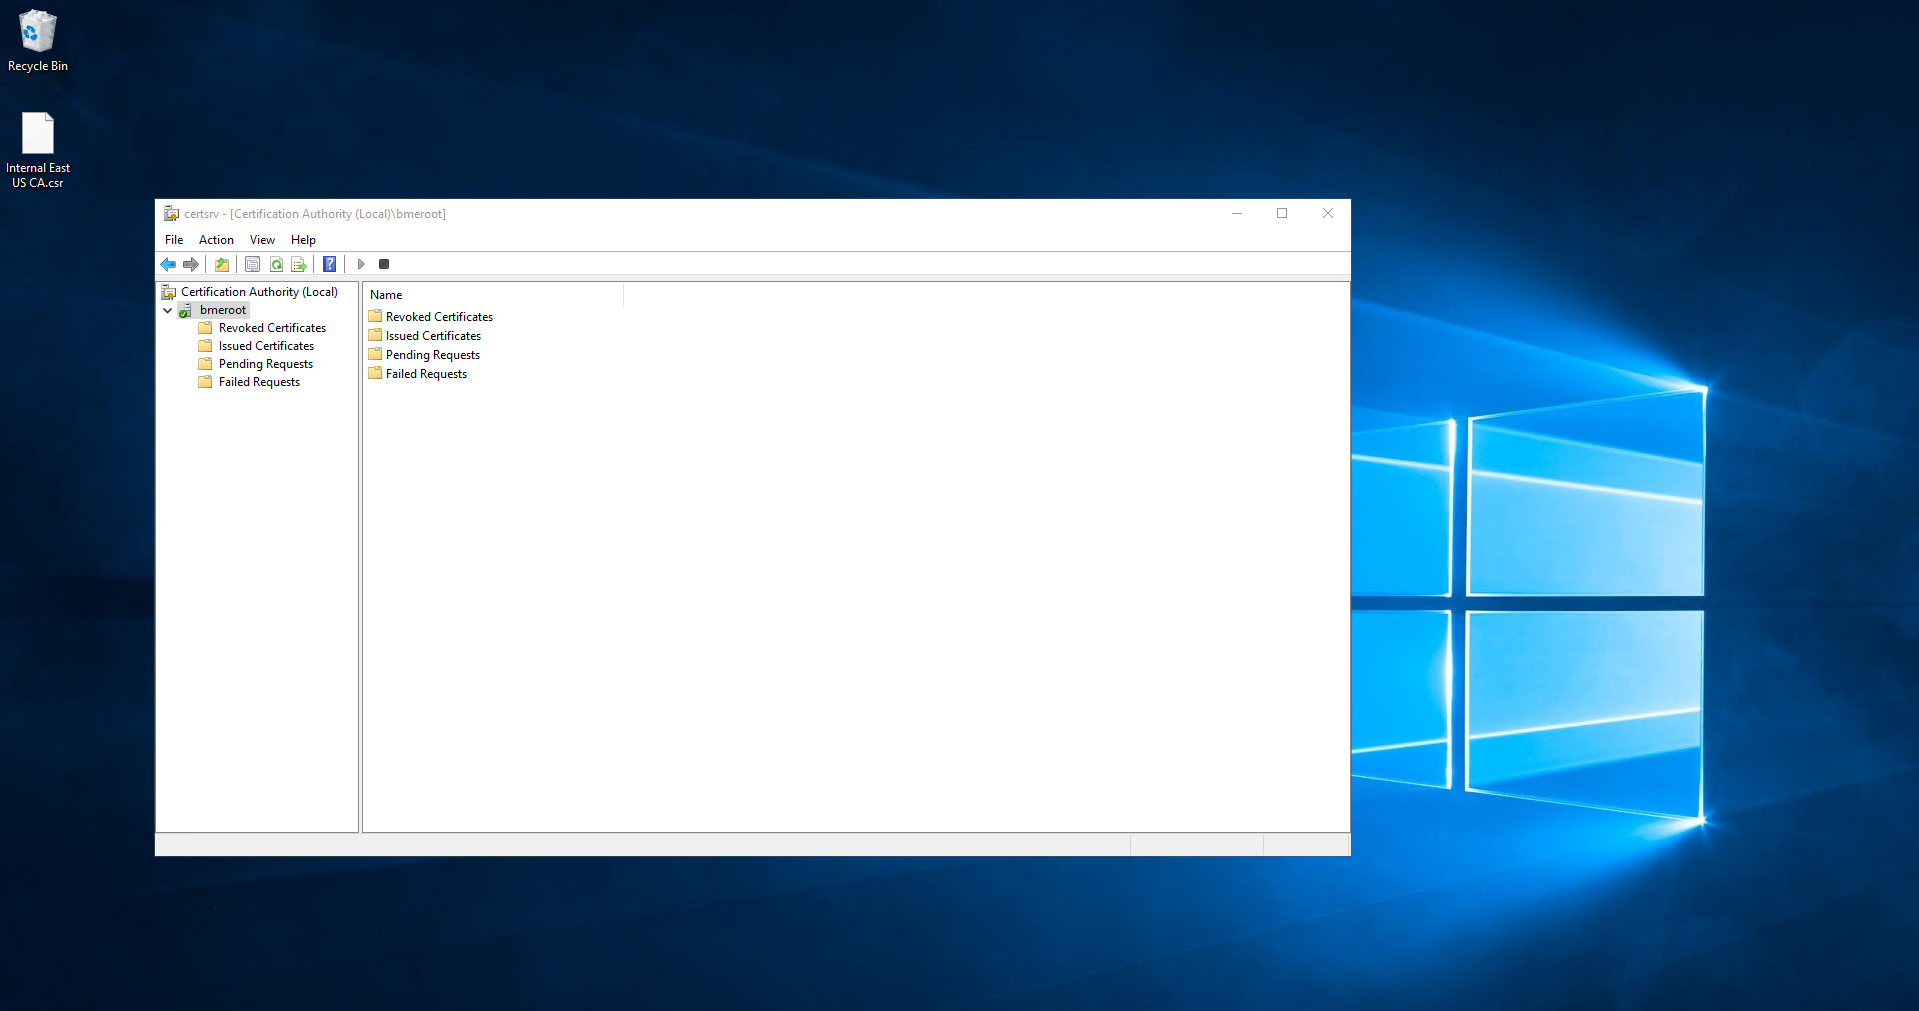
Open your Certificate Authority in Windows.
-
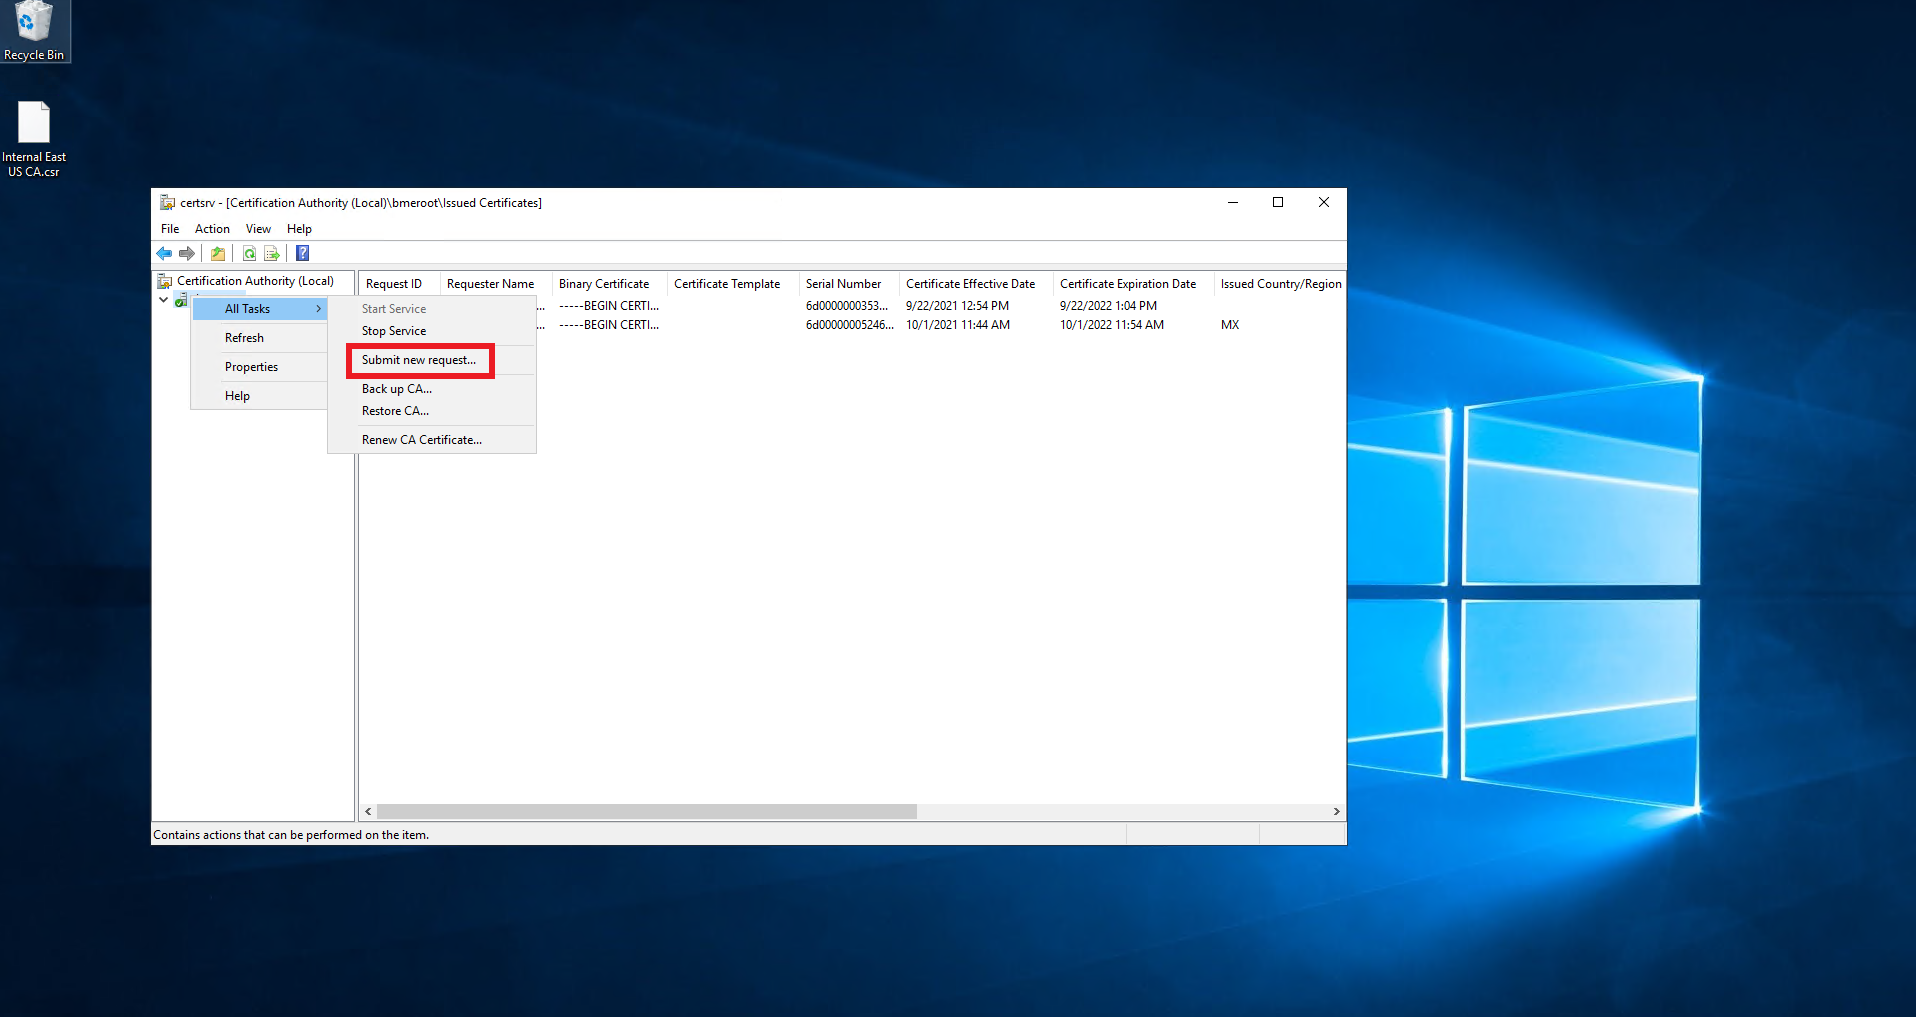
From the left-hand menu, right click the CA.
-
Select All Tasks > Submit new request.
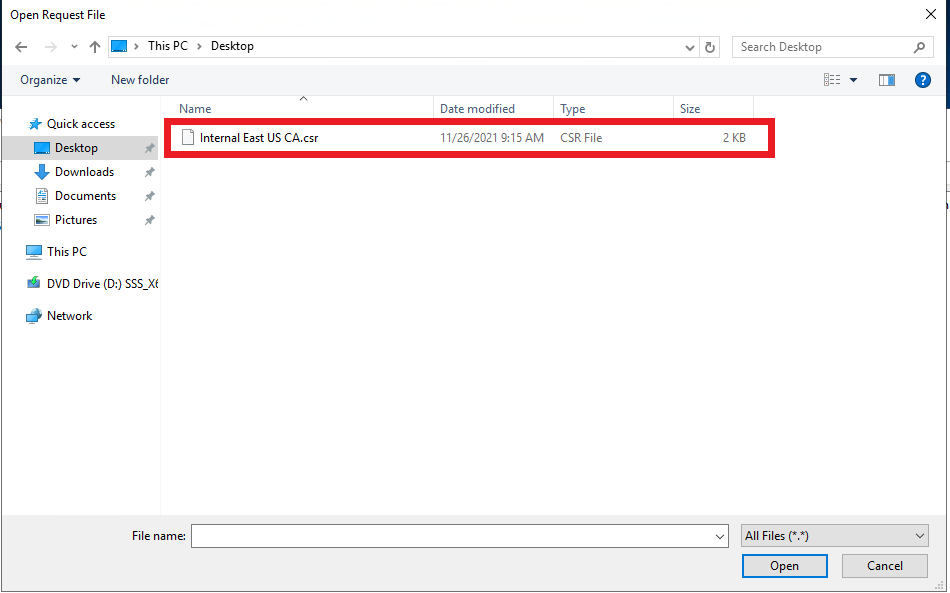
-
Select the downloaded CSR.
-
From the left-hand menu, click on Pending Requests.

-
Right click on the newly created request.
-
Select All Tasks > Issue.
-
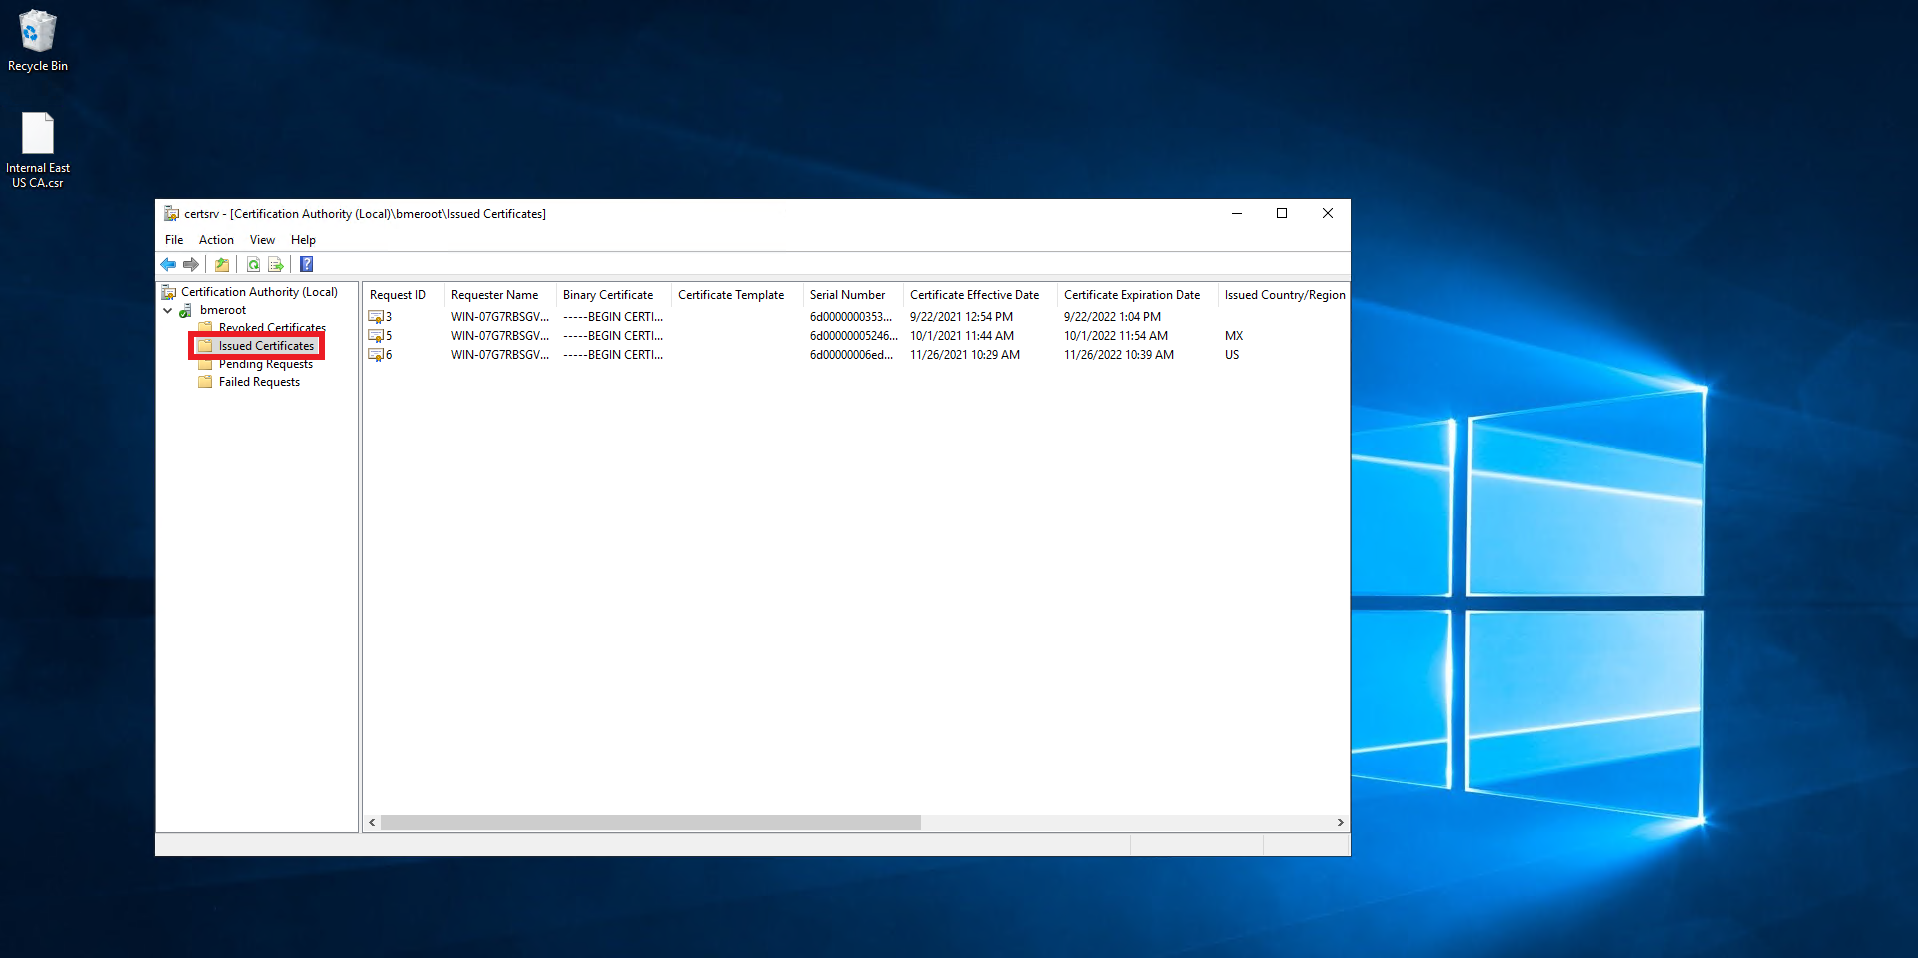
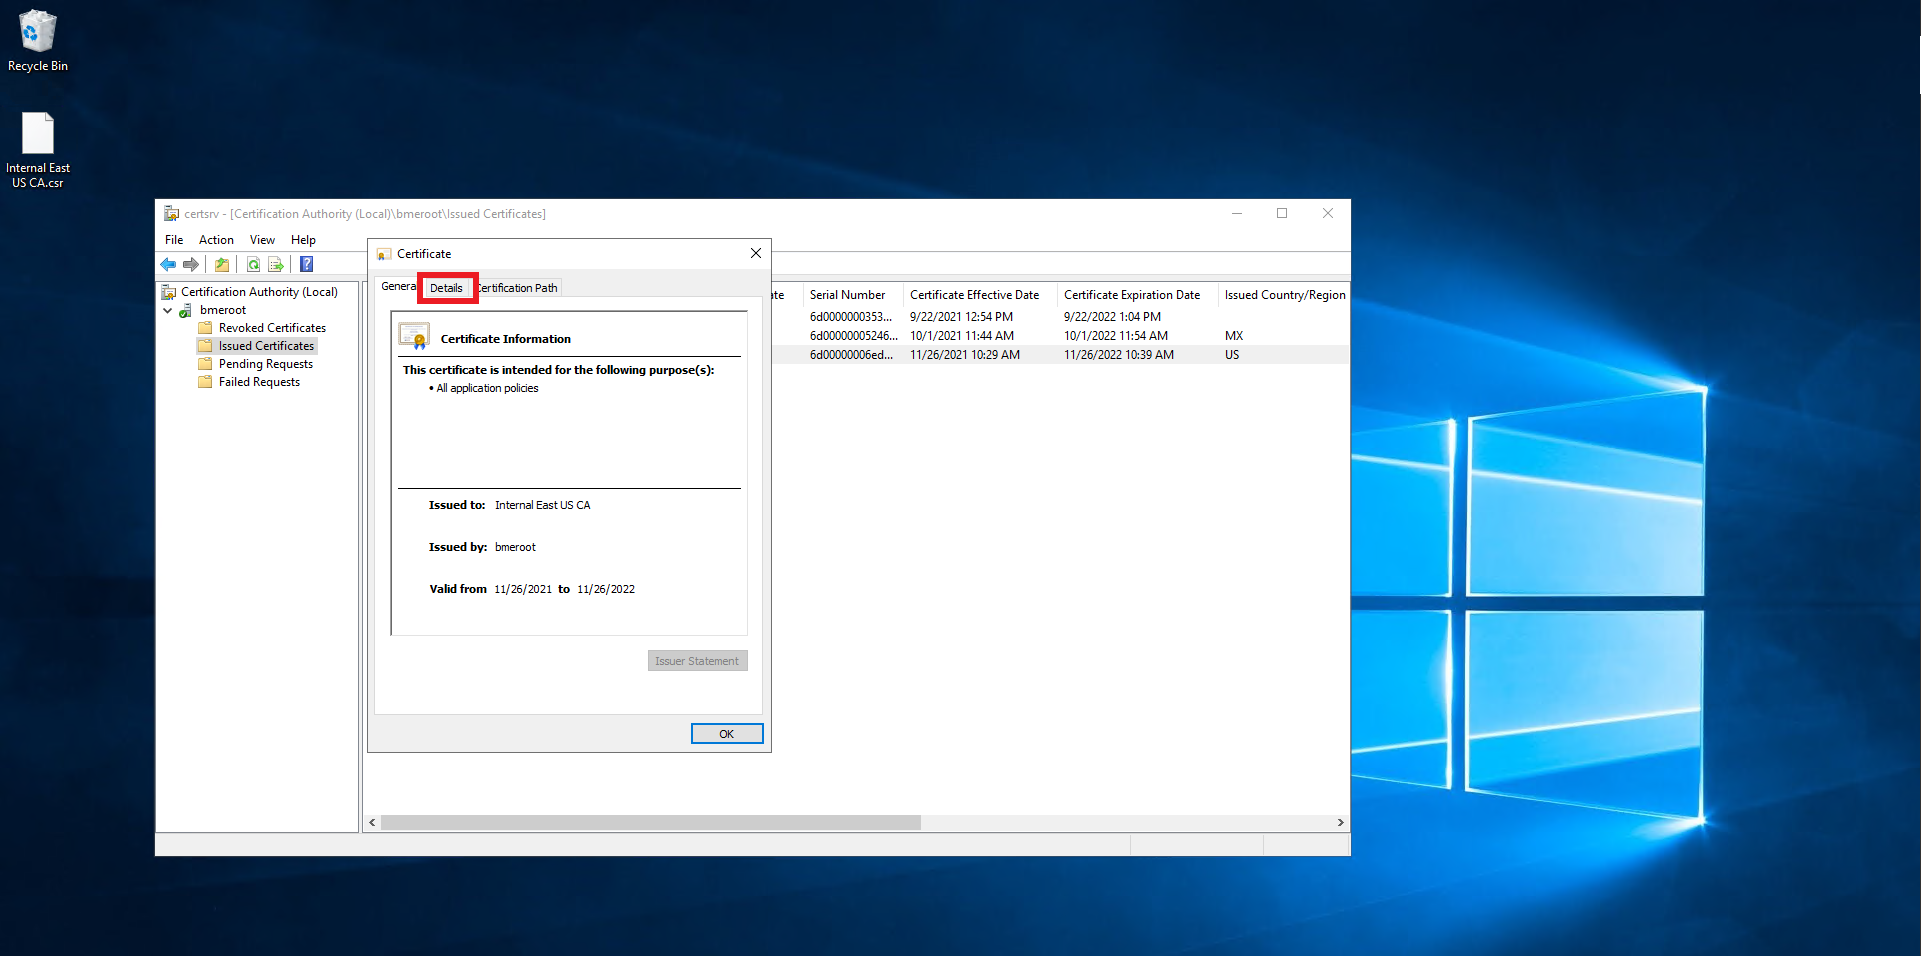
Click on Issued Certificates.
-
Double click on the newly created certificate.
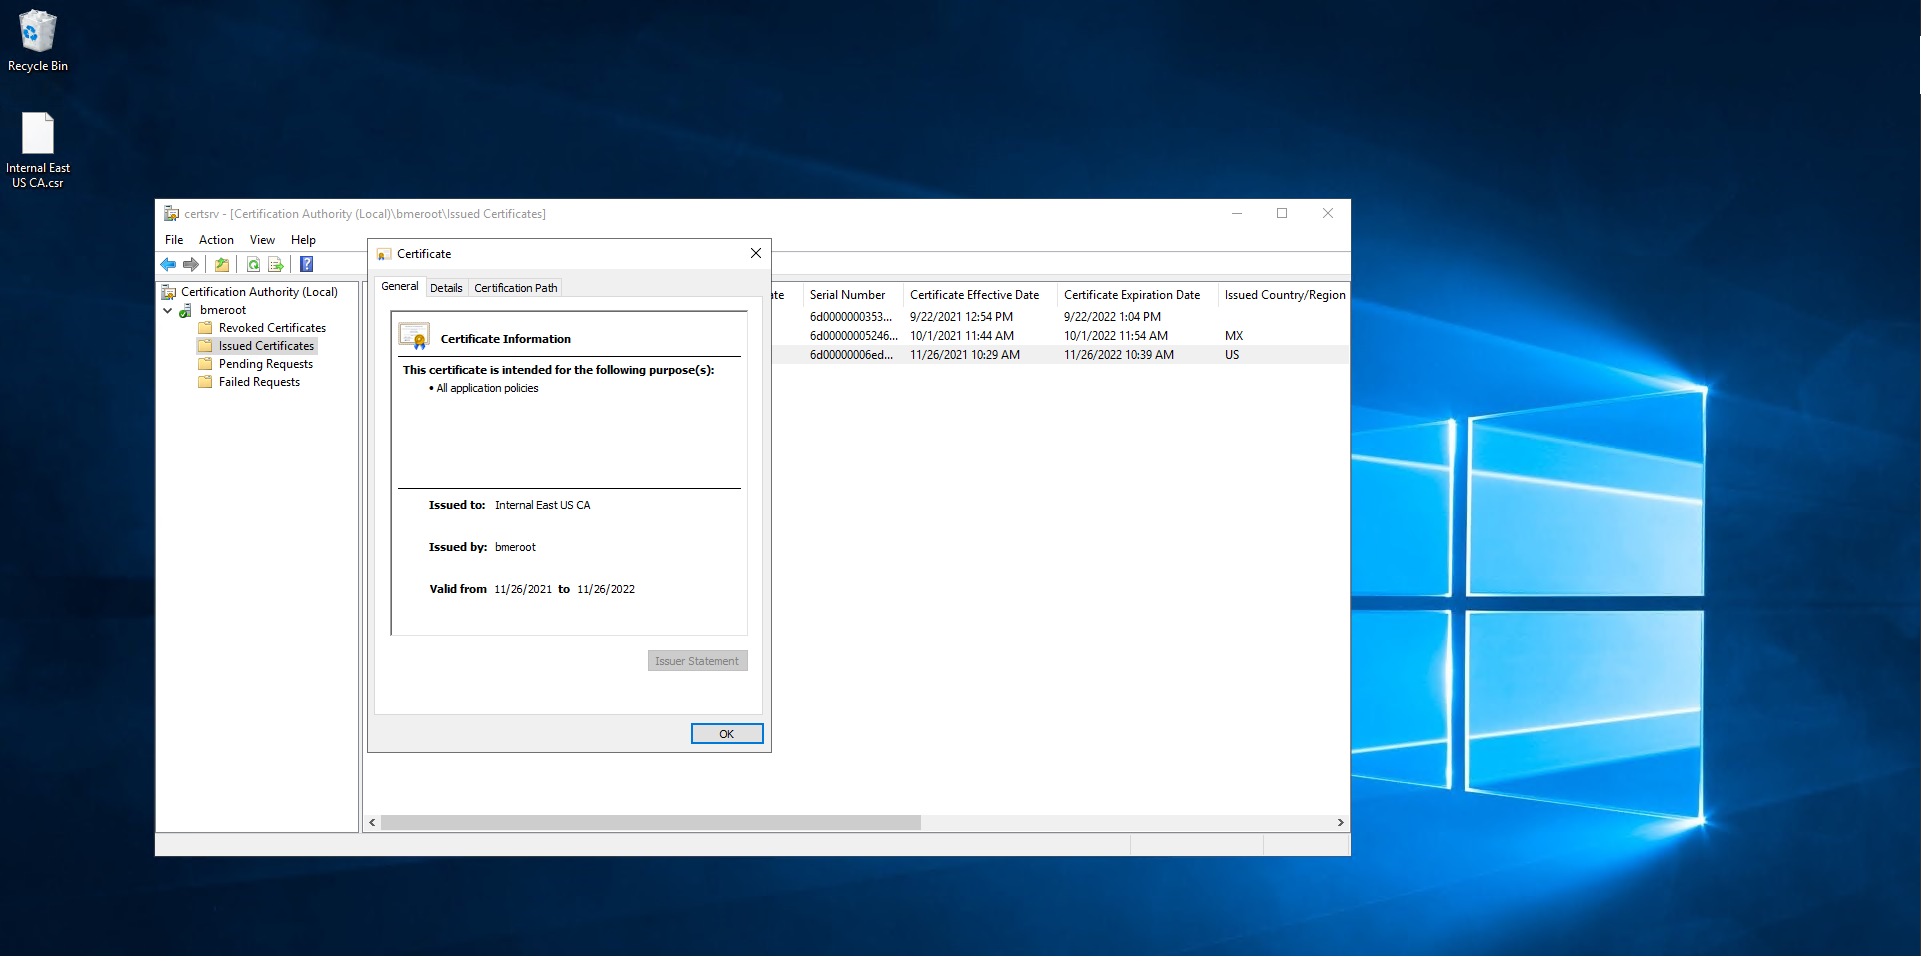
-
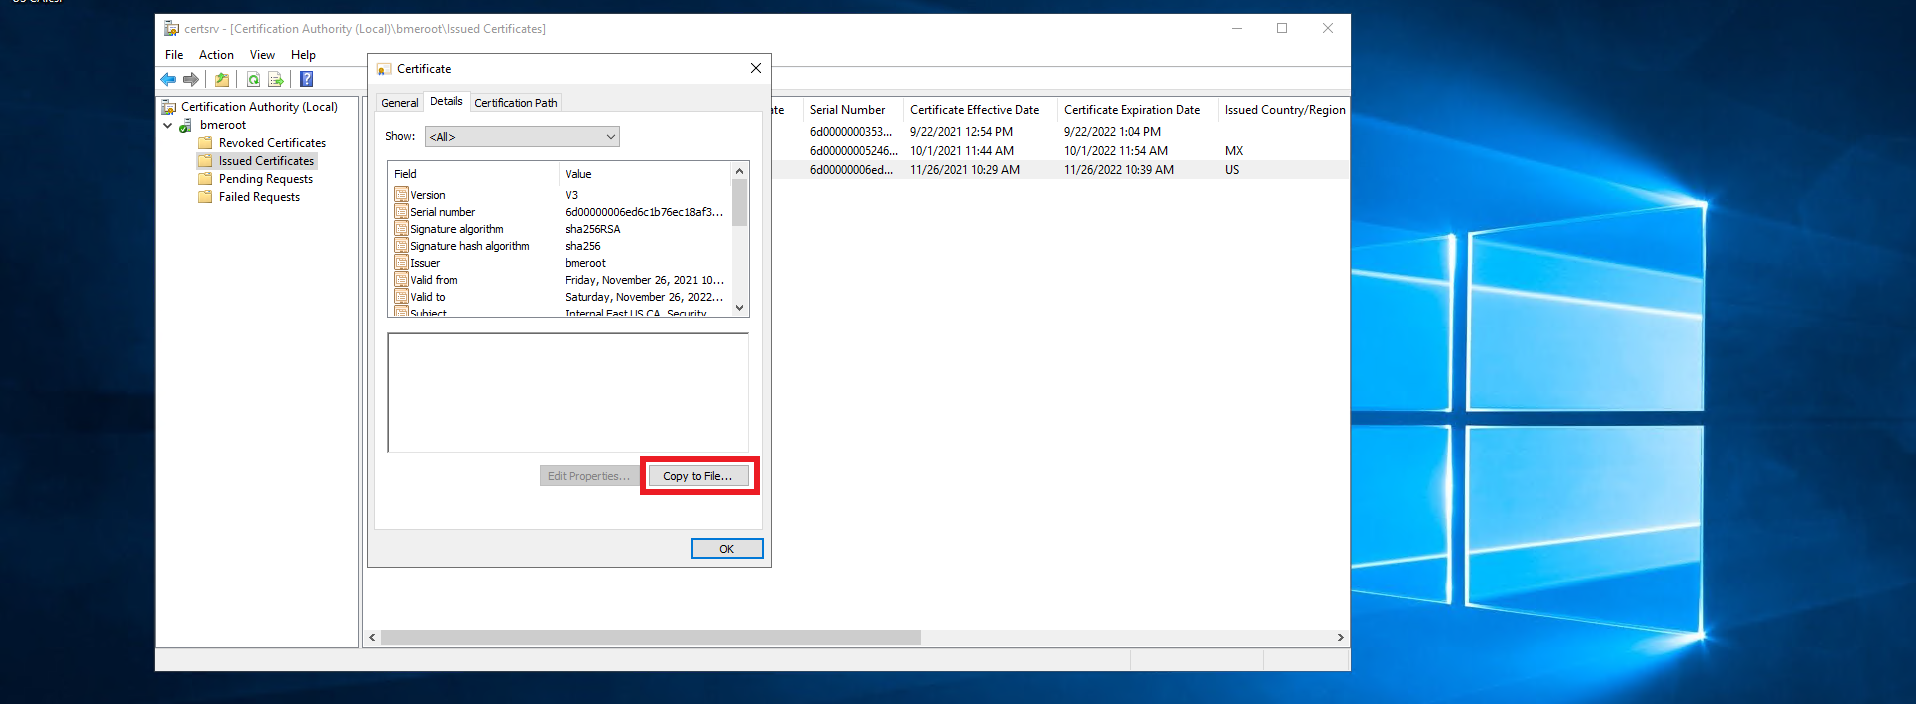
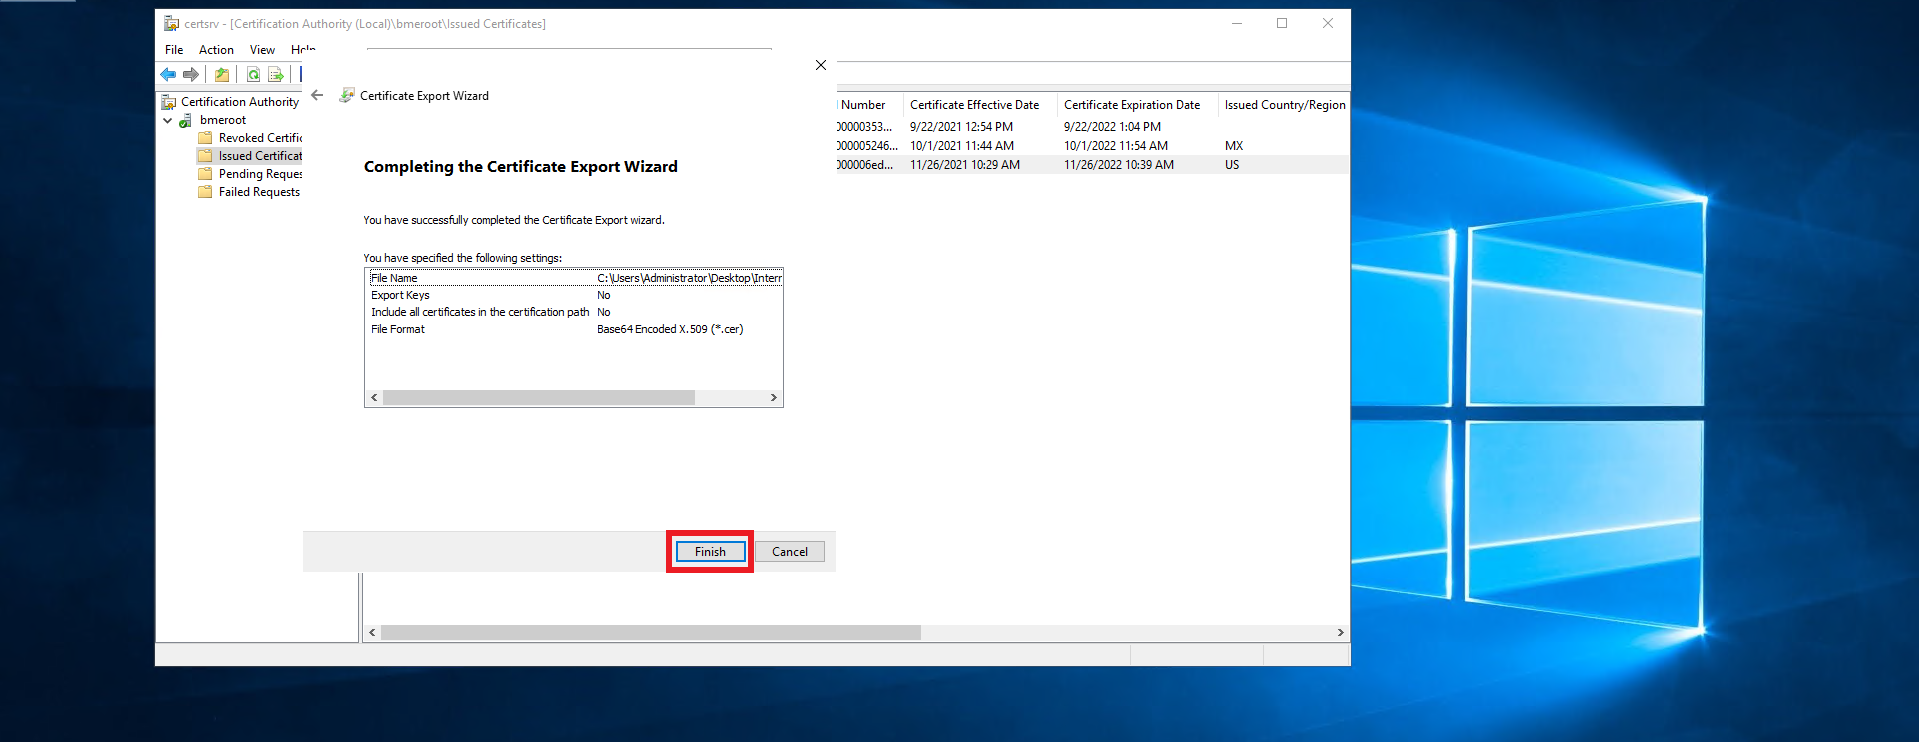
Click on Details.
-
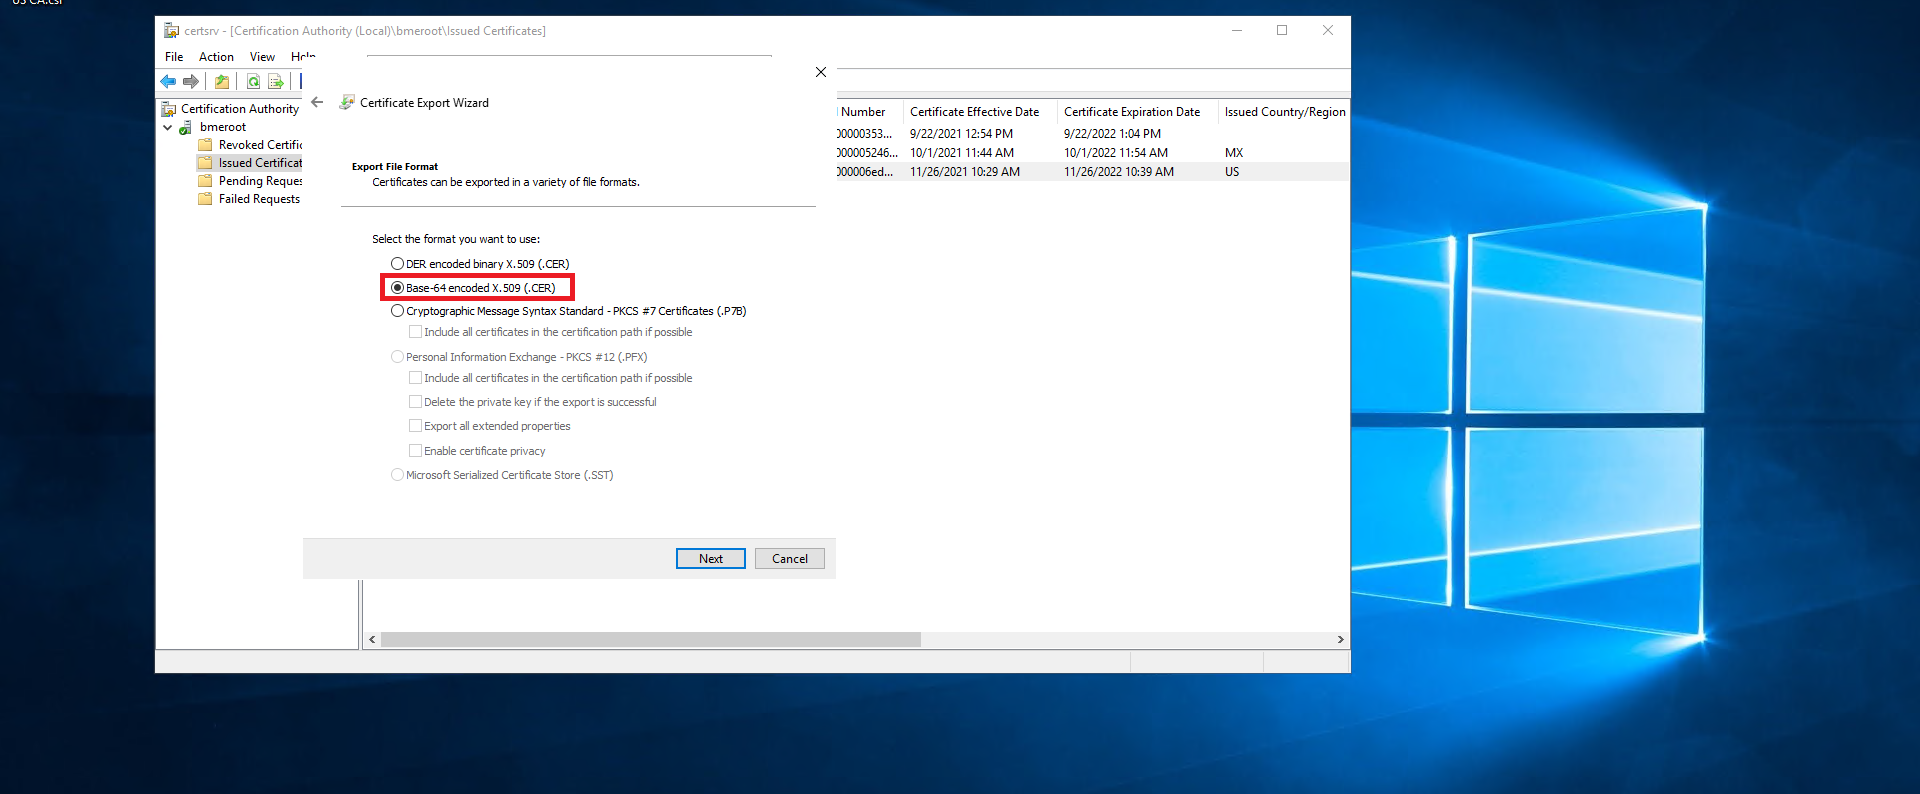
Click on the Copy to File… Button.
-
Click Next.
-
Select the Base-64 encoded X.509 (.CER) option.
-
Click Next.
-
Select where you want to save the newly created certificate.
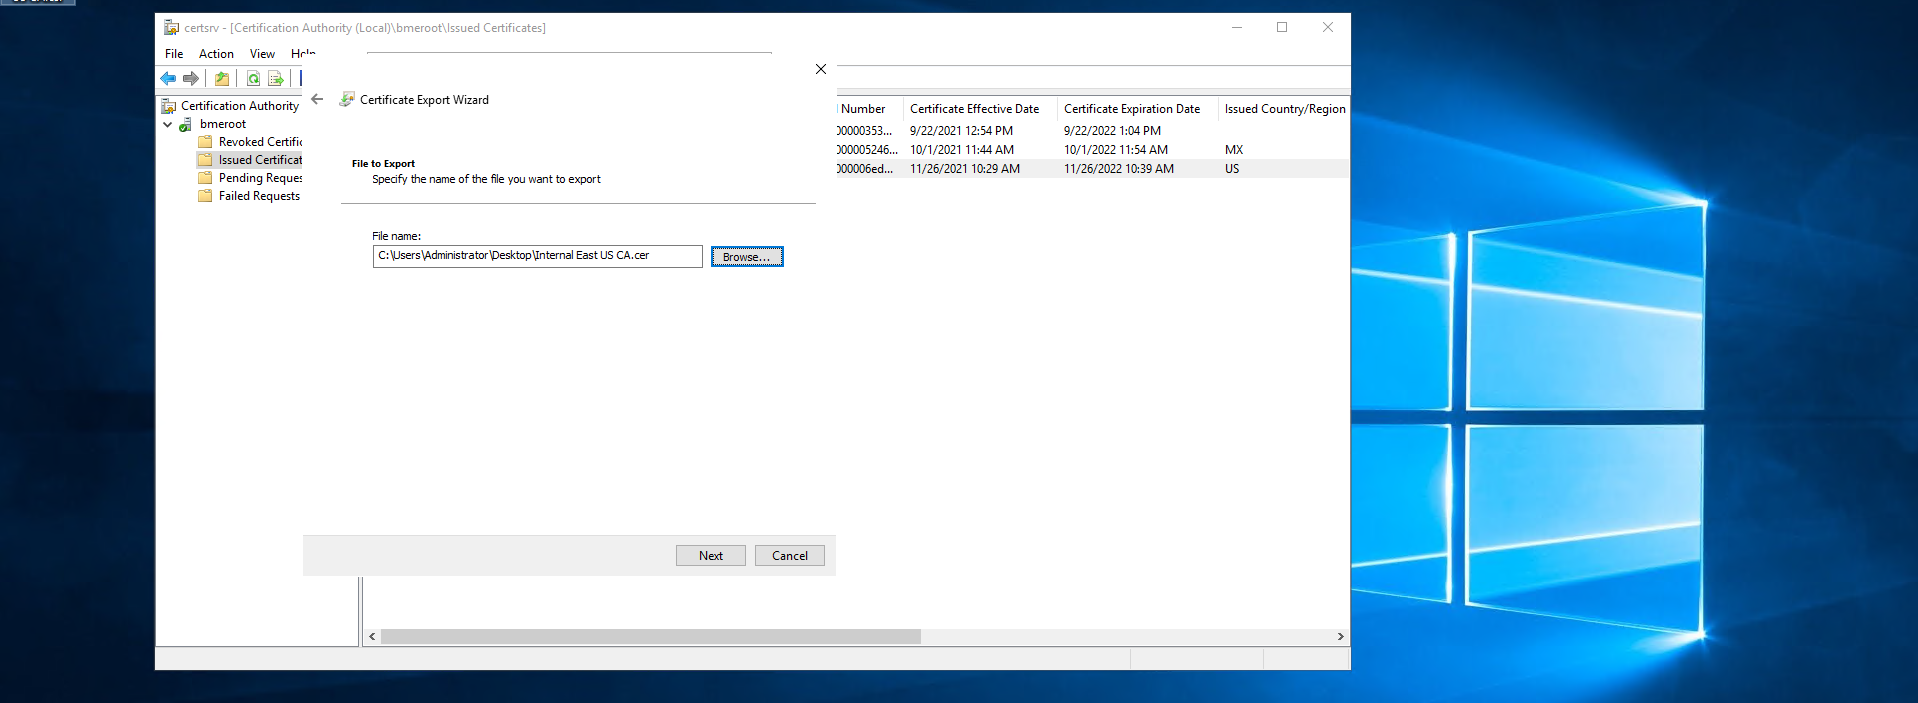
-
Click Next.
-
Click Finish.
-
A new .cer file will be created in the location you selected.
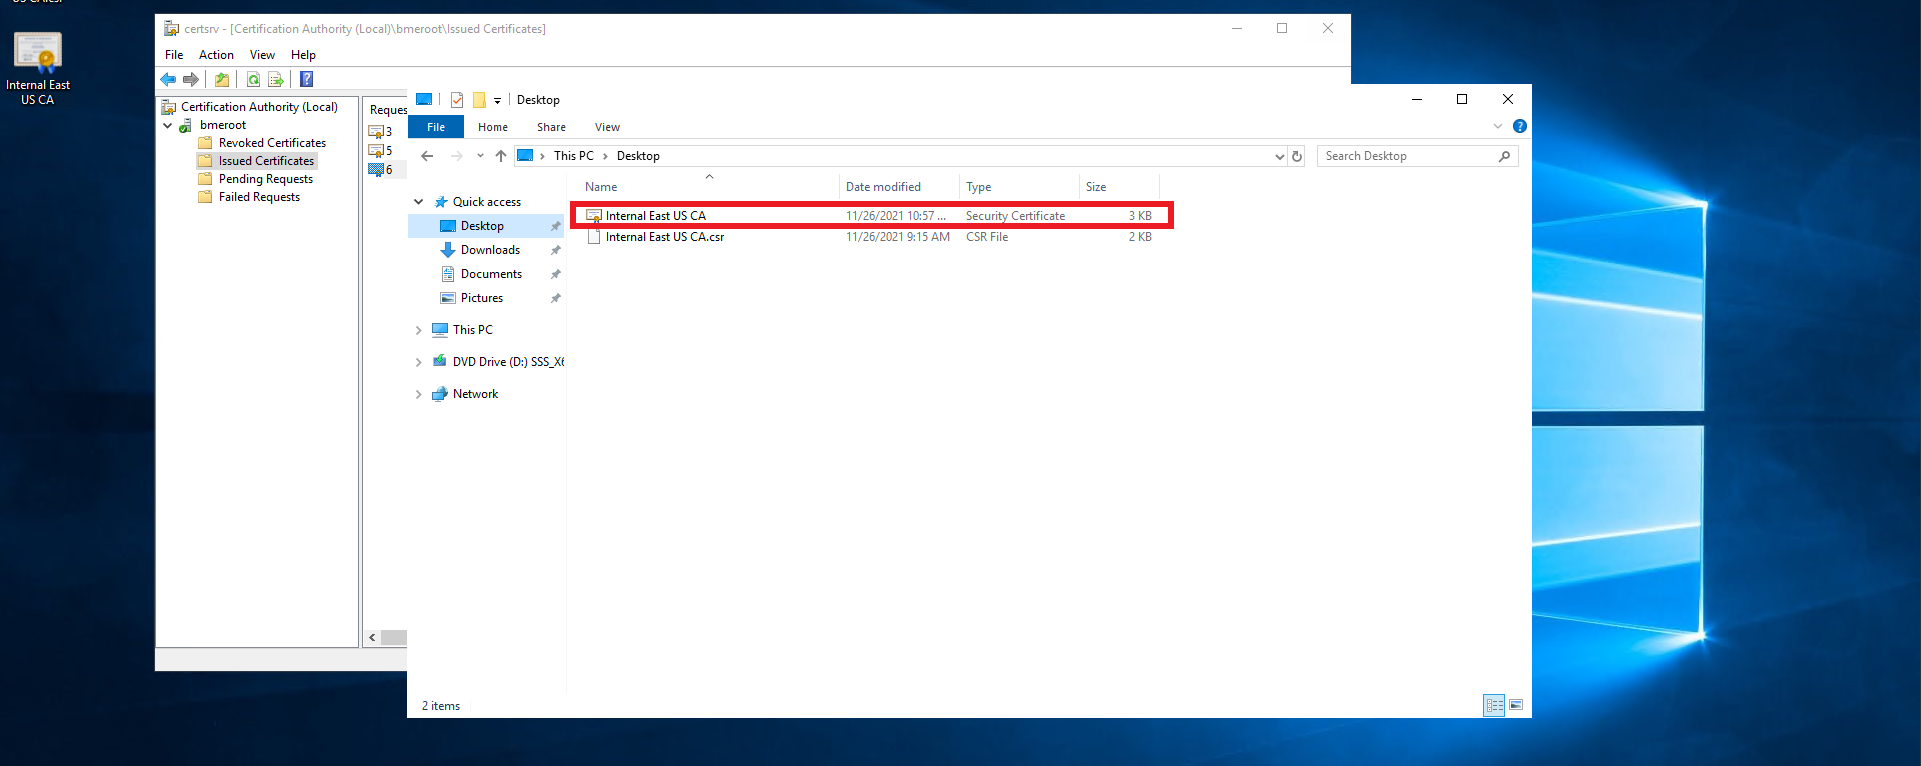
-
Follow your PKI team’s guidance on transferring the certificate file out of the offline CA into an internet connected computer.
-
Once you have the certificate in an internet connected computer, go to https://portal.ezca.io/
-
Login with an account that is registered as a PKI Admin in EZCA.
-
Navigate to Certificate Authorities.
-
Click View Details of the CA you want to import the certificate for.

-
Scroll down to the location you want to import, and click the Upload CA Certificate button.
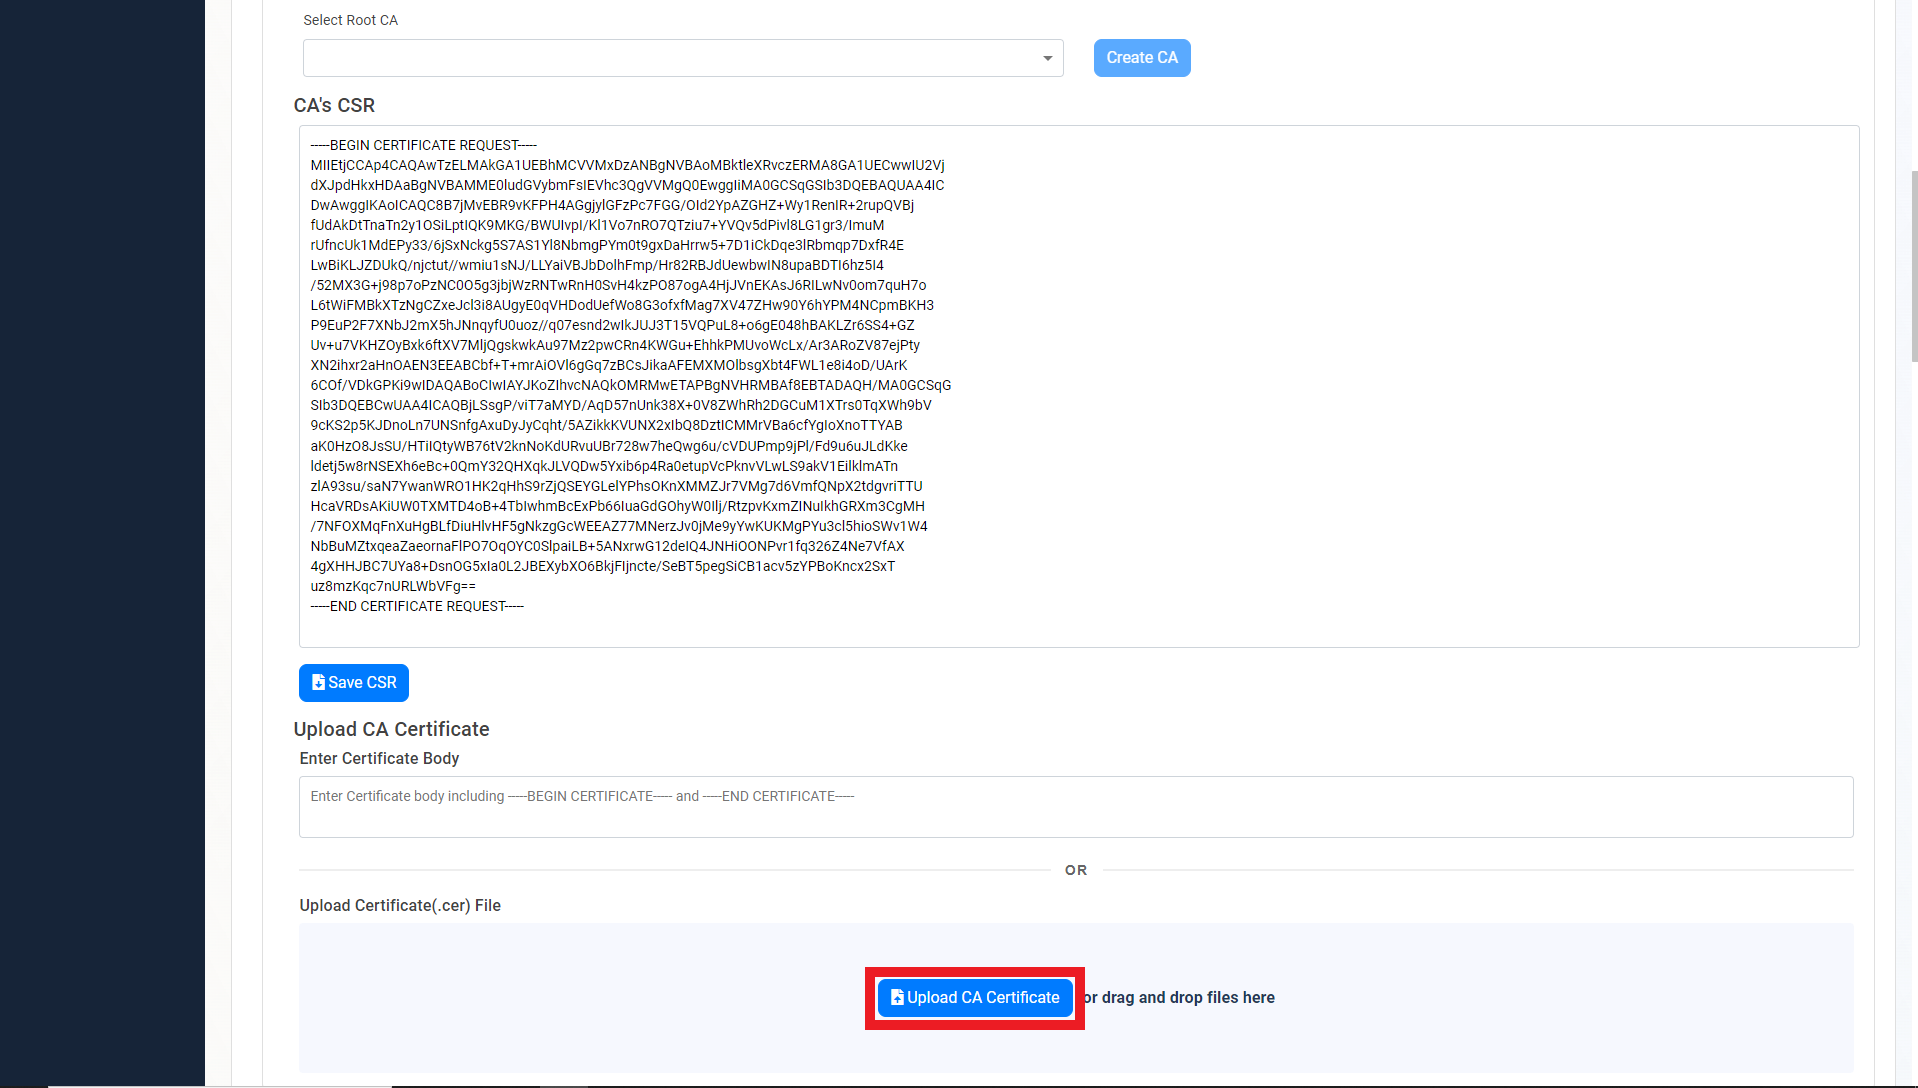
-
Select the newly created certificate file.

-
Click on the Save Certificate button

-
Repeat these steps for each location.
-
Your CA is ready to be used!
How to Download Your CA Certificate
Now that your CA has been created, you can download the CA certificate to upload it to your MDM or to manually trust it on your devices. Follow these steps to download your CA certificate:
-
Under the CA’s View Details page, scroll down to the location you want to download the certificate for and click on the Download Certificate button.
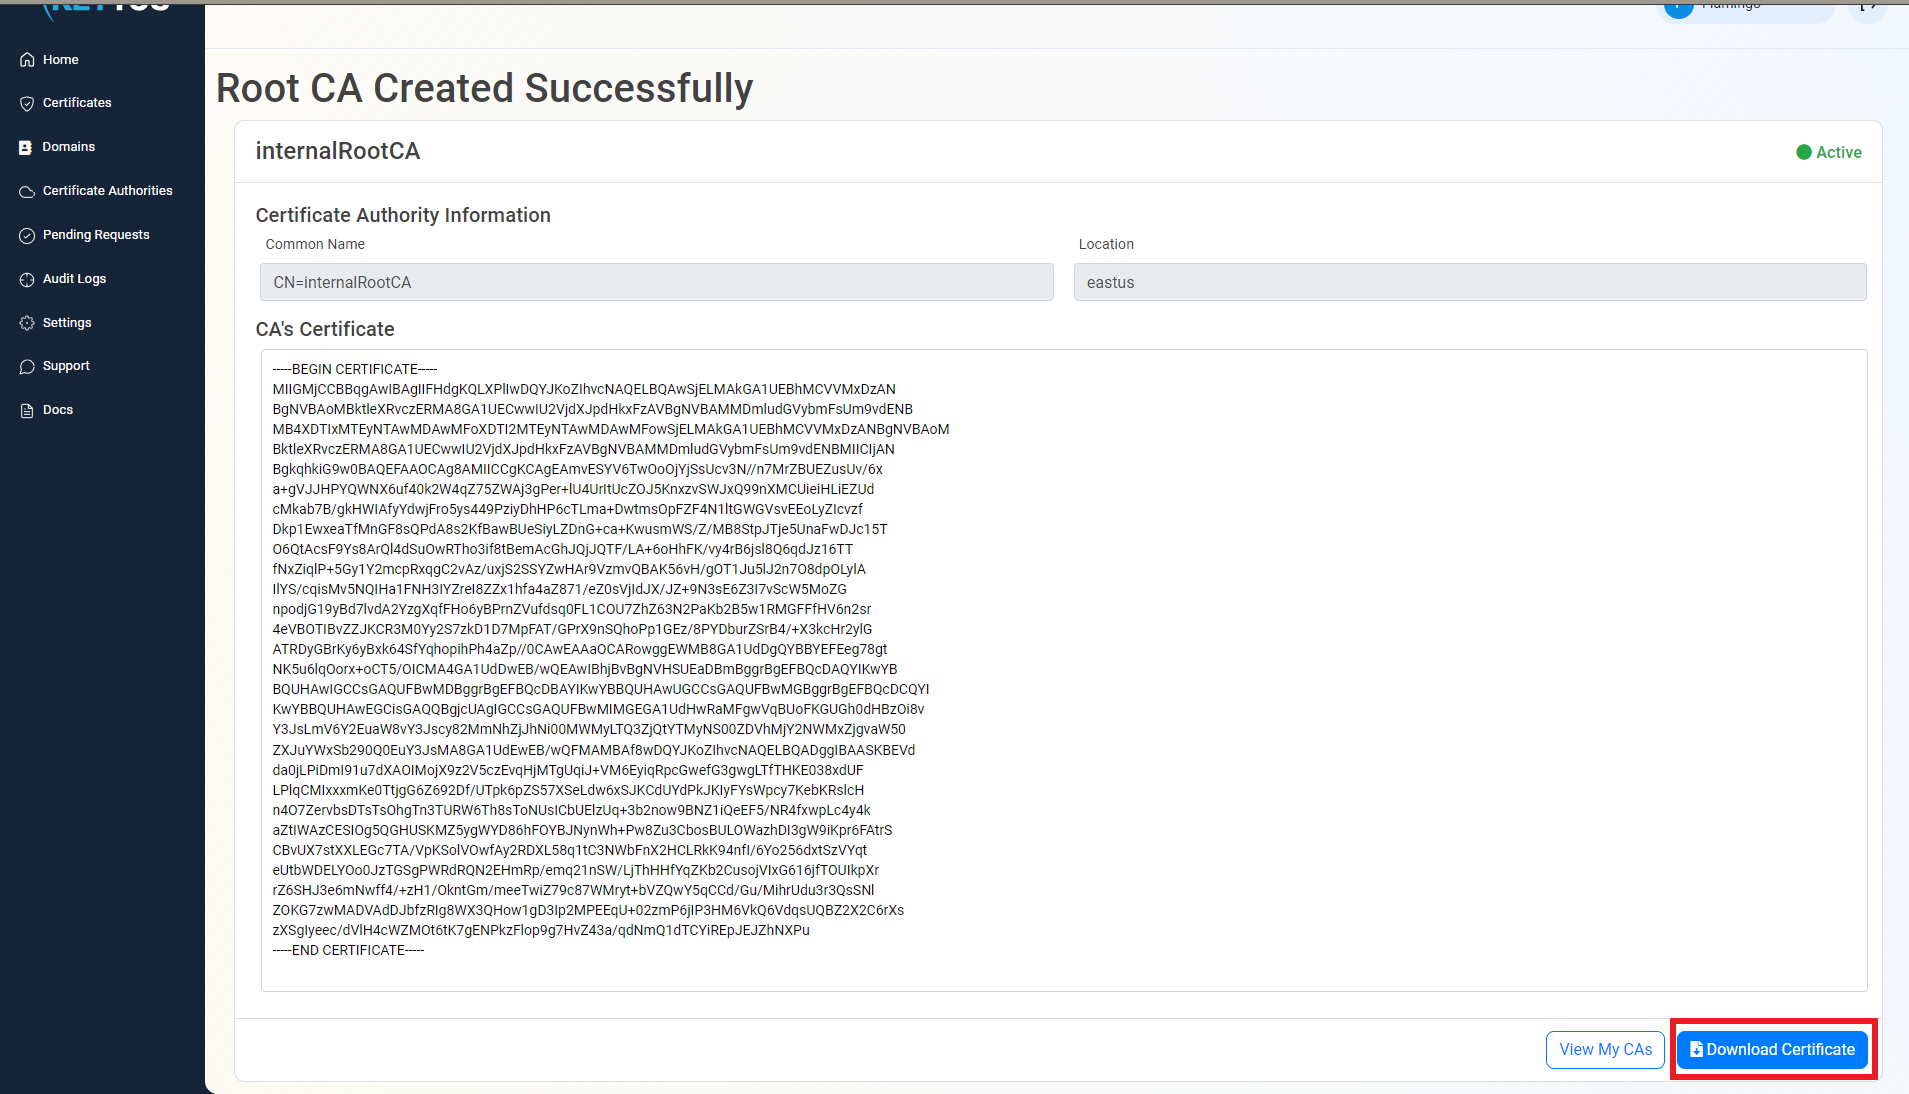
-
Now you are ready to connect your MDM to EZCA and start issuing SCEP certificates
Next Steps - How to Issue SCEP Certificates with Your New SCEP CA
Now that you have your SCEP CA created, you can connect it to your MDM and start issuing certificates to your devices.
🚀 Connect Your MDM and Issue SCEP Certificates