Intune Profiles for Android Devices
In this page we will guide you on how to create an Intune profile to issue X509 certificates either for devices or users using SCEP for Android.
Prerequisites
How to Download Your CA Certificate from EZCA
To issue certificates to your Android devices using Intune, you first need to download the CA certificate from your EZCA portal and upload it to Intune as a trusted certificate. Follow these steps to download your CA certificate from EZCA:
- Navigate to your EZCA portal instance, such as portal.ezca.io.
- From the left-hand menu, select Certificate Authorities.
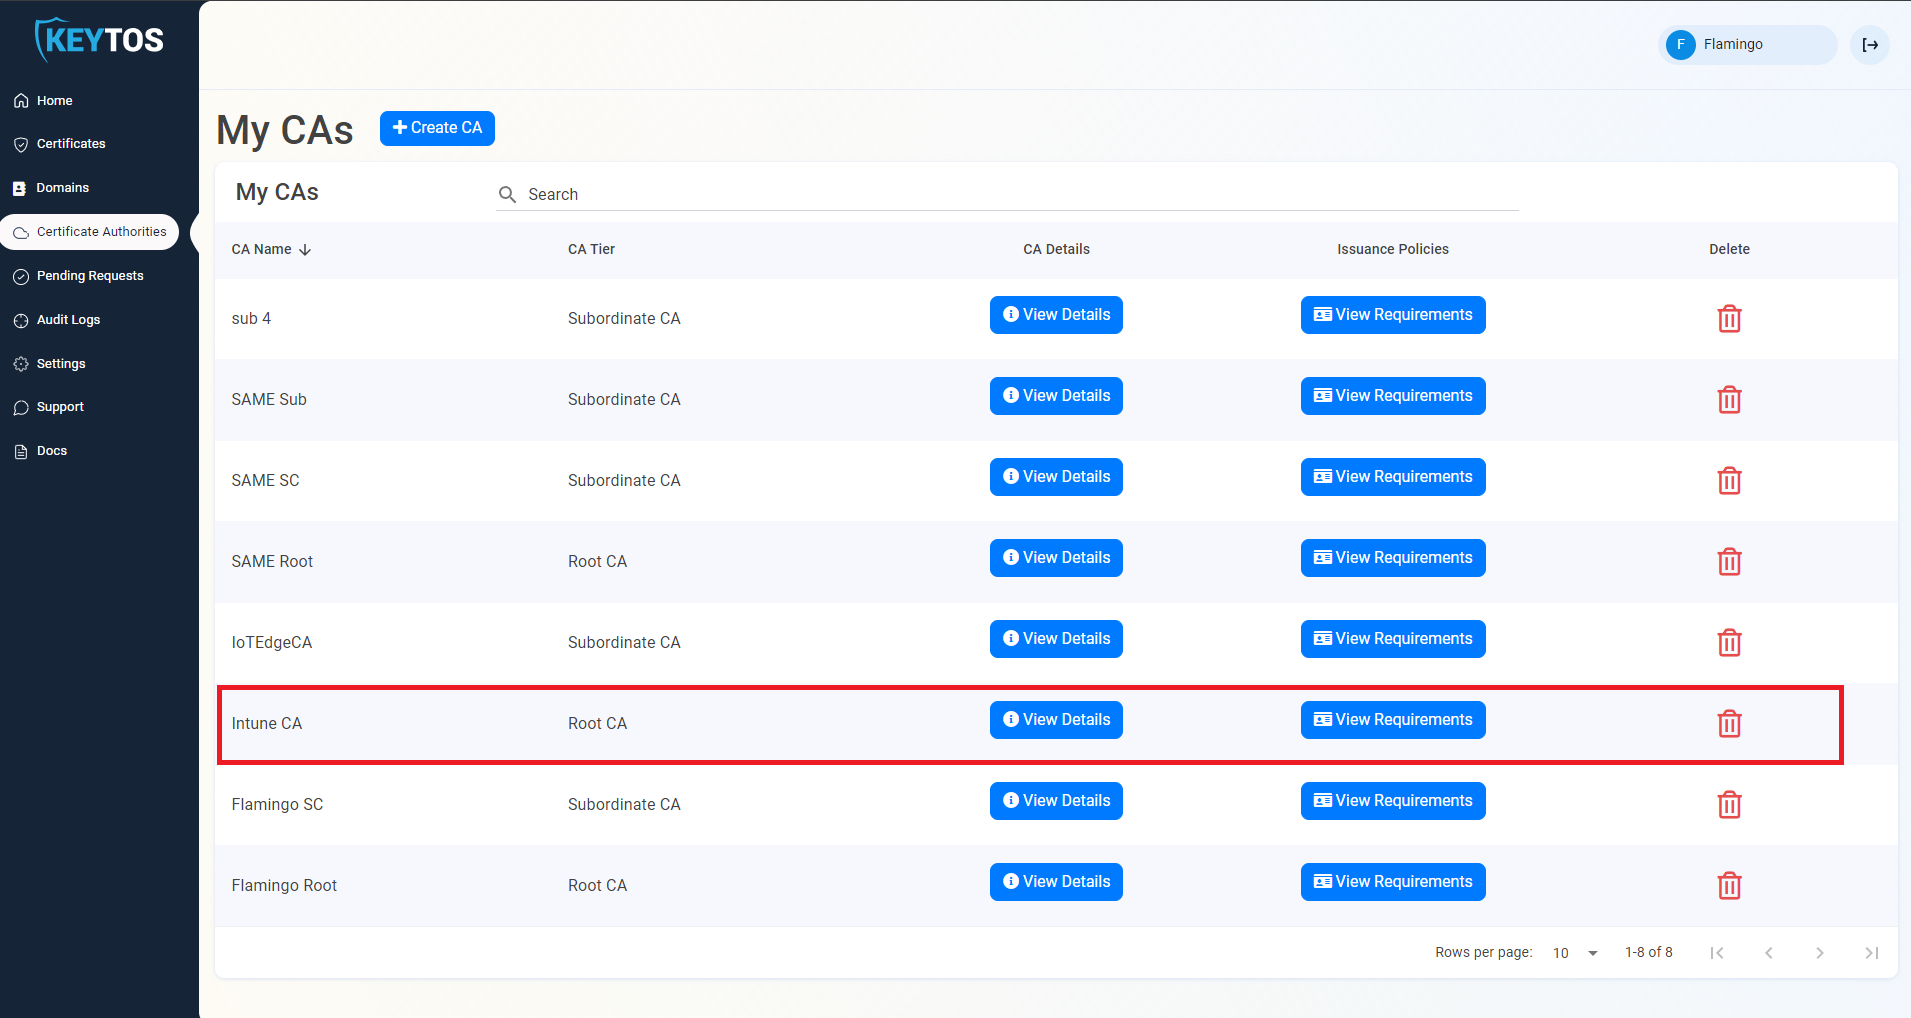
- Find the CA you created for Intune and click on the View Details button.
- For your CA’s region(s), click on the Download Certificate button to download the CA certificate.
- Repeat the previous step for each CA in your PKI chain. If you have a Root CA and an Intermediate CA, make sure to download both certificates.
How to Add a Trusted Certificate Profile in Intune for Your CA Certificates
The next step is to add the CA certificate you downloaded from EZCA to Intune as a trusted certificate profile. This will allow your Android devices to trust the certificates issued by your EZCA CA. Follow these steps to create a trusted certificate profile in Intune:
-
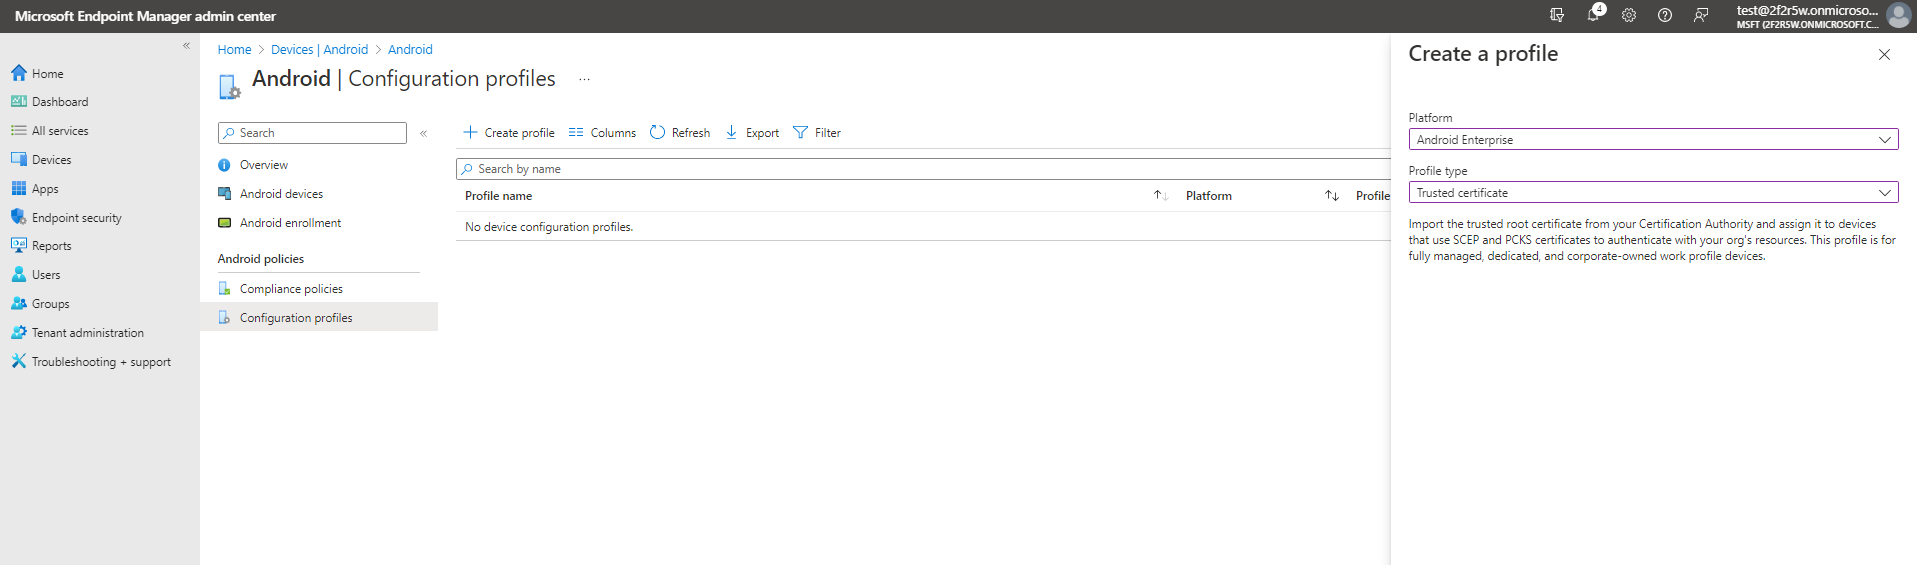
Select Devices -> Android -> Configuration profiles.
-
Click the Create profile button.
-
Select Android Enterprise as the Platform type.
-
Select the Trusted Certificate template.
-
Click Create.
-
Enter the name for this Intune certificate profile and click Next.
-
Upload the first CA Certificate you downloaded from EZCA.
-
Select your Assignment rules.
-
Create the configuration profile. Now all the devices in scope will trust certificates issued by this CA.
-
Repeat the previous steps to create additional trusted certificate profiles for each CA certificate in your PKI chain if you have more than one CA (e.g. Root and Intermediate). Make sure to assign all the trusted certificate profiles to the same devices so they can build the full trust chain to your CA.
How to Create a SCEP Certificate Profile in Intune for Android Device Certificates
How to Create Intune SCEP Profile For Device Certificates
-
Once you have created your trusted certificate profile, go back to the Android configuration profiles page and click the Create profile button.
-
Select Android Enterprise as the Platform type.
-
Select the SCEP Certificate template.

-
Click Create.
-
Enter the name for this Intune SCEP profile.
-
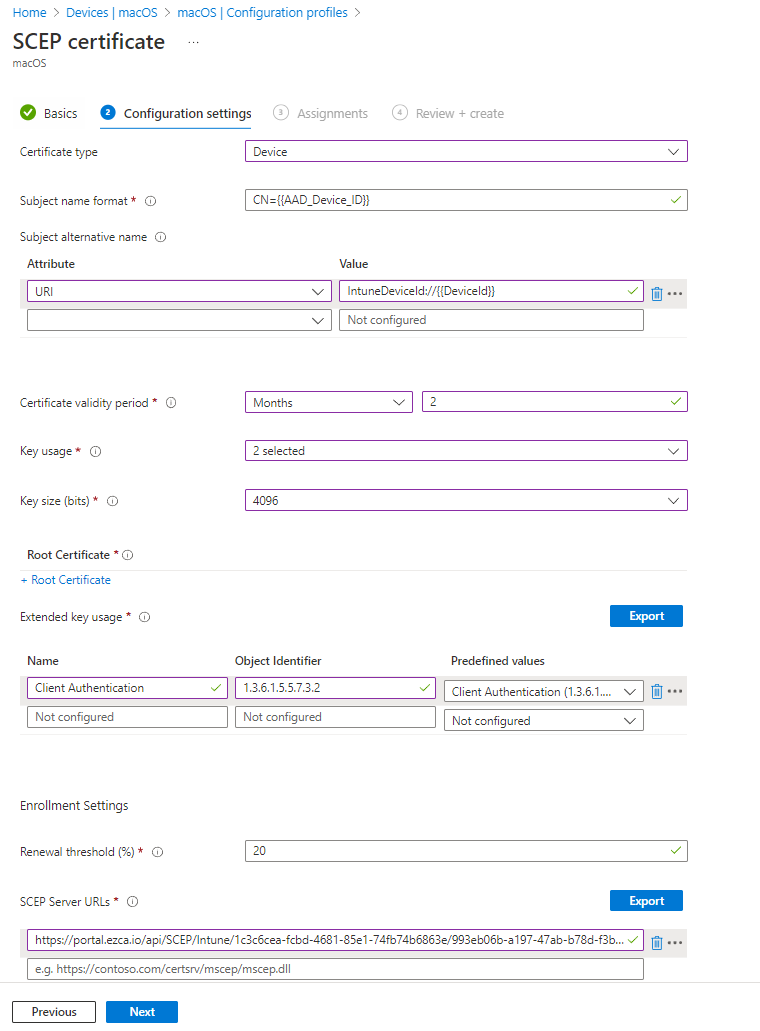
In configuration settings, we are going to select Device as the certificate type.
-
For Subject name we will enter
CN={{AAD_Device_ID}}orCN={{DeviceId}} -
In the Subject Alternate Name we will select the URI Attribute and enter
IntuneDeviceId://{{DeviceId}}as the value. -
For Certificate Validity period enter the period you entered in EZCA.
-
For Key Storage Provider (KSP) We recommend Enroll to Trusted Platform Module (TPM) KSP, otherwise fail however, if you want to support PCs without TPM and are ok with the risk of software based keys, feel free to use one of the other options.
-
For Key Usage select both Digital Signature and Key Encipherment
-
Key Size select 4096.
-
Hash Algorithm SHA-2
-
In the root certificate field click the + Root Certificate link and select your Root CA that you created in the “Create Trusted Certificate Profile” section.
Make sure to select your Root CA, not your Issuing CA. Unlike Windows & macOS, for Android devices you need to use your Root CA certificate here.
-
For Extended key Usage select Client Authentication (1.3.6.1.5.5.7.3.2)
-
Feel free to leave the renewal percentage at 20% or increase it to a value you feel comfortable with.
-
Now your Setup should look something like this:
-
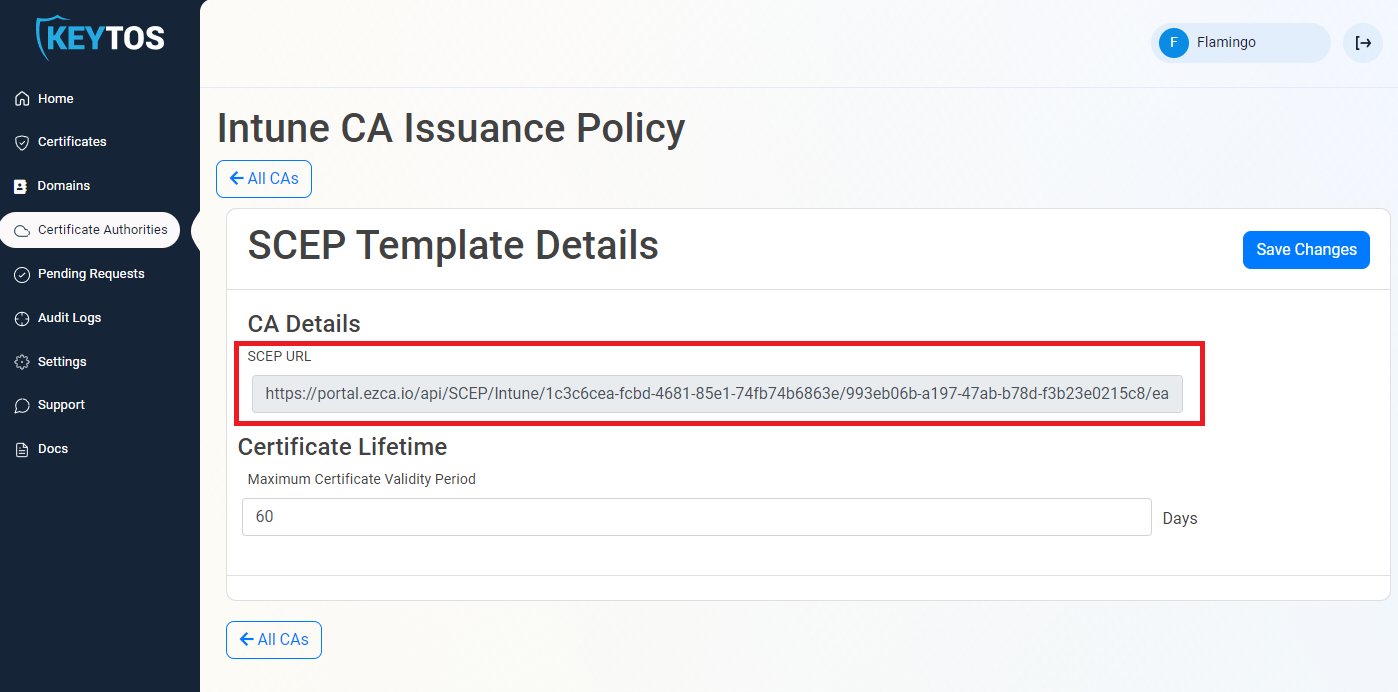
The Last step is to get the SCEP Server URLs from EZCA. For this we will go back to your EZCA Portal, Click on Certificate Authorities and Select the “View Requirements” button on your Intune CA.
-
Copy the SCEP URL.
-
Go back to your Intune Portal tab, and paste the URL in the “SCEP Server URLs” section.
-
Click Next.
-
Select the devices or groups you want to apply this profile to, Once the assignments are added, review and create the policy.
How to Create Intune SCEP Profile For User Certificates
-
Once you have created your trusted certificate profile, go back to the Windows configuration profiles page and click the Create profile button.
-
Select Android Enterprise as the Platform type.
-
Select the SCEP Certificate template.
-
Click Create.
-
Enter the name for this Intune SCEP profile.
-
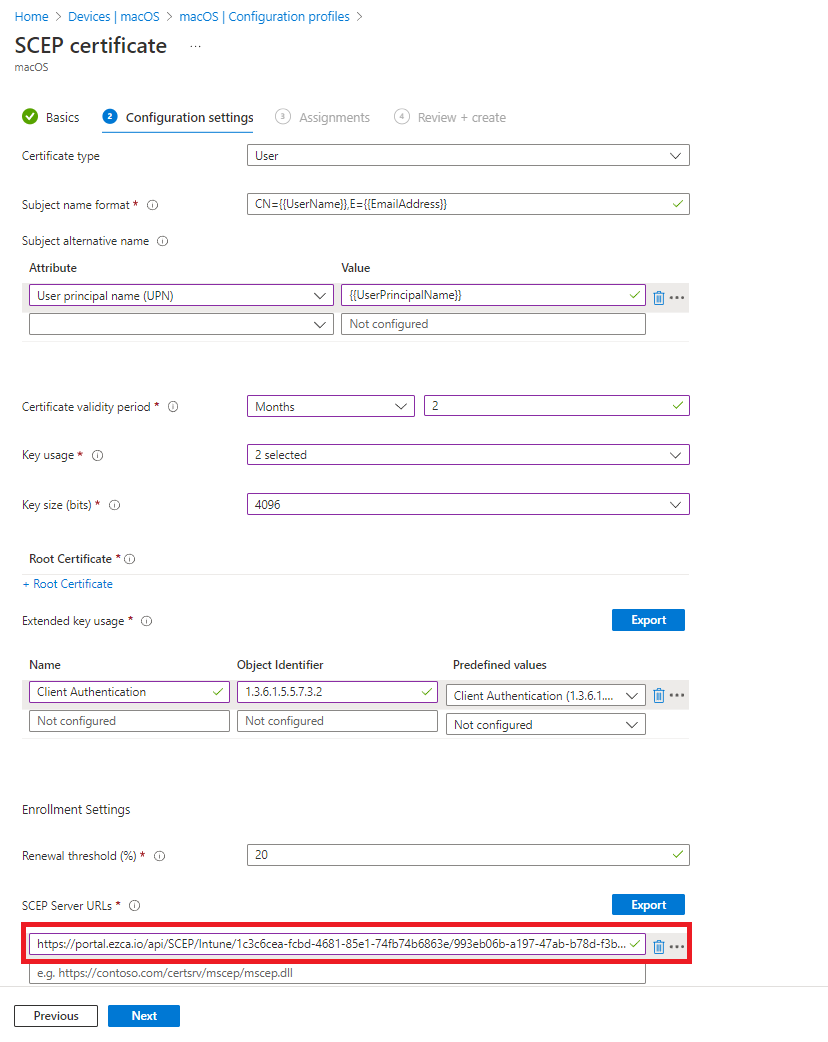
In configuration settings, we are going to select User as the certificate type.
-
For Subject name we will leave
CN={{UserName}},E={{EmailAddress}} -
In the Subject Alternate Name we will select the “User Principal Name (UPN)” Attribute and enter
{{UserPrincipalName}}as the value. -
For Certificate Validity period enter the period you entered in EZCA.
-
For Key Storage Provider (KSP) We recommend either Enroll to Trusted Platform Module (TPM) KSP, otherwise fail or Enroll to Windows Hello For Business, otherwise fail depending on how you want to use this certificate. However, if you want to support PCs without TPM and are ok with the risk of software based keys, feel free to use one of the other options.
-
For Key Usage select both Digital Signature and Key Encipherment
-
Key Size select 4096.
-
Hash Algorithm SHA-2
-
In the root certificate field click the + Root Certificate link and select your Root CA that you created in the “Create Trusted Certificate Profile” section.
Make sure to select your Root CA, not your Issuing CA. Unlike Windows & macOS, for Android devices you need to use your Root CA certificate here.
-
For Extended key Usage select Client Authentication (1.3.6.1.5.5.7.3.2).
-
Feel free to leave the renewal percentage at 20% or increase it to a value you feel comfortable with.
-
Now your Setup should look something like this:
-
The last step is to get the SCEP Server URLs from EZCA. For this we will go back to your EZCA Portal, Click on Certificate Authorities and Select the “View Requirements” button on your Intune CA.
-
Copy the SCEP URL.
-
Go back to your Intune Portal tab, and paste the URL in the SCEP Server URLs section.
-
Click Next.
-
Select the devices or groups you want to apply this profile to, Once the assignments are added, review and create the policy.