How To Set Up 802.1X Network Authentication on Android
Note: While you can manually configure your Android device to connect to an enterprise 802.1X network, we highly recommend using a Mobile Device Management (MDM) solution like Microsoft Intune to push the necessary network profiles and certificates to your devices. This ensures that all devices are consistently configured and reduces the risk of misconfiguration.
What is 802.1X Network Authentication?
At home, you probably just plug your computer into an ethernet cable or connect to a Wi-Fi network using a single password. It’s easy and convenient because at home you (usually) trust everyone who can connect to your network. However, in an enterprise environment, you want to make sure that only authorized users and devices can connect to your network. This is where 802.1X network authentication comes in. 802.1X is a network protocol that provides an authentication mechanism to devices wishing to attach to a LAN or WLAN. It is commonly used in enterprise networks to provide secure access to network resources.
Enterprise networks require a higher level of security and configuration than home networks. Instead of a single password, enterprise networks use RADIUS (Remote Authentication Dial-In User Service) servers to authenticate users and devices. To establish a secure connection, devices need to have the correct network profiles and certificates installed. These tell the device what security protocols to use (EAP-TLS, EAP-TTLS, etc.) and which RADIUS servers to trust. Without these profiles and certificates, your device won’t know how to connect securely to the network. That’s why devices will fail to connect to enterprise networks if they are not properly configured.
How to Trust Your RADIUS Server CA Certificate on Android
For your Android device to trust the RADIUS server during the authentication process, you need to install the RADIUS server CA certificate on your device. This tells your Android device to trust all RADIUS servers that present a certificate signed by this CA during the authentication process.
How to Download Your Radius Server CA Certificate
If you used the EZRADIUS auto-generated certificate for your RADIUS server, you’ll just have a single CA certificate to download. Follow these steps:
-
Log in to your EZRADIUS portal.
-
Navigate to Policies.
-
Select the policy you are using for Entra ID Password Authentication.
-
Scroll down to the Server Certificate section.
-
Click on the Download CA Certificate button to download the certificate to your local machine. It will have a filename similar to
RootCA.cer.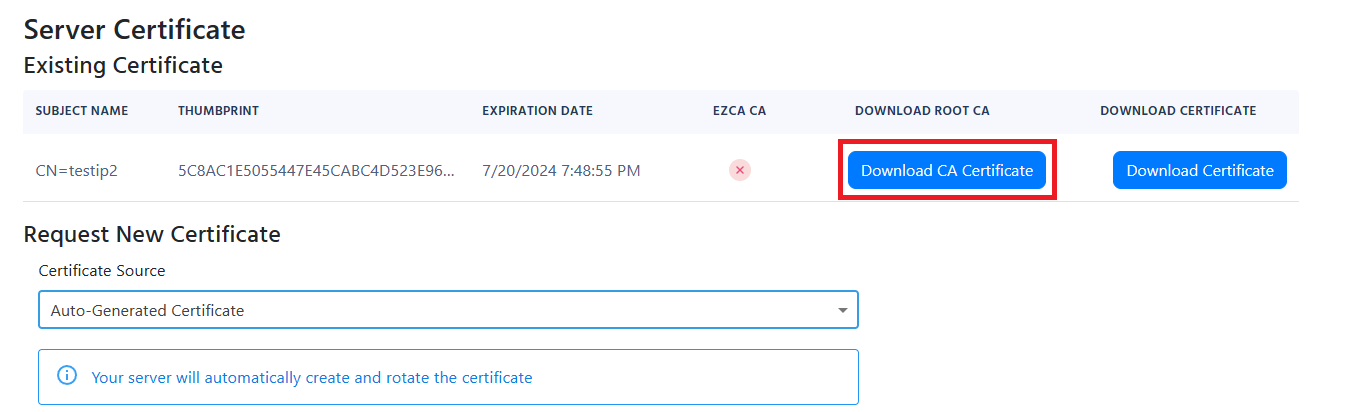
If you used the EZRADIUS EZCA to issue your RADIUS server certificate, you’ll need to download the the CA certificate for your EZCA CA, plus the Root CA certificate, if applicable. Follow these steps:
-
Log in to your EZCA portal.
-
Navigate to Certificate Authorities.
-
Select the CA that issued your RADIUS server certificate.
-
Click on the View Details button.
-
Click on the Download Certificate button to download the CA certificate to your local machine. It will have a filename similar to
<CA-NAME>.cer. -
If your EZCA CA is an intermediate CA, make sure to also download the Root CA certificate by repeating the above steps for the Root CA.
Refer to your PKI documentation to download the CA certificate(s) that issued your RADIUS server certificate. Ensure you have the root CA and any intermediate CA certificates if applicable.
How to Install the RADIUS Server CA Certificate on Android
To install the RADIUS server CA certificate on your Android device, follow these steps:
- Transfer the downloaded CA certificate file (e.g.,
RootCA.cer) to your Android device. You can do this via USB, email, or cloud storage. (or you can directly download it on the device if accessible.) - On your Android device, open the Settings app.
- Navigate to Security (or Security & location).
- Scroll down and select Encryption & credentials (or Install from storage under Credential storage).
- Tap on Install a certificate (or Install from storage).
- Choose CA certificate.
- Locate and select the CA certificate file you transferred to your device.
- You may be prompted to set a device lock screen PIN, pattern, or password if you haven’t already.
- Enter a name for the certificate (e.g., “RADIUS CA Certificate”) and tap OK to install it.
How to Set Up Your Network for RADIUS Authentication on Android
When connecting your Android device to an enterprise network using RADIUS authentication, you need to ensure that the correct EAP (Extensible Authentication Protocol) method is configured based on your authentication setup.
How to Configure EAP-TTLS/PAP on Android for WiFi RADIUS Authentication
-
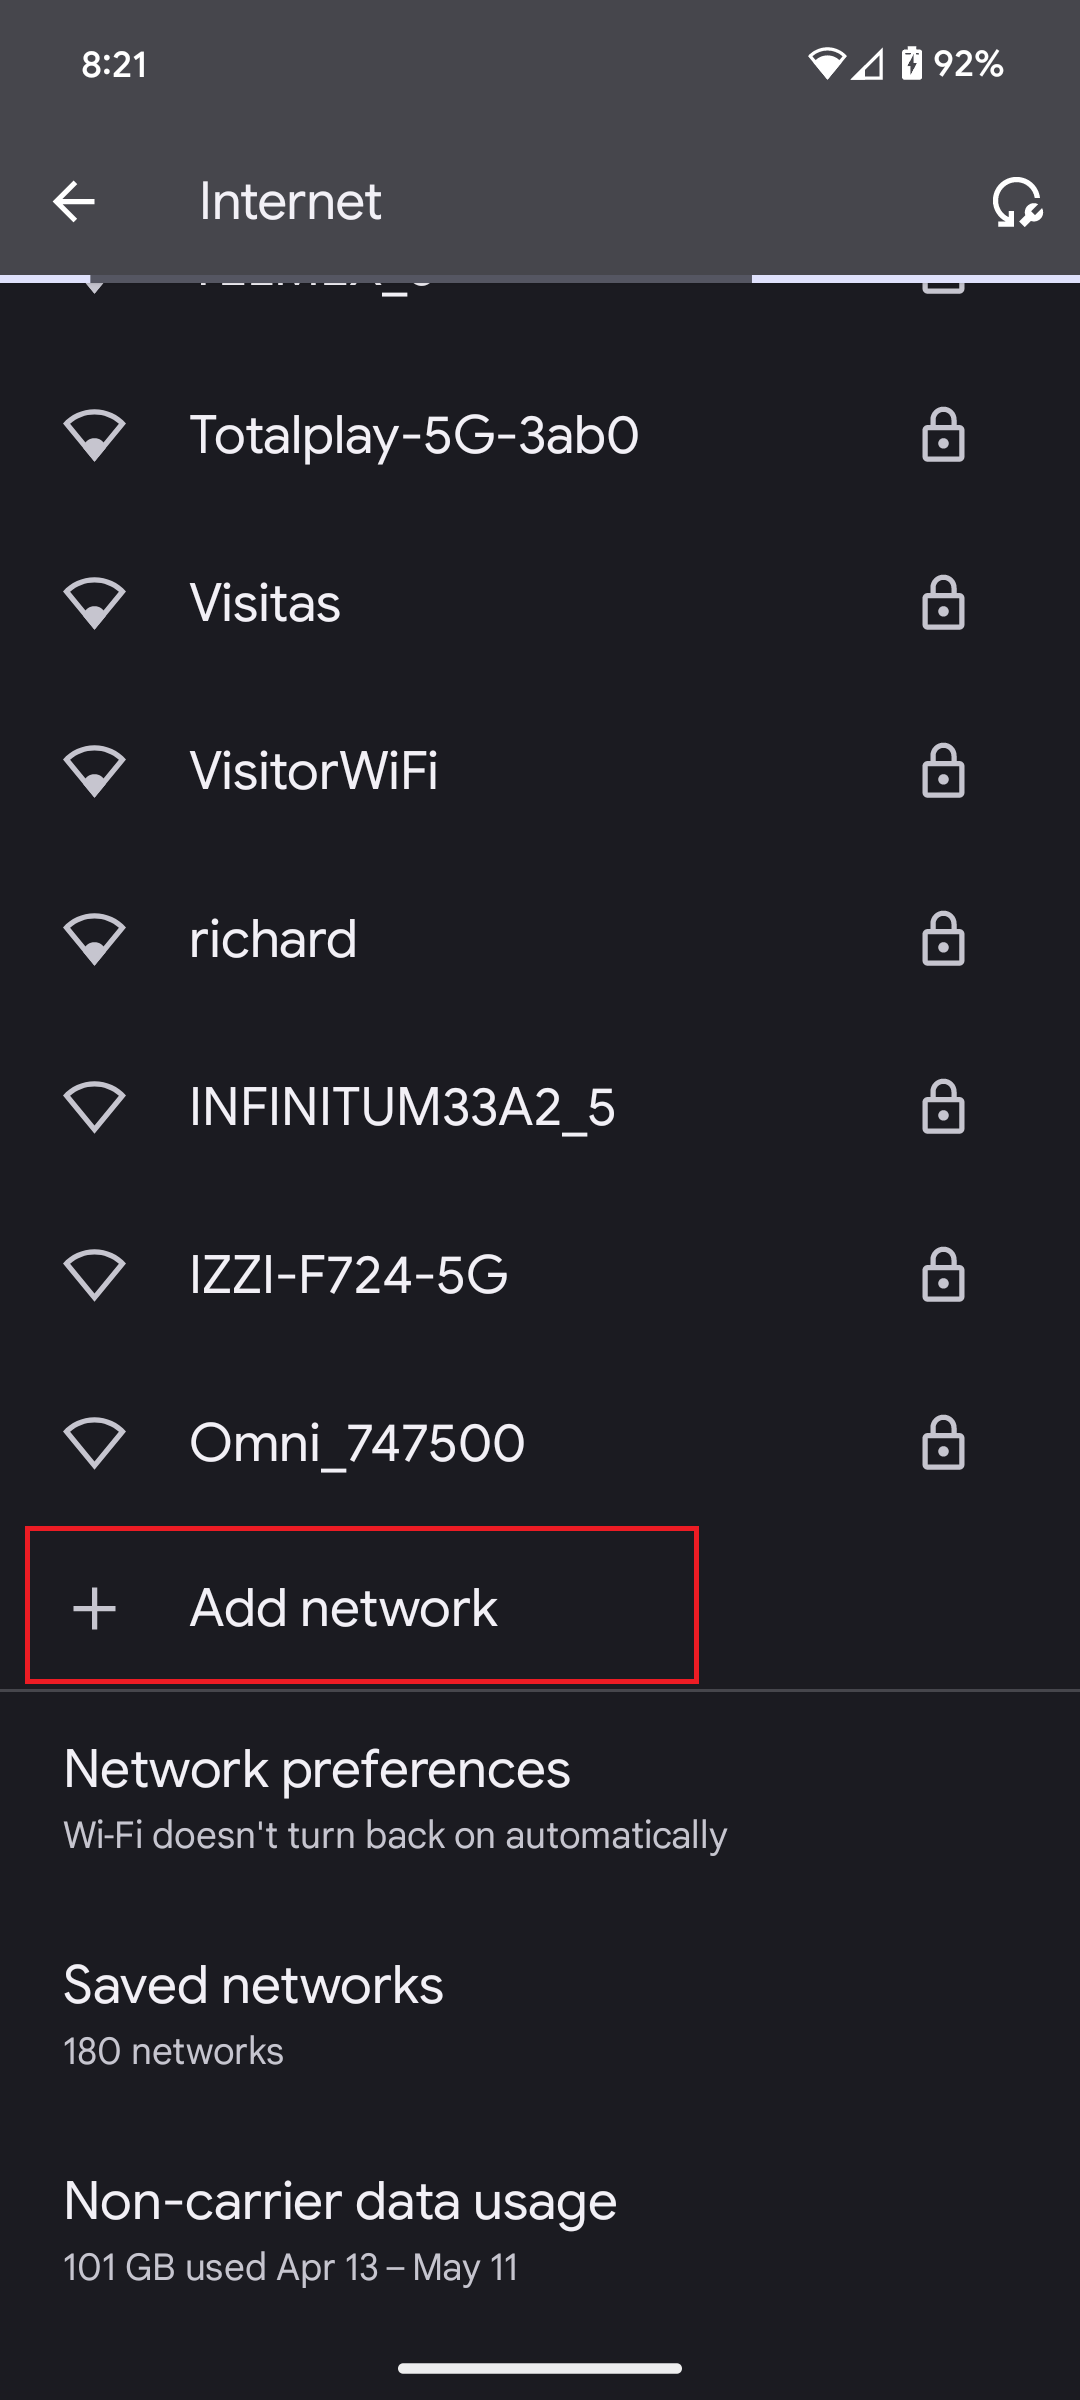
Go to Settings –> Network & Internet –> Wi-Fi.
-
Scroll down to the bottom and click on Add Network.
-
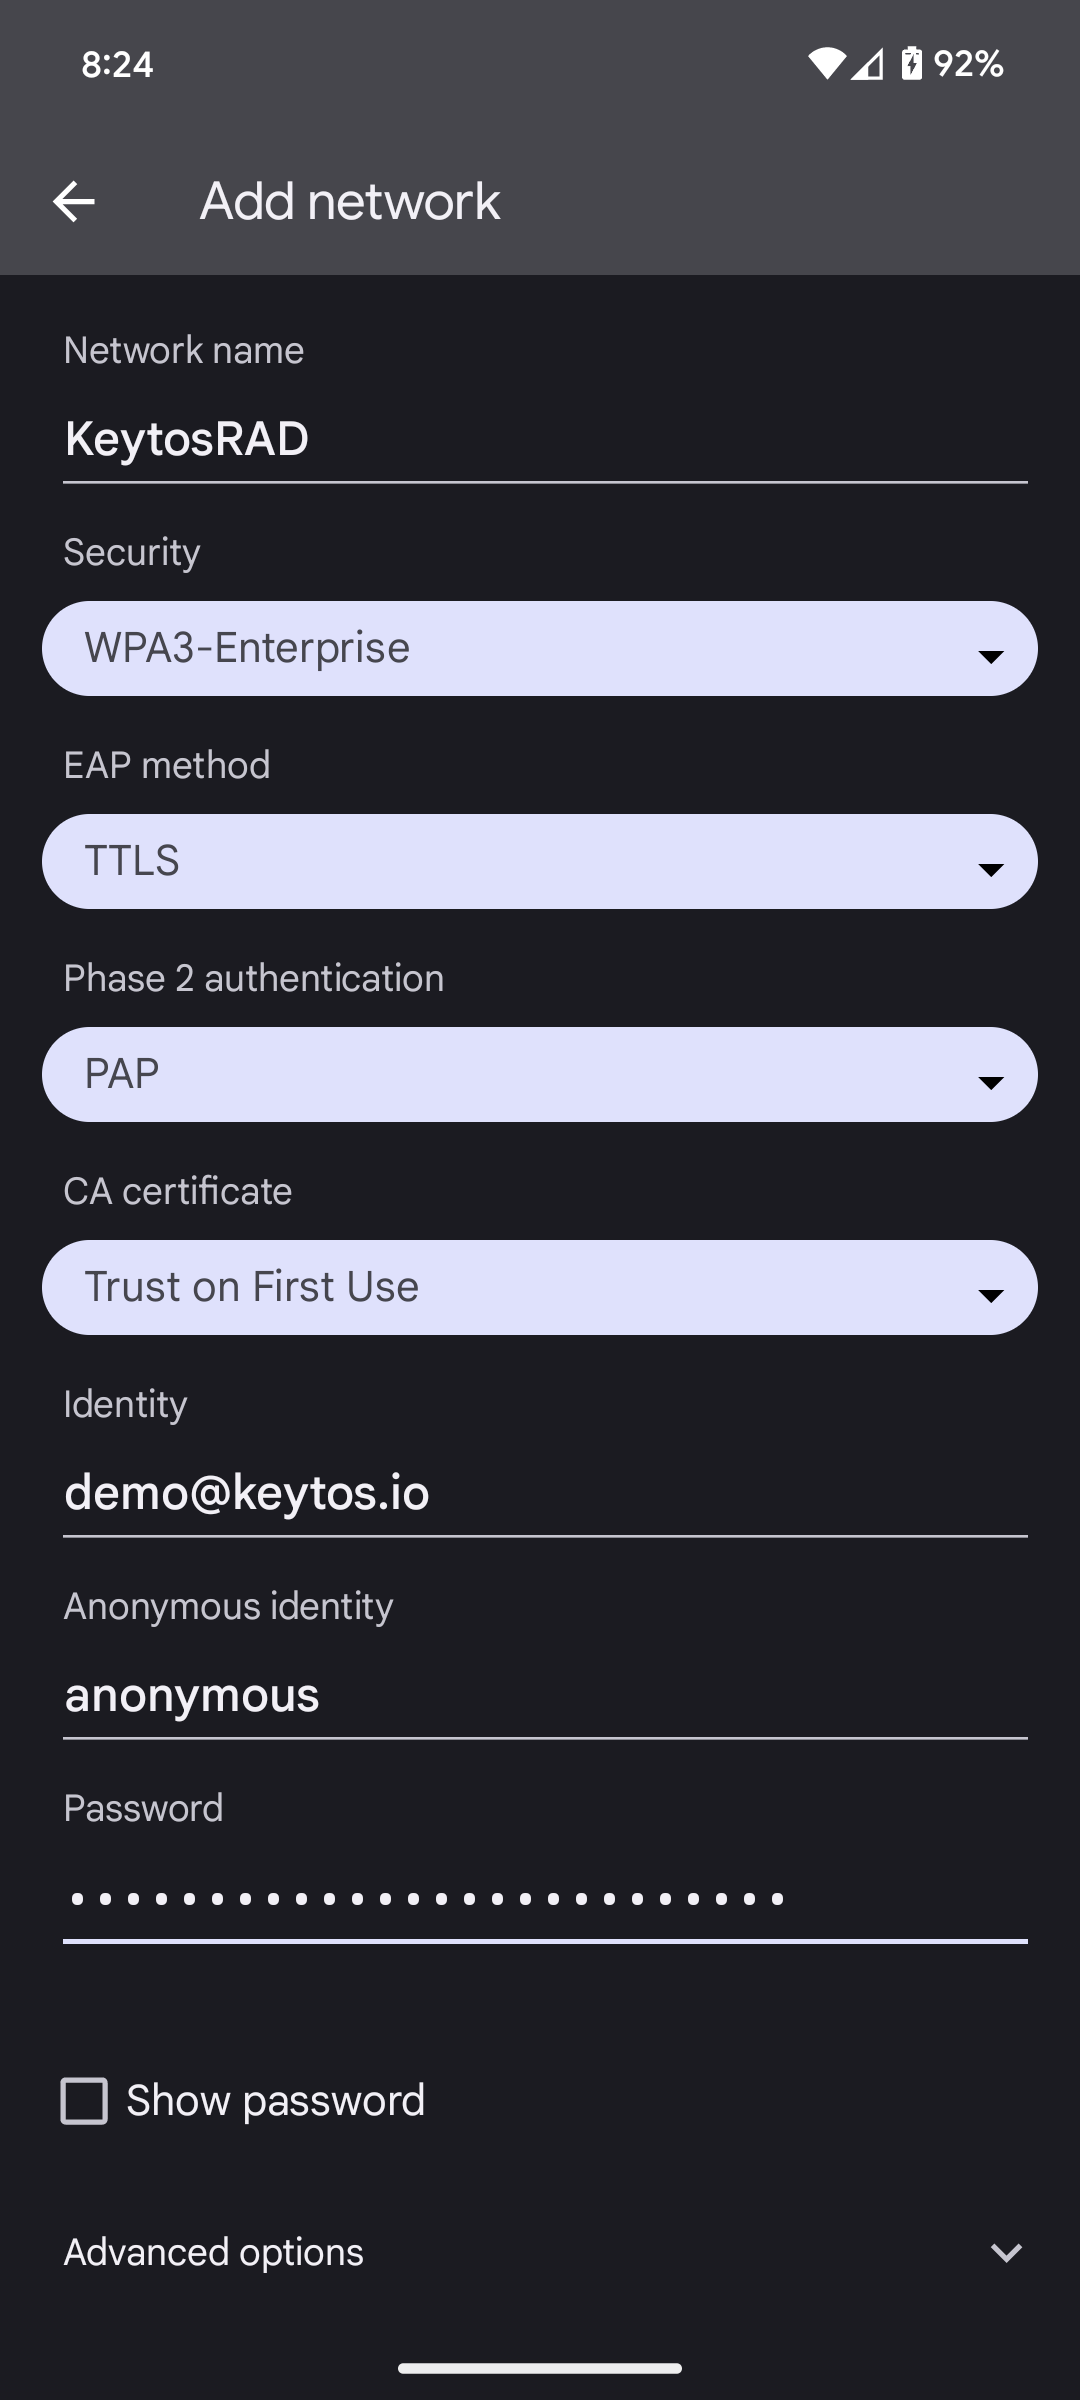
Enter the Network Name (SSID) of your network (Case Sensitive).
-
Select the Security type as either WPA2-Enterprise or WPA3-Enterprise (Depending on your network settings).
-
Select the EAP Method as TTLS.
-
Select the Phase 2 Authentication as PAP.
-
For CA Certificate, if you have installed the certificate on your device, select “Use system certificates”. If not, select “Trust on First Use”.
-
In the Identity field, enter your Entra ID username.
-
In the Password field, enter your Entra ID password.
-
It should look like this:
-
Click Save at the bottom right.