How-To: Distribute the EZCMS Application to Your Users via Microsoft Intune
Introduction - Distributing the EZCMS Application via Microsoft Intune
Due to your organization’s endpoints and configuration being build directly into the EZCMS application binary, it cannot be distributed through centralized app stores and must be distributed directly to your users. If you want your users to have a seamless experience where the EZCMS application is automatically installed on their devices without needing to manually download and install it, you can use a Mobile Device Management (MDM) solution like Microsoft Intune to distribute the EZCMS application to their devices.
Let’s go through the steps to distribute the EZCMS application to your users via Microsoft Intune.
Prerequisites for Distributing the EZCMS Application via Microsoft Intune
Before you can distribute the EZCMS application to your users via Microsoft Intune, make sure you have the following prerequisites in place:
- Microsoft Intune Subscription: Ensure that your organization has an active Microsoft Intune subscription and that you have the necessary permissions to manage applications within Intune.
- EZCMS Environment: Ensure that you have set up your EZCMS environment and have access to the custom application binary for your organization.
- .NET Framework 4.7.2 or later: To package the EZCMS application for Intune distribution, you will need to have the .NET Framework 4.7.2 or later installed on your machine. This is not required to run the EZCMS application, but it is required to use the Microsoft Win32 Content Prep Tool to prepare the application for Intune distribution.
How to Distribute the EZCMS Application via Microsoft Intune - Step-by-Step Guide
To distribute the EZCMS application to your users via Microsoft Intune you will need to download your binary, prepare the application for Intune distribution, and then upload it to Intune and assign it to your users. Follow the steps below to complete this process:
Step 1: How to Download Your Custom EZCMS Application Binary
To download your organization’s custom EZCMS application binary, follow these steps:
-
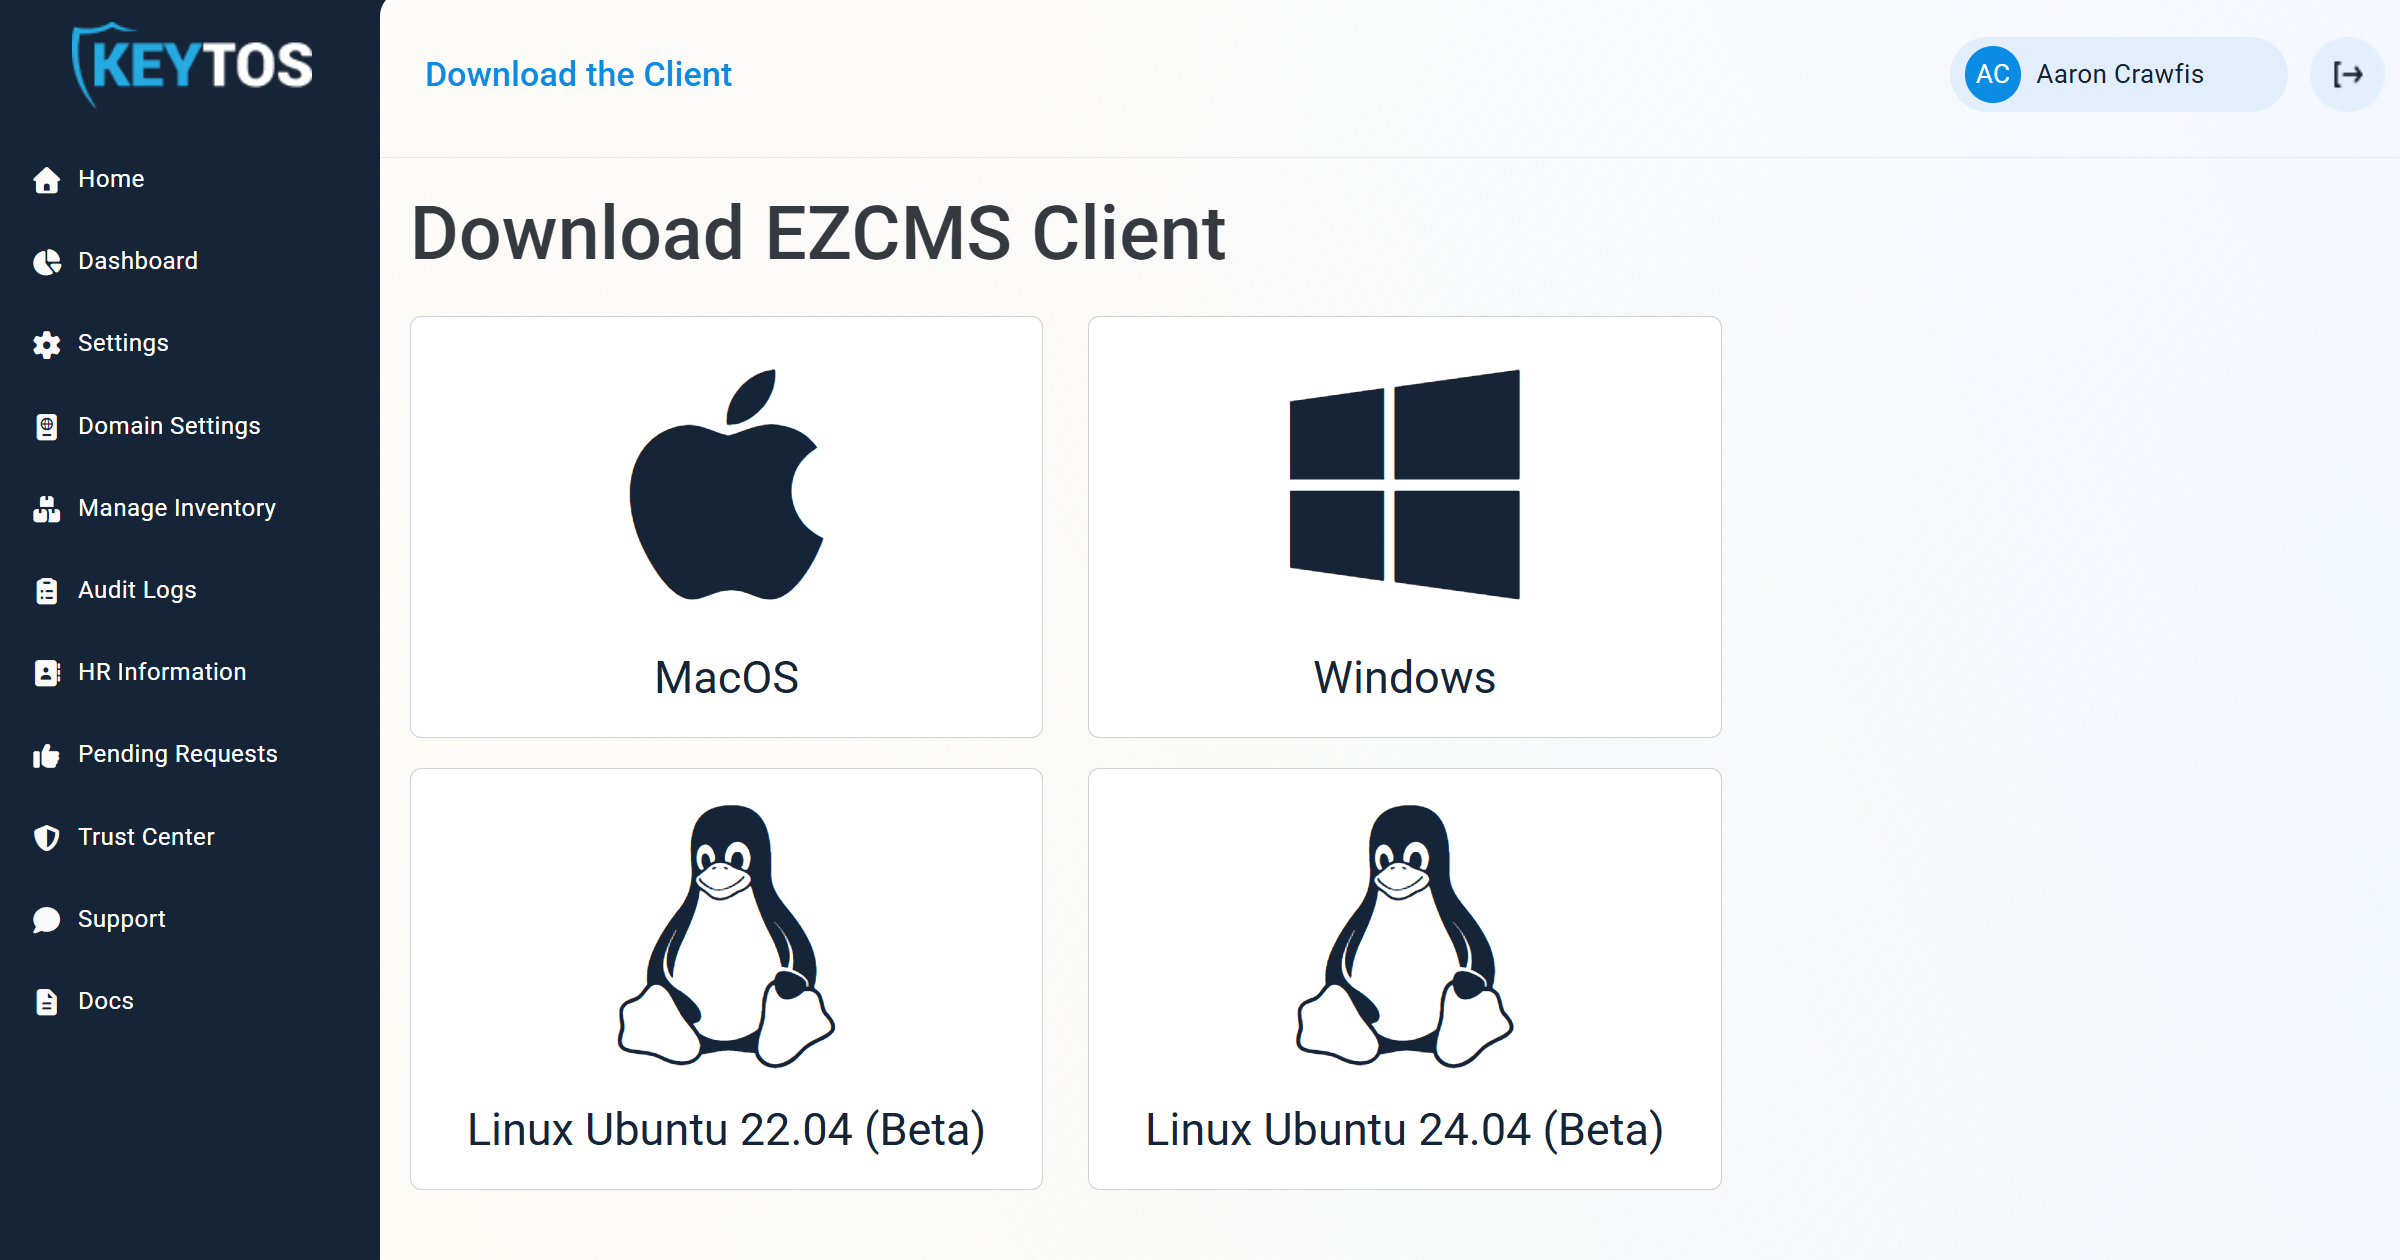
Navigate to your organization’s EZCMS dashboard.
-
In the top-left corner, click Download the Client.
-
Select the Windows operating system to download the Windows application binary.
-
Save the downloaded application binary to a directory named “EZCMS” within a working directory on your machine where you will prepare the application for Intune distribution in the next step. (e.g.,
C:\Users\<YourUsername>\Downloads\EZCMS-Intune\EZCMS\EZCMS.exe). You should have a directory structure like this:C:\ └── Users └── <YourUsername> └── Downloads └── EZCMS-Intune └── EZCMS └── EZCMS.msi
-
Navigate to your organization’s EZCMS dashboard.
-
In the top-left corner, click Download the Client.
-
Select the macOS operating system to download the macOS application binary.
-
Save the .dmg file to your machine in a location you can easily access in an upcoming step.
Step 2: How to Prepare the EZCMS Application for Intune Distribution
In this step you will prepare the EZCMS application for distribution through Microsoft Intune.
For Windows applications, you need to prepare the application by using the Microsoft Win32 Content Prep Tool. This tool will convert the EZCMS application binary into the .intunewin format required for Intune distribution.
- Download the latest version of the Microsoft Win32 Content Prep Tool from GitHub. Place it in the working directory alongside the “EZCMS” directory you created in Step 1. Your directory structure should look like this:
C:\ └── Users └── <YourUsername> └── Downloads └── EZCMS-Intune ├── IntuneWinAppUtil.exe └── EZCMS └── EZCMS.msi - Open a Terminal or Command Prompt window and navigate to the working directory where you placed the Microsoft Win32 Content Prep Tool and the “EZCMS” directory. For example:
cd C:\Users\<YourUsername>\Downloads\EZCMS-Intune - Run the Microsoft Win32 Content Prep Tool using the following command:
IntuneWinAppUtil.exe -c .\EZCMS -s .\EZCMS\EZCMS.msi -o .\ - You will now have a file named
EZCMS.intunewinin your working directory. This is the file you will upload to Microsoft Intune for distribution to your users.
For macOS applications there are no additional steps required to prepare the application for Intune distribution. The .dmg file you downloaded in Step 1 can be directly uploaded to Intune in the next step.
Step 3: How to Upload the EZCMS Application to Microsoft Intune and Assign it to Your Users
Now that you have downloaded and prepared the EZCMS application for Intune distribution, you can upload it to Microsoft Intune and assign it to your users. Follow the steps below to complete this process:
-
Navigate to the Intune Admin Center and sign in with your administrator account.
-
Select Apps > All apps > Create to create a new application.
-
For App type, select Windows app (Win32) and click Select.
-
Click Select app package file and upload the
EZCMS.intunewinfile that you created in Step 2. -
Fill out the remaining App information fields as desired, such as the name, description, publisher, etc. Then click Next.
-
You can download a Logo for the EZCMS application from this link and use it as the logo for the application in Intune if you wish.

-
-
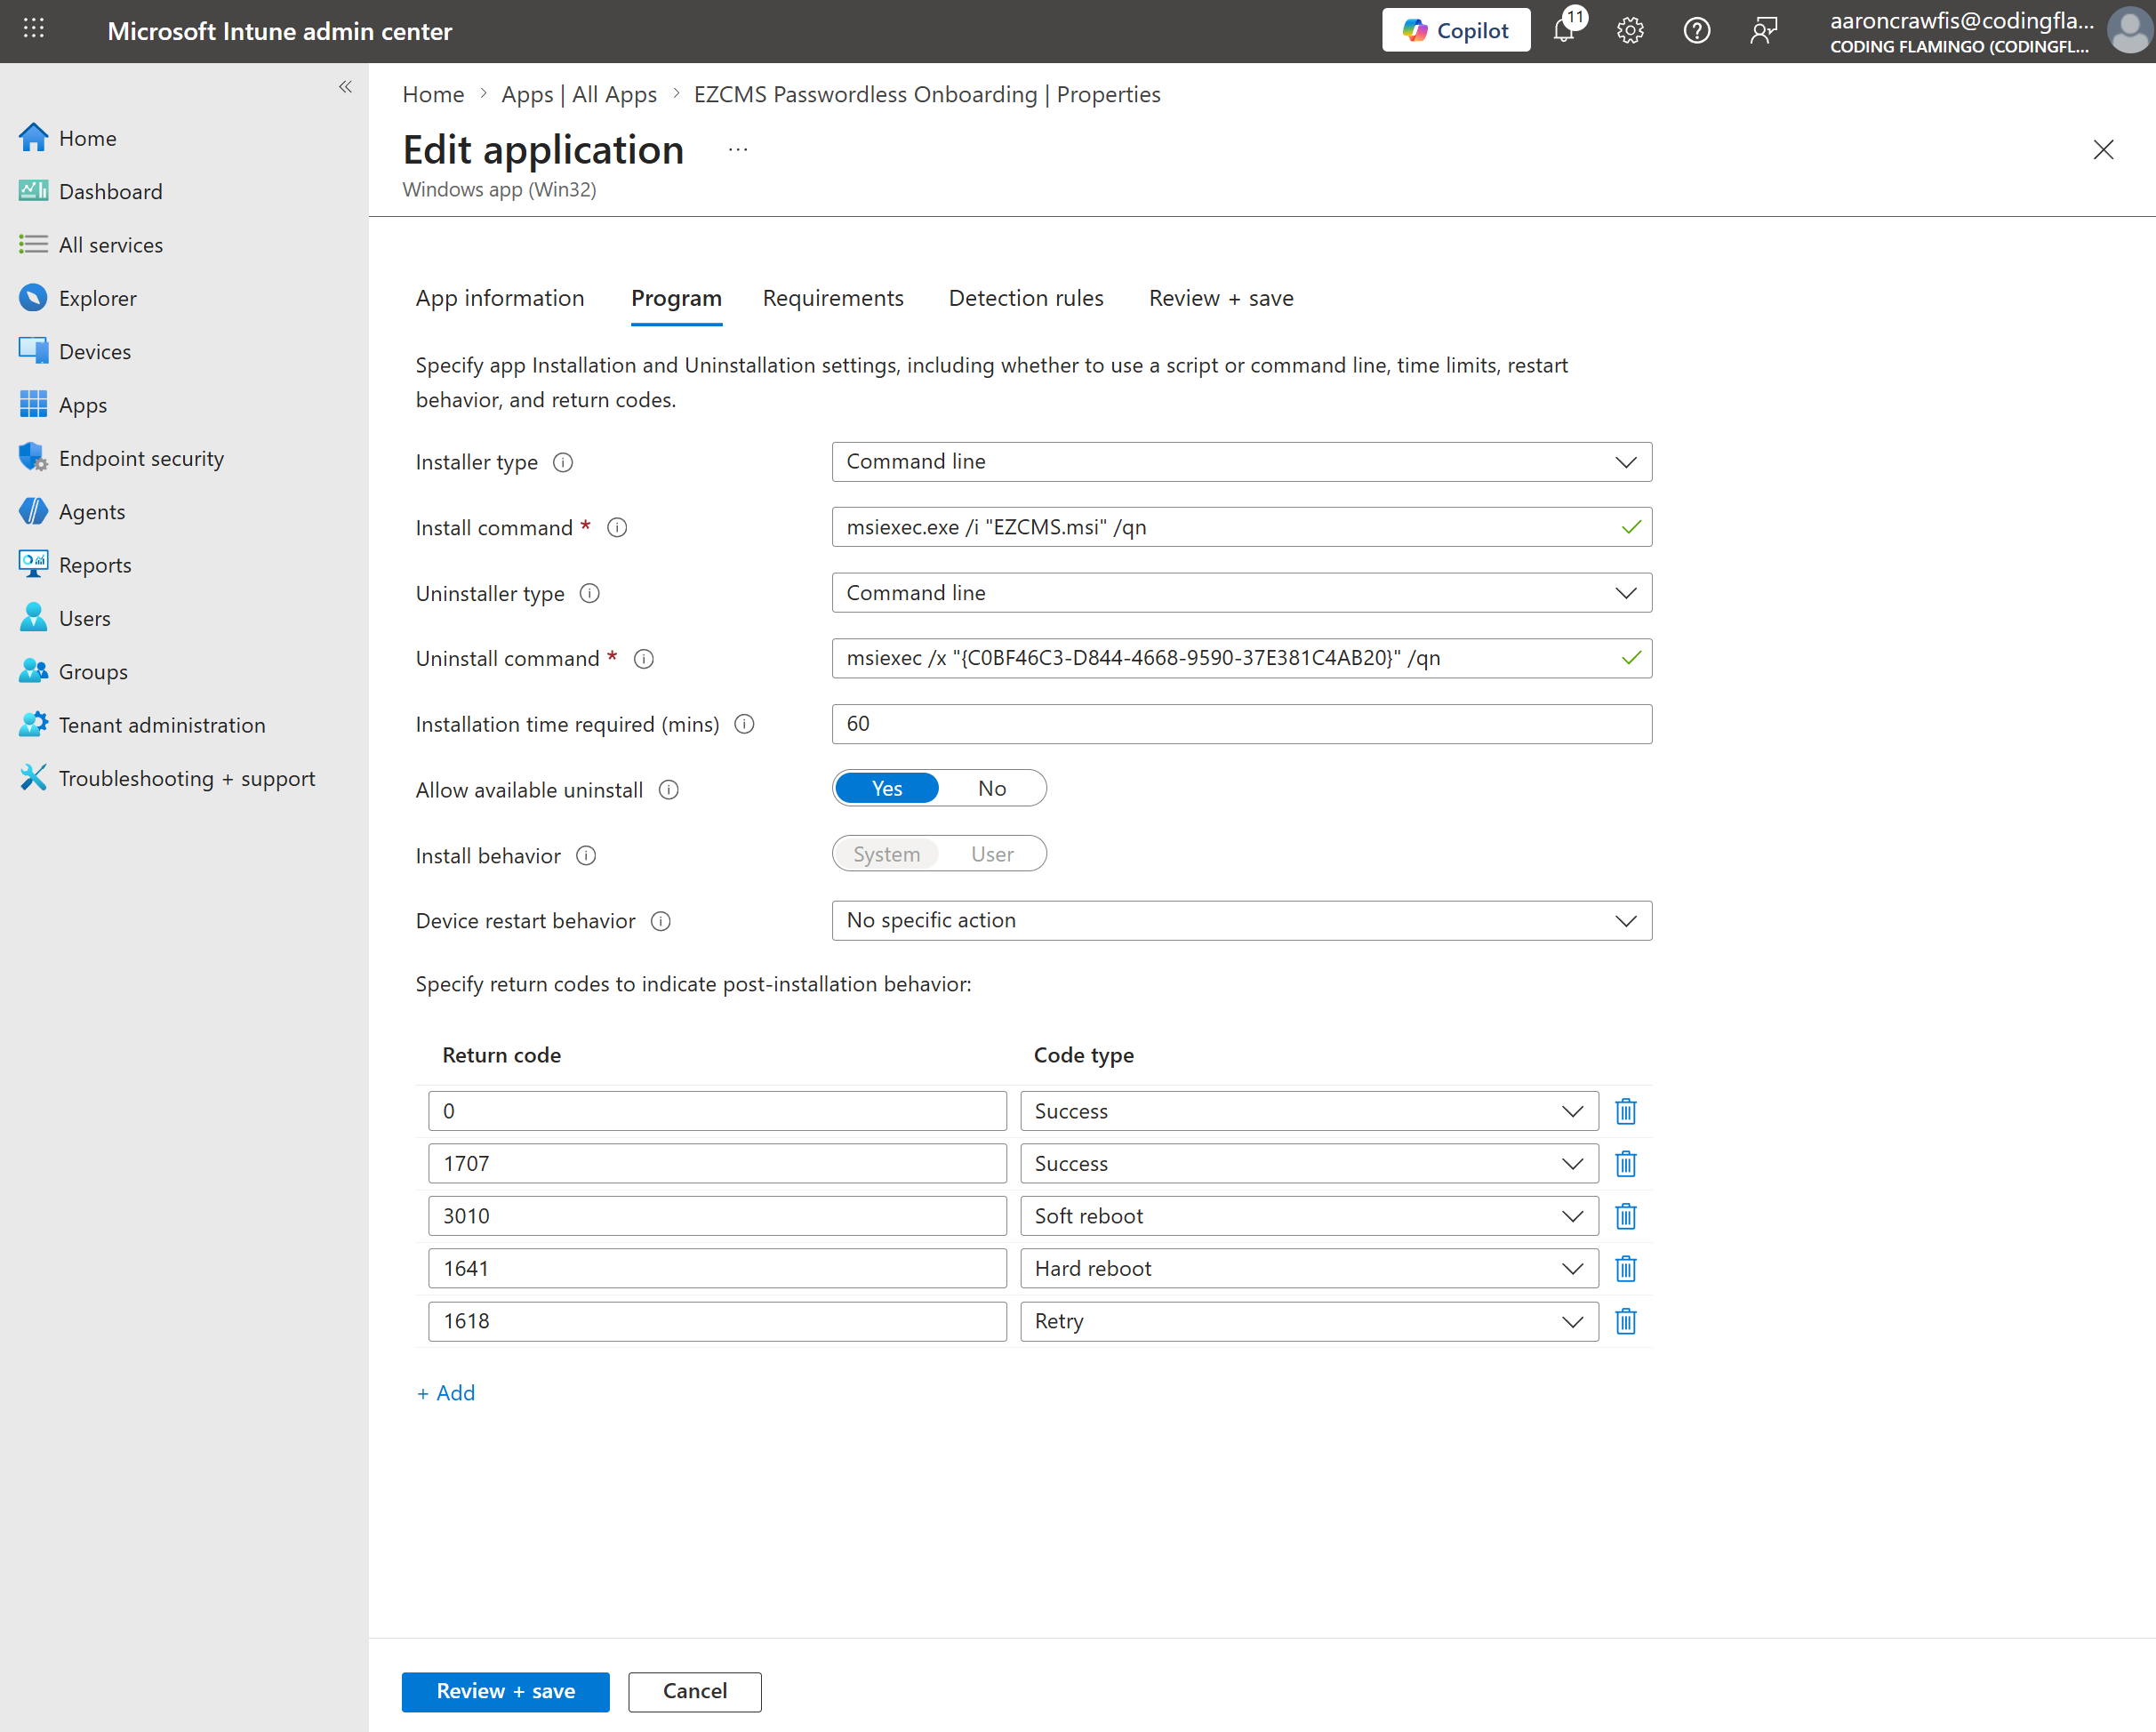
For Program, enter the following commands:
-
Installer type: Select Command line.
-
Install command:
msiexec.exe /i "EZCMS.msi" /qn -
Uninstaller type: Select Command line.
-
Uninstall command: Leave as the default value of
msiexec.exe /x {AppCode} /qn(Intune will automatically replace{AppCode}with the correct product code for the application when it generates the uninstall command). -
installation time required (mins): Leave as the default value of
60minutes. -
Allow available uninstall: Set as desired (this allows users to uninstall the application from their device).
-
Install behavior: Select System to ensure the application is installed with system-level privileges, which is required for the EZCMS application to function properly.
-
Device restart behavior: Select No specific action, as the EZCMS application does not require a device restart after installation.
-
-
Click Next to specify the device requirements.
-
Check operating system architecture: Select No. Allow this app to be installed on all systems.
-
Minimum operating system: Select Windows 10 1903 or later.
-
Disk space required (MB): Enter
256MB to ensure that devices have sufficient disk space to install the application. -
Physical memory required (MB): Enter
512MB to ensure that devices have sufficient memory to run the application.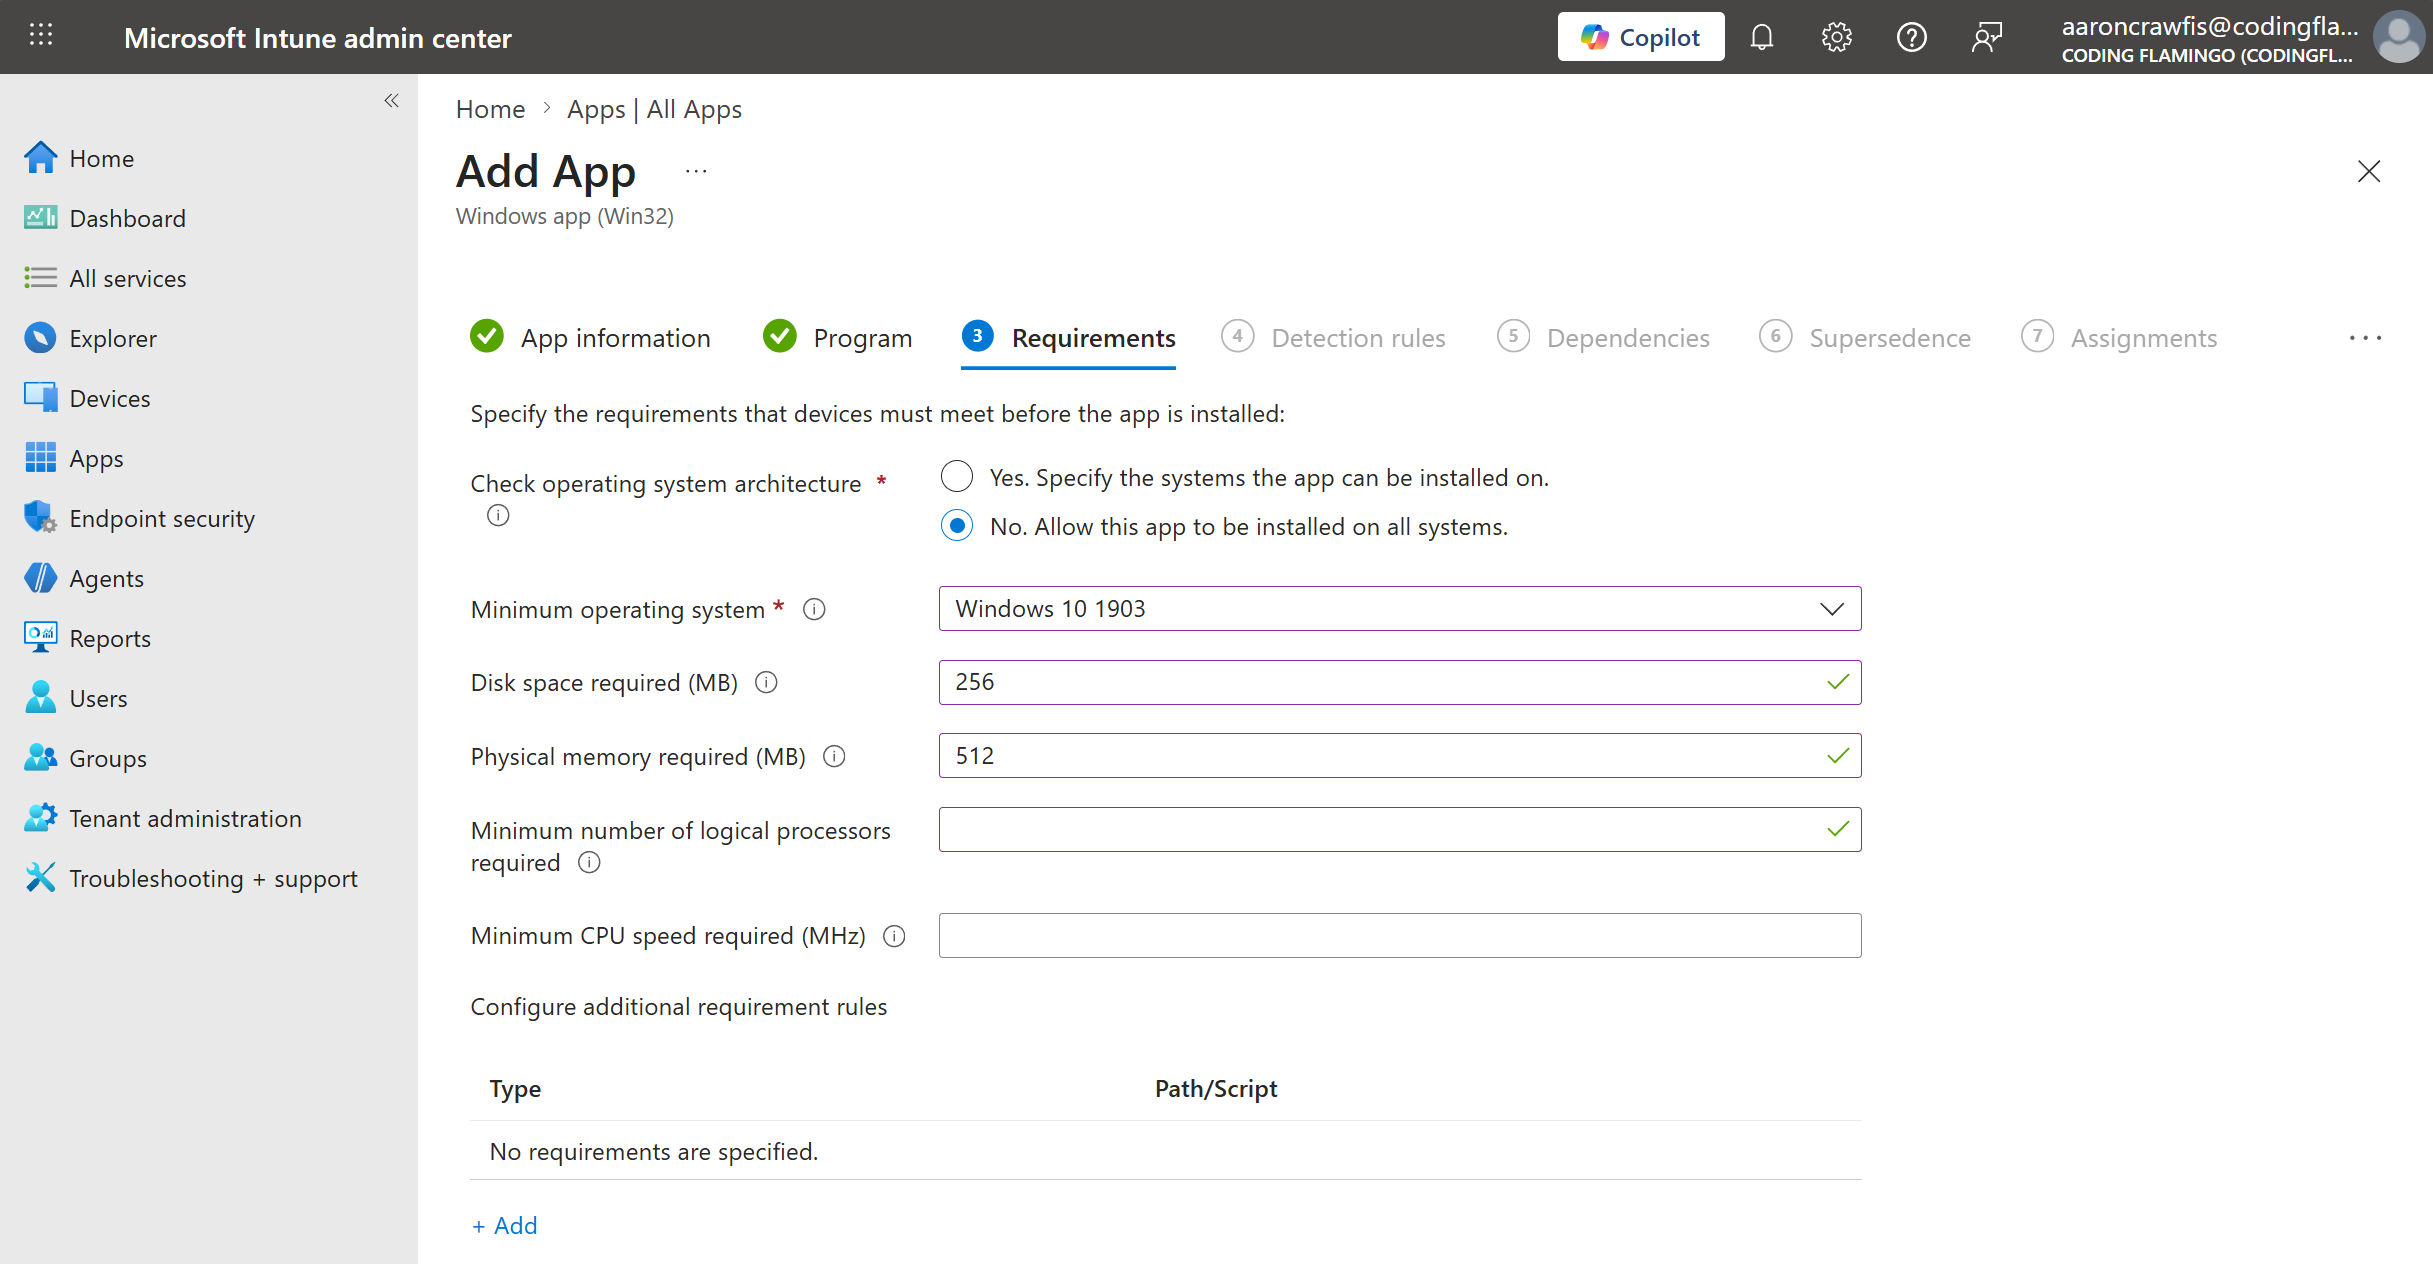
-
-
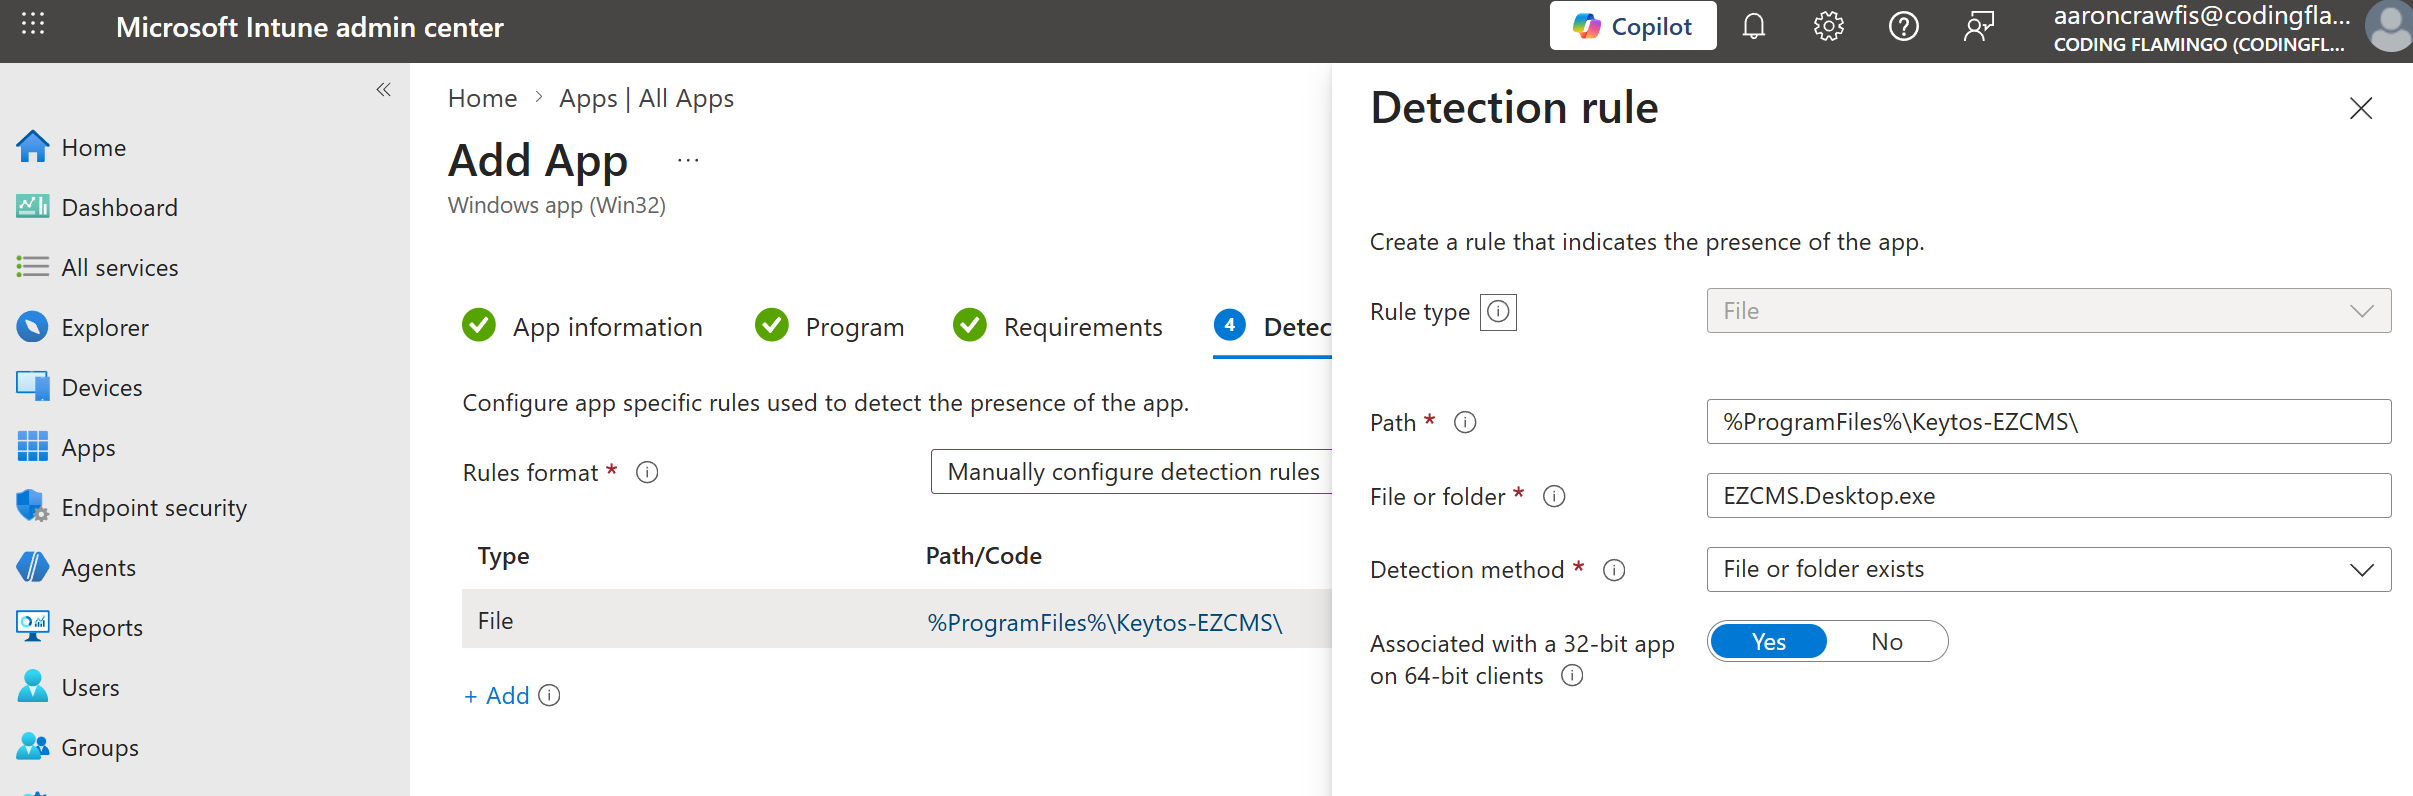
Under Detection rules, drop down the Rules format and select Manually configure detection rules.
-
Click + Add to add a new detection rule with the following configuration:
-
Rule type: Select File.
-
Path: Enter
%ProgramFiles%\Keytos-EZCMS\. -
File or folder: Enter
EZCMS.Desktop.exe. -
Detection method: Select File or folder exists.
-
Associated with a 32-bit app on 64-bit clients: Set to Yes as EZCMS is a 32-bit application and this ensures that the detection rule will work properly on both 32-bit and 64-bit devices.
-
-
Click Ok and then Next to move to the next page.
-
Leave Dependencies blank as the EZCMS application does not have any dependencies that need to be installed before it can be installed. Click Next to move to the next page.
-
Leave Supersedence blank as the EZCMS application is not replacing any existing applications on your users’ devices. Click Next to move to the next page.
-
Set your Assignments to specify which users or devices should receive the EZCMS application. You can assign the application to all users, all devices, or specific groups of users or devices within your organization. Choose the assignment strategy that best fits your organization’s needs and click Next to move to the next page.
-
Review your new Intune application and click Create to finish creating the application and distributing it to your users.
-
Your users will now receive the EZCMS application on their devices based on the assignment strategy you chose in the previous step.
-
Navigate to the Intune Admin Center and sign in with your administrator account.
-
Select Apps > All apps > Create to create a new application.
-
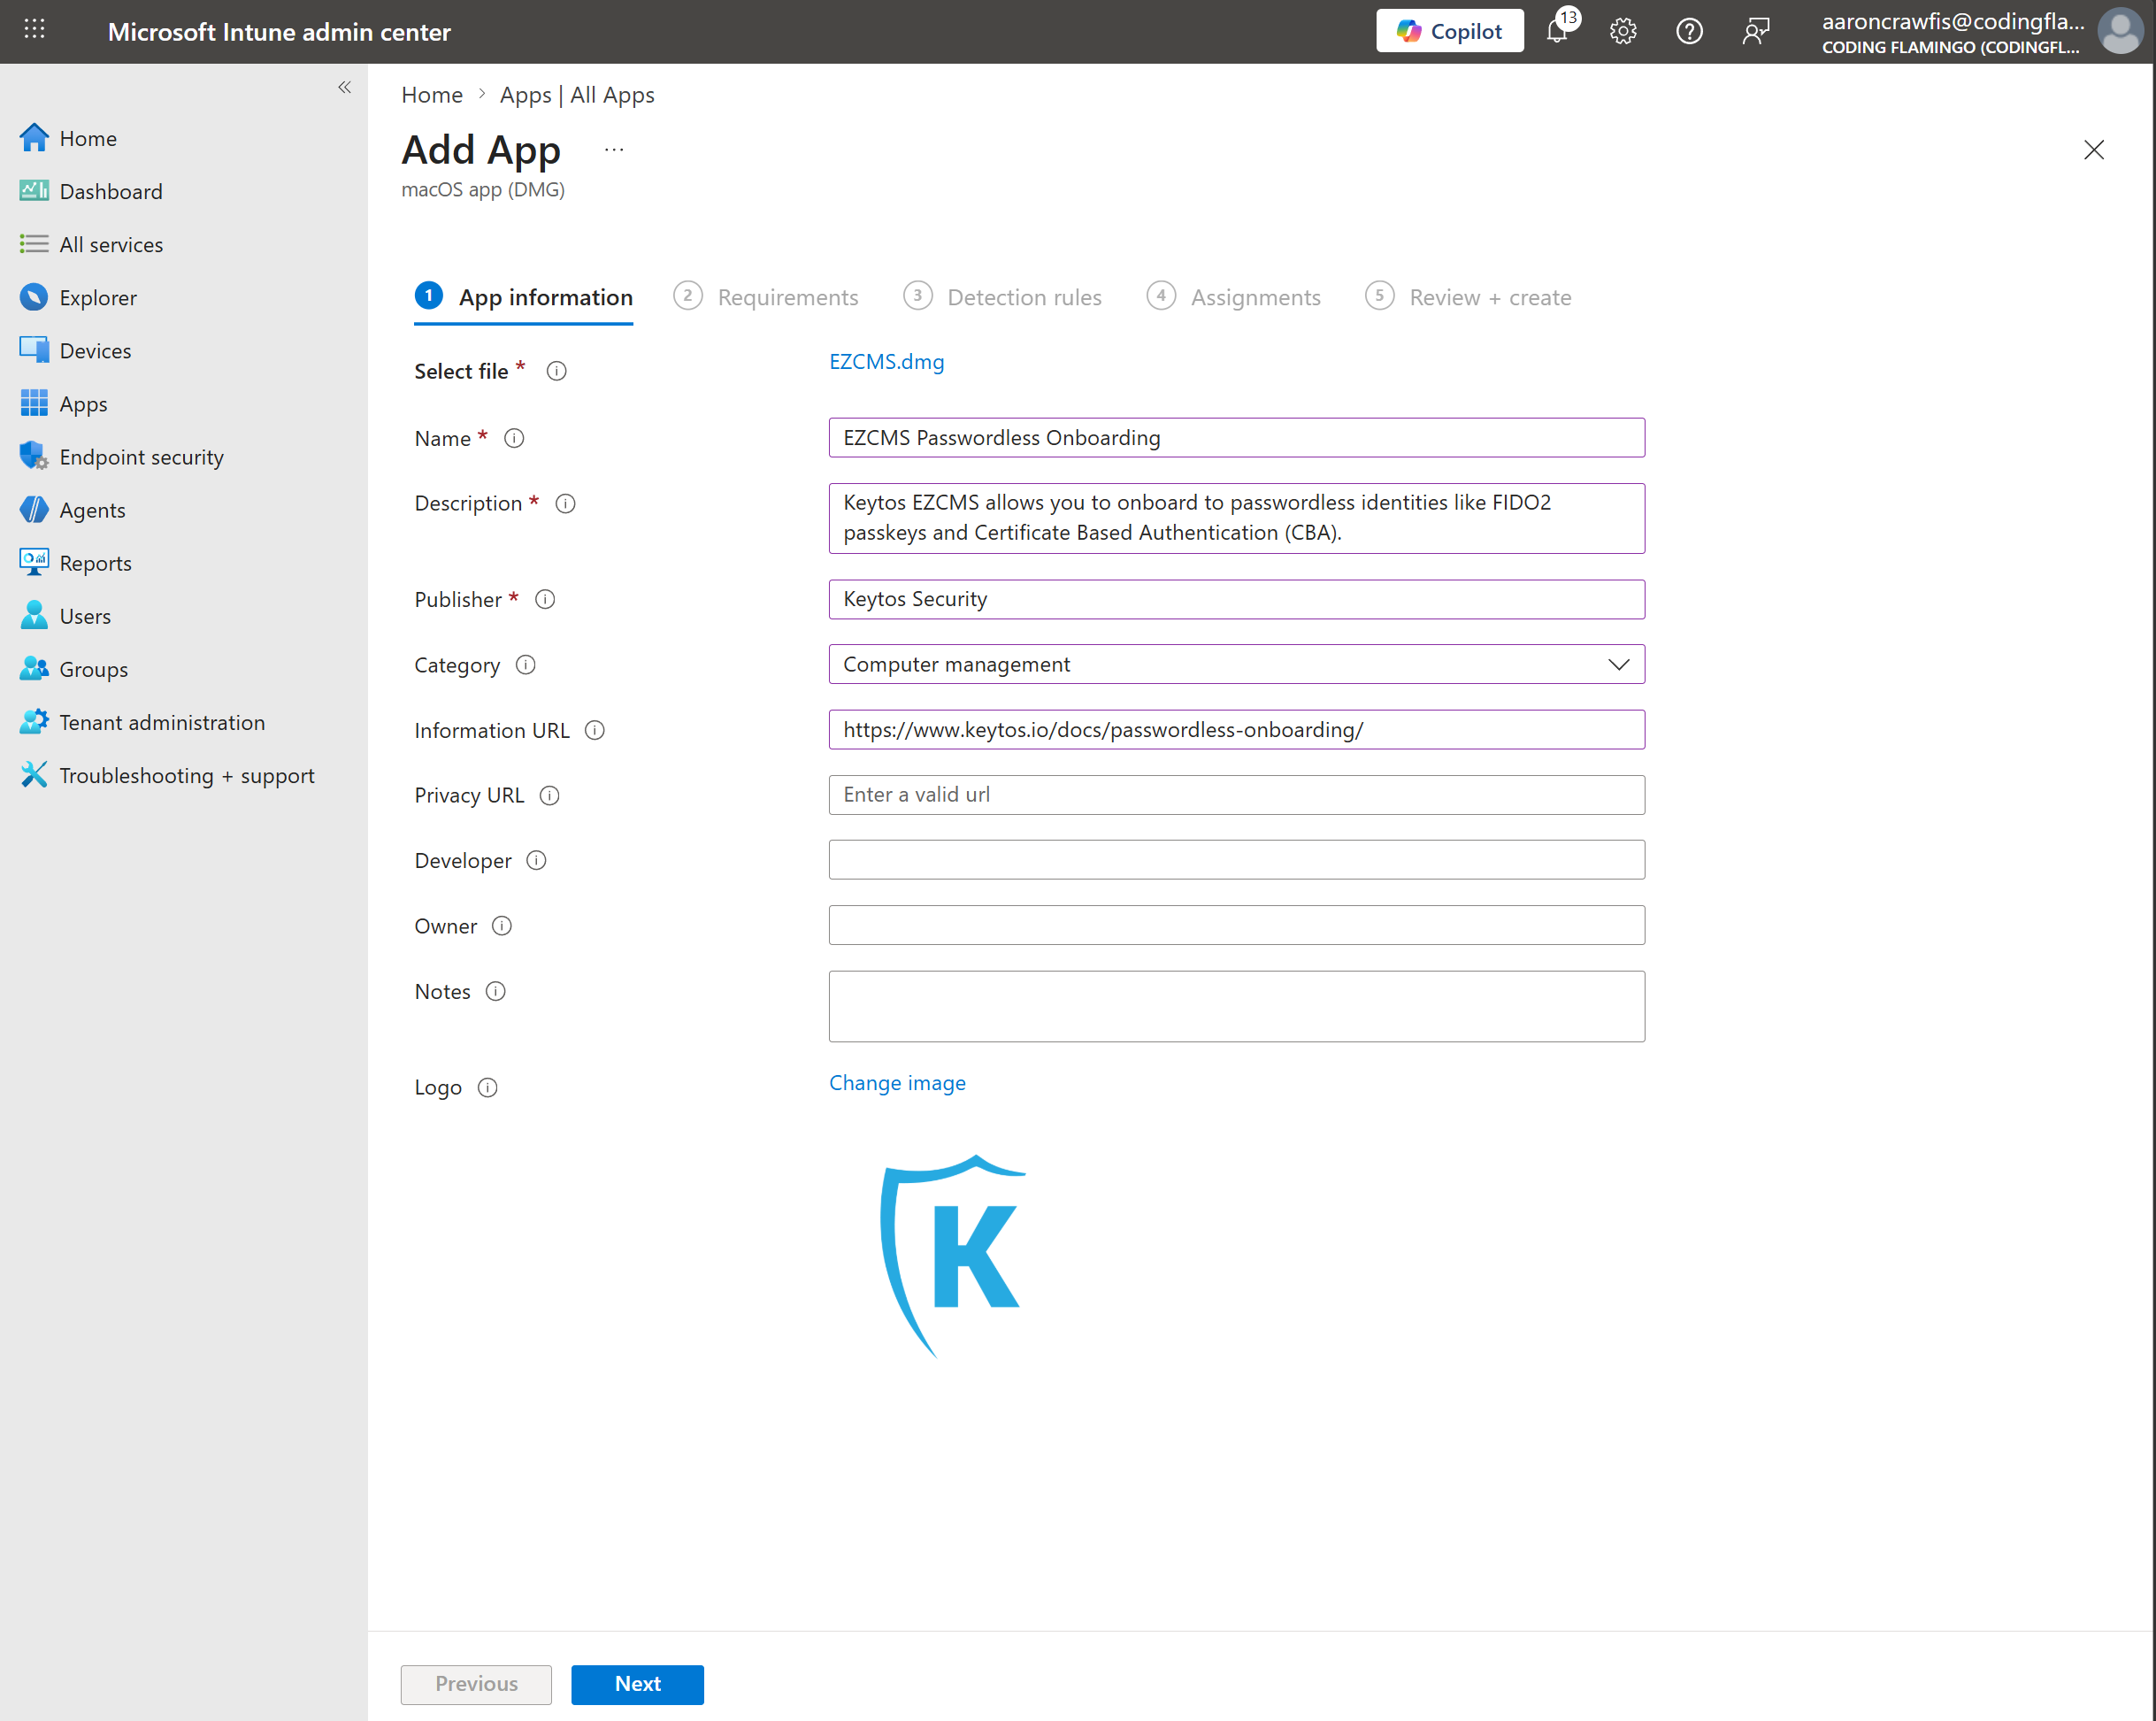
For App type, select macOS app (DMG) and click Select.
-
Click Select app package file and upload the .dmg file that you downloaded in Step 1.
-
Fill out the remaining App information fields as desired, such as the name, description, publisher, etc. Then click Next.
-
You can download a Logo for the EZCMS application from this link and use it as the logo for the application in Intune if you wish.
-
-
For Requirements > Minimum operating system, select macOS Sonoma 14.0 or later. Click Next to move to the next page.
-
For Detection rules:
-
Ignore app version: Leave as Yes.
-
App bundle ID (CFBundleIdentifier): Enter
com.keytos.ezcms. -
App version (CFBundleShortVersionString): Set to
2.1.24.0(since Ignore app version is set to Yes, the specific version number does not matter, but you must enter a value for this field).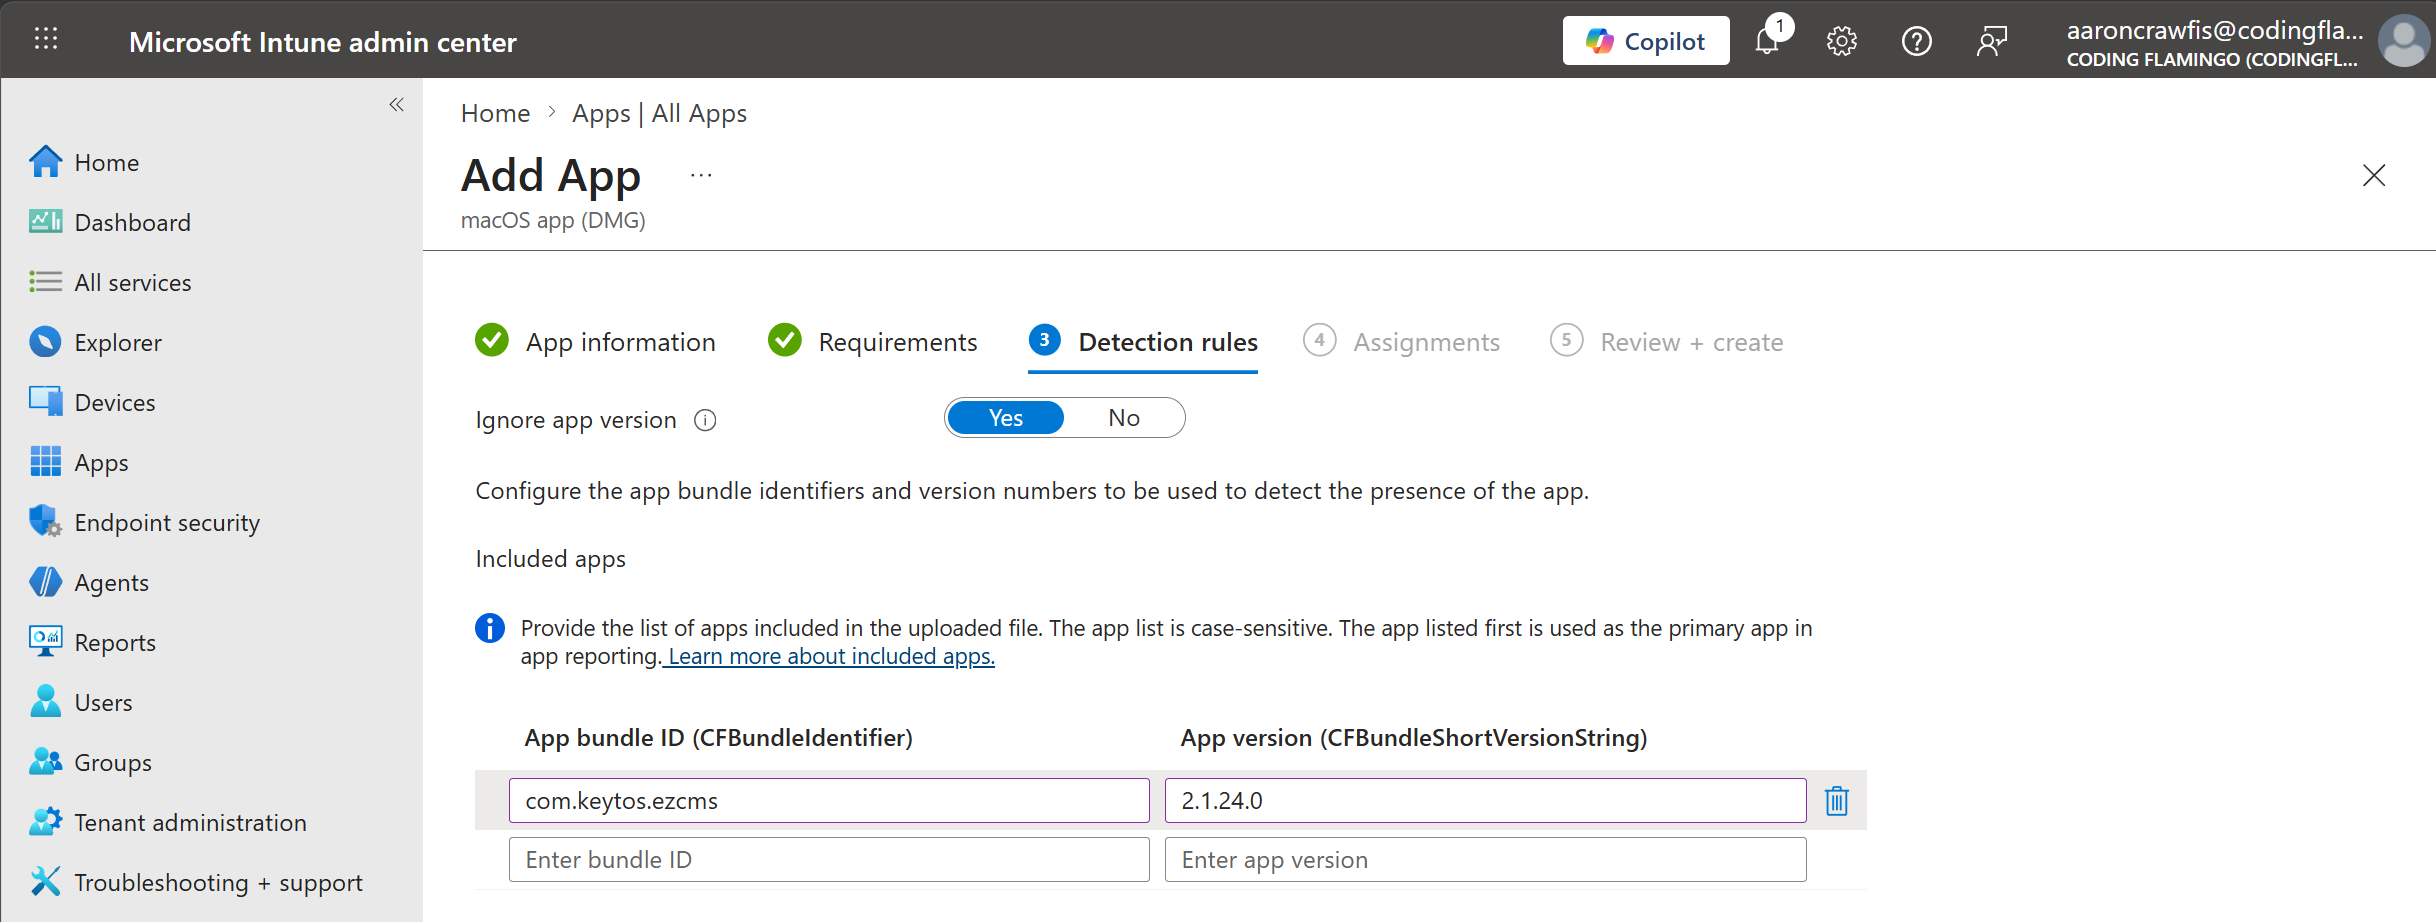
-
-
Click Next to move to the next page.
-
Under Assignments, specify which users or devices should receive the EZCMS application. You can assign the application to all users, all devices, or specific groups of users or devices within your organization. Choose the assignment strategy that best fits your organization’s needs and click Next to move to the next page.
-
Review your new Intune application and click Create to finish creating the application and distributing it to your users.
-
Your users will now receive the EZCMS application on their devices based on the assignment strategy you chose in the previous step.
How to Run EZCMS Using Standard User Privileges Using Intune Endpoint Privilege Management
On Windows devices, EZCMS requires elevated privileges to launch and interact with your hardware security keys. This means at application launch users will be prompted to run the application with administrator privileges. However, not all organizations provide administrator privileges to their users and instead run as a standard user for day-to-day operations.
Intune Endpoint Privilege Management (EPM) is an Intune add-on which allows your users to run as standard, low-privilege users while still allowing them to run specific applications with elevated privileges when needed. If your organization uses Intune EPM, you can configure the EZCMS application to run with elevated privileges to allow your standard user accounts to use the application without needing to have administrator privileges all the time.
Note that Intune Endpoint Privilege Management is an add-on to Microsoft Intune and requires an add-on or full Intune Suite license to use. Please consult with your Microsoft representative to ensure that your organization has the necessary licenses to use Intune Endpoint Privilege Management.
Follow these steps to configure the EZCMS application to run with elevated privileges using Intune Endpoint Privilege Management.
Prerequisites for Configuring Intune Endpoint Privilege Management
Before you can configure Intune Endpoint Privilege Management to allow the EZCMS application to run with elevated privileges, make sure you have the following prerequisites in place:
- You have deployed Intune Endpoint Privilege Management in your environment.
- You have deployed the EZCMS application to your users via Intune as described in the previous steps of this guide.
How to Configure Intune Endpoint Privilege Management for the EZCMS Application
By far the easiest way to configure Intune Endpoint Privilege Management to allow the EZCMS application to run with elevated privileges is to use the Automatic configuration option within Intune Endpoint Privilege Management.
-
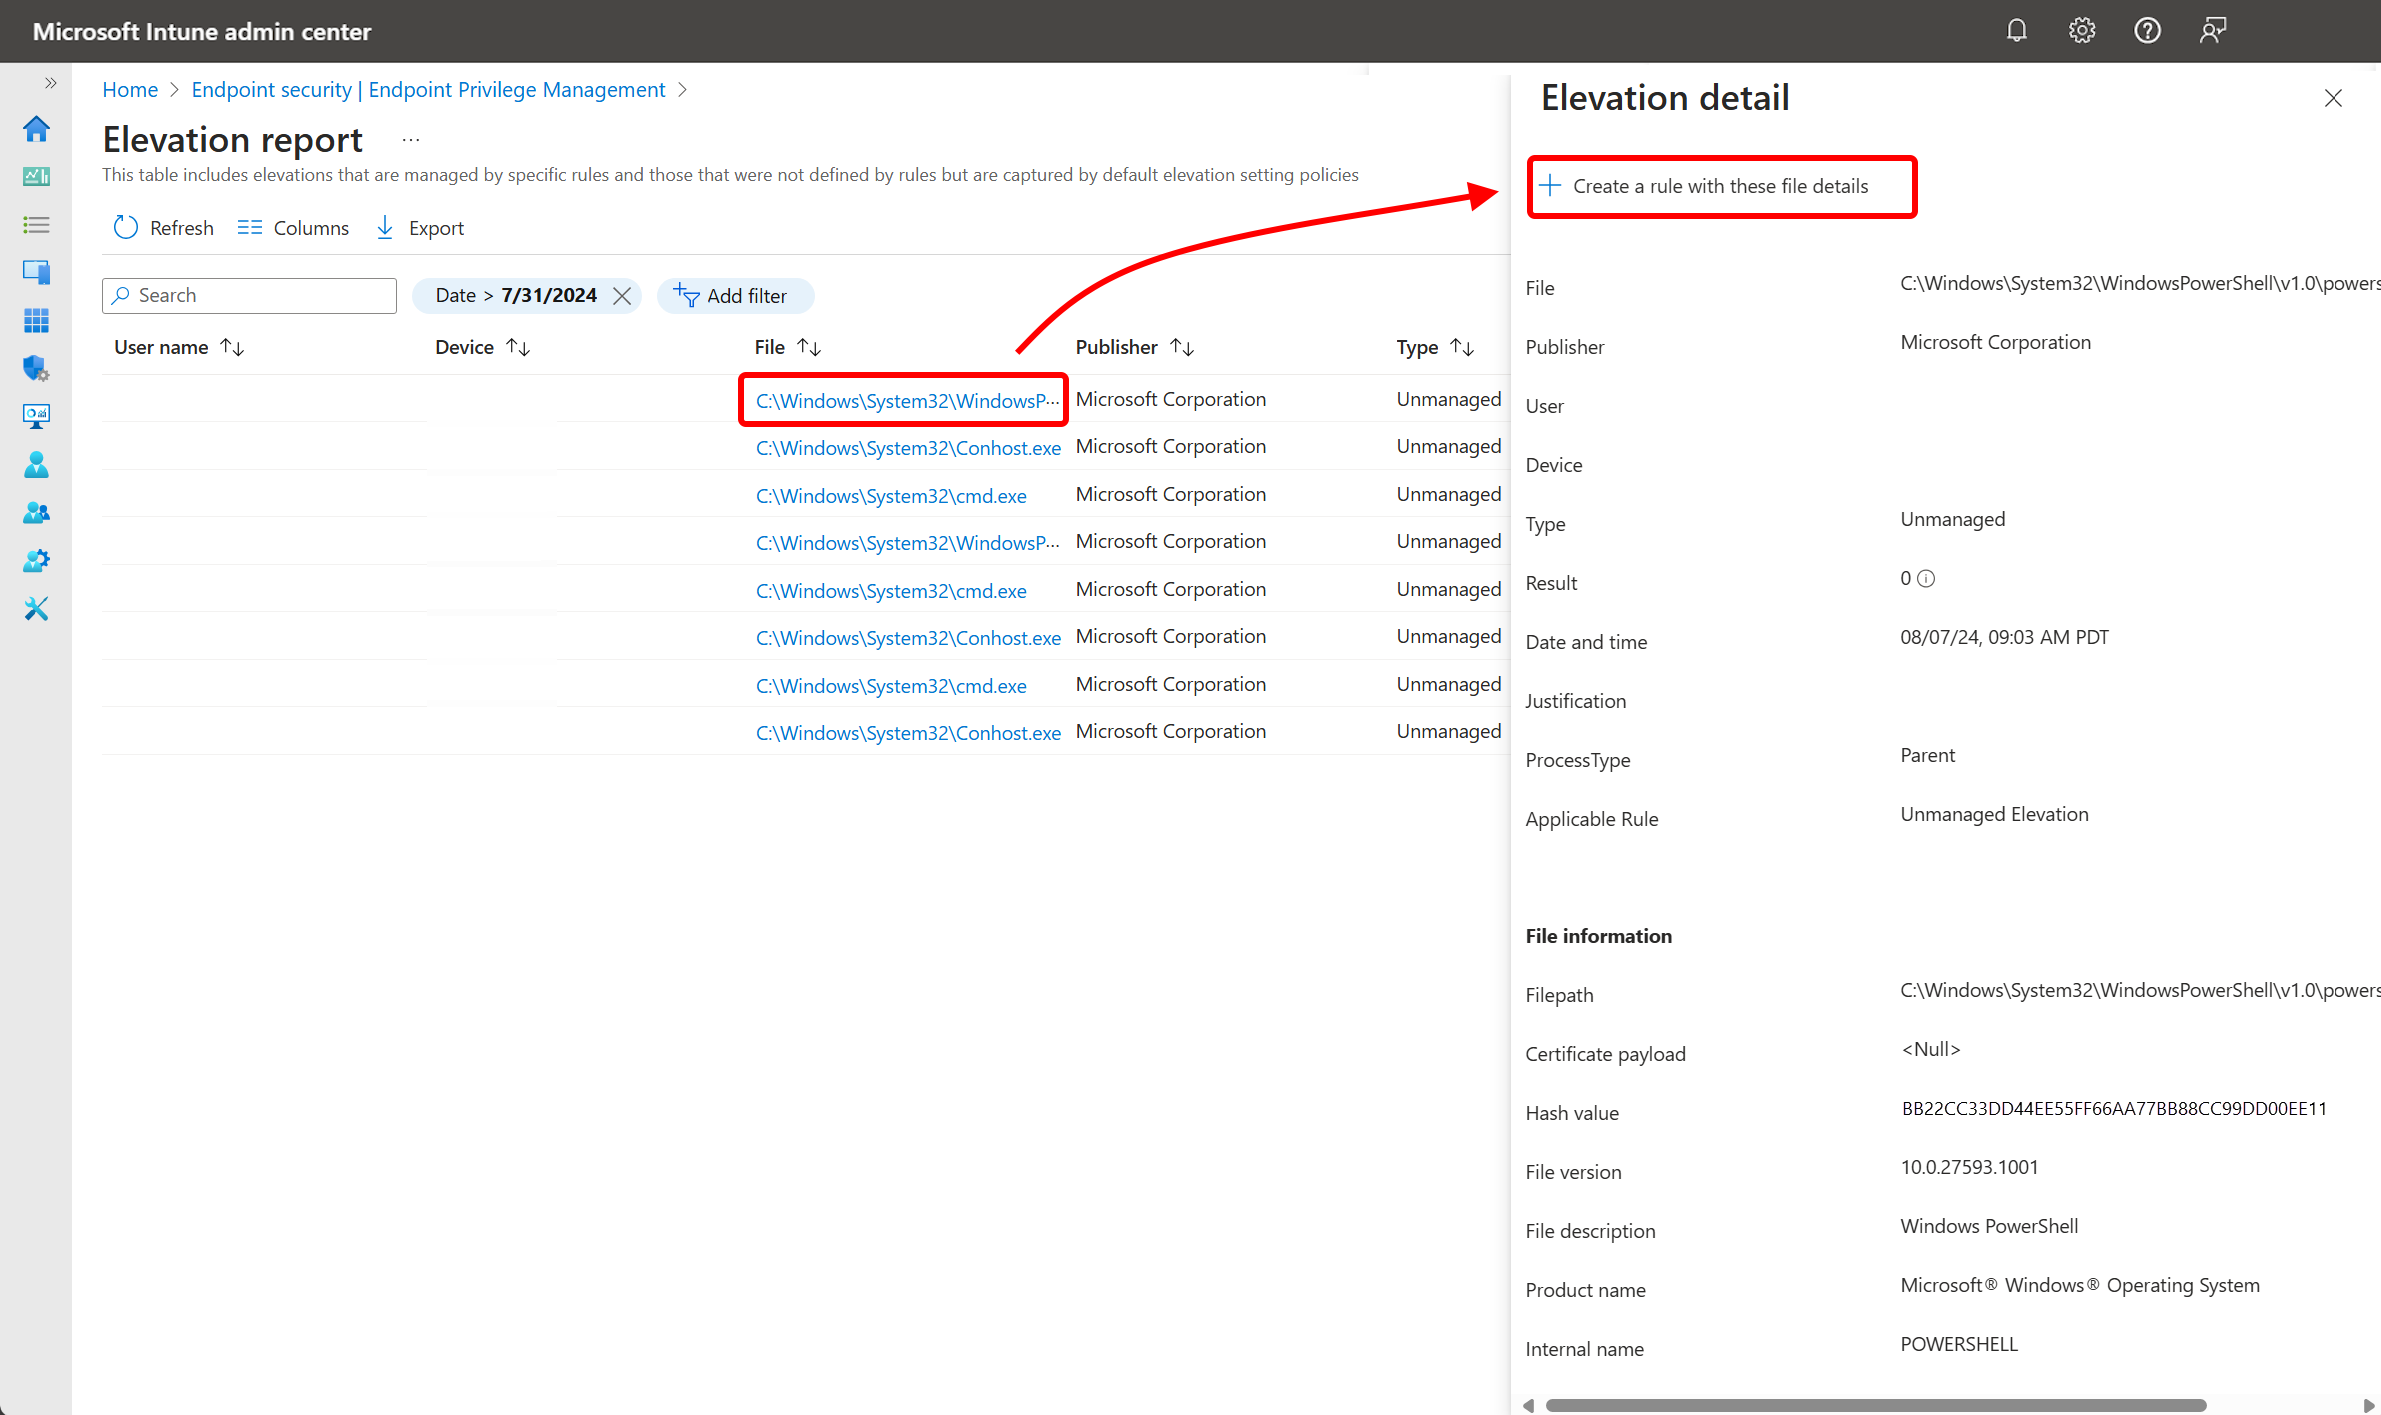
Using a standard user account on a device that has Intune Endpoint Privilege Management deployed, launch the EZCMS application. You will be prompted to allow the application to run with administrator privileges. Enter a business justification and click Send.
-
Within the Elevation report in the Intune Admin Center, find the elevation event for the EZCMS application that you just sent and click on the File link within the details of the elevation event.
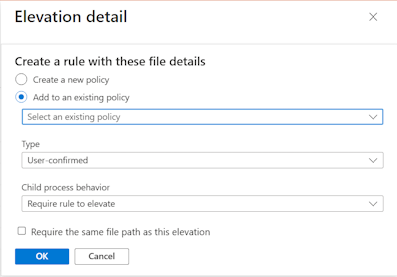
-
Click + Create a rule with these file details to create a new Intune Endpoint Privilege Management rule for the EZCMS application with the correct file details automatically filled in.
-
Follow the prompts to create the new Endpoint Privilege Management rule, ensuring that you set the elevation Type to User confirmed to allow users to run the EZCMS application with elevated privileges after confirming a prompt. Once you have completed the prompts, save the new rule.