How-To: Issue SCEP Certificates in NinjaOne on Windows
Overview - Issuing SCEP Certificates with NinjaOne on Windows
In this guide, we will walk through the steps to configure NinjaOne to issue SCEP certificates from your EZCA SCEP CA to Windows devices using the EZCA Certificate Renewal Client. At a high level you will:
- Configure your EZCA SCEP CA to use a static SCEP challenge.
- Store your EZCA SCEP CA parameters (SCEP Endpoint URL, SCEP Challenge, CA Certificates, and CA Authority Subject Key Identifier) as NinjaOne custom fields.
- Create NinjaOne Automation Scripts to deploy CA certificates and request SCEP certificates from your EZCA SCEP CA.
- Create NinjaOne Scheduled Automations to run your scripts on a regular basis to ensure devices always have the necessary CA certificates installed and have a valid SCEP certificate issued from your EZCA SCEP CA.
Let’s get started!
How to Configure NinjaOne to Issue SCEP Certificates on Windows - Video Tutorial
Check out the video tutorial below for a step-by-step walkthrough of how to configure NinjaOne to issue SCEP certificates on your Windows devices from your EZCA SCEP CA!
How to Configure NinjaOne to Issue SCEP Certificates on Windows - Step-by-Step Guide
The following steps will guide you through the process of configuring NinjaOne to issue SCEP certificates to your Windows devices from your EZCA SCEP CA.
Prerequisites for Configuring NinjaOne with SCEP
- You will need a NinjaOne account with the appropriate permissions to create and deploy policies and scripts.
- You will need an EZCA SCEP CA set up and ready to issue certificates.
Step 1: How to Create Organization-Level Custom Fields in NinjaOne
To issue SCEP certificates in NinjaOne, you will need to store your EZCA SCEP Endpoint URL, SCEP Challenge, CA Certificates, and CA Authority Subject Key Identifier (SKI) in custom fields at the organization level. This allows you to easily reference these values in your script when requesting certificates from your SCEP CA. You can also override these values at a site or device level if needed, but for most use cases, organization-level custom fields should suffice.
-
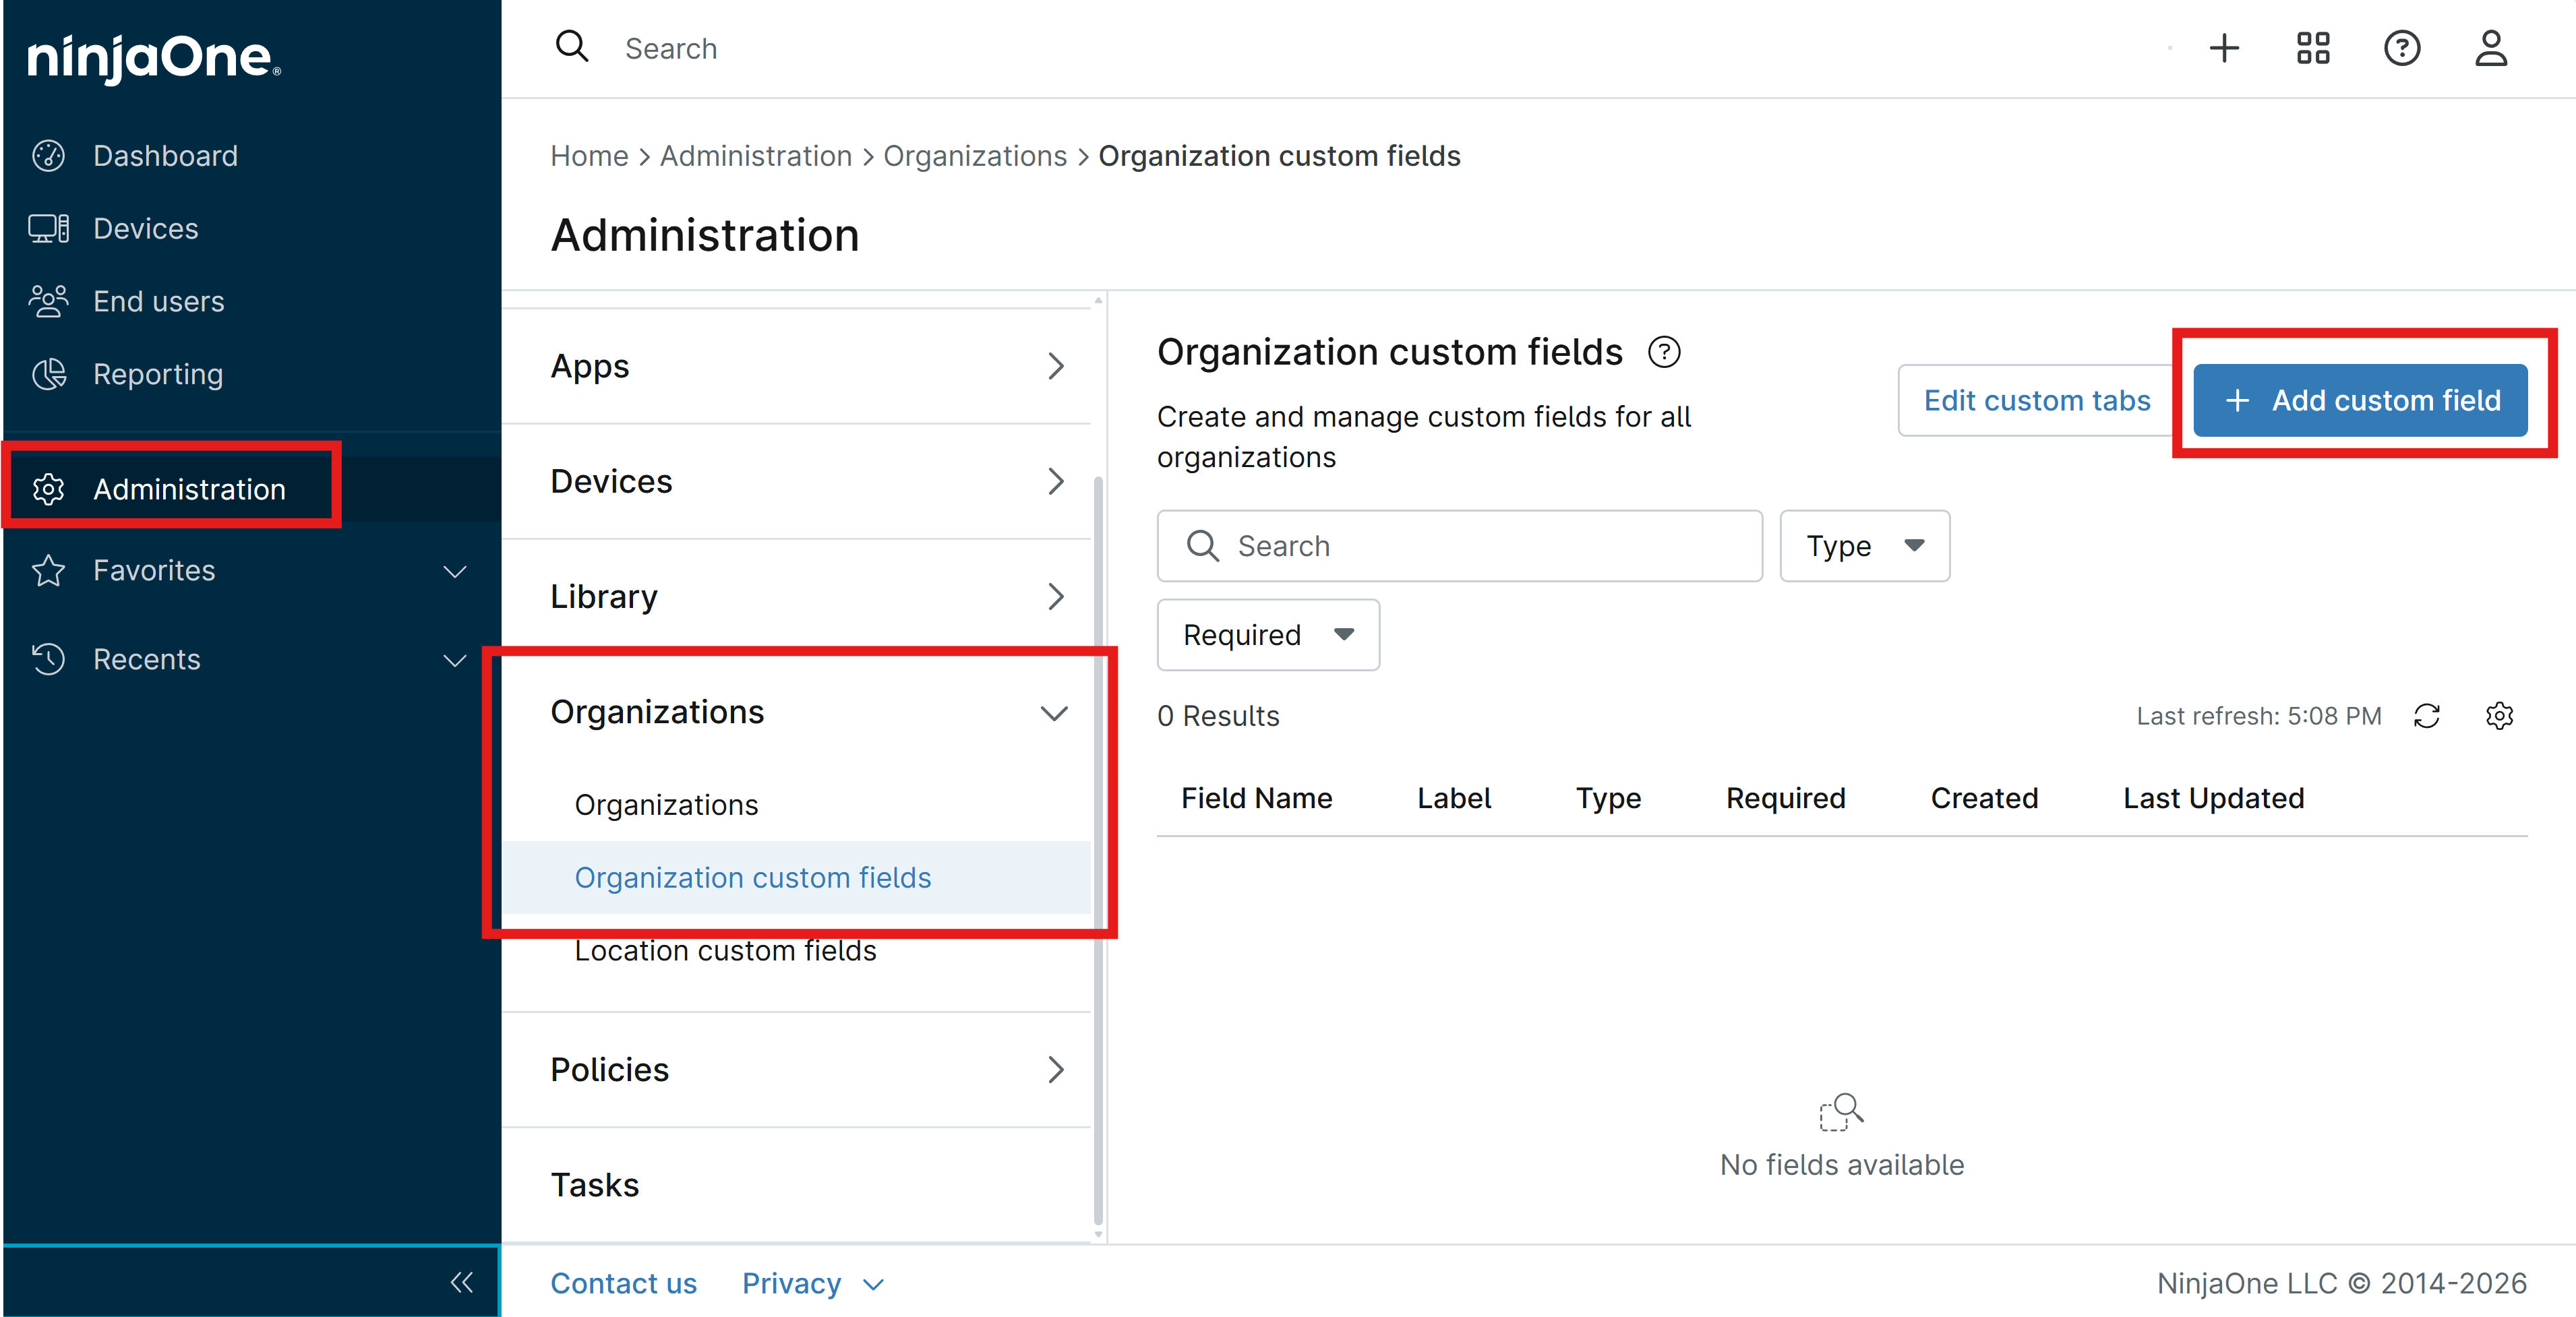
Log in to your NinjaOne portal and navigate to Administration > Organizations > Organization custom fields.
-
Click on the + Add Custom Field button.
-
Refer to the table below for the Custom field type, Label, and Name of each custom field you need to create.
-
Under the Permissions section, set the following:
- For Automations, set this to Read Only.
- For API, set this to None (unless you want to use the API to populate this field, in which case you can set this to Read/Write).
- For Technician access, set this to Editable (unless you want to restrict this field from being edited by technicians, in which case you can set this to Read Only or None).
-
Under the Details section, set the Description to the value in the table below (or a description of your choice).
-
Click on the Submit button to create the custom field.
| Label | Name | Type | Description |
|---|---|---|---|
| EZCA SCEP Endpoint | ezcaScepEndpoint | Text | The URL of the EZCA SCEP Endpoint |
| EZCA SCEP Challenge | ezcaScepChallenge | Secure | The static challenge for the EZCA SCEP CA, if applicable |
| EZCA CA Certificates | ezcaCaCertificates | Multi-line | The CA certificate(s) for the EZCA SCEP CA, in PEM format with -----BEGIN CERTIFICATE----- and -----END CERTIFICATE----- delimiters. If you have a separate Root CA and SCEP Subordinate CA, include both certificates concatenated together in this field, with the SCEP Subordinate CA certificate first followed by the Root CA certificate. |
| EZCA Authority Subject Key | ezcaAuthoritySubjectKey | Text | The Subject Key Identifier (SKI) of the CA certificate, used to identify which CA to request from or renew with. Retrieved from EZCA > Certificate Authorities > View Requirements > Advanced Settings |
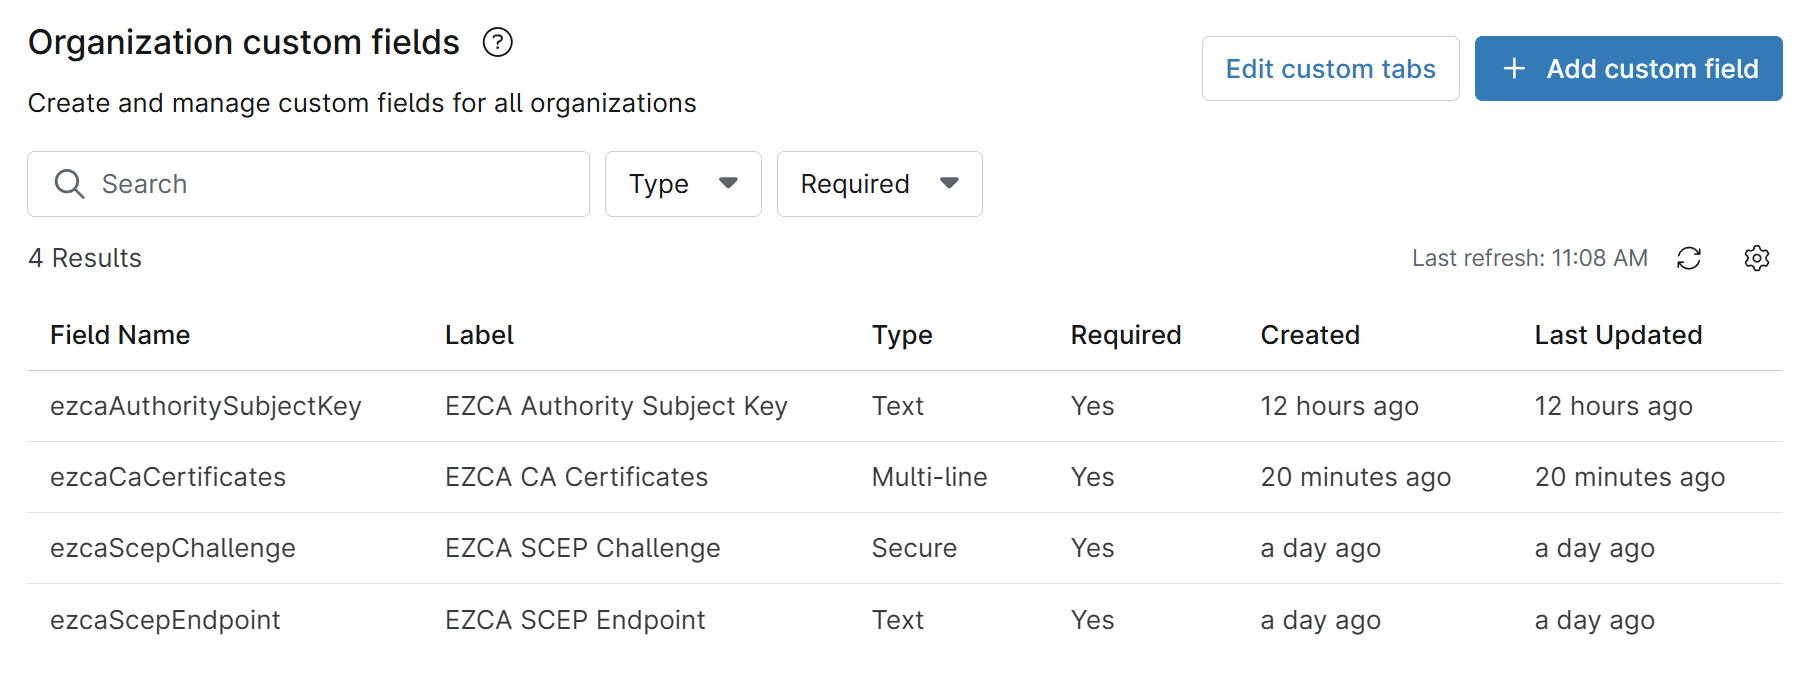
You should now have a completed list of custom fields that looks like:
Step 2: How to Download Your Root and/or SCEP CA Certificates from EZCA
To establish trust for your SCEP certificates, you will need to download and push the CA certificate(s) for your SCEP CA to your devices. Let’s start by downloading each of the CA certificates in your PKI hierarchy from the EZCA portal. If you just have a single Root CA that is also your SCEP CA, you will just need to download that one CA certificate. If you have a separate Root CA and SCEP Subordinate CA, you will need to download both the Root CA certificate and the SCEP Subordinate CA certificate.
-
Navigate to your EZCA portal and sign in as a PKI Administrator.
-
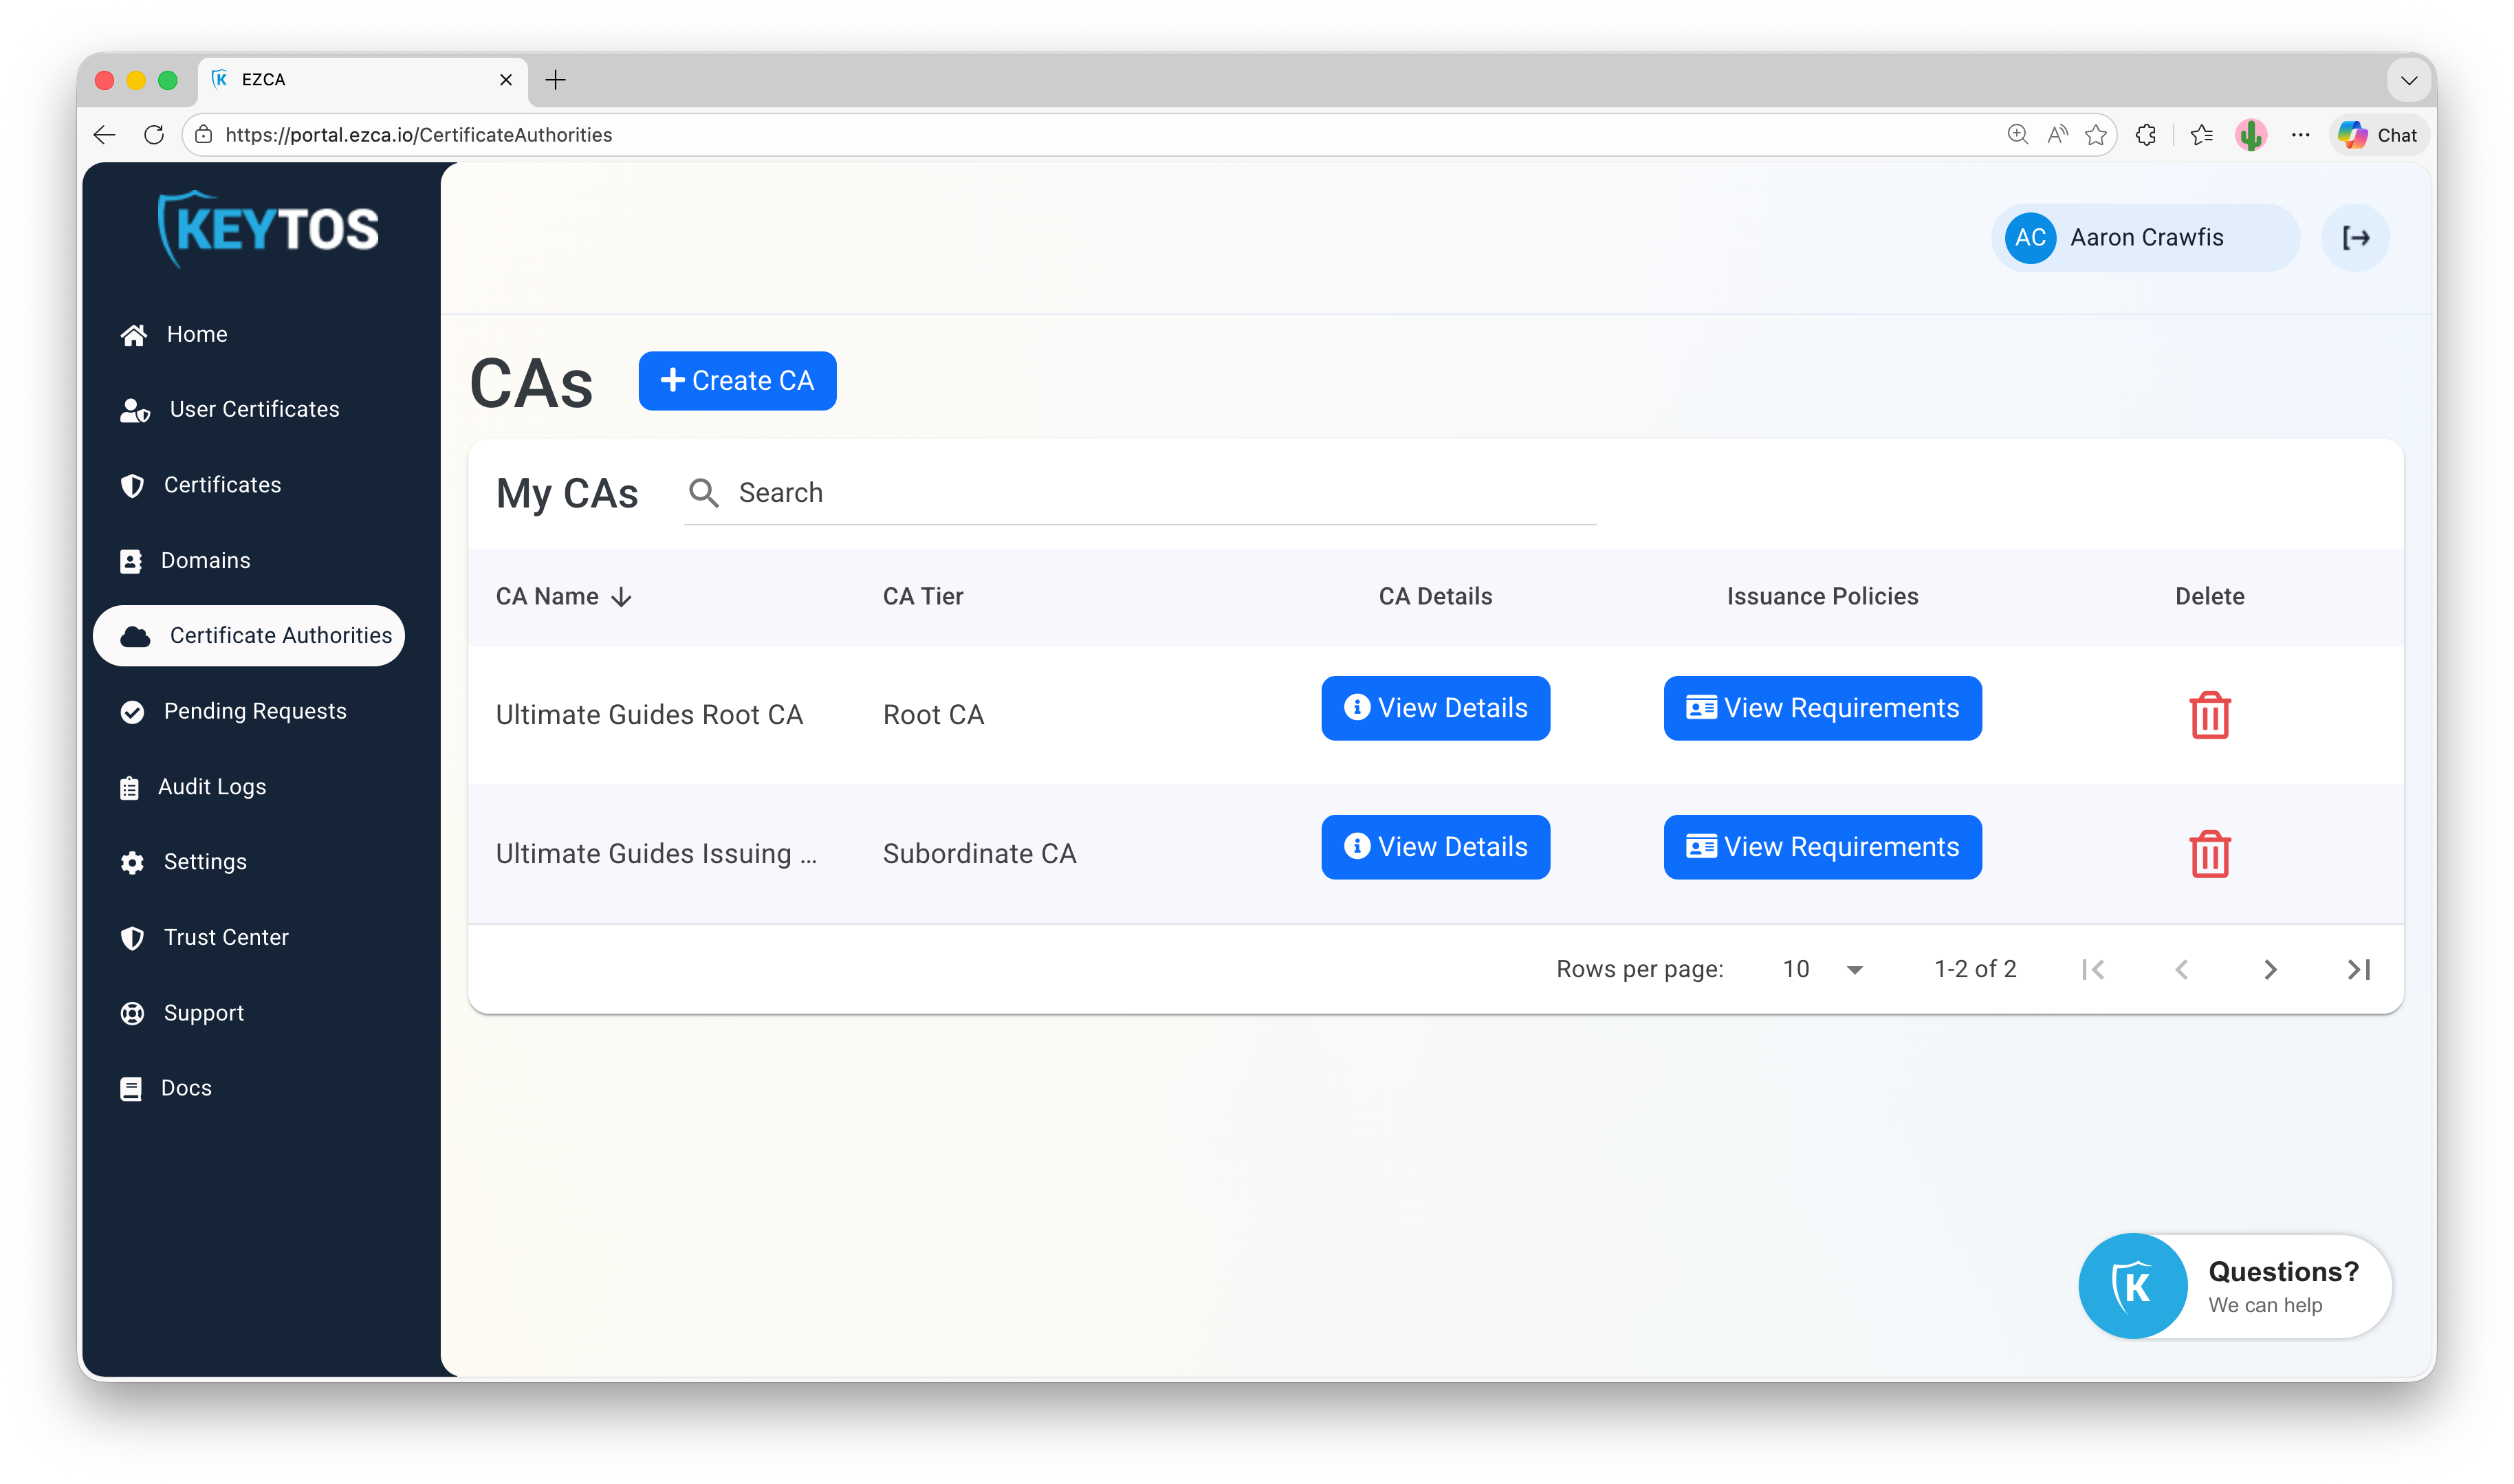
Click on the Certificate Authorities tab and scroll to your SCEP CA.
-
Click on the View Details button for your SCEP CA.
-
Scroll down to the CA Locations section and click on the Download Certificate button for your CA.

-
If your SCEP CA is a subordinate CA, repeat the process to download the root CA certificate as well.
-
Keep these certificate files handy, as you will need to copy and paste their contents into the custom field you created in NinjaOne to store your CA certificates in an upcoming step.
-
Switch back over to your NinjaOne portal and navigate to Dashboard > Overview > Organizations > [Your Organization]

-
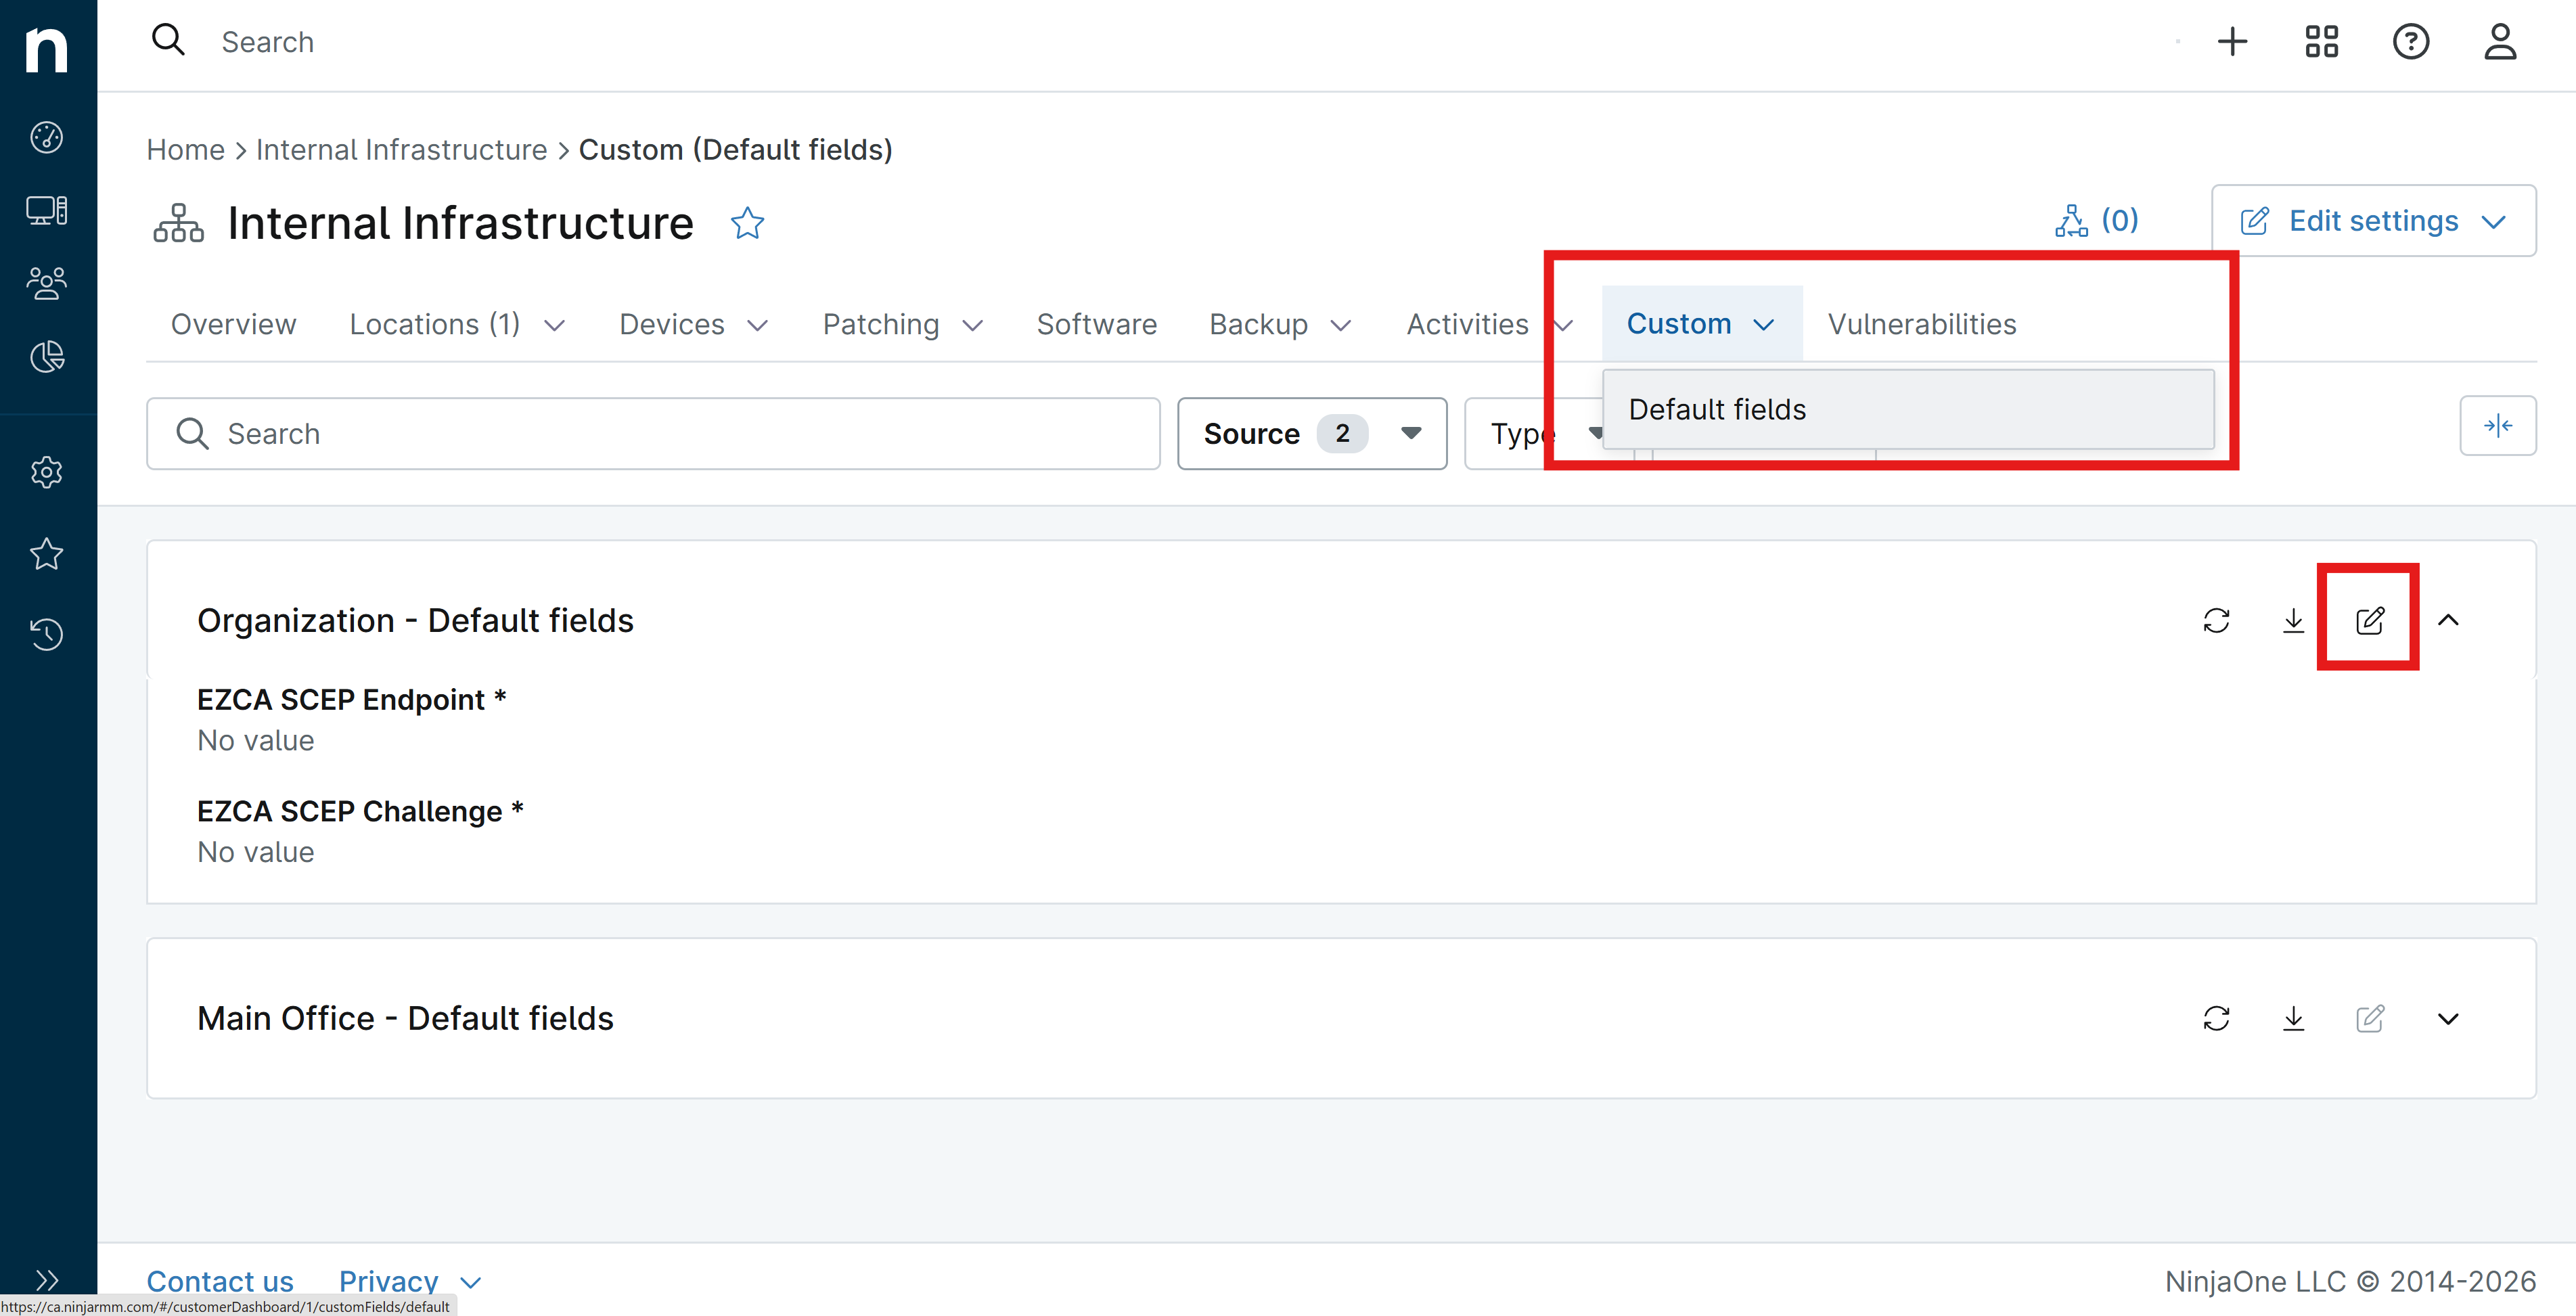
Hover over the Custom tab and select Default fields
-
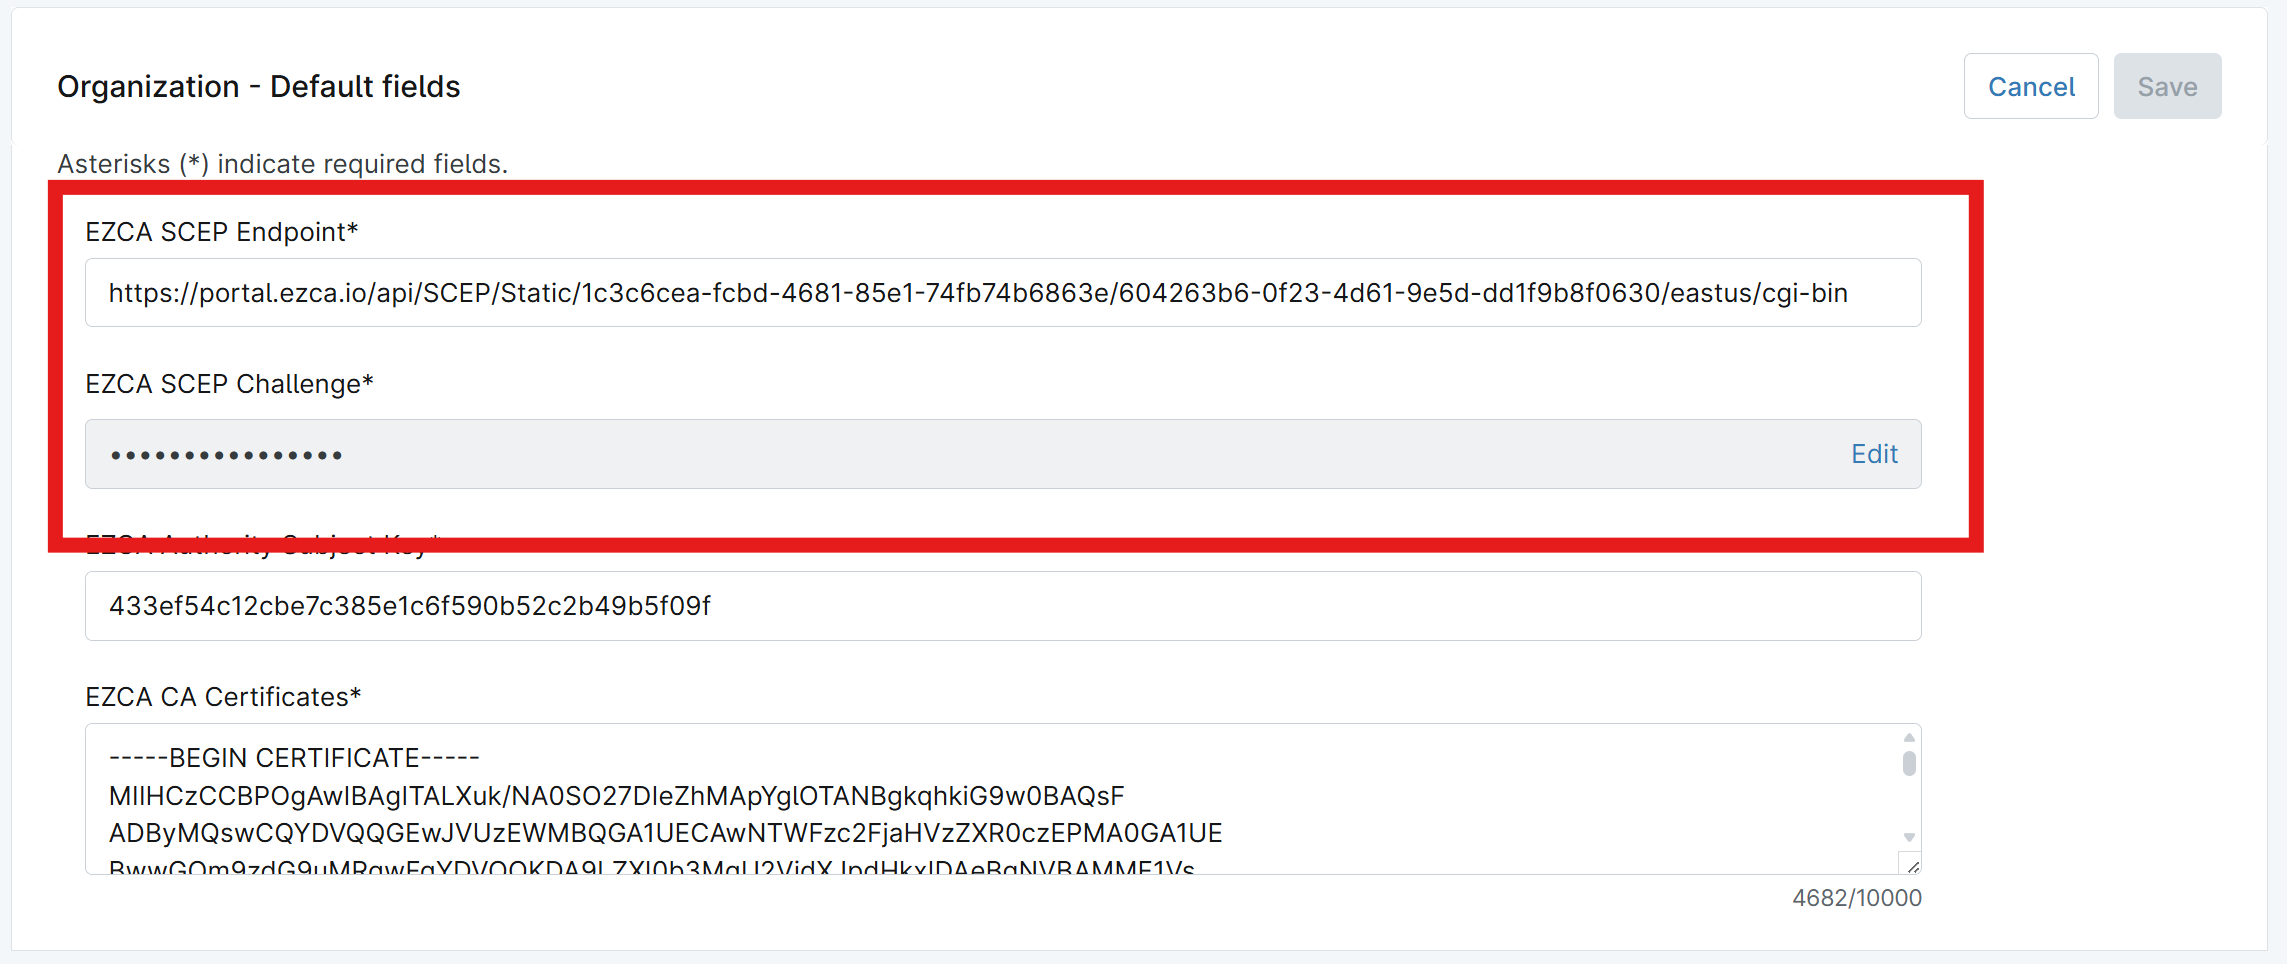
Under Organization - Default fields, click the edit/pencil icon to edit the default organization custom fields.
-
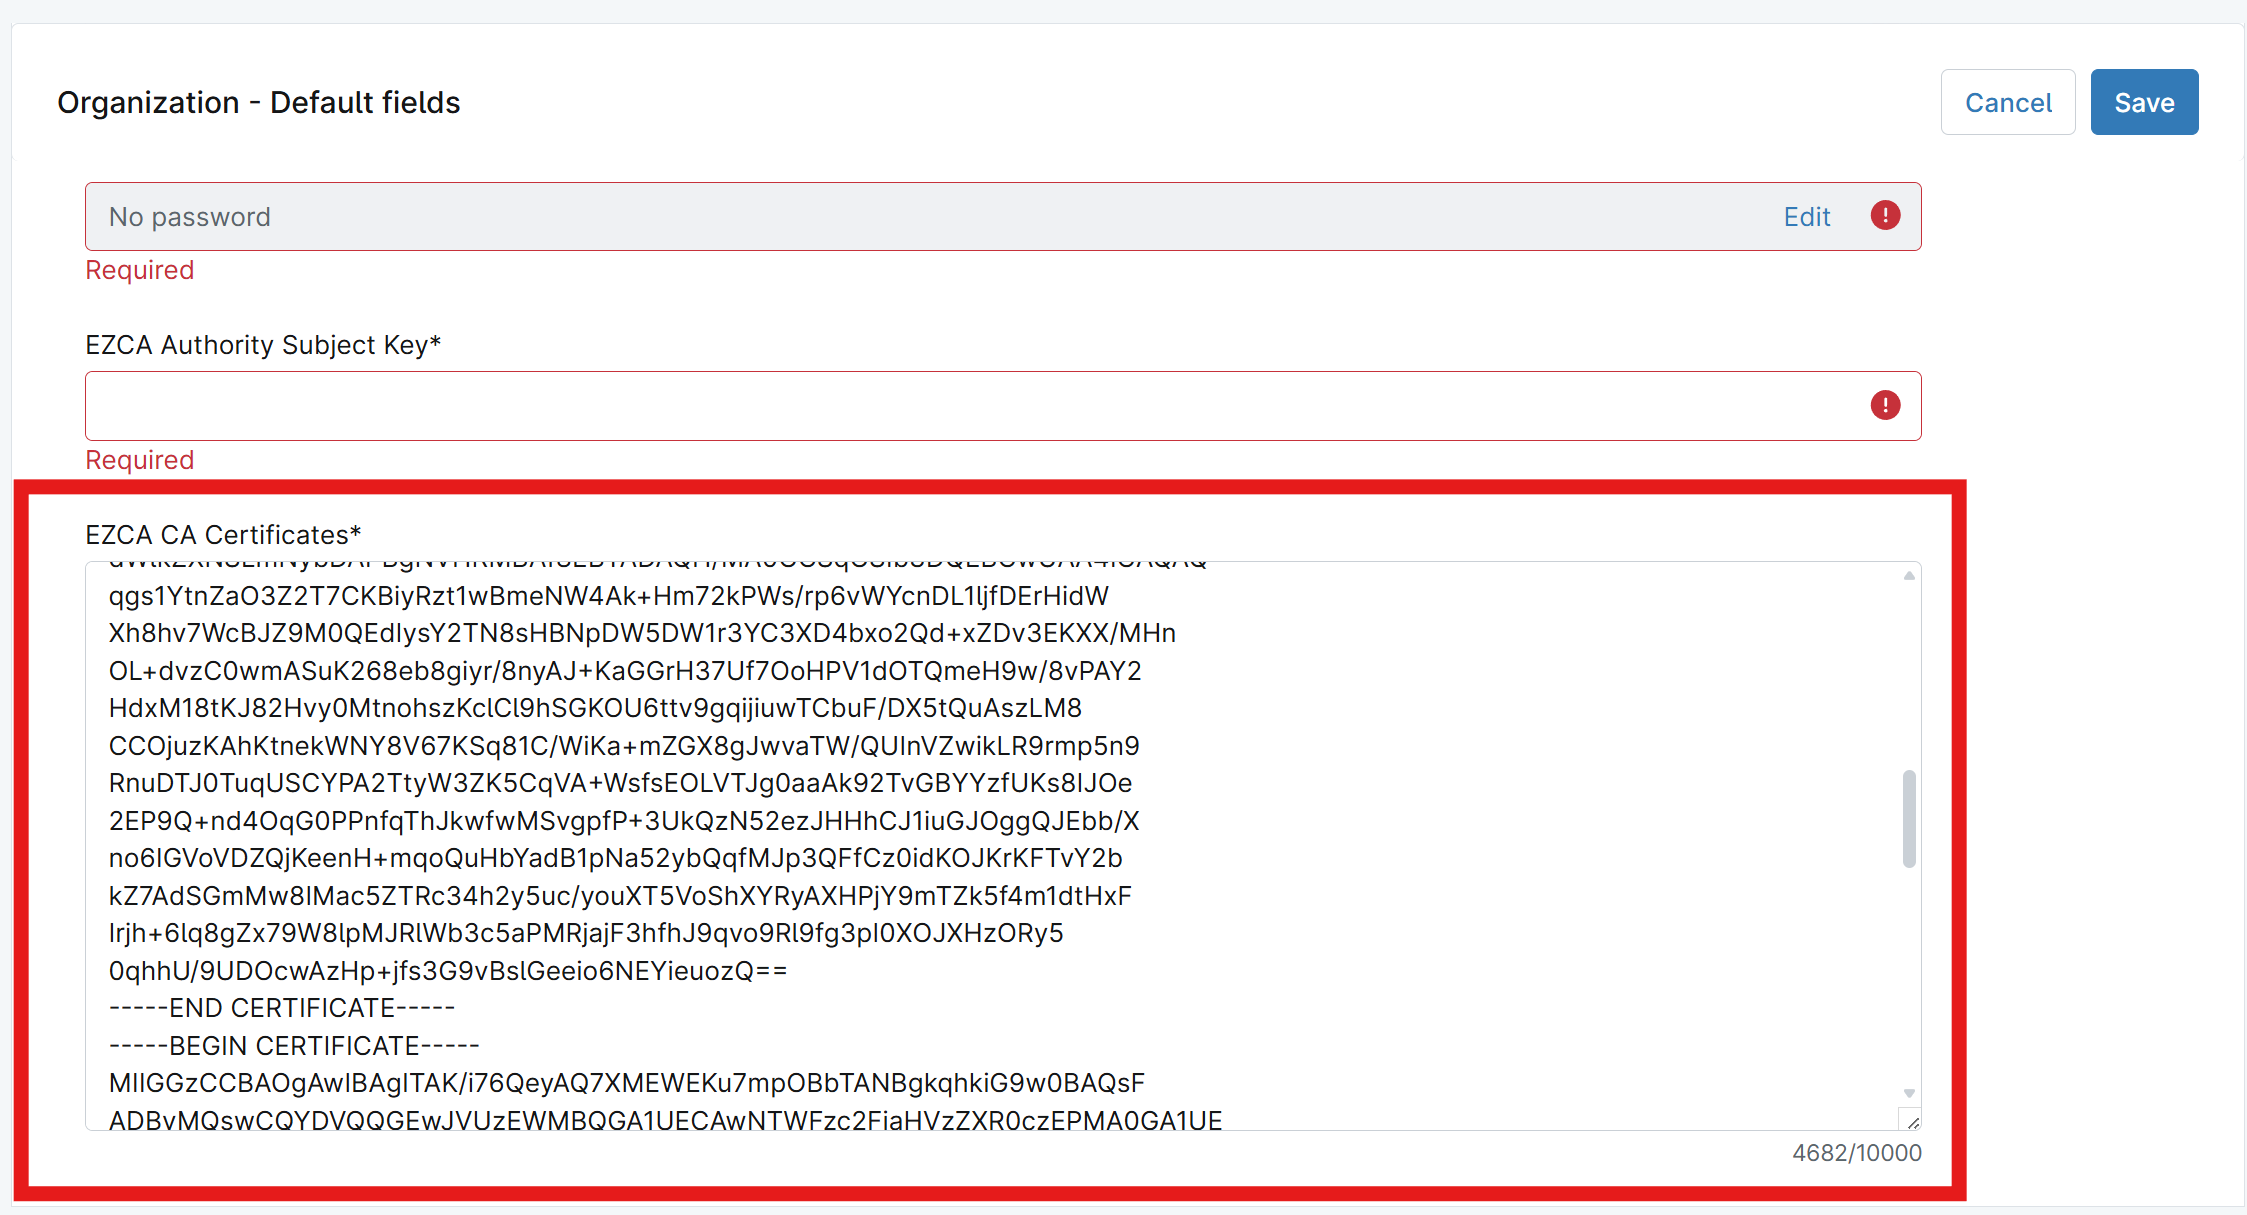
Open each of the CA certificate files you downloaded from EZCA in a text editor. You should see
-----BEGIN CERTIFICATE-----at the beginning of the file and-----END CERTIFICATE-----at the end of the file, with a block of encoded text in between. -
Copy the entire contents of the CA certificate file, including the
-----BEGIN CERTIFICATE-----and-----END CERTIFICATE-----lines. -
Back in NinjaOne, paste the certificate contents into EZCA CA Certificates.
-
Repeat the process for the second CA certificate if you have both a Root CA and SCEP Subordinate CA, making sure to paste the SCEP Subordinate CA certificate first, followed by the Root CA certificate, so that the certificates are in the correct order in the field.
-
You should now have the CA certificate(s) both stored in the custom field and visible in the field preview.
Step 3: How to Retrieve the CA Authority Subject Key Identifier (SKI) from Your EZCA SCEP CA
The CA Authority Subject Key Identifier (SKI) is a unique identifier for the CA certificate that is used when renewing SCEP certificates with EZCA. You will need to retrieve this value from your EZCA SCEP CA and store it in a custom field in NinjaOne so that your script can reference it when requesting and renewing certificates.
-
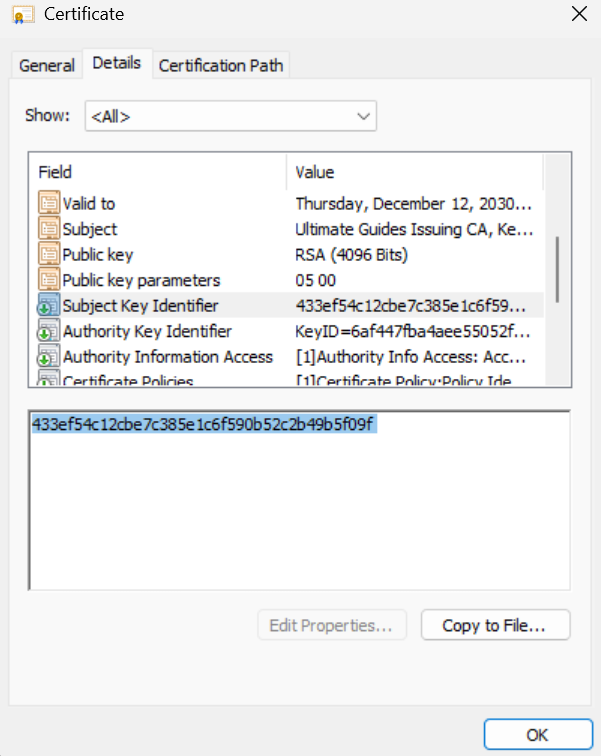
Open your SCEP CA certificate file that you downloaded from EZCA in your OS’s default certificate viewer by double-clicking on the file.
-
In the certificate viewer, navigate to the Details tab and look for the field called Subject Key Identifier. This is the value you need to retrieve.
-
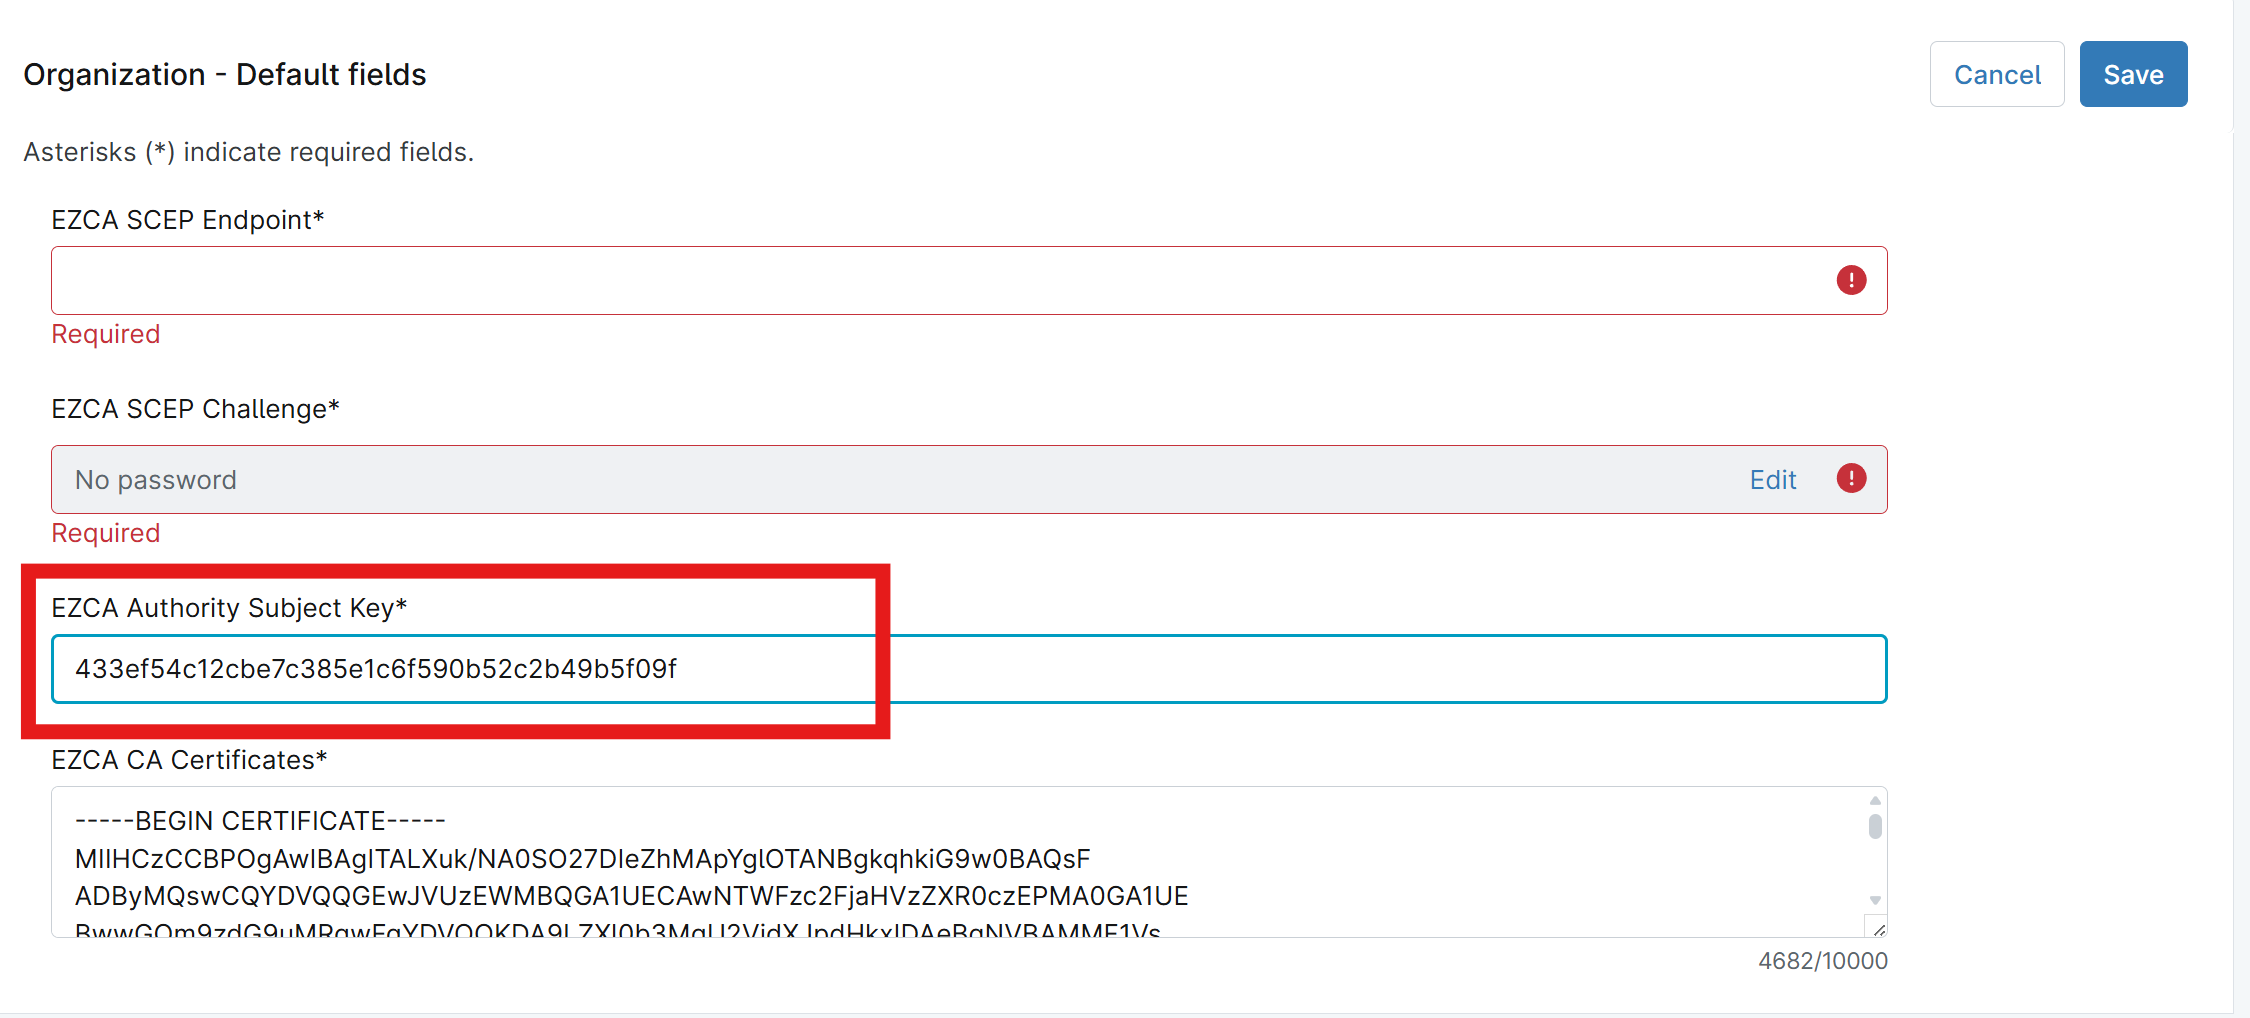
Back in NinjaOne, paste the Subject Key Identifier value into the EZCA Authority Subject Key custom field that you created earlier.
Step 4: How to Enable Static SCEP Challenge in Your EZCA SCEP CA
EZCA SCEP CAs support static SCEP challenges, which allow you to set a fixed challenge value that devices must use when requesting certificates from the SCEP CA. Follow the steps below to enable a static SCEP challenge for your EZCA SCEP CA and retrieve the challenge value to use in your NinjaOne script.
-
Navigate to your EZCA portal and sign in as a PKI Administrator.
-
Click on the Certificate Authorities tab and scroll to your SCEP CA.
-
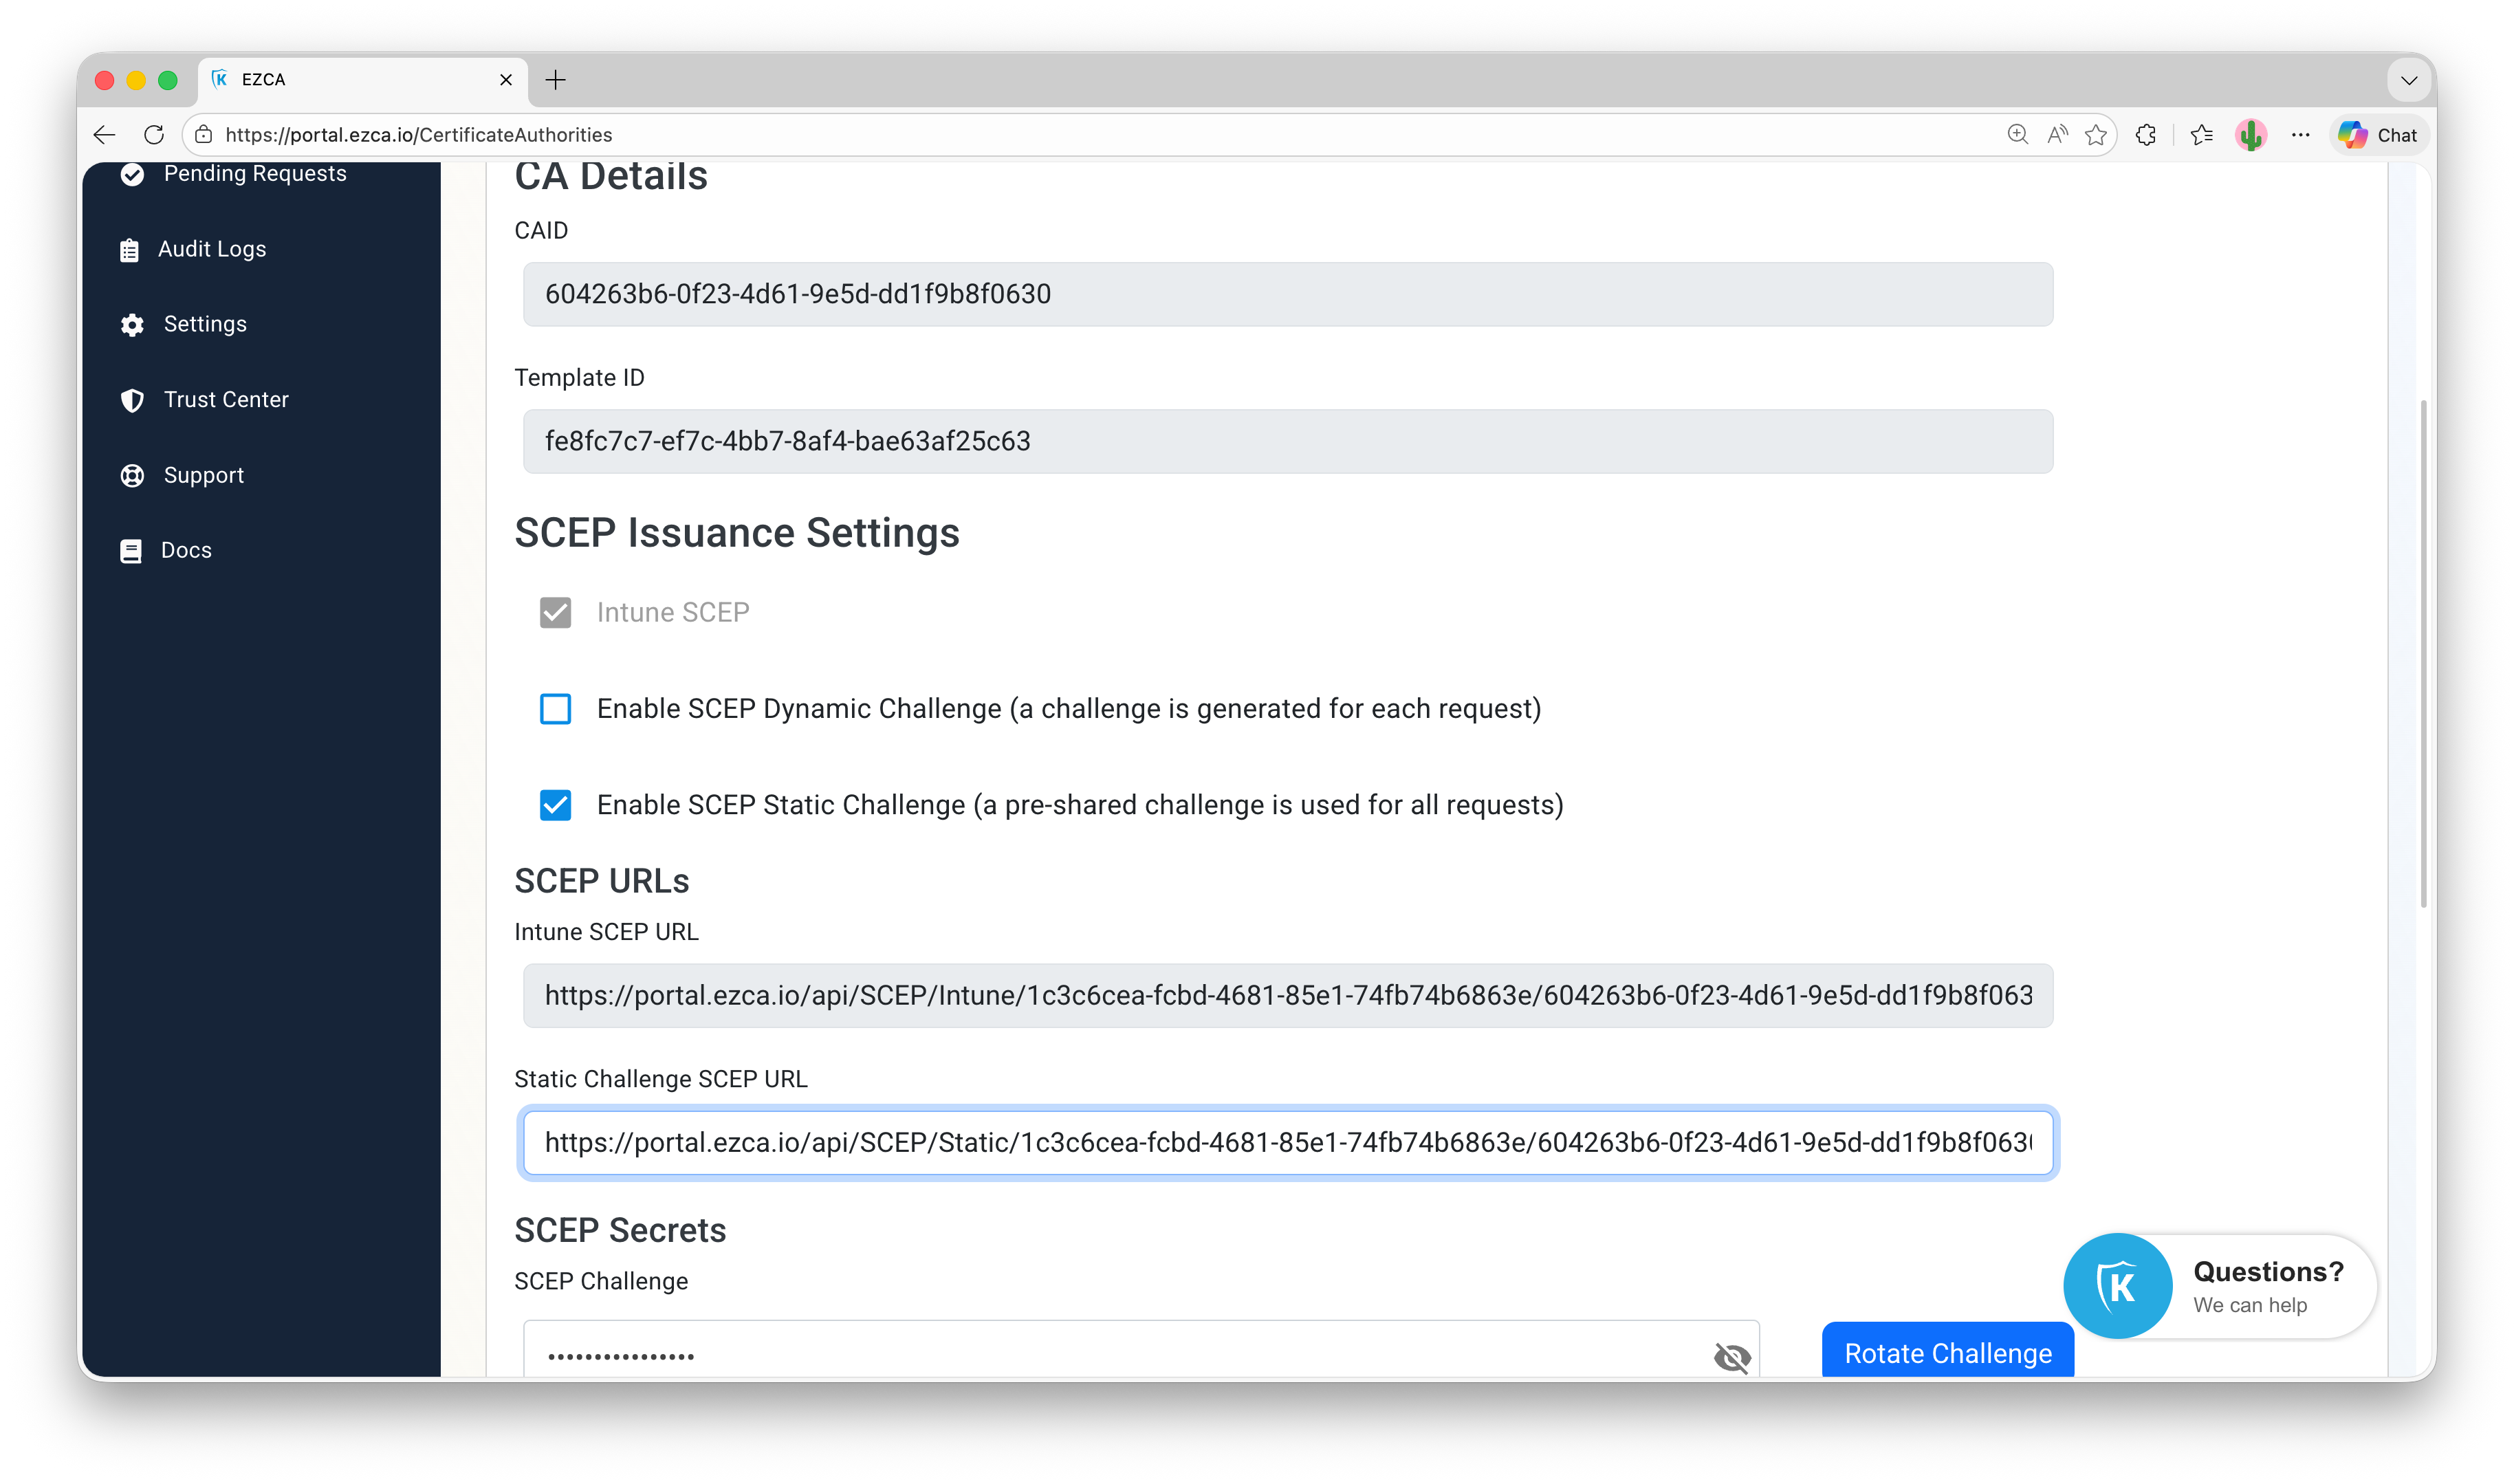
Click on View Requirements for your SCEP CA.
-
Check the box for Enable SCEP Static Challenge and click Save Changes. You will now see your Static Challenge SCEP URL and SCEP Challenge:
-
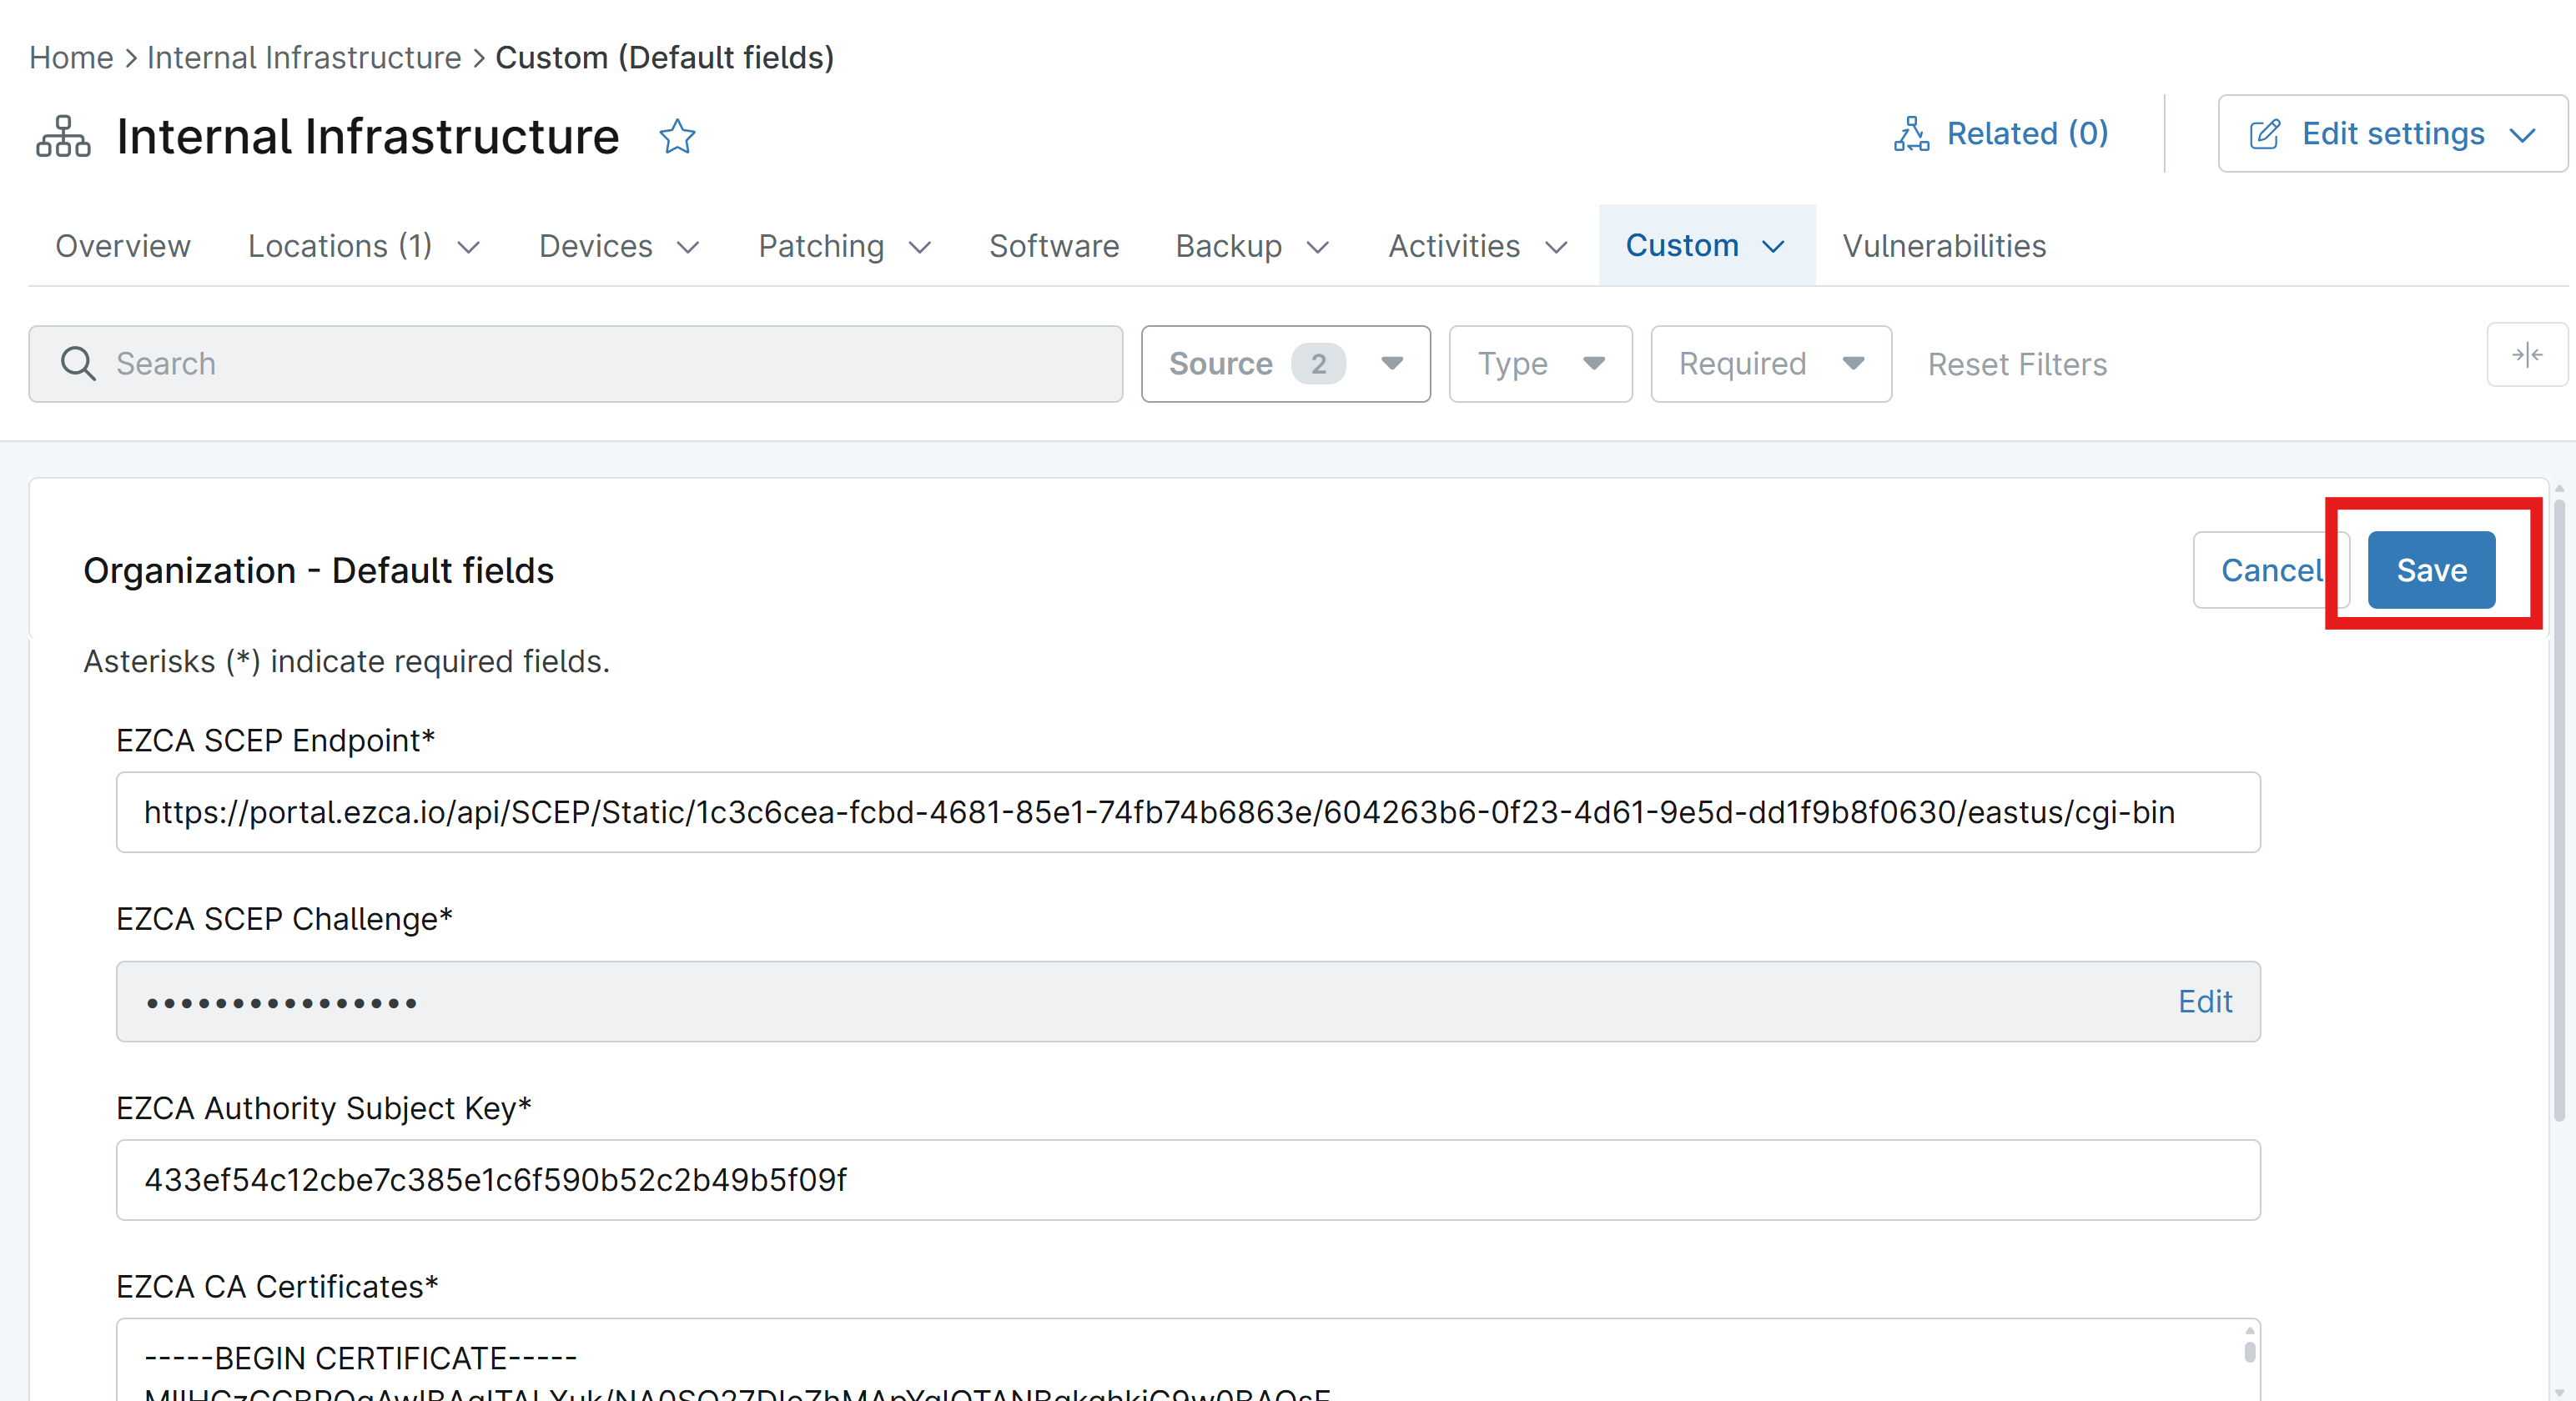
Back in NinjaOne, paste the SCEP URL and SCEP Challenge values into the EZCA SCEP Endpoint and EZCA SCEP Challenge custom fields that you created earlier.
-
Click Save to save your changes to the custom fields. They can now be used in your NinjaOne scripts to request certificates from your EZCA SCEP CA.
Step 5: How to Create an Automation Script in NinjaOne to Push CA Certificates to Devices
Before you can issue your first SCEP certificate to a device using NinjaOne, you need to ensure that the device trusts the CA certificate(s) for your SCEP CA. To do this, you can create an automation script in NinjaOne that retrieves the CA certificate(s) from the custom field you created and installs them into the appropriate certificate store on the device.
-
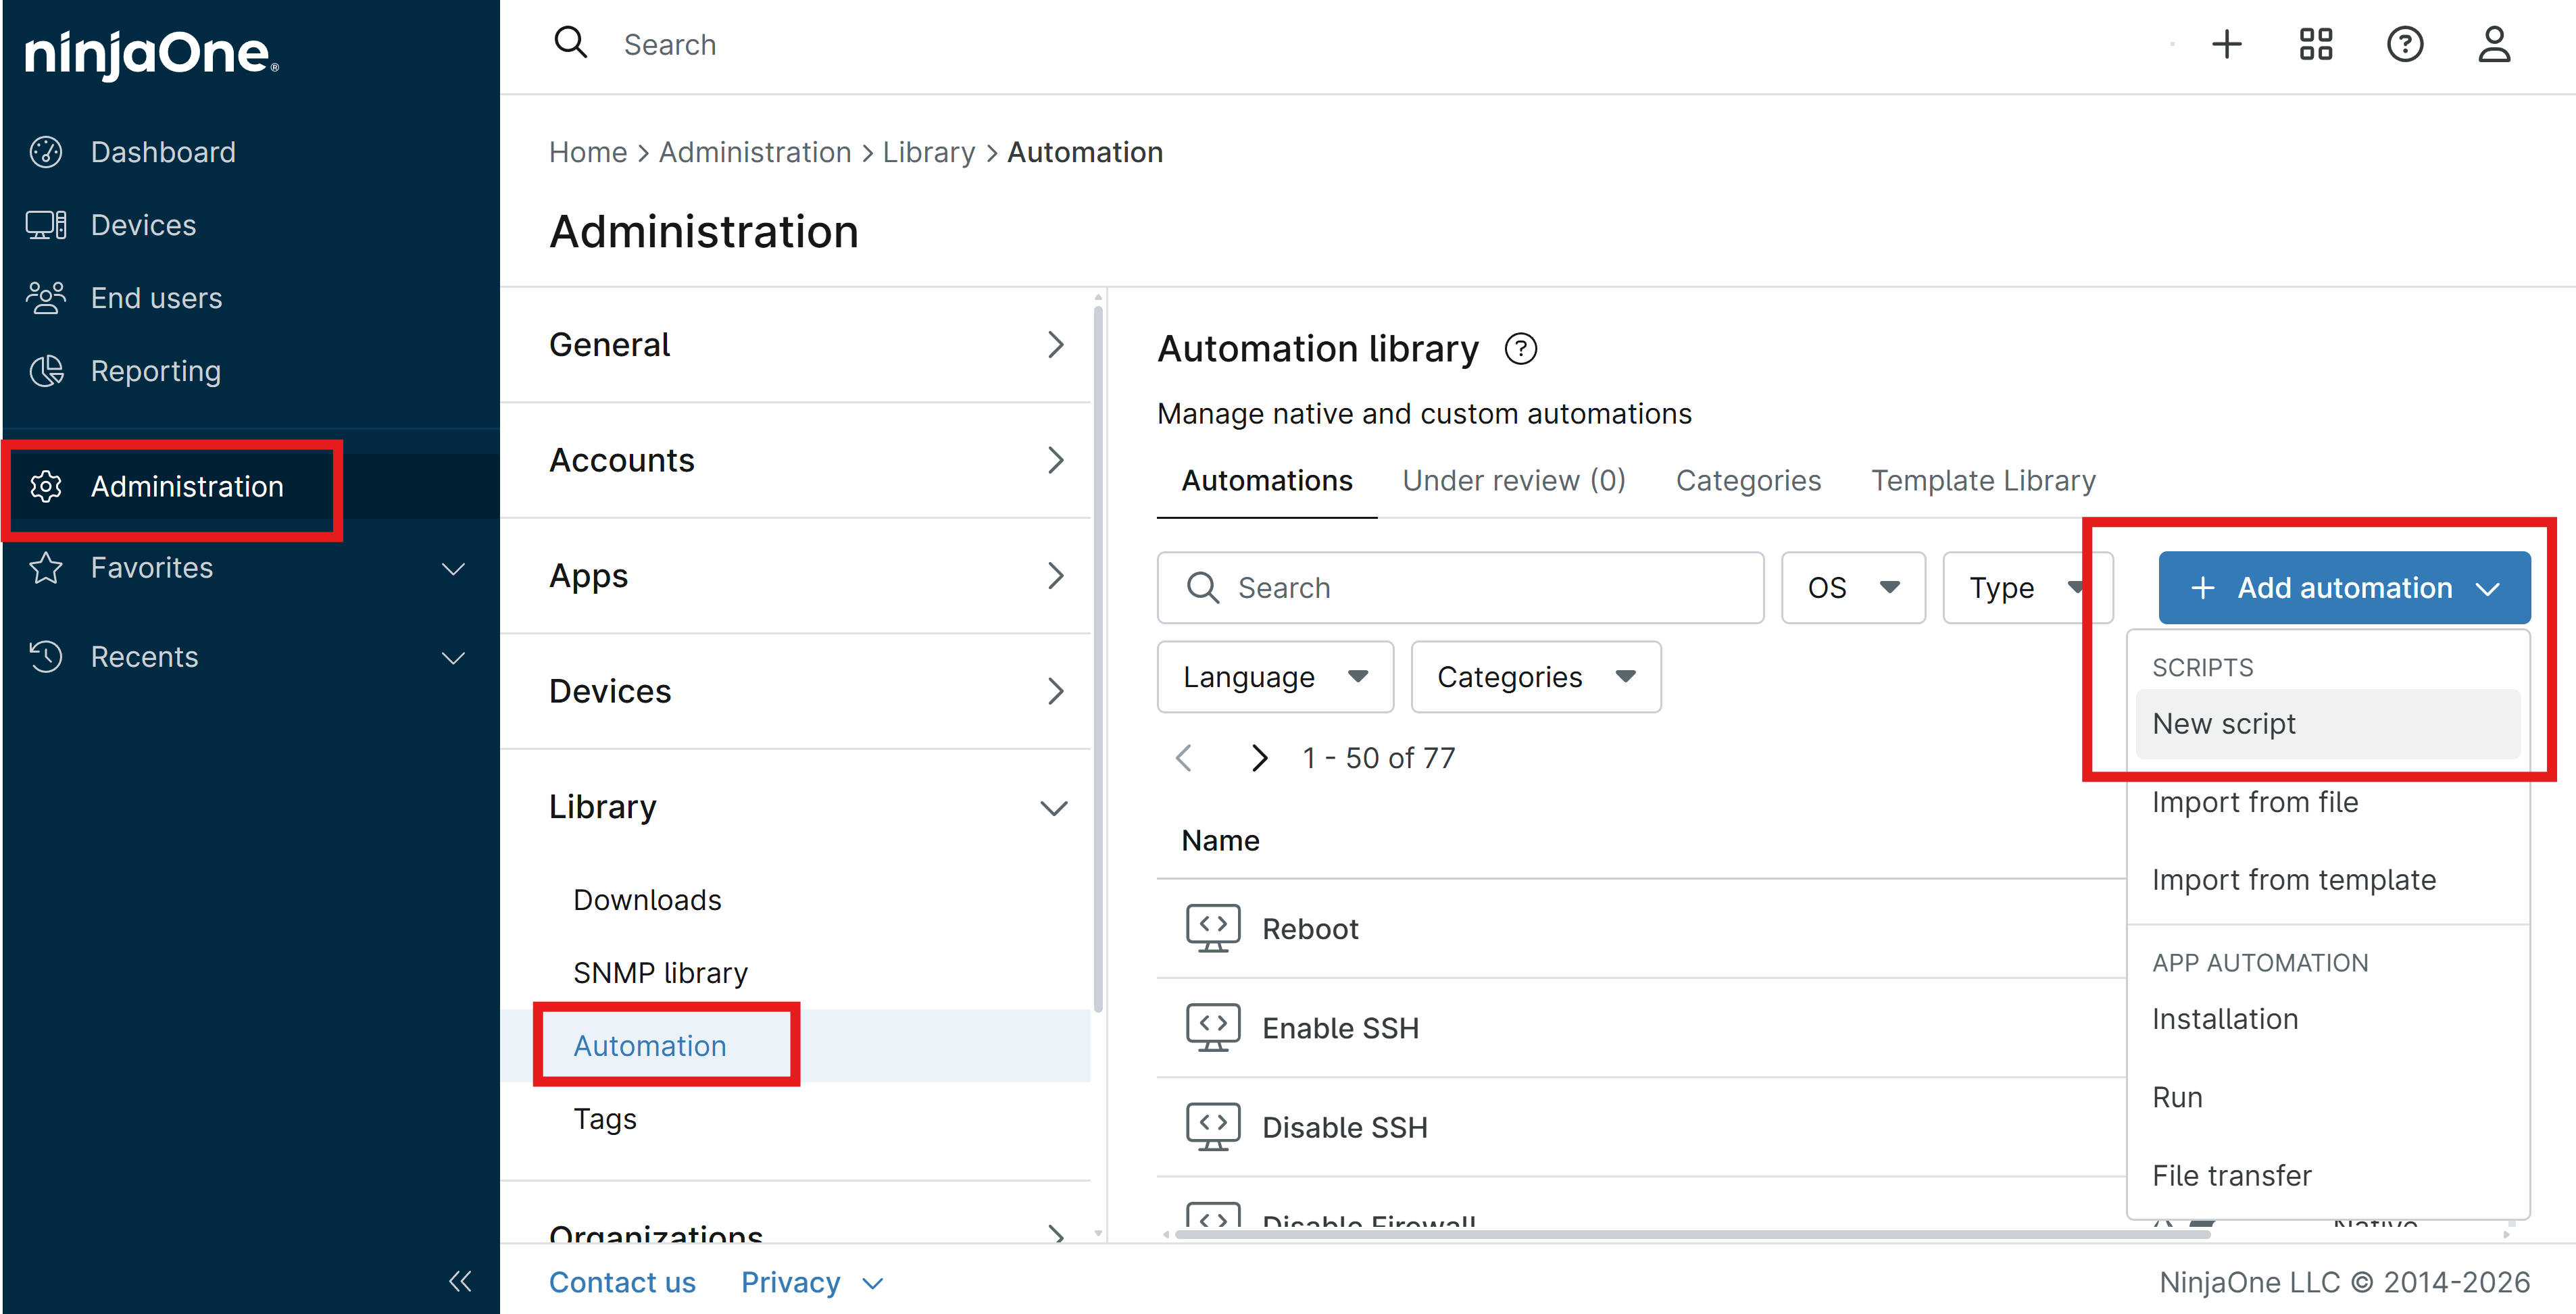
In your NinjaOne portal, navigate to Administration > Library > Automation.
-
Click on the + Add automation button and select New script.
-
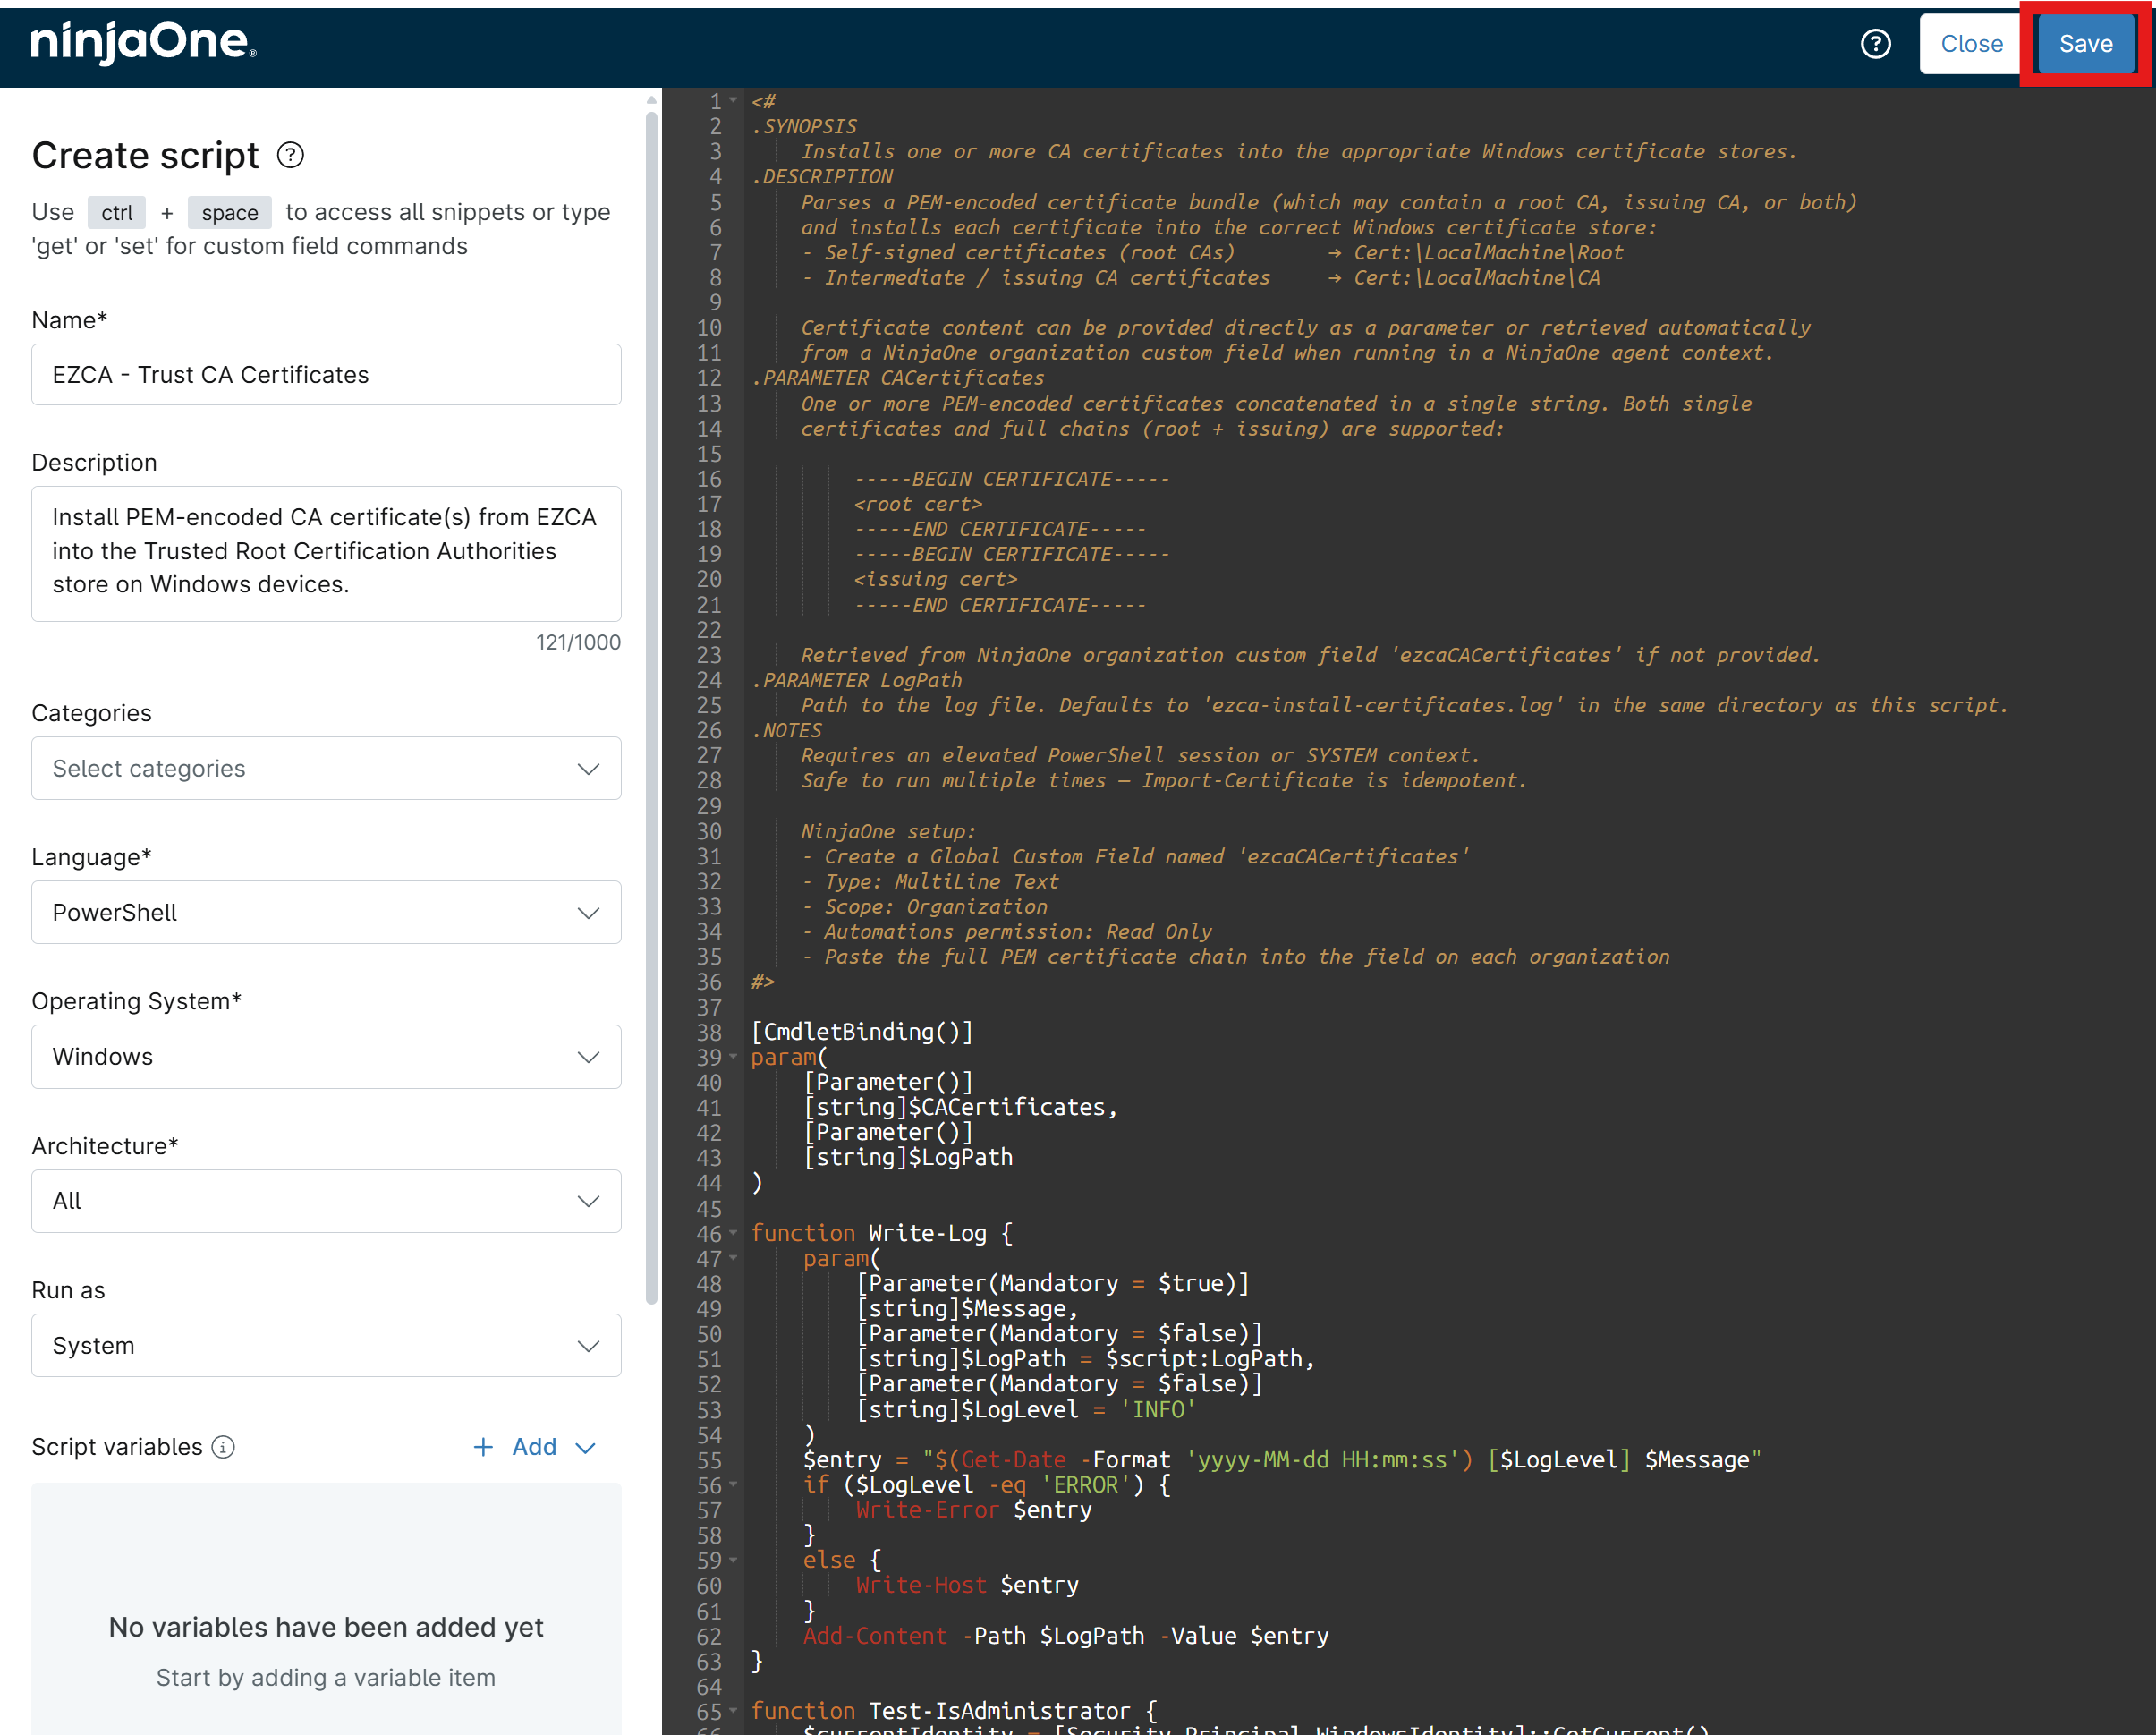
Enter the following values under Create script:
- Name:
EZCA - Trust CA Certificates - Description:
Install PEM-encoded CA certificate(s) from EZCA into the Trusted Root Certification Authorities and Intermediate Certification Authorities stores on Windows devices. - Language: PowerShell
- Operating System: Windows
- Architecture: All
- Run as: System
- Script variables: None
- Parameters: None
- Name:
-
Copy and paste the contents of Install-EZCACertificatesFromPEM.ps1 into the script editor in NinjaOne.
-
Click on the Save button to save your script.
Step 6: How to Create an Automation Script in NinjaOne to Issue SCEP Certificates
Another NinjaOne automation script is needed to request SCEP certificates from your EZCA SCEP CA. This script will reference the custom fields you created to retrieve the SCEP Endpoint, SCEP Challenge, CA Certificates, and CA Authority Subject Key Identifier (SKI) values when requesting certificates.
-
Click on the + Add automation button again and select New script.
-
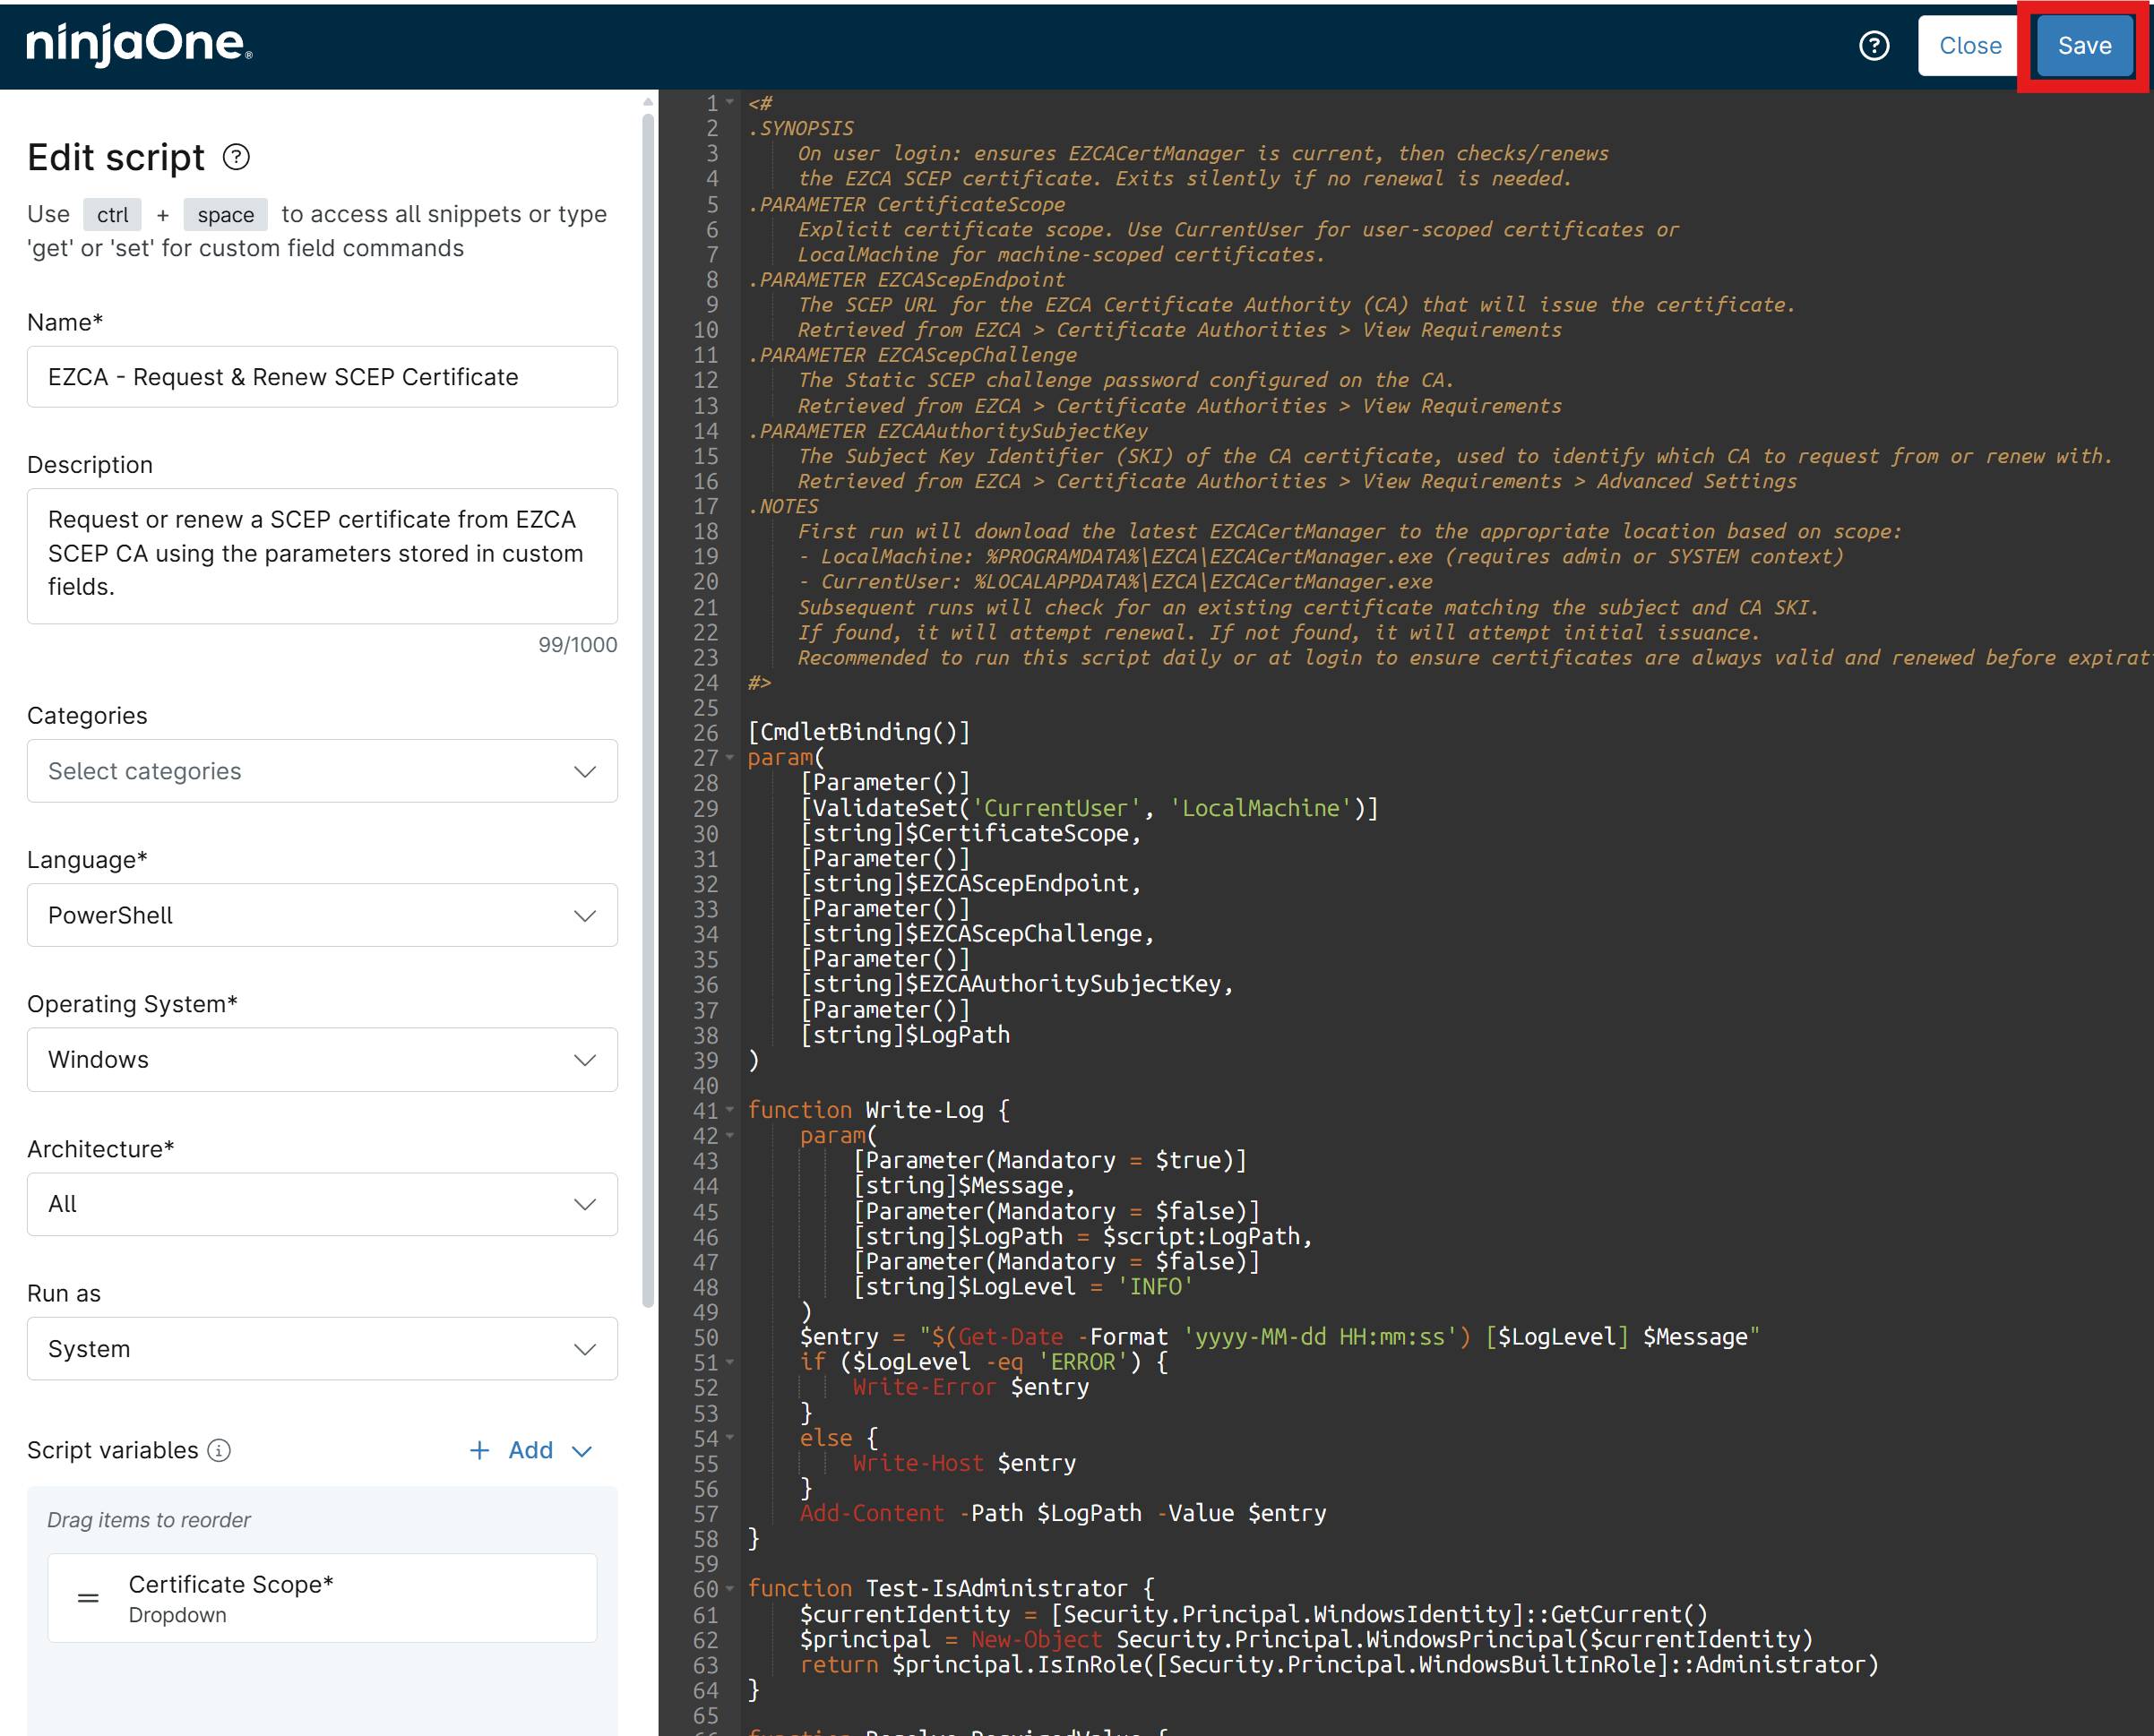
Enter the following values under Create script:
- Name:
EZCA - Request & Renew SCEP Certificate - Description:
Request or renew a SCEP certificate from EZCA SCEP CA using the parameters stored in custom fields. - Language: PowerShell
- Operating System: Windows
- Architecture: All
- Run as: If issuing device/machine certificates, select System. If issuing user certificates, select Current user.
- Parameters: None
- Name:
-
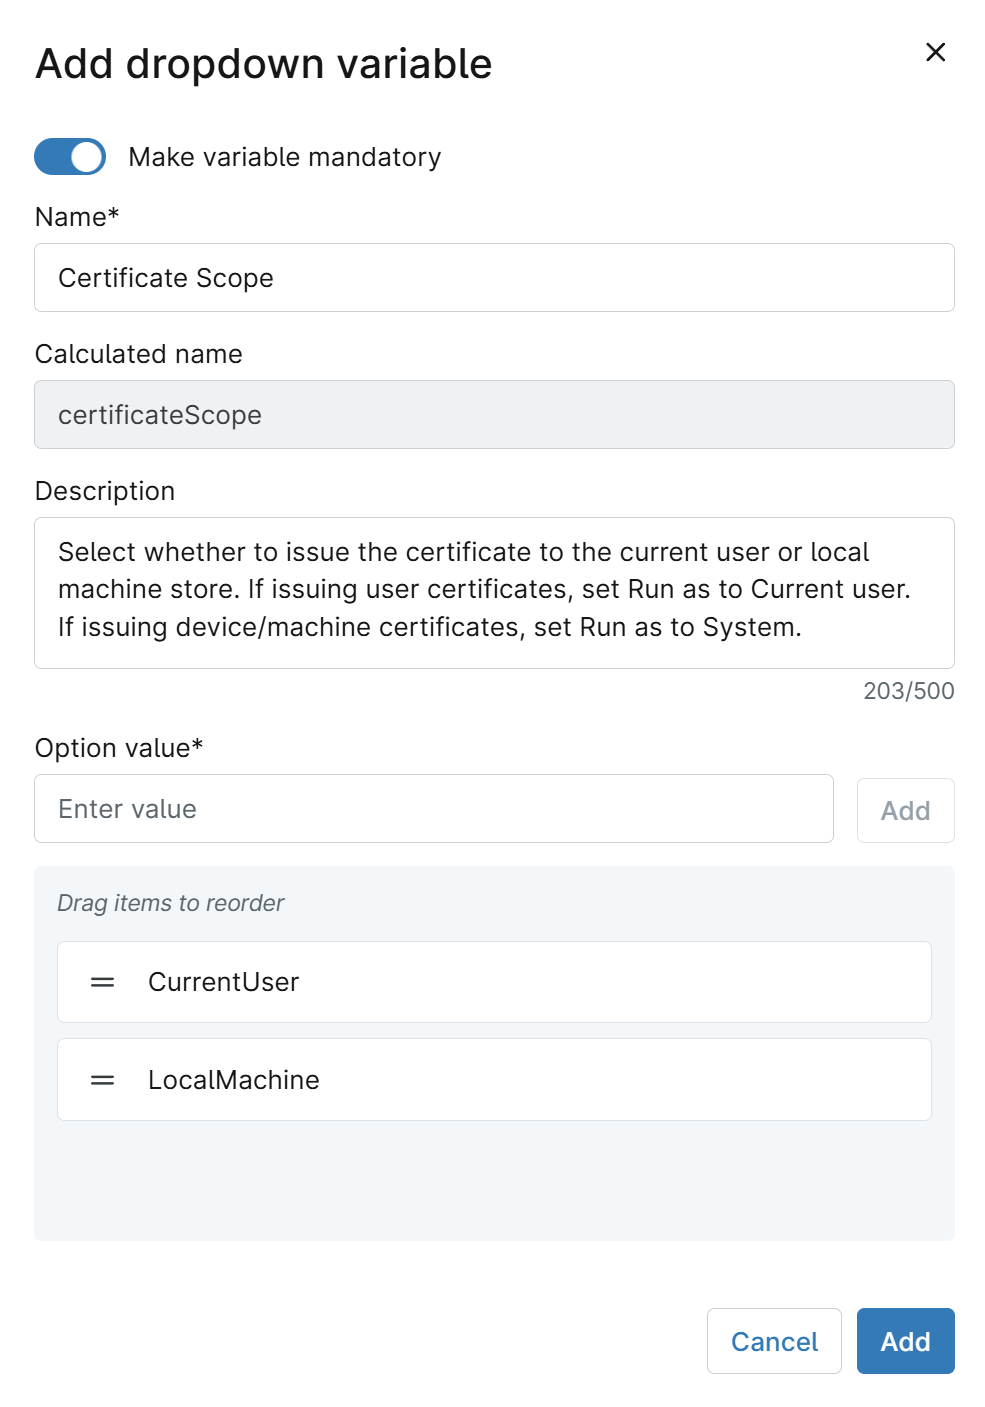
Under Script variables, add a Dropdown variable with the following values:
- Make variable mandatory: Enabled
- Name:
Certificate Scope - Description:
Select whether to issue the certificate to the current user or local machine store. If issuing user certificates, set Run as to Current user. If issuing device/machine certificates, set Run as to System. - Option value: Add
CurrentUserandLocalMachine - Click Add to add the variable.
-
Copy and paste the contents of Create-EZCASCEPCertificateWithRenewal.ps1 into the script editor in NinjaOne.
-
Click on the Save button to save your script.
Step 7: How to Run Your NinjaOne Automation Script to Deploy CA Certificates and Issue SCEP Certificate
Now that you have your automation scripts created in NinjaOne, you can run them on your target devices to first deploy the CA certificates and then request SCEP certificates from your EZCA SCEP CA.
-
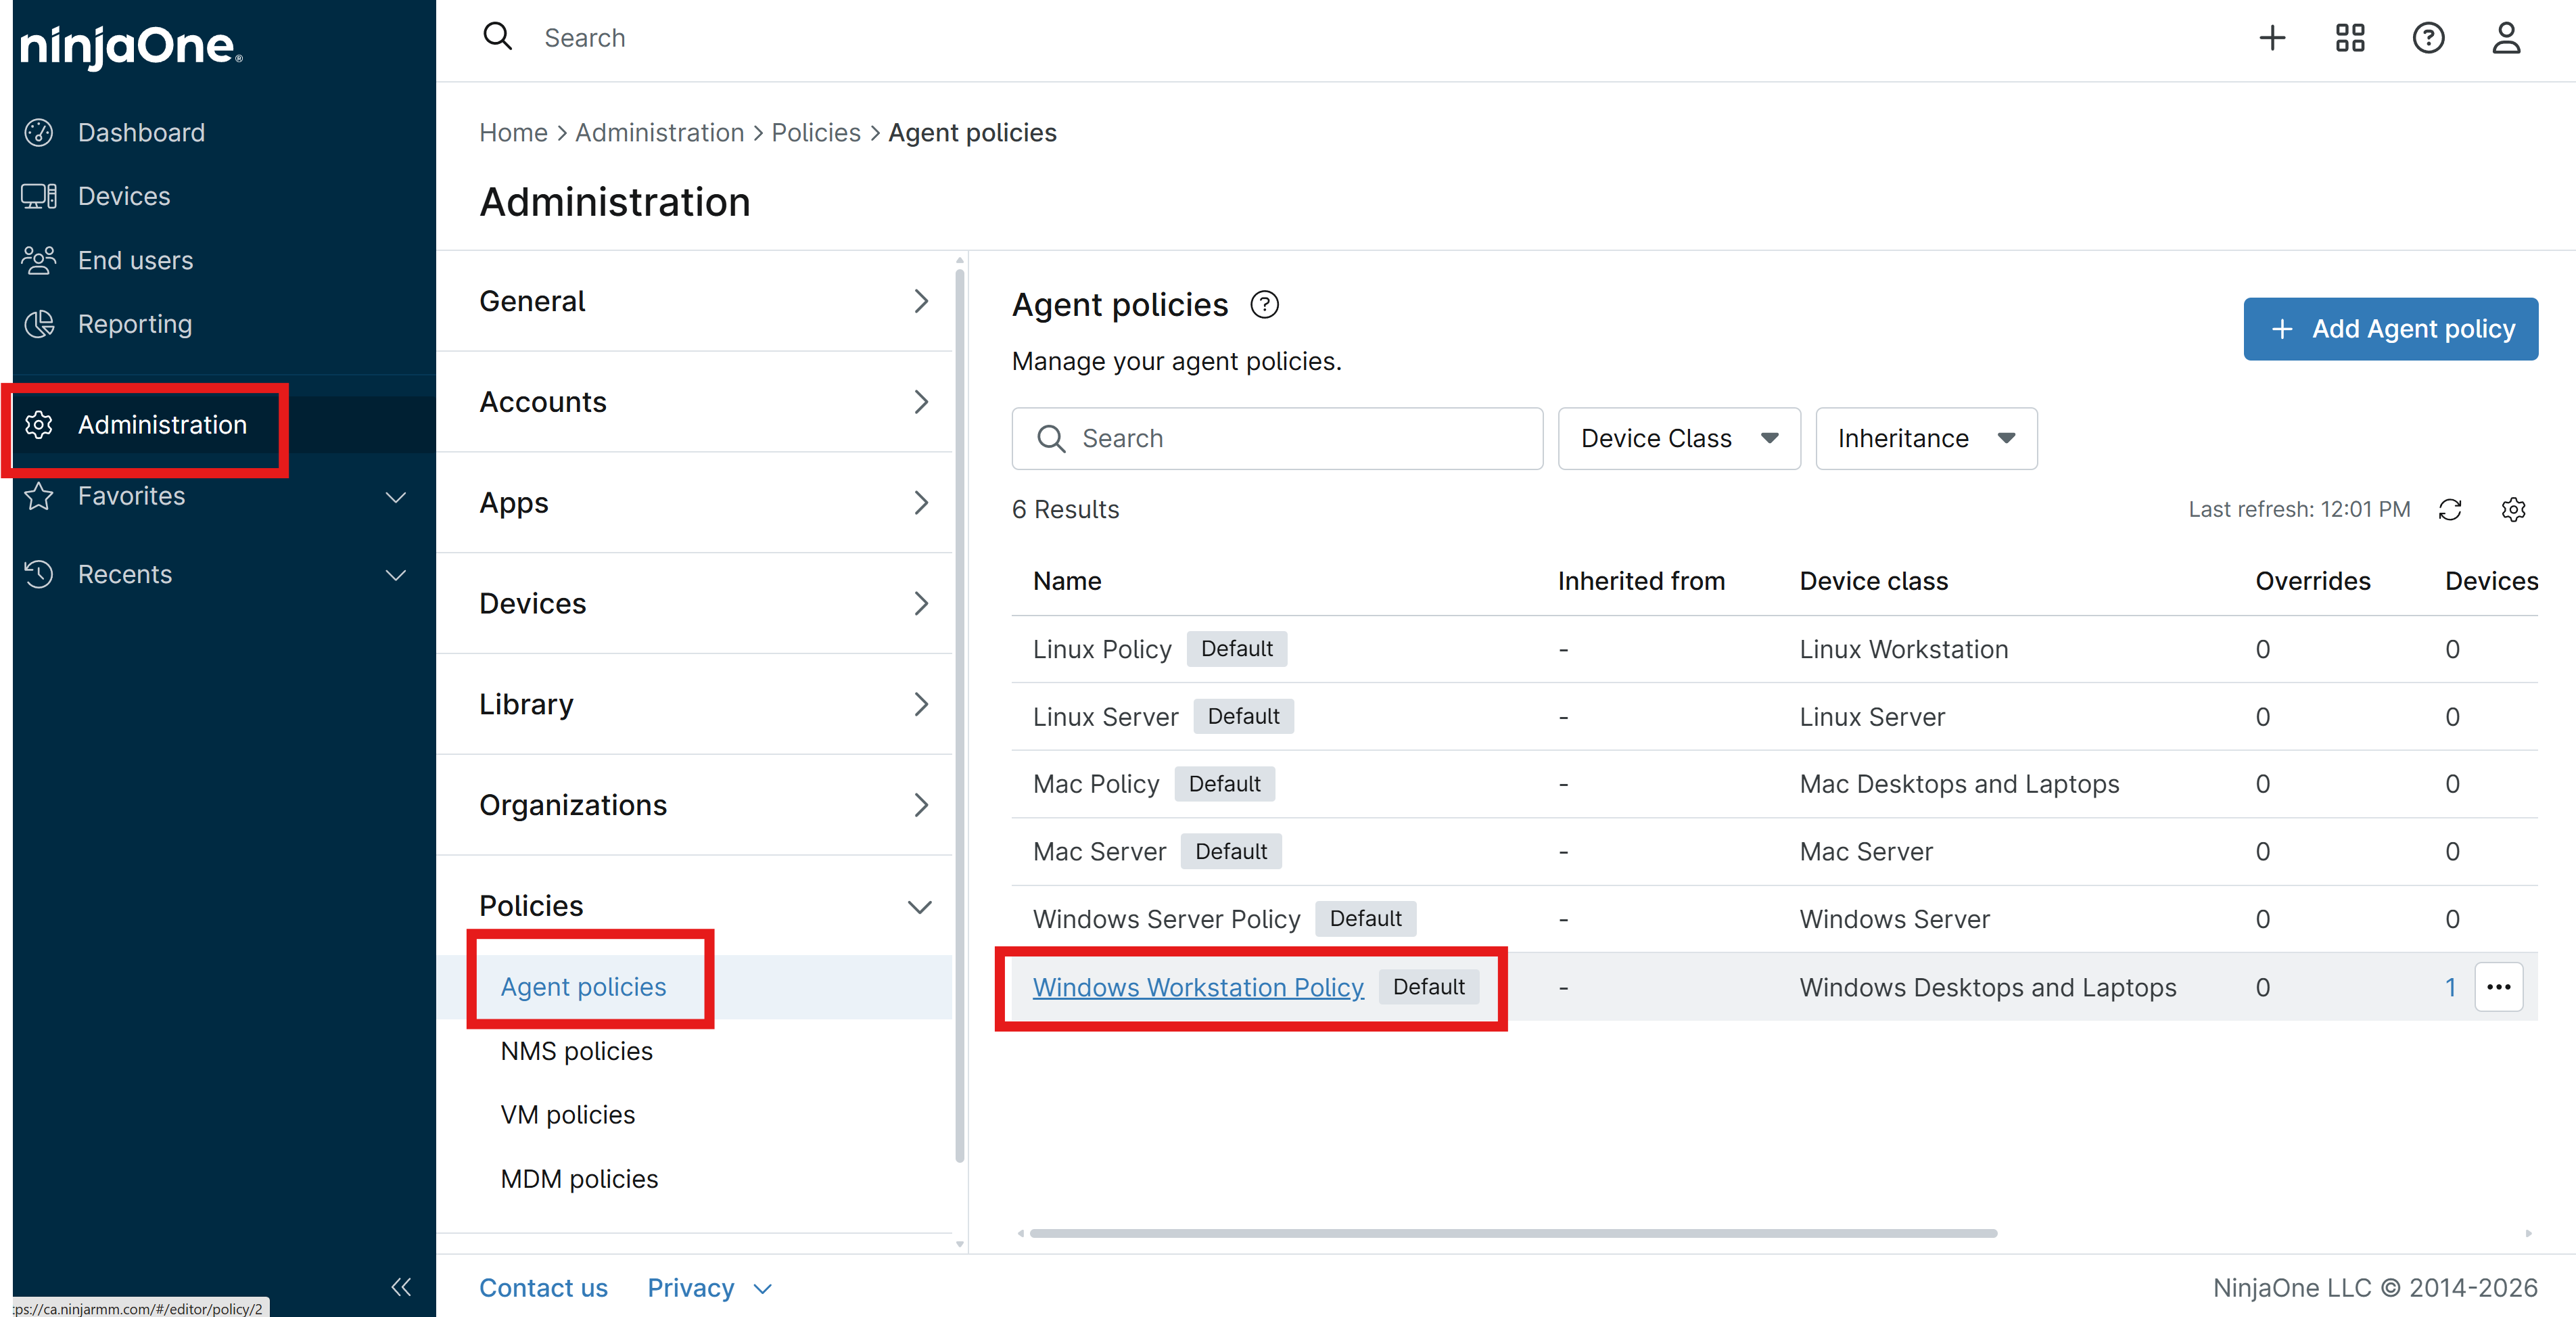
In your NinjaOne portal, navigate to Administration > Policies > Agent policies.
-
Click on your existing agent policy (or create a new one):
-
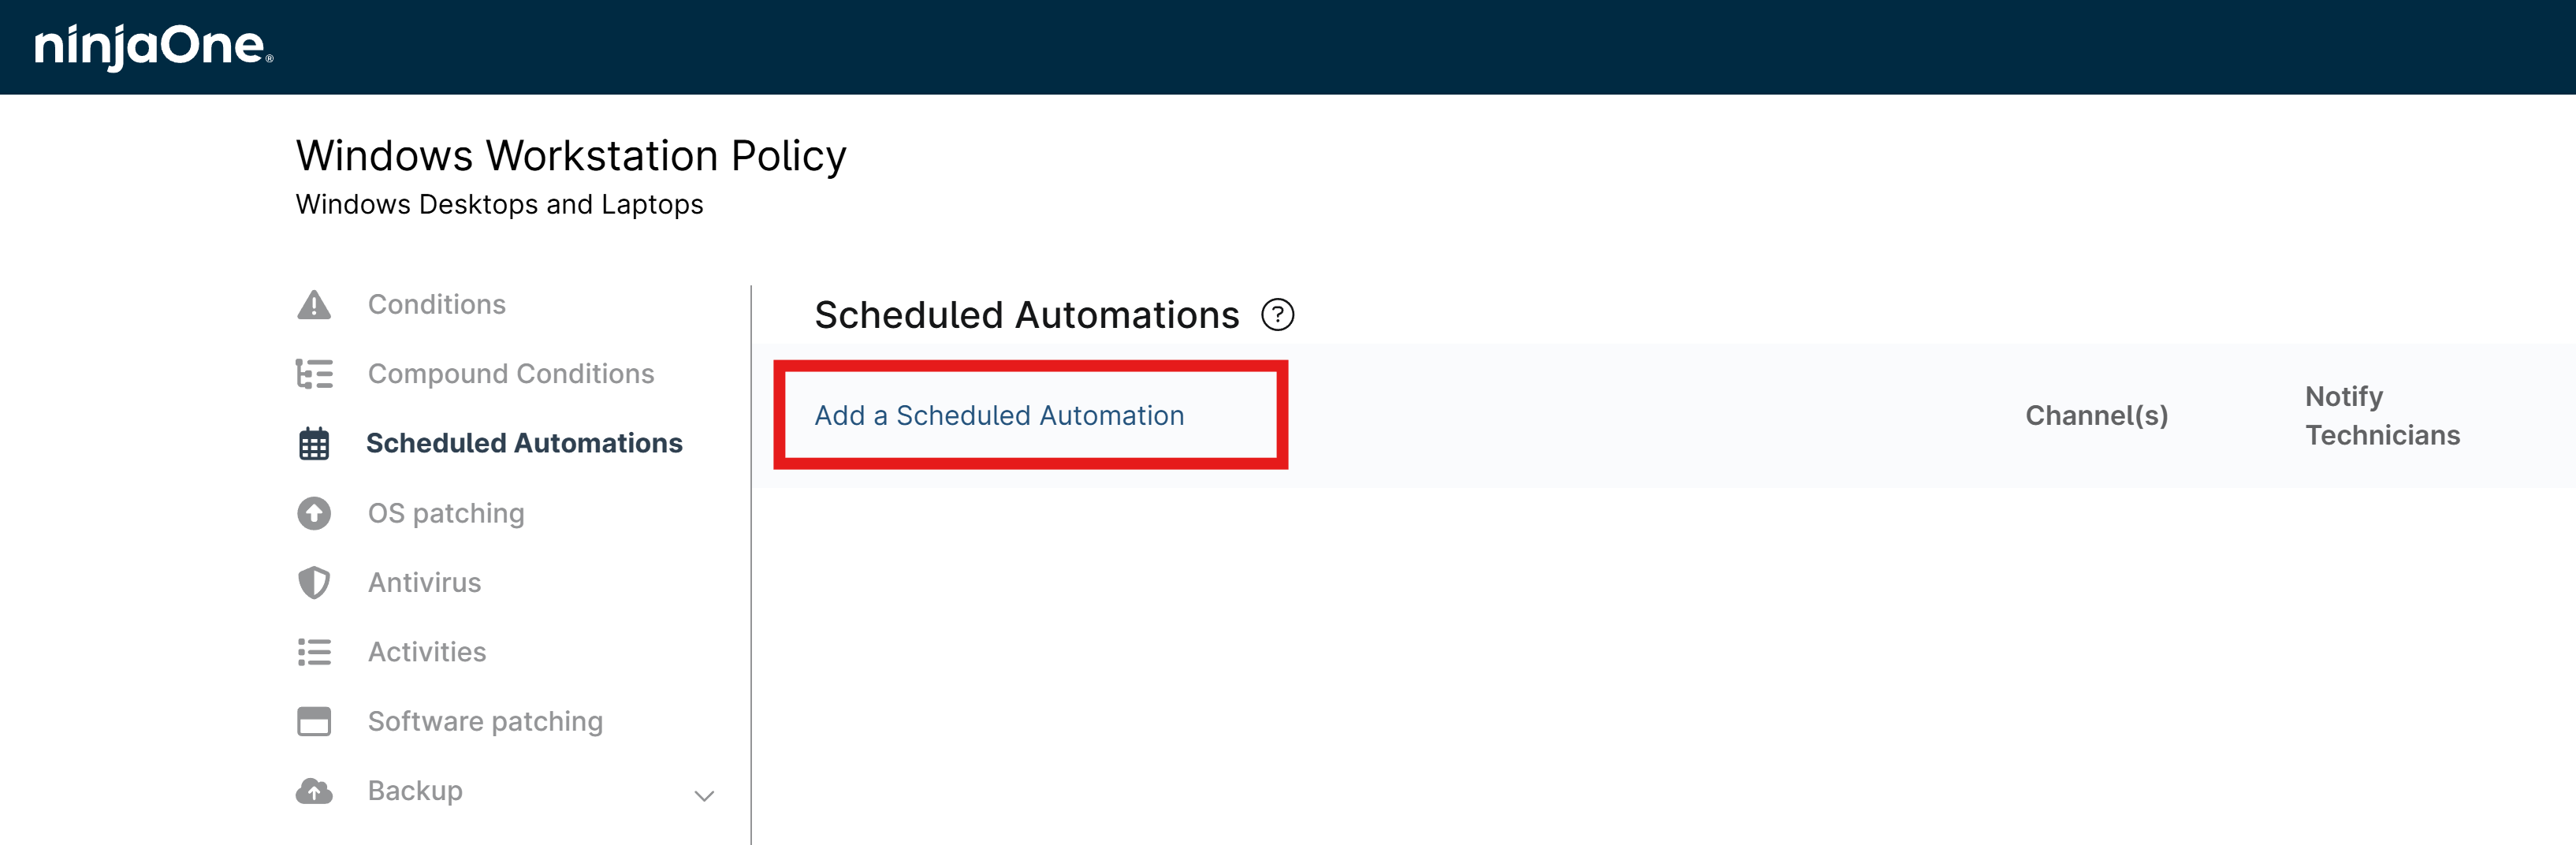
Under Scheduled Automations, click Add a Scheduled Automation.
-
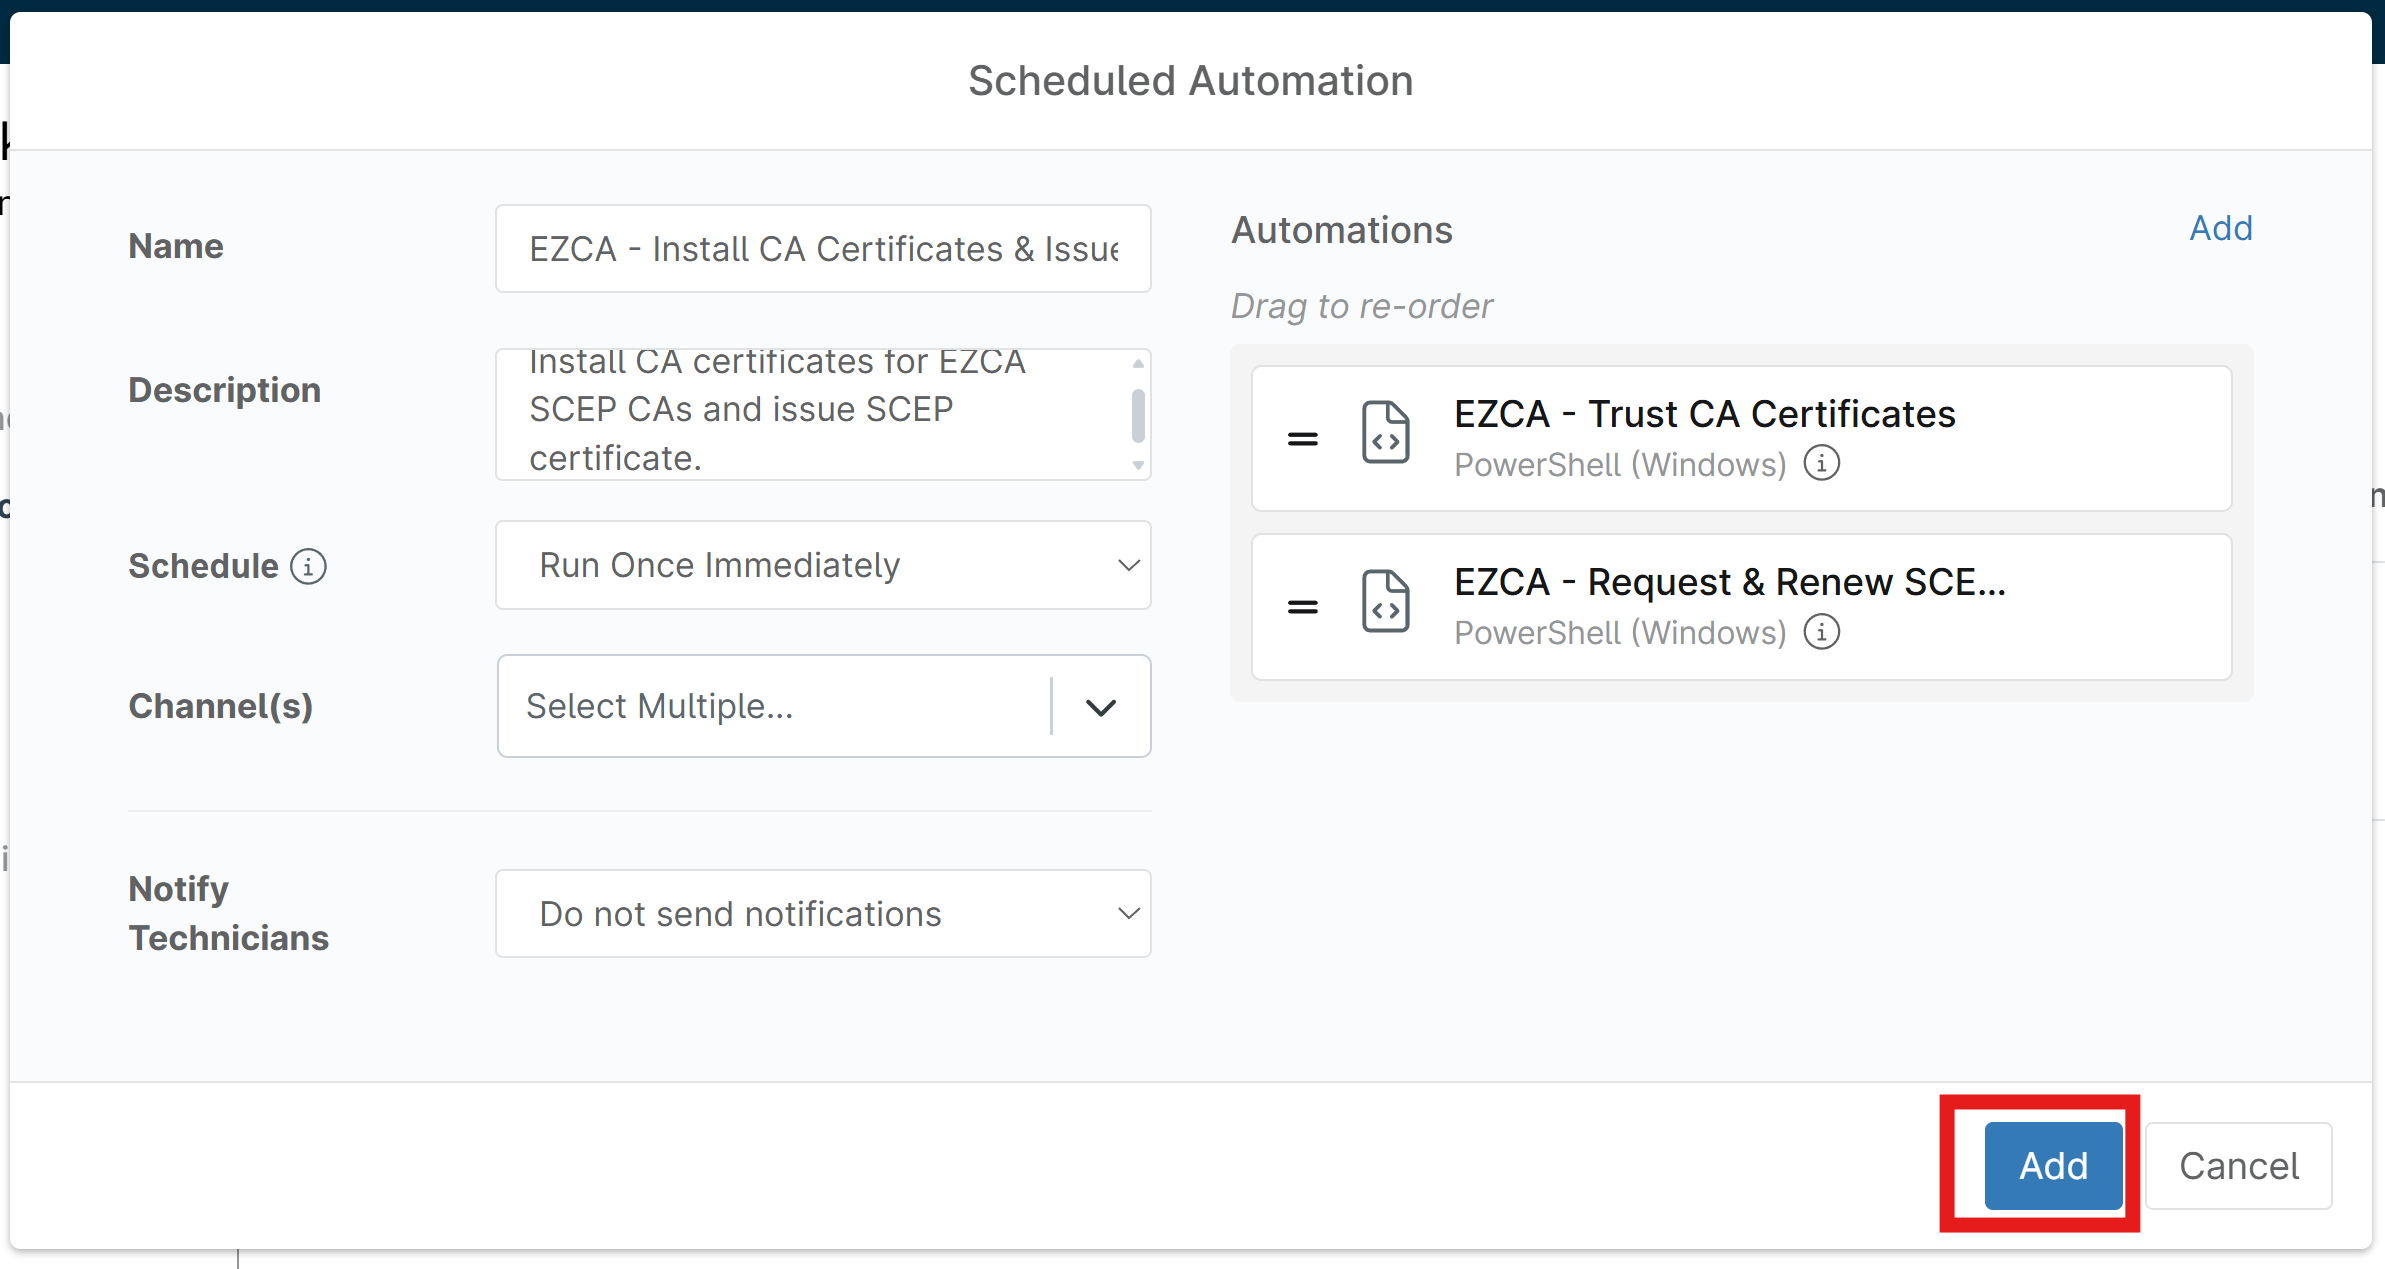
Enter the following values for your scheduled automation:
- Name:
EZCA - Install CA Certificates & Issue SCEP Certificate - Description:
Install CA certificates for EZCA SCEP CAs and issue SCEP certificate. - Schedule:
Run Once Immediately. This executes the automation right away on any online device. For offline devices, it will run as soon as they come online, and it will also apply to any new devices added to the policy in the future. - Channels: Set as desired.
- Notify Technicians: Set as desired.
- Name:
-
Next to Automations click Add.
-
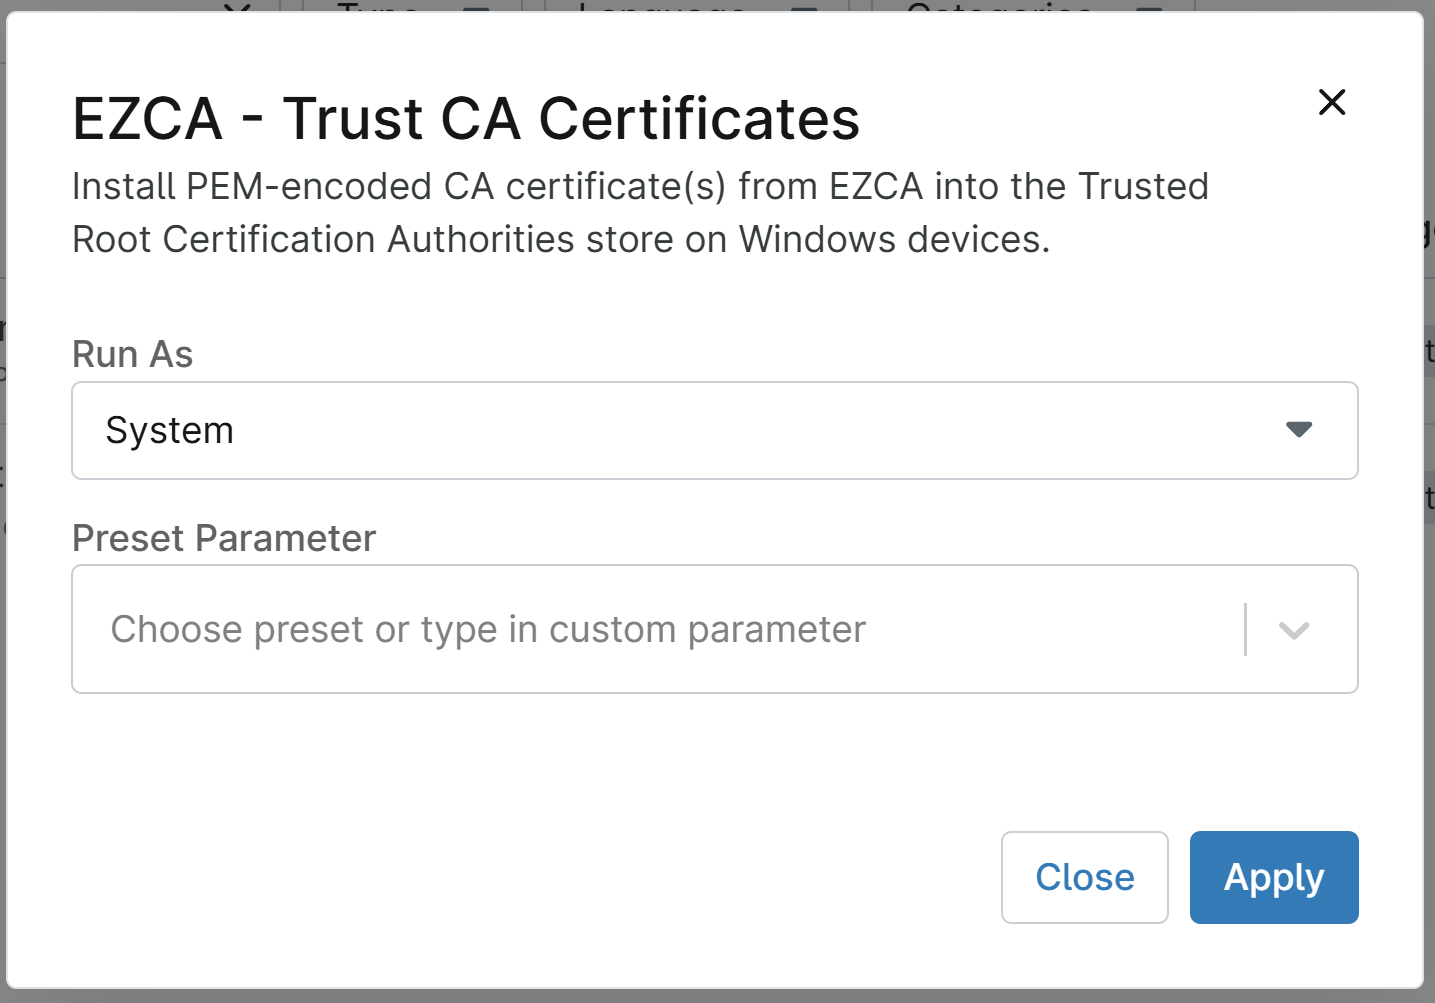
Search for “EZCA” and select EZCA - Trust CA Certificates.
-
Keep Run As set to System and leave Preset Parameter blank.
-
Click Apply to add the automation.
-
Next to Automations click Add again to add another scheduled automation to issue a SCEP certificate after the CA certificates have been installed.
-
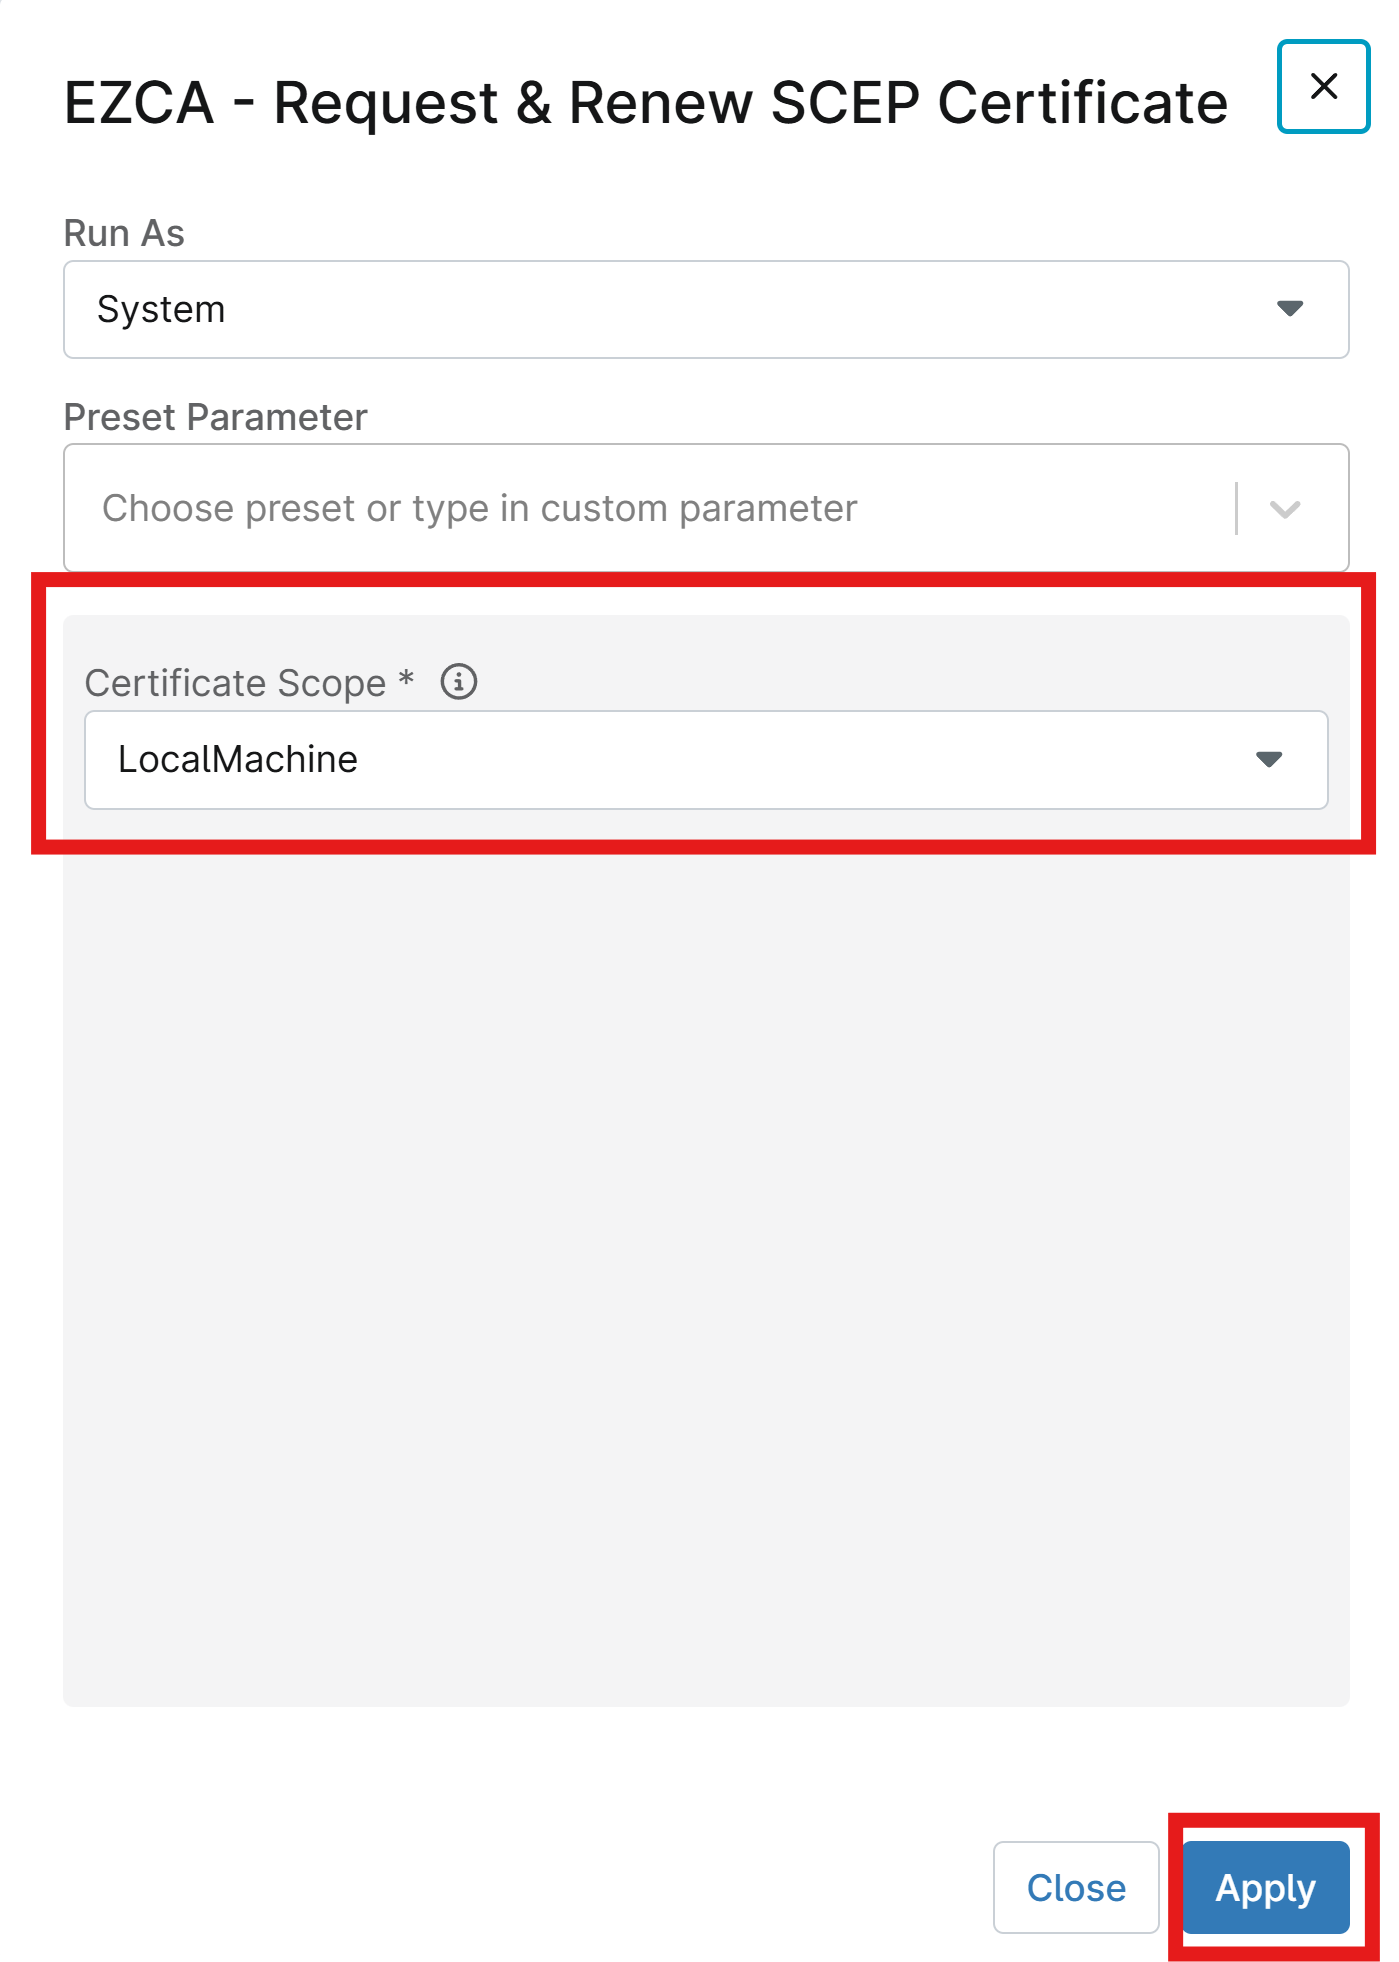
Search for “EZCA” and select EZCA - Request & Renew SCEP Certificate.
-
If issuing machine/device certificates, set Run As to System. If issuing user certificates, set Run As to Current Logged On User.
-
Keep Preset Parameter blank.
-
Set CertificateScope to LocalMachine if issuing machine/device certificates or CurrentUser if issuing user certificates.
-
Click Apply to add the automation.
-
Click Add to save your scheduled automation.
Step 8: How to Run Your NinjaOne Automation Script to Issue SCEP Certificates
In the previous step you configured your devices to trust your EZCA CA certificates and you issued the initial SCEP certificate to your devices. However, SCEP certificates typically have a relatively short validity period (e.g. 1 year or less) and need to be renewed regularly to ensure that devices always have a valid certificate. To automate the renewal process, you can add one more Scheduled Automation which runs periodically to check the expiration date of the installed SCEP certificate and automatically renew it with your EZCA SCEP CA when it is close to expiring.
-
Under Scheduled Automations in your NinjaOne agent policy, click Add a Scheduled Automation to add another scheduled automation.
-
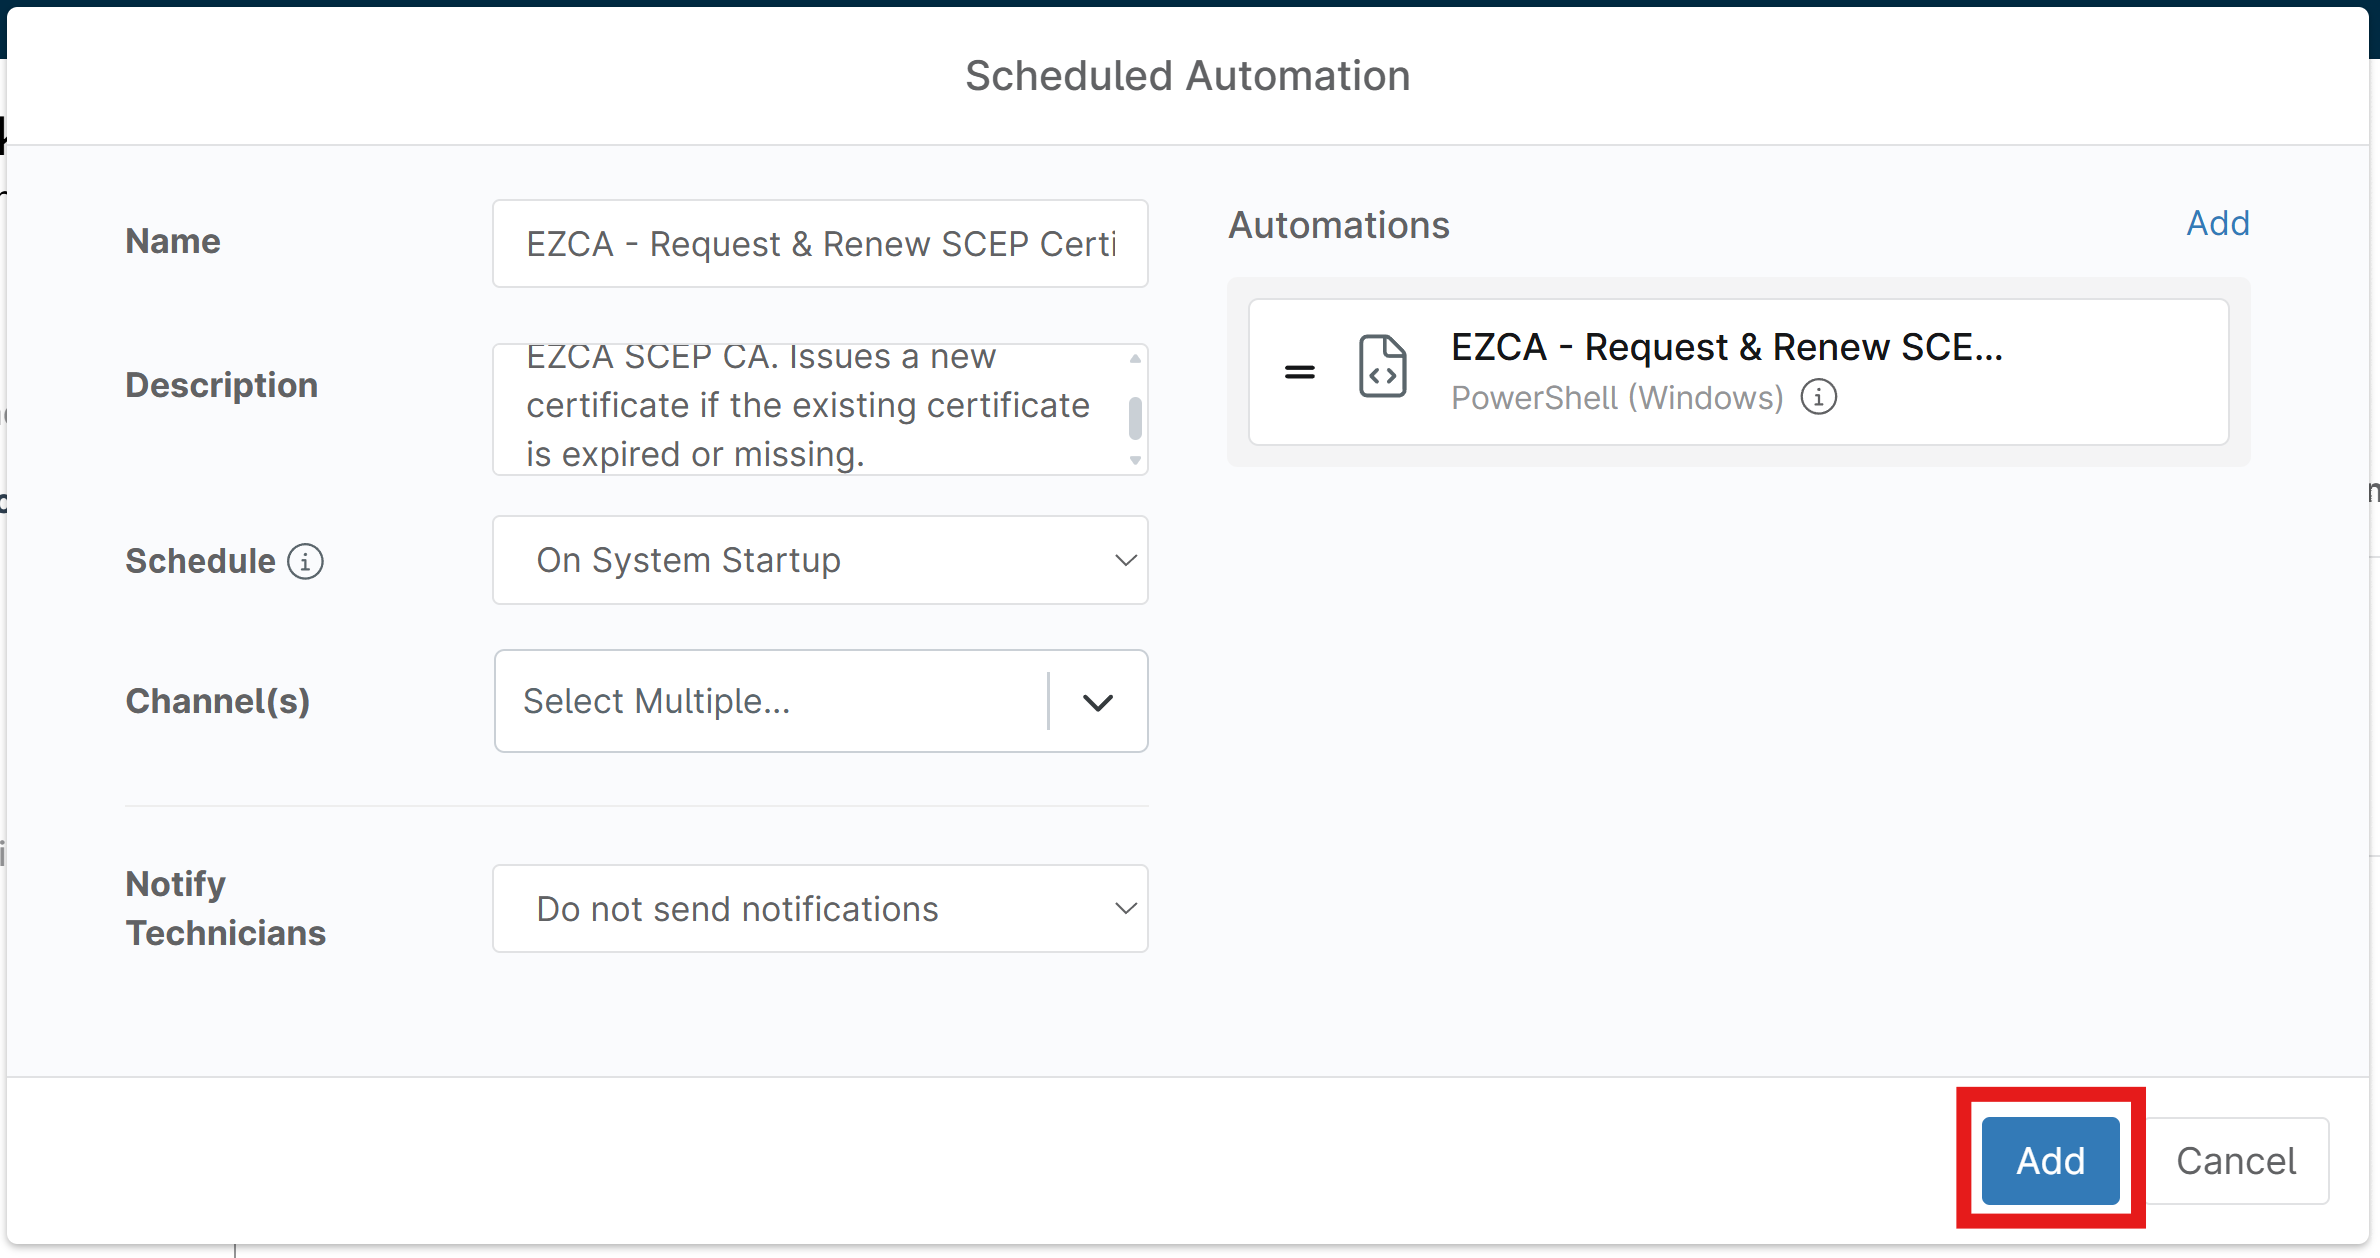
Enter the following values for your scheduled automation:
- Name:
EZCA - Request & Renew SCEP Certificate - Description:
Renew a SCEP certificate from EZCA SCEP CA. Issues a new certificate if the existing certificate is expired or missing. - Schedule: If you want to issue device/machine certificates, select On System Startup. If you want to issue user certificates, select On User Logon. This ensures that the script runs when the device starts up or when the user logs in, which is a good time to check for certificate renewal as well. You can choose Daily, but note that this will not run if the device is offline during the scheduled time, so it may not be as reliable for ensuring timely certificate renewal.
- Channels: Set as desired.
- Notify Technicians: Set as desired.
- Name:
-
Search for “EZCA” and select EZCA - Request & Renew SCEP Certificate.
-
If issuing machine/device certificates, set Run As to System. If issuing user certificates, set Run As to Current Logged On User.
-
Keep Preset Parameter blank.
-
Set CertificateScope to LocalMachine if issuing machine/device certificates or CurrentUser if issuing user certificates.
-
Click Apply to add the automation.
-
Click Add to save your scheduled automation.
-
Make sure to Save your policy to apply the new Scheduled Automations:
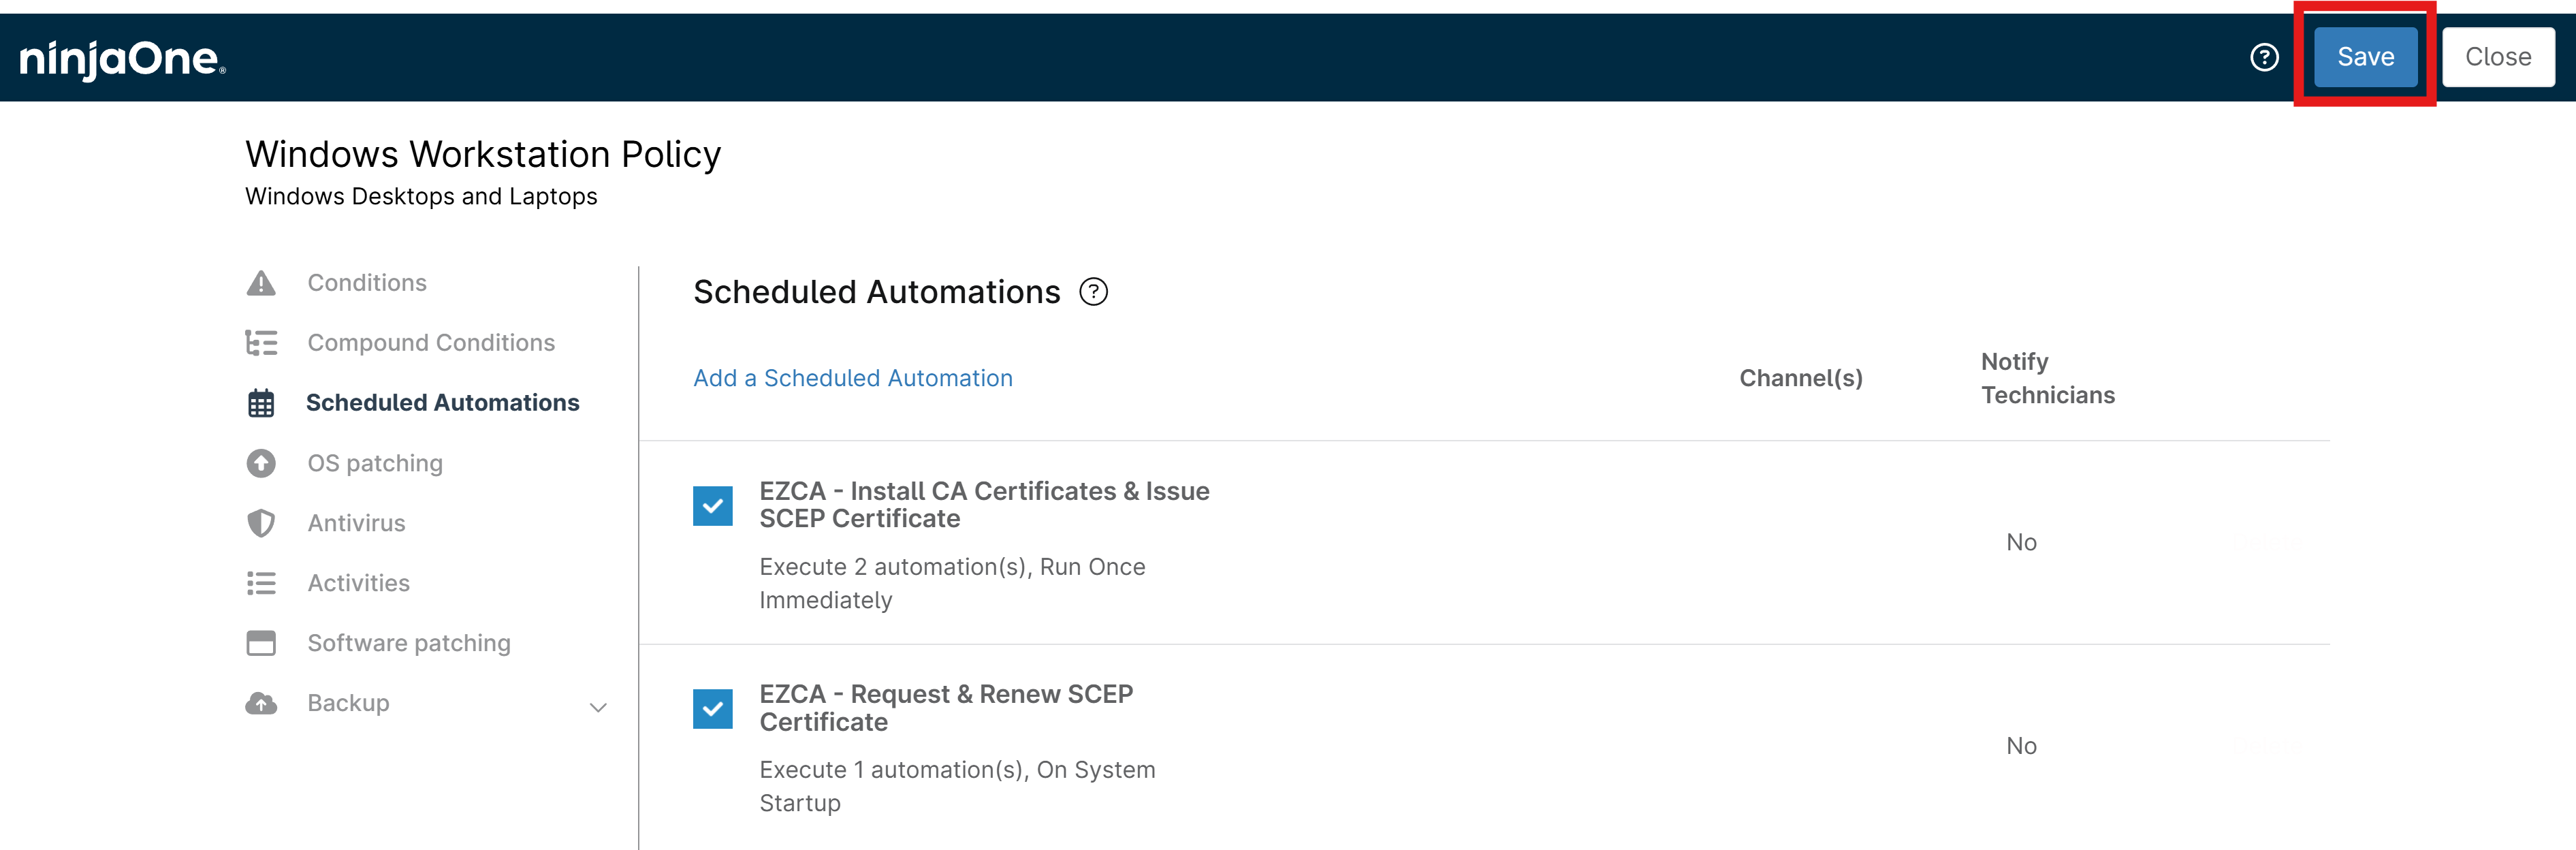
-
Your devices will now automatically check for certificate renewal on the schedule you set and request a new SCEP certificate from your EZCA SCEP CA when the existing certificate is close to expiring, ensuring that your devices always have a valid certificate installed.
Step 9: How to Verify SCEP Certificate Issuance and Renewal on Your Devices
Now that you have your scheduled automations set up to issue and renew SCEP certificates from your EZCA SCEP CA, you can verify that the certificates are being installed correctly on your devices.
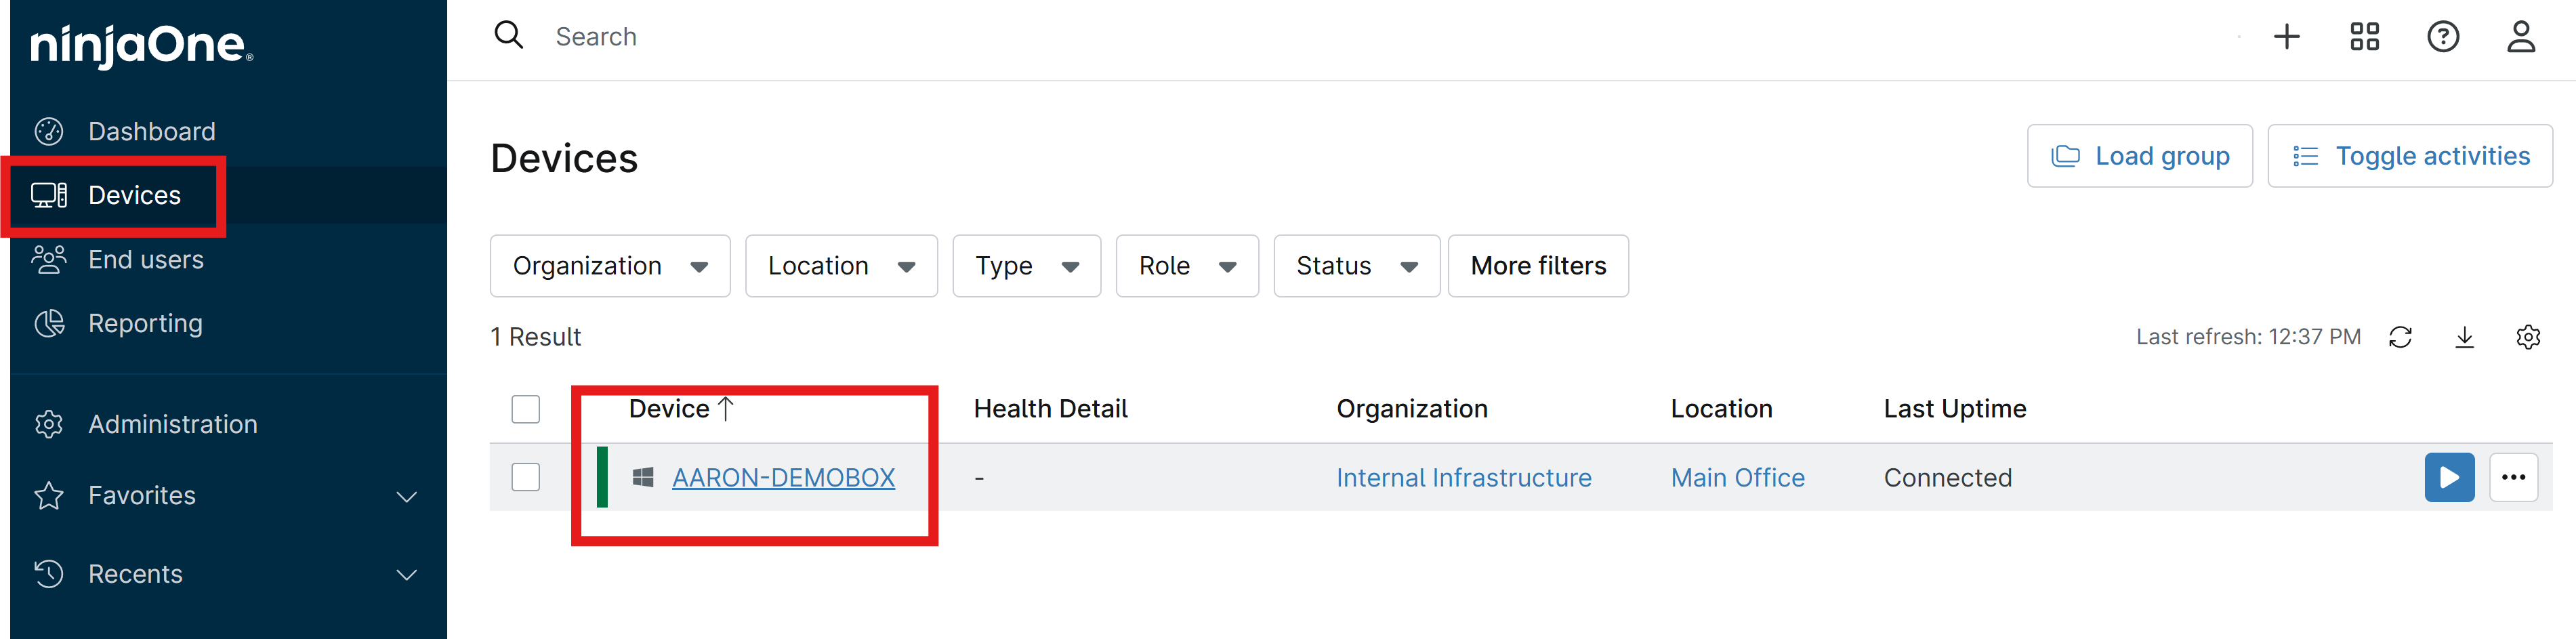
-
In NinjaOne, navigate to Devices and select a device you want to validate.
-
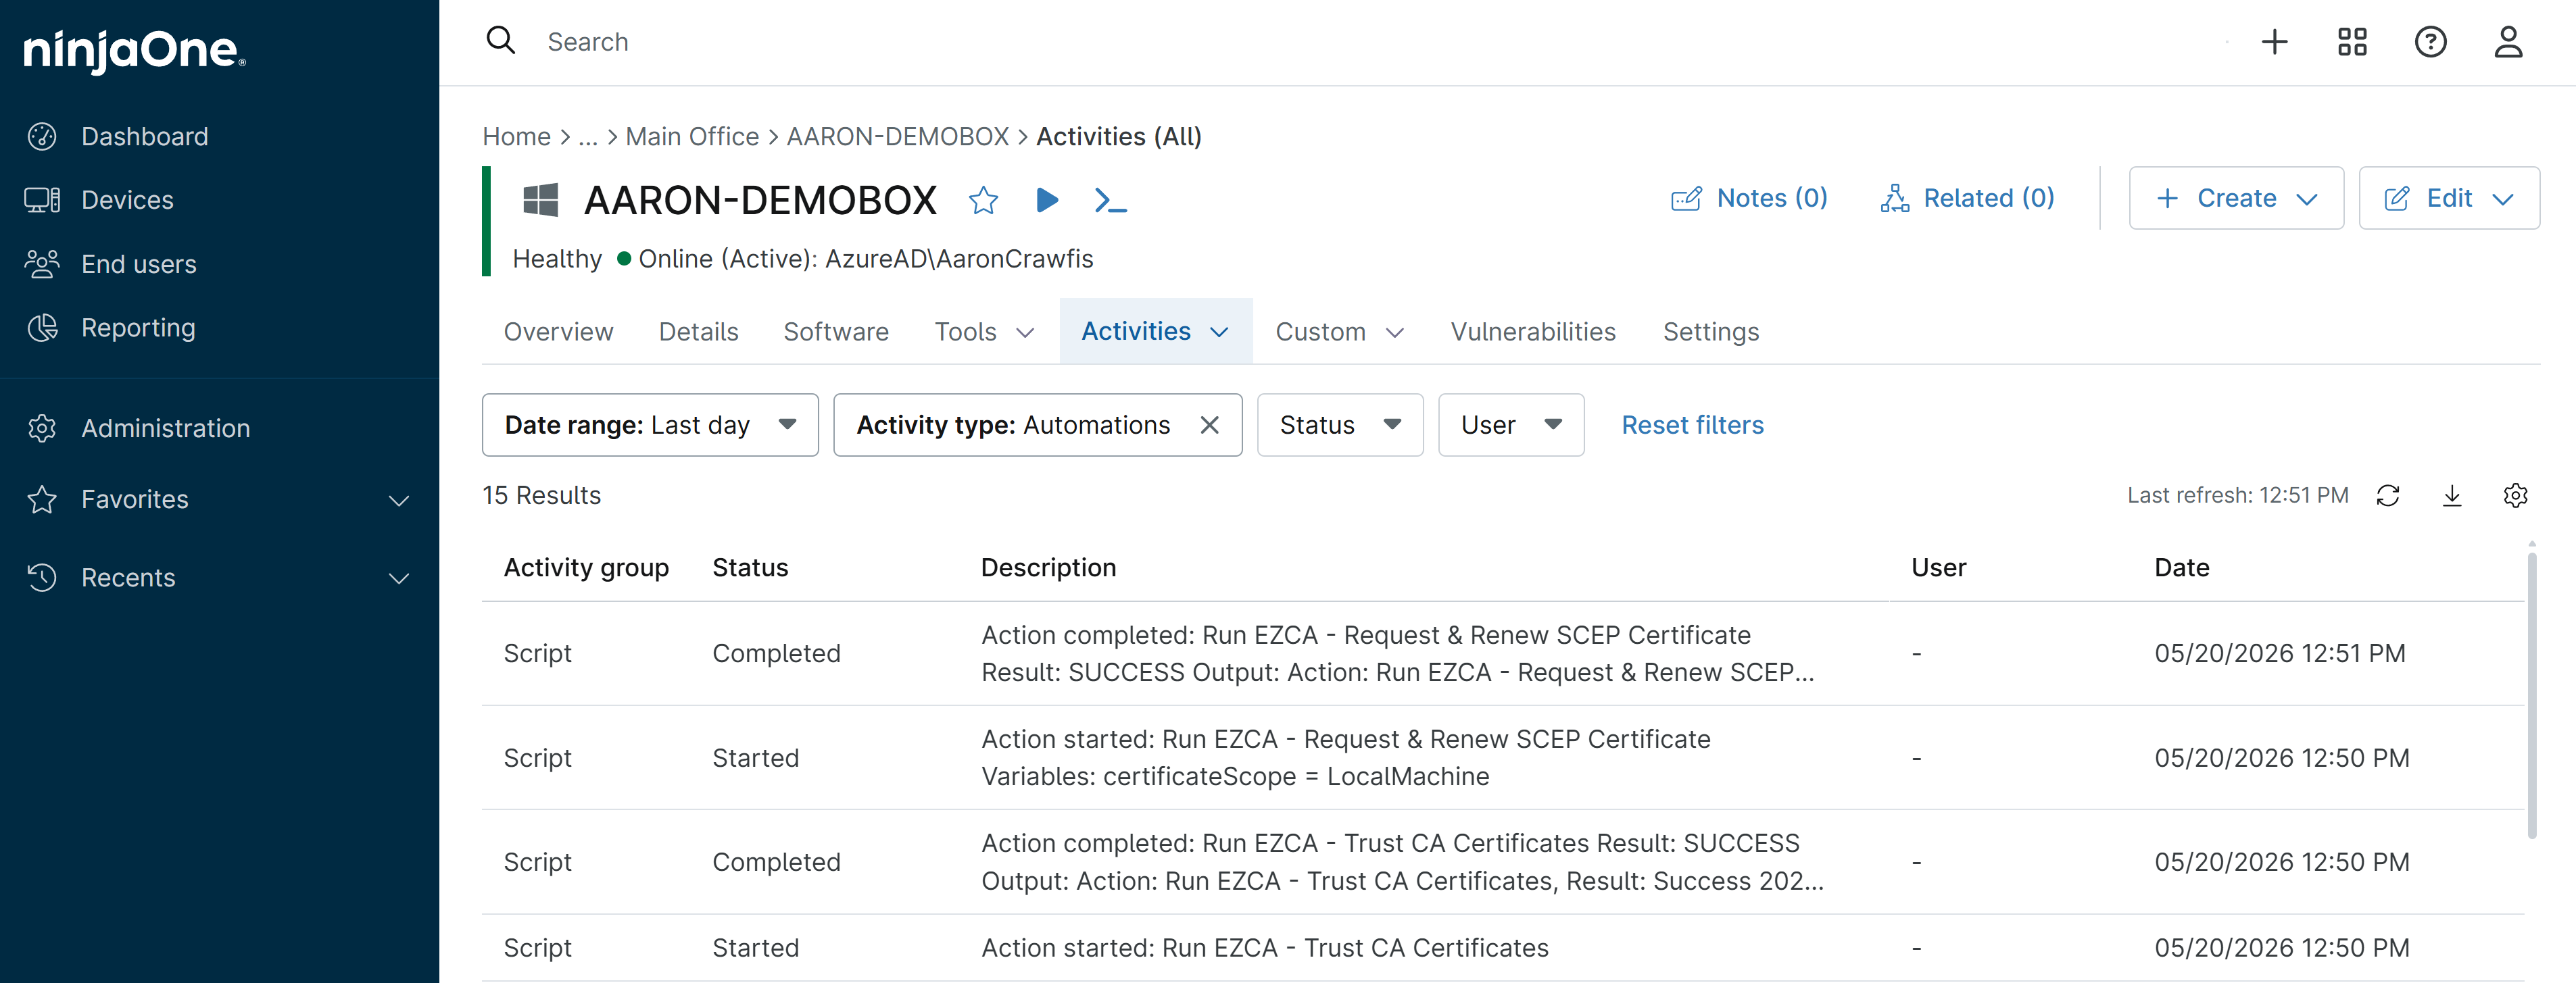
Hover over the Actions tab and select All to view all actions for the device.
-
You should see both the EZCA - Trust CA Certificates and EZCA - Request & Renew SCEP Certificate actions in the list, with the status of each.
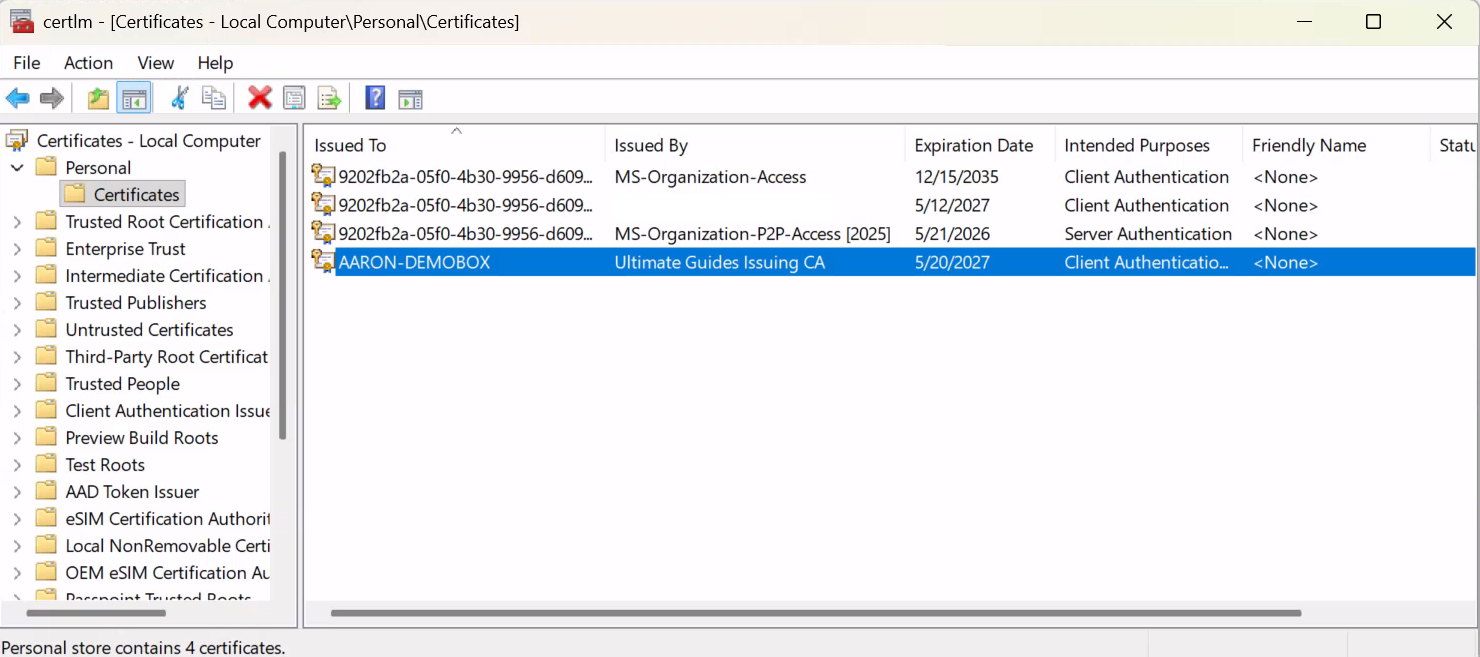
You can also check on the device itself to verify that a SCEP certificate was installed correctly.
-
If you issued the certificate to the local machine store, open the Certificates MMC snap-in for the local machine by running
certlm.msc(or searching for it in the Start Menu). If you issued the certificate to the current user store, runcertmgr.mscinstead. -
Open Personal > Certificates to view all installed certificates in the Personal store (either for the local machine or current user, depending on where you issued the certificate).
-
You should see the SCEP certificate that was issued from your EZCA SCEP CA.
Enjoying EZCA? Leave Us a Review!
We hope you’re enjoying using EZCA to issue your SCEP certificates in NinjaOne! If you have a moment, we would greatly appreciate it if you could leave us a review on G2. Your feedback helps other IT professionals discover EZCA and helps us continue to improve our service. Thank you for your support!