How To Distribute WPA Enterprise Wi-Fi Profiles For Windows Using NinjaOne MDM
Overview - How Wi-Fi Profiles Are Distributed to Windows Devices in NinjaOne MDM
NinjaOne MDM uses Automation scripts on Windows to control configuration and settings on Windows devices. To set up RADIUS authentication on Windows devices using NinjaOne MDM, you can use the PowerShell script provided in the link below to configure your Windows devices to use EAP-TLS certificate-based authentication or EAP-TTLS with Entra ID credentials to connect to your network.
How to Set Up RADIUS Authentication on Windows in NinjaOne MDM - Step by Step Guide
Follow the steps below to set up RADIUS authentication on Windows devices using NinjaOne MDM:
Prerequisites for Setting Up WPA Enterprise Wi-Fi Profiles on Windows in NinjaOne MDM
Before you can set up RADIUS authentication on Windows devices using NinjaOne MDM, make sure you have the following prerequisites in place:
1. How to Create an EZRADIUS Subscription for Cloud RADIUS with NinjaOne MDM
An EZRADIUS subscription handles central configuration and billing. Make sure you have an active EZRADIUS subscription for Cloud RADIUS before you set up your access policies.
You can create an EZRADIUS subscription directly though Keytos by visiting our sign up page. Learn more in our sign up guide.
How to Sign Up for an EZRADIUS Subscription with a Credit Card
If you’d like to bill your EZRADIUS subscription directly to your Azure subscription, you can create your EZRADIUS subscription through the Azure Marketplace. Visit the EZRADIUS listing in the Azure Marketplace to create your subscription. Learn more in our Azure Marketplace sign up guide.
How to Sign Up for an EZRADIUS Subscription through the Azure Marketplace
If you’d like to pay through a prepaid invoice, please contact our sales team at sales@keytos.io to set up your EZRADIUS subscription.
2. How to Configure Your EZRADIUS Access Policies
Access Policies in EZRADIUS determine who can connect to your network and how they can authenticate. You need to configure your Access Policies in EZRADIUS before you set up RADIUS authentication on your Windows devices using NinjaOne MDM.
Visit our guide on how to create a certificate-based Access Policy in EZRADIUS to learn how to set up your Access Policy for EAP-TLS certificate-based authentication.
Visit our guide on how to create an Access Policy with Entra ID credentials in EZRADIUS to learn how to set up your Access Policy for EAP-TTLS with Entra ID credentials.
How to Create an Access Policy with Entra ID Credentials in EZRADIUS
3. How to Issue Certificates to Windows Devices for EAP-TLS Authentication in NinjaOne MDM
This step is only necessary if you’re using EAP-TLS certificate-based authentication. If you’re using EAP-TTLS with Entra ID credentials, you can skip this step.
If you plan to use EAP-TLS certificate-based authentication for your Windows devices, you need to issue certificates to your Windows devices.
Follow our EZCA certificate guide to set up your EZCA certificate authority and issue certificates to your Windows devices.
If you’re using a third-party CA, you can follow the instructions provided by your CA to issue certificates to your Windows devices. Make sure to export the certificates in PFX format, as you’ll need to import them into NinjaOne MDM in the next step.
Step 1 - How to Generate Your Wi-Fi XML Profile for RADIUS Authentication on Windows in NinjaOne MDM
Windows uses XML profiles to configure Wi-Fi settings on Windows devices. Follow the instructions below to generate your Wi-Fi XML profile for RADIUS authentication on Windows devices using NinjaOne MDM.
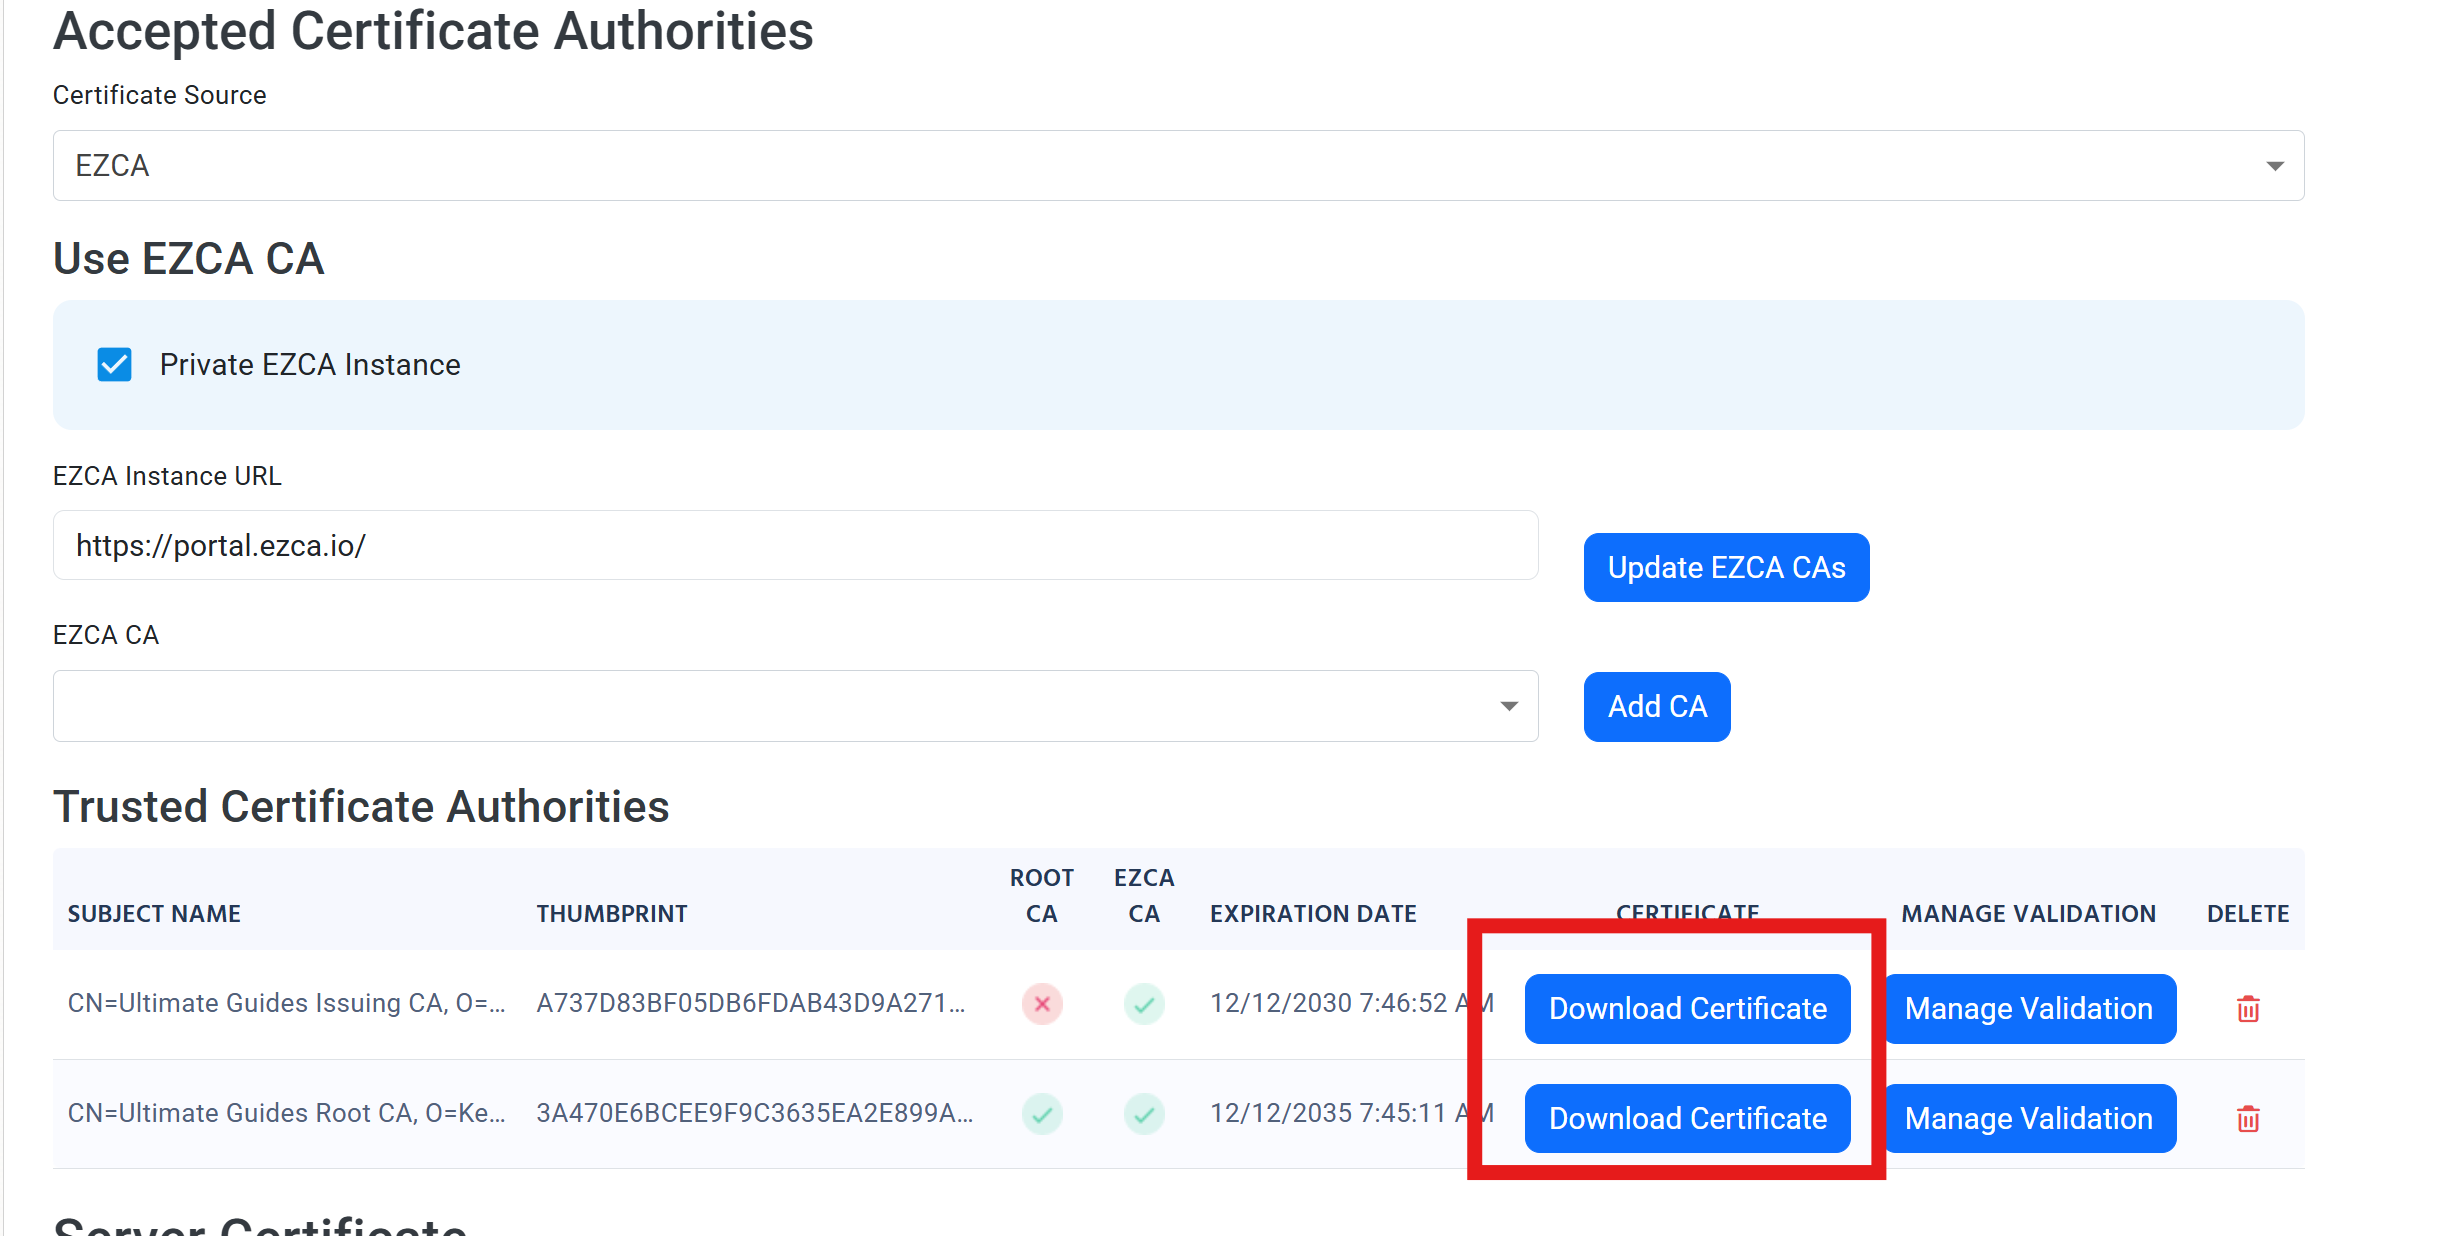
Download Your Certificate Authority (CA) Certificates for EAP-TLS Authentication
You will need your Certificate Authority (CA) certificates to generate your Wi-Fi XML profile for EAP-TLS authentication. Make sure to download all CA certificates in your certificate chain, including the root CA and any intermediate CAs, as a .cer file.
If you need to download your CA certificates, you can do so from your EZRADIUS portal by following these steps:
-
Navigate to your EZRADIUS portal.
-
From the left-hand menu, select Policies.
-
Scroll down to your RADIUS policy and find the Accepted Certificate Authorities > Trusted Certificate Authorities section.
-
For each CA in your certificate chain, click the Download Certificate button to download the CA certificate as a .cer file.
Download Your EZRADIUS Server Certificate CA
You will also need your EZRADIUS server certificate to generate your Wi-Fi XML profile for EAP-TLS authentication. This is the certificate that your Windows devices will trust when connecting to your network.
To download your EZRADIUS server certificate, follow these steps:
-
Still in your EZRADIUS portal under the same RADIUS policy, scroll down to the Server Certificate > Existing Certificate section.
-
Click Download Certificate to download your EZRADIUS server certificate as a .cer file.

Generate Your Wi-Fi XML Profile for RADIUS Authentication on Windows in NinjaOne MDM
Use our XML generation tool to generate your Wi-Fi XML profile for RADIUS authentication on Windows devices. Download the generated XML file and save it, as you’ll need to upload it to NinjaOne MDM in the next step.
Generates a Windows netsh-importable WLAN profile for EZRADIUS.
Certificates are read and fingerprinted entirely in your browser — nothing is uploaded.
Network Configuration
EAP-TLS Configuration
.cer files (plus any intermediates) that issue your
client certs. Their thumbprints become the CAHashList used to select the right client cert.
EZRADIUS Server Certificate
Parsed certificate details
Generate Your Wi-Fi XML Profile for RADIUS Authentication with Entra ID Credentials
Use our XML generation tool to generate your Wi-Fi XML profile for RADIUS authentication with Entra ID credentials. Download the generated XML file and save it, as you’ll need to upload it to NinjaOne MDM in the next step.
Generates a Windows netsh-importable WLAN profile for EZRADIUS.
Certificates are read and fingerprinted entirely in your browser — nothing is uploaded.
Network Configuration
EAP-TLS Configuration
.cer files (plus any intermediates) that issue your
client certs. Their thumbprints become the CAHashList used to select the right client cert.
EZRADIUS Server Certificate
Parsed certificate details
Step 2 - How to Upload Your Wi-Fi XML Profile to NinjaOne MDM
Now that you have your Wi-Fi XML profile generated, you need to add a new NinjaOne organization custom field and add it to your organization.
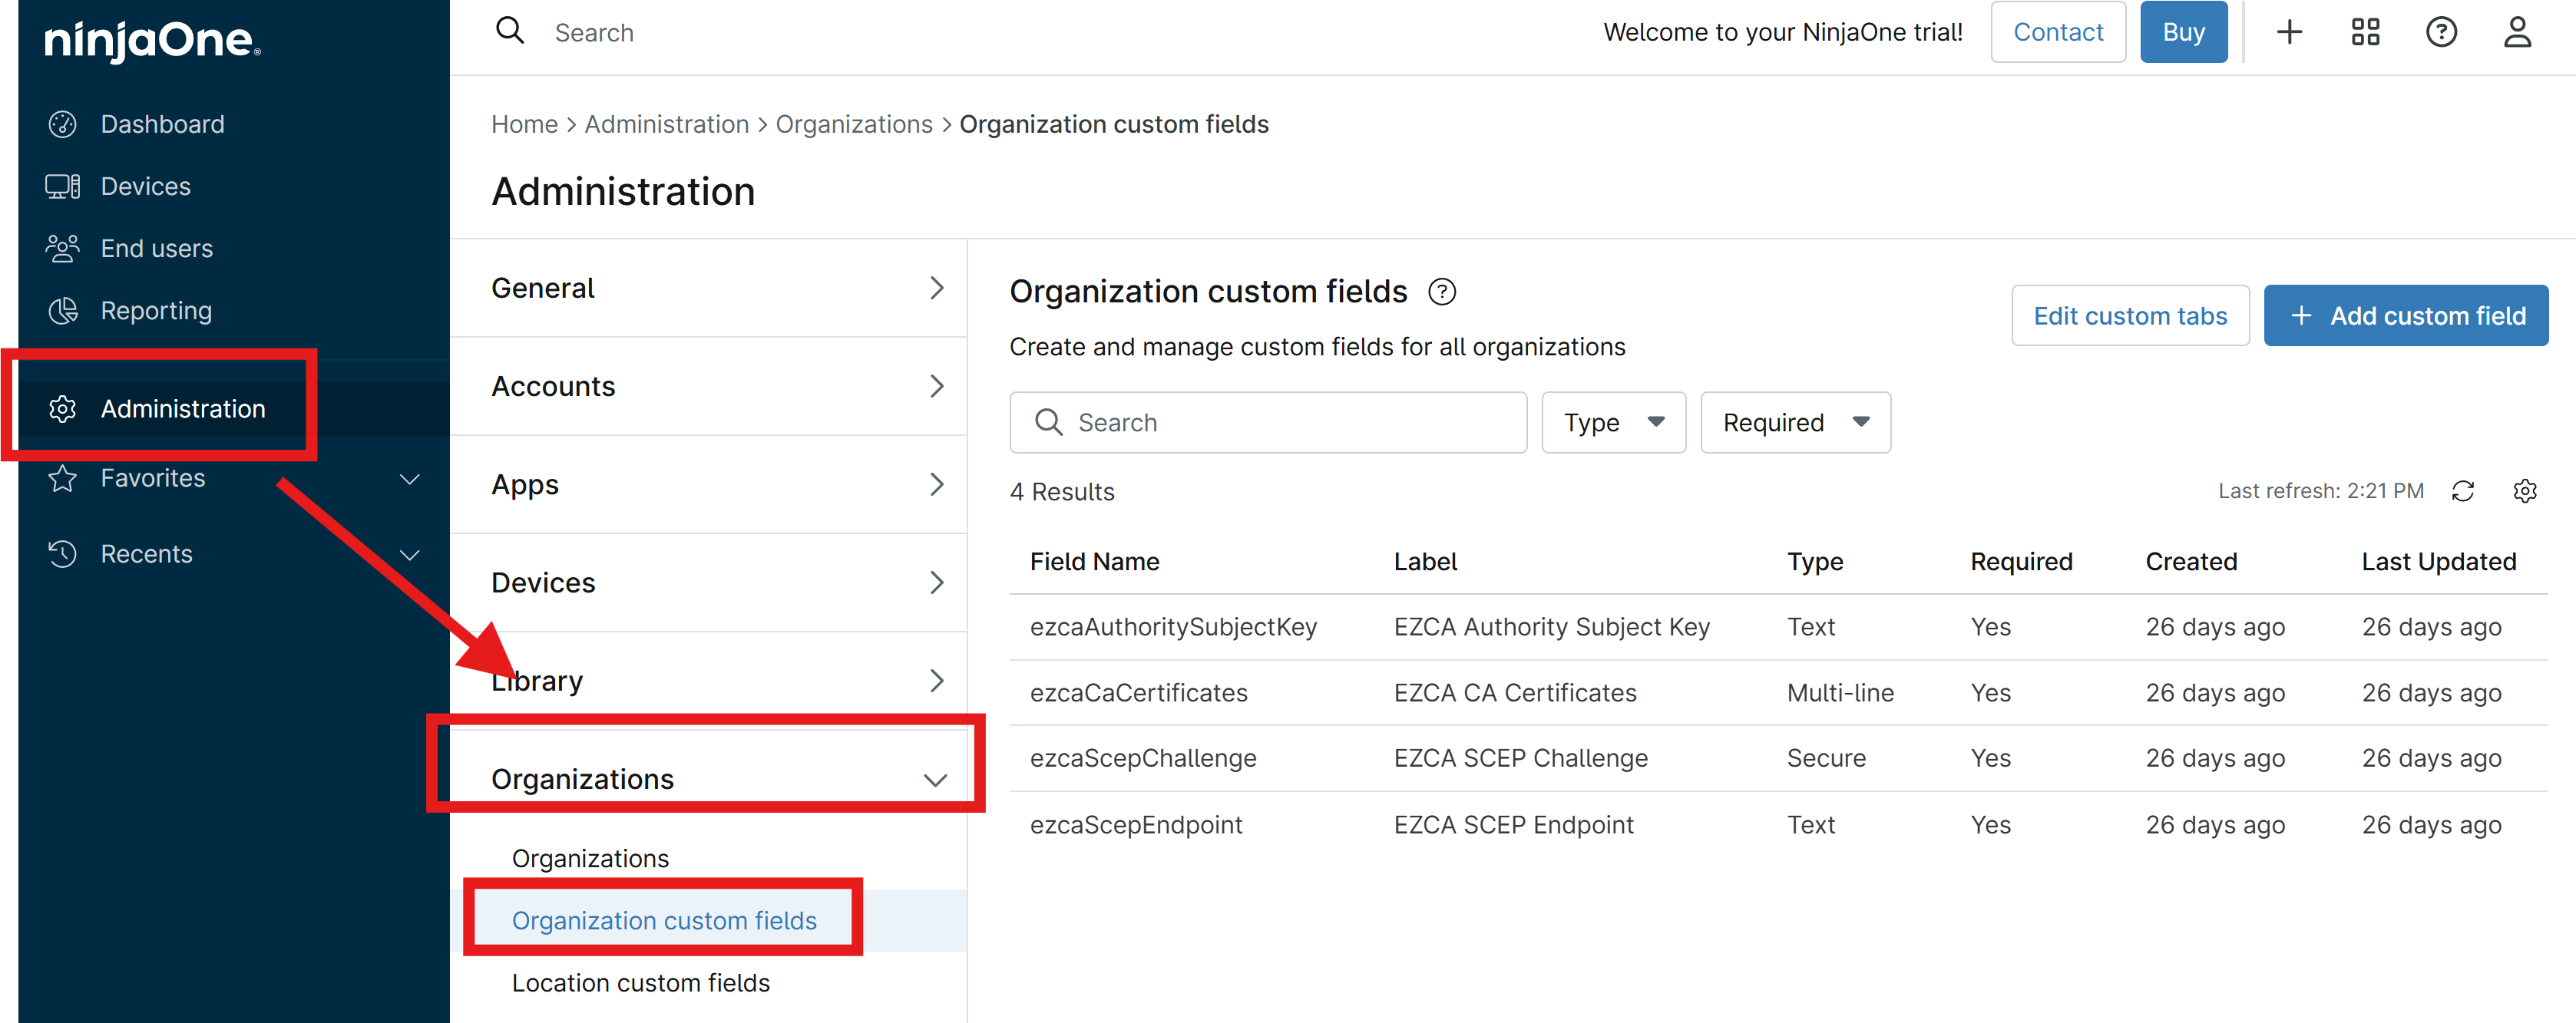
How to Create a New NinjaOne Organization Custom Field for Your Wi-Fi XML Profile
-
Navigate to your NinjaOne portal.
-
From the left-hand menu, select Administration > Organization > Organization custom fields.
-
Click + Add custom field.
-
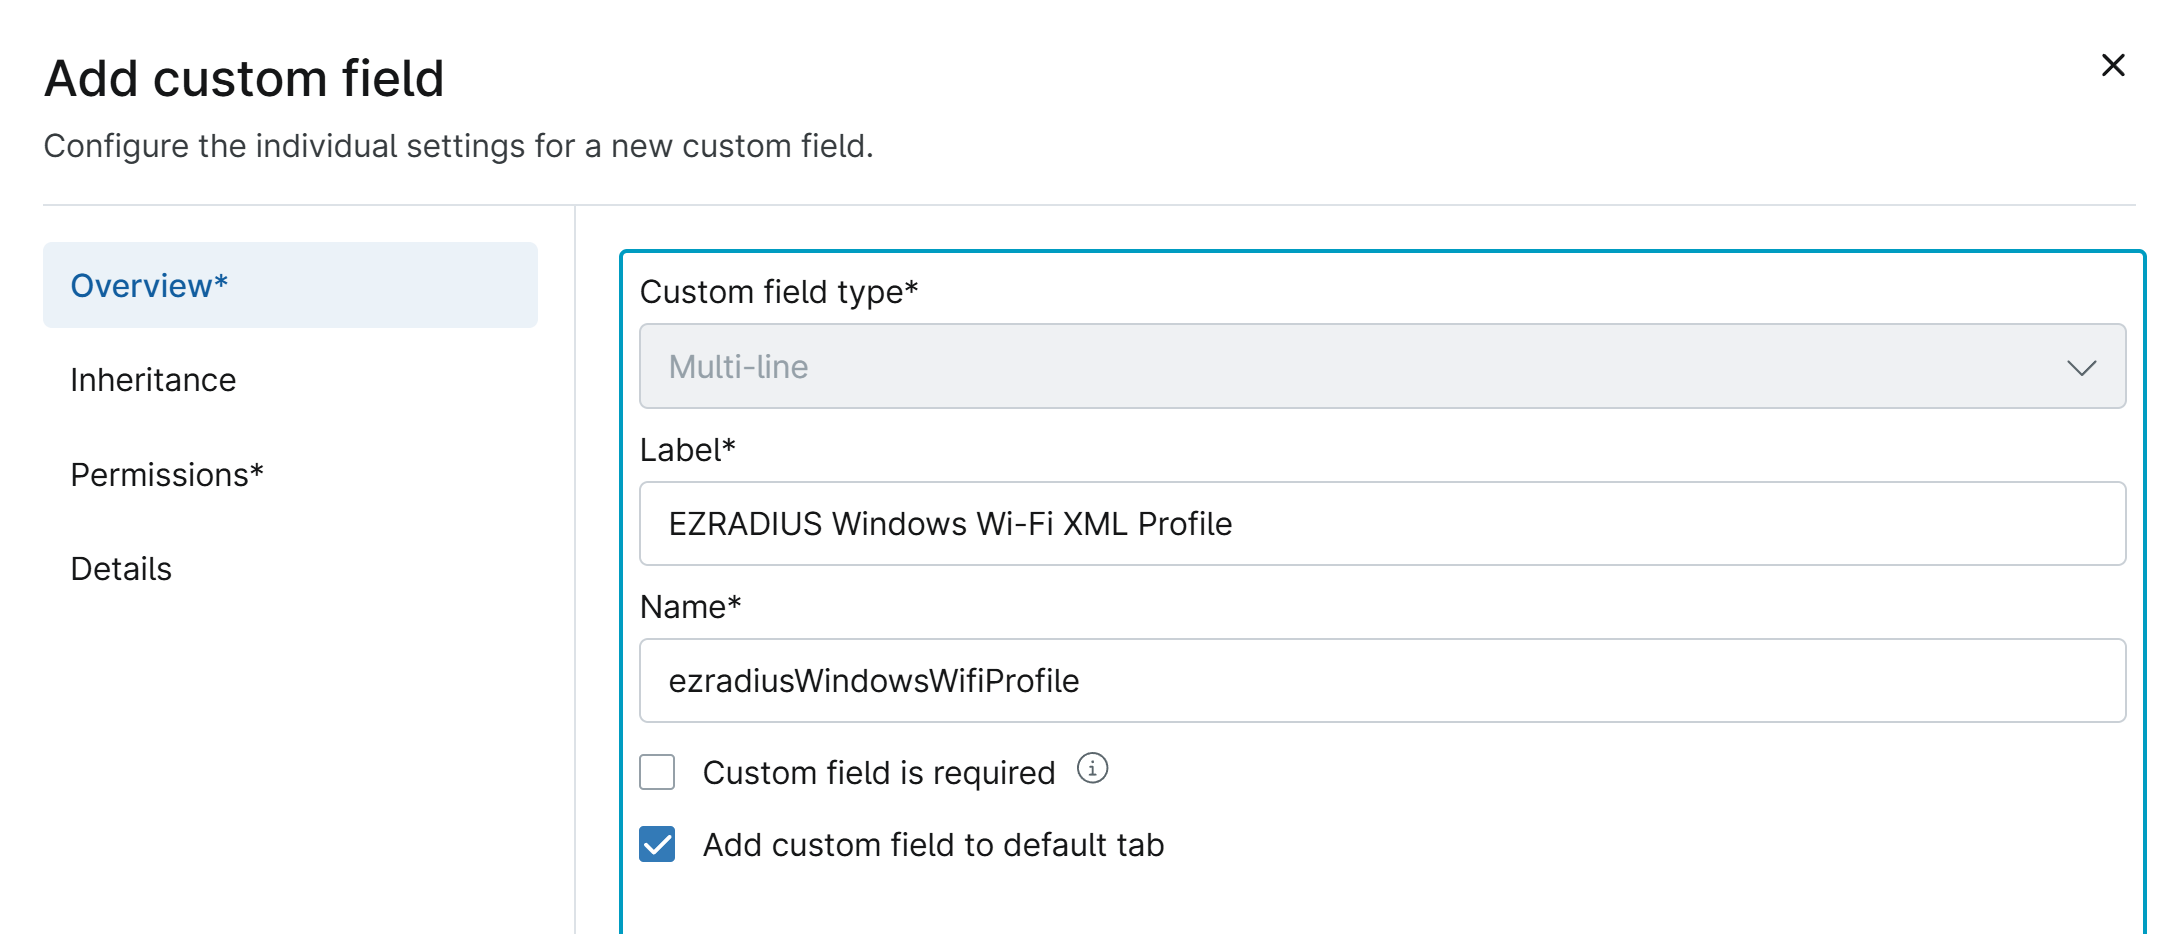
For the Custom field type, select Multi-line.
-
Under Overview, enter the following information:
- Label: EZRADIUS Windows Wi-Fi XML Profile
- Name: ezradiusWindowsWifiProfile
-
Keep Inheritance set to the default values.
-
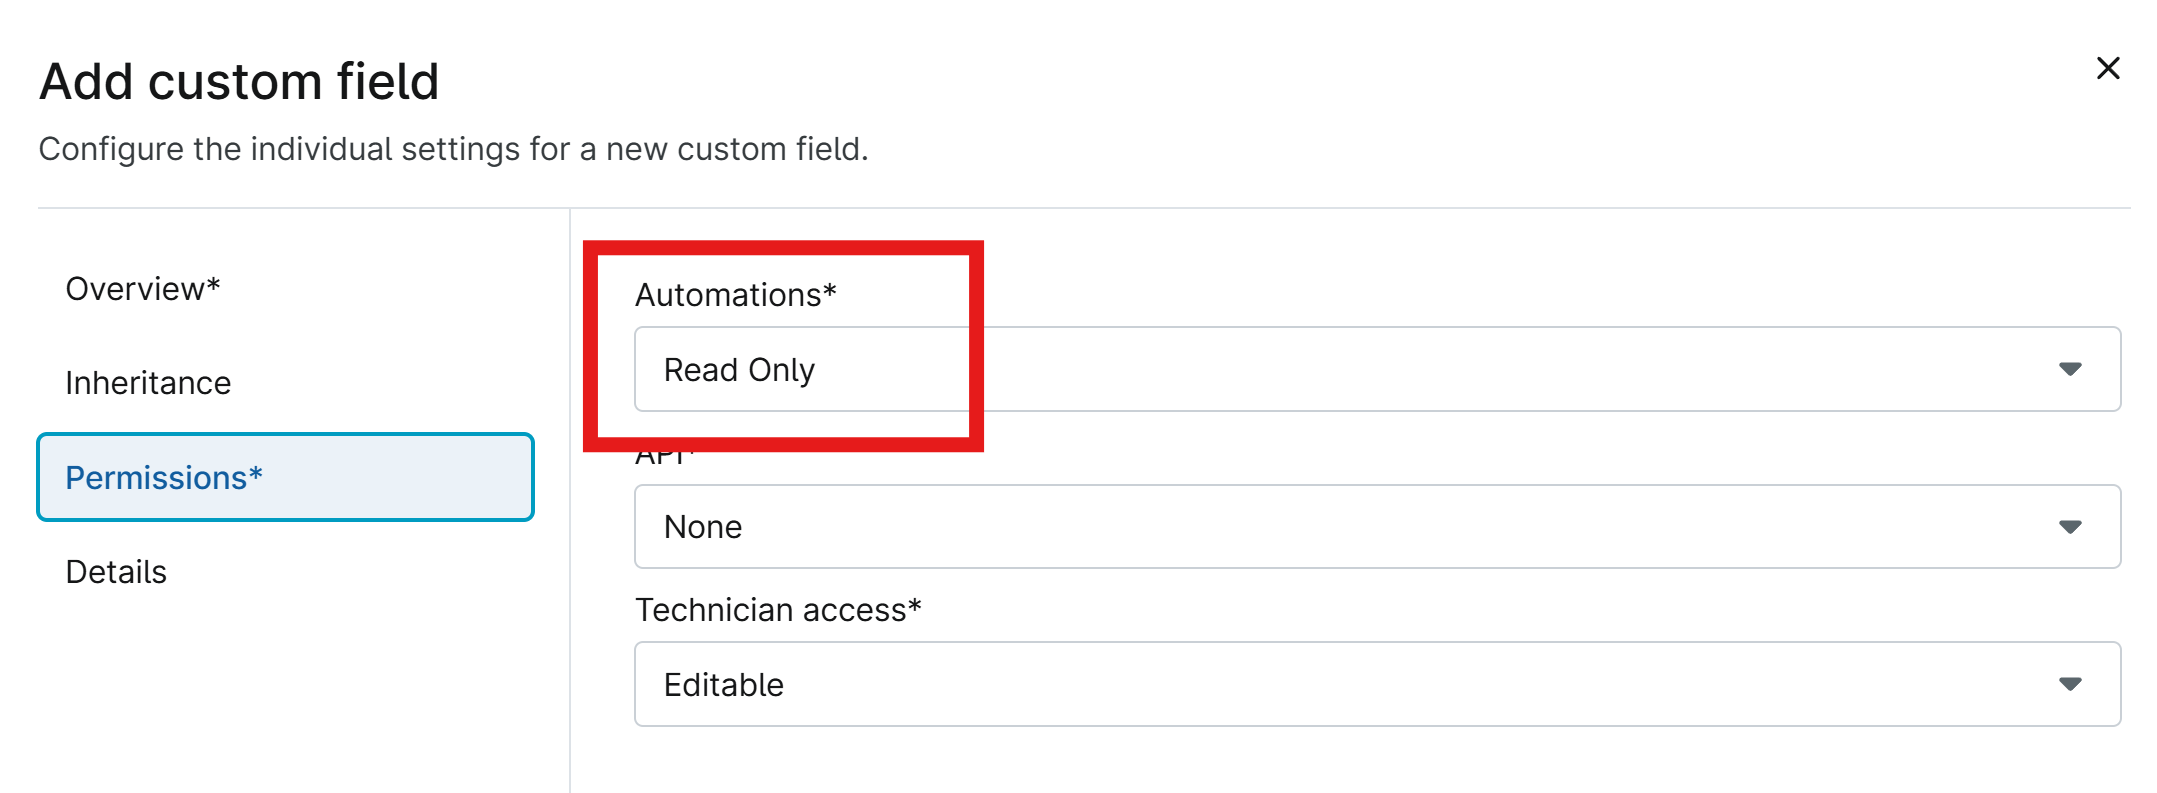
Under Permissions, set Automations to Read Only so that the custom field can be used in your NinjaOne install script.
-
Under Details, optionally add a description for the custom field to provide more context for your team.
-
Click Submit to create your custom field.
How to Set Your Wi-Fi XML Profile Custom Field Value in NinjaOne MDM
Now that the custom field is created, you need to set the value of the custom field to the contents of your Wi-Fi XML profile for RADIUS authentication.
-
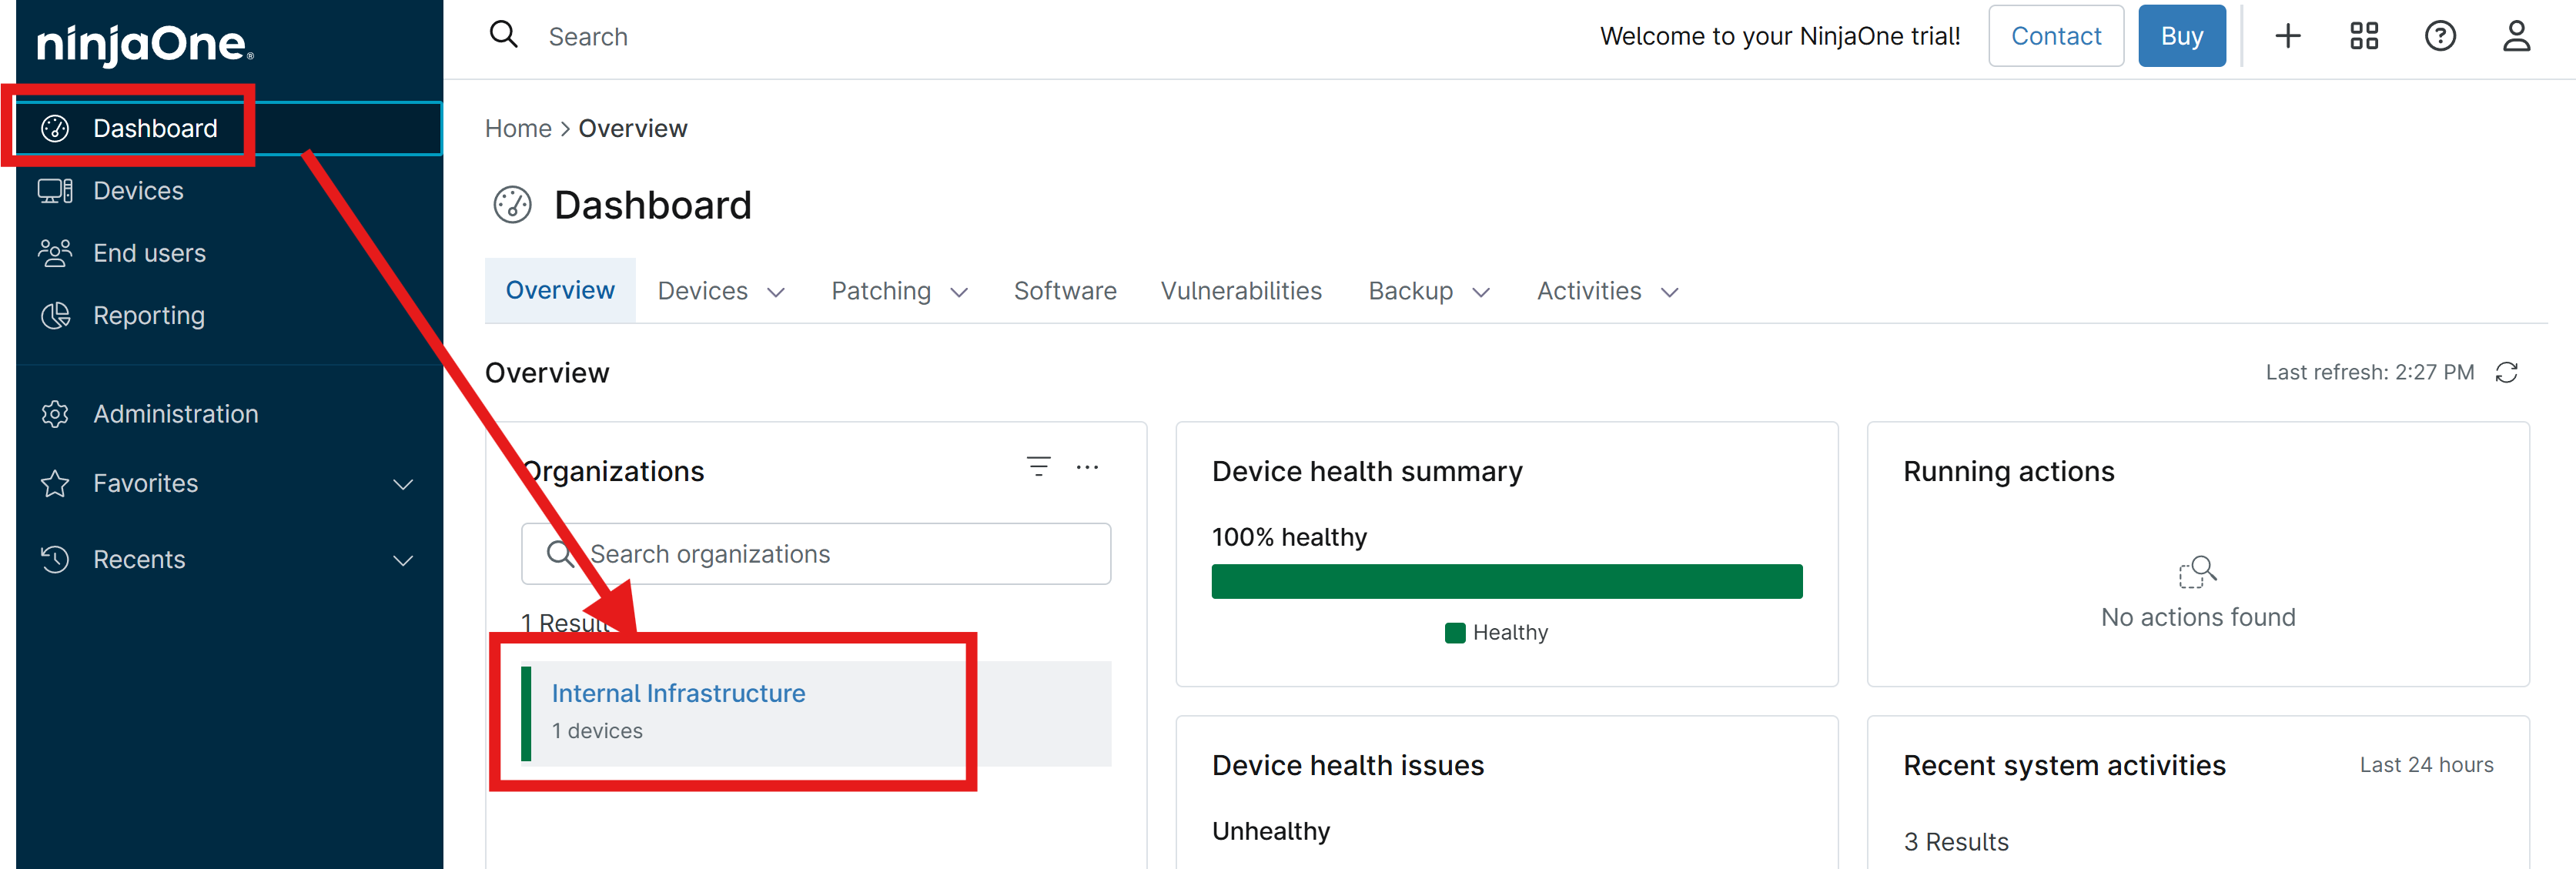
Still in your NinjaOne portal, navigate to Dashboard and select your organization under Organizations.
-
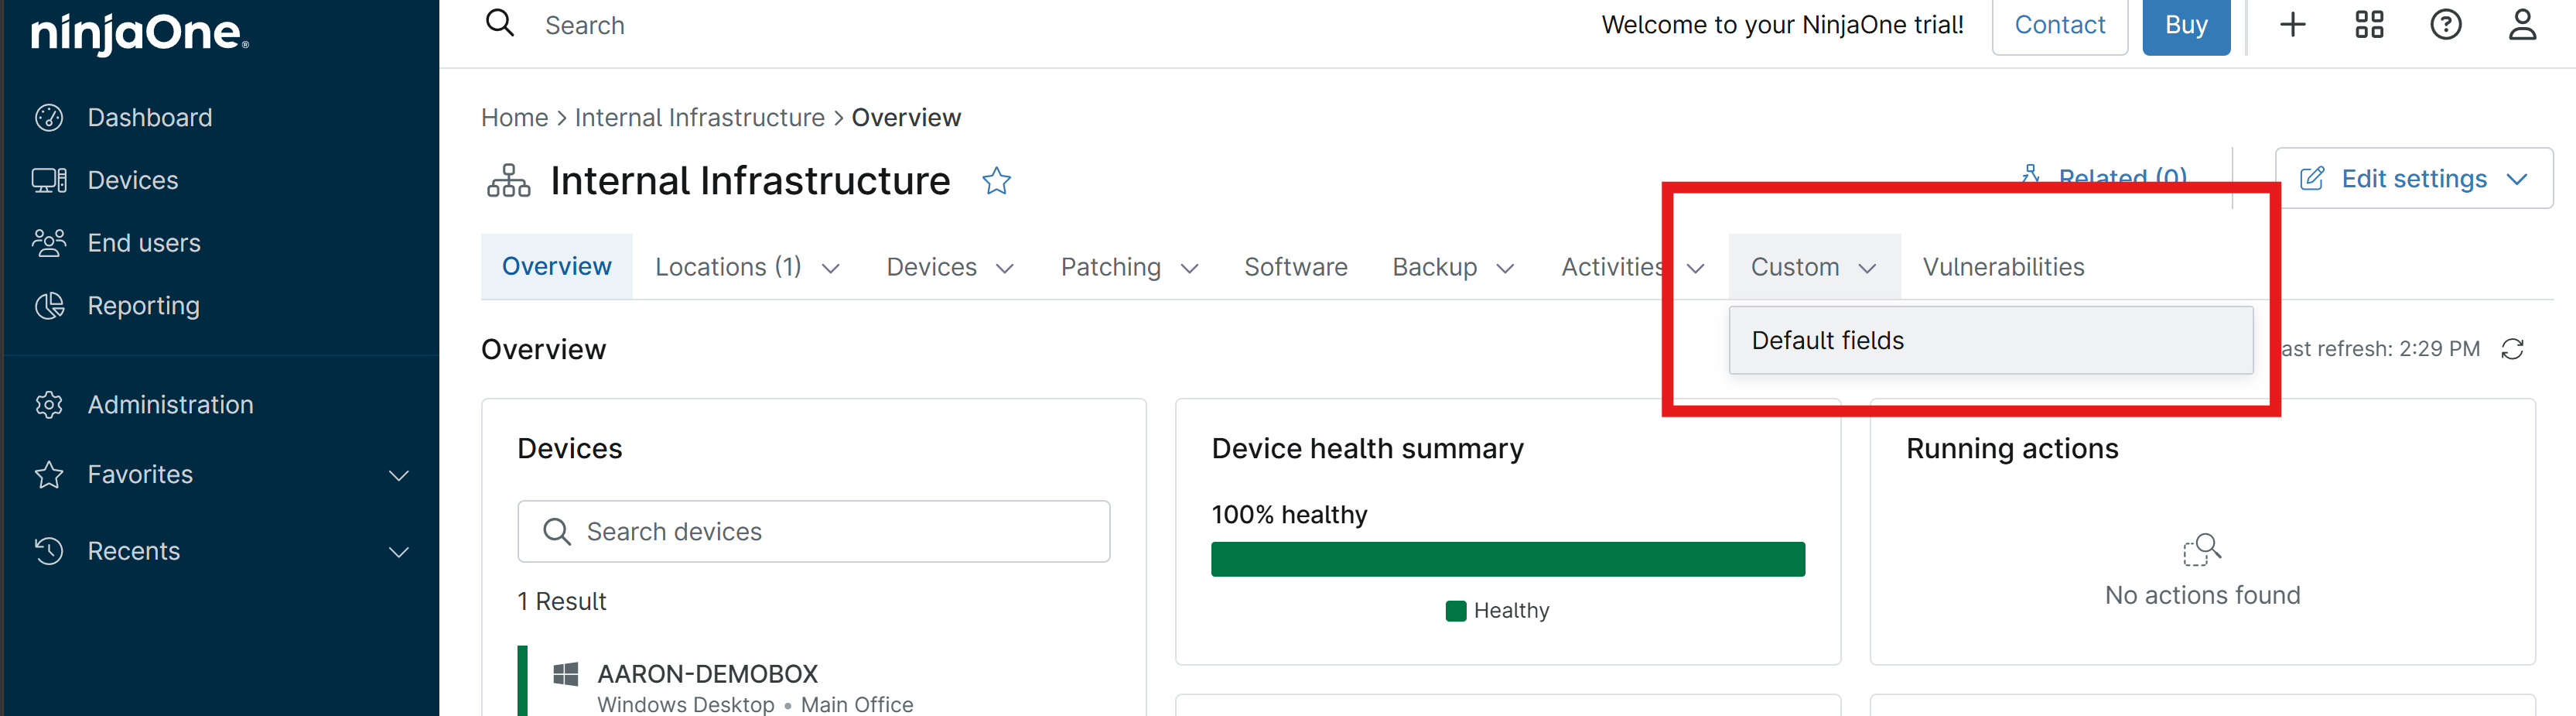
From the tab menu, select Custom > Default fields.
-
Click the pencil icon to edit your default fields.
-
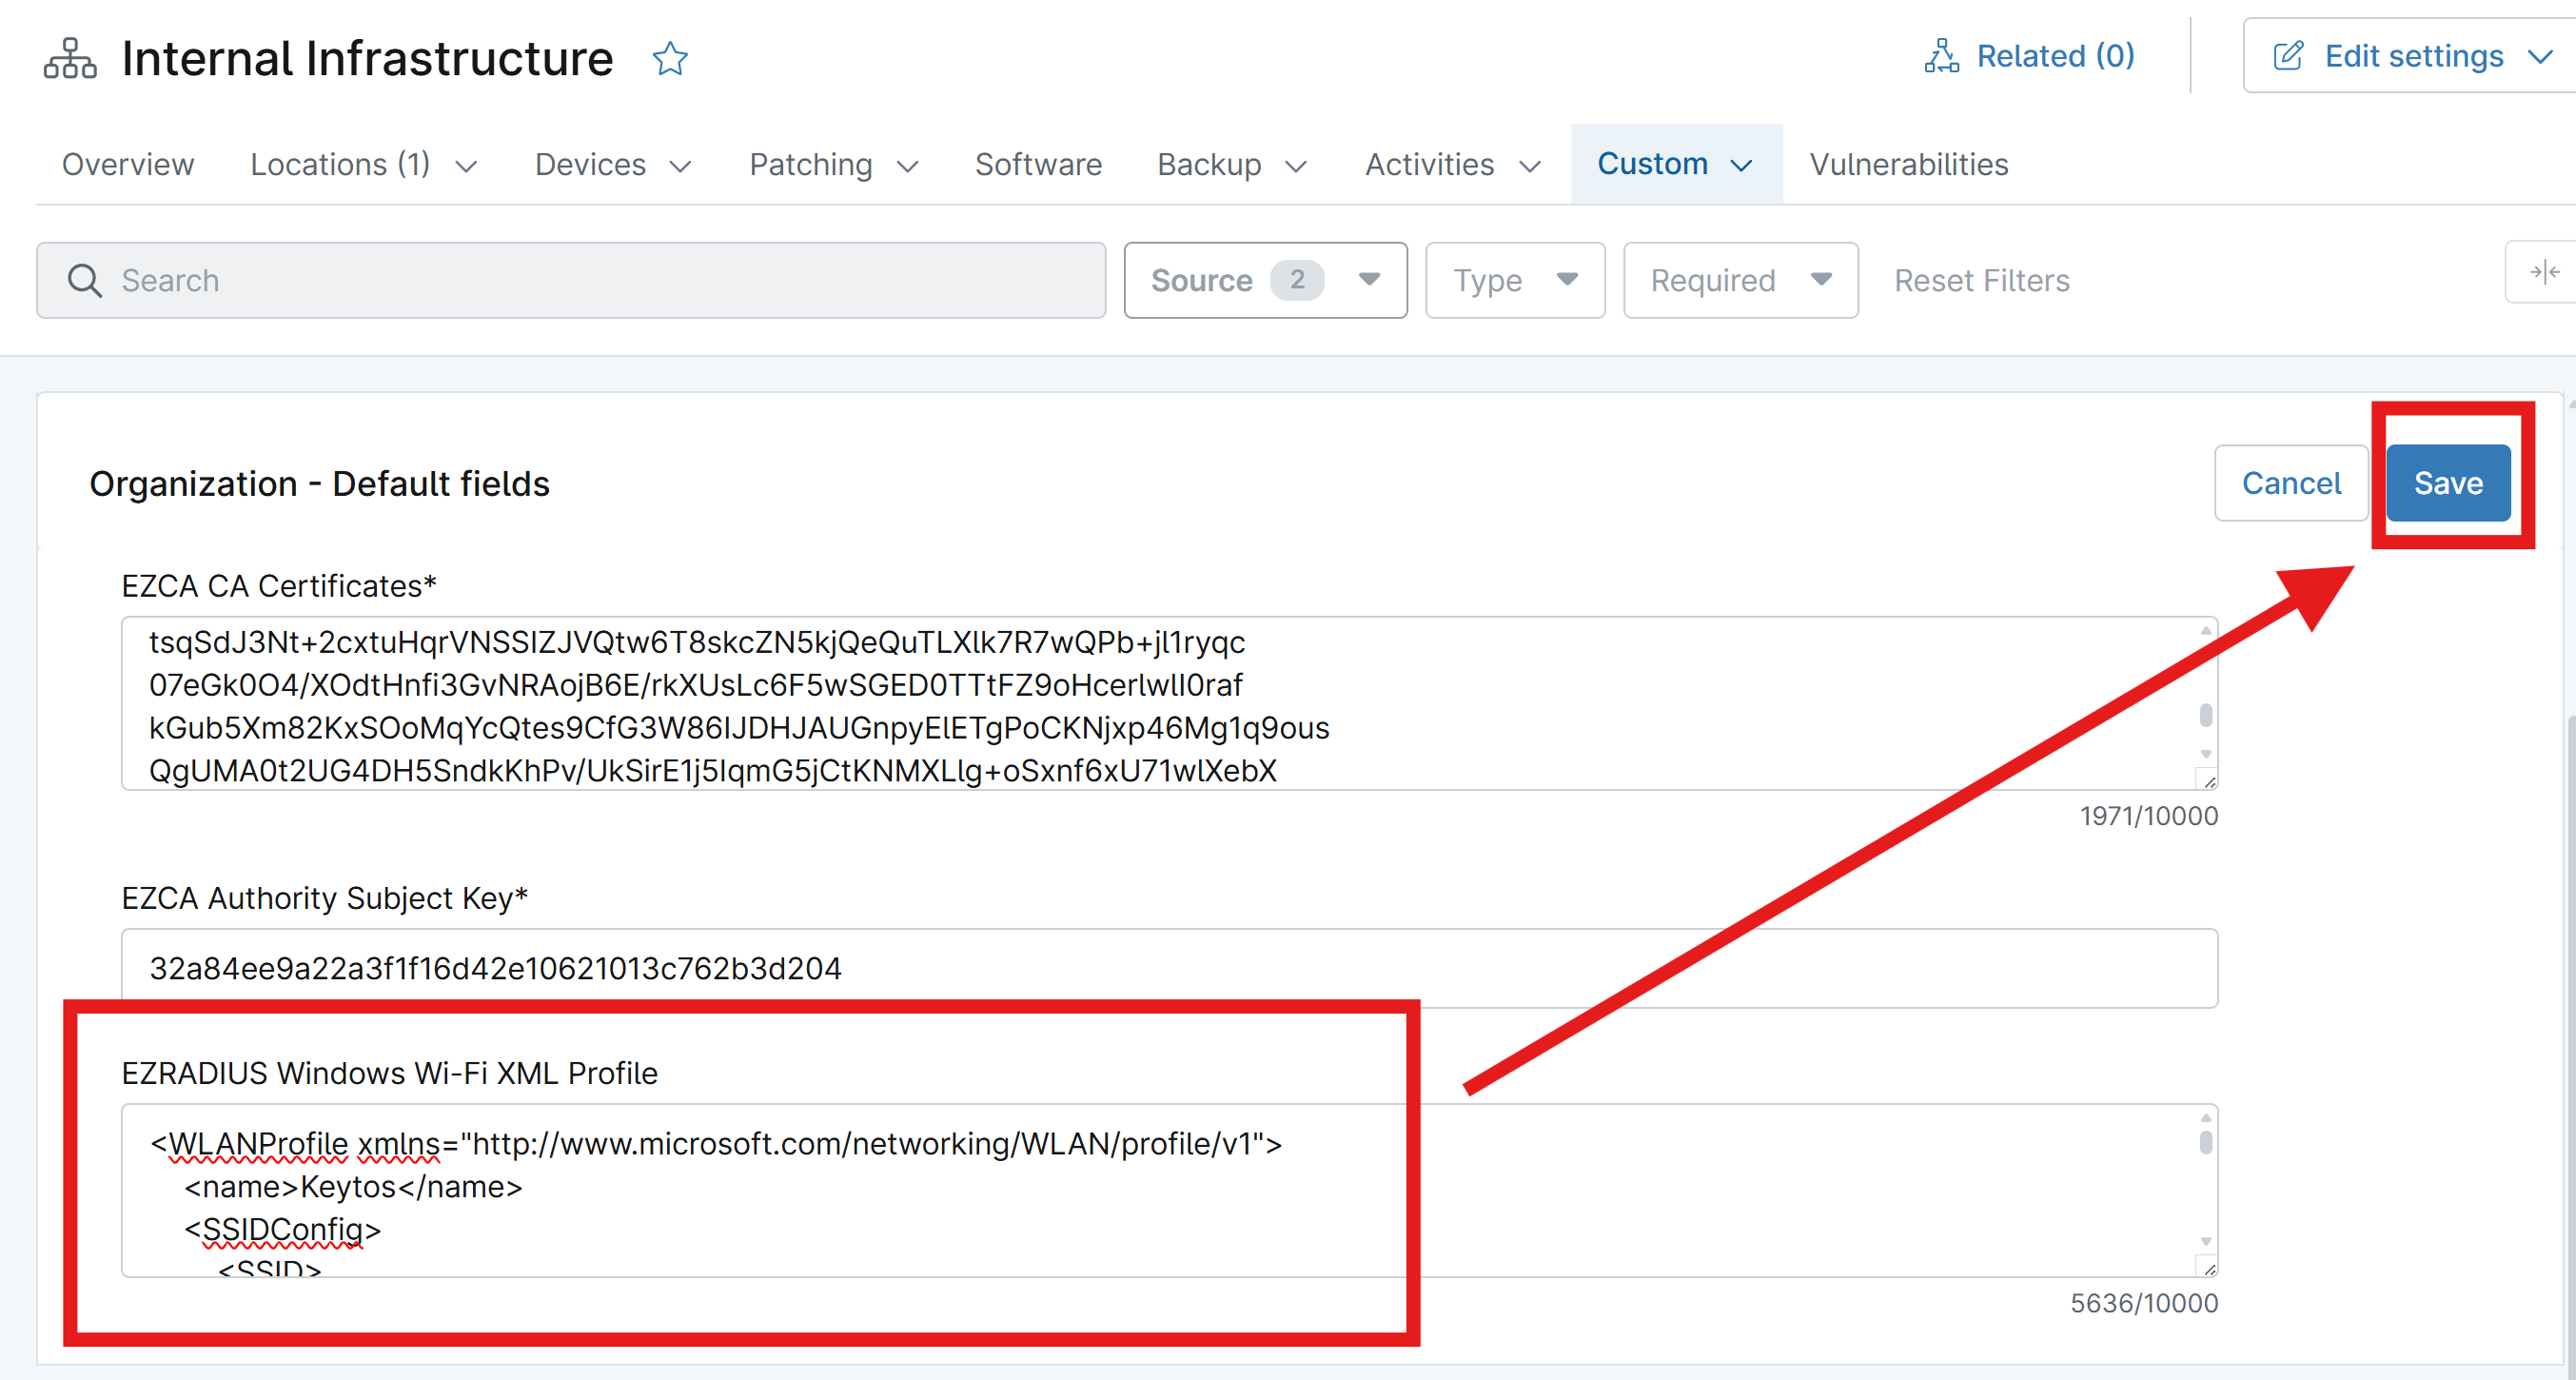
Under EZRADIUS Windows Wi-Fi XML Profile, paste the contents of your Wi-Fi XML profile for RADIUS authentication.
-
Click Save to save the custom field value.
Step 3 - How to Create a Wi-Fi Profile Installation Script in NinjaOne MDM for Windows
Now that you have your Wi-Fi XML profile uploaded to NinjaOne MDM as a custom field, you need to create an installation script in NinjaOne MDM that will install the Wi-Fi profile on your Windows devices.
-
In your NinjaOne portal, navigate to Administration > Library > Automation
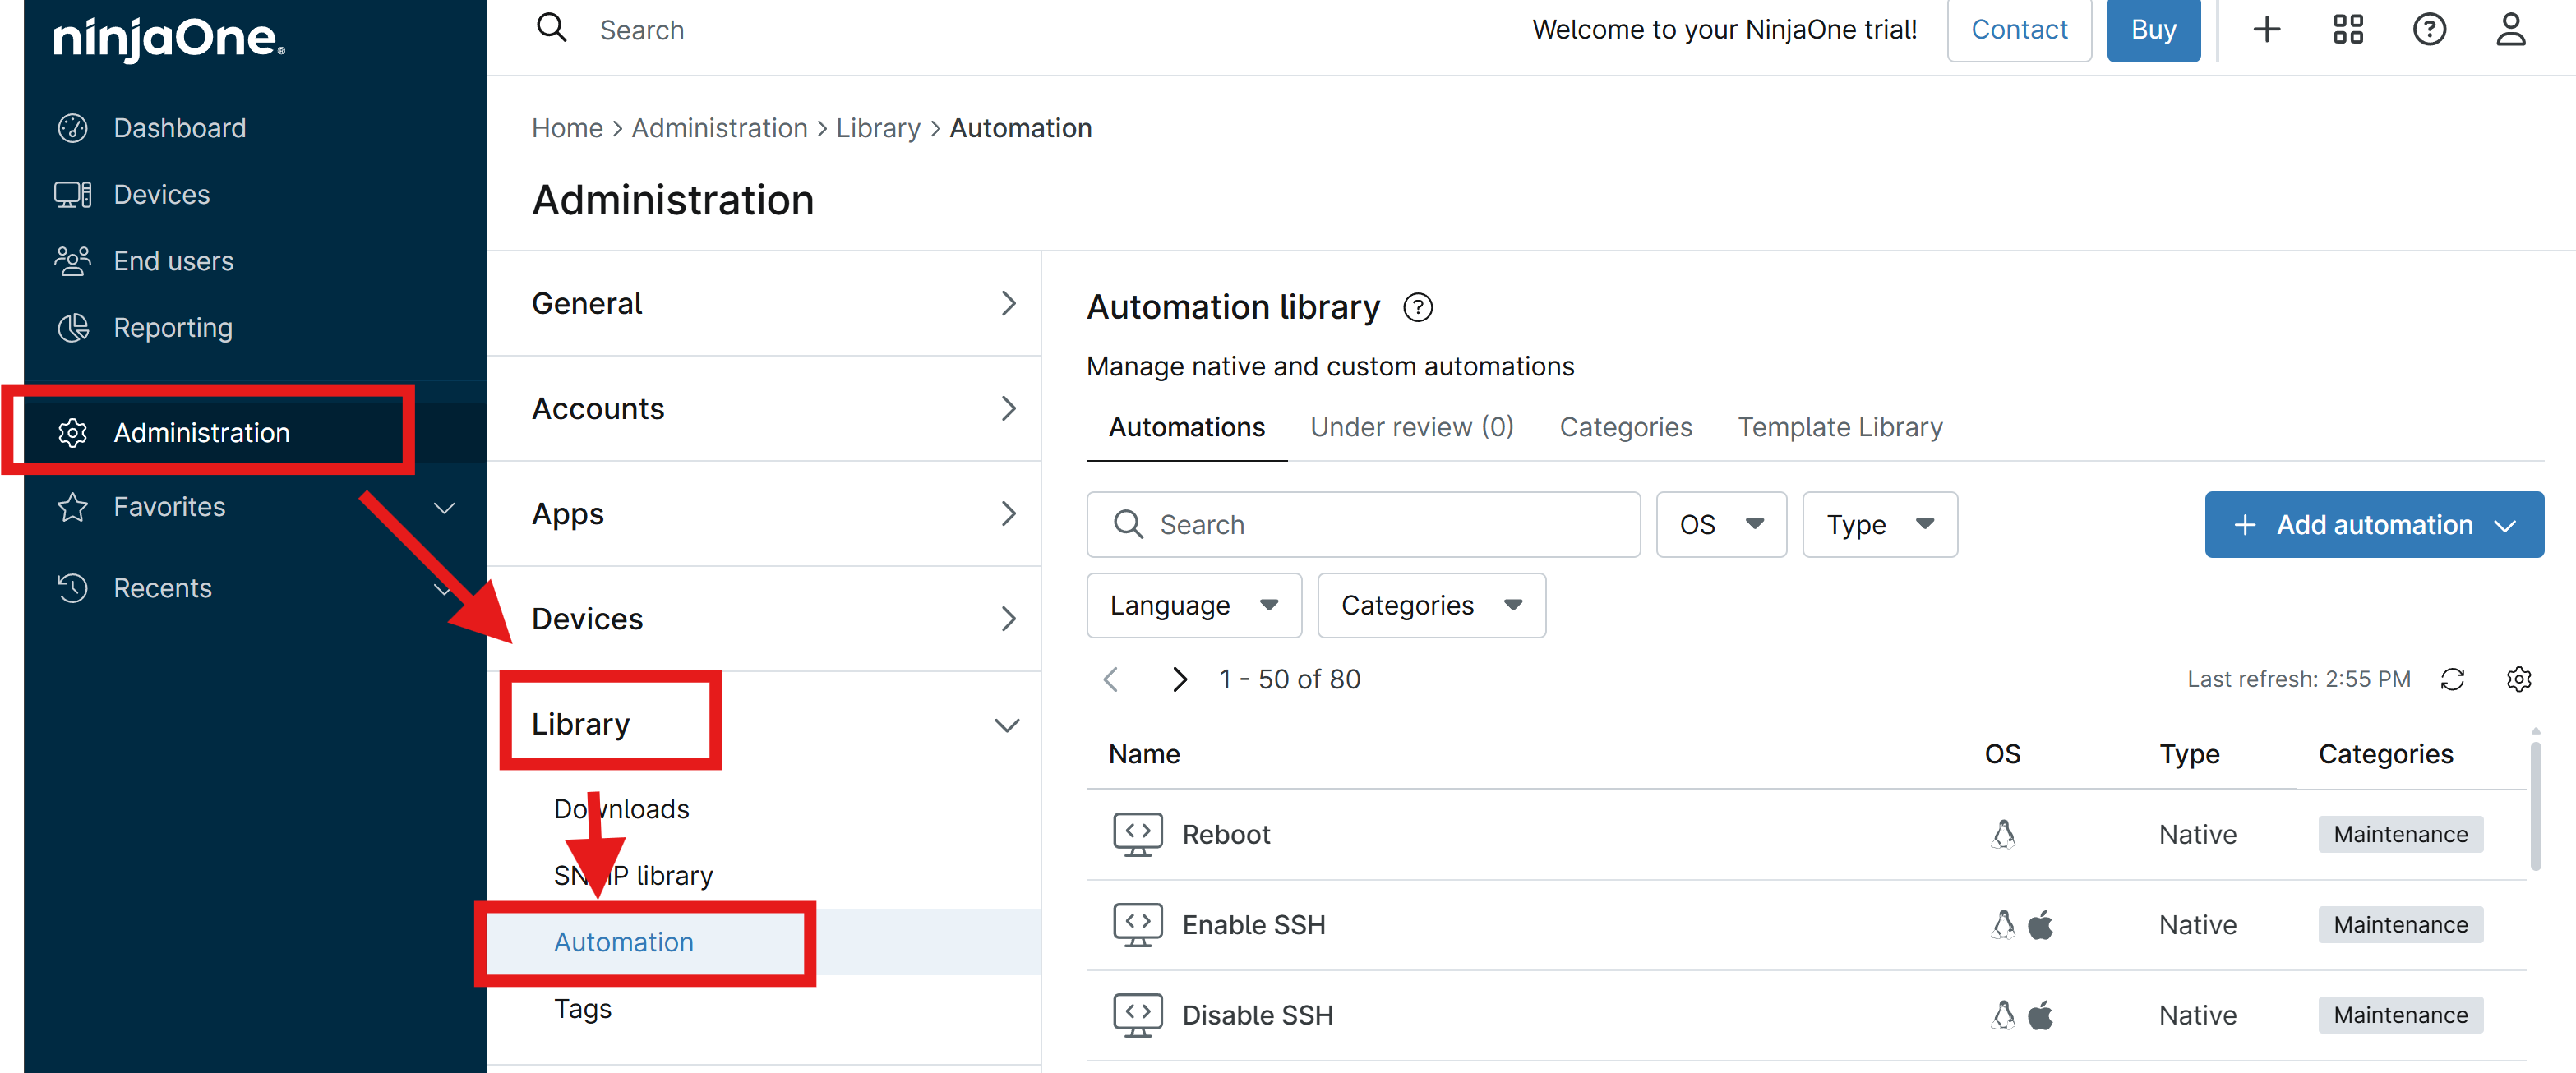
-
Click + Add Automation > New script to create a new automation script.
-
Enter the following information:
- Name: Install EZRADIUS Wi-Fi Profile
- Description: This script installs the EZRADIUS Wi-Fi XML profile on Windows devices for RADIUS authentication.
- Language: PowerShell
- Operating System: Windows
- Architecture: All
- Run as: System (you can override this later when you add the script to your Windows policy)
-
Next to Script variables, click + Add > String/Text to add a new script variable.
-
Enter the following information for the script variable:
- Make variable mandatory: Enabled
- Name: Profile Scope
- Description: The scope of the Wi-Fi profile installation. Use “User” to install the profile for the current user or “Machine” to install the profile for the entire machine. Must match the scope of your certificate if using EAP-TLS authentication. If using EAP-TTLS with Entra ID credentials, set the scope to “User”.
- Option values: Add “User” and “Machine” as option values for the variable.
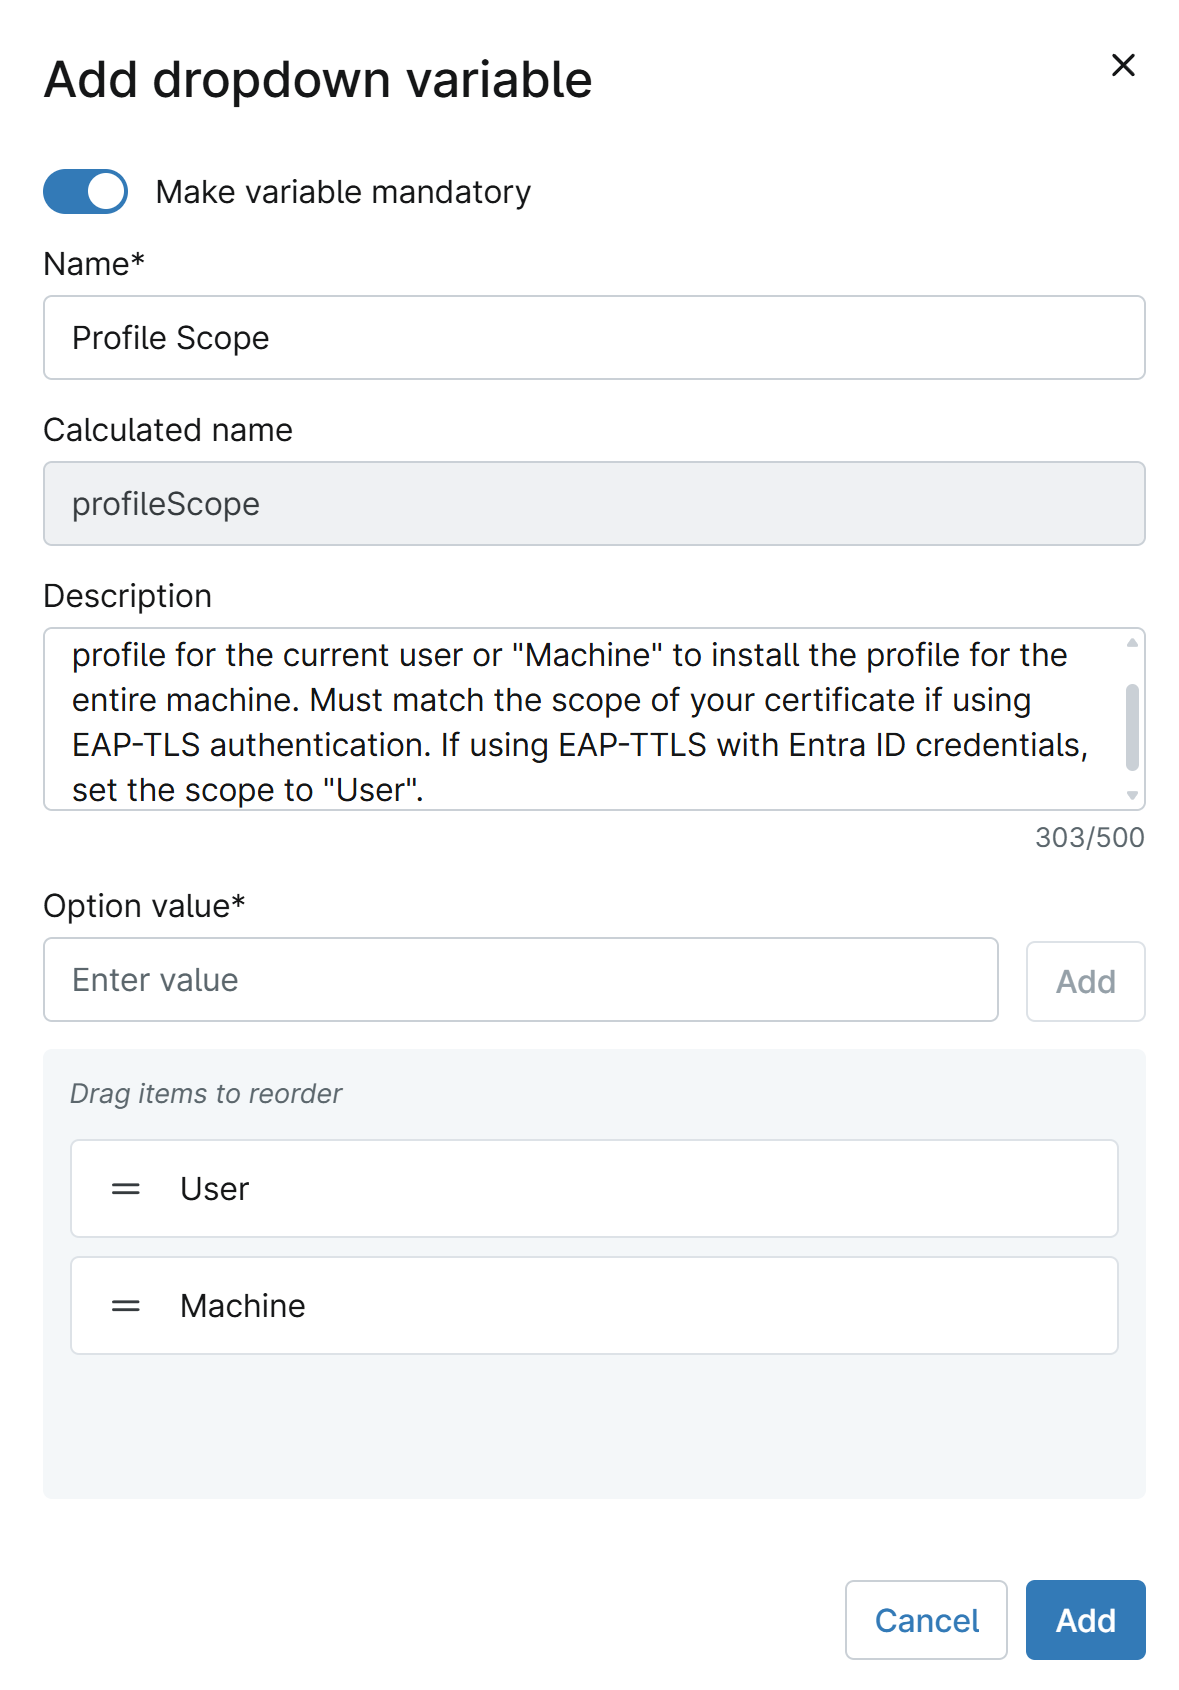
-
Click Add to add the script variable.
-
Download Install-WifiProfile.ps1 and open it in a text editor. This is the PowerShell script that will be used to install the Wi-Fi profile on your Windows devices.
-
Copy the contents of
Install-WifiProfile.ps1and paste it into the script editor in your NinjaOne automation script.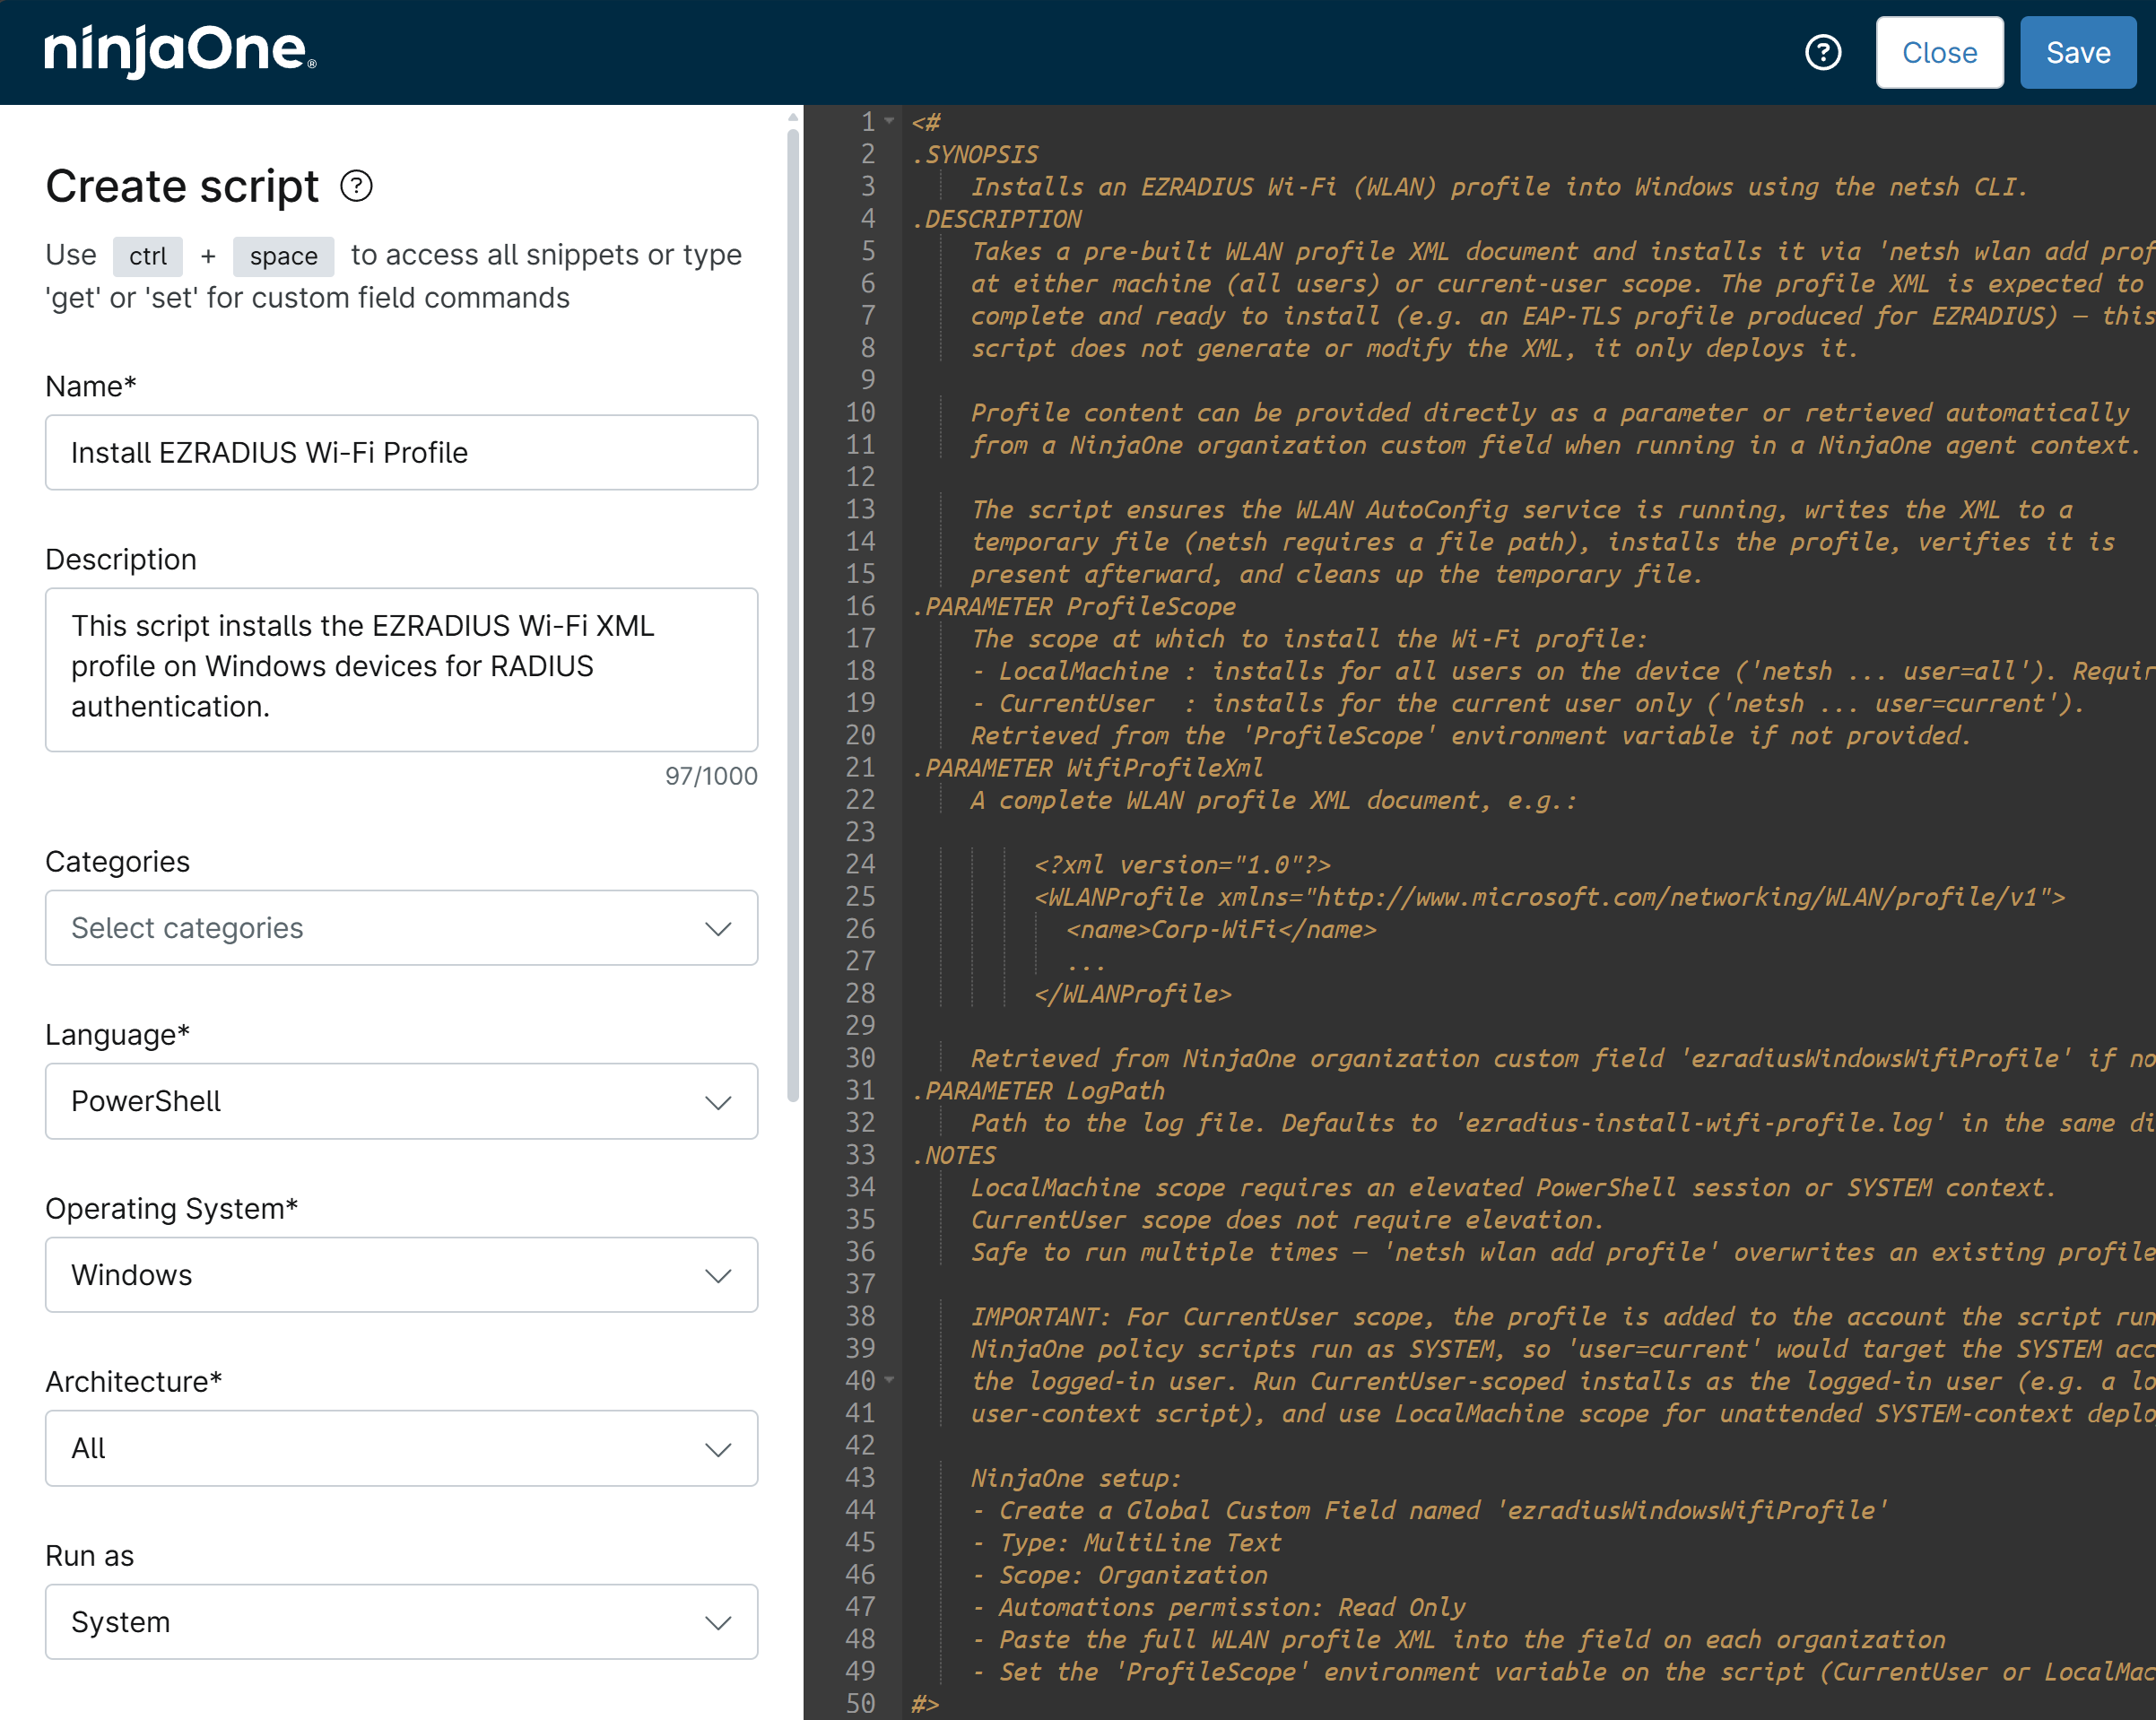
-
Click Save to save your automation script.
Step 4 - How to Update Your Windows Policy in NinjaOne MDM to Include Your Wi-Fi Profile Installation Script
After creating your Wi-Fi profile installation script, you need to update your Windows policy in NinjaOne MDM to include the installation of the Wi-Fi profile on your Windows devices.
-
In your NinjaOne portal, navigate to Administration > Policies > Agent policies.
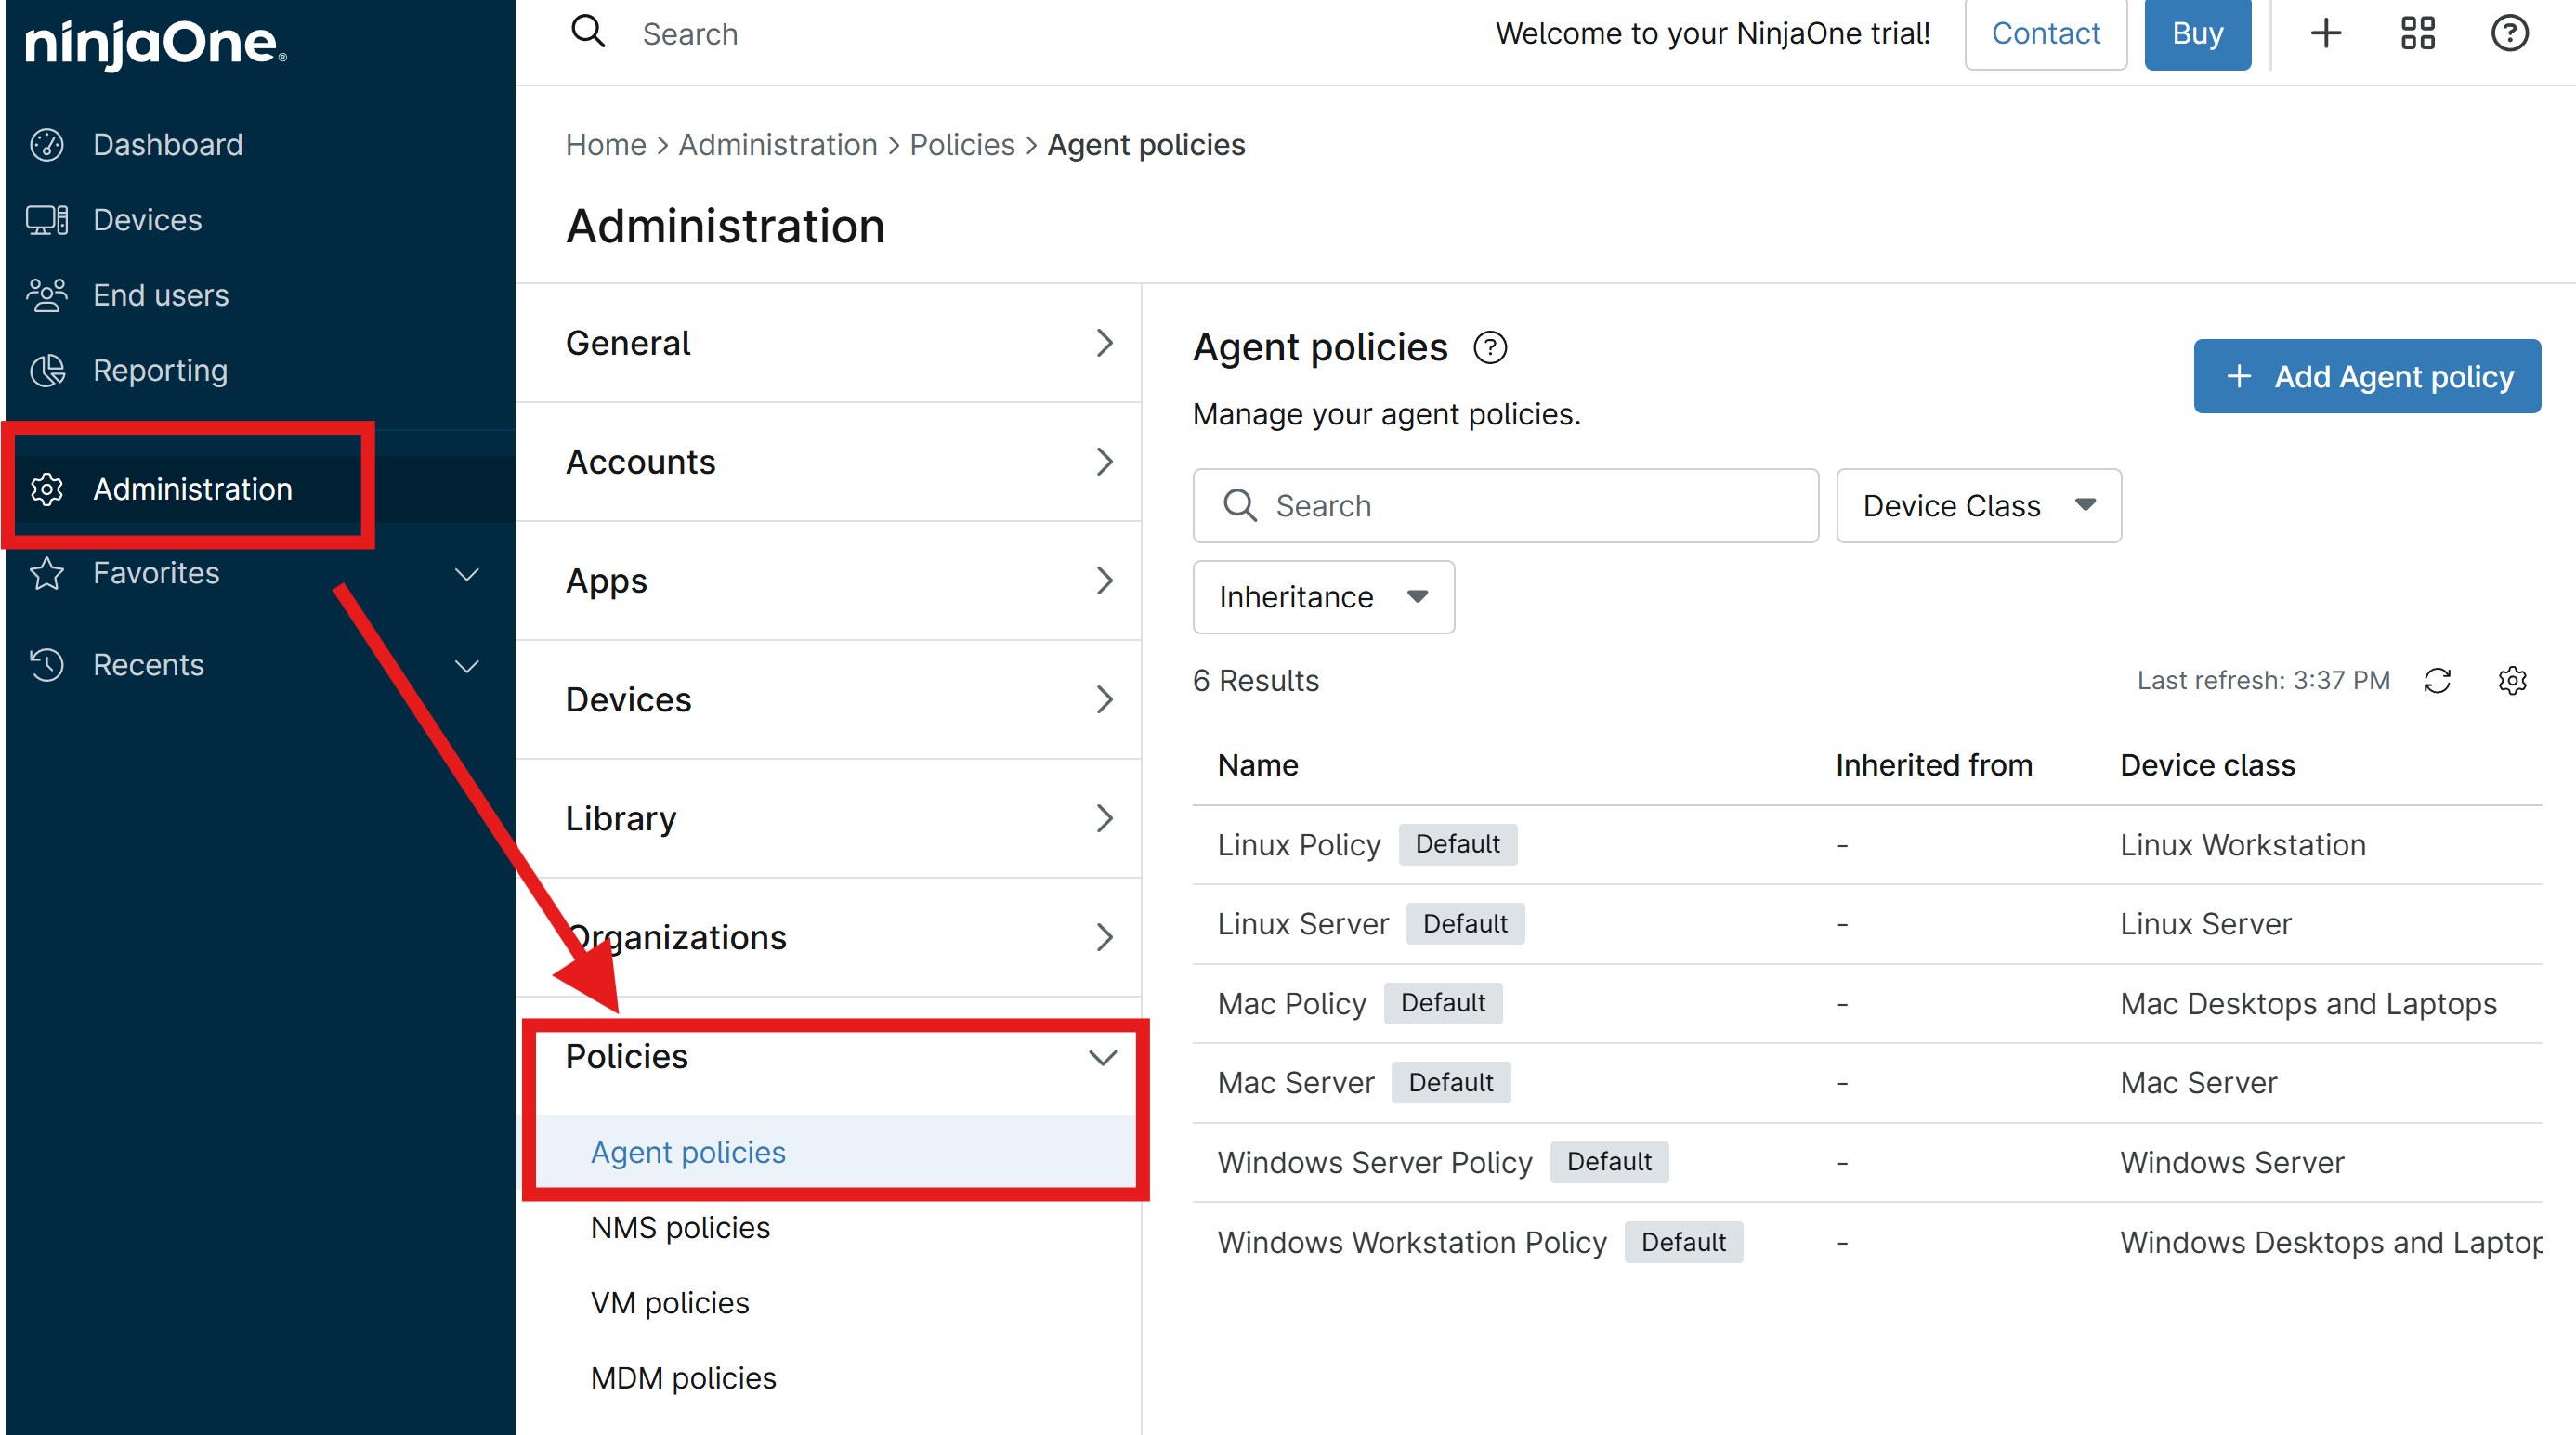
-
Select the Windows Workstation Policy or select your custom Windows policy if you have one set up.
-
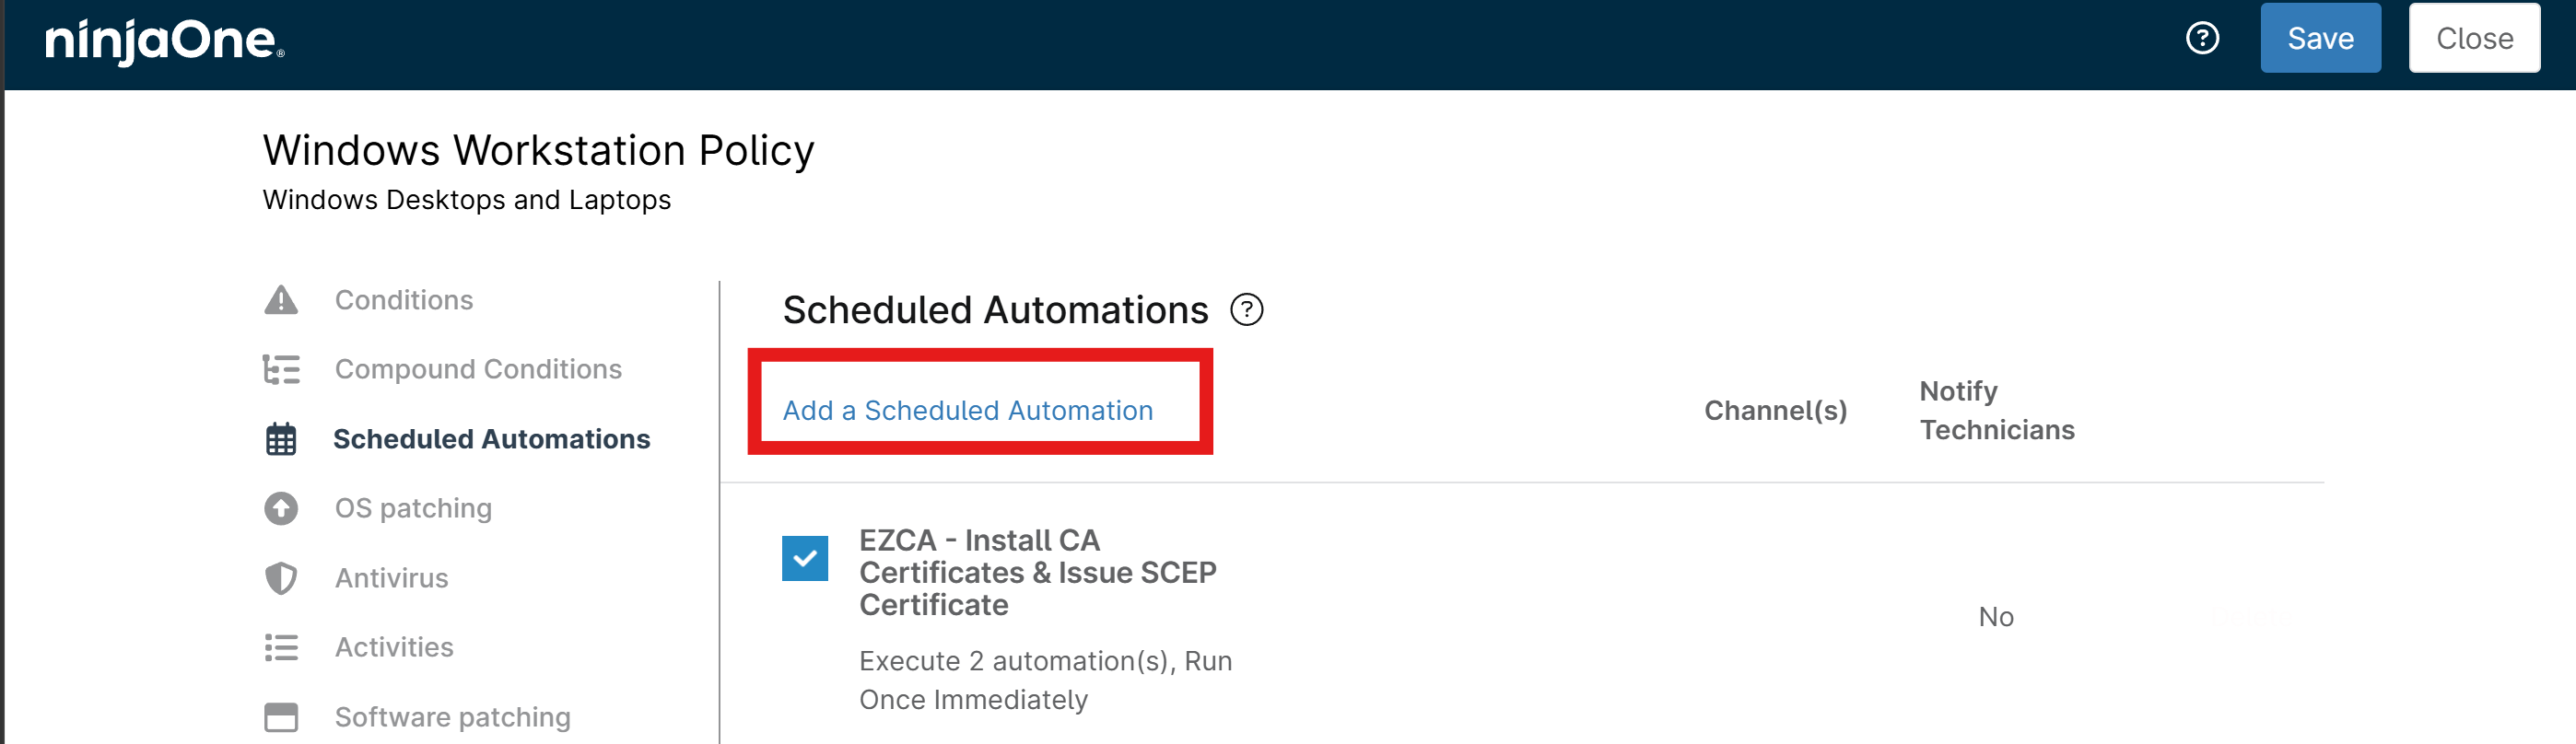
From the left-hand menu, select Scheduled Automations.
-
Click Add a Scheduled Automation to add a new scheduled automation to your Windows policy.
-
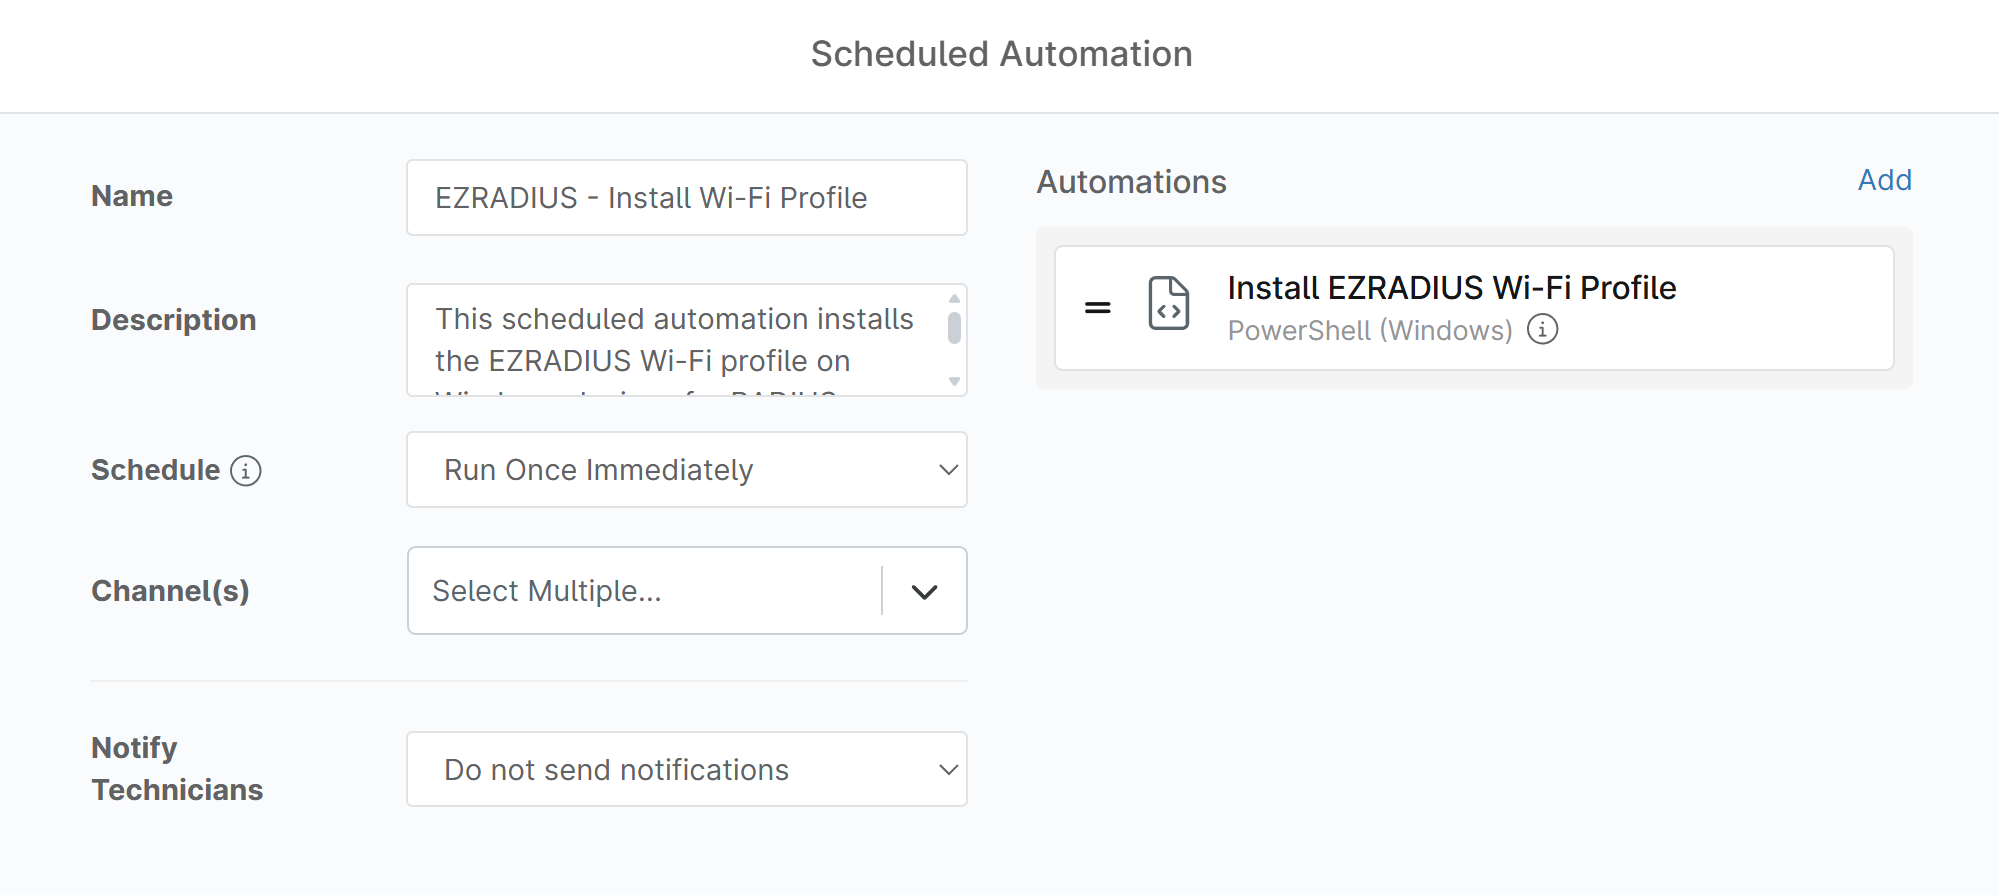
Fill in the following information for your scheduled automation:
- Name: EZRADIUS - Install Wi-Fi Profile
- Description: This scheduled automation installs the EZRADIUS Wi-Fi profile on Windows devices for RADIUS authentication.
- Schedule: Run Once Immediately (runs once on every device as soon as they are online and sync with NinjaOne)
-
Under Automations, click the small Add button.
-
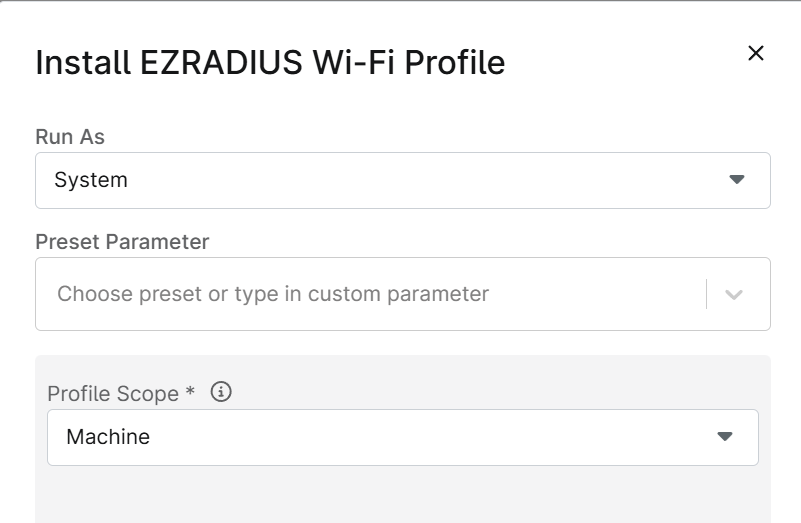
Select the Install EZRADIUS Wi-Fi Profile automation script that you created in the previous step and set the following:
- Run As: If you use device/machine certificates for EAP-TLS authentication, select System. If you use user certificates for EAP-TLS authentication or if you use EAP-TTLS with Entra ID credentials, select Current User.
- Profile Scope: Select the scope of your Wi-Fi profile installation. If you use device/machine certificates for EAP-TLS authentication, select Machine. If you use user certificates for EAP-TLS authentication or if you use EAP-TTLS with Entra ID credentials, select User.
-
Click Apply to apply the automation script to your scheduled automation.
-
You should now have a complete scheduled automation for installing the EZRADIUS Wi-Fi profile on your Windows devices.
-
Click the larger Add button in the bottom right corner to add the scheduled automation to your policy.
-
Click Save to save your updated Windows policy.
Done! Your Windows devices will now have the EZRADIUS Wi-Fi profile installed and will be able to connect to your network using RADIUS authentication with the settings you configured in your Wi-Fi XML profile.
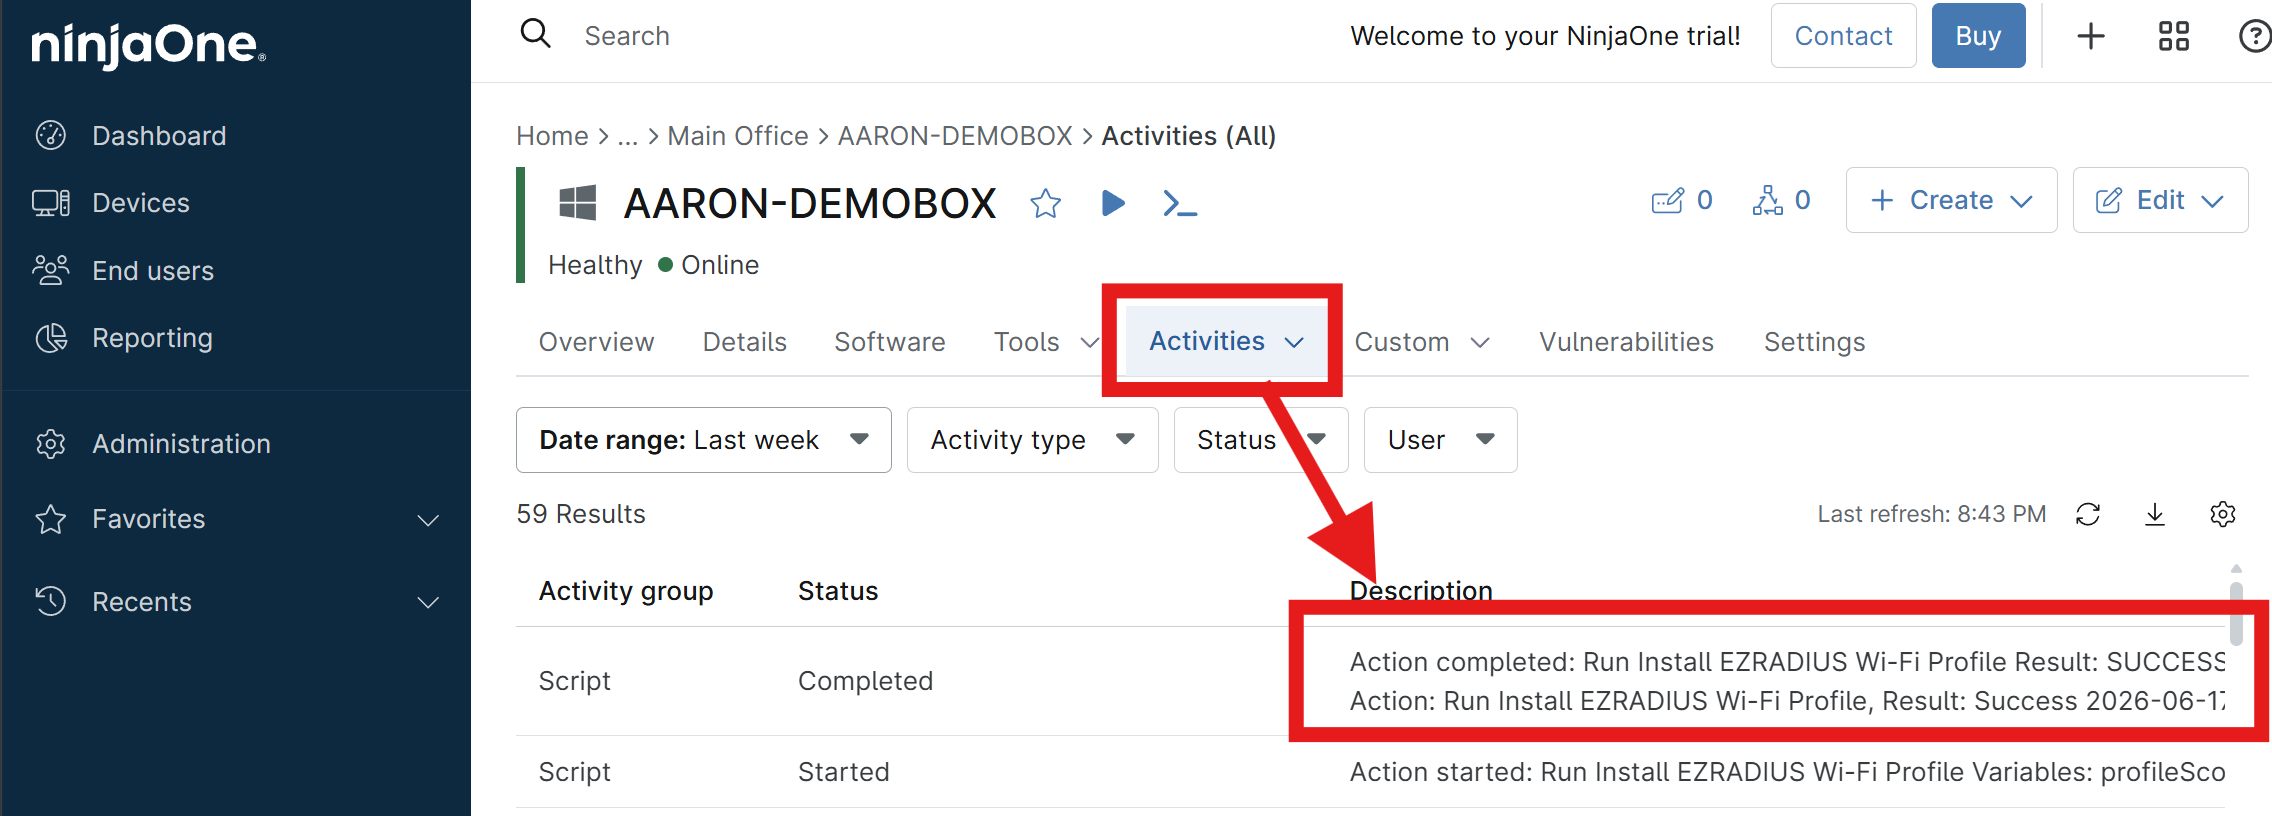
Step 5 - How to Verify RADIUS Authentication is Working on Your Windows Devices in NinjaOne MDM
To verify that the Wi-Fi profile was installed correctly, follow these steps.
-
In your NinjaOne portal, navigate to Devices and select a Windows device that is enrolled in your NinjaOne MDM and is assigned to the Windows policy that you updated in the previous step.
-
In the tab menu, select Activities > All to view the activity log for the device.
-
Look for an activity with the name Install EZRADIUS Wi-Fi Profile to confirm that the Wi-Fi profile installation script ran successfully on the device.