

















How-To: Setup RADIUS Authentication in SimpleMDM
Introduction to Wi-Fi Authentication in SimpleMDM with Cloud RADIUS
With EZRADIUS Cloud RADIUS you can easily connect to a WPA Enterprise Wi-Fi network using either Entra ID credentials (with EAP-TTLS) or certificates (with EAP-TLS) for authentication. This guide will walk you through the steps to set up RADIUS authentication in SimpleMDM using Cloud RADIUS for both EAP-TTLS and EAP-TLS authentication methods. By the end of this guide, you will have a fully configured Wi-Fi profile in SimpleMDM that uses Cloud RADIUS for authentication.How to Configure Wi-Fi Profiles in SimpleMDM with Cloud RADIUS - Step by Step Guide
The following section will guide you through the steps to set up RADIUS authentication in SimpleMDM using Cloud RADIUS. The steps will vary slightly based on the authentication method you choose (EAP-TLS or EAP-TTLS). Follow the instructions for your preferred authentication method.Prerequisites for Setting Up RADIUS Authentication in SimpleMDM
Before you begin, ensure that you:
- Registered the Keytos and EZRADIUS applications in your Entra ID tenant
- Created an EZRADIUS billing plan/subscription
- Are a Subscription Owner or Network Administrator of your EZRADIUS subscription
- You are a SimpleMDM administrator
How To Create an EZRADIUS Policy for Cloud RADIUS Authentication
The first step to set up cloud RADIUS for SimpleMDM devices is to create an EZRADIUS policy that defines how authentication requests from SimpleMDM devices will be handled. Refer to the following guides for the specific steps to configure your cloud RADIUS policy.
How to Create a Passwordless Certificate Access Policy
A certificate access policy allows you to accept X.509 certificates for authentication and determine which users or devices are allowed to connect to your network. View this guide to learn how to create a certificate access policy in EZRADIUS if you have not already done so.
How to Create an Entra ID Username and Password Access Policy
An Entra ID username and password access policy allows you to authenticate your Entra ID users using their existing credentials. View this guide to learn how to create an Entra ID username and password access policy in EZRADIUS if you have not already done so.
How To Configure Your SimpleMDM Configuration Profile for WPA Enterprise Wi-Fi
Now that EZRADIUS is configured to authenticate your users, the next step is to configure your SimpleMDM Wi-Fi profile to use RADIUS authentication with EZRADIUS. The configuration will vary based on the authentication method you choose (EAP-TLS or EAP-TTLS) and based on profile editor (iMazing or Apple Configurator). Follow the instructions for your preferred method.
How To Create SCEP Certificates in iMazing Profile Editor for SimpleMDM Devices for EAP-TLS Authentication
iMazing is an alternative application to Apple Configurator that allows you to create configuration profiles on both macOS and Windows.
-
In a new tab, navigate to your EZRADIUS portal.
-
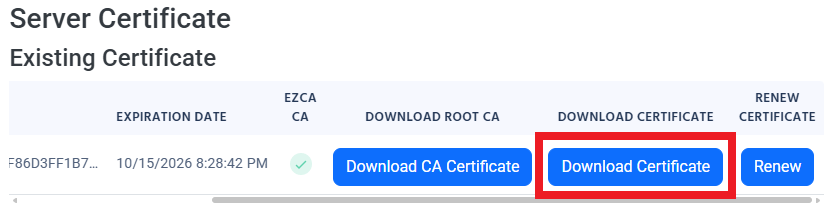
Go to the Policies page and scroll down to the Server Certificates > Existing Certificate section.
-
Click on the Download CA Certificate button to download your root CA certificate.

-
Click on the Download Certificate button to download your server CA certificate.
-
Download iMazing Profile Editor for your operating system.
-
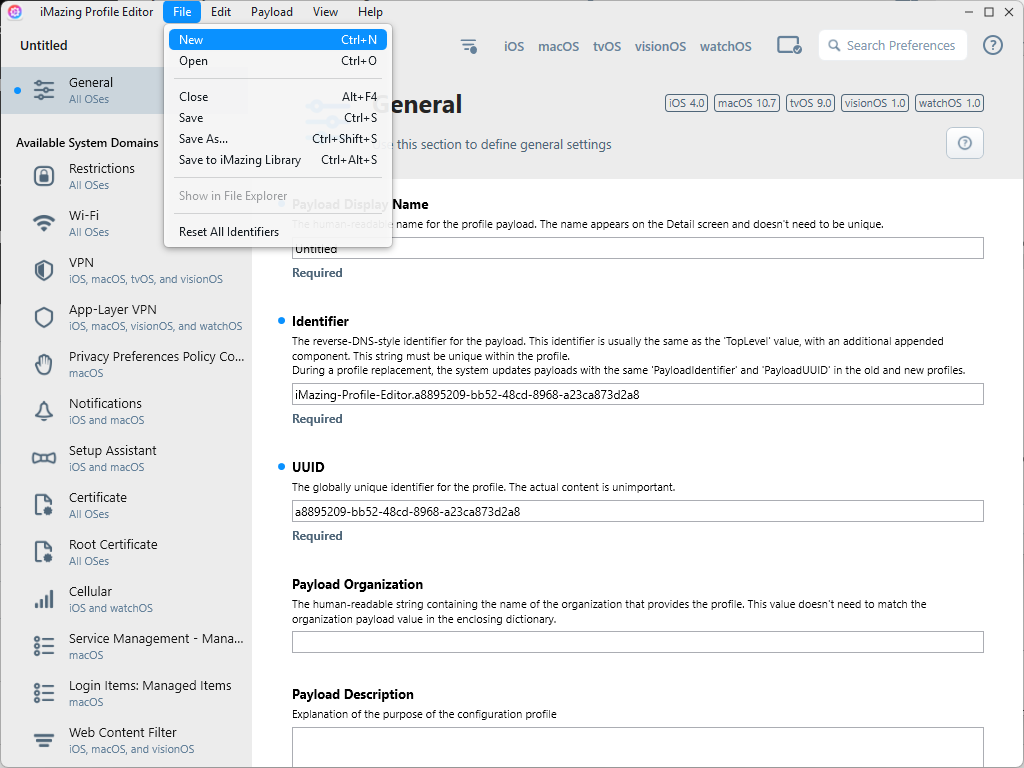
In iMazing, click File → New.
-
In the General settings, enter a name for the profile.
-
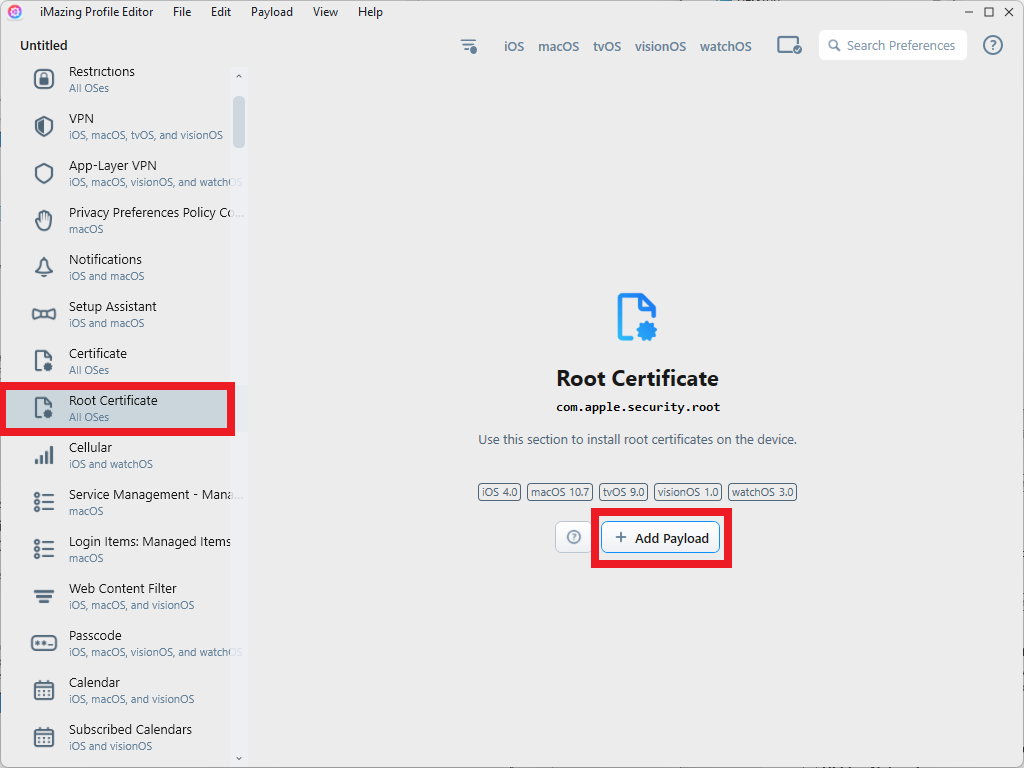
Under Available System Domains click Root Certificate, then Add Payload.
-
Upload the Root Certificate your downloaded from EZRadius.
-
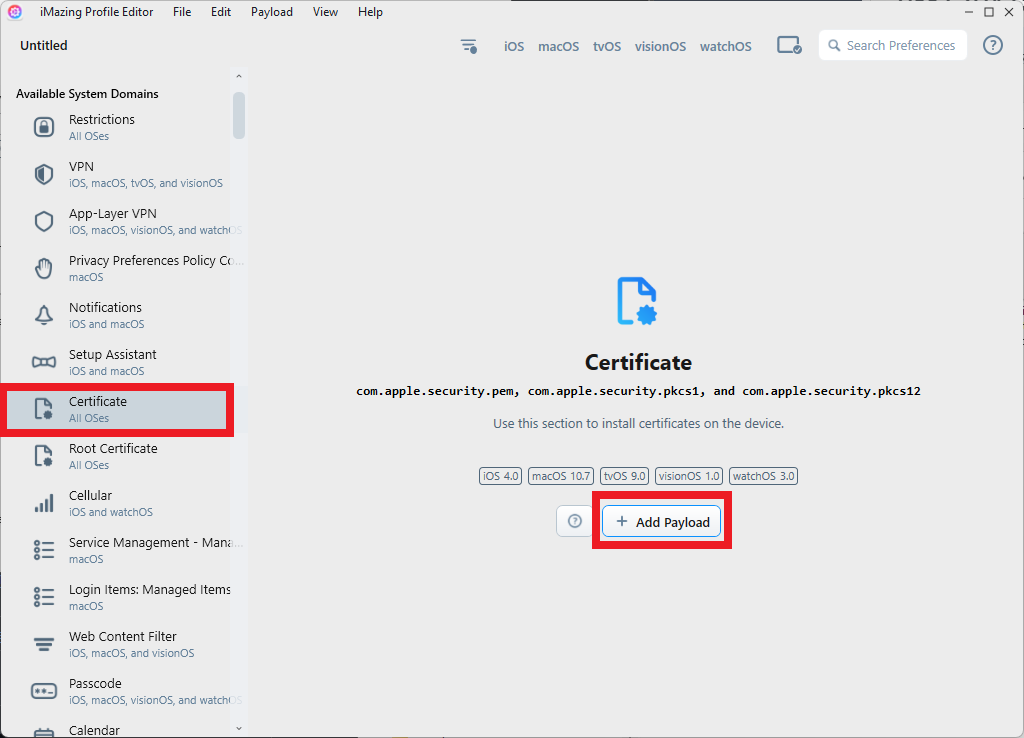
Under Available System Domains click Certificate, then Add Payload.
-
Upload the Server Certificate your downloaded from EZRadius.
-
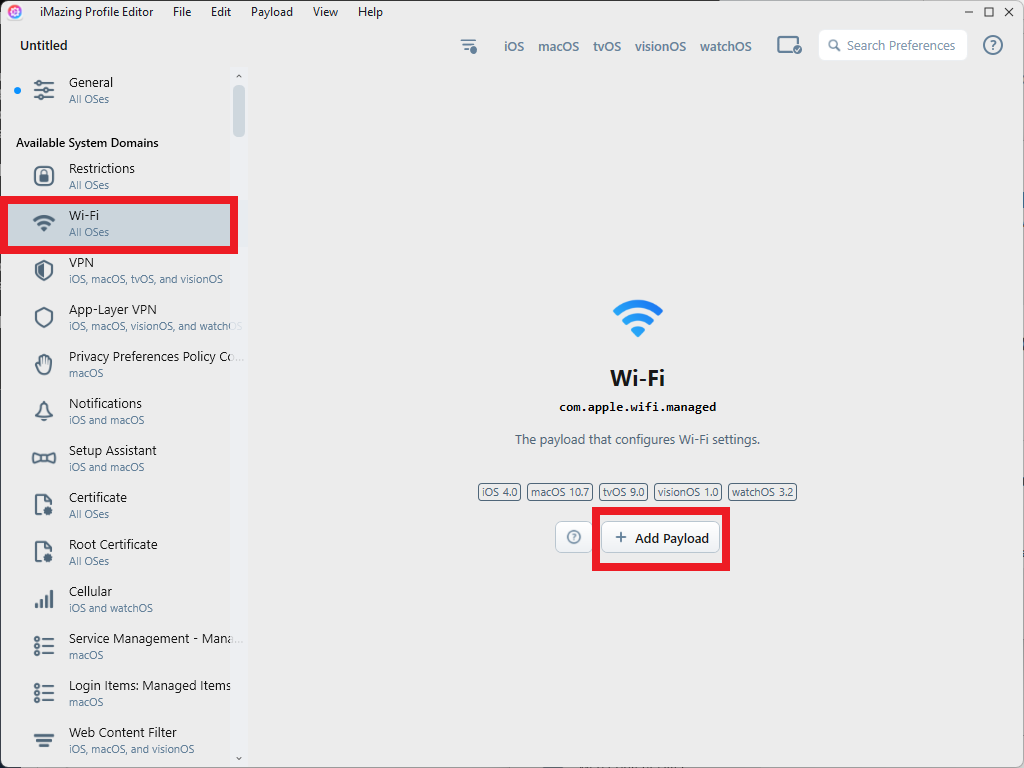
Under Available System Domains click Wi-Fi, then Add Payload.
-
Enter the SSID of your network.
-
Set the Encryption Type as WPA2 and WPA3
-
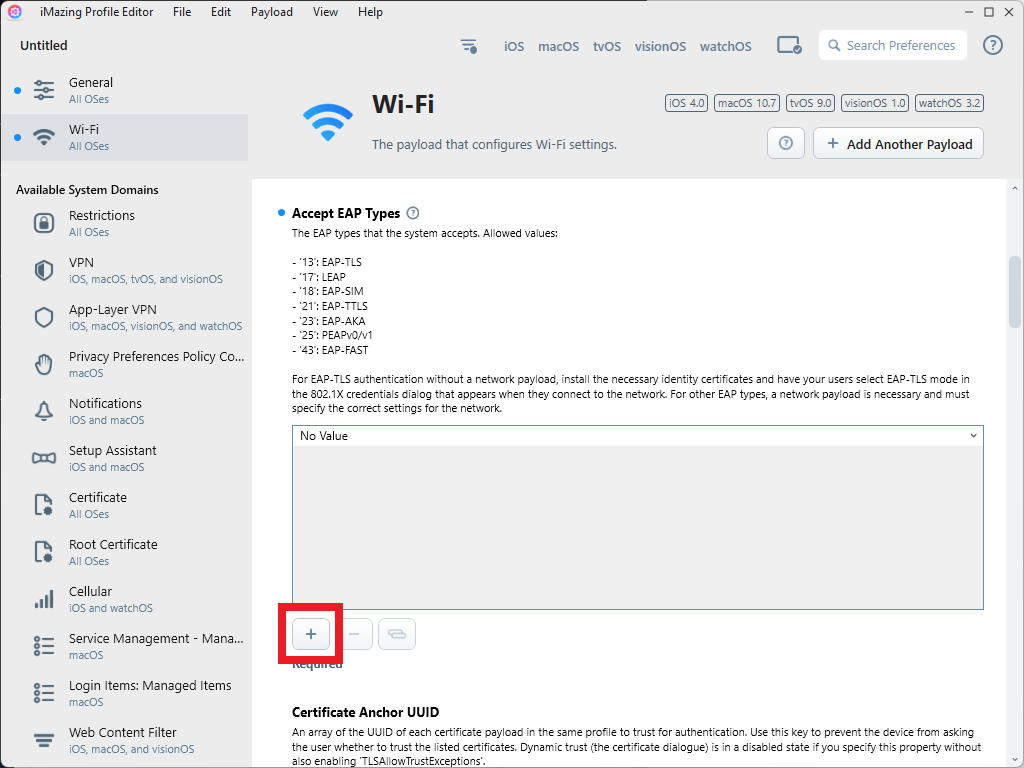
In Accept EAP Types click the + to add a new empty entry.
-
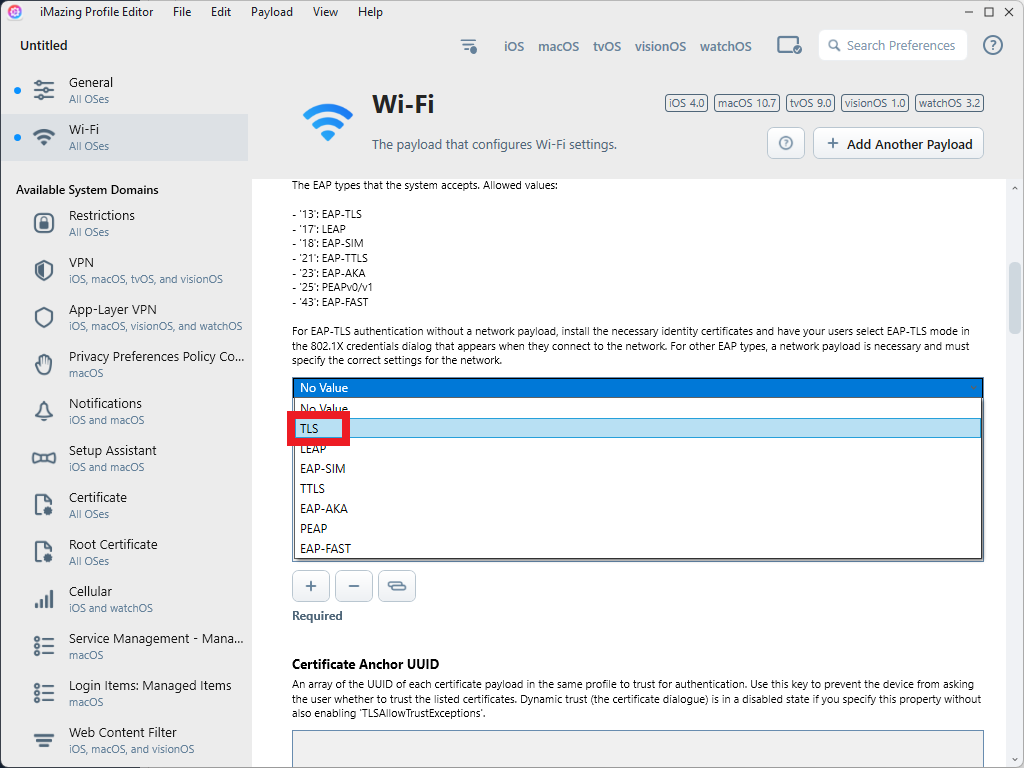
Click on the No value entry and select TLS from the dropdown.
-
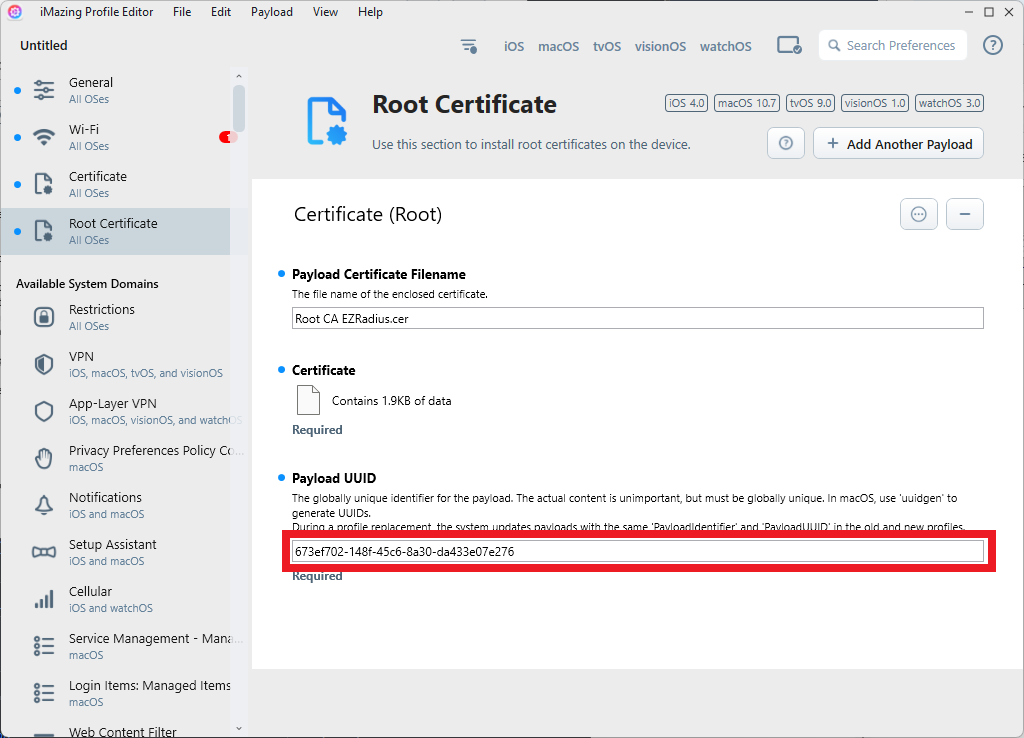
Go back into your Root Certificate payload.
-
Copy the Payload UUID
-
Go back to your Wi-Fi payload after copying the UUID.
-
In Certificate Anchor UUID click the + to add a new empty entry.
-
Click on the new entry and paste the Payload UUID you just copied.
-
Scroll to TLS Trusted Certificates and paste the Payload UUID again.
-
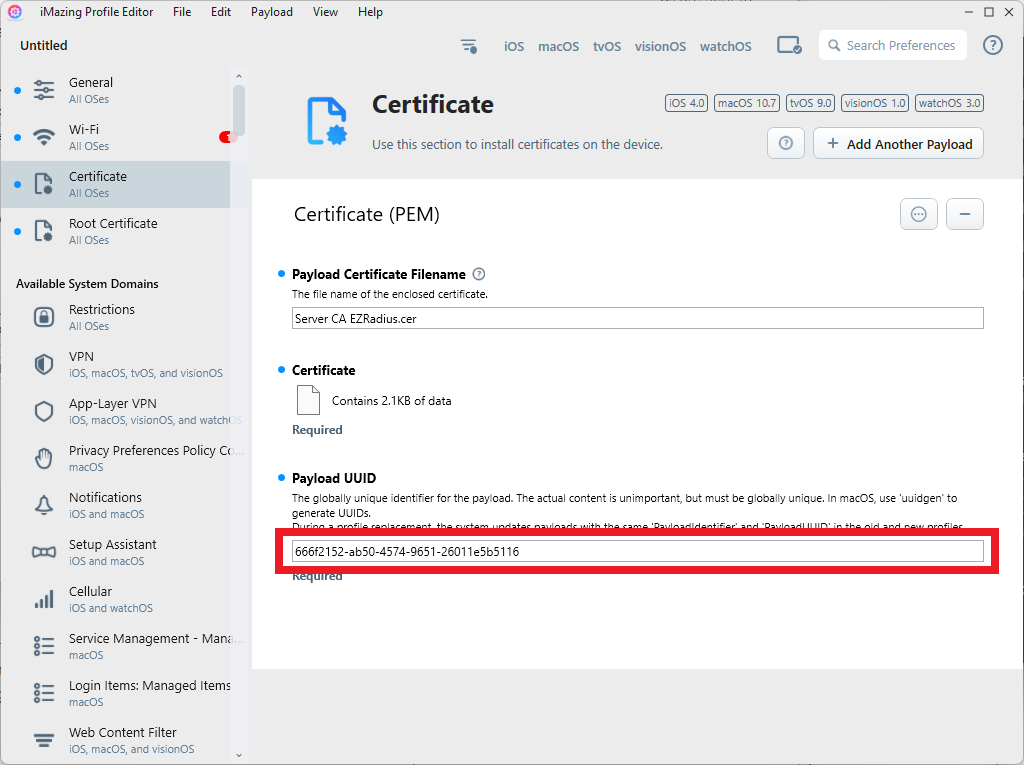
Go into your Certificate payload.
-
Copy the Payload UUID.
-
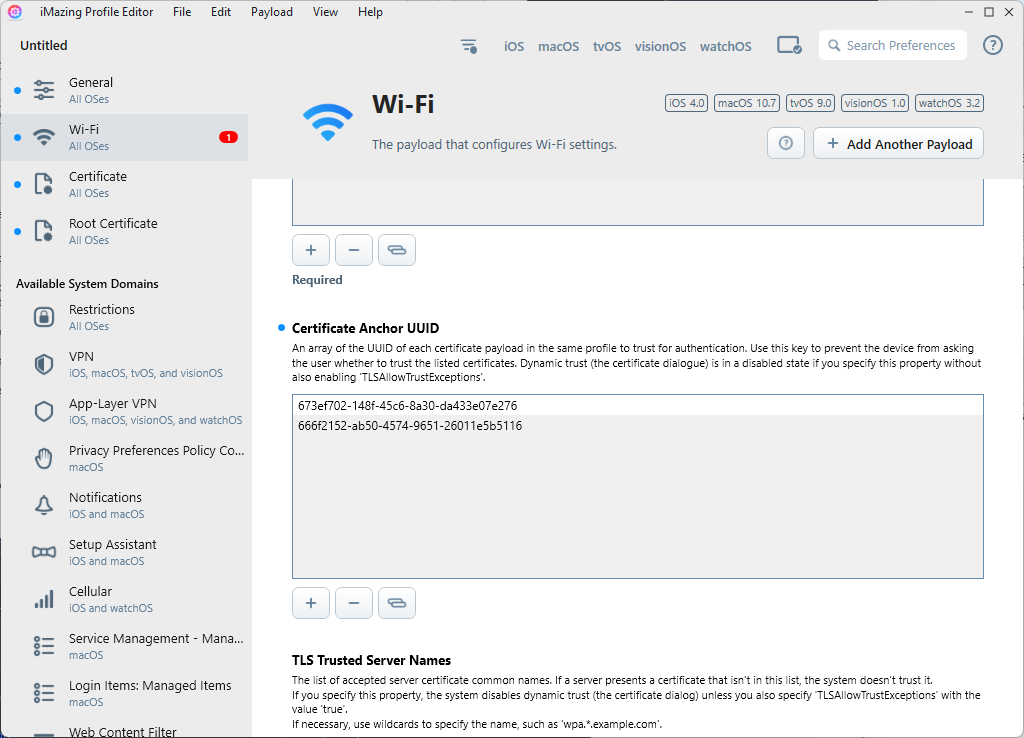
Go back to your Wi-Fi payload after copying the UUID.
-
In Certificate Anchor UUID click the + to add a new empty entry.
-
Click on the new entry and paste the Payload UUID you just copied. You should have two entries.
-
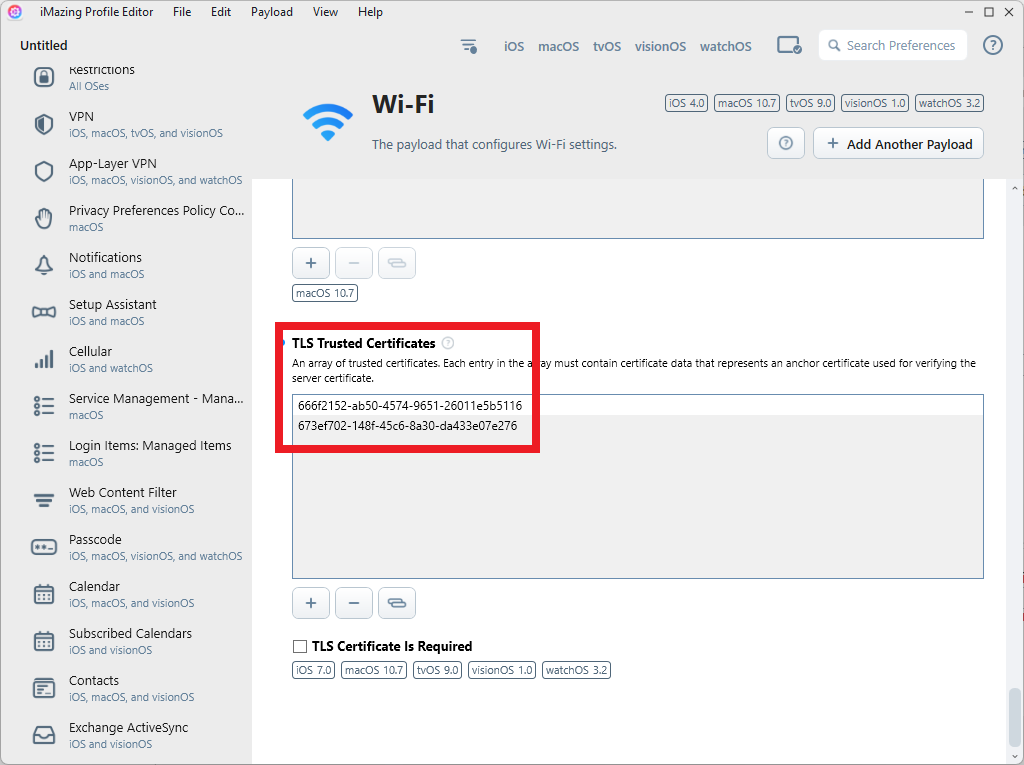
Scroll to TLS Trusted Certificates and paste the Payload UUID again. You should have two entries.
-
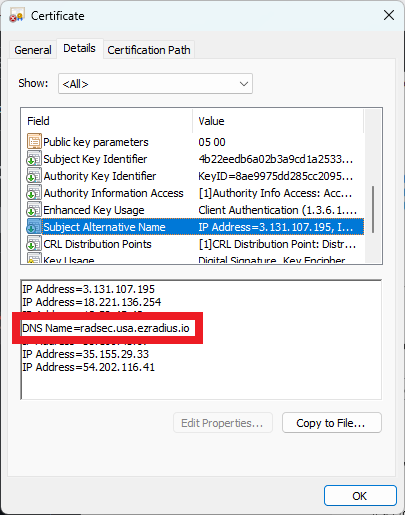
Navigate to where you saved your Server certificate on your computer and open it.
-
Scroll down until you find the Subject Alternate Name field.
-
Copy just the URL from the DNS Name entry.
-
Go back to iMazing.
-
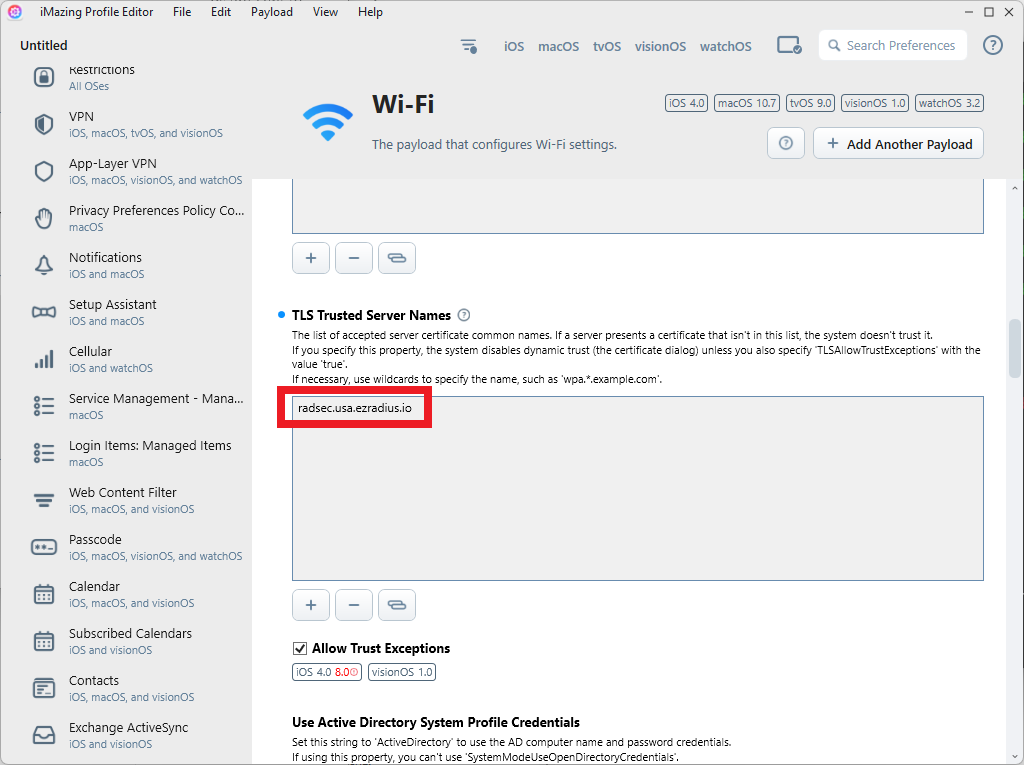
Paste this DNS name into the TLS Trusted Server Names field.
-
In your web browser, go back to your EZCA portal.
-
Click Certificate Authorities and find the SCEP CA you previously created.
-
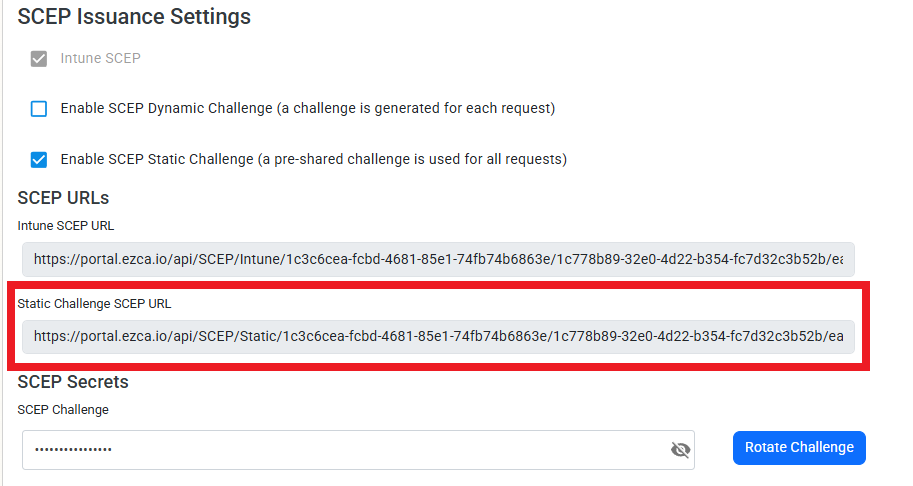
Click View Requirements.
-
Copy the Static Challenge SCEP URL.
-
Go back into iMazing.
-
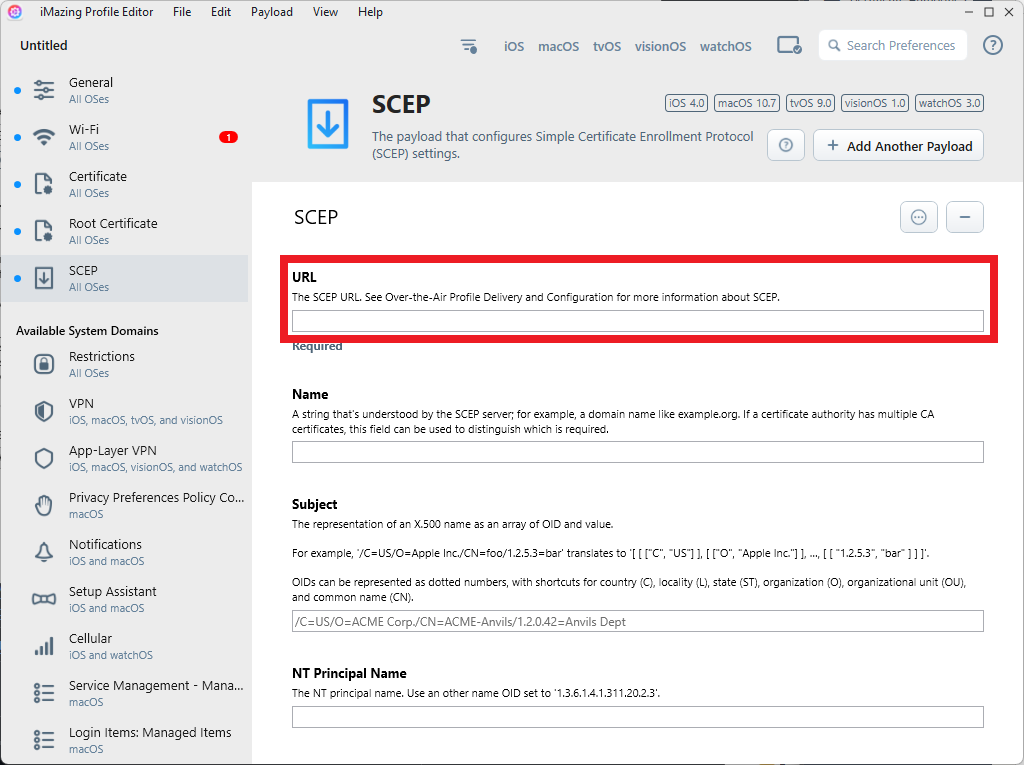
Under Available System Domains click SCEP, then Add Payload.
-
Paste the SCEP URL you just copied into the URL field.
-
Go back into EZCA.
-
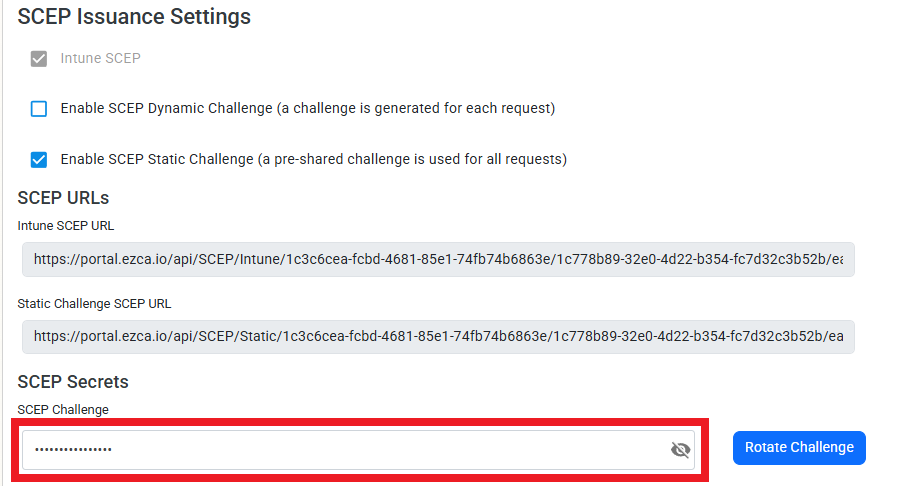
Copy the SCEP Challenge.
-
Go back into iMazing.
-
Paste the SCEP Challenge you just copied into the Challenge field.
-
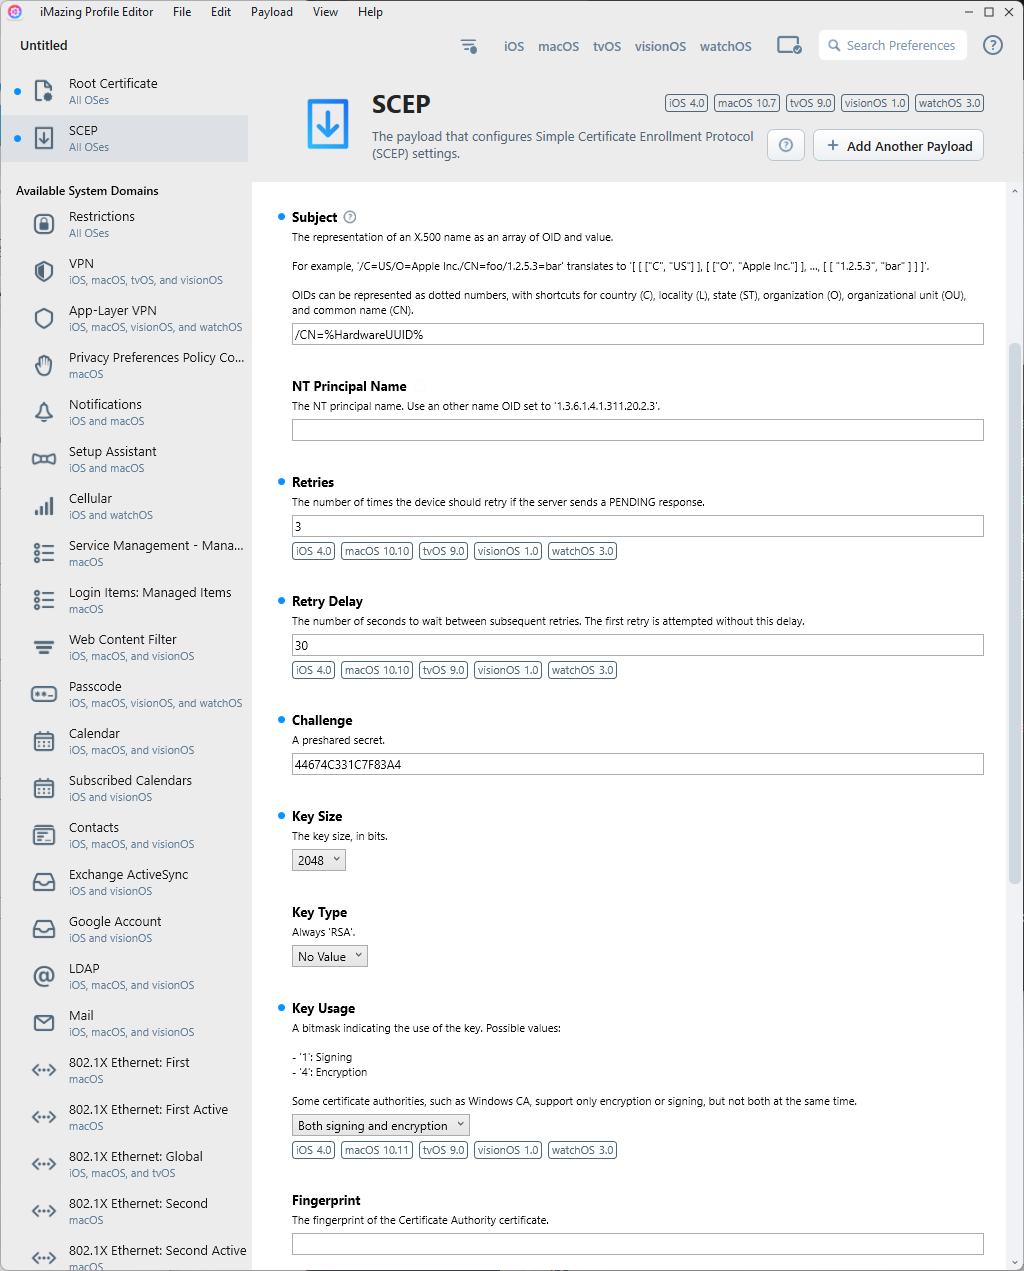
Enter the following settings:
-
Subject: Use a static value or Apple’s built-in variables (e.g.
CN=%ComputerName%). -
Subject Alternative Name Type: Set as DNS Name.
-
Subject Alternative Name Value: Use a static value or Apple’s built-in variables (e.g.
%HostName%). -
In the Retries field, enter 3.
-
In the Retry Delay field, enter 30.
-
In the Key Size field, enter at least 2048 or greater.
-
In the Key Usage dropdown, select Both signing and encryption.
-
-
Scroll down and copy the Payload UUID.
-
Under Available System Domains click Wi-Fi.
-
Paste the SCEP Payload UUID into Certificate UUID field.
-
In the menu bar, click File → Save.
How To Create SCEP Certificates in iMazing Profile Editor for SimpleMDM Devices for EAP-TTLS Authentication
iMazing is an alternative application to Apple Configurator that allows you to create configuration profiles on both macOS and Windows.
-
In a new tab, navigate to your EZRADIUS portal.
-
Go to the Policies page and scroll down to the Server Certificates > Existing Certificate section.
-
Click on the Download CA Certificate button to download your root CA certificate.
-
Download iMazing Profile Editor for your operating system.
-
In iMazing, click File → New.
-
In the General settings, enter a name for the profile.
-
Under Available System Domains click Root Certificate, then Add Payload.
-
Upload the Root certificate your downloaded from EZRadius.
-
Under Available System Domains click Wi-Fi, then Add Payload.
-
Enter the SSID of your network.
-
Set the Encryption Type as WPA2 and WPA3
-
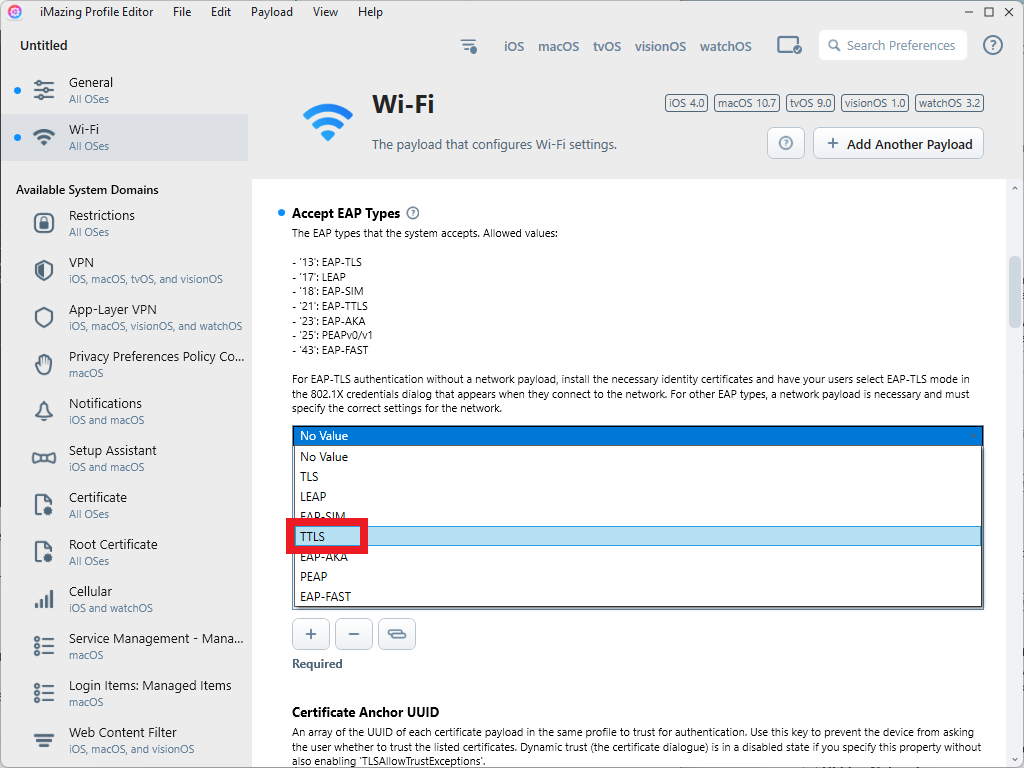
In Accept EAP Types click the + to add a new empty entry.
-
Click on the No value entry and select TTLS from the dropdown.
-
Enter your Entra ID username in the Username field.
-
Enter your Entra ID password in the Password field.
-
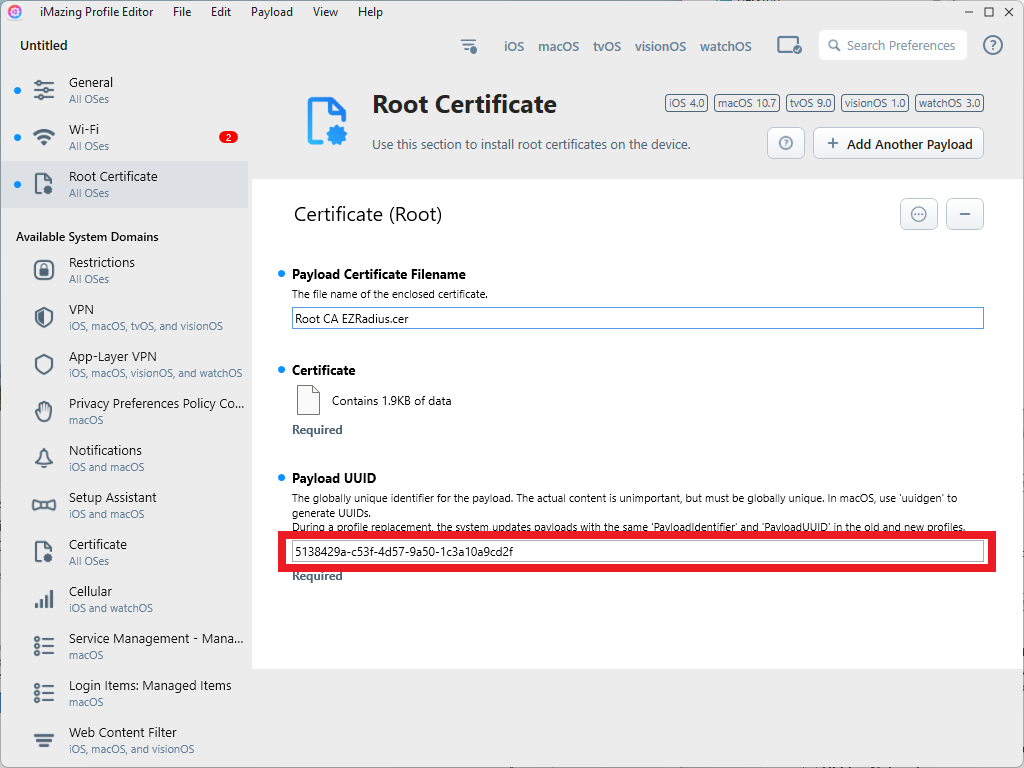
Go back into your Root Certificate payload.
-
Copy the Payload UUID.
-
Go back to your Wi-Fi payload after copying the UUID.
-
In Certificate Anchor UUID click the + to add a new empty entry.
-
Click on the new entry and paste the Payload UUID you just copied.
-
Scroll down until you find TTLS Inner Authentication.
-
Set this to PAP.
-
In the menu bar, click File → Save.
How To Create SCEP Certificates in Apple Configurator for SimpleMDM Devices for EAP-TLS Authentication
-
Download Apple Configurator from the App Store.
-
In Apple Configurator, click on File → New Profile.
-
In the General settings, enter the name of the profile.
-
Click Certificates on the left.
-
Click on Configure.
-
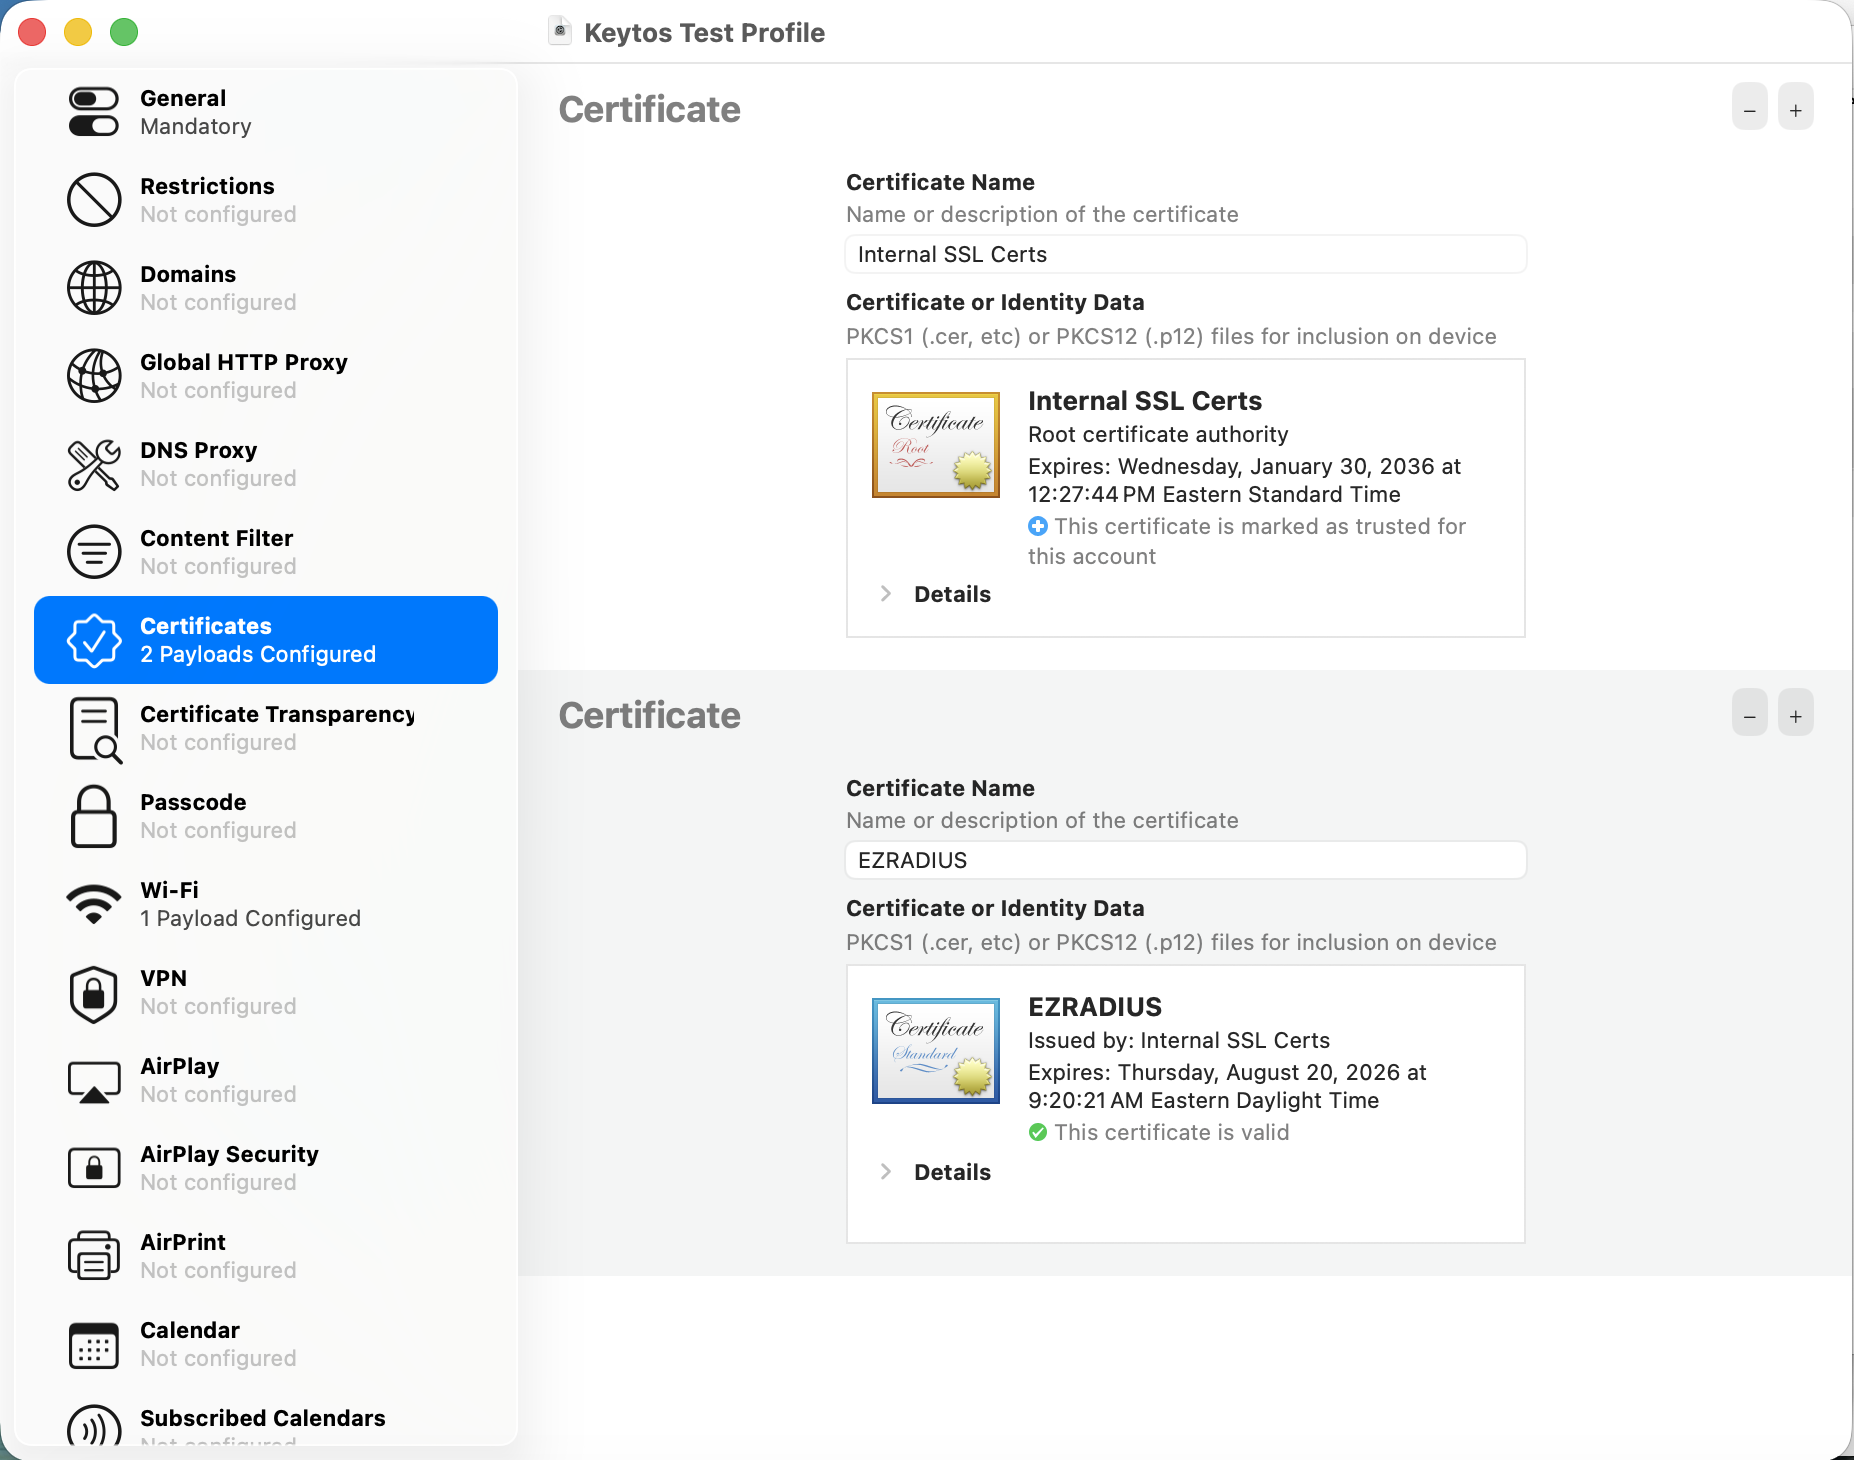
Upload the Root Certificate you downloaded from EZRadius.
-
Upload the Server Certificate you downloaded from EZRadius.
-
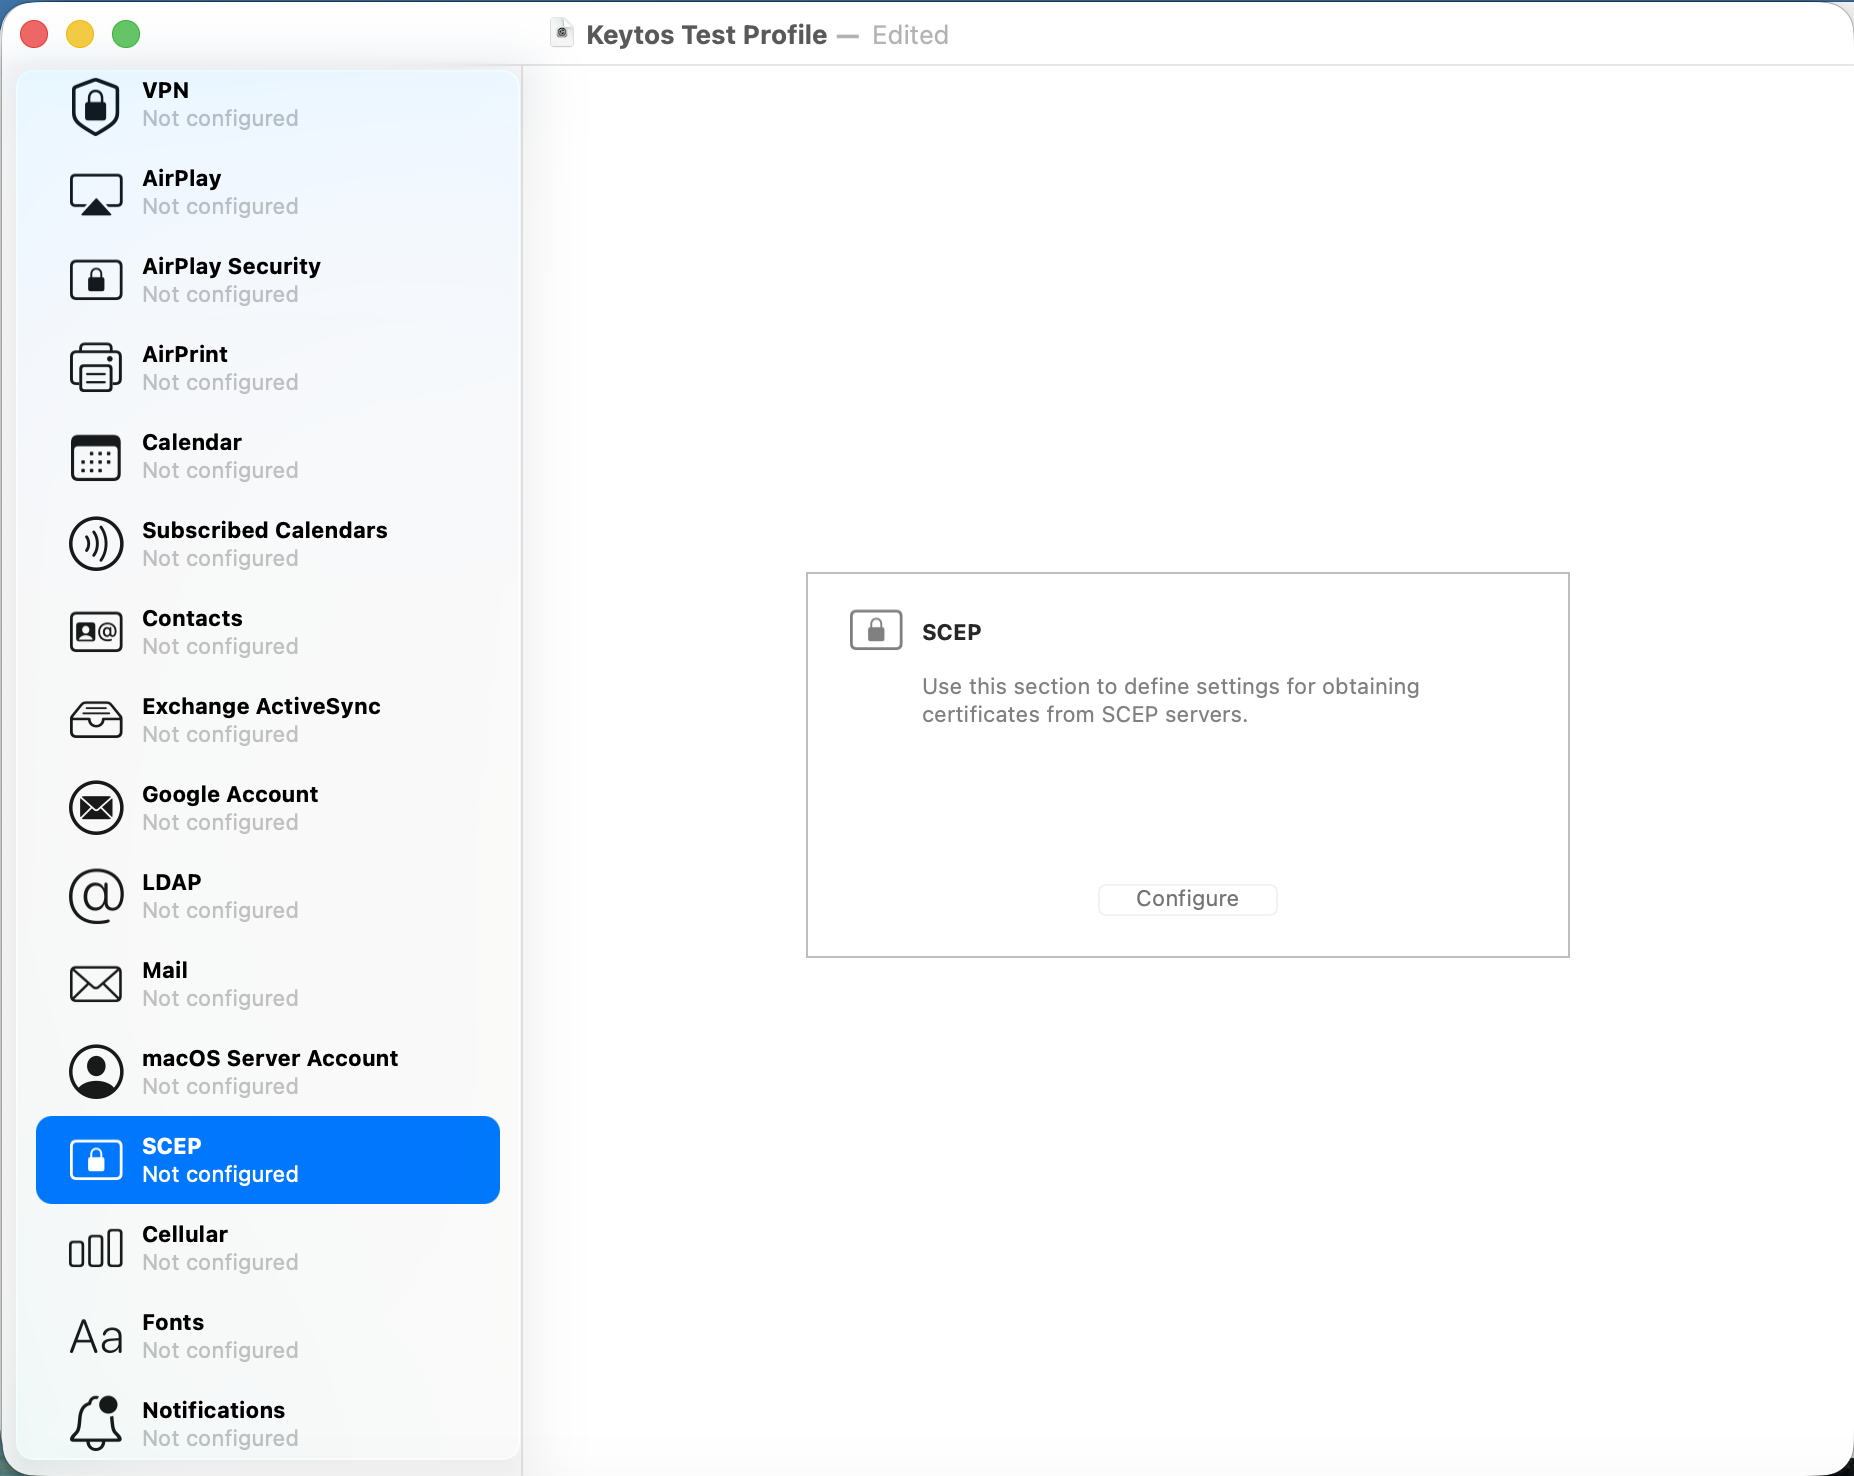
Click on SCEP on the left.
-
Click on Configure.
-
In your web browser, go back to your EZCA portal.
-
Click Certificate Authorities and find the SCEP you previously created.
-
Click View requirements.
-
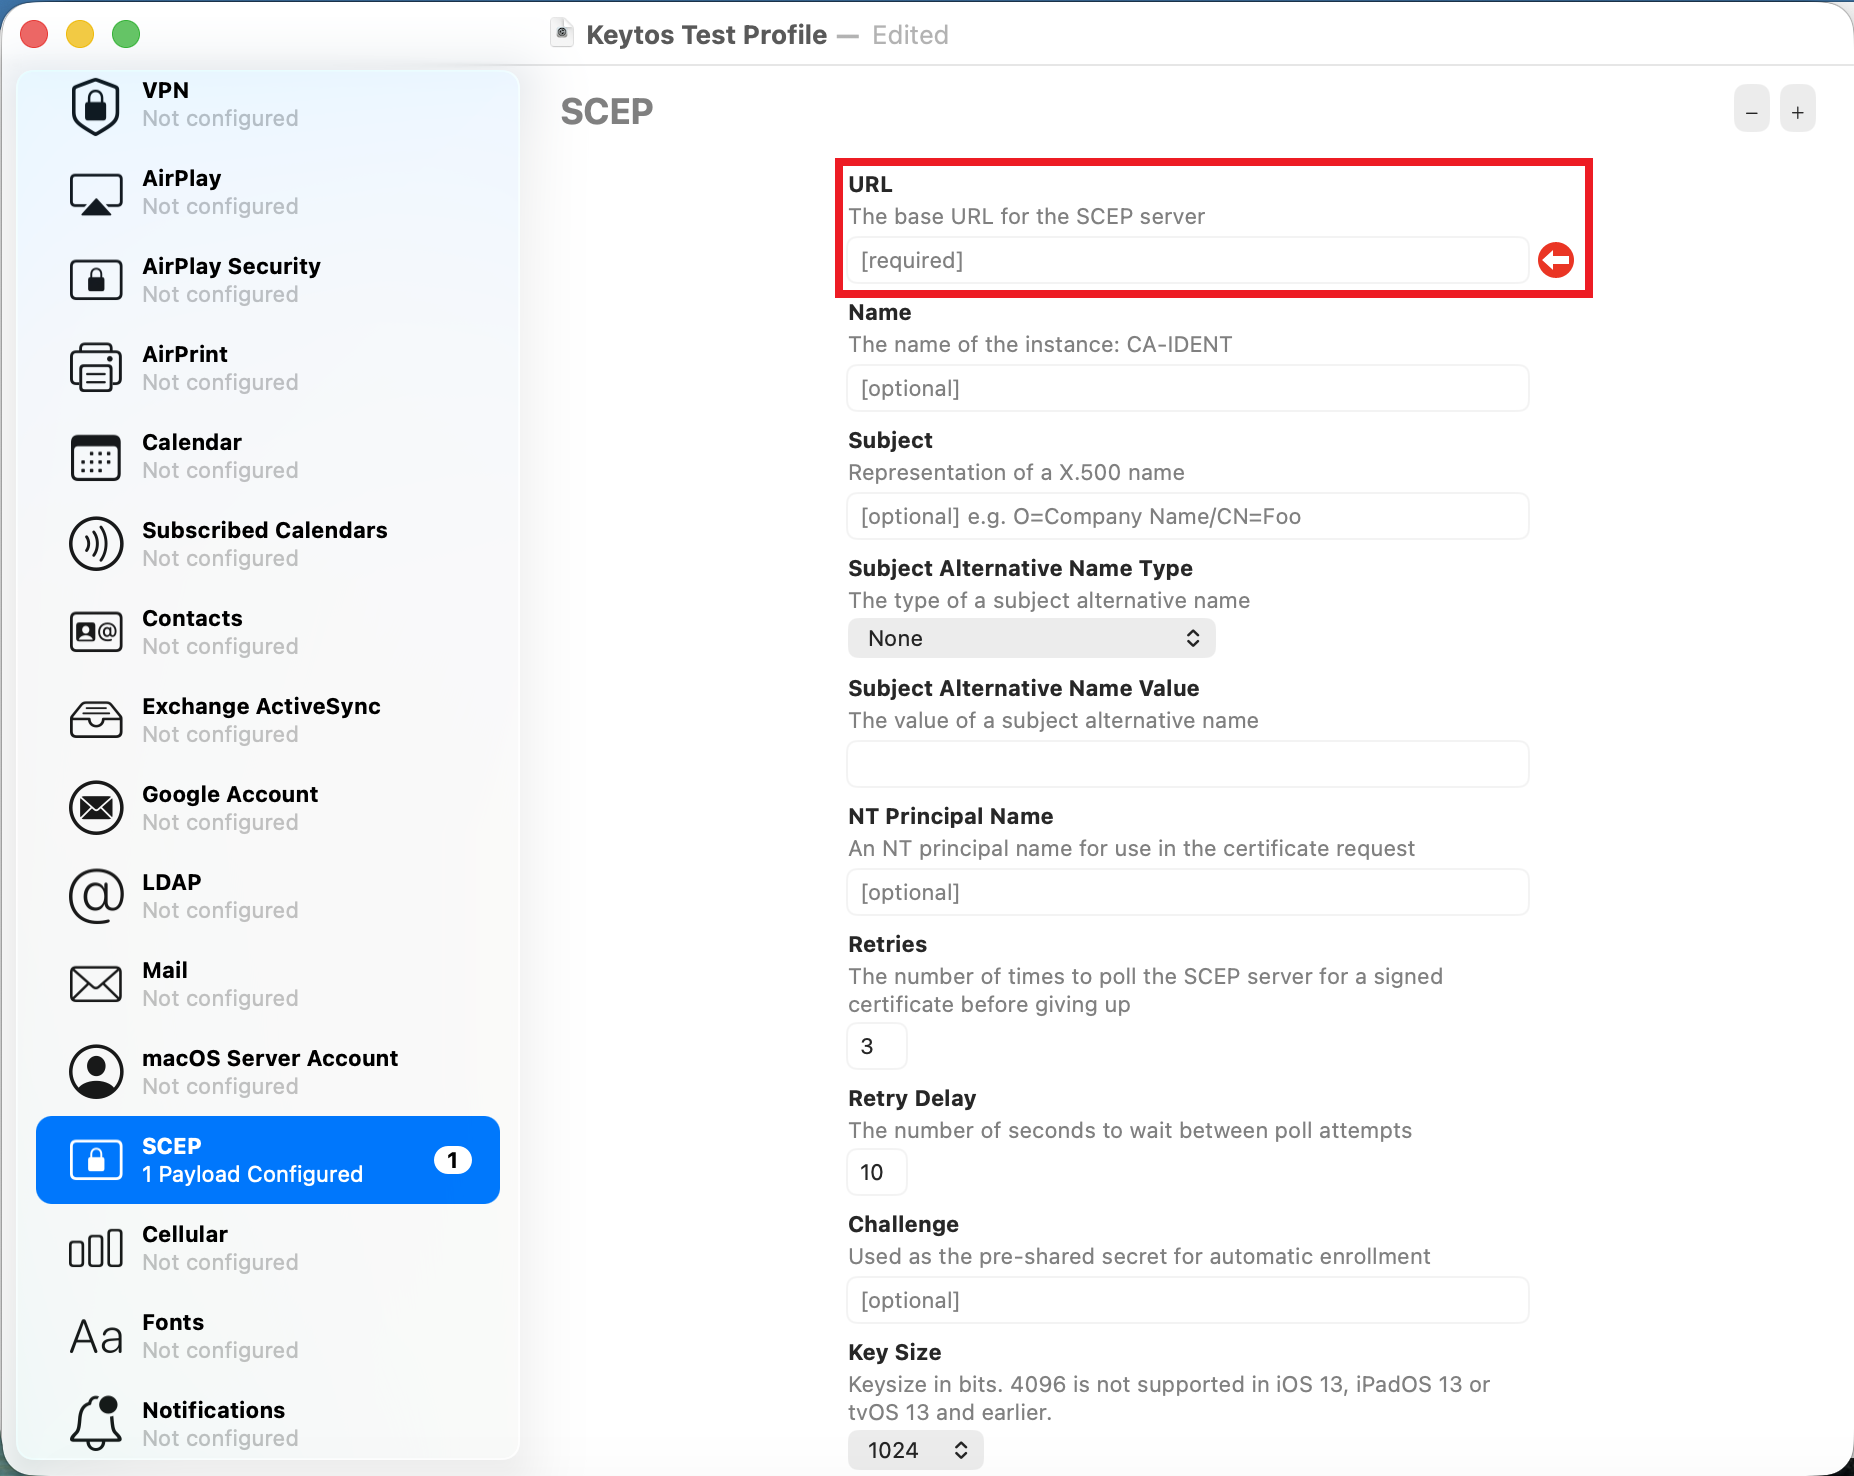
Copy the Static Challenge SCEP URL.
-
Go back into Apple Configurator.
-
Paste the SCEP URL you just copied into the URL field.
-
Go back into EZCA.
-
Copy the SCEP Challenge.
-
Go back into Apple Configurator.
-
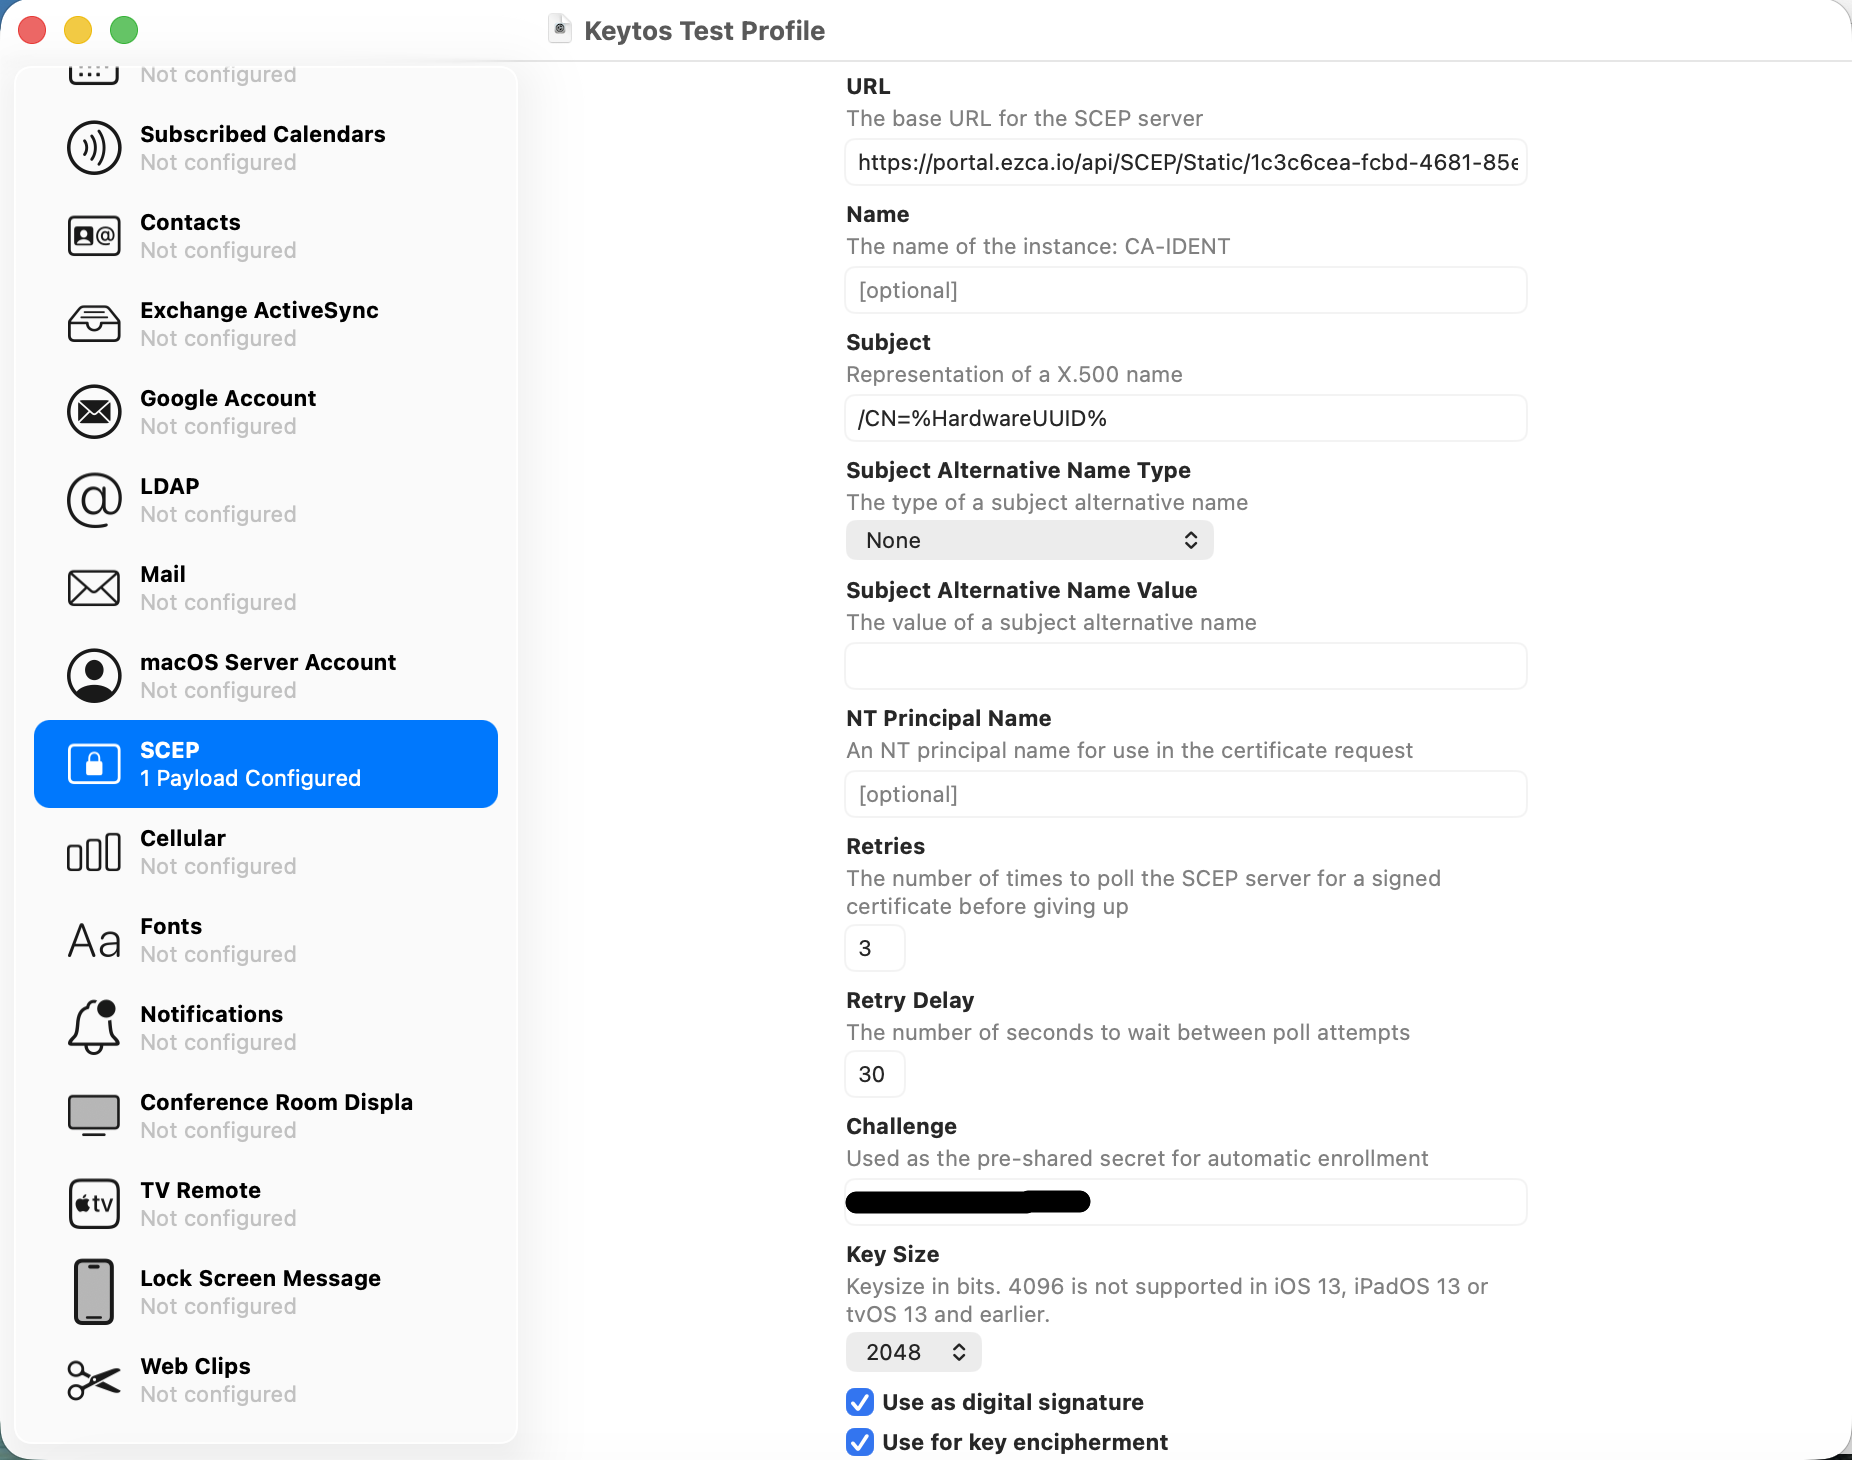
Paste the SCEP Challenge you just copied into the Challenge field.
-
Enter the following settings:
-
Subject: Use a static value or Apple’s built-in variables (e.g.
CN=%ComputerName%). -
Subject Alternative Name Type: Set as DNS Name.
-
Subject Alternative Name Value: Use a static value or Apple’s built-in variables (e.g.
%HostName%). -
In the Retries field, enter 3.
-
In the Retry Delay field, enter 30.
-
In the Key Size field, enter at least 2048 or greater.
-
In the Key Usage dropdown, select Both signing and encryption.
-
-
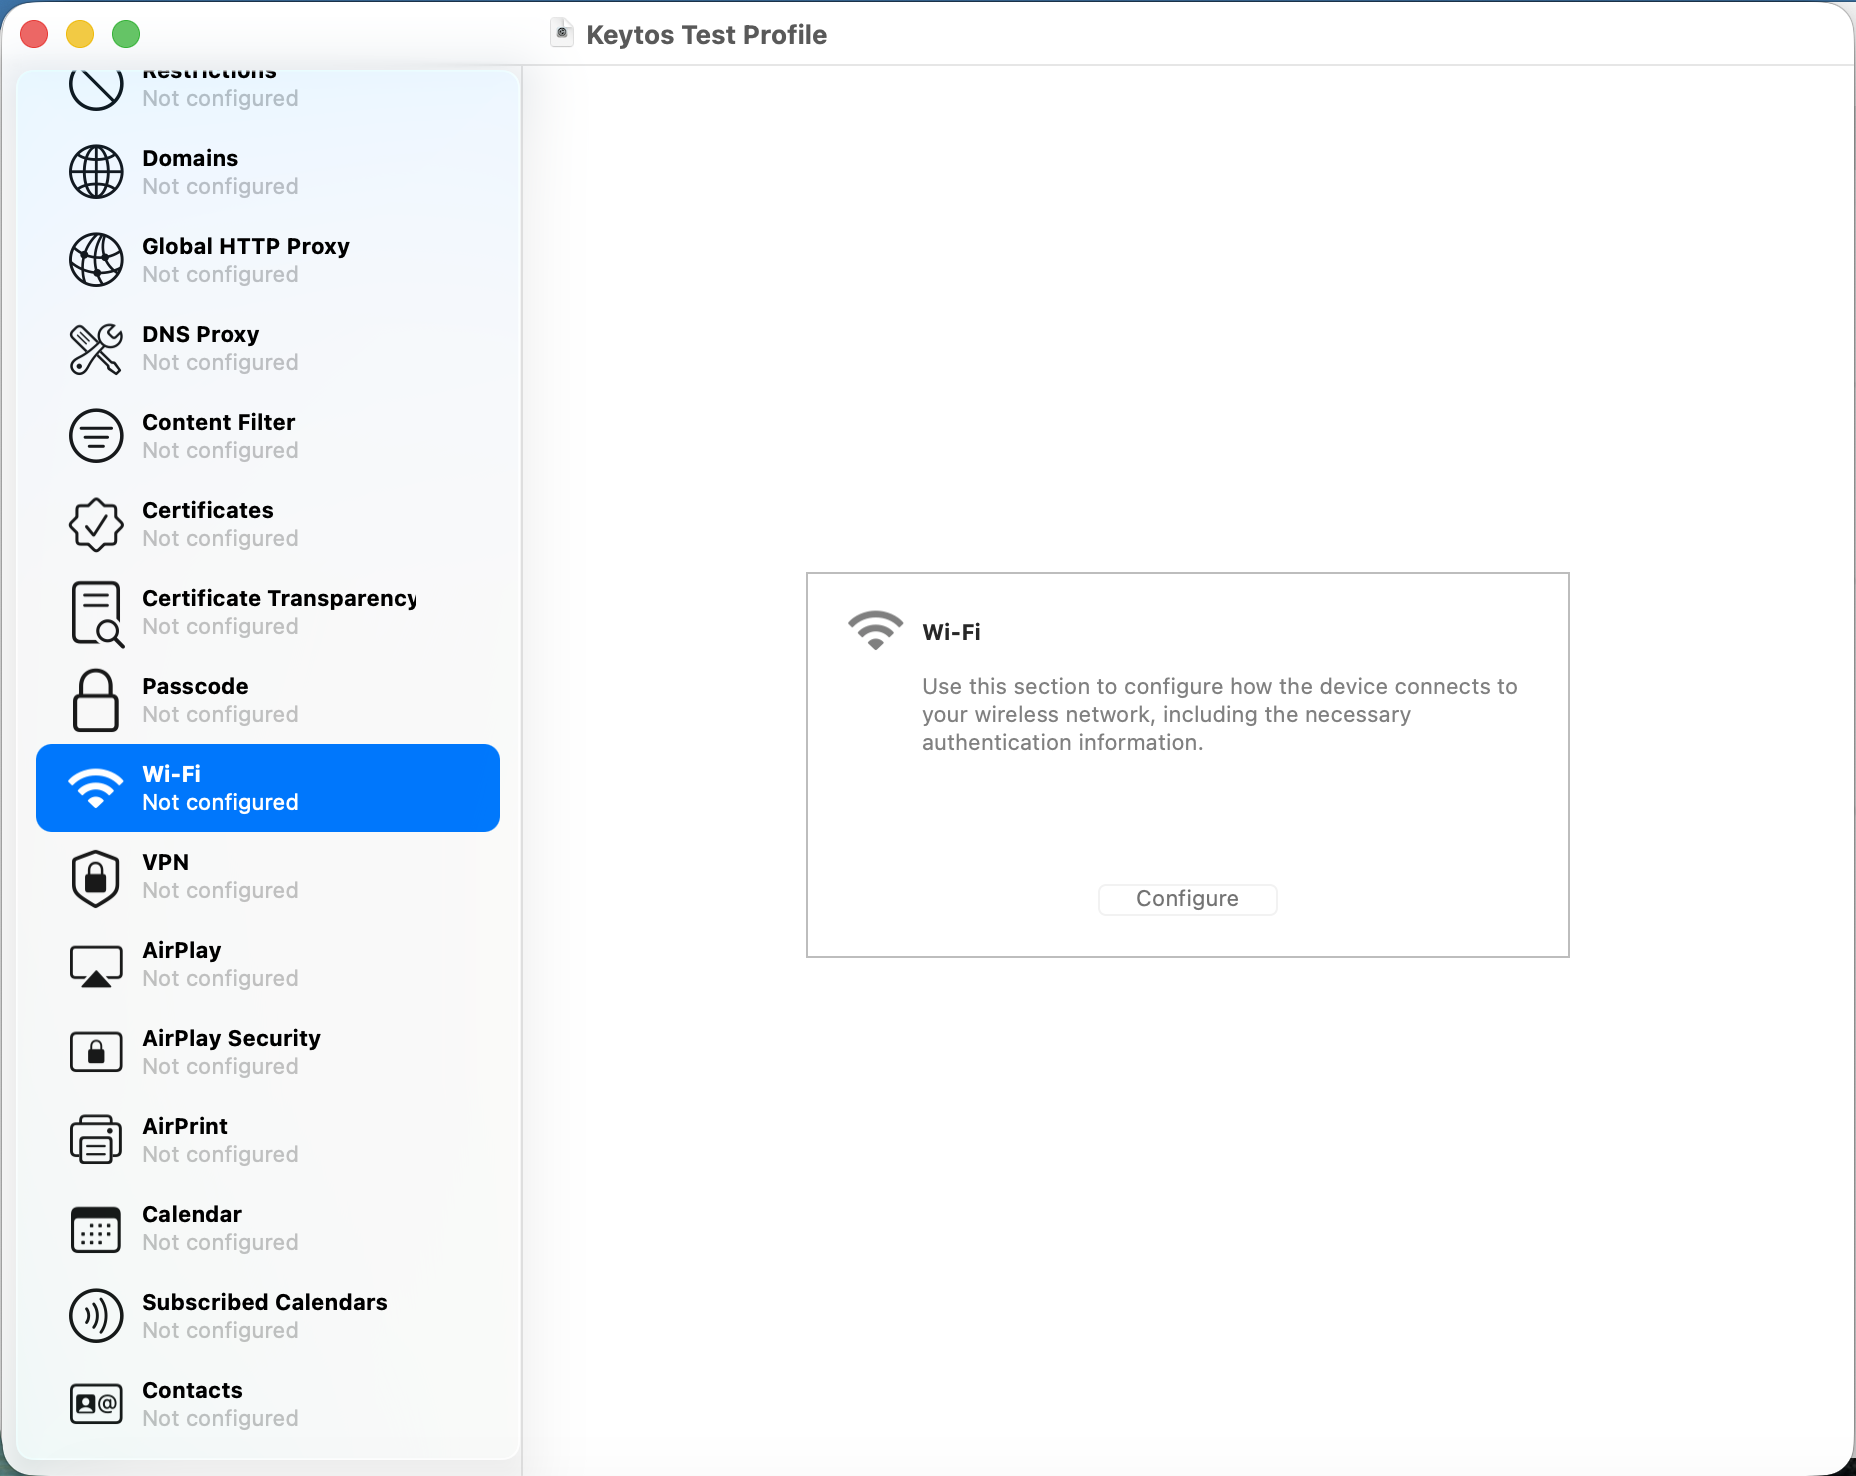
Click on Wi-Fi on the left.
-
Click on Configure.
-
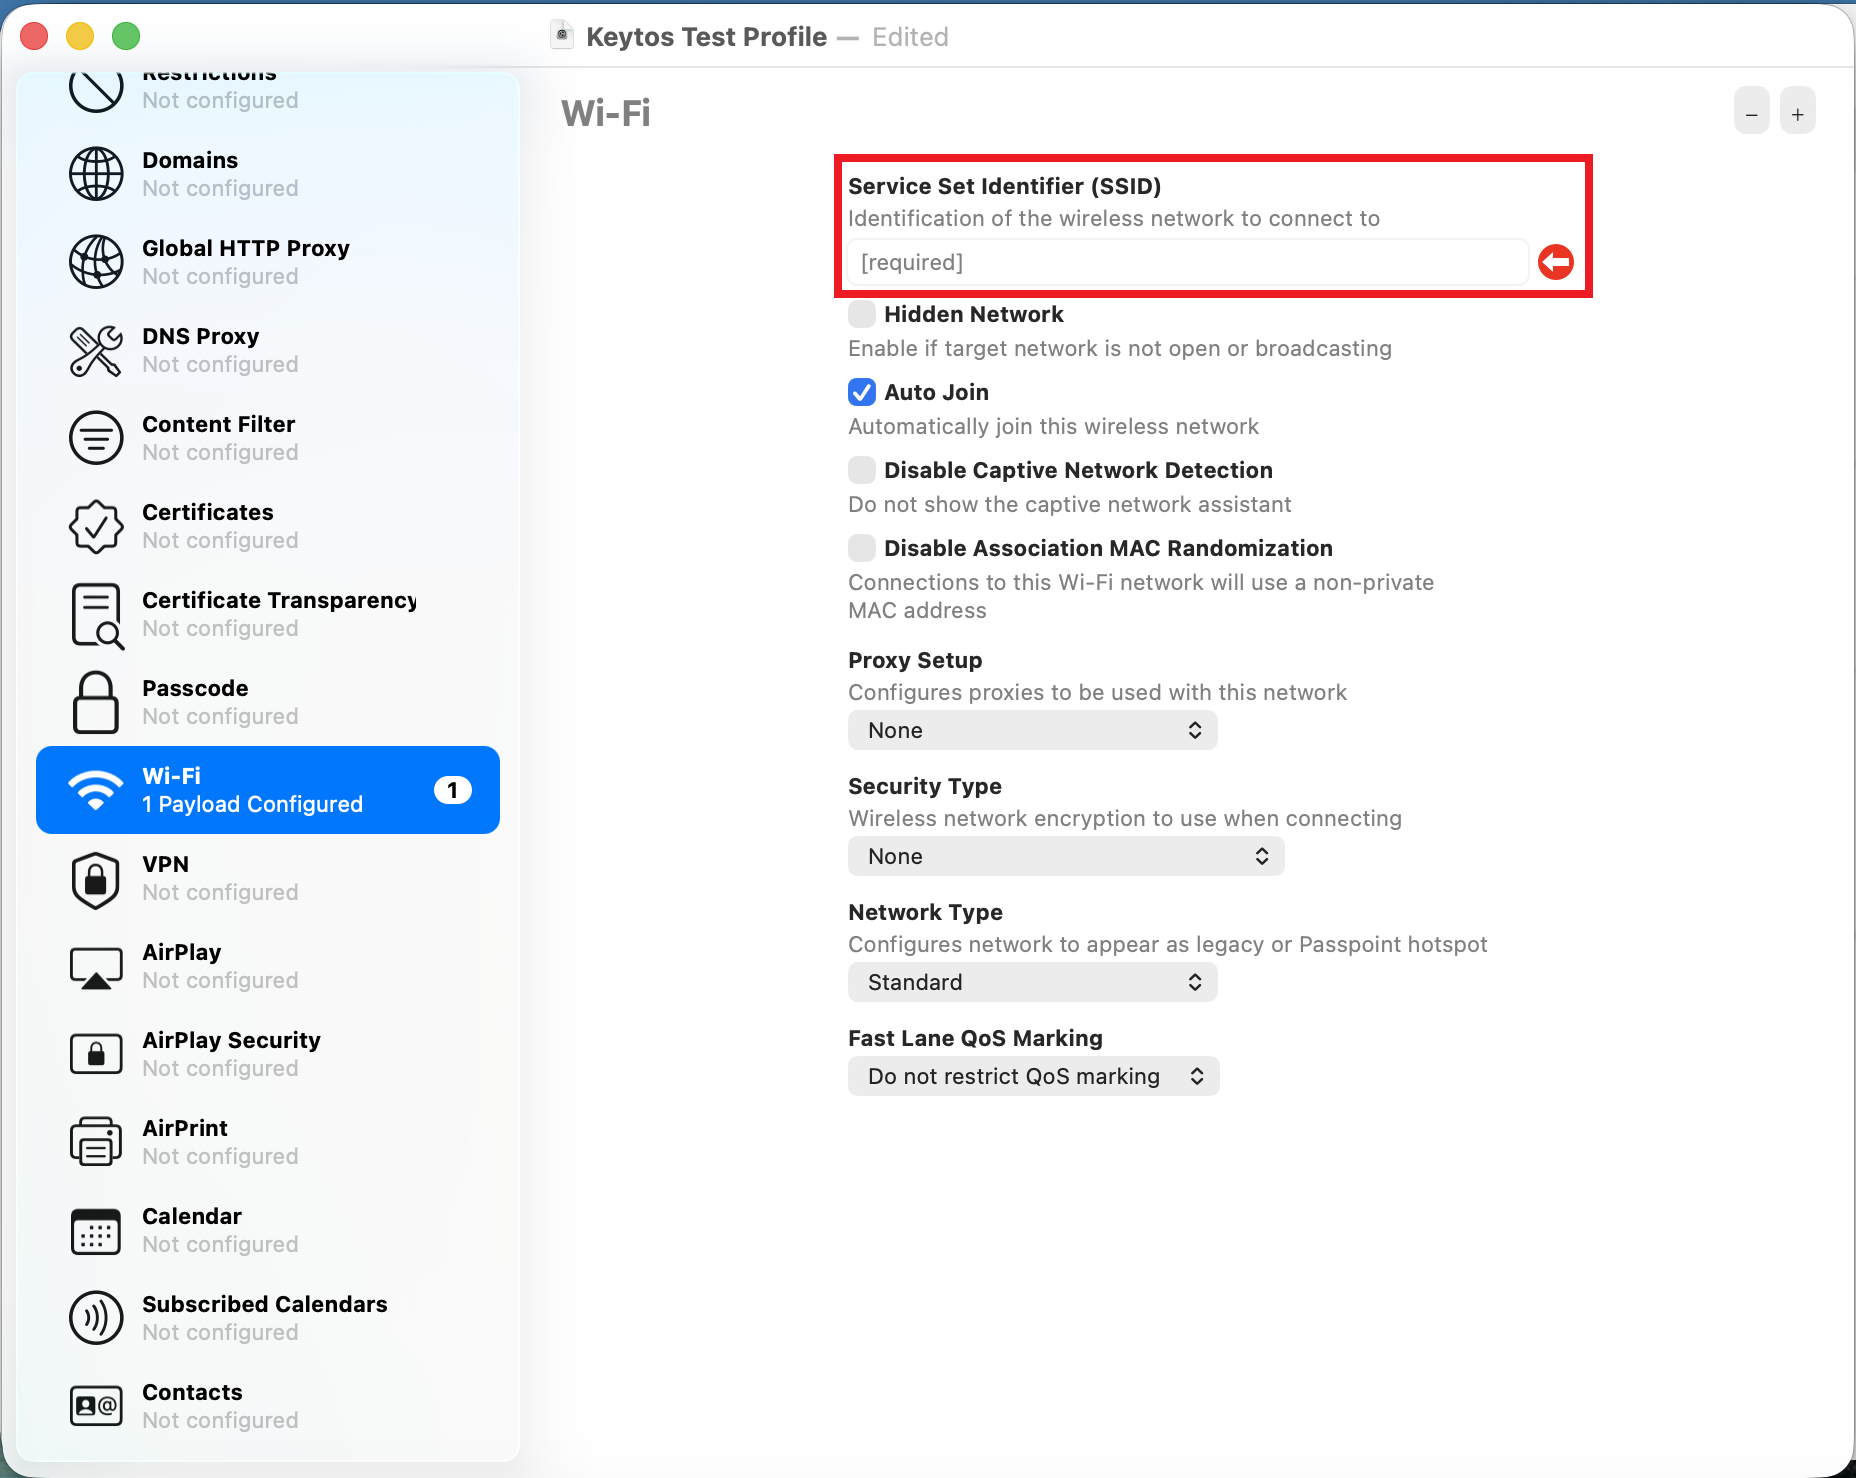
Enter the SSID of your network.
-
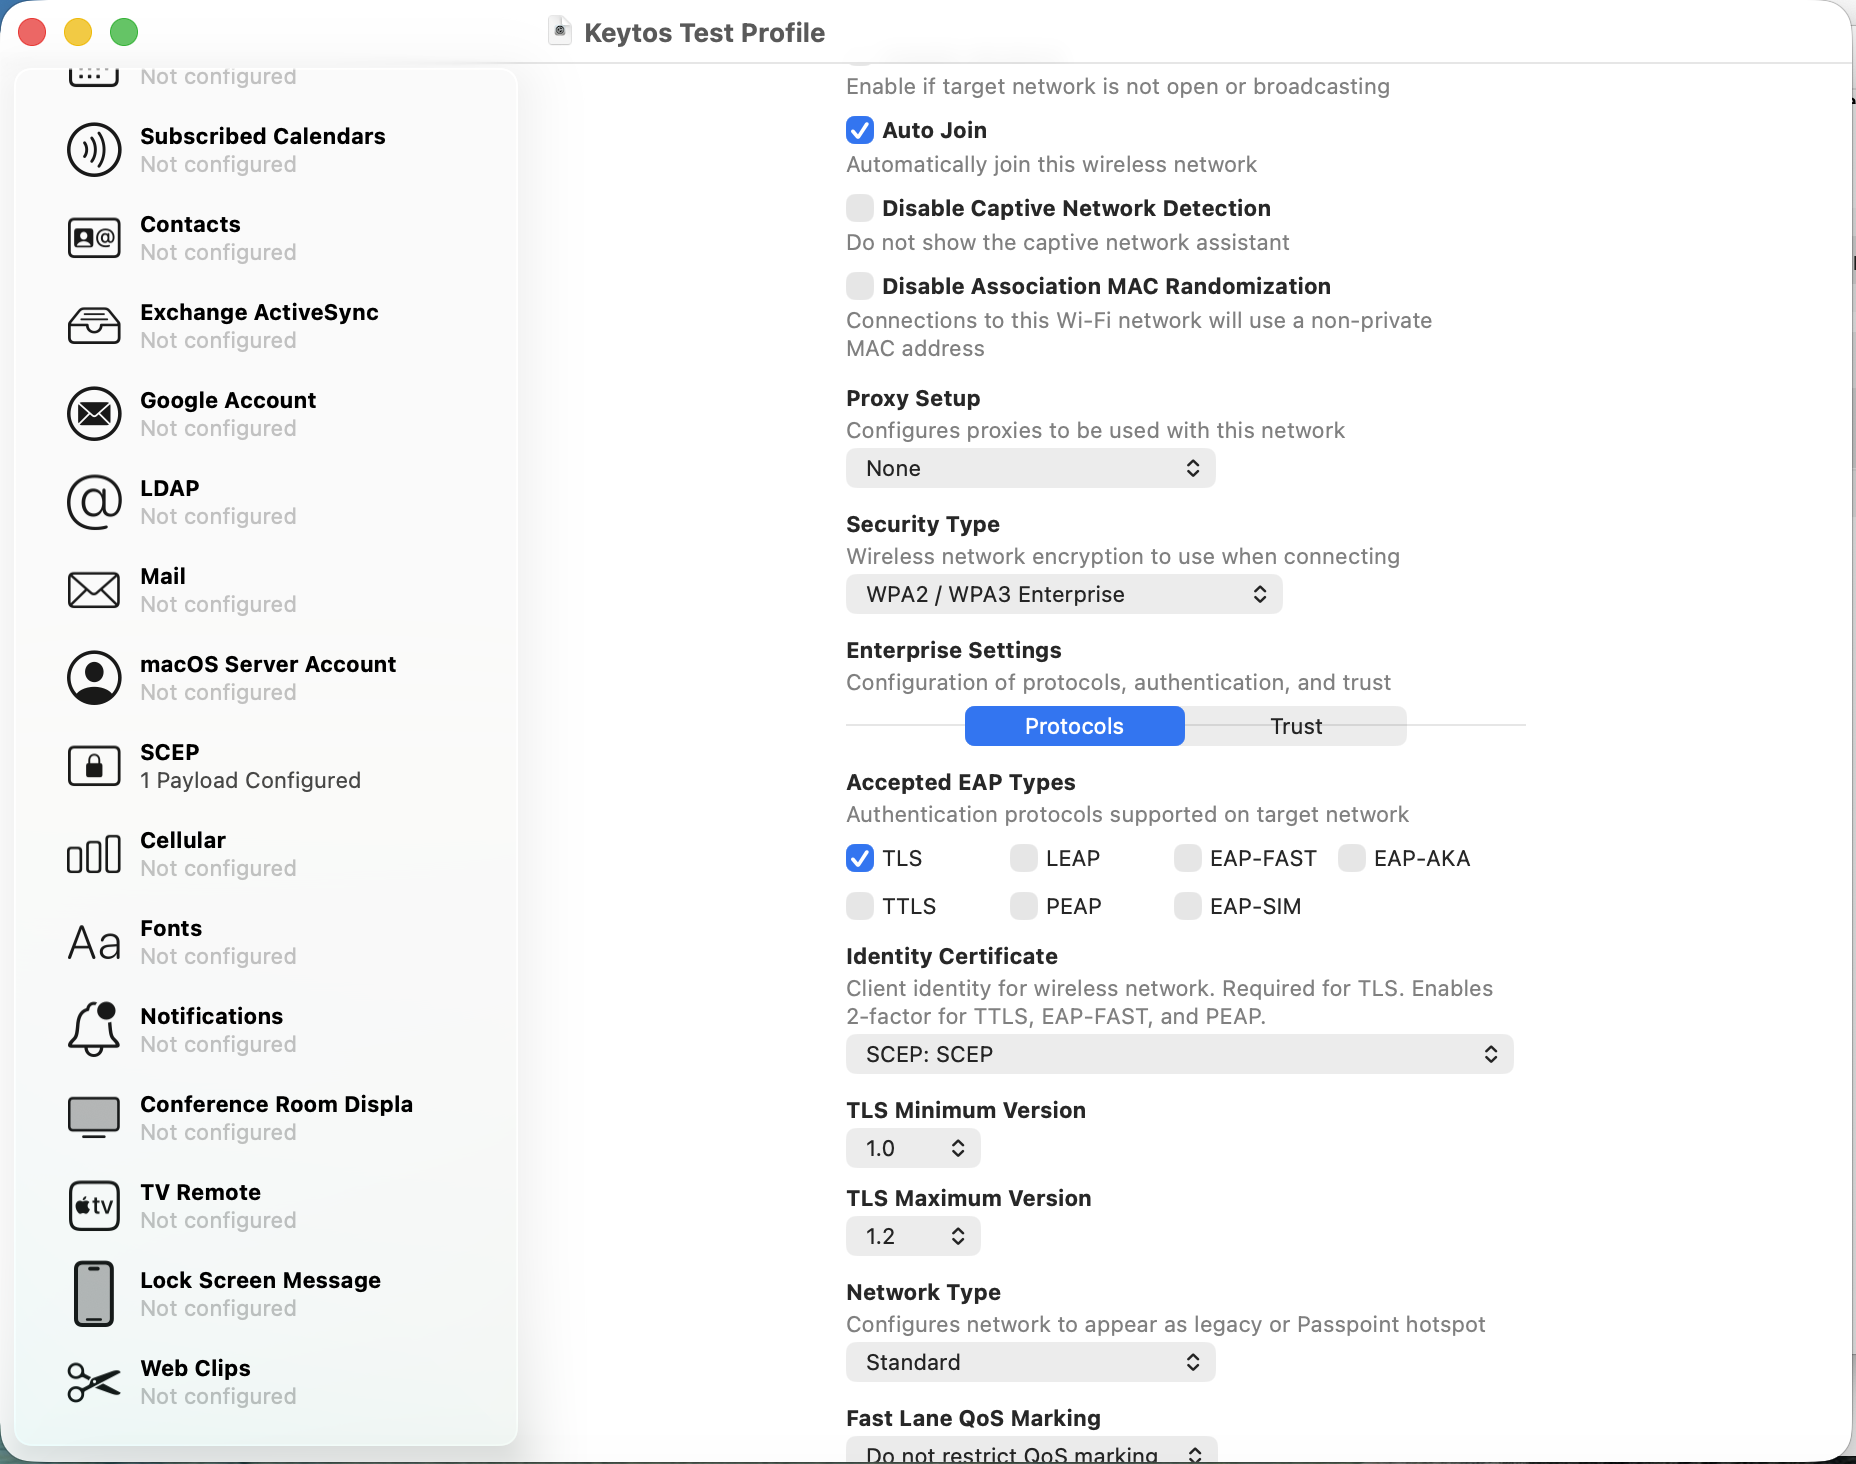
Select the Security type as WPA2 / WPA3-Enterprise.
-
Select the EAP Method as TLS.
-
Under Identity Certificate select the SCEP one you just created.
-
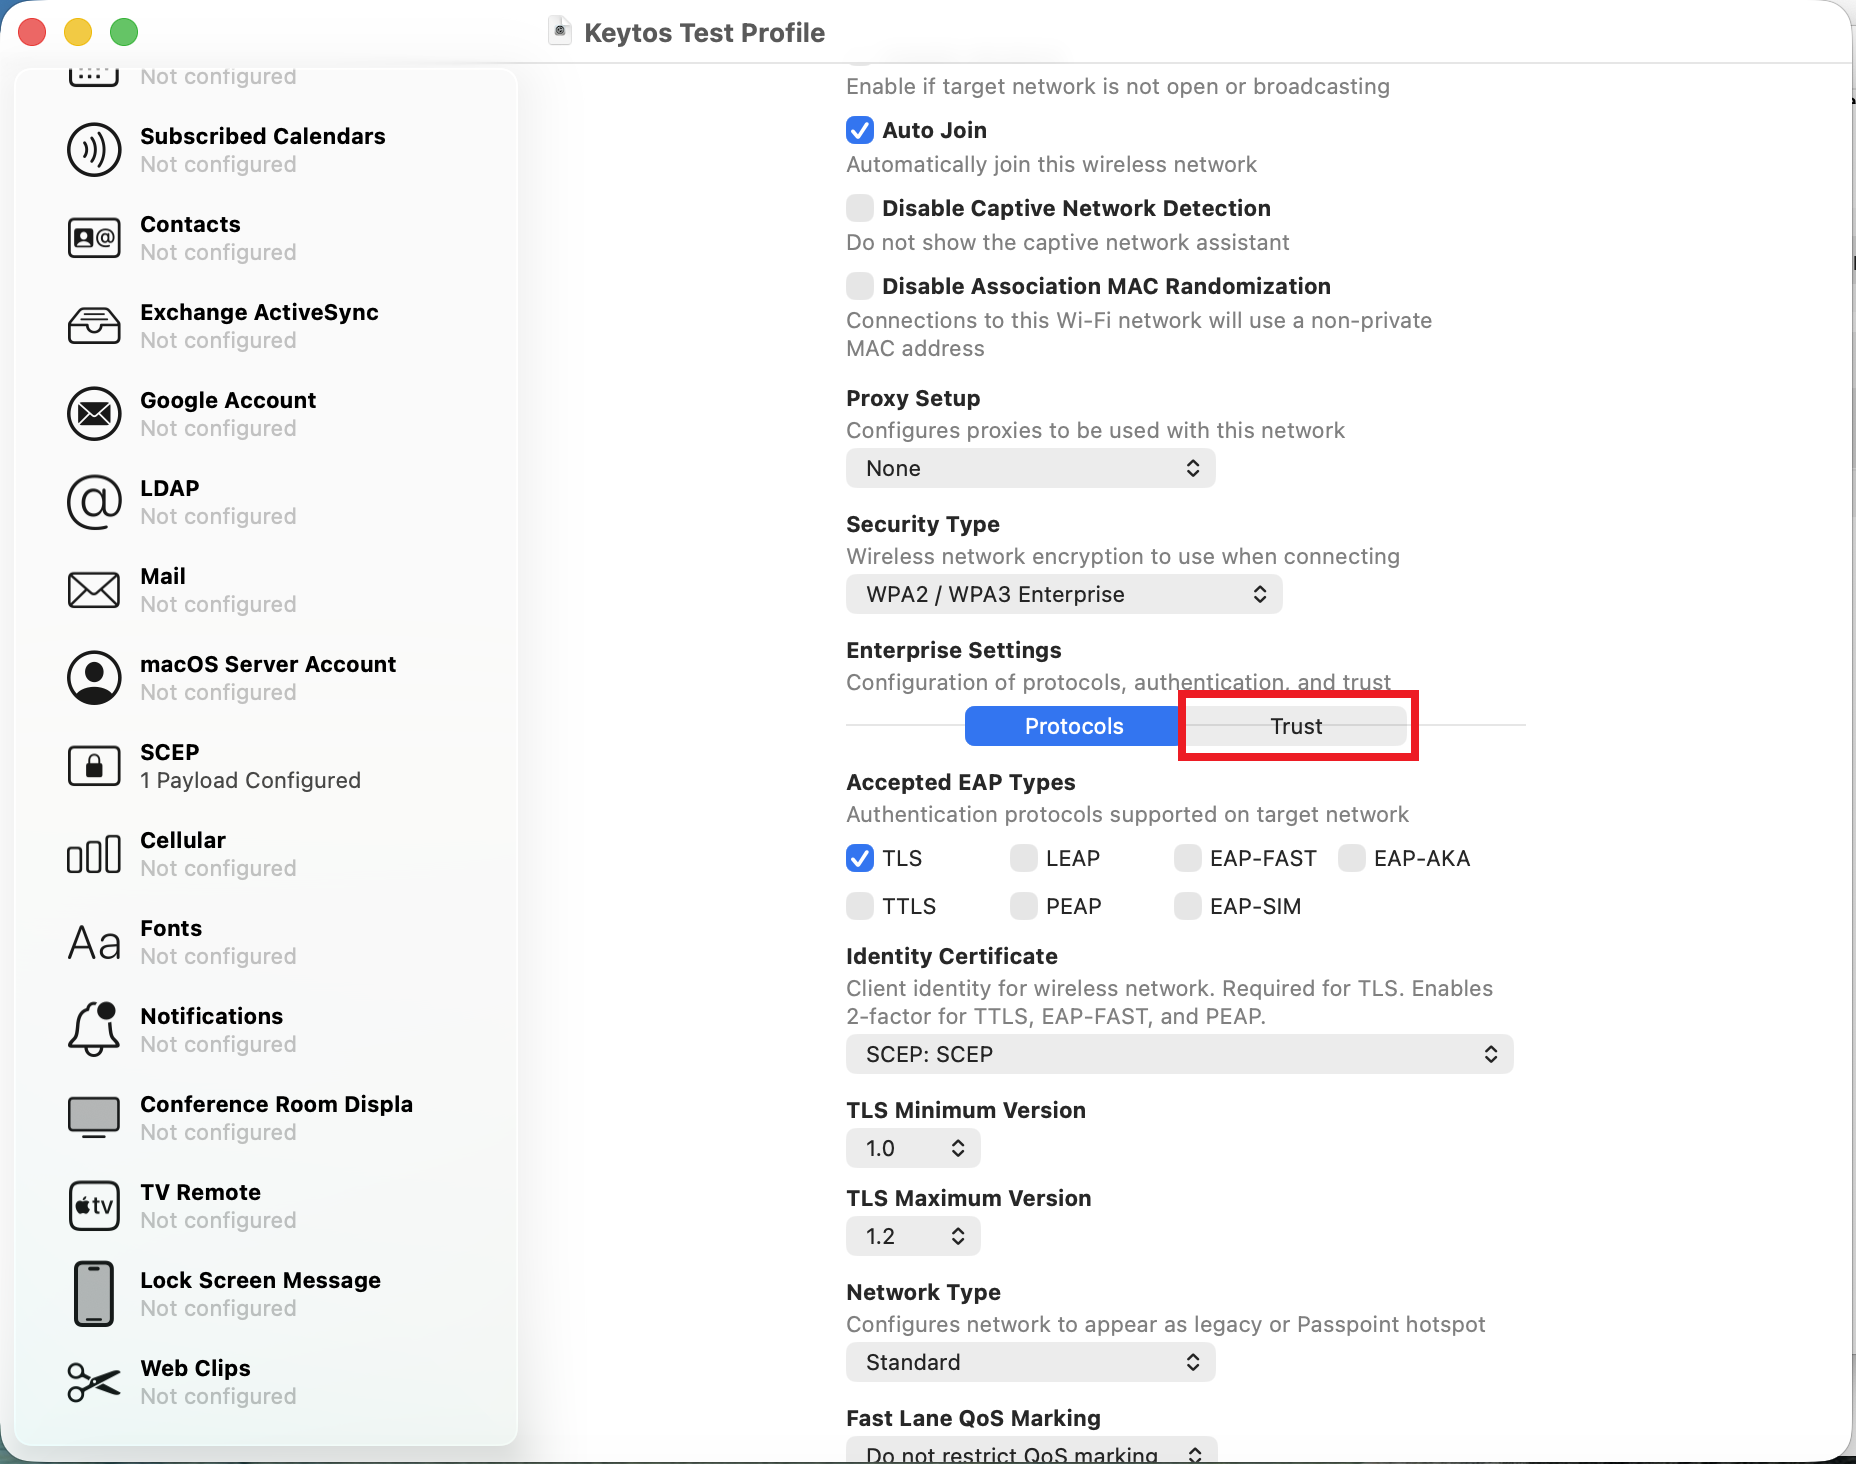
Switch from the Protocols tab to Trust.
-
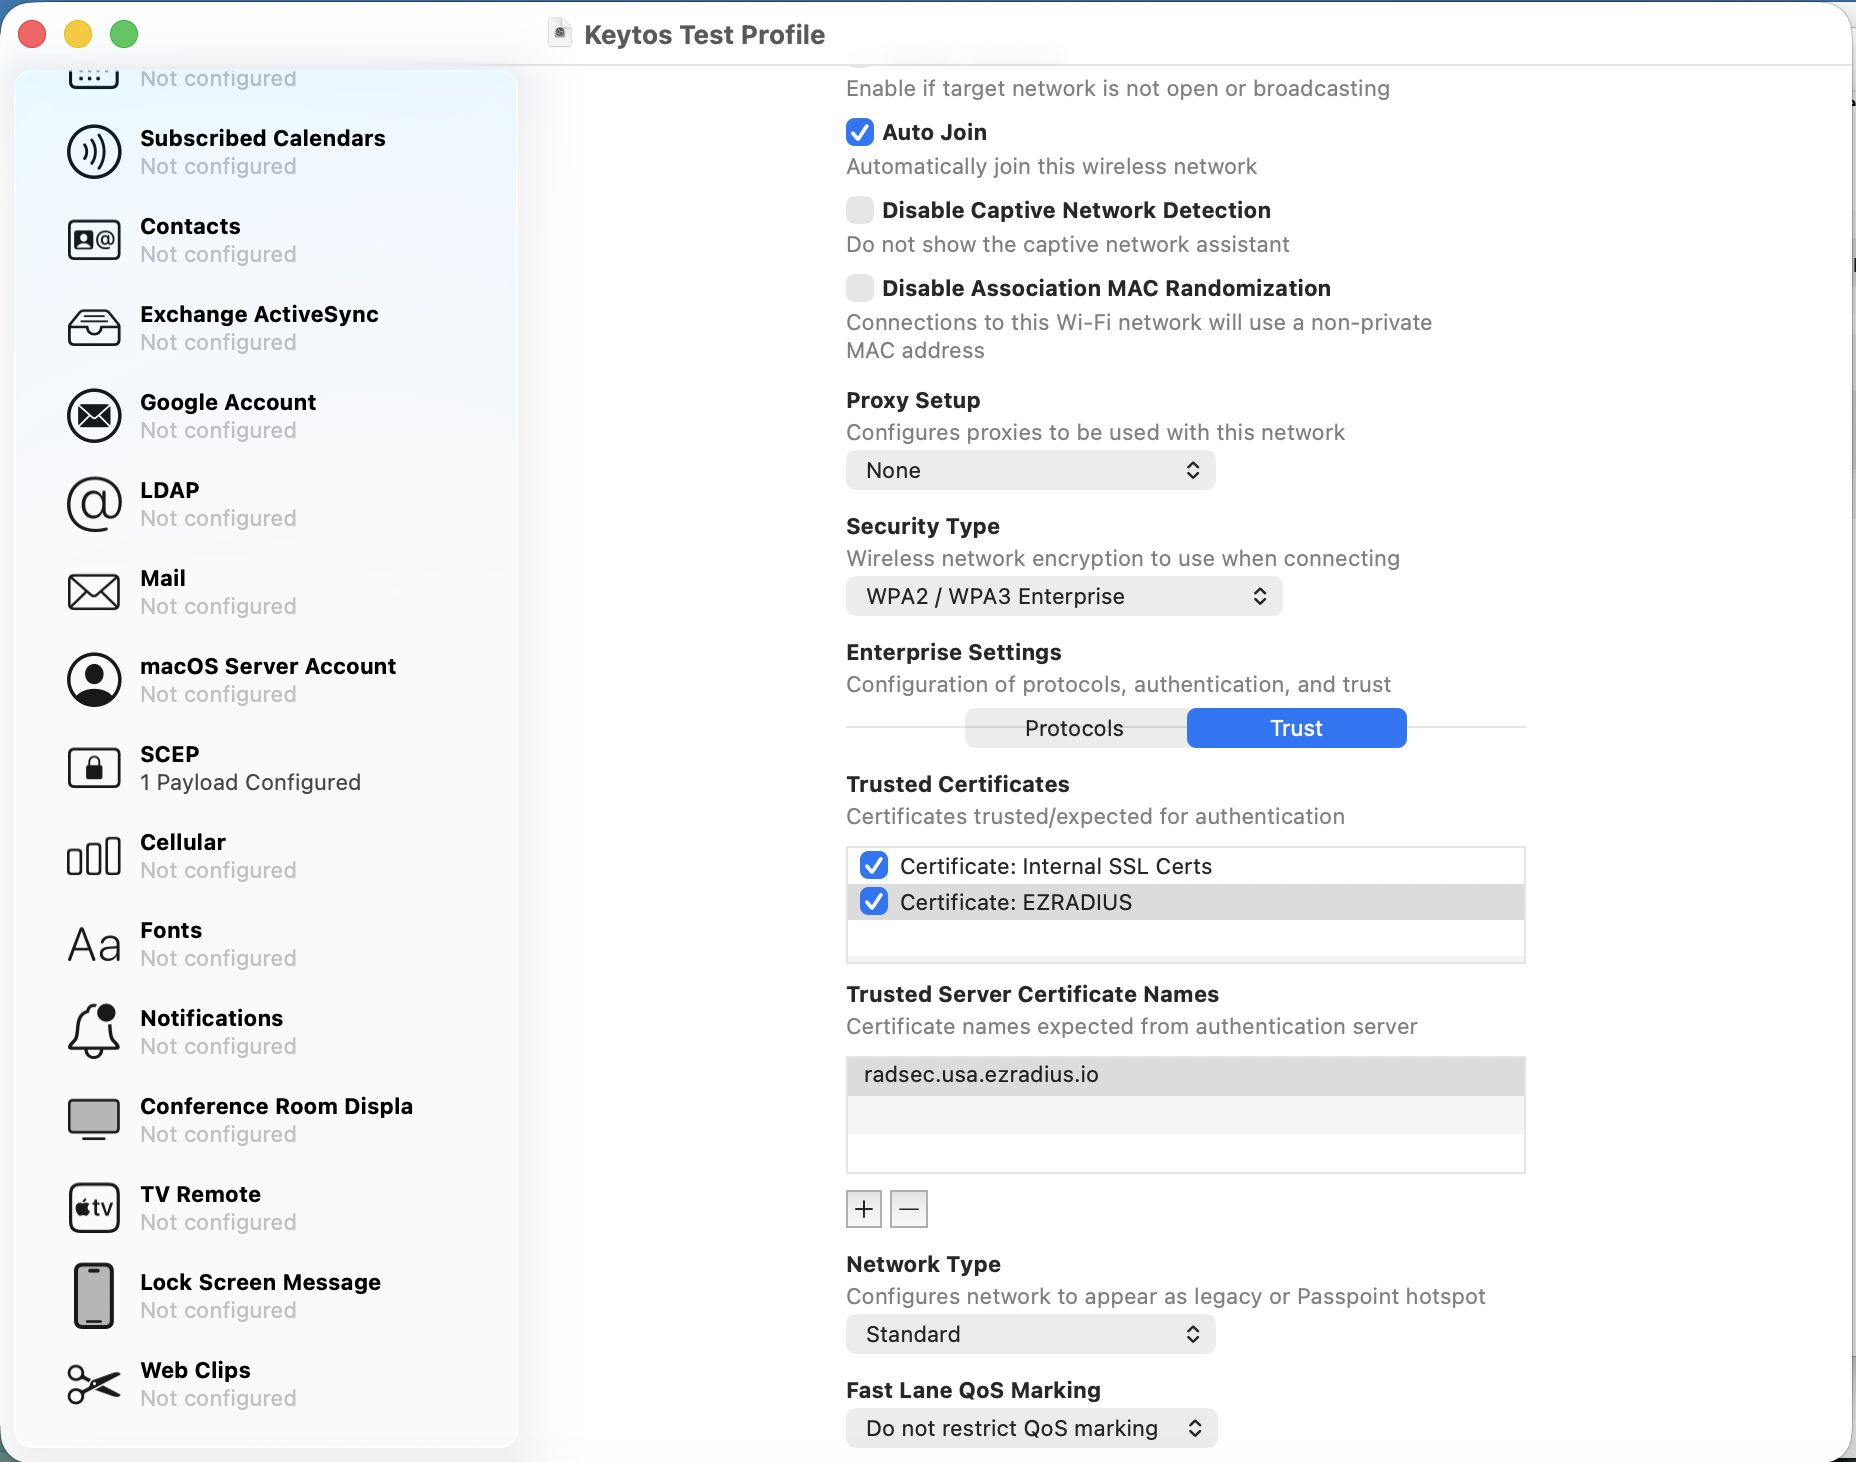
Check the box next to the two certificates you have added.
-
Navigate to where you saved your Server certificate on your computer and open it.
-
Scroll down until you find the Subject Alternate Name field.
-
Copy just the URL from the DNS Name entry.
-
Go back into Apple Configurator.
-
Paste this DNS Name into the Trusted Server Certificate Names field.
-
Click File → Save to save as a
.mobileconfig. -
Done!
How To Create SCEP Certificates in Apple Configurator for SimpleMDM Devices for EAP-TTLS Authentication
If you are using Entra ID passwords you will need to configure the device to use EAP-TTLS/PAP due to Entra ID not supporting MS-CHAPv2 Identity delegation. To configure EAP-TTLS/PAP on macOS, follow these steps:
-
Download Apple Configurator from the App Store.
-
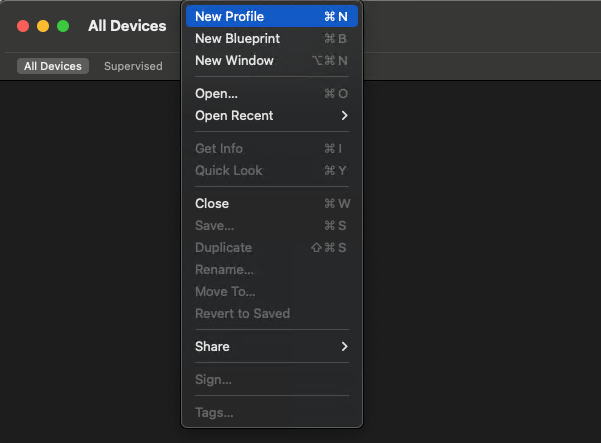
In Apple Configurator, click on File → New Profile.
-
In the General settings, enter the name of the profile.
-
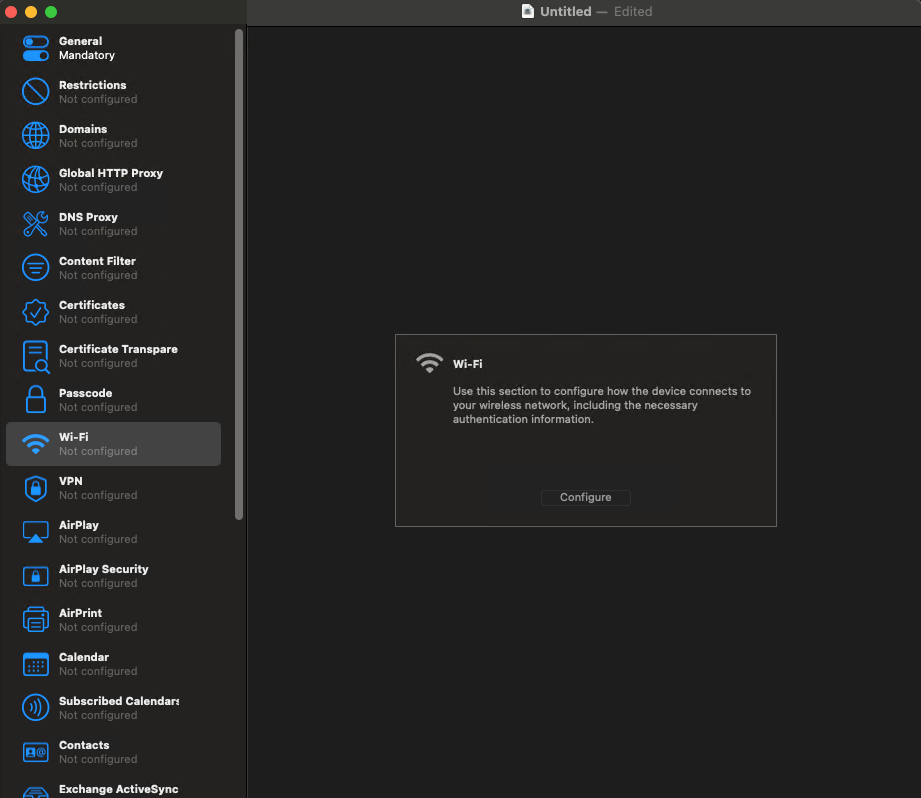
Click on Wi-Fi on the left.
-
Click on Configure.
-
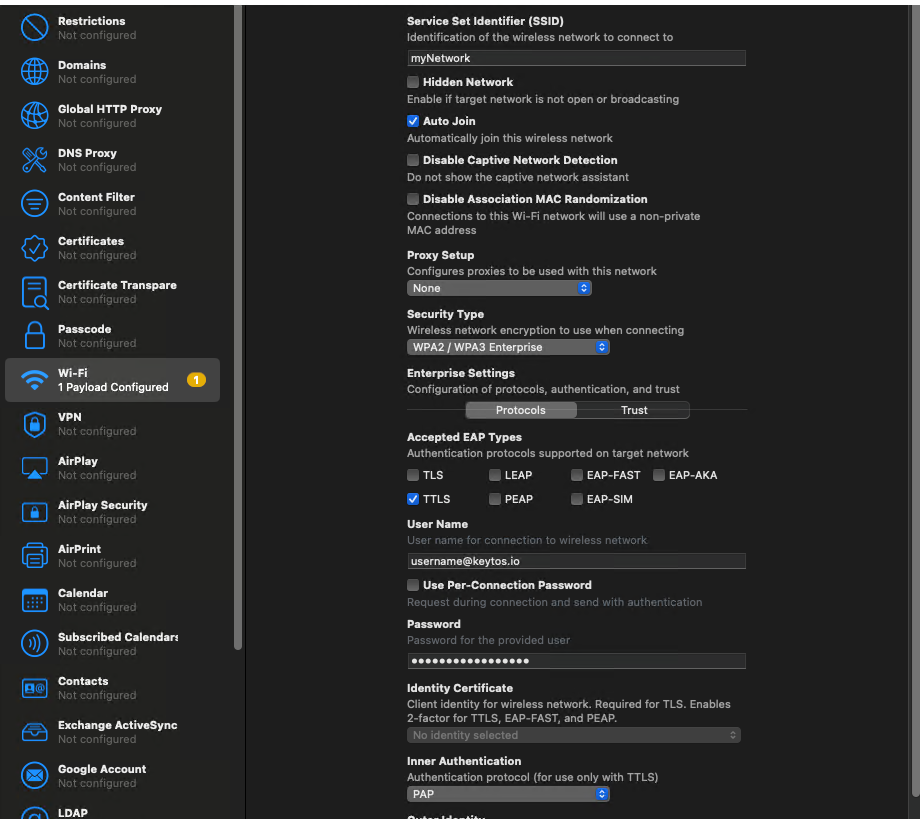
Enter the SSID of your network (Case Sensitive).
-
Select the Security type as either WPA2-Enterprise/WPA3-Enterprise.
-
Select the EAP Method as TTLS.
-
Enter your Entra ID username in the Identity field.
-
Enter your Entra ID password in the Password field.
-
Select PAP as the Inner Authentication.
-
Click Save.
How To Issue SCEP Certificates to SimpleMDM Devices
Once you have created your .mobileconfig file, you will need to issue it to all your devices.
-
Open SimpleMDM in your browser.
-
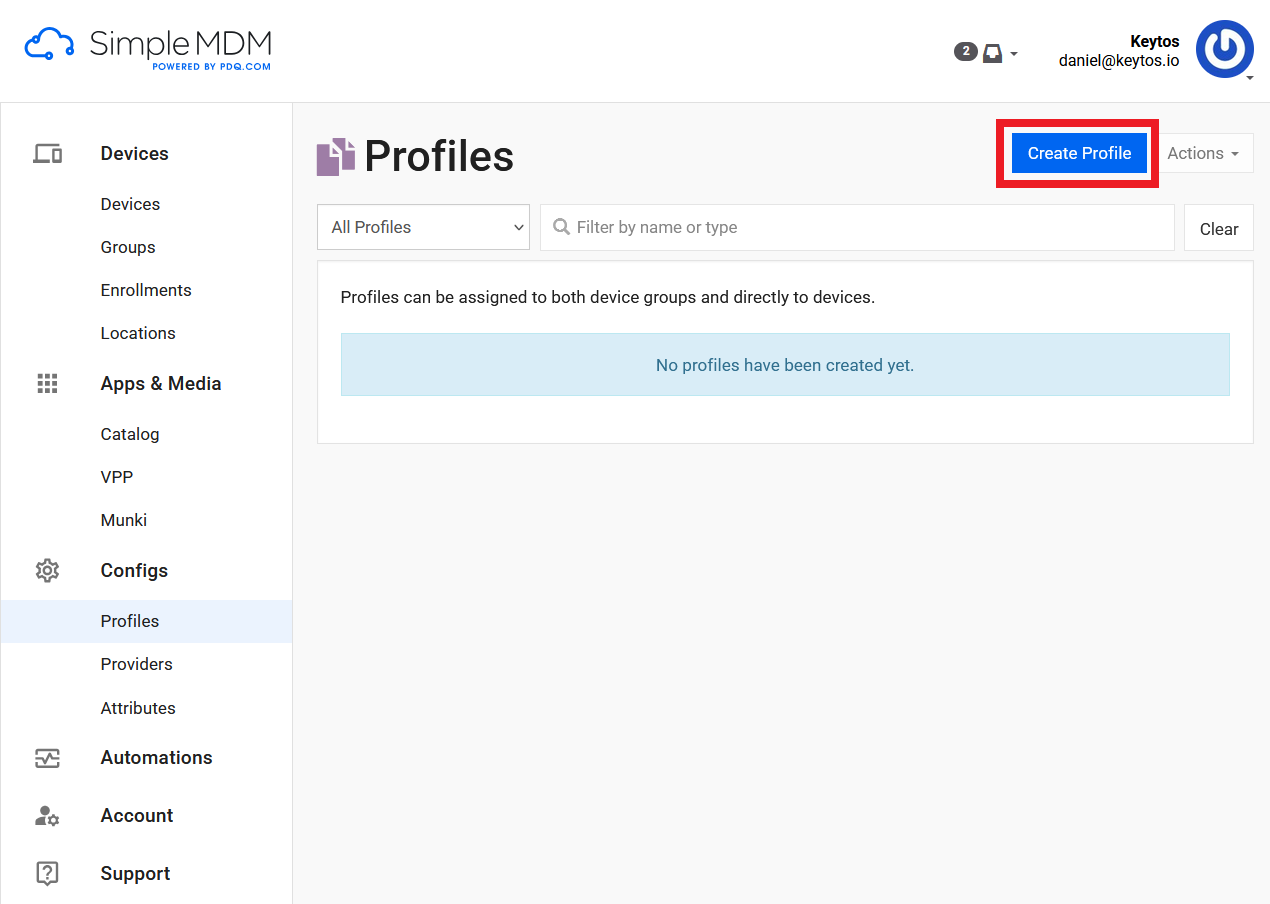
Navigate to Config → Profiles.
-
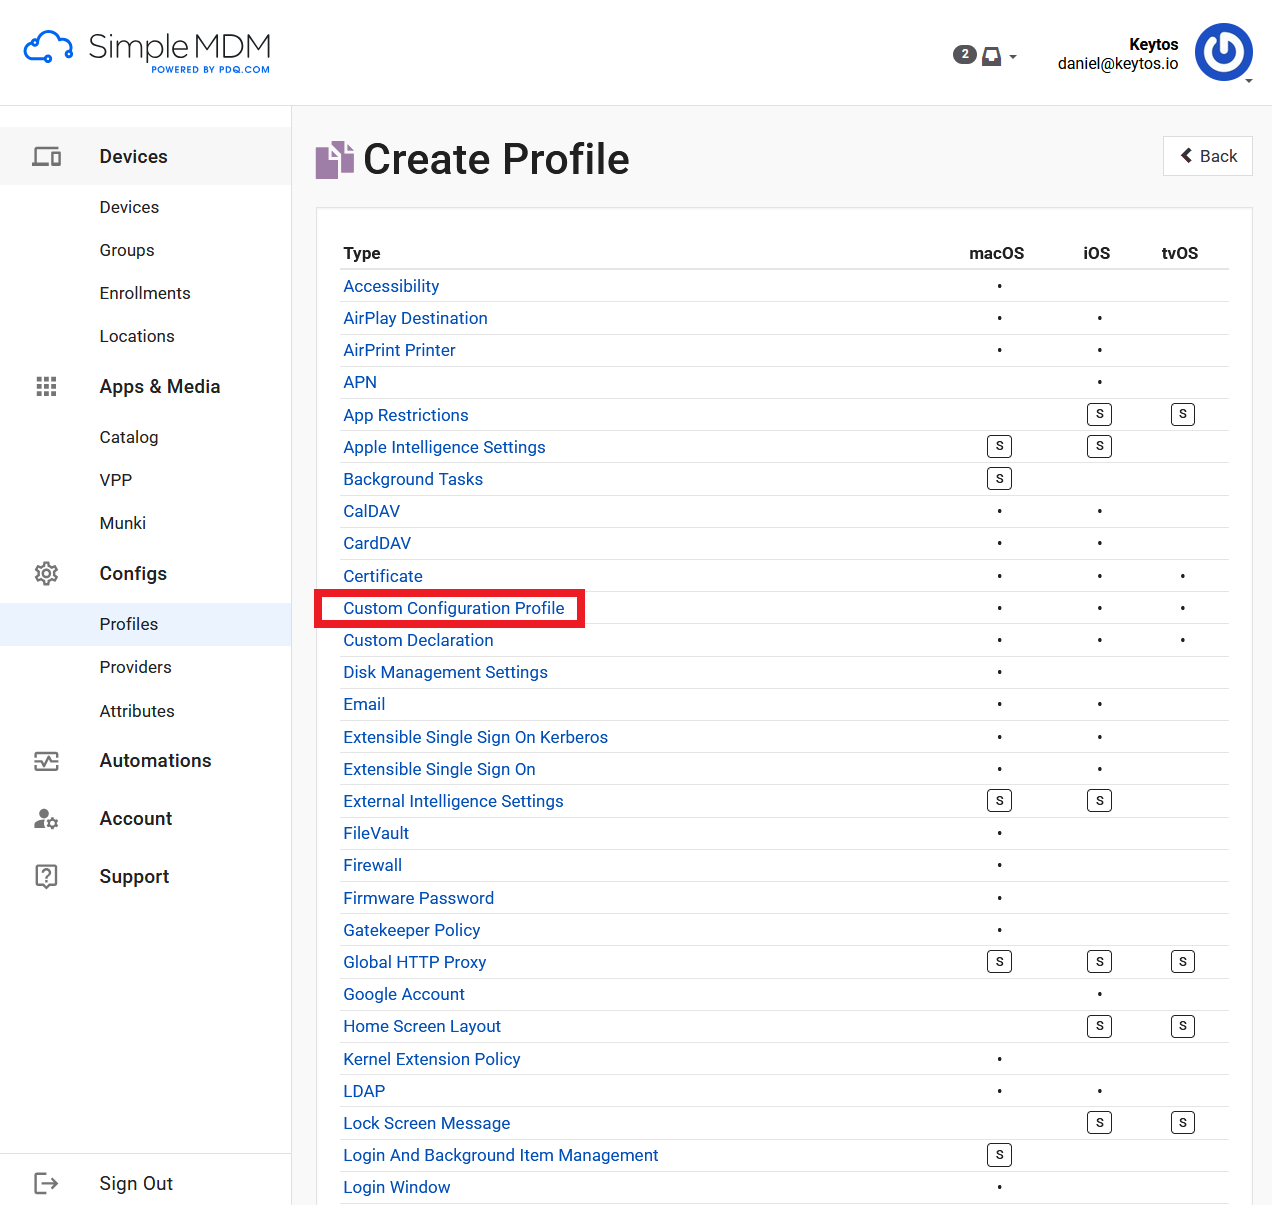
Click Create Profile.
-
Select Custom Configuration Profile.
-
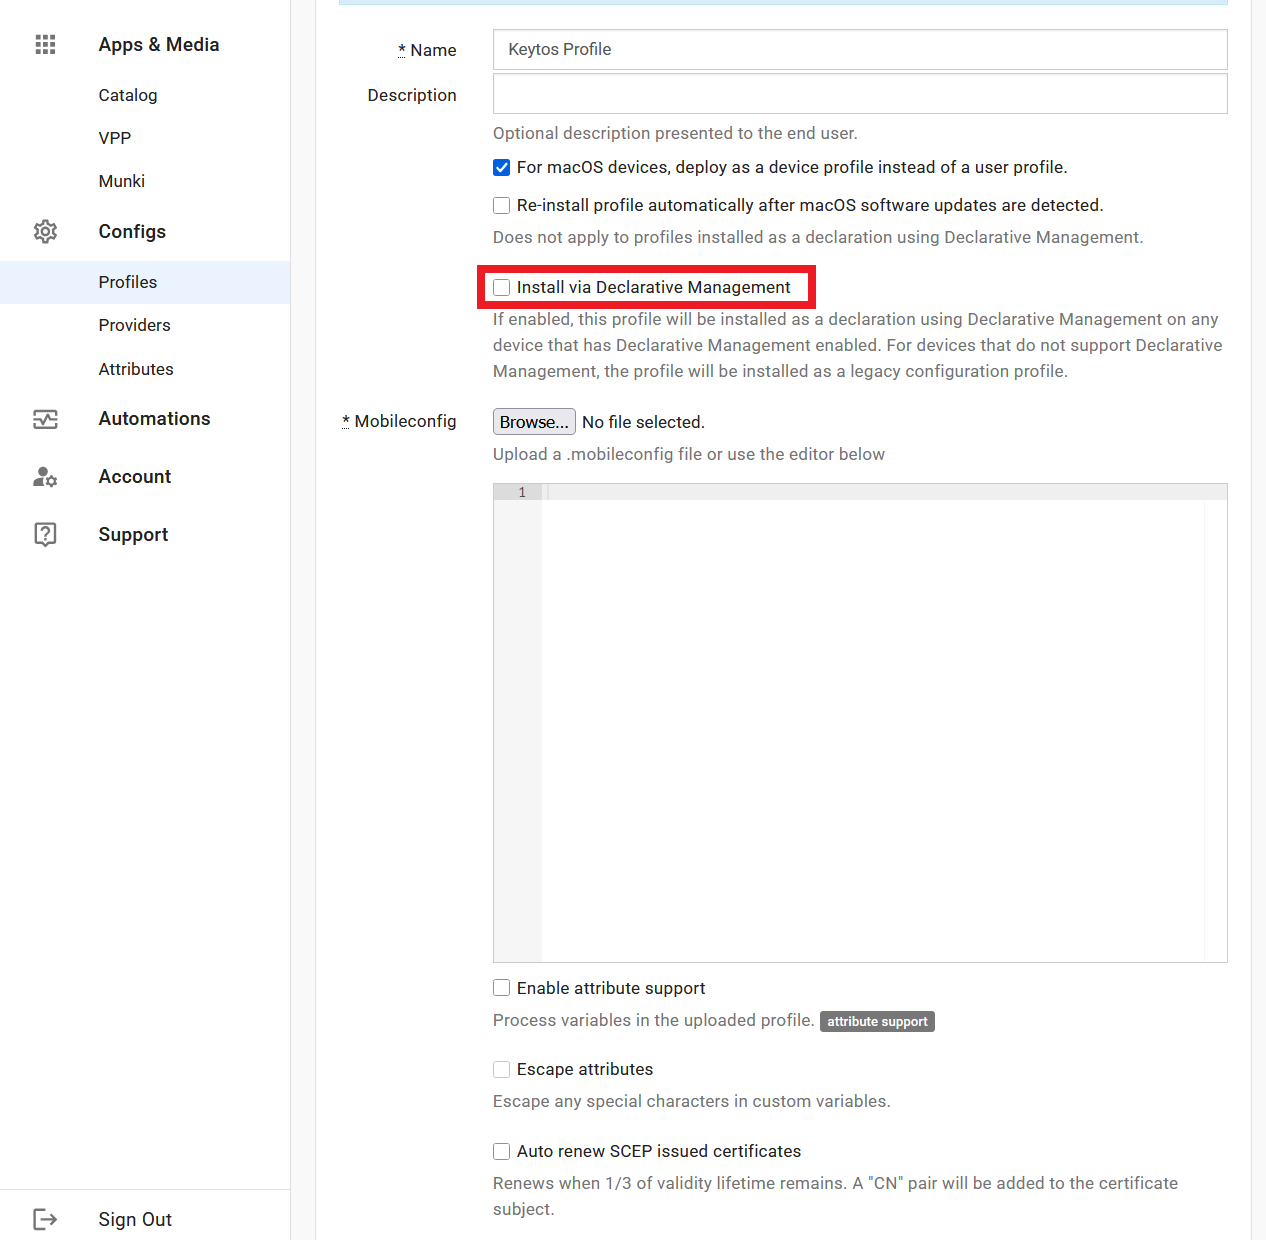
Name your profile.
-
Disable Install via Declarative Management.
-
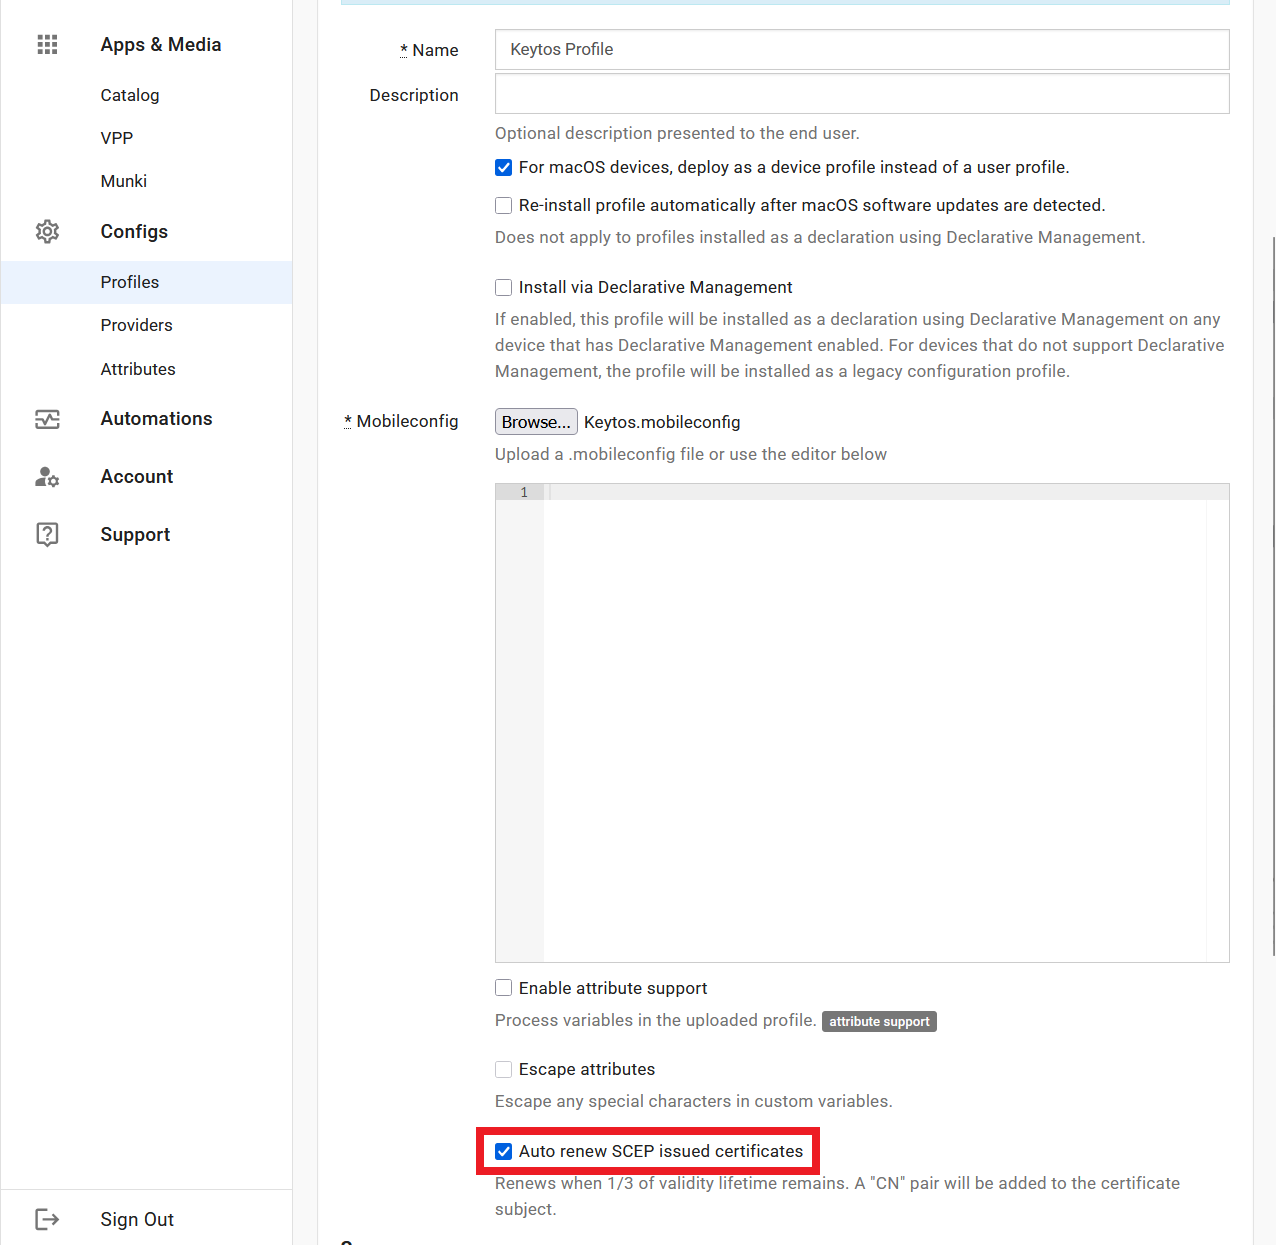
Upload the
.mobileconfigyou just created. -
Enable Auto renew SCEP issued certificates.
-
Scroll to the bottom and click Save.
-
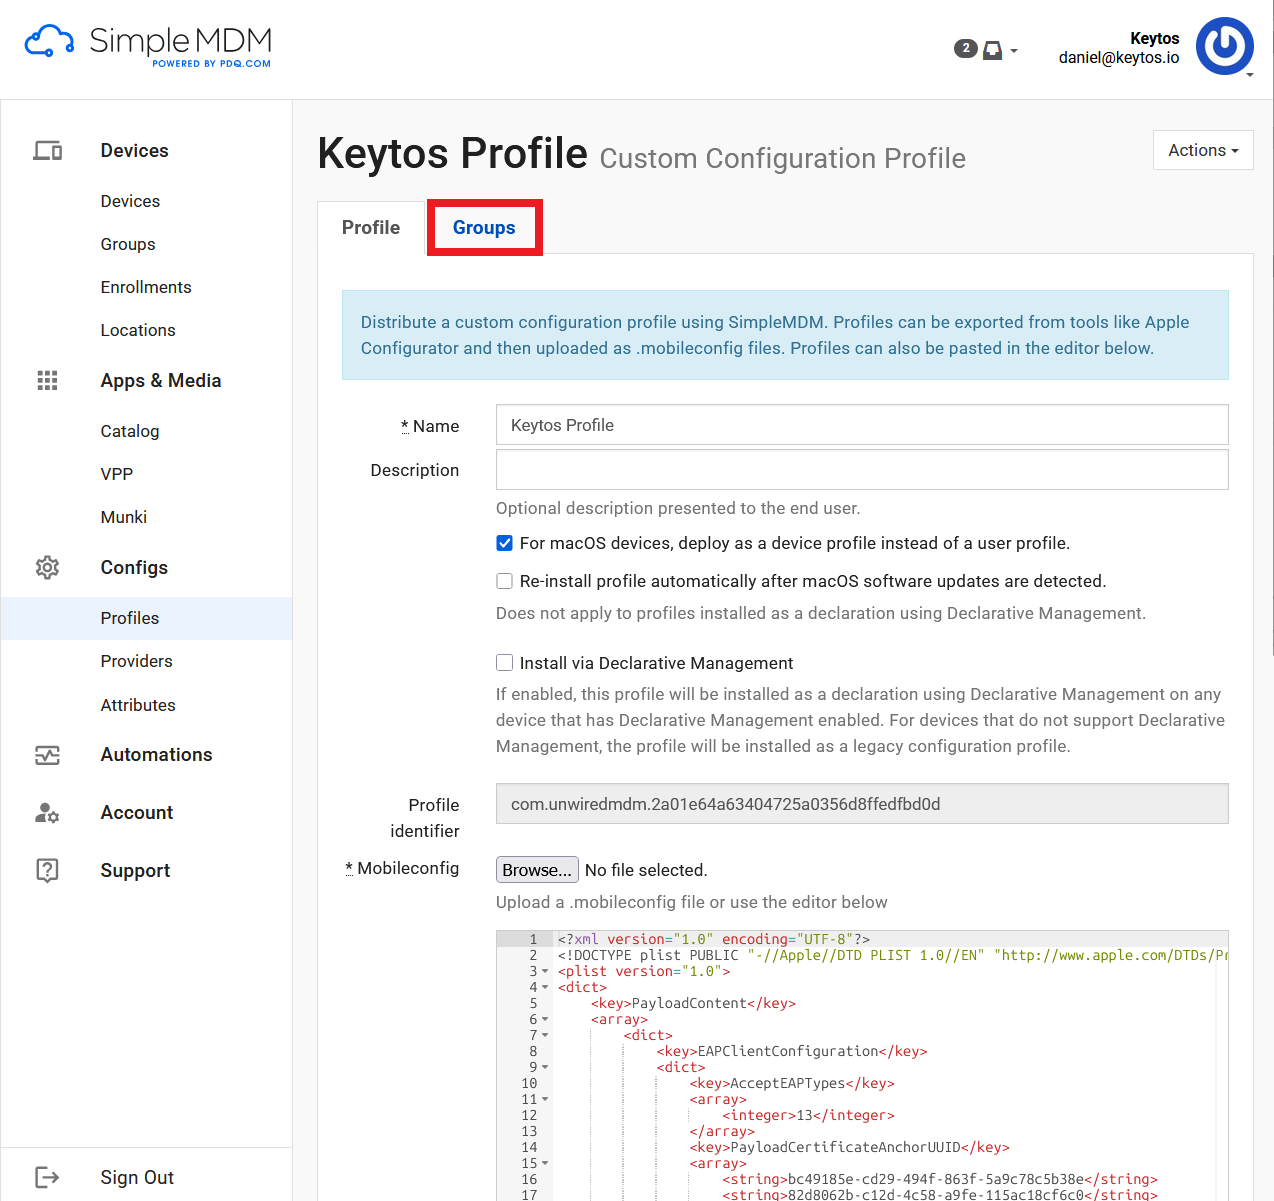
Click on the profile you just created.
-
Click on the Groups tab.
-
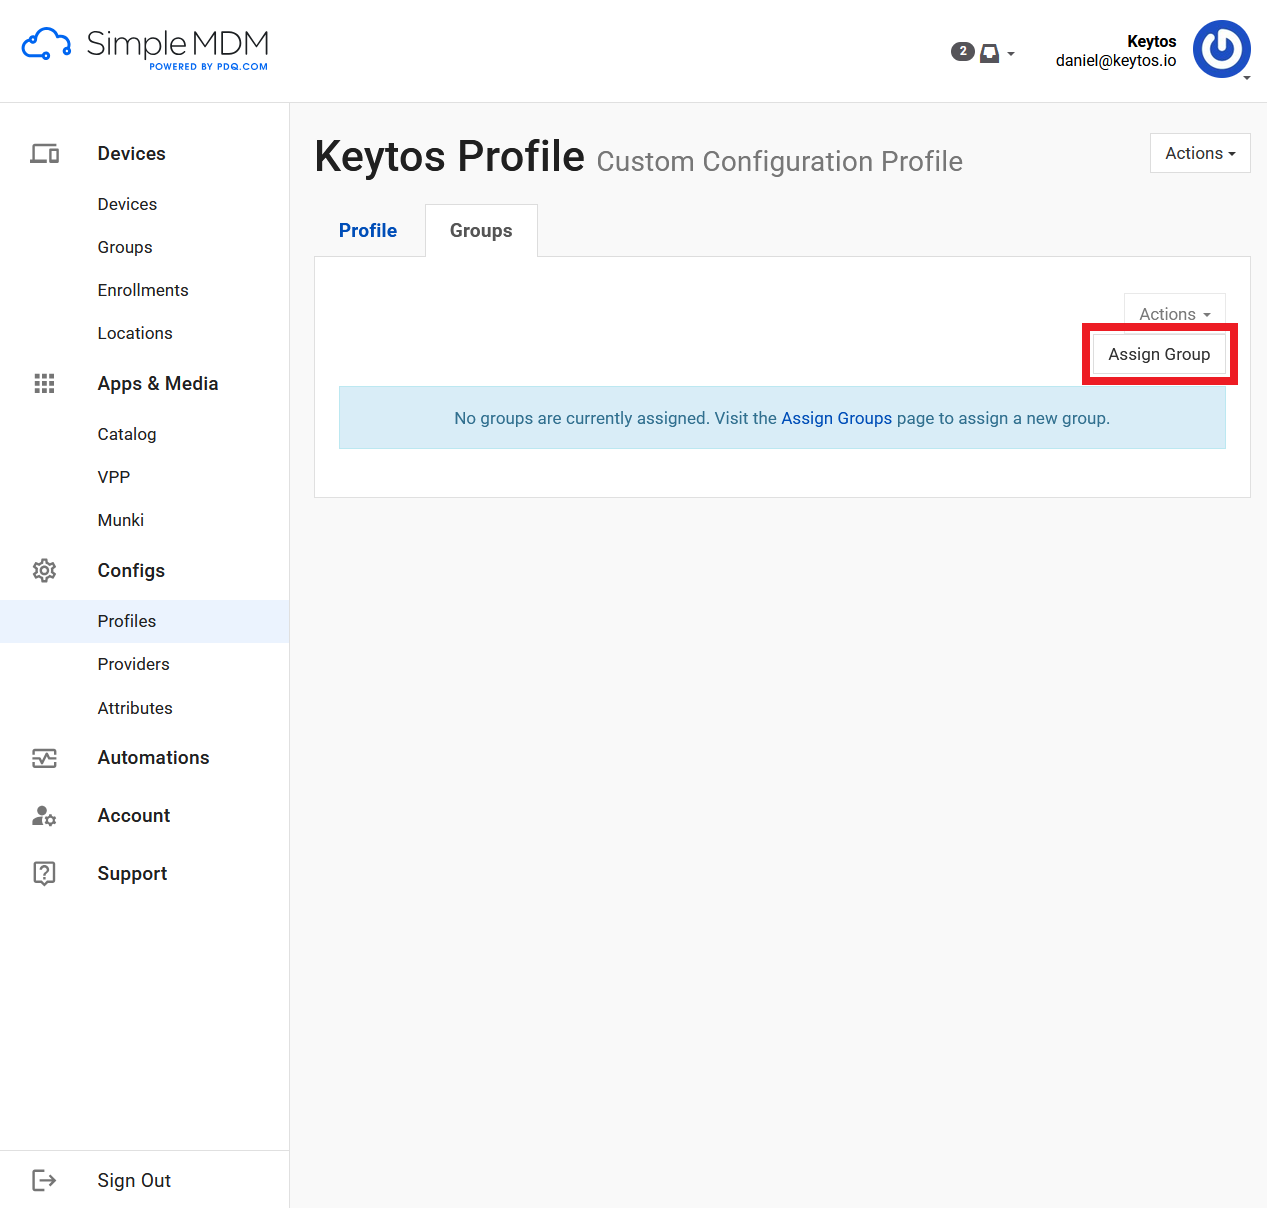
Click Assign Group.
-
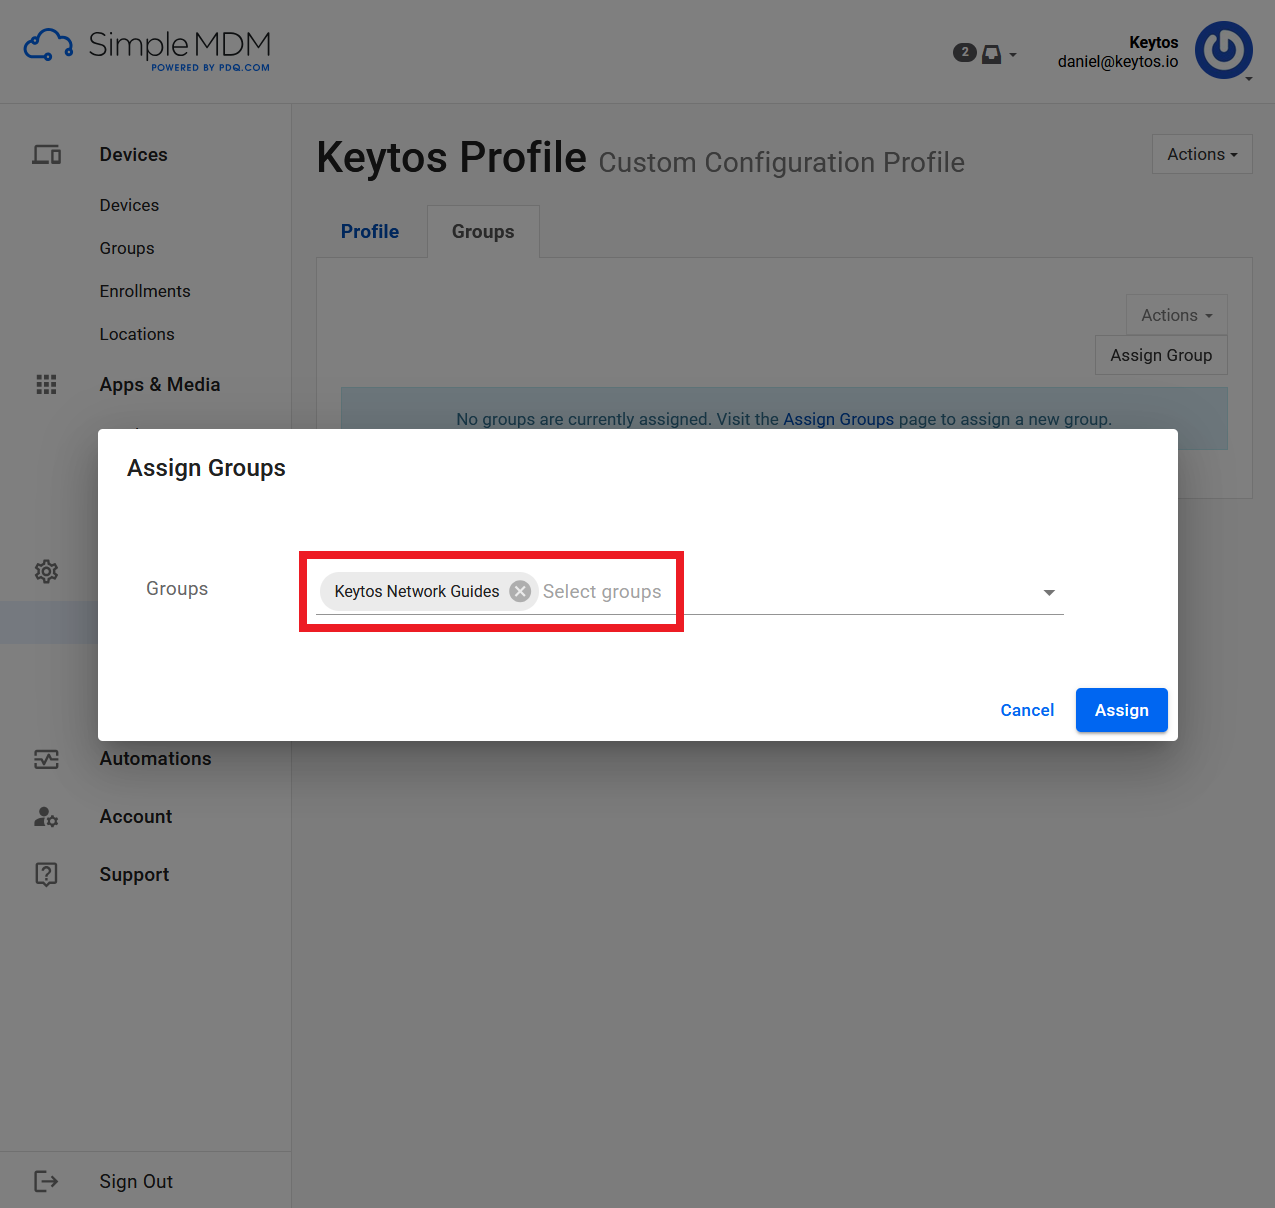
Select all the groups you want to assign this profile to.
-
Click Assign.
-
Navigate to Devices → Groups.
-
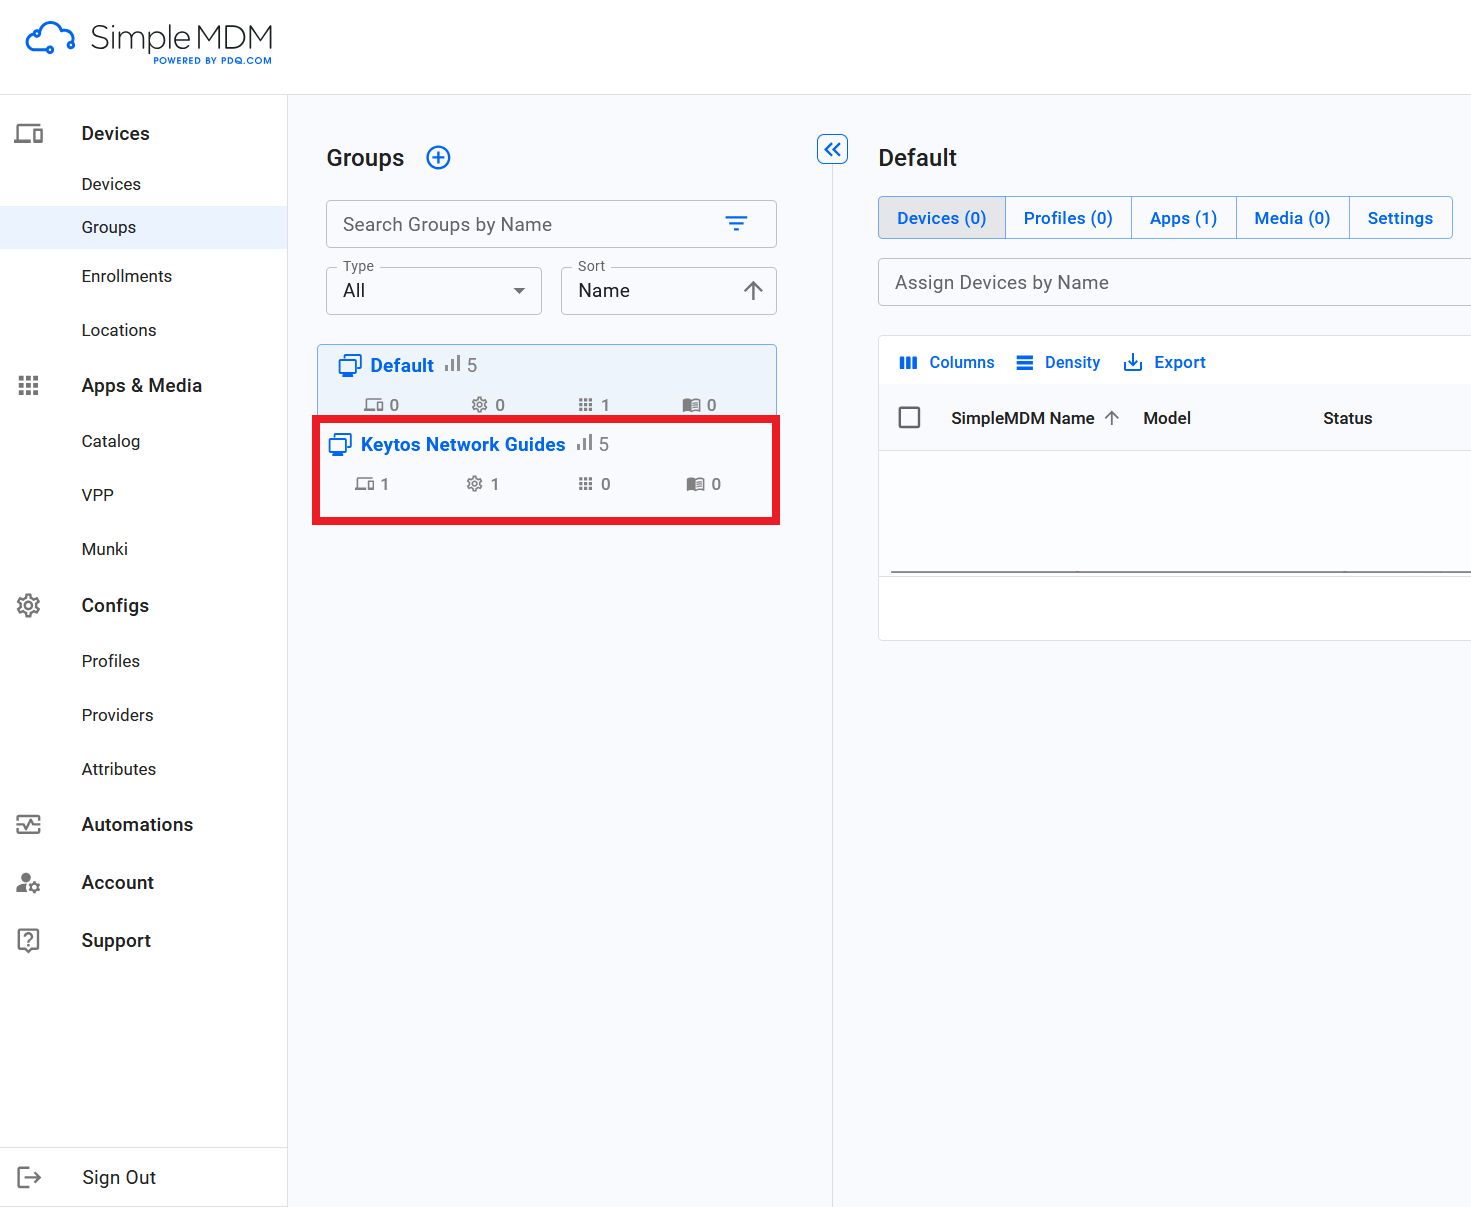
Select the group you assigned the profile to.
-
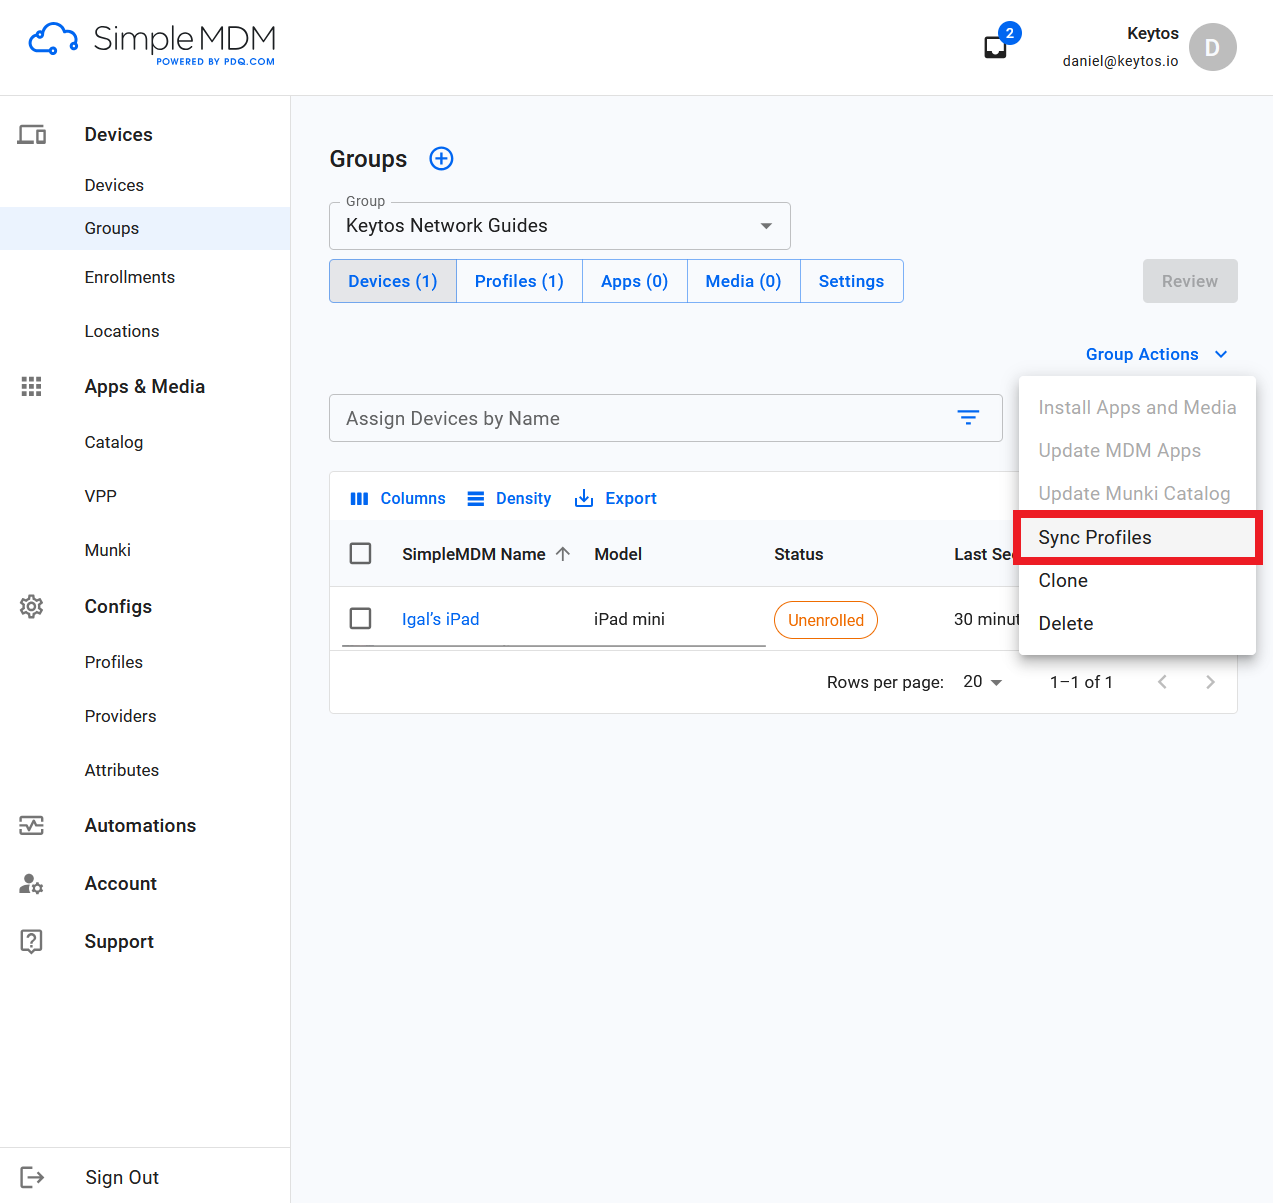
Click on Group Actions and select Sync Profiles.
-
Repeat for any additional groups.
-
Done!
How To Test Your Wi-Fi Configuration in macOS
Now that you have configured your SimpleMDM Wi-Fi profile to use Cloud RADIUS for authentication, the next step is to test the configuration on a managed macOS device. Follow these steps to test your Wi-Fi configuration:
-
On a managed macOS device, click on the Wi-Fi icon in the menu bar and select the Wi-Fi network that you configured in your SimpleMDM Wi-Fi profile.
-
You might see a prompt asking you to select a certificate for authentication. If so, select the SCEP certificate that was issued to the device and click Continue.
-
If your configuration is correct, the device should successfully connect to the Wi-Fi network.
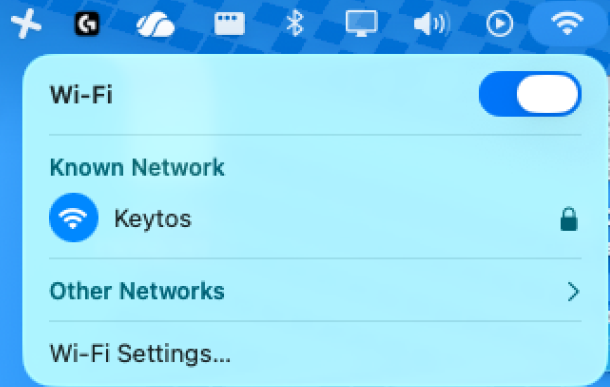
Now that you have configured your SimpleMDM Wi-Fi profile to use Cloud RADIUS for authentication, the next step is to test the configuration on a managed macOS device. Follow these steps to test your Wi-Fi configuration:
-
On a managed macOS device, click on the Wi-Fi icon in the menu bar and select the Wi-Fi network that you configured in your SimpleMDM Wi-Fi profile.
-
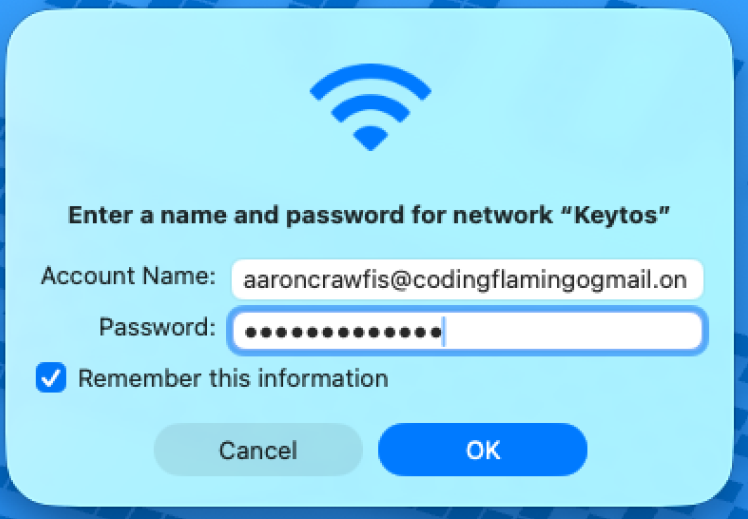
You will be prompted to enter your Entra ID username and password. Enter your Entra ID email address as the username and your Entra ID password, then click OK.
-
If your configuration is correct, the device should successfully connect to the Wi-Fi network.
Now when the user connects to the Wi-Fi network, they will be prompted for their Entra ID password.
Enjoying EZCA? Leave Us a Review!
We hope you’re enjoying using EZCA to issue your SCEP certificates! If you have a moment, we would greatly appreciate it if you could leave us a review on G2. Your feedback helps other IT professionals discover EZCA and helps us continue to improve our service. Thank you for your support!