

















How To Distribute WPA Enterprise Wi-Fi Profiles For macOS Using NinjaOne MDM
Overview - How Wi-Fi Profiles Are Distributed to macOS Devices in NinjaOne MDM
NinjaOne MDM uses Mobile Configuration (.mobileconfig) profiles on macOS to control configuration and settings on macOS devices. To set up WPA Enterprise Wi-Fi profiles on macOS devices using NinjaOne MDM, you can create a .mobileconfig file with your Wi-Fi details, as well as your SCEP certificate details if you’re using EAP-TLS certificate-based authentication. This file can then be uploaded to NinjaOne MDM and distributed to your macOS devices to set up RADIUS authentication with Entra ID credentials or certificates on your Wi-Fi network.
How to Set Up RADIUS Authentication on macOS in NinjaOne MDM - Step by Step Guide
Follow the steps below to set up RADIUS authentication on macOS devices using NinjaOne MDM:
Prerequisites for Setting Up WPA Enterprise Wi-Fi Profiles on macOS in NinjaOne MDM
Before you can set up RADIUS authentication on macOS devices using NinjaOne MDM, make sure you have the following prerequisites in place:
1. How to Create an EZRADIUS Subscription for Cloud RADIUS with NinjaOne MDM
An EZRADIUS subscription handles central configuration and billing. Make sure you have an active EZRADIUS subscription for Cloud RADIUS before you set up your access policies.
You can create an EZRADIUS subscription directly though Keytos by visiting our sign up page. Learn more in our sign up guide.
How to Sign Up for an EZRADIUS Subscription with a Credit Card
If you’d like to bill your EZRADIUS subscription directly to your Azure subscription, you can create your EZRADIUS subscription through the Azure Marketplace. Visit the EZRADIUS listing in the Azure Marketplace to create your subscription. Learn more in our Azure Marketplace sign up guide.
How to Sign Up for an EZRADIUS Subscription through the Azure Marketplace
If you’d like to pay through a prepaid invoice, please contact our sales team at sales@keytos.io to set up your EZRADIUS subscription.
2. How to Configure Your EZRADIUS Access Policies
Access Policies in EZRADIUS determine who can connect to your network and how they can authenticate. You need to configure your Access Policies in EZRADIUS before you set up RADIUS authentication on your macOS devices using NinjaOne MDM.
Visit our guide on how to create a certificate-based Access Policy in EZRADIUS to learn how to set up your Access Policy for EAP-TLS certificate-based authentication.
Visit our guide on how to create an Access Policy with Entra ID credentials in EZRADIUS to learn how to set up your Access Policy for EAP-TTLS with Entra ID credentials.
How to Create an Access Policy with Entra ID Credentials in EZRADIUS
3. How to Issue Certificates to macOS Devices for EAP-TLS Authentication in NinjaOne MDM
This step is only necessary if you’re using EAP-TLS certificate-based authentication. If you’re using EAP-TTLS with Entra ID credentials, you can skip this step.
If you plan to use EAP-TLS certificate-based authentication for your macOS devices, you need to issue certificates to your macOS devices.
Follow our EZCA certificate guide to set up your EZCA certificate authority and issue certificates to your macOS devices.
If you’re using a third-party CA, you can follow the instructions provided by your CA to issue certificates to your macOS devices. Make sure to export the certificates in PFX format, as you’ll need to import them into NinjaOne MDM in the next step.
4. How To Install the Apple MDM App In NinjaOne MDM
To manage and deploy Apple management profiles to your macOS, iOS, and iPadOS devices, you will first need to configure Apple MDM in NinjaOne. This involves creating an Apple MDM push certificate and uploading it to NinjaOne to establish trust between NinjaOne and Apple’s Push Notification Service (APNs). This allows NinjaOne to send management profiles, including the SCEP certificate profile we will create later, to your macOS, iOS, and iPadOS devices.
You only need to configure Apple MDM in NinjaOne once for your organization. After the initial setup, you can deploy Apple management profiles to all your macOS, iOS, and iPadOS devices without repeating this process.
-
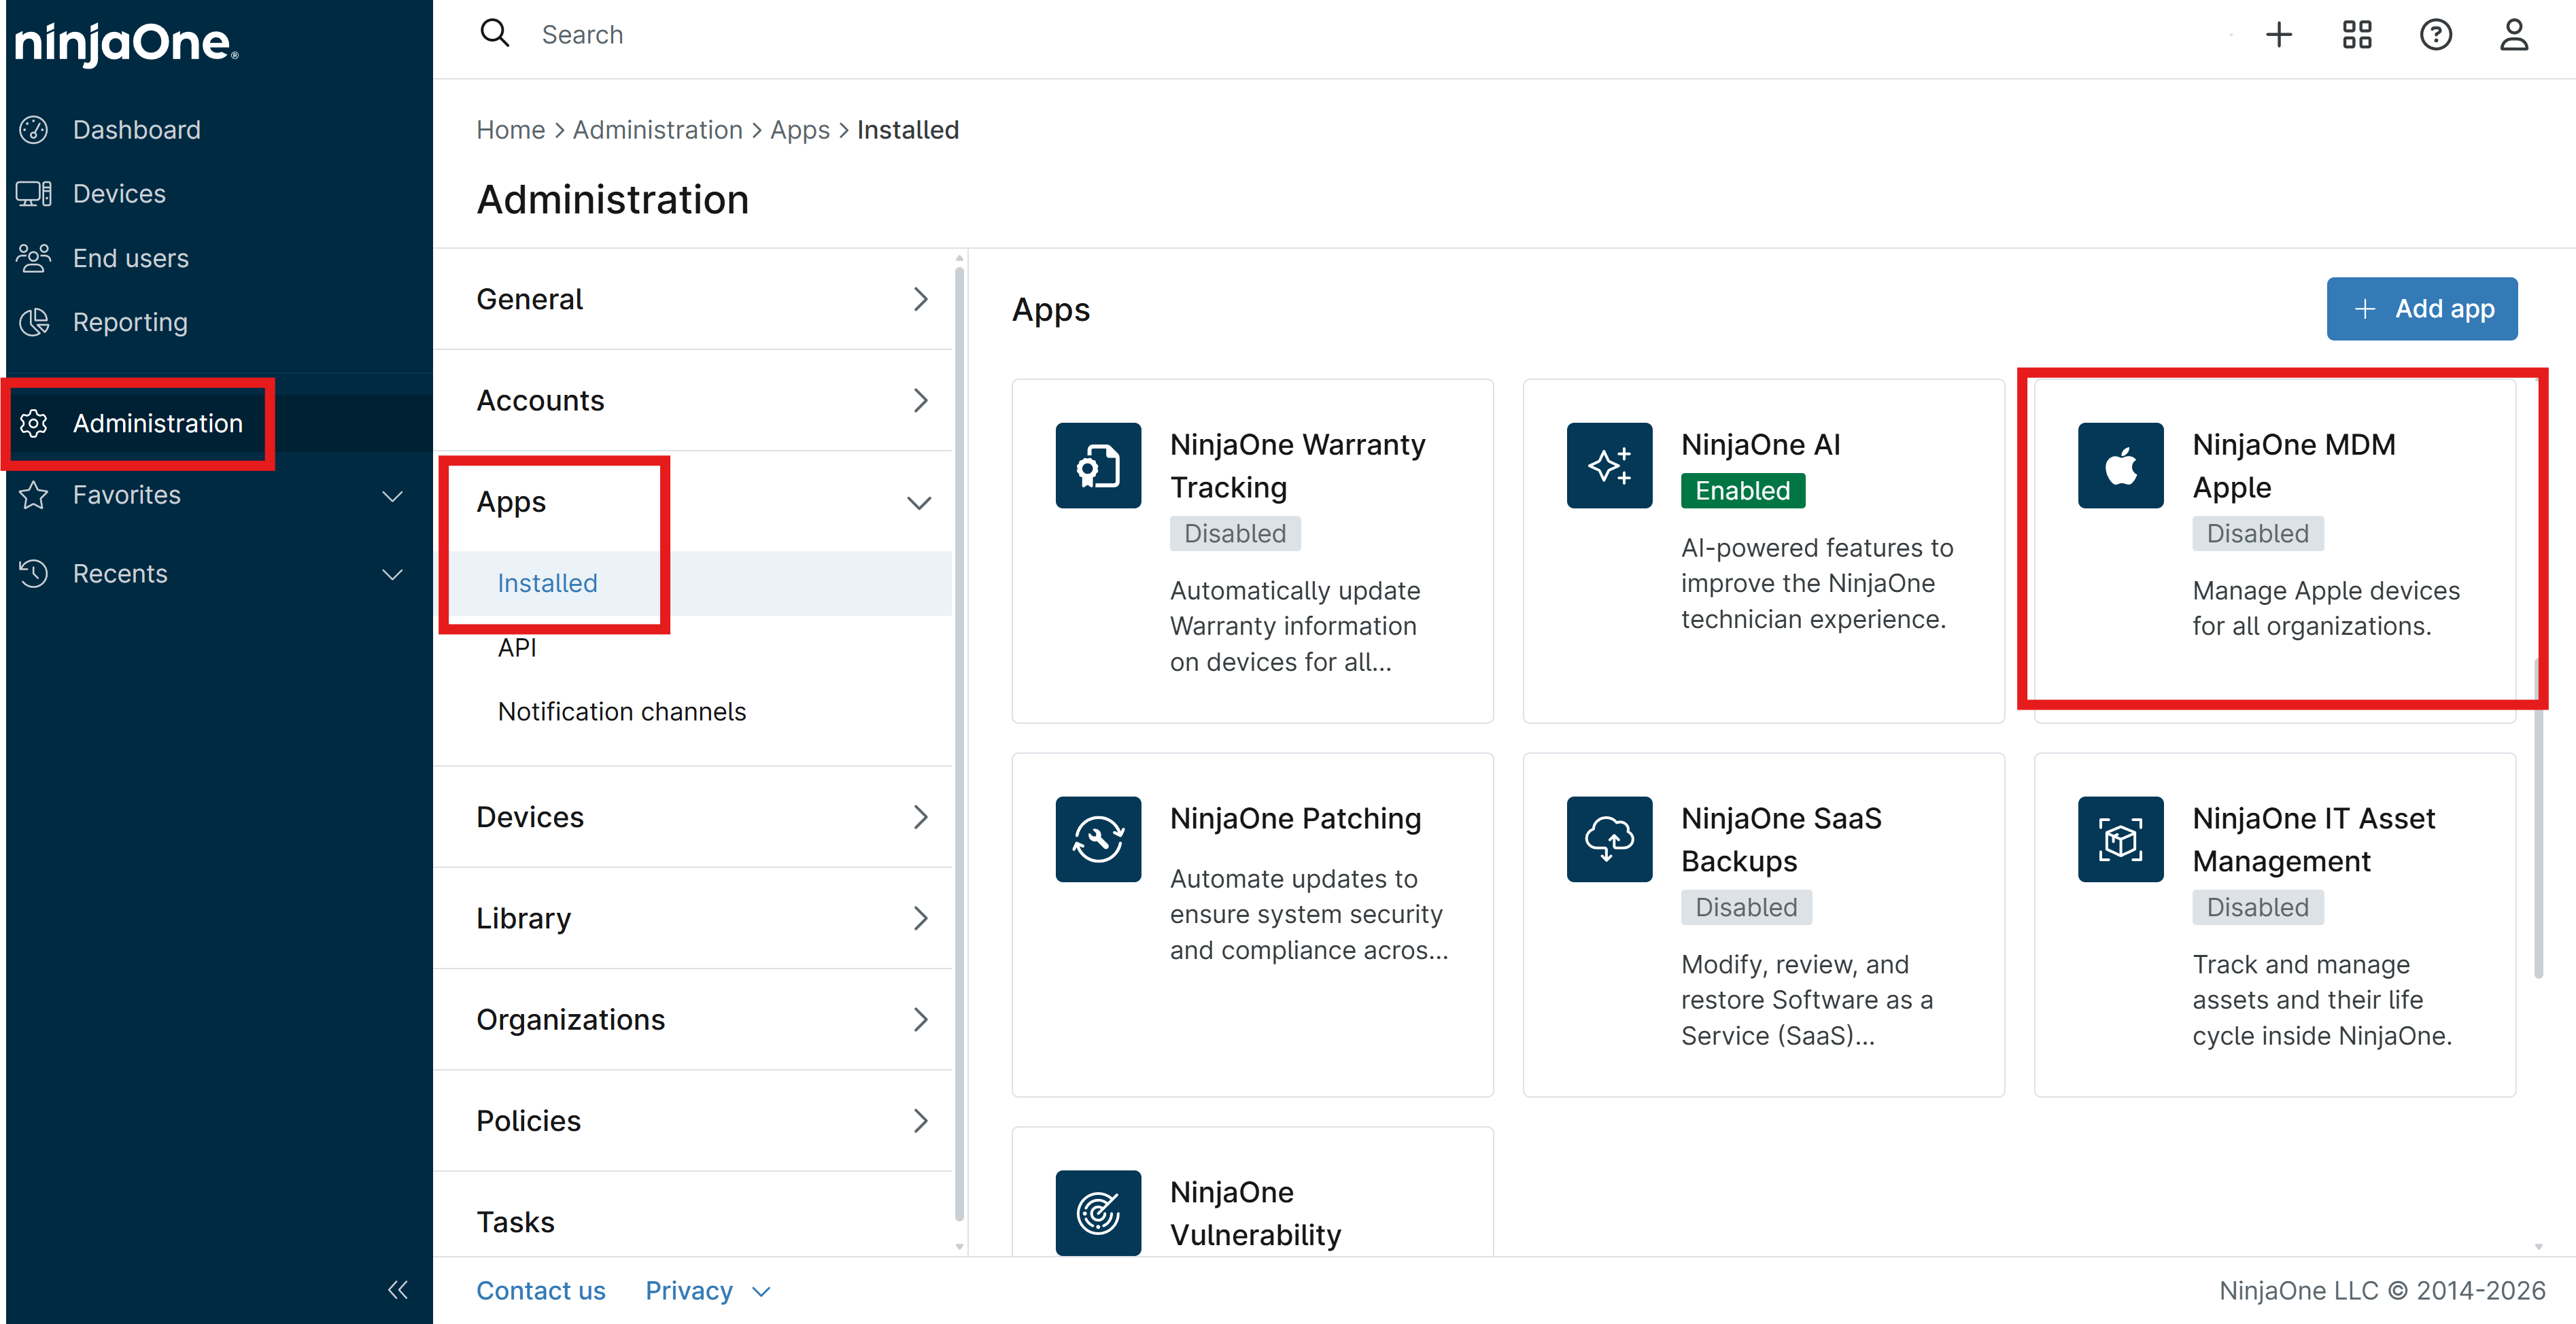
Navigate to Administration > Apps > Installed and select NinjaOne MDM Apple from the list.
-
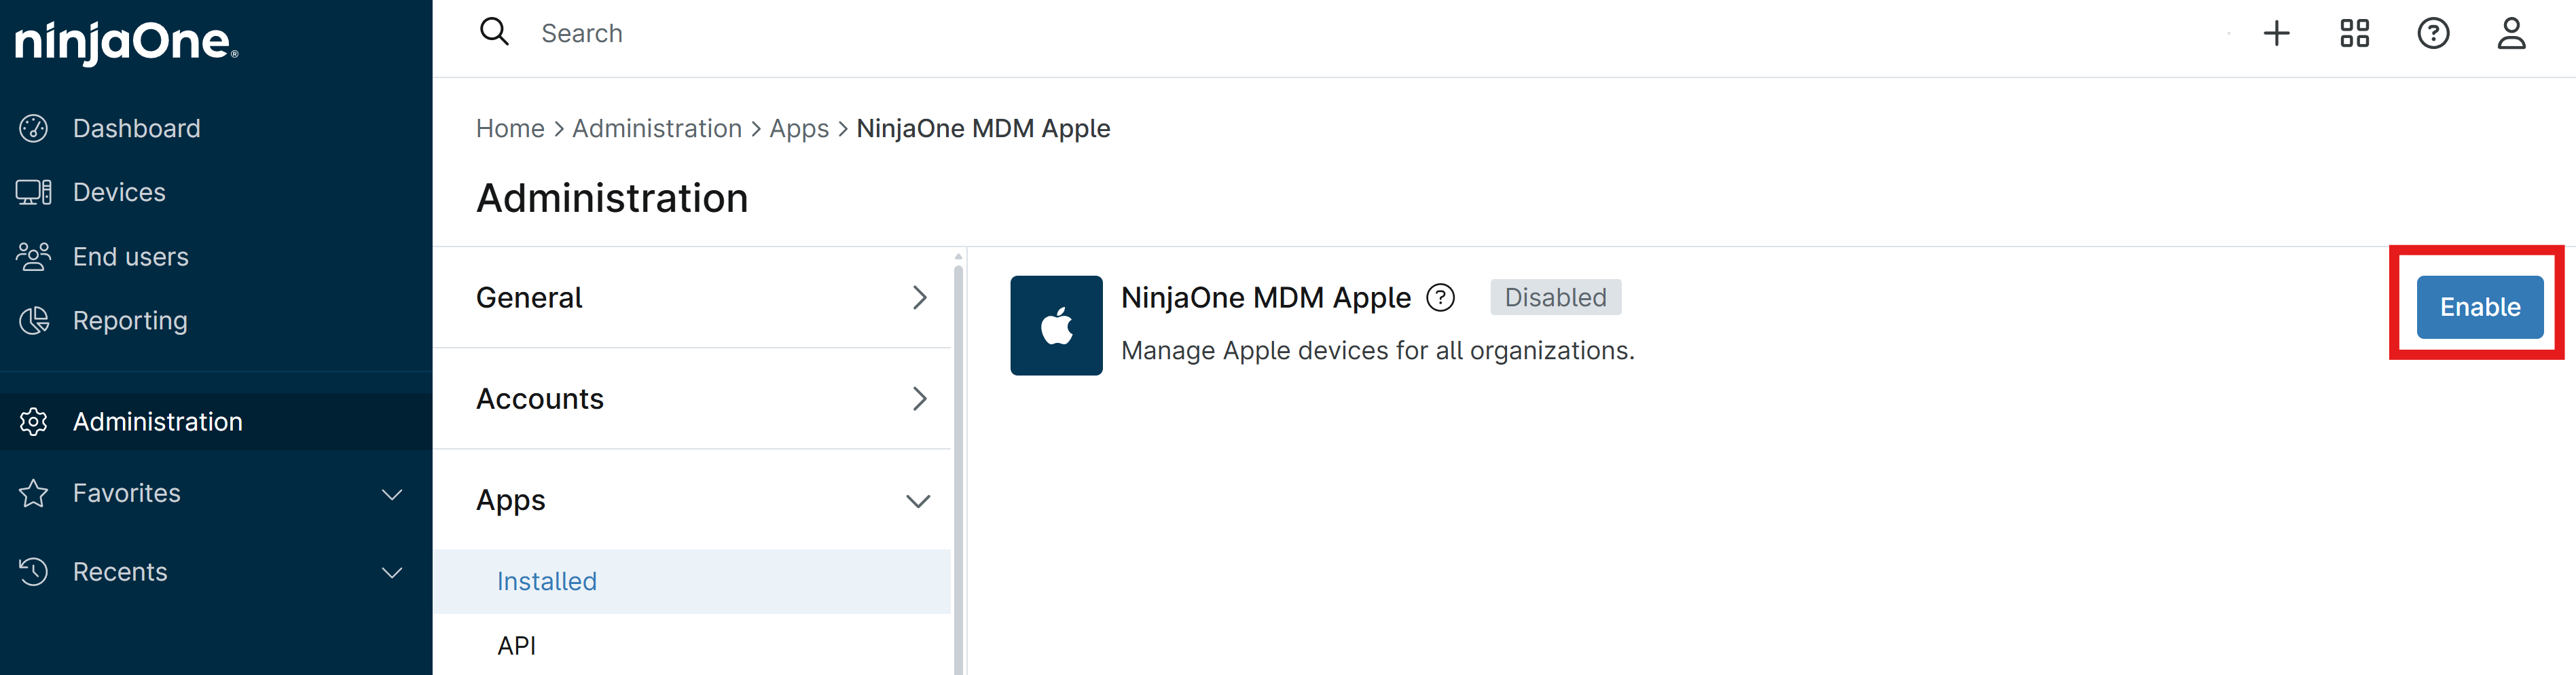
Click Enable to begin the process of configuring Apple MDM.
-
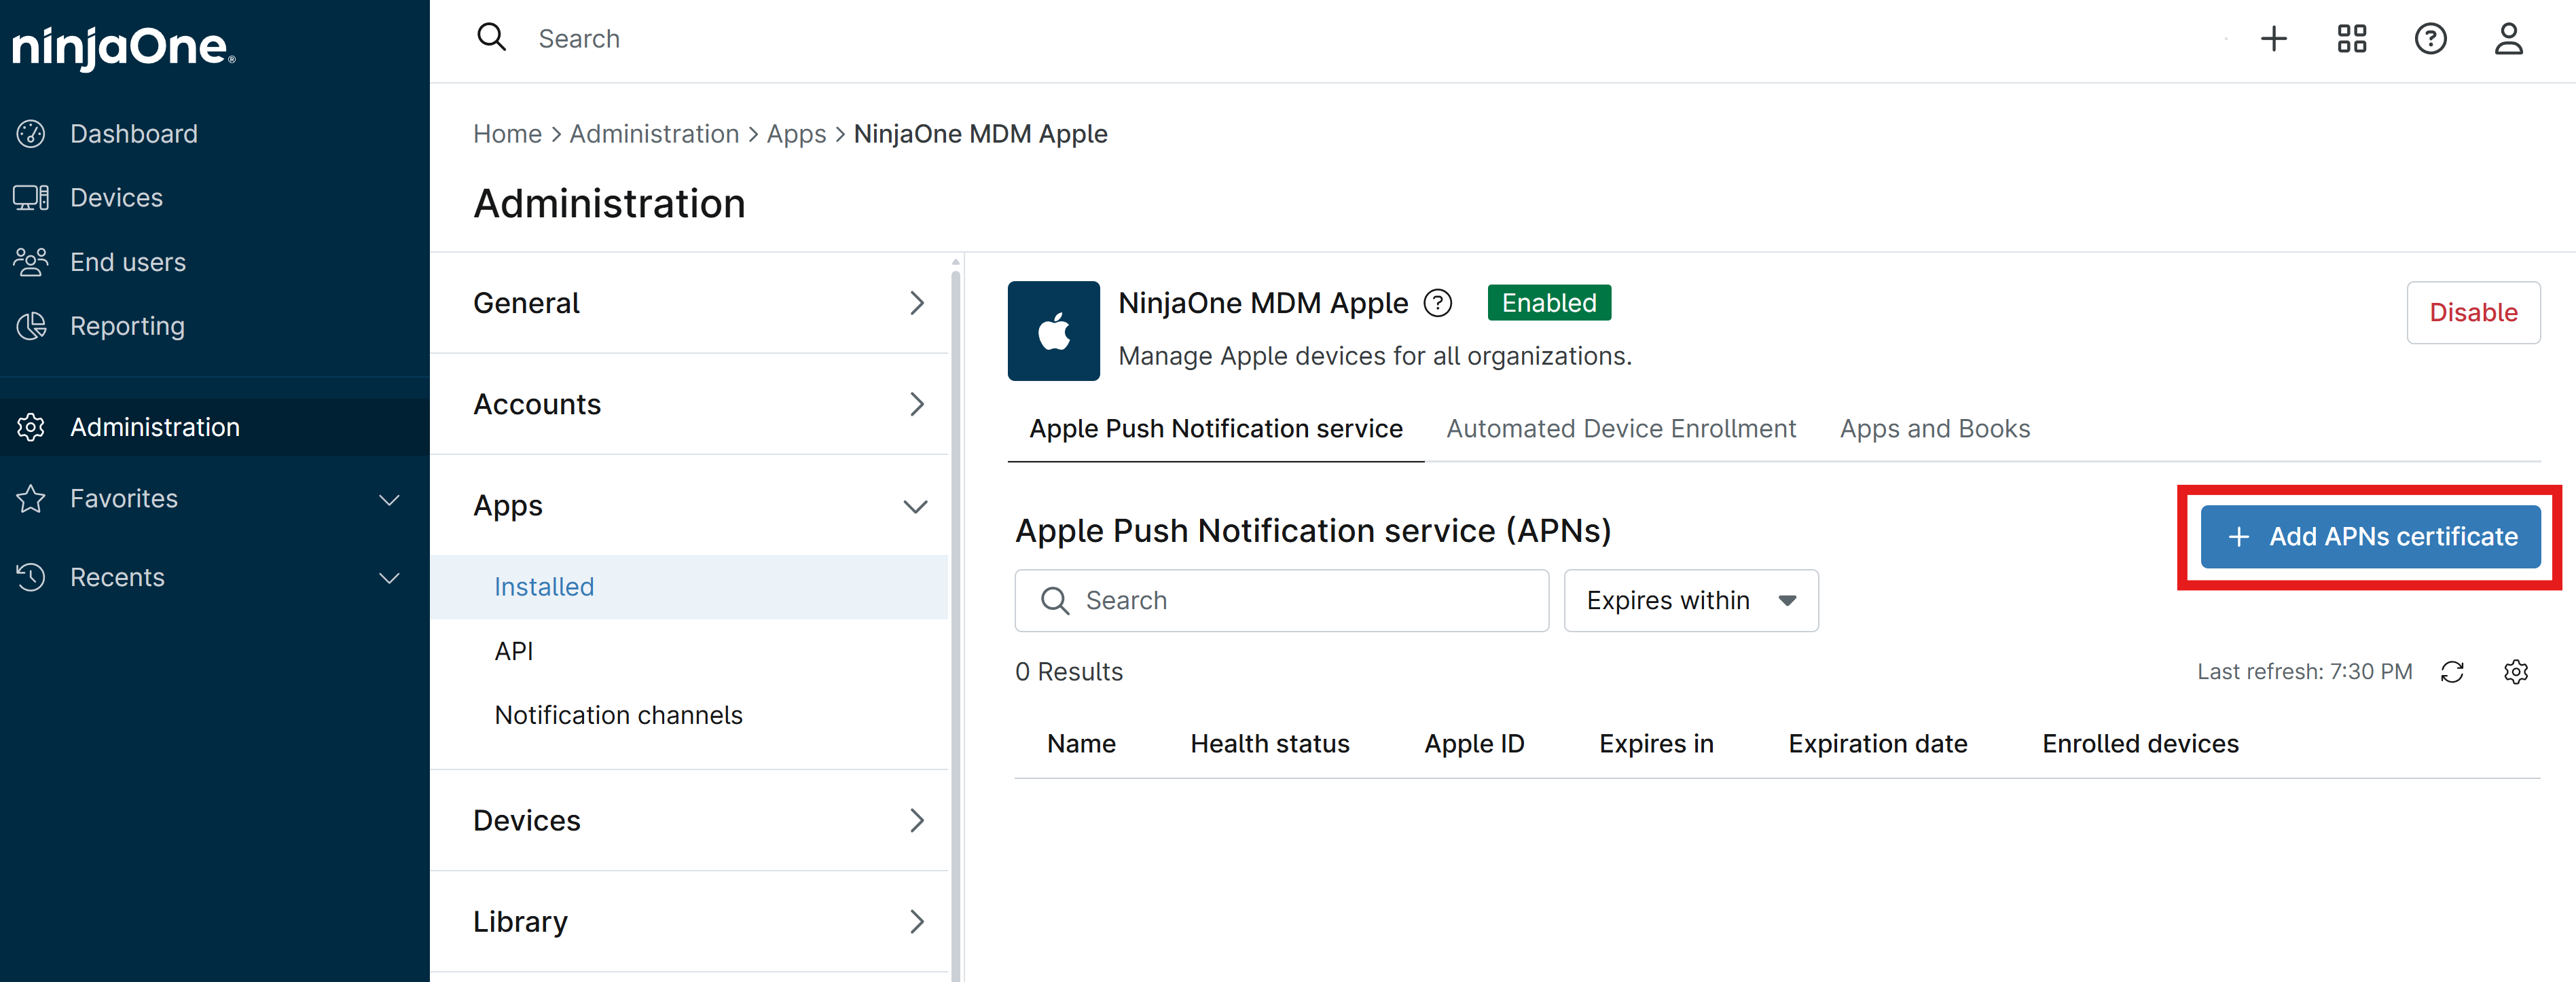
Click + Add APNs certificate to download, sign, and upload your Apple MDM push certificate.
-
Click Download file to download the CSR file that you will need to sign with Apple to create your APNs certificate.
-
Click Apple Push Certificates Portal to open the Apple Push Certificates Portal in a new tab, and sign in with your Apple ID.
-
Click Create a Certificate, read and accept the terms, and upload the CSR file you downloaded from NinjaOne.
-
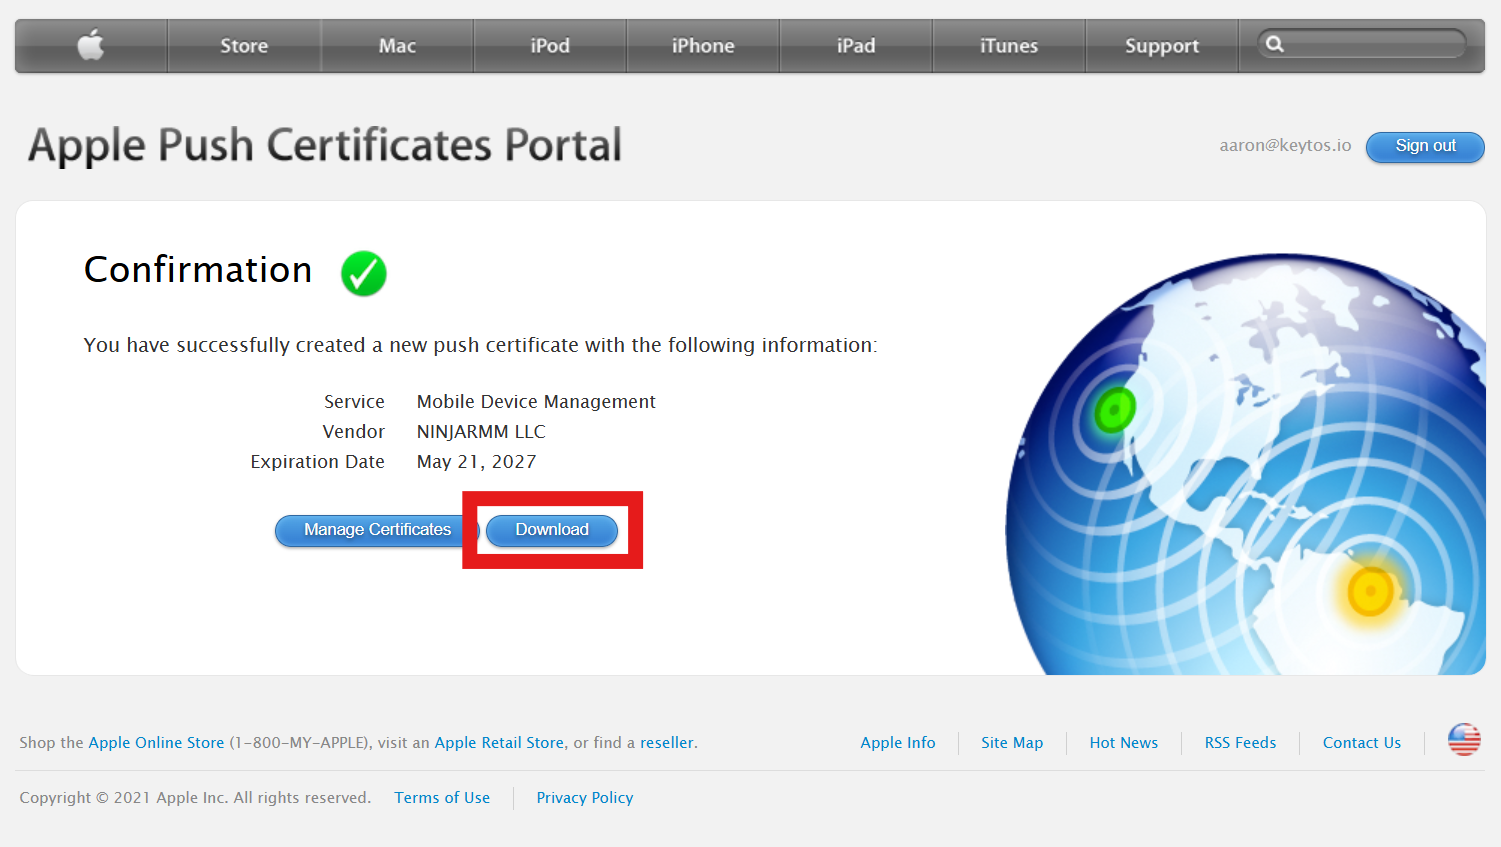
Click Download to download the signed APNs certificate from Apple. Save this file to your computer.
-
Set a calendar reminder for 30 days before the noted Expiration Date to ensure you renew your APNs certificate before it expires, as an expired APNs certificate will cause MDM management and SCEP certificate issuance to stop working until the certificate is renewed and updated in NinjaOne.
-
Return to the NinjaOne tab and click Upload file to upload the APNs certificate you downloaded from Apple.
-
Enter your Apple ID that you used to sign the APNs certificate in the Apple ID field, and add a descriptive name for Create APNs certificate name.
-
Click Save to save your APNs certificate in NinjaOne and complete the Apple MDM configuration process.
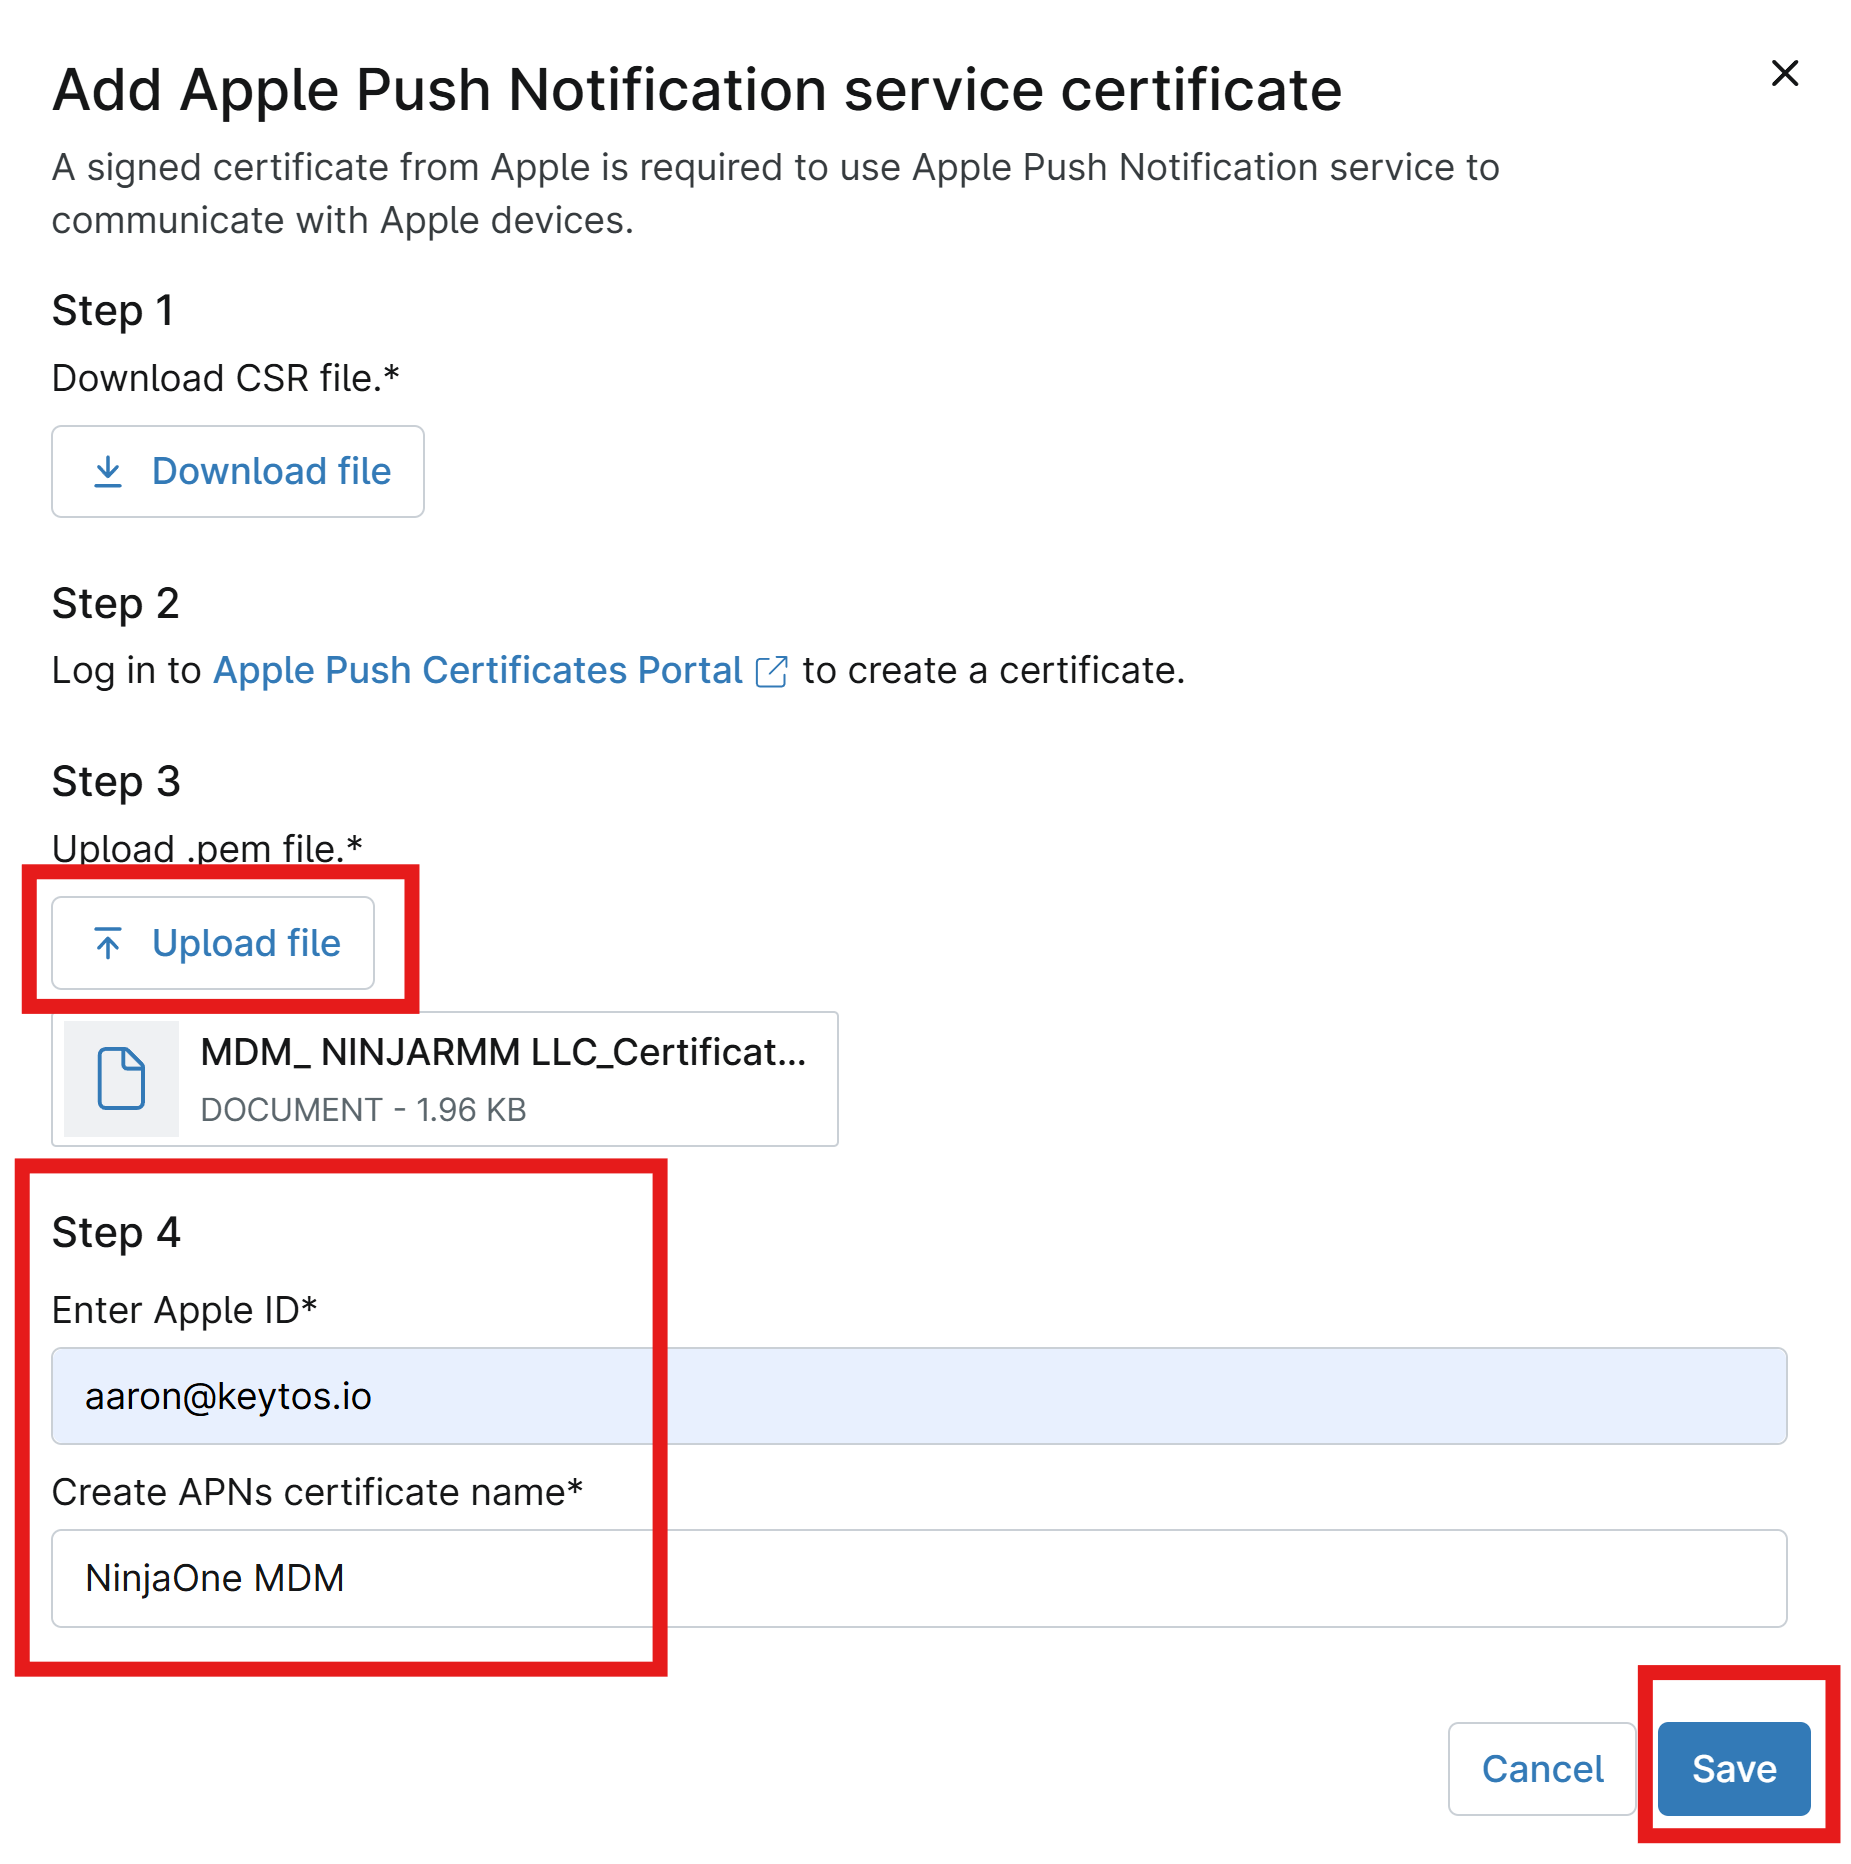
-
Done. You now have Apple MDM configured in NinjaOne and can deploy Apple management profiles to your macOS, iPadOS, and iOS devices.
Step 1 - How to Create a .mobileconfig File for Your Wi-Fi Profile
To create a .mobileconfig file for your Wi-Fi profile, you can use a tool like Apple Configurator 2 or a third-party MDM configuration profile generator. The .mobileconfig file should include the details of your Wi-Fi network, as well as your SCEP certificate details if you’re using EAP-TLS certificate-based authentication.
If you’ve already set up SCEP certificate issuance in NinjaOne MDM for your macOS devices, continue to use the same .mobileconfig file that you used for your SCEP configuration, but add the details of your Wi-Fi network and the RADIUS server to the file.
Apple Configurator 2 Instructions and Third-Party MDM Configuration Profile Generator Instructions
Step 2 - How to Upload Your .mobileconfig File to NinjaOne MDM and Distribute It to Your macOS Devices
Now that you have a .mobileconfig file with your Wi-Fi profile details, you can upload it to NinjaOne MDM and distribute it to your macOS devices.
If you’ve already set up SCEP certificate issuance in NinjaOne MDM for your macOS devices, make sure to upload your updated .mobileconfig file with your Wi-Fi profile details to the same SCEP profile that you created for your SCEP configuration. This way, your devices will receive both their certificates and the Wi-Fi profile in the same profile installation.
-
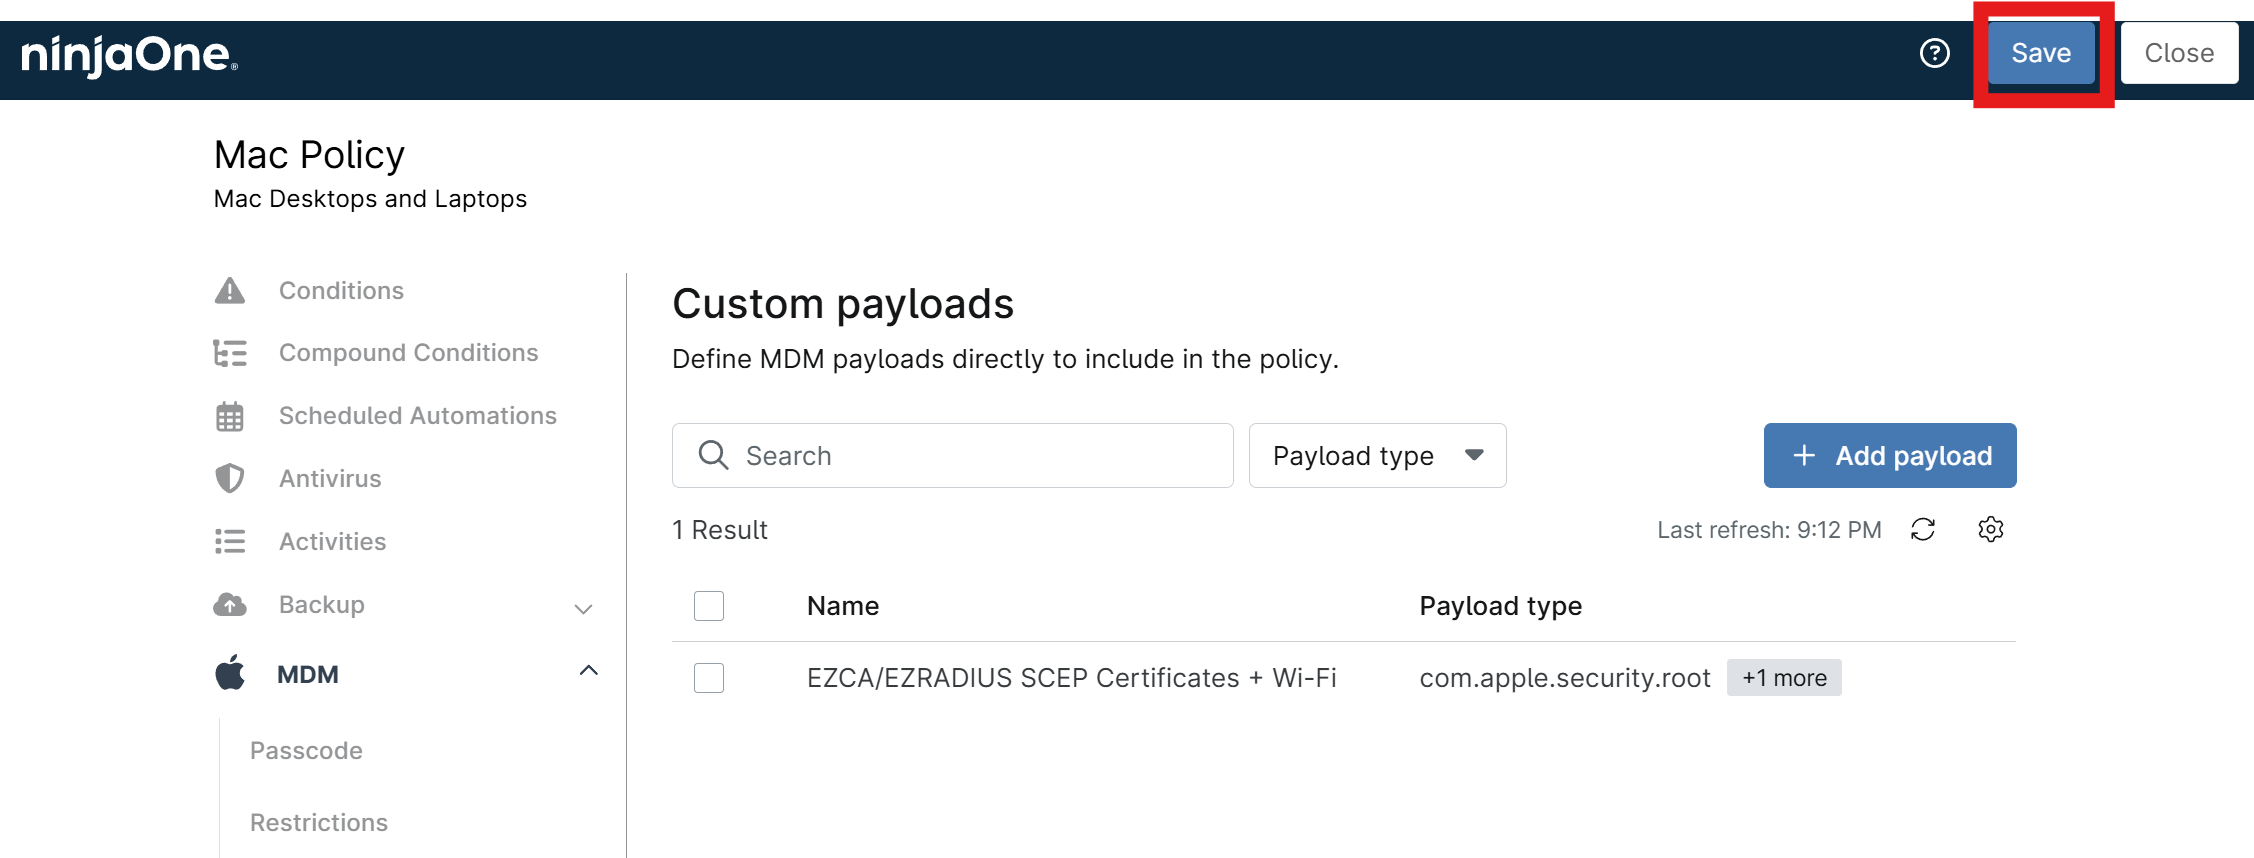
In the NinjaOne portal, navigate to Administration > Policies > Agent policies and select the Mac policy you want to deploy the profile with, or create a new policy if needed.
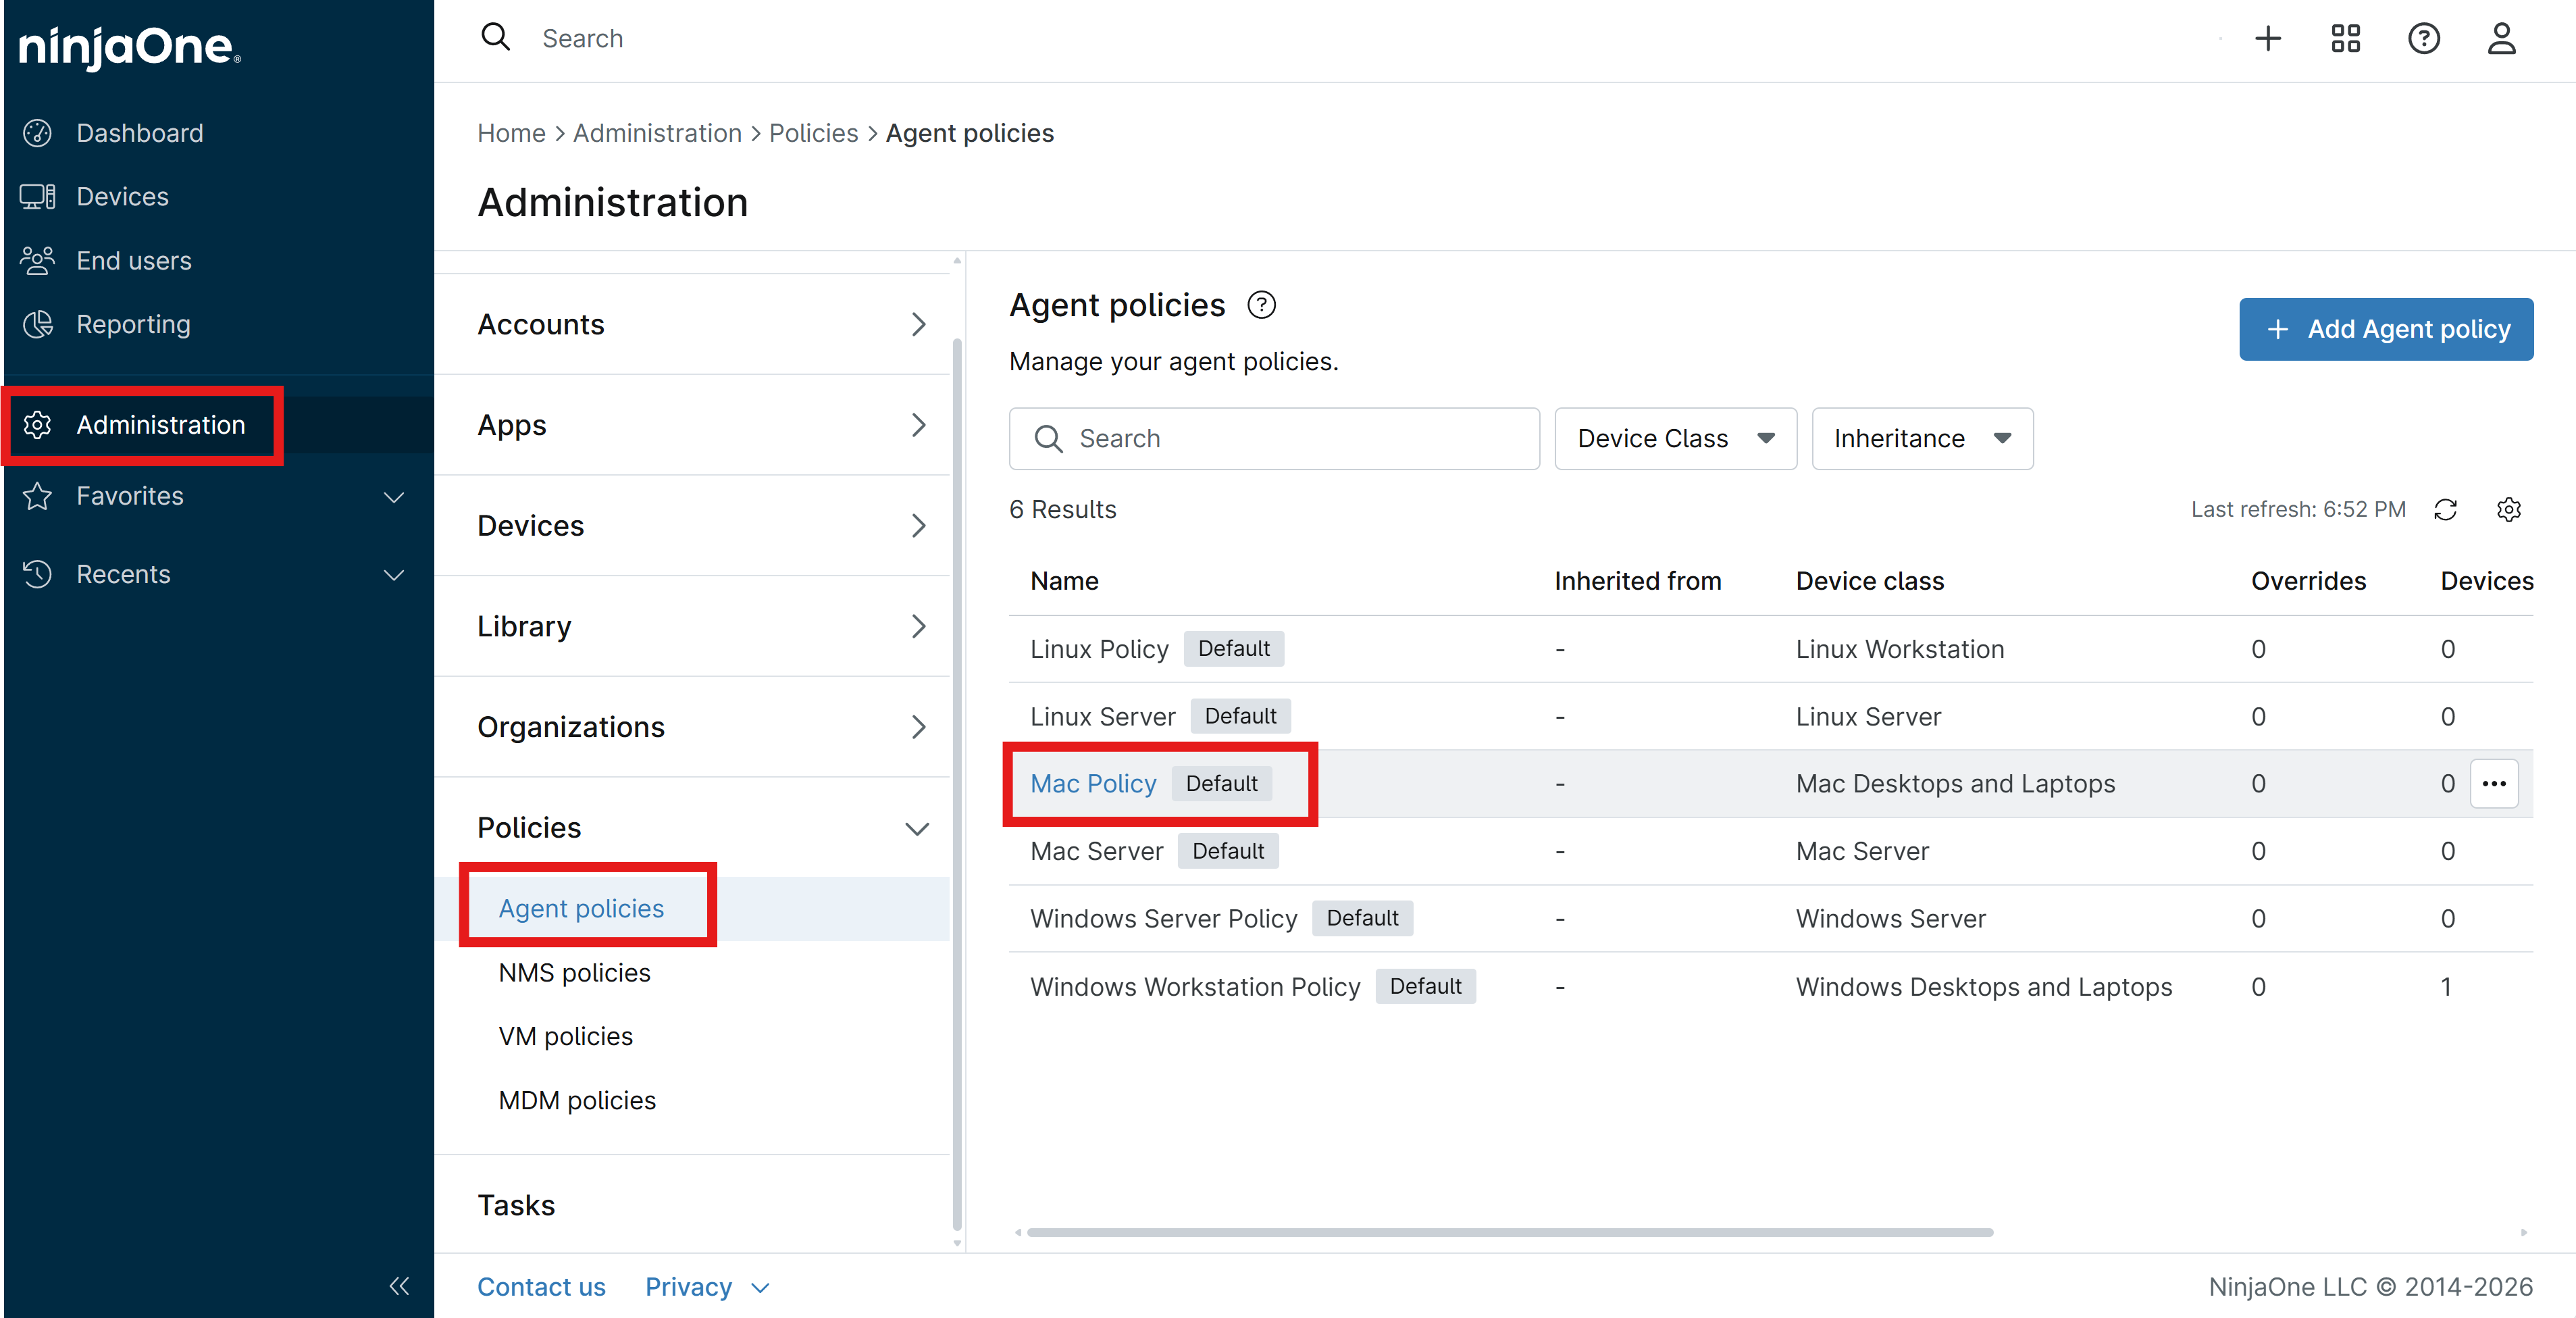
-
From the left-hand menu, select MDM > Custom payload and click on the + Add payload button.
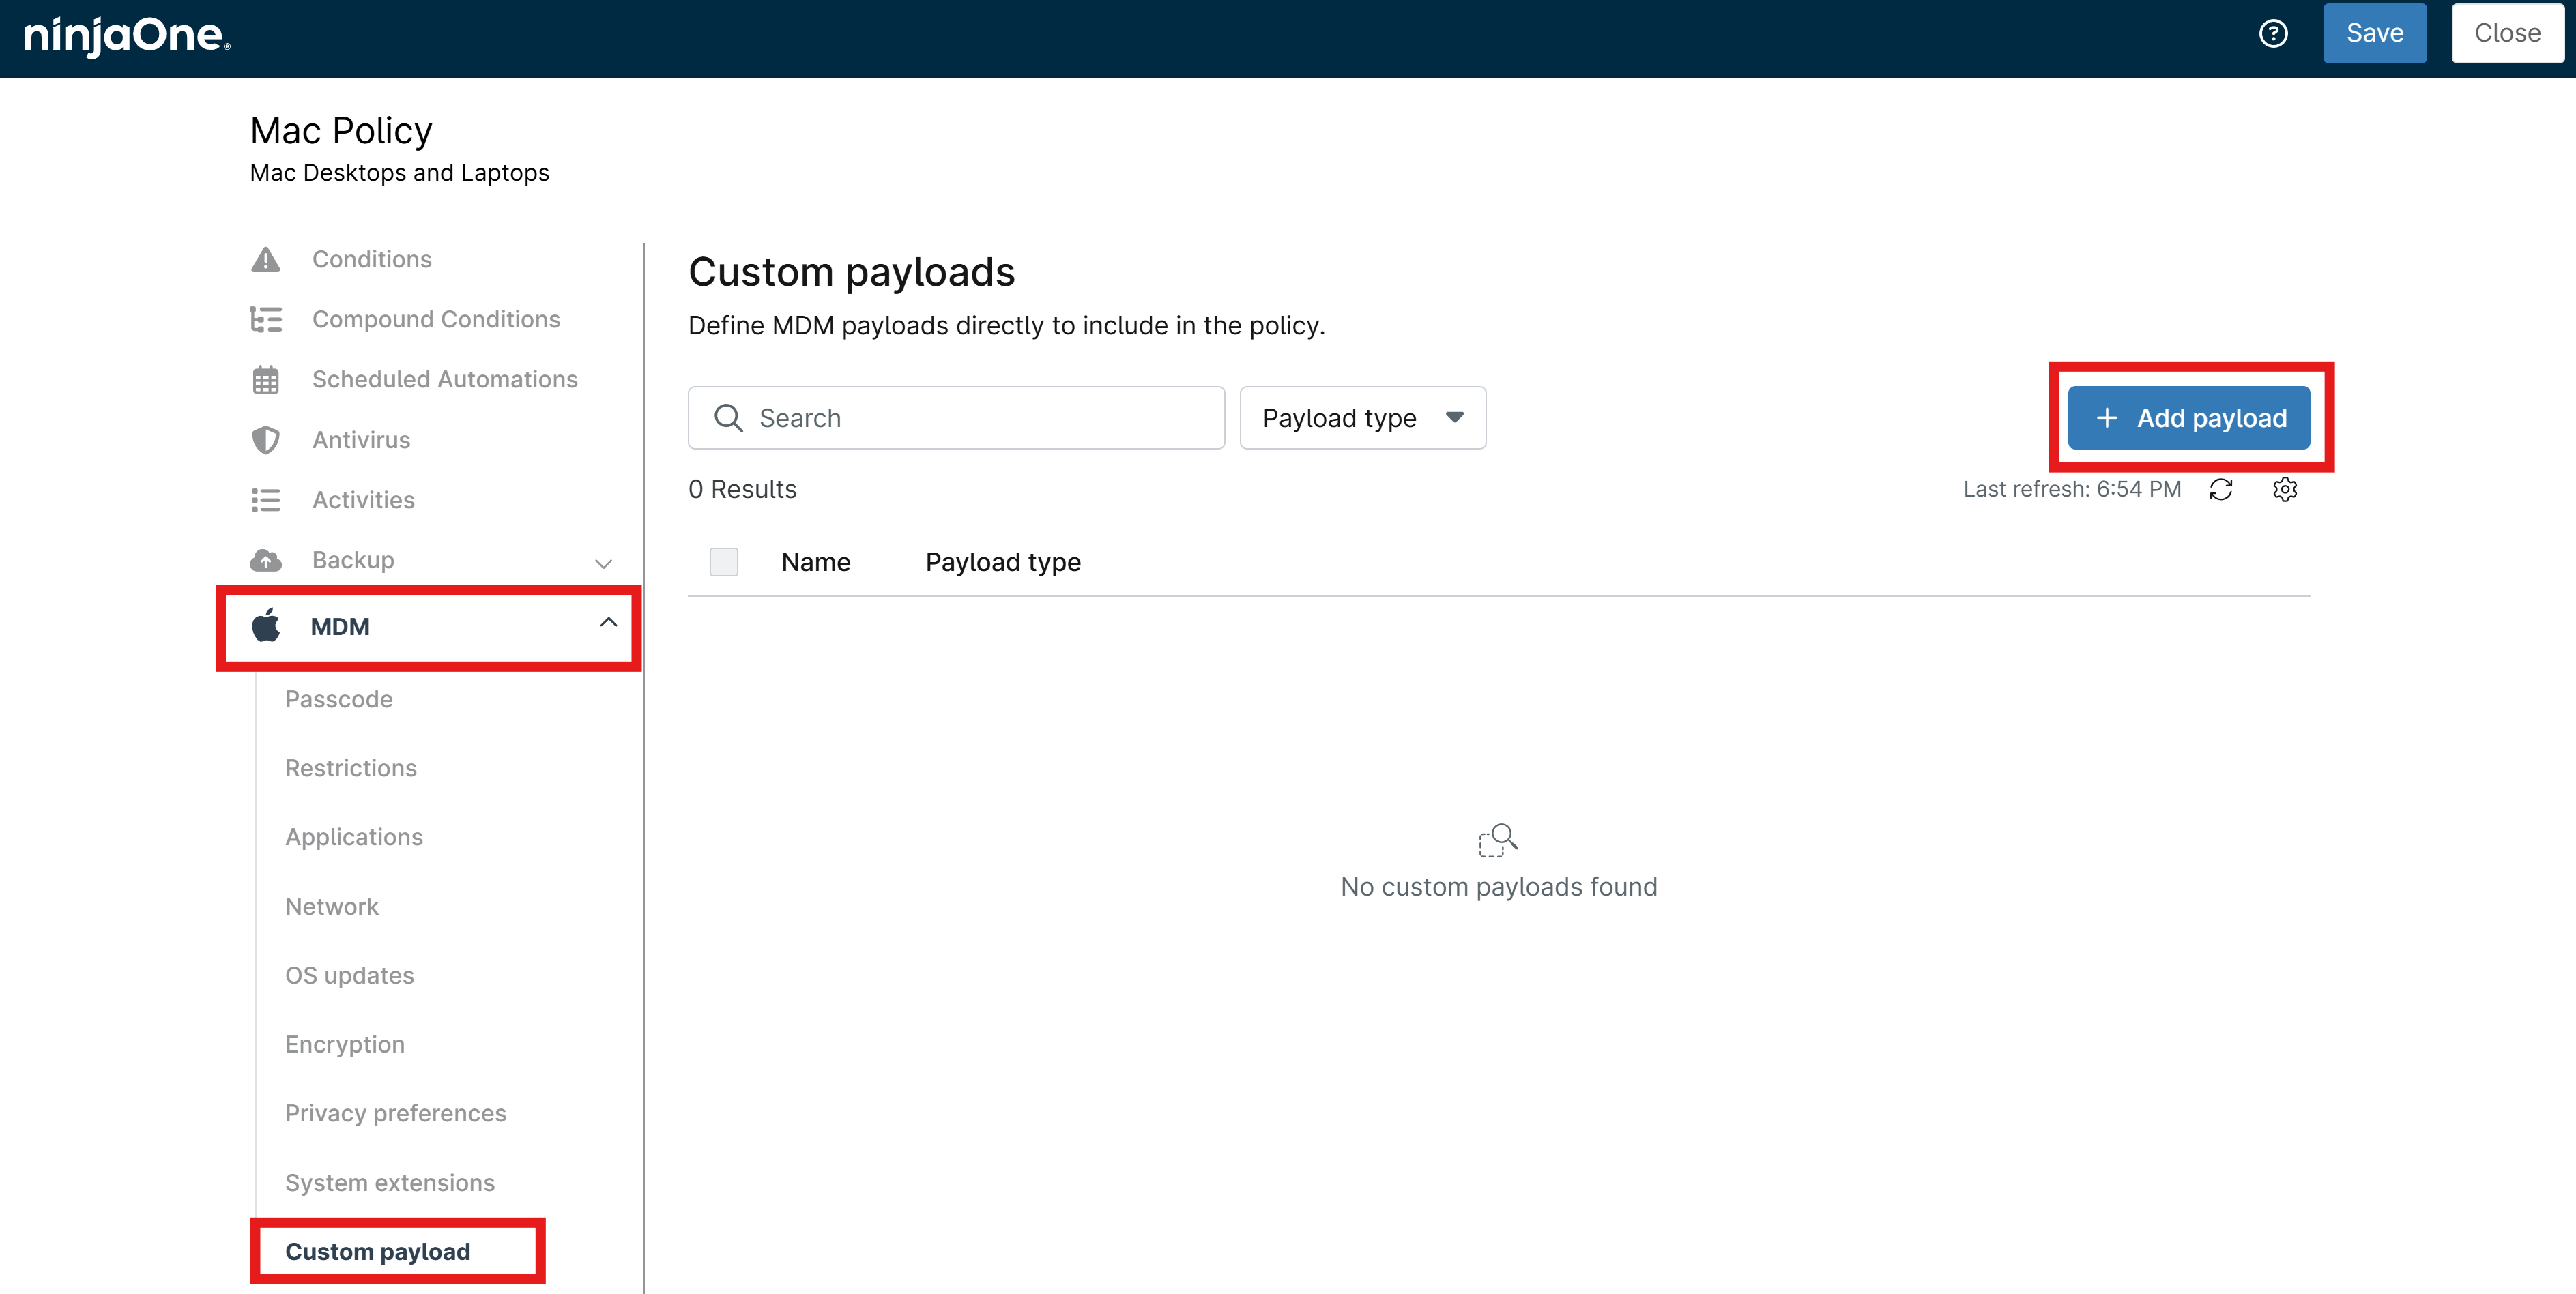
-
Set the Name to
EZRADIUS - Wi-Fi Profile(or a name of your choice), and click Upload file to upload the.mobileconfigfile you created in the previous step.- If you previously set up SCEP certificate issuance, you can rename your existing SCEP profile to add “Wi-Fi” to the name to make it easier to identify that this profile includes both the SCEP certificate and the Wi-Fi profile.
-
Click Add to add the custom payload to the policy.
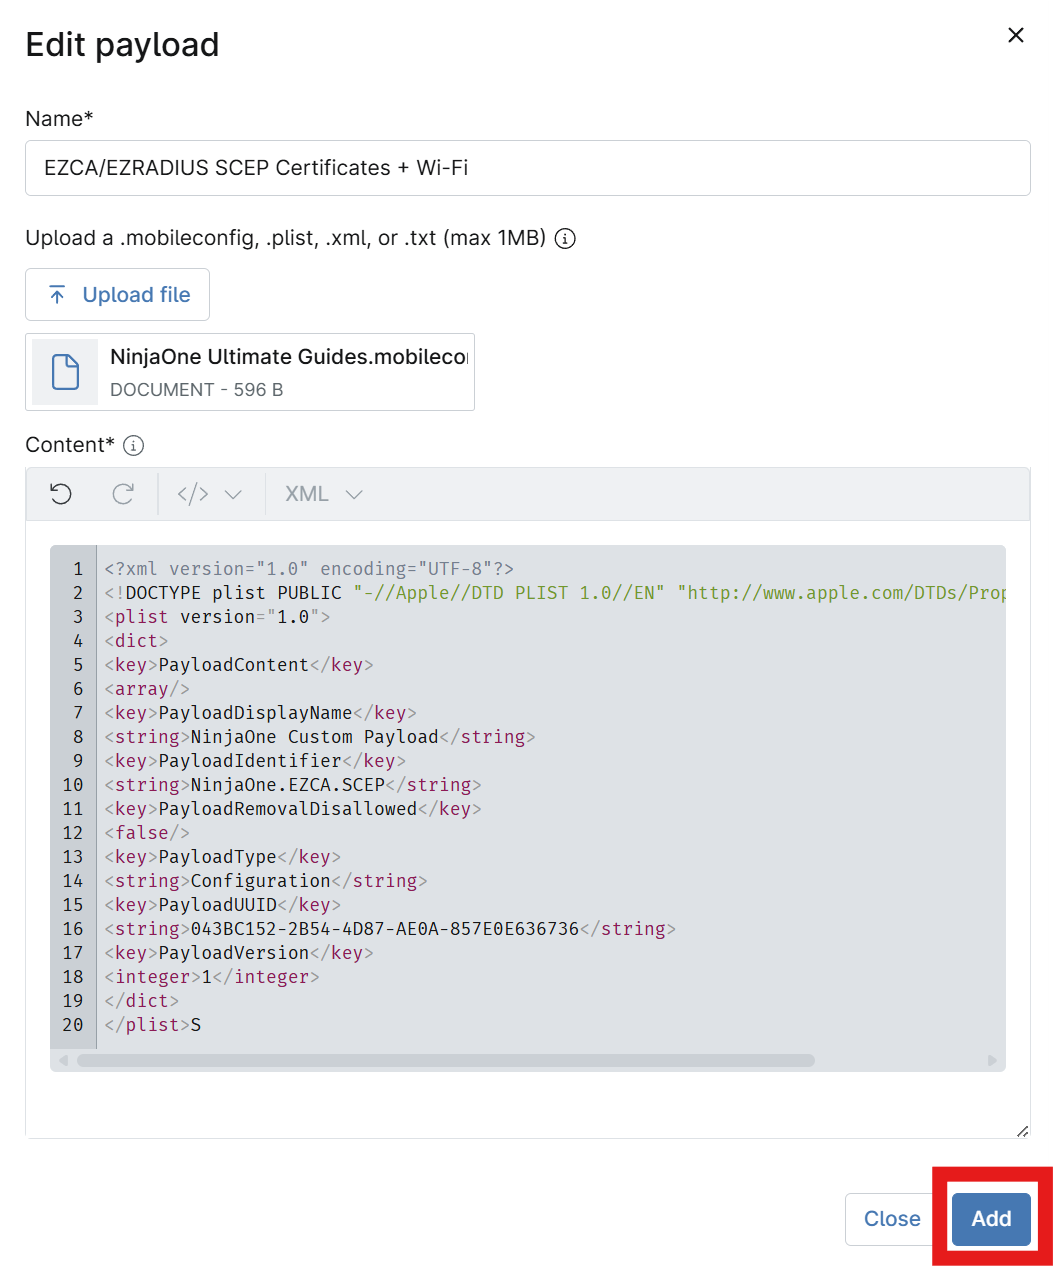
-
In the top-right corner, click on the Save button to save your changes to the policy.
Step 3 - How to Join Your macOS Devices to NinjaOne via MDM Enrollment to Receive Custom Payloads
In order for your macOS devices to receive the Apple management profile with the Wi-Fi payload that you deployed in the previous step, they will need to be enrolled via the MDM enrollment profile method. Enrolling via a DMG or PKI installer will not work for receiving MDM-deployed custom profiles, as those enrollment methods do not establish the necessary MDM management channel between the device and NinjaOne for deploying profiles.
To enroll your macOS devices via MDM enrollment:
-
Navigate to your NinjaOne portal.
-
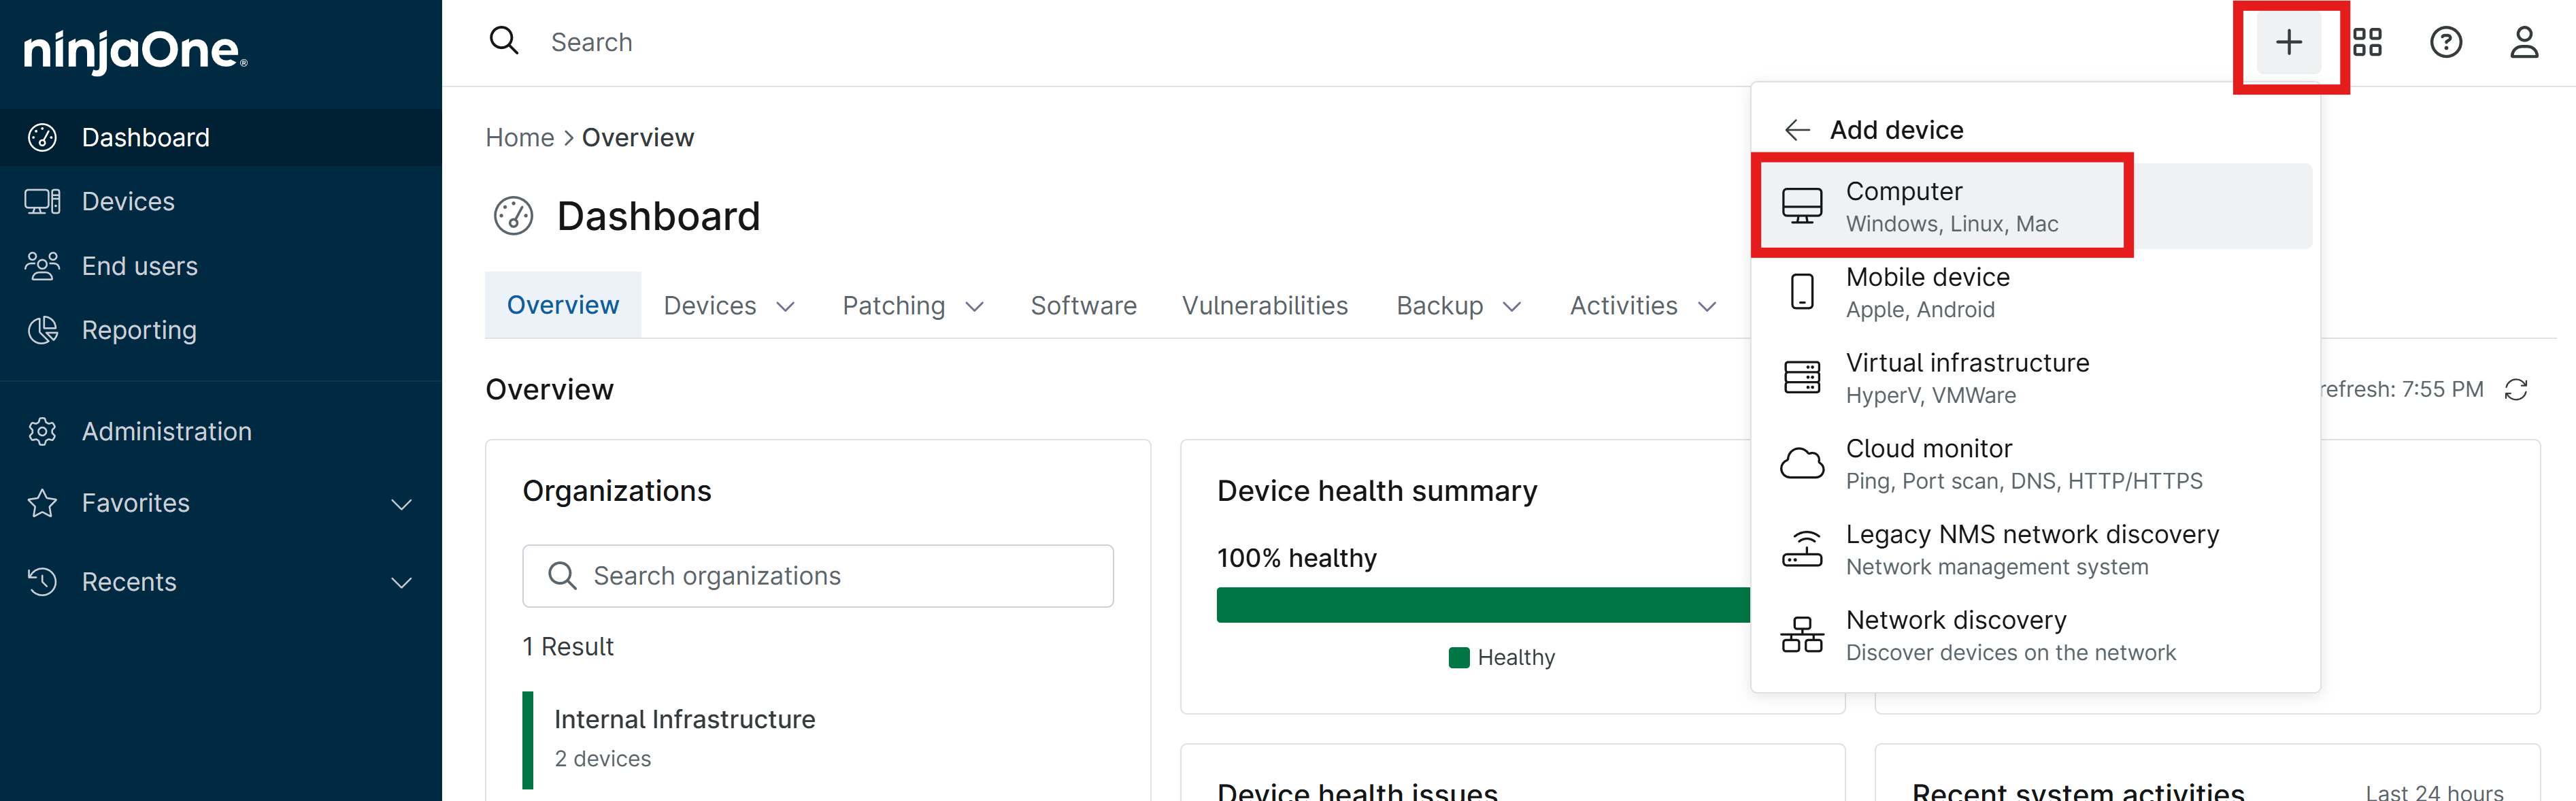
In the top-right corner, click the + button, then Device, then Computer.
-
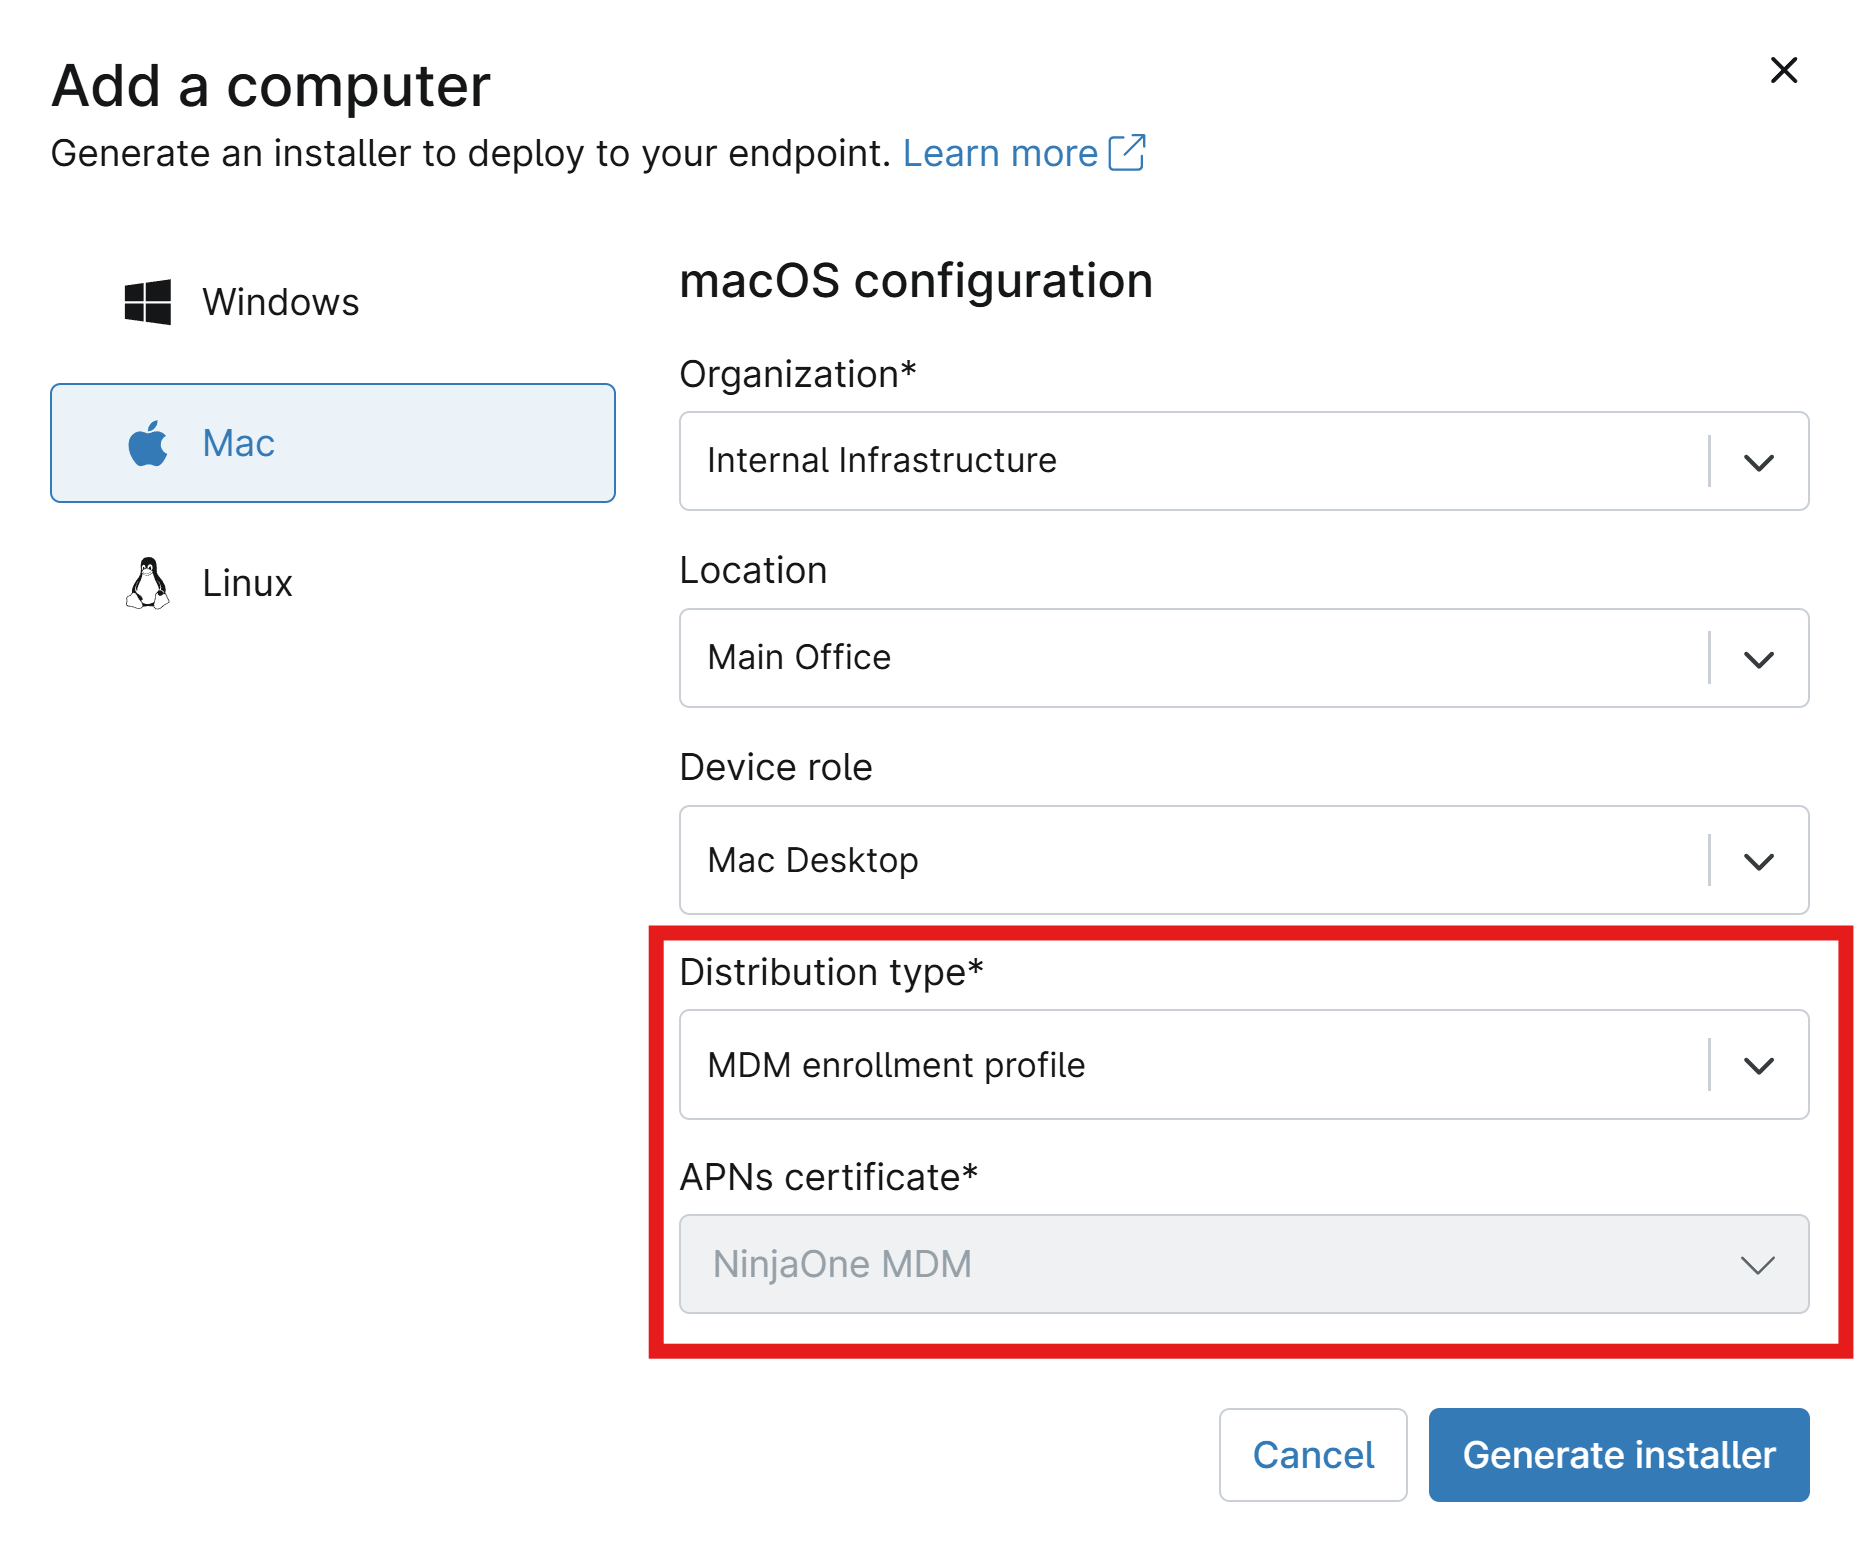
Select Mac and fill in your organization/location/role information.
-
Set Distribution type to MDM enrollment profile and select your APNs certificate if you have more than one.
-
Click Generate installer and distribute the generated .mobileconfig file to your users to install on their devices and complete the enrollment process.
Step 5: Verify Wi-Fi Profiles on macOS Devices
Once your macOS devices are enrolled in NinjaOne MDM and have received the Apple management profile with the Wi-Fi payload it can connect to the Wi-Fi network. You can verify that the certificates have been issued and installed correctly by checking the certificate store on the macOS device.
Make sure your devices are enrolled via MDM enrollment profile method, as other enrollment methods like DMG or PKI installer will not work for receiving MDM-deployed profiles and thus will not receive the Wi-Fi profile.
- On your macOS device, click on the Wi-Fi icon in the menu bar and select your Wi-Fi network from the list of available networks.
- Authentication can take up to 30 seconds. If you’re using Entra ID credentials, you will be prompted to enter your Entra ID username and password. If you’re using EAP-TLS certificate-based authentication, the device will automatically use the installed SCEP certificate to authenticate with the RADIUS server.