

















How To Manage Your Wi-Fi Profiles
Overview - How Do I Manage My Wi-Fi Networks in Keytos Shield?
In Keytos Shield, Wi-Fi networks are used to keep track of the wireless networks in your organizations to distribute Wi-Fi profiles to your users and devices via MDM solutions and the Keytos Connect application. This allows you to centrally manage your Wi-Fi configurations, ensuring that all users and devices have the correct network settings and security policies applied automatically.
How to Create a Wi-Fi Network in Keytos Shield
Before creating a Wi-Fi network, ensure that you’ve completed the initial onboarding process in Keytos Shield. This will set up your first network profile and Wi-Fi network. Once complete, you can create additional Wi-Fi networks as needed to manage your organization’s wireless configurations.
Step 1 - How to Enter Your Wi-Fi Network Details
Follow the steps below to create a new Wi-Fi network in Keytos Shield:
-
Navigate to your regional Keytos Shield portal. You can find this at the Keytos global portal. (US Government Portal).
-
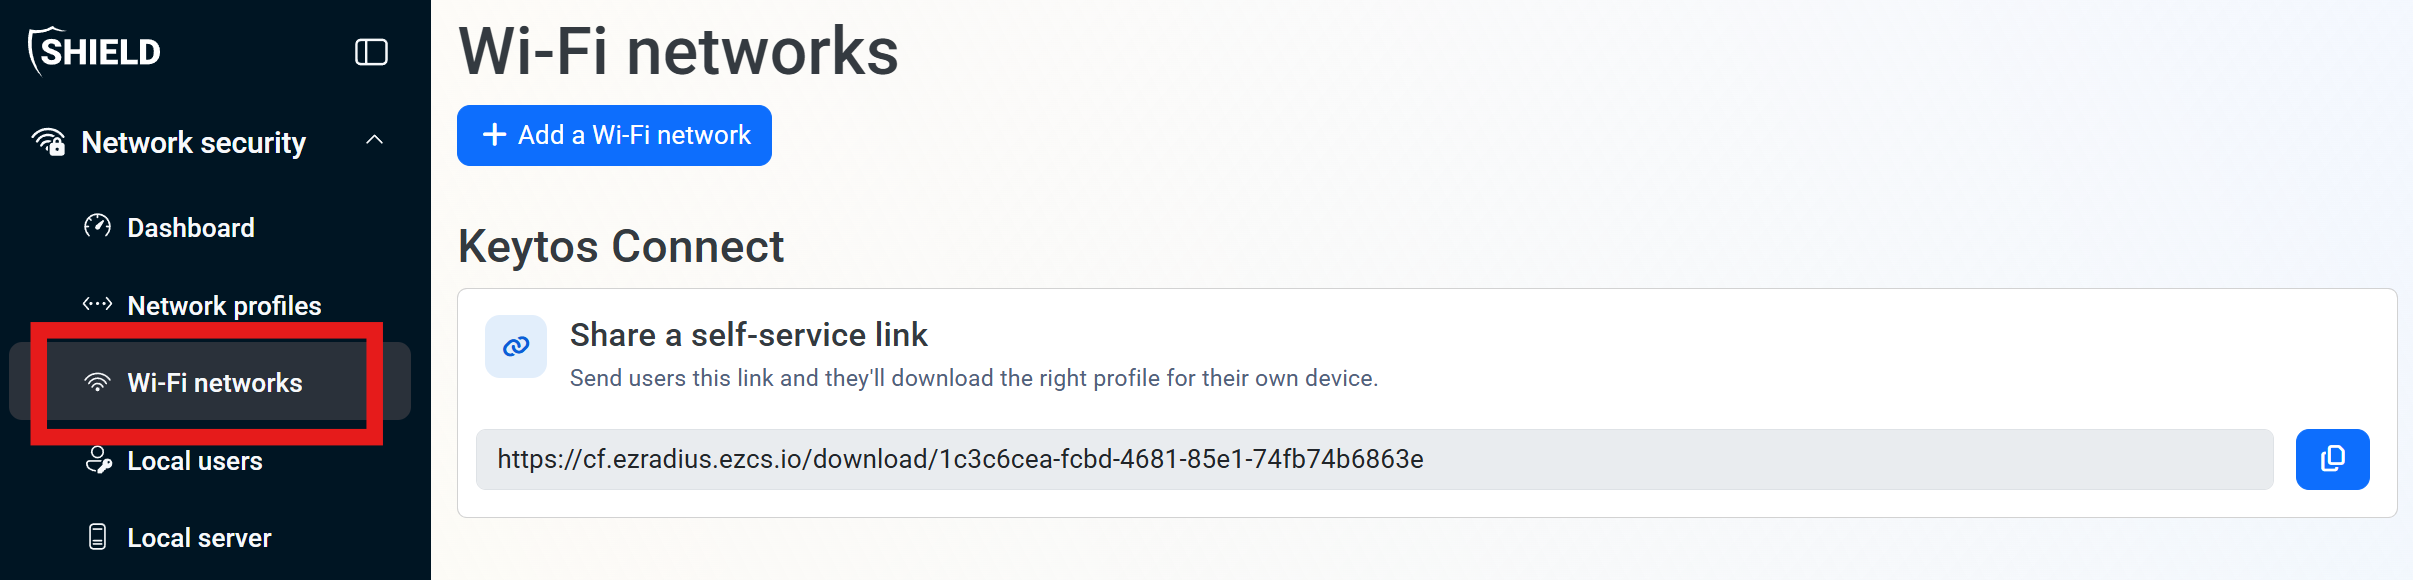
From the left-hand navigation bar, click on Wi-Fi networks.
-
Click on Create a Wi-Fi network to create a new Wi-Fi network. A form will appear where you can enter the details of your new Wi-Fi network.
-
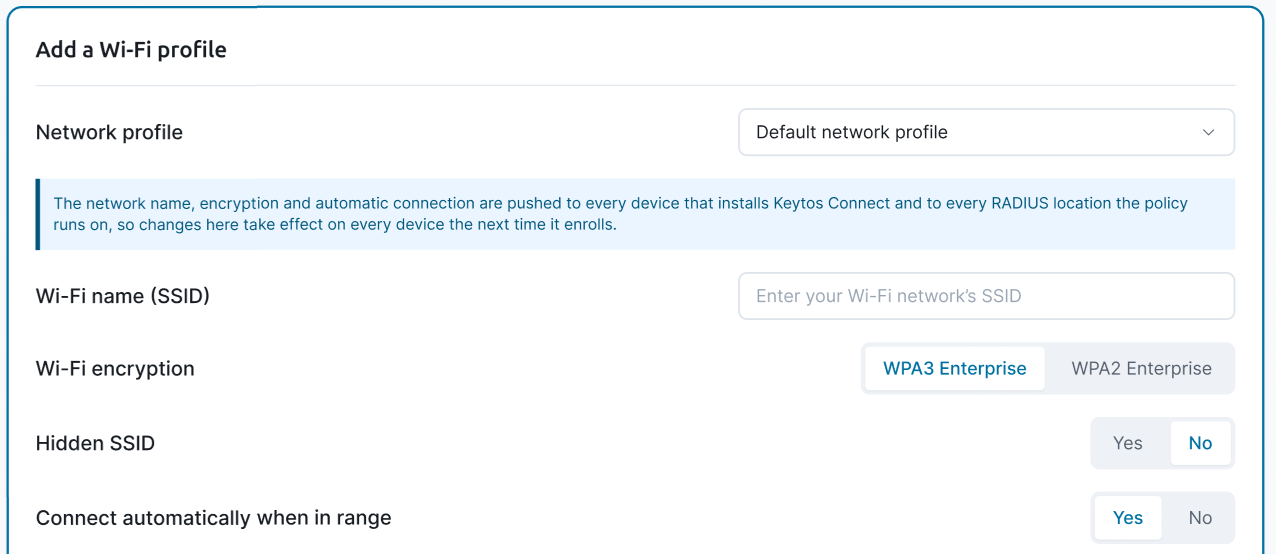
Under Network profile, select the network profile you want to associate with this Wi-Fi network.
-
Enter your Wi-Fi network details:
- Wi-Fi name (SSID): Enter the name of your Wi-Fi network.
- Wi-Fi encryption: Select the type of encryption your Wi-Fi network uses (e.g., WPA2, WPA3).
- Hidden SSID: Specify whether your Wi-Fi network’s SSID is hidden. Select Yes if the SSID is hidden, or No if it is broadcasted.
- Connect automatically when in range: Specify whether devices should automatically connect to this Wi-Fi network when it is within range. Select Yes to enable automatic connection, or No to disable it.
-
If you want to set up Keytos Connect for BYOD devices for this Wi-Fi network, proceed to the next step. Otherwise, click Create Wi-Fi profile to save your Wi-Fi network without enabling Keytos Connect.
Step 2 - How to Enable Keytos Connect for BYOD Devices (optional)
Keytos Connect is a free mobile and desktop application that allows users to easily and securely connect their unmanaged BYOD and personal devices to your organization’s Wi-Fi networks. By enabling Keytos Connect for a Wi-Fi network, users can automatically receive the necessary network credentials and configuration, simplifying the connection process and enhancing security for BYOD devices.
To enable Keytos Connect for a Wi-Fi network:
-
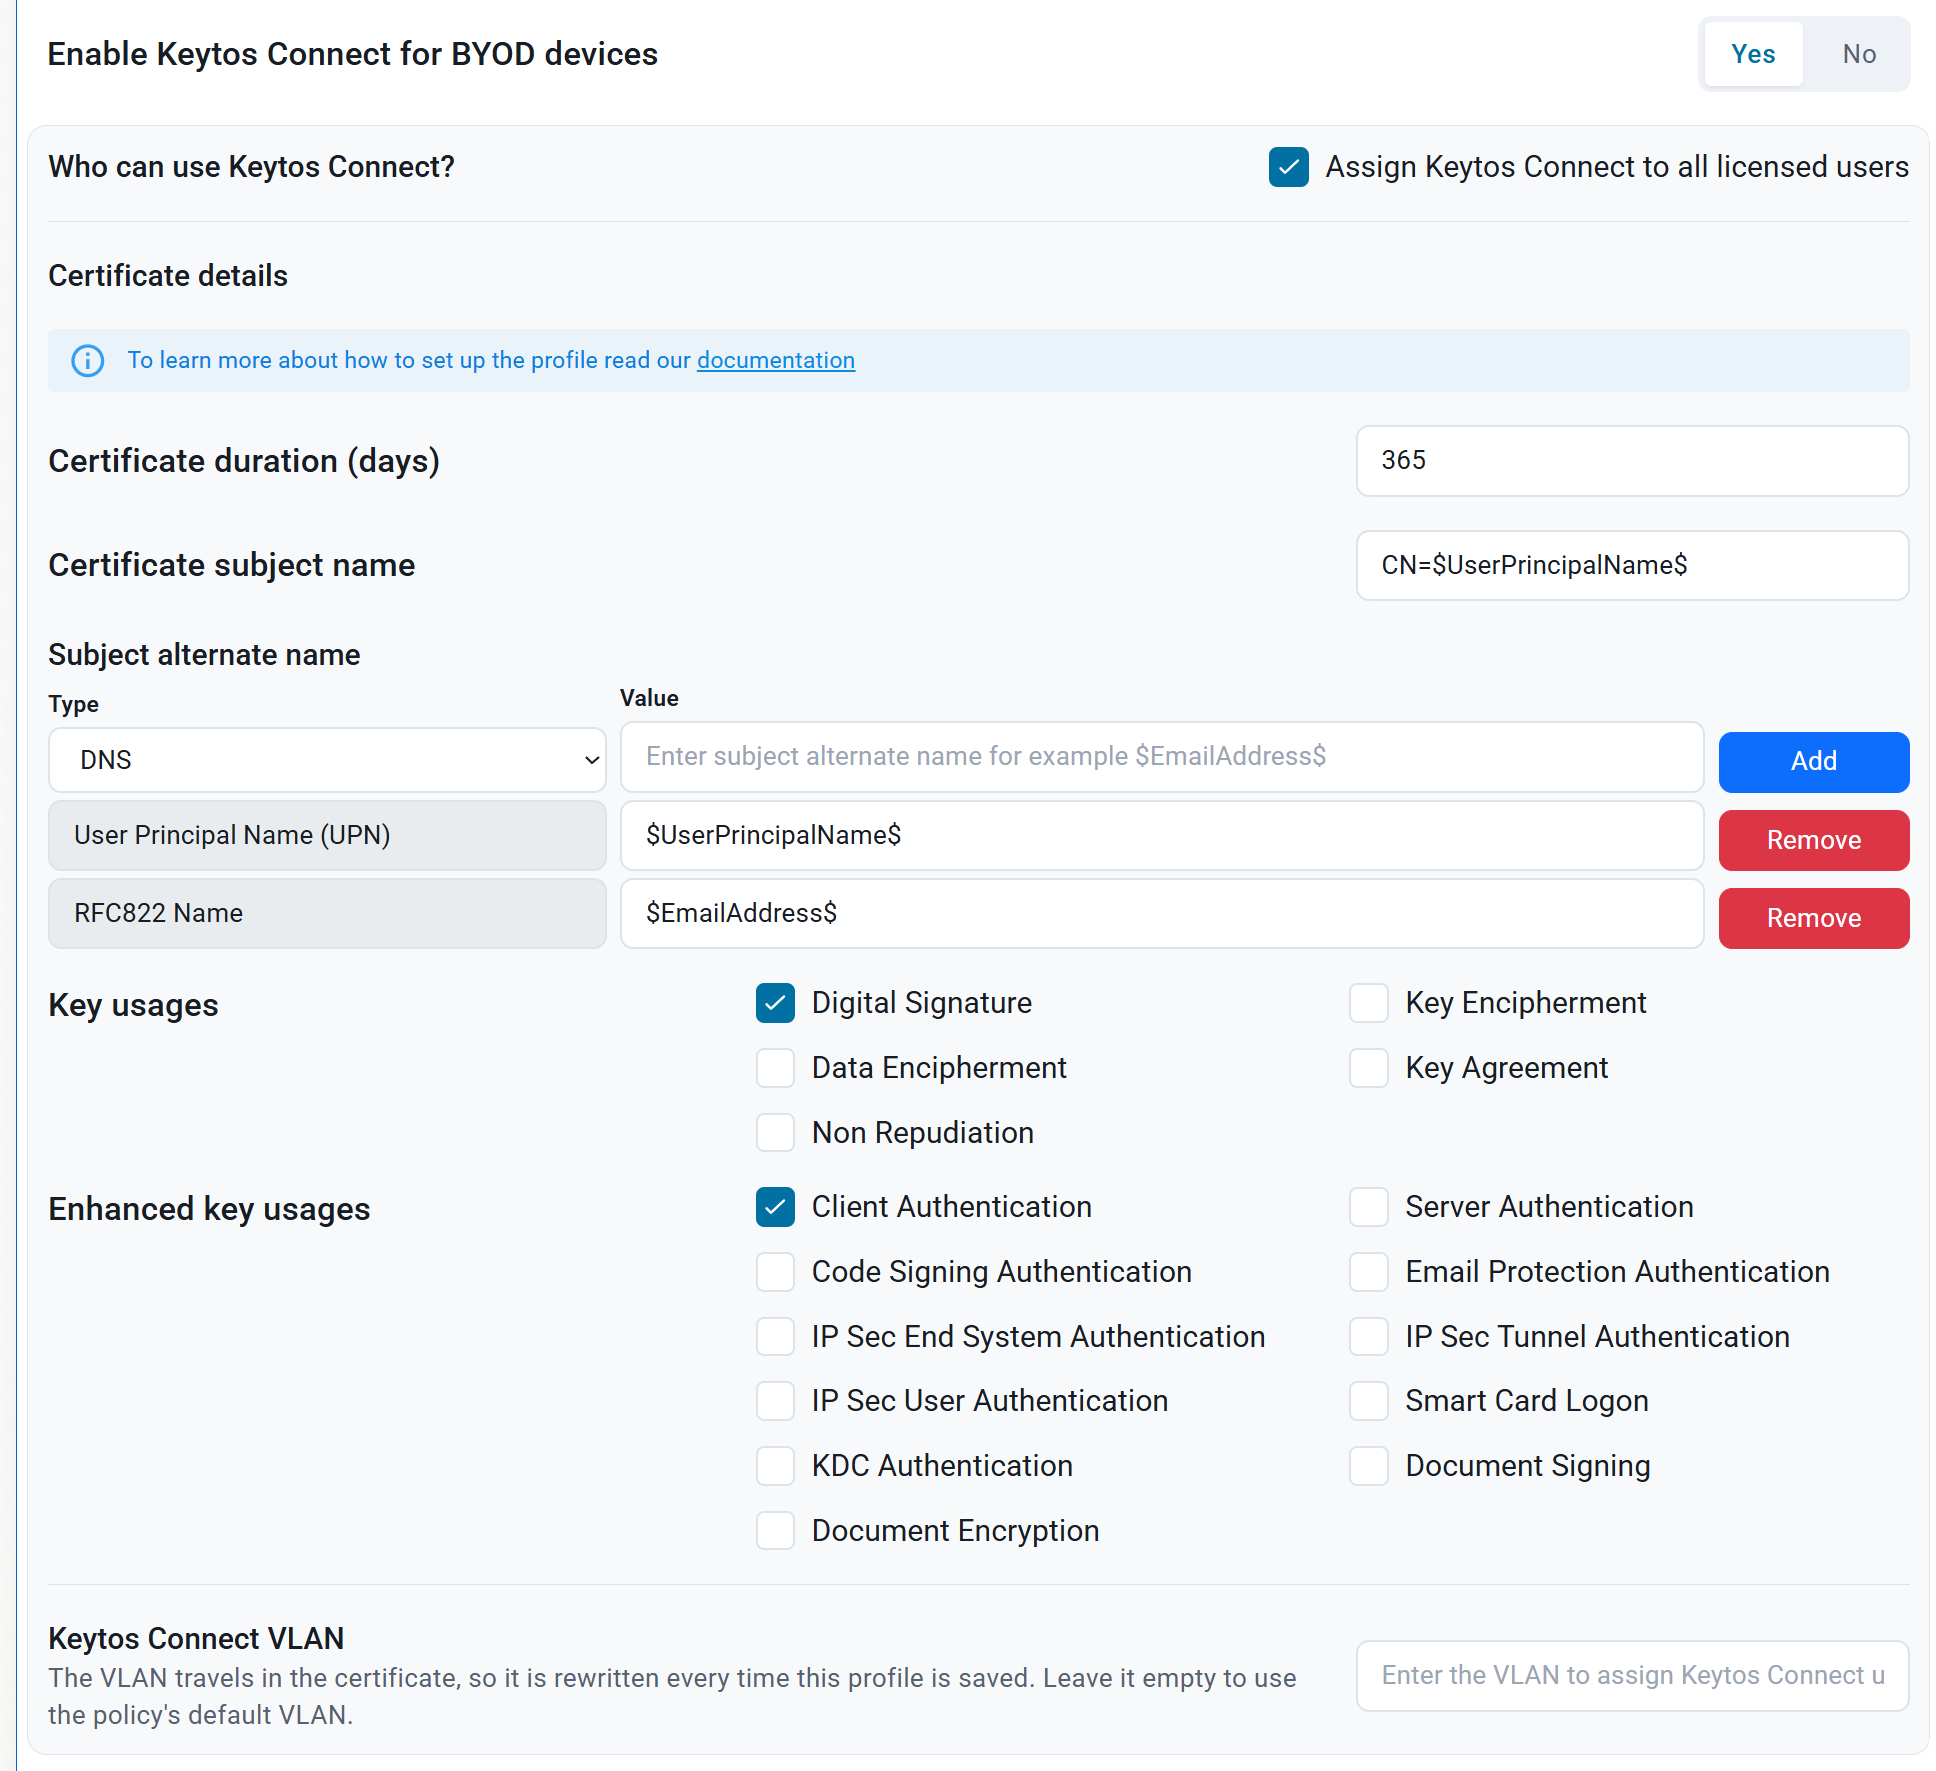
Set Enable Keytos Connect for BYOD devices to Yes to enable Keytos Connect for this Wi-Fi network.
-
If you want all users in your Entra ID tenant to have access to this Wi-Fi network via Keytos Connect, check the box for Assign Keytos Connect to all licensed users. Otherwise, uncheck this box and manually specify Entra ID users and/or groups who should have access to this Wi-Fi network.
-
Optionally update the Certificate details for Keytos Connect if needed. This controls the certificate used for secure communication between Keytos Connect and your Wi-Fi network.
- Certificate duration (days): Specify the duration for which the certificate is valid, in days. When a certificate nears expiry, Keytos Connect will automatically renew the certificate, but it may require the user to re-authenticate in the application to continue using the Wi-Fi network.
- Certificate subject name: Specify the subject name for the certificate issued by Keytos Connect to your user devices. You can use variables like
$UserName$,$UserPrincipalName$, and other available variables listed in the reference section below. - Subject alternative name: Specify the subject alternative name for the certificate issued by Keytos Connect to your user devices. You can use the same variables as for the certificate subject name, such as
$UserName$,$UserPrincipalName$, and other available variables listed in the reference section below. - Key usages: Specify the key usages for the certificate issued by Keytos Connect to your user devices. Key usages define the purpose of the certificate’s public key, such as digital signature, key encipherment, or both. For Wi-Fi authentication, you just need Digital signature.
- Extended key usages: Specify any extended key usages for the certificate issued by Keytos Connect to your user devices. Extended key usages provide additional context for the certificate’s intended purpose, such as client authentication or server authentication. For Wi-Fi authentication, you typically need Client Authentication.
-
Click Create Wi-Fi profile to save your changes.
Keytos Shield Wi-Fi Profile Reference
What Certificate Variables are Available for Certificate Values?
When configuring certificate subject names and subject alternative names for Keytos Connect certificates, you can use the following variables to dynamically insert user-specific information. These variables will be replaced with the corresponding values from the user’s Entra ID profile when the certificate is issued.
| Variable | Description | Example |
|---|---|---|
$UserName$ |
The full name of the user. | Jared Dunn |
$UserPrincipalName$ |
The user principal name (UPN) of the user, such as jared@pidepiper.com. | jared@pidepiper.com |
$Alias$ |
The alias of the user, which is the part of the UPN before the @ symbol, such as jared. | jared |
$EmailAddress$ |
The email address of the user, from the mail attribute in Entra ID. If this is empty, the UPN will be used instead. | jared@pidepiper.com |
$OnPremisesSamAccountName$ |
The on-premises SAM account name of the user. If this is empty, the UPN will be used instead. | jared |
$OnPremisesDistinguishedName$ |
The on-premises distinguished name of the user. If this is empty, the UPN will be used instead. | CN=Jared Dunn,OU=Users,DC=pidepiper,DC=com |
$OnPremisesUPN$ |
The on-premises user principal name (UPN) of the user. If this is empty, the UPN will be used instead. | jared@pidepiper.com |
$OnPremisesSid$ |
The on-premises security identifier (SID) of the user. If this is empty, the UPN will be used instead. | S-1-5-21-1234567890-123456789-1234567890-1234 |
$OnPremisesDomainName$ |
The on-premises domain name of the user. | PIDEPIPER |
$OnPremisesSamAndDomainName$ |
This field combines the on-premises SAM account name and domain name in the format username@DOMAIN. If this is empty, the UPN will be used instead. | jared@PIDEPIPER |