

















How To Distribute Network Profiles to Windows Devices via Microsoft Intune
Overview - How to Distribute Network Profiles to Windows Devices via Intune
To connect an Intune-managed Windows device to your network, you need to distribute a network profile that includes the necessary network settings, authentication methods, and certificates. This guide will walk you through the steps to configure and push these profiles to Windows devices using Microsoft Intune.
What Intune Configuration Policies Do I Need to Create to Distribute Network Profiles to Windows Devices?
For a Windows device to successfully connect to your network using a network profile, you need to create and configure the following Intune configuration policies:
- Trusted Certificate Policy: This policy ensures that the Windows device trusts your Shield’s Root CA certificate, which is necessary for establishing a secure connection to your network.
- SCEP Certificate Policy: This policy provisions each Windows device with a unique identity certificate via the Simple Certificate Enrollment Protocol (SCEP), enabling secure authentication with your network.
- Wi-Fi Profile Policy: This policy contains the network settings, such as SSID, security type, and authentication method, required for the Windows device to connect to your network automatically using the certificates provisioned through Intune.
Step-by-Step Guide - How To Configure Network Profile Intune Configuration Policies for Windows
Follow these steps to configure and push the necessary Intune configuration policies for Windows devices:
Prerequisites for Configuring Windows Network Profiles via Intune
Before you begin configuring network profiles for Windows devices via Intune, ensure that you have completed all the necessary prerequisites:
- The Keytos Entra ID applications are registered in your tenant.
- You have signed up for a Keytos Shield Plan.
- You have existing access policies in Keytos Shield.
- You are a Subscription Owner or Network Administrator.
- You have checked Intune under “Which MDMs do you use to manage your devices” in Keytos Shield.
- You are an Intune Administrator.
Step 1 - How to Push Your Shield CA Certificates as Trusted Certificates on Windows Devices via Intune
For your devices to establish a secure connection to Keytos Shield, you need to distribute the Shield CA certificates (both Root and Issuing) to your devices via Intune.
How to Download Your Shield Root and Issuing CA Certificates
Begin by downloading your Shield Root and Issuing CA certificates from the Keytos Shield portal.
-
Log in to your Keytos Shield portal.
-
From the left-hand navigation bar, click on Network Profiles.
-
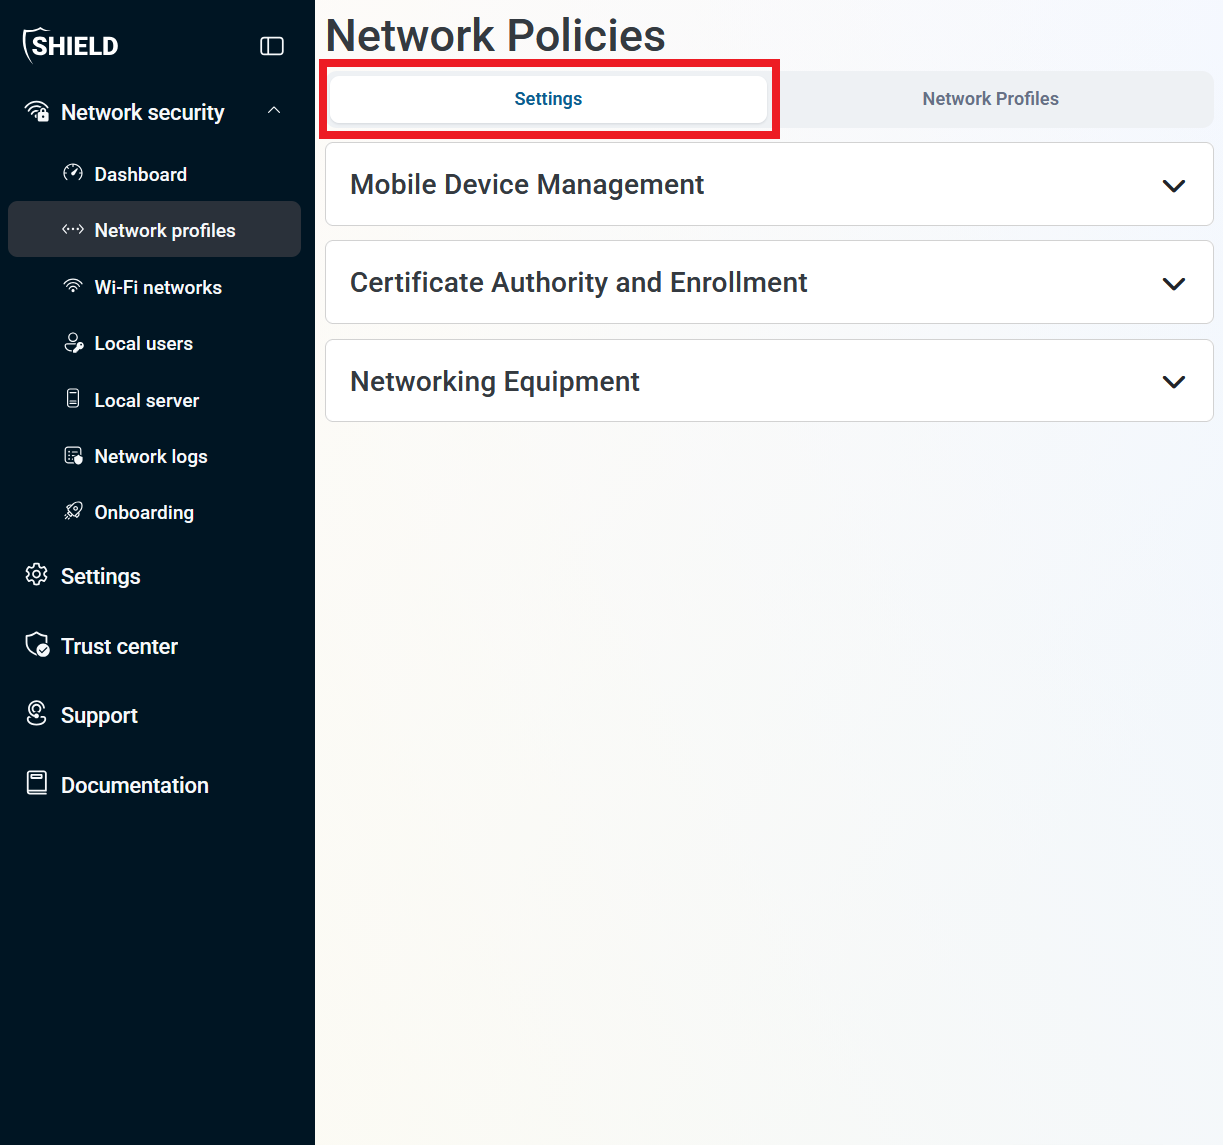
At the top of the page, select the Settings tab.
-
Scroll down to the Certificate Authority and Enrollment section and expand the Intune subsection.
Not seeing the Intune subsection? Make sure to enable Intune under the Mobile Device Management section further up on the page and save your changes.
-
Next to
rootca.cer, click Download and save it to your local machine. -
Next to
issuingca.cer, click Download and save it to your local machine as well.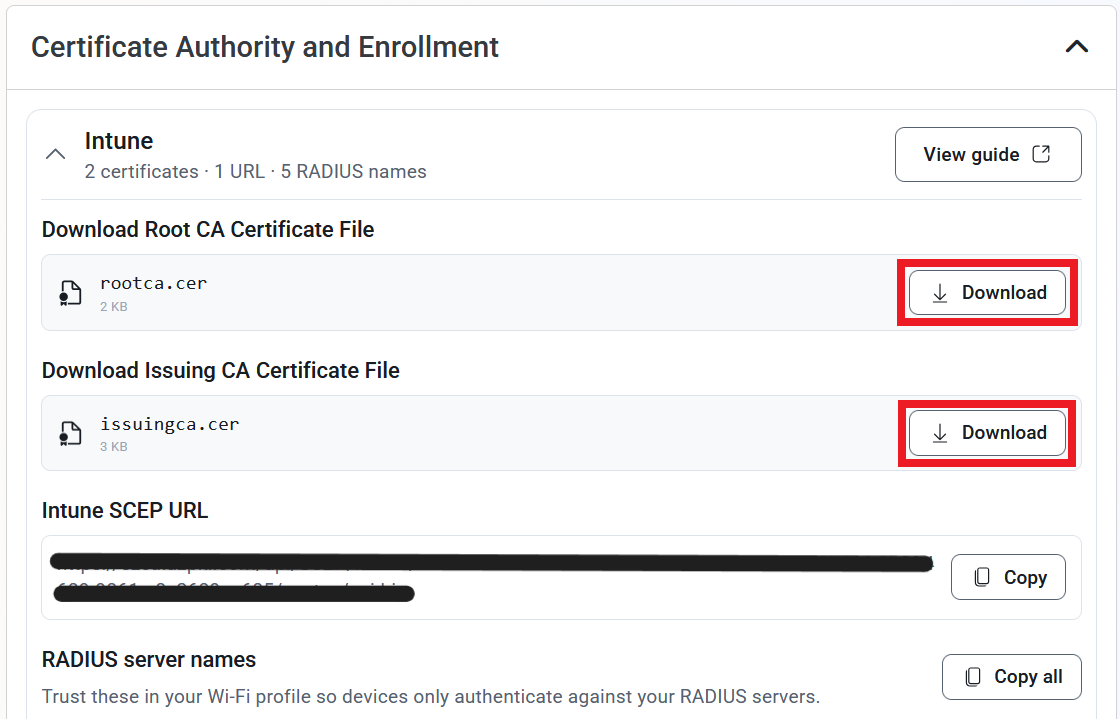
How to Push Your CA Certificates to Your Windows Devices via Intune
Now that you have your Shield CA certificates downloaded, the next step is to push them to your devices’ Trusted Store using Microsoft Intune.
-
Navigate to the Intune portal: https://aka.ms/Intune
-
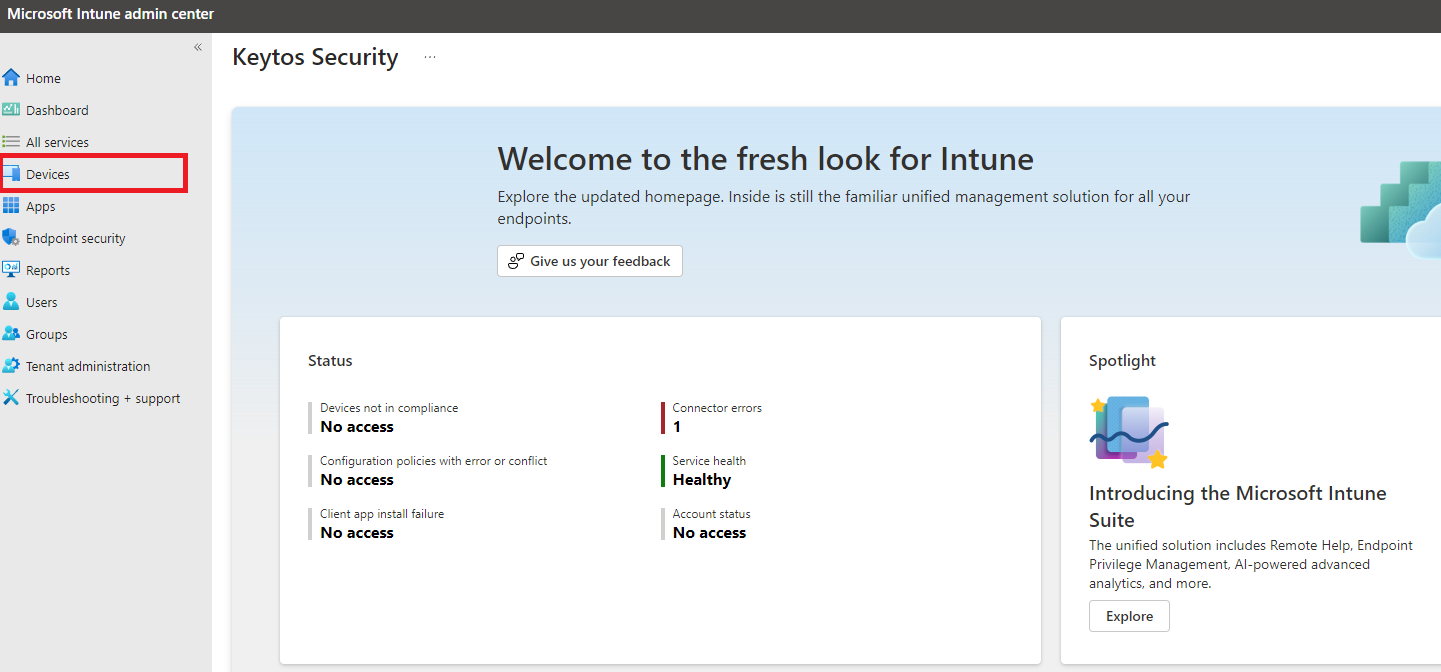
From the left-hand menu, click on Devices.
-
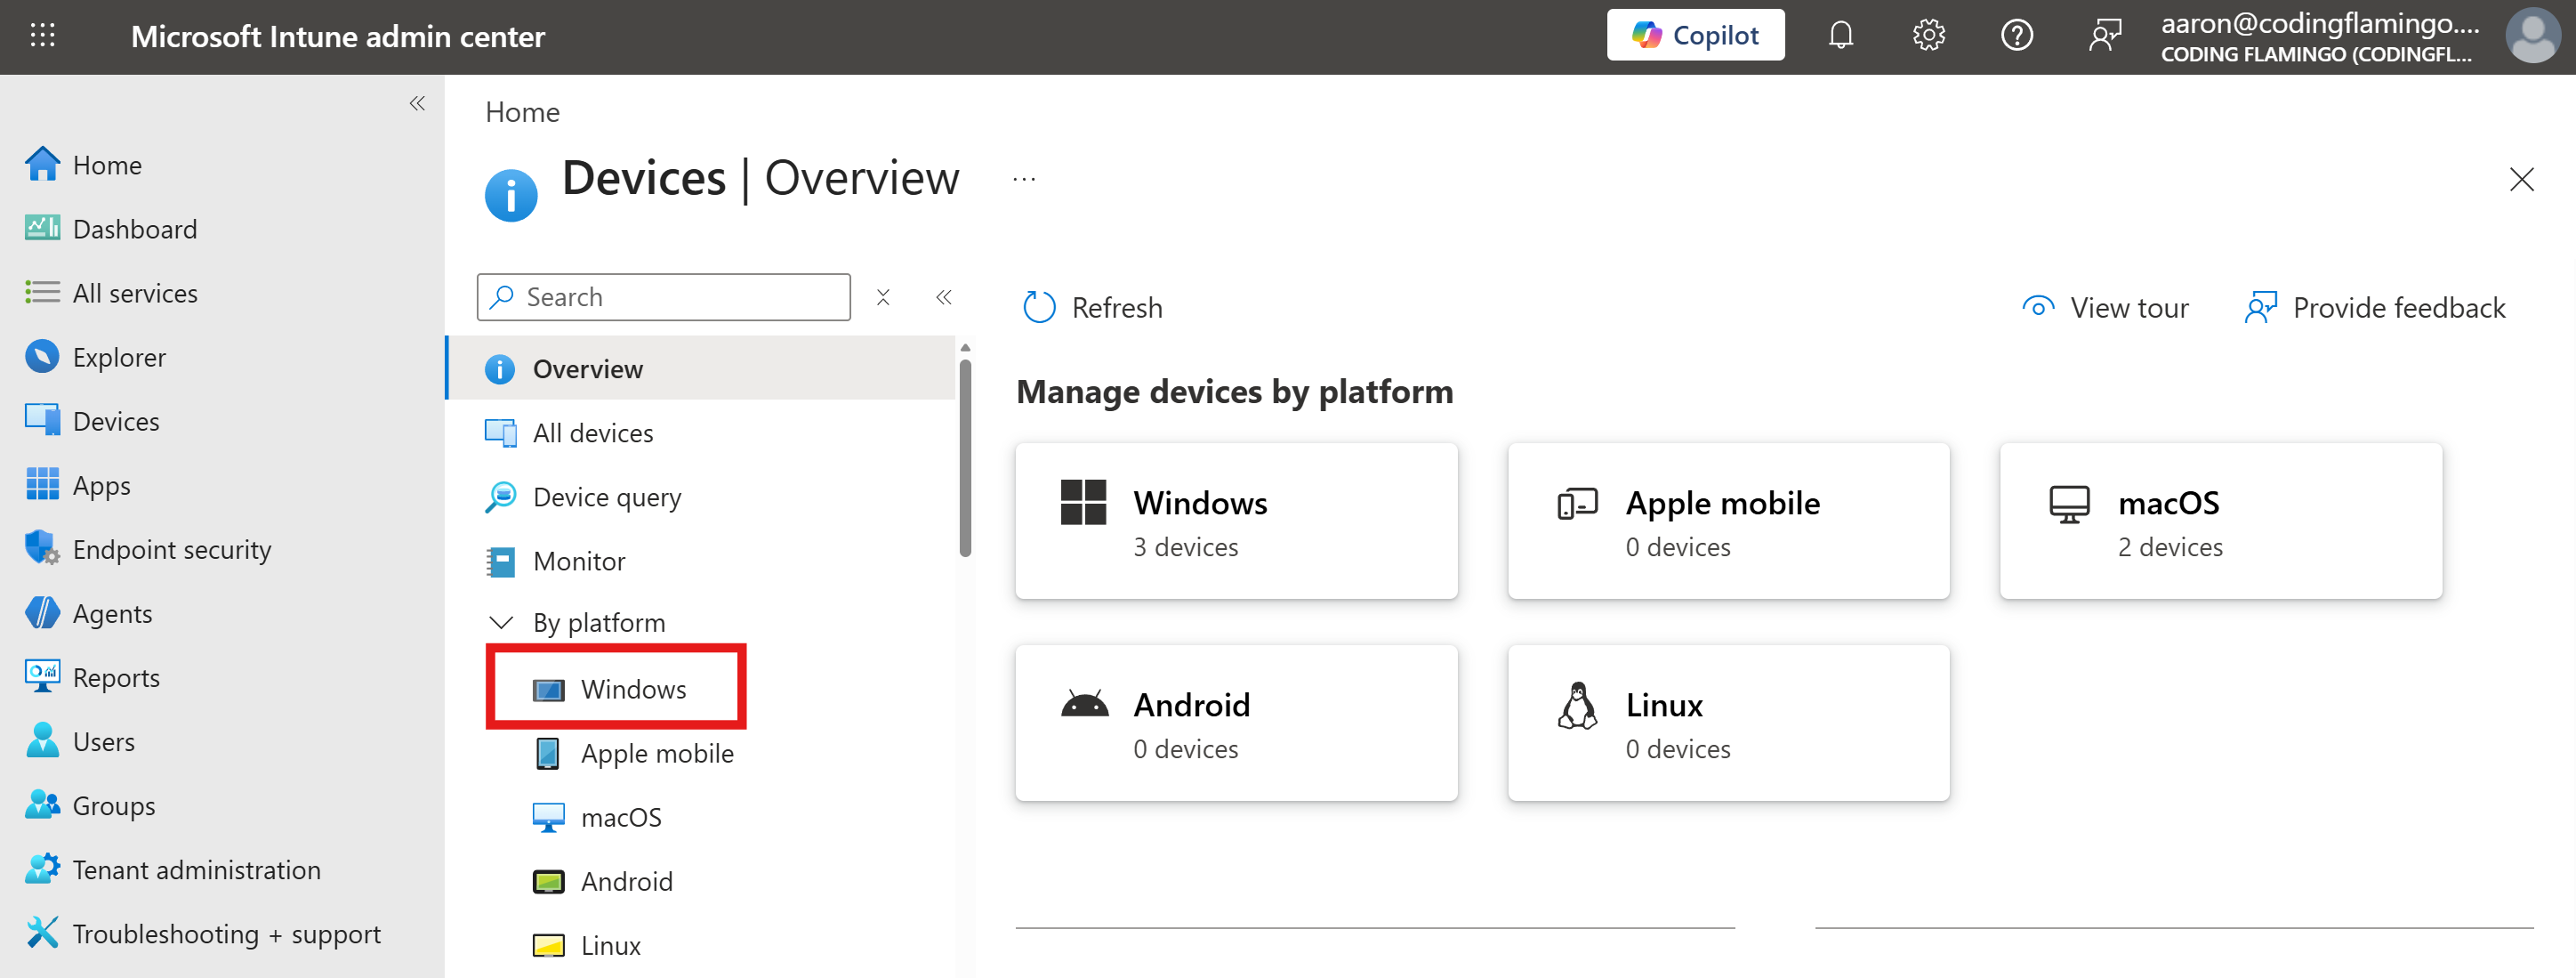
From the left-hand sub-menu, click Windows to manage Windows devices.
-
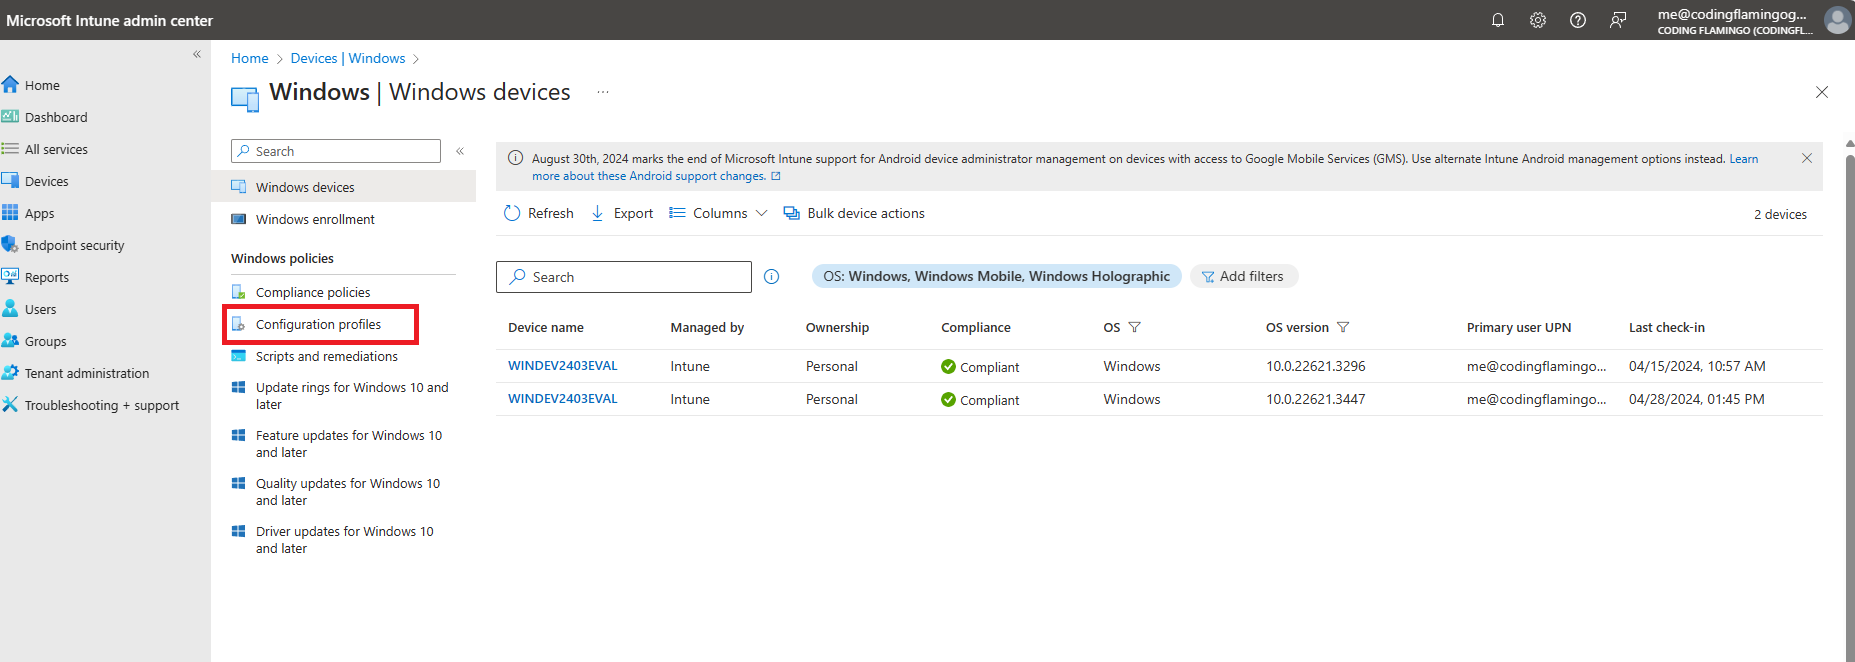
From the left-hand sub-menu, click on Configuration Profiles.
-
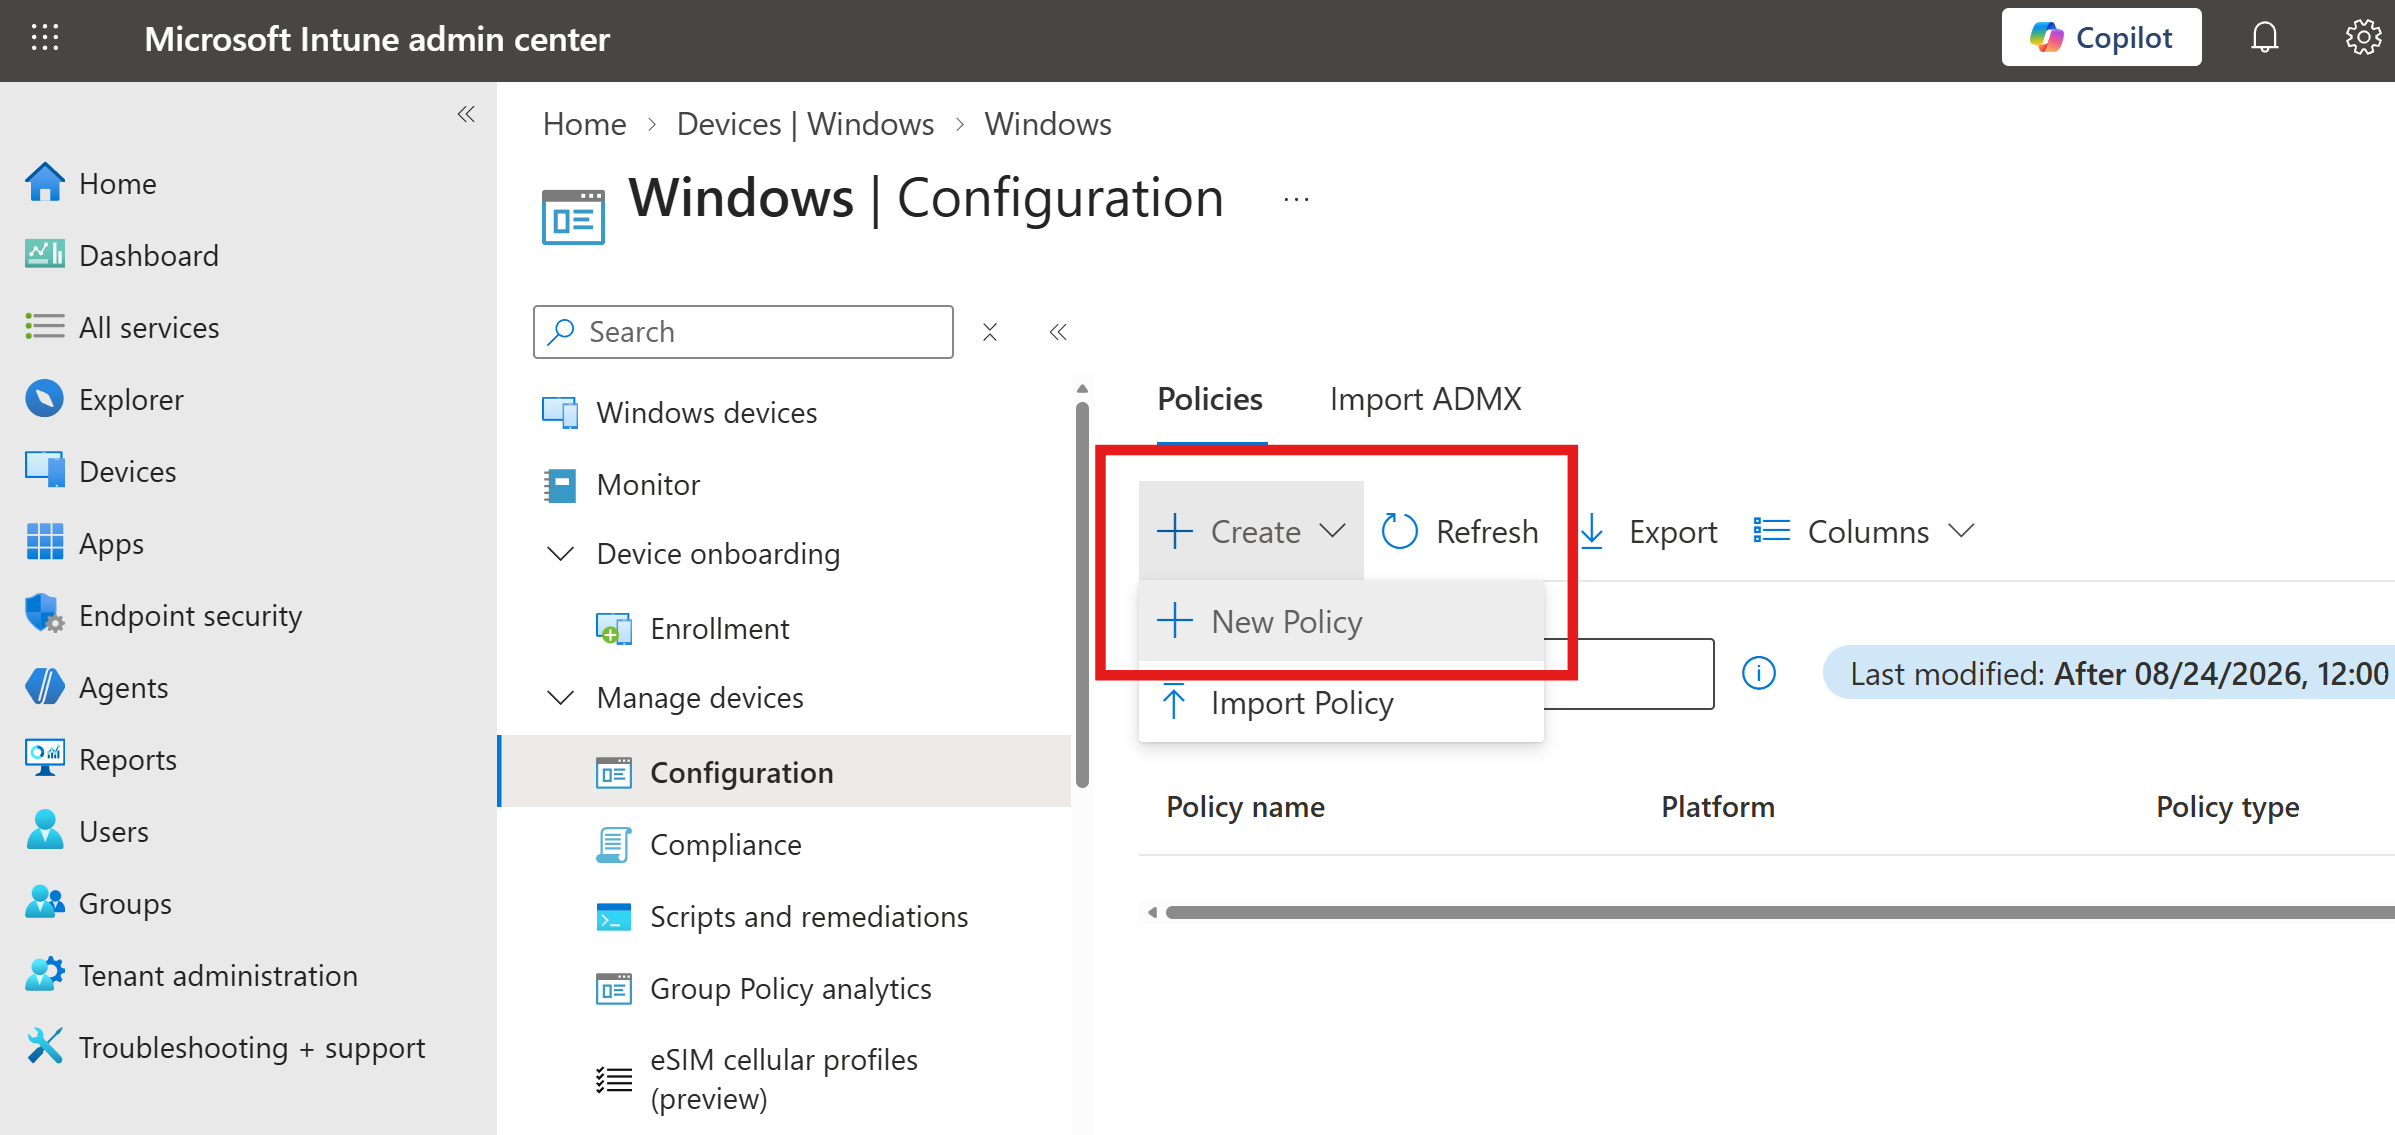
Click on the + Create button at the top of the list, then + New Policy.
-
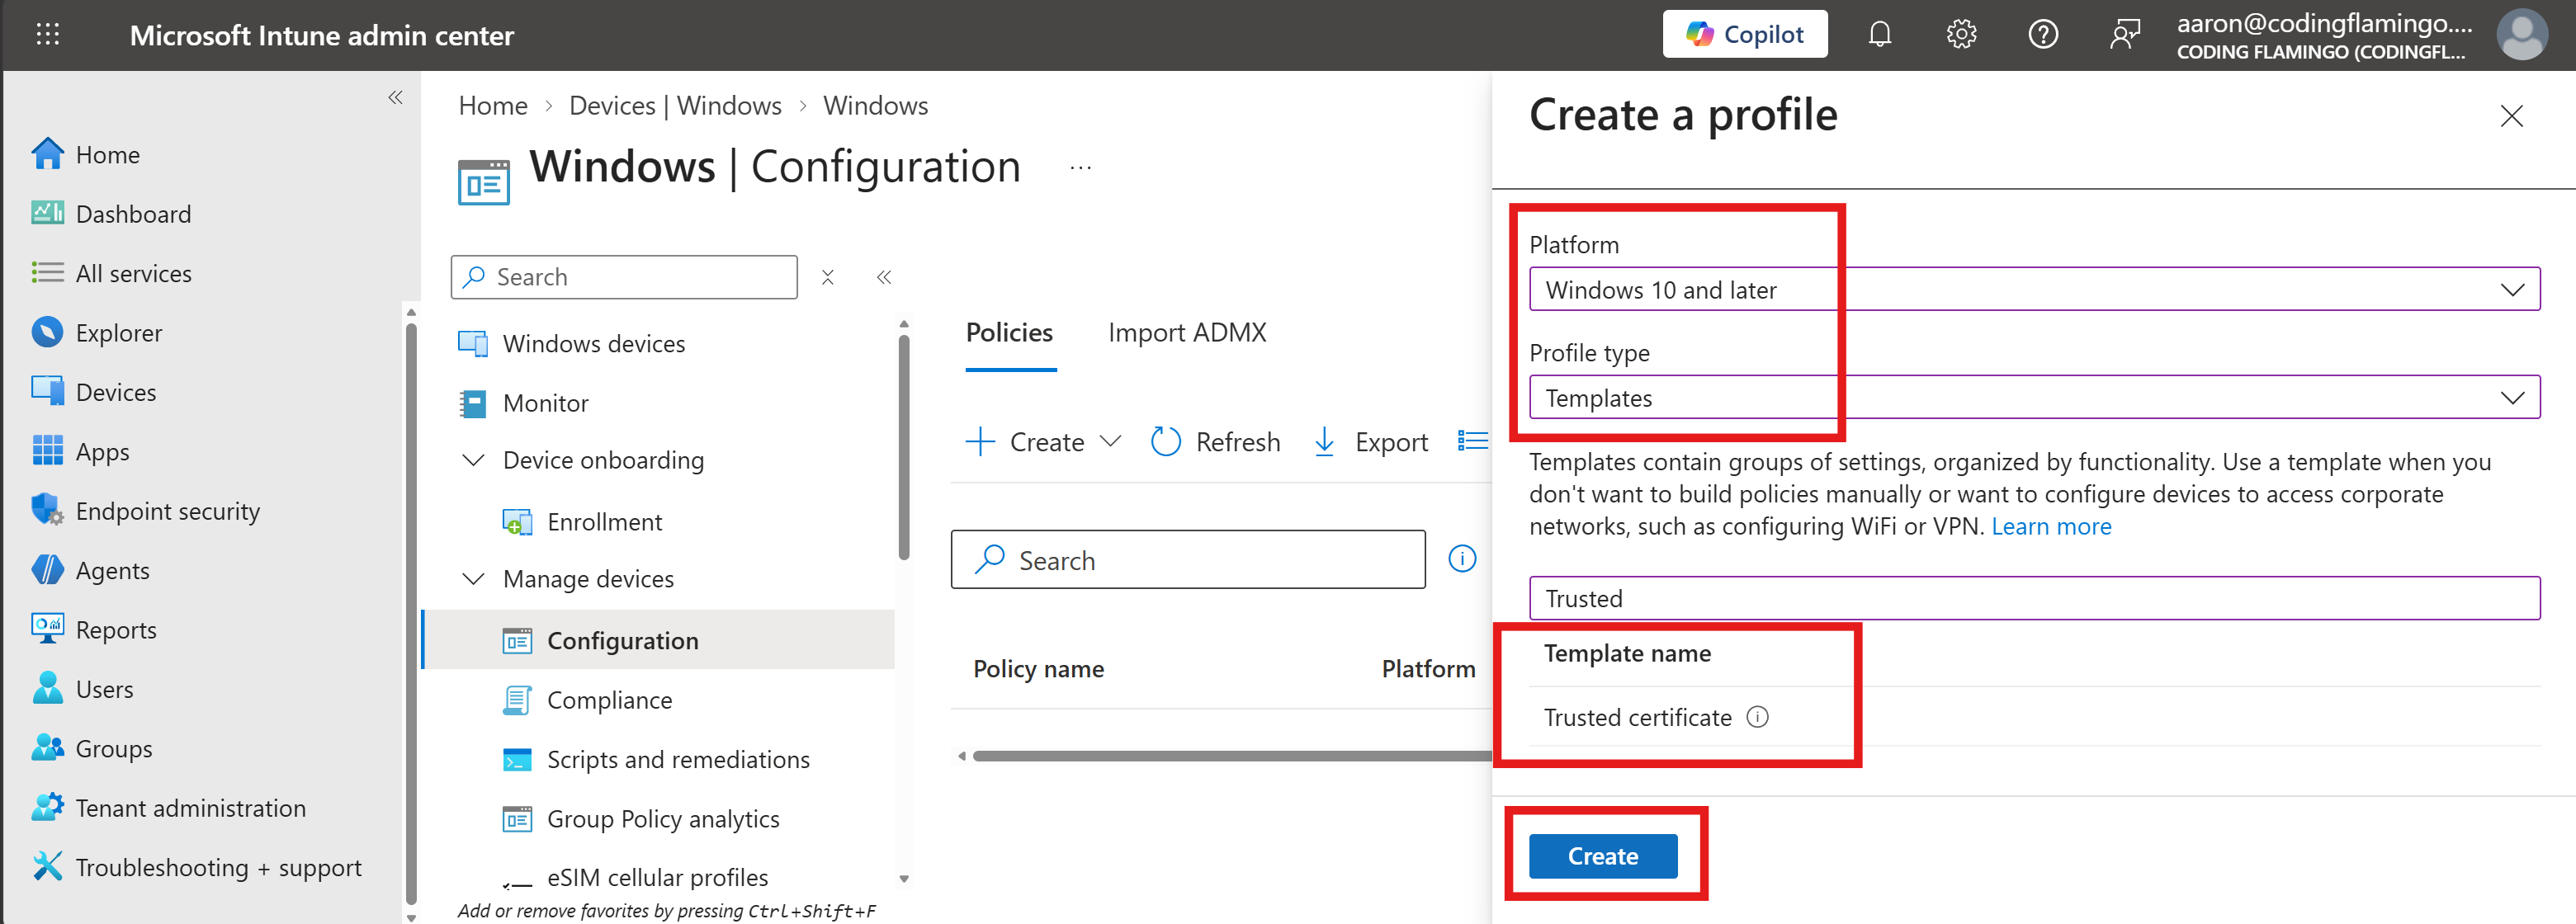
Under Create a profile, select the following options and click Create:
-
Platform: Windows 10 and later
-
Profile type: Templates
-
Template name: Trusted certificate
-
-
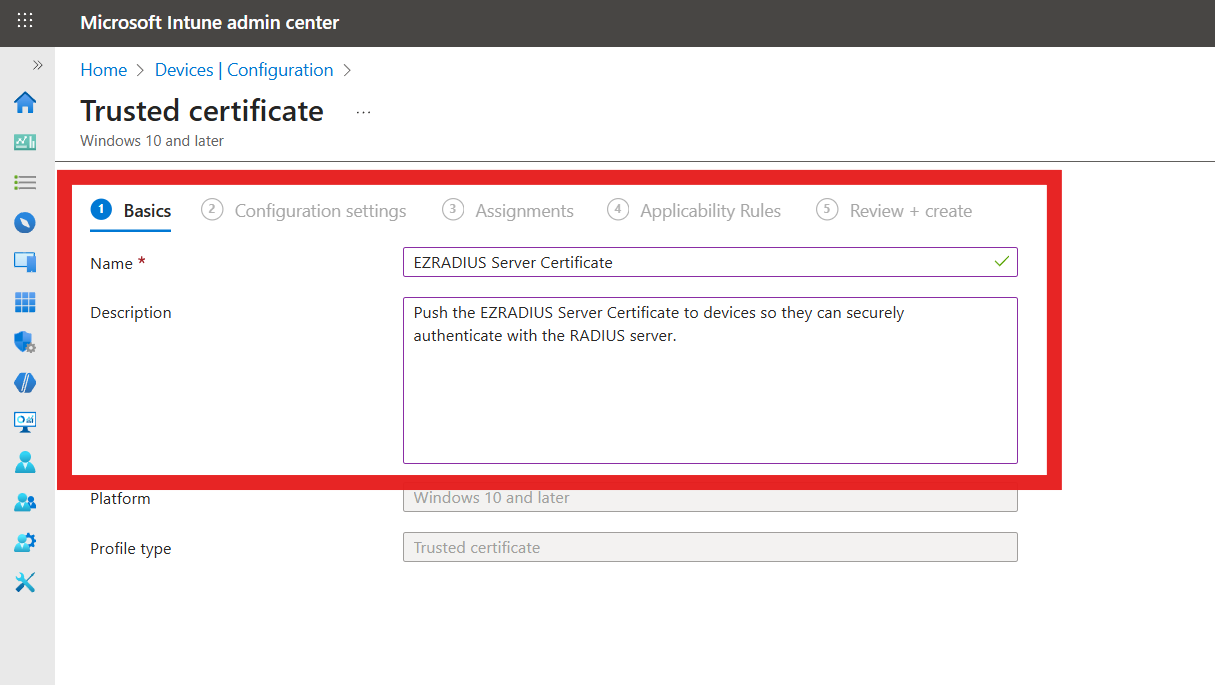
Within the Basics tab, fill out the fields:
-
Name: Friendly name for your organization
-
Description: Description for your organization
-
-
Click on Next.
-
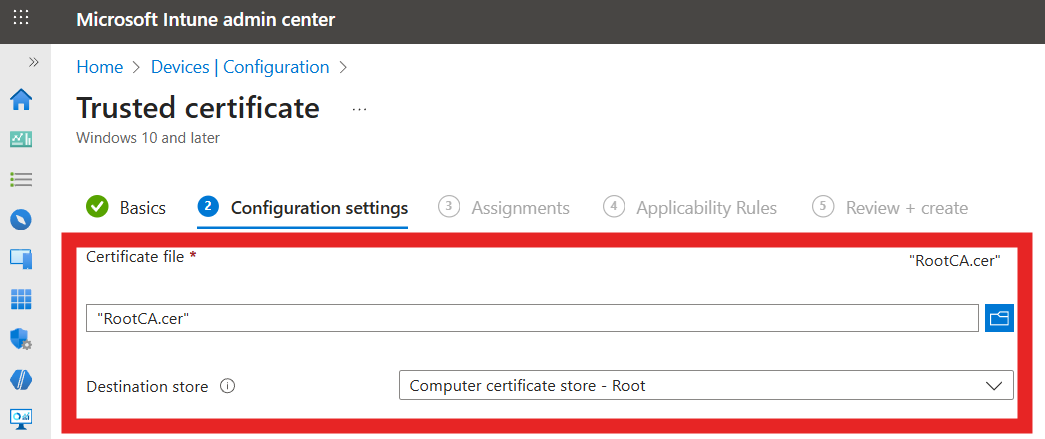
Within the Configuration settings tab, configure the following options:
-
Certificate file: Select the CA certificate you downloaded earlier from Keytos Shield (
rootCA.cer). -
Destination store: Select the appropriate store based on the type of CA certificate:
- Computer certificate store - Root (if a root CA certificate)
- Computer certificate store - Intermediate (if an intermediate CA certificate).
-
-
Click on Next.
-
Within the Assignments tab, select the users, groups or devices you want to deploy this profile to.
-
Click on Next.
-
Within the Applicability Rules tab, add any rules if needed, then click on Next.
-
Click on Create to finish creating the profile.
-
Repeat the above steps to distribute all necessary CA certificates (both root and intermediate) to your Windows devices.
How to Verify the Keytos Shield CA Certificates Have Been Pushed by Intune
To verify that the Shield CA certificates have been successfully pushed to your Windows devices via Intune, follow these steps:
- On a Windows device, open the Run dialog by pressing
Win + R. - Type
certlm.mscand press Enter to open the Local Computer Certificate Manager. - Navigate to Trusted Root Certification Authorities > Certificates and check for the presence of the Shield Root CA certificate.
- Navigate to Intermediate Certification Authorities > Certificates and check for the presence of the Shield Issuing CA certificate.
If both certificates are present in their respective stores, the deployment via Intune was successful.
Not seeing the Shield CA certificates in the respective stores? Ensure that the Intune profile has been correctly assigned to the device and that the device has synced with Intune. You can manually trigger a sync by going to Settings > Accounts > Access work or school, selecting your work or school account, and clicking Sync.
Step 2 - How to Issue a SCEP Certificate to a Windows Device via Intune
If you are using username + password authentication or another PKI platform such as Microsoft Cloud PKI, you can skip this step and move on to Step 3.
A SCEP (Simple Certificate Enrollment Protocol) certificate allows your Windows device to authenticate with its own unique certificate, which can be used for secure network access and other authentication purposes. Follow these steps to issue a SCEP certificate to your Windows device via Intune.
How to Get Your Keytos Shield SCEP Server URL
To issue SCEP certificates to your Windows devices via Intune, you will need the SCEP Server URL from your Keytos Shield portal.
-
Open the Keytos Shield portal.
-
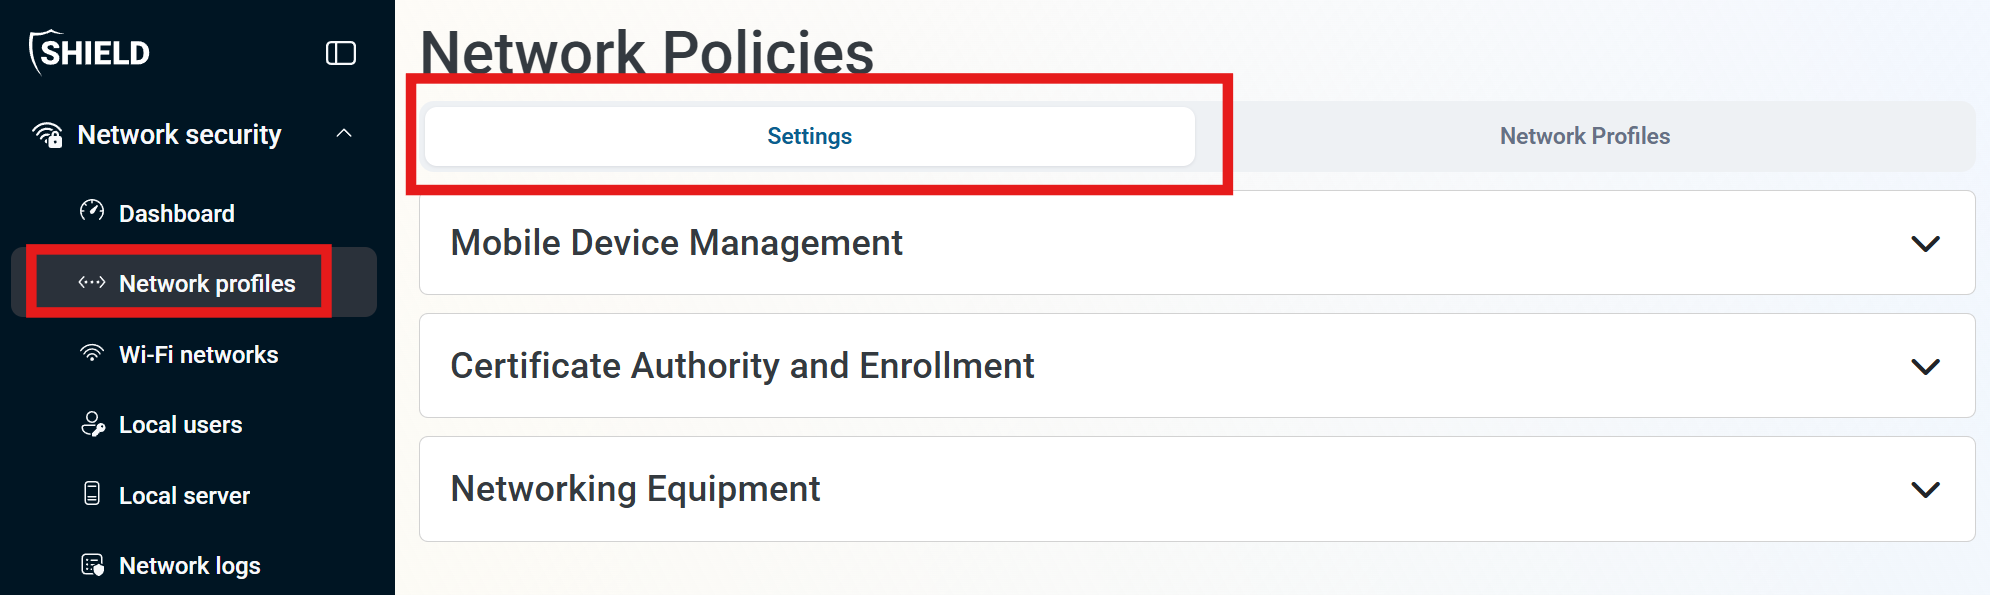
From the left-hand menu, navigate to Network profiles.
-
In the top tab bar, select Settings.
-
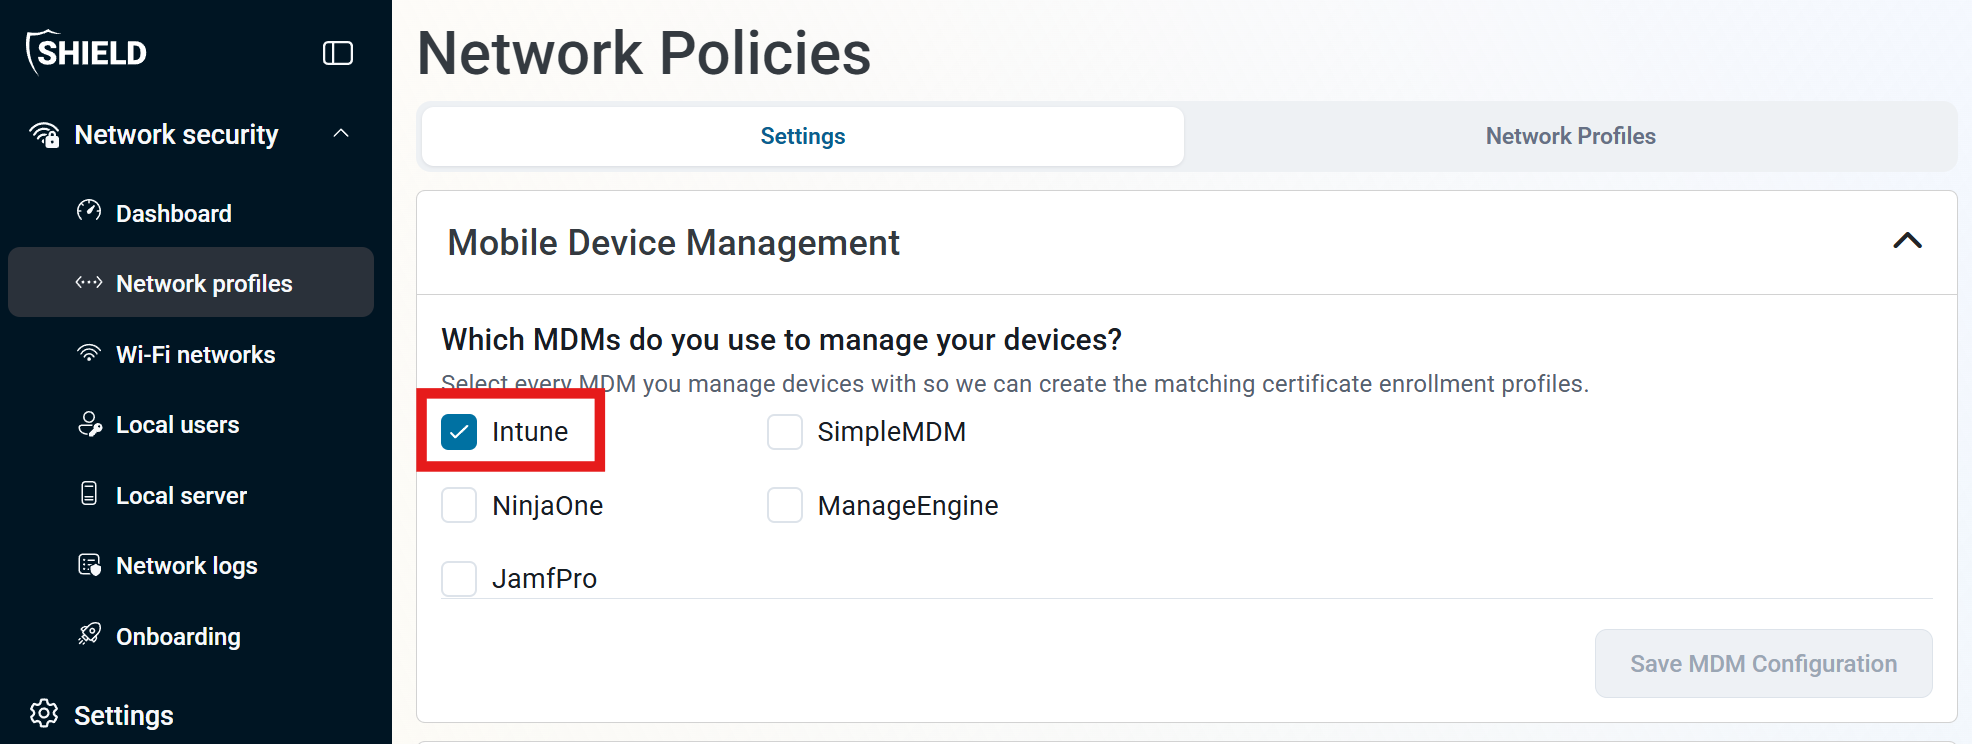
Under Mobile Device Management, make sure Intune is enabled.
-
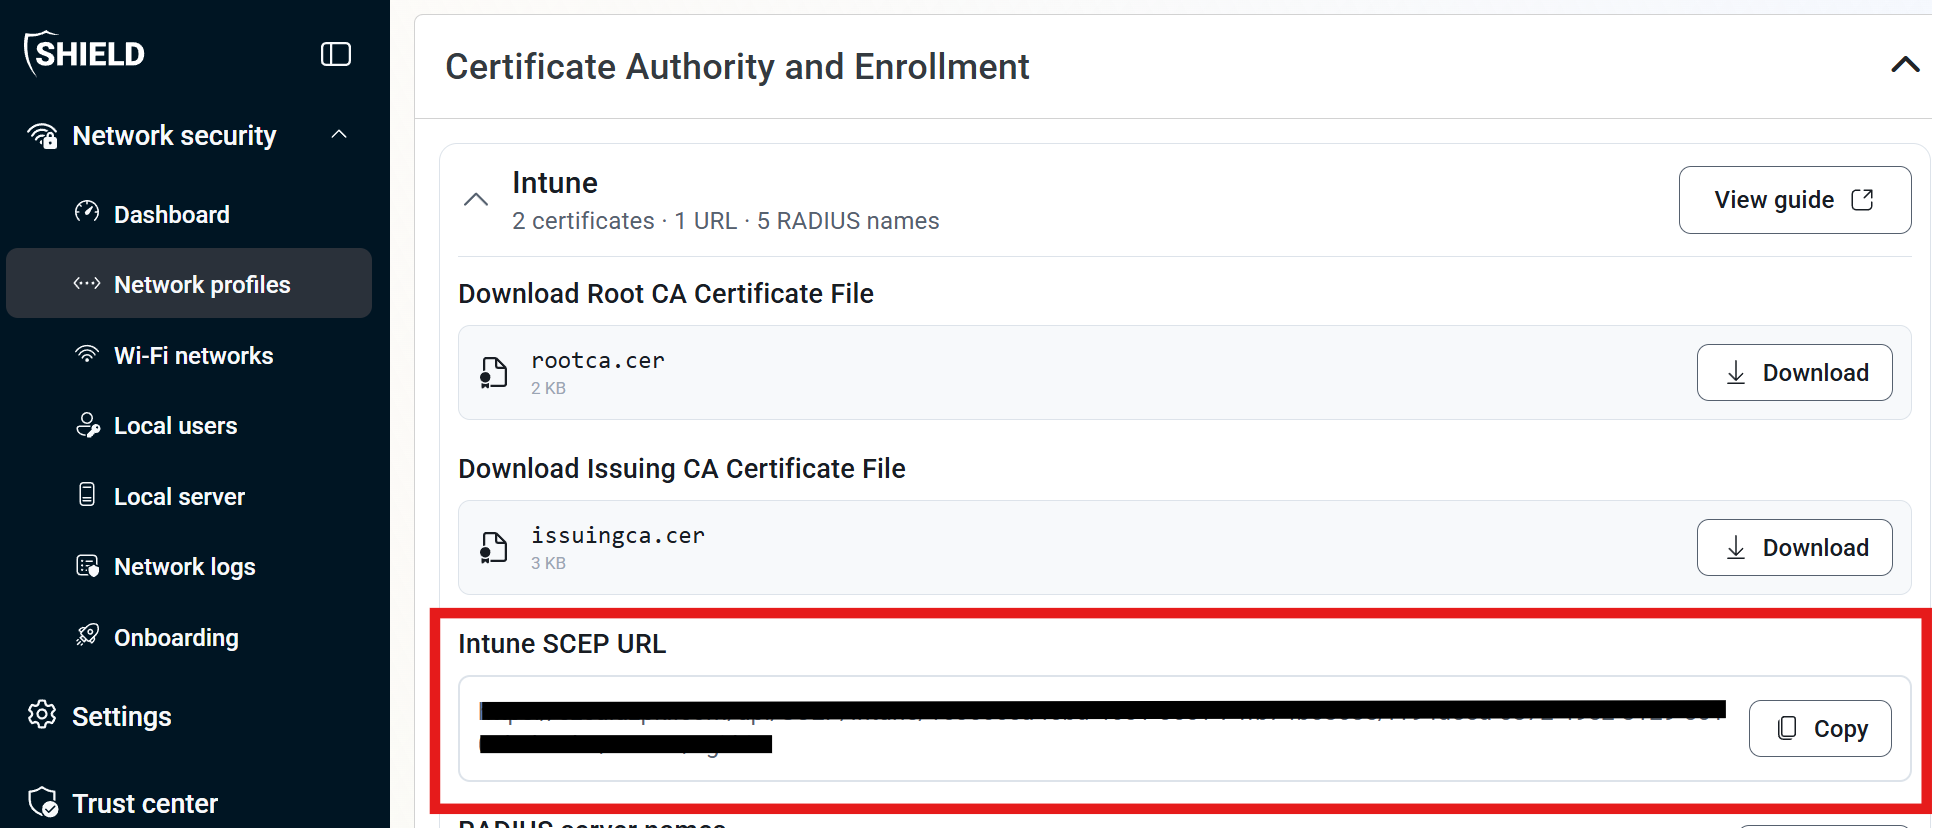
Under Certificate Authority and Enrollment, copy the Intune SCEP URL for your issuing CA. You’ll need this in a little bit.
How to Create a SCEP Profile for Windows Devices in Intune
The next step is to create your SCEP profile for Windows devices in Intune.
When selecting device or user certificates, make sure you match the authentication type you set during the onboarding process. If you’re unsure, check your Network profiles page under Access Policies.
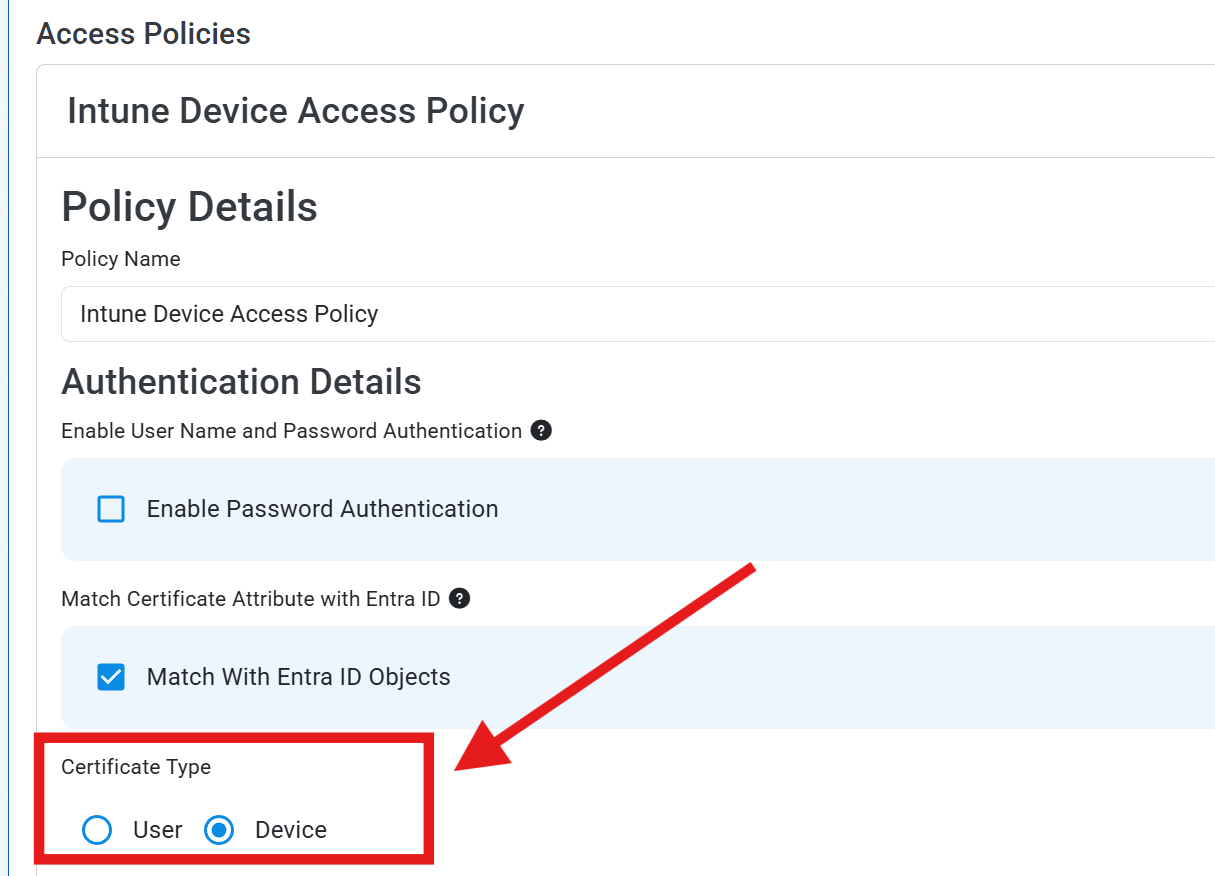
How to Create an Intune SCEP Profile For Device Certificates
The following steps will guide you on how to create an Intune SCEP profile to issue device certificates to your Windows devices.
-
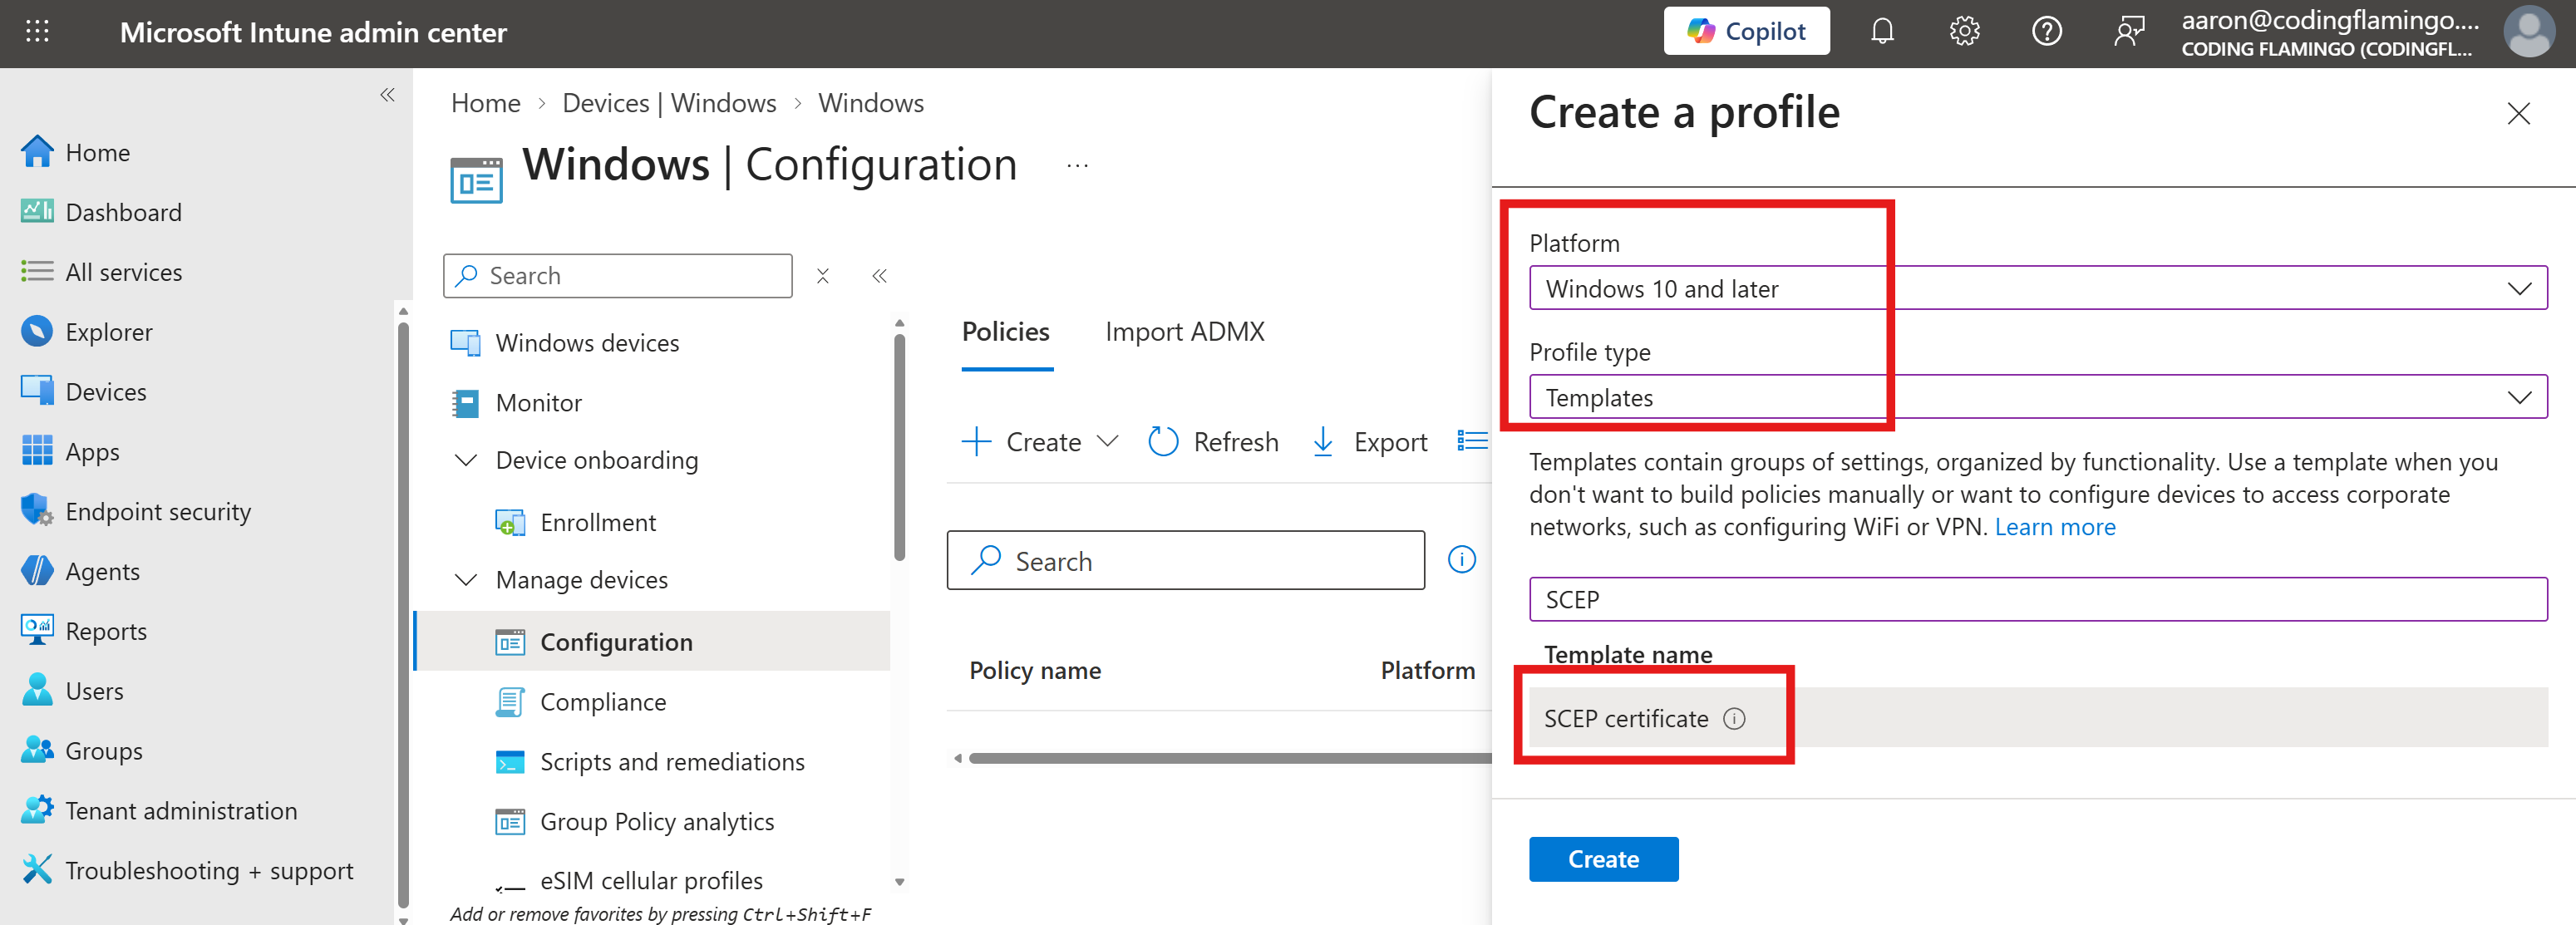
In the Intune Portal, click on + Create profile again to start creating a new configuration profile. Enter the following fields:
-
Platform: select Windows 10 and later.
-
Profile type: select Templates.
-
Template name: select SCEP Certificate.
-
-
Click Create.
-
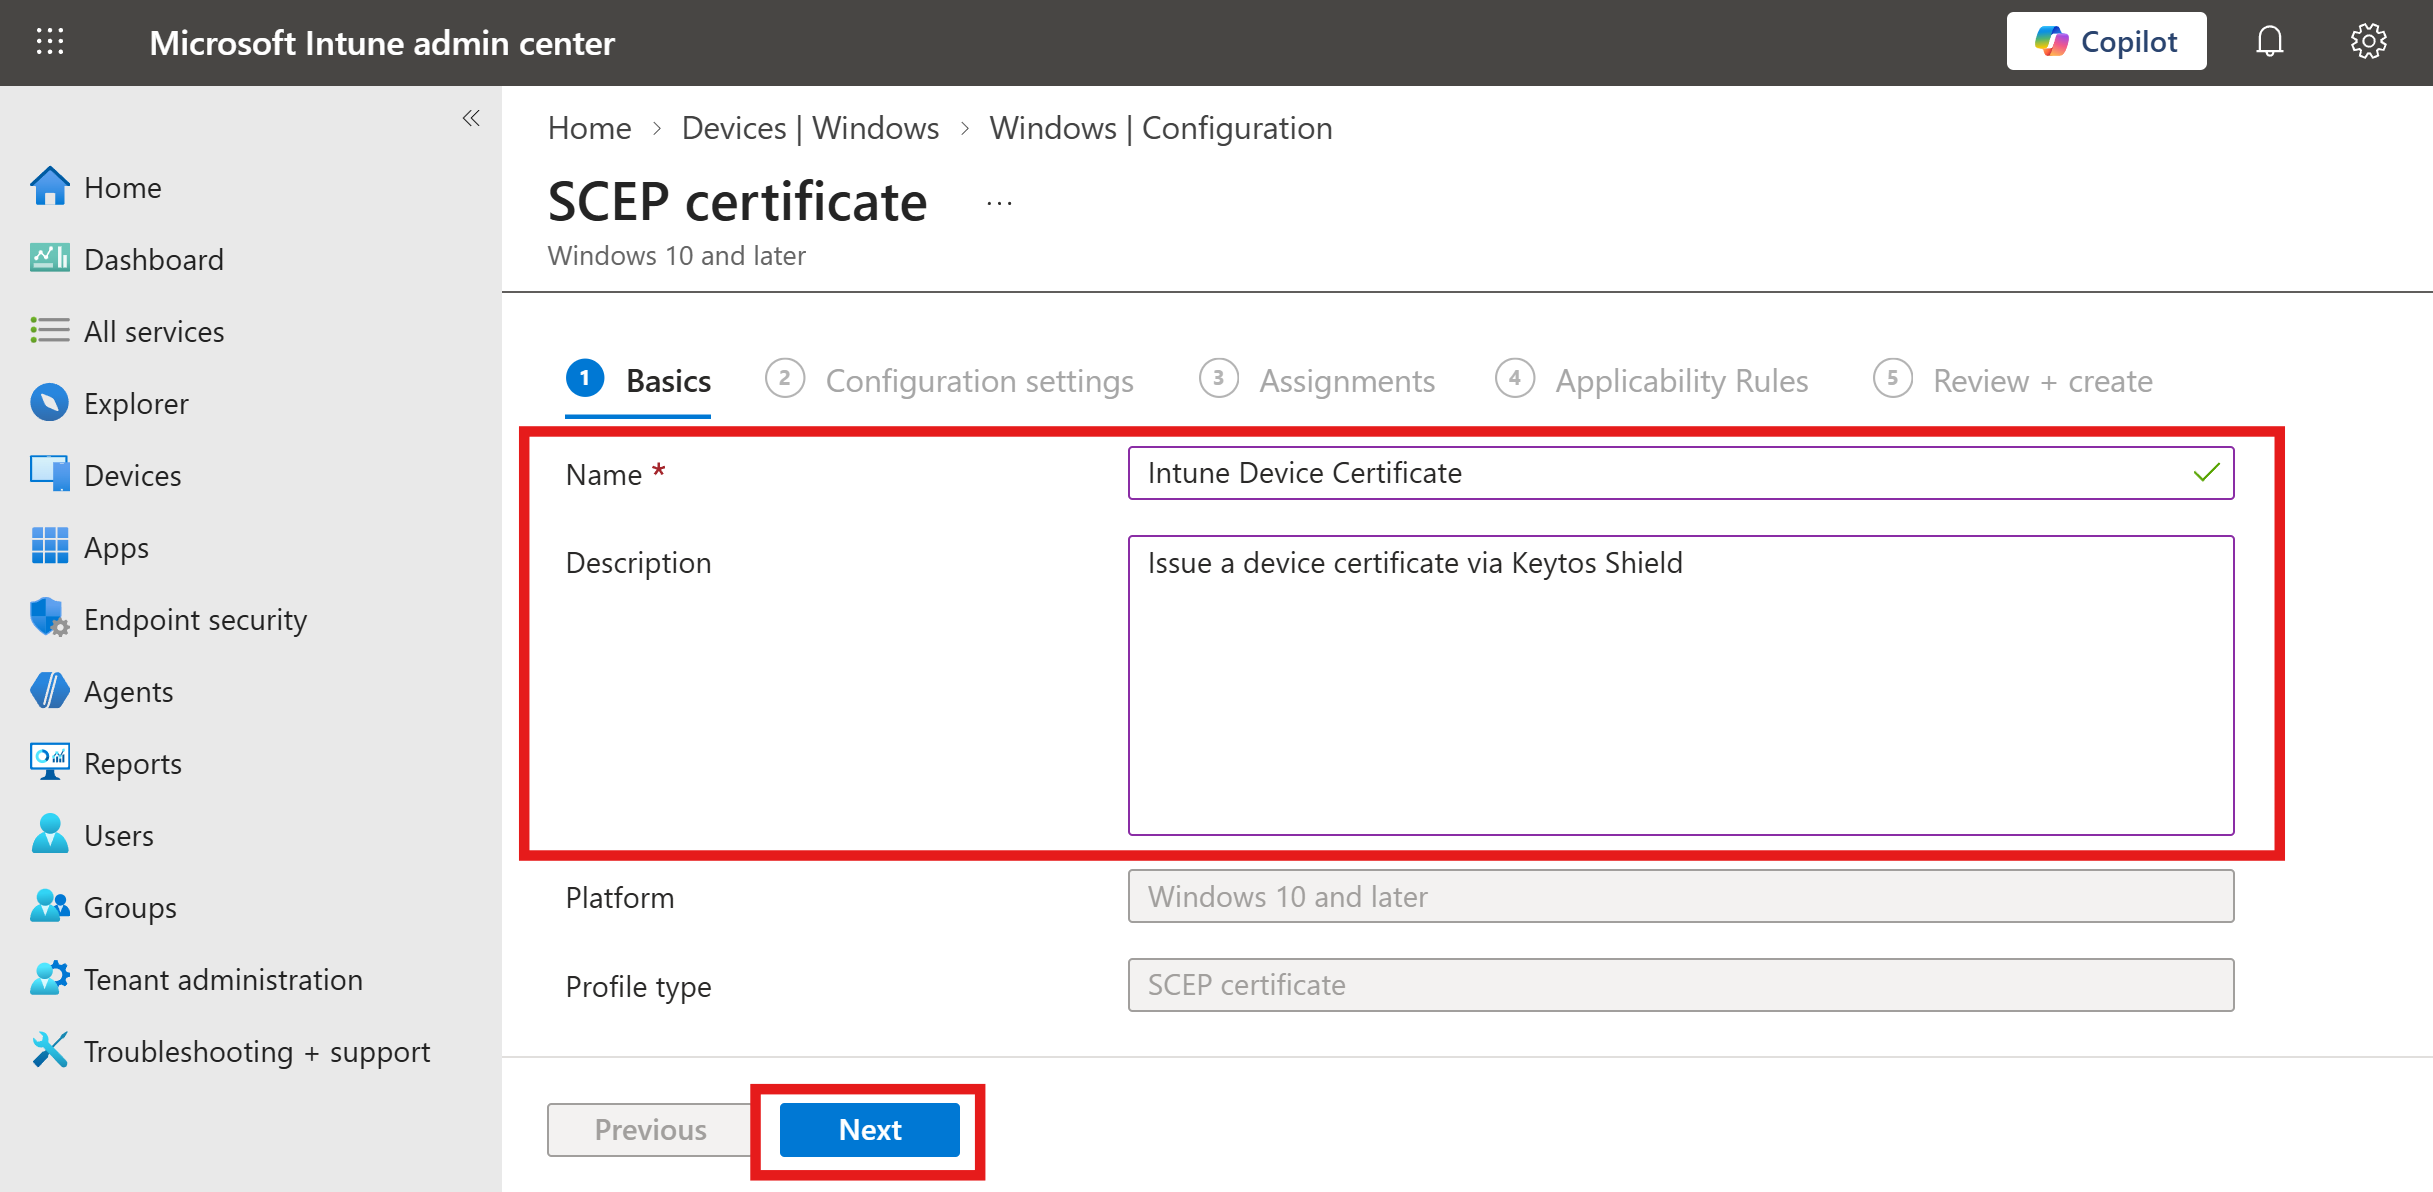
Under the Basics tab, enter the Name and Description for this Intune SCEP profile and click Next to proceed.
-
Under the Configuration settings tab, configure your basic certificate settings:
-
Certificate type: select Device.
-
Subject name format: Leave this as the default of
CN={{AAD_Device_ID}}. -
Subject alternative name > Attribute: select DNS (not URI). Your Shield Intune device access policy reads the device ID from the Subject Alternate Name (DNS) field.
-
Subject alternative name > Value: enter
{{DeviceId}}.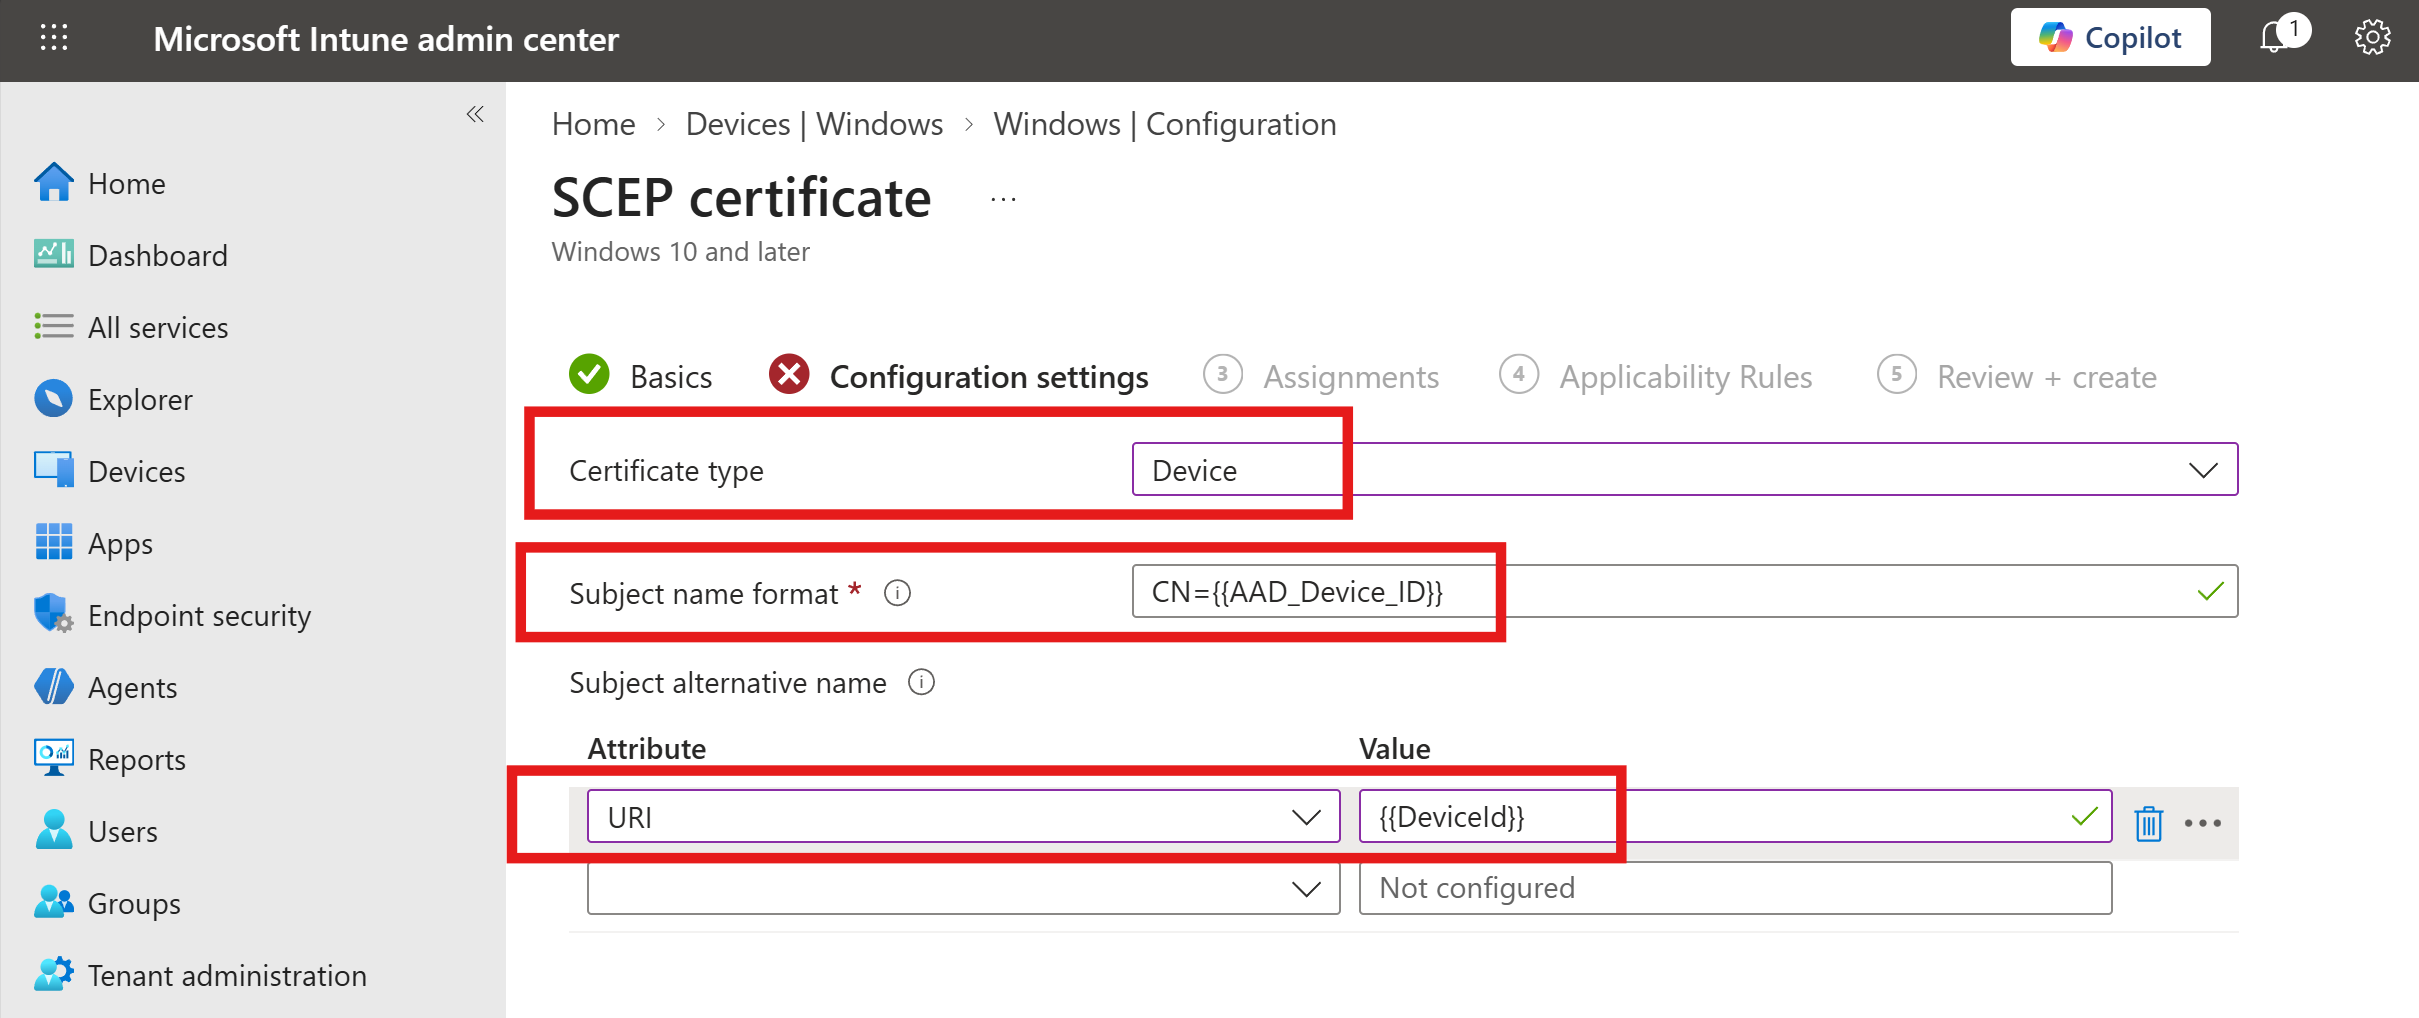
Changing Subject Alternative Name ValuesThe values you set here must match the values set in your Shield network profile access policy. If you want to change your SAN values, make sure to update the corresponding settings in your network profile as well.
-
-
If you have Microsoft Entra hybrid-joined devices and plan to use your SCEP certificates for Key Distribution Center (KDC) authentication, add another Subject alternative name URI attribute with the value
{{OnpremisesSecurityIdentifier}}. This fulfills the strong mapping requirements for KB5014754.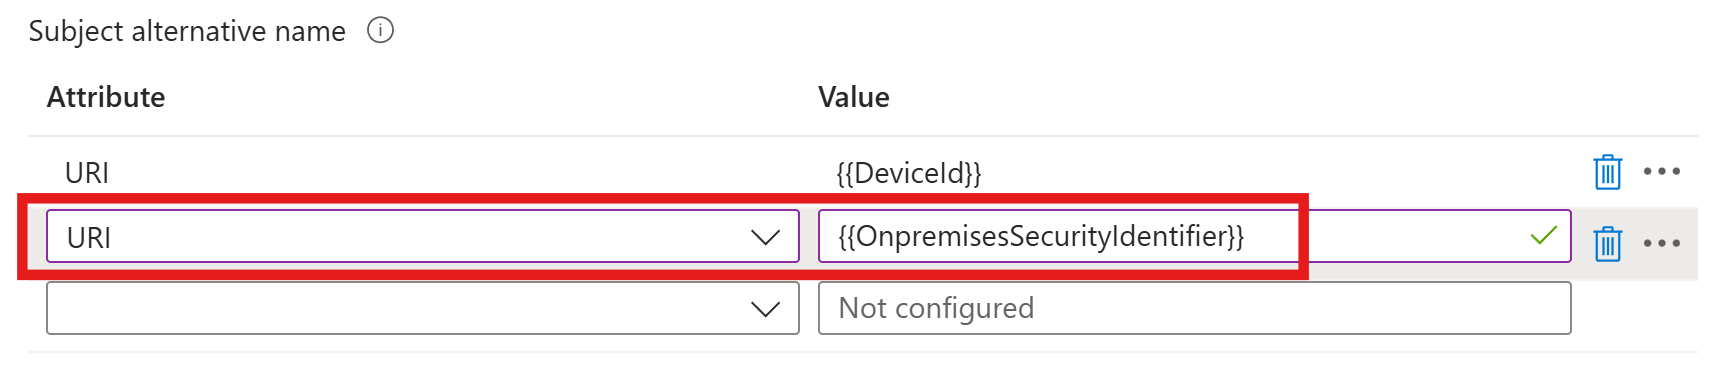
-
For Certificate Validity Period, keep the default value of 1 year.
Custom Validity PeriodsShield will always issue certificates for the default 1-year validity period. If you set a different value in Intune it will be ignored due to this value not being supported in Apple devices.
As a workaround, if you want to change the validity period for a specific Intune profile, you can add an additional DNS Subject Alternative Name with the value
keytosEZCAValidity=90where the number is the number of days for that specific certificate, up to 365 days.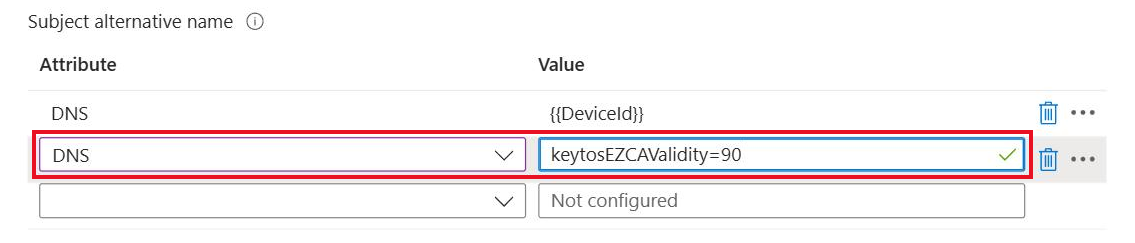
-
For Key Storage Provider (KSP), set this to Enroll to Trusted Platform Module (TPM) KSP, otherwise fail to ensure your private keys are securely stored in the TPM. If you need to support PCs without a TPM and are ok with the risk of software based keys, you can select another option, such as fallback to software KSP.

-
For Key Usage, select both Digital Signature and Key Encipherment.

-
For Key Size, select 2048.

-
For Hash Algorithm, select SHA-2.

-
In the Root Certificate field, click + Root Certificate and select the Keytos Shield Issuing CA trusted certificate profile you created in Step 1 - Push Shield CA Certificates.
 Make sure to select your Issuing CA
While it says Root Certificate, if you created a Subordinate/Issuing CA as part of a multi-tier CA hierarchy, you must select the Issuing CA profile not the Root CA.
-
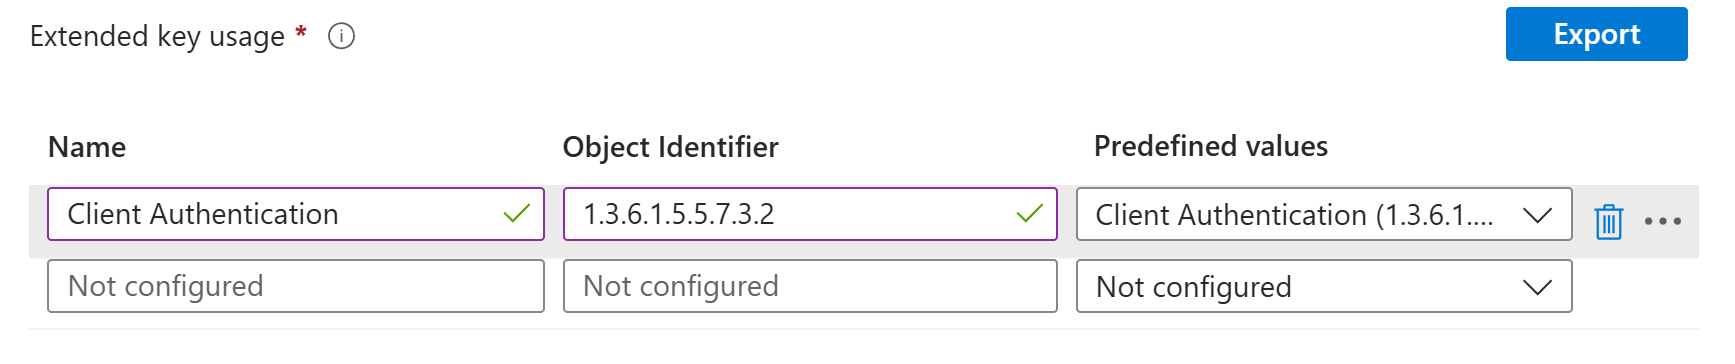
For Extended Key Usage select Client Authentication (1.3.6.1.5.5.7.3.2).
-
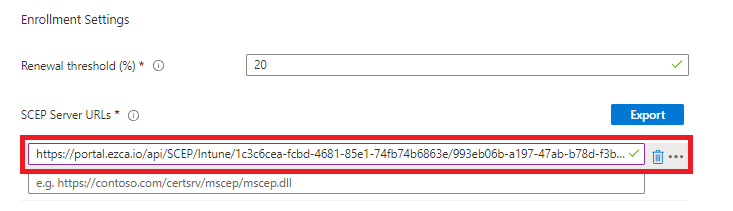
Leave Renewal threshold at the default value of 20% so your certificates automatically renew when they reach 20% of their validity period remaining.

-
Paste your Intune SCEP Server URL that you copied from the Keytos Shield portal into the SCEP Server URLs field.
-
Click Next.
-
Under the Assignments and Applicability Rules sections, configure the target devices or users for this profile and click Next.
-
Review your profile settings and click Create.
-
Done! Your managed Windows devices will now start receiving device certificates issued from your Keytos Shield SCEP CA based on the assignment and applicability rules you set.
How to Create an Intune SCEP Profile For User Certificates
The following steps will guide you on how to create an Intune SCEP profile to issue user certificates to your Windows devices.
-
In the Intune Portal, click on + Create profile again to start creating a new configuration profile. Enter the following fields:
-
Platform: select Windows 10 and later.
-
Profile type: select Templates.
-
Template name: select SCEP Certificate.
-
-
Click Create.
-
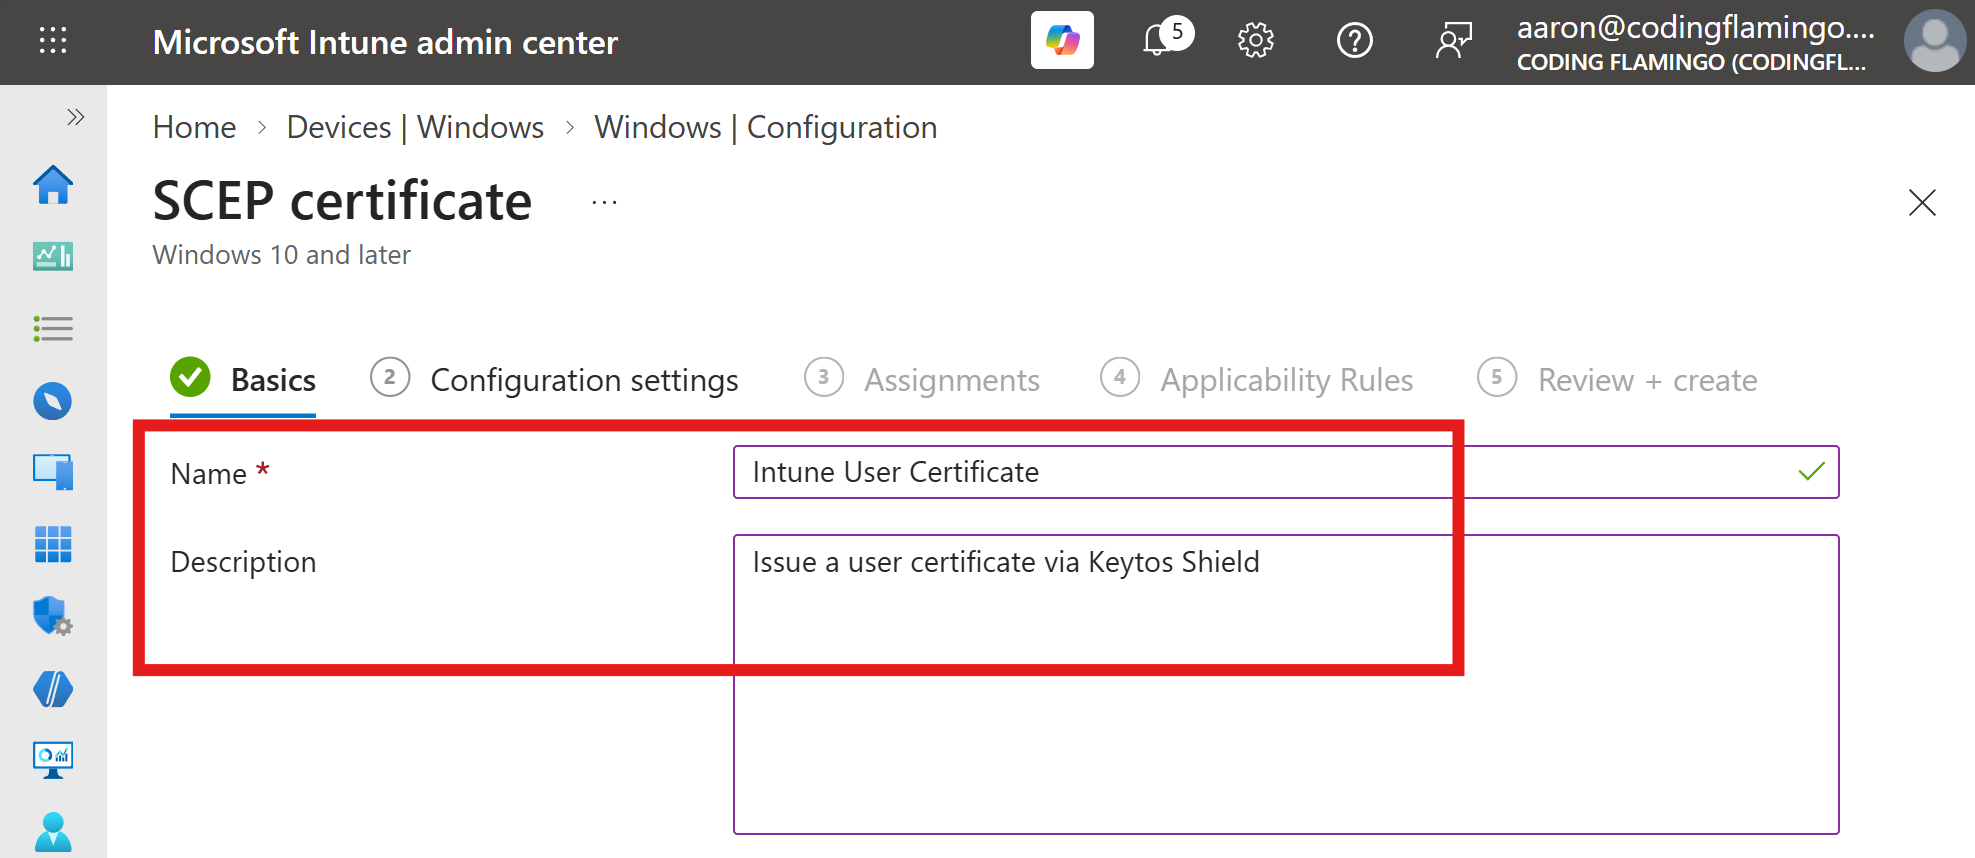
Under the Basics tab, enter the Name and Description for this Intune SCEP profile and click Next to proceed.
-
Under the Configuration settings tab, configure your basic certificate settings:
-
Certificate type: select User.
-
Subject name format: Leave this as the default of
CN={{UserName}},E={{EmailAddress}}. -
Subject alternative name > Attribute: select UPN.
-
Subject alternative name > Value: enter
{{UserPrincipalName}}.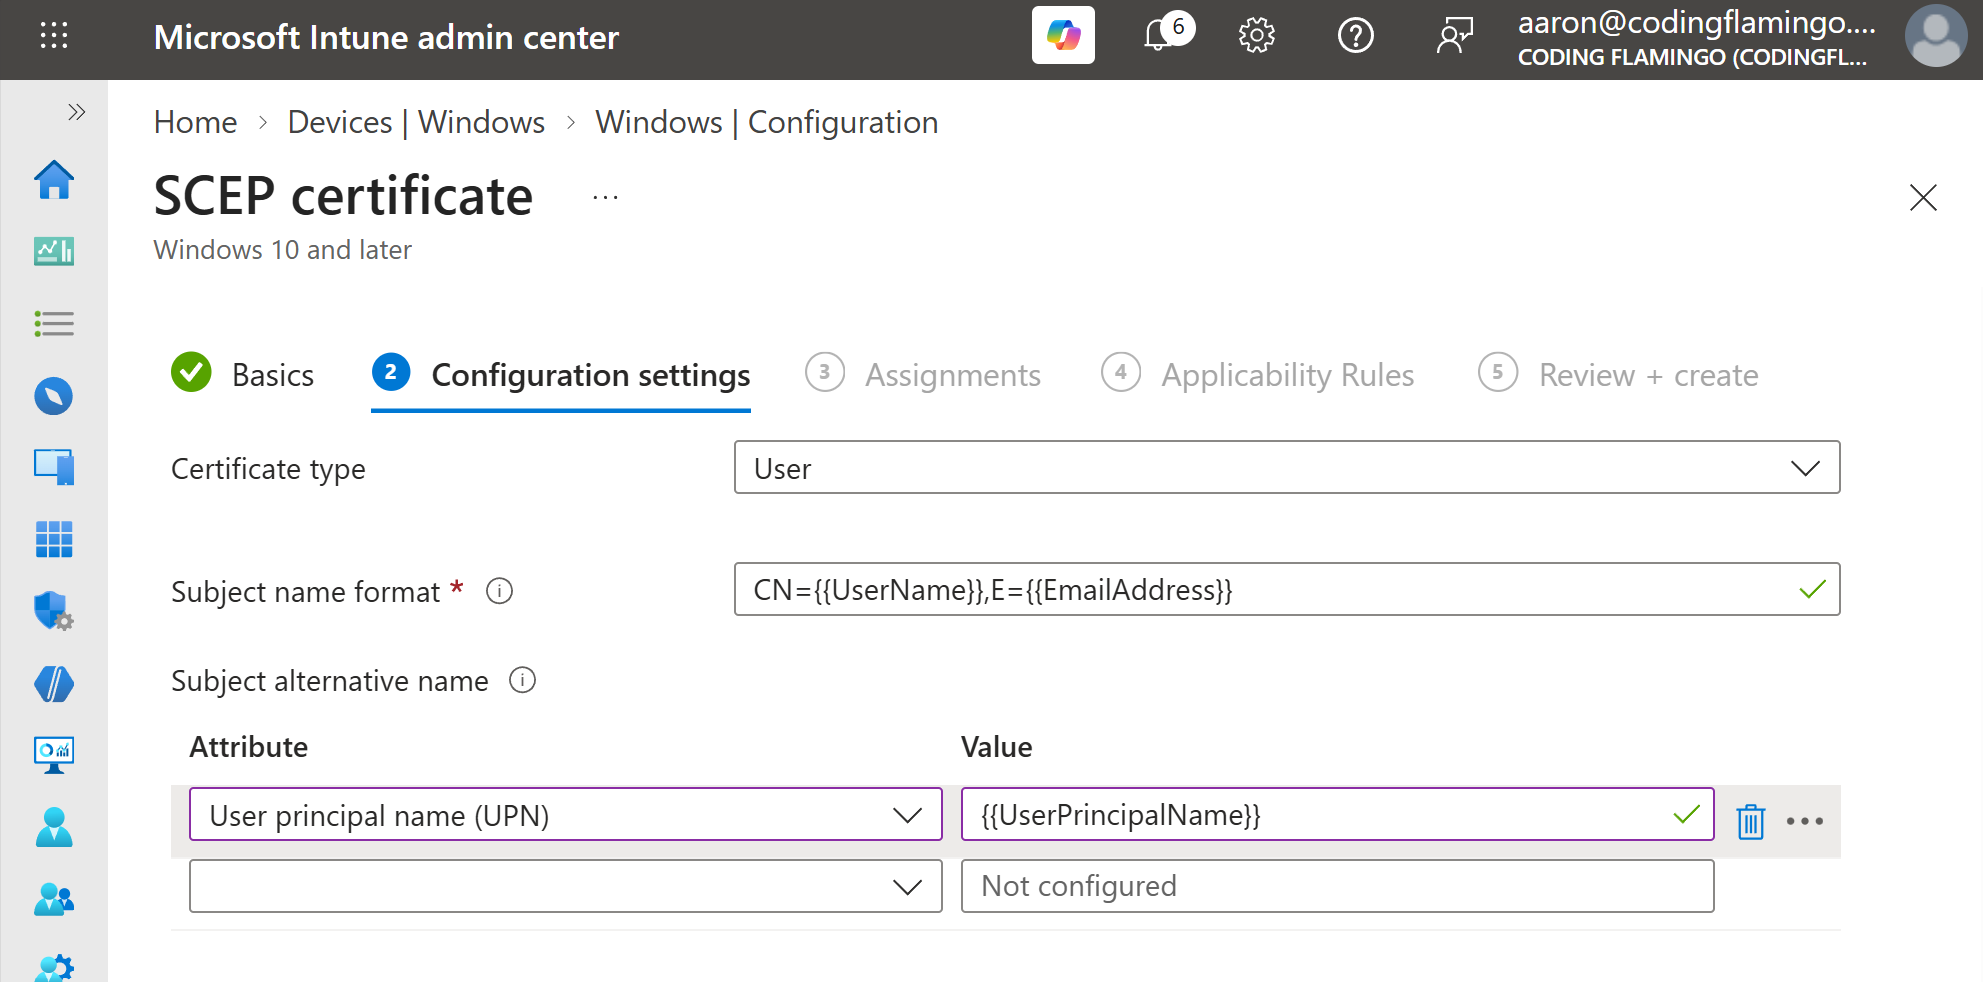
Changing Subject Alternative Name ValuesThe values you set here must match the values set in your Shield network profile access policy. If you want to change your SAN values, make sure to update the corresponding settings in your network profile as well.
-
-
If you have Active Directory synced users and plan to use your SCEP certificates for Key Distribution Center (KDC) authentication, add another Subject alternative name URI attribute with the value
{{OnpremisesSecurityIdentifier}}. This fulfills the strong mapping requirements for KB5014754.
-
For Certificate Validity Period, keep the default value of 1 year.
Custom Validity PeriodsShield will always issue certificates for the default 1-year validity period. If you set a different value in Intune it will be ignored due to this value not being supported in Apple devices.
As a workaround, if you want to change the validity period for a specific Intune profile, you can add an additional DNS Subject Alternative Name with the value
keytosEZCAValidity=90where the number is the number of days for that specific certificate, up to 365 days.
-
For Key Storage Provider (KSP), set this to Enroll to Trusted Platform Module (TPM) KSP, otherwise fail to ensure your private keys are securely stored in the TPM. If you need to support PCs without a TPM and are ok with the risk of software based keys, you can select another option, such as fallback to software KSP.
-
For Key Usage, select both Digital Signature and Key Encipherment.
-
For Key Size, select 2048.
-
For Hash Algorithm, select SHA-2.
-
In the Root Certificate field, click + Root Certificate and select the Keytos Shield Issuing CA trusted certificate profile you created in Step 1 - Push Shield CA Certificates.
Make sure to select your Issuing CAWhile it says Root Certificate, if you created a Subordinate/Issuing CA as part of a multi-tier CA hierarchy, you must select the Issuing CA profile not the Root CA.
-
For Extended Key Usage select Client Authentication (1.3.6.1.5.5.7.3.2).
-
Leave Renewal threshold at the default value of 20% so your certificates automatically renew when they reach 20% of their validity period remaining.
-
Paste your Intune SCEP Server URL that you copied from the Keytos Shield portal into the SCEP Server URLs field.
-
Click Next.
-
Under the Assignments and Applicability Rules sections, configure the target devices or users for this profile and click Next.
-
Review your profile settings and click Create.
-
Done! Your managed Windows devices will now start receiving user certificates issued from your Keytos Shield SCEP CA based on the assignment and applicability rules you set.
Step 3 - How to Create a Wi-Fi Profile in Intune for Certificate Authentication
Now that your device has the necessary CA certificates and SCEP certificate installed, you can proceed to create a Wi-Fi profile in Intune for certificate-based authentication.
How to Get Your RADIUS Server Names in Keytos Shield
To make sure your devices only trust the correct RADIUS servers, you will need to obtain the list of RADIUS server names from your Keytos Shield portal.
-
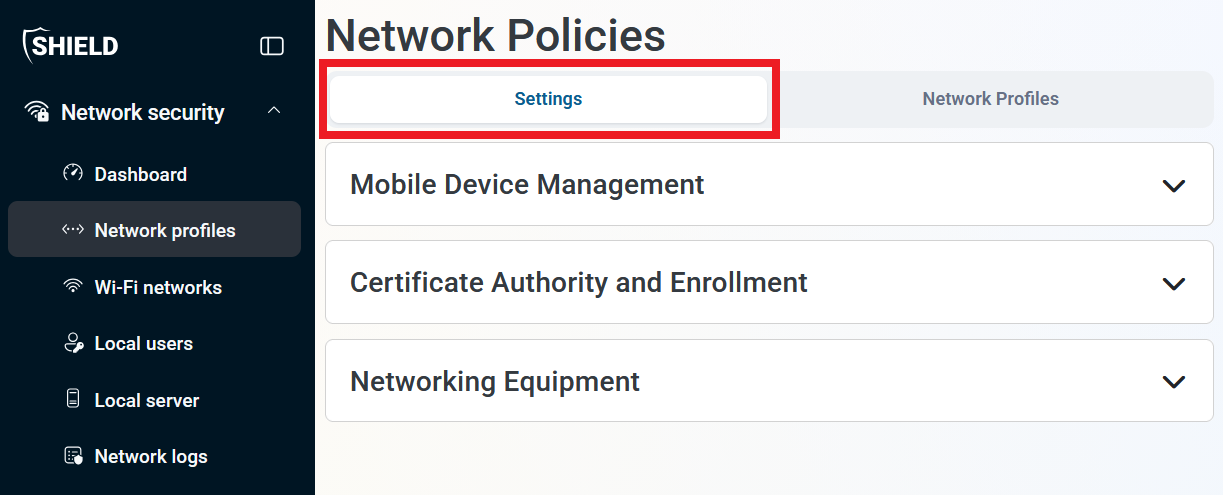
From within Network profiles > Settings in the Keytos Shield portal, expand Certificate Authority and Enrollment.
-
Expand your MDM’s section to view the available configuration options.
-
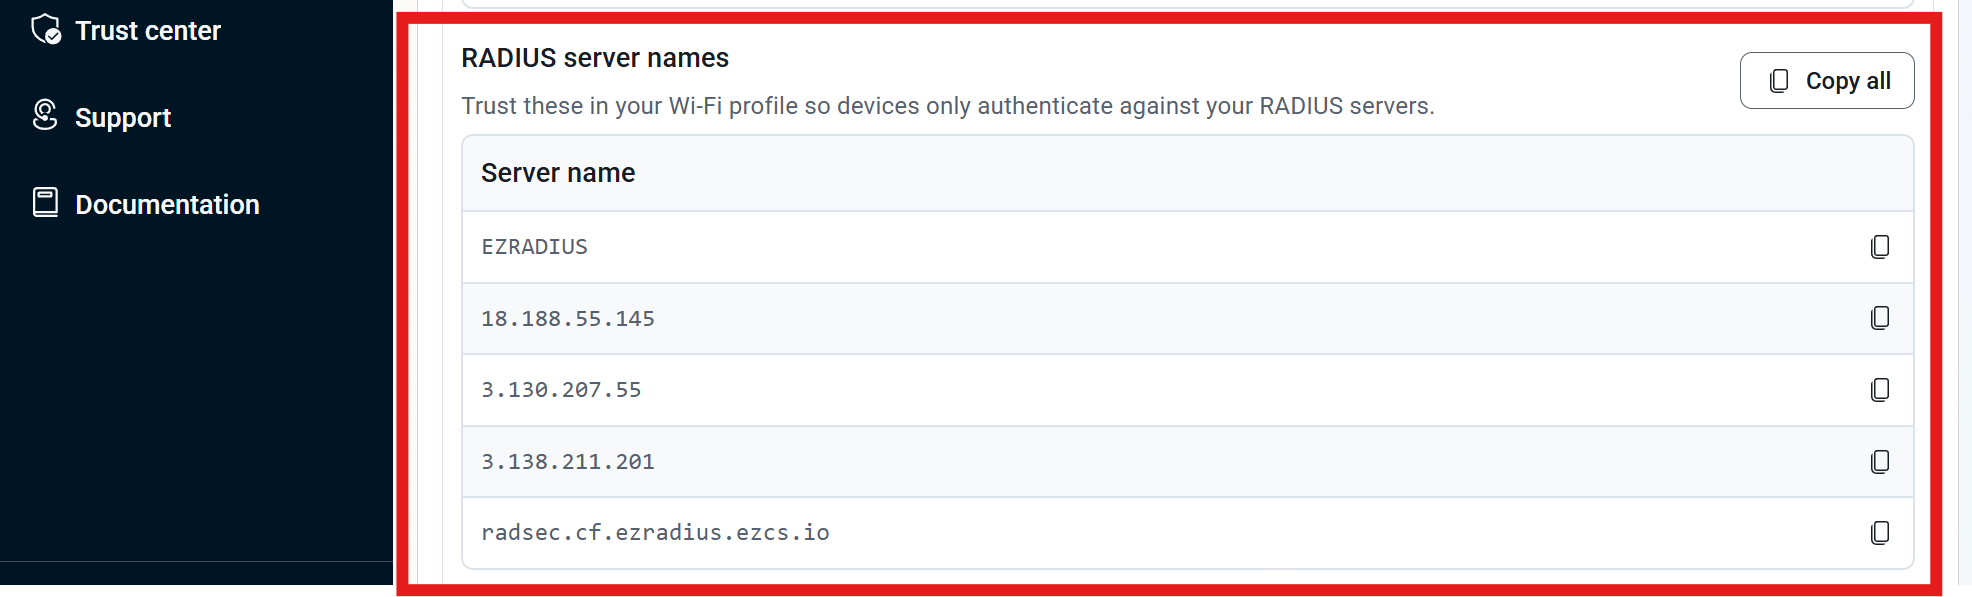
You will see a list of RADIUS server names for your network profile. You will need these in the next section.
How to Create a Windows Wi-Fi Profile in Intune
The final set of steps is to create a Windows Wi-Fi profile in Intune that tells your device how to connect to your secure network using the certificates issued in the previous steps.
-
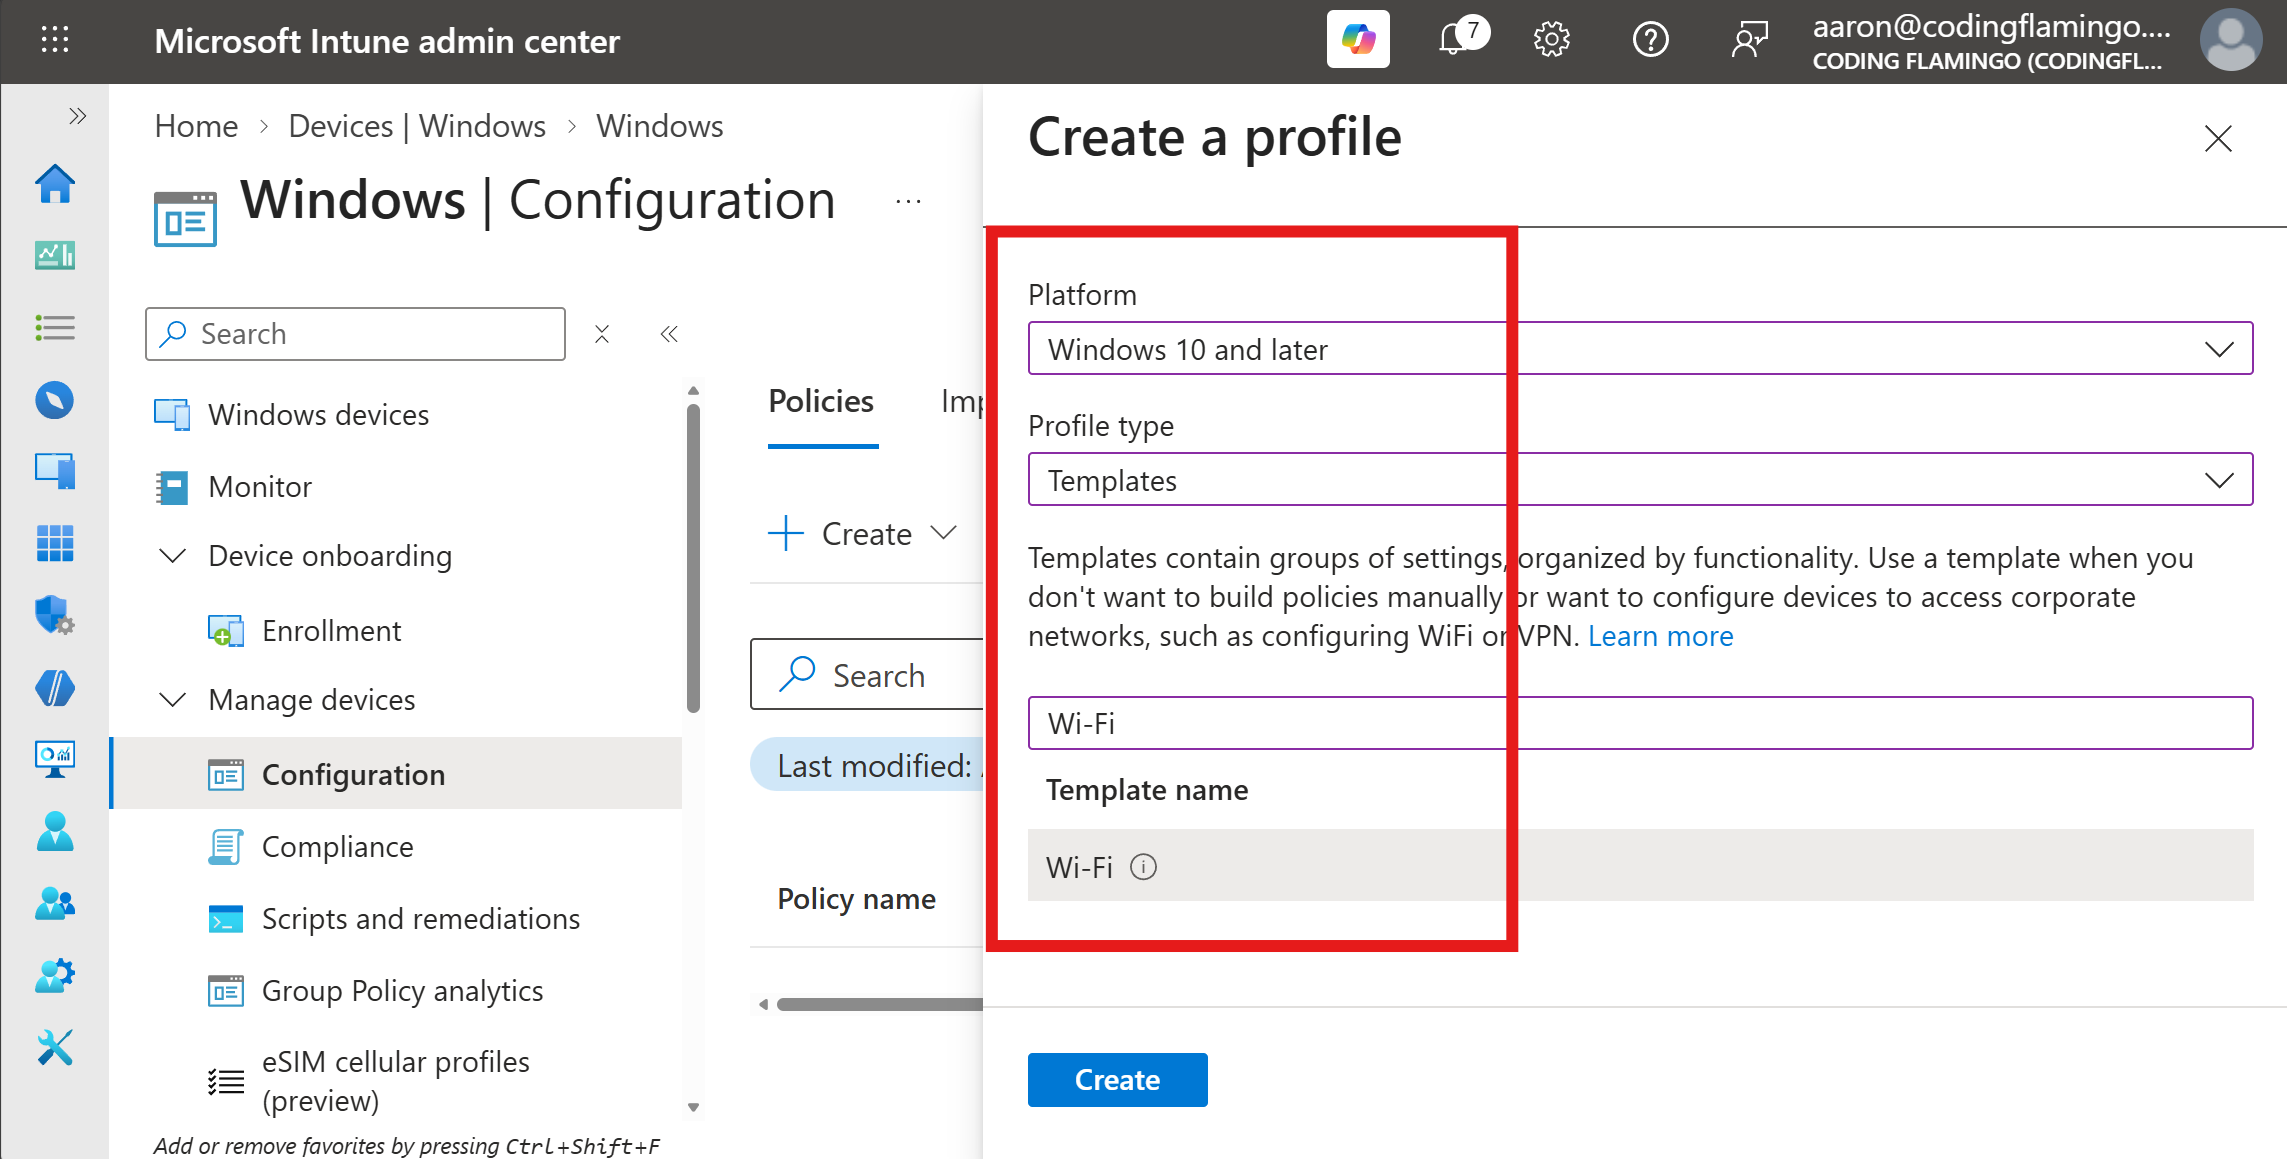
In the Intune Portal, click on + Create profile again to start creating a new configuration profile. Enter the following fields:
-
Platform: select Windows 10 and later.
-
Profile type: select Templates.
-
Template name: select Wi-Fi.
-
-
Click on Create at the bottom of the page.
-
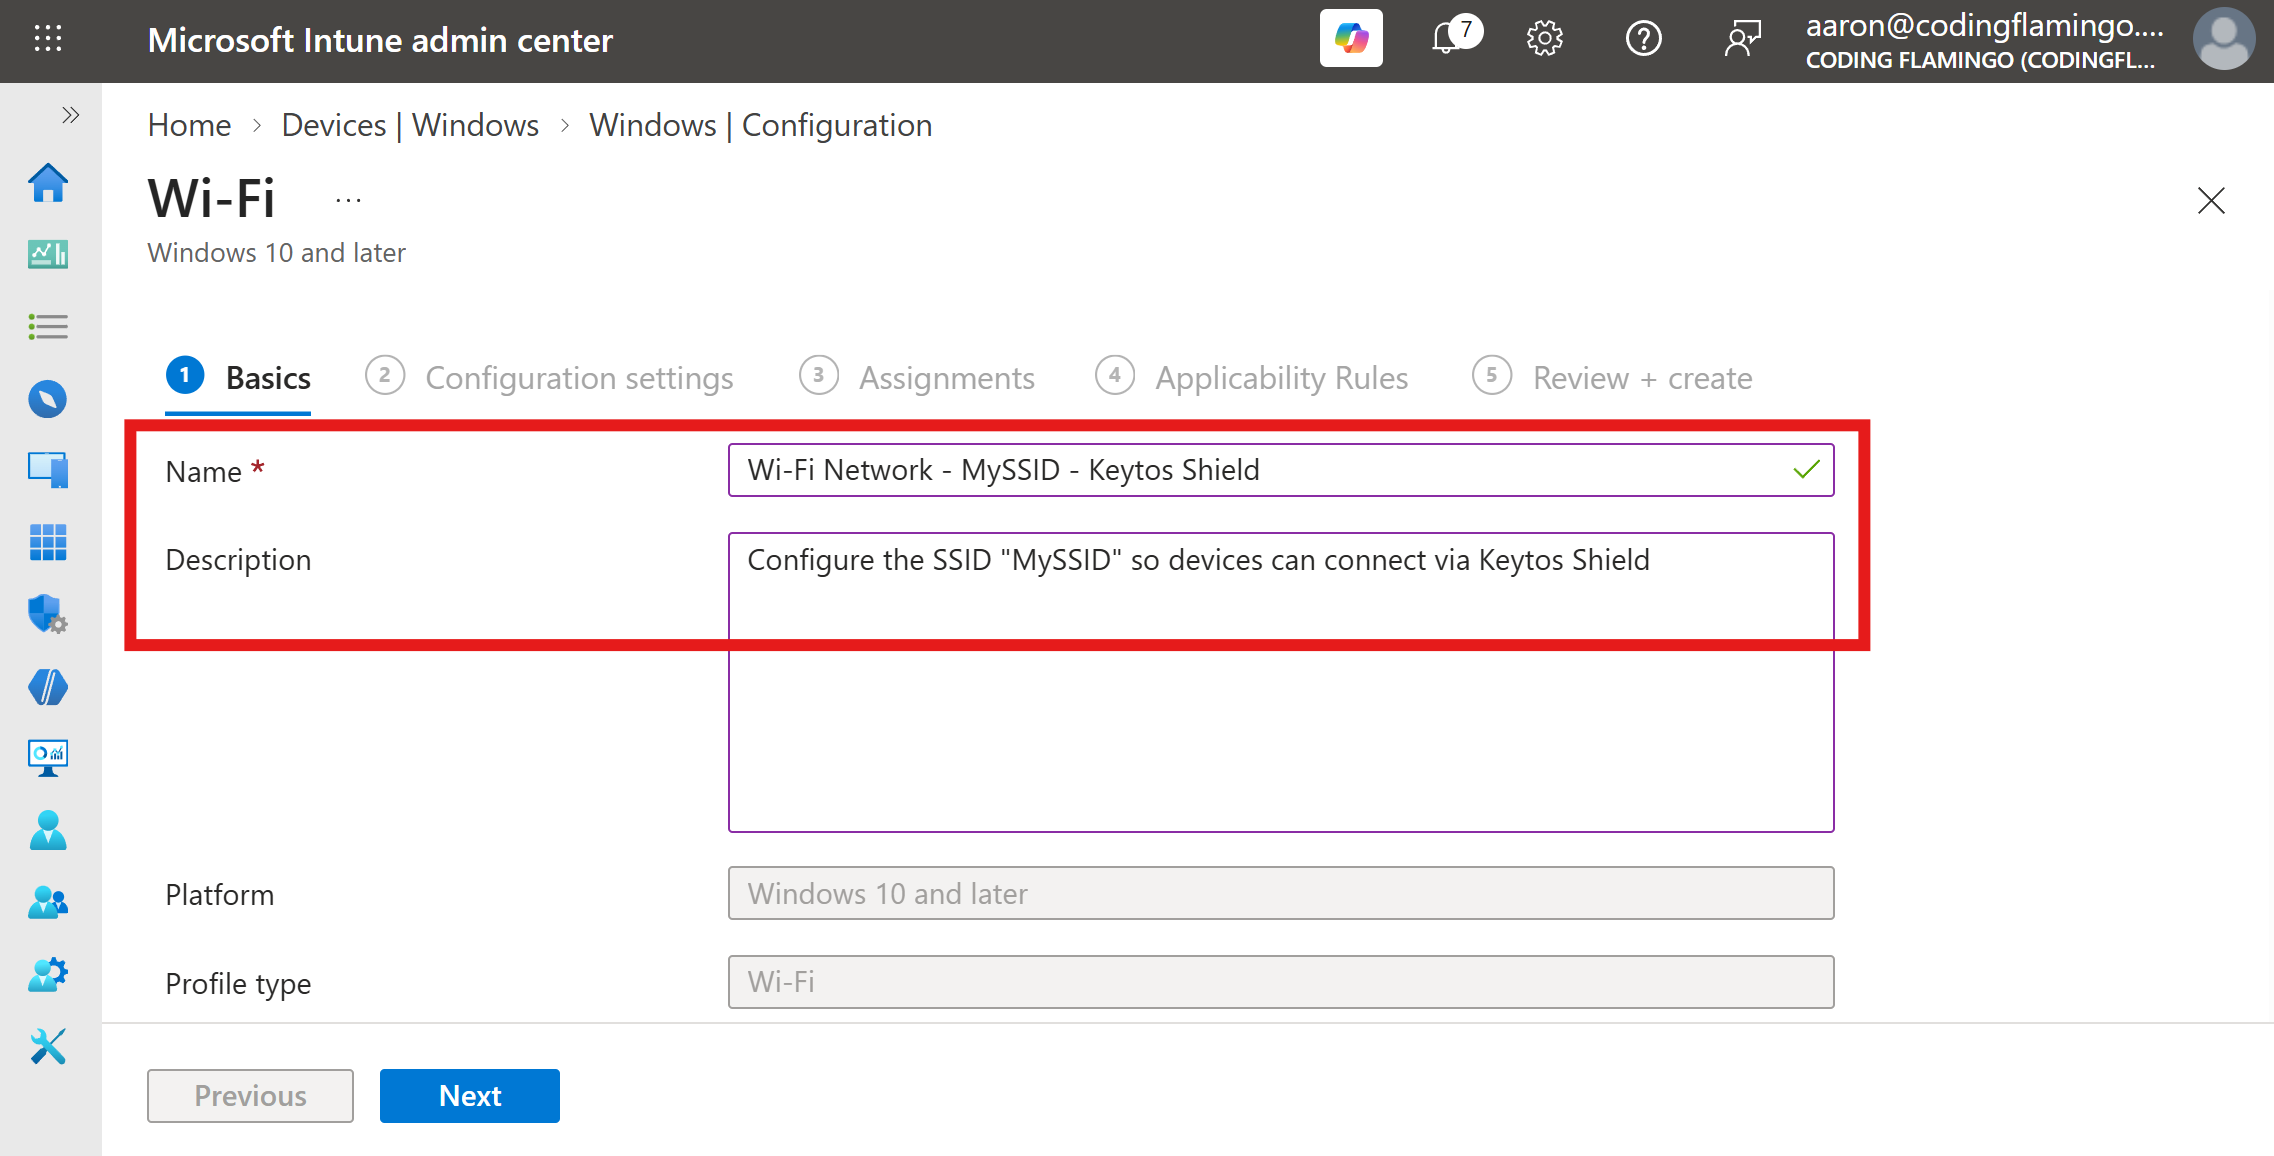
Under the Basics tab, enter the Name and Description for this Intune Wi-Fi profile and click Next to proceed.
-
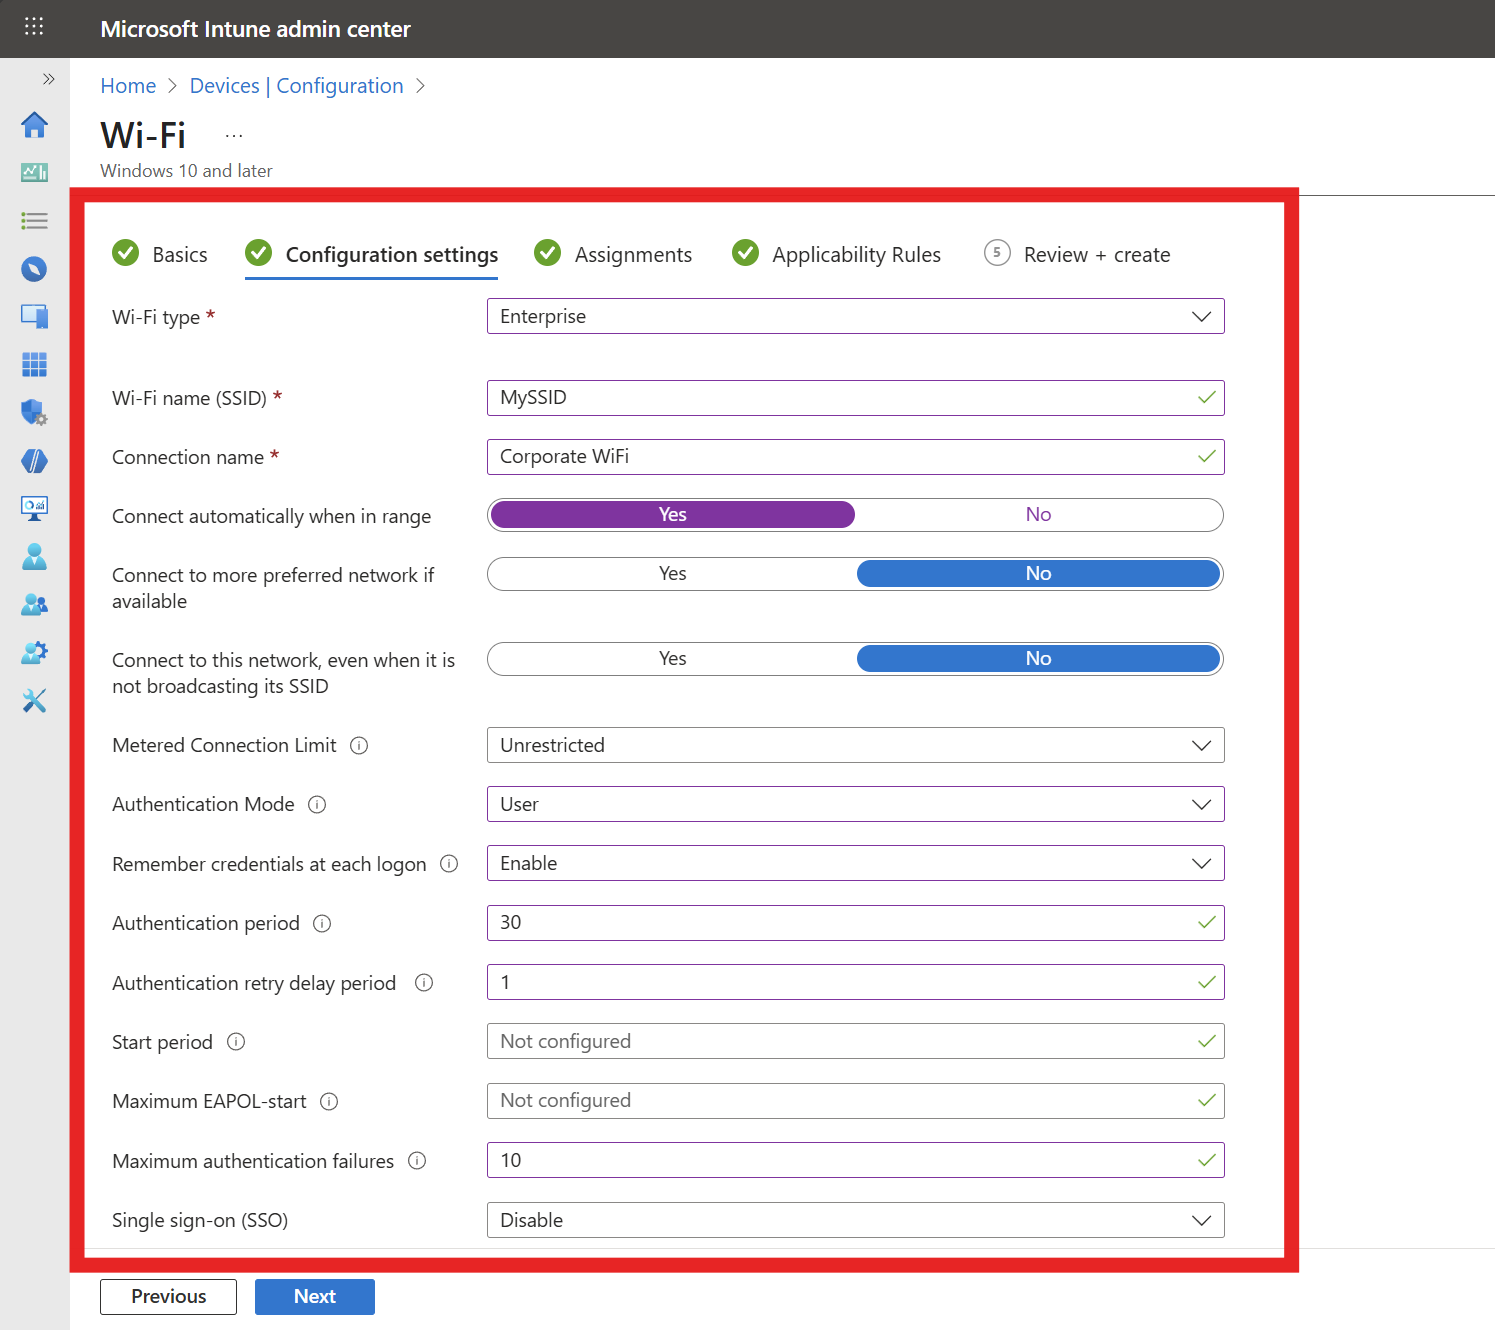
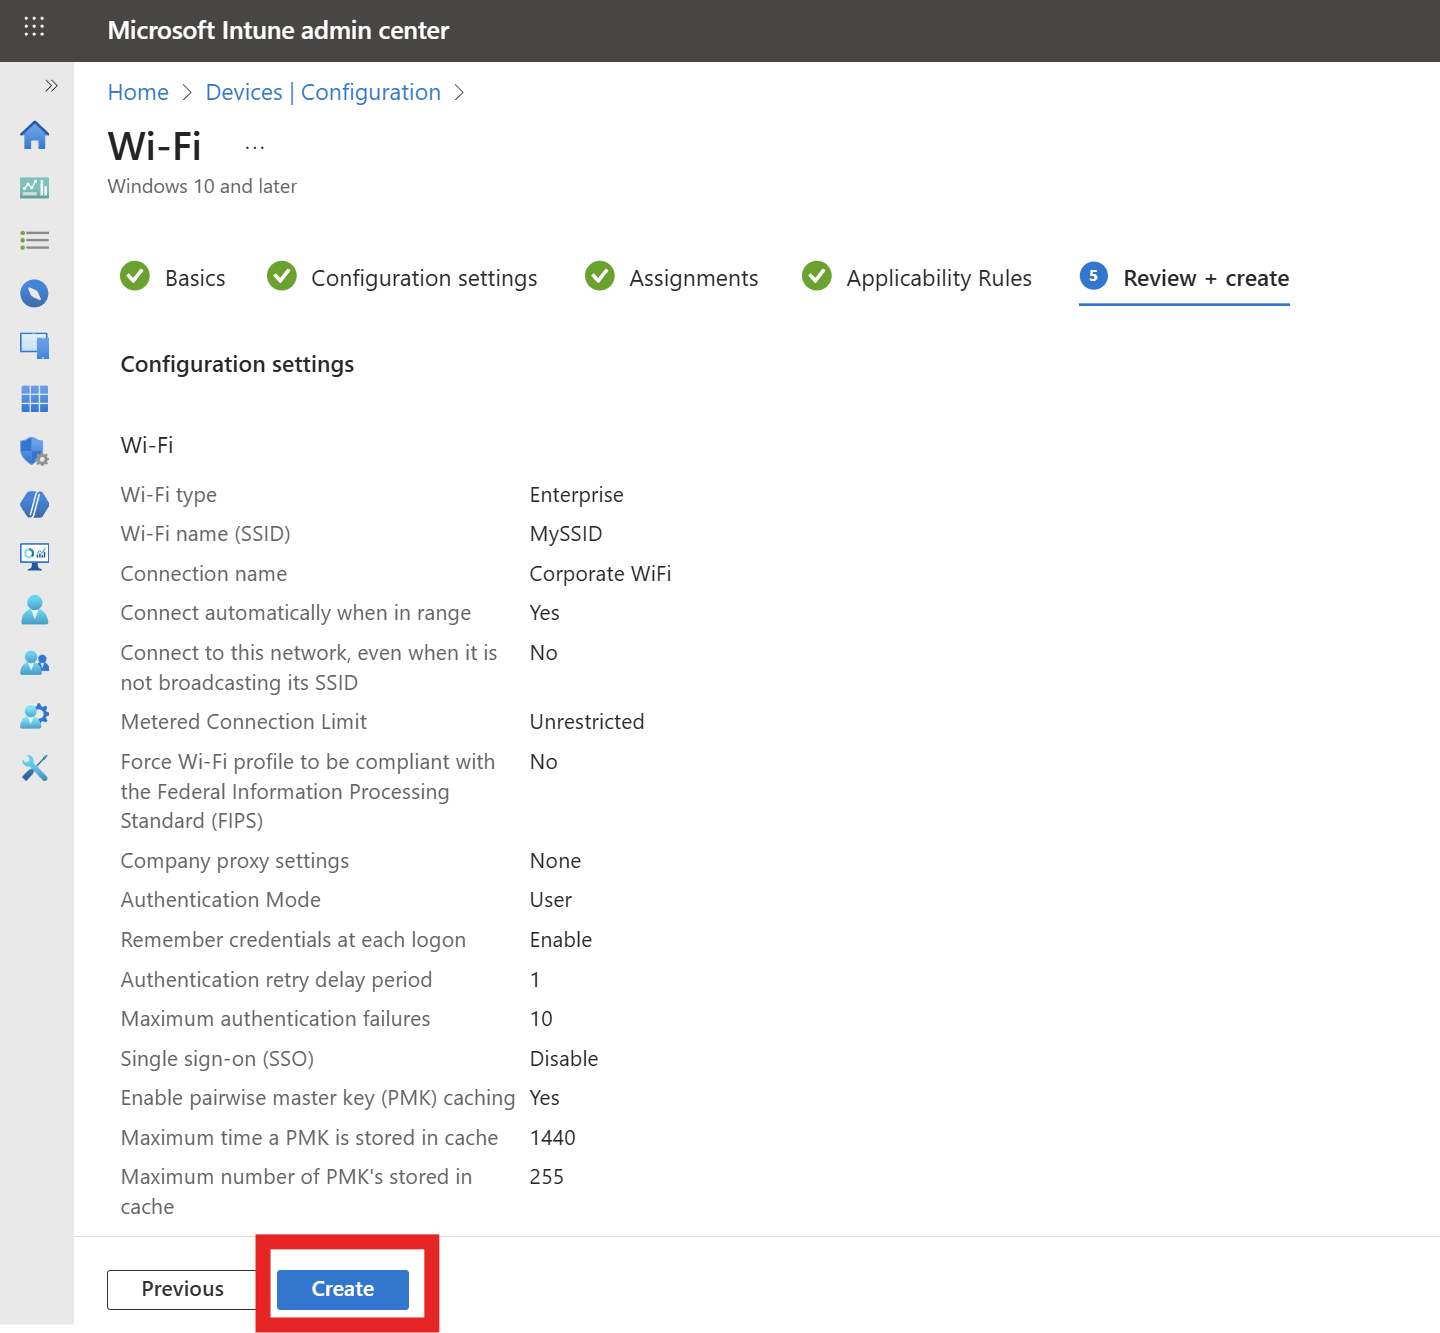
Enter the following required Configuration settings. Any field not mentioned below can be left as default or set to your organization’s preference:
-
Wi-Fi type: Enterprise
-
Wi-Fi name (SSID): Your Wi-Fi Network SSID (case sensitive)
-
Connection name: Friendly name for your users
-
Authentication mode: Select the mode based on whether your SCEP certificate is issued to the User or the Device.
-
Remember credentials: Set to No (not needed for certificate authentication).
-
Authentication period: 30 seconds is a recommended value we’ve seen work well for most environments.
-
Authentication retry delay: 1 second is a recommended value we’ve seen work well for most environments.
-
Maximum authentication failures: 10 is a recommended value we’ve seen work well for most environments.
-
Single sign-on (SSO): Disable
-
-
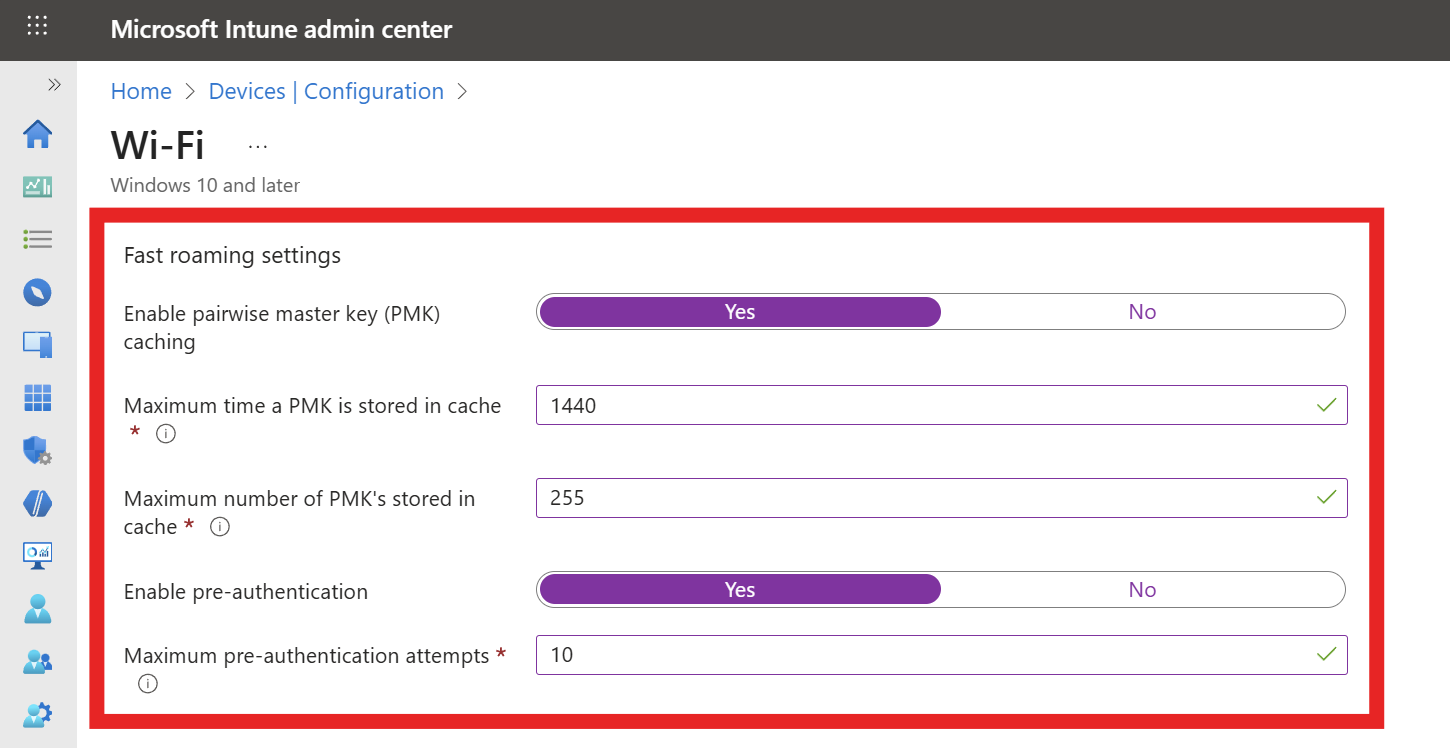
If your network controller supports Fast Roaming, fill out the Fast Roaming settings section with the following settings:
-
Enable pairwise master key (PMK) caching: Yes
-
Max PMK time stored in cache: We recommend setting this to the maximum (1440 minutes) to improve user experience.
-
Max number of PMKs in cache: We recommend setting this to the maximum (255) to improve user experience.
-
Enable pre-authentication: Yes
-
Max pre-authentication attempts: 10 is a recommended value we’ve seen work well for most environments.
-
-
Fill out the Server Trust section with the following settings:
-
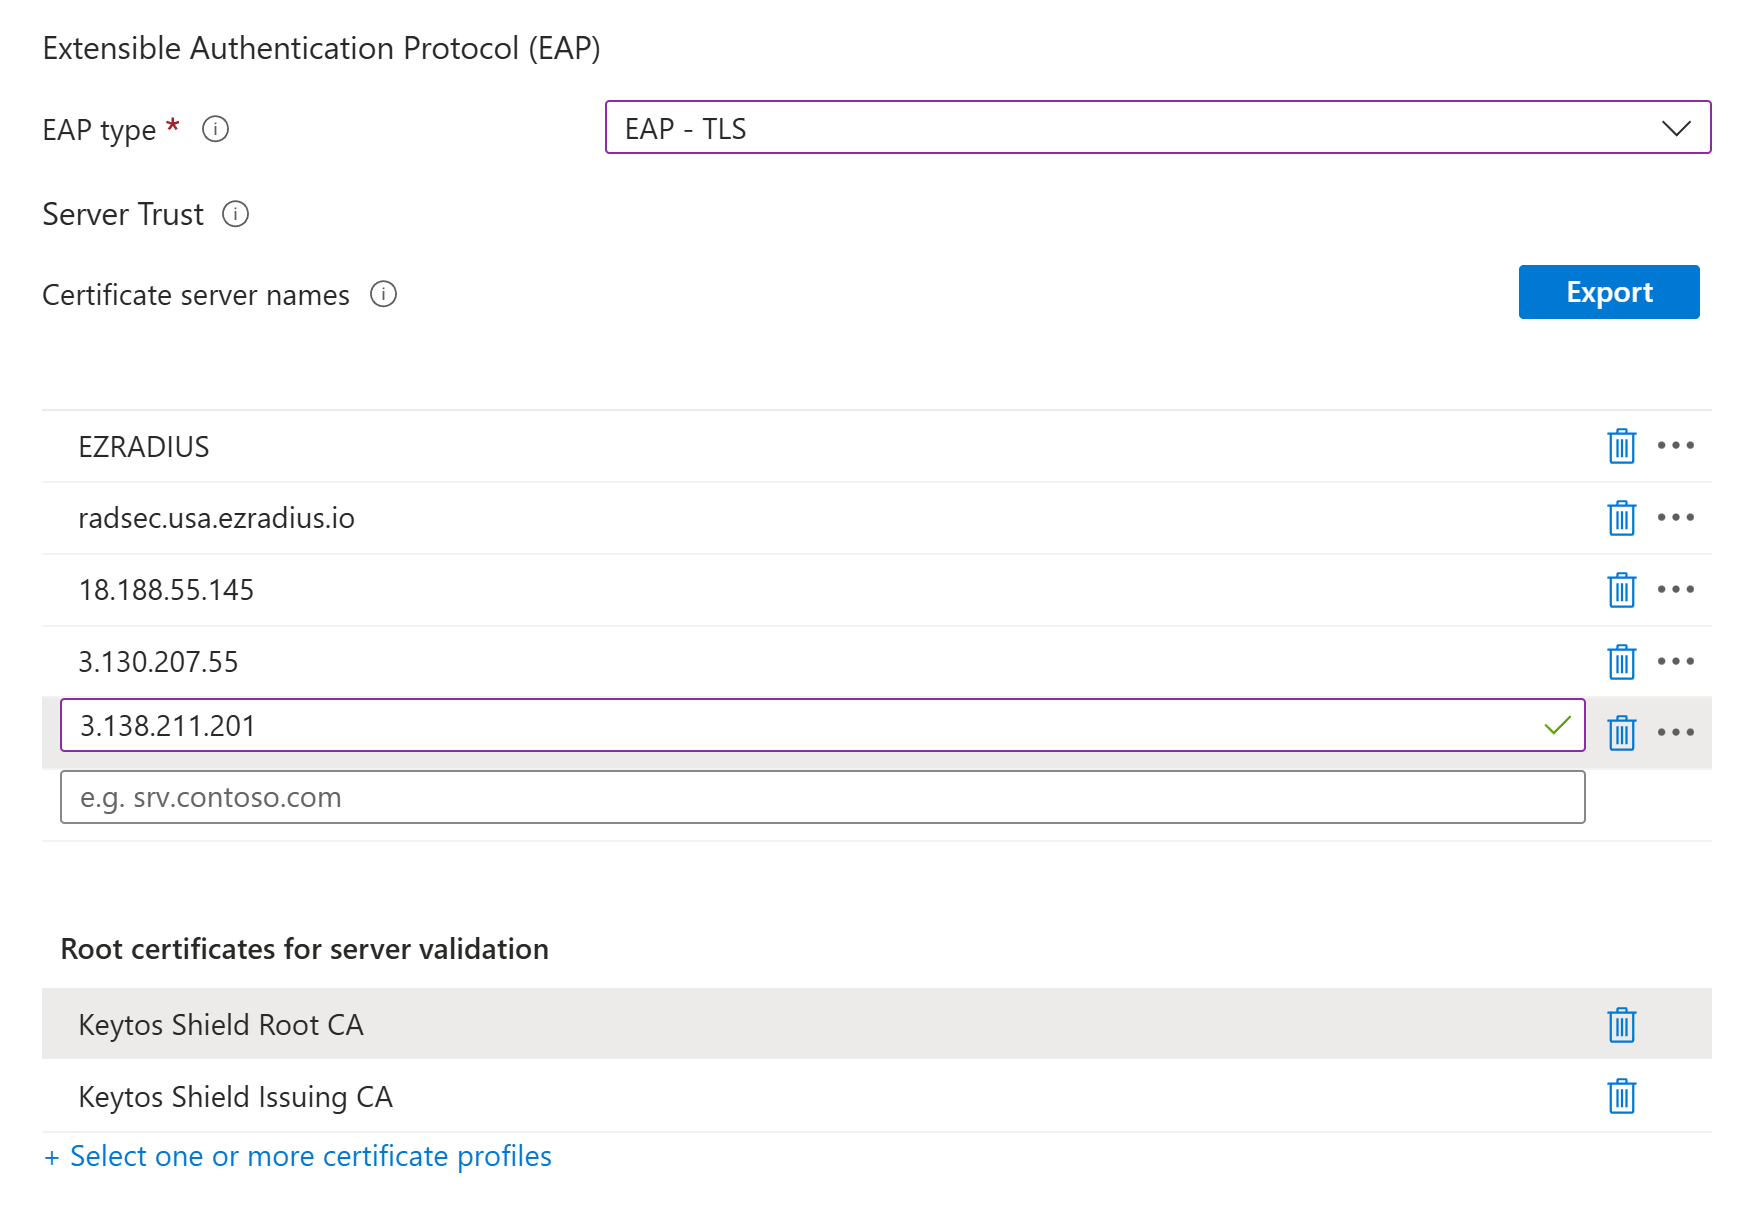
EAP type: EAP-TLS
-
Certificate server names: Enter every RADIUS server name that you copied from Keytos Shield in the How to Get Your RADIUS Server Names in Keytos Shield step, one value per entry.
-
Root Certificates for server validation: Select both your Keytos Shield Root CA and Issuing CA trusted certificate profiles
-
-
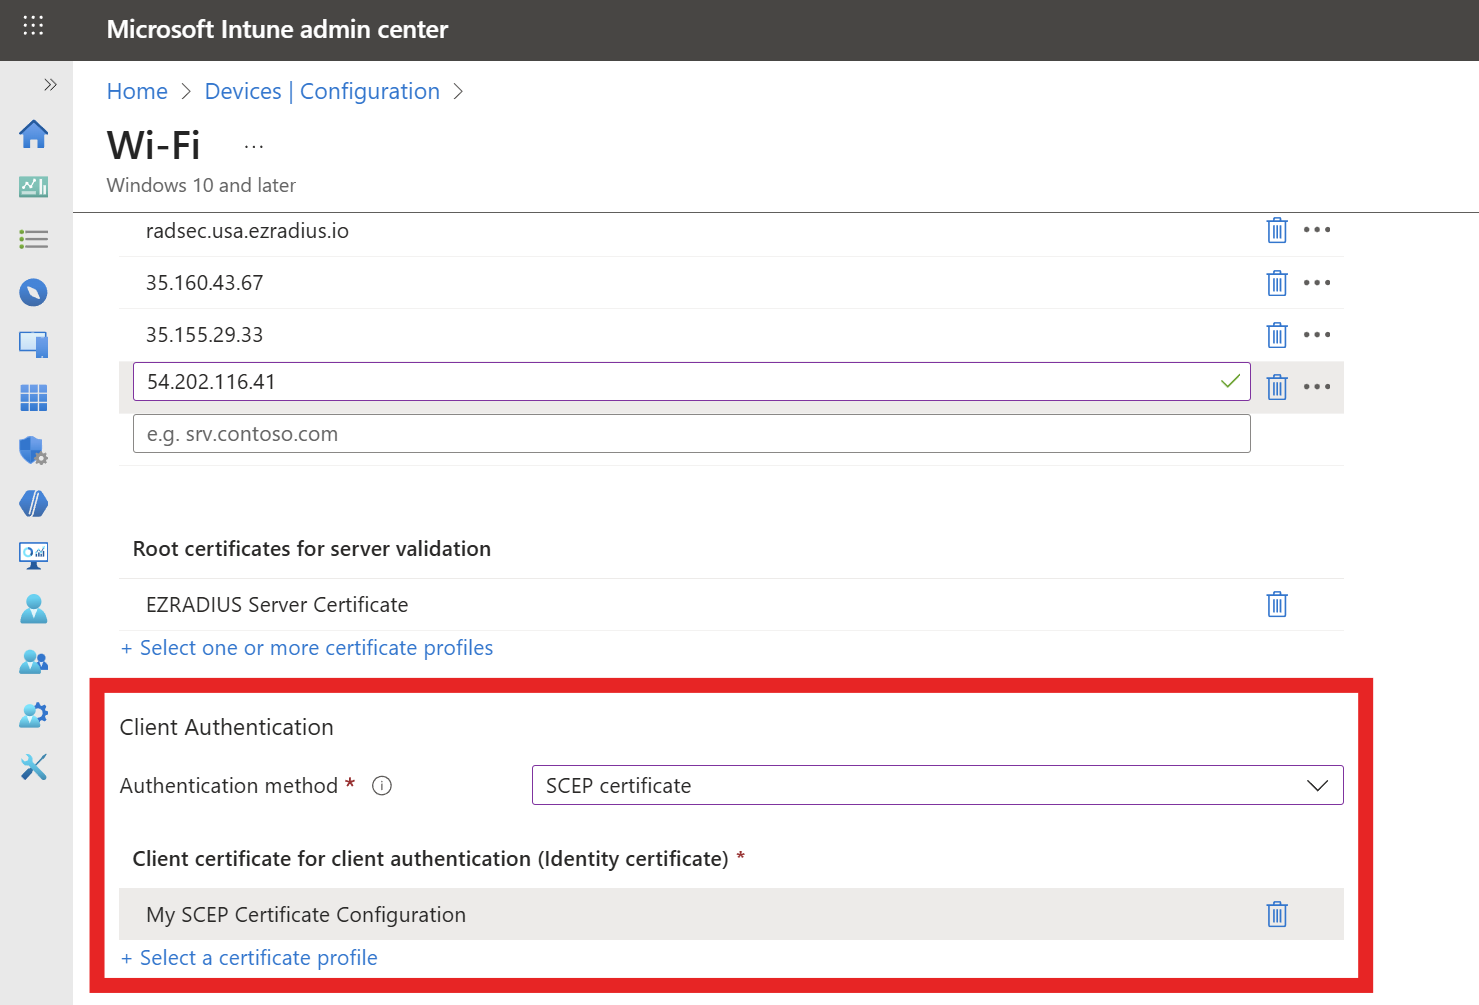
Fill out the Client Authentication section with the following settings:
-
Authentication Method: SCEP Certificate
-
Client certificate for client authentication: Select the SCEP profile created earlier for issuing client certificates to your devices.
-
-
Click on Next.
-
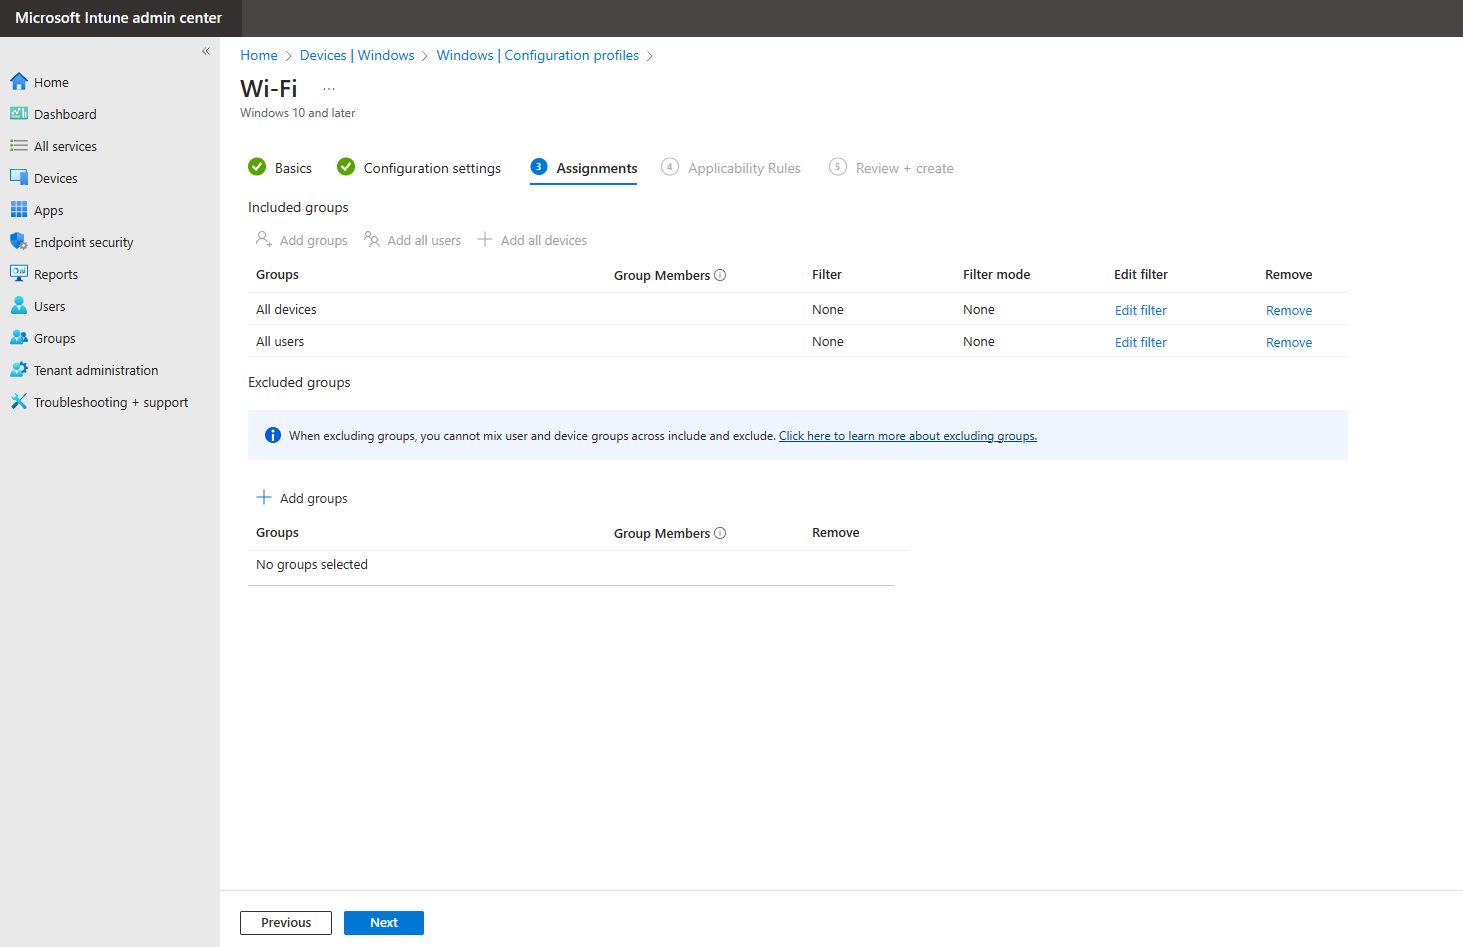
Select the users, groups or devices you want to deploy this profile to and click Next.
-
Add any applicability rules if needed, then click on Next.
-
Review your settings and click on Create.
-
Done! Your Wi-Fi profile is now created and will be pushed to your devices. Once the profile is applied, users will be able to connect to the Wi-Fi network using their SCEP-issued certificates.
-
Go to your Intune portal: https://aka.ms/Intune
-
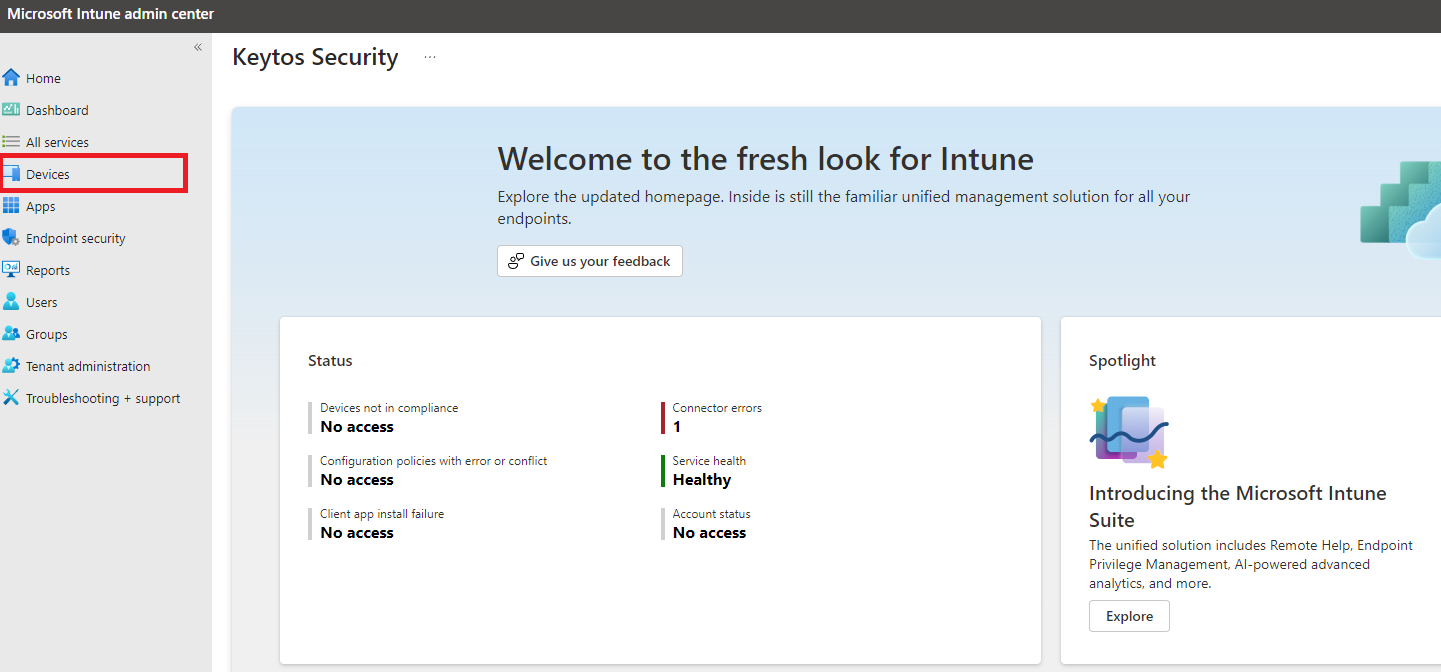
Click on Devices
-
Select the OS/platform you want to configure. In this case we will select Windows, but the setup is similar for other OS platforms.
-
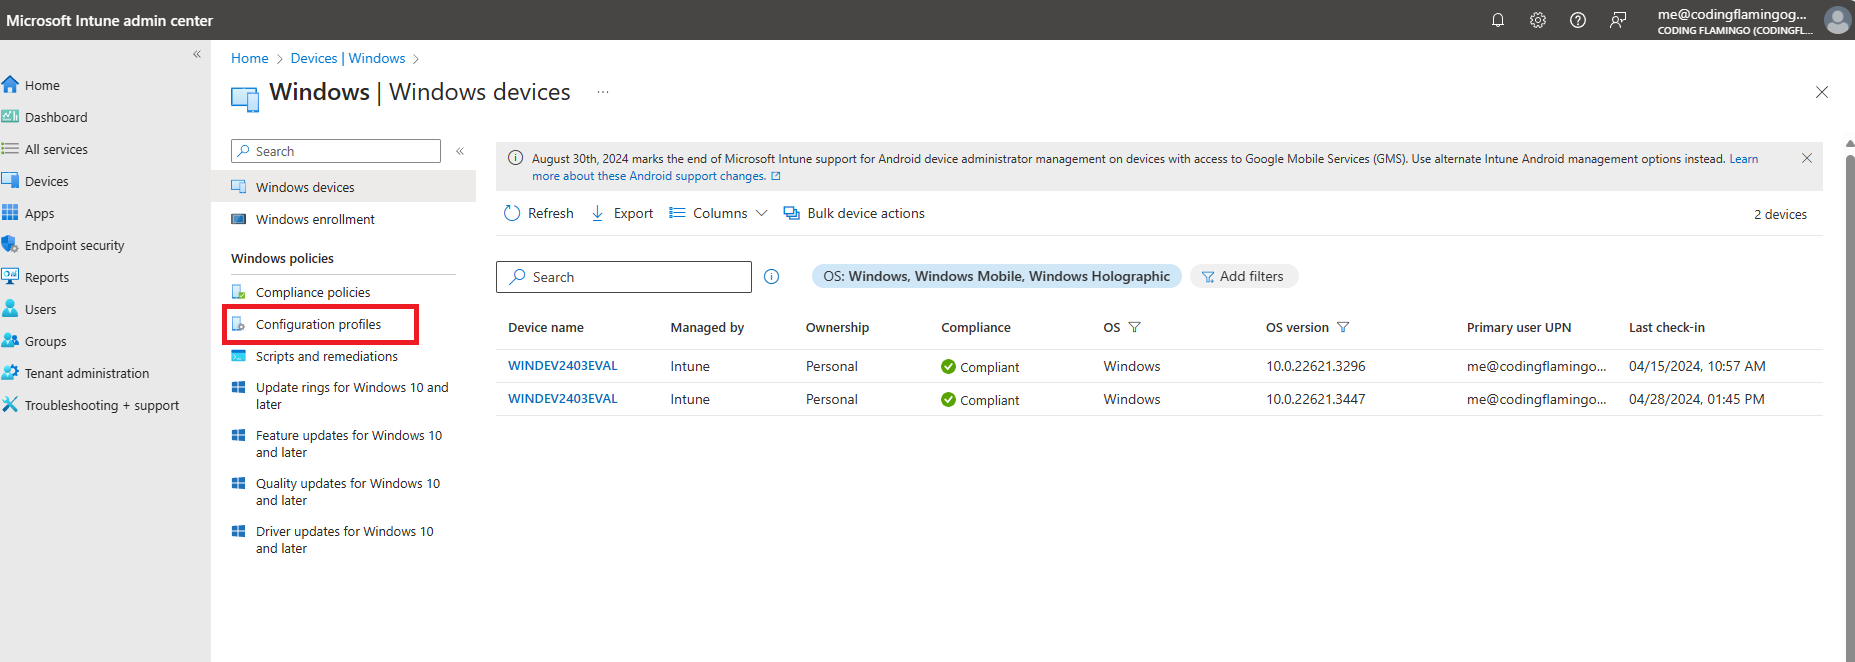
Click on Configuration Profiles.
-
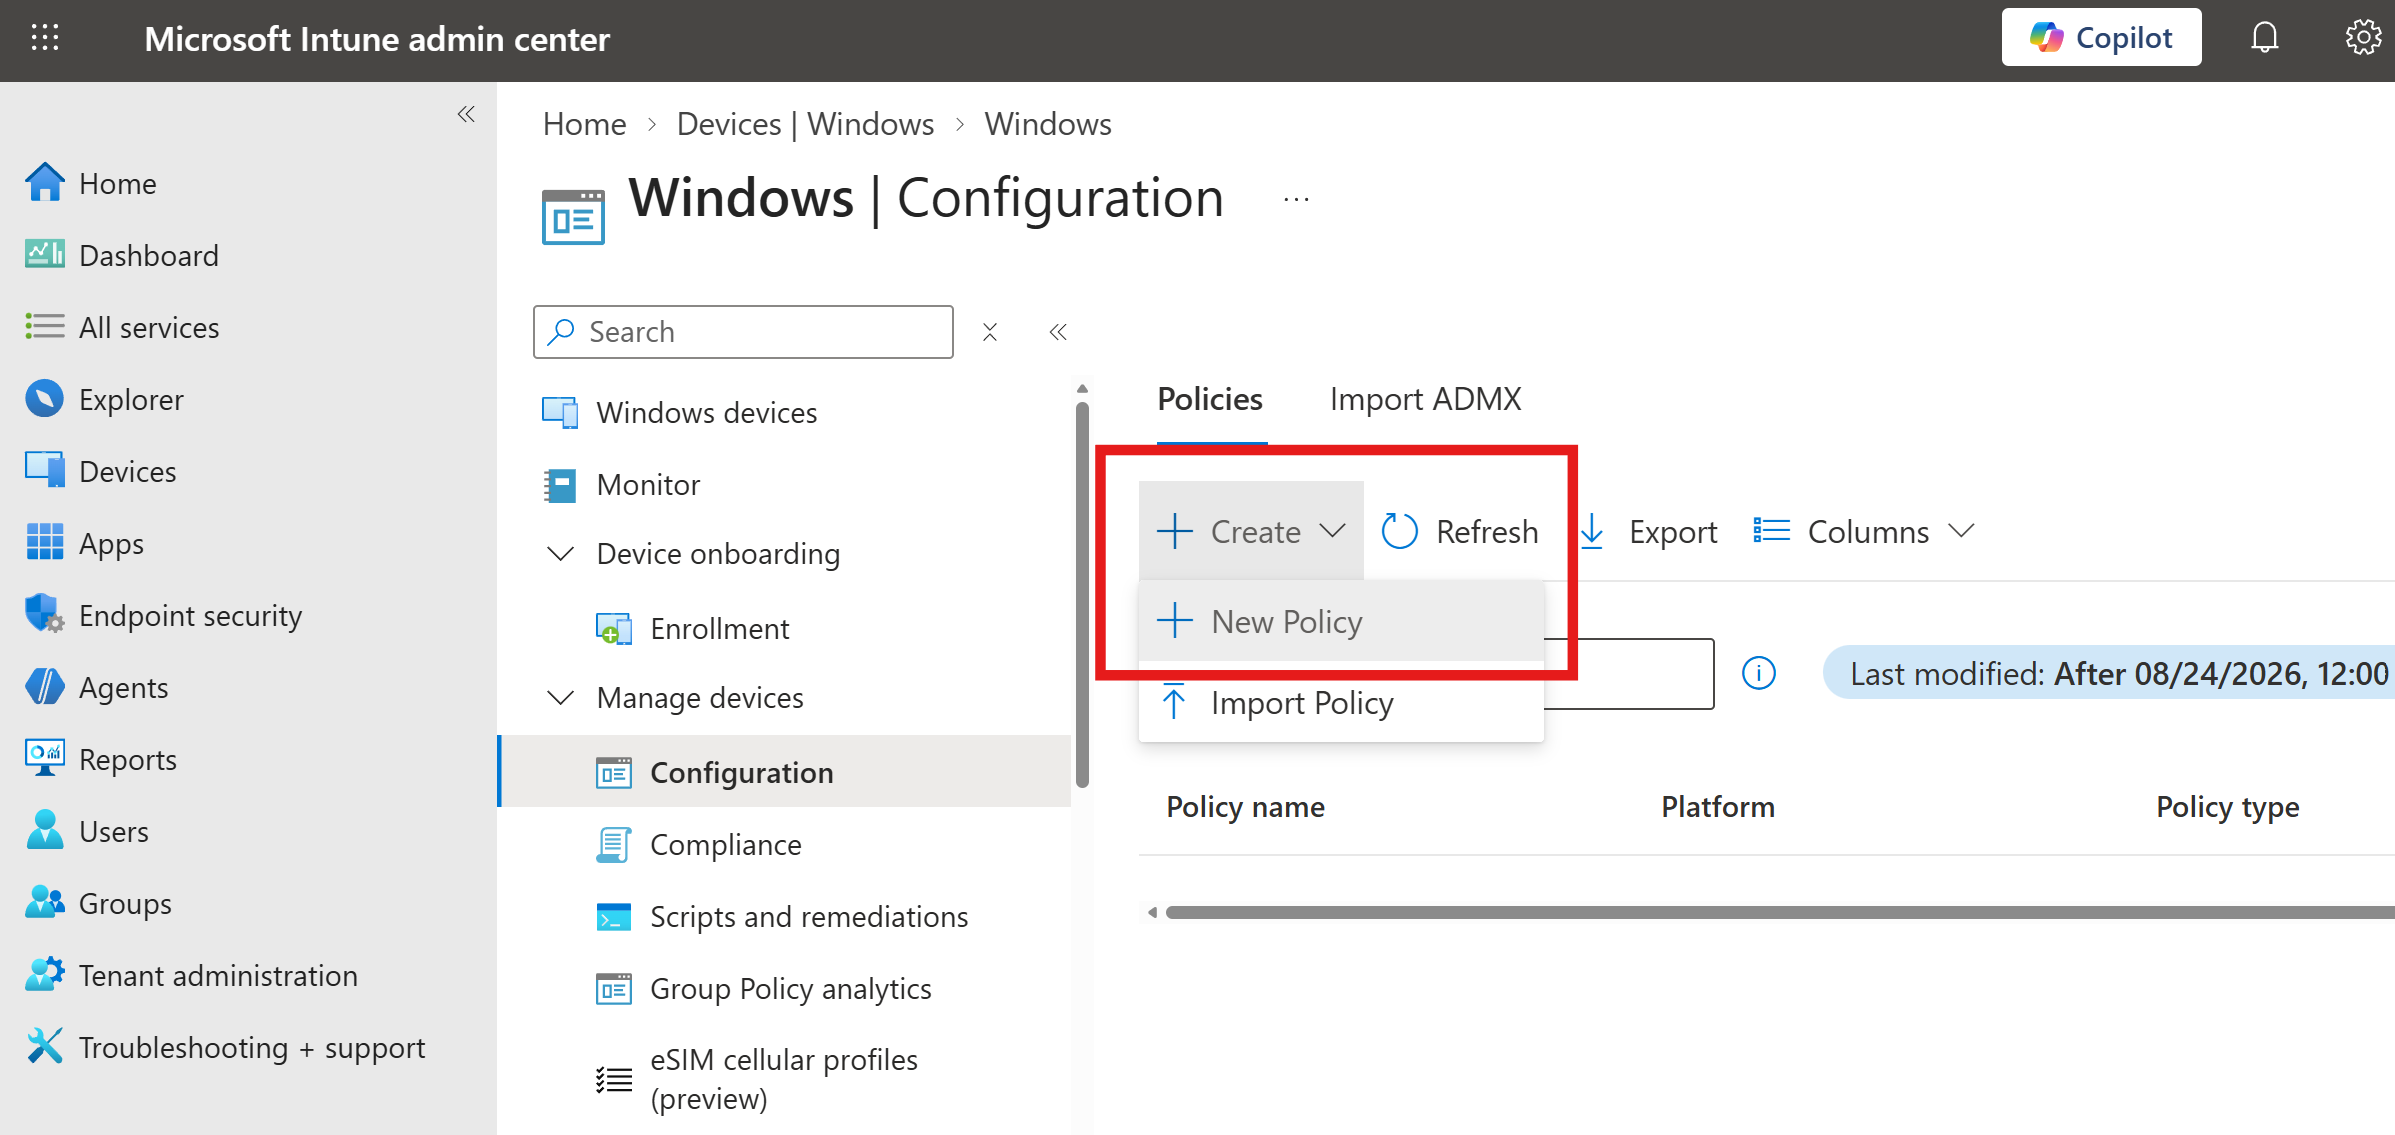
Click on the + Create button at the top of the list.
-
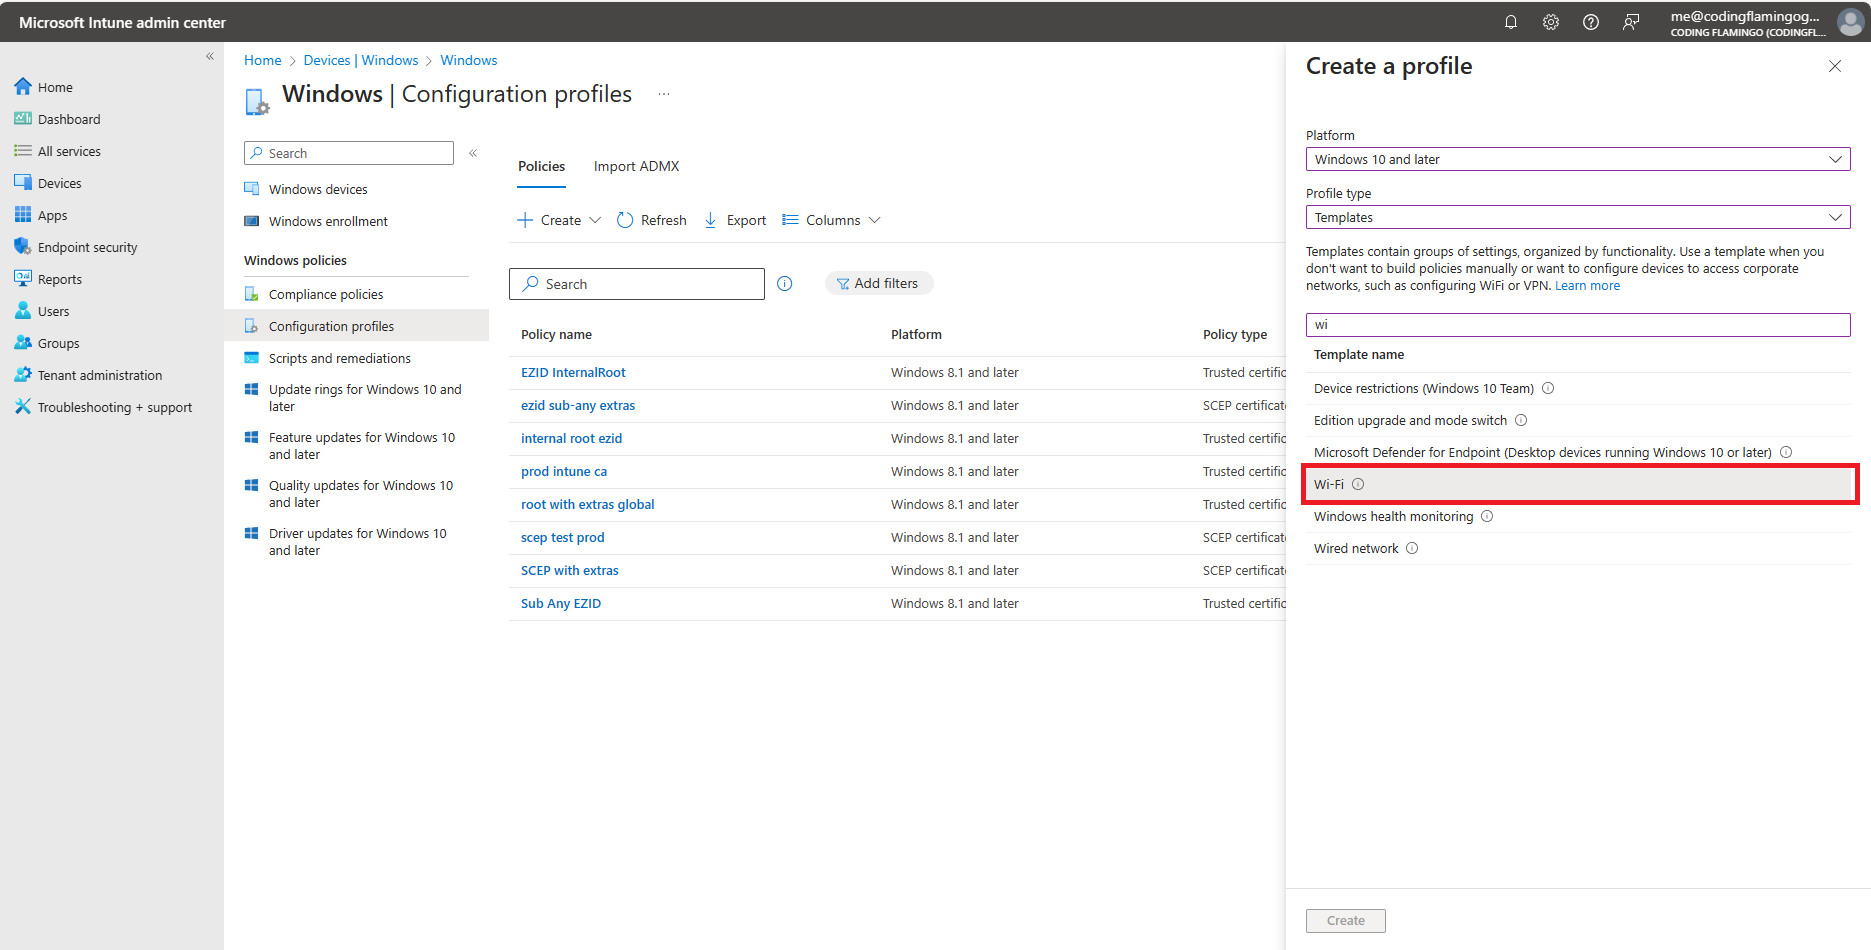
Select Windows 10 and later as the platform.
-
Select Templates as the profile type.
-
Select Wi-Fi as the template.
-
Click on Create at the bottom of the page.
-
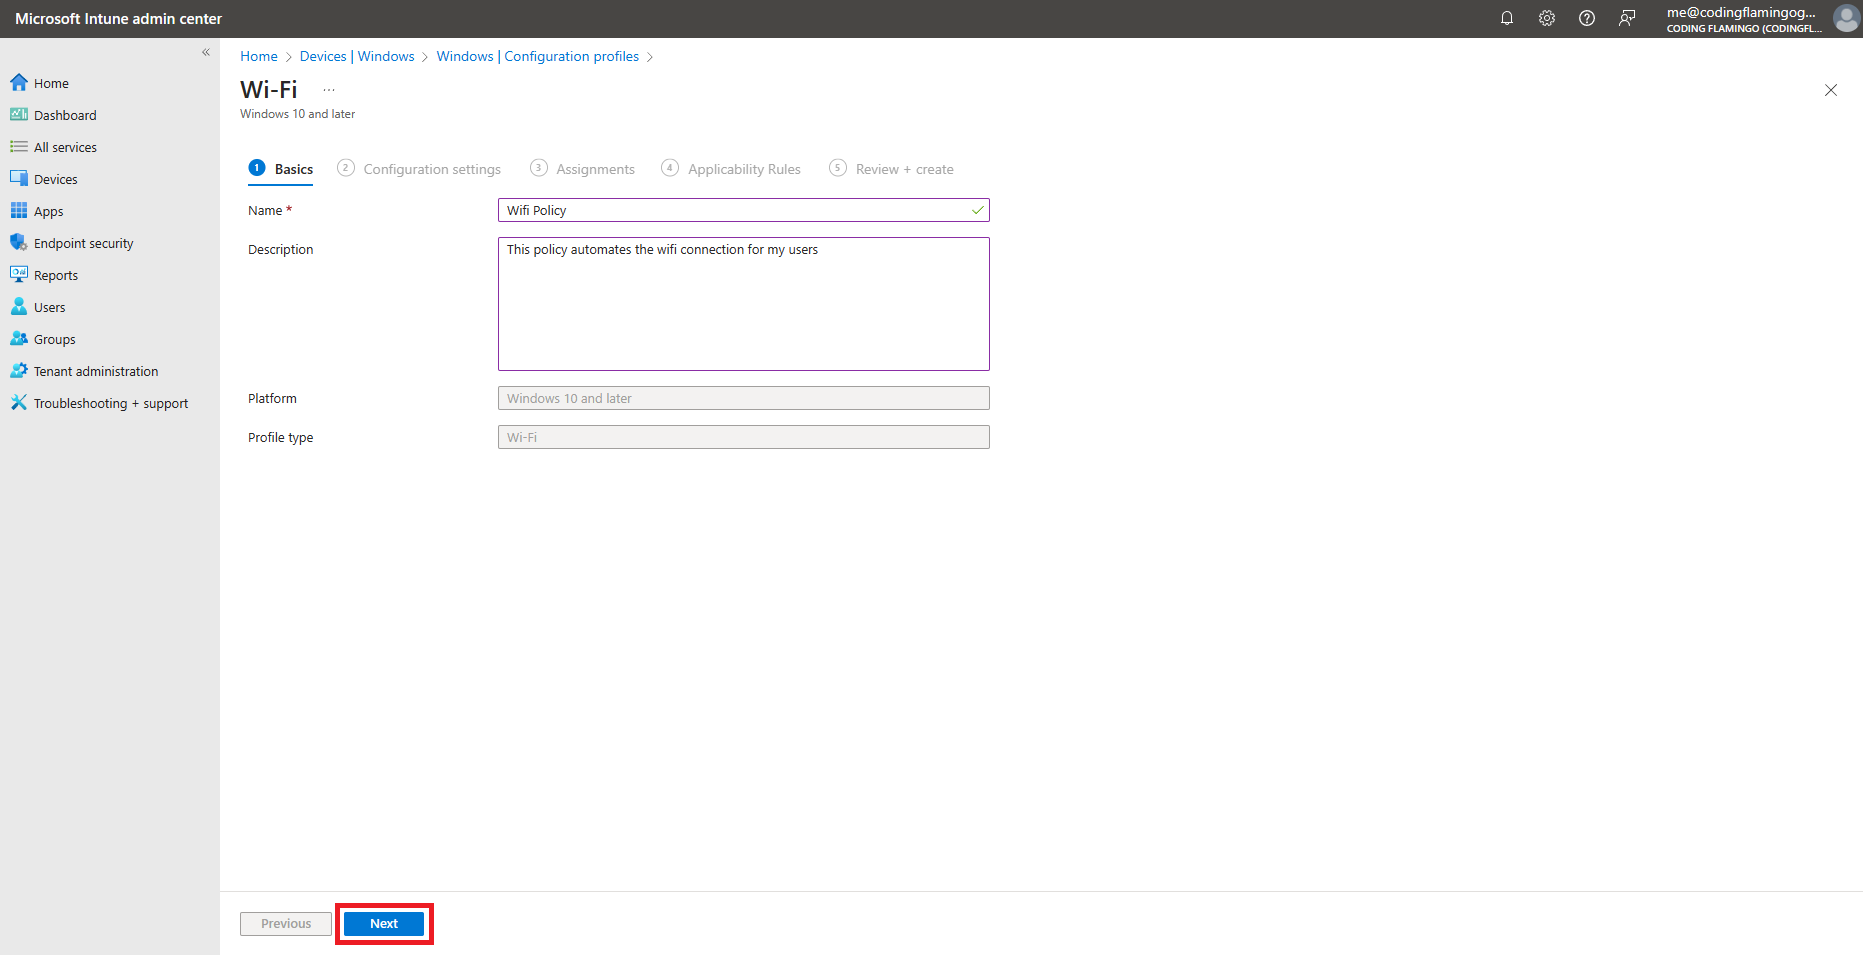
Fill in the Name and Description fields with something meaningful for your organization.
-
Click on Next.
-
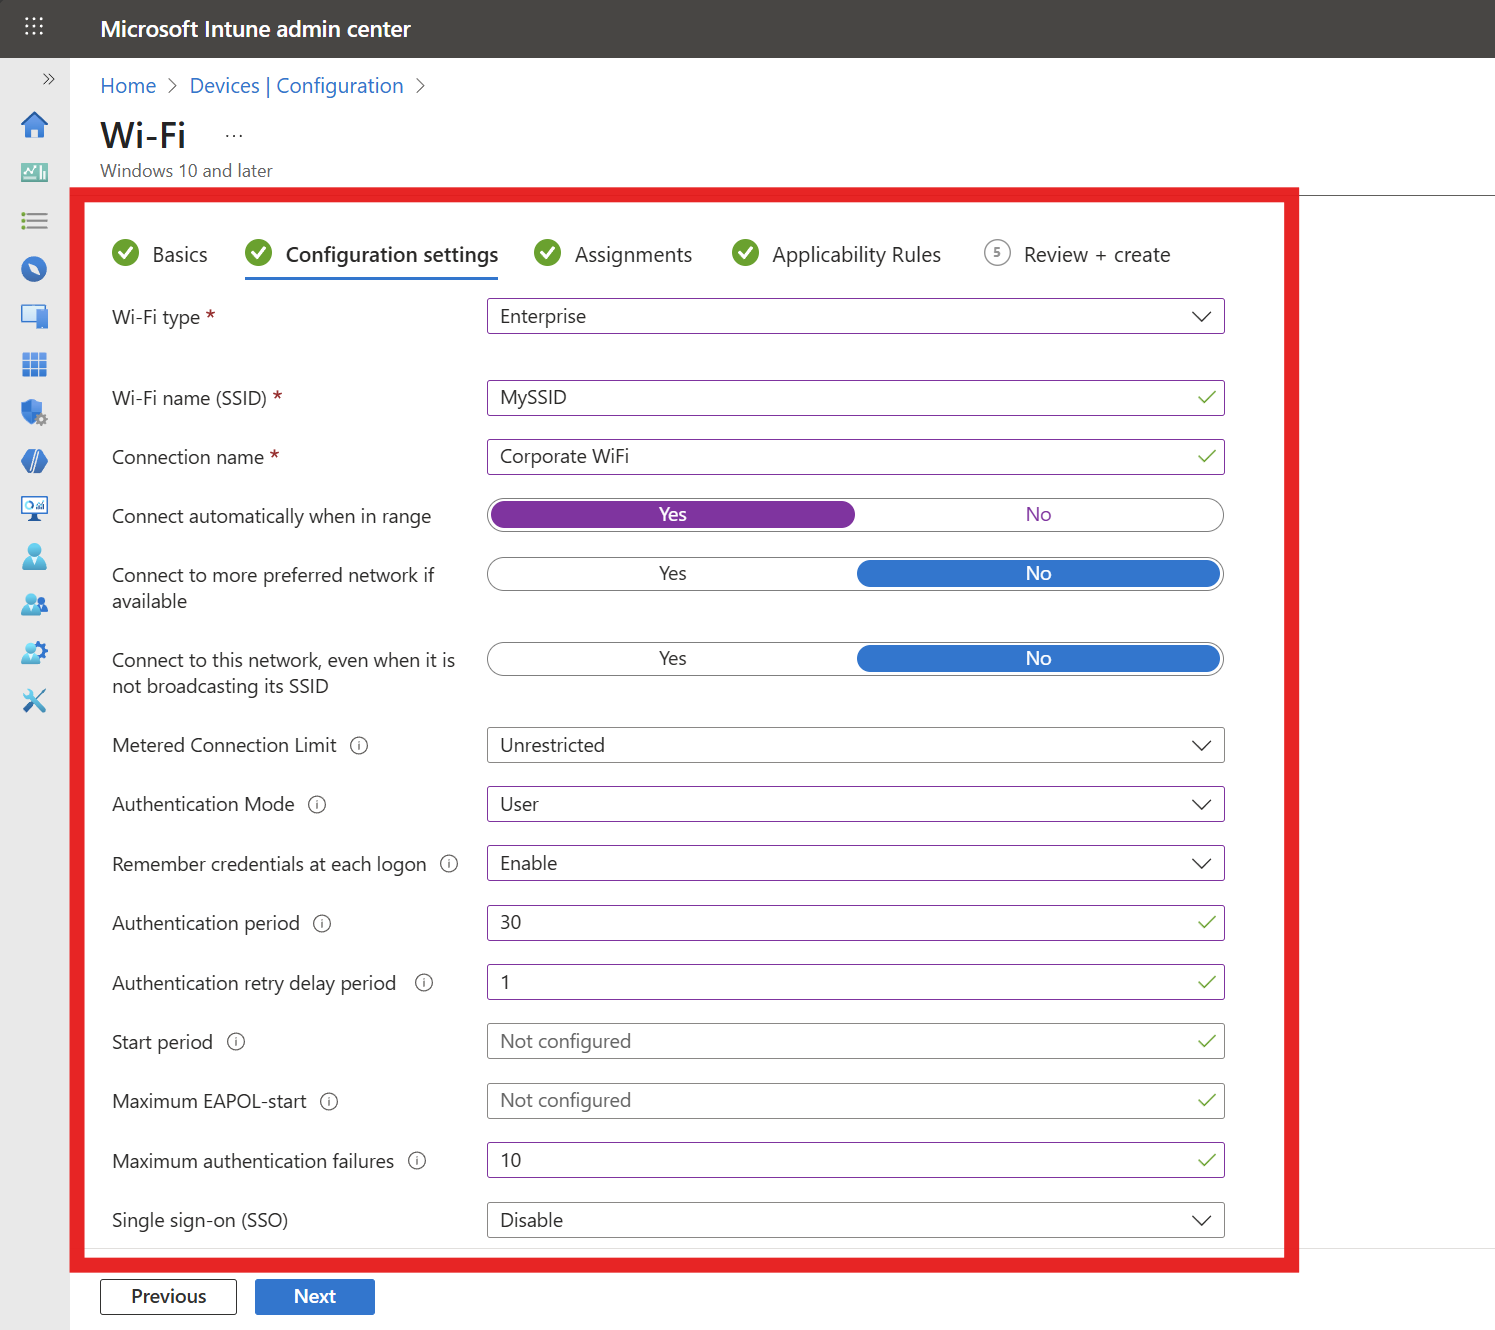
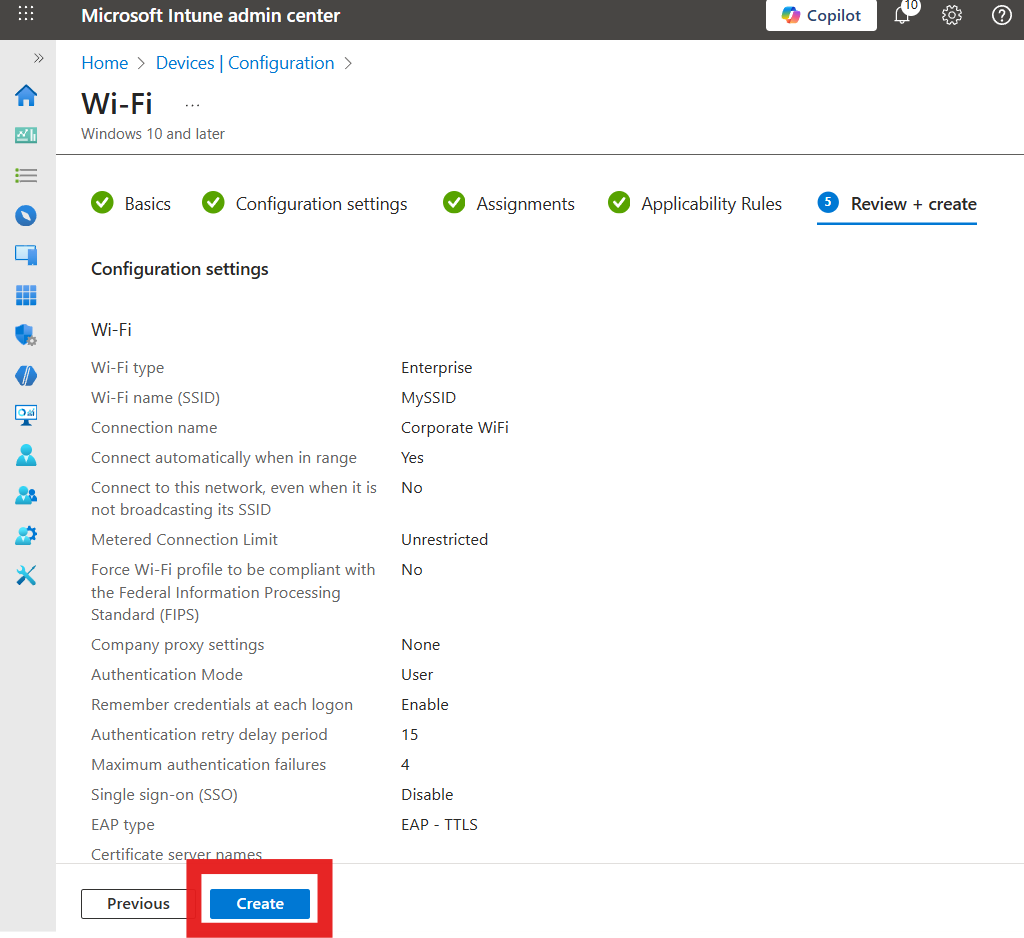
Enter the following required Configuration settings. Any field not mentioned below can be left as default or set to your organization’s preference:
-
Wi-Fi type: Enterprise
-
Wi-Fi name (SSID): Your Wi-Fi Network SSID (Case Sensitive)
-
Connection name: Friendly name for your users
-
Authentication mode: User (Device is not supported for Entra ID Password authentication)
-
Remember credentials: Yes/No (Based on your preference)
-
Authentication period: 30 seconds is a recommended value we’ve seen work well for most environments.
-
Authentication retry delay: 1 seconds is a recommended value we’ve seen work well for most environments.
-
Maximum authentication failures: 10 is a recommended value we’ve seen work well for most environments.
-
Single sign-on (SSO): Disable
-
-
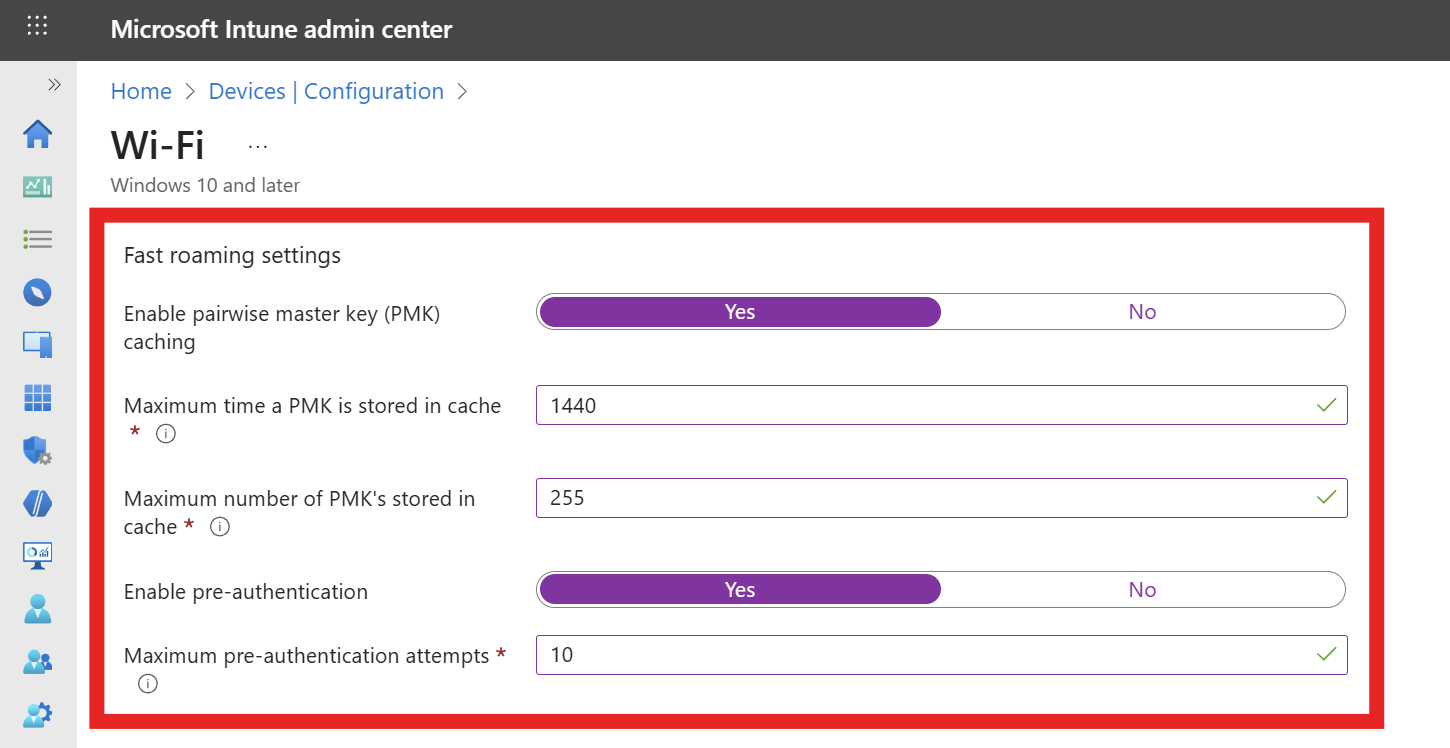
If your network controller supports Fast Roaming, fill out the Fast Roaming settings section with the following settings:
-
Enable pairwise master key (PMK) caching: Yes
-
Max PMK time stored in cache: We recommend setting this to the maximum (1440 minutes) to improve user experience.
-
Max number of PMKs in cache: We recommend setting this to the maximum (255) to improve user experience.
-
Enable pre-authentication: Yes
-
Max pre-authentication attempts: 10 is a recommended value we’ve seen work well for most environments.
-
-
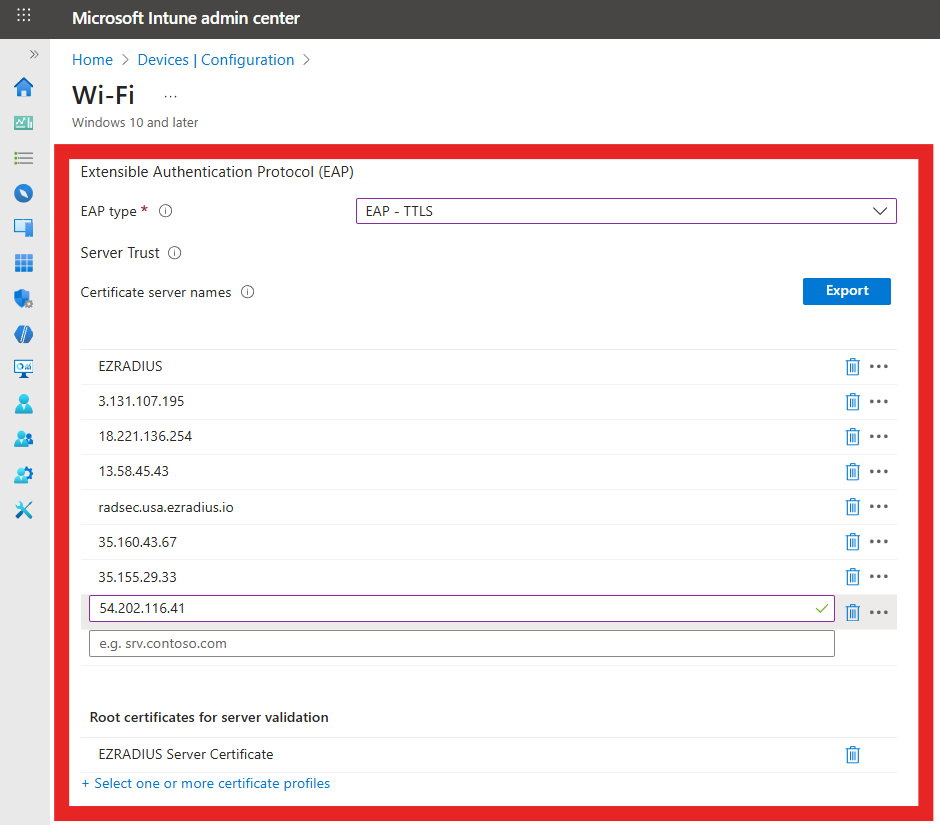
Fill out the Server Trust section with the following settings:
-
EAP type: EAP-TTLS
-
Certificate server names: Enter every RADIUS server name that you copied from Keytos Shield in the How to Get Your RADIUS Server Names in Keytos Shield step, one value per entry.
-
Root Certificates for server validation: Select both your Keytos Shield Root CA and Issuing CA trusted certificate profiles.
-
-
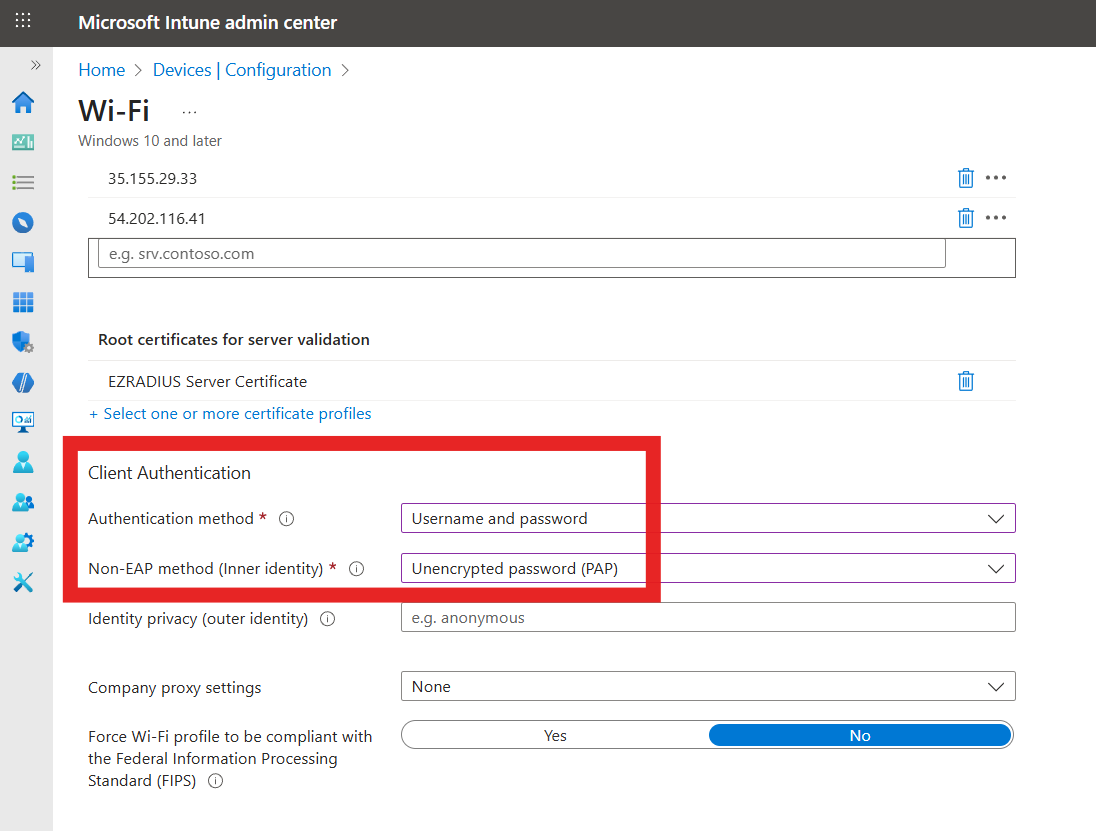
Fill out the Client Authentication section with the following settings:
-
Authentication Method: Username and Password
-
Non-EAP method (Inner method): Unencrypted Password (PAP) (Don’t worry the password is encrypted by the EAP-TTLS tunnel, it is not sent unencrypted over the air)
-
-
Click on Next.
-
Select the users, groups or devices you want to deploy this profile to and click Next.
-
Add any applicability rules if needed, then click on Next.
-
Review your settings and click on Create.
-
Done! Your WiFi profile is now created and will be pushed to your devices. Once the profile is applied, users will be able to connect to the WiFi network using their Entra ID credentials.
How to Troubleshoot and Test an Intune Wi-Fi Profile in Windows
How to Test the Wi-Fi Certificate Authentication Setup
Now that you have created and deployed the WiFi profile, it’s important to test the setup to ensure everything is functioning correctly. Follow these steps to test your WiFi profile with Certificate Authentication:
- Begin on a device that is targeted by the Intune Wi-Fi profile you created.
- Force a sync with Intune to ensure the latest profiles are applied. You can do this by going to Settings > Accounts > Access work or school, selecting your work account, and clicking on Sync.
- Once the sync is complete, check that the WiFi profile has been applied by going to Settings > Network & Internet > Wi-Fi > Manage known networks. You should see the SSID you configured in the list.
- If you use User-based certificate authentication, attempt to connect to the Wi-Fi network. You should be connected without being prompted for a username or password. If you use Device-based certificates, the device should connect automatically without user interaction. You may need to restart the device to trigger the connection.