

















How To Manage Your Network Profiles in Keytos Shield
Overview - What is a Shield Network Profile?

A network profile in Shield controls how your access points, switches, users, and devices can connect to your networks. Each network profile contains settings for authentication methods, accepted certificate authorities, and access policies that define the conditions under which network access is granted.
We usually recommend setting up a single network profile for your entire organization, with multiple access policies defined for each user or device segment or SSID. This page and accompanying guides walk through reference architectures, best practices, and step-by-step instructions for creating and managing network profiles in Keytos Shield.
How To Create a Shield Network Profile - Step-by-Step Guide
During your first-time onboarding you will set up a Shield network profile with the default & recommended configuration. We recommend reviewing and customizing this configuration to match your organization’s specific network requirements, instead of creating a new profile from scratch.
Prerequisites For Creating a Shield Network Profile
Before you begin creating a Shield network profile, ensure that you have met all the prerequisites listed below.
- The Keytos Shield Entra ID applications are registered in your tenant.
- You have an active Keytos Shield plan.
- You are a Subscription Owner or Network Administrator on your Keytos Shield plan.
Step 1: How to Create a New Shield Network Profile
To create a new Shield network profile:
-
Navigate to your regional Keytos Shield portal. You can find this at the Keytos global portal. (US Government Portal).
-
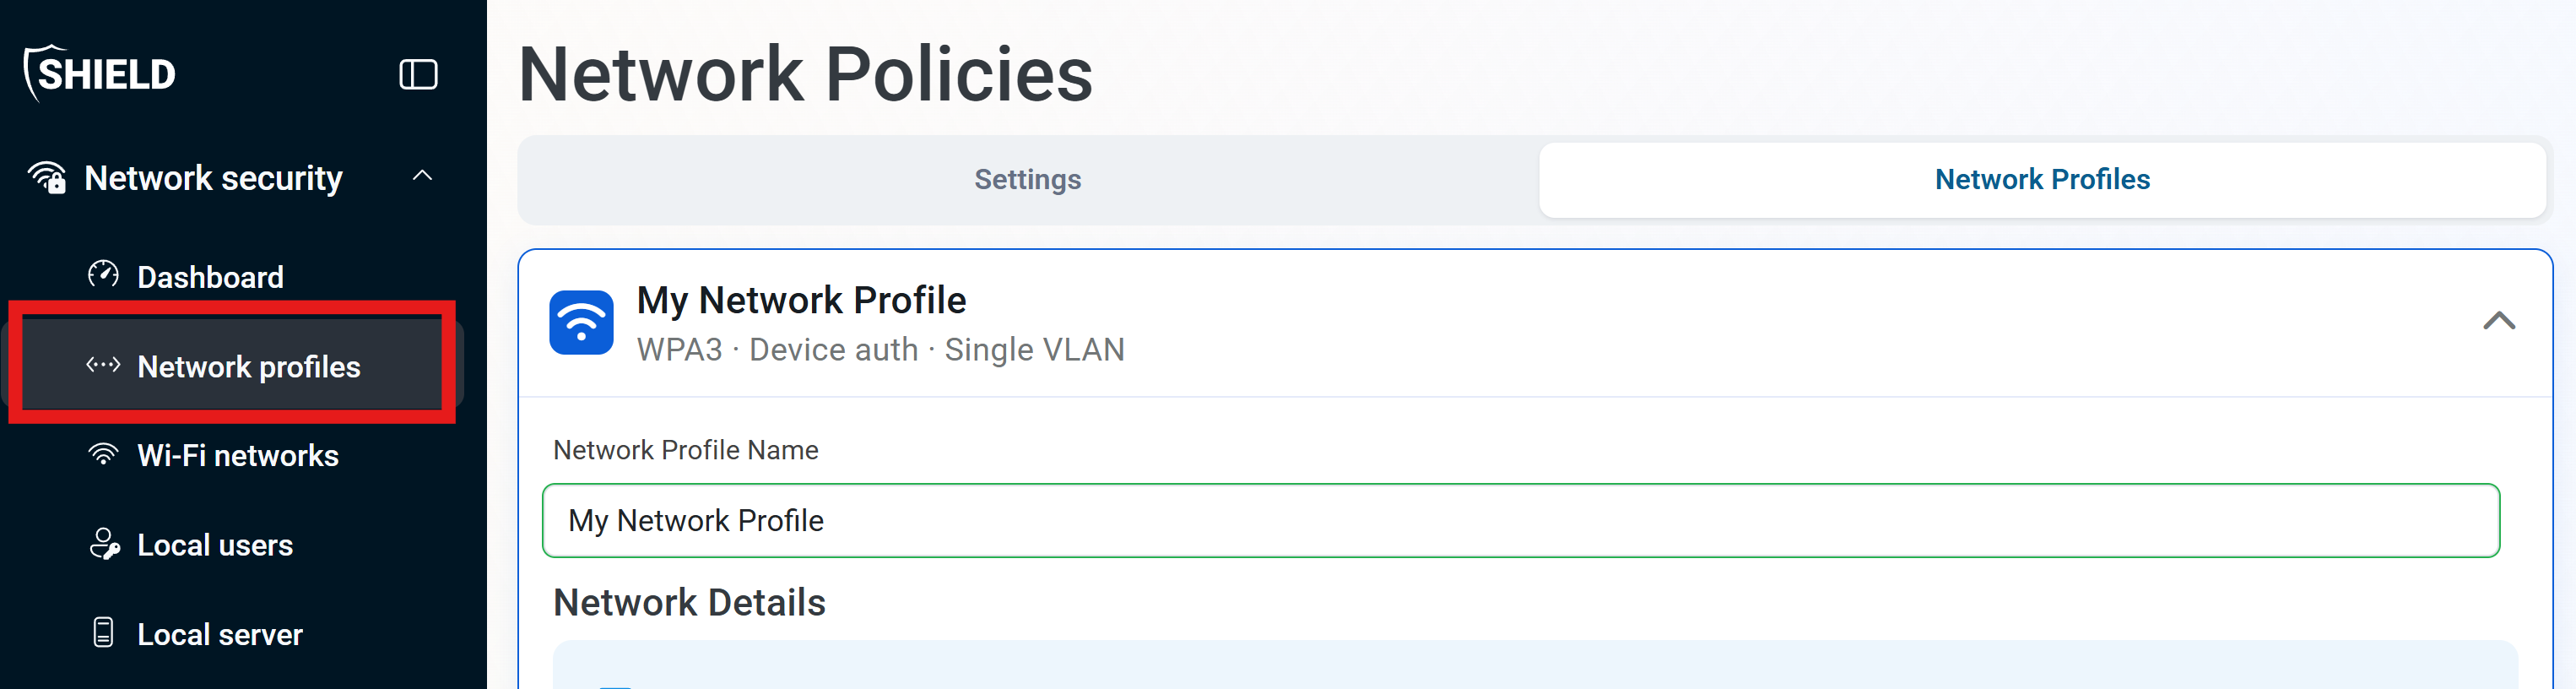
From the left-hand navigation menu, select Network Profiles:
-
At the bottom of the page, click on + Create New Network Profile to create a blank network profile.

-
Enter a Network Profile Name which will help you identify this network profile later. This name is for your records, and Keytos Shield will create a unique identifier for the profile behind the scenes.

Step 2: Configure How Your Network Will Connect to Shield
Keytos Shield supports both RADIUS and RadSec for network authentication. We typically recommend Classic RADIUS for most deployments, but if you have a dynamic IP address or plan to use legacy authentication protocols, RadSec will be a better choice. They can also be used together if needed.
Check the box for Enable Classic RADIUS and/or Enable RadSec depending on your network setup.

Now, choose the appropriate method for your network by selecting either Classic RADIUS or RadSec from the options below.
How to Configure RADIUS and/or RadSec in Keytos Shield
Follow the steps below to configure your network access policies for RADIUS and/or RadSec
How to Set Up Classic RADIUS for Keytos Shield
Classic RADIUS uses the public IP address of your RADIUS client (access point, switch, etc.) and a shared secret to authenticate incoming requests. In this section, you will add your public IP addresses and create a shared secret so we know which requests are coming from your authorized network devices.
When specifying an IP address, make sure to use the external IP address for your network. It should not start with 192.168.***, 10.0.***, 172.16.***, or any other private IP address range (the only exception is when you run a local Shield RADIUS server, whose access points use private IP addresses). If you’re unsure, visit What is my IP to find your public IP address, or click the My IP Address button in the Keytos Shield portal to automatically add your current public IP address if you’re connecting from within your network.
There are two ways to add IP addresses to your RADIUS policy: either manually adding them one by one or uploading a CSV file for multiple IP addresses.
How To Manually Add Your IP Address(es)
To manually add your IP address(es) to the RADIUS policy, follow these steps:
-
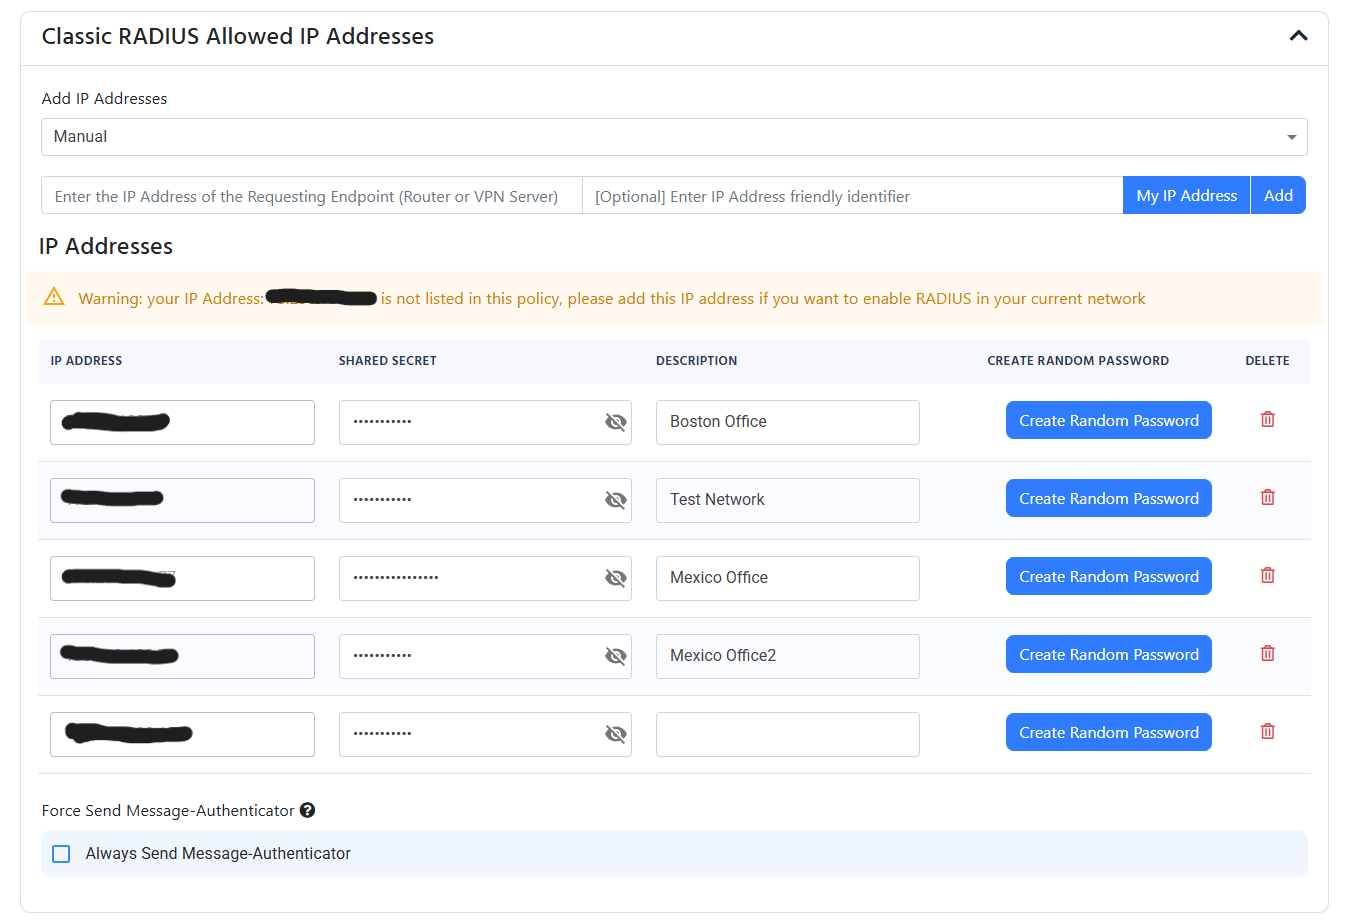
Select Manual from the dropdown.
-
Enter the public IP address of your router or VPN server.
-
Provide a friendly name for the IP address (for your records).
-
Click Add to add the IP address to the list of allowed RADIUS clients.
-
A randomly generated shared secret will be created for the IP address. You can change this shared secret if needed.
-
Repeat the process for each additional public IP address that will connect to Keytos Shield. Make sure to include any backup/failover IP addresses as well.
If you have multiple IP Addresses you can add them using a CSV file (if you have an CIDR range and want to convert it to IP range, use this site).
How To Create a CSV File for Uploading IP Addresses
Before uploading, you need to prepare a CSV file containing all the IP addresses you want to add. Follow the instructions below to create and upload the CSV file.
- Create a new file named
ip_addresses.csvon your computer. - Open the file in a text editor or spreadsheet application and enter your IP addresses, friendly names, and shared secrets following the format
IP Address,Friendly Name,Shared Secret. Don’t include headers in the file.
For example, a CSV file with two IP addresses would look like this:
12.12.12.12,First Name,SharedSecret1
12.12.12.13,Second Name,SharedSecret2
Make sure to save your CSV file before proceeding to the upload steps.
How to Upload the CSV File
Now that you have your CSV file, follow these steps to upload it:
-
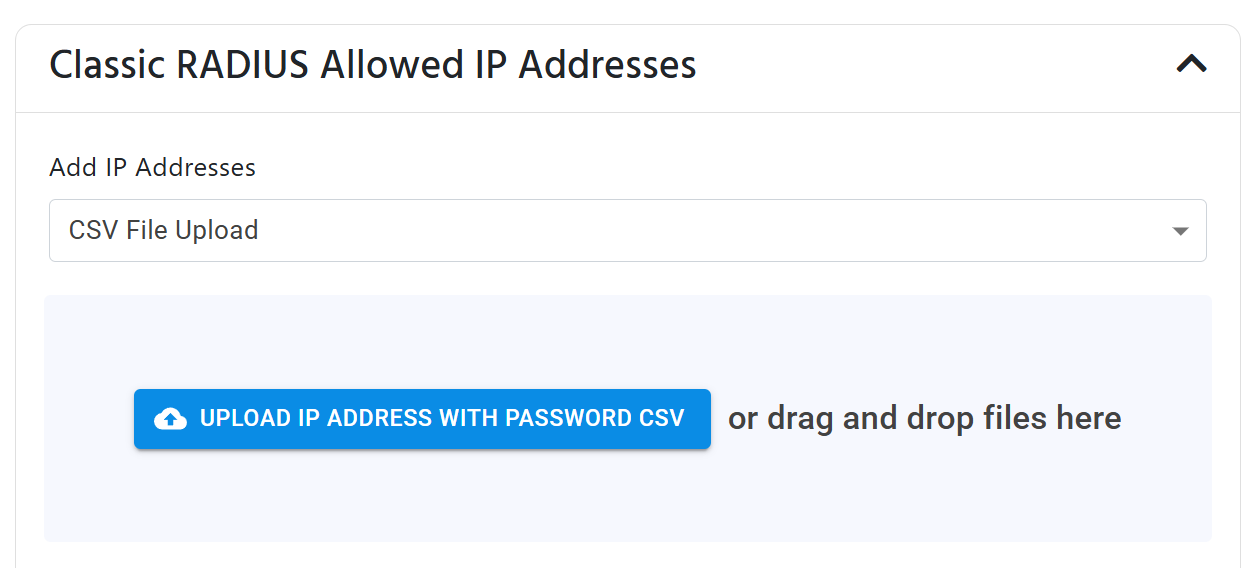
Drop down the Add IP Addresses menu and select CSV File Upload.
-
Either drag-and-drop your CSV file into the upload area or click on the area to browse and select your CSV file.
Collapses this section and completes the checkmark.
How to Configure RadSec for Keytos Shield
RadSec (RADIUS over TLS) uses the incoming RadSec client certificate to authenticate the connecting device and associate it with your network profile. To configure RadSec for your network, you need to add a trusted CA which issues your RadSec client certificates (recommended), or specific certificate thumbprints (ok for testing/troubleshooting).
Certificate Authorities can only be associated with a single Keytos Shield network profile. If you are a Managed Service Provider (MSP) or have multiple customers sharing a public IP address, each customer must use a distinct RadSec CA in their Keytos Shield network profile. Keytos Shield identifies which profile a RadSec request belongs to by the CA that signed the client certificate, so it cannot be shared across multiple profiles. Instead, use distinct CAs for each customer’s network profile or create multiple access policies within one network profile.
How to Add Your Shield CA as a Trusted Certificate Authority for RadSec
Keytos Shield comes with a cloud PKI included, which can be used to issue RadSec client certificates.
- Under Authorized certificate authorities, set Certificate source to Shield.
- Add both the Keytos Shield Root CA and Keytos Shield Issuing CA as trusted certificate authorities for RadSec.
How to Add an EZCA CA as a Trusted Certificate Authority for RadSec
If your RadSec certificate is issued by your EZCA Certificate Authority, then you can easily add the CA to the cloud RADIUS server by:
-
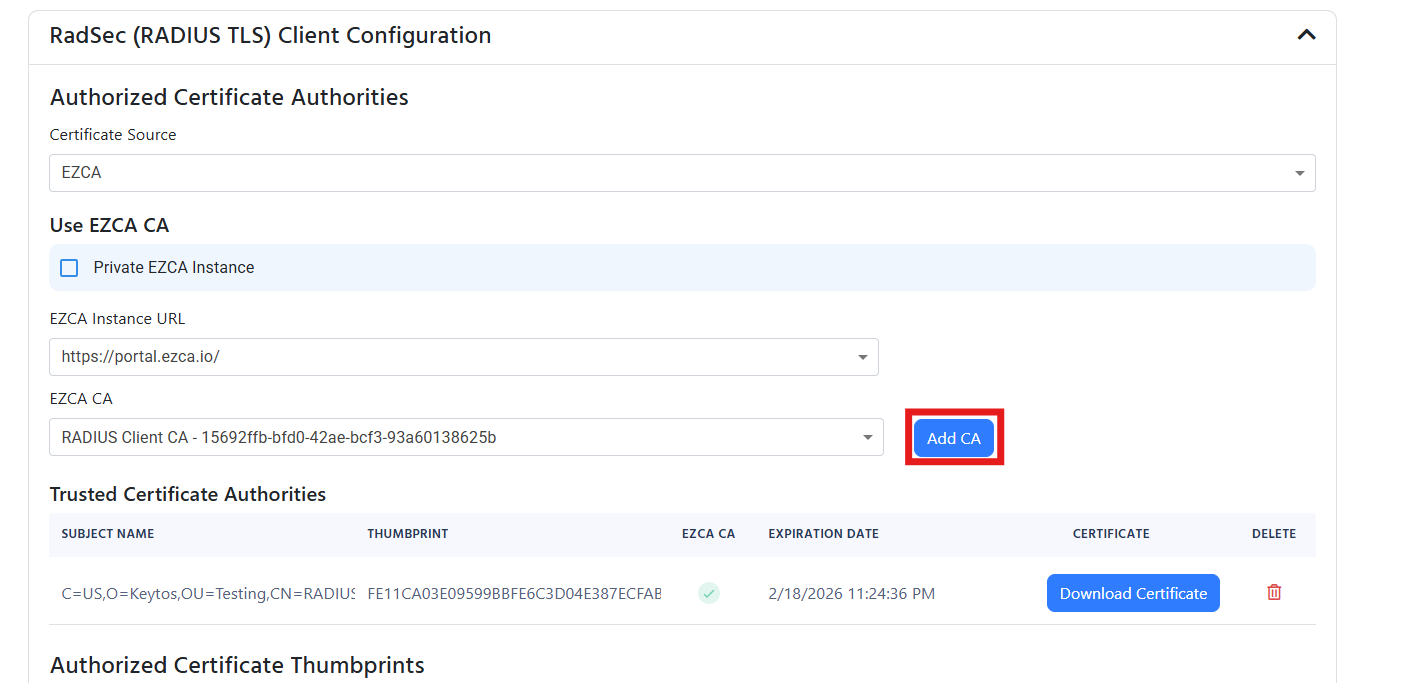
From the Certificate Source dropdown, select EZCA.
-
Under the EZCA Instance URL dropdown , select your EZCA instance.
-
Under the EZCA CA dropdown, select the CA you want to add.
-
Click Add CA to add the CA to the RADIUS server.
-
If you have a 2 tier hierarchy, add both your Root CA and your Issuing CA.
-
Your CA will now be listed under the Trusted Certificate Authorities section.
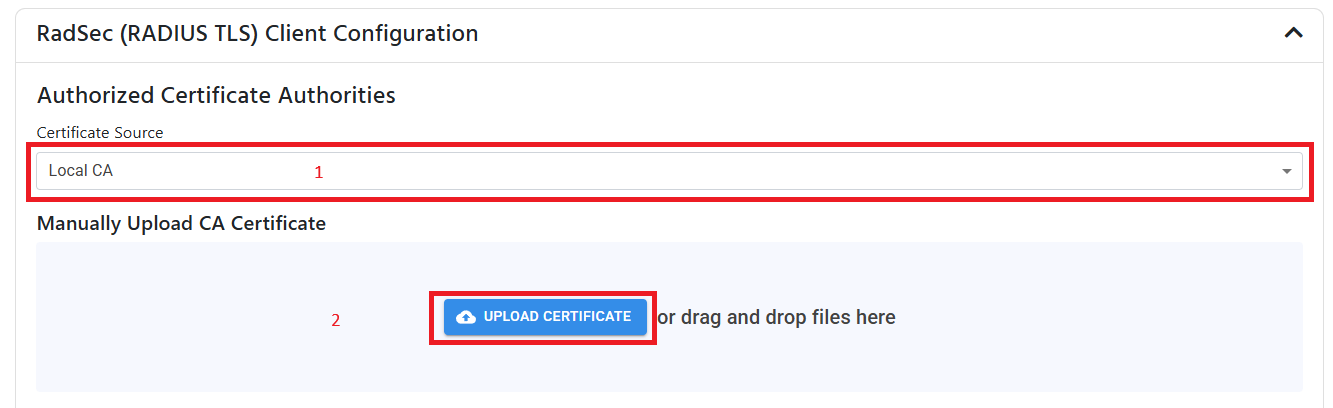
How to Add Certificate Authorities to RadSec Using 3rd Party CA
If your device uses a certificate from a 3rd party CA, you can add the CA to the cloud RADIUS server by following these steps:
-
From the Certificate Source dropdown, select Local CA.
-
Upload your CA certificate in PEM format.
-
Your CA will now be listed under the Trusted Certificate Authorities section.
How to Add a Self-Signed Certificate as a Trusted Certificate for RadSec
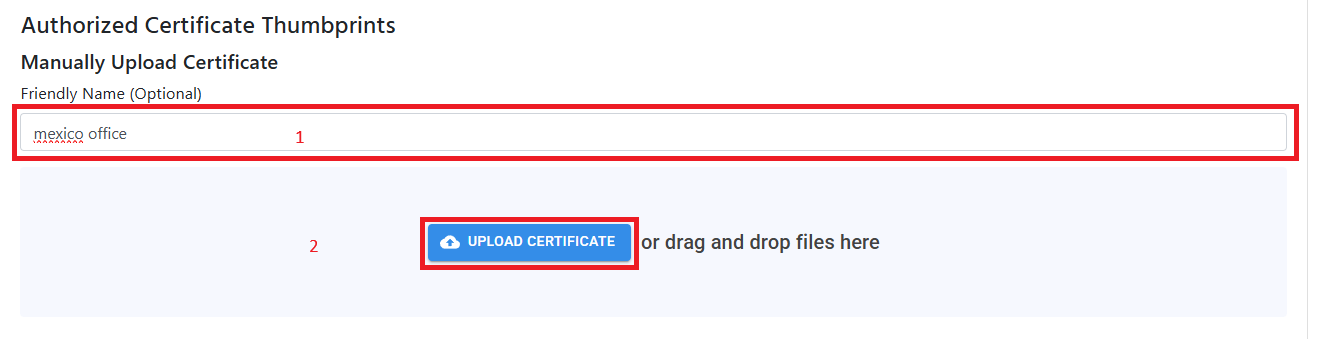
If your networking device only supports self-signed certificates for RadSec, you can upload the single certificate to your cloud RADIUS policy by following these steps:
-
Leave the Authorized Certificate Authorities section empty. You don’t need to add any CAs for self-signed certificates.
-
Under Authorized Certificate Thumbprints, enter a certificate Friendly Name (This is just for your records, useful if have multiple locations).
-
Upload the certificate in PEM format.
-
Your certificate will now be listed under the Trusted Certificates section.
Collapses this section and completes the checkmark.
Step 3: Add Certificate Authorities to Shield for Certificate Authentication
This section is only needed if you plan to use EAP-TLS certificate-based authentication in at least some of your network connections. If you only plan to use username and password authentication, you can skip this section.
A Trusted Certificate Authority (CA) is the CA which issues your user and/or device certificates which are used for network authentication. You can add one more more CAs in this section to control which certificates can authenticate to your network.
To add your Keytos Shield CAs as trusted CAs for certificate authentication, follow these steps:
- Under Certificate Source, select EZCA.
- For your EZCA Instance URL, select the region that matches your Keytos Shield deployment.
- Add both the Keytos Shield Root CA and Keytos Shield Issuing CA as trusted certificate authorities for certificate authentication.
How to Add an EZCA Certificate Authority as a Trusted CA
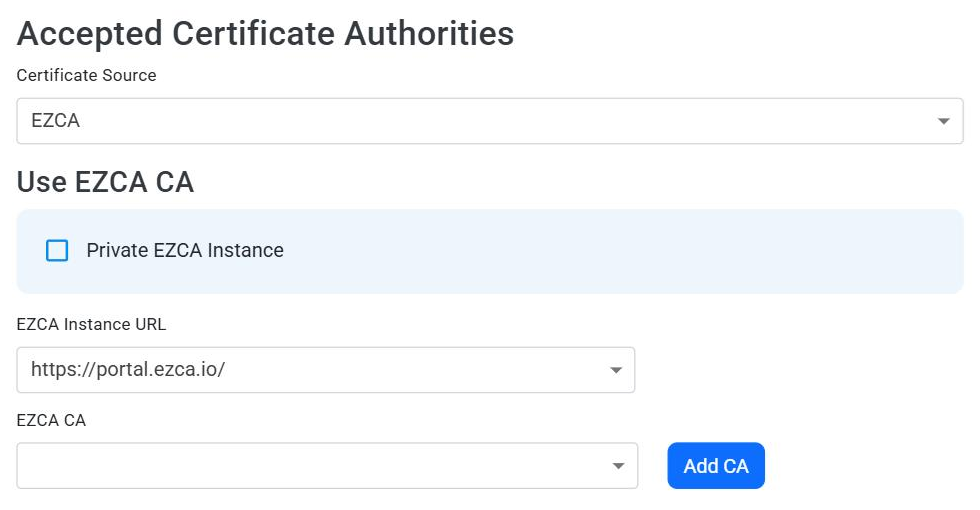
To add an EZCA Certificate Authority as a trusted CA in your network profile, follow these steps:
-
From the Certificate Source dropdown, select EZCA.
-
Under the EZCA Instance URL dropdown, select the EZCA instance where your CA lives (for example
https://portal.ezca.io/,https://eu.ezca.io/, orhttps://au.ezca.io/). Your CAs will only appear in the list if you select the right instance. -
If you are using a private EZCA instance, check the Private Instance checkbox and enter your EZCA URL.
-
Under the EZCA CA dropdown, select your EZCA CA.
-
Click the Add button to add the CA.
-
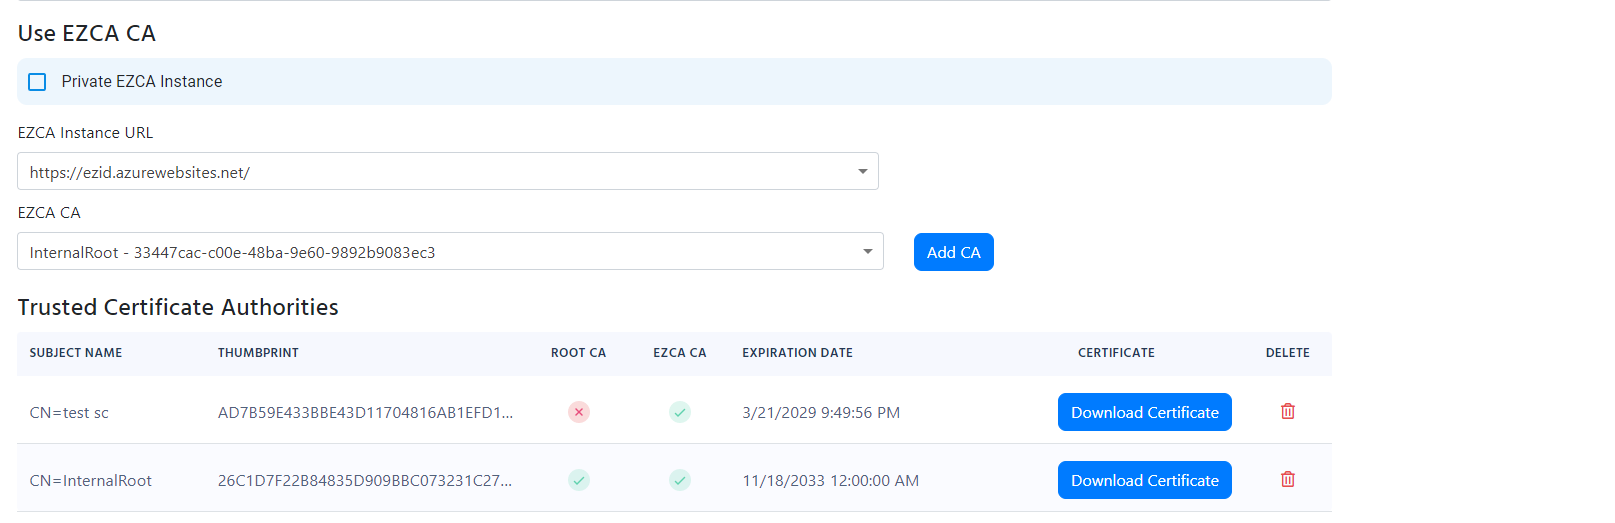
If you have a 2 tier hierarchy, add both your Root CA and your Issuing CA.
-
You should now see your CA(s) listed under your Trusted Certificate Authorities:
How to Add a Third-Party Certificate Authority as a Trusted CA
To add a third-party Certificate Authority as a trusted CA in your network profile, follow these steps:
-
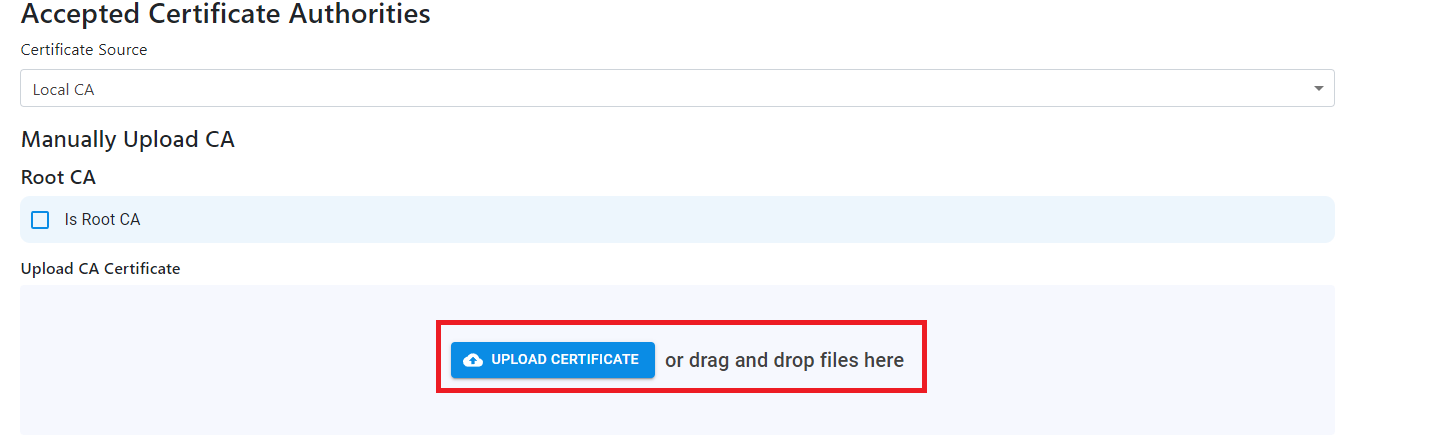
From the Certificate Source dropdown, select Local CA.
-
If you are uploading a Root CA, check the IS Root CA checkbox. If you are uploading an Intermediate/Issuing CA, leave the checkbox unchecked.
-
Click on the Upload Certificate button and select your CA certificate in PEM format.
-
If you have a multi-tier hierarchy, make sure to add both your Root CA and your Intermediate/Issuing CA(s).
-
Repeat the process for each additional CA chain you need to add.
Step 4: Verify Your RADIUS Server Certificate
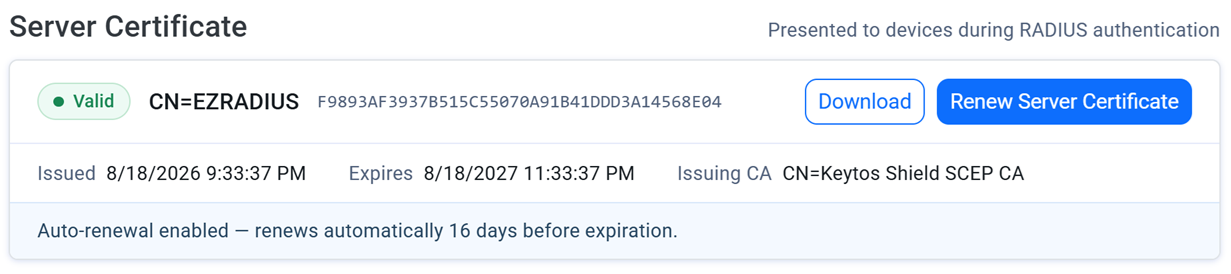
Keytos Shield automatically hosts your RADIUS server certificate, ensuring that your network devices can securely authenticate with the RADIUS server. This certificate is issued and renewed by the same Shield PKI infrastructure you already use for SCEP enrollment, so you do not need to manually manage or renew your RADIUS server certificate.
Step 5: Configure Your RADIUS Network Access Policies
An access policy defines the rules and conditions under which users and devices can authenticate to your network via your network profile. You can configure access policies for certificate-based authentication, Entra ID users, local users, and MAC Authentication Bypass.
Follow these steps to configure your RADIUS network access policies for different types of authentication:
How to Configure RADIUS Network Access Policies
Follow one or more sections below to configure your network access policies
EAP-TLS certificate-based authentication is the strongest method for securing network access, as it relies on certificates rather than passwords to fully encrypt and protect the communication between the client and the network.
There are a few different ways to configure your access policy, depending on what type of certificate or identity you are using for authentication. Select the appropriate tab below to follow the instructions for your specific setup.
How to Accept All Valid Certificates From a Trusted CA
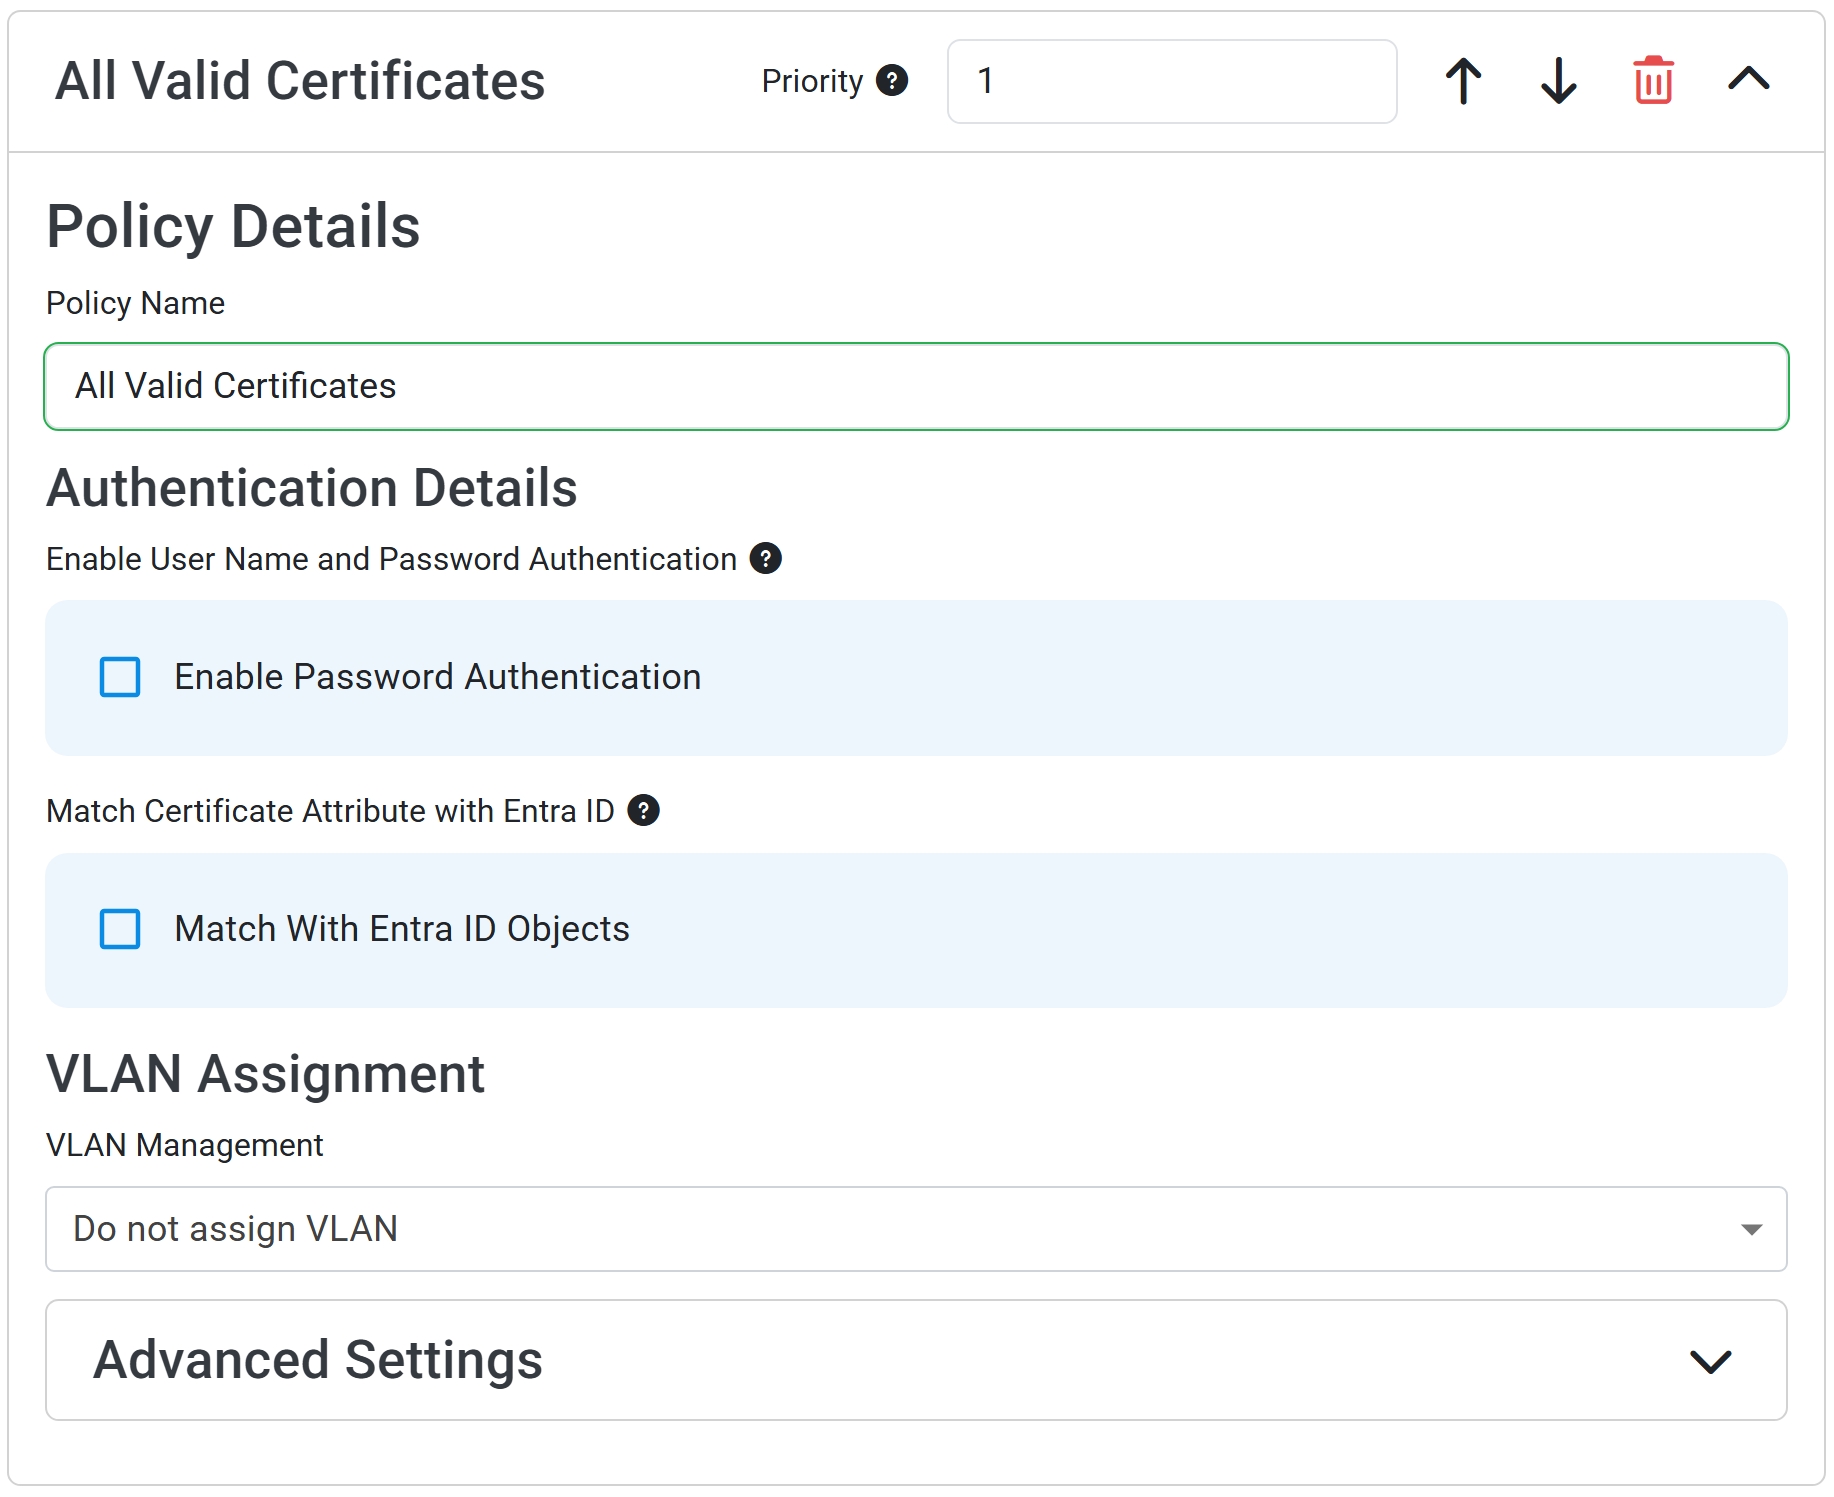
By default, Keytos Shield will allow any certificate issued by a Trusted CA to authenticate, without requiring any additional matching criteria. If you want all valid certificates to be accepted:
-
Click Add Access Policy to create a blank access policy.
-
Provide a Policy Name, such as “All Valid Certificates”.
-
Leave all fields unchecked and in their default state.
How to Only Accept User Certificates From Valid Entra ID Users
If you want to restrict an access policy to only allow user certificates from valid Entra ID users, follow these steps:
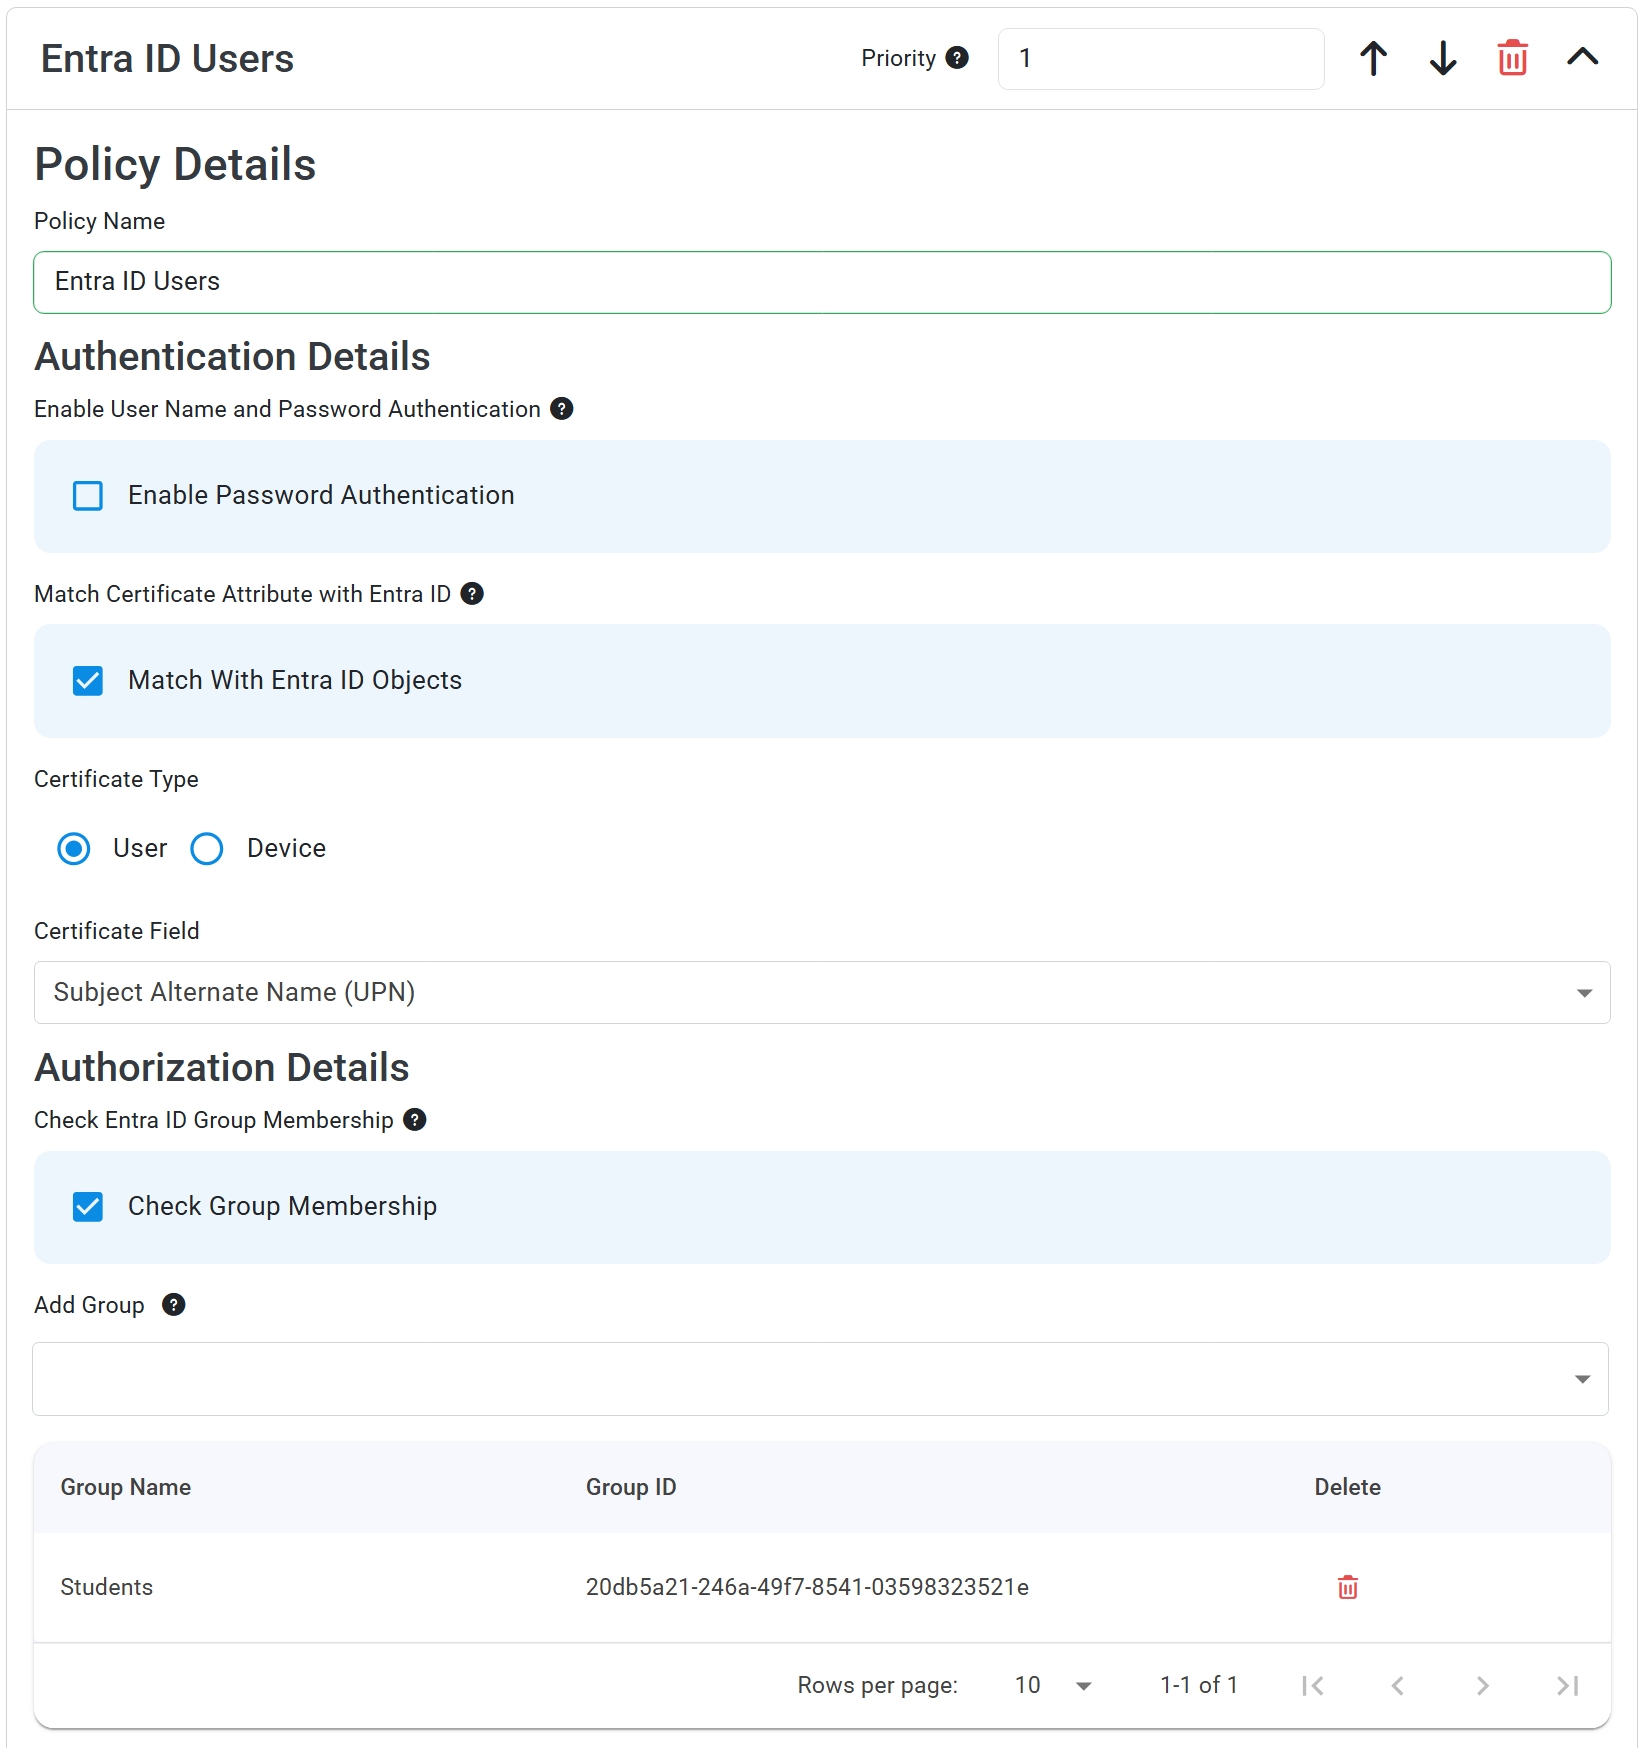
- Check the Match With Entra ID Objects checkbox.
- For Certificate Type, select User.
- Under Certificate Field, select which certificate field contains the user’s User Principal Name (UPN). Usually this is Subject Alternate Name (UPN), which is what our Intune SCEP and Keytos Connect guides configure. If your certificates only contain the user’s email address in an RFC822 Subject Alternative Name (for example Jamf
$EMAILADDRESScertificates), select Subject Alternate Name (Email) instead.
Now that you have matched the certificate with a valid Entra ID user, you can optionally also check that the user is in a specific Entra ID group.
- Check the Check Group Membership checkbox.
- Under the Add Group section, type in the name of the Entra ID group you want to check for membership. Select it from the dropdown list.
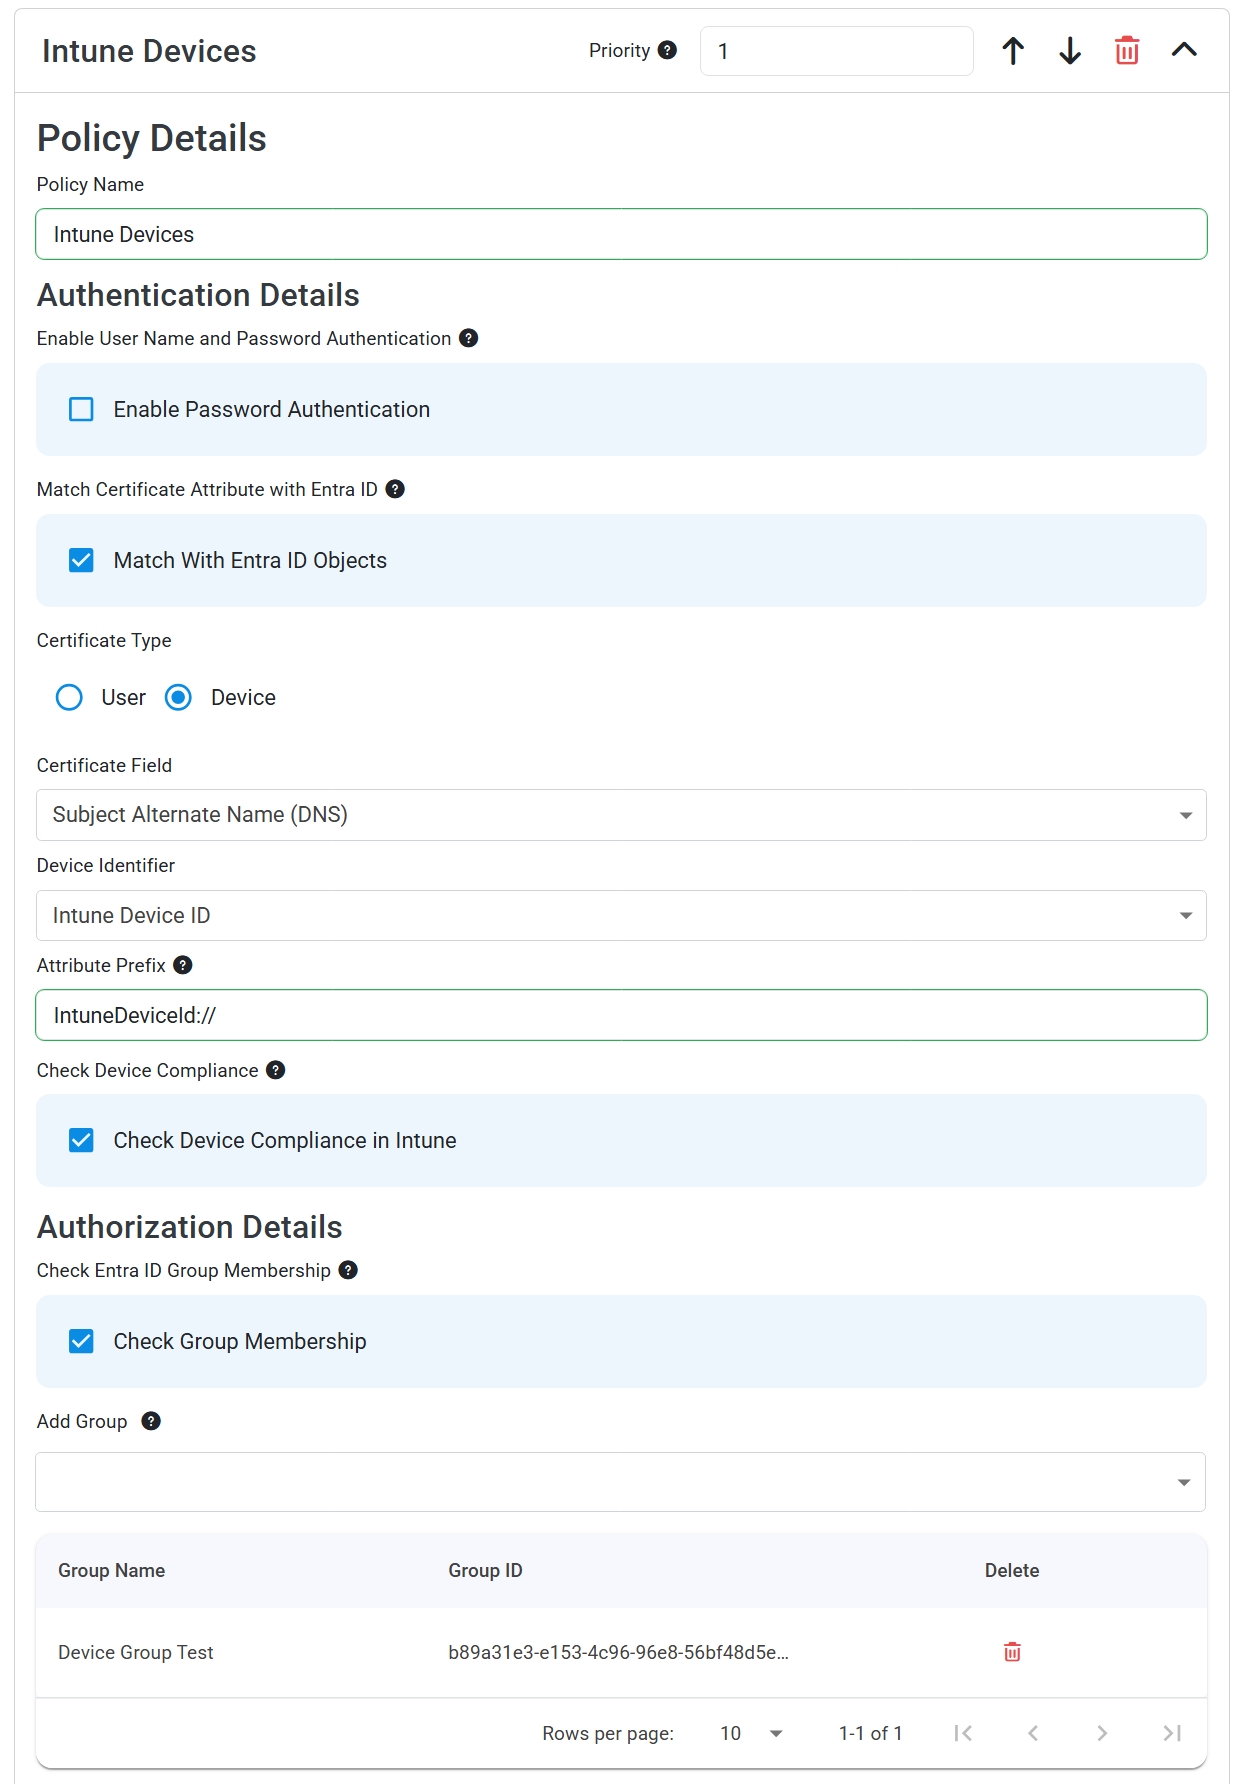
You should now have an access policy that only allows user certificates from valid Entra ID users, optionally restricted to specific Entra ID groups:
How to Only Accept Device Certificates From Valid Intune-Managed Devices
If you want to restrict an access policy to only allow device certificates from valid Intune-managed devices, follow these steps:
- Check the Match With Entra ID Objects checkbox.
- For Certificate Type, select Device.
- Under Certificate Field, select Subject Alternate Name (DNS). Our Intune SCEP guides add the Intune device ID to the certificate as a DNS Subject alternative name with the value
{{DeviceId}}. - For Device Identifier, set this to Intune Device ID, which is the Intune identifier for the device.
- Leave Attribute Prefix empty, since the Subject alternative name only contains the device ID.
Now that you have matched the certificate with a valid Intune-managed device, you can optionally check if the device is compliant in Intune before granting access. This ensures that only devices meeting your organization’s compliance requirements are allowed to match against this policy.
- Check the box for Check Device Compliance in Intune.
If you want to also restrict access based on group membership, follow these steps:
- Check the Check Group Membership checkbox.
- Under the Add Group section, type in the name of the Entra ID group you want to check for membership. Select it from the dropdown list. Note that this group has to contain the device itself, not the user who owns the device.
You should now have an access policy that only allows device certificates from valid Intune-managed devices, optionally restricted to specific Entra ID groups:
Intune and Entra ID device matching only work with certificates issued through an Intune SCEP profile, because other MDMs (such as Jamf, SimpleMDM, or NinjaOne) do not put an Intune or Entra ID device ID in the certificate. For devices managed by other MDMs, use All Valid Certificates (CA matching) or user certificate matching instead.
How to Only Accept Device Certificates From Valid Entra ID Devices
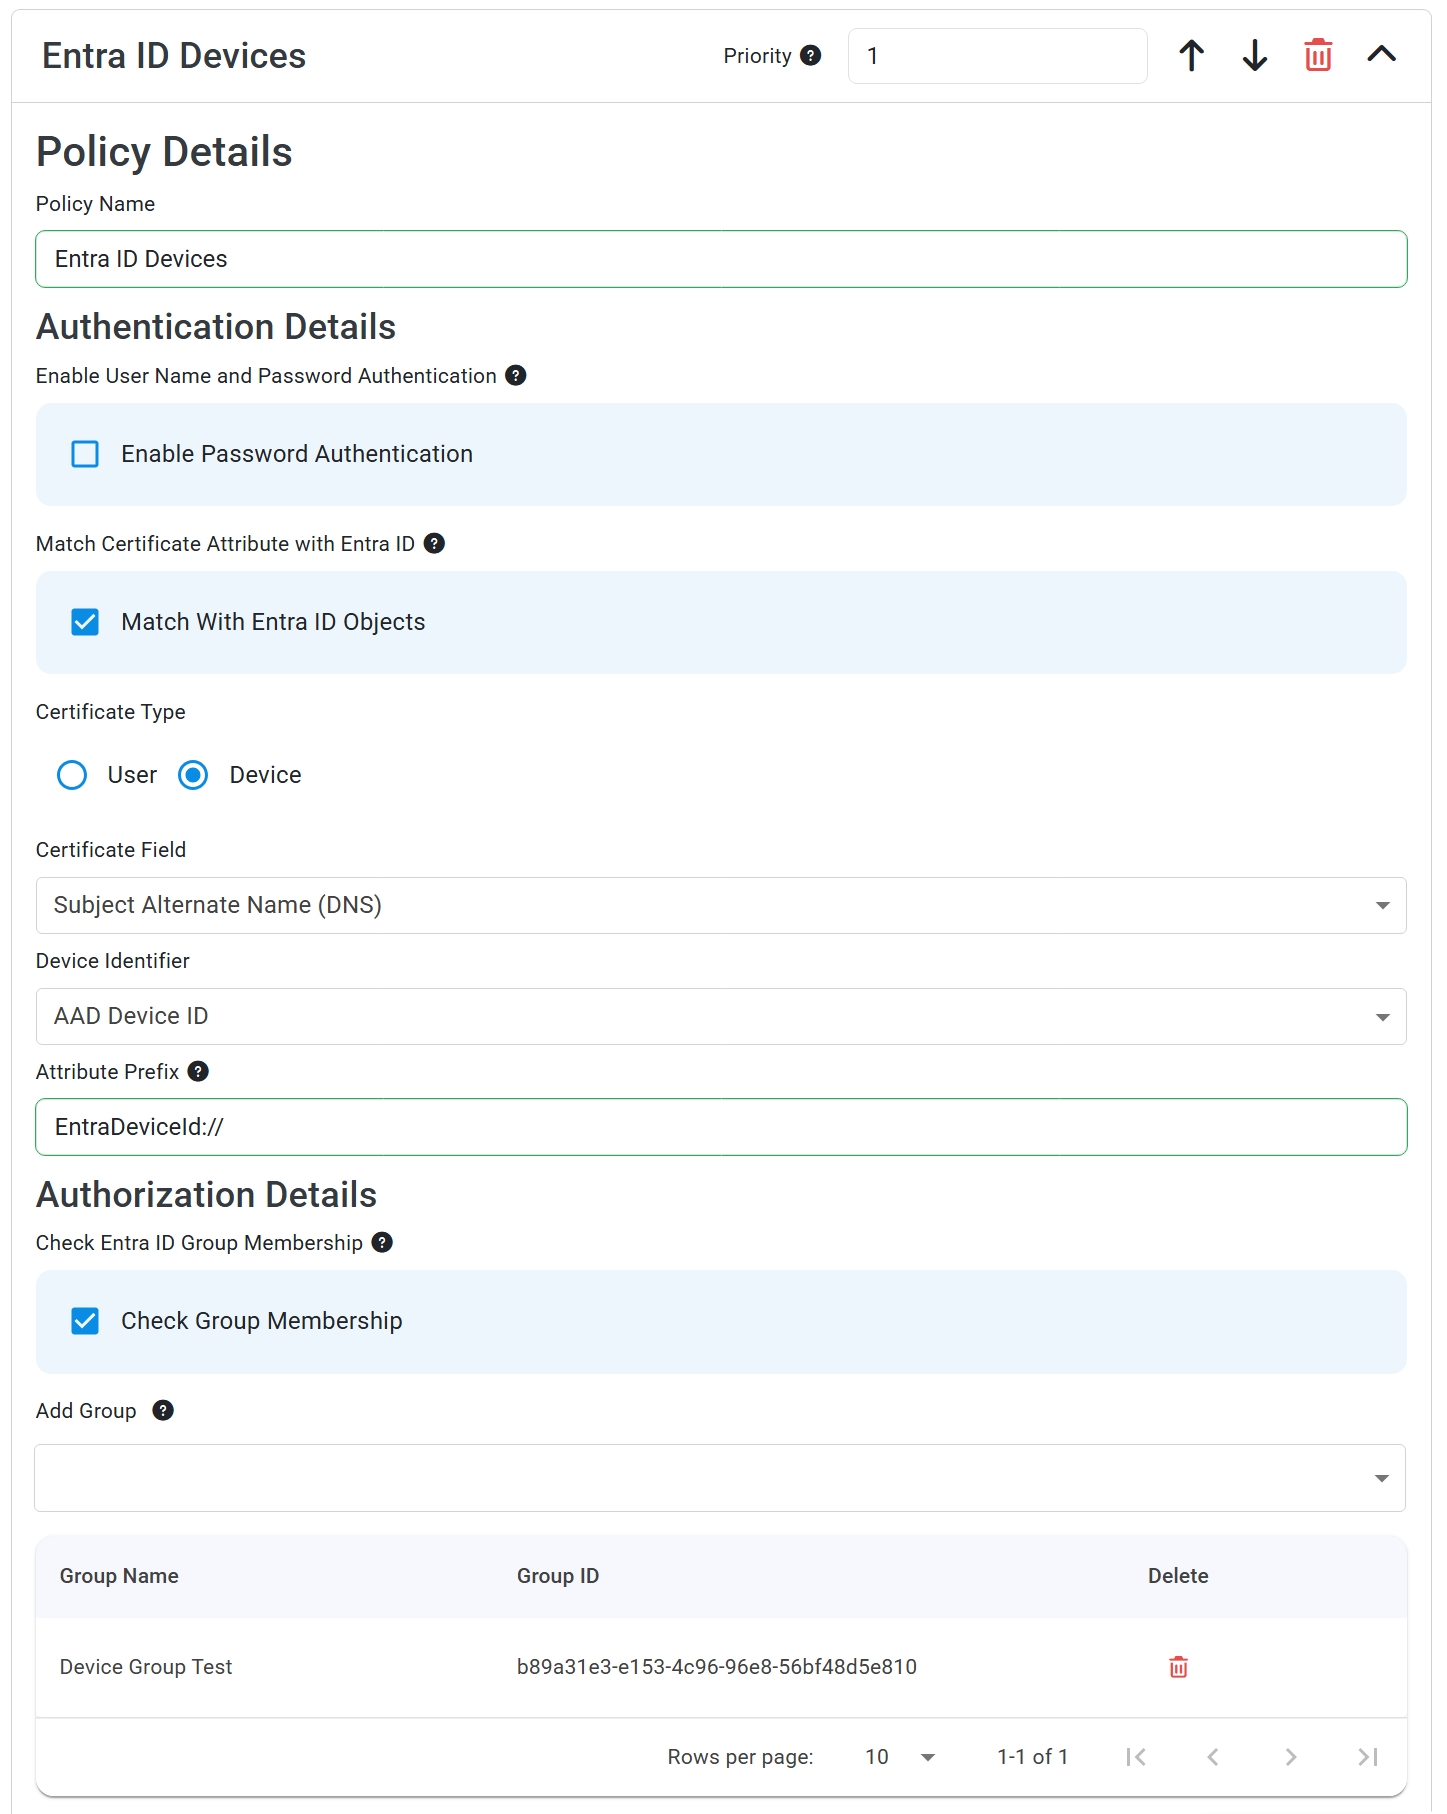
If you want to restrict an access policy to only allow device certificates from valid Entra ID devices, follow these steps:
- Check the Match With Entra ID Objects checkbox.
- For Certificate Type, select Device.
- Under Certificate Field, select which certificate field contains the device’s Entra ID device ID. If you followed our Intune SCEP guides, the Entra ID device ID is in the subject name (
CN={{AAD_Device_ID}}), so select Subject Name. - For Device Identifier, set this to AAD Device ID, which is the Entra ID identifier for the device.
- If you selected a Subject Alternative Name field, set Attribute Prefix to any text that comes before the device ID in that field so that the system correctly extracts the device ID from the certificate. Leave it empty when using the Subject Name field.
If your Intune SCEP profile uses CN={{DeviceId}} (the Intune device ID) instead of CN={{AAD_Device_ID}}, use Intune device matching instead of Entra ID device matching.
Now that you have matched the certificate with a valid Entra ID device, you can optionally also check that the device is in a specific Entra ID group.
- Check the Check Group Membership checkbox.
- Under the Add Group section, type in the name of the Entra ID group you want to check for membership. Select it from the dropdown list. Note that this group has to contain the device itself, not the user who owns the device.
You should now have an access policy that only allows device certificates from valid Entra ID devices, optionally restricted to specific Entra ID groups:
Collapses this section and completes the checkmark.
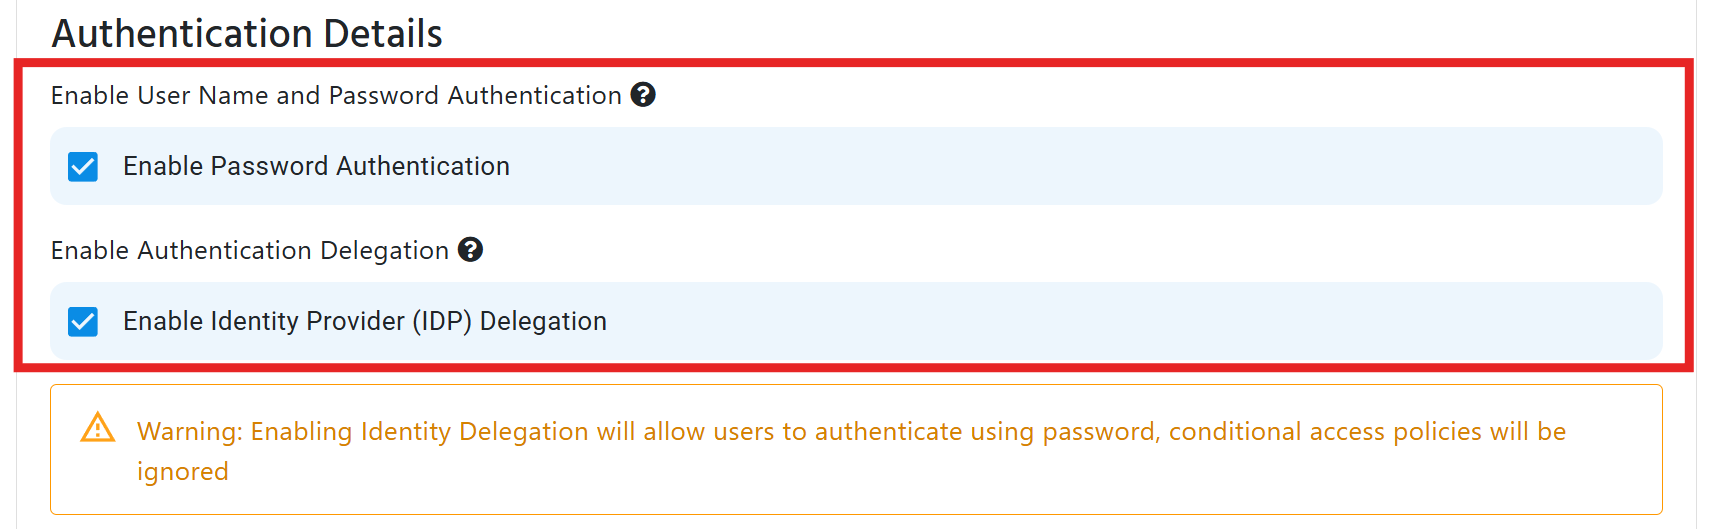
If you want your users to authenticate to your network directly using their Entra ID username and password, you will need to create an access policy that enables EAP-TTLS with Entra ID credentials.
How to Create an Entra ID Access Policy
Follow the steps below to configure such an access policy:
-
Click Add Access Policy to create a blank access policy.
-
Provide a Policy Name, such as “Students”.
-
For this policy you only want to enable EAP-TTLS with Entra ID credentials, so we will select the Enable Password Authentication checkbox and also select Enable Identity Provider (IDP) Delegation.
 Note
NoteWhen you enable IDP Delegation, Keytos Shield will disable PEAP-MSCHAPv2 and standalone PAP for this specific access policy since they are not compatible with IDP Delegation. Only EAP-TTLS with PAP as the inner (phase 2) method is supported for Entra ID, which is what our Wi-Fi profile guides configure.
(optional) Restrict Access Policy to Specific Entra ID Groups
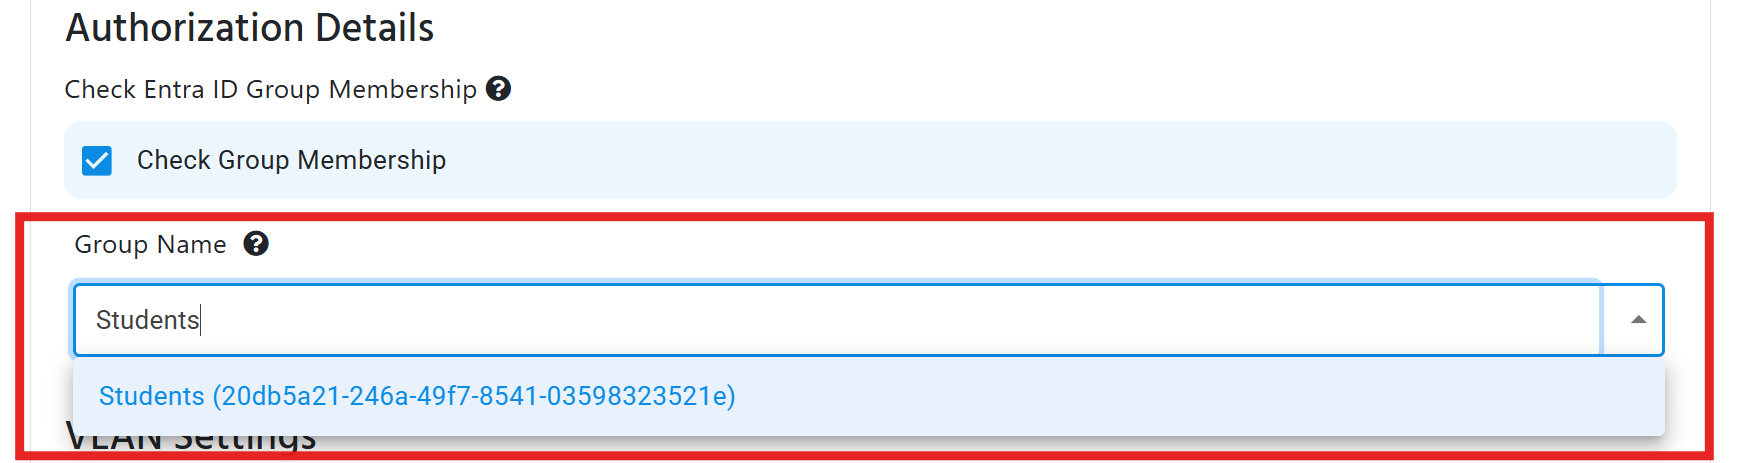
You can optionally restrict this access policy to only apply to users who are members of specific Entra ID groups. This allows you to control which users are subject to this policy based on their group membership.
-
Check the box for Check Group Membership.

-
Under Group Name, enter the Group Name that you want to check for membership in the “Group Name” field. If you enter a name, Keytos Shield will automatically search for the group in your Entra ID tenant. Click the matching group from the dropdown to select it.
Collapses this section and completes the checkmark.
If you want your users to authenticate to your network directly using local user accounts and legacy protocols, you will need to create an access policy that enables local user authentication.
How to Create a Local User Access Policy
Follow the steps below to configure such an access policy:
-
Click Add Access Policy to create a blank access policy.
-
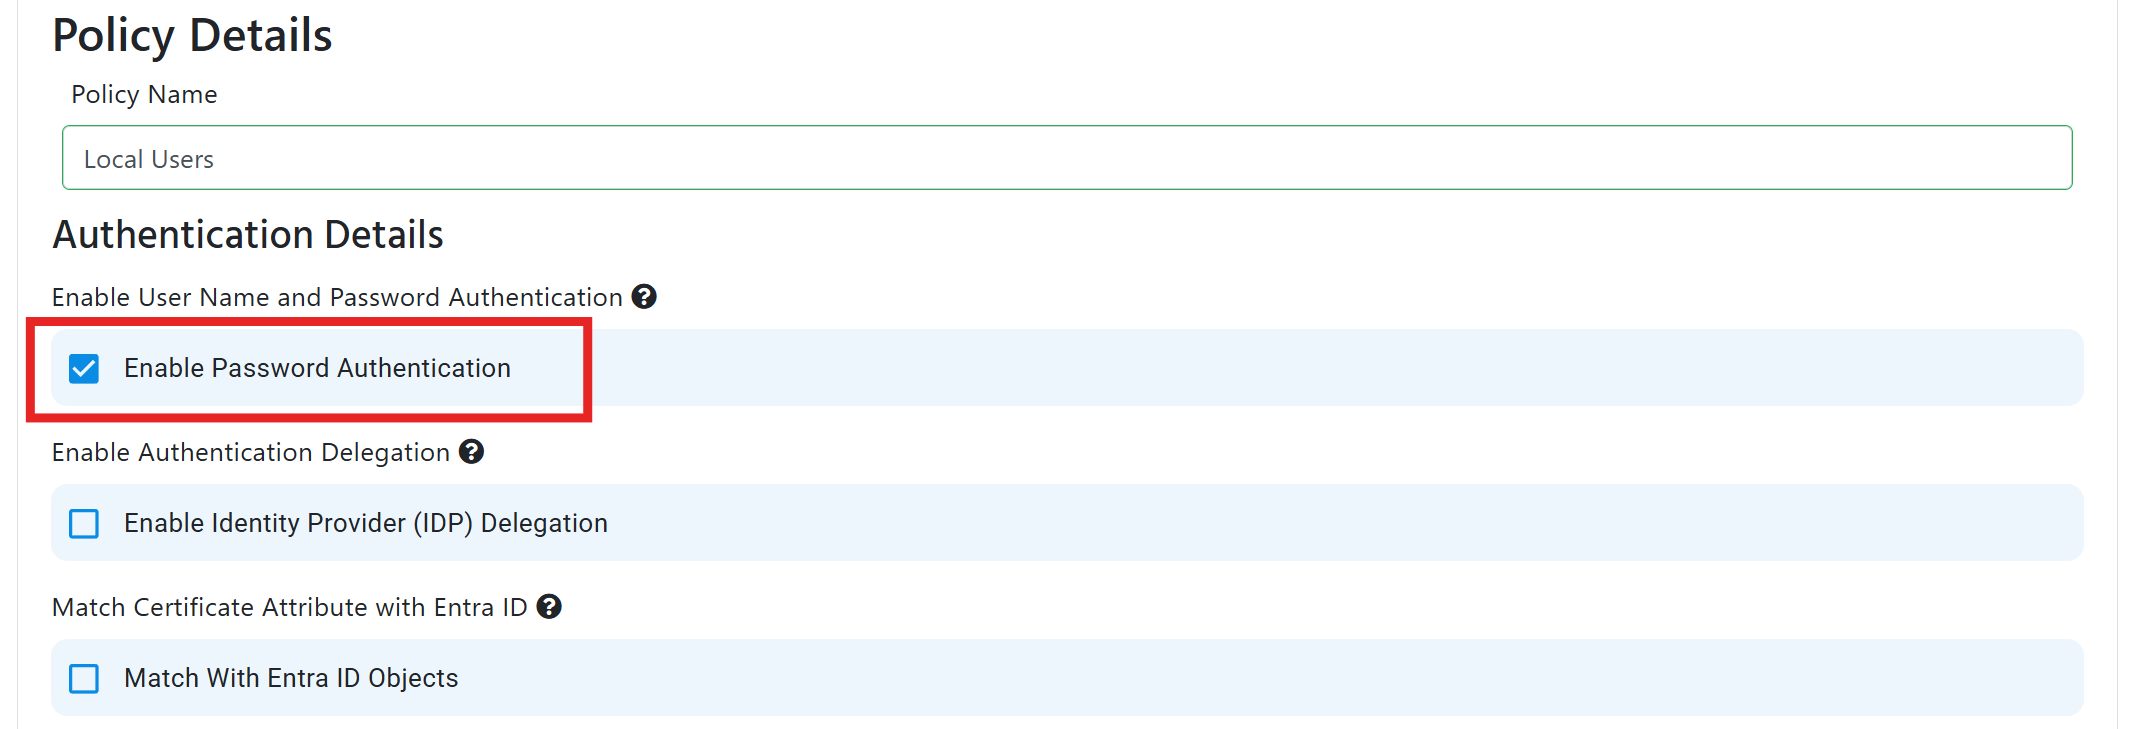
Provide a Policy Name, such as “Local Users”.
-
Check the box for Enable Password Authentication, which will allow PAP, PEAP-MSCHAPv2, and EAP-TTLS RADIUS methods to be used for authentication.
-
Leave Enable Identity Provider (IDP) Delegation unchecked, as this is only needed when using Entra ID for authentication.
Collapses this section and completes the checkmark.
If you have legacy devices that cannot authenticate using 802.1X, you can use MAC Authentication Bypass (MAB) to allow these devices to connect to the network.
MAC Authentication Bypass relies on MAC addresses to identify devices. However, MAC addresses can be easily spoofed by malicious users, so make sure to set a specific VLAN for MAB devices to limit their access to the network.
How to Enable MAC Authentication Bypass
Follow the steps below to configure such an access policy:
- Click Add Access Policy to create a blank access policy.
- Provide a Policy Name, such as “MAB Devices”.
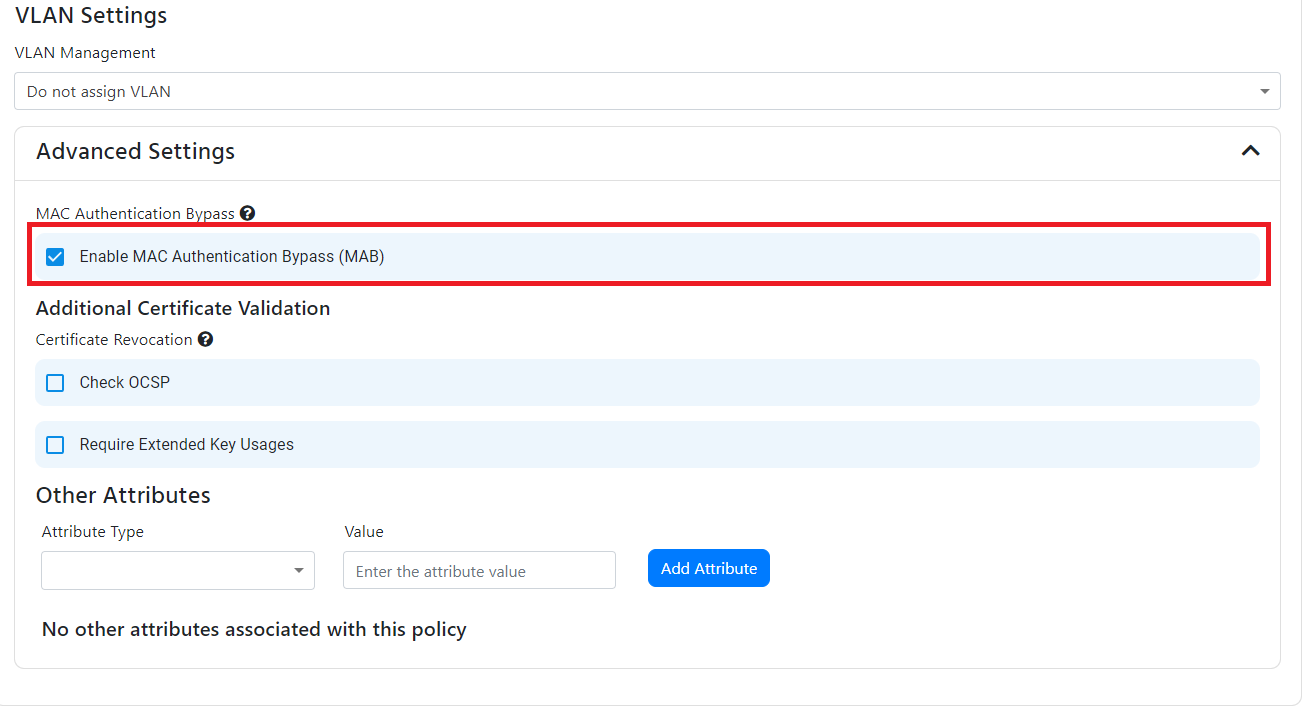
- Expand the Advanced Settings section.
- Check the box for Enable MAC Authentication Bypass.
Collapses this section and completes the checkmark.
Step 6: How to Assign VLANs Within Your Network Profile
By default, Keytos Shield will not set a Virtual LAN (VLAN), and your network will use its own default VLAN. However, you can specify a specific VLAN in each access policy to assign specific users and devices to their own VLAN and override the default.
This is useful for putting specific Entra ID users or groups into their own VLANs, or putting compliant devices into a separate VLAN from non-compliant devices.
If you do not want to assign a VLAN for this access policy, keep VLAN Management set to Do not assign VLAN. This will ensure that the network uses its default VLAN for all users and devices under this access policy.

If you want to assign a specific, static VLAN to all devices that match against this access policy, set VLAN Management to Assign Static VLAN and enter the VLAN ID in the VLAN Name field. This ensures that all matching devices are placed in the specified VLAN, overriding the network’s default VLAN.
If you want to assign different VLANs to different users or devices based on their attributes, you should either:
- Set up multiple access policies, each with a different static VLAN and different matching attributes.
- Use dynamic VLAN assignment based on certificate values to automatically assign VLANs according to the information contained in the user’s certificate.
More information on how to use this field is available in our reference architectures

VLANs can also be set based on a VLAN ID specified within the certificate authenticating to the network. To configure this:
-
From the VLAN Management dropdown, select Assign Dynamic VLAN (From Certificate Value).
-
Under Certificate Field, select the field in the certificate that contains the VLAN ID.
-
If there’s a prefix in front of the VLAN ID in the certificate, enter the prefix in the Prefix field. Keytos Shield will ignore this prefix when assigning VLANs.

Step 7: Set Your Access Policy Order
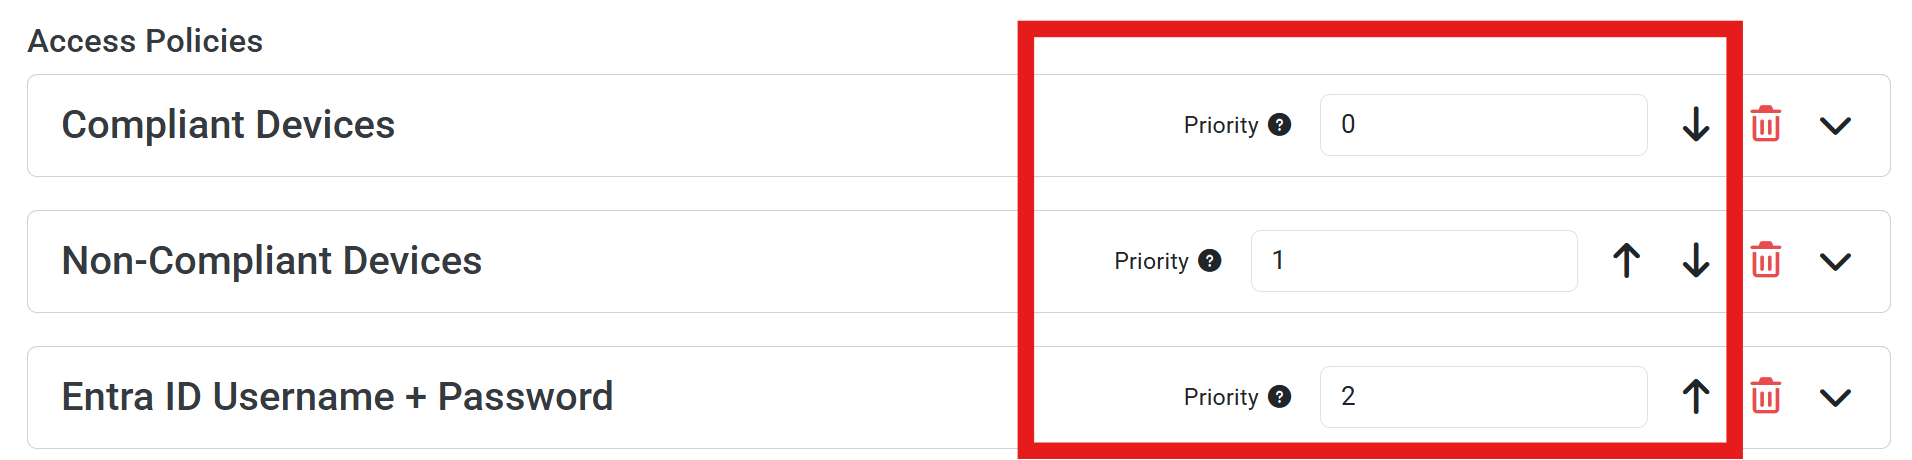
Access Policies are evaluated in sequential order, starting with priority 0, and working in increasing priority value through all the policies. An incoming authentication request will be evaluated against each policy in sequence until a matching policy is found or all policies have been evaluated.
- If a policy is matched, the corresponding VLAN assignment and other settings defined in that policy will be applied to the authenticated device and no further policies will be evaluated.
- If no policy is matched, the authentication request will be denied, and the device will not be granted access to the network.
You can reorder policies by clicking the ↑ (up) and ↓ (down) arrows next to each policy to adjust their priority within the list, or by manually specifying the priority value for each policy.
Step 8: Optionally Configure Advanced Access Policy Settings
If you have more advanced requirements for your access policies, you can configure them by expanding the Advanced Settings tab and configuring the available options.
Advanced Access Policy Settings
Optionally configure advanced settings for your access policies
If you want to bypass authentication for devices based on their MAC address, you can:
- Check the box for Enable MAC Authentication Bypass (MAB).
- Either directly add your MAC addresses, or enable Bulk Upload Addresses to add multiple MAC addresses at once.
Collapses this section and completes the checkmark.
Keytos Shield checks CRLs (Certificate Revocations Lists) by default but if you also want to check OCSP, you can check the Enable OCSP checkbox. you can read more about the difference between CRL and OCSP here
Collapses this section and completes the checkmark.
If you want to require that the certificate being used for authentication has specific Extended Key Usages such as “Client Authentication”:
- Check the box for Require Extended Key Usage.
- Either select an EKU from Predefined Extended Key Usages, or enter a custom EKU in the Custom Extended Key Usage > Name and Object Identifier fields.
- Click Add Extended Key Usage to add the EKU configuration.
Collapses this section and completes the checkmark.
If you want to match attributes in the request (for example, matching the SSID name sent as a called station ID), you can add the attributes in the Match Attributes in Request and enter the value and the matching scheme (either contains or equals). Some common attributes to match are:
- Called-Station-ID: Usually set-up to contain the SSID of the network or the MAC address of a device when carrying out MAC-Authentication-Bypass.
- NAS Identifier (NAS-ID): Usually set-up to contain the SSID of the network or the MAC address of a device when carrying out MAC-Authentication-Bypass.
Collapses this section and completes the checkmark.
If you want to send attributes in the response (for example, sending the Filter-Id to the device), you can add the attributes in the Sent Attributes in Response and enter the value. Supported attributes are:
- Filter-Id: Can be used to assign a pre-defined access control list (ACL) to the user that successfully authenticates with the access policy
- Cisco-AVPair: Cisco-specific attribute
Collapses this section and completes the checkmark.
Step 9: Save Your Network Profile
At the bottom of the page, click Save Network Profile to save all the changes made to your network profile.
How to Delete a Shield Network Profile
If you need to delete a Shield network profile, follow these steps:
-
Navigate to your regional Keytos Shield portal. You can find this at the Keytos global portal. (US Government Portal).
-
From the left-hand navigation menu, select Network Profiles:
-
Locate the network profile you want to delete, scroll down to the bottom of it, and click Remove Network Profile.
