

















How To Distribute Shield Network Profiles to Your macOS Devices via Jamf Pro
Overview - How to Distribute Shield Network Profiles to macOS via Jamf Pro
To connect your Jamf Pro-managed devices to your network, you need to distribute a network profile that includes the necessary network settings, authentication methods, and certificates. This guide will walk you through the steps to configure and push these profiles to your devices using Jamf Pro.
How Does Distributing Network Profiles to macOS via Jamf Pro Work?
Pushing a network profile to a managed device in Jamf Pro requires a few different pieces to properly configure trust, encryption, and authentication. This typically involves:
- Trusted Certificate: For a device to trust your Shield identities, server endpoints, and network infrastructure, it must have your Shield’s Root CA certificate pushed to its trusted certificate store. Without this certificate, the device will not be able to establish a secure connection to Shield for network access or authentication.
- ACME Certificate: Every Jamf Pro managed device needs its own identity and certificate, which is delivered via the ACME protocol. Shield communicates with your device and with Jamf Pro via ACME to ensure that each device has a unique and trusted identity for network authentication.
- Wi-Fi Profile: A Wi-Fi profile contains the necessary network settings, such as the SSID, security type, and authentication method, required for the device to connect to your network. This profile ensures that the device can automatically connect to the network using the appropriate credentials and certificates provisioned through Jamf Pro.
Step-by-Step Guide - How to Distribute Shield Network Profiles to macOS via Jamf Pro
Follow this guide to distribute your Keytos Shield network profiles to your devices using Jamf Pro. This includes setting up the necessary certificates, creating Wi-Fi profiles, and testing the configuration to ensure your devices can connect securely to your network.
Prerequisites for Setting Up Network Profiles in Jamf Pro
- The Keytos Entra ID applications are registered in your tenant.
- You have signed up for a Keytos Shield Plan.
- You have existing access policies in Keytos Shield.
- You are a Subscription Owner or Network Administrator.
- You have checked Jamf Pro under “Which MDMs do you use to manage your devices” in Keytos Shield.
- You are an Jamf Pro Administrator.
Step 1: How to Enable Jamf Pro Integration with Keytos Shield
Before you can distribute network profiles and certificates, you need to enable the integration between Jamf Pro and Keytos Shield. This allows Jamf Pro to communicate with Shield for certificate issuance and profile management.
-
Login to your Keytos Shield portal.
-
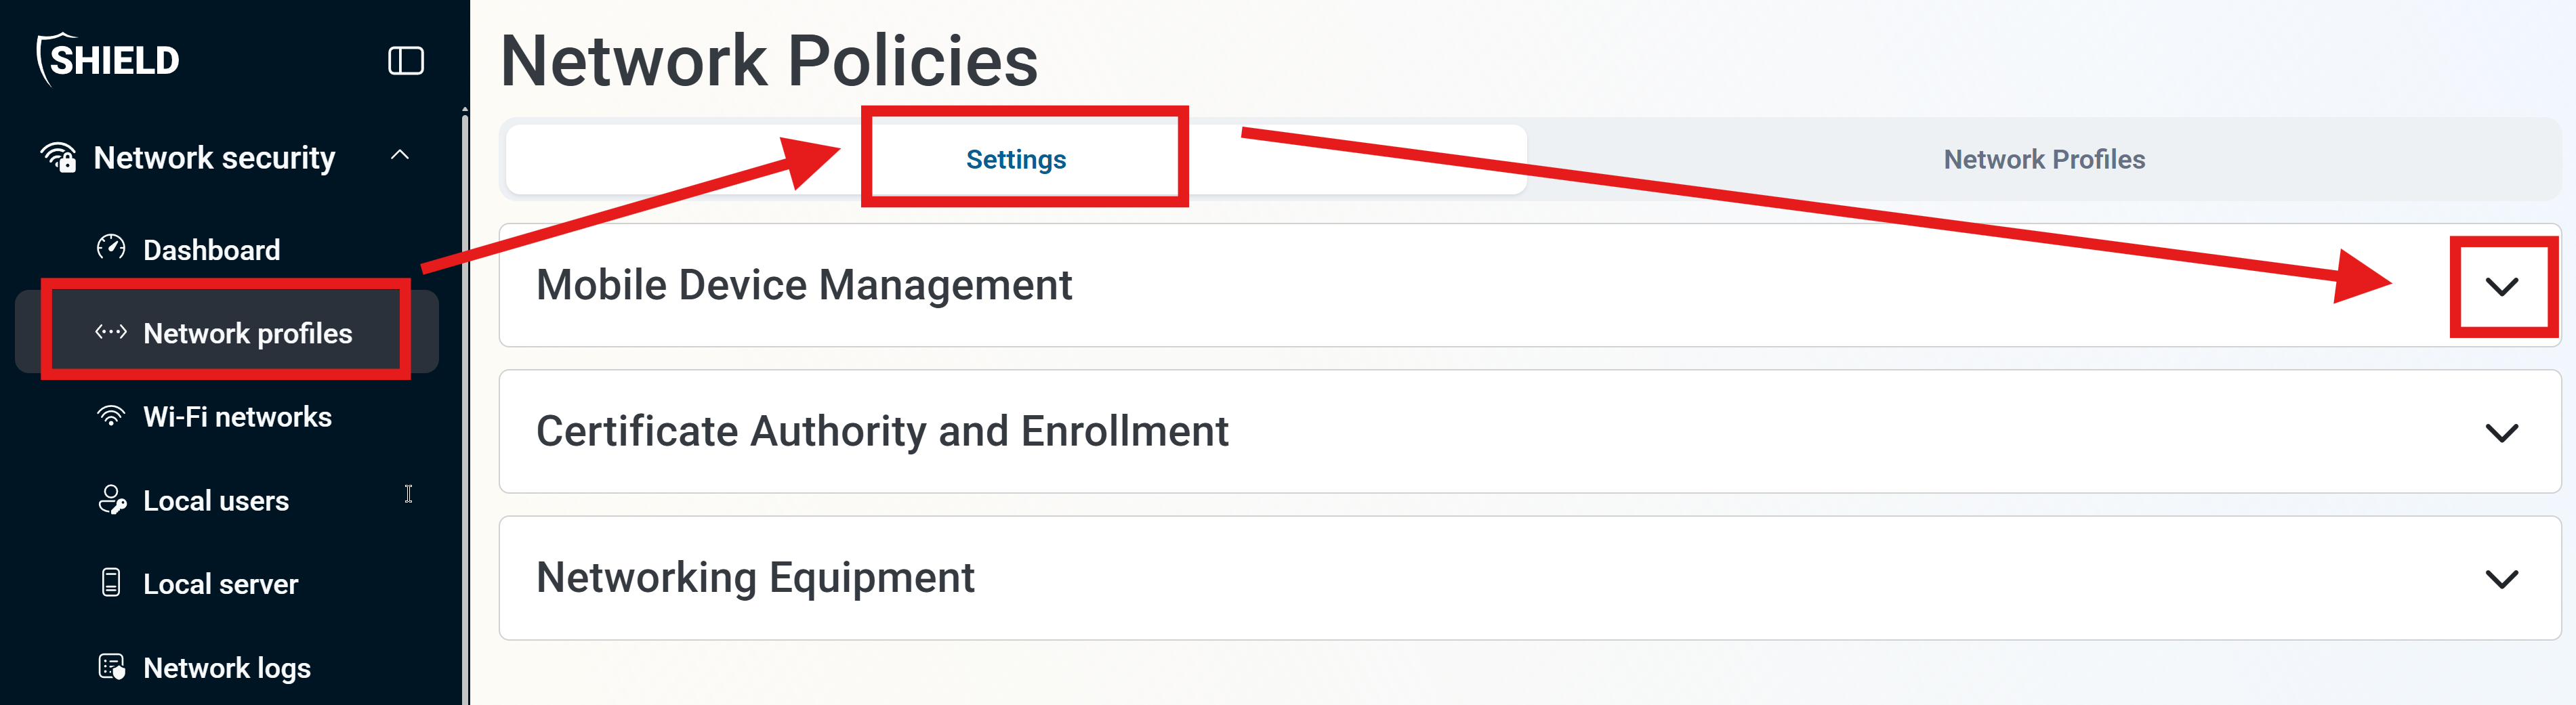
From the left-hand menu, select Network profiles.
-
From the top tabs, select Settings.
-
Expand Mobile Device Management.
-
Select the MDM solution(s) you use within your environment, including Jamf Pro. You can select as many as applicable.
- Some MDM solutions may require additional configuration steps. Follow the specific instructions provided for each MDM solution to complete the integration.
-
Click Save MDM Configuration to apply your changes and enable the integration with the selected MDM solution(s).
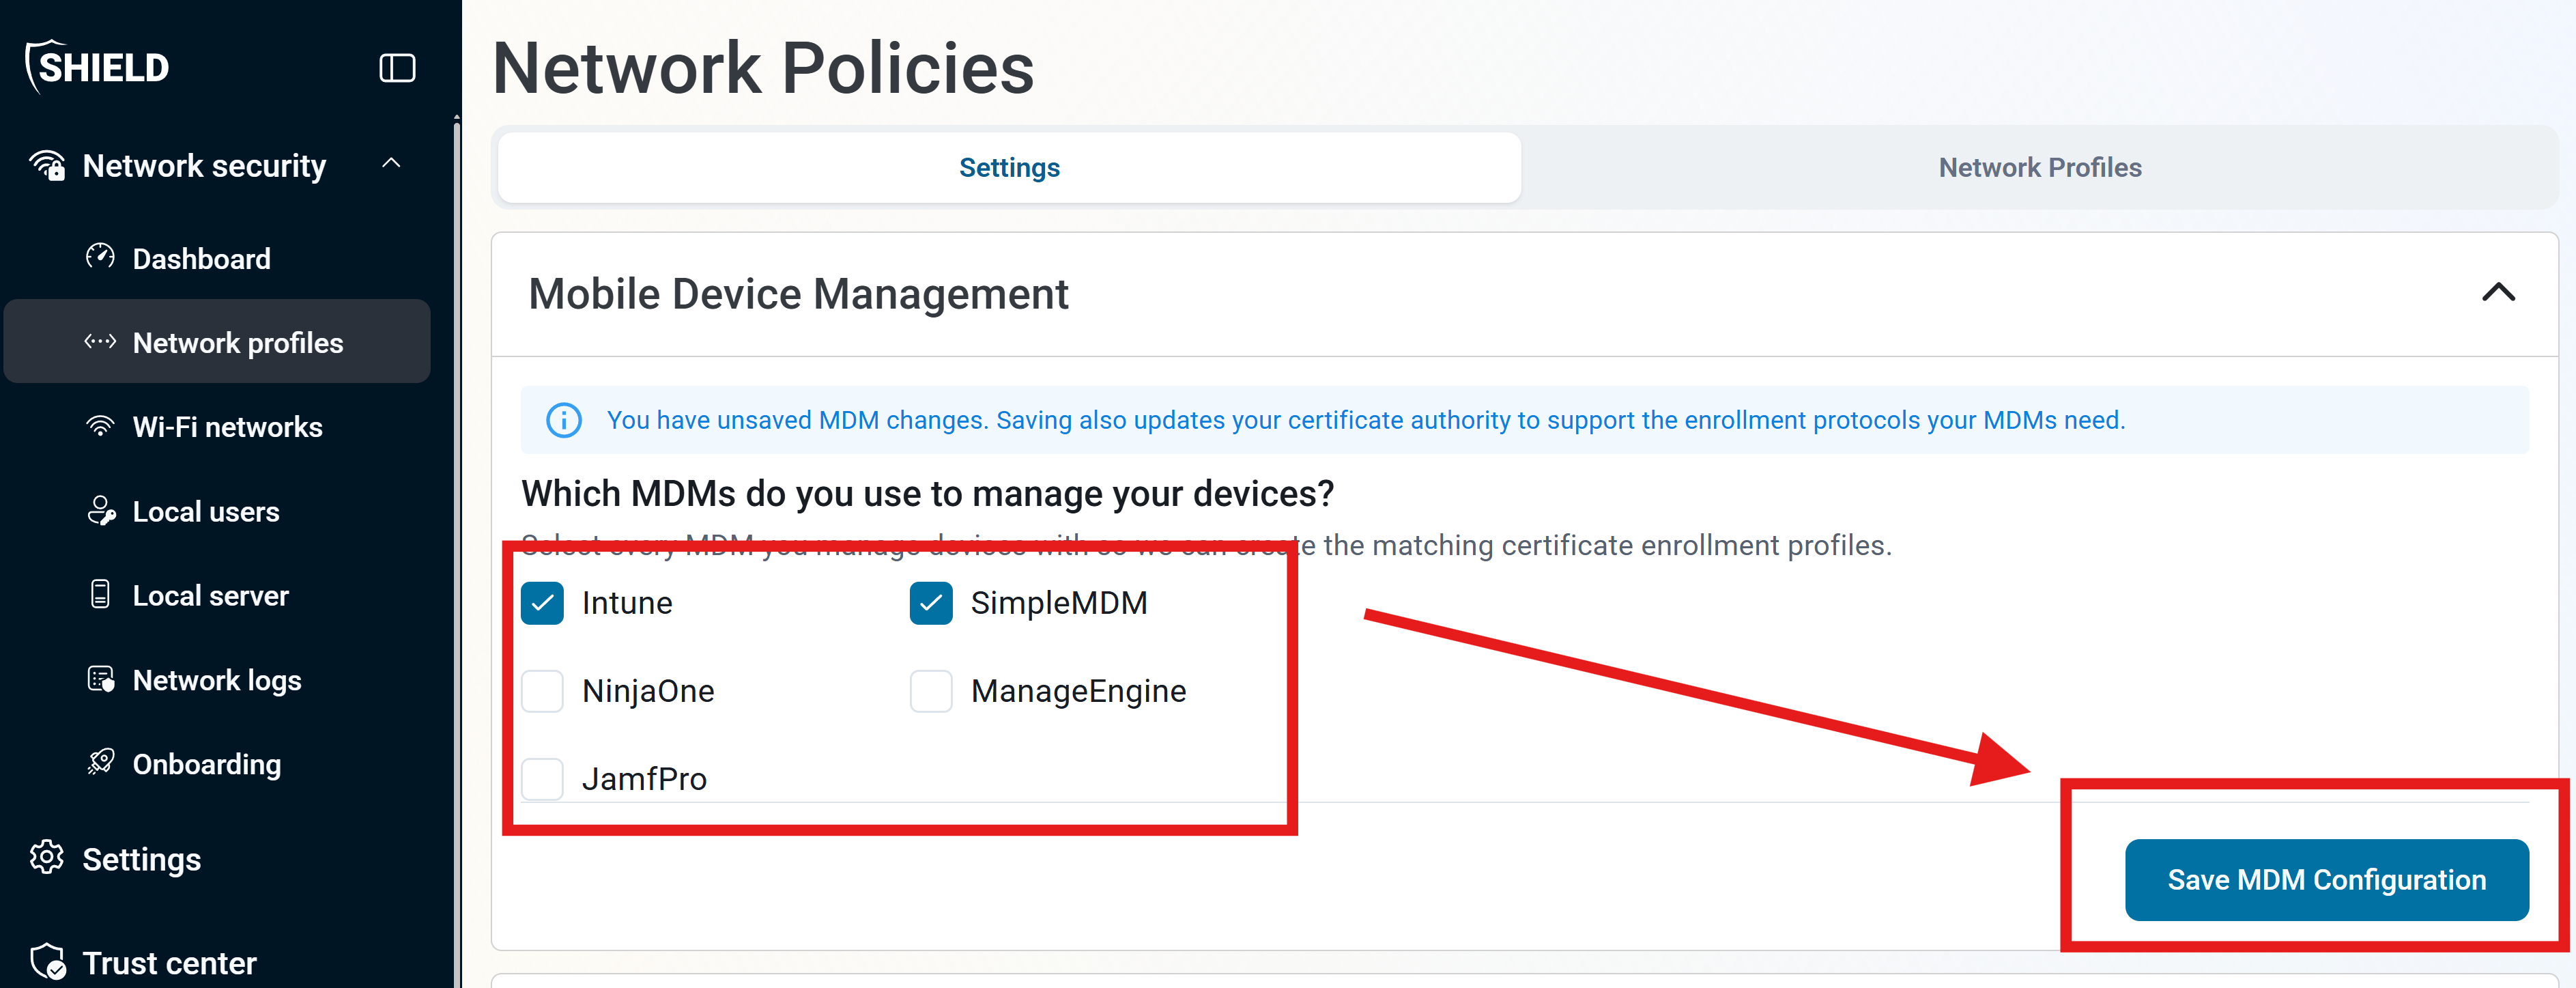
Leave this tab open because you will need to come back in a bit to grab a few pieces of information.
Step 2: How to Push Your Shield CA Certificates as Trusted Certificates on Jamf Pro Devices via Jamf Pro
For your devices to establish a secure connection to Keytos Shield, you need to distribute the Shield CA certificates (both Root and Issuing) to your devices via Jamf Pro.
How to Download Your Shield Root and Issuing CA Certificates
-
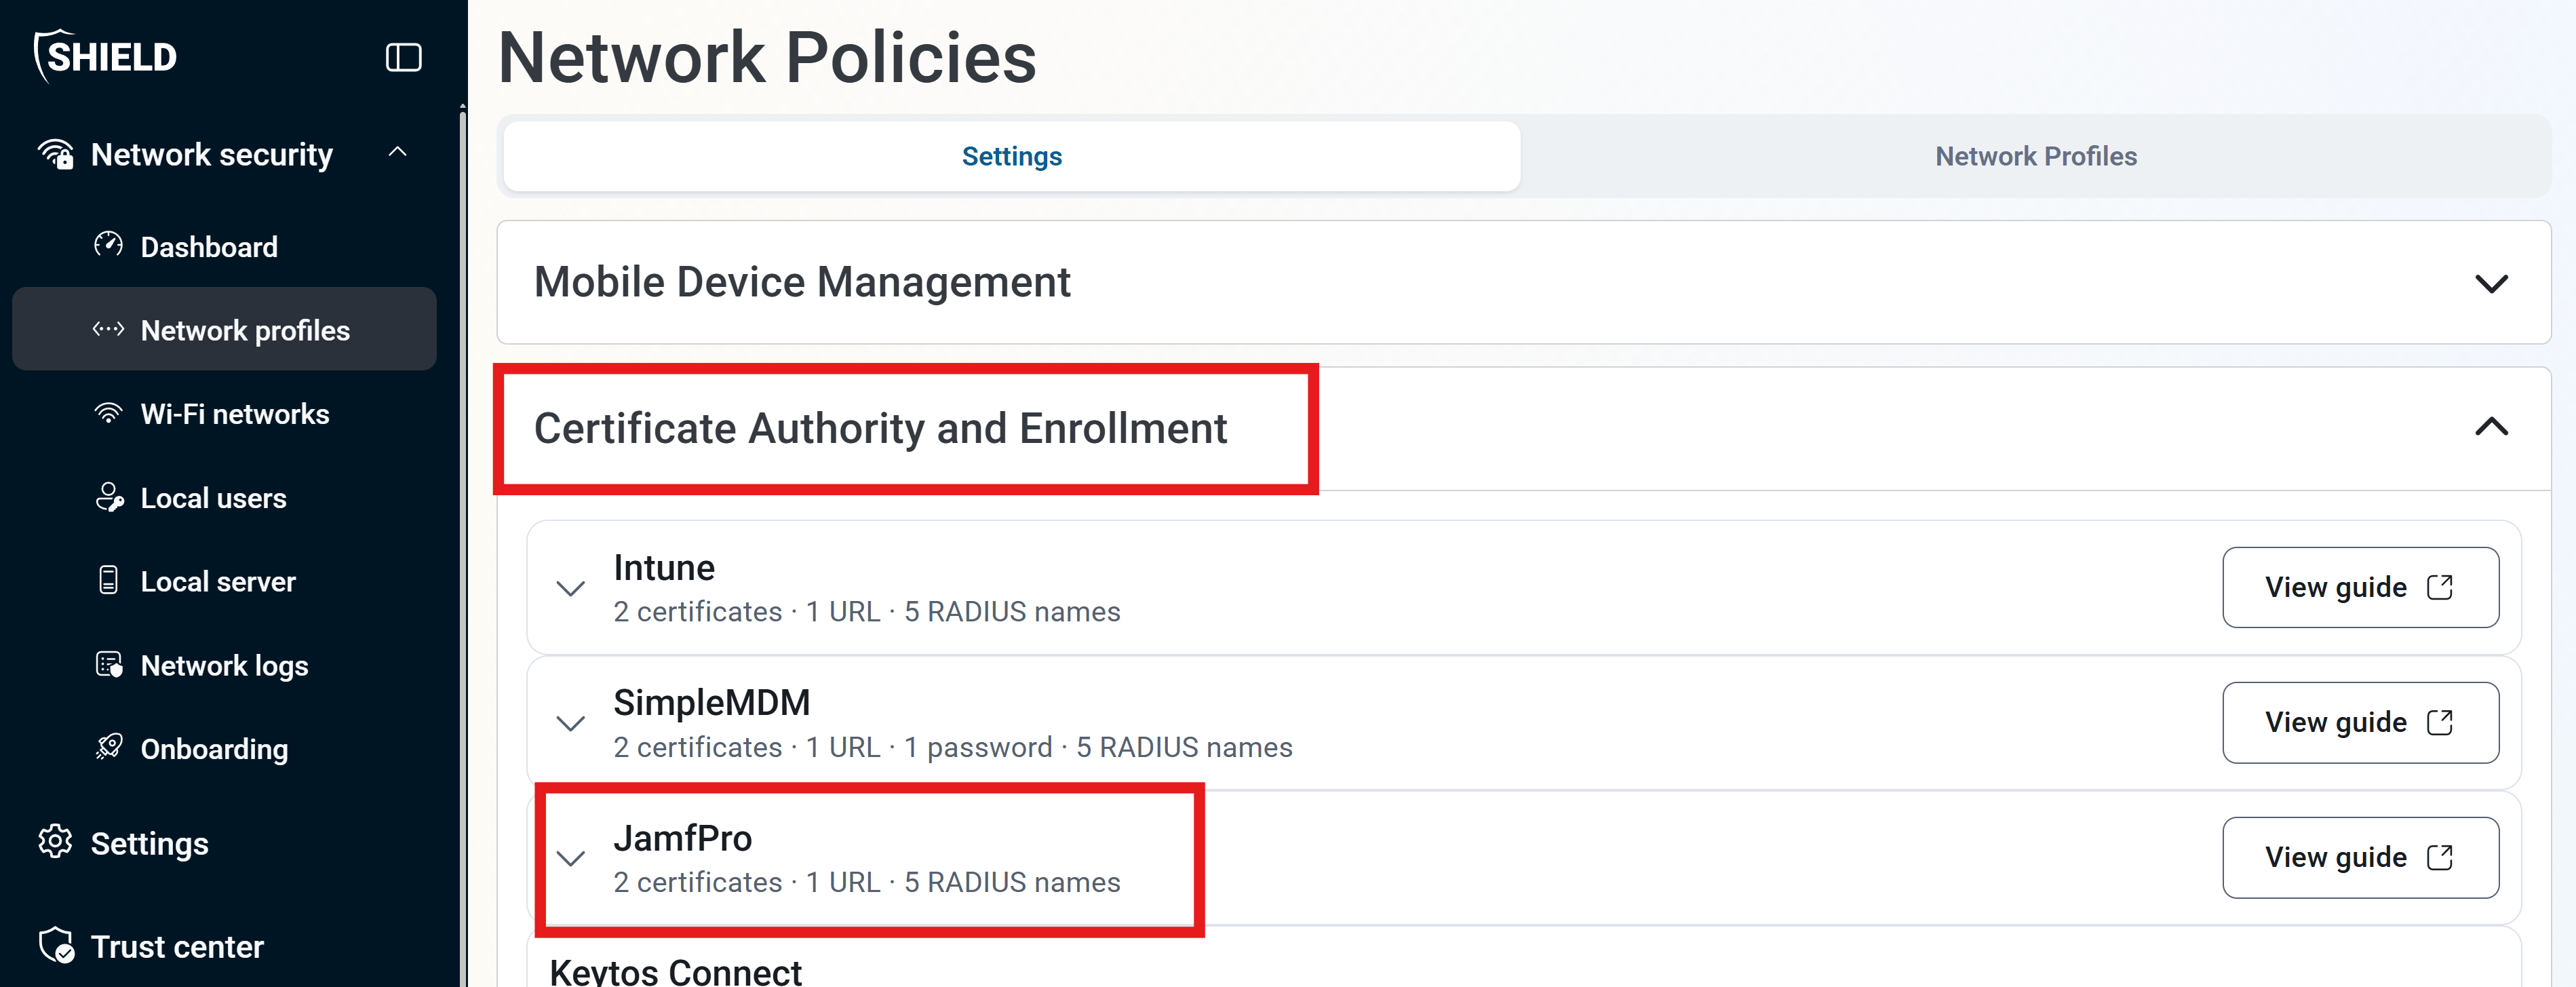
From within Network profiles > Settings in the Keytos Shield portal, expand Certificate Authority and Enrollment.
-
Expand Jamf Pro to view the available certificates for download.
-
Next to
rootca.cer, click Download to download the Shield Root CA certificate to your local machine. -
Next to
issuingca.cer, click Download to download the Shield Issuing CA certificate to your local machine.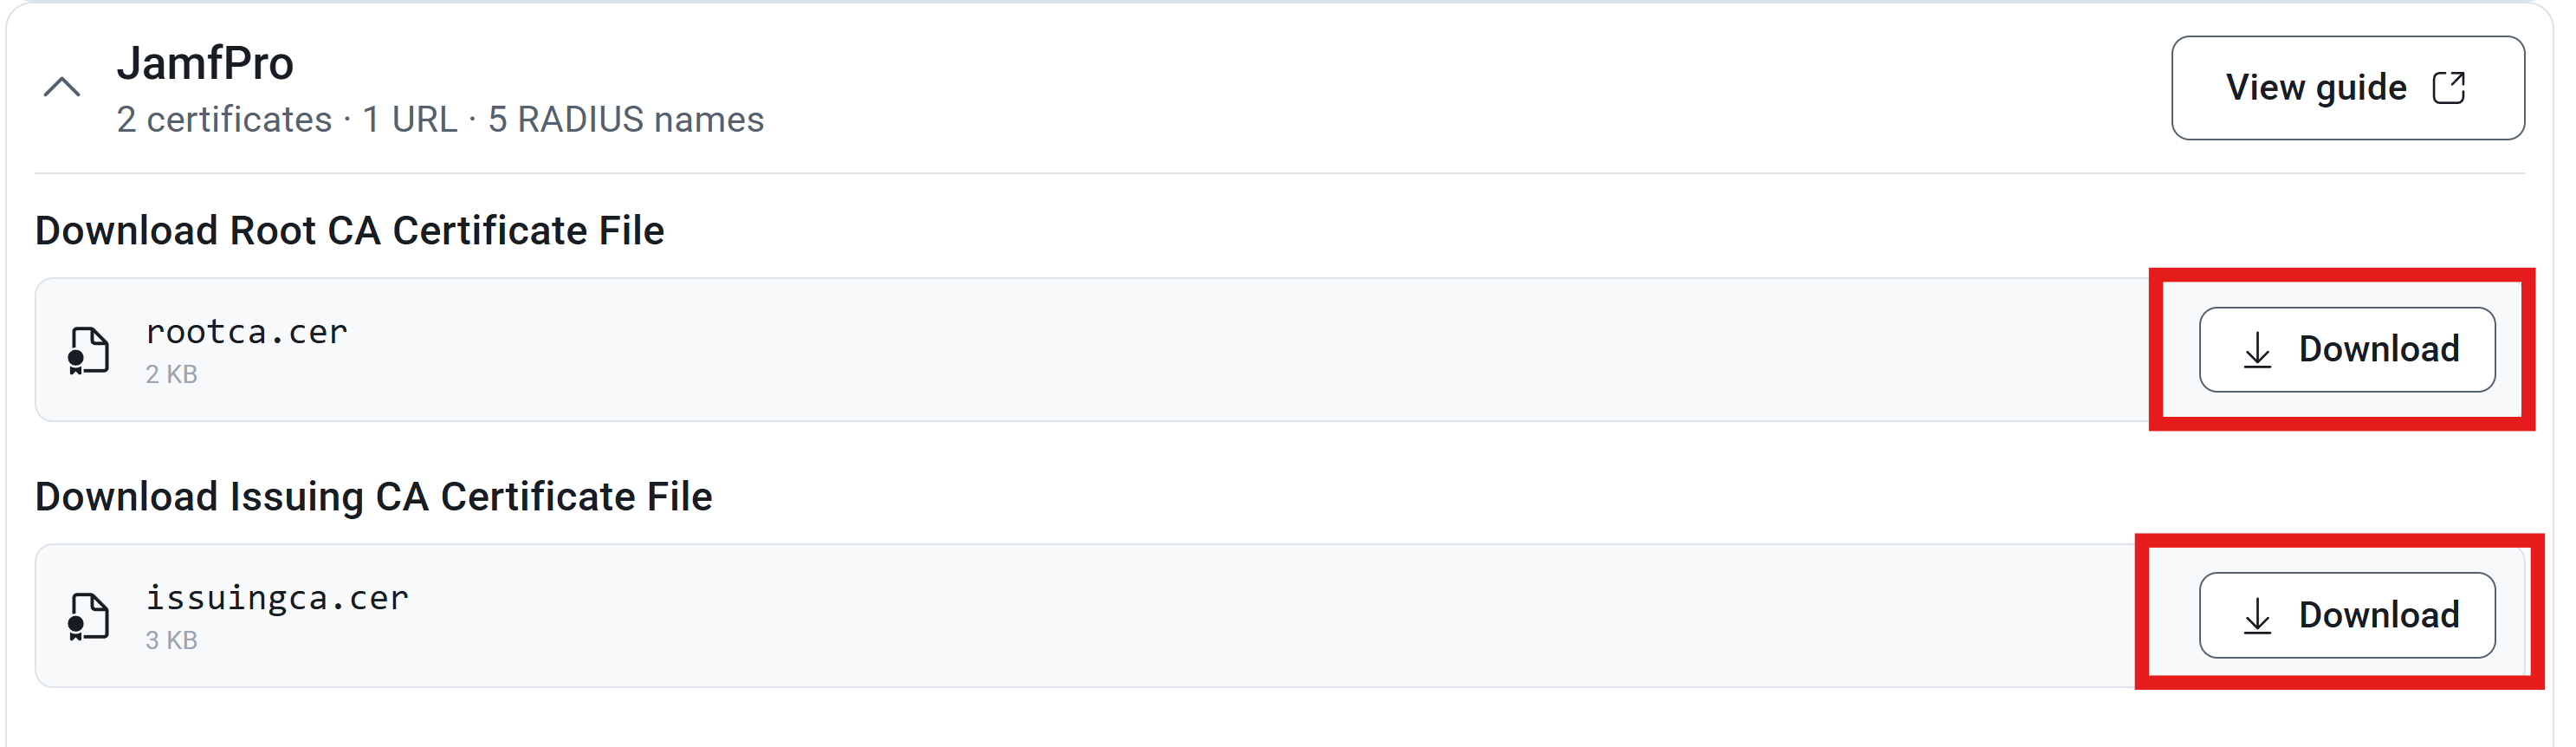
How to Push Your Keytos Shield CA Certificates in Jamf Pro
Follow these steps to push your Keytos CA certificates to your devices using Jamf Pro.
-
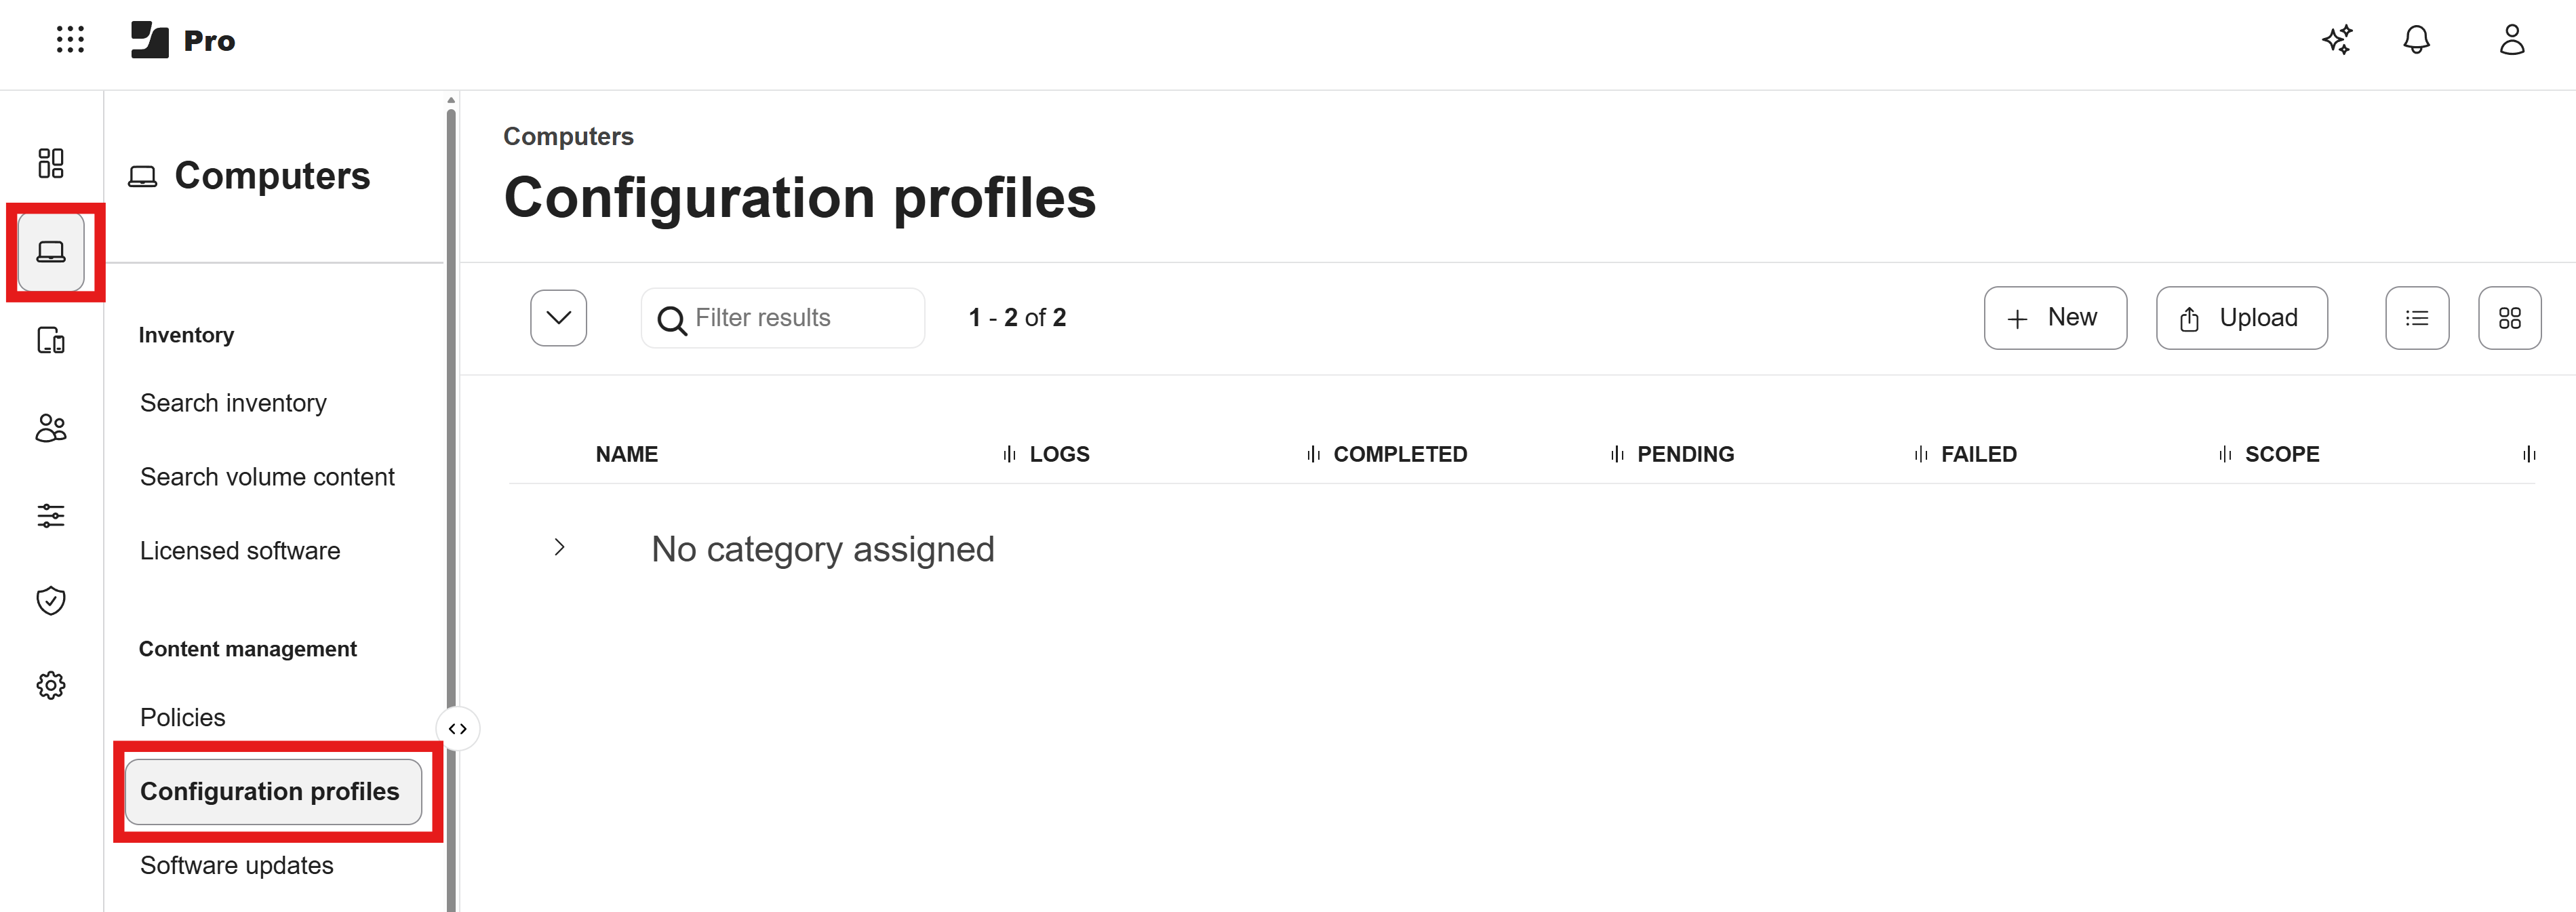
In your Jamf Pro portal, go to Computers > Configuration Profiles.
-
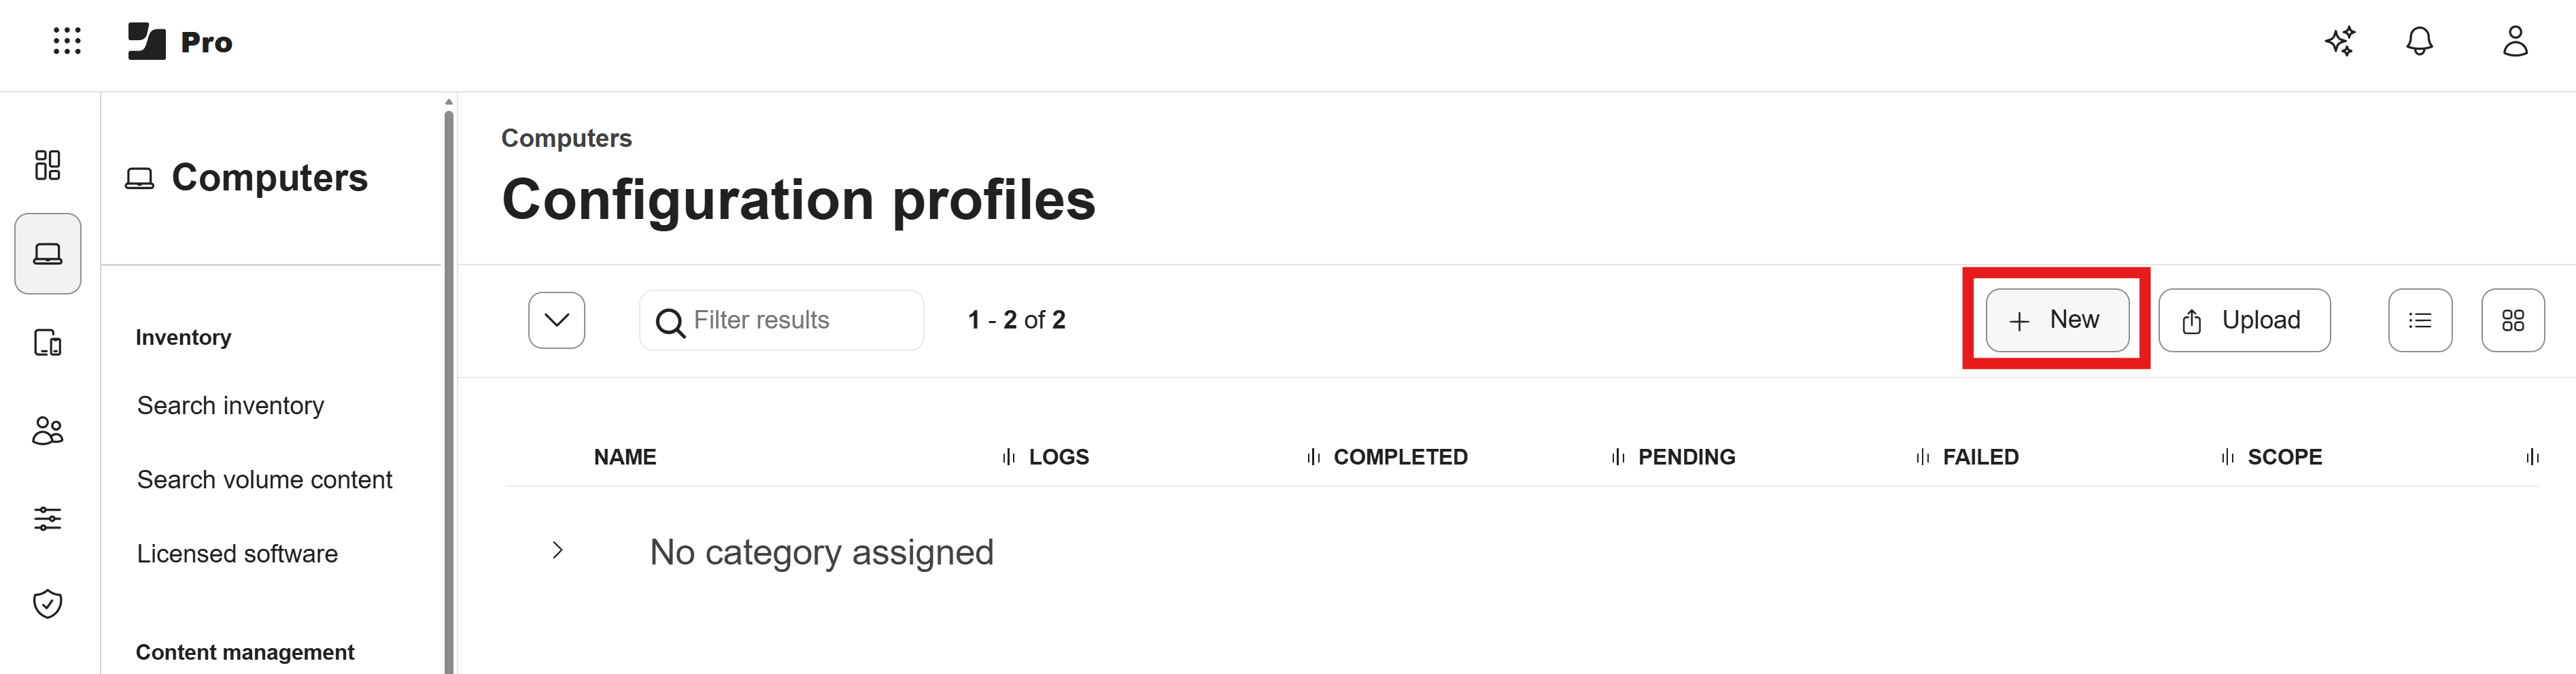
Click + New to create a new Configuration Profile (or edit an existing one if you already have a profile configured).
-
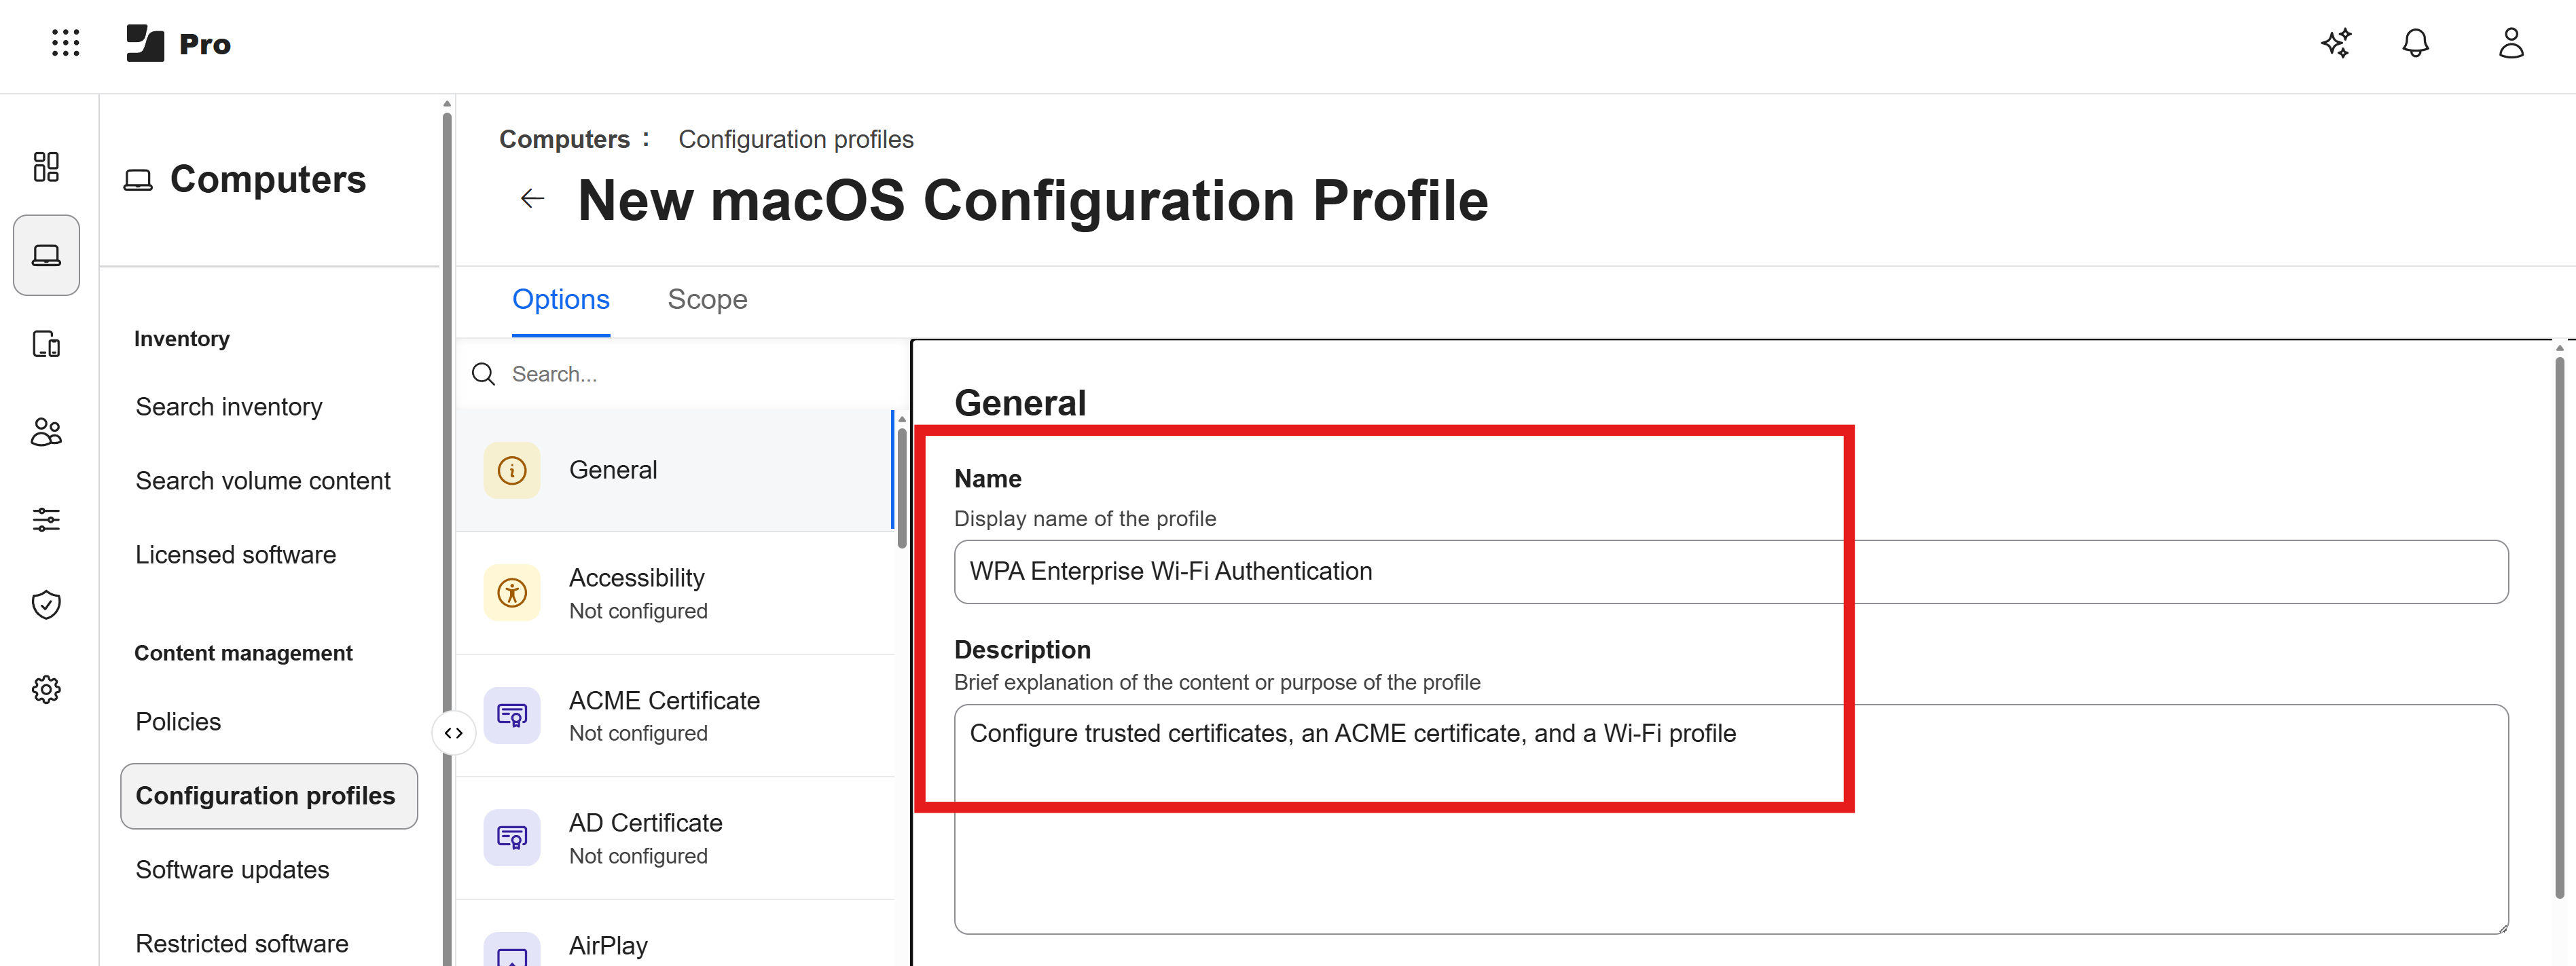
Under the General section add a Name and Description for your profile. This helps you identify the profile later.
-
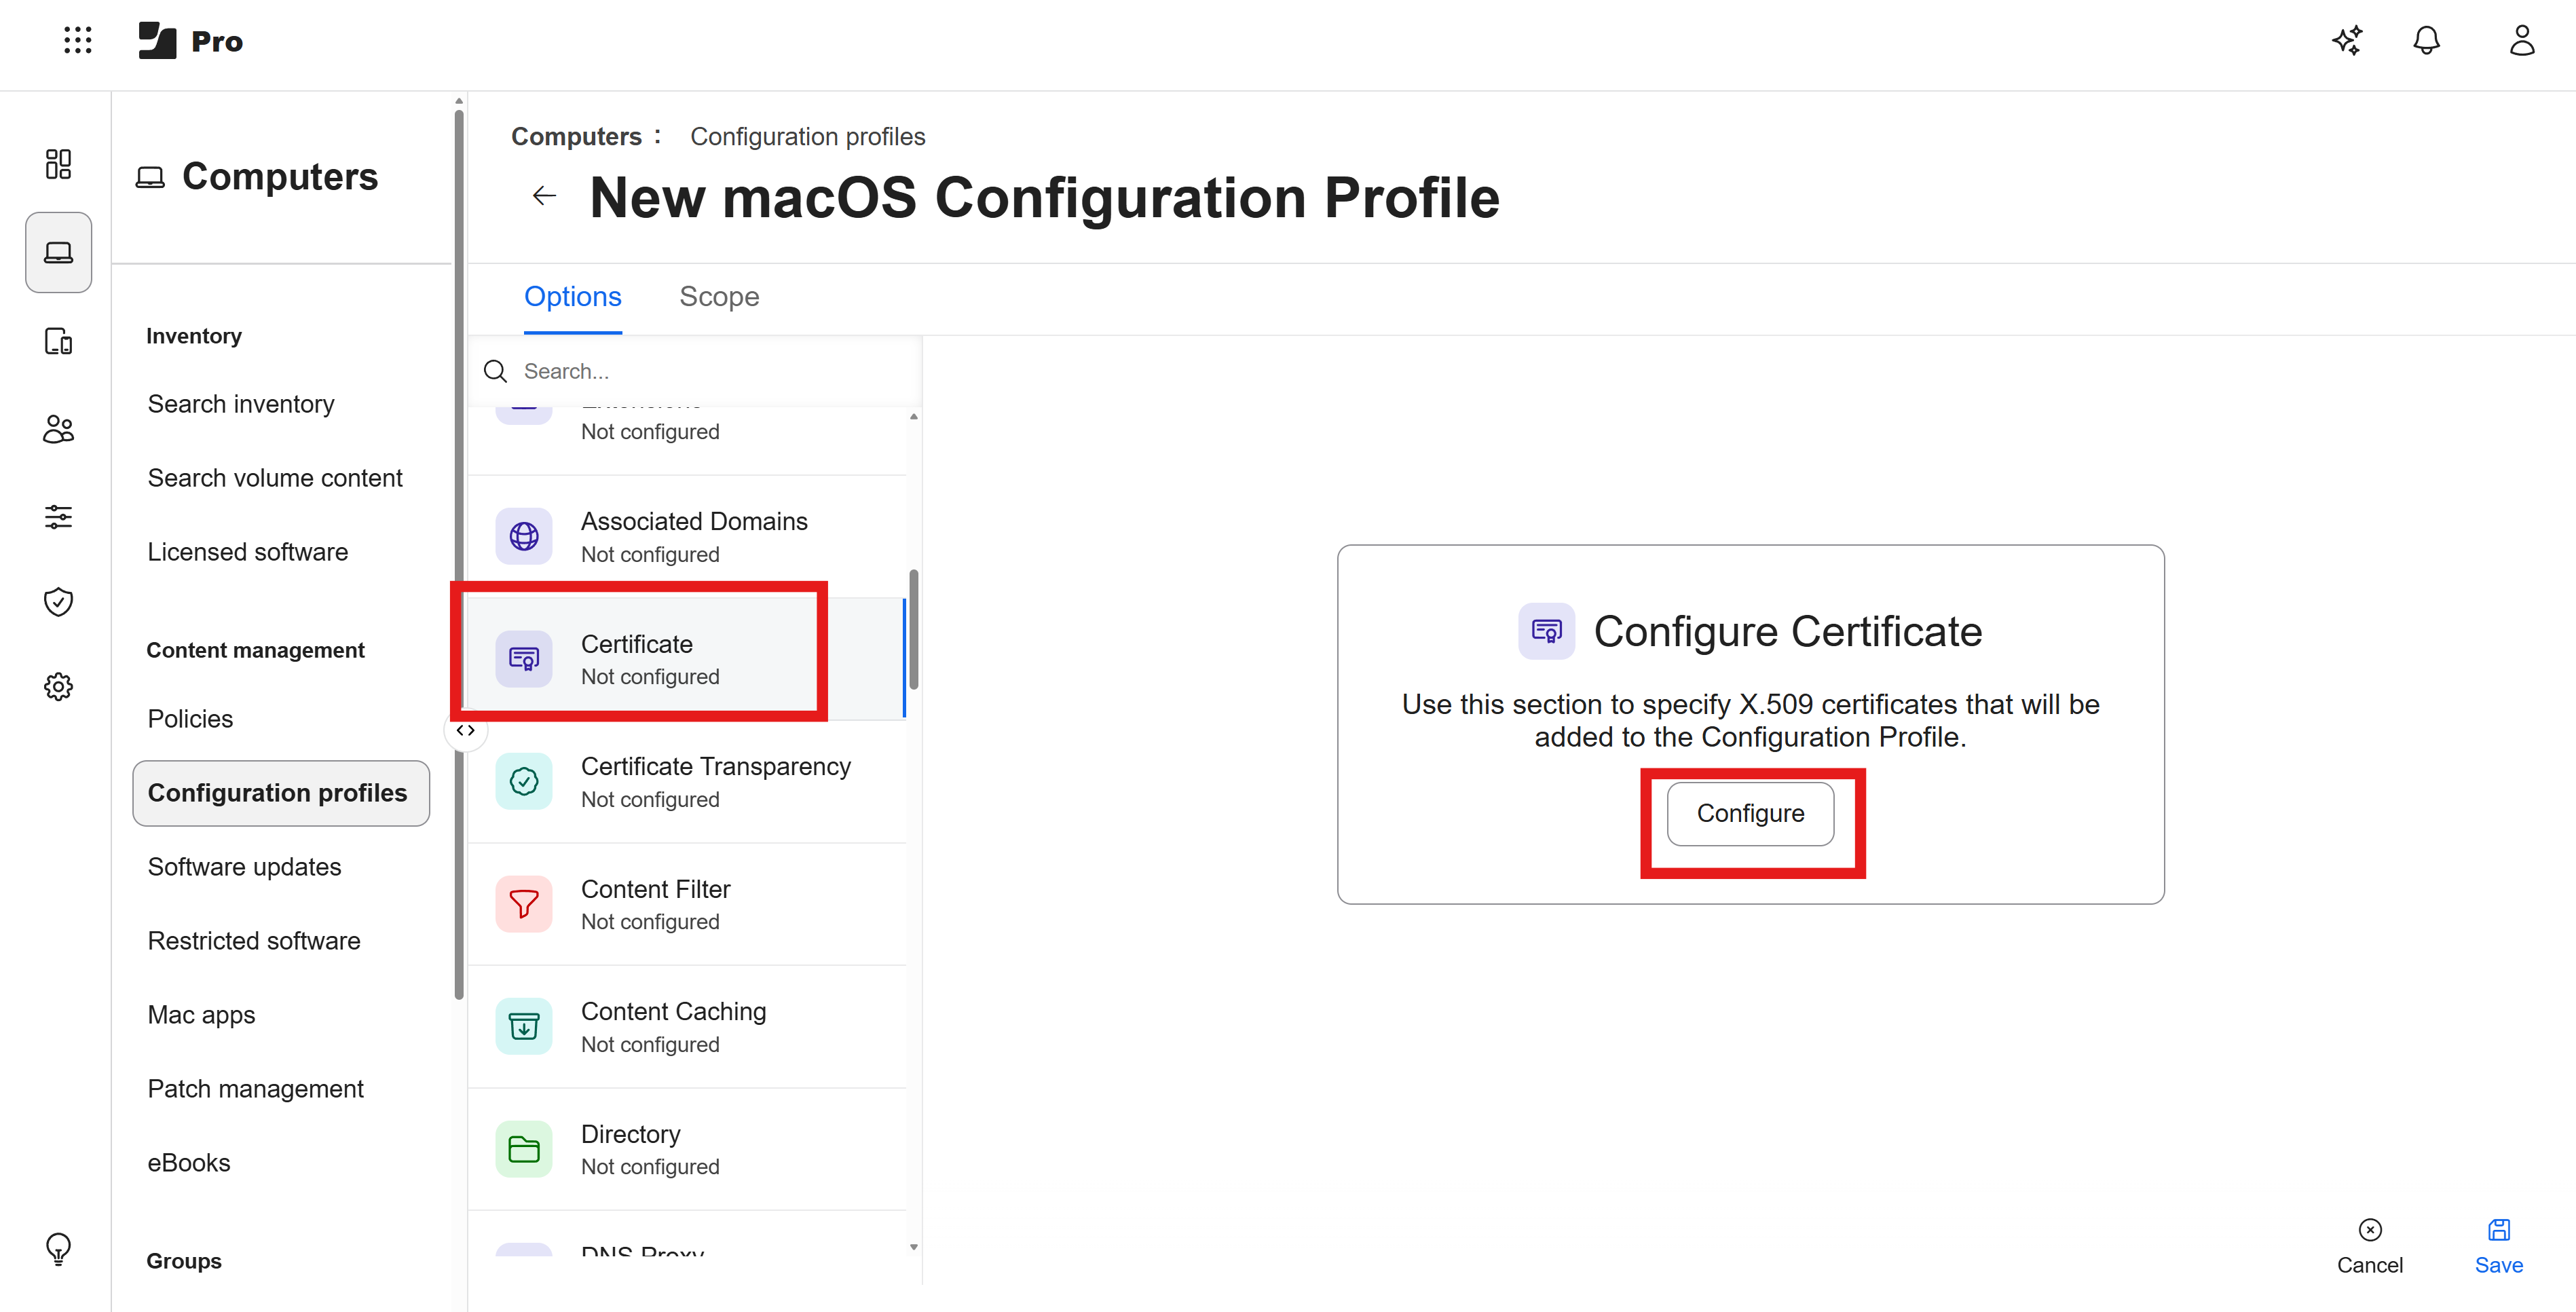
Scroll down to the Certificates section and click the Configure button to add a new certificate _(or click + if you already have a Certificate)**.
-
Enter the certificate details for your CA certificate:
-
Certificate Name - a friendly name for your certificate, such as Keytos Shield Root CA.
-
Select - select Upload and choose the CA certificate file from your local machine.
-
Password - leave this blank since the CA certificate does not require a password.
-
Allow all apps access - check this option to allow all applications on the device to access the certificate.
-
Allow export from keychain - check this option to allow the certificate to be exported from the device’s keychain. (it’s ok since this is just your root CA’s certificate and not a private key)
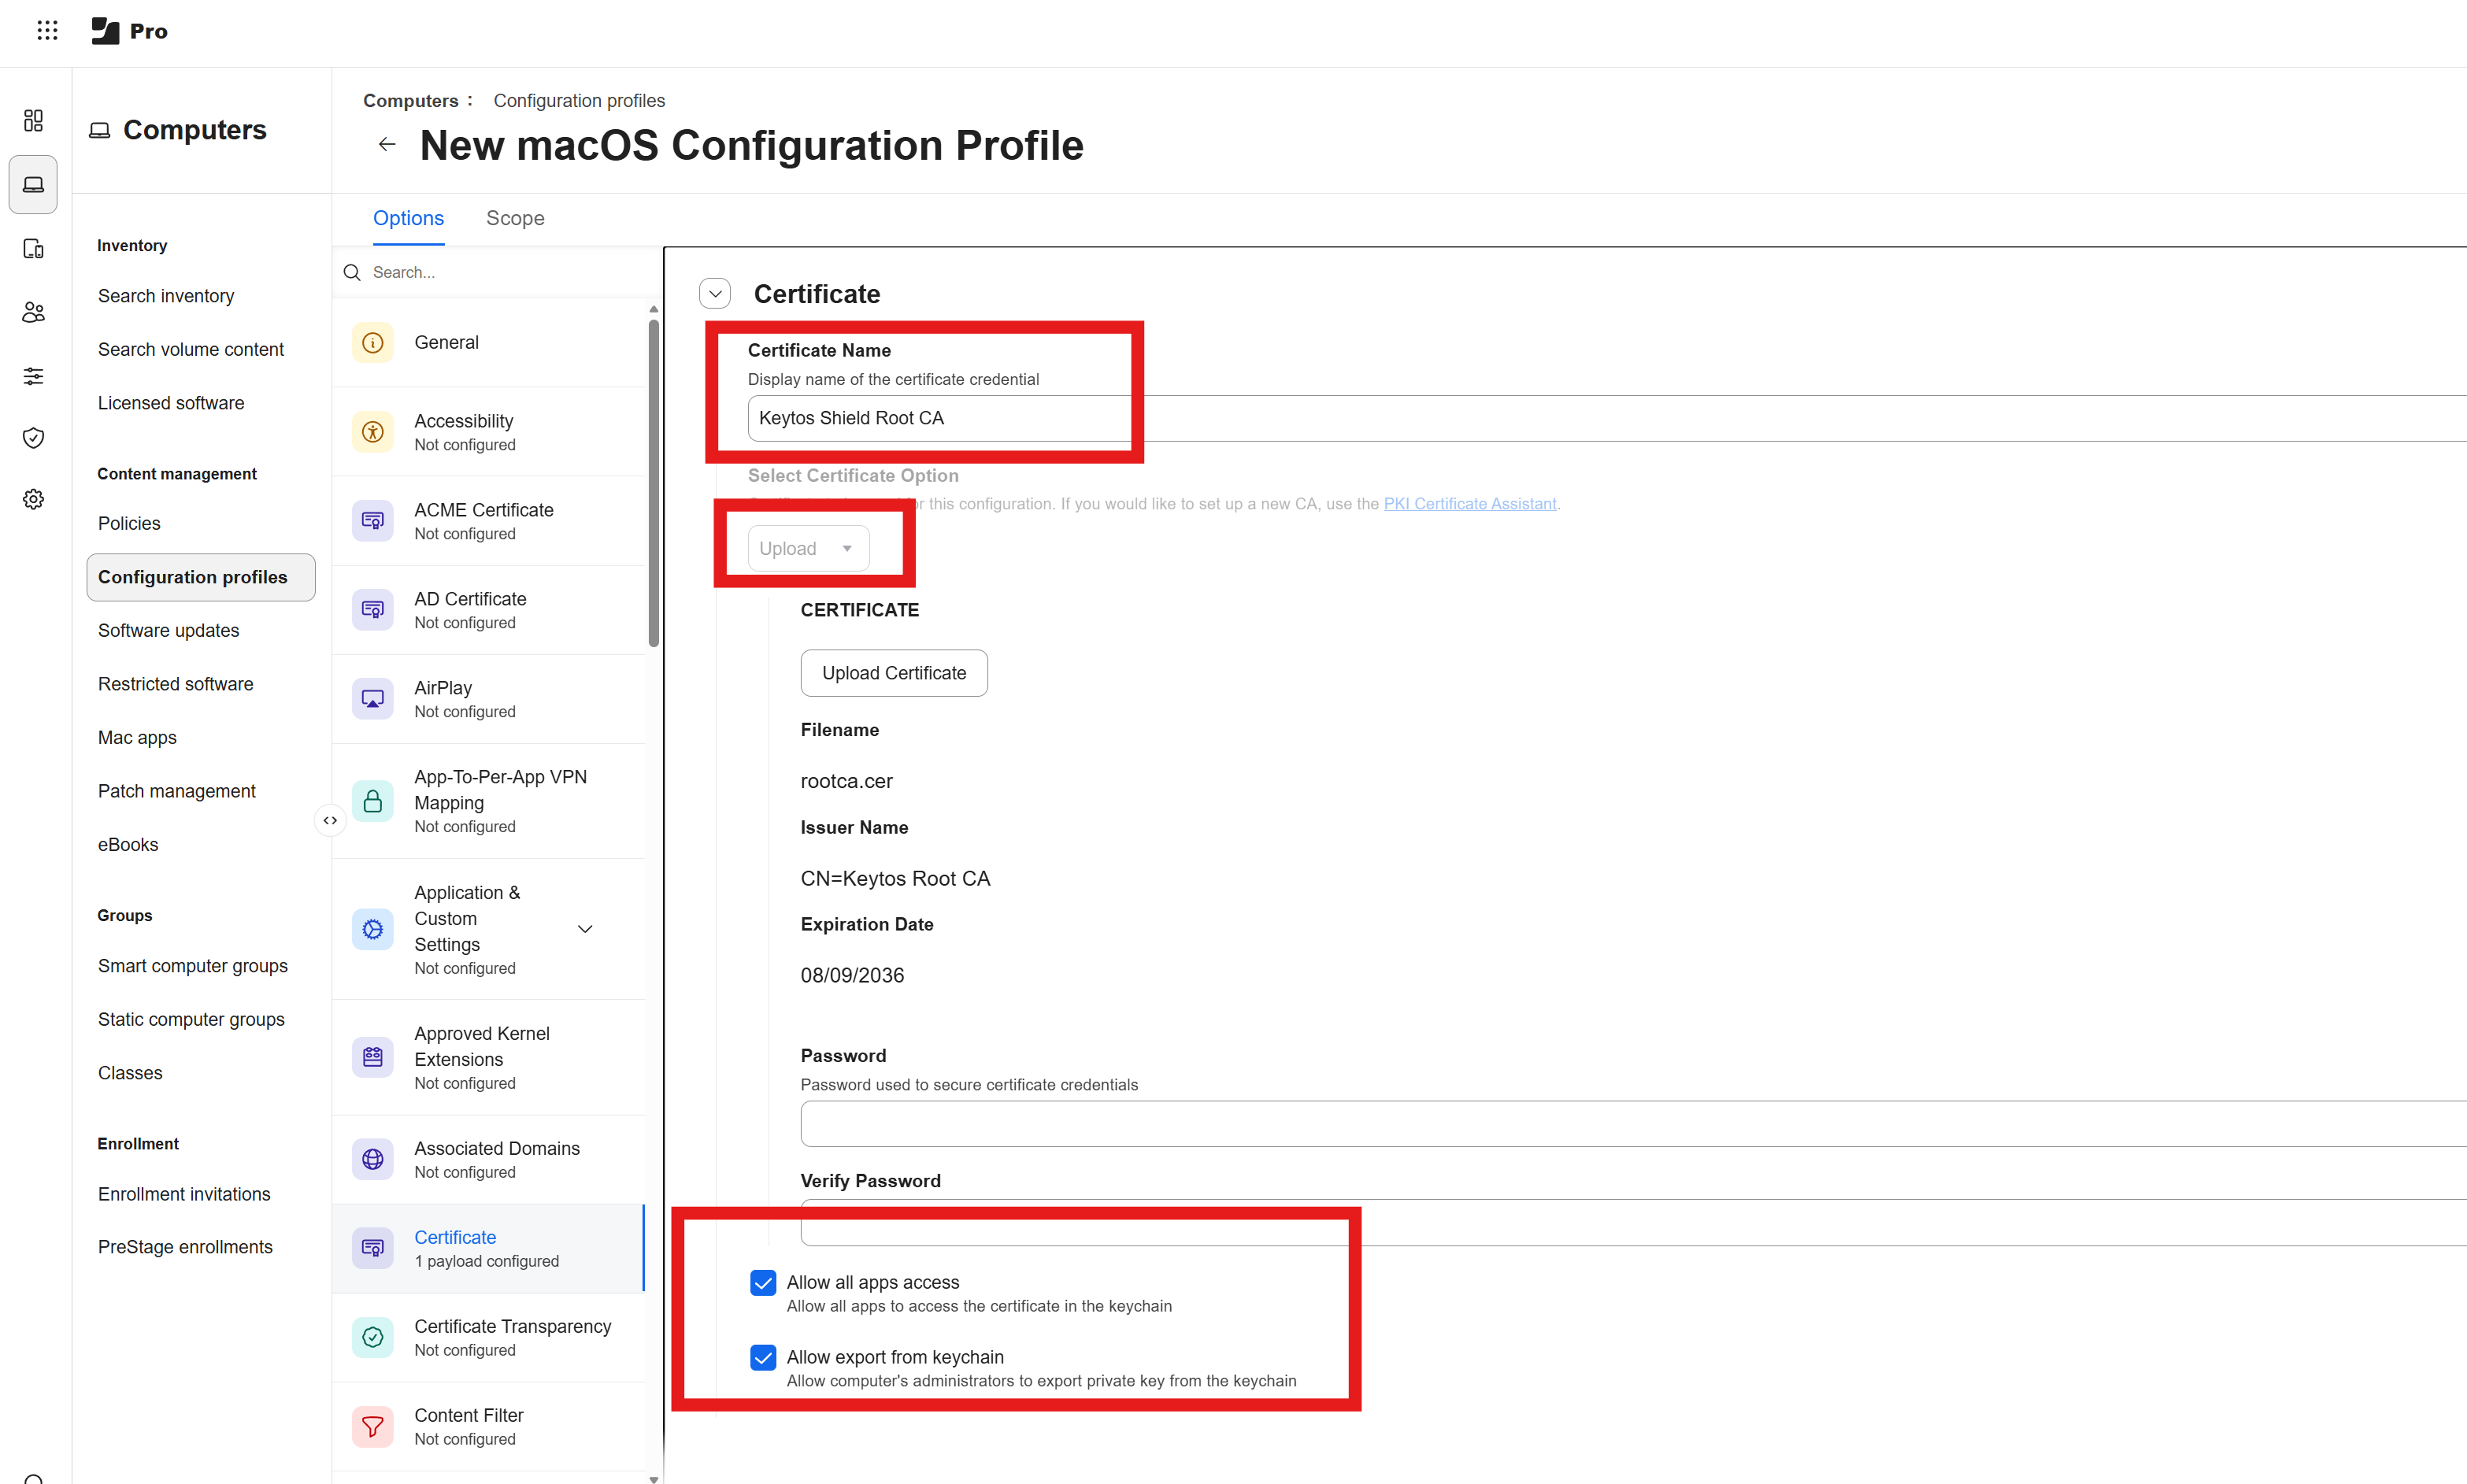
-
-
If you have any other certificates, such as an Intermediate CA, click + to add another certificate following the same steps as above.
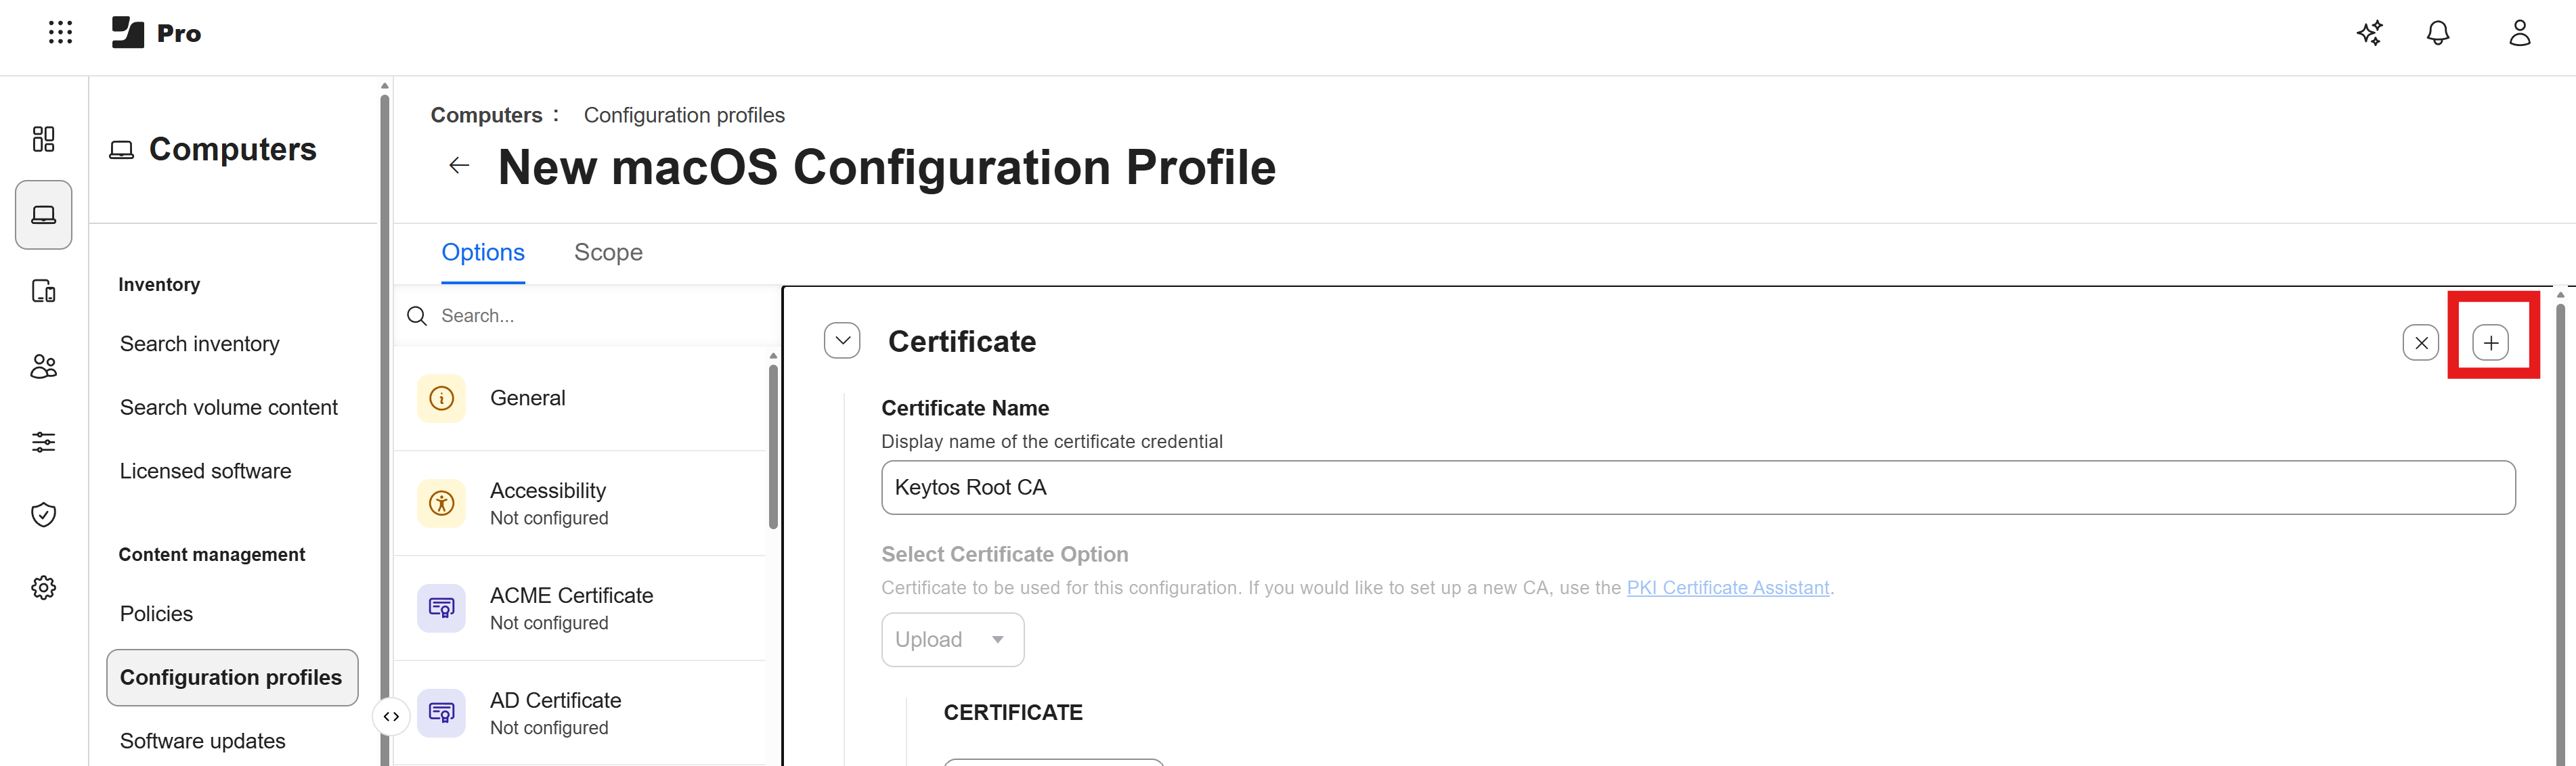
-
Click Save to save the Configuration Profile with the new certificate and push it to your devices.
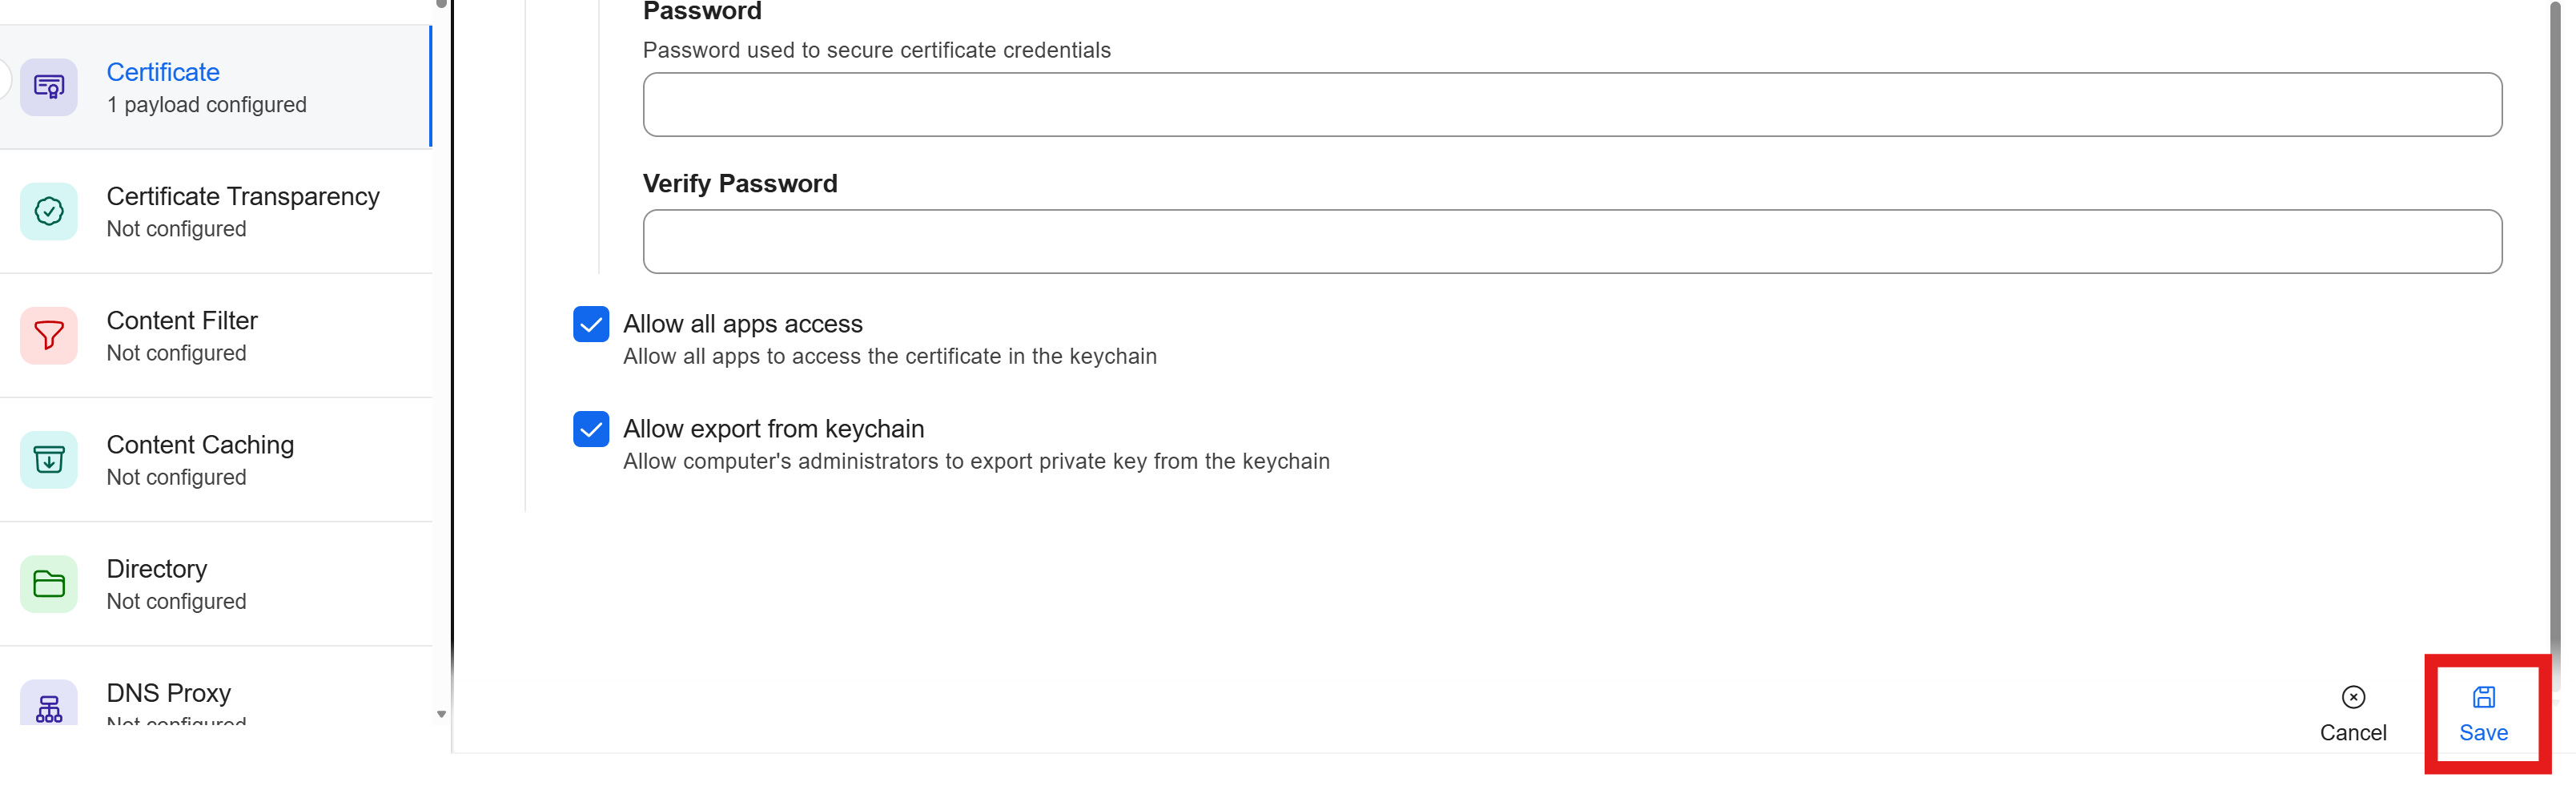
Step 3 - How to Issue an ACME Certificate to a Device via Jamf Pro
Now that you have configured your trusted CA certificates, you can now configure Jamf Pro to issue ACME certificates to your Apple devices using your Keytos Shield CA. Follow these steps to configure Jamf Pro to issue ACME certificates:
How to Get Your ACME URL
-
Back in your Keytos Shield portal, go to Network profiles > Settings and return to Certificate Authority and Enrollment.
-
Under the Jamf Pro section, locate your ACME URL value.
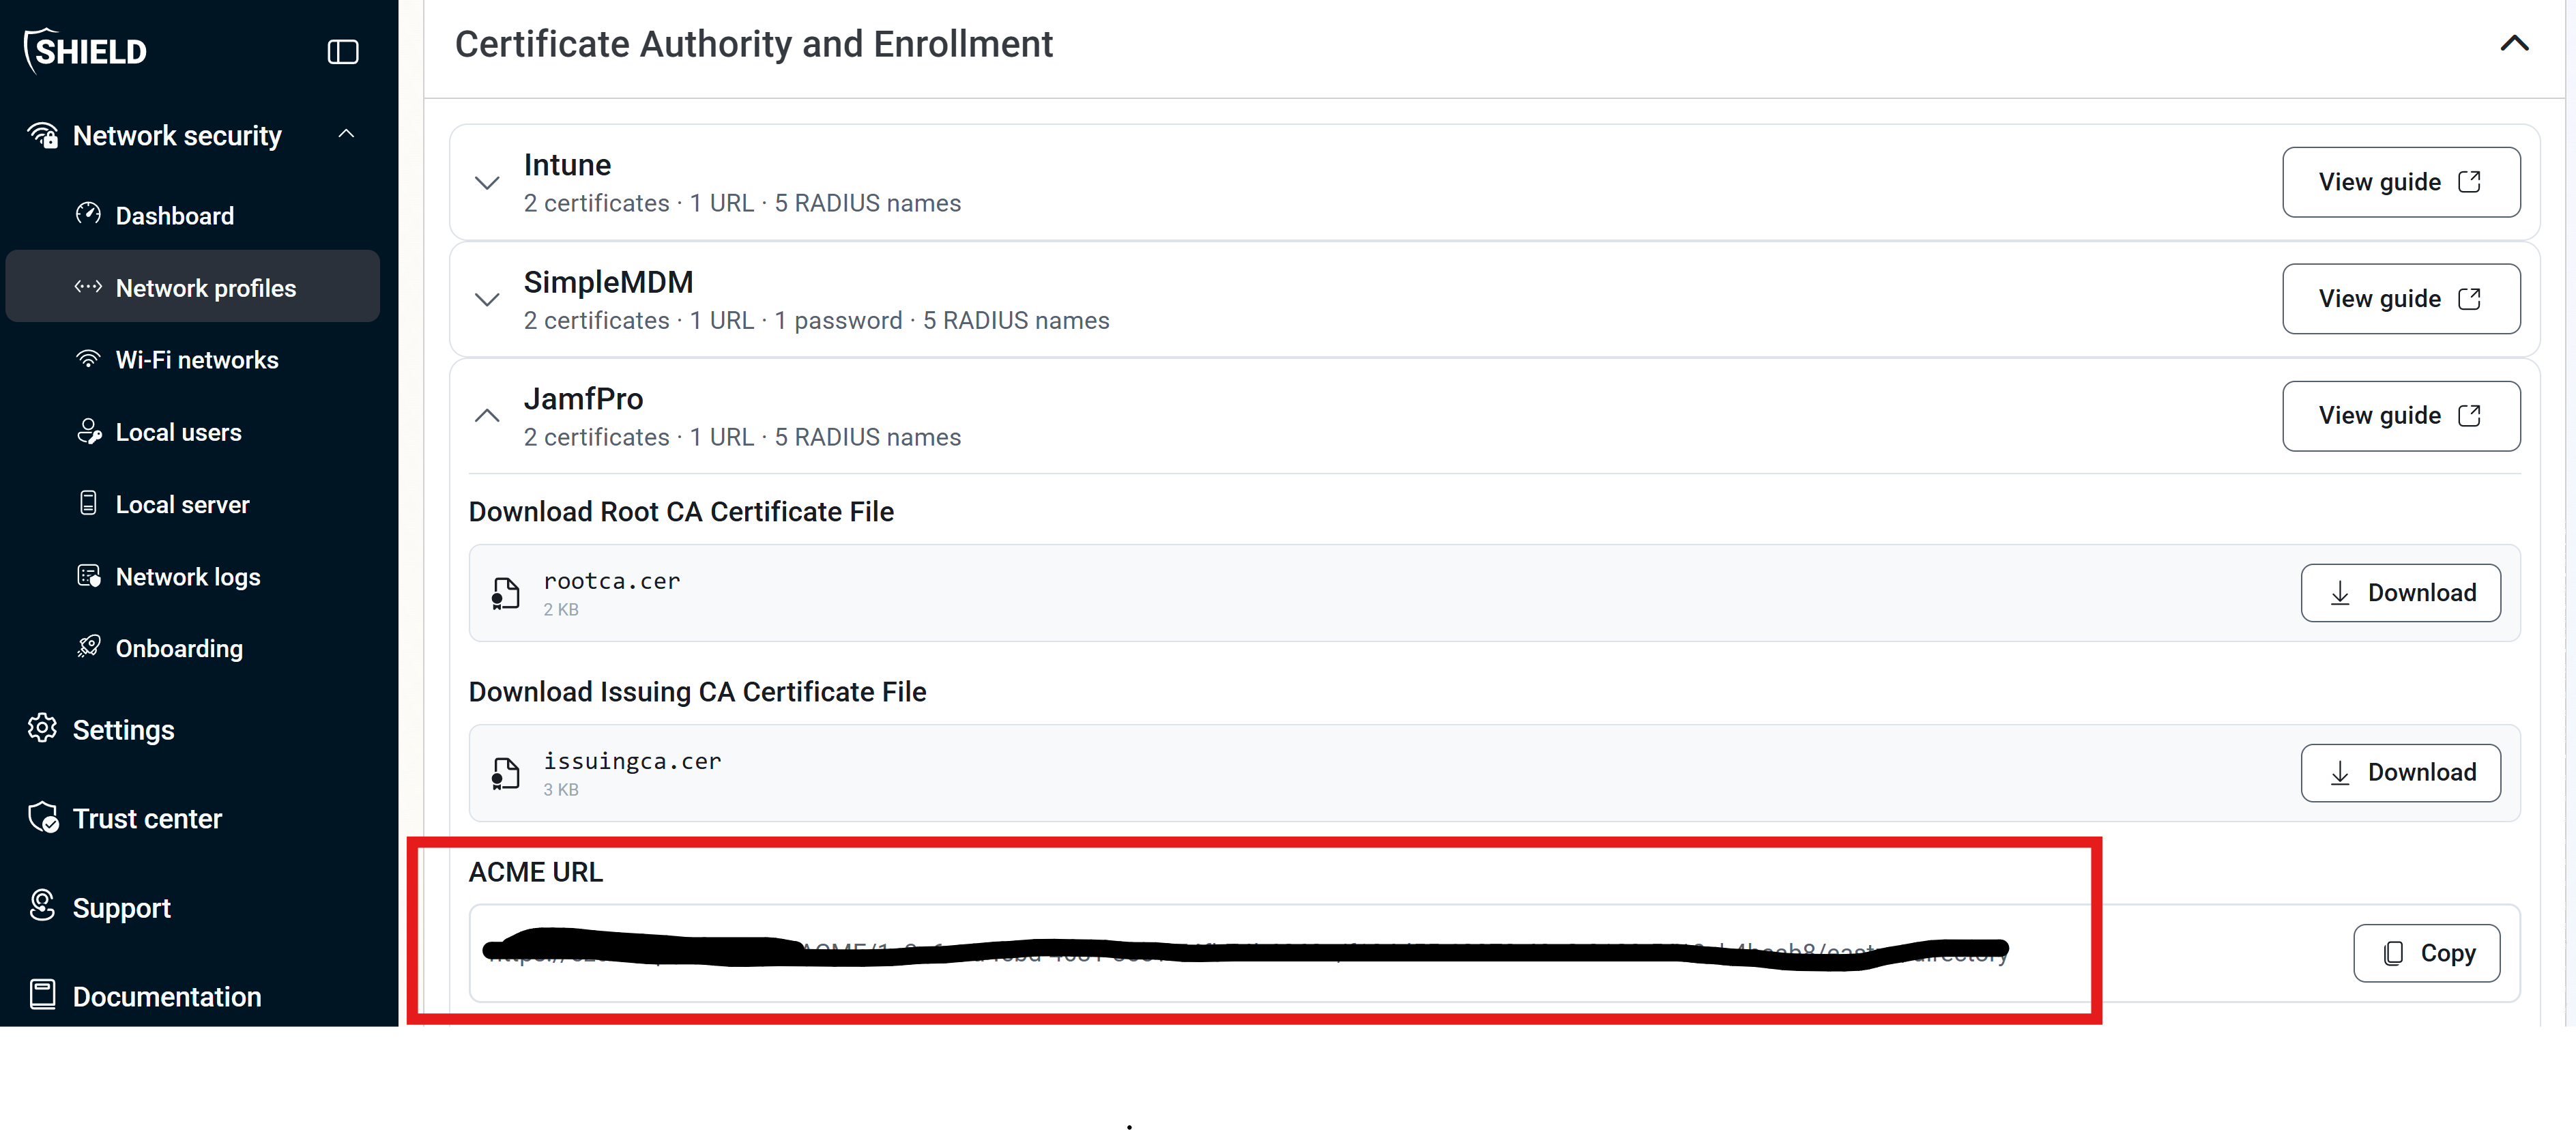
-
You’ll need this URL in the next section when configuring an ACME certificate in Jamf Pro.
How to Configure an ACME Certificate in Jamf Pro
-
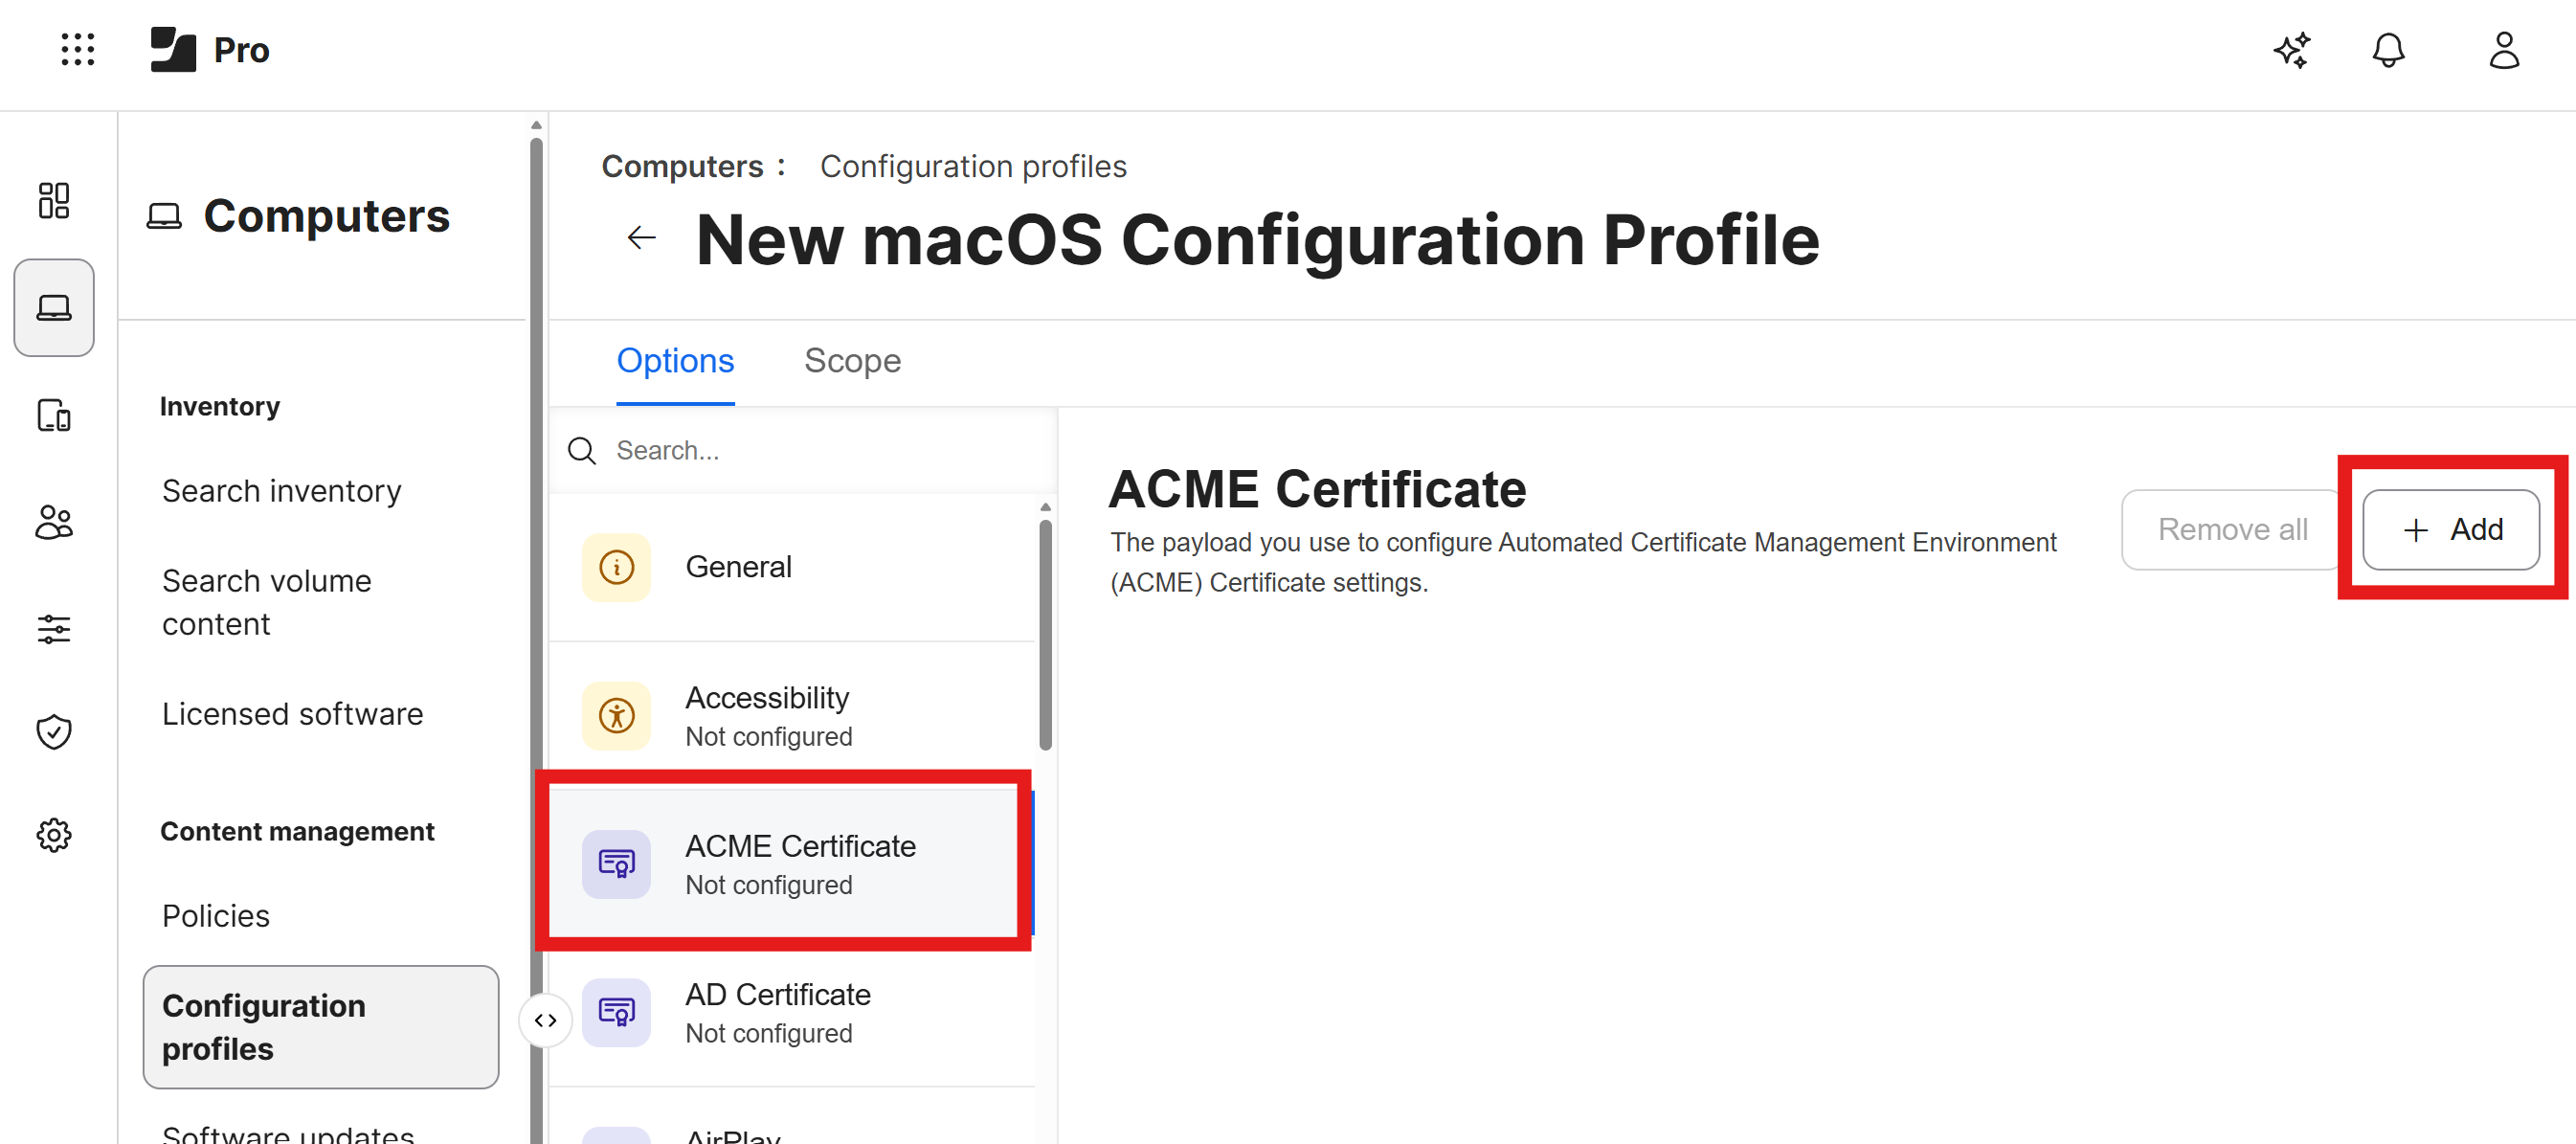
Navigate back to your Jamf Pro tab where you were configuring your Configuration Profile, and scroll up to the ACME Certificate section.
-
Click on the + Add button to add a new ACME certificate.
-
Enter the following information for your ACME certificate:
- ACME directory URL: Paste the ACME URL you copied from your Keytos Shield portal (labeled ACME Device Registration URL in EZCA and ACME URL in Keytos Shield).
- Client identifier: Set this to
$SERIALNUMBERto use the device’s serial number as the client identifier. - Key Size: Set this to 384 for a strong, elliptic curve key that is hardware bound. You can set this as needed based on your use case and device support.
- Key Type: Set this to ECSECPrimeRandom
- Hardware Bound: Set this to true so the device’s secure enclave is used to generate the key and store it securely on the device.
- Redistribute Profile: Specify the days from expiration that Jamf Pro should redistribute the profile to devices. We’ll set this to 15 days.
- Subject Name: Use the available variables and any static values you want to build the subject name for the certificate. You can see the full list of Jamf supported dynamic values here. For example, you could use
CN=$UDIDto set the Common Name of the certificate to the device’s unique device identifier orCN=$USERNAMEto set the Common Name of the certificate to the user or device’s username. - Subject Alt Name: Set the following recommended SAN values:
- RFC822Name:
$EMAILADDRESS(if issuing user certificates) - DNS*:
$HOSTNAME(if issuing device certificates)
- RFC822Name:
- Extended Key Usage:
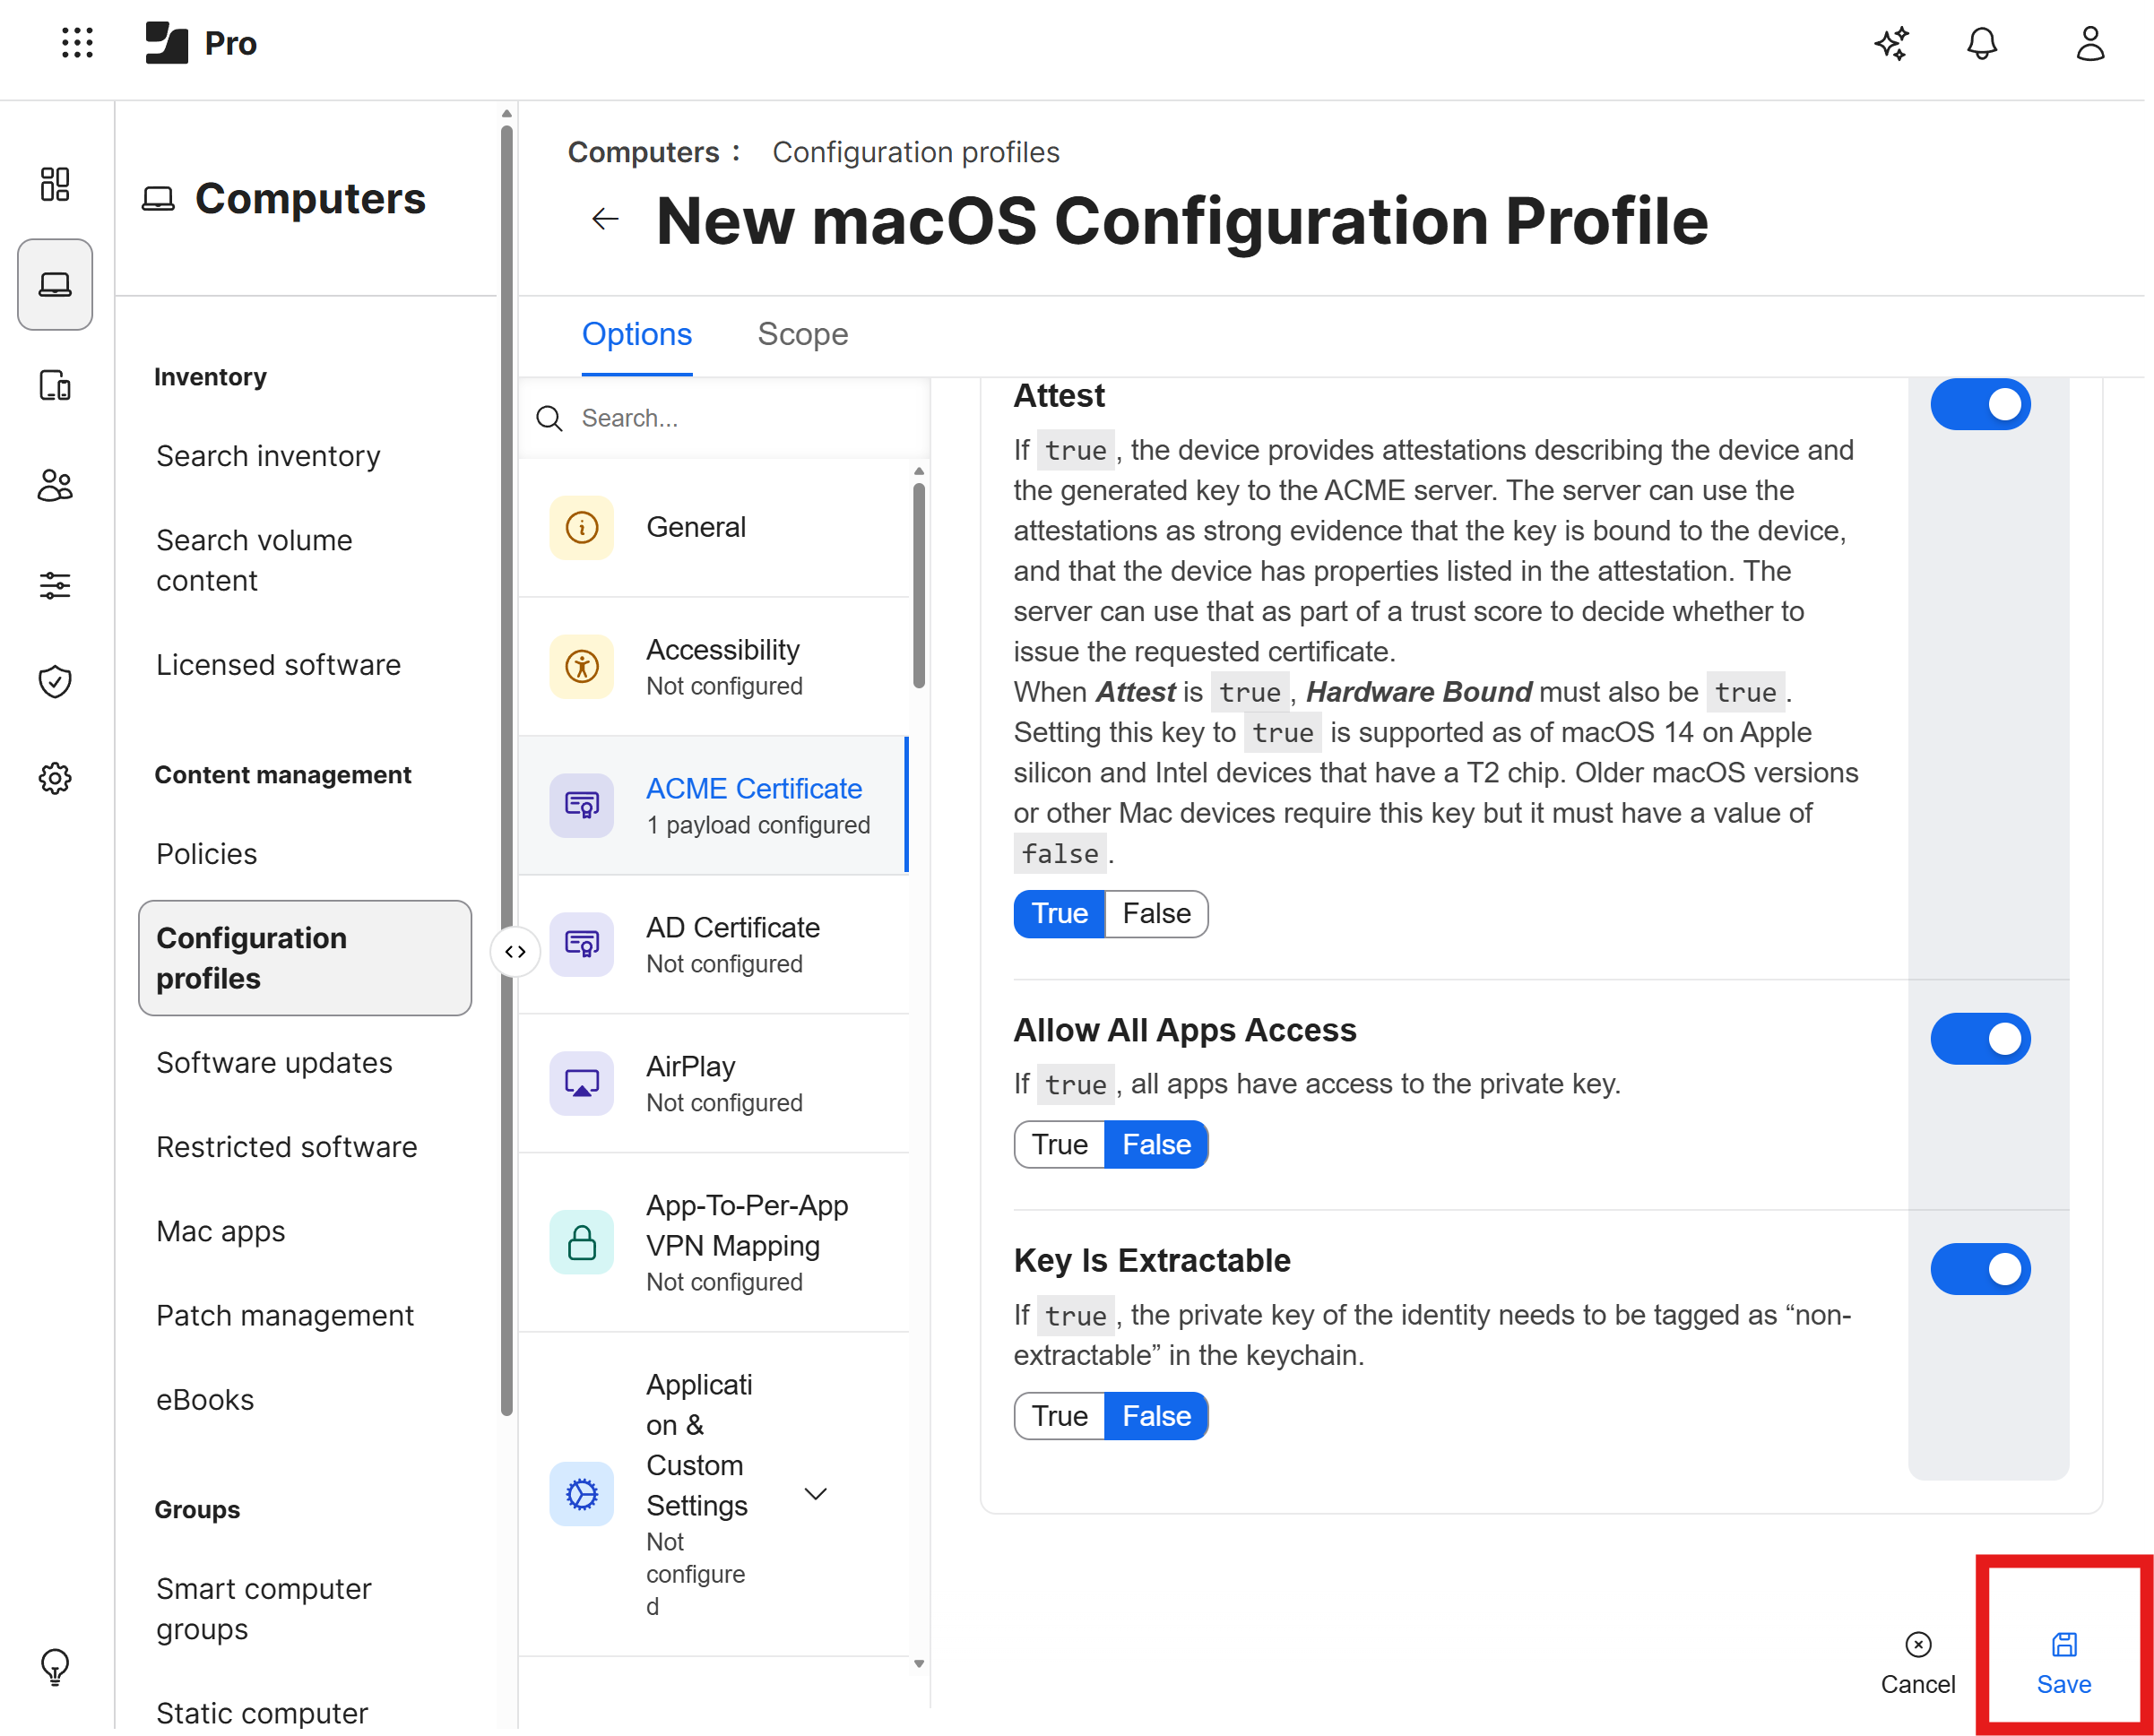
1.3.6.1.5.5.7.3.2for client authentication. You can add additional EKU values as needed for your use case. - Attest: We recommend setting this to True.
- Allow All Apps Access: Set this to false, unless you have specific 3rd party apps (VPNs) that require access to the certificate. If you are using the certificate for Jamf Pro and Apple’s built-in Wi-Fi or VPN, you do not need to check this box.
- Key Is Extractable: Set this to false to prevent the private key from being exportable from the device’s secure enclave.
-
Click Save to save your ACME certificate configuration.
Step 4 - How to Add a Wi-Fi Network to macOS Devices via Jamf Pro
Follow these steps to add a Wi-Fi network to your devices using Jamf Pro.
How to Get Your RADIUS Server Names in Keytos Shield
-
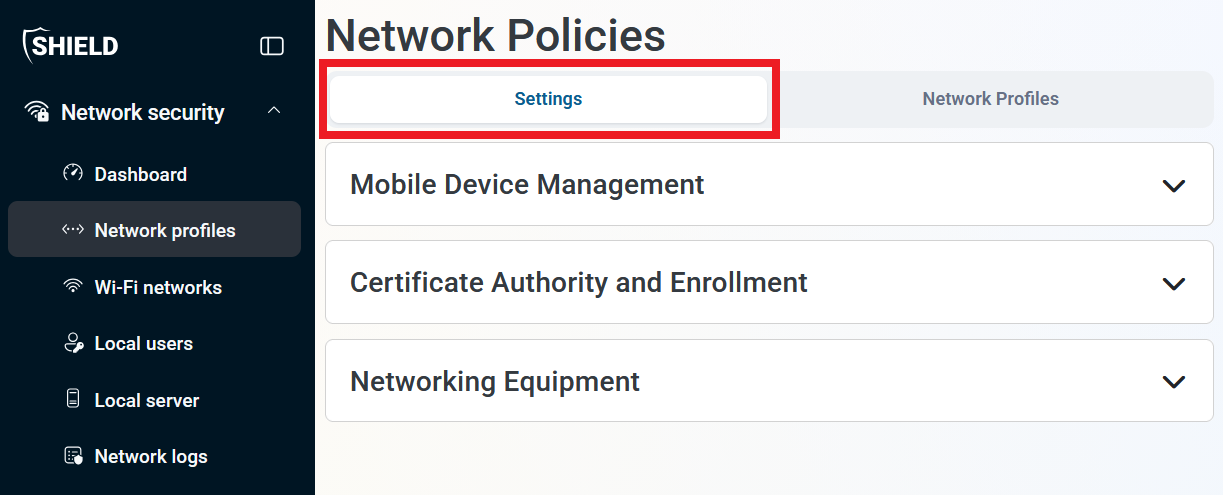
From within Network profiles > Settings in the Keytos Shield portal, expand Certificate Authority and Enrollment.
-
Expand your MDM’s section to view the available configuration options.
-
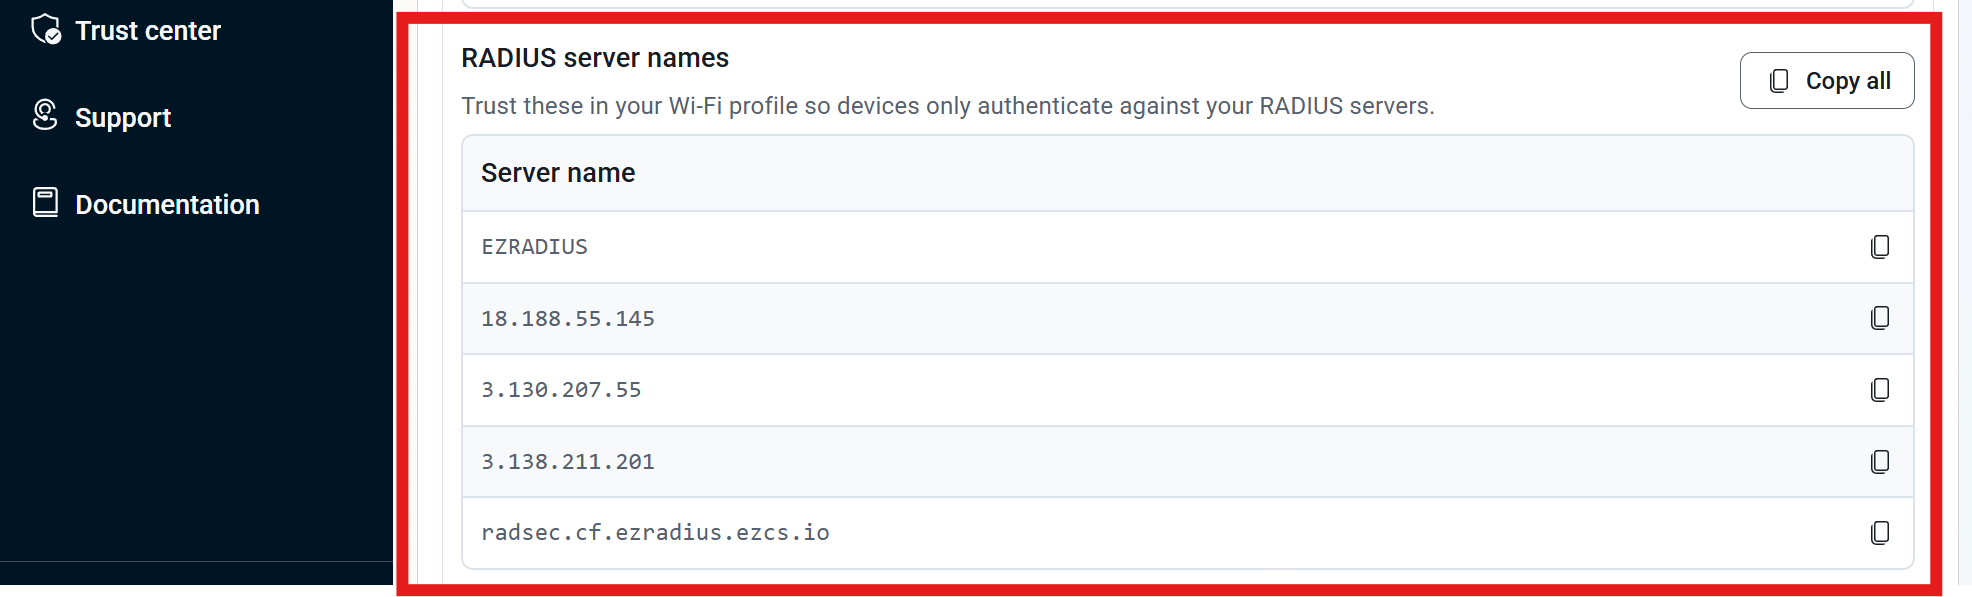
You will see a list of RADIUS server names for your network profile. You will need these in the next section.
How to Create a Wi-Fi Network Profile in Jamf Pro
-
Begin in your Jamf Pro configuration profile where you’ve already configured your trusted CA certificates and SCEP/ACME certificate.
-
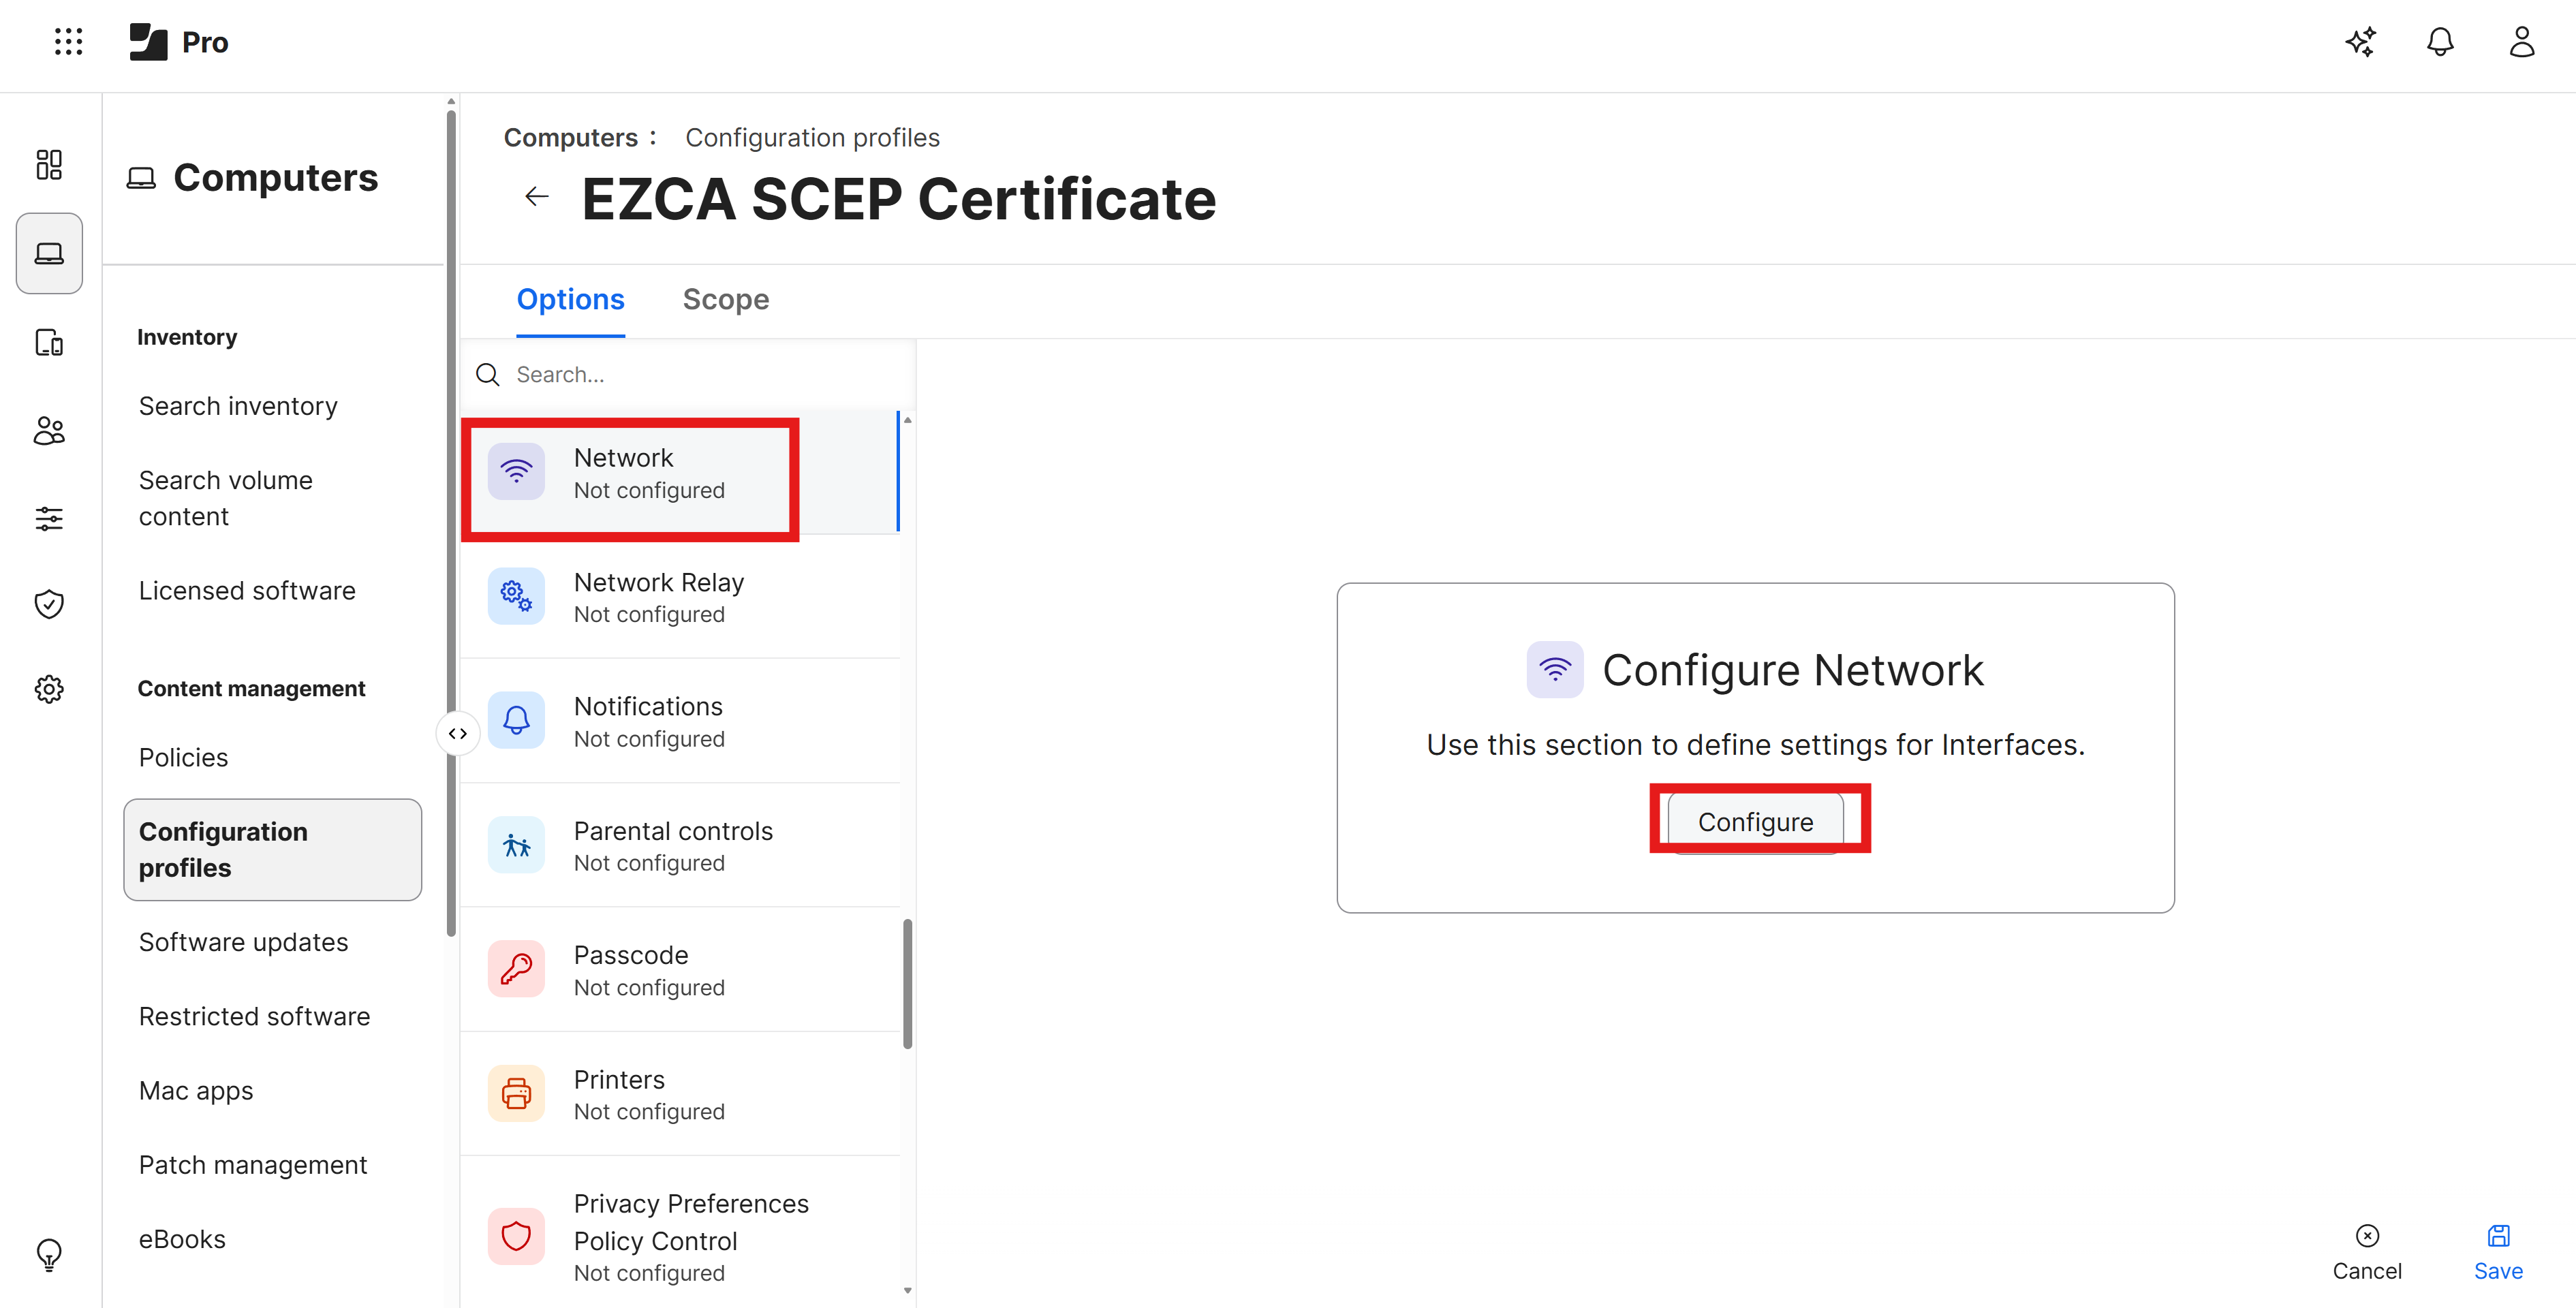
Scroll down to the Network payload and click on the Configure button.
-
Set the following values:
- Network Interface: Keep as Wi-Fi
- SSID: Set this to the exact name of your Wi-Fi network (case sensitive)
- Security Type: Set this to your Wi-Fi security type (e.g. WPA2/WPA3 Enterprise)
-
Under the Protocols tab set Accepted EAP Types to EAP-TLS
-
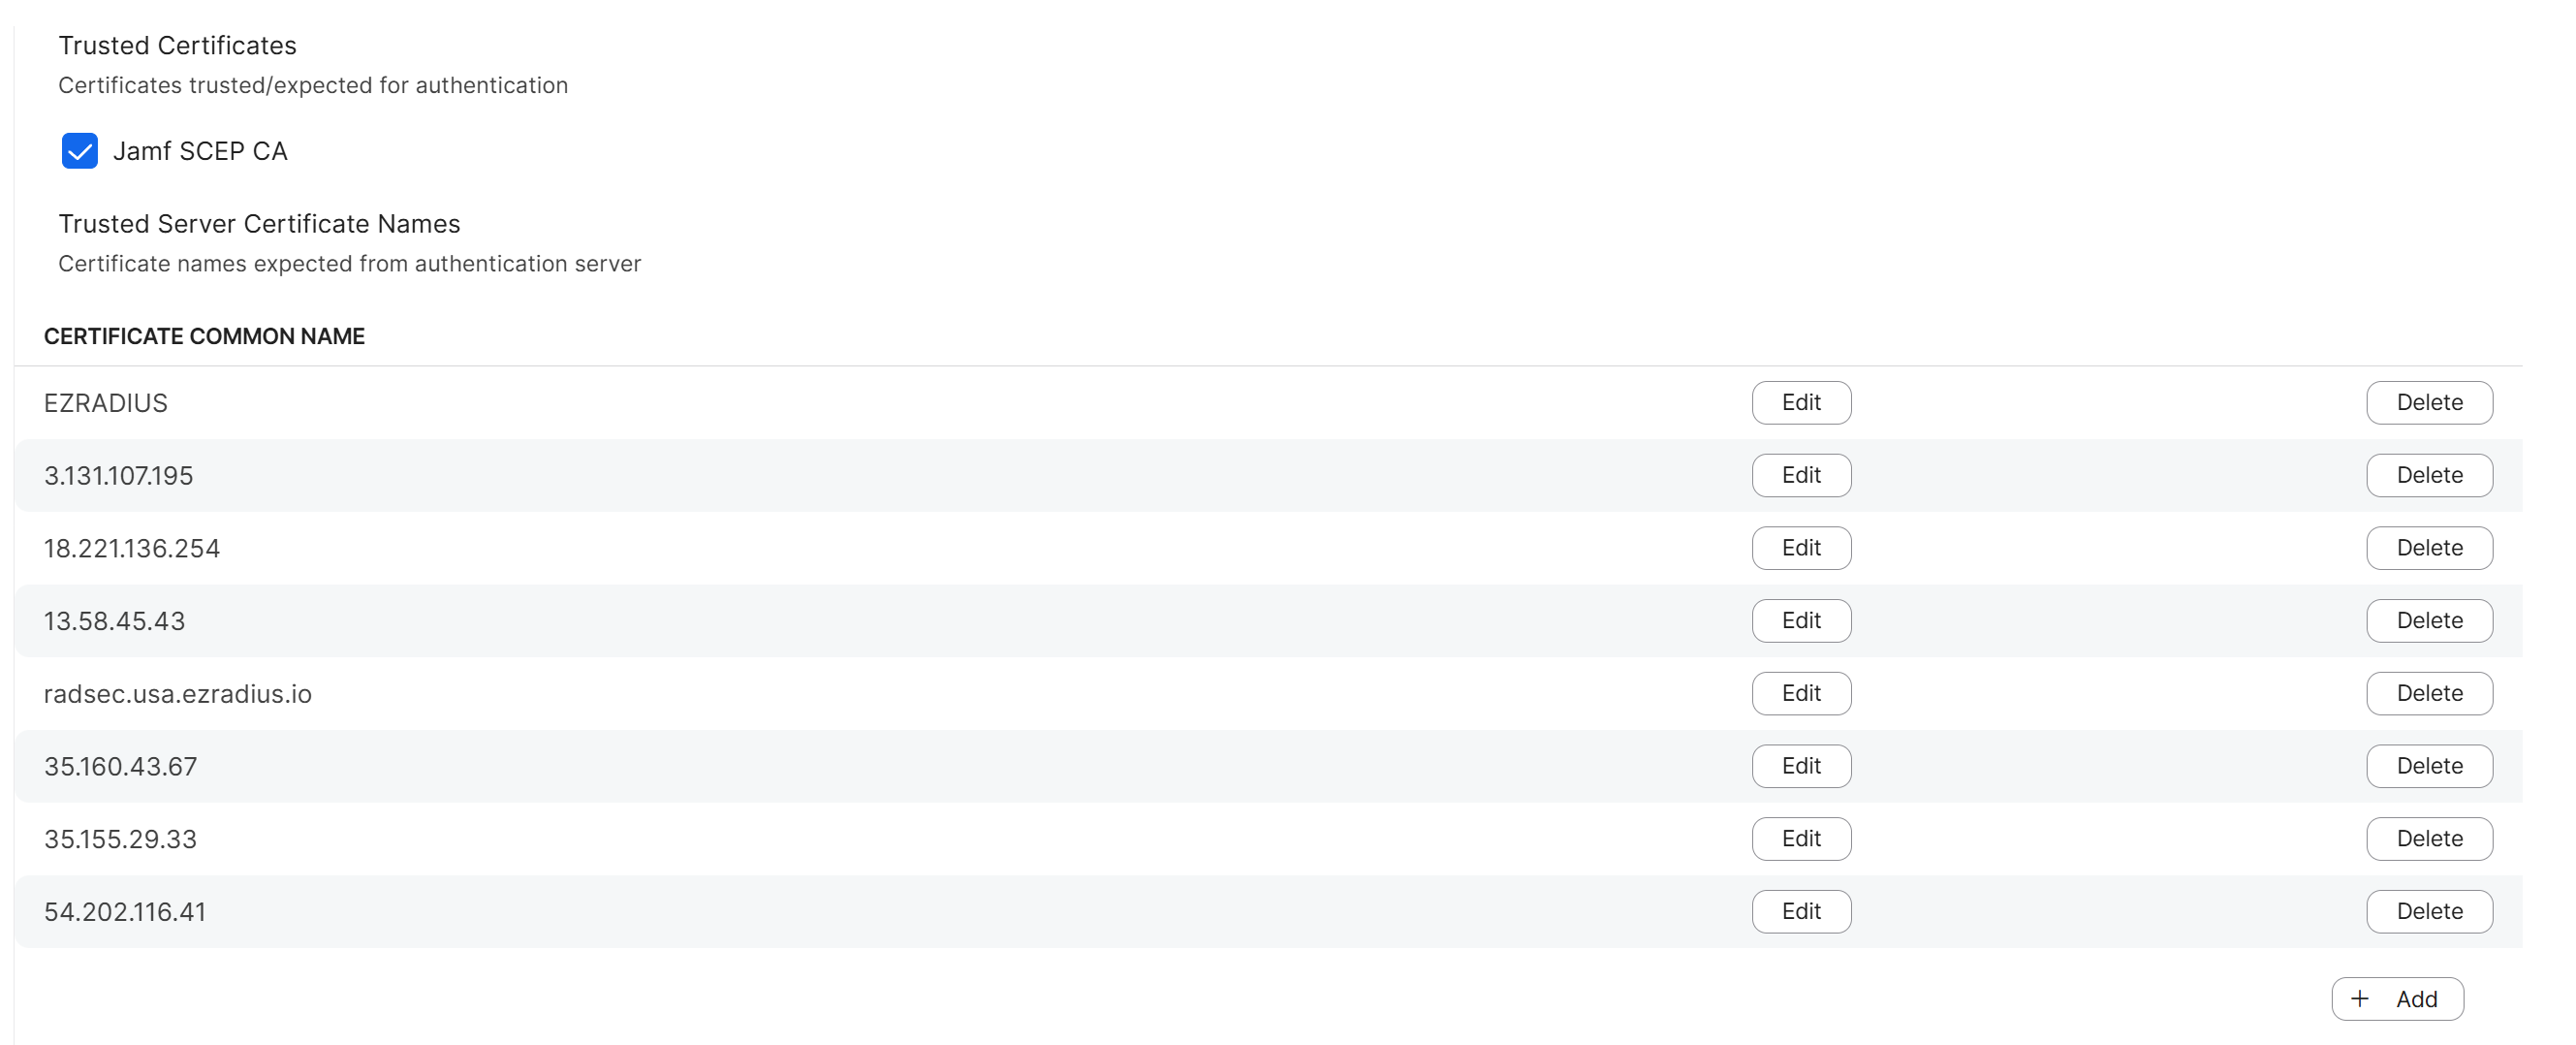
Under the Trust tab, set the following values:
-
Trusted Certificates: Check the box for every Keytos Shield CA certificate you have uploaded.
-
Trusted Server Certificate Names: Add every RADIUS Server name that you copied in the previous step, one value per entry.
-
-
Configure the remaining settings as follows:
-
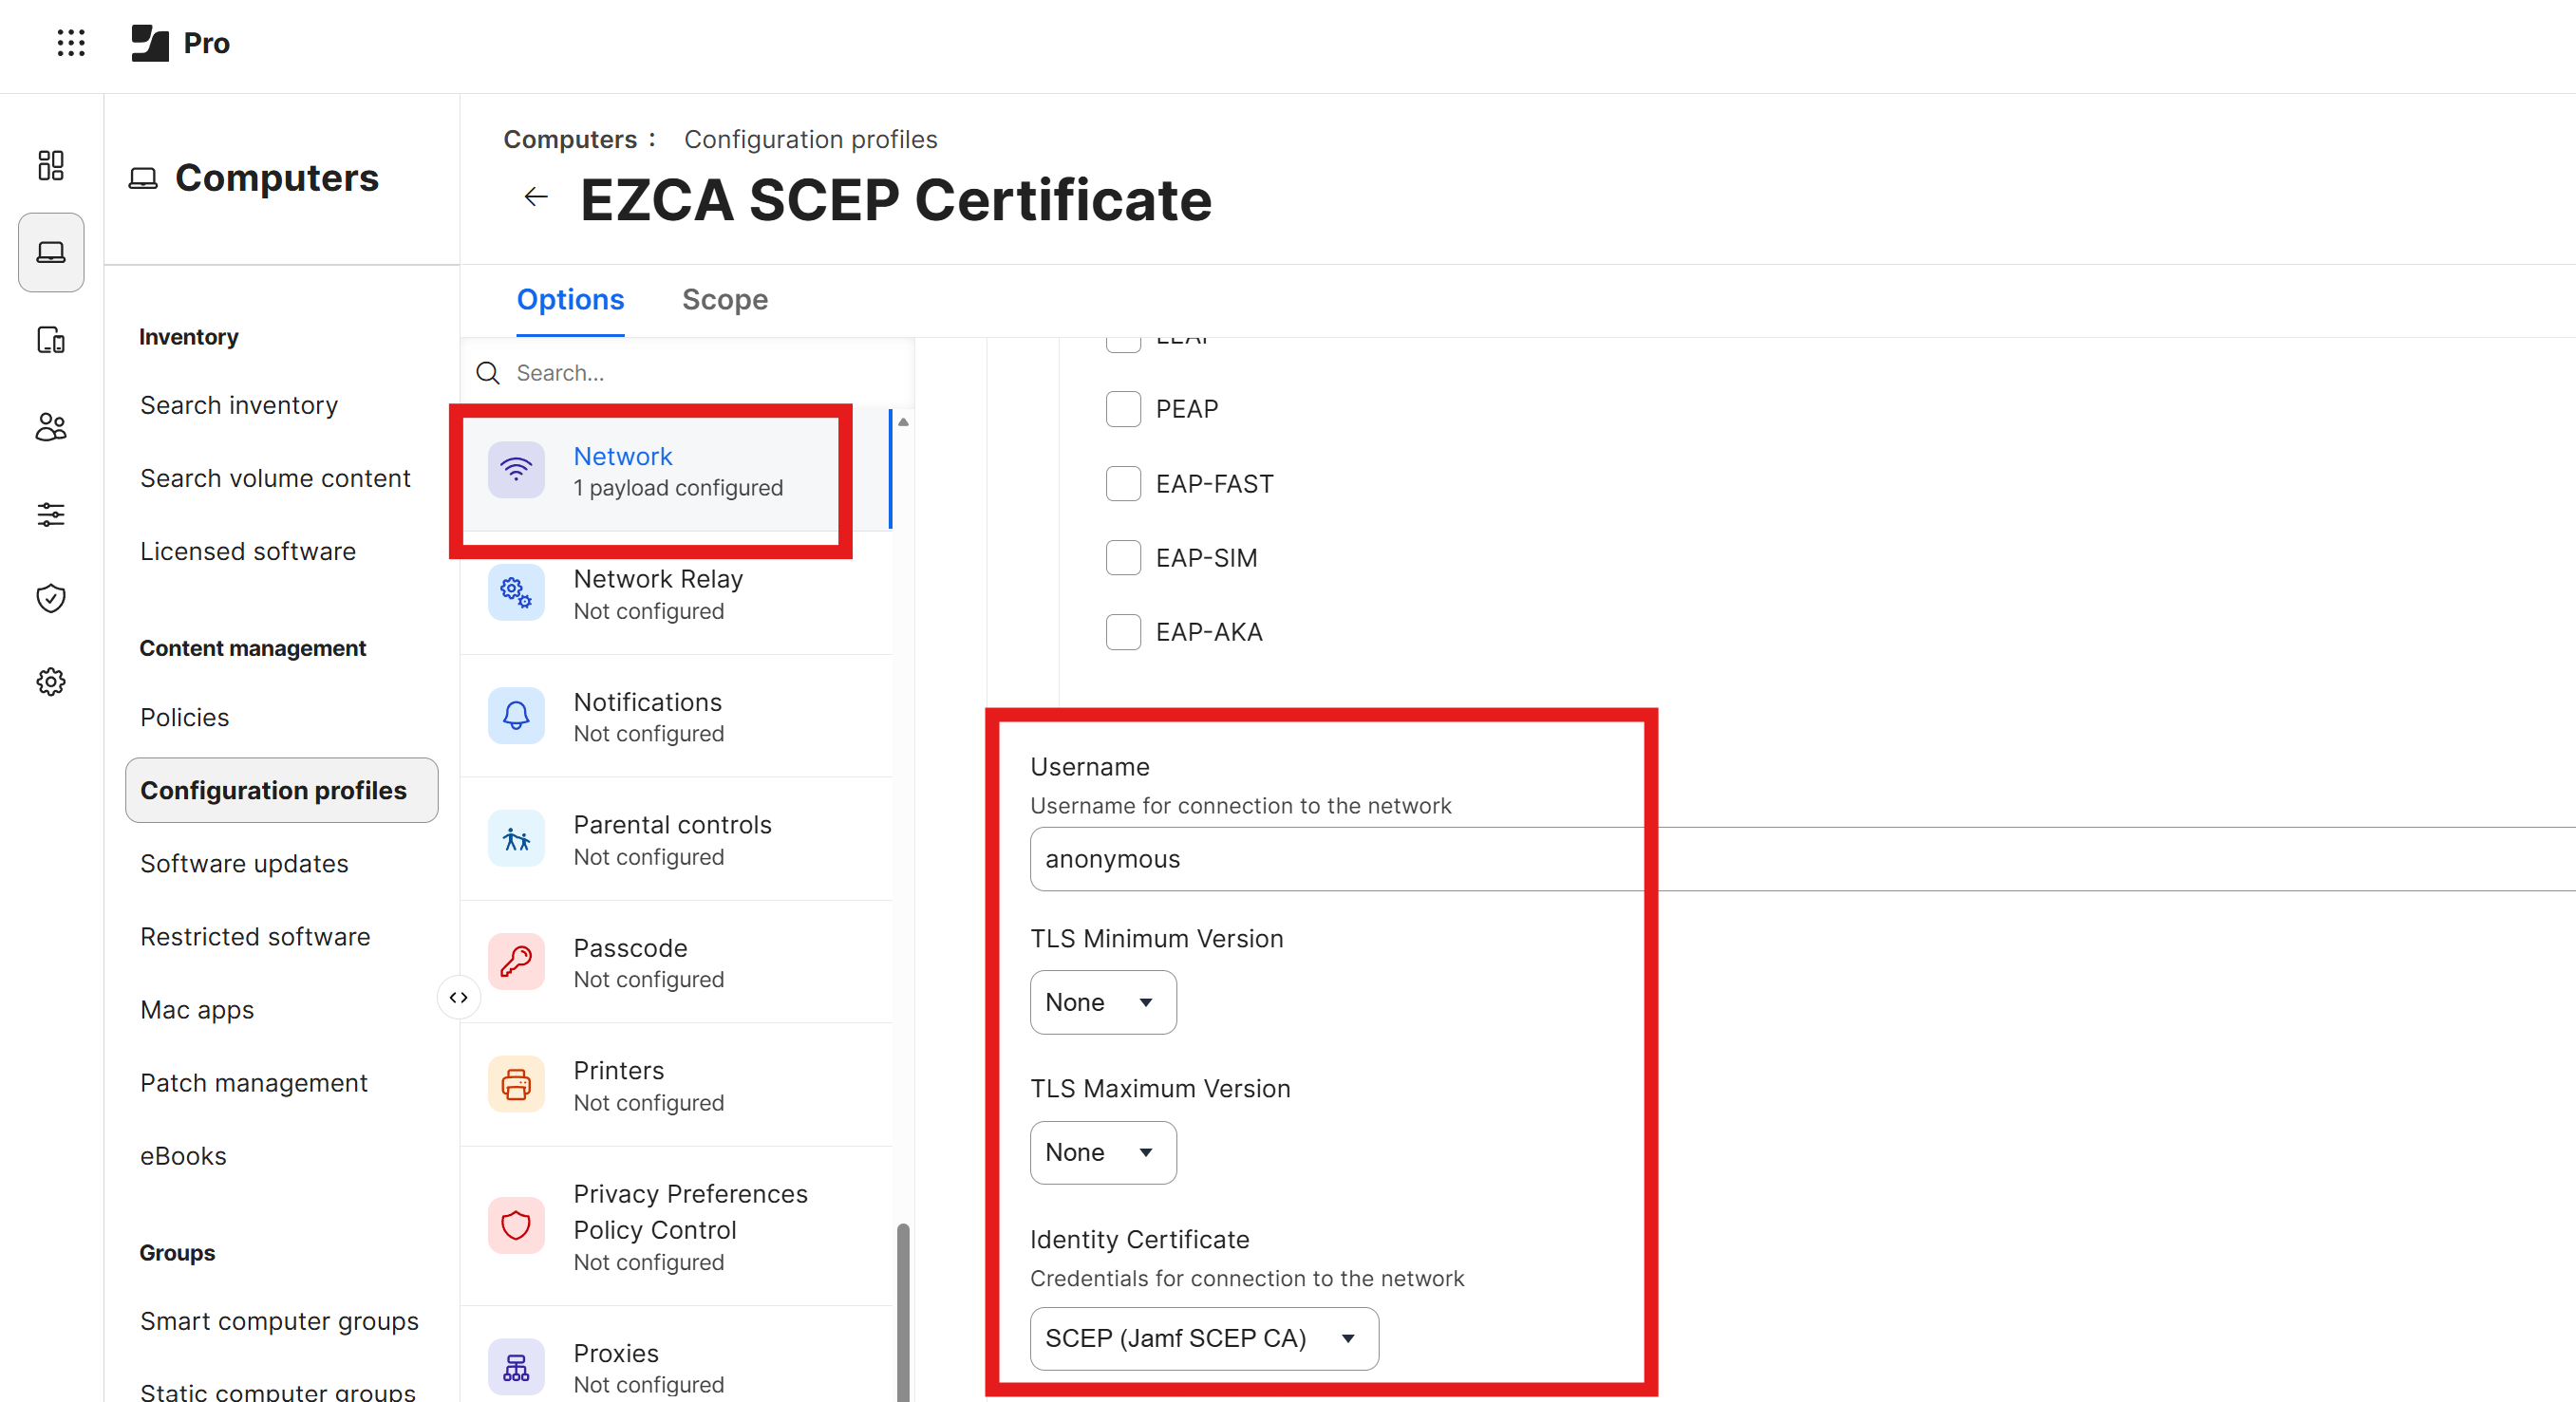
Username: Set this to
anonymousor leave blank (this value is not used for EAP-TLS authentication) -
Identity Certificate: Select the ACME/SCEP certificate that you configured in the previous step.
-
-
Click Save to save the Wi-Fi payload configuration and push it to your devices.
Step 5 - How to Scope Your Configuration Profile to Users
Now that you have configured all of the Options in your new Configuration Profile, the next step is to set the Scope for which users and devices will receive this profile.
- Click on the Scope tab at the top of the page.
- Under Target Computers and Target Users, select the users and devices that you want to receive this Wi-Fi configuration. For example you can select All Users and All Computers.
- Click Save to save the Configuration Profile with the new Scope settings.
Step 6 - How To Test Your Wi-Fi Configuration in macOS
Now that you have configured your Jamf Pro Wi-Fi profile to use Cloud RADIUS for authentication, the next step is to test the configuration on a managed macOS device. Follow these steps to test your Wi-Fi configuration:
-
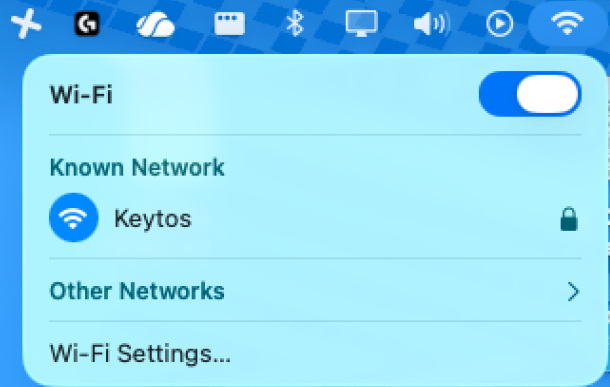
On a managed macOS device, click on the Wi-Fi icon in the menu bar and select the Wi-Fi network that you configured in your Jamf Pro Wi-Fi profile.
-
If your configuration is correct, the device should successfully connect to the Wi-Fi network.
-
If you are prompted for a certificate, this means your timeout settings might be incorrect in your network configuration, or your certificate has not been properly issued to the device. Check your network and certificate settings to resolve this issue.