

















How-To: Connect Your Network to Keytos Shield Cloud RADIUS
Overview - How to Protect Your Network with Cloud RADIUS
Having a single Wi-Fi password for your network is a security nightmare. It’s impossible to know who has access to your network, and it’s nearly impossible to change the password regularly without causing major outages. The best way to secure your network is to use WPA-Enterprise with either certificates or individual user accounts for authentication.
To protect your network using certificates or Entra ID accounts, you will need a RADIUS server to handle authentication requests. Keytos Shield includes a cloud-based RADIUS-as-a-Service that integrates directly with Entra ID to provide secure authentication for your network without needing to manage any RADIUS servers or infrastructure. Simply add Keytos Shield as a RADIUS server in your Controller, and your users can log in using either passwordless certificates or their Entra ID username and password.
Prerequisites for Connecting Your Network to Keytos Shield
Already completed the onboarding process? You can skip directly to the step-by-step guide
The first step to getting started with Keytos Shield is to create a subscription. This will allow you to access the Keytos Shield portal and begin onboarding your users and devices.
How to Install Keytos Shield and Create a Subscription
It's free to get started and there's no sales call or credit card required
How to Register & Consent the Keytos Shield Entra ID Application
Keytos Shield uses native Entra ID authentication to provide a seamless passwordless experience for your users. Begin by registering the Keytos Shield Entra ID application using the link below. Make sure to use your Global Administrator account (or forward the link to your Global Administrator) to complete the consent process.
Single Click
The easiest way to register the applications is to click the button below while logged in with your Global Administrator account:
Manual URL
Alternately, you can copy & paste the following URL into your browser. Make sure you are logged in with your Global Administrator account before accessing the link.
https://login.microsoftonline.com/organizations/adminconsent?client_id=2963e596-88f5-43a1-ab17-68b8026c6468&redirect_uri=https://portal.keytos.io/Welcome
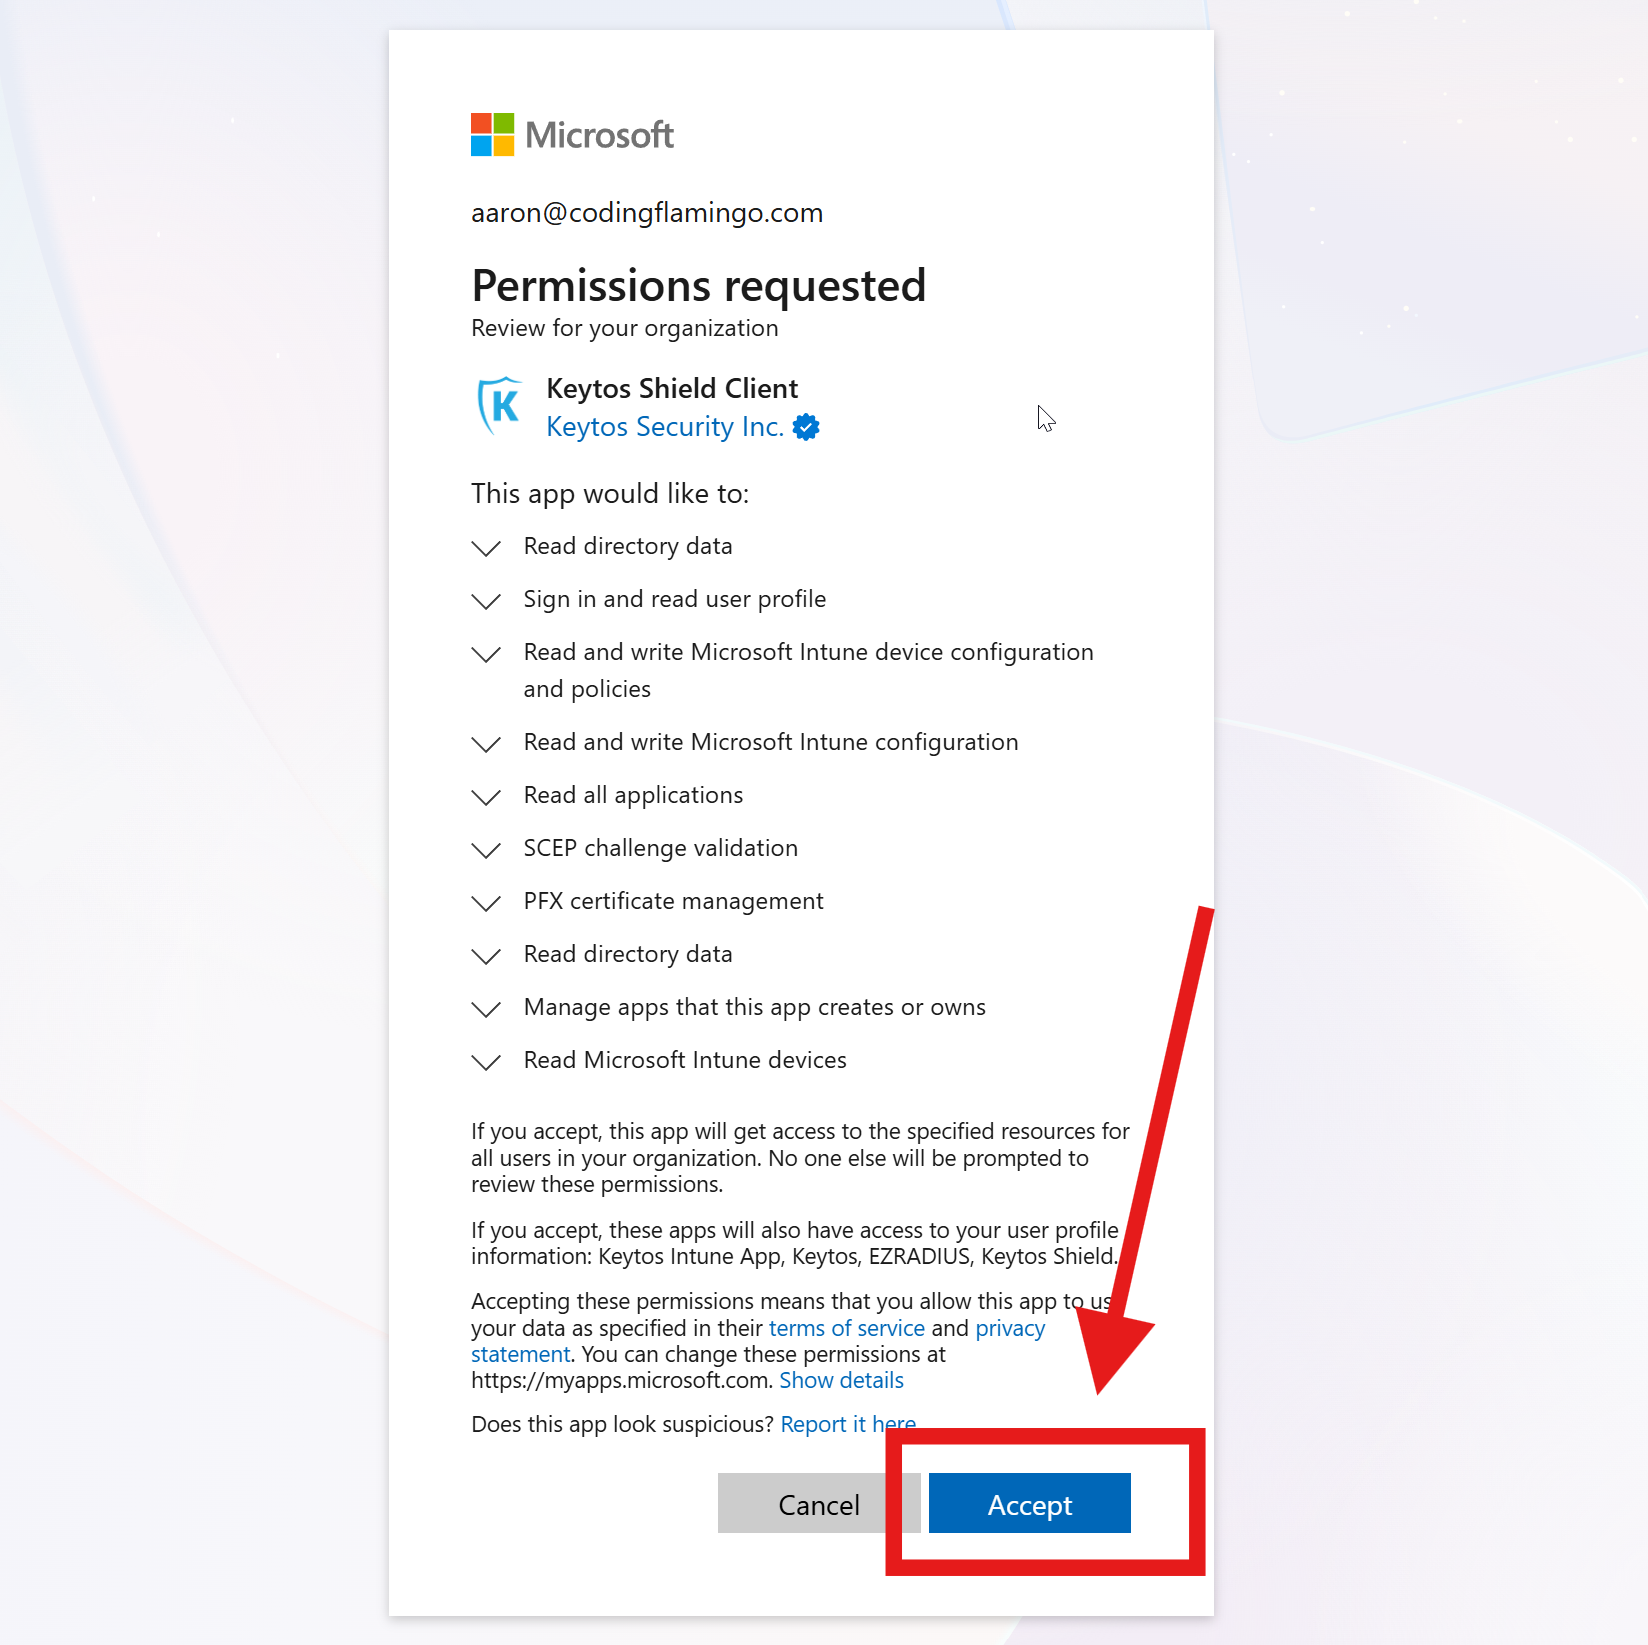
You will see a consent screen similar to the one below. Click Accept to register the applications in your tenant.
This registration is specifically for Azure GCC High tenants and will not work for commercial or other government clouds. An Azure GCC High tenant is required to use this registration.
Single Click
The easiest way to register the applications is to click the button below while logged in with your Global Administrator account:
Manual URL
Alternately, you can copy & paste the following URL into your browser. Make sure you are logged in with your Global Administrator account before accessing the link.
https://login.microsoftonline.us/organizations/adminconsent?client_id=2cf07322-0273-4052-bd9b-e38c1c433803&redirect_uri=https://portal.keytos.us/Welcome
For more information on these specific permissions and why they are needed, please refer to the Keytos Shield FAQs.
Collapses this section and completes the checkmark.
How to Create Your Keytos Shield Subscription
A Keytos Shield subscription handles permissions, billing, and central configuration for your organization. You can create a subscription directly with us, or through the Azure Marketplace. Both options provide a 1-month free trial, and you can cancel at any time.
You can create a Keytos Shield subscription directly through the Azure portal and bill straight to your existing Azure bill. To create a Keytos Shield subscription through the Azure Marketplace, follow these steps:
Note: Azure GCC High does not yet support the Azure Marketplace. Please create a subscription directly through the Keytos portal if you wish to deploy to Azure GCC High.
-
Open Keytos Shield on the Azure Marketplace in your browser.
-
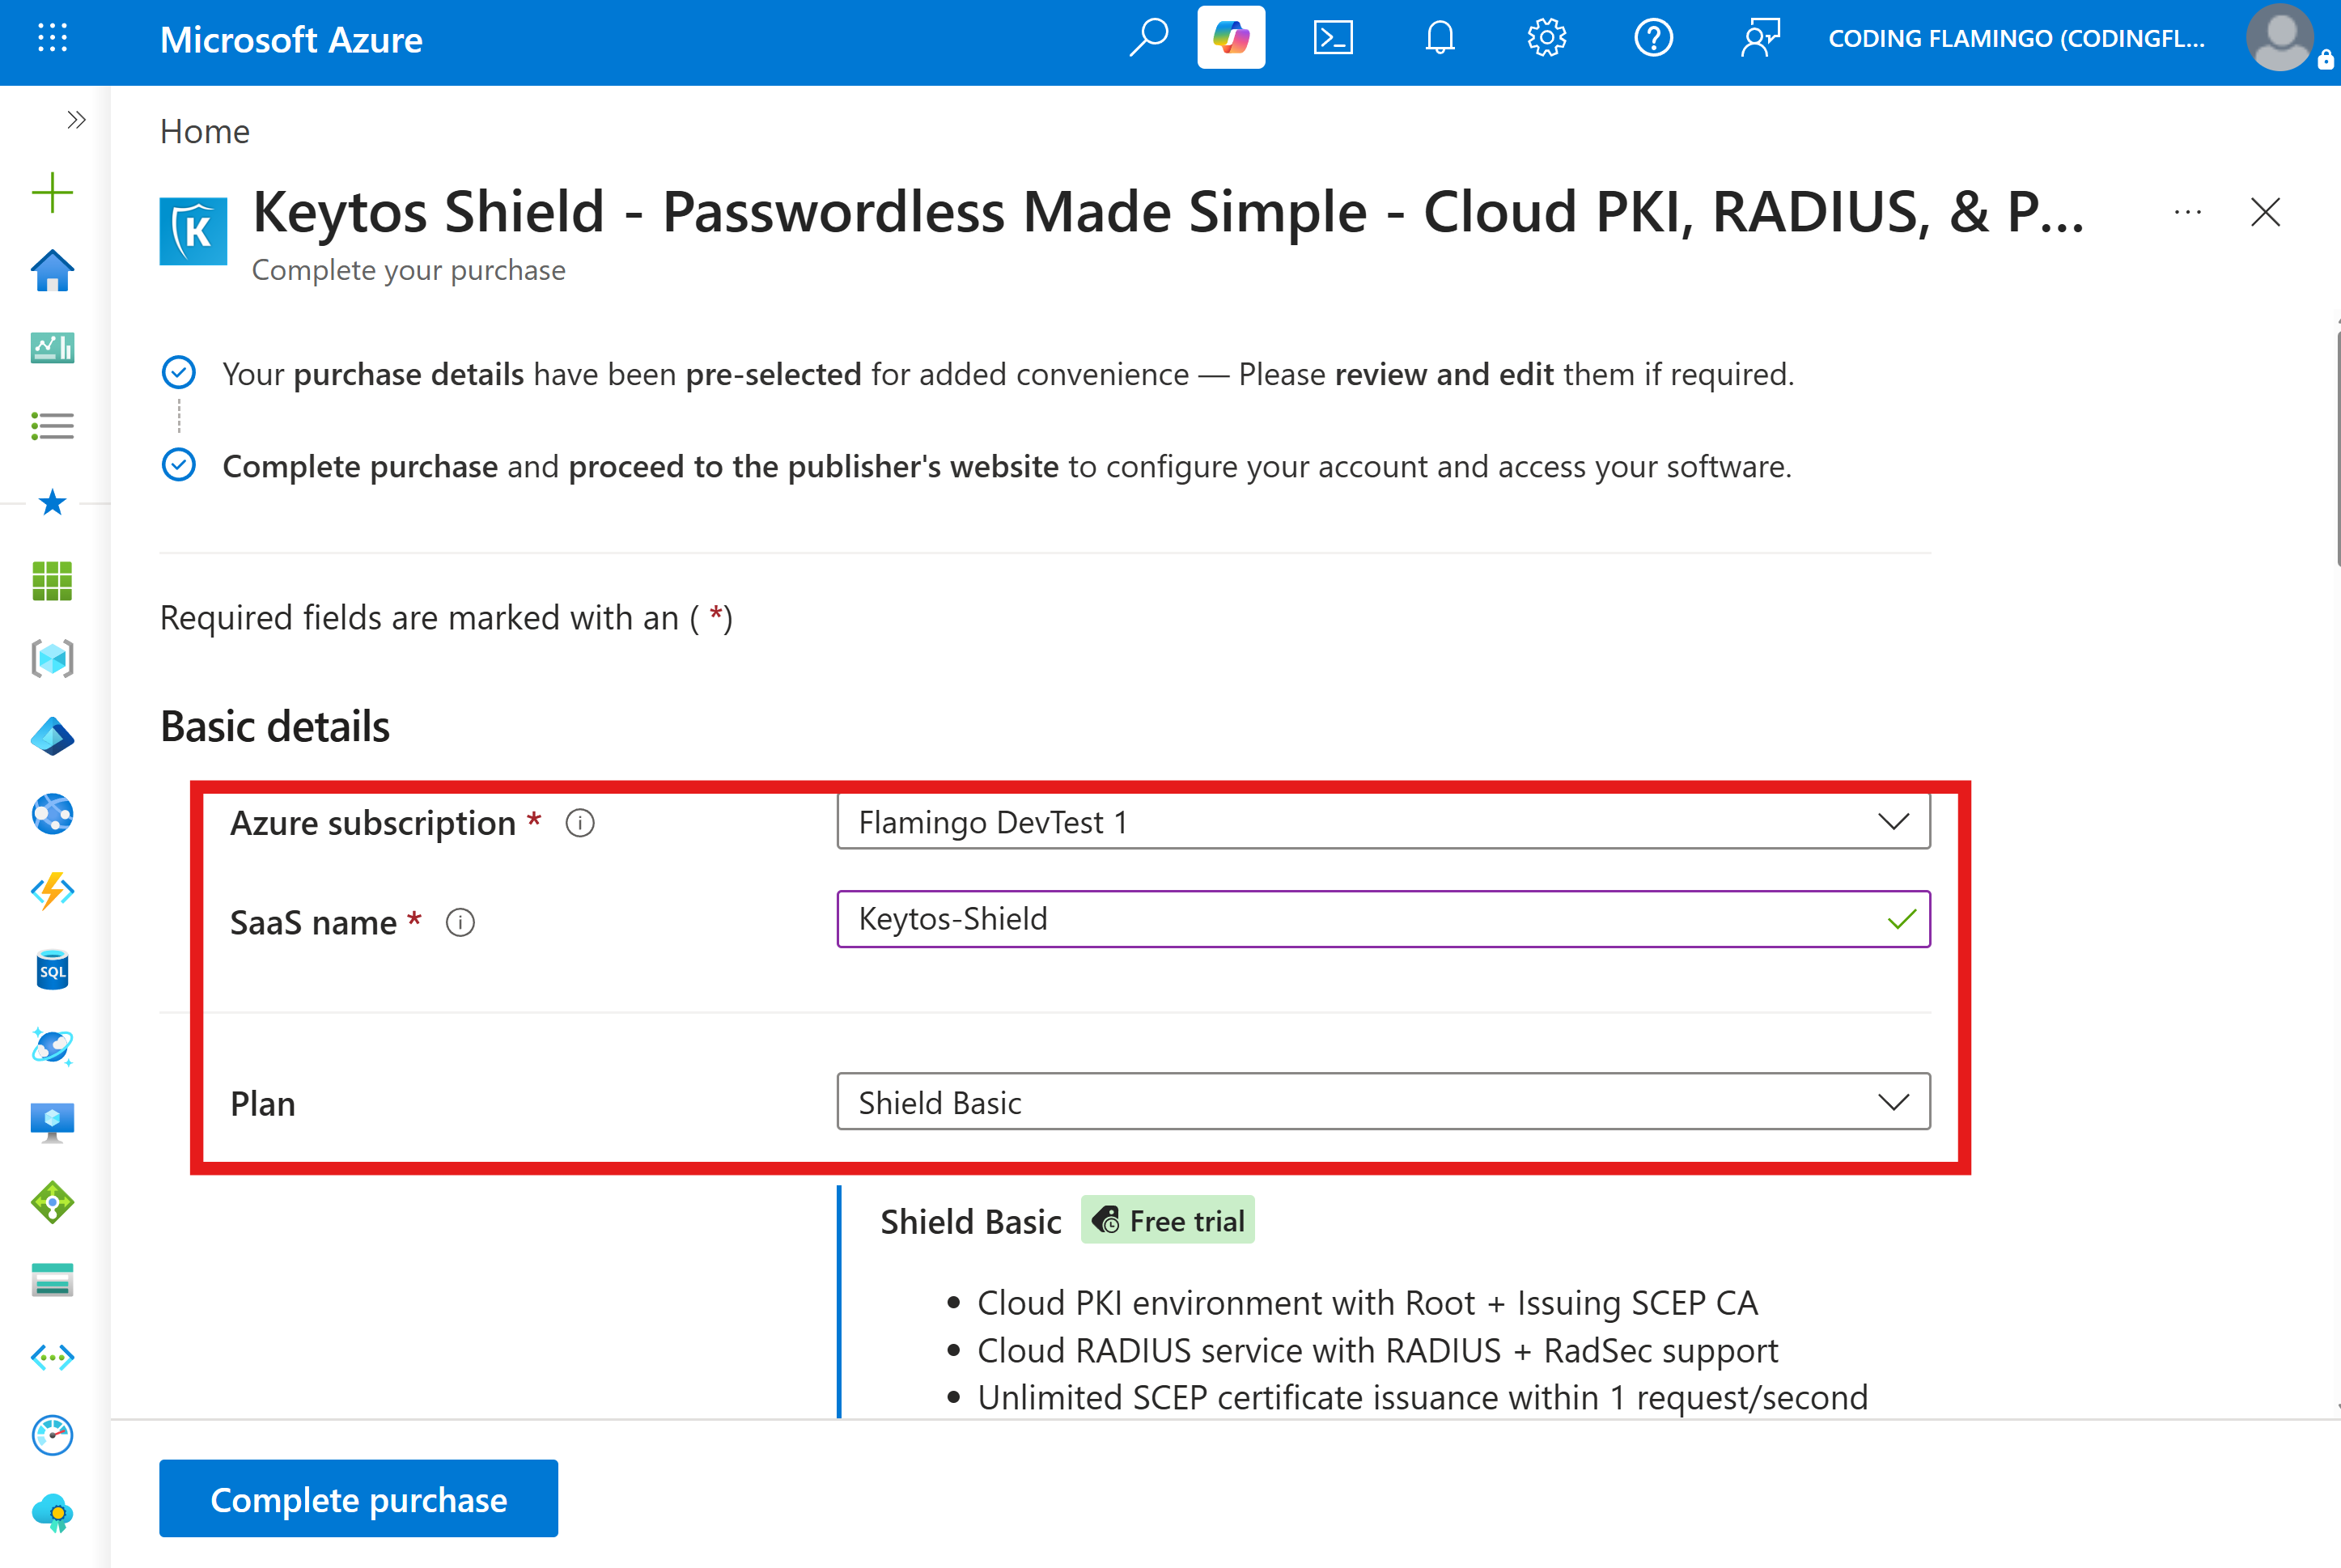
Under Basic details, enter the following required information: Azure subscription: Select the Azure subscription you want to use for your Keytos Shield deployment. SaaS name: Enter a unique name for your Keytos Shield SaaS instance. Plan: Select your desired Shield plan.
-
Make sure to enable Auto-renew for your subscription to ensure uninterrupted service.

-
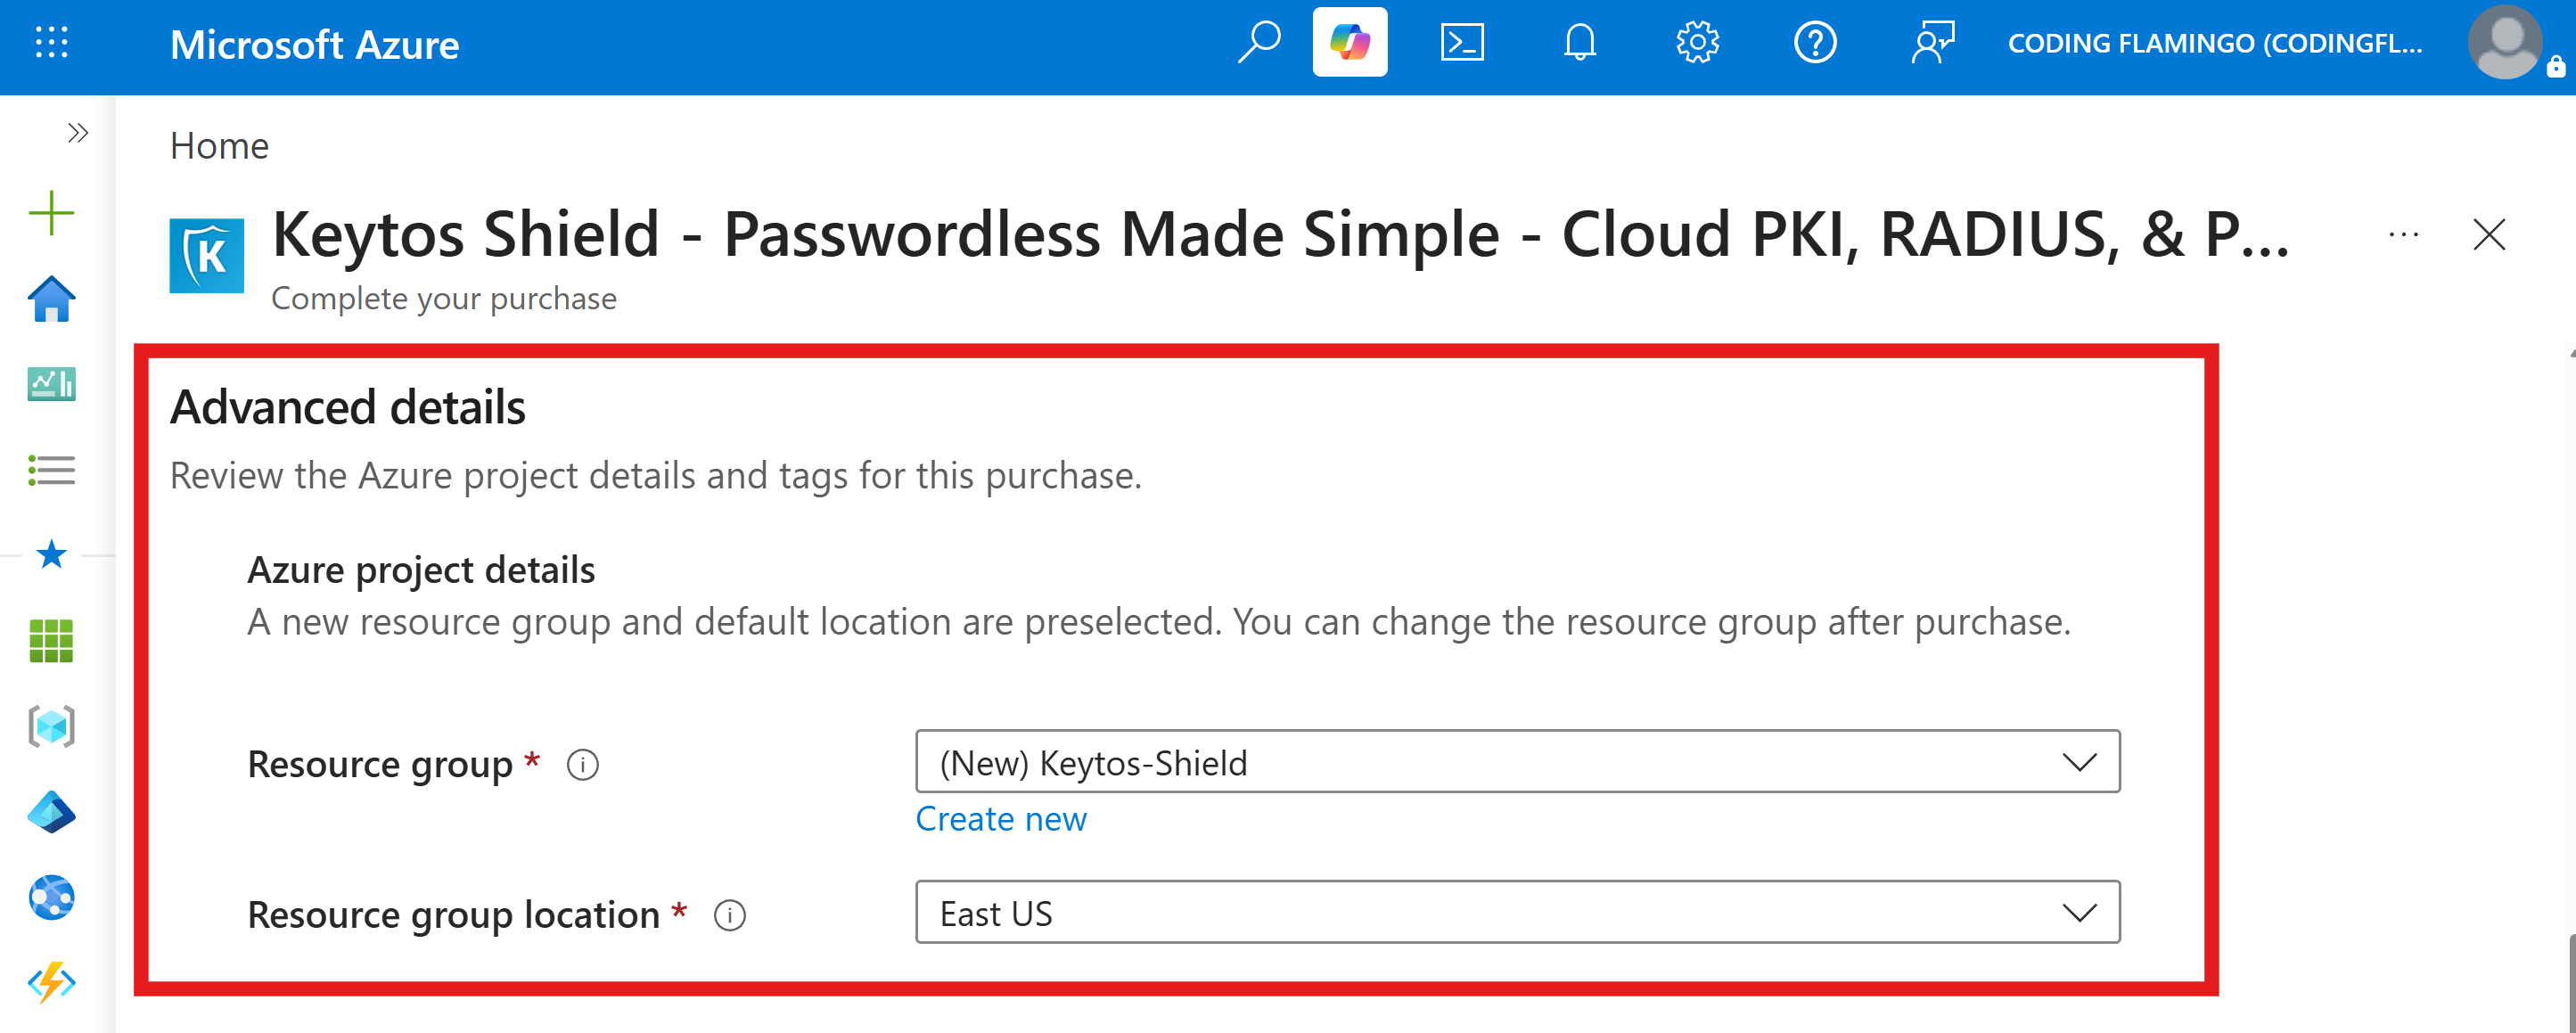
Under Advanced details, you can optionally configure the following settings:
-
Resource group: Select the resource group where you want this SaaS resource to be deployed. Note that all backing infrastructure runs in Keytos’ secure environment, so no infrastructure is deployed within your selected resource group. Just the billing resource.
-
Resource group location: Select the location for the resource group.
-
-
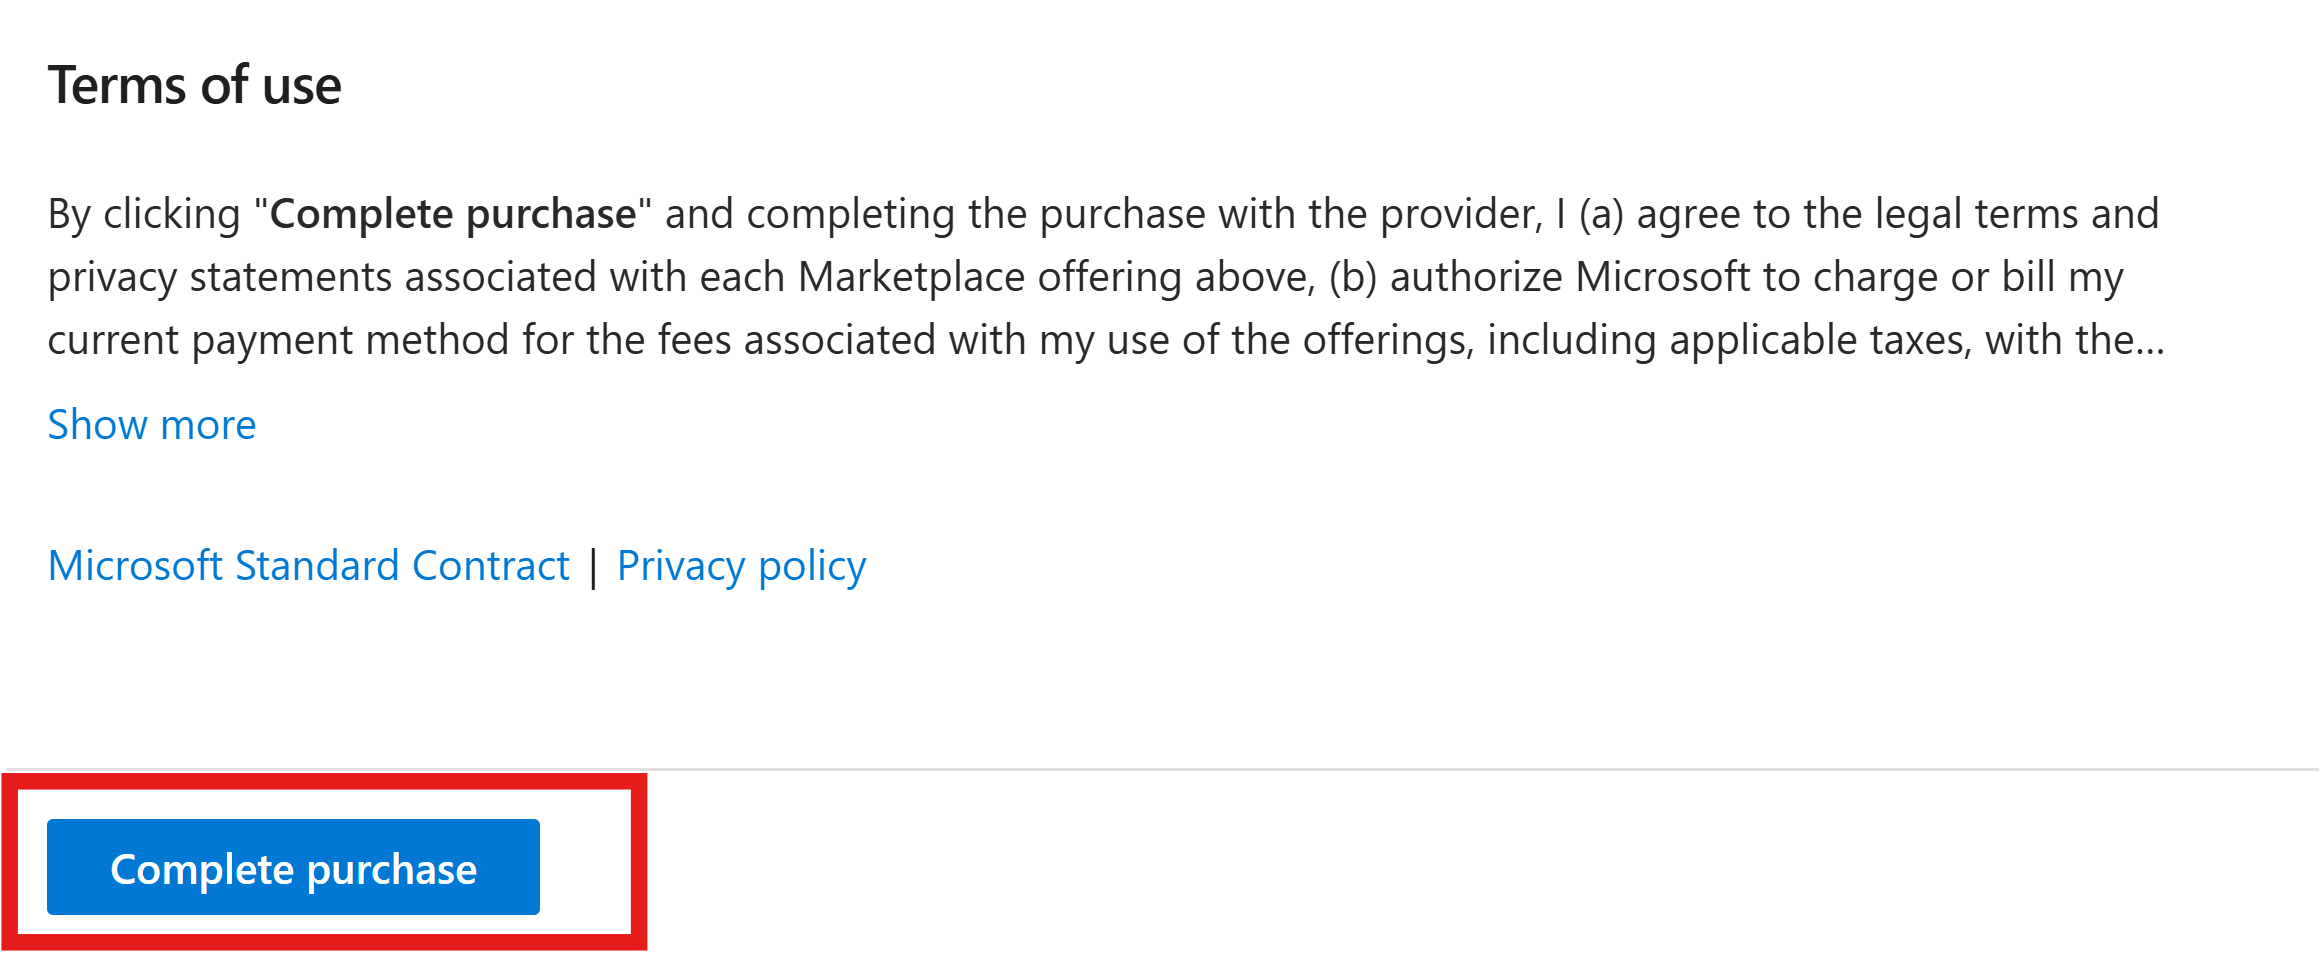
Click Complete purchase to deploy your Keytos Shield subscription. It should take a few seconds to complete.
-
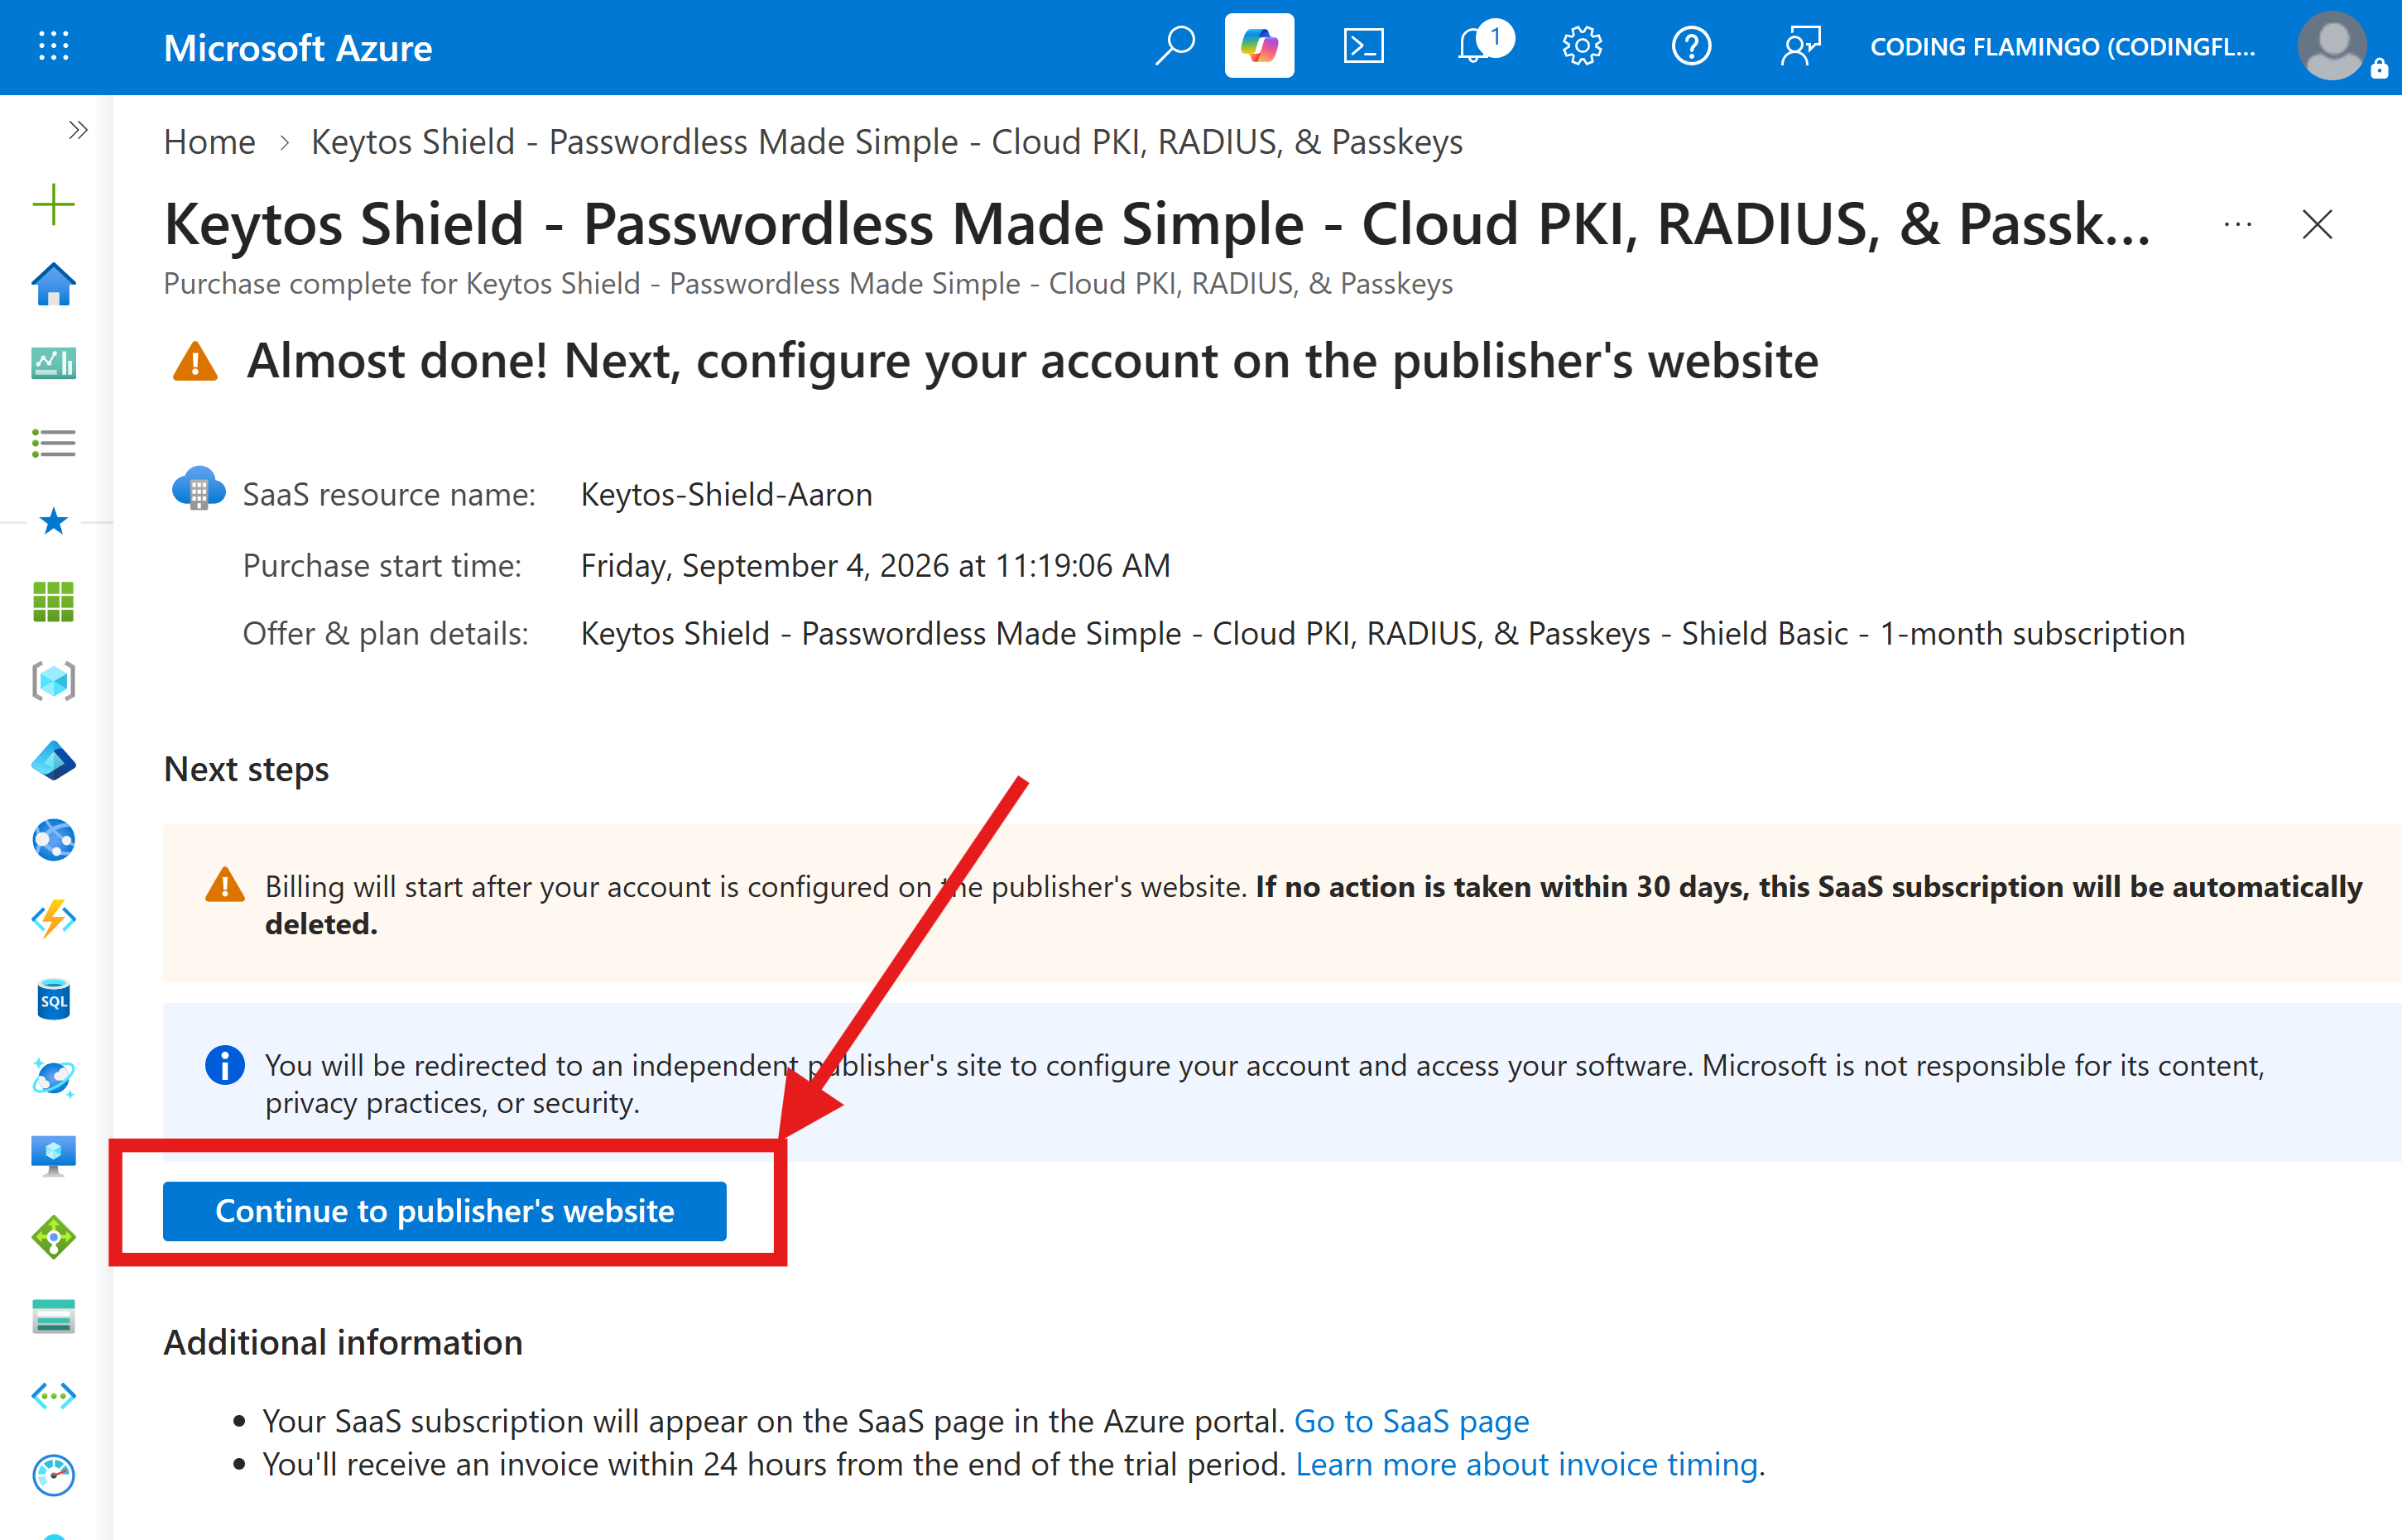
Click Continue to publisher’s website to finalize your Keytos Shield subscription creation.
-
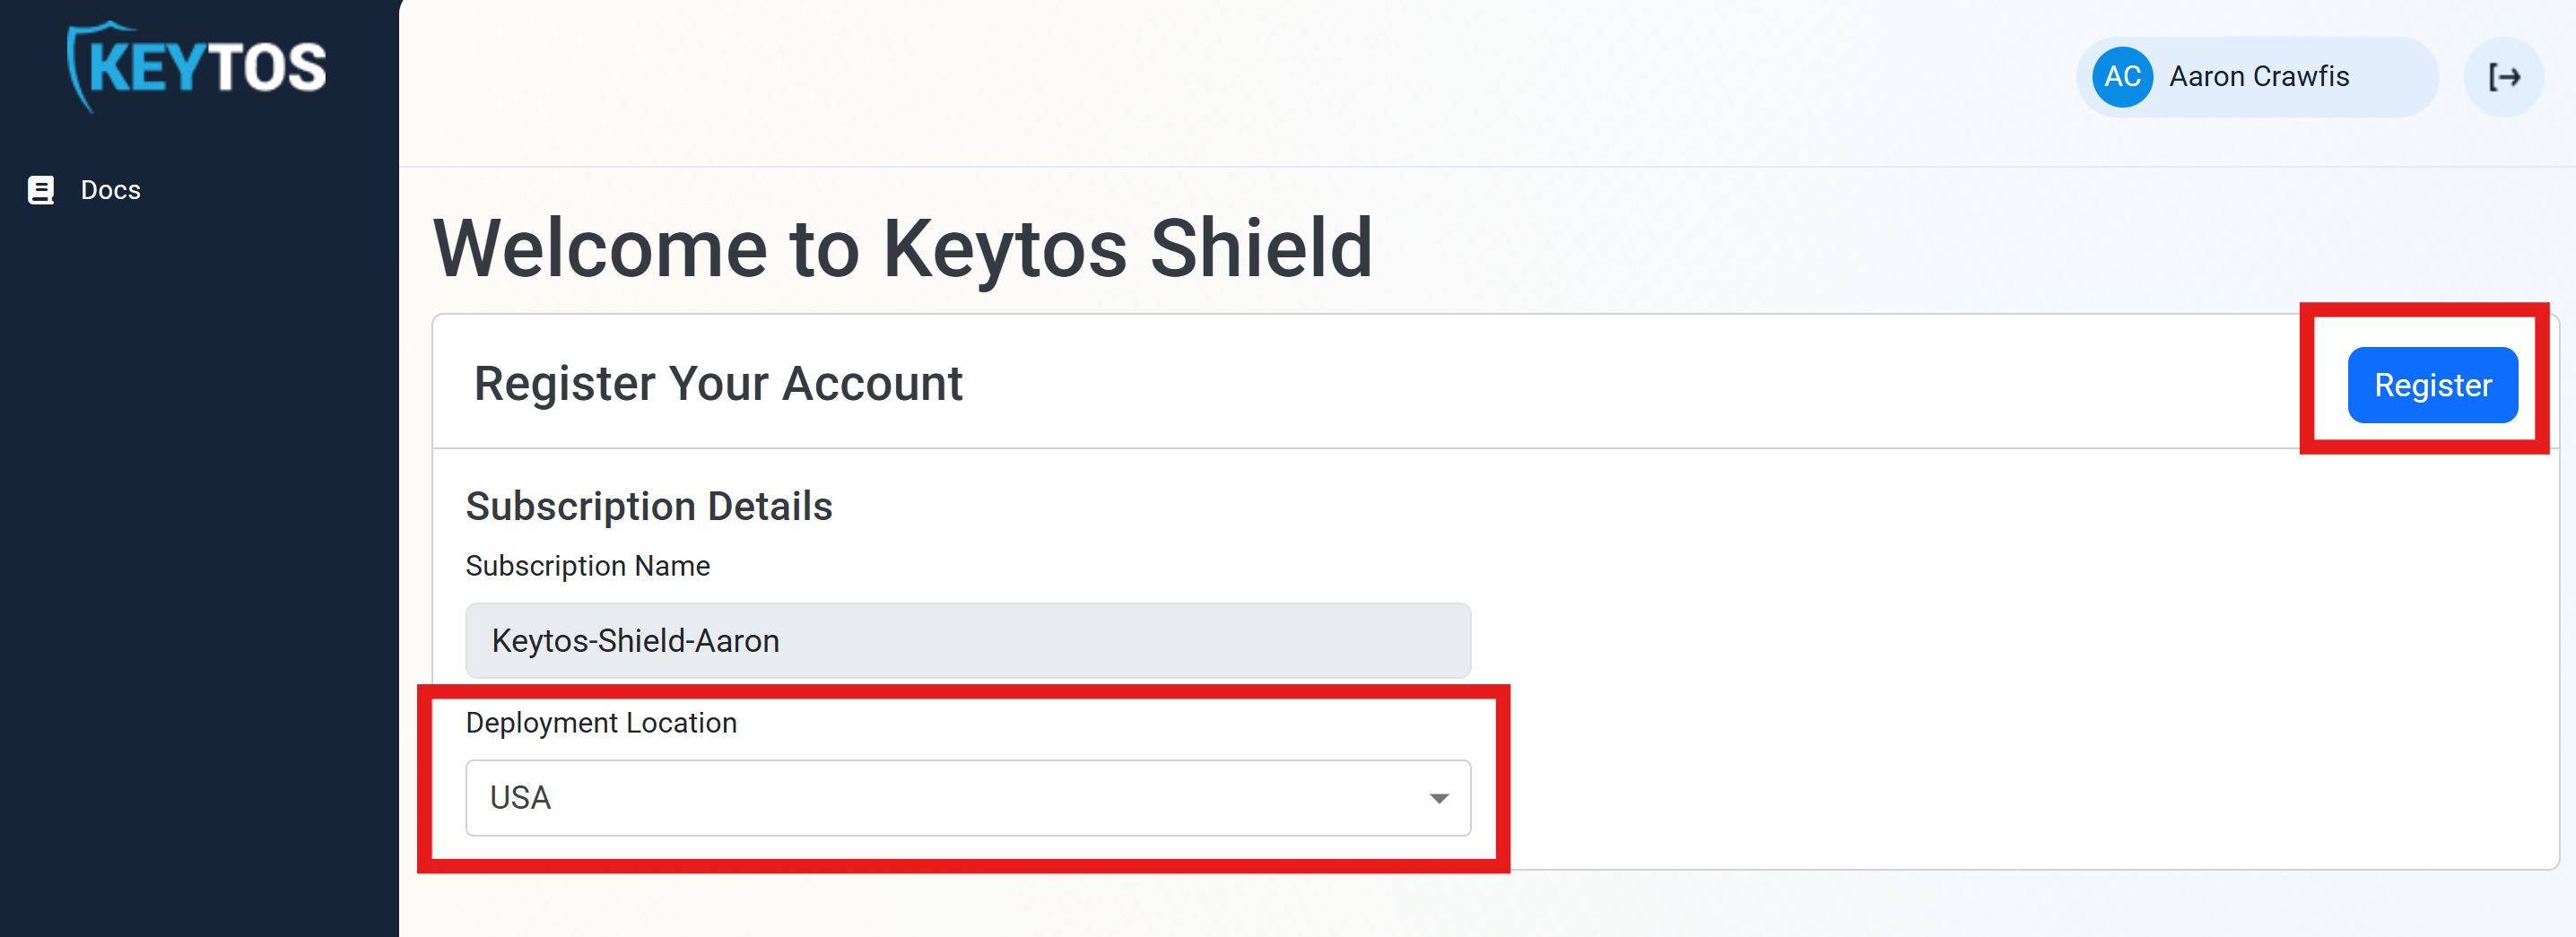
Within the Keytos portal, select a Deployment Location for your subscription and click Register to complete the subscription creation process.
-
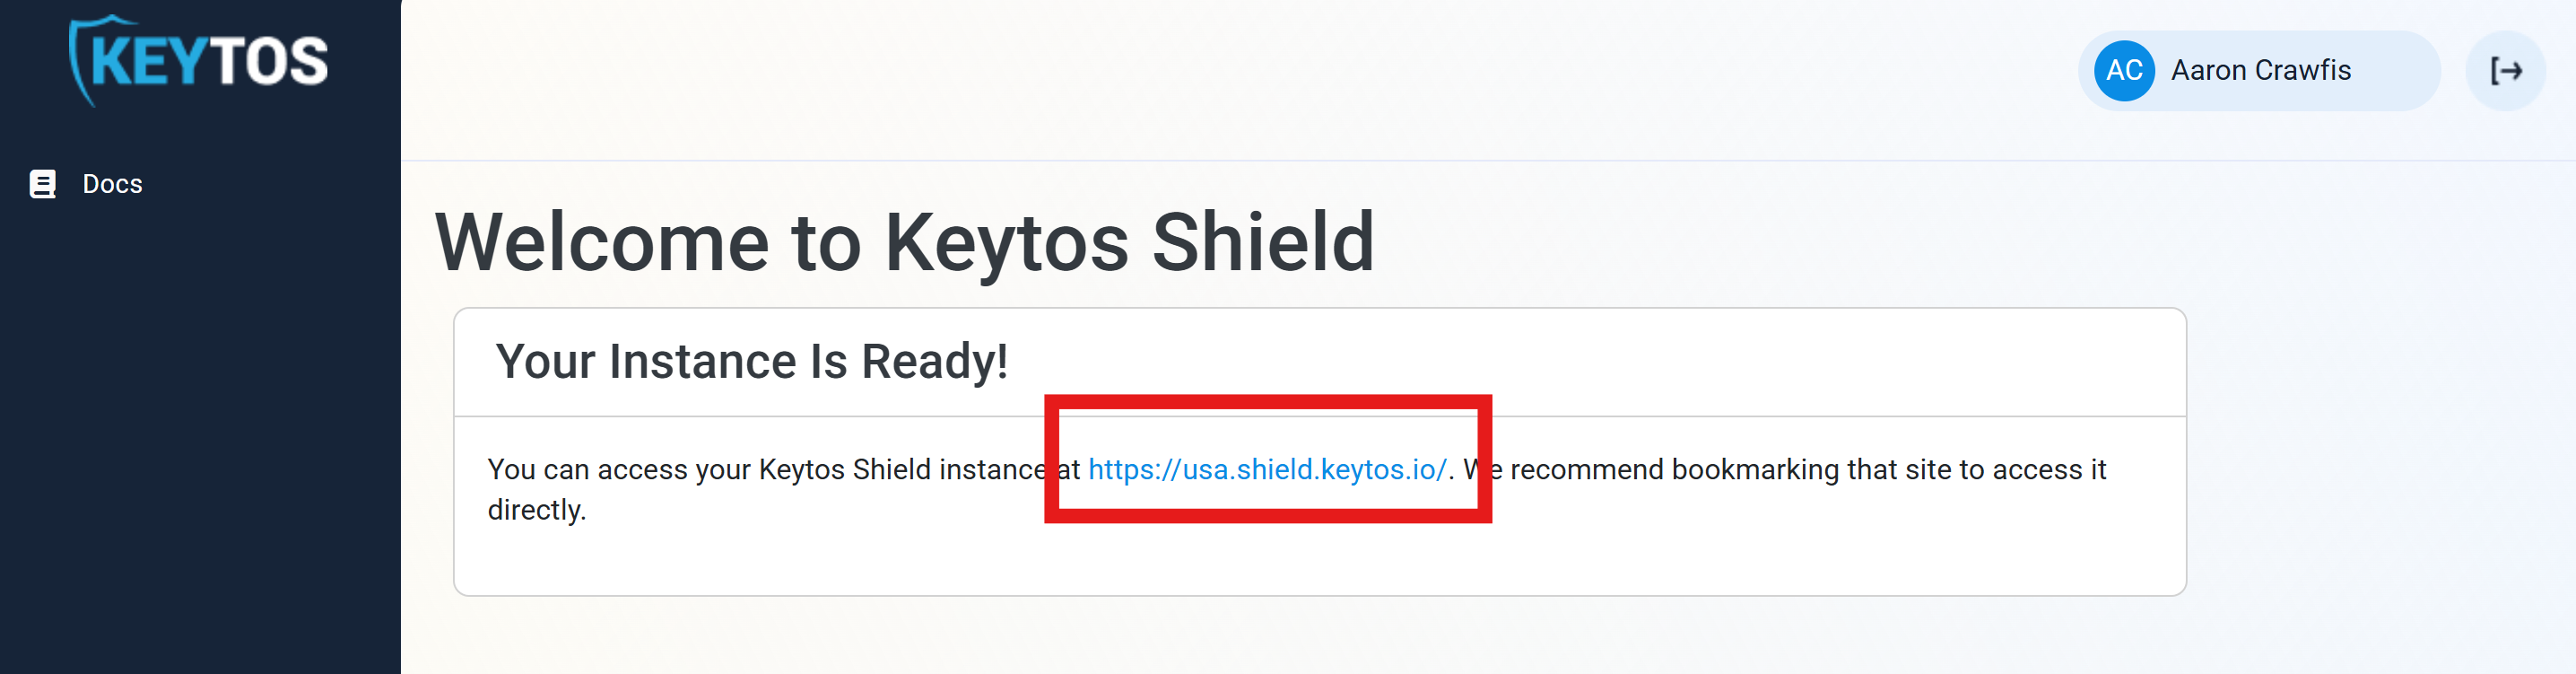
In a few seconds your instance will be ready. Click the instance URL to access your Keytos Shield subscription.
-
Done! You have successfully created your Keytos Shield subscription and can begin your onboarding process.
To create a Keytos Shield subscription directly through the Shield portal, follow these steps:
-
Open the Keytos Shield portal in your browser. (US Government Portal).
-
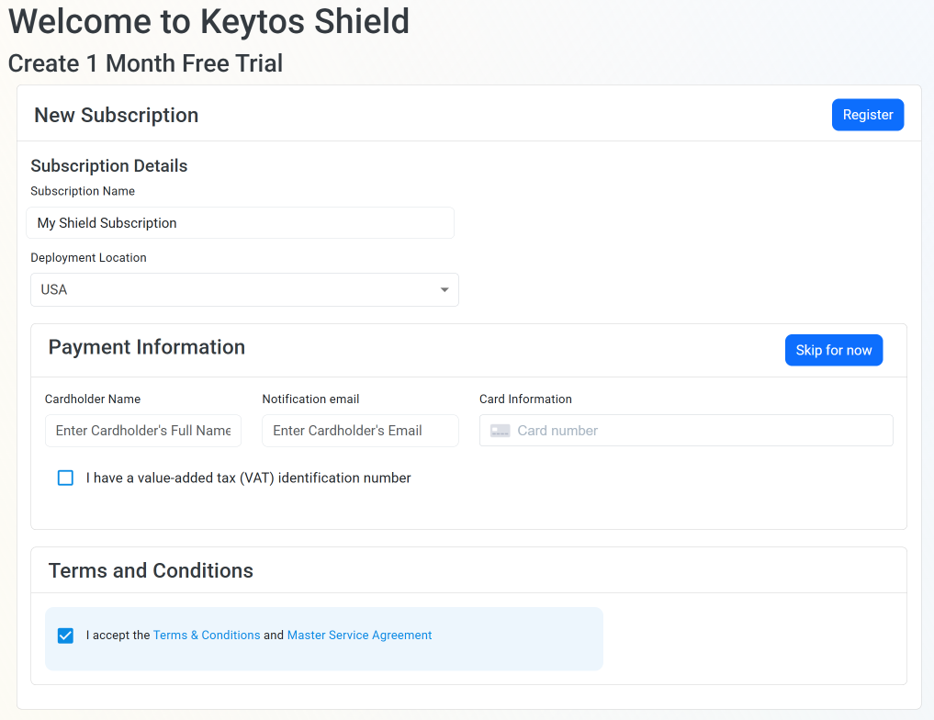
Under Subscription Name, enter a friendly name for your subscription. (you can always change this later)
-
Select a Deployment Location for your subscription. This will be your primary region where your Keytos Shield resources will be hosted.
-
Optionally enter your credit card information. You can click Skip for now if you just want to try out Keytos Shield for free for 1 month and add a payment method later.
- If you are managed by a MSP or reseller, the credit card form will not be shown, and you can proceed with creating your subscription without entering any payment information.
-
Check the Terms & Conditions box to agree to the terms of service.
-
Click Register to create your subscription. It should complete in just a few seconds.
-
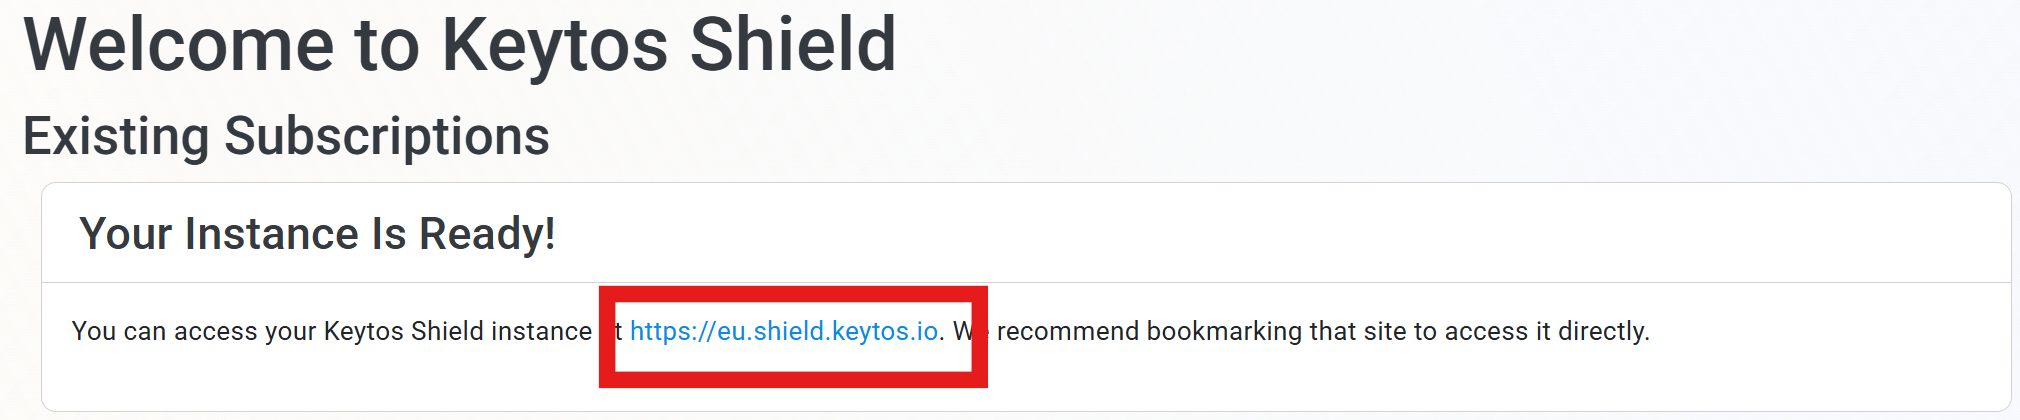
You should now see your newly created Keytos Shield subscription endpoint listed under Existing subscriptions:
Collapses this section and completes the checkmark.
Now that you have created a Keytos Shield subscription, you can proceed to onboard your environment to Shield using the onboarding guide.
How to Configure Shield via the Onboarding Guide
The Shield onboarding guide will walk you through the steps to onboard your environment to Shield
It’s easy to get started with the interactive onboarding guide within Keytos Shield. Follow these steps to onboard your environment and configure your network security settings.
-
Open the Keytos Shield global portal in your browser. (US Government Portal). Make sure to sign in with the same account used to create your Keytos Shield subscription.
-
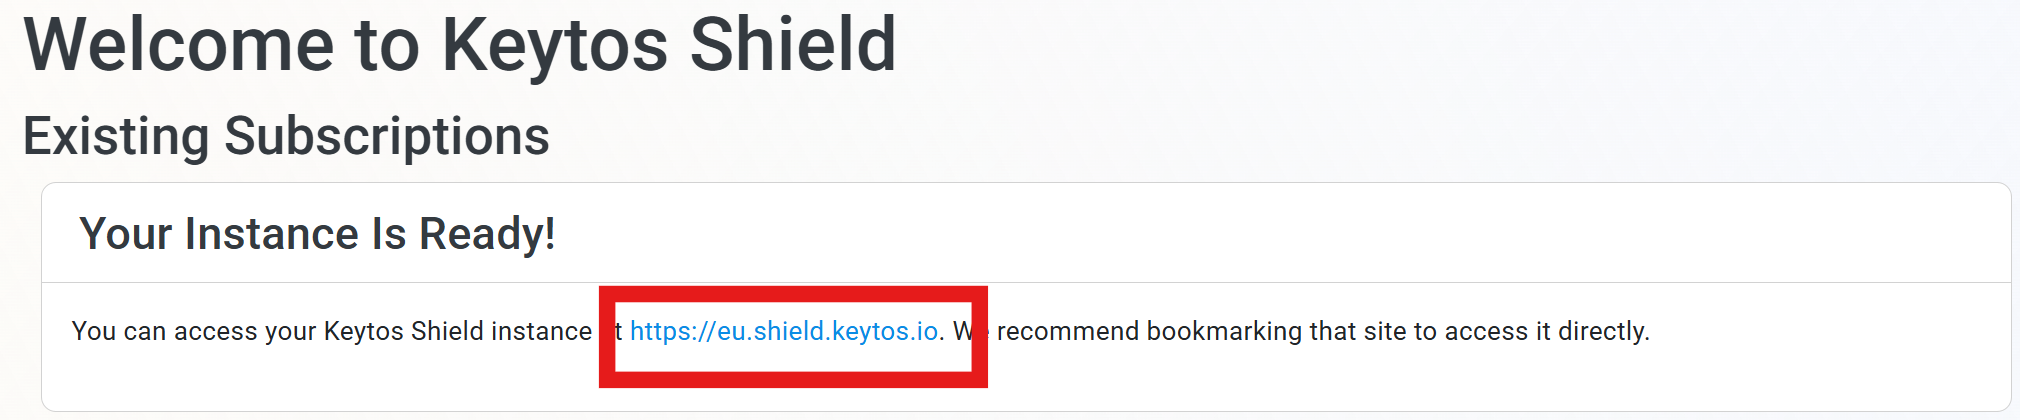
Under Existing subscriptions you’ll see your region-specific Keytos Shield endpoint. Open it to access the onboarding guide and start configuring your network security settings.
-
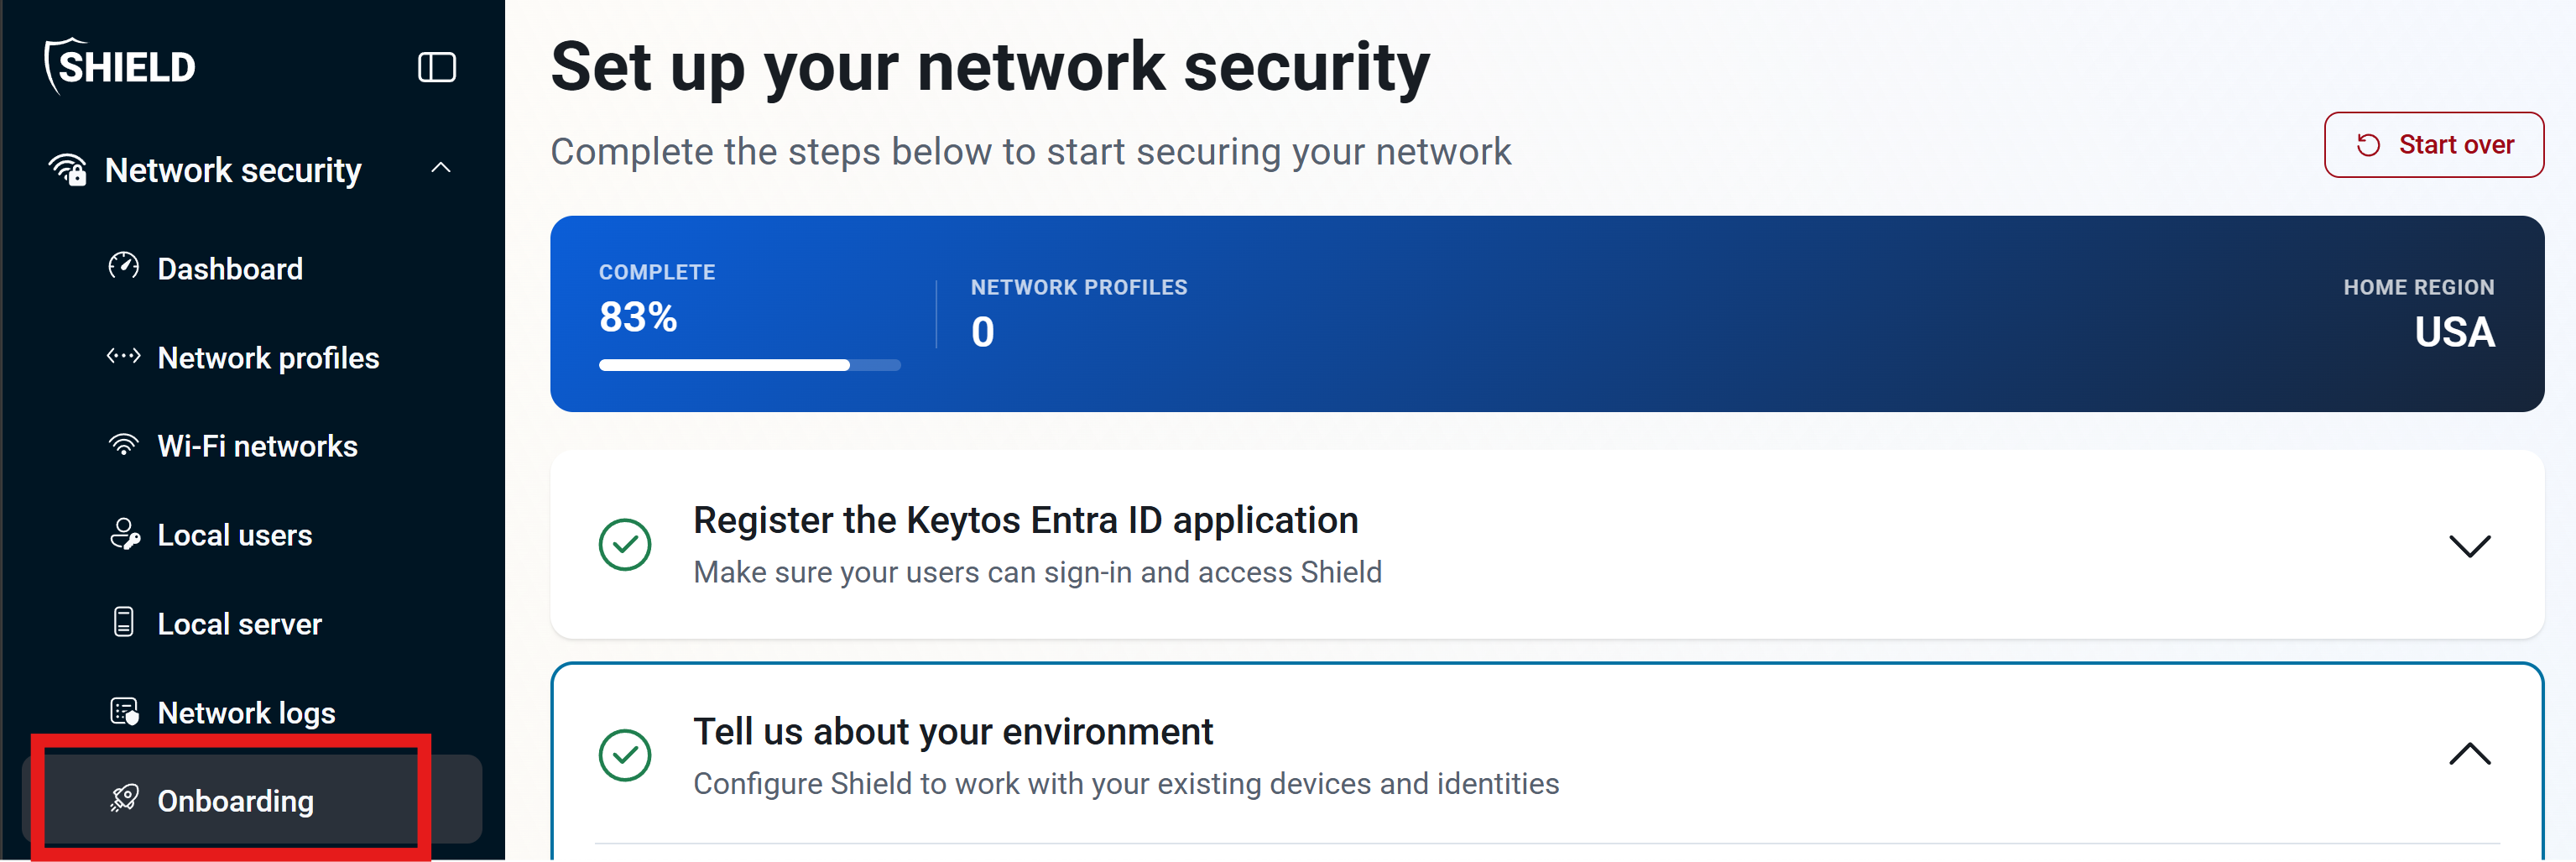
You should automatically be redirected to the network security onboarding guide on first login. If not, you can manually navigate to it from the left-hand nav bar under Onboarding:
Collapses this section and completes the checkmark.
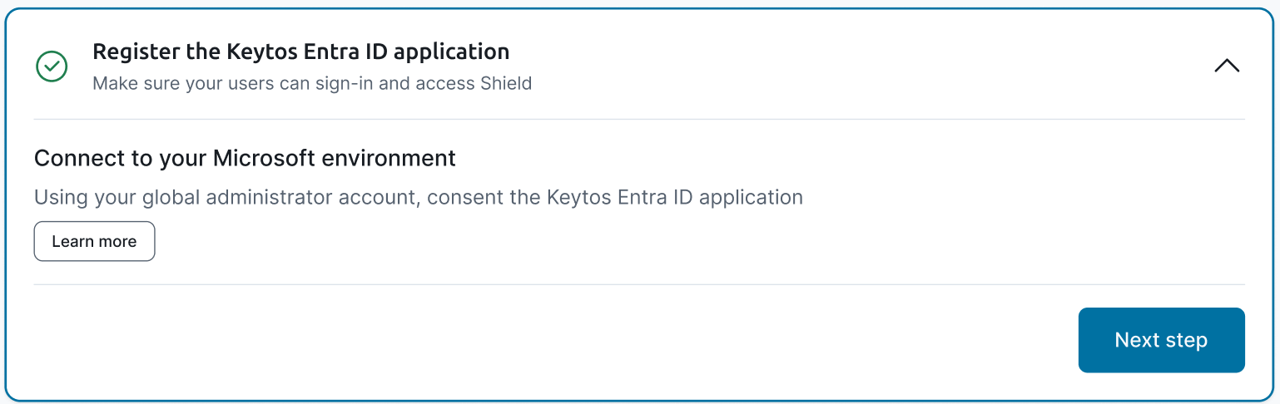
How To Register the Keytos Entra ID Application (already completed)
Since you have already completed this earlier, the step should be marked as completed. If there was an issue with the consent, refer to Step 1 above to re-consent the application using your global administrator account.
Collapses this section and completes the checkmark.
How To Configure Your Infrastructure and PKI Environment
In step 2, you’ll answer a few questions about your environment and how you want to configure your PKI and MDM settings.
How to Set Up Your PKI in Keytos Shield
Keytos Shield includes a Cloud PKI which will issue your SCEP certificates. If you only have cloud resources and no on-premises PKI, you can rely solely on the Cloud PKI for certificate issuance. If you have an existing on-premises PKI, you can integrate it with Keytos Shield to chain your Shield SCEP CA up to your existing Root CA.
-
What type of environment do you have?
-
Select Hybrid infrastructure if you have an on-premises Active Directory environment, or an existing PKI environment that you want to integrate with Keytos Shield.
-
Select Cloud only if you have a cloud-only environment and do not have an on-premises Active Directory or PKI infrastructure. You won’t be asked any further questions about on-premises PKI integration.

-
-
Will you use Windows Hello for Business for on-premises resources?
-
Select Yes if you have a hybrid environment and want to use Windows Hello for Business and certificates issued by Keytos Shield to authenticate to your on-premises resources.
-
Select No if you do not plan to use Windows Hello for Business for your on-premises resources.

-
-
Do you have an existing on-premises PKI?
-
Select Yes if you have an existing on-premises PKI environment and want to integrate it with Keytos Shield.
-
Select No if you do not have an existing on-premises PKI environment or do not want to integrate it with Keytos Shield.

-
-
Will you use your existing Root CA as your Root CA?
-
Select Yes if you have an existing Root CA and want the certificates issued by Keytos Shield to chain up to it.
-
Select No if you want to use Shield’s Root CA instead of chaining up to your existing Root CA.

-
-
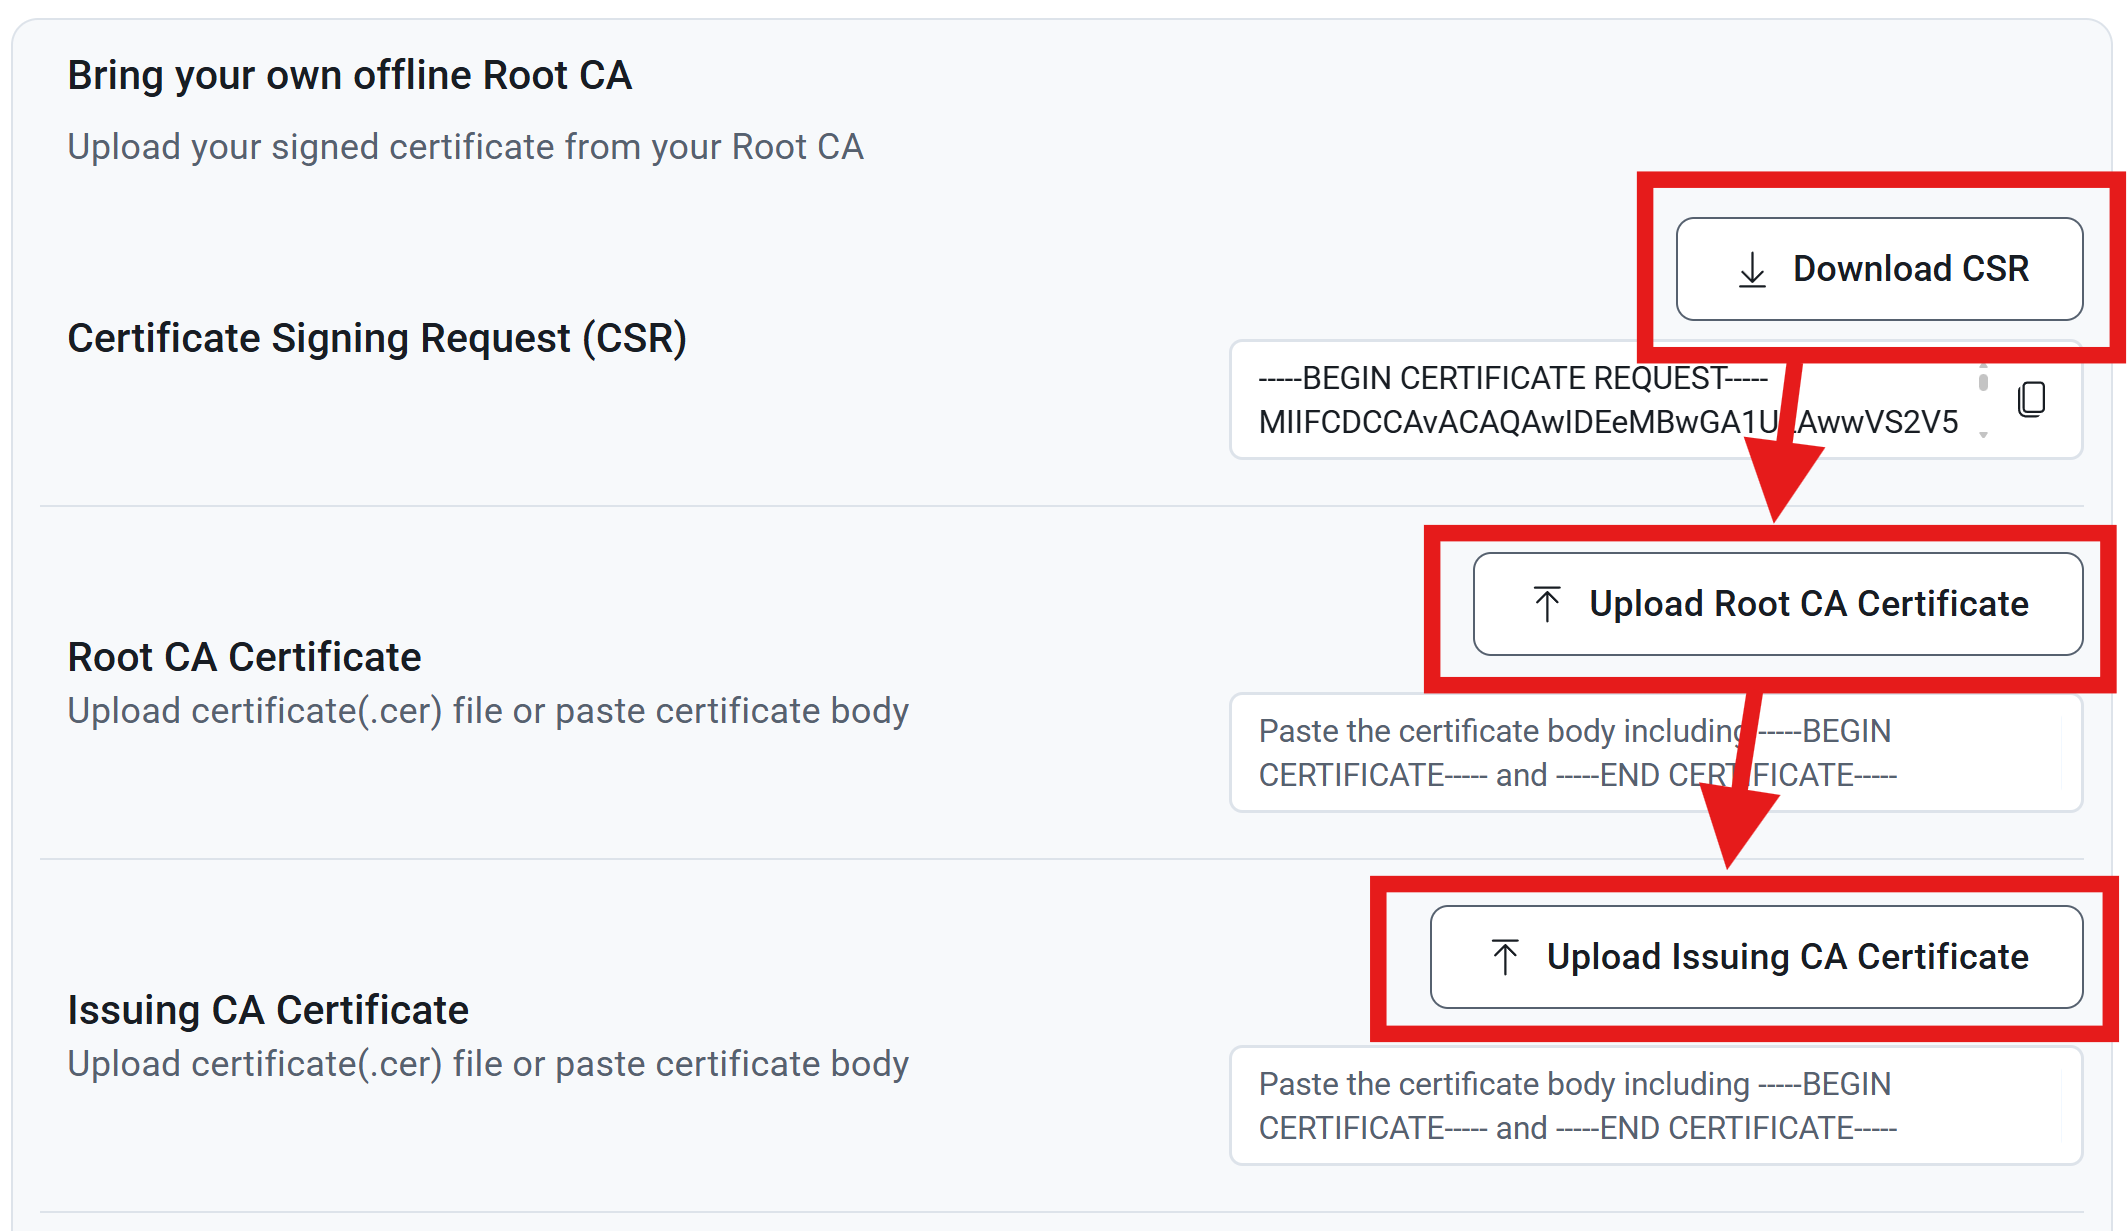
Bring your own Root CA - If you selected Yes to the previous question, follow these steps to bring your own Root CA:
- Download the CSR from Keytos Shield.
- Submit the CSR to your existing Root CA to generate a certificate.
- Once you have the certificate, upload it to Keytos Shield, along with the Root CA certificate.
-
Which MDMs do you use to manage your devices?
-
Select any Mobile Device Management (MDM) solutions that you use to manage your devices. This will help Keytos Shield configure your SCEP CA correctly to be able to issue certificates via your MDM. You can always add more MDMs later if needed from the Network profiles page.

-
-
Mark as Complete
- Click Mark as Complete to save your settings and continue to the next step.
Collapses this section and completes the checkmark.
How to Configure Your Shield Network Profile
A Shield network profile defines how your network connects to Shield via RADIUS and/or RadSec. In this step you’ll configure how you plan to connect your network to Keytos Shield.
How to Configure Your Network Profile Basics
-
Under Network profile name, enter a friendly name for your network profile, such as “Office Network” or “Headquarters”.

-
Select if you want to use RADIUS or RadSec for network authentication.
Classic RADIUS requires a static IP addressClassic RADIUS is our recommended option if you plan to use certificate-based authentication (EAP-TLS) or Entra ID authentication (EAP-TTLS). However, it requires you to have a static IP. If you have a dynamic IP address, or you plan to use unencrypted authentication (PAP, PEAP, MS-CHAPv2) you should use RadSec instead.

How to Configure RADIUS or RadSec
Based on your choice of RADIUS or RadSec, you will need to follow the specific configuration steps for that authentication method. Use the tabs below to view the instructions for each option.
Classic RADIUS is a great option if you want a straightforward and widely supported method for network authentication and you plan to do certificate-based authentication or Entra ID username & password authentication.
-
Under Add IP addresses, click My IP or manually enter the public IP address for your network that will be sending RADIUS requests to Keytos Shield.
-
Click Add to save the IP address to your network profile.
-
Repeat for all your public IP addresses, including any backup IP addresses you may have for redundancy.

While RadSec is more complex to configure than Classic RADIUS, it is compatible with dynamic IP addresses and offers better security for legacy authentication protocols like PAP, PEAP, and MS-CHAPv2 if you plan to use them on your network.
Note: Make sure your network equipment supports RadSec. If it does not, you will need to use Classic RADIUS instead, or run a local proxy within your network that protects your RADIUS traffic inside an encrypted tunnel (useful if you’re using unencrypted protocols like PAP or MS-CHAPv2).
-
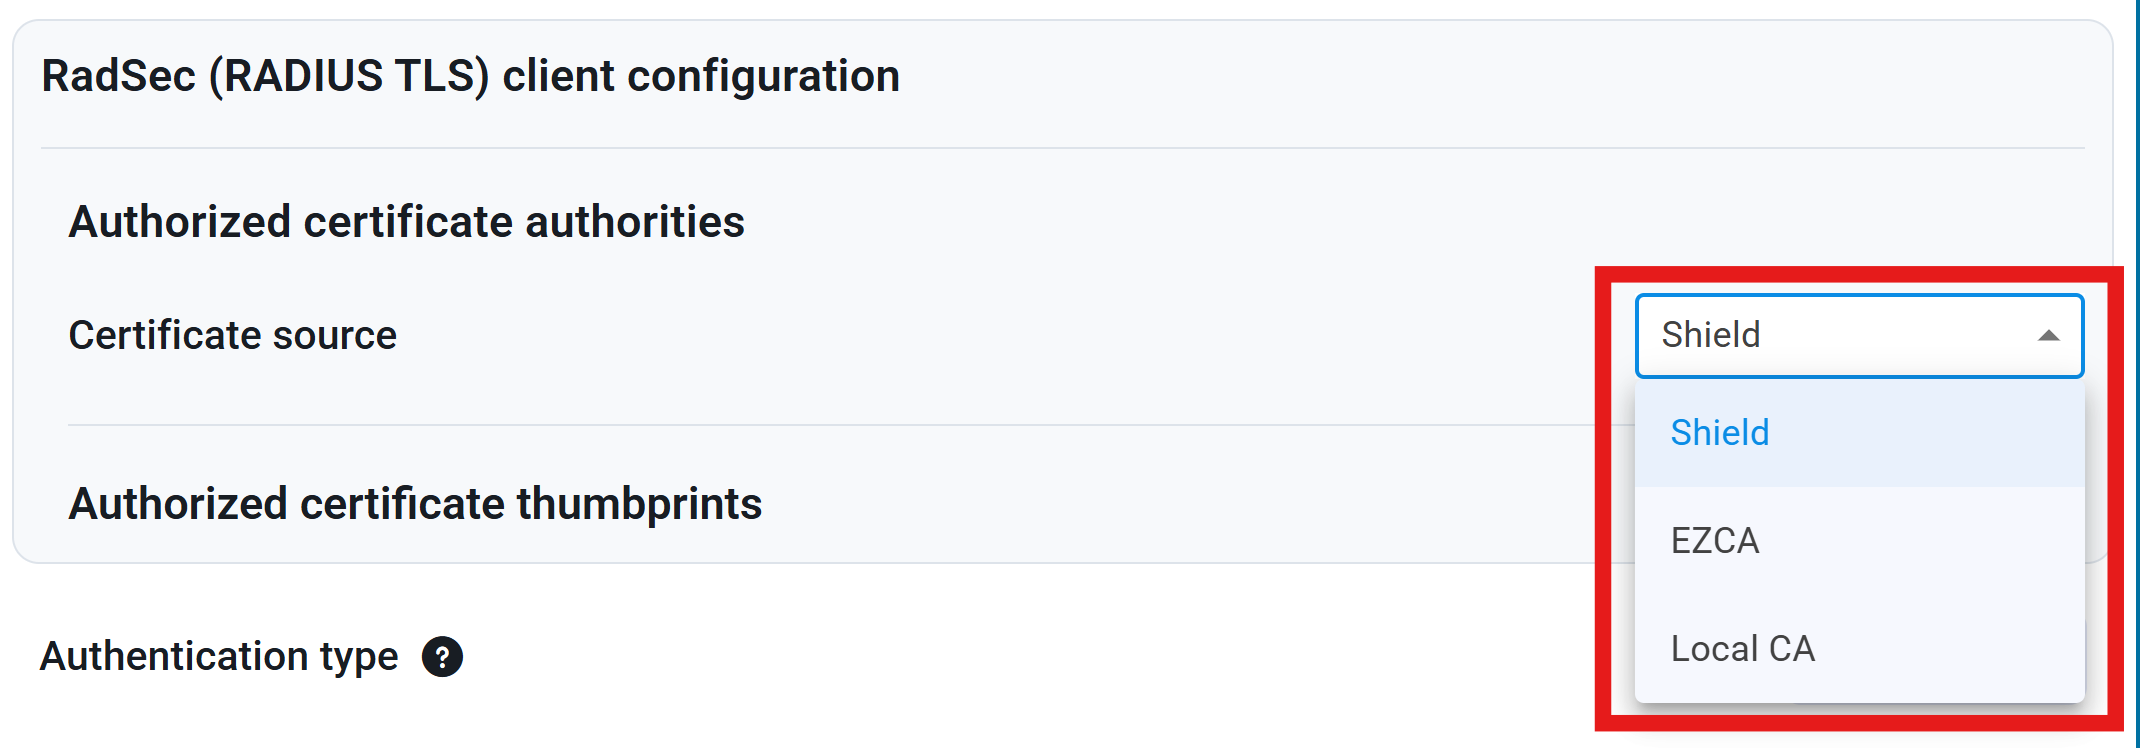
Under Authorized certificate authorities > Certificate source, select where the certificate authority for your RadSec connection is located. Some APs, such as Meraki, come pre-configured with their own certificate authorities, while others like Unifi require you to provide your own certificate authority.
-
Shield: Select this option if you want to use the certificate authority provided by Keytos Shield to issue RadSec certificates for your network.
-
EZCA: Select this option if you want to use an existing EZCA certificate authority for your RadSec certificates.
-
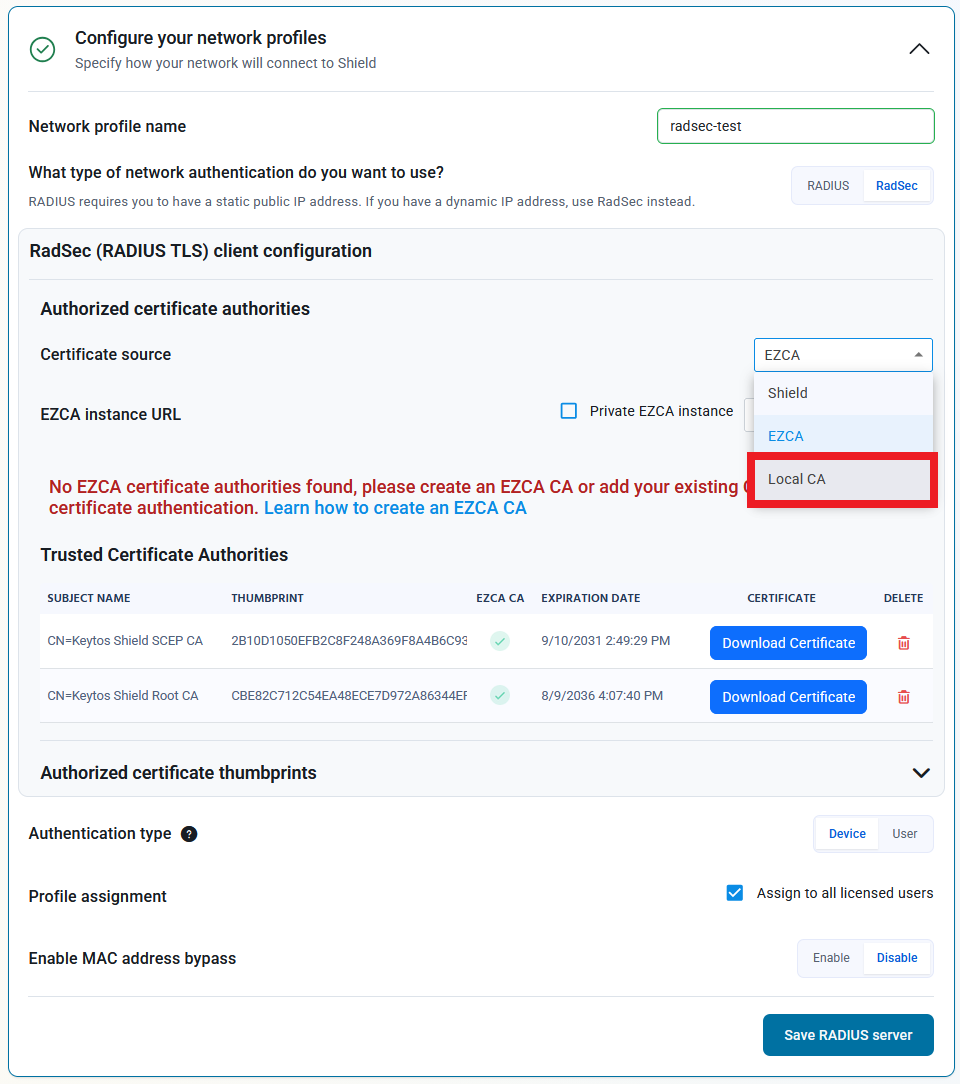
Local CA: Select this option if you want to use a 3rd party certificate authority for your RadSec certificates.
-
-
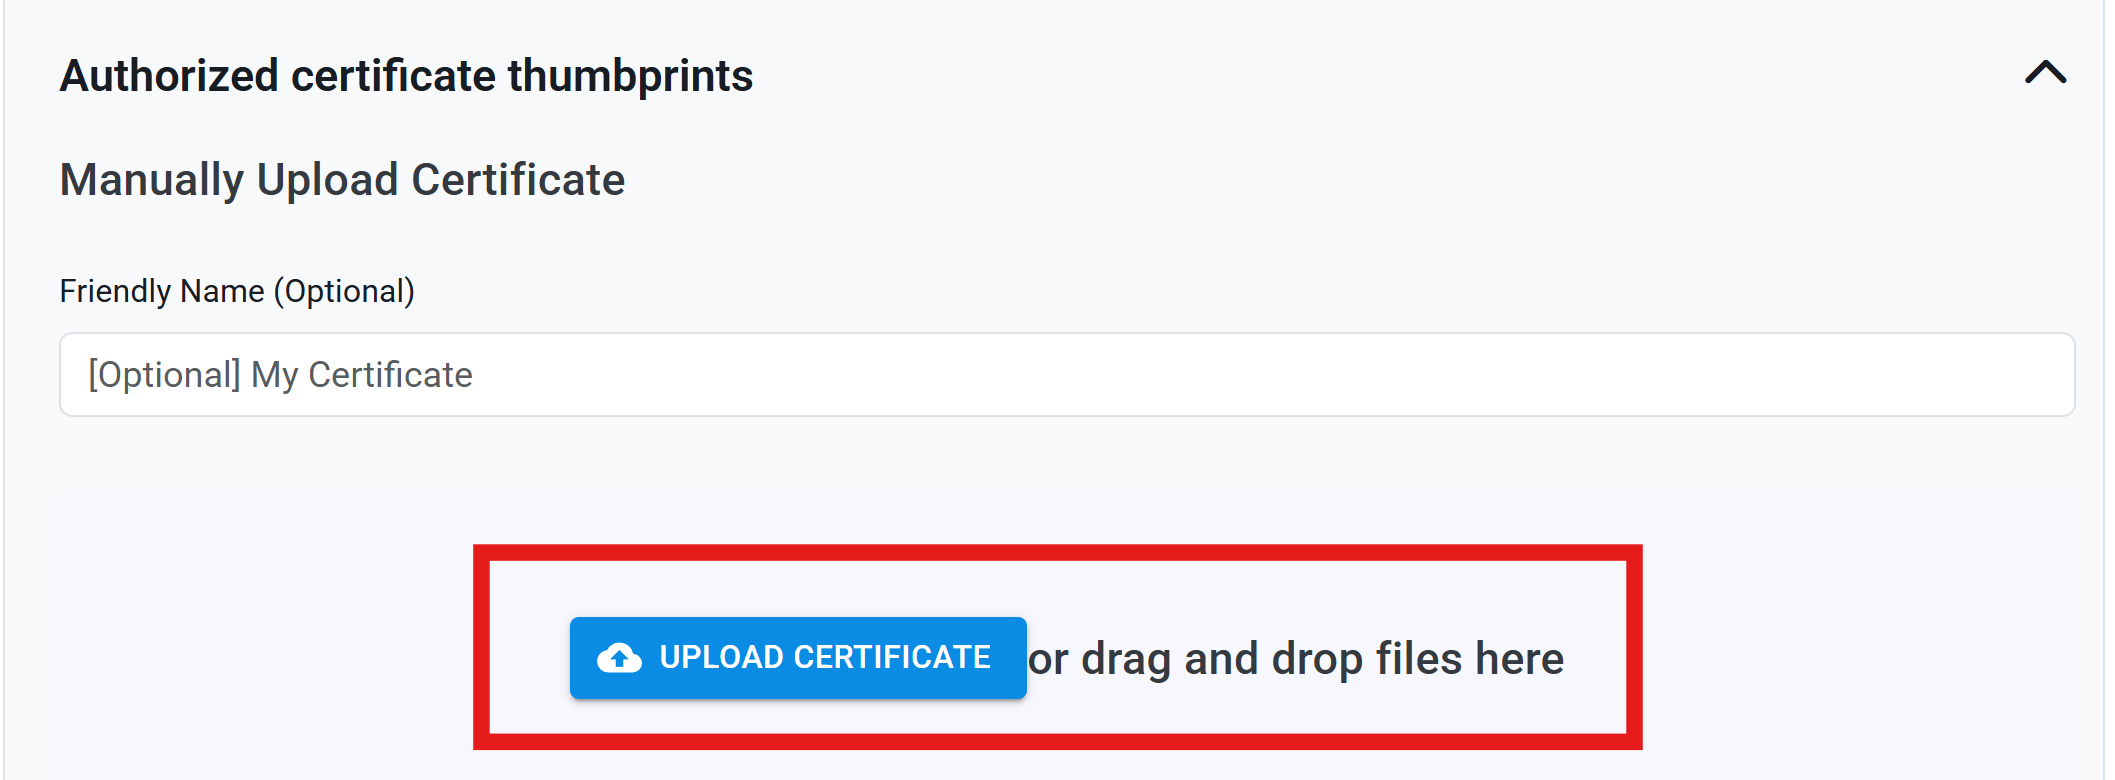
(optional) Authorized certificate thumbprints: If you want to trust individual RadSec certificates based on their thumbprints, expand this section and upload your self-signed or third-party certificates.
Want to protect your legacy authentication protocols like PAP, PEAP, and MS-CHAPv2 but can’t use RadSec? Or want to increase availability + reduce latency for your authentication requests? Running a local server within your network can help achieve these goals.
Keytos Shield comes with a free local RADIUS/RadSec server that you can optionally run within your network to handle authentication requests locally, providing an additional layer of security and control over your network authentication.
To set up a local RADIUS server, first set up RADIUS or RadSec as your primary authentication here in the onboarding flow, and then visit our guide on adding a local Shield RADIUS server to complete the setup.
How to Configure Network Profile Assignment and Optional Settings
Now that you have configured RADIUS or RadSec, the final steps are to choose what users and/or devices will be assigned to this network profile and configure any optional settings.
-
For Authentication type, select the appropriate option for your network.
-
Device: Select this option if you want to authenticate individual devices on your network.
-
User: Select this option if you want to authenticate users on your network.

Note: Want to use both? Select your primary authentication type here and complete the onboarding guide, and you can add additional authentication types in the Network profiles page later.
-
-
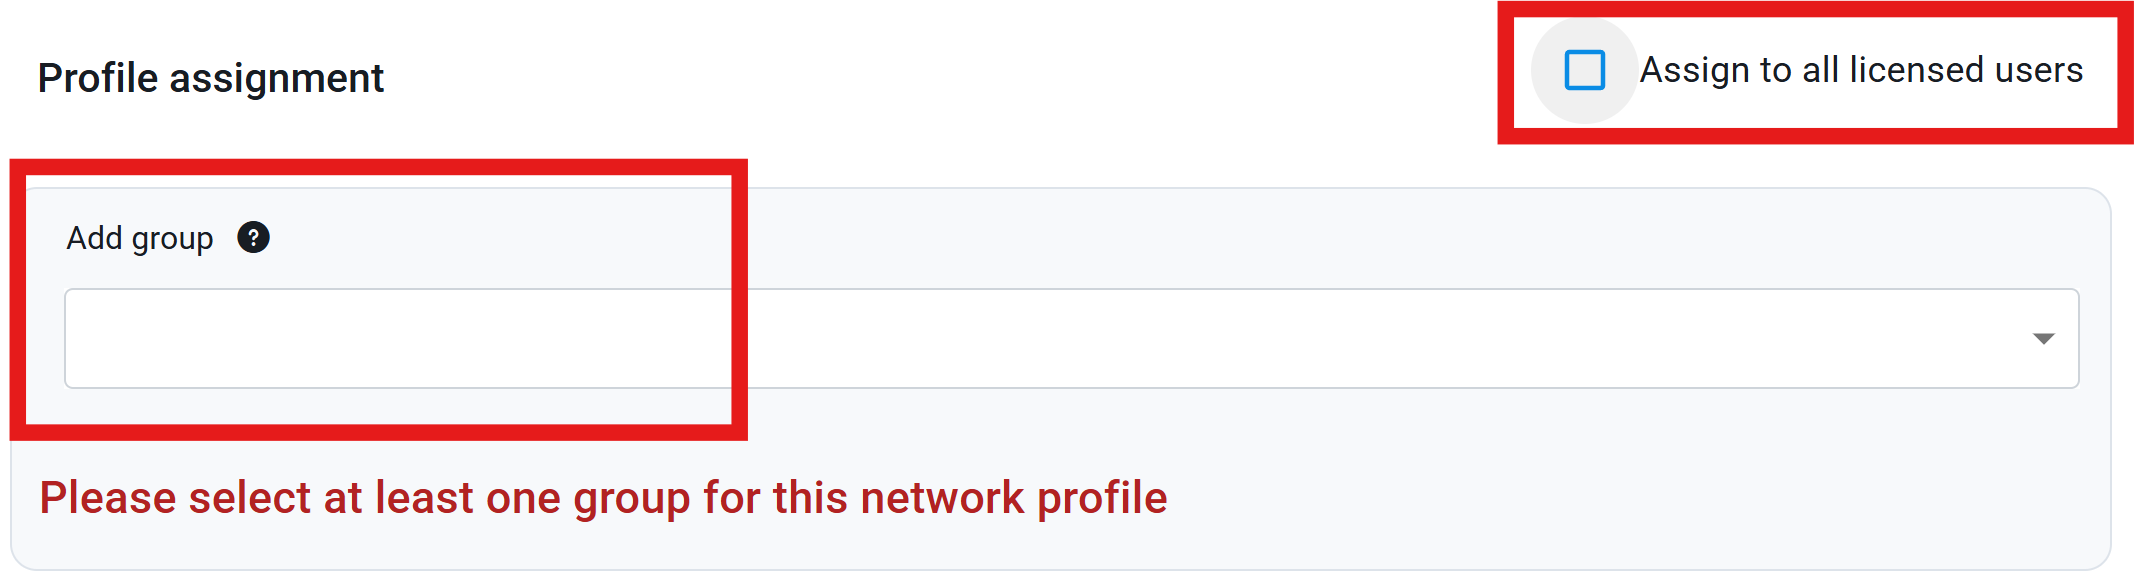
For Profile assignment, either keep Assign to all licenses users selected, or uncheck it and choose the Entra ID user(s) and/or group(s) that you want to assign this network profile to.
-
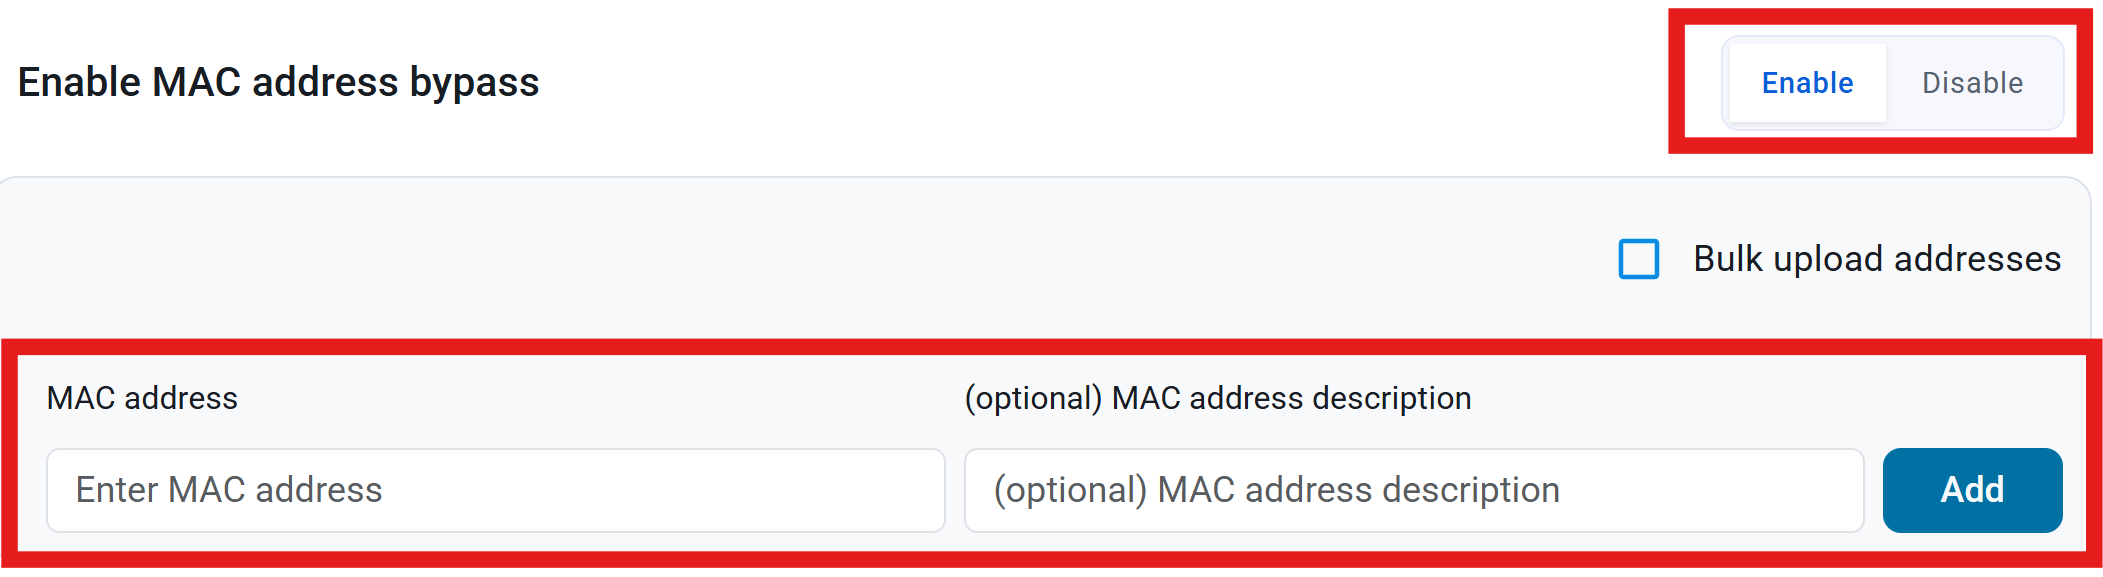
Optionally enable Enable MAC authentication bypass if you want devices to bypass authentication based on their MAC address.
-
If you have a small set of MAC addresses, manually enter them and click Add.
-
If you have a large set of MAC addresses, check the box for Bulk upload addresses and upload a CSV file containing the MAC addresses.
-
-
Click Save RADIUS Server to save your network profile and proceed with the configuration.
Collapses this section and completes the checkmark.
How To Add Your Wi-Fi Networks
Now that you have configured your RADIUS server, the next step is to add your Wi-Fi networks to Keytos Shield.
-
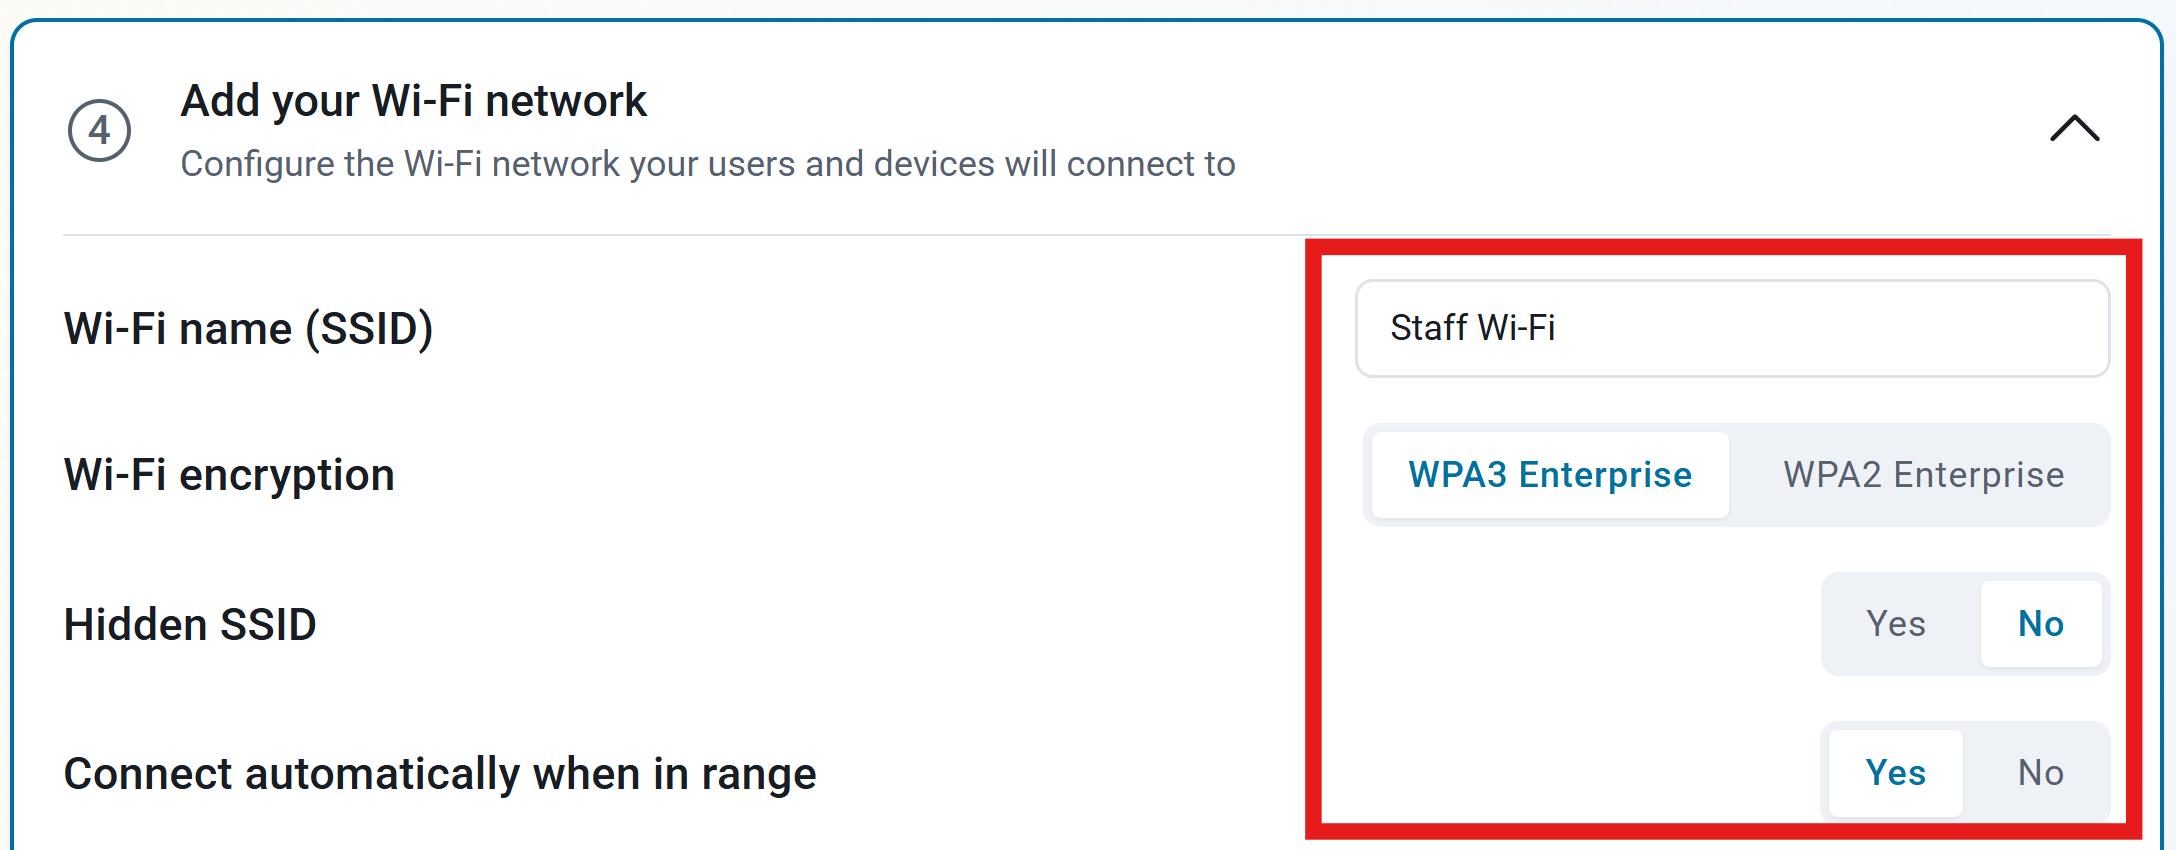
Enter your Wi-Fi network basics:
-
Wi-Fi network name (SSID) - Add your SSID name here. This is case sensitive, so make sure to enter it exactly as it is configured on your network.
-
Wi-Fi encryption - Select the encryption type that matches your Wi-Fi network configuration.
-
Hidden SSID - If your SSID is hidden, enable this option.
-
Connect automatically when in range - Choose if you want your device to connect automatically when in range or not.
-
-
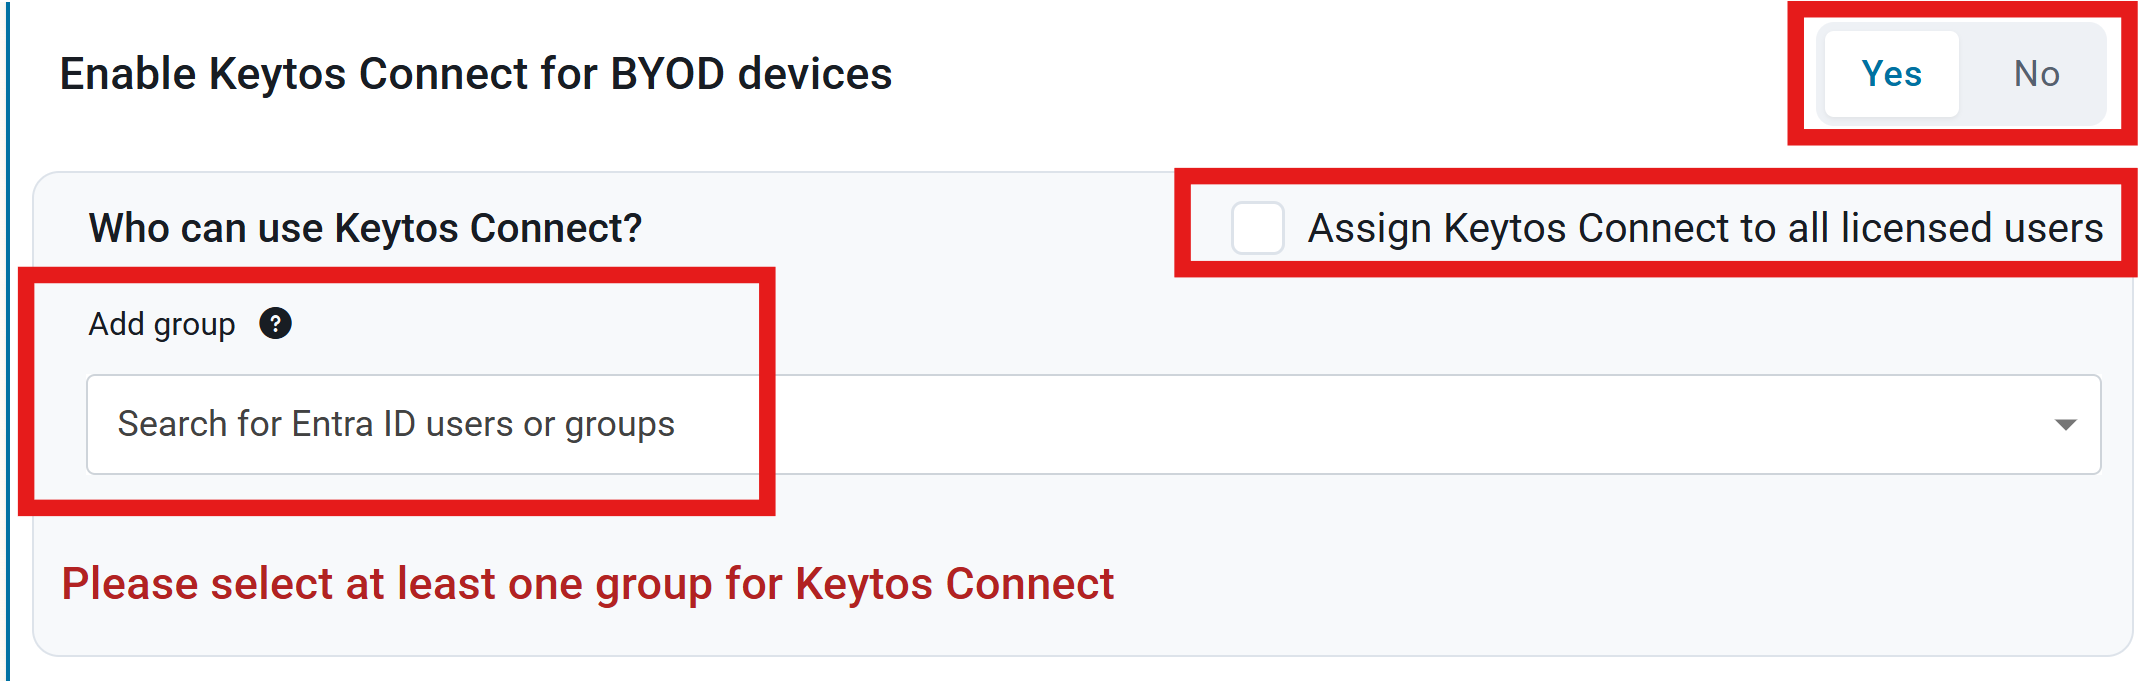
Select if you want to Enable Keytos Connect for BYOD devices. This allows BYOD devices to connect via the Keytos Connect app without the need for an MDM solution. If you centrally managing your devices via an MDM solution, you can leave this option disabled.
-
If enabled, you can select if all licensed users can connect to this network, or only specific users/groups.
-
-
Click Save Wi-Fi network to save your Wi-Fi network configuration and continue to the next step.
Collapses this section and completes the checkmark.
Here is where you will connect your network to Keytos Shield. Follow the instructions below to complete the network connection process.
Collapses this section and completes the checkmark.
Step-by-Step Guide - How to Connect Your Network to Keytos Shield
The following steps will help you configure your network to use Keytos Shield as its Cloud RADIUS provider. Depending on if you selected RADIUS or RadSec as your connection type, the steps may vary slightly.
If you are unsure about whether you should use Classic RADIUS or RadSec, we typically recommend Classic RADIUS over RadSec due to its wider support and ease of use. However, we recommend RadSec if you have a dynamic public IP address. If you are still unsure, or would just like to learn more, please refer to our comparison page for more information.
How to Connect Your Network to Keytos Shield with Classic RADIUS
Setting up RADIUS for your network involves configuring your network controller with the Keytos Shield RADIUS server IP addresses and shared secret. Follow the steps below to complete the setup.
Step 1 - How to Get Your Keytos Shield RADIUS Server IP Addresses
The Keytos Shield RADIUS IP addresses are needed for your network controller to communicate with Keytos Shield. You can get them from the onboarding guide or from the network policies page.
If you’re currently going through the onboarding guide, you can find the Keytos Shield RADIUS IP addresses in step 5, Connect your network. Copy one IP from each region, starting with the closest to you.
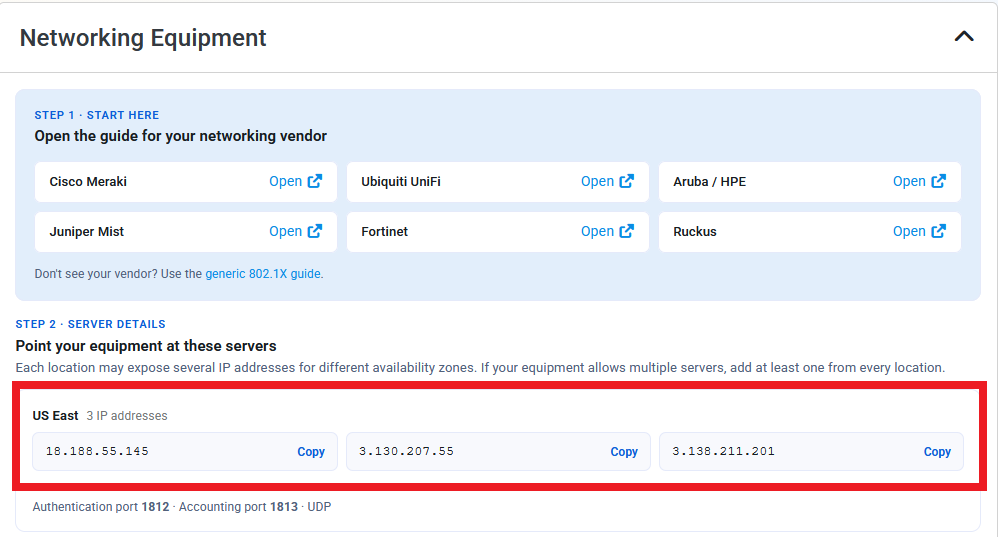
If you’ve already gone through the onboarding guide previously, you can find the Keytos Shield RADIUS IP addresses directly from the network profiles page.
-
Navigate to the Keytos Shield Network profiles page from the left-hand menu.
-
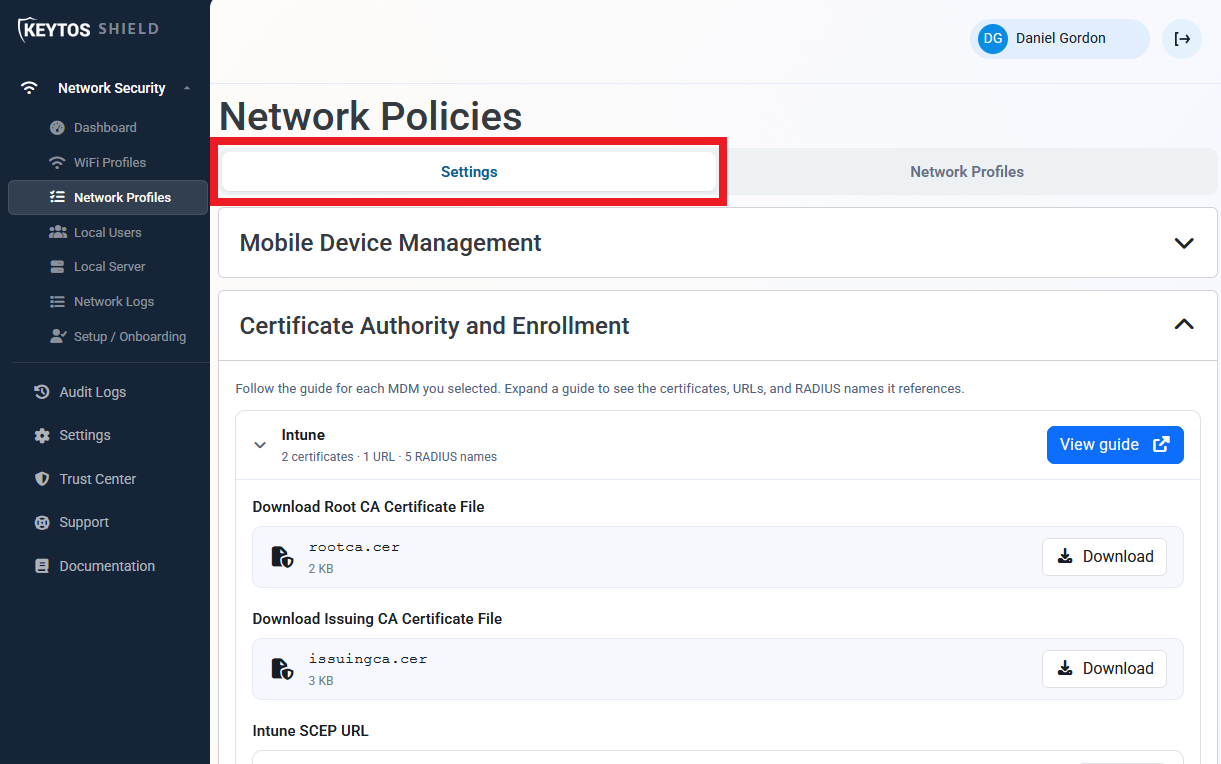
At the top of the page, select the Settings tab.
-
Scroll down to the bottom of the page and expand the Networking Equipment section.
-
Copy one of the IP address from the region closest to your network controller (you’ll add the others later).
Step 2 - How to Add a Cloud RADIUS Server IP Addresses to Your Network
Now that you have obtained your Keytos Shield RADIUS server IP addresses, you need to add them to your network controller.
Each network controller may have a slightly different interface for adding RADIUS server IP addresses. Refer to your network controller’s documentation for specific instructions on how create a new RADIUS server entry.
- Make sure to add a RADIUS server IP from the region closest to you as the primary server, and an IP from a different region as the secondary server. If your network allows you to add more than two RADIUS servers, you can add all the remaining IP addresses as additional servers.
- If you’re asked for a port, specify 1812.
Step 3 - How to Get Your Keytos Shield Shared Secret for RADIUS
When you added your public IP address to your Keytos Shield policy, a shared secret was automatically generated for you. This shared secret is used to authenticate your network controller (RADIUS client) to the Keytos Shield server.
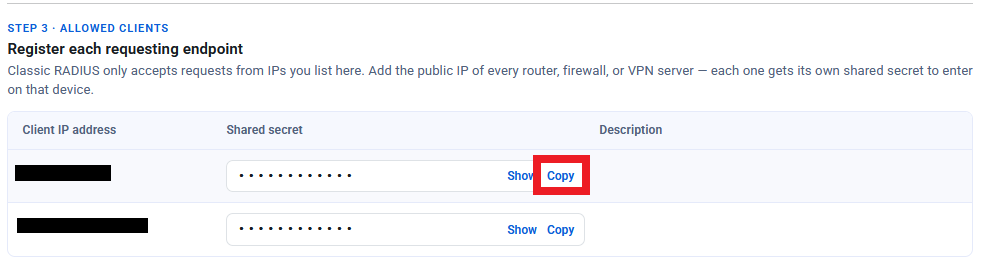
In step 5, Connect your network, of the Keytos Shield network security onboarding guide the Keytos Shield shared secrets are listed for each IP. Reveal and copy the value from your IP address.
-
In the Keytos Shield portal, navigate to the Keytos Shield Network Profiles page from the left-hand menu.
-
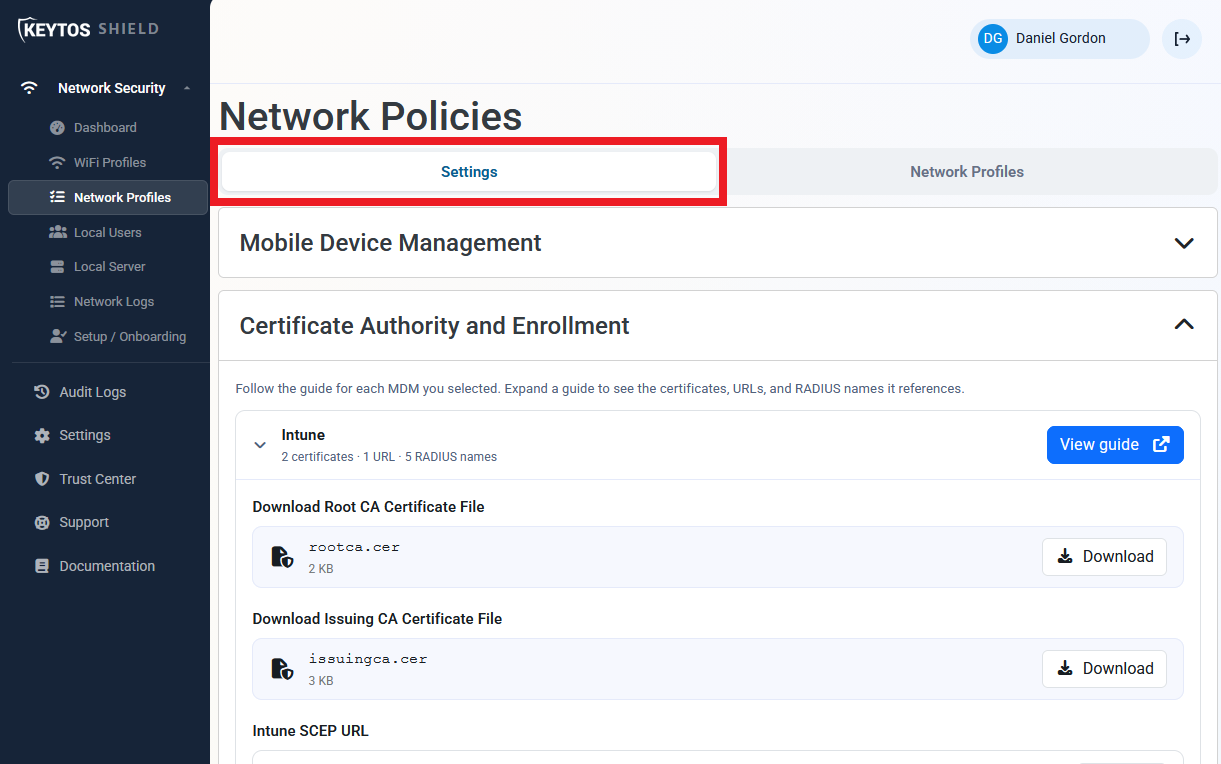
At the top of the page, select the Settings tab.
-
Scroll down to the bottom of the page and expand the Networking Equipment section.
-
For your public IP addresses, click the Copy button under the Shared secret column.
Step 4 - How to Add the Keytos Shield Shared Secret to Your Network
Now that you have the shared secret that is unique to your public IP address, you will need to add it to your network controller in the same location where you added the RADIUS server IP addresses.
Step 5 - How to Configure RADIUS Accounting in Your Network
RADIUS accounting provides additional logging and tracking of network activity, helping you monitor user authentication and session details. If your network controller supports RADIUS accounting, you can enable it and:
- Use the same RADIUS server IP addresses as before
- Use the same shared secret as before
- Set the accounting port to 1813
Step 6 - How to Configure RADIUS Timeout Settings in Your Network
Depending on your network, you may have different timeout settings available to you. Here is a comprehensive list of recommended values. If your network has a setting in the list, please match it with the value below.
| Setting | Recommended value | Description |
|---|---|---|
| Server timeout | 30 seconds (or highest value up to 30 seconds) |
How long to wait for a RADIUS server response before timing out. |
| Retry count | 3 times | Number of times to retry a request after a timeout. |
| RADIUS fallback | Active | Allows authentication to use another configured RADIUS server if the current server is unavailable. |
| EAP Timeout | 30 seconds | How long to wait for an EAP response before timing out. |
| EAP max retries | 5 times | Maximum number of retries for an EAP exchange. |
| EAP identity timeout | 30 seconds | How long to wait for the client’s EAP identity response. |
| EAP identity retries | 5 times | Maximum number of retries when requesting the client’s EAP identity. |
How to Connect Your Network to Keytos Shield with RadSec
Setting up RadSec for your network involves configuring your network controller and Keytos Shield to use the appropriate RadSec certificates and setting the IP and shared secret in your network controller. Follow the steps below to complete the setup.
Step 1 - How to Get Your Keytos Shield RADIUS Server IP Addresses
The Keytos Shield RADIUS IP addresses are needed for your network controller to communicate with Keytos Shield. You can get them from the onboarding guide or from the network policies page.
If you’re currently going through the onboarding guide, you can find the Keytos Shield RADIUS IP addresses in step 5, Connect your network. Copy one IP from each region, starting with the closest to you.
If you’ve already gone through the onboarding guide previously, you can find the Keytos Shield RADIUS IP addresses directly from the network profiles page.
-
Navigate to the Keytos Shield Network profiles page from the left-hand menu.
-
At the top of the page, select the Settings tab.
-
Scroll down to the bottom of the page and expand the Networking Equipment section.
-
Copy one of the IP address from the region closest to your network controller (you’ll add the others later).
Step 2 - How to Add Cloud RADIUS Server IP Addresses to Your Network
Now that you have obtained your Keytos Shield RADIUS server IP addresses, you need to add them to your network controller.
Each network controller may have a slightly different interface for adding RADIUS server IP addresses. Refer to your network controller’s documentation for specific instructions on how to create a new RADIUS server entry.
- Make sure to add a RADIUS server IP from the region closest to you as the primary server, and an IP from a different region as the secondary server. If your network allows you to add more than two RADIUS servers, you can add all the remaining IP addresses as additional servers.
- Set the shared secret to radsec.
- If you’re asked for a port, specify 2083.
Step 3 - How to Download Your Keytos Shield RadSec CA Certificate
The Keytos Shield RadSec CA certificate is needed for your network controller to communicate with Keytos Shield. You can get it from the onboarding guide or from the Network profiles page.
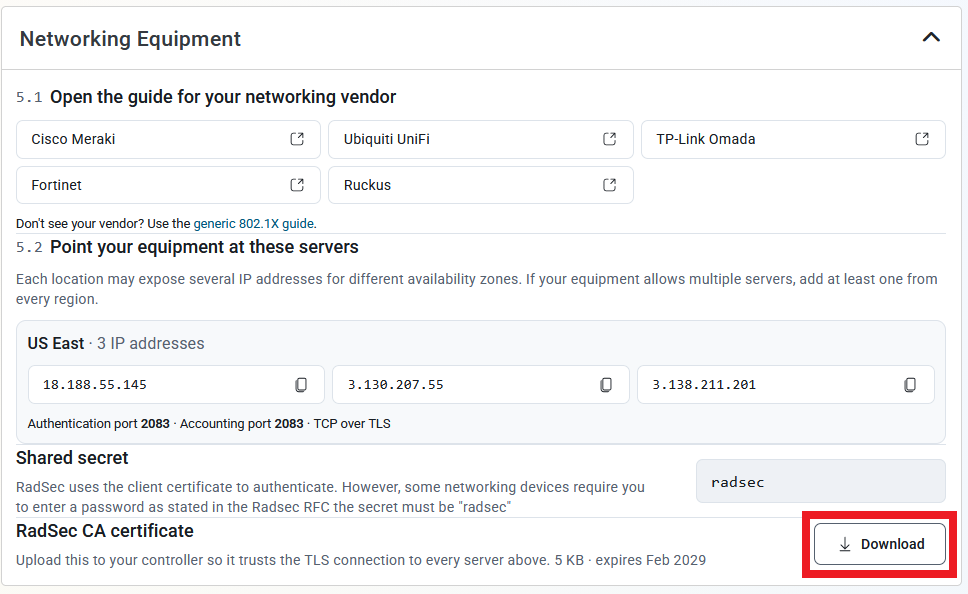
If you’re currently going through the onboarding guide, you can find the Keytos Shield RadSec CA certificate in step 5, Connect your network. Click the Download button to download your Keytos Shield RadSec CA certificate. This should download as radsec-ca.cer.
If you’ve already gone through the onboarding guide, you can find the Keytos Shield RadSec CA certificate directly from the network profiles page.
-
Navigate to the Keytos Shield Network profiles page from the left-hand menu.
-
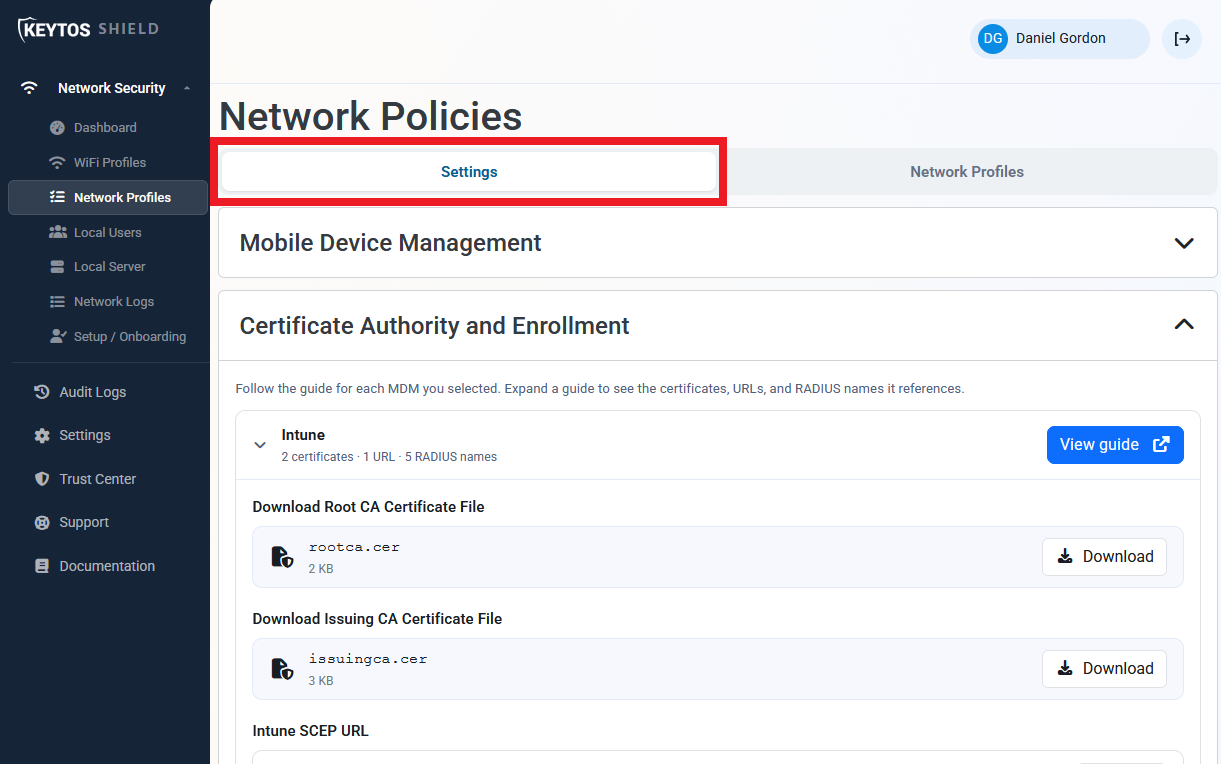
At the top of the page, select the Settings tab.
-
Scroll down to the bottom of the page and expand the Networking Equipment section.
-
Click the Download button to download your Keytos Shield RadSec CA certificate. This should download as
radsec-ca.cer.
Step 4 - How to Upload Your RadSec CA Certificate to Your Network
Now that you have obtained your Keytos Shield RadSec CA certificate, upload it to your network controller as a trusted CA. Refer to your network controller vendor’s documentation for its certificate-import procedure.
Step 5 - How to Trust Your RadSec Client Certificates
Keytos Shield accepts RadSec connections from network controllers whose client certificate was issued by a CA that Shield trusts. Some network devices, such as Cisco Meraki, use a certificate issued by the vendor’s own CA. However, for other network devices, you will need to install a RadSec client certificate that you created in Keytos Shield. Use the tab that matches the requirements of your controller.
How to Download Your Keytos Shield RadSec Client Certificate and Private Key
If your network controller requires you to upload a RadSec client certificate and private key, follow the steps below to complete the setup.
Note: This step expects you to have completed the Keytos Shield onboarding. If you have not already done so, complete the onboarding before attempting to create a RadSec client certificate and private key.
-
Navigate to the Keytos Shield Network profiles page from the left-hand menu.
-
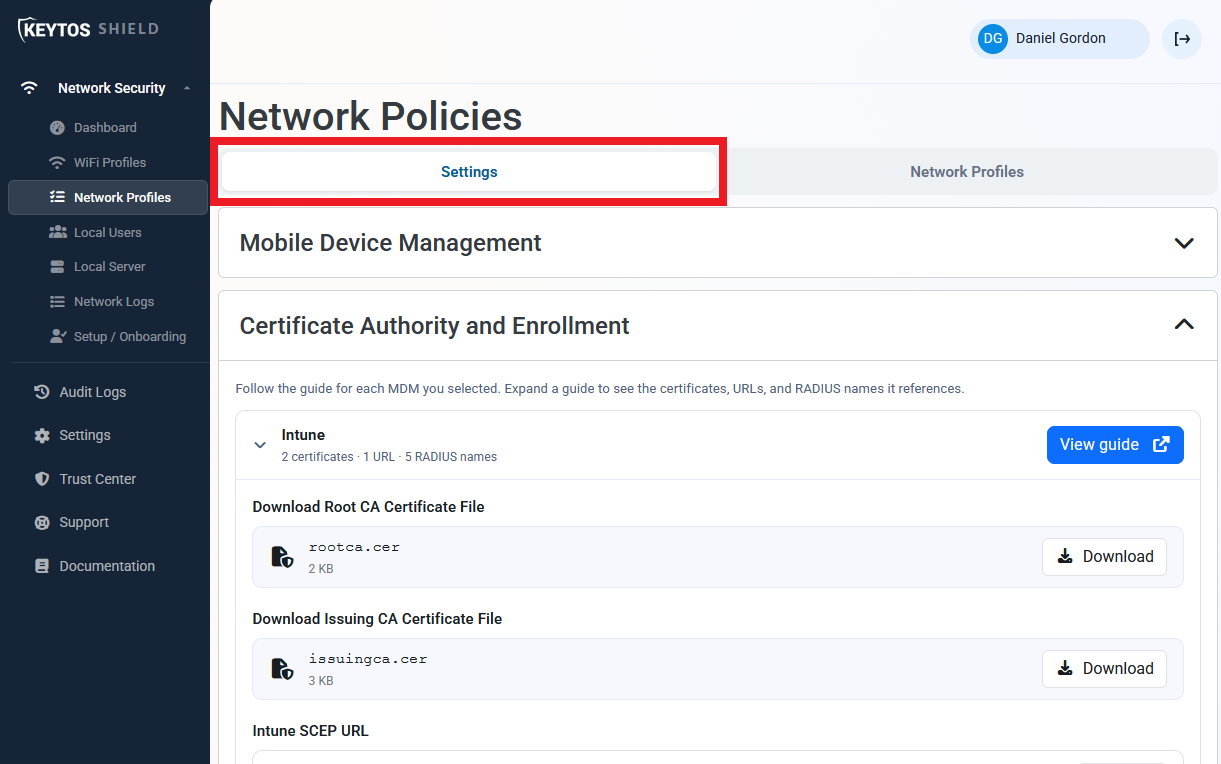
At the top of the page, select the Settings tab.
-
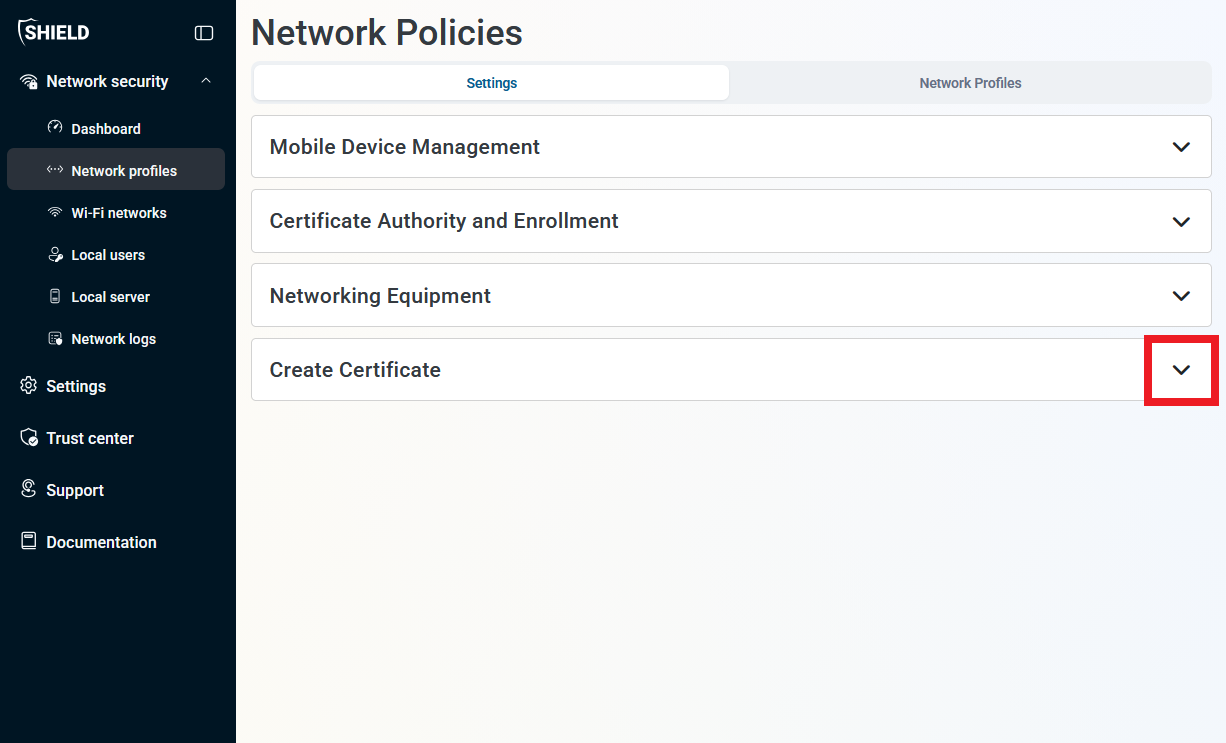
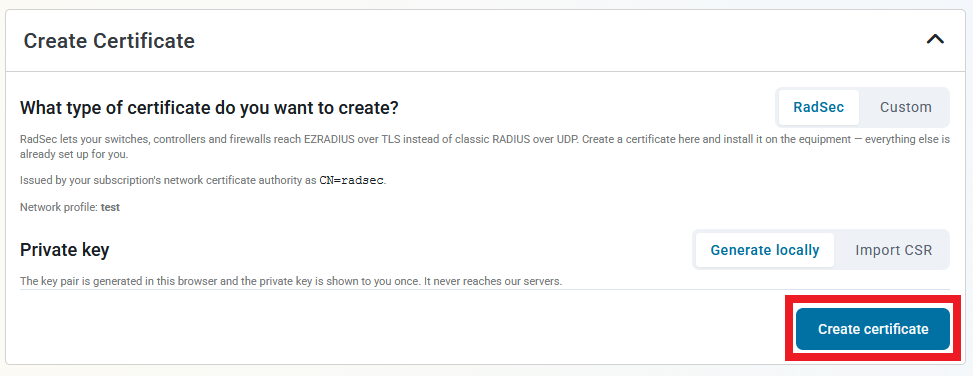
Scroll down to the bottom of the page and expand the Create Certificate section.
-
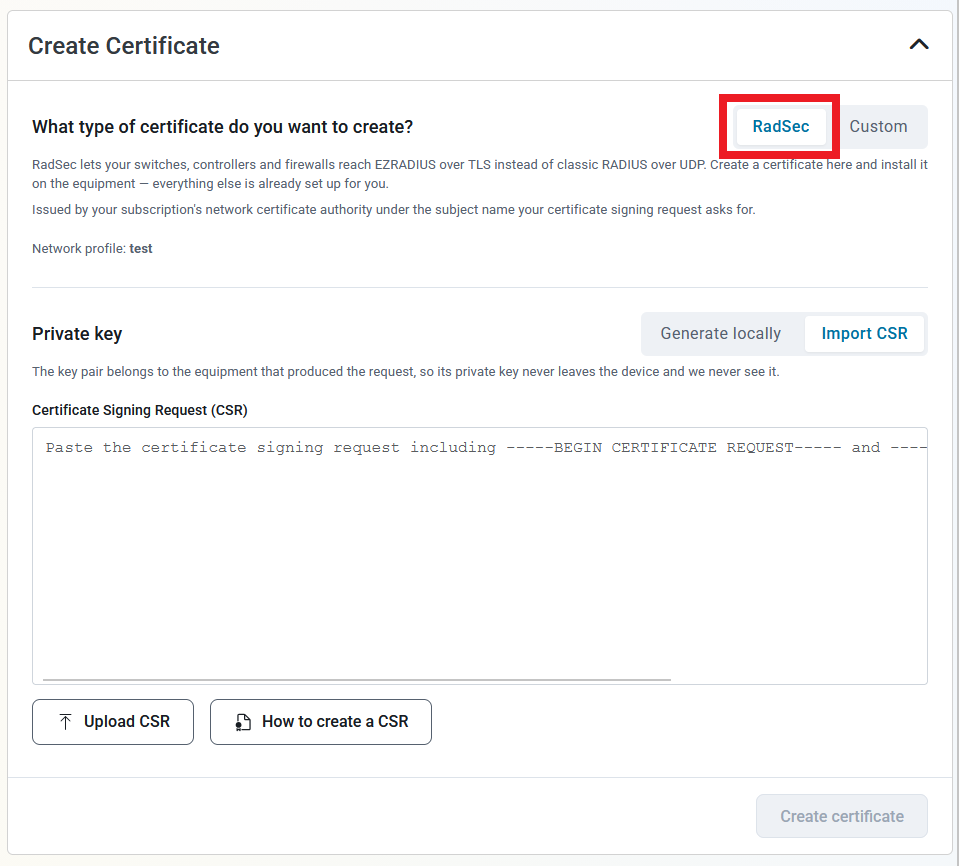
For What type of certificate do you want to create? select RadSec.
-
For the Private key, select Generate Locally.
-
Click Create certificate.
-
Once the certificate has been created, download or copy both the certificate and private key. These should download as
radsec.cerandradsec.keyrespectively. Note that this is the only time the private key is shown.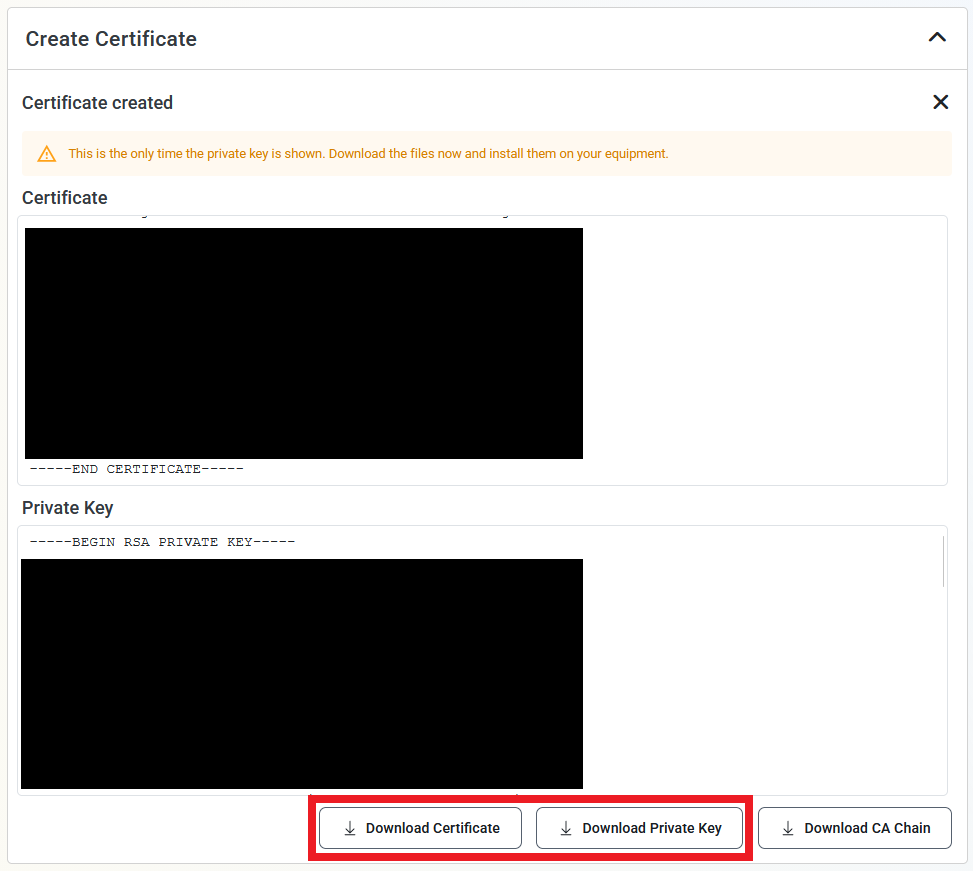
How to Upload Your RadSec Client Certificate and Private Key to Your Network
Now that you have obtained your Keytos Shield RadSec client certificate and private key, you need to upload them to your network controller. Refer to your network vendor’s documentation for instructions.
How to Trust Your Shield CA in Keytos Shield
- In your network profile’s RadSec (RADIUS TLS) Client Configuration section, under Authorized Certificate Authorities, set Certificate Source to Shield.
- Click Save Network Profile.
How to Get Your Network Controller’s RadSec CA Certificate
Refer to your network controller’s documentation for downloading the RadSec CA certificate.
How to Add Your Network Controller’s RadSec CA Certificate to Keytos Shield
-
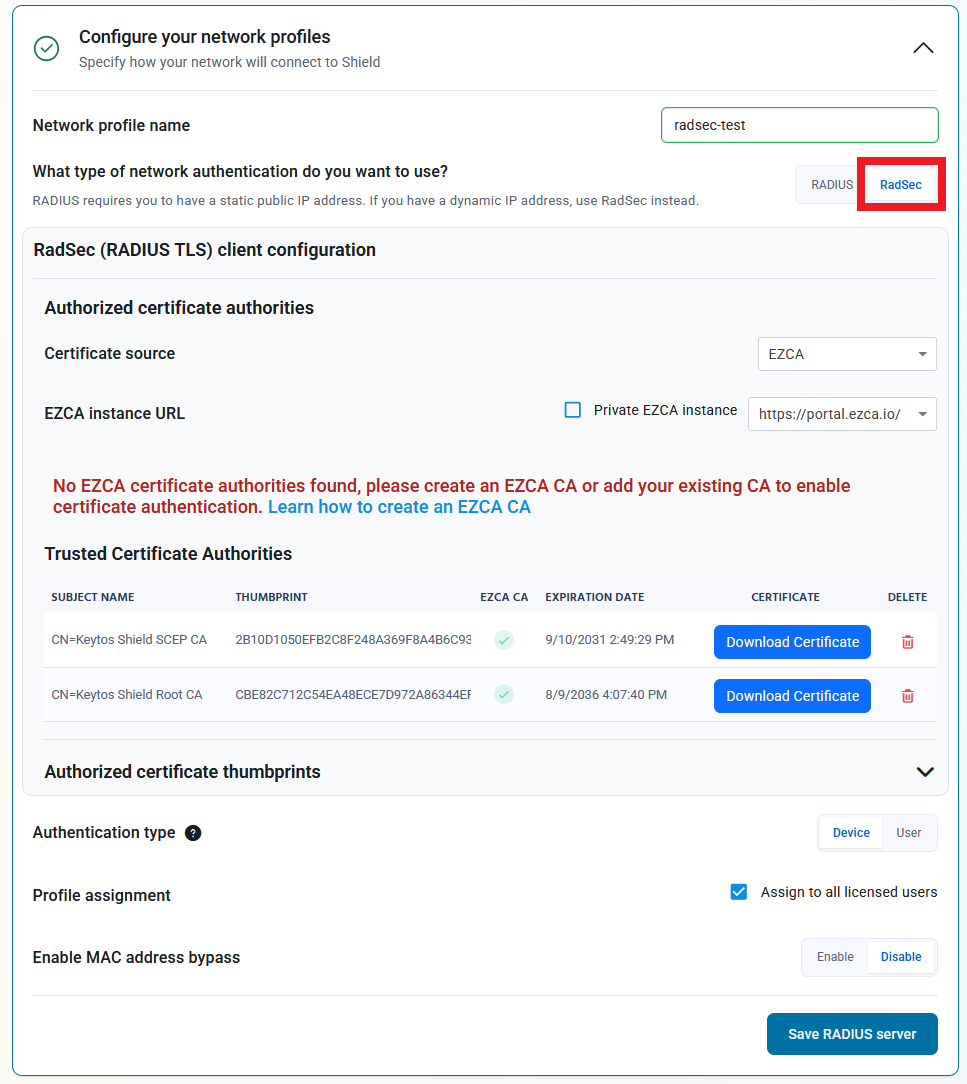
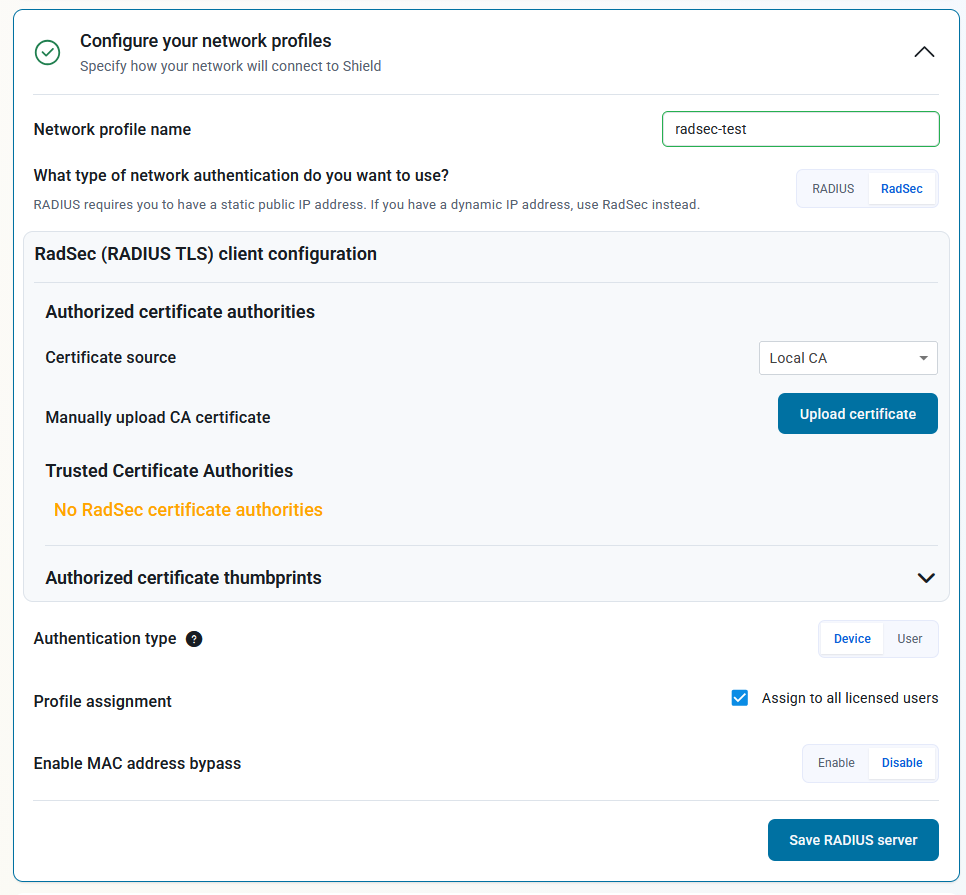
Expand step 3, Configure your network profiles.
-
For What type of network authentication do you want to use? select RadSec.
-
Under Authorized certificate authorities, change the Certificate source dropdown to Local CA.
-
Just below that dropdown, click Upload certificate.
-
Select the RadSec CA certificate you got from your network controller. You should now see it in your Trusted Certificate Authorities.
-
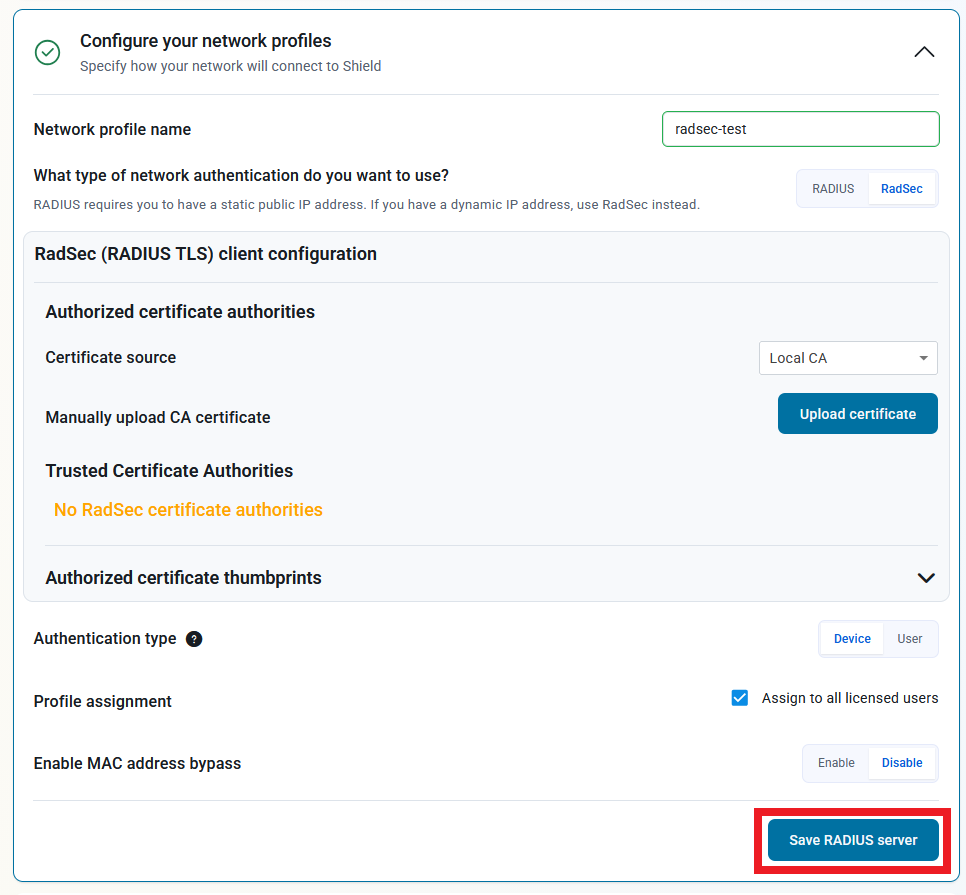
At the bottom of the section, click Save RADIUS Server.
-
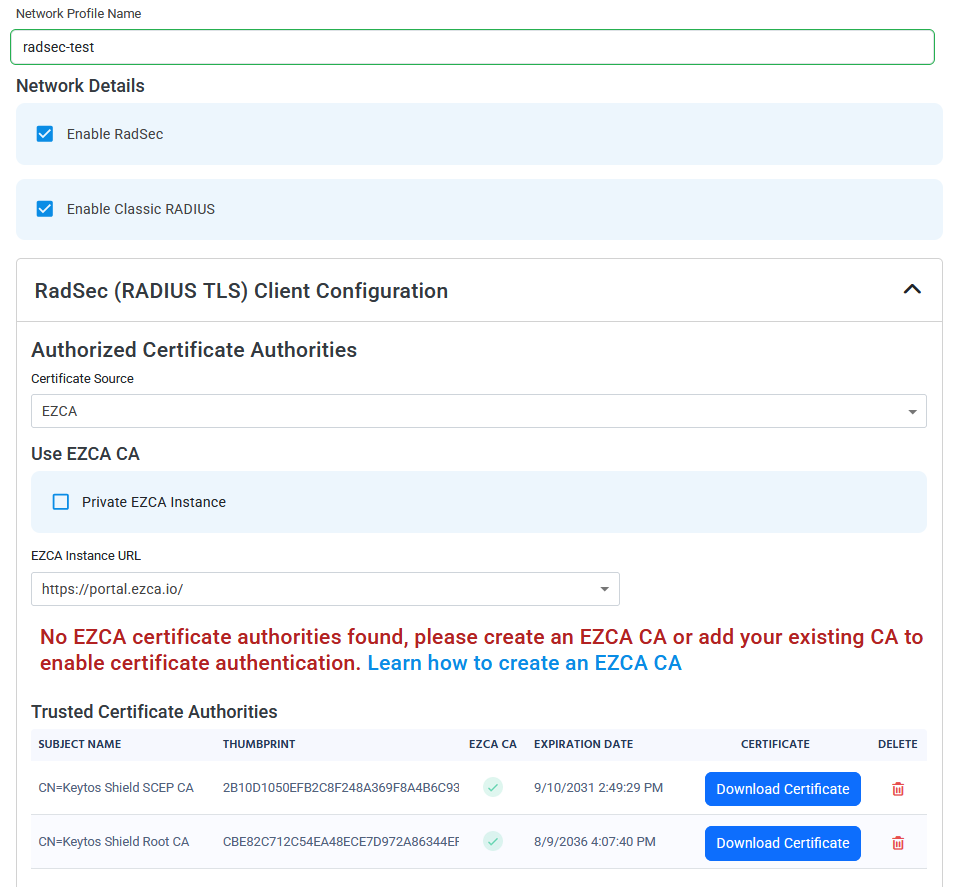
Navigate to the Keytos Shield Network profiles page from the left-hand menu.
-
At the top of the page, select the Network Profiles tab.
-
Navigate to the Network profile you are enabling RadSec on.
-
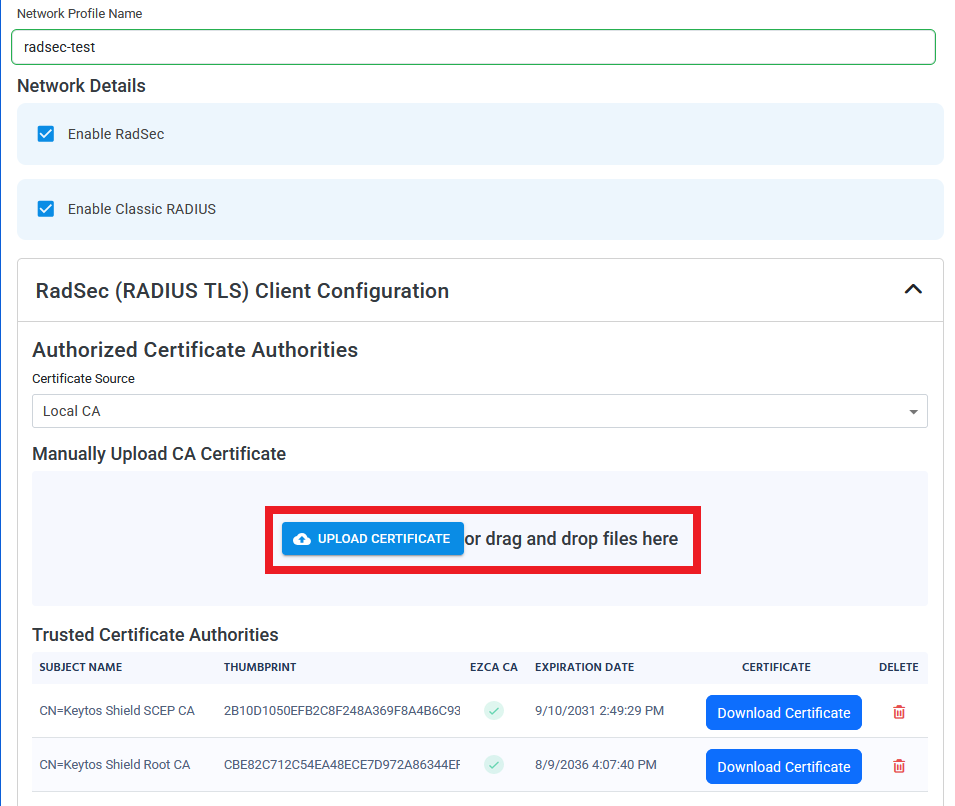
Expand the RadSec (RADIUS TLS) Client Configuration section.
-
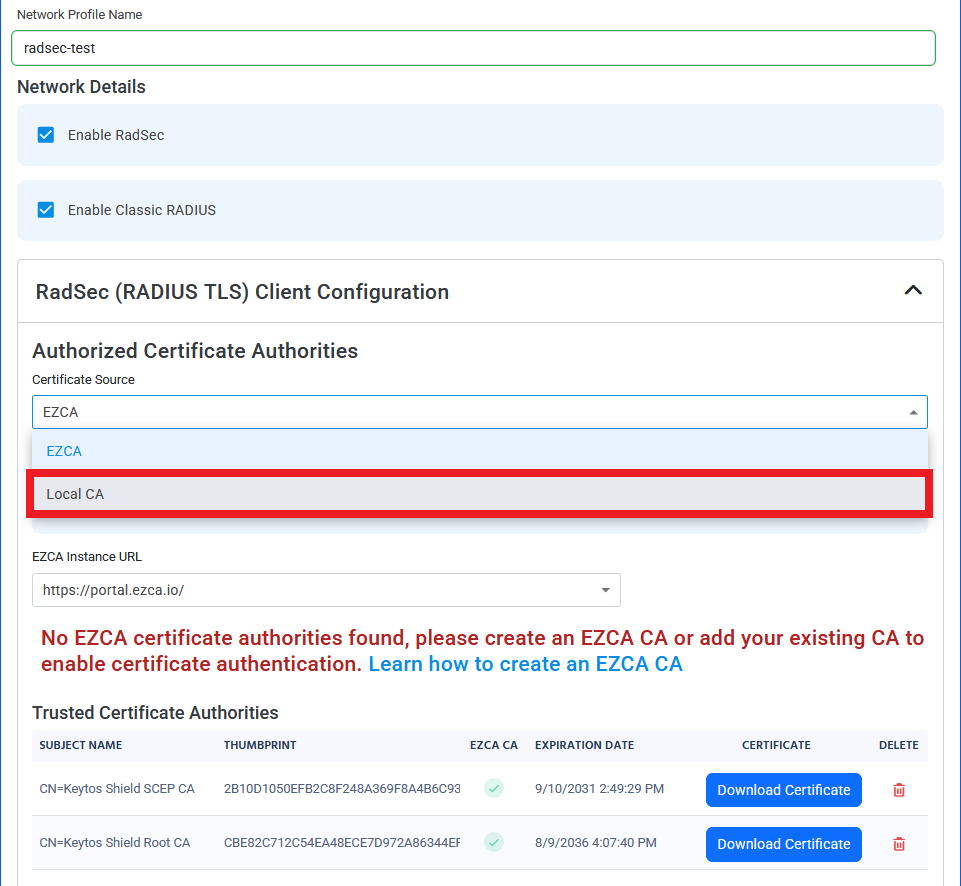
Under Authorized Certificate Authorities, change the Certificate Source dropdown to Local CA.
-
Click the Upload Certificate button.
-
Select the RadSec CA certificate you got from your network controller. You should now see it in your Trusted Certificate Authorities.
-
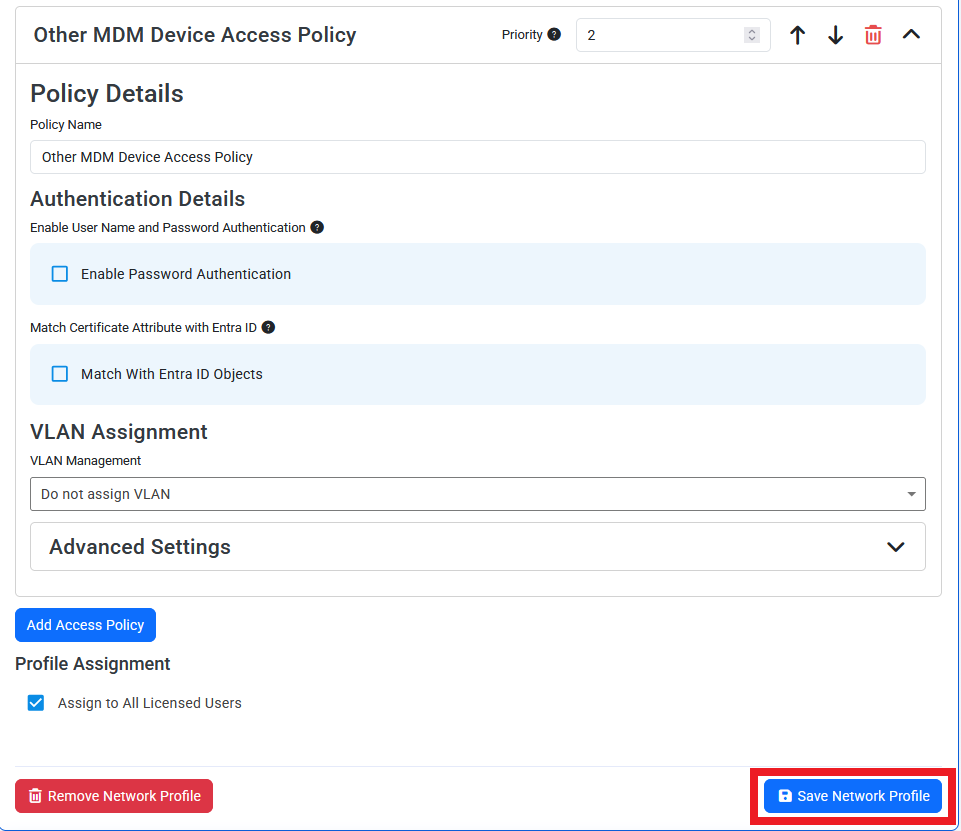
Scroll to the bottom of the network profile and click Save Network Profile.
Done! Keytos Shield and your network controller are now configured to use RadSec.
How to Troubleshoot Network and Connection Issues
Not able to connect to your network after setting up Keytos Shield? Visit our troubleshooting guide to help diagnose and resolve common issues when using Cloud RADIUS with .
Troubleshooting Guide