

















How To Troubleshoot Network Errors in Keytos Shield
Overview - How to Troubleshoot Network Errors in Keytos Shield
If you’re unable to connect to your network using Keytos Shield, this page will guide you through the steps to troubleshoot and resolve common PKI and network errors.
What is the Typical Troubleshooting Process?
At a high level, the troubleshooting process typically follows these steps:
- Check your Shield network logs to identify any errors or unusual activity.
- Check your network controller or access points to make sure you have properly configured your RADIUS endpoints and timeout settings.
- Check your device’s certificate store to make sure you have a valid certificate installed.
- Check your device’s known Wi-Fi networks to ensure that the network you are trying to connect to is listed and properly configured.
Let’s walk through each of these steps in detail to help you troubleshoot network errors effectively.
Step 1: How to Check Your Shield Network Logs
The very first step is to check your Shield network logs to identify any errors or unusual activity. These logs provide detailed information about network events and can help pinpoint the source of connection issues.
How to Query Your Shield Network Security Logs
To view your network logs:
-
Begin in your Keytos Shield portal.
-
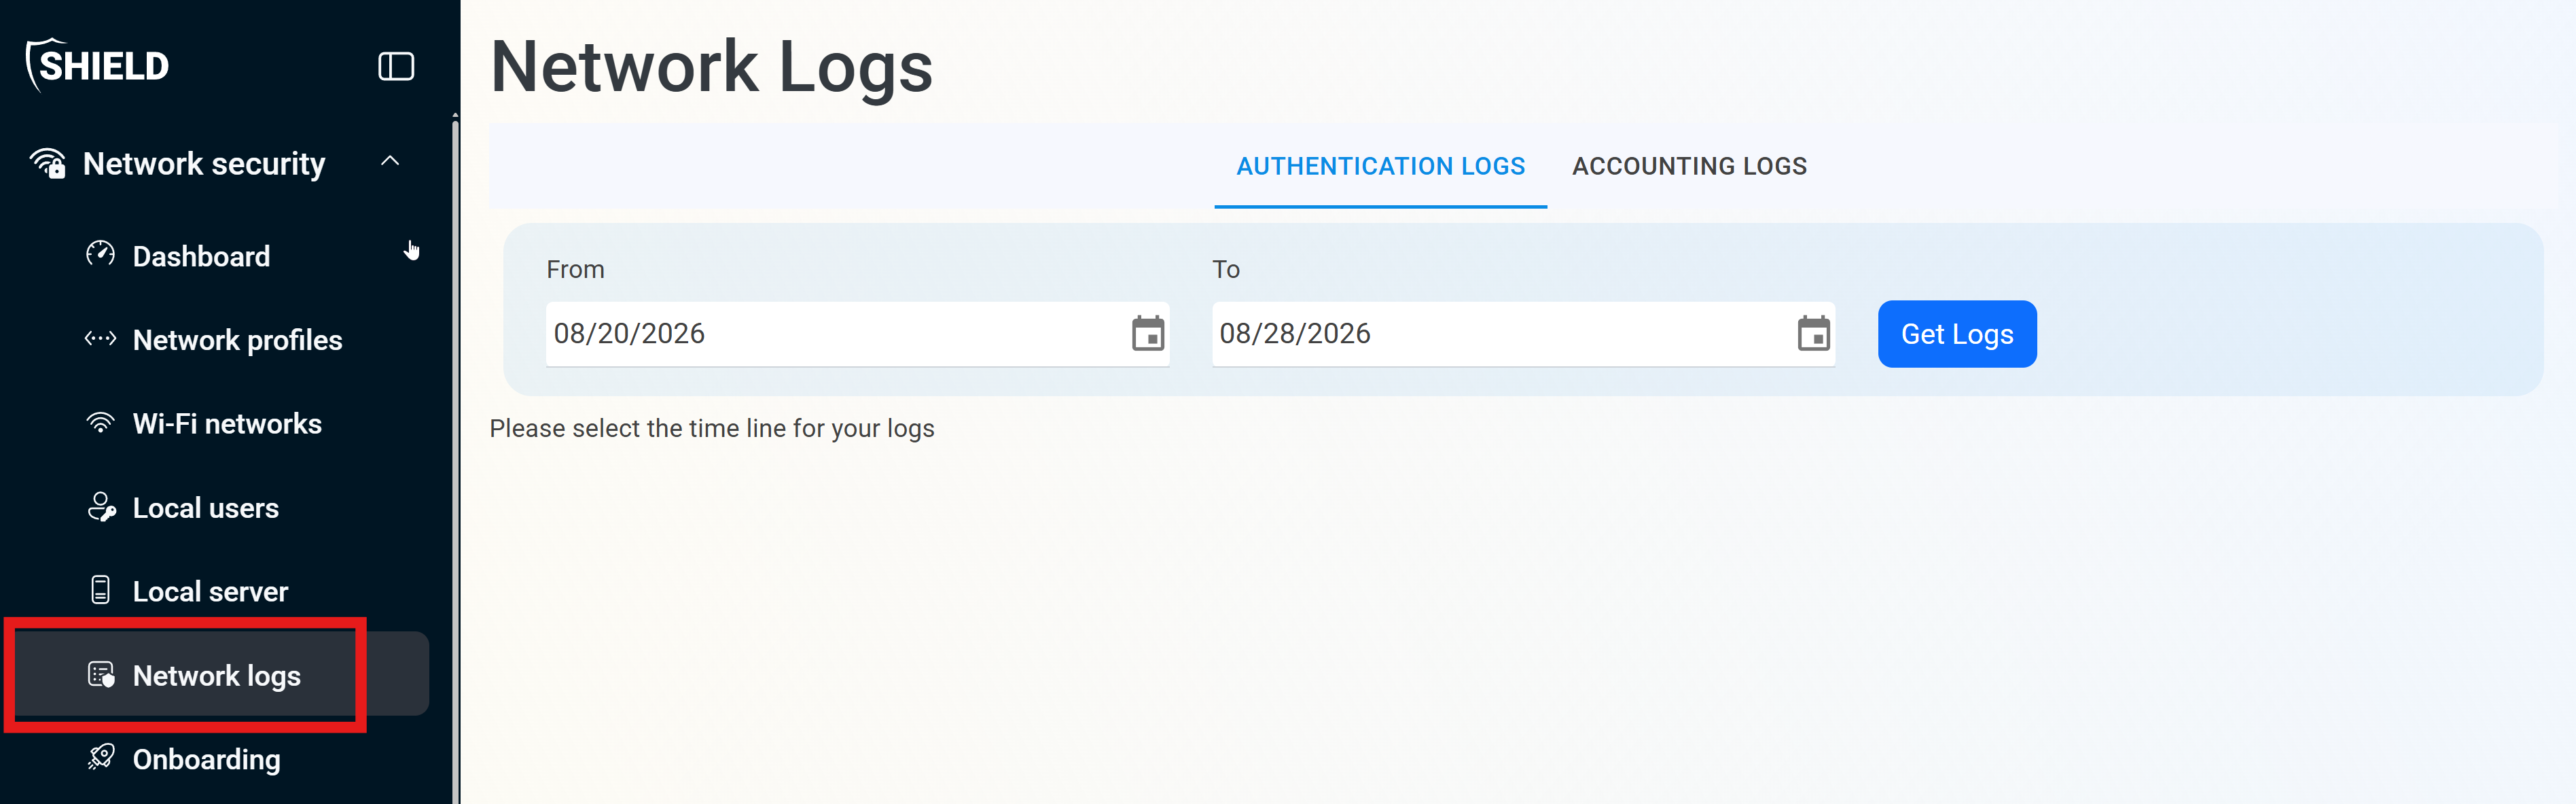
From the left-hand navigation menu, select Network logs.
-
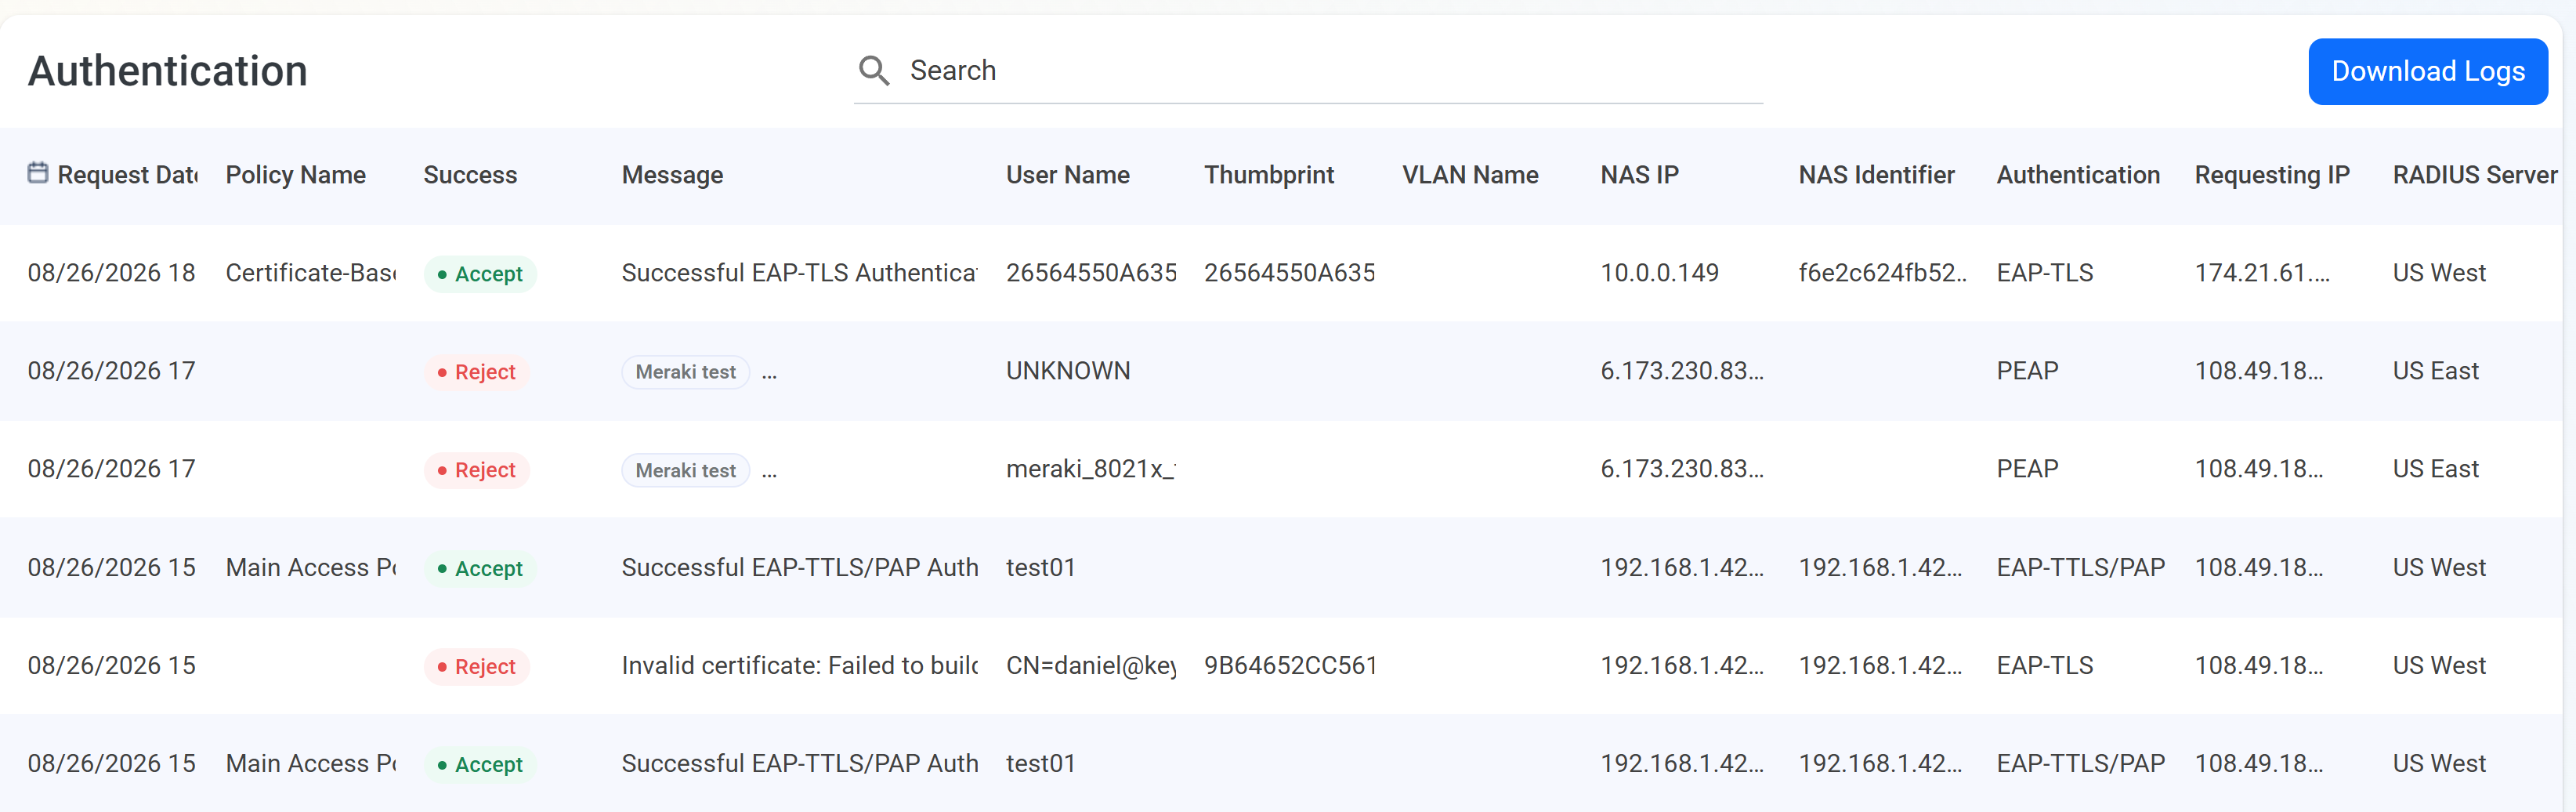
Click Get Logs to retrieve the last week of network activity. You can also change the date range to view logs from a different period. You should see a table of recent authentication events.
If you don’t see any logs, skip down to the common network log issues section below.
Common Network Log Issues
Troubleshooting steps for when no logs are returned
If you don’t see any logs after clicking Get Logs, that indicates one or more of the following issues:
- Your public IP address has not been added to your network profile and RADIUS configuration. Make sure you add your network’s public IP address. If you’re unsure, click the My IP button to automatically detect and add your current public IP address.
- Your network controller/access points are using the wrong shared secret. Verify that the shared secret you entered is the correct one for that specific public IP address (each public IP address can have its own shared secret).
- Your RadSec configuration is incorrect and Shield is unable to establish a connection with your network controller. An easy way to troubleshoot this is to enable RADIUS within your network profiles in addition to RadSec, and add your public IP address. Shield will show you both your RadSec and RADIUS connection attempts now that we know what your public IP address is.
- You have an upstream firewall that is blocking RADIUS (ports 1812 and 1813) or RadSec (port 2083). Ensure that your firewall allows traffic on these ports to reach your network controller.
- Your access point isn’t sending a NAS IP Address in its request. This one is pretty rare for most networks, but it can prevent Shield from properly identifying and logging the request. Ensure that your access point is configured to include the NAS IP Address in its RADIUS requests, and that you haven’t removed or disabled this setting inadvertently.
If you’ve added your public IP address and confirmed your shared secret and you still aren’t seeing any logs, the issue is likely in your network. Shield will always show logs for any connection attempts it receives, so the absence of logs usually indicates that the requests are not reaching Shield. Check your network configuration, firewall rules, and ensure that your network controller is correctly sending RADIUS or RadSec requests to Shield.
Collapses this section and completes the checkmark.
What Are Common Error Messages in Shield Network Logs?
Most error messages in the Shield networks logs are one of the following. Expand the sections below to see common error messages and their troubleshooting steps:
Common Error Messages
Troubleshooting steps for common error messages in Shield network logs
This error indicates that a device tried to connect to your network using an authentication method that is not supported by the Identity Provider (IDP). This can be caused by a few different issues:
- You are trying to use Entra ID username + password authentication, and your device doesn’t have a Wi-Fi profile installed that tells it to use EAP-TTLS instead of PEAP or MSCHAPv2. Ensure that your device is configured correctly with a Wi-Fi profile that specifies EAP-TTLS as the authentication method.
- You are trying to use a legacy authentication method like PEAP or MSCHAPv2, but you have not created an access policy that enables password authentication. Double check your access policies to ensure they are configured correctly.
- You have random users/devices trying to connect to your network with random credentials. This is super common in schools where many students and staff are constantly trying to connect to the network, often with incorrect or outdated credentials. You can safely ignore these failed attempts as long as your legitimate users are able to connect successfully.
Collapses this section and completes the checkmark.
This means your network controller/access point is misconfigured and you have set your RADIUS accounting port to 1812 instead of 1813. Update your network to use 1812 for authentication and 1813 for accounting.
Collapses this section and completes the checkmark.
This error message can be a bit noisy sometimes and can commonly be safely ignored if your legitimate users are able to connect successfully after an automatic retry or two. However, if this error occurs frequently and affects user connectivity, there are a few reasons this might happen:
- Your network controller/access point doesn’t have a high enough timeout setting to allow the TLS authentication to complete. Check your network controller/access point settings and increase the timeout if necessary.
- If you’re running a RADIUS proxy server, make sure it’s not running on Azure. Azure doesn’t support fragmented UDP packets. Switch to RadSec instead, or move your proxy to another cloud like AWS or DigitalOcean.
- Your Wi-Fi profile authentication timeouts are too low. Increase the timeout settings in your Wi-Fi profile to allow enough time for the authentication process to complete.
Collapses this section and completes the checkmark.
This error typically occurs when a client successfully authenticates but fails to complete the subsequent steps required to establish a connection within the expected timeframe. Common causes include:
- Network latency or connectivity issues between the client and the access point. Check your network infrastructure for any potential bottlenecks or disruptions.
- Client device issues, such as low battery, misconfigured network settings, or software bugs. Ensure the client device is properly configured and functioning correctly.
- Access point or network controller timeout settings are too low. Increase the timeout settings to allow clients sufficient time to complete the authentication session.
If your users are consistently experiencing this error, review the network and client configurations, and consider increasing the timeout settings on both the access points and the network controller to ensure that clients have sufficient time to complete the authentication process.
Collapses this section and completes the checkmark.
This means your user entered an incorrect username and/or password on a device. If you see this a lot it could be the result of cached credentials on the client device. Clearing the cached credentials or ensuring the user enters the correct username and password should resolve this issue.
Collapses this section and completes the checkmark.
This error occurs when a client attempts to resume an EAP session after the allowed timeout period has expired. Common causes include:
- Network latency or connectivity issues causing delays in the authentication process.
- Client device issues, such as low battery or misconfigured network settings.
- Access point or network controller timeout settings being too low. Increase the timeout settings to allow clients sufficient time to complete the authentication session.
Review the network and client configurations, and consider increasing the timeout settings on both the access points and the network controller to ensure that clients have sufficient time to complete the authentication process.
Collapses this section and completes the checkmark.
This error can happen when an invalid RadSec client certificate is used, or your RadSec CA trust is misconfigured. Double check the following:
- Make sure your RadSec client (network device) has the Shield RadSec CA certificate (
radsec-ca.cer, downloaded from Network profiles > Settings > Networking Equipment) installed and trusted. This is a different certificate than your Shield Root and Issuing CA certificates. - Verify that your RadSec trusted CA certificates are correctly installed and recognized by the client.
- Make sure you upload/add all CA certificates in the chain to the RadSec client and server configurations.
- Ensure your RadSec client certificate is valid and has not expired.
Collapses this section and completes the checkmark.
If you see this error with no Entra ID user associated, it typically means there was a timeout between the Shield service and Microsoft Entra ID. Even if a RADIUS attempt fails, we will still complete and retry the connection to Entra ID, and cache the results. So a retry should resolve this issue.
If the error persists even after retries, make sure you’ve added a Conditional Access exemption to Shield/EZRADIUS and you have correctly configured your Wi-Fi profile.
Collapses this section and completes the checkmark.
This means your certificate chain could not be validated due to one or more of the following reasons: the revocation status of a certificate is unknown, the revocation server is offline, or the root certificate is not trusted. Double check that all CA certificates in your chain have been added to your Keytos Shield network profile, and you CA’s CRL is accessible and up to date.
Collapses this section and completes the checkmark.
This means that one of the certificates in your chain (the leaf client certificate or one of the CA certificates) has been revoked. Double check your CAs and try issuing a fresh certificate to your device and try again.
Collapses this section and completes the checkmark.
This means that one of the certificates in your chain (the leaf client certificate or one of the CA certificates) is not yet valid or has expired. Double check the validity period of your certificates and ensure your device’s date and time are correct.
Collapses this section and completes the checkmark.
This error means a device attempted to authenticate using MSCHAPv2 with a username that doesn’t exist in your list of local users.
- If you intended to use a local username for authentication, make sure the username exists in your list of local users.
- If you intended to use Entra ID Authentication, switch to EAP-TTLS/PAP as MSCHAPv2 is not supported by Entra ID. This requires a Wi-Fi profile be pushed to your device with the correct authentication method configured.
Collapses this section and completes the checkmark.
This error occurs when a device attempts to authenticate using a password, but there are no access policies configured to allow password authentication for that user or device.
- Check your access policies and ensure that there is a policy that allows password authentication for the relevant users or devices.
This error can be caused by random users trying to authenticate with incorrect credentials or by devices that are not properly configured to use password authentication. If your users and devices can connect successfully, you can usually ignore these errors.
Collapses this section and completes the checkmark.
This error usually means that your client device does not trust your Shield’s server certificate, or you haven’t added your complete list of RADIUS server names to your Wi-Fi profile.
Make sure you’ve pushed your Shield CA certificates to your client trusted certificate store and that your Wi-Fi profile includes the complete list of RADIUS server names (6+ IPs and 2 strings).
Collapses this section and completes the checkmark.
This error occurs when a device attempts to authenticate with a certificate, but the device is not compliant in Intune. Ensure that the device meets all compliance requirements in Intune before attempting authentication. You can also create another access policy that doesn’t require device compliance for authentication and places devices in another VLAN if you want to be able to patch your devices while they are non-compliant and then reauthenticate once they become compliant.
Note that compliance results are cached for up to 15 minutes, so changes in device compliance may not be immediately reflected.
Collapses this section and completes the checkmark.
This error occurs when a device attempts to authenticate with a certificate, but the device cannot be found in Intune. Ensure that the device is properly enrolled in Intune and that it appears in the Intune device list before attempting authentication.
If the device is present in Intune, make sure your access policy is configured correctly to pull the right value for the Intune Device ID from your certificate. It’s usually in the Subject Alternate Name (SAN) list, but your specific configuration may vary.
Collapses this section and completes the checkmark.
This means your access policy or certificate is misconfigured, where Shield cannot pull the correct certificate value from the client certificate. Ensure that your access policy is correctly configured to extract the necessary information from the certificate, typically from the Subject Alternate Name (SAN) field.
Try opening your certificate on your local device and comparing against the expected values configured in your access policy, particularly the Subject Alternate Name (SAN) field. Check for any prefixes as well and specify those in your access policy.
Collapses this section and completes the checkmark.
This means your network controller/access point is sending vendor-specific attributes (VSAs) that are not supported by Shield. You may need to adjust your network controller/access point configuration to avoid using unsupported VSAs.
Collapses this section and completes the checkmark.
Step 2: How to Check Your Network Configuration
The next step in troubleshooting network connectivity errors is to check your network configuration to ensure that your network devices are correctly set up to communicate with Shield. This includes verifying your network controller/access point settings, RADIUS server configuration, and any relevant network policies.
Double check all the following:
- Make sure your RADIUS IPs are correctly configured and match the IP addresses of the Shield RADIUS IPs. Set one from the region closest to you as your primary and another region’s IP as a secondary.
- Ensure you are using port 1812 for RADIUS authentication, 1813 for RADIUS accounting, and 2083 for RadSec. The protocol/ports you use need to match your network profile access policies.
- Ensure your timeout settings are correctly configured to allow sufficient time for RADIUS authentication and accounting requests to complete. This typically involves increasing the default values to a higher value, such as 30 seconds. Consult the guide for your specific network vendor to know where to increase these timeouts.
- Make sure your devices support WPA 3 if you’ve enabled WPA 3 on your network. Try dropping down to WPA 2 if you encounter compatibility issues.
- Verify you don’t have any upstream firewalls or network devices blocking RADIUS traffic between your network devices and the Shield RADIUS servers. Ensure that the necessary ports (1812, 1813, 2083) are open and properly routed.
- Make sure you don’t have any secondary or backup internet connections that will have a different public IP address than your primary. If you do, make sure every public IP is added to your network profile.
Step 3: How to Check Your Device’s Certificate Store
The next step is to double check that you have the Shield CA certificates and a valid user/device certificate (if applicable) installed on your device.
To check your device’s certificate store on Windows:
- Press Win + R, type
certmgr.msc, and press Enter. - Navigate to Trusted Root Certification Authorities > Certificates and verify that the Shield CA certificates are installed.
- Navigate to Intermediate Certification Authorities > Certificates and verify that the Shield intermediate CA certificates are installed.
- Navigate to Personal > Certificates and verify that your user certificate is installed.
If you are using a device certificate instead of a user certificate:
- Press Win + R, type
certlm.msc, and press Enter. - Navigate to Personal > Certificates and verify that your device certificate is installed.
To check your device’s certificate store on macOS:
- Open Keychain Access from Applications > Utilities.
- In the left sidebar, select System and then Certificates.
- Verify that the Shield CA certificates are installed.
- Verify that the Shield intermediate CA certificates are installed.
- Verify that your user or device certificate is installed.
Step 4: How to Check Your Device’s Known Wi-Fi Networks
A Wi-Fi profile is required to connect to a WPA Enterprise network. Without one, your device won’t know what certificate to use, what protocol to attempt, and what RADIUS servers to trust. Follow these steps to check your device’s known Wi-Fi networks.
To check your known Wi-Fi networks on Windows:
- Press Win + R, type
ms-settings:network-wifi, and press Enter. - Click on Manage known networks.
- Verify that your WPA Enterprise network is listed. If you’re using Intune, you should see Added by company policy under the name of the network.
To check your known Wi-Fi networks on macOS:
- Open System Preferences from the Apple menu.
- Click on Network and select Wi-Fi from the left sidebar.
- Click on Advanced.
- Verify that your WPA Enterprise network is listed under Preferred Networks.
To check your known Wi-Fi networks on iOS/iPadOS:
- Open Settings from the home screen.
- Tap on Wi-Fi.
- Verify that your WPA Enterprise network is listed under My Networks.
To check your known Wi-Fi networks on Android:
- Open Settings from the home screen.
- Tap on Network & Internet or Connections (depending on your device).
- Tap on Wi-Fi.
- Tap on Saved networks or Manage networks.
- Verify that your WPA Enterprise network is listed.
If you’re missing your Wi-Fi network from the list of known networks, you will need to check your MDM (Mobile Device Management) configuration to ensure that the Wi-Fi profile has been correctly deployed to your device.
Step 5: How to Pull Device Network Logs
If you’ve confirmed that your device has the correct certificates installed and your Wi-Fi network is listed among the known networks, but you’re still experiencing connectivity issues, you may need to pull your device’s network logs for further troubleshooting.
To pull network logs on Windows:
- Press Win + R, type
eventvwr.msc, and press Enter. - Navigate to Applications and Services Logs > Microsoft > Windows > WLAN-AutoConfig > Operational.
- Look for events related to your WPA Enterprise network.
To pull network logs on macOS:
- Open Console from Applications > Utilities.
- Click Start streaming to begin capturing network logs.
- In the search bar, type
Wi-Fior the name of your network. - Review the logs for any connectivity issues.
To pull network logs on iOS/iPadOS:
- Open Settings from the home screen.
- Tap on Privacy & Security > Analytics & Improvements > Analytics Data.
- Look for logs related to Wi-Fi connectivity.
To pull network logs on Android:
- Open Settings from the home screen.
- Tap on About phone > Build number and tap it seven times to enable developer options (if not already enabled).
- Go back to Settings > System > Developer options > Take bug report.
- Select Full report and wait for the report to be generated.
- Review the report for Wi-Fi connectivity issues.
Still Having Trouble With Your Network Connection?
If you’ve followed all the steps above and are still experiencing network connectivity issues, Keytos offers a few support options:
- Check out the live chat support in the bottom right corner of this site. Click the Questions icon to start a conversation with our support team.
- Open a support ticket from within your Keytos Shield portal under the Support page. This will also include network logs and other information necessary for troubleshooting.
- For issues or consultations related to your network setup, MDM configuration, or other systems outside of Keytos Shield, Keytos does offer paid professional support services that can assist with external systems.