How-To: Restrict Access to Entra ID Applications with SCEP Certificates and Entra CBA
Overview - How to Protect Entra ID Applications with SCEP Certificates and Entra CBA
If you want to restrict access to your organization’s applications and data so only corporate devices can access them, there are plenty of guides out there on Entra Conditional Access and how to set them up with Entra and Microsoft Intune. However, that approach requires devices to report compliance to Entra ID through Intune or a supported partner integration. What if your MDM, such as Jamf or NinjaOne, cannot report compliance to Entra ID?
This guide will walk you through how to use SCEP certificates, issued by any MDM solution, to enable Entra CBA and restrict access to Entra ID applications based on the presence of a valid SCEP certificate. As long as your SCEP certificates are properly configured to be non-exportable and backed by a Trusted Platform Module (TPM), you can enforce strong device-based authentication for your organization’s applications.
This guide focuses on locking down access to your organization’s applications to only devices that have a valid SCEP certificate installed, ensuring that only corporate-managed devices can authenticate successfully.
If you are looking for how to set up Smart Card or security key authentication for Entra CBA instead, please refer to this guide on how to configure Smart Card or security key authentication for Entra CBA.
What If I Already Use Microsoft Intune and I Want to Restrict Access to Only Corporate Devices?
If your organization already uses Microsoft Intune to manage devices, Entra Conditional Access already allows you to require compliant devices for access to your Entra ID applications. You can just enable the Require device to be marked as compliant setting in your conditional access policy and enforce device compliance without needing to set up SCEP certificates for this purpose.
Why Do SCEP Certificates Only Count as a Single Factor During Authentication?
Unlike a Smart Card or security key which require both physical possession and a PIN or biometric factor, SCEP certificates only require the presence of the certificate on the device. A user does not need to provide an additional factor such as a PIN or biometric verification during authentication. For that reason it’s recommended to only count SCEP certificates as a single factor during authentication, and to require another factor such as a password or app-based authentication or passkey for multi-factor authentication (MFA).
If you have strong PIN protection policies, TPM-bound keys, and adequate timeout settings on your device, you can consider counting SCEP certificates as multi-factor authentication (MFA), but it is generally recommended to combine them with another independent factor to ensure robust security.
Can I Distribute SCEP Certificates to Personal/BYOD Devices?
There’s nothing stopping you from distributing SCEP certificates to personal/BYOD devices, but it defeats the purpose of locking down access in the first place. The security of adding SCEP certificates as a factor is that only your organization can issue and manage these certificates via a central Mobile Device Management (MDM) solution and the user can’t export it. Having a self-service or BYOD approach would remove the security benefit. A better approach for personal/BYOD devices is to rely on strong device-based authentication methods such as app-based authentication, passkeys, or other multi-factor authentication (MFA) mechanisms.
Why Do Only User Certificates Count and Not Device Certificates for Entra CBA?
When authenticating to Entra ID, you are logging in as a specific user. Therefore, only user certificates are relevant for Entra CBA, as they directly tie the authentication to the individual user. Device certificates, on the other hand, authenticate the device itself and do not provide a direct link to the user’s identity, which is why they do not count for Entra CBA.
For this reason, any SCEP certificate used for Entra CBA must have the user’s User Principal Name (UPN) configured as the Principal Name in the certificate’s subject alternative name (SAN).
Step-by-Step Guide - How to Use SCEP Certificates for Entra CBA
Prerequisites for Using SCEP Certificates with Entra CBA
Before you begin, ensure you have the following prerequisites in place:
- An active EZCA subscription
- A SCEP Certificate Authority
- You have issued user SCEP certificates to your devices via a Mobile Device Management (MDM) solution, with the user’s User Principal Name (UPN) correctly configured in the certificate’s subject or subject alternative name (SAN).
- An Entra ID tenant with appropriate administrative privileges to configure the trust store and manage authentication methods.
Step 1: How to Add Your Certificate Authorities (CAs) to Entra’s Trust Store
The first step is to add your Certificate Authorities (CAs) to Entra’s trust store, ensuring that Entra can recognize and validate the SCEP certificates issued by your CAs.
How to Download Your EZCA Certificate Authority (CA) Certificate(s)
Follow these steps to download your EZCA CA certificates for each level of your certificate hierarchy.
-
Navigate to your EZCA portal.
-
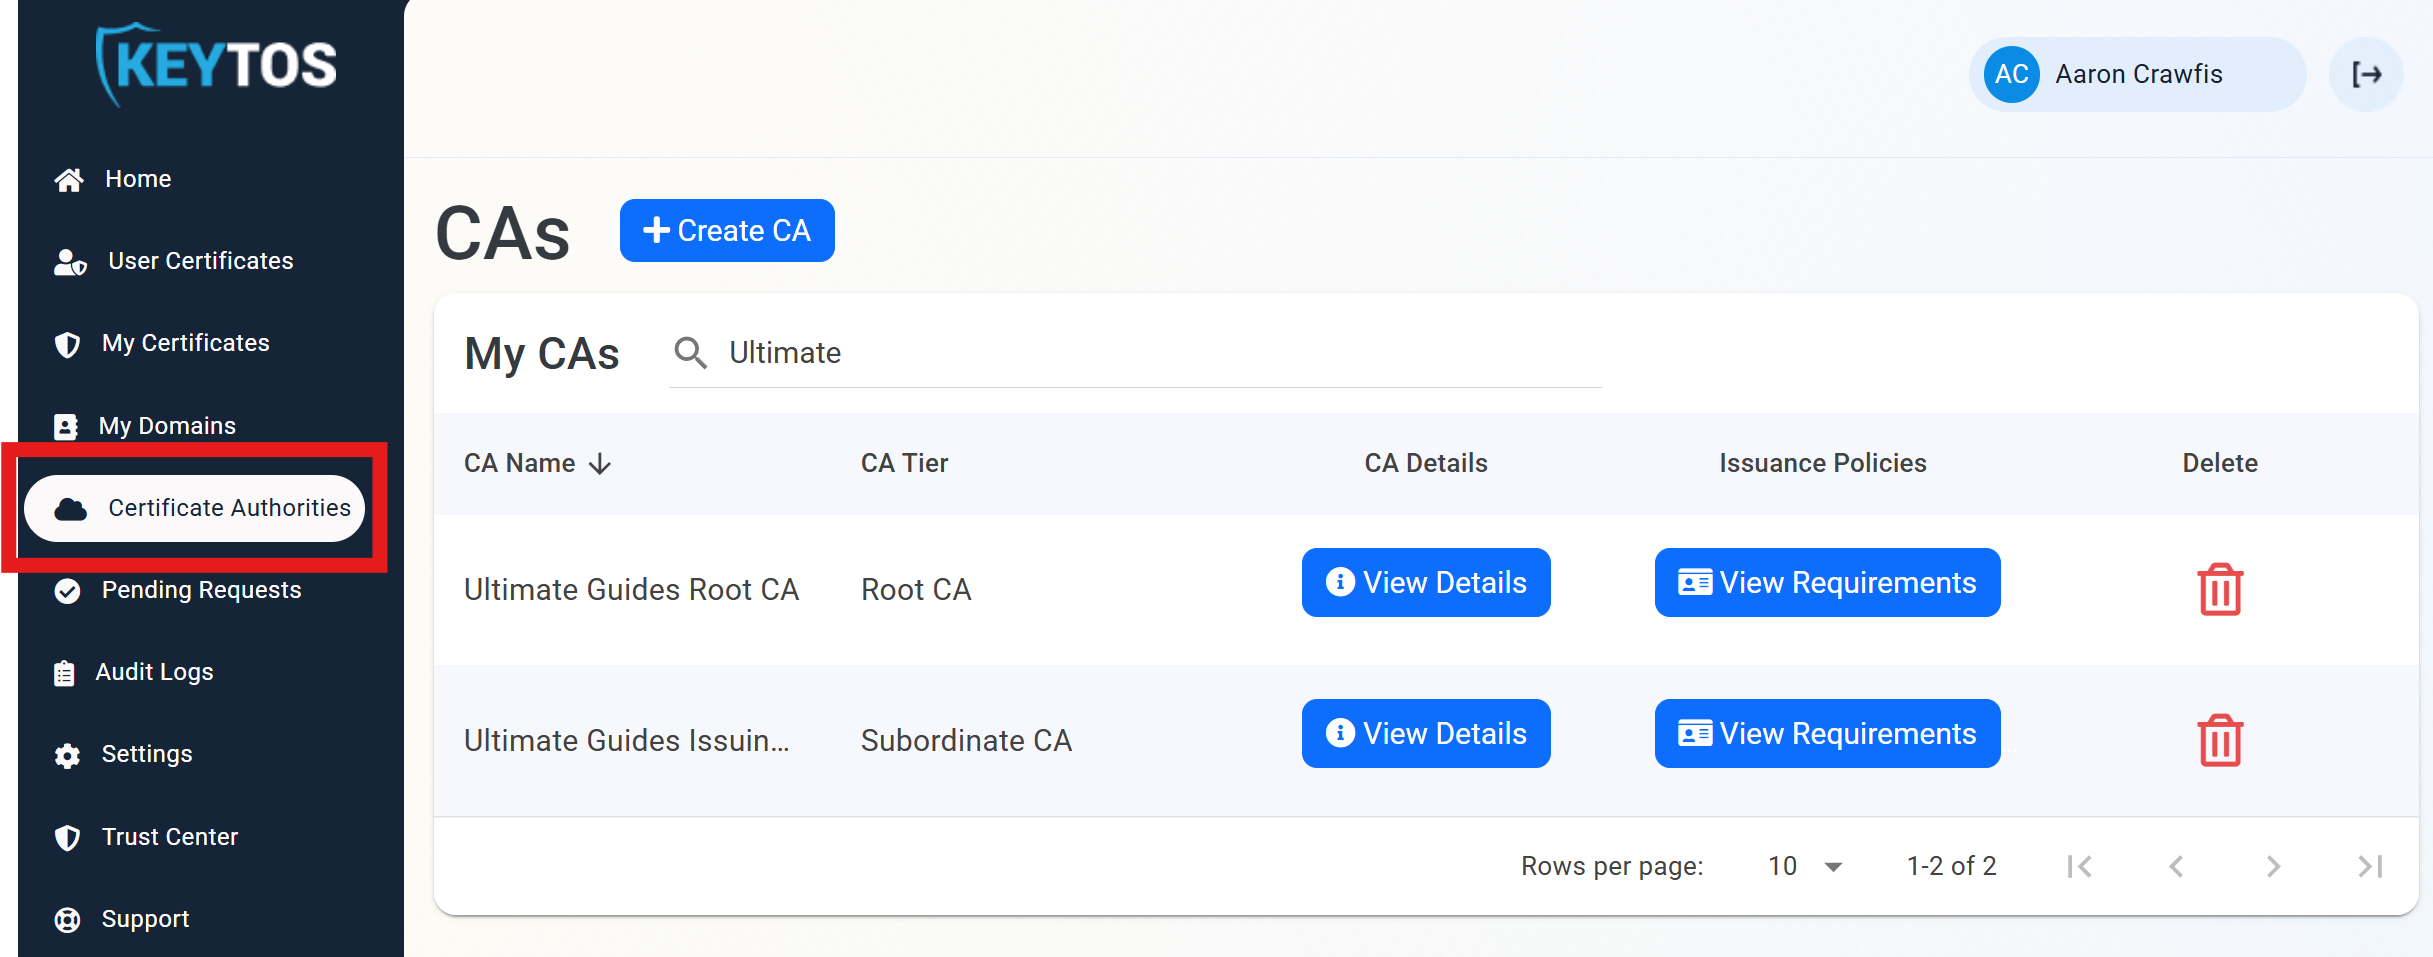
From the left-hand navigation menu, select Certificate Authorities.
-
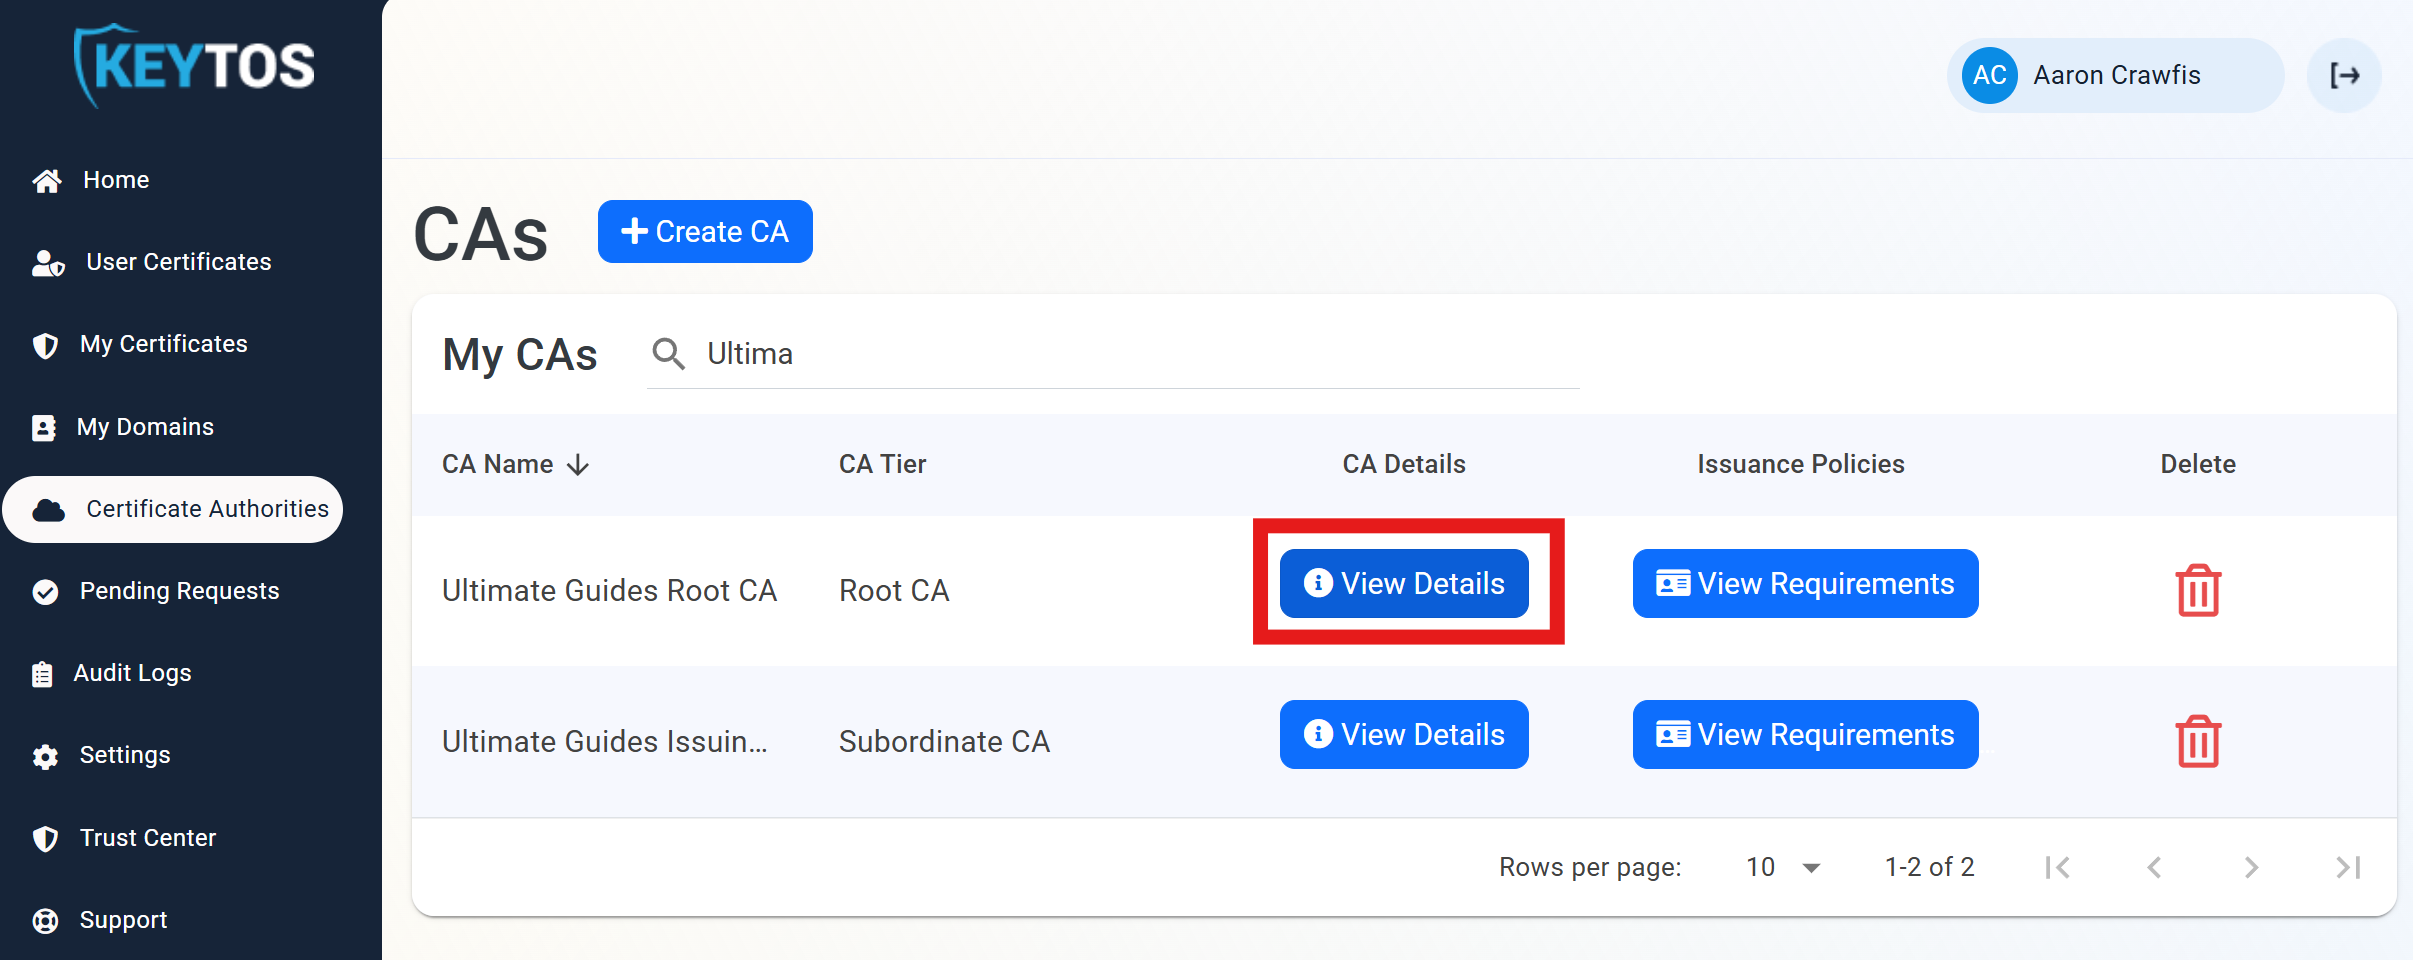
For the CA you want to download the certificate for, click View Details.
-
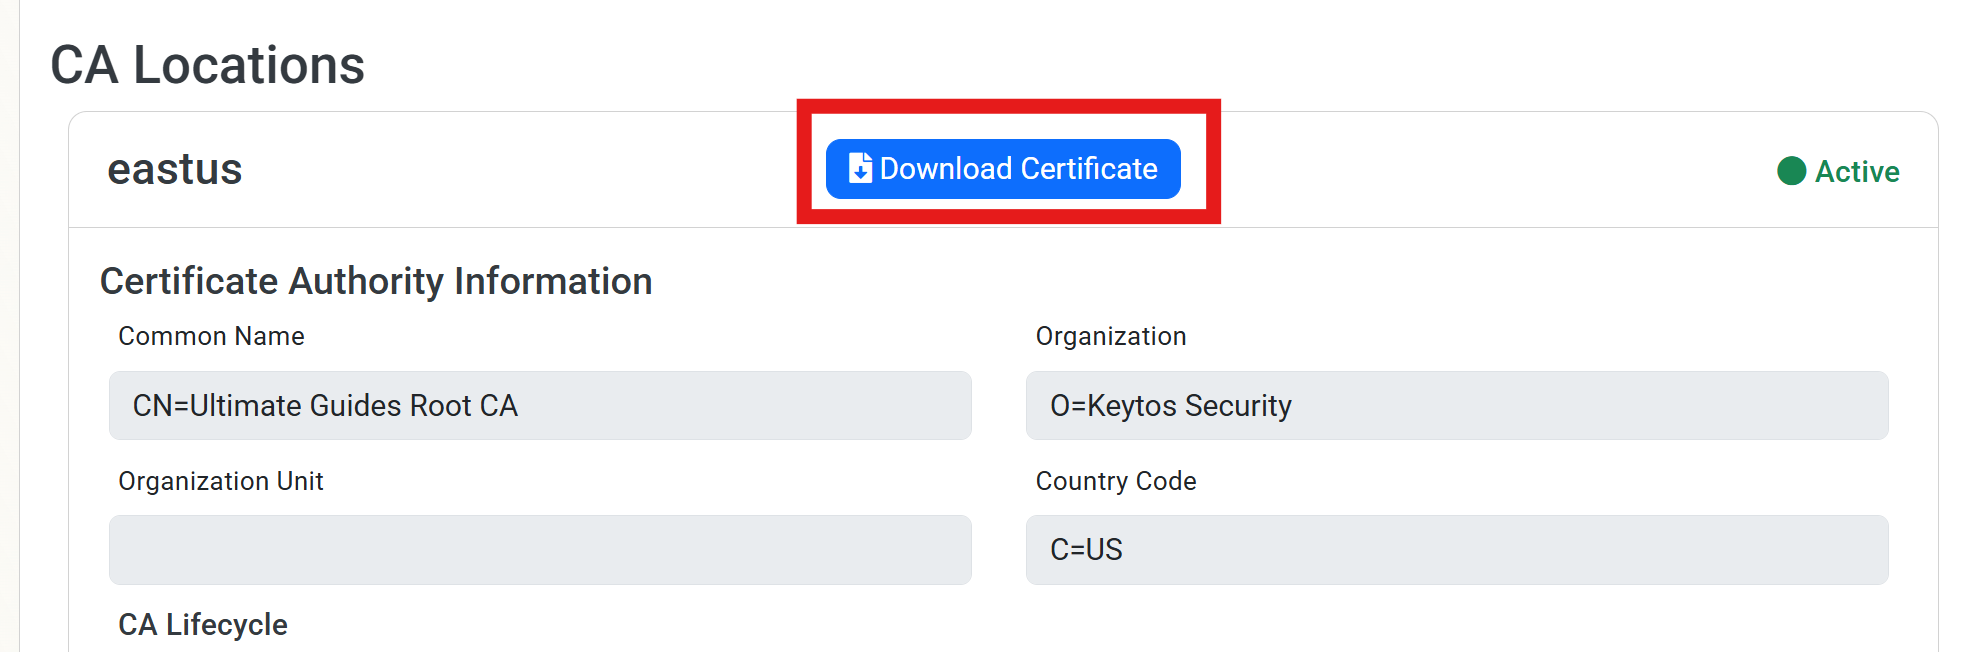
For each CA Location, click Download Certificate and save the certificate file to your local machine.
-
Repeat the above steps for each CA in your certificate hierarchy (Root CA, SCEP CA, and any Intermediate CAs).
How to Get Your EZCA Certificate Revocation List (CRL) URL
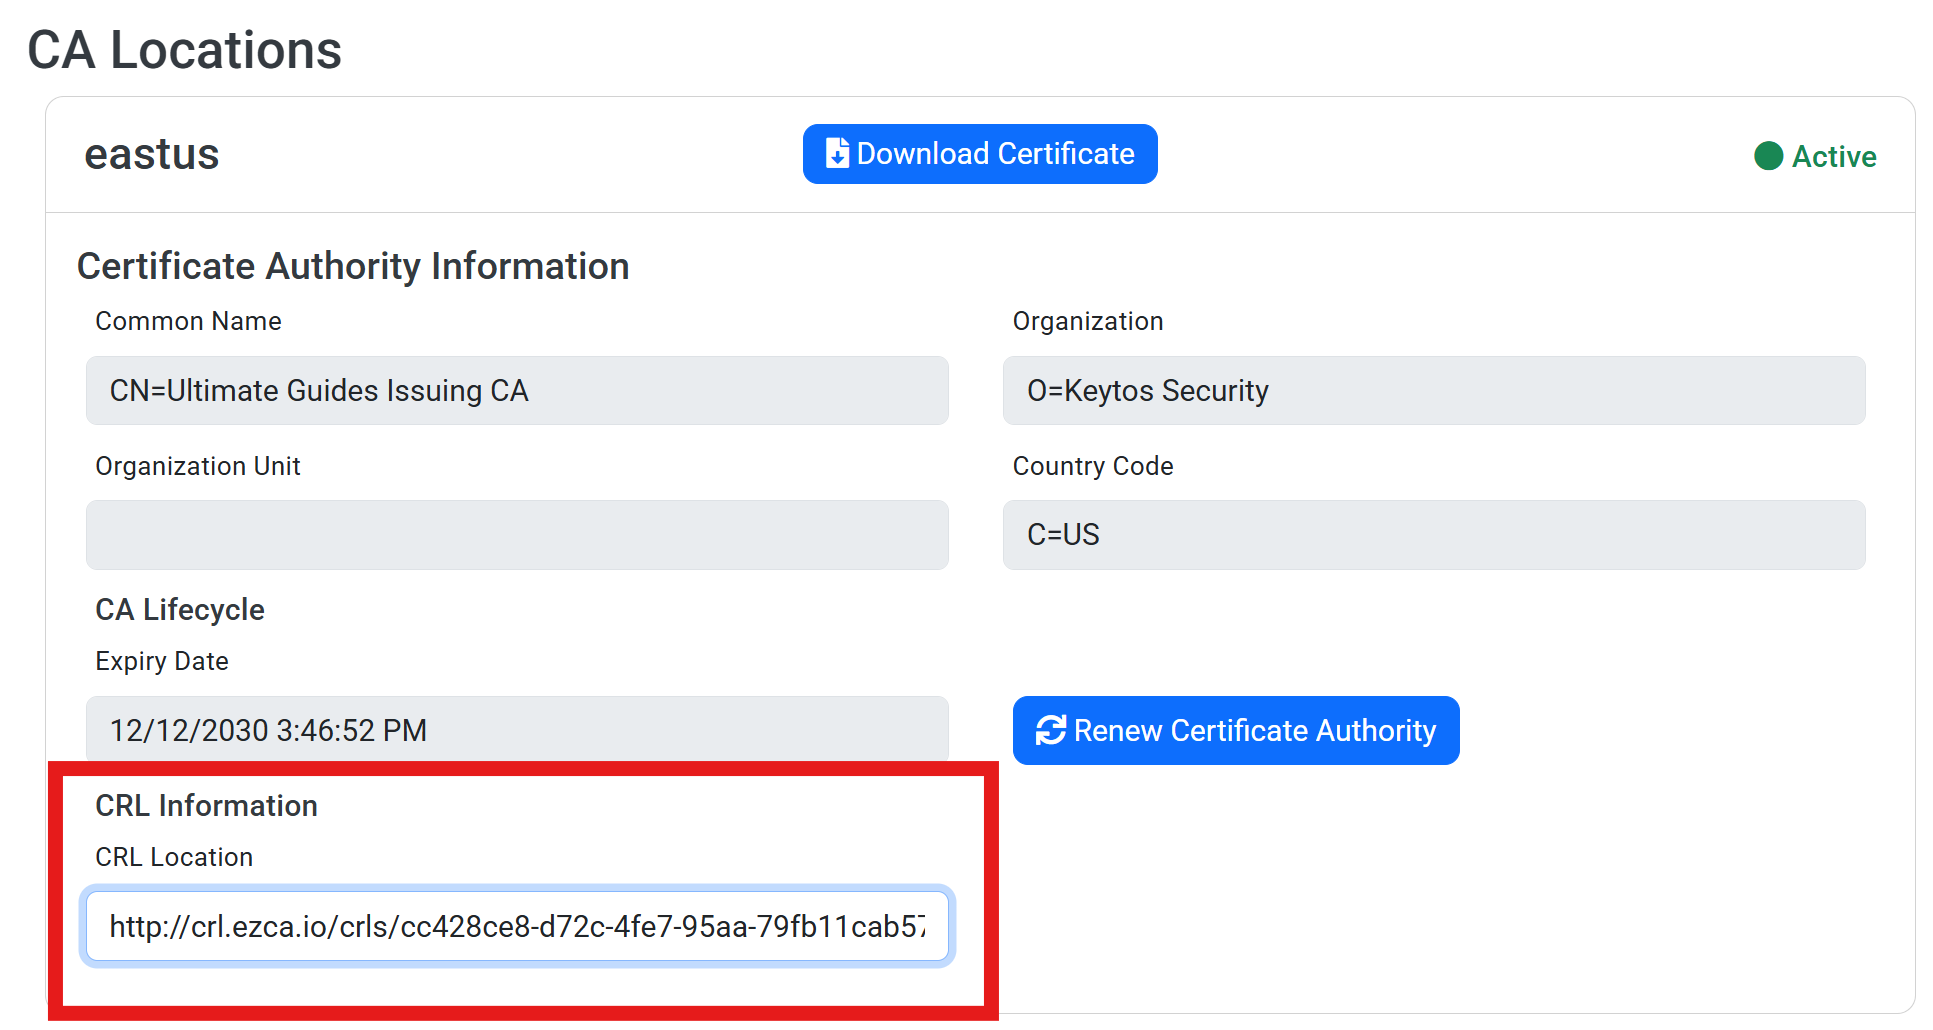
In the next step, you’ll need each CA’s unique CRL URL to configure that CA in Entra’s trust store. You can get each URL from the corresponding CA’s View Details page.
-
Navigate to the View Details page for each CA in your hierarchy.
-
Under CA Locations > Certificate Authority Information > CRL Information, copy the CRL Location URL.
How to Import Your EZCA Certificate Authority (CA) Certificate(s) into Entra’s Trust Store
Now that you have downloaded your EZCA CA certificate(s), you can import them into Entra’s trust store to enable Entra to recognize and validate the SCEP certificates issued by your CAs.
-
Navigate to the Entra admin center at https://entra.microsoft.com.
-
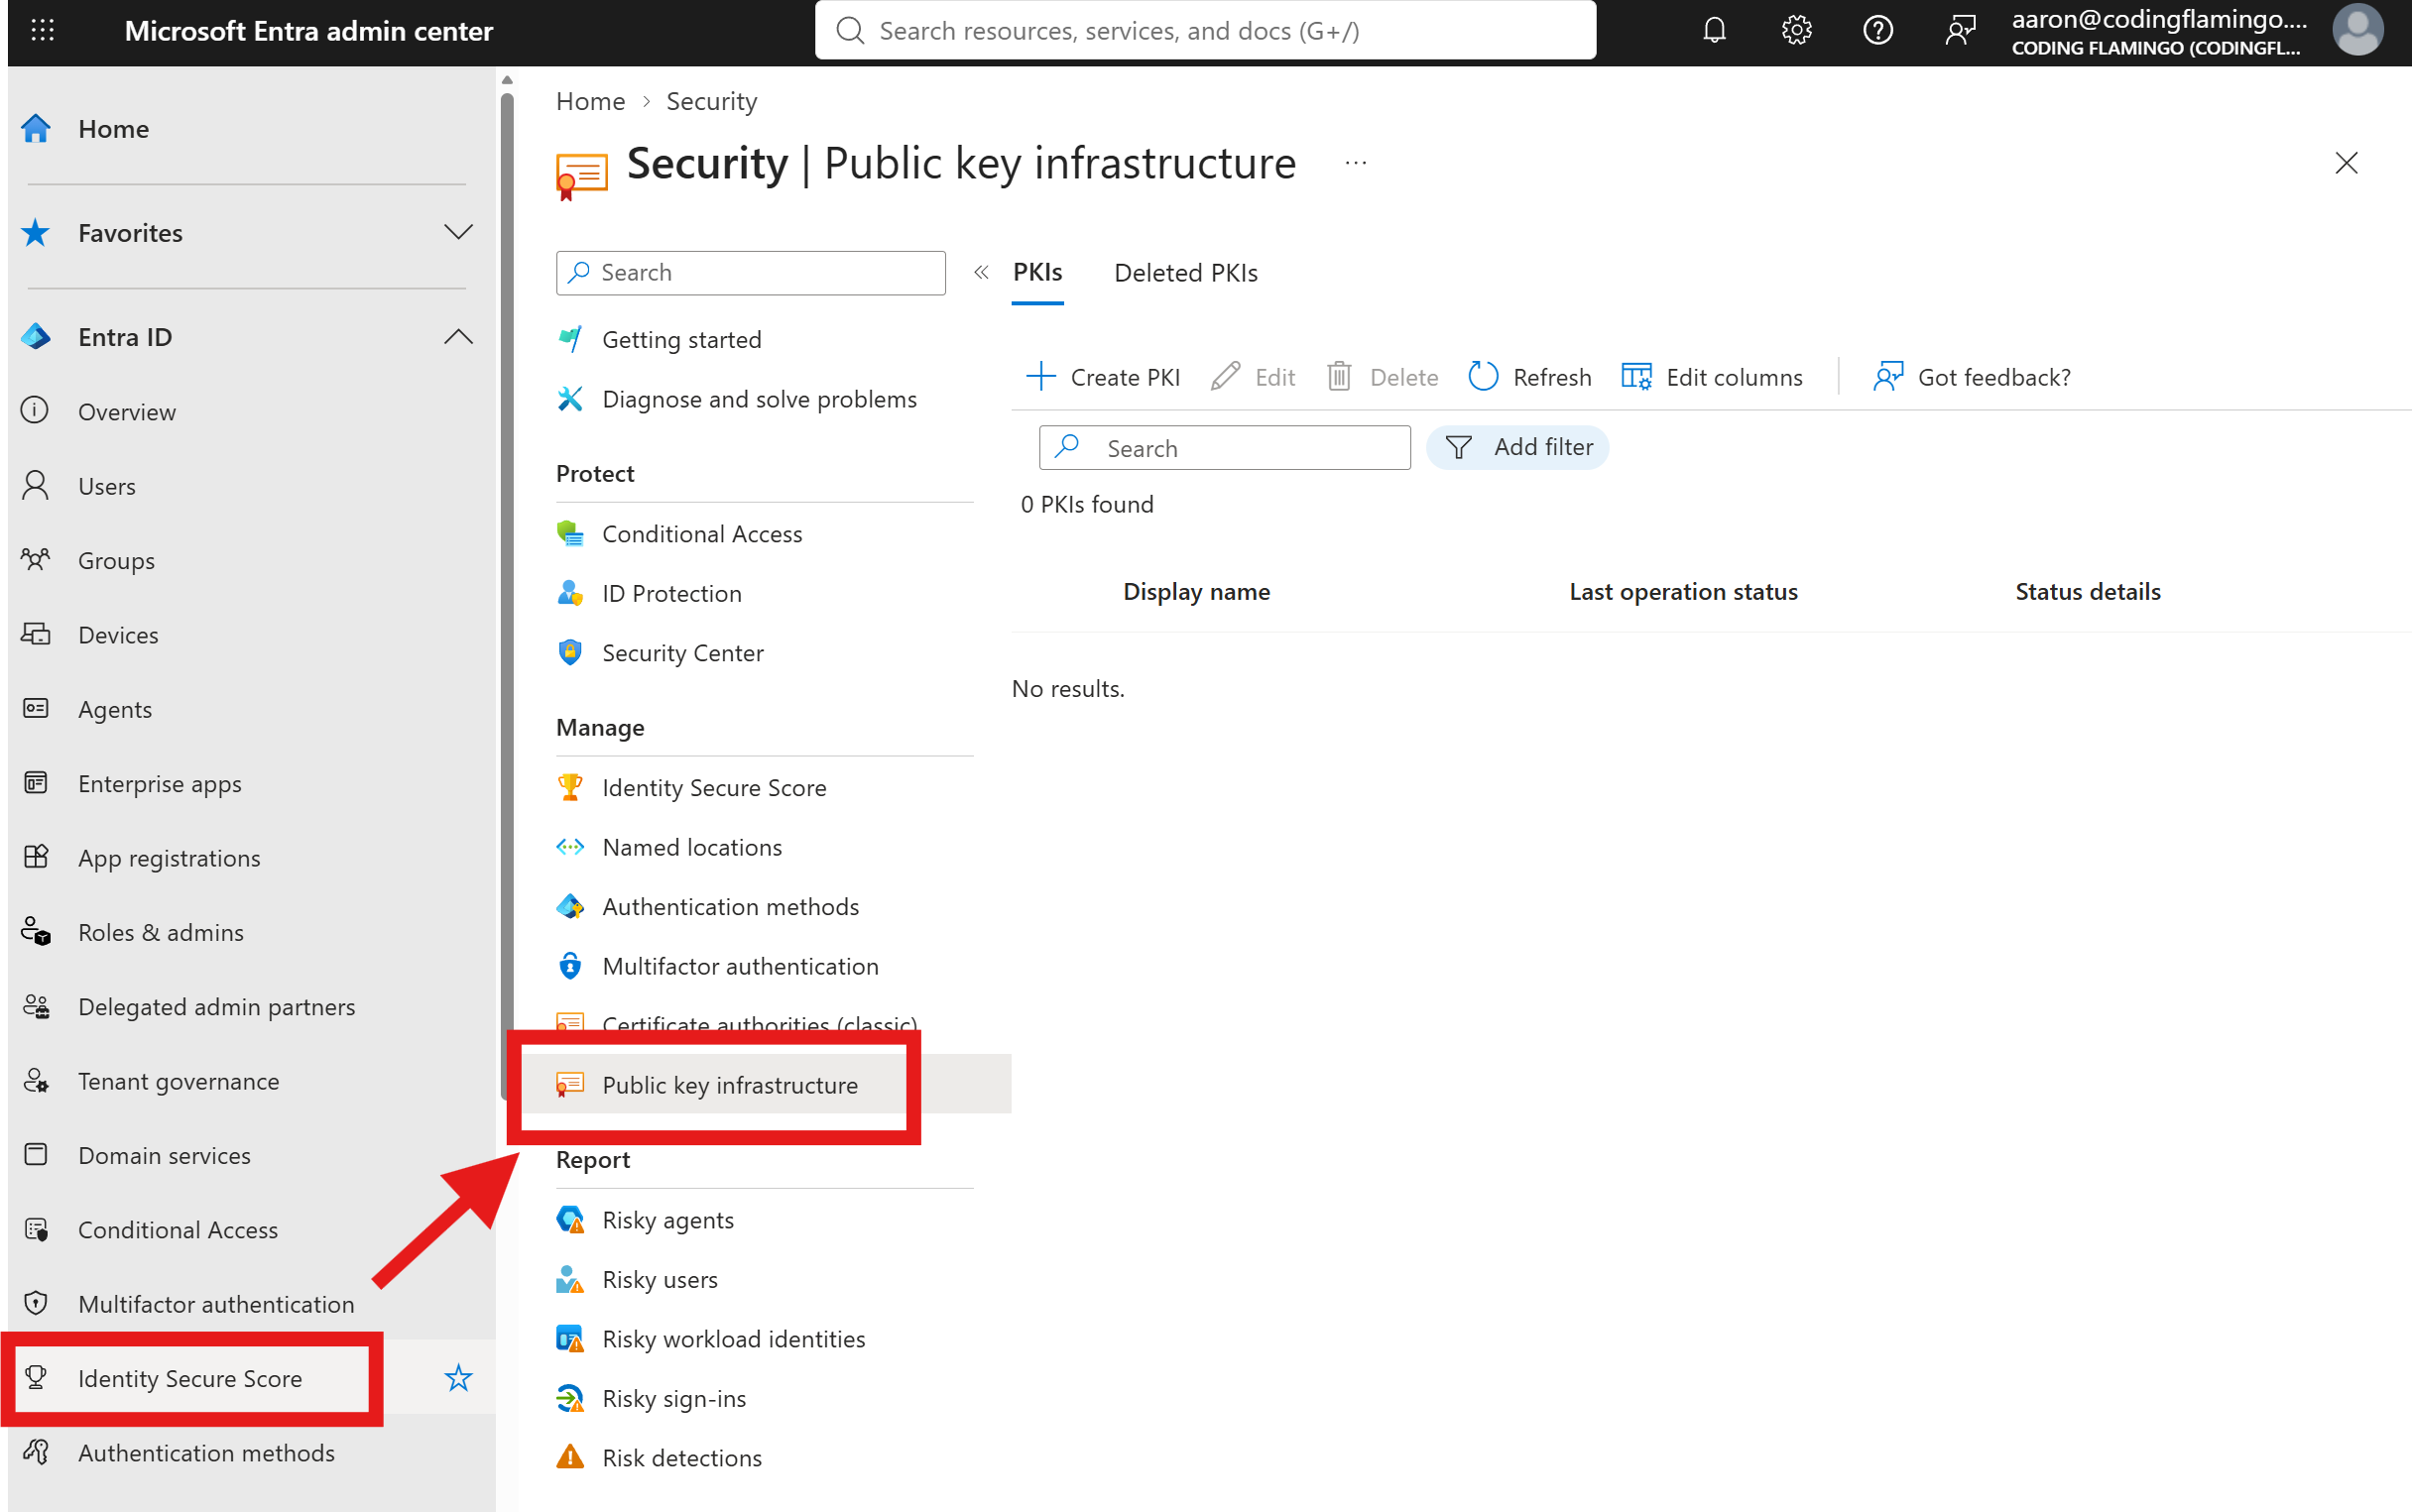
From the left-hand navigation menu, select Identity Secure Score > Public key infrastructure. (direct link).
-
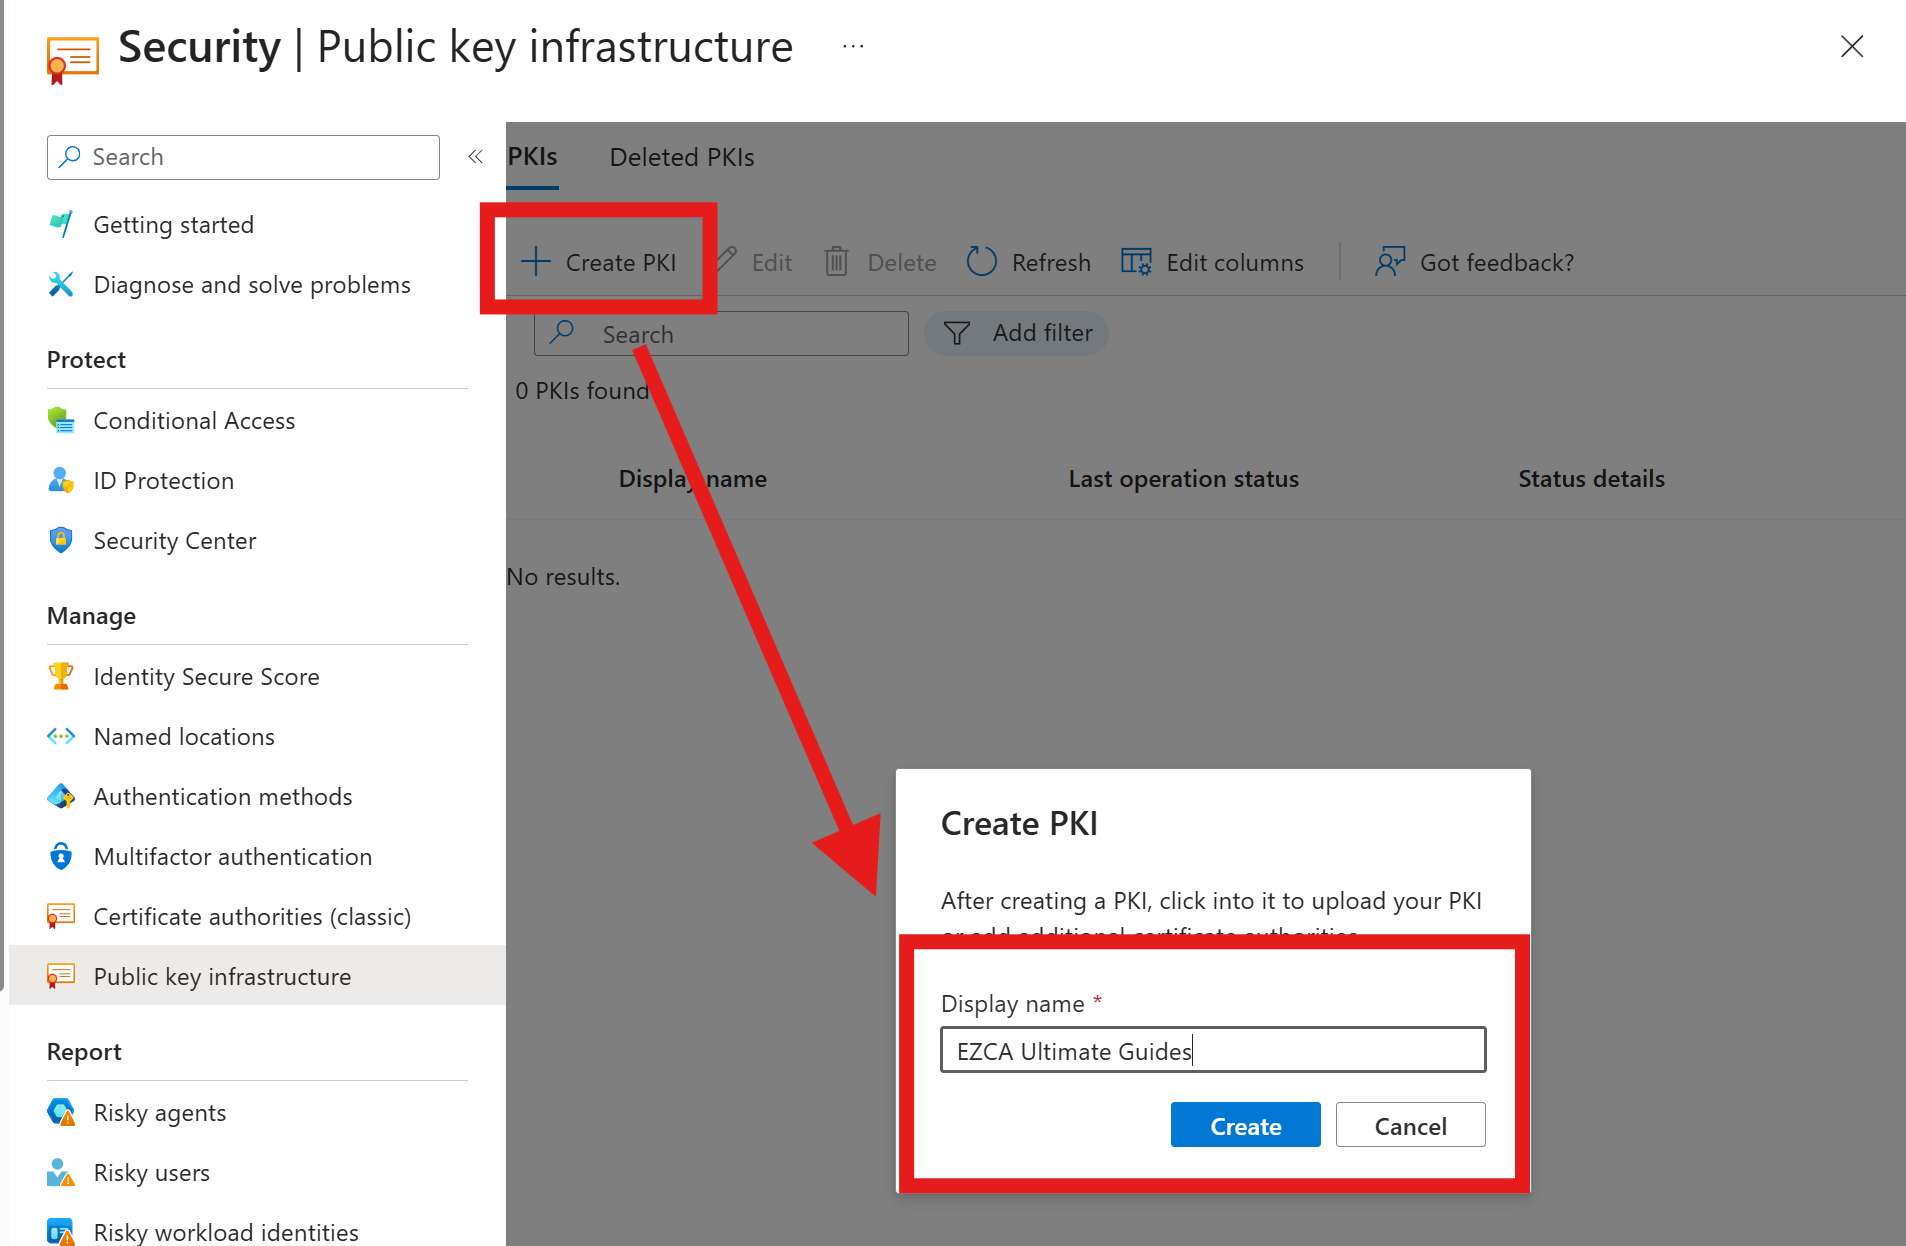
Click + Create PKI, enter a Display Name for your PKI configuration, and click Create.
-
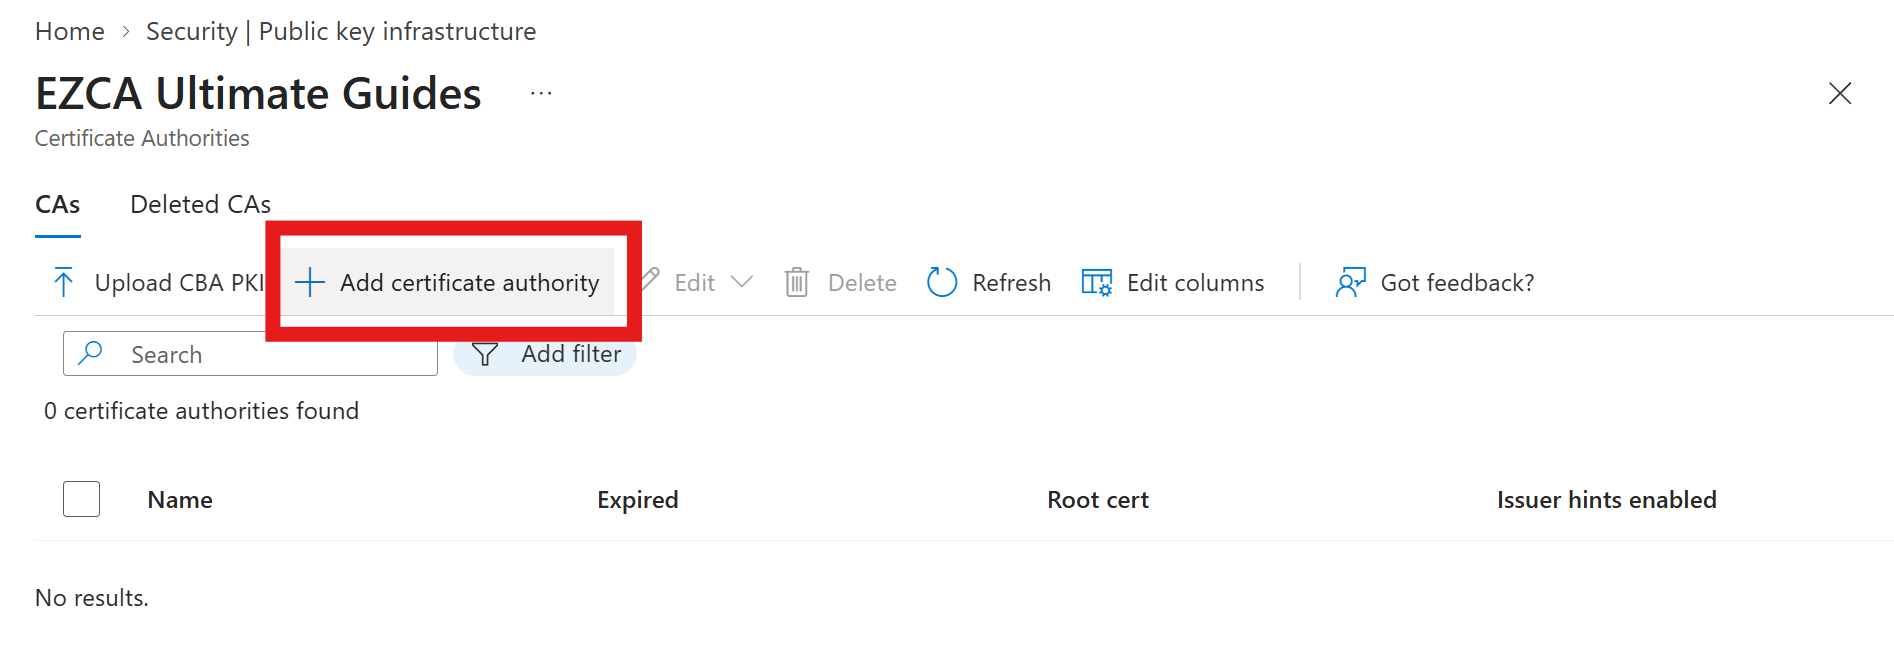
Open your newly created PKI configuration to manage and import your CA certificates.
-
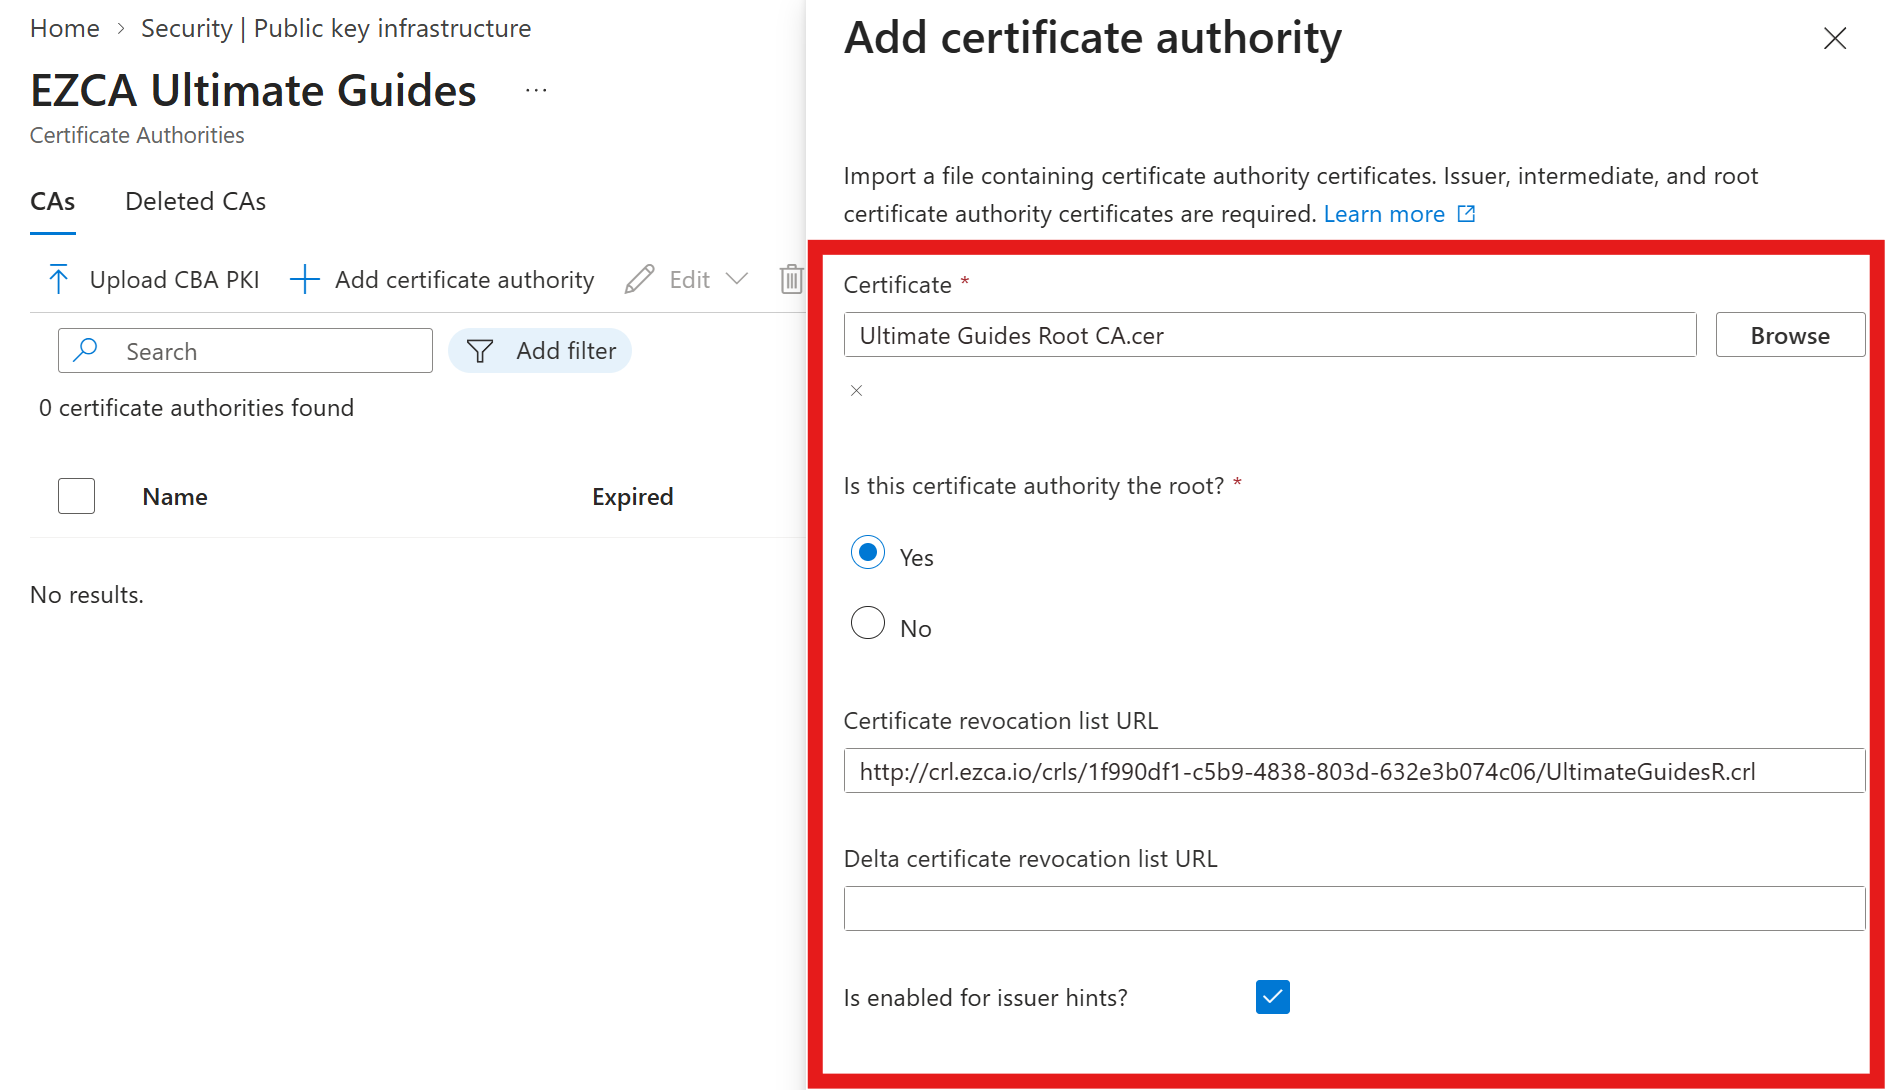
Click + Add certificate authority to add your first EZCA CA certificate to Entra.
-
Enter in the following details for your EZCA CA certificate:
-
Certificate: Select the EZCA CA certificate file you downloaded earlier.
-
Is this certificate authority the root: Select Yes if this CA is the root CA; otherwise, select No.
-
Certificate revocation list URL: Enter the CRL URL which you previously obtained from your EZCA View Requirements page.
-
Delta certificate revocation list URL: Leave blank.
-
Is enabled for issuer hints?: Leave this checked.
-
-
Click Save to add your EZCA CA certificate to Entra’s trust store.
-
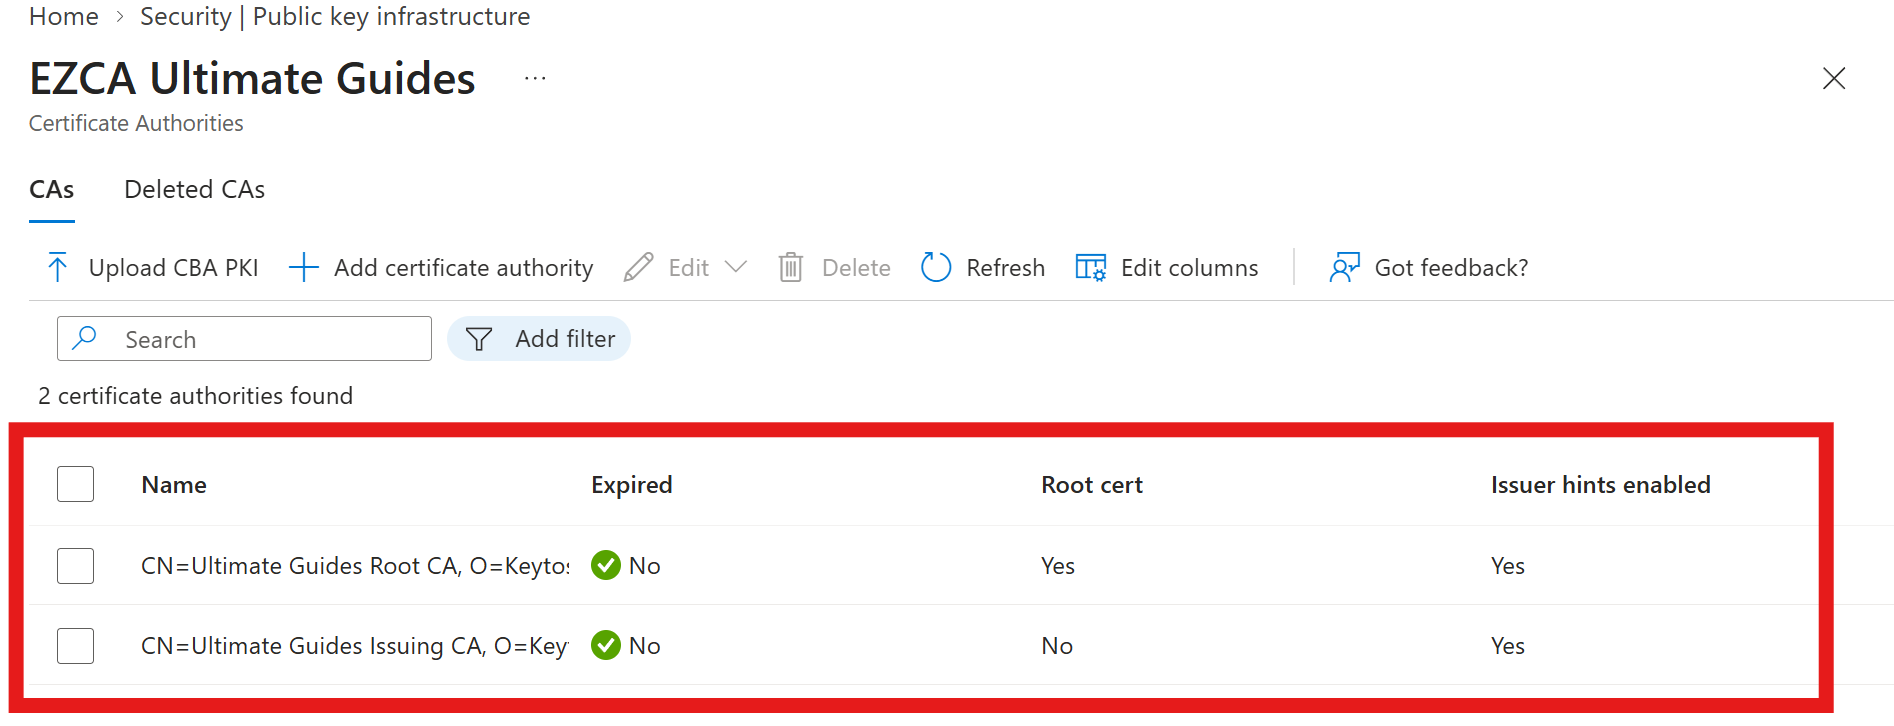
Repeat the process to add any additional EZCA CA certificates in your hierarchy to Entra’s trust store, if necessary. You should now have all your EZCA CA certificates imported and visible in Entra’s trust store.
-
Done! You have successfully imported your EZCA CA certificates into Entra’s trust store.
Step 2: How to Enable and Configure Entra Certificate Based Authentication (CBA)
Now that you have imported your EZCA CA certificates into Entra’s trust store, you can proceed to enable and configure Entra Certificate Based Authentication (CBA).
-
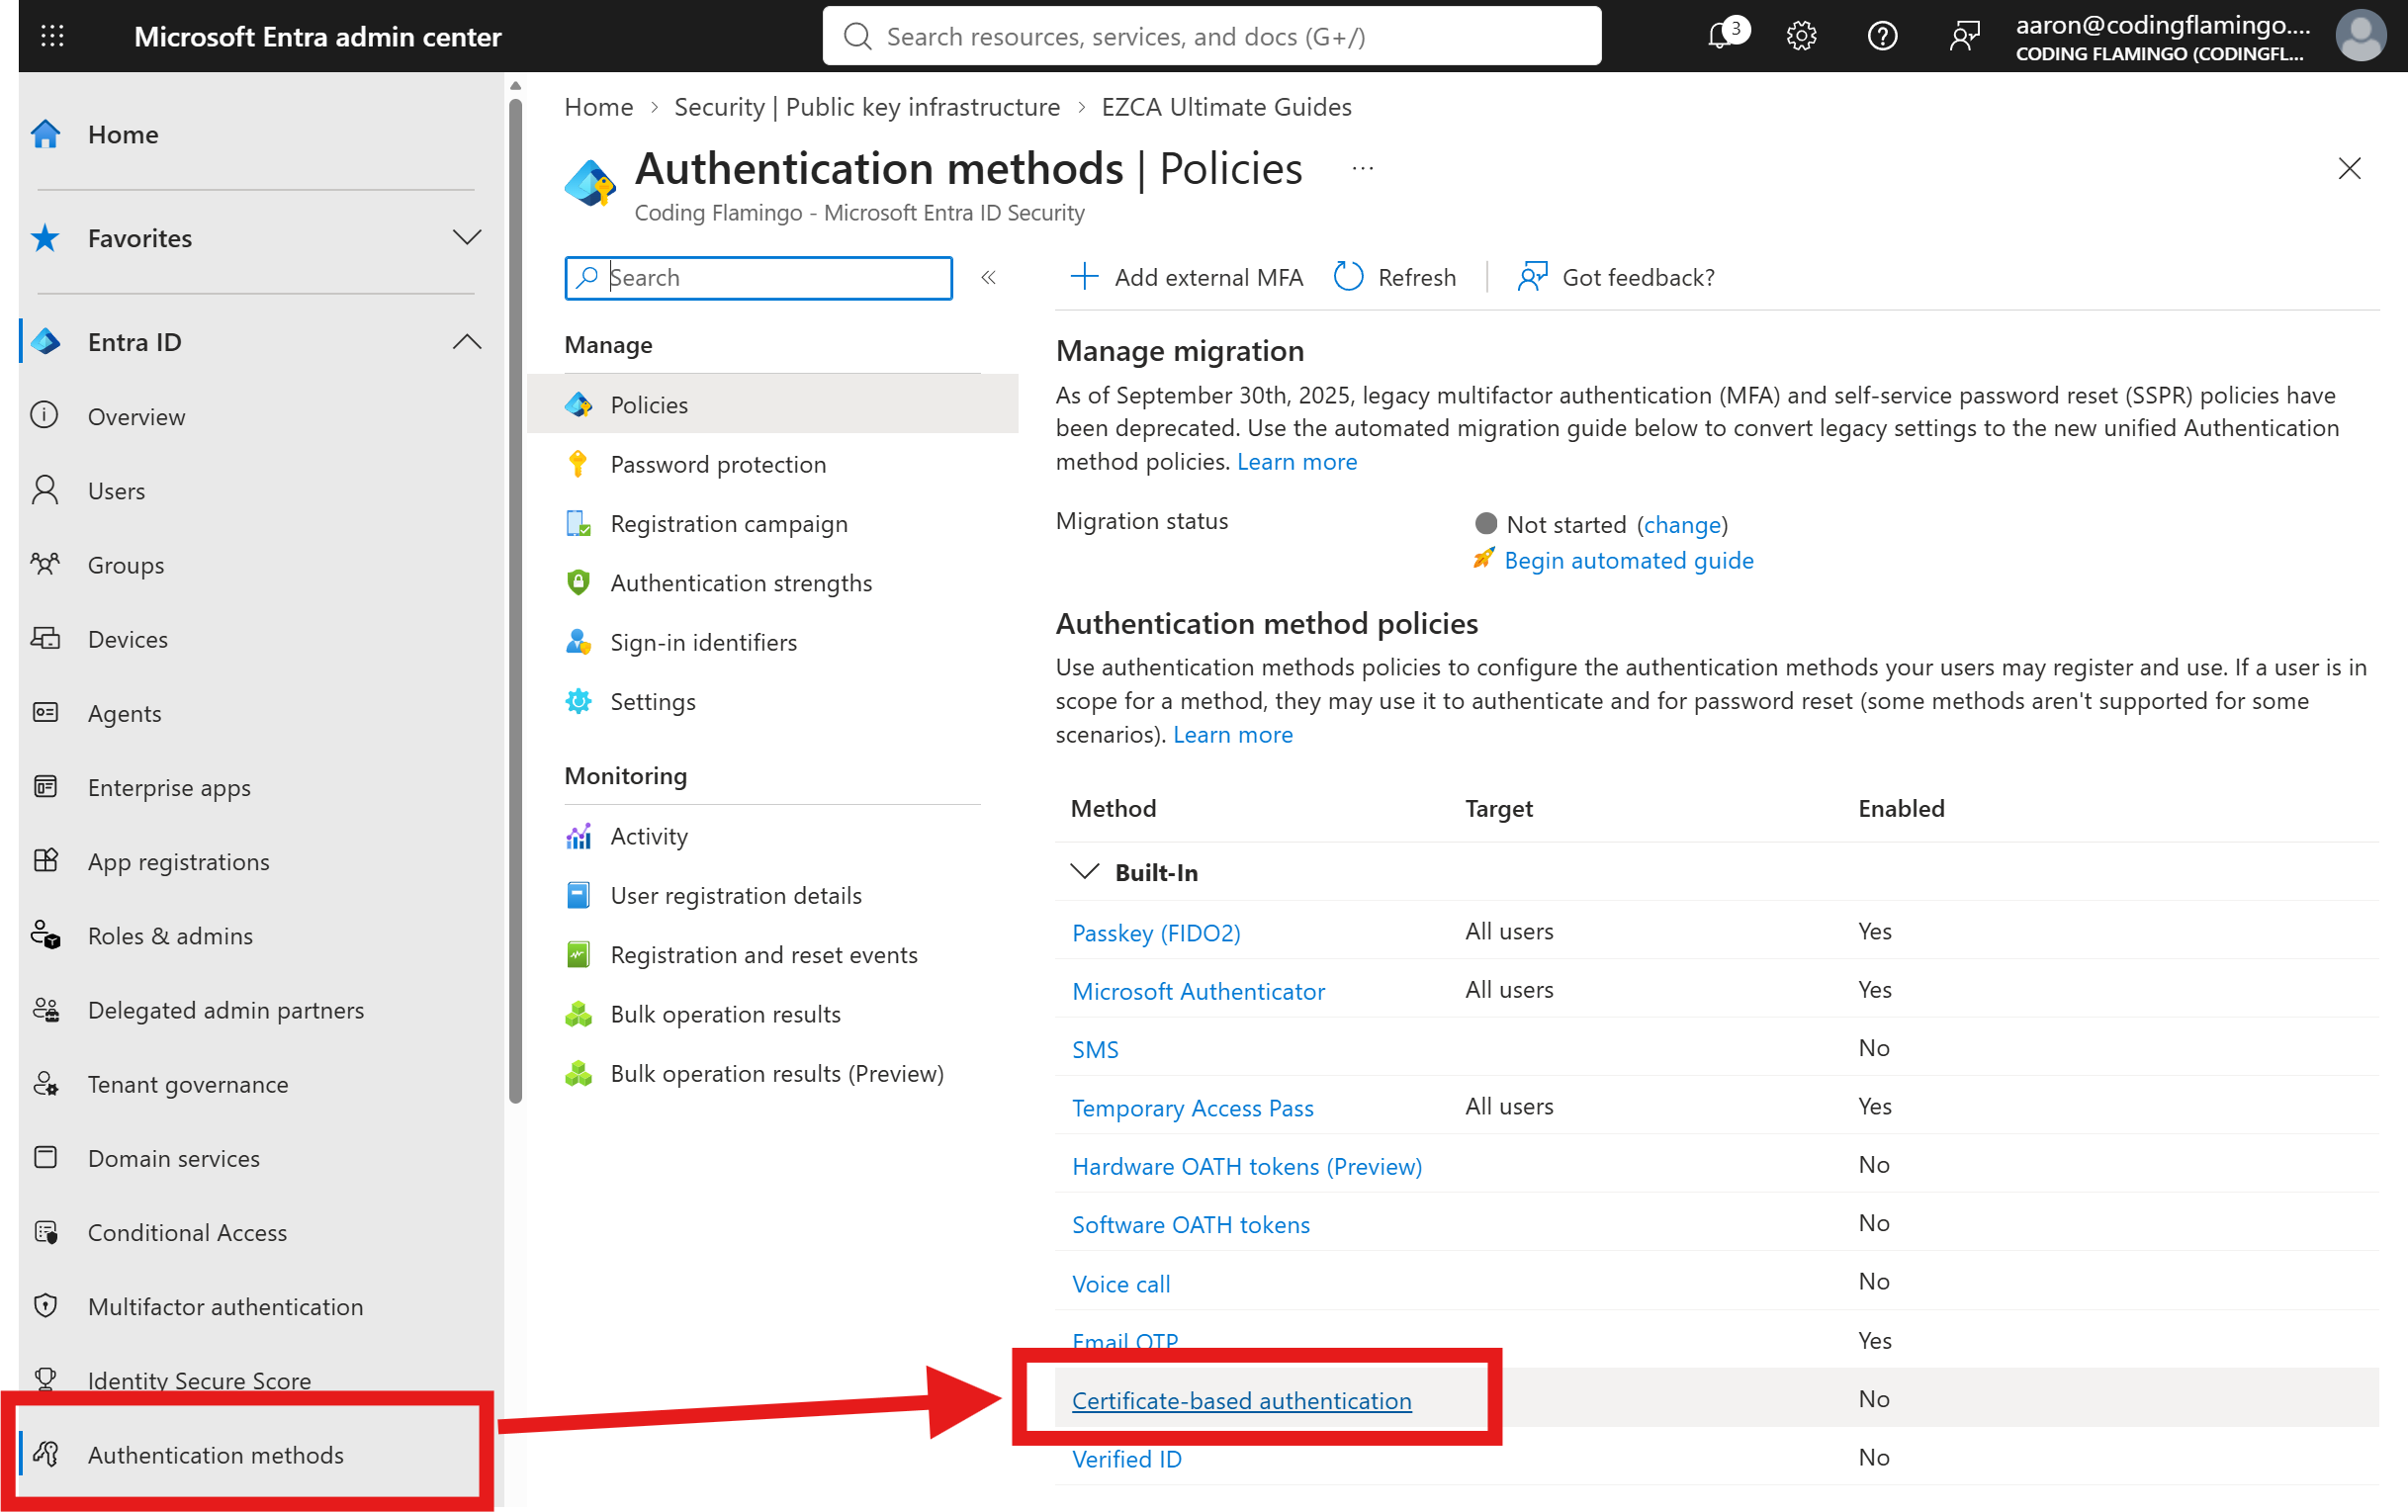
In the Entra portal left-hand navigation, navigate to Authentication methods and then select Certificate-based authentication.
-
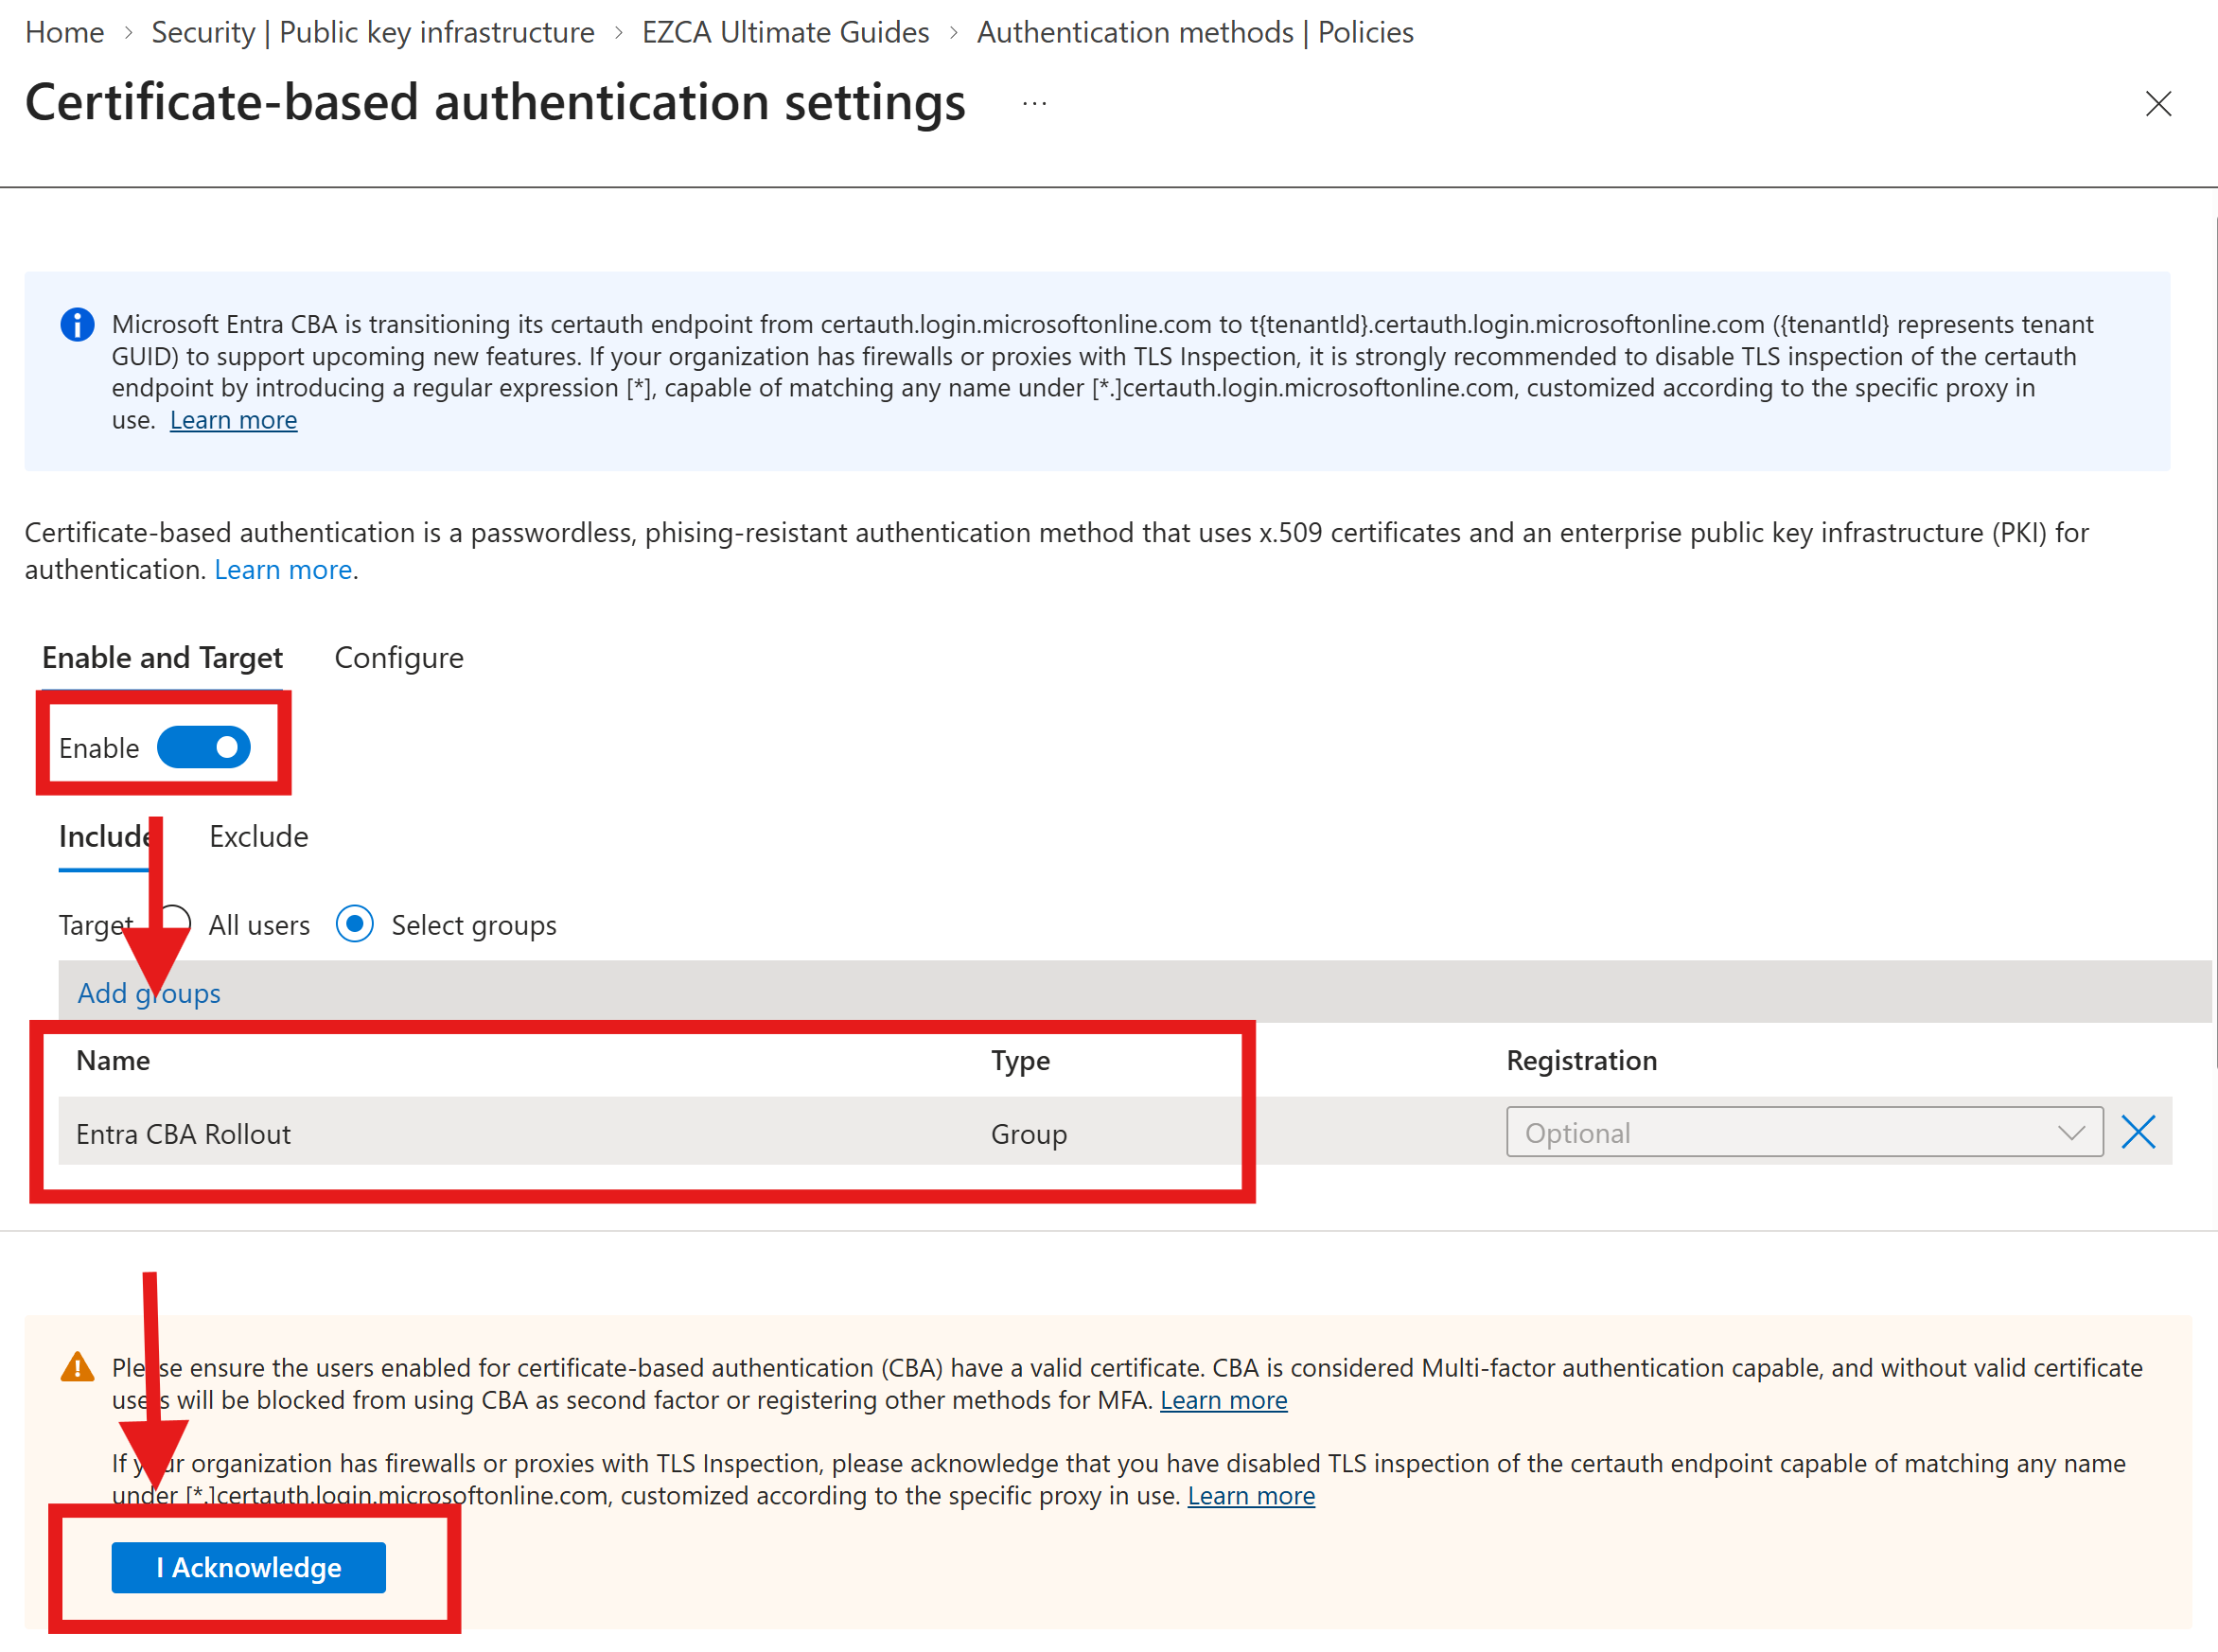
Switch the Enable toggle to on.
-
Under Include, select a small pilot group of users who will be part of the initial CBA rollout. It is not recommended to enable CBA for all users at this stage.
-
Click I Acknowledge to confirm that your users have a valid certificate issued to them already and they may be locked out if they do not have one.
-
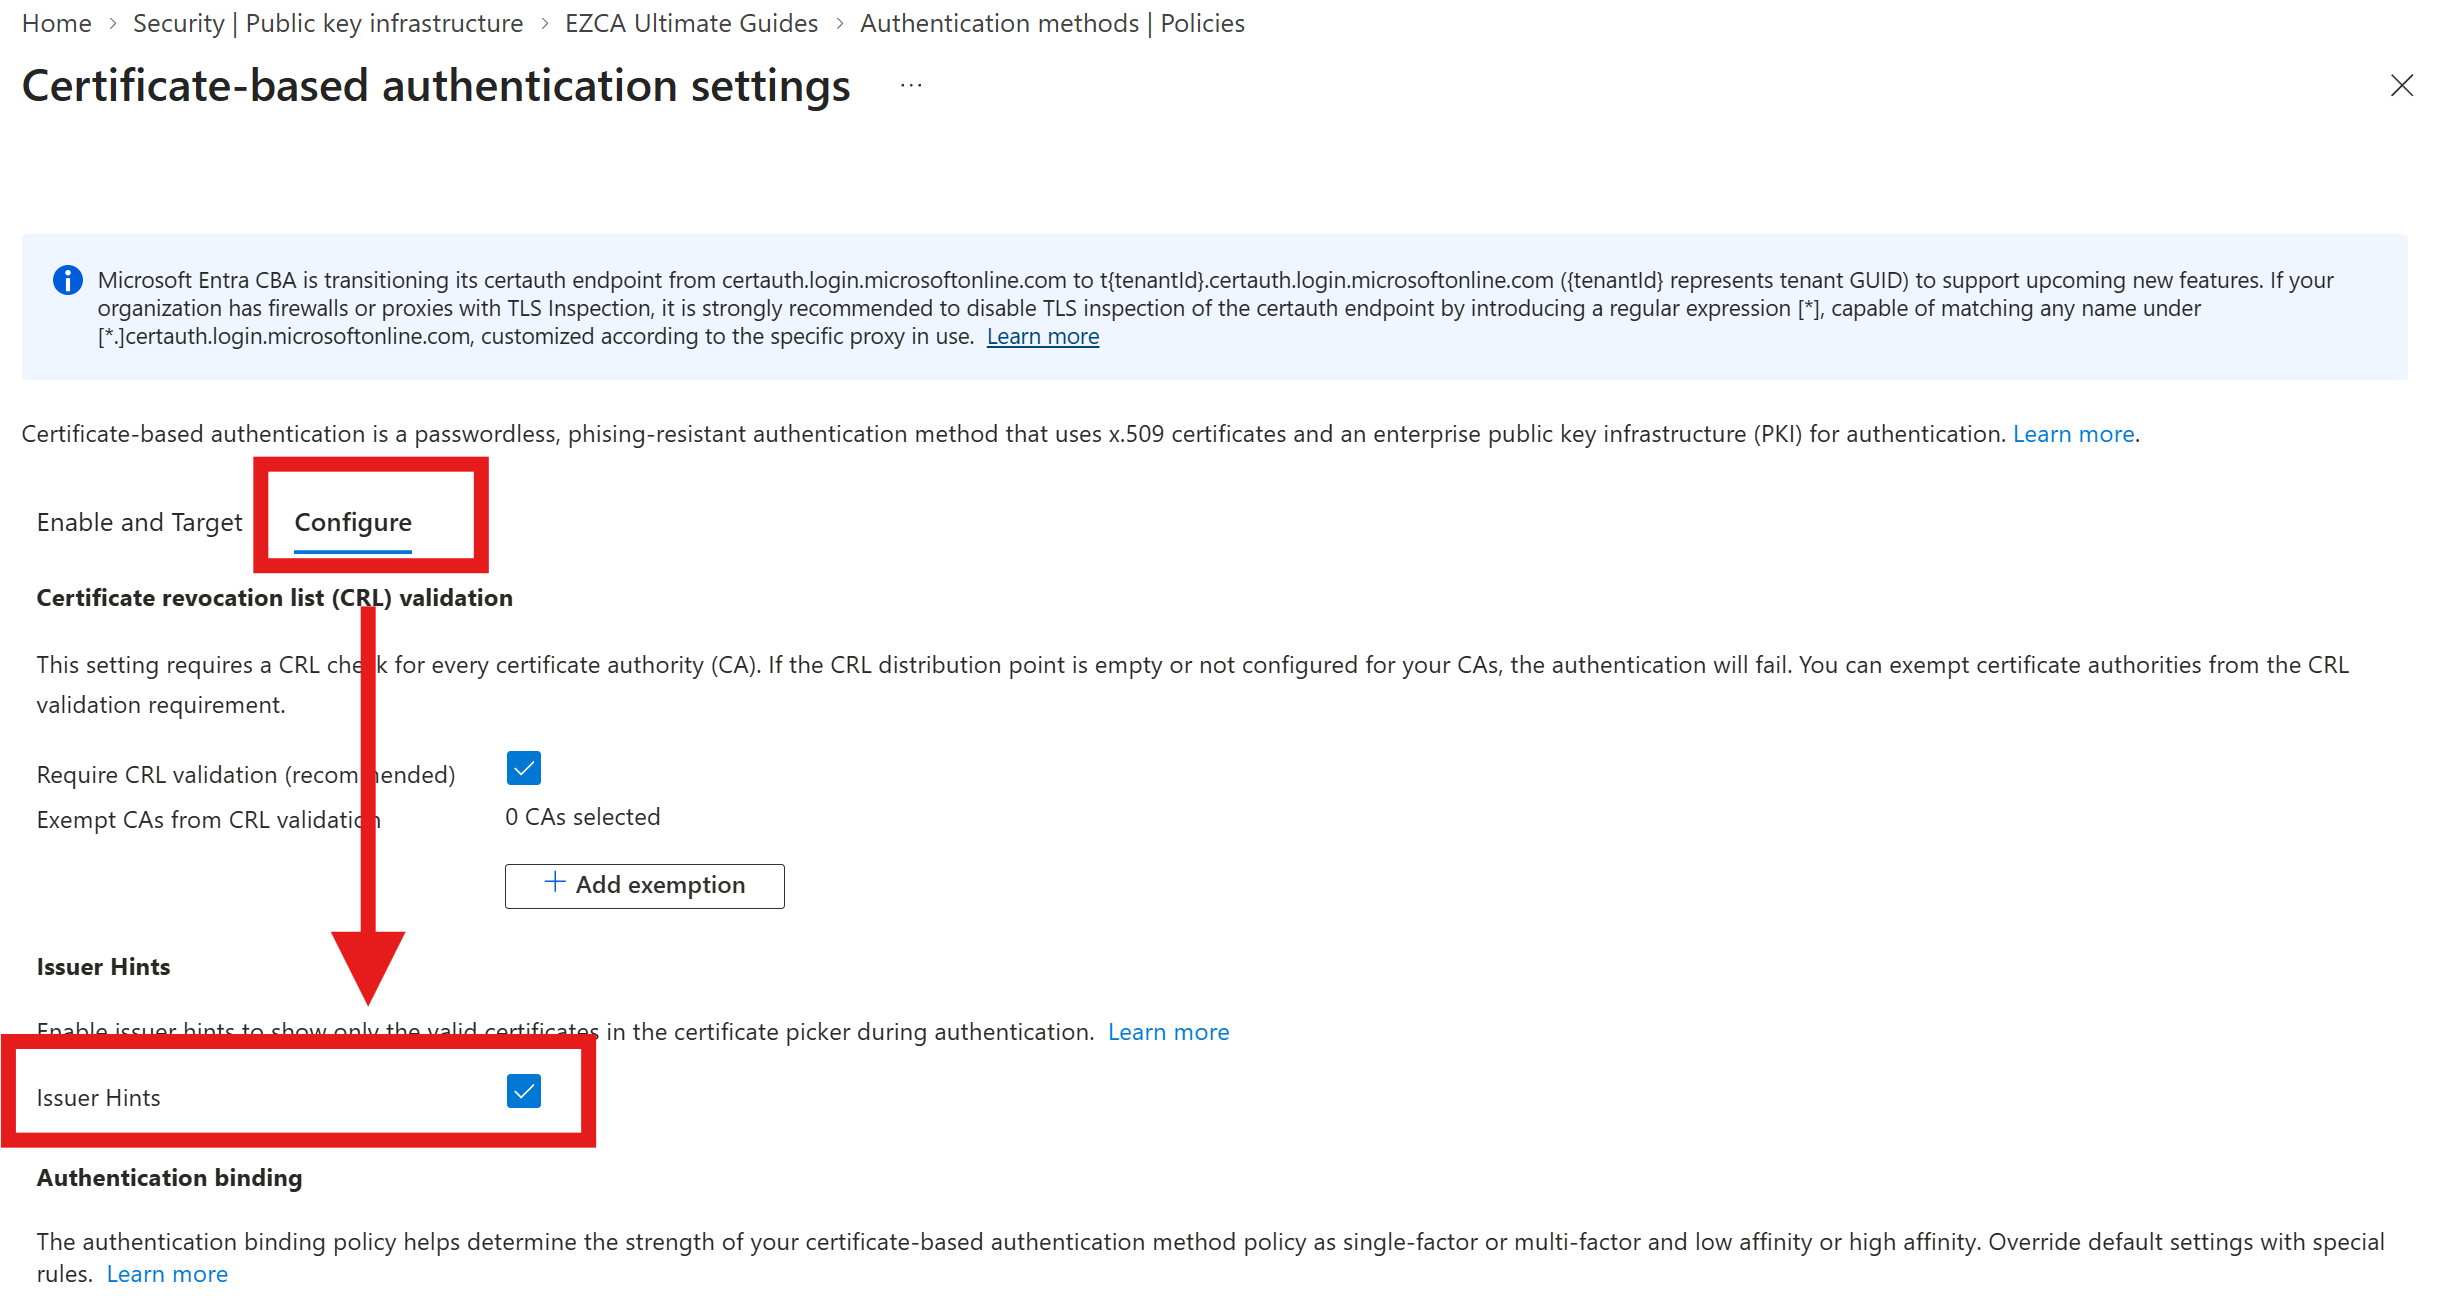
Select the Configure tab to configure your CBA settings.
-
Enable Issuer hints to show only valid certificates during the authentication process.
-
Under Authentication Binding:
- Leave Default authentication strength set to Single-factor.
- Leave Required Affinity Binding set to Low.
-
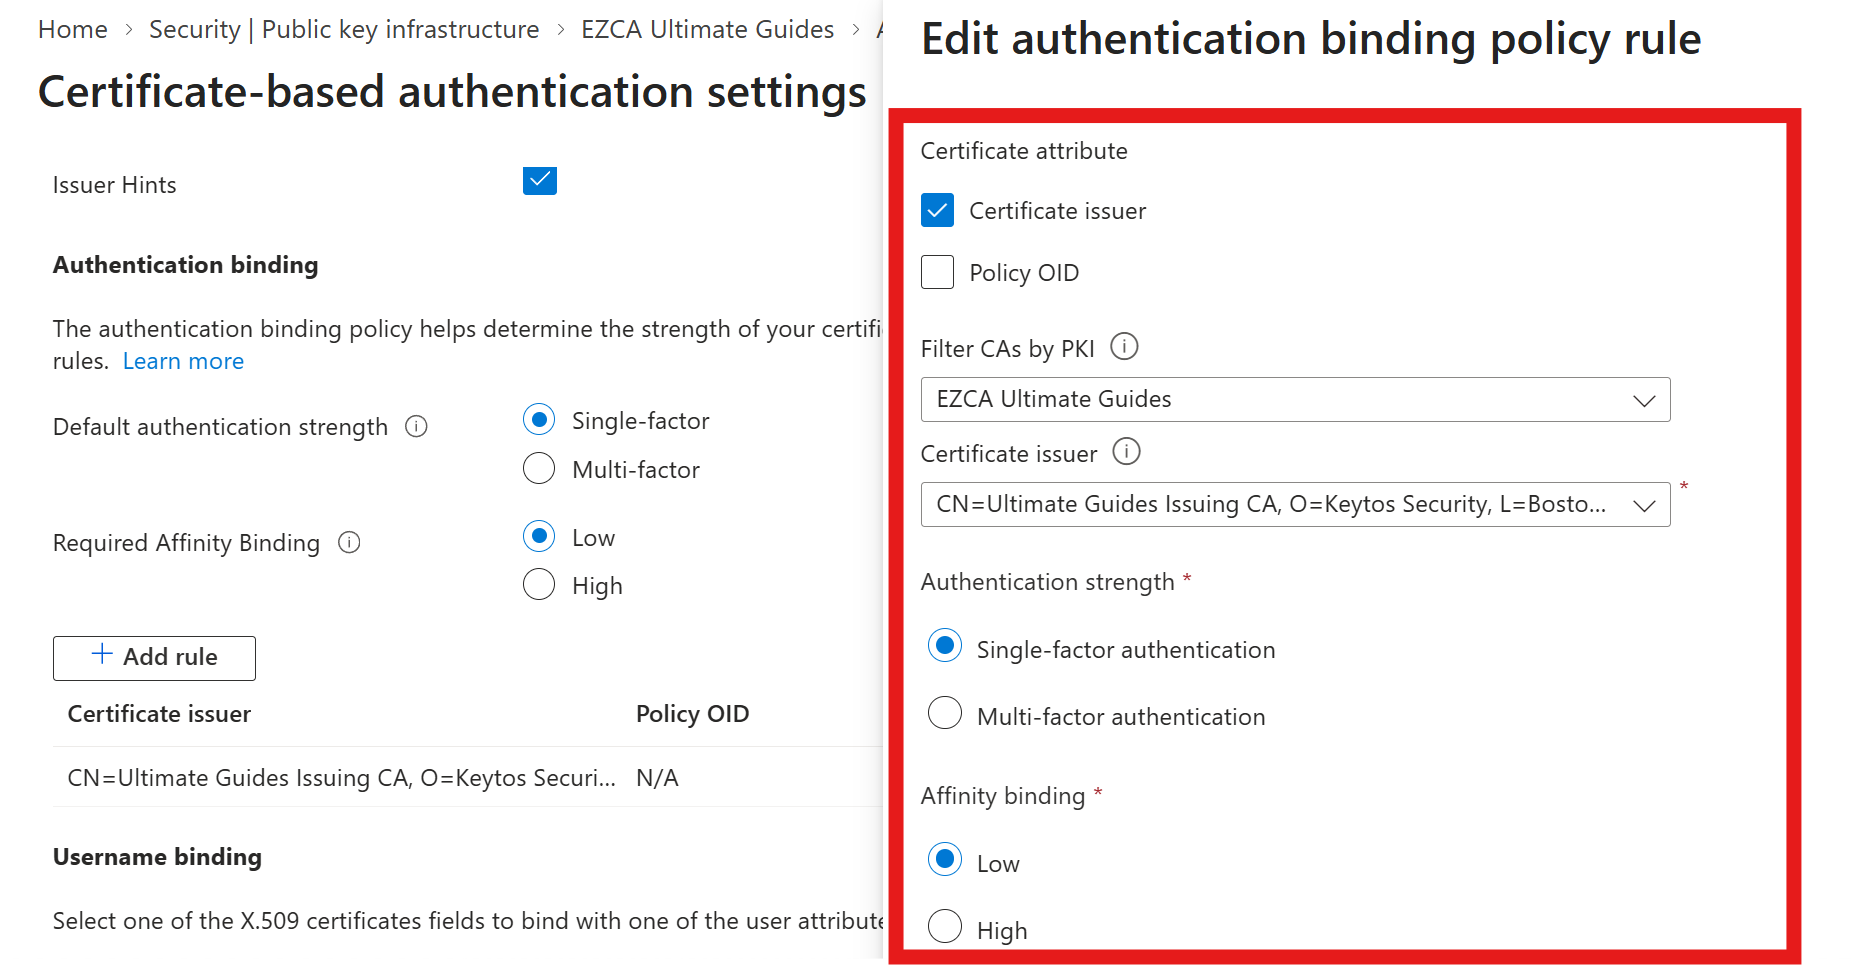
Click + Add rule and configure the following settings:
-
Certificate attribute: Check the Certificate issuer box.
-
Filter CAs by PKI: Select the PKI you previously configured in Entra’s trust store.
-
Certificate issuer: Select the specific CA issuer that directly issues your SCEP certificates.
-
Authentication strength: Select Single-factor authentication.
-
Affinity binding: Select Low.
-
-
Click Save to apply your authentication binding rule.
-
Under Username binding, ensure that you have at least PrincipalName selected with the userPrincipalName user attribute. This ensures that the certificate is correctly mapped to the user’s principal name during authentication. You can optionally add other attributes as needed for your environment.

-
Leave Certificate issuer scoping policy section empty unless you want to restrict authentication to specific certificate issuers for specific groups of users.
-
Click Save
At this point your users can now authenticate to Entra ID applications using their SCEP-issued certificates. However, it does not yet require that authentication to be performed using a certificate from your trusted SCEP CA. To enforce this, you need to create a custom authentication strength and build a conditional access policy around it.
Step 3: How to Add a Custom Authentication Strength Locked to Your CA
To lock down Entra ID applications so only users with a valid certificate issued by your SCEP CA can authenticate, you need to create a custom authentication strength that is tied to your CA. This ensures that only users presenting a certificate from your trusted CA can access the application.
-
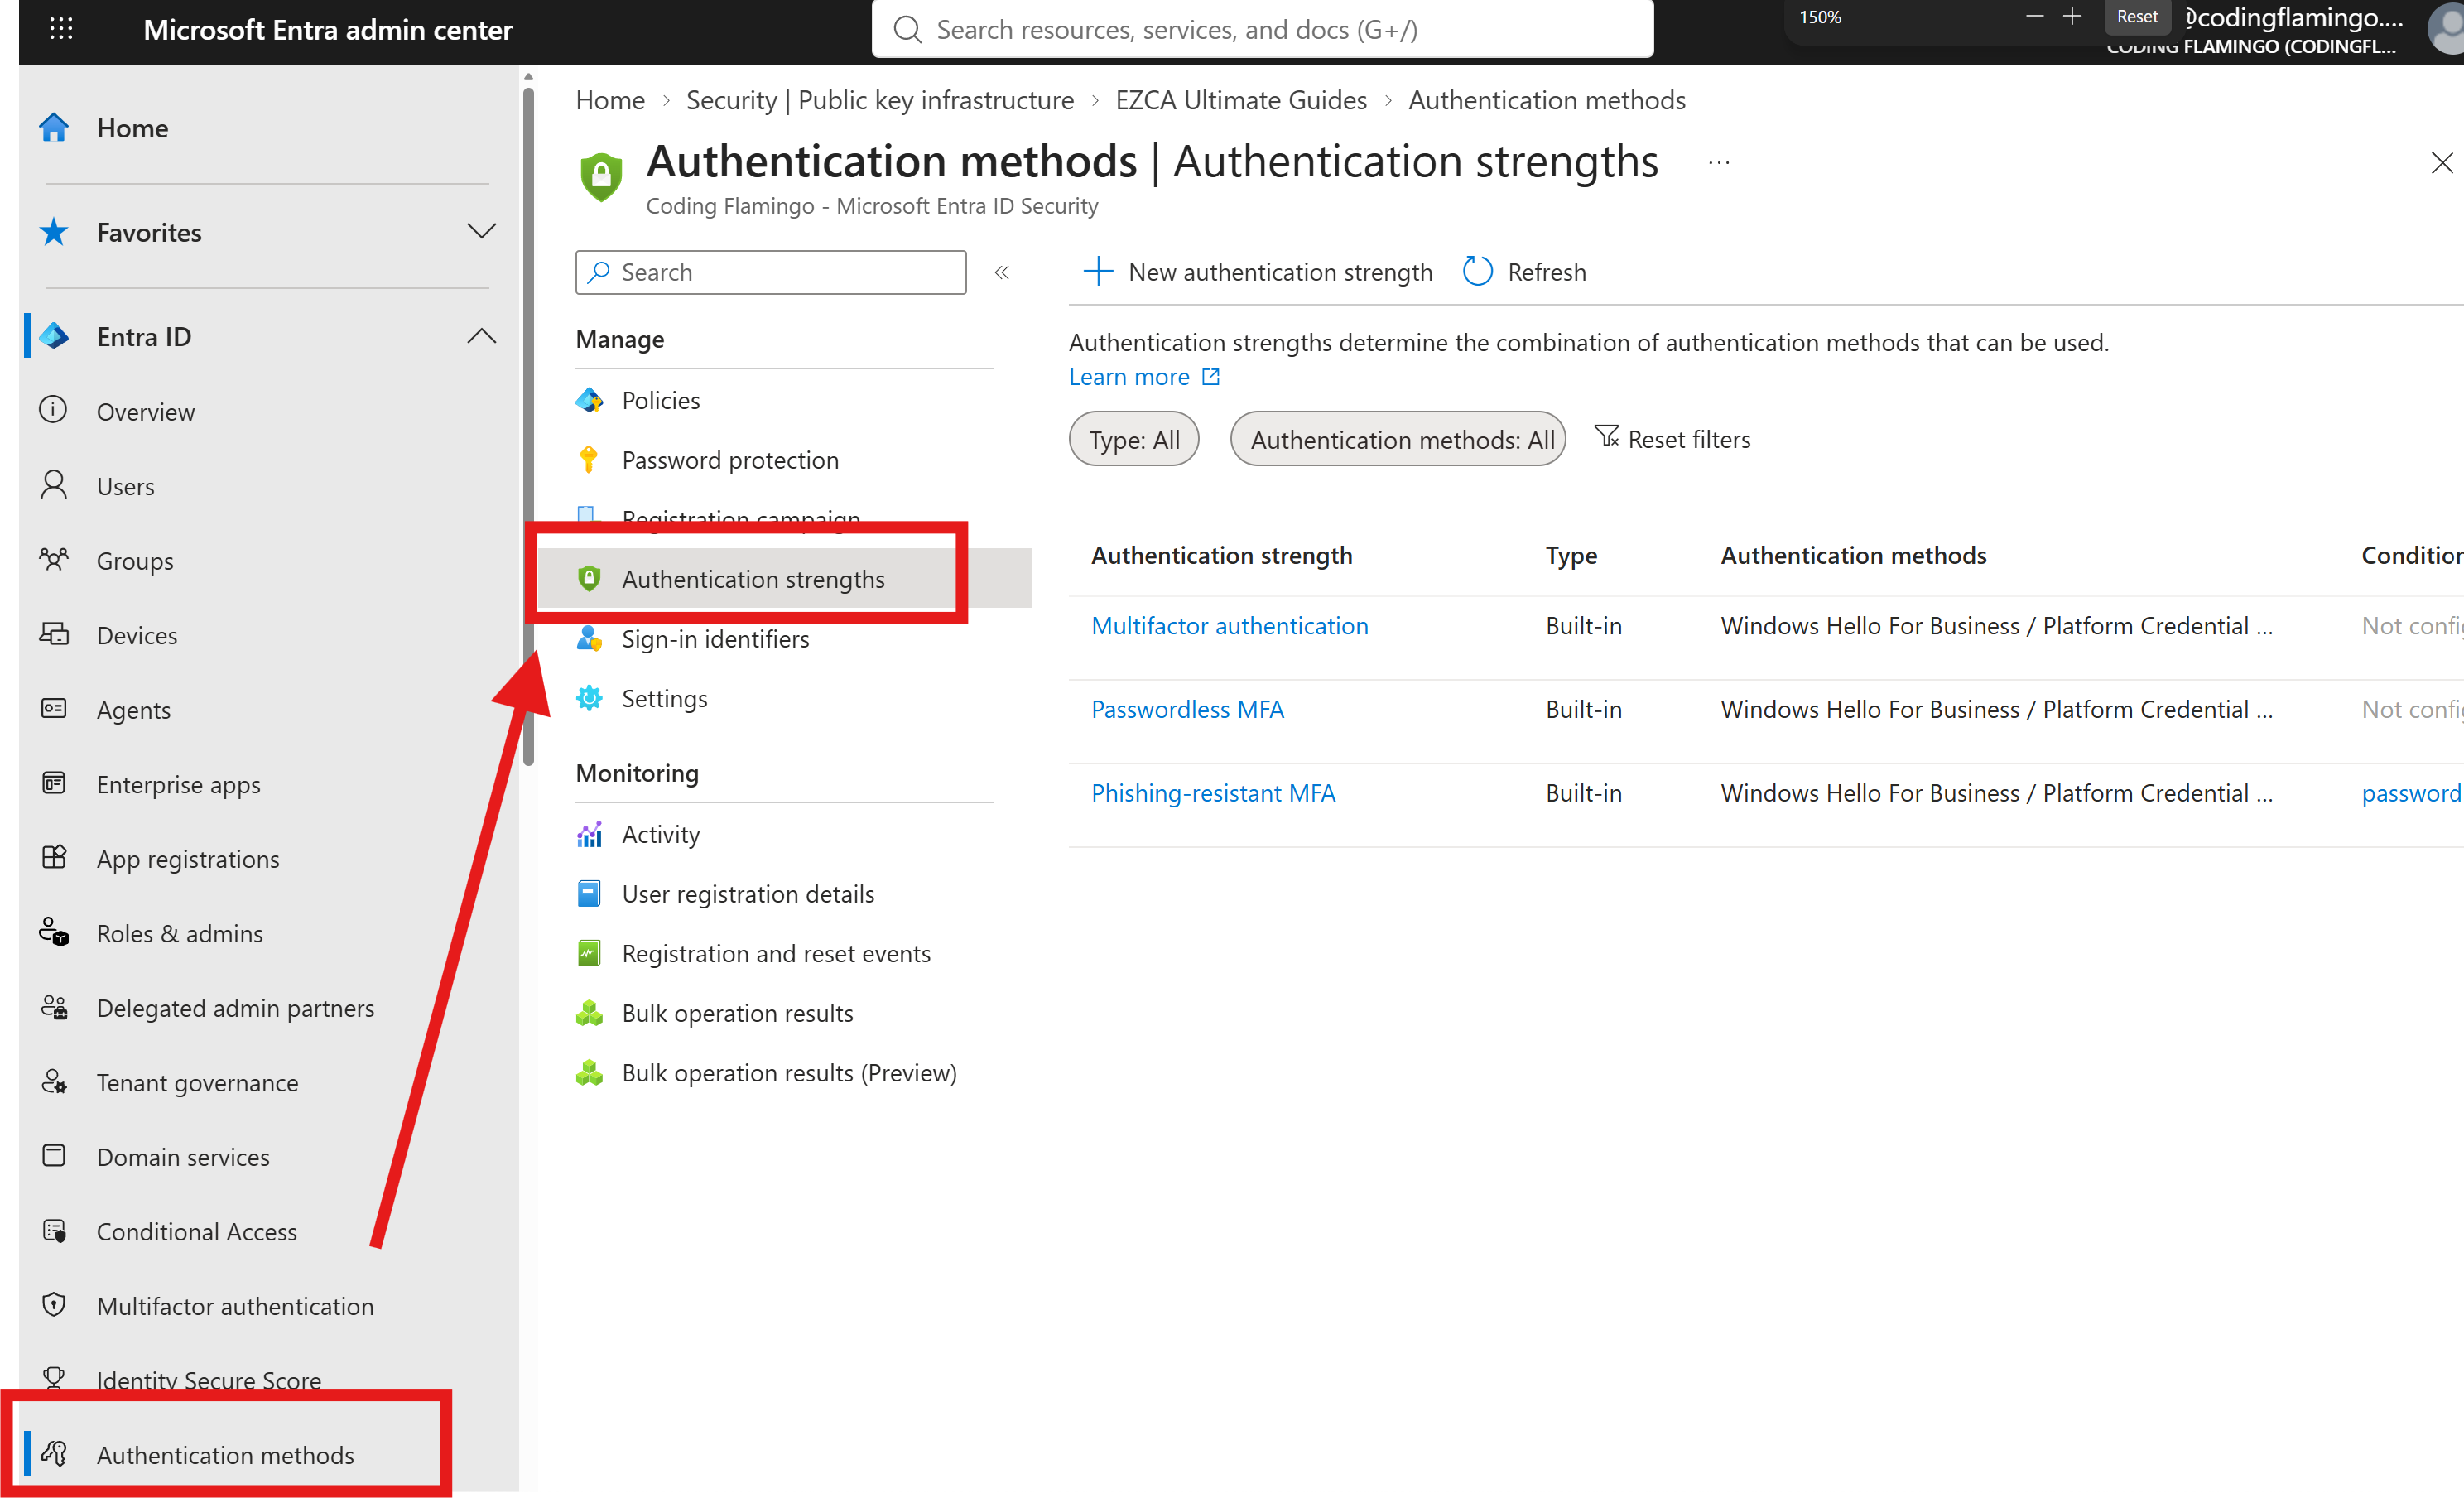
In the Entra ID portal, navigate in the left-hand menu to Authentication methods > Authentication strengths.
-
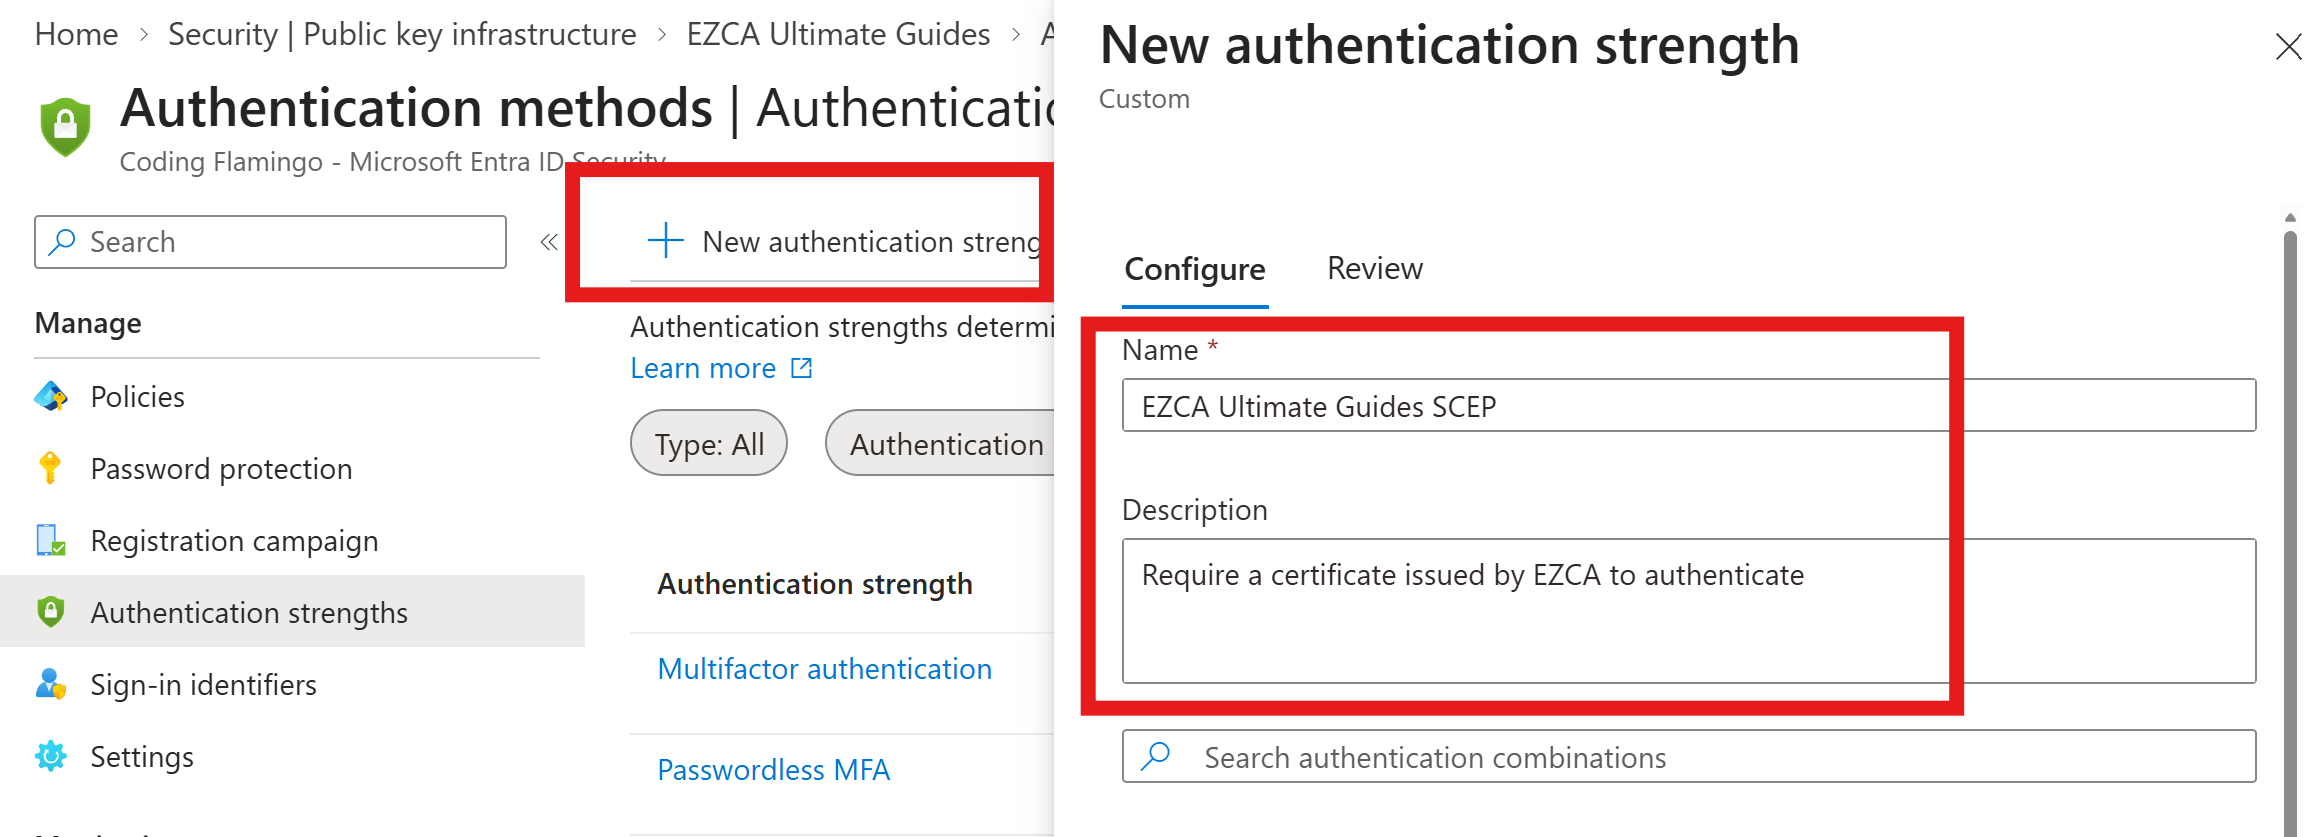
Click + New authentication strength to create a new custom authentication strength.
-
Set a Name and Description for your custom authentication strength.
-
Scroll down and check the box for Single factor authentication > Certificate-based authentication (Single factor).
-
Click Advanced options to configure additional settings for your custom authentication strength.

-
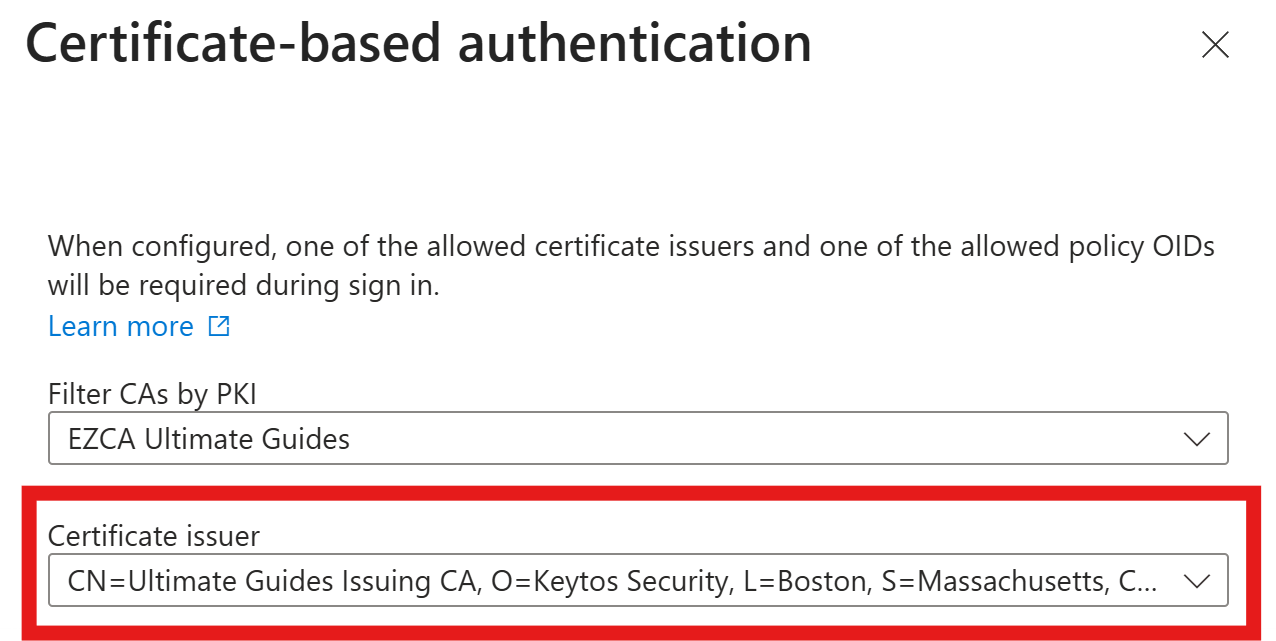
For Certificate issuer, select the EZCA certificate authority that directly issues your SCEP certificates.
-
Click Save, then Next, and then Create to apply your custom authentication strength.
At this point, your custom authentication strength is created and locked to your SCEP CA. However, it will not be enforced until you build a conditional access policy that requires it.
Step 4: How to Build Your Conditional Access Policy with Entra CBA
The final step is to build your conditional access policy using the custom authentication strength you just created. This ensures that only users with a valid certificate issued by your SCEP CA can access the specified applications.
-
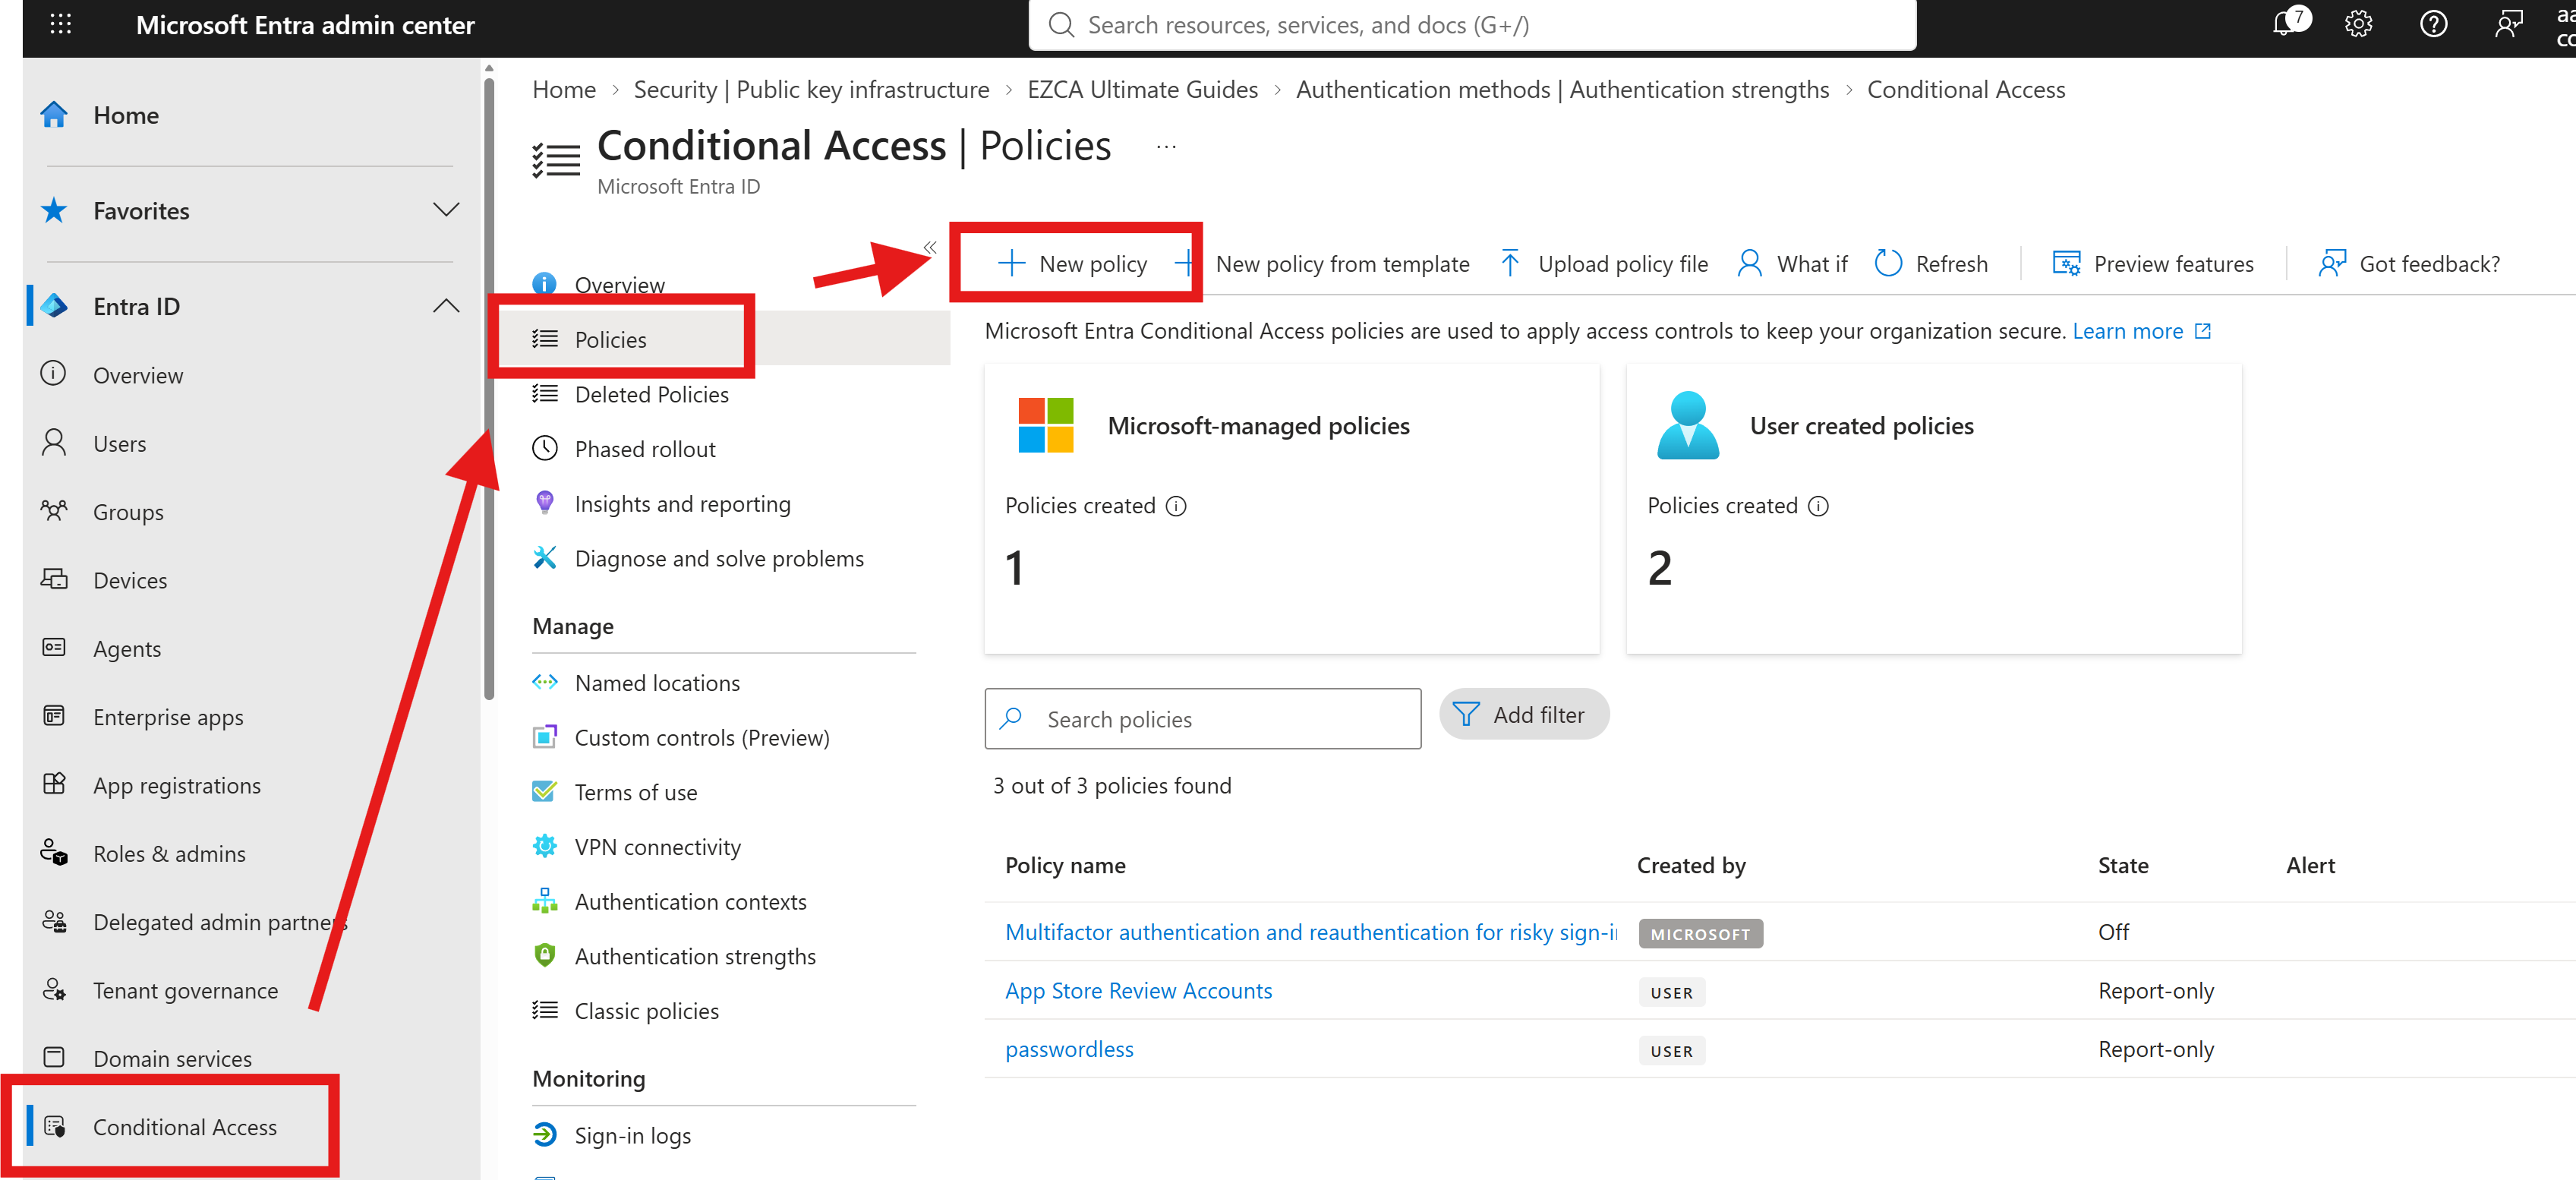
In the Entra ID portal left-hand menu, navigate to Conditional Access > Policies.
-
Click + New policy to create a new conditional access policy.
-
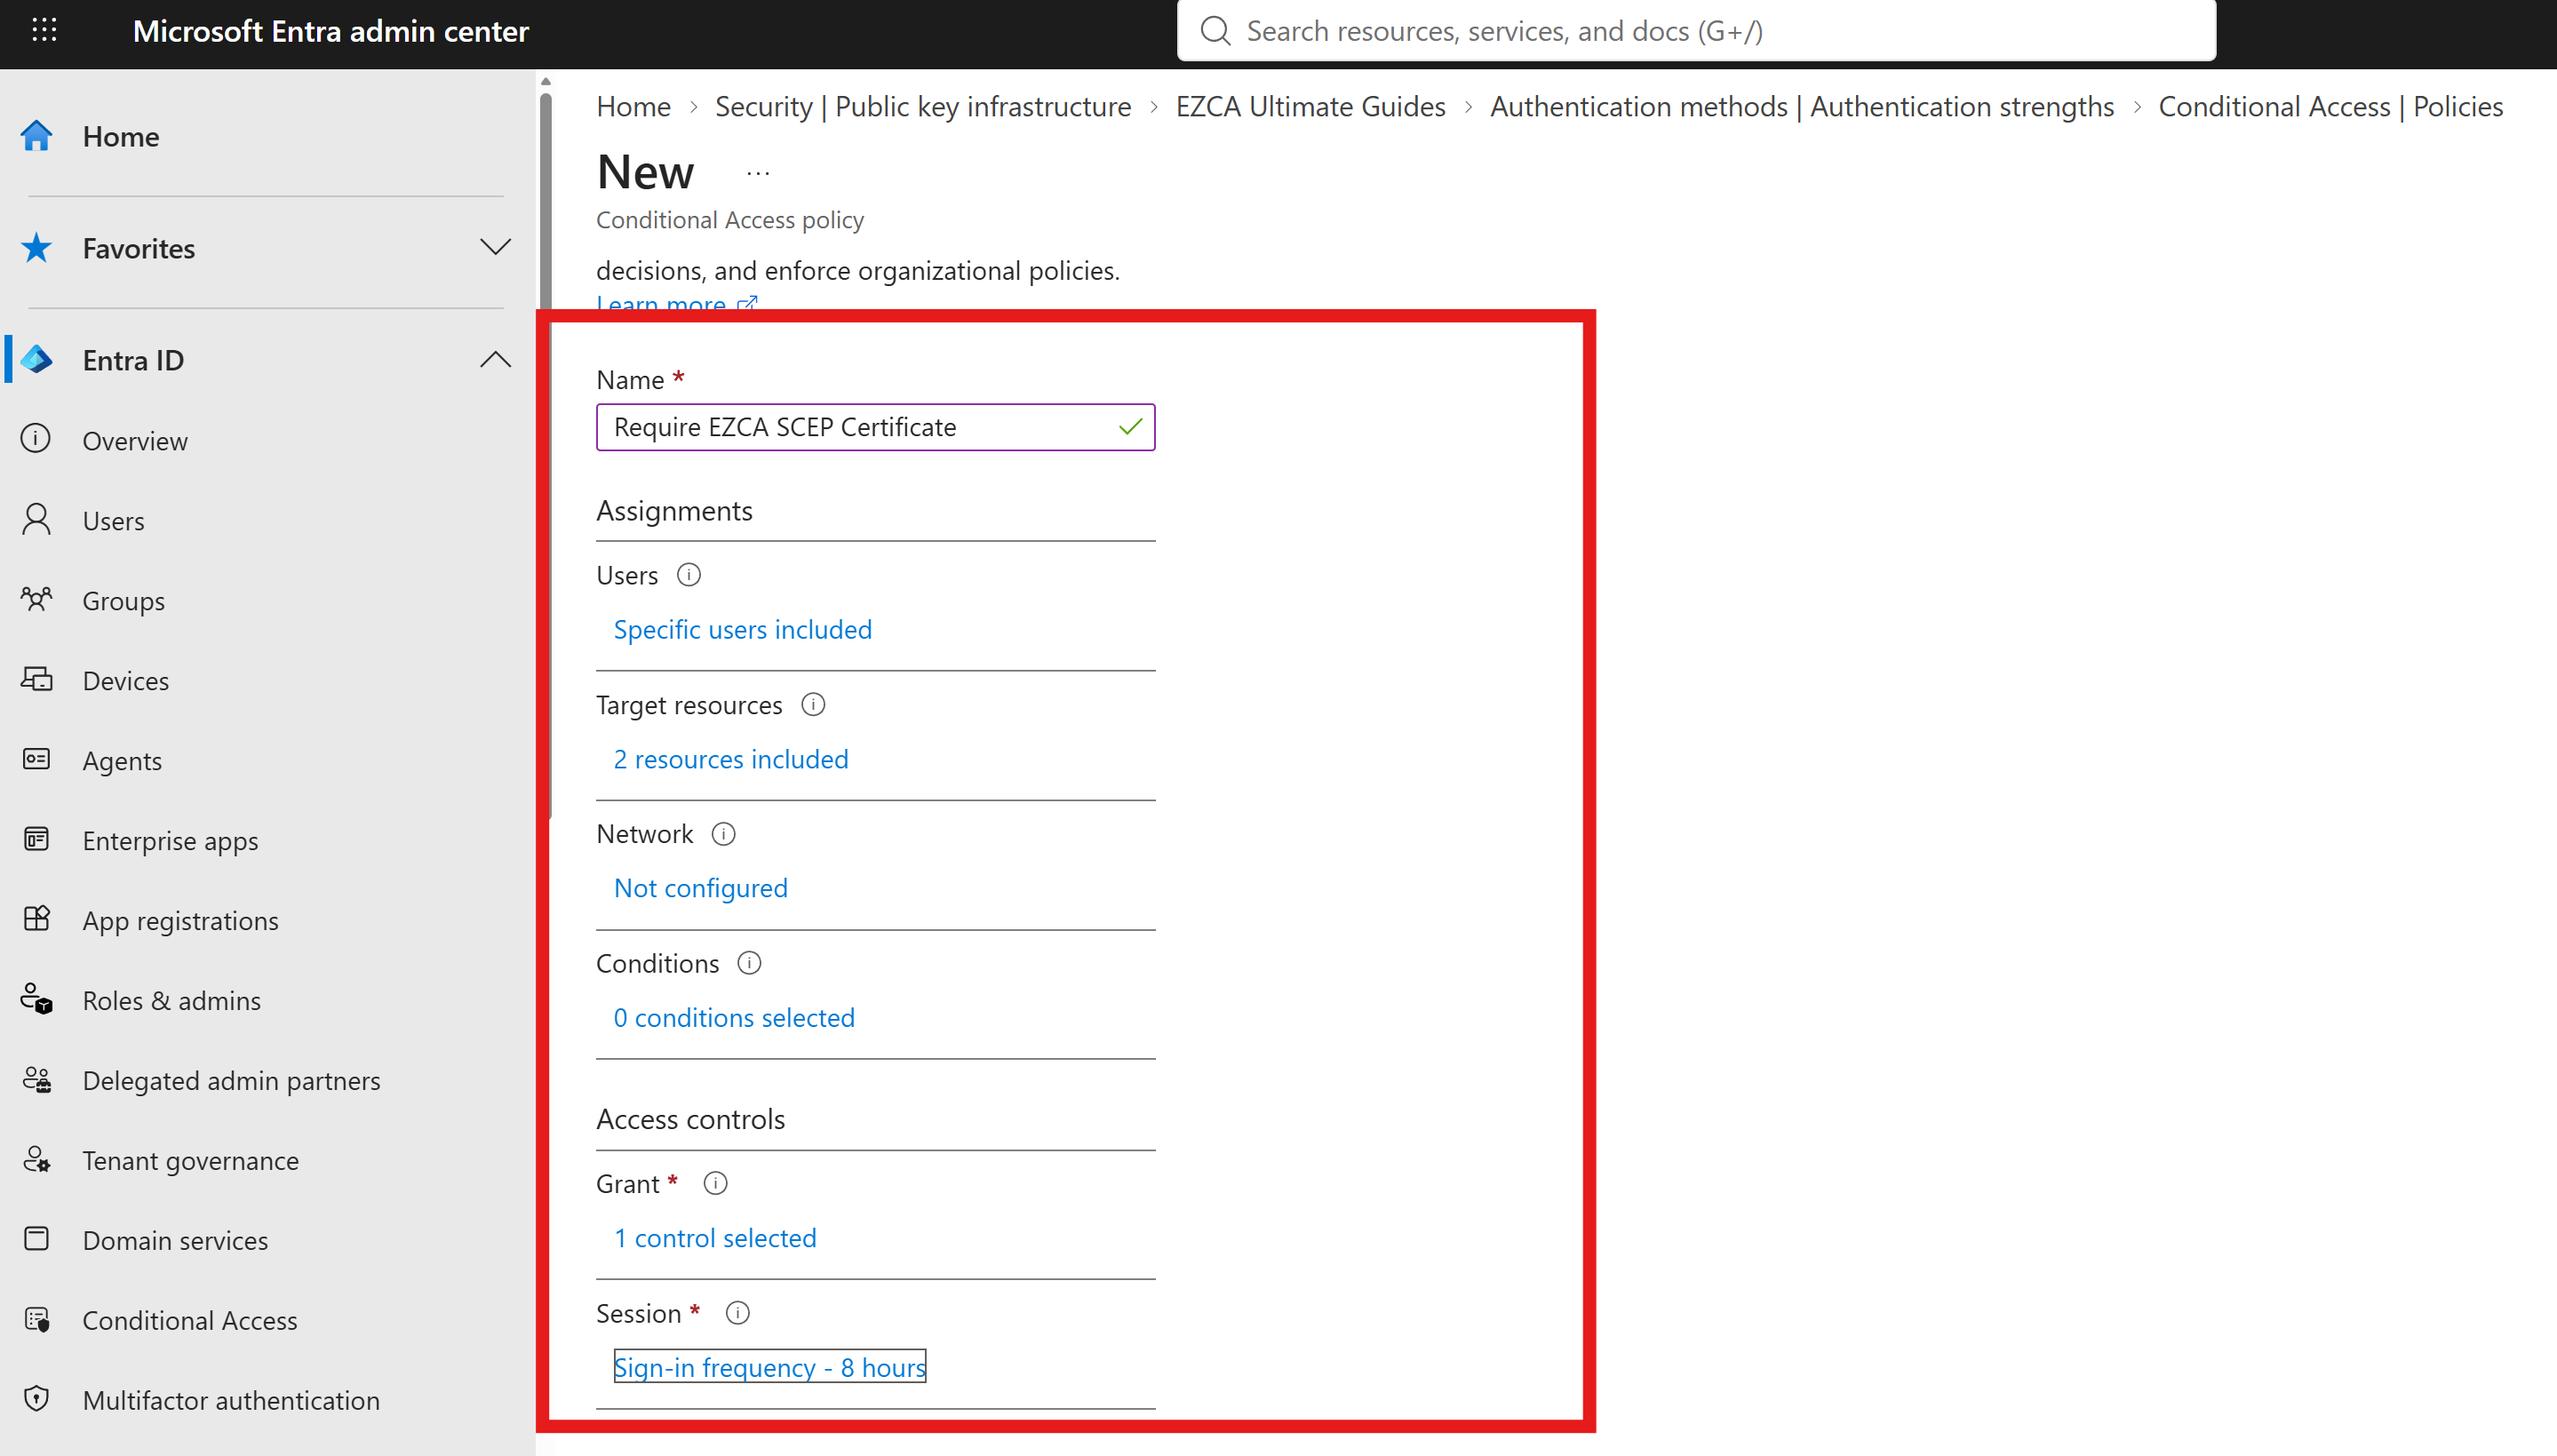
Fill in the following information for your new conditional access policy:
-
Name: Provide a name for your conditional access policy, such as “Require EZCA SCEP Certificate”.
-
Assignments > Users: Select the users or groups to which this conditional access policy will apply, such as the previous group you created for CBA Pilot Users.
-
Assignments > Target resources: Select the Resources or Actions to which this conditional access policy will apply, such as specific applications or all cloud apps.
-
Assignments > Network: Leave this unconfigured unless you have specific network requirements.
-
Assignments > Conditions: Optionally configure conditions under which this conditional access policy will apply, such as device platforms, locations, or client apps.
-
Access controls > Grant: Select Require authentication strength and then choose the custom authentication strength you created for SCEP certificates.
-
Access controls > Session: Set Sign-in frequency to how often users are required to re-authenticate, such as every 12 hours. Set any other session controls as needed.
-
Enable policy: Set this to Report-only to monitor the policy without enforcing it, or On to enforce the policy immediately.
-
-
Save the conditional access policy.
How to Require Multiple Authentication Factors (MFA) During Sign-In
At this point, the conditional access policy you created requires users to authenticate using their SCEP certificate. However, this is only a single factor (what you have), and you may want to require an additional factor, such as a password or a mobile authenticator app, to fully implement multi-factor authentication (MFA).
To require multiple authentication factors during sign-in, you can create a second MFA conditional access policy (if you don’t already have one) that enforces MFA during sign-in.
- Create a new conditional access policy specifically for MFA:
- Name: Provide a name for your MFA conditional access policy, such as “Require MFA”.
- Assignments > Users: Select the users or groups to which this MFA conditional access policy will apply, such as the previous group you created for CBA Pilot Users. If you select all users, exclude your emergency access accounts to prevent a tenant-wide lockout.
- Assignments > Target resources: Select the Resources or Actions to which this MFA conditional access policy will apply, such as specific applications or all cloud apps.
- Access controls > Grant: Select Require multi-factor authentication.
- Enable policy: Set this to Report-only to monitor the policy without enforcing it, or On to enforce the policy immediately.
- Save the MFA conditional access policy.
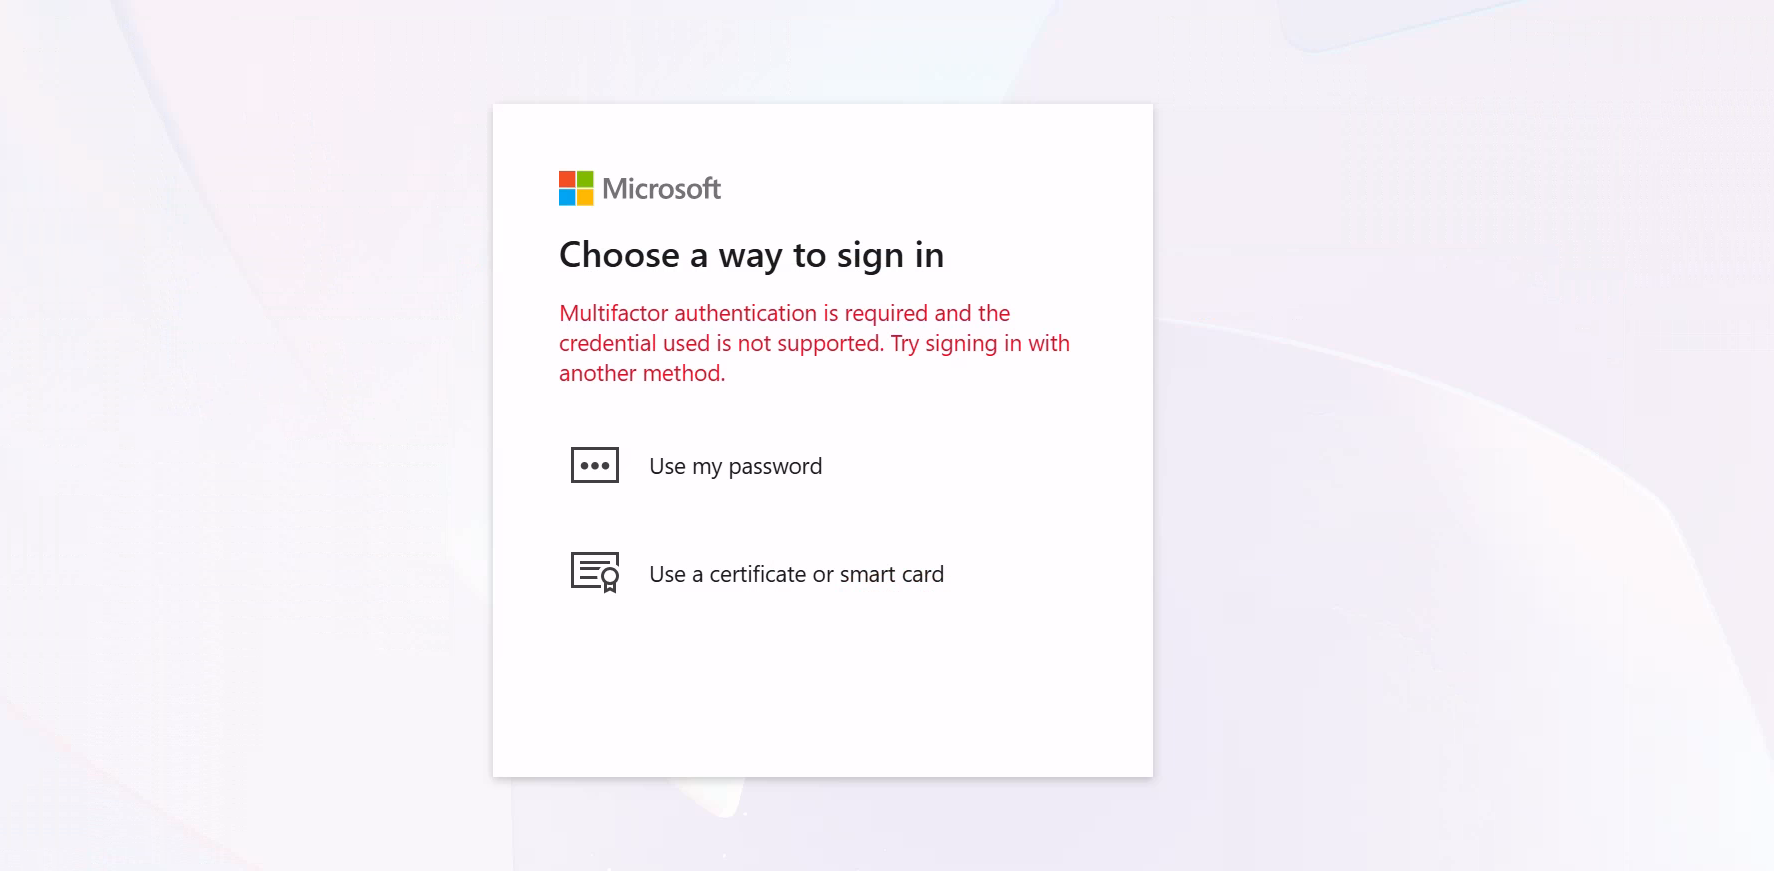
At this point, your in-scope users will be prompted to authenticate using their SCEP certificate and then complete the additional MFA requirement, such as entering a password or approving a notification from a mobile authenticator app.
Step 5: How to Log In to Entra ID with SCEP Certificates and an Additional MFA Factor
Now that you have set up your conditional access policies and configured SCEP certificates for your users, you can log in to Entra ID using your SCEP certificate.
-
Navigate to a page that requires authentication with Entra ID, and that is configured as part of your conditional access policy.
-
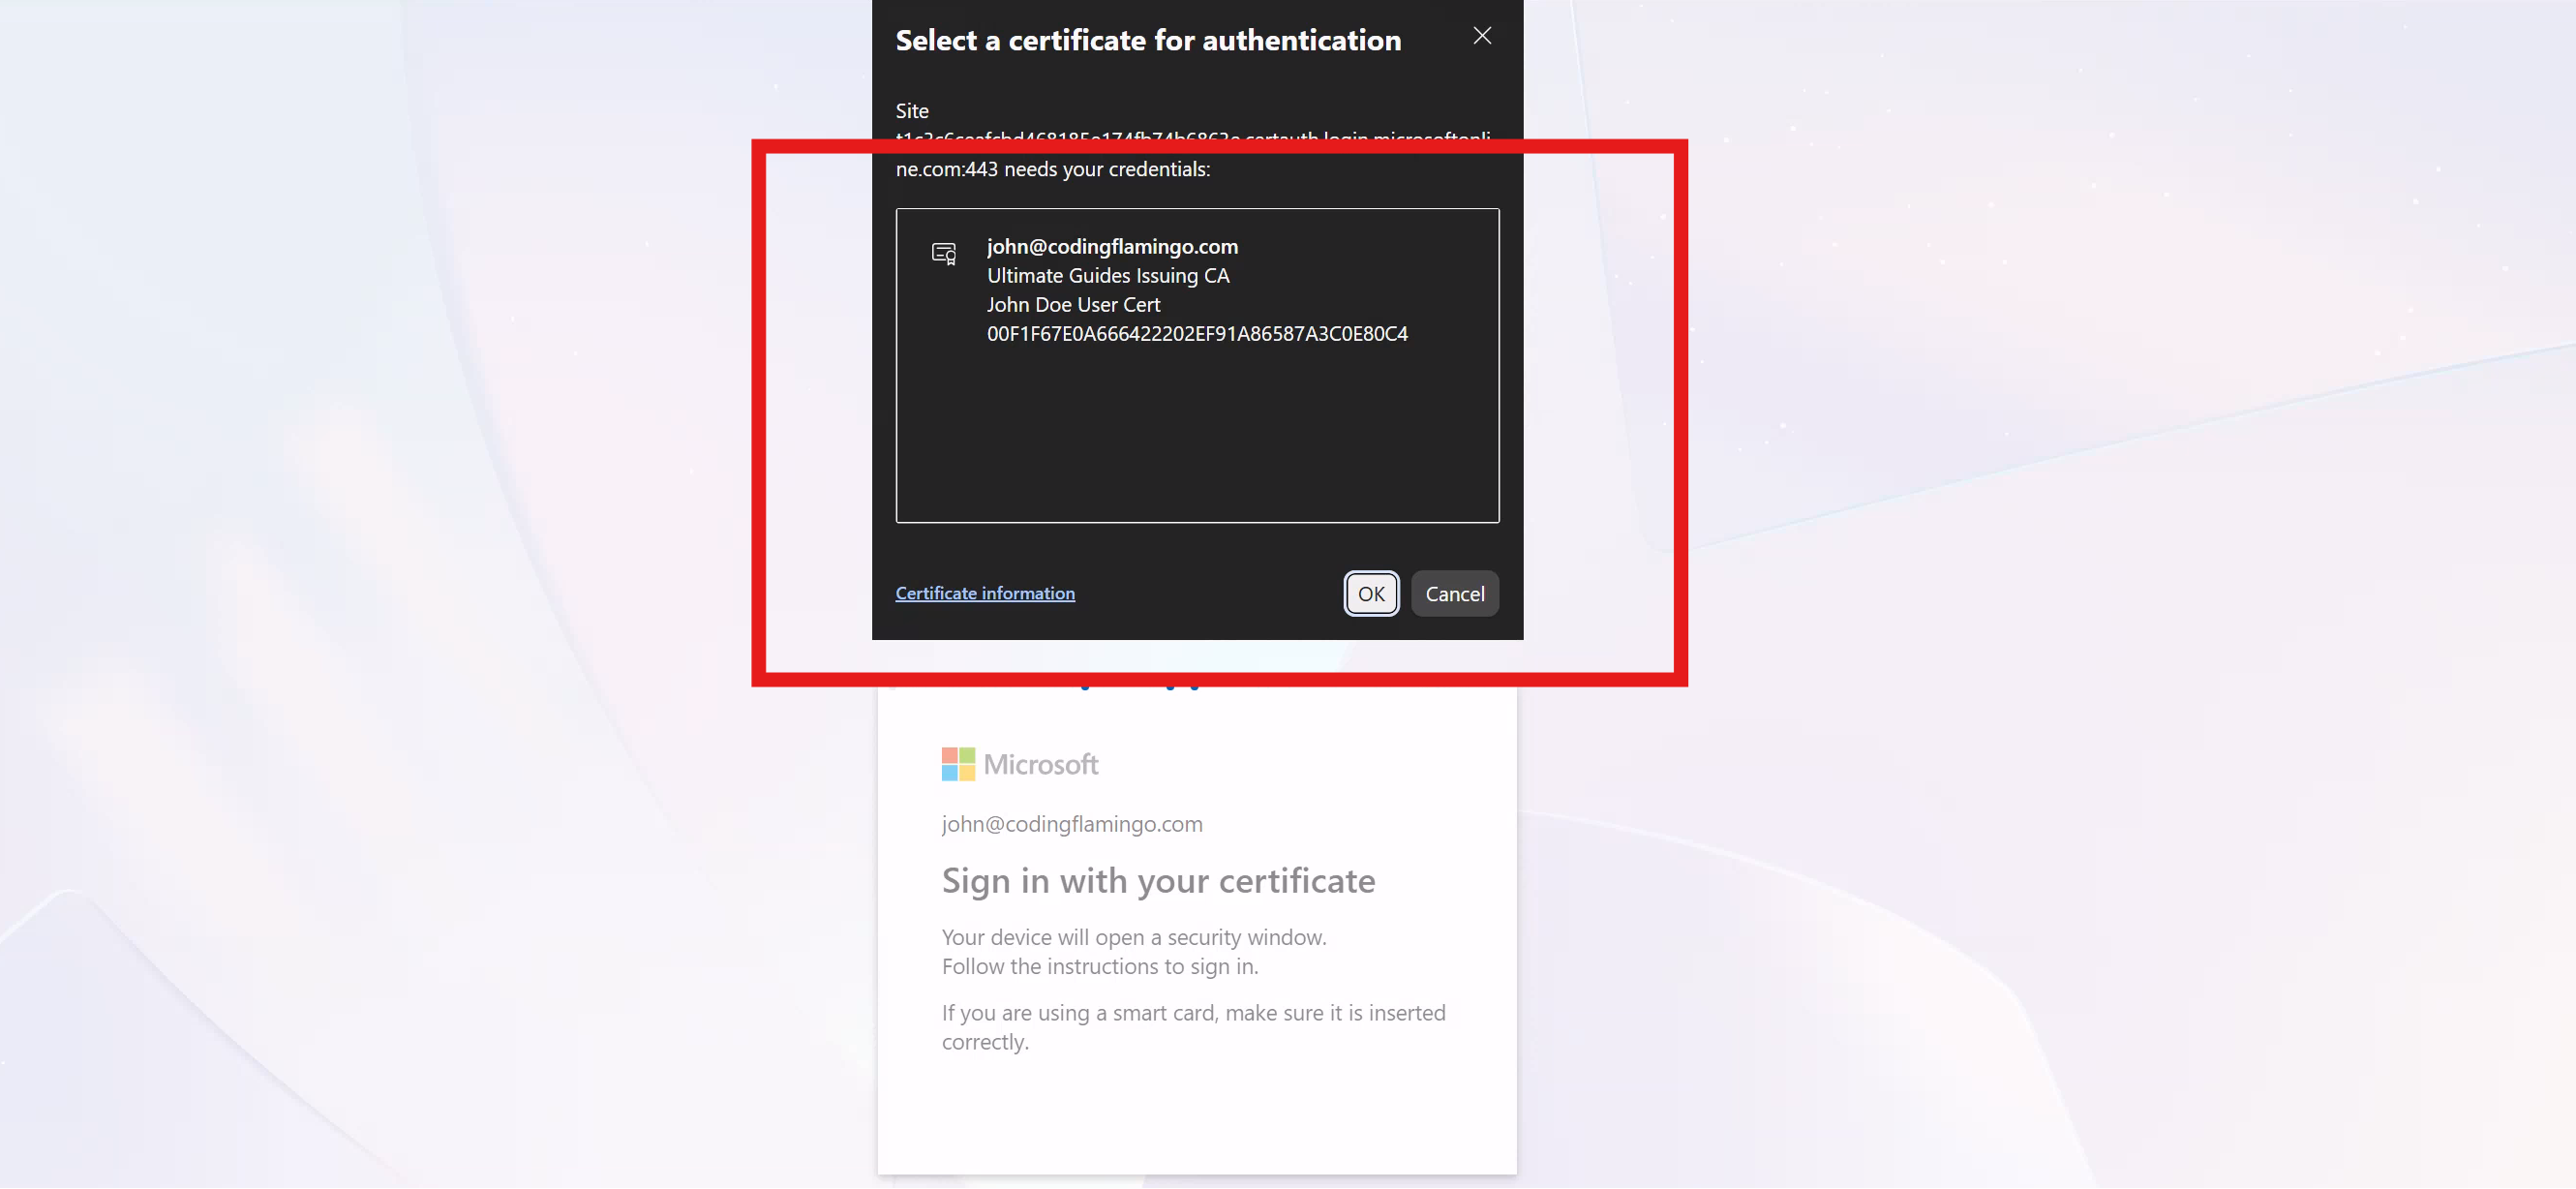
You should automatically be prompted to select a certificate from your device, filtered to show only the SCEP certificates that are valid for authentication.
-
Select the appropriate SCEP certificate from the prompt to complete the authentication process.
-
You will now be prompted to complete an additional authentication factor, such as entering a password or approving a notification from a mobile authenticator app, depending on your MFA configuration.