

















How-To: Enable Cloud RADIUS with Entra ID Authentication in Aruba Instant On
Introduction - How to Protect Your Aruba Instant On Network with Cloud RADIUS
Having a single Wi-Fi password for your network is a security nightmare. It’s impossible to know who has access to your network, and it’s nearly impossible to change the password regularly without causing major outages. The best way to secure your Aruba Instant On network is to use WPA-Enterprise with either certificates or individual user accounts for authentication.
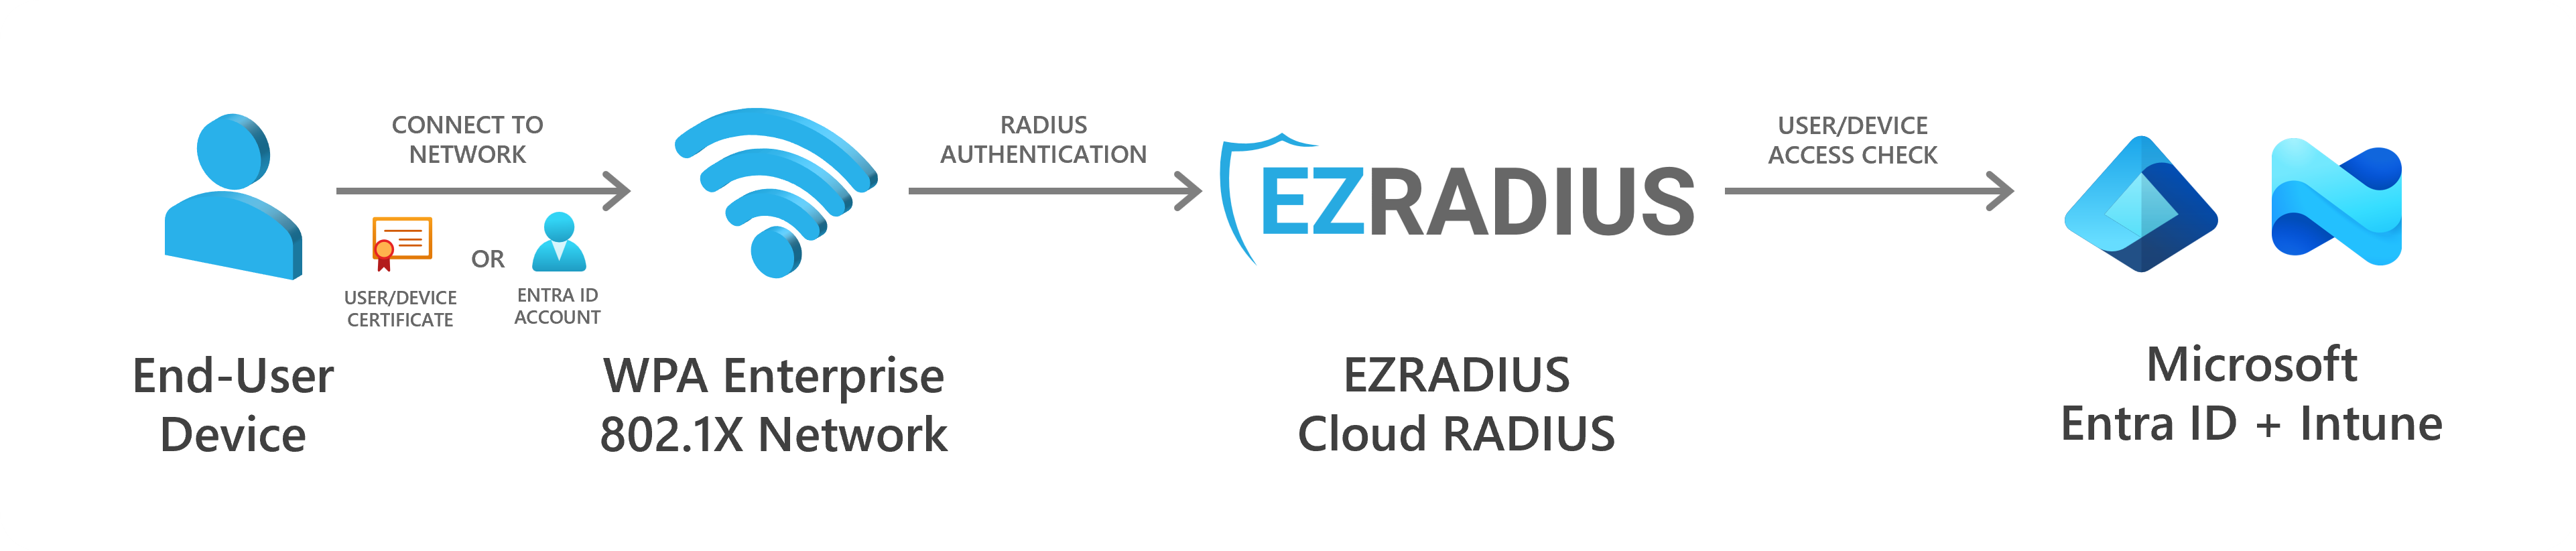
To protect your Aruba Instant On network using certificates or Entra ID accounts, you will need a RADIUS server to handle authentication requests. EZRADIUS is a cloud-based RADIUS as a Service that integrates directly with Entra ID to provide secure authentication for your Aruba Instant On network without needing to manage any RADIUS servers or infrastructure. Simply add EZRADIUS as a RADIUS server in your Aruba Instant On Controller, and your users can log in using either passwordless certificates or their Entra ID username and password.
Prerequisites for Setting Up Cloud RADIUS for Aruba Instant On
How to Create an EZRADIUS Subscription
An EZRADIUS billing subscription is required to create your cloud-based RADIUS server for your Aruba Instant On network. If you do not already have an EZRADIUS subscription, follow this guide to create one.
Create an EZRADIUS Subscription
How to Set Up User Credentials for Cloud RADIUS
If you haven’t configured your authentication method yet, make sure to set that up before proceeding. This ensures that your users can authenticate properly when they connect to your Aruba Instant On network.
How to Set Up Passwordless Certificate Authentication with RADIUS
Certificates are the best way to authenticate users or devices without the need for any passwords. Simply connect to the network and the certificate will handle the authentication for you. This is the most secure and user-friendly way to authenticate users in your Aruba Instant On network.
While EZRADIUS supports any X.509 certificate such as ADCS and Microsoft Cloud PKI, the easiest way to create and manage certificates for your users is to use Keytos EZCA, a cloud-based PKI service that integrates directly with EZRADIUS. It only takes a few minutes to get started with EZCA and begin issuing certificates for passwordless Wi-Fi access in your Aruba Instant On network.
How to Set Up Entra ID Users to Authenticate with RADIUS
Don’t want to manage certificates? No problem! You can authenticate your existing Entra ID users using their username and password without needing to manage any PKI infrastructure.
Note that if you have conditional access policies set up in Entra ID (such as MFA), you will need to add an exception for EZRADIUS in order for username/password authentication to work. View this page for more details on adding this exception.
How to Set Up Local Users to Authenticate with RADIUS
Have legacy devices or non-Entra ID users? You can also create local users directly in EZRADIUS and authenticate them using their username and password. Check out this page for more information on creating local users in EZRADIUS or letting your Entra ID users self-register local RADIUS accounts if needed.
How to Set Up MAC Address Bypass for Non-Authenticating Devices
Some devices do not support secure authentication methods like EAP-TLS or EAP-TTLS. In these cases, you can use MAC Address Bypass (MAB) to allow these devices to connect to your Aruba Instant On network without needing to authenticate. Note that MAC Address Bypass is not secure and should only be used for devices that do not support other authentication methods, and you should always be aware of the security risks involved. View this guide for more information on setting up MAC Address Bypass in EZRADIUS.
How to Set Up Your Cloud RADIUS Access Policies for Entra ID Authentication
An EZRADIUS Access Policy defines how EZRADIUS will authenticate users when they connect to your Aruba Instant On network. You will need to create at least one access policy in EZRADIUS before you can connect your Aruba Instant On network to EZRADIUS.
How to Create a Passwordless Certificate Access Policy
A certificate access policy allows you to accept X.509 certificates for authentication and determine which users or devices are allowed to connect to your Aruba Instant On network. View this guide to learn how to create a certificate access policy in EZRADIUS if you have not already done so.
How to Create an Entra ID Username and Password Access Policy
An Entra ID username and password access policy allows you to authenticate your Entra ID users using their existing credentials. View this guide to learn how to create an Entra ID username and password access policy in EZRADIUS if you have not already done so.
How to Create a Local Username and Password Access Policy
A local username and password access policy allows you to authenticate users that you have created directly in EZRADIUS. View this guide to learn how to create a local username and password access policy in EZRADIUS if you have not already done so.
Step-by-Step Guide to Setting Up Cloud RADIUS for Aruba Instant On
The following steps will guide you through the process of setting up Cloud RADIUS for your Aruba Instant On network using EZRADIUS.
Step 1 - How to Add EZRADIUS as a RADIUS Server in Aruba Instant On
Now that you have your EZRADIUS subscription and access policy set up, you can add EZRADIUS as a RADIUS server in your Aruba Instant On Controller.
How to Add a Cloud RADIUS Server to a Aruba Instant On Wi-Fi Network
-
Log into your Instant On portal.
-
Select the site you would like to enable RADIUS authentication in.
-
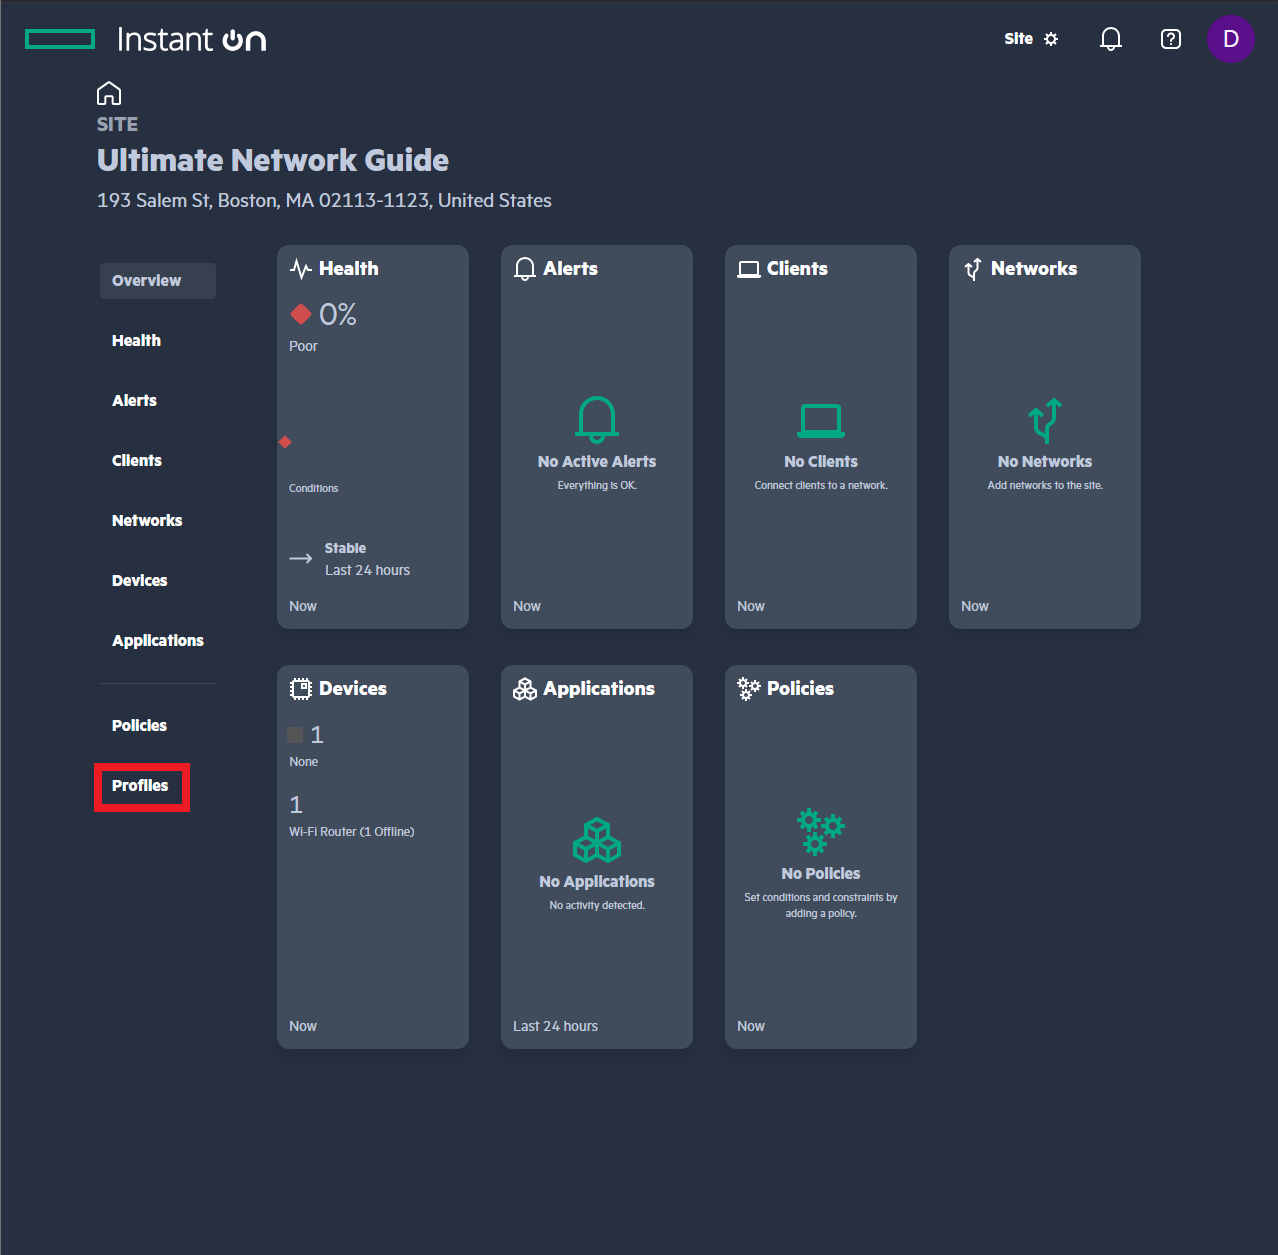
On the home page, use the left-hand menu to navigate to Profiles.
-
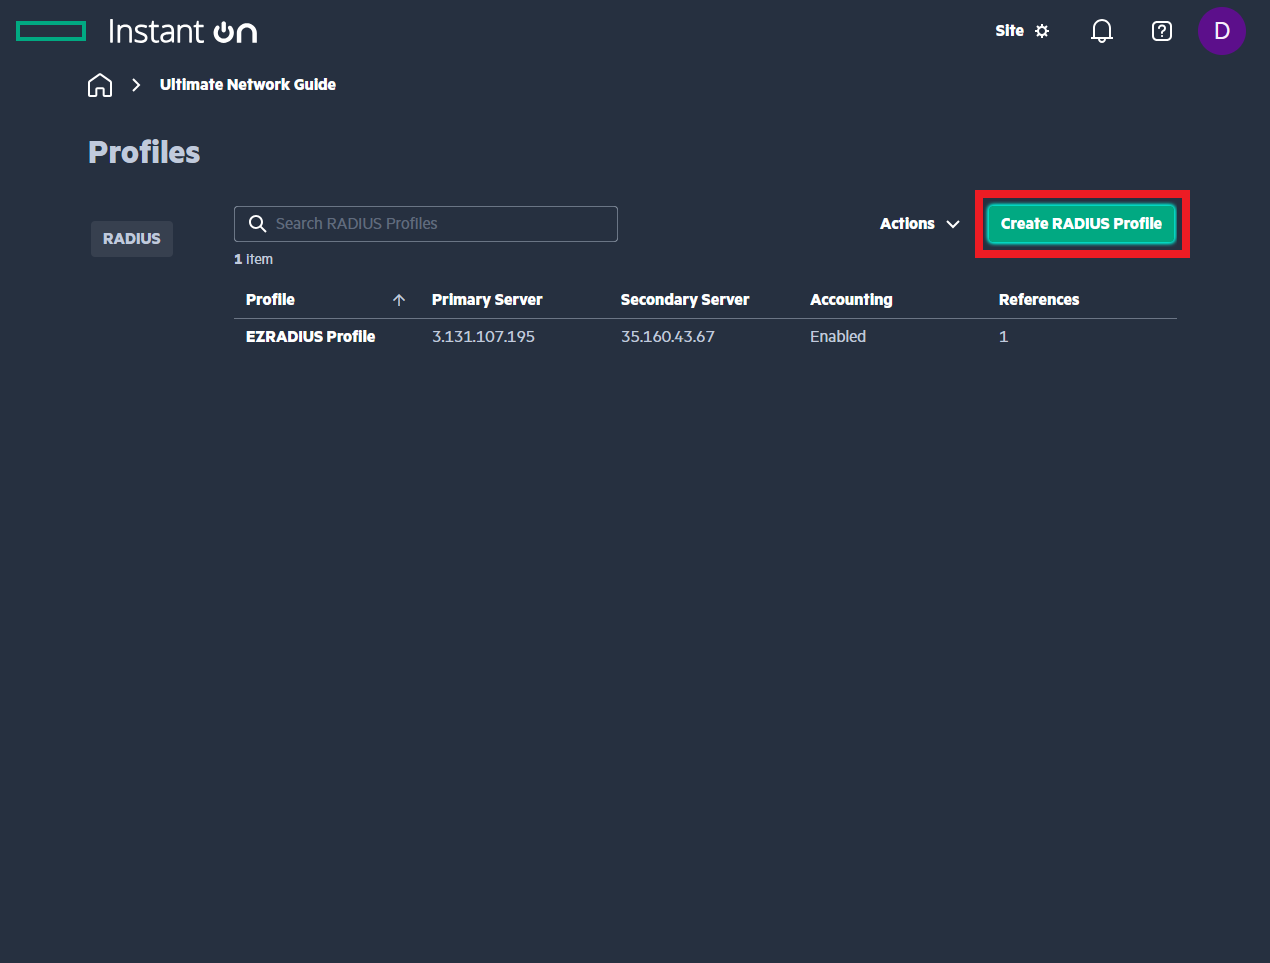
If you have an existing RADIUS profile, click the profile name to edit it. Otherwise, click the Create RADIUS Profile button.
-
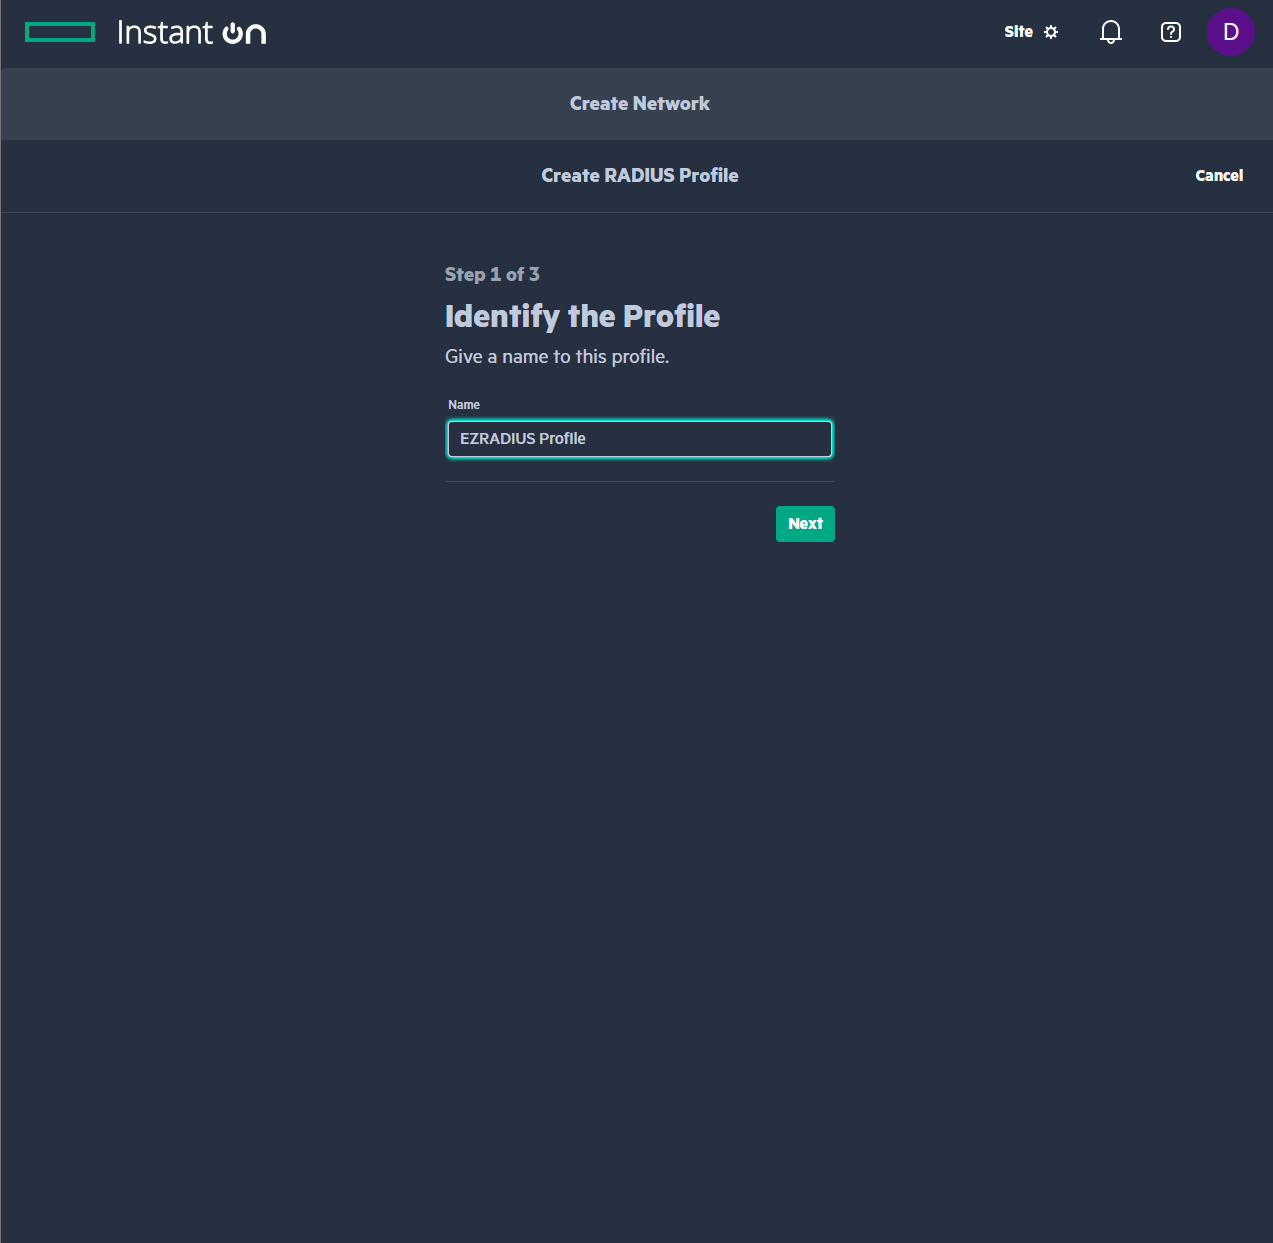
Give the RADIUS Profile a memorable name like Keytos RADIUS Profile then click Next.
How to Get Your EZRADIUS Server IP Addresses for Aruba Instant On RADIUS
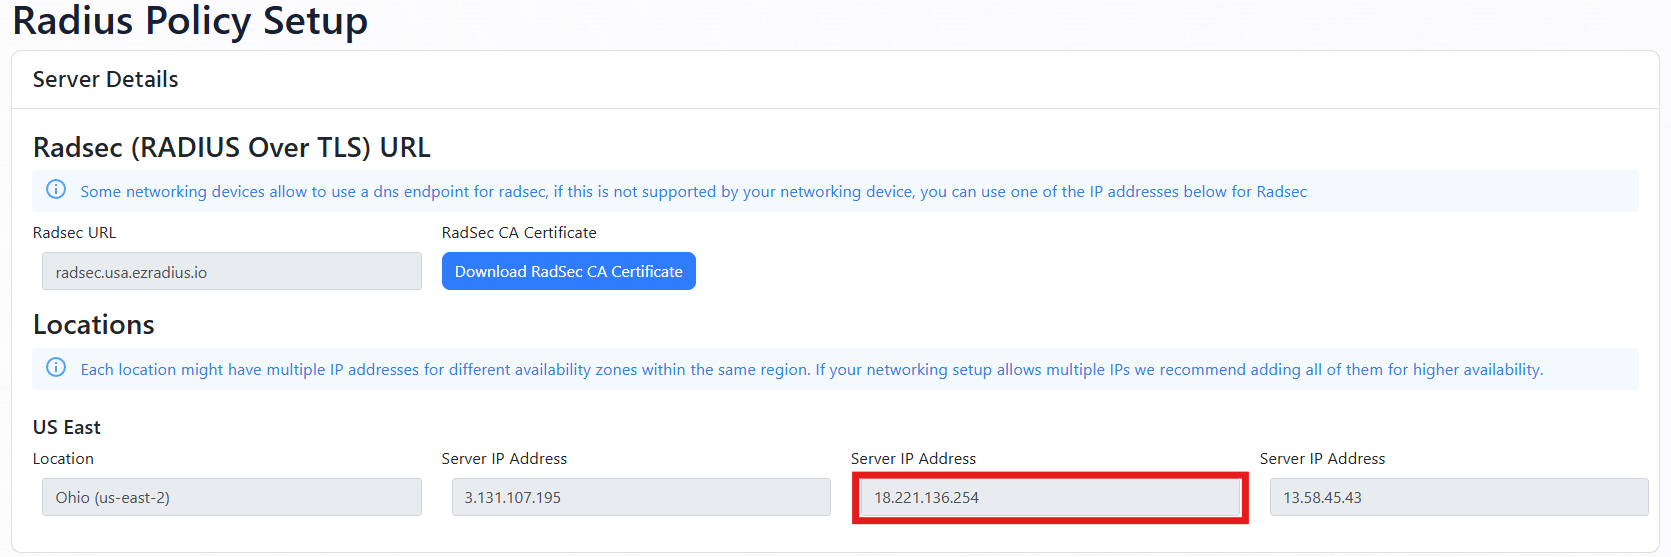
You can get your EZRADIUS Server IP addresses from the EZRADIUS dashboard. These IP addresses are needed to configure your network controller to communicate with the EZRADIUS service.
-
Navigate to the EZRADIUS Policies page from the left-hand menu.
-
At the top of the Policies page, you will find the EZRADIUS Server IP addresses. Copy one of the IP addresses from the region closest to your network controller (you’ll add the others later).
How to Add Your EZRADIUS Server IP Address to Instant On RADIUS
-
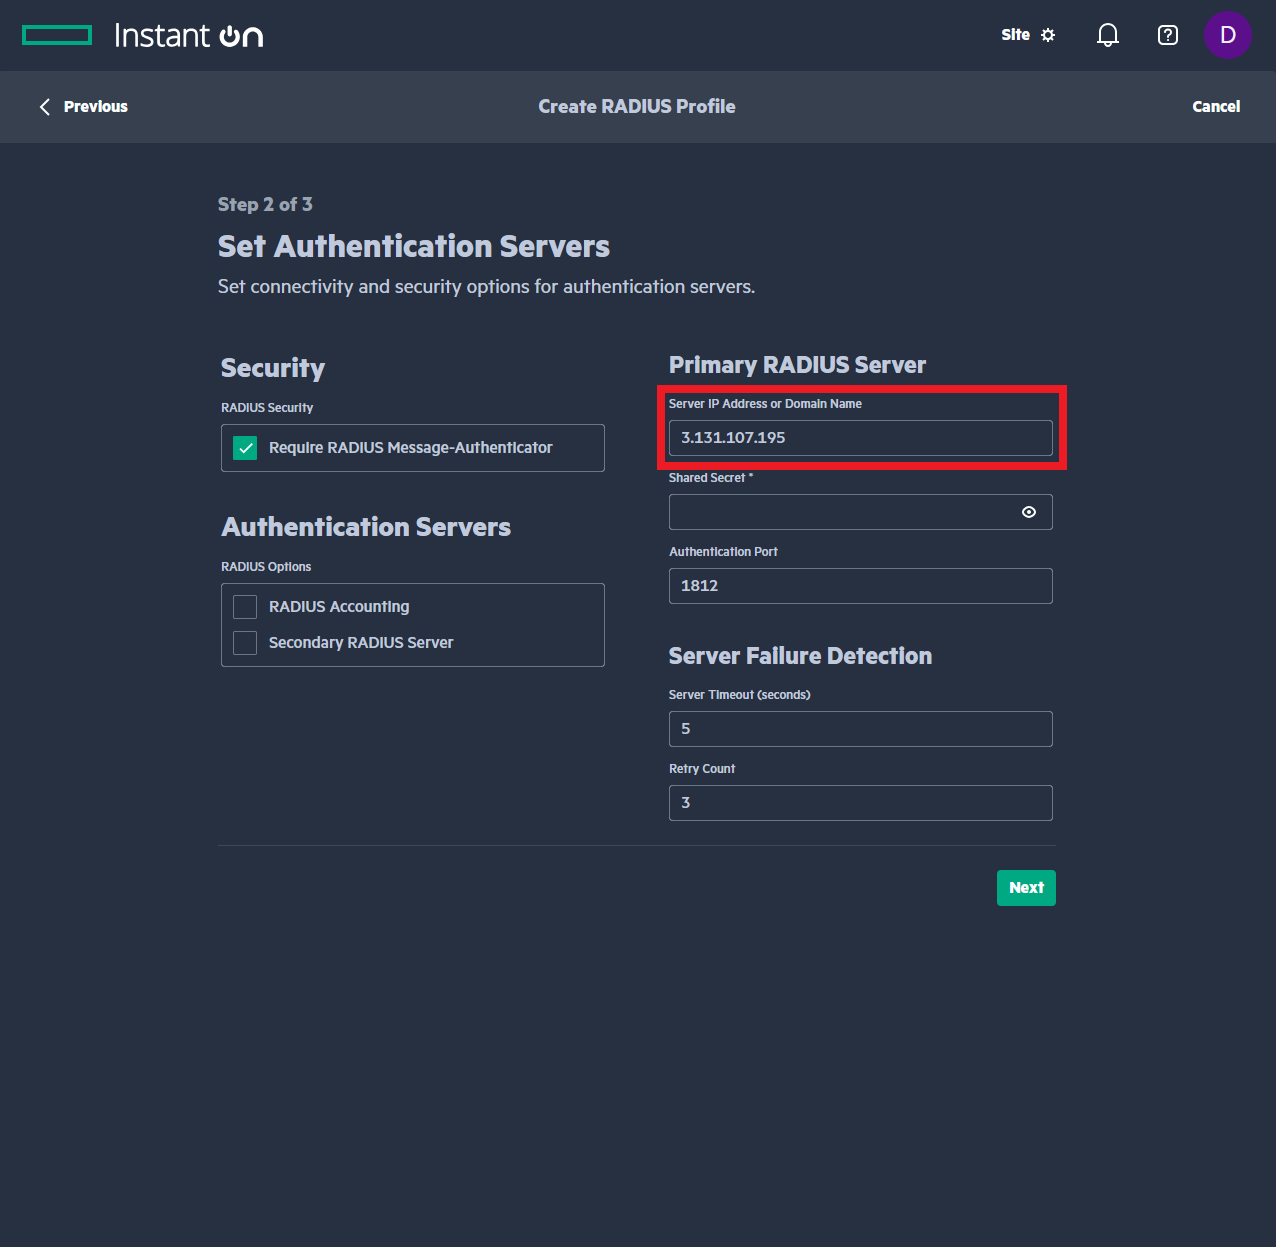
In your Instant On portal, paste the IP address into the Server IP Address or Domain Name field.
How to Get Your EZRADIUS Shared Secret for Aruba Instant On RADIUS
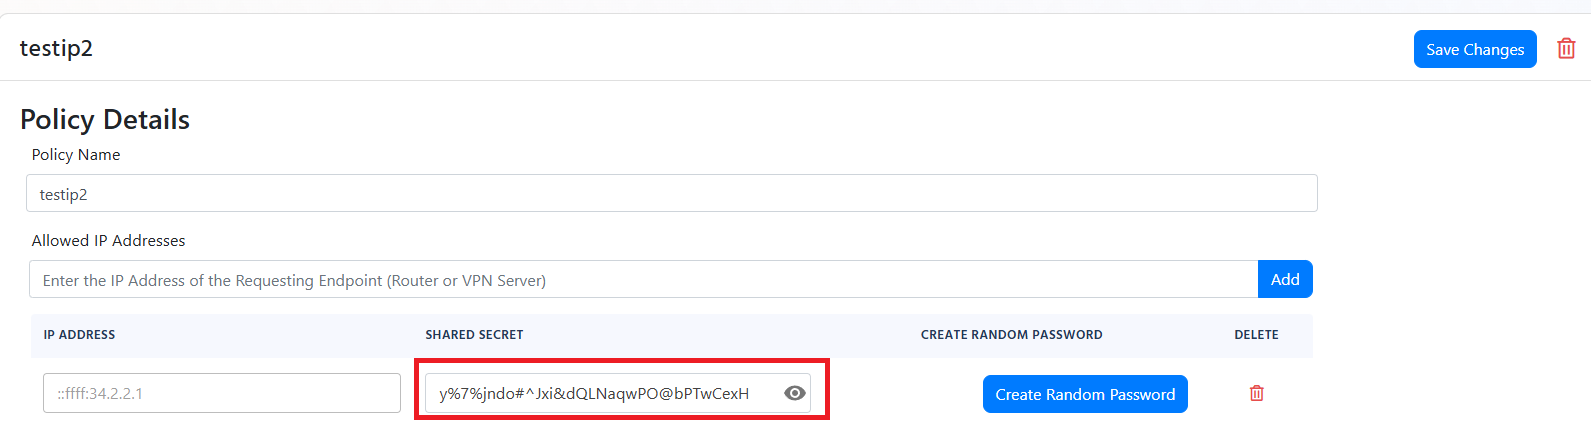
When you added your public IP address to your EZRADIUS policy, a shared secret was automatically generated for you. This shared secret is used to authenticate your network controller (RADIUS client) to the EZRADIUS server.
-
In the EZRADIUS portal, navigate to the EZRADIUS Policies page from the left-hand menu.
-
Scroll down to your RADIUS policy and find the Classic RADIUS Allowed IP Addresses section.
-
For your public IP address, click on the eye icon to reveal the shared secret.
How to Add Your EZRADIUS Server Shared Secret to Instant On RADIUS
-
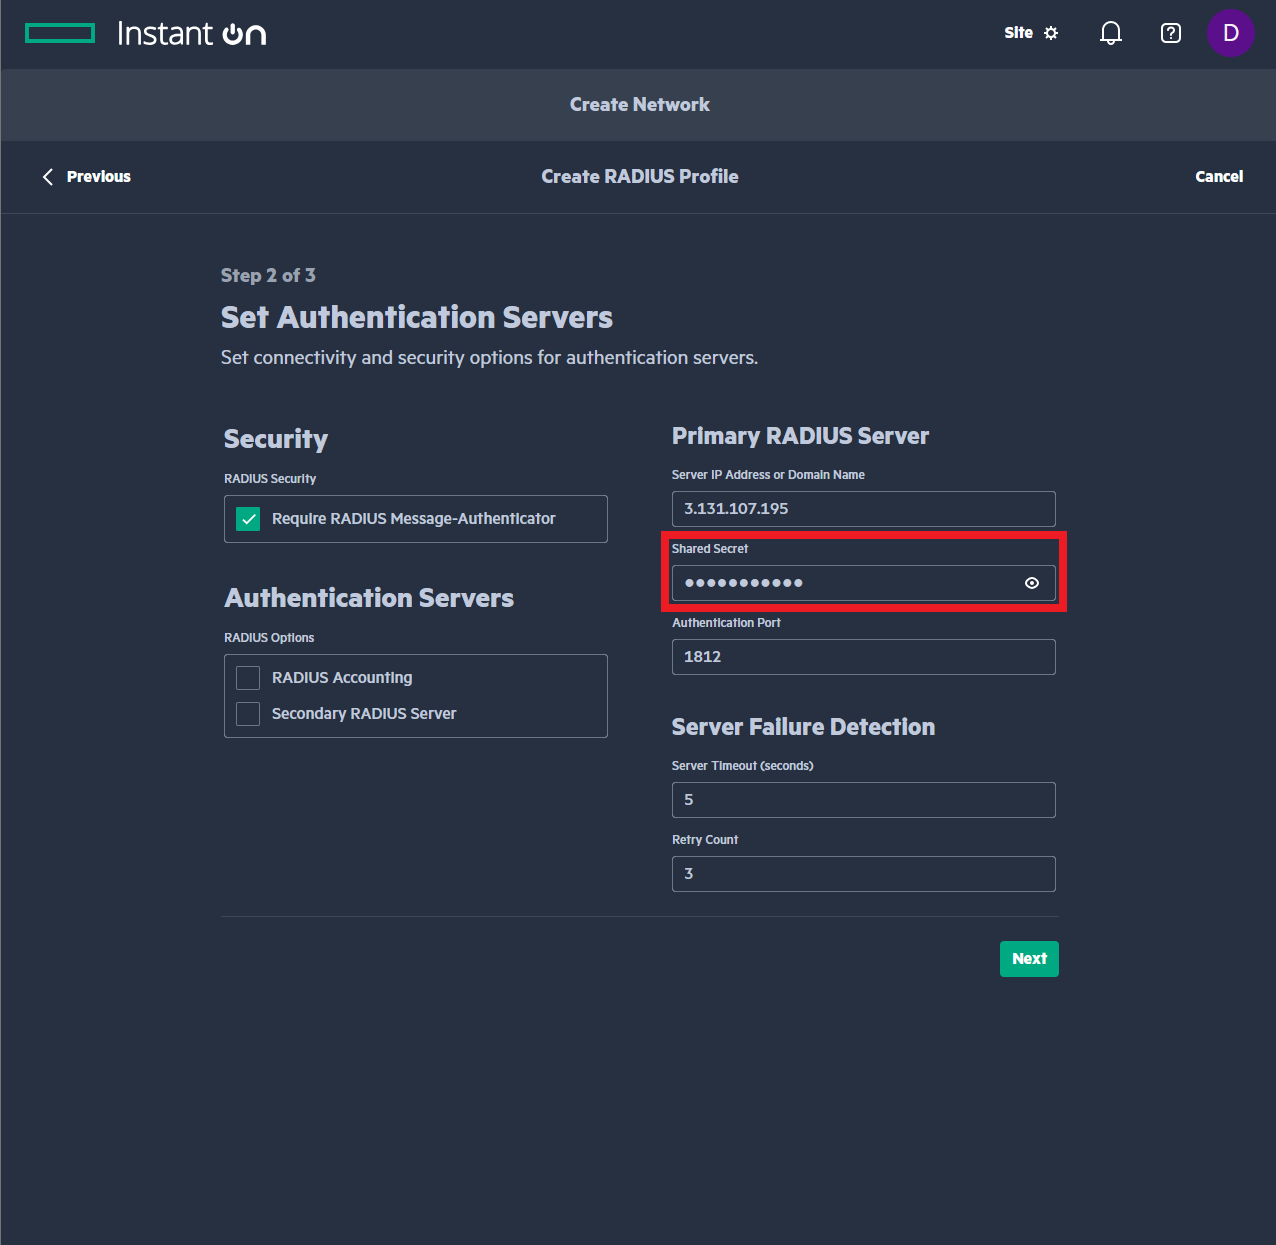
In your Instant On portal, paste the IP address into the Shared Secret field.
How to Add a Secondary RADIUS Server in Aruba Instant On
-
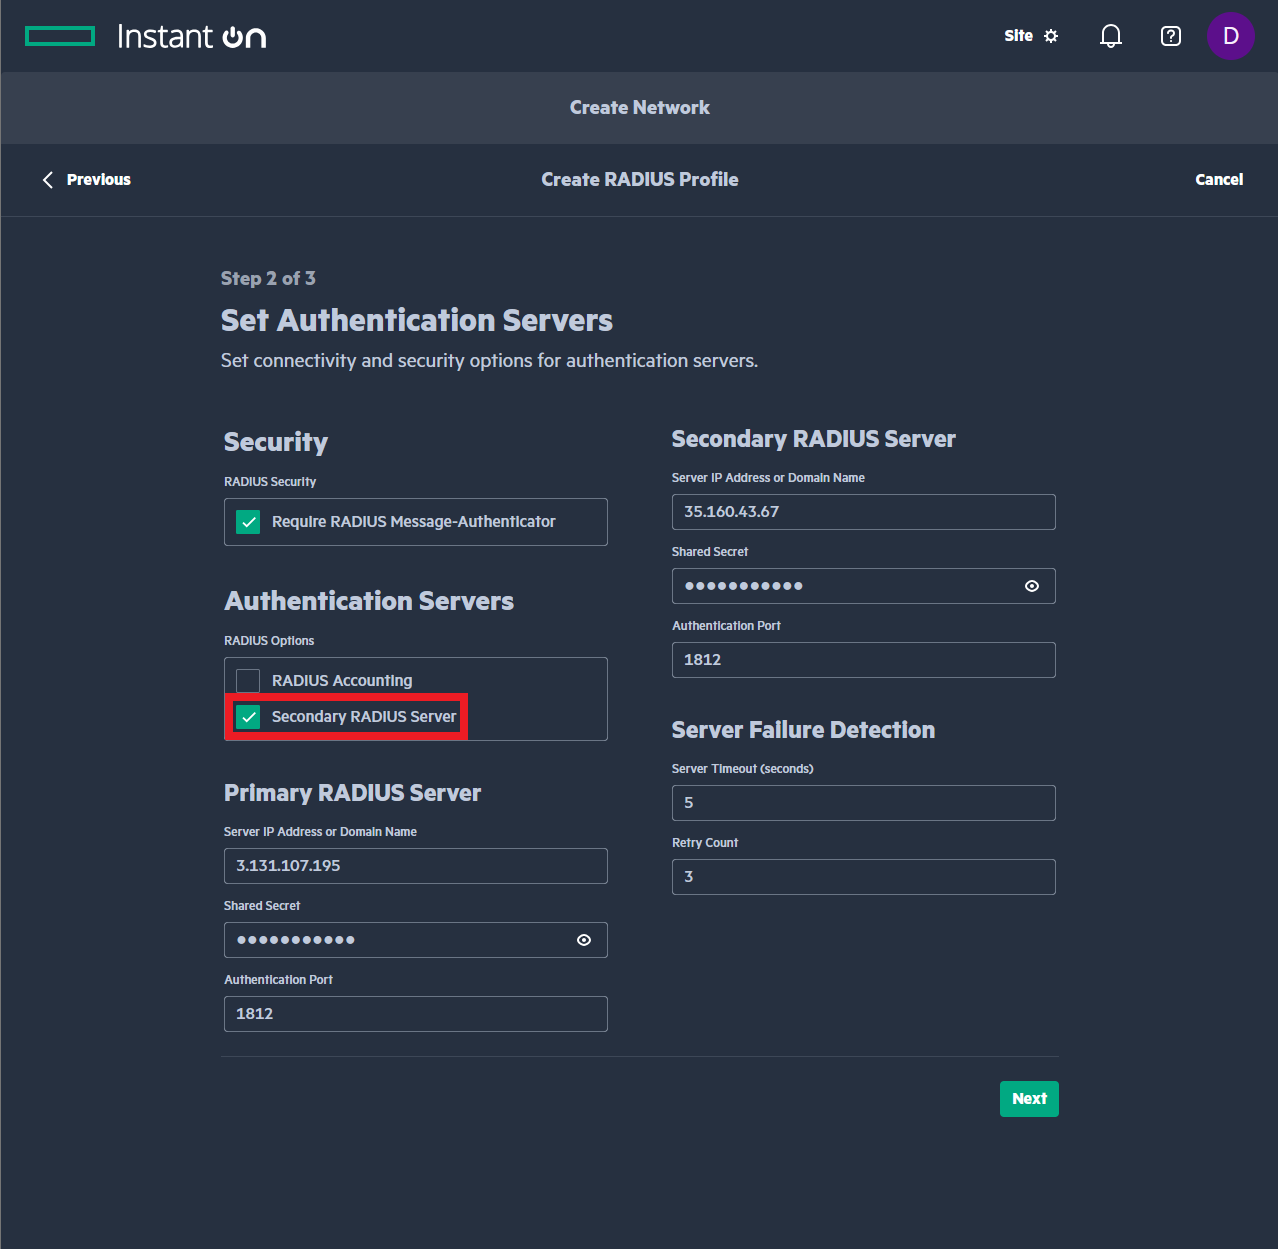
In your Instant On portal, enable Secondary RADIUS Server.
-
Repeat the steps above for entering your IP address and shared secret.
How to Configure RADIUS Timeout and Retries in Aruba Instant On
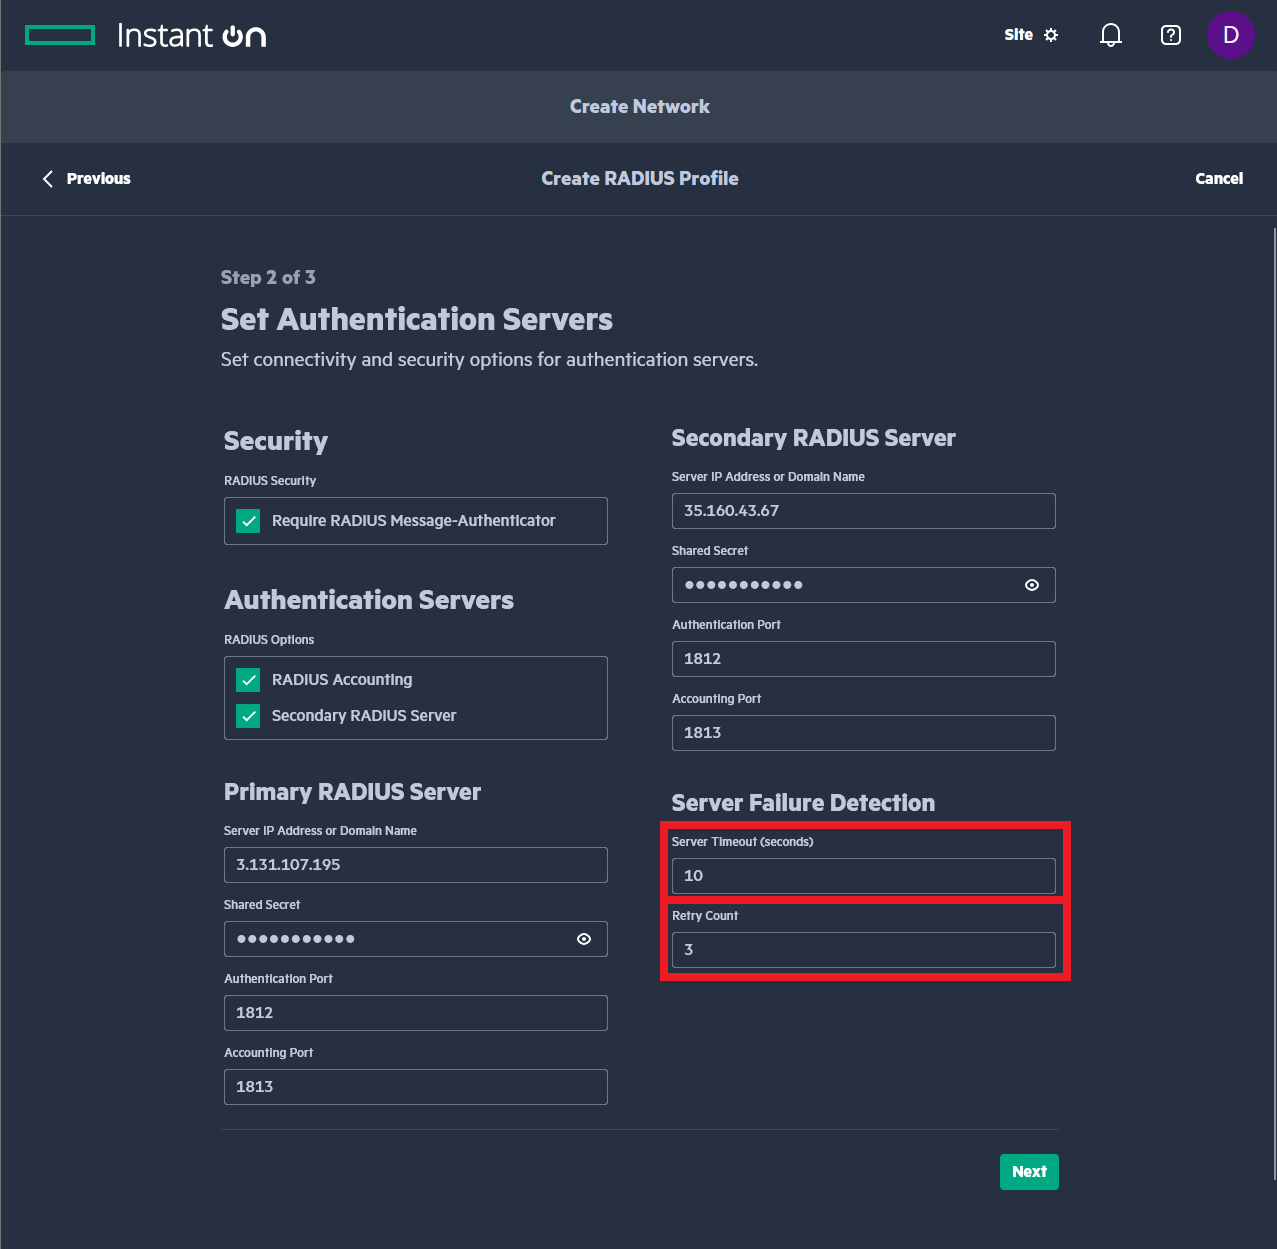
- In your Instant On portal, enter the following settings:
-
Server Timeout to 10 seconds.
-
Retry Count to 3 times.
-
How to Enable RADIUS Accounting in Aruba Instant On
-
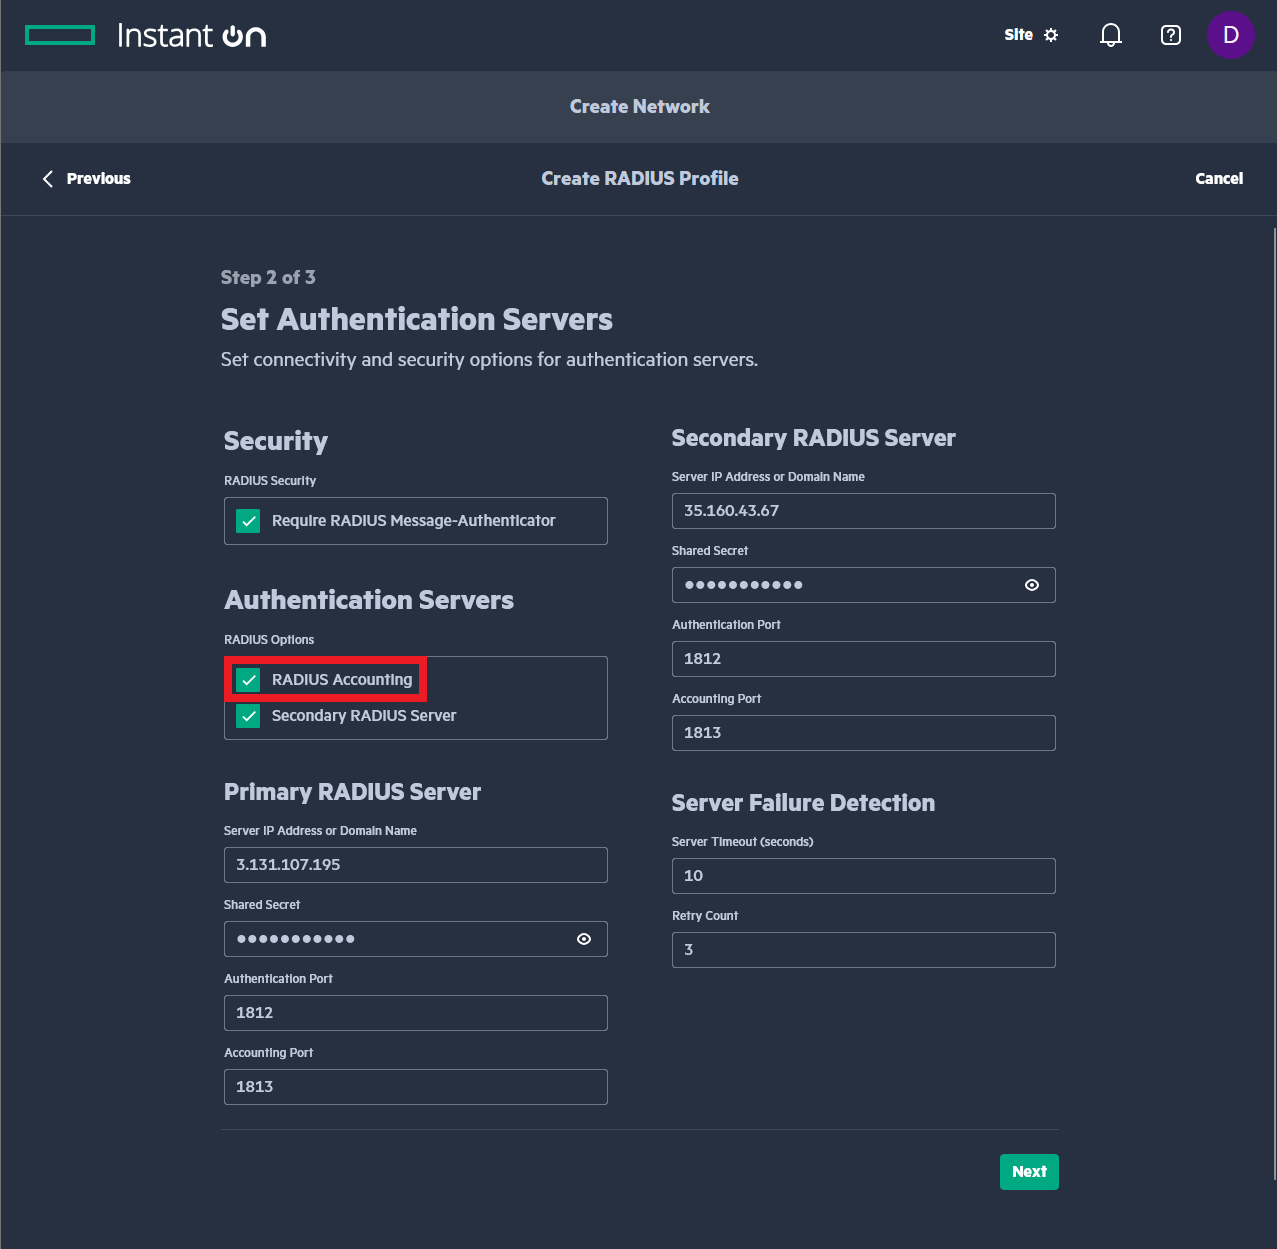
In your Instant On portal, enable RADIUS Accounting.
How to Set Network Access Attributes in Aruba Instant On
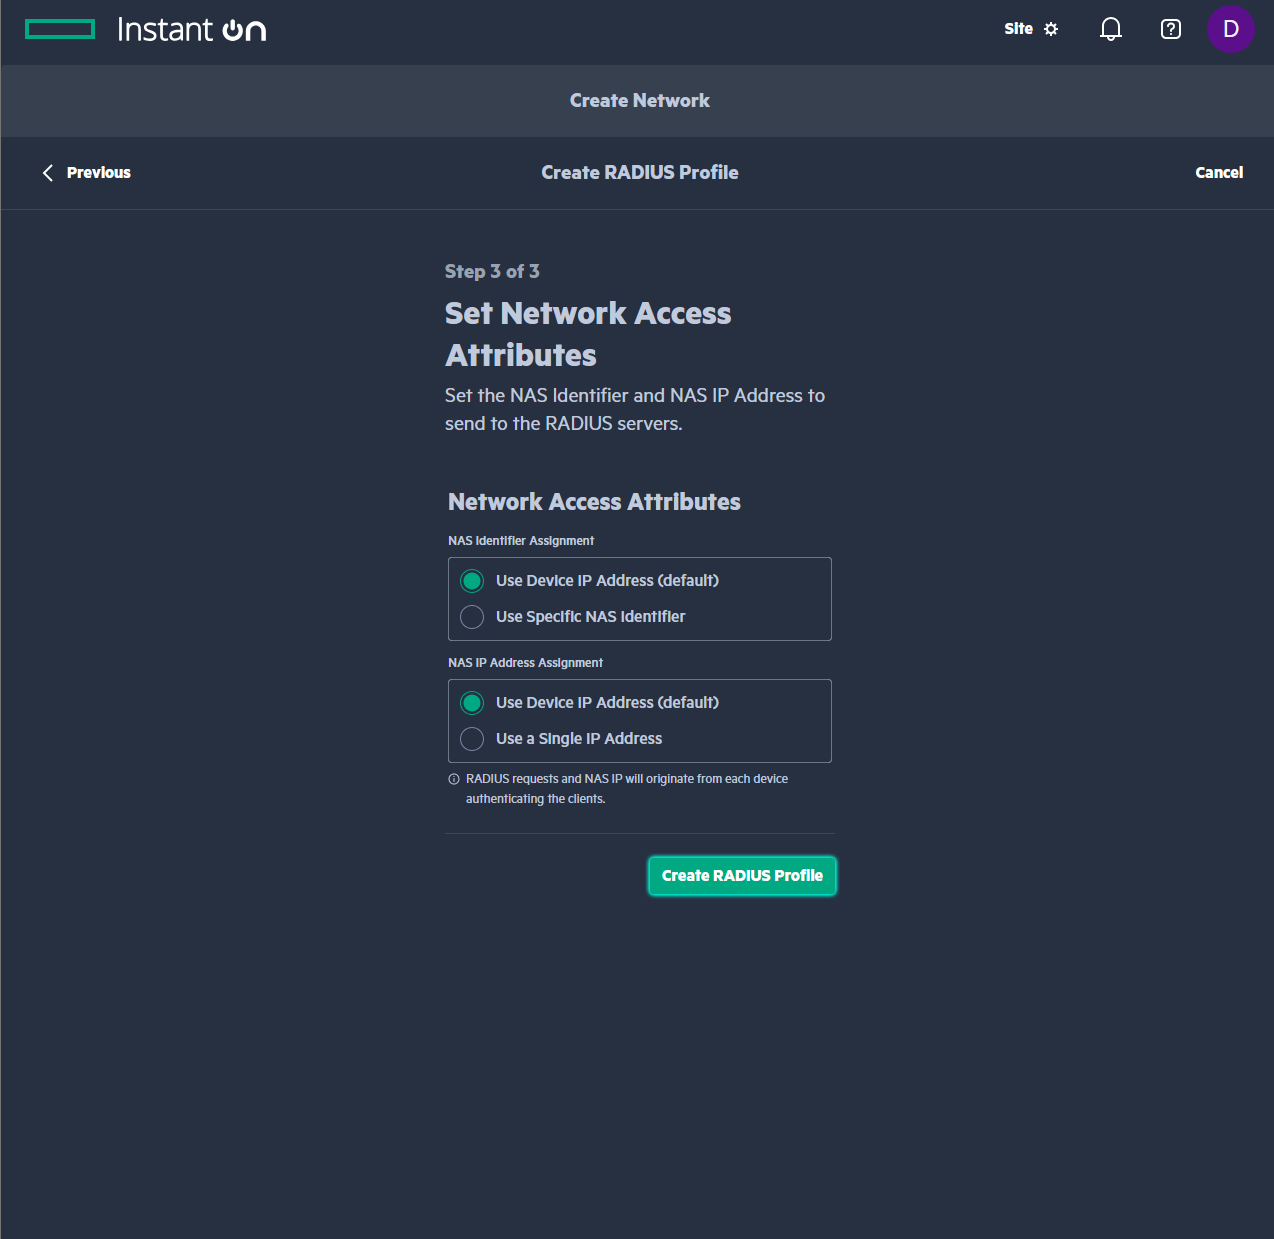
Now that you’ve configured your RADIUS Authentication Servers, click Next to configure your Network Access Attributes.
-
In your Instant On portal, you can keep your Network Access Attributes as default.
Step 2 - How to Assign RADIUS Profile to Network
-
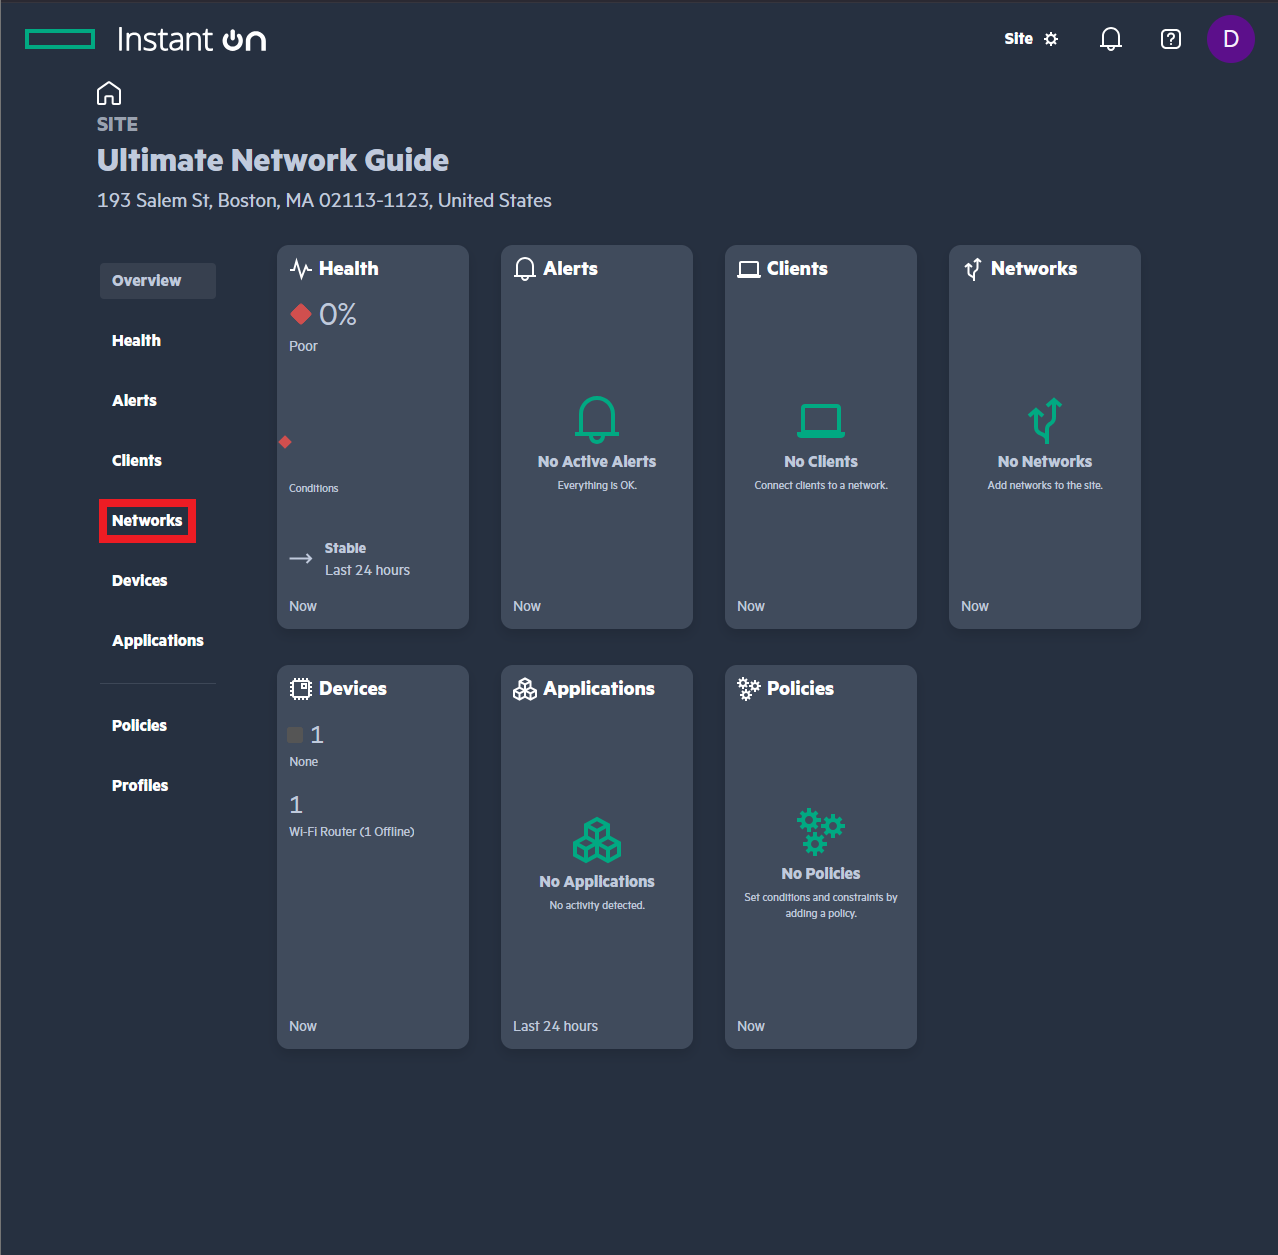
On the home page, use the left-hand menu to navigate to Networks.
-
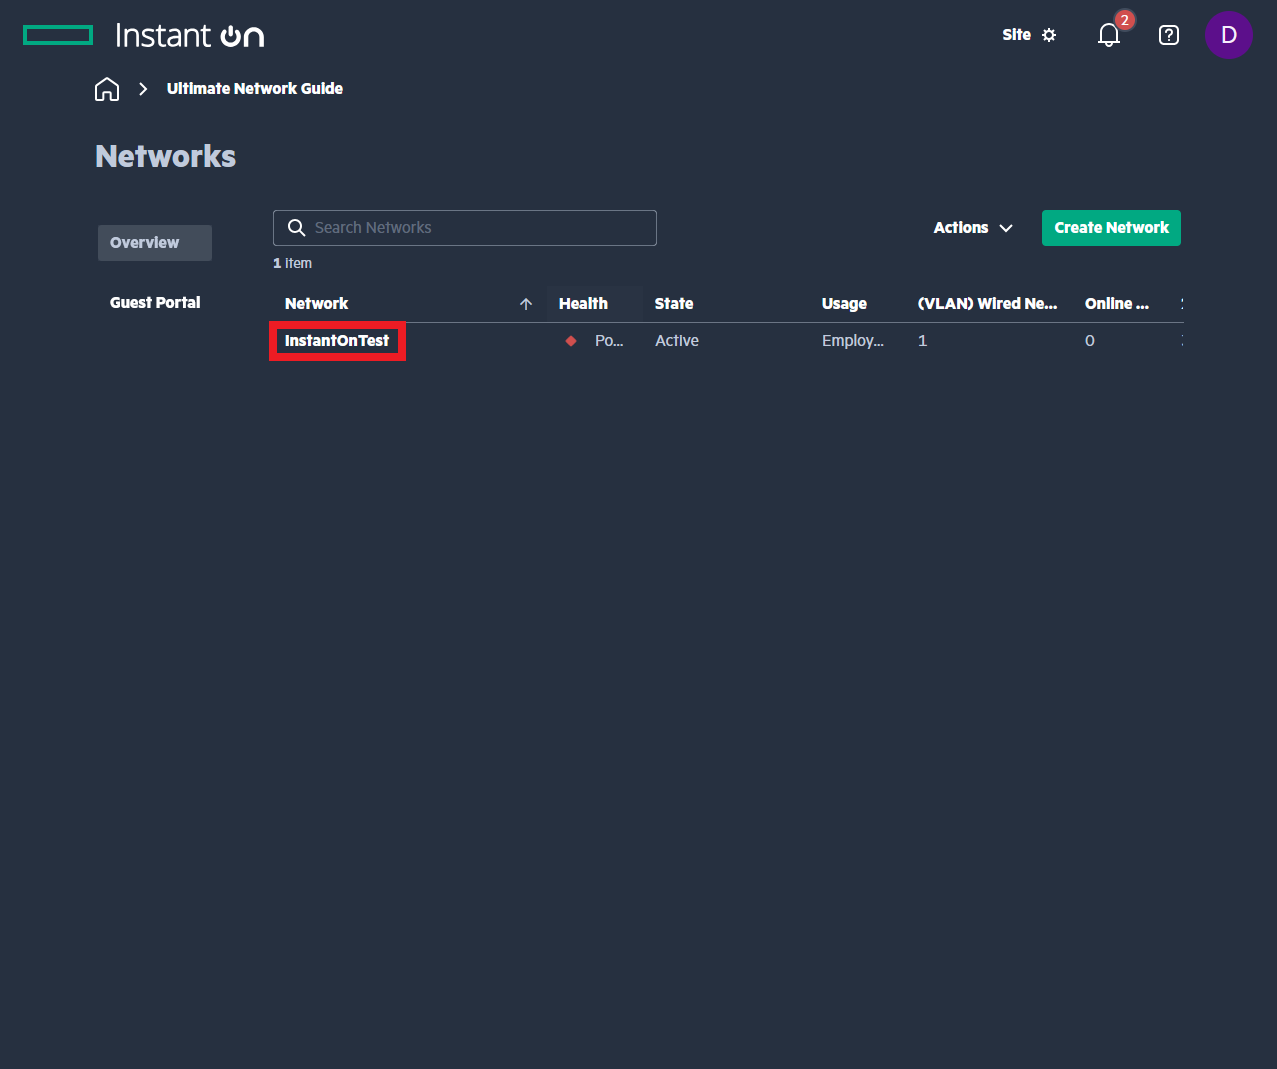
If you have an existing network, click the network name you want to add RADIUS authentication to. (If you don’t have a network yet, create a new Employee network)
-
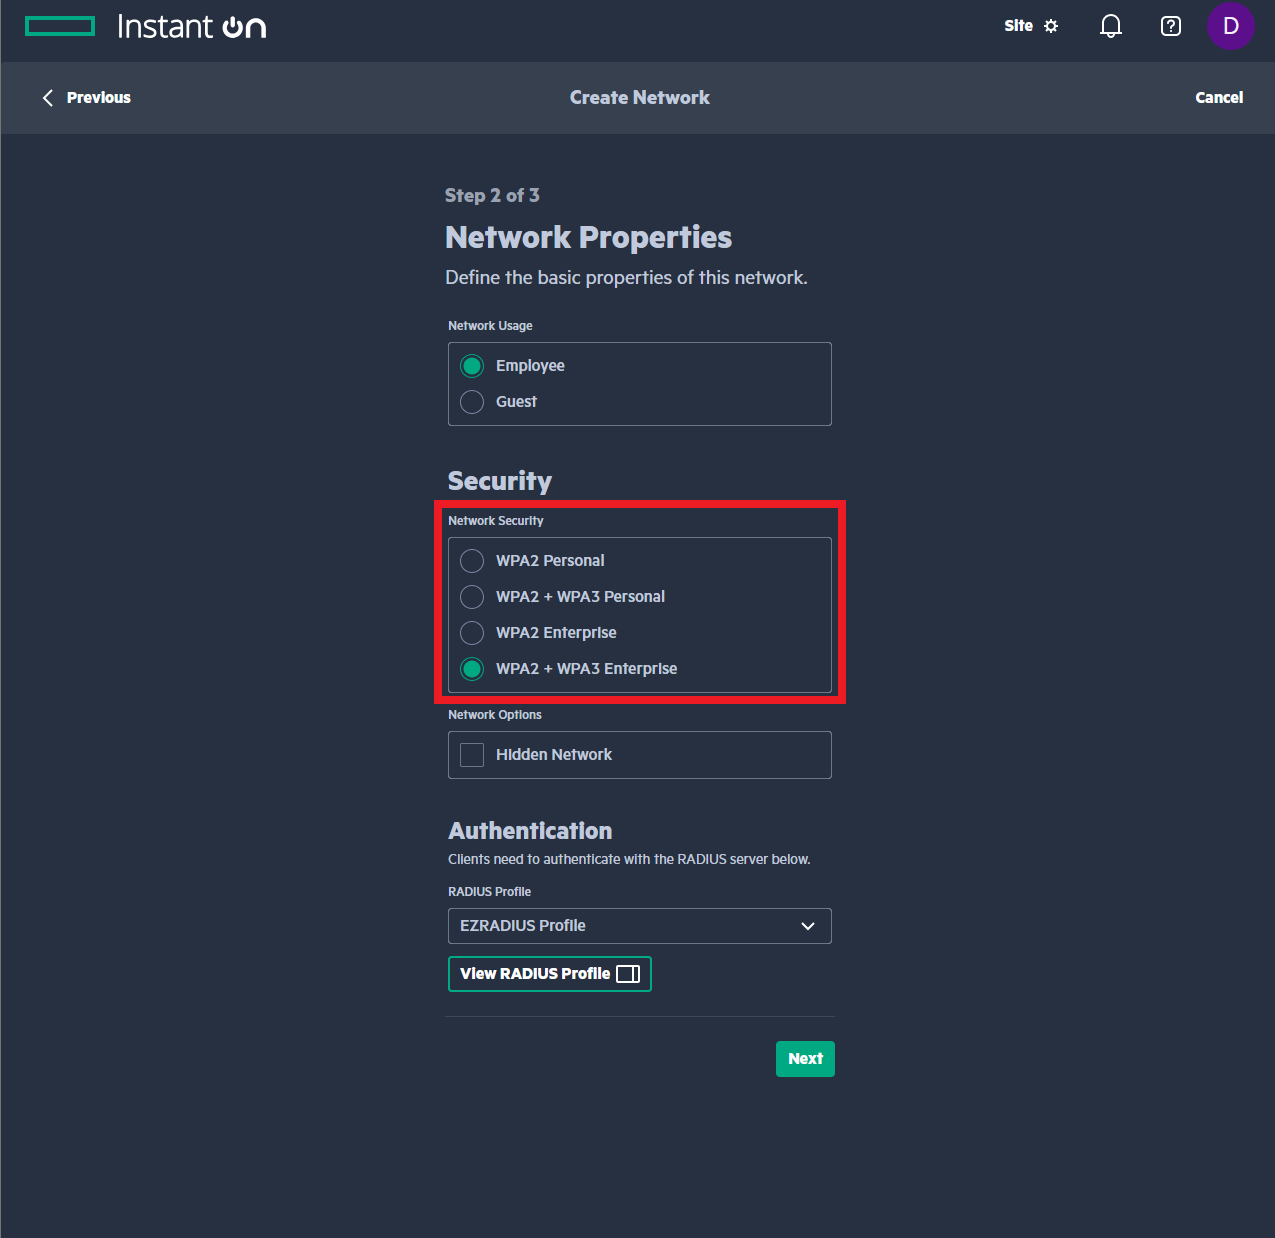
Ensure that you have the Network Security set to WPA2 Enterprise or WPA2 + WPA3 Enterprise.
-
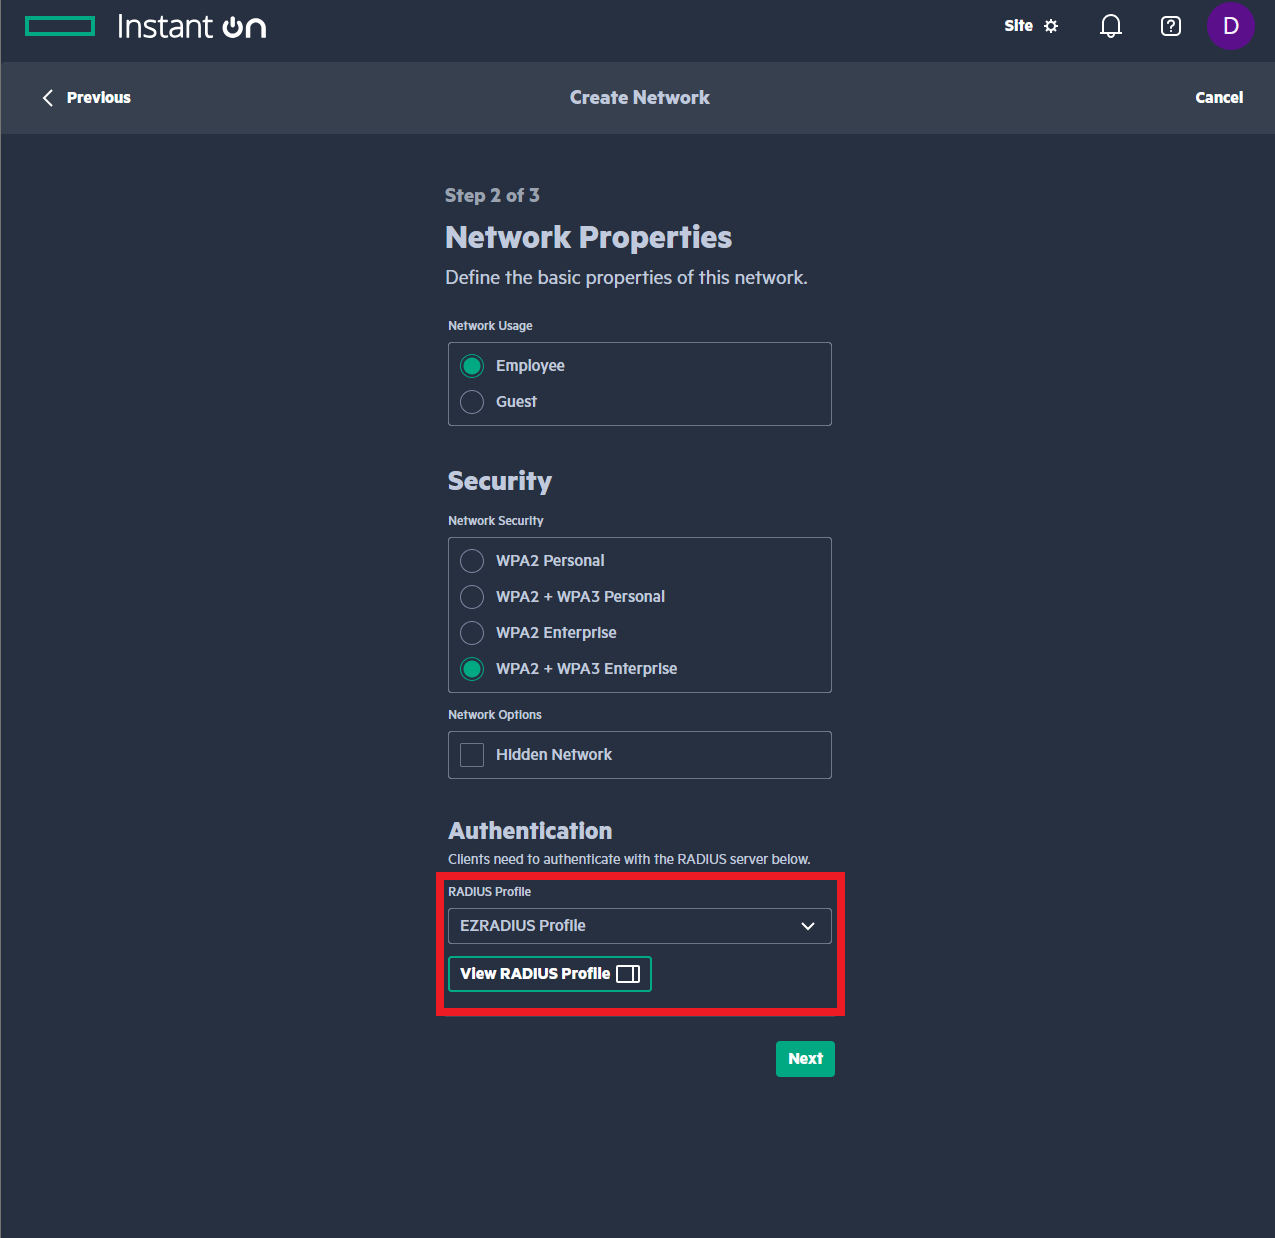
Under Authentication, select your RADIUS profile under the dropdown.
-
Save your changes.
Done! You should have RADIUS authentication fully configured for your Aruba Instant On network. If you have additional sites you would like to enable RADIUS authentication with EZRADIUS for, repeat the steps for the additional sites.
Step 3 - How to Configure Your Devices to Use Cloud RADIUS with Aruba Instant On
Now that you have set up Cloud RADIUS for your Aruba Instant On network, there are a few more steps to ensure your users’ devices can connect seamlessly. By default, devices won’t be able to connect using Cloud RADIUS until you configure the appropriate network profile and RADIUS CA certificate. Make sure to follow the instructions below to push the necessary configurations to your users’ devices.
How to Push the RADIUS CA Certificate and Wi-Fi Profile Using Microsoft Intune
Follow these Intune step-by-step guides to push the required CA certificate and Wi-Fi profile to your users’ devices so they can seamlessly connect to your Aruba Instant On network using Cloud RADIUS.
How to Push the RADIUS CA Certificate and Wi-Fi Profile Using Jamf Pro
Follow these Jamf Pro step-by-step guides to push the required CA certificate and Wi-Fi profile to your users’ devices so they can seamlessly connect to your Aruba Instant On network using Cloud RADIUS.
How to Manually Configure the RADIUS CA Certificate and Wi-Fi Profile on Your Devices
Follow these manual configuration step-by-step guides to manually configure the required CA certificate and Wi-Fi profile on your users’ devices so they can connect to your Aruba Instant On network using Cloud RADIUS.
How to Troubleshoot Cloud RADIUS Issues in Aruba Instant On
Not able to connect to your Aruba Instant On network after setting up EZRADIUS? Refer to this troubleshooting guide to help diagnose and resolve common issues when using Cloud RADIUS with Aruba Instant On.
Troubleshooting GuideWe also have a detailed video guide to help you troubleshoot common Cloud RADIUS issues with Aruba Instant On below:
Enjoying EZRADIUS? Leave Us a Review!
We hope you’re enjoying using EZRADIUS to secure your Aruba Instant On network! If you have a moment, we would greatly appreciate it if you could leave us a review on G2. Your feedback helps other IT professionals discover EZRADIUS and helps us continue to improve our service. Thank you for your support!