

















How-To: Use EZRADIUS Cloud RADIUS with Microsoft Intune Cloud PKI
Introduction - How Can I Configure RADIUS with My Microsoft Cloud PKI Certificates?
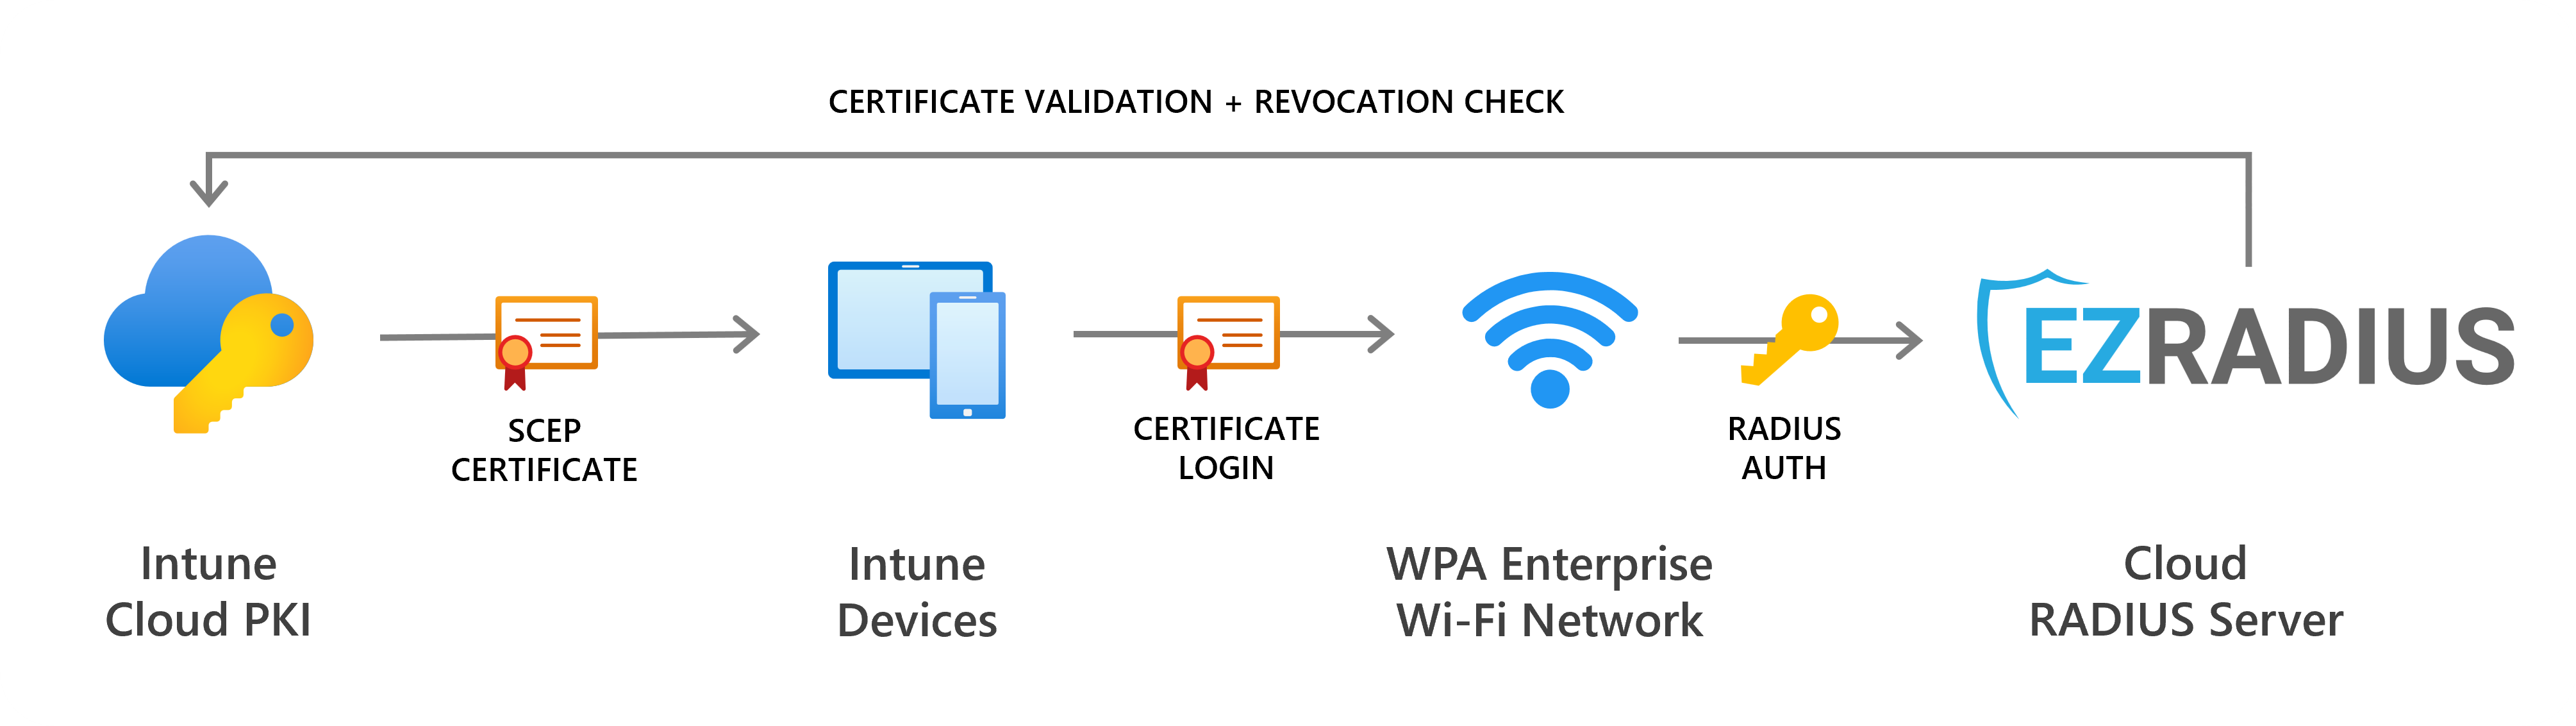
Microsoft Cloud PKI allows you to issue certificates to your Intune-managed devices. But once you have certificates on your devices, how can you use them for Wi-Fi authentication?
EZRADIUS Cloud RADIUS natively supports certificate-based authentication, making it easy to leverage your Cloud PKI certificates for secure, passwordless Wi-Fi access. No more passwords or complex on-premises RADIUS servers. Just configure EZRADIUS to trust your Cloud PKI and you’re set.
Video Tutorial - How to Enable RADIUS Authentication in Intune
It’s easy to get up and running with EZRADIUS and Microsoft Intune Cloud PKI in under 30 minutes with our step-by-step video guide:
Step-by-Step Guide - How to Configure Network Profiles in Intune for RADIUS Authentication on Windows
Prerequisites for Configuring Microsoft Cloud PKI and EZRADIUS for RADIUS Authentication
Before you begin, ensure that you meet the prerequisites outlined below:
How to Prepare Microsoft Cloud PKI and EZRADIUS
Make sure you have completed all prerequisites before proceeding
How to Create Your Microsoft Cloud PKI Root and SCEP CAs
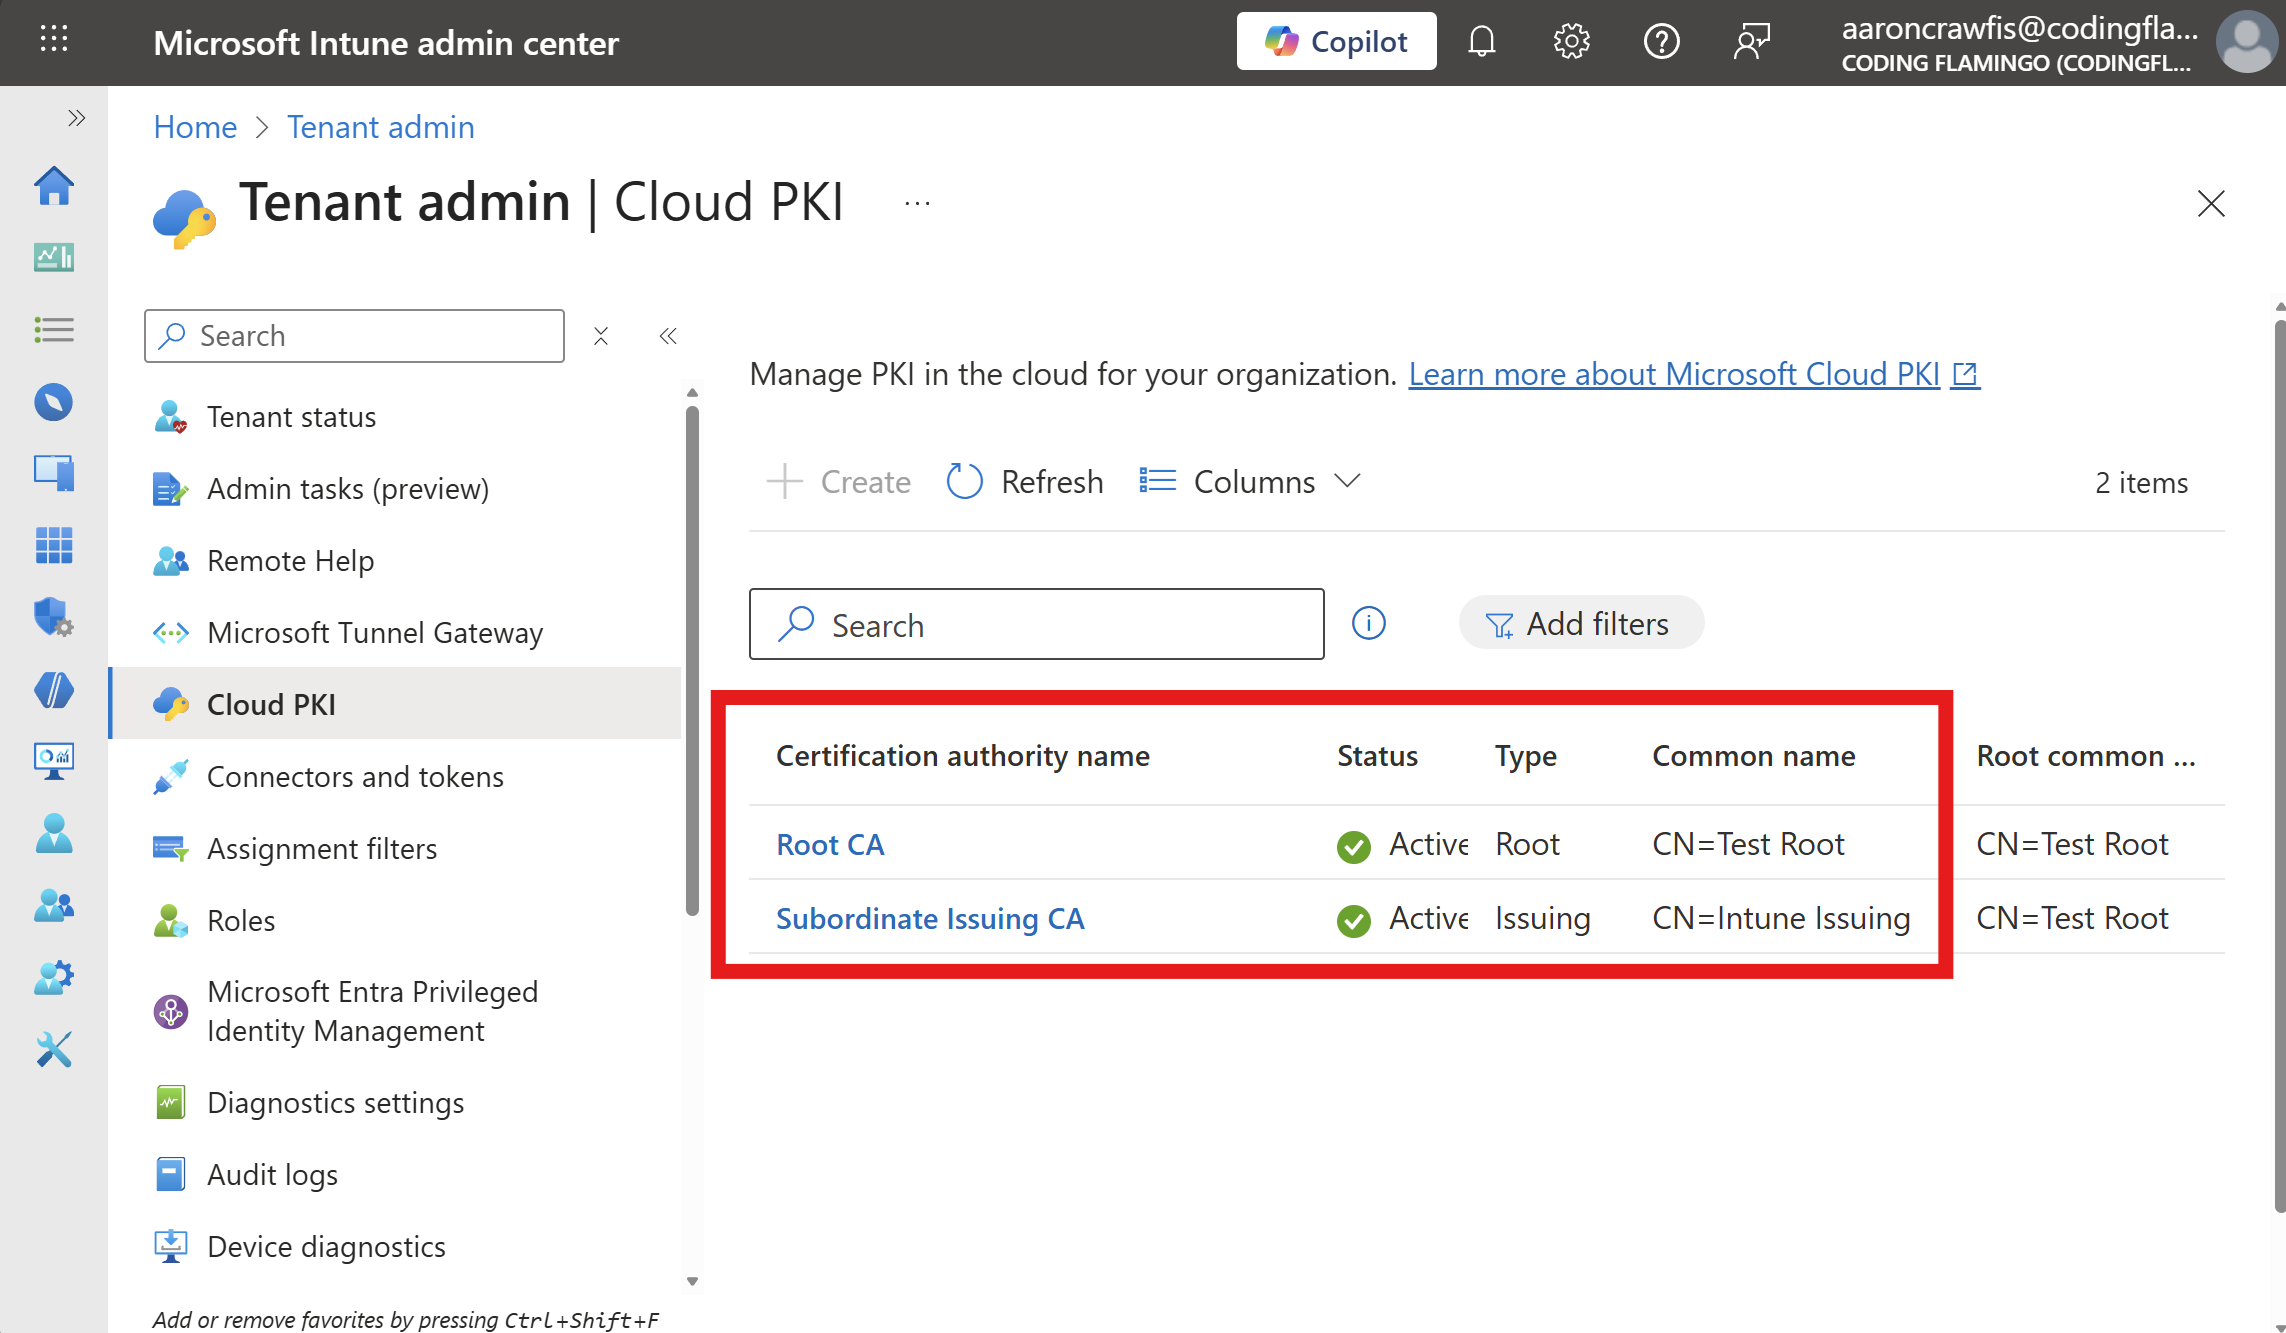
The first step to password-less WiFi is to create your Cloud PKI Certificate Authorities (CAs) in Microsoft Intune. These CAs will issue the certificates that your users and devices will use to authenticate to Wi-Fi via EZRADIUS.
While EZRADIUS supports both single-tier and two-tier PKI architectures, Microsoft Intune Cloud PKI requires a two-tier PKI setup. This means you’ll need both a Root CA and an Issuing CA configured in your Intune Cloud PKI.
After completing these steps, you should have one or more certificate authorities (CAs) configured in Intune Cloud PKI that issue certificates to your users/devices.
Collapses this section and completes the checkmark.
How to Register and Consent the EZRADIUS Entra ID App
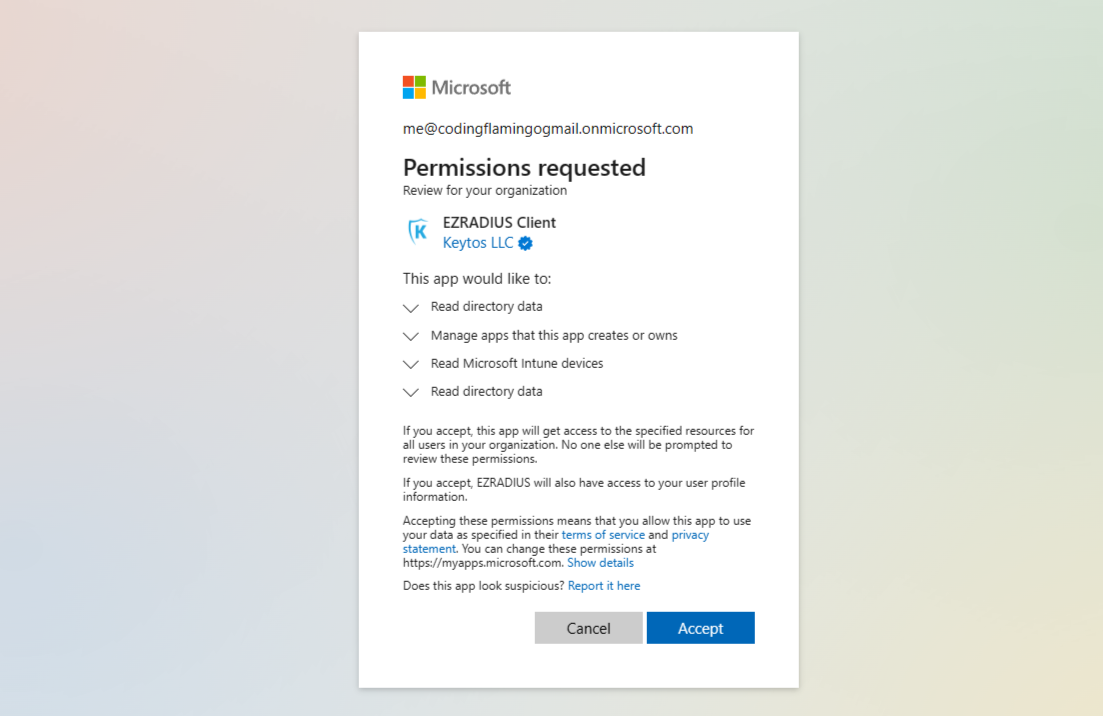
Using your Global Administrator account, visit the following consent URL to consent the EZRADIUS Entra ID applications in your tenant. You will be prompted to consent the EZRADIUS Client application.
Single Click
The easiest way to register the applications is to click the button below while logged in with your Global Administrator account:
Register EZRADIUS Applications
Manual URL
Alternately, you can copy & paste the following URL into your browser:
https://login.microsoftonline.com/common/oauth2/authorize?client_id=d212033b-7fb6-43ee-ac3a-2dcd606a5797&prompt=admin_consent&response_type=code&redirect_uri=https%3A%2F%2Fportal.ezradius.io%2FWelcome
Single Click
The easiest way to register the applications is to click the button below while logged in with your Global Administrator account in your GCC High tenant:
Register EZRADIUS Applications
Manual URL
Alternately, you can copy & paste the following URL into your browser:
https://login.microsoftonline.us/common/oauth2/authorize?client_id=a288acbf-718f-4c4d-ae28-60728df9ca54&prompt=admin_consent&response_type=code&redirect_uri=https%3A%2F%2Fportal.ezca.us%2FWelcome
You will see a consent screen similar to the one below. Click Accept to register the applications in your tenant.
Collapses this section and completes the checkmark.
How to Create an EZRADIUS Subscription
An EZRADIUS subscription handles permissions, billing, and central configuration for your organization. You can create a subscription directly with us, or through the Azure Marketplace.
How to Create an EZRADIUS SaaS Subscription in Azure
-
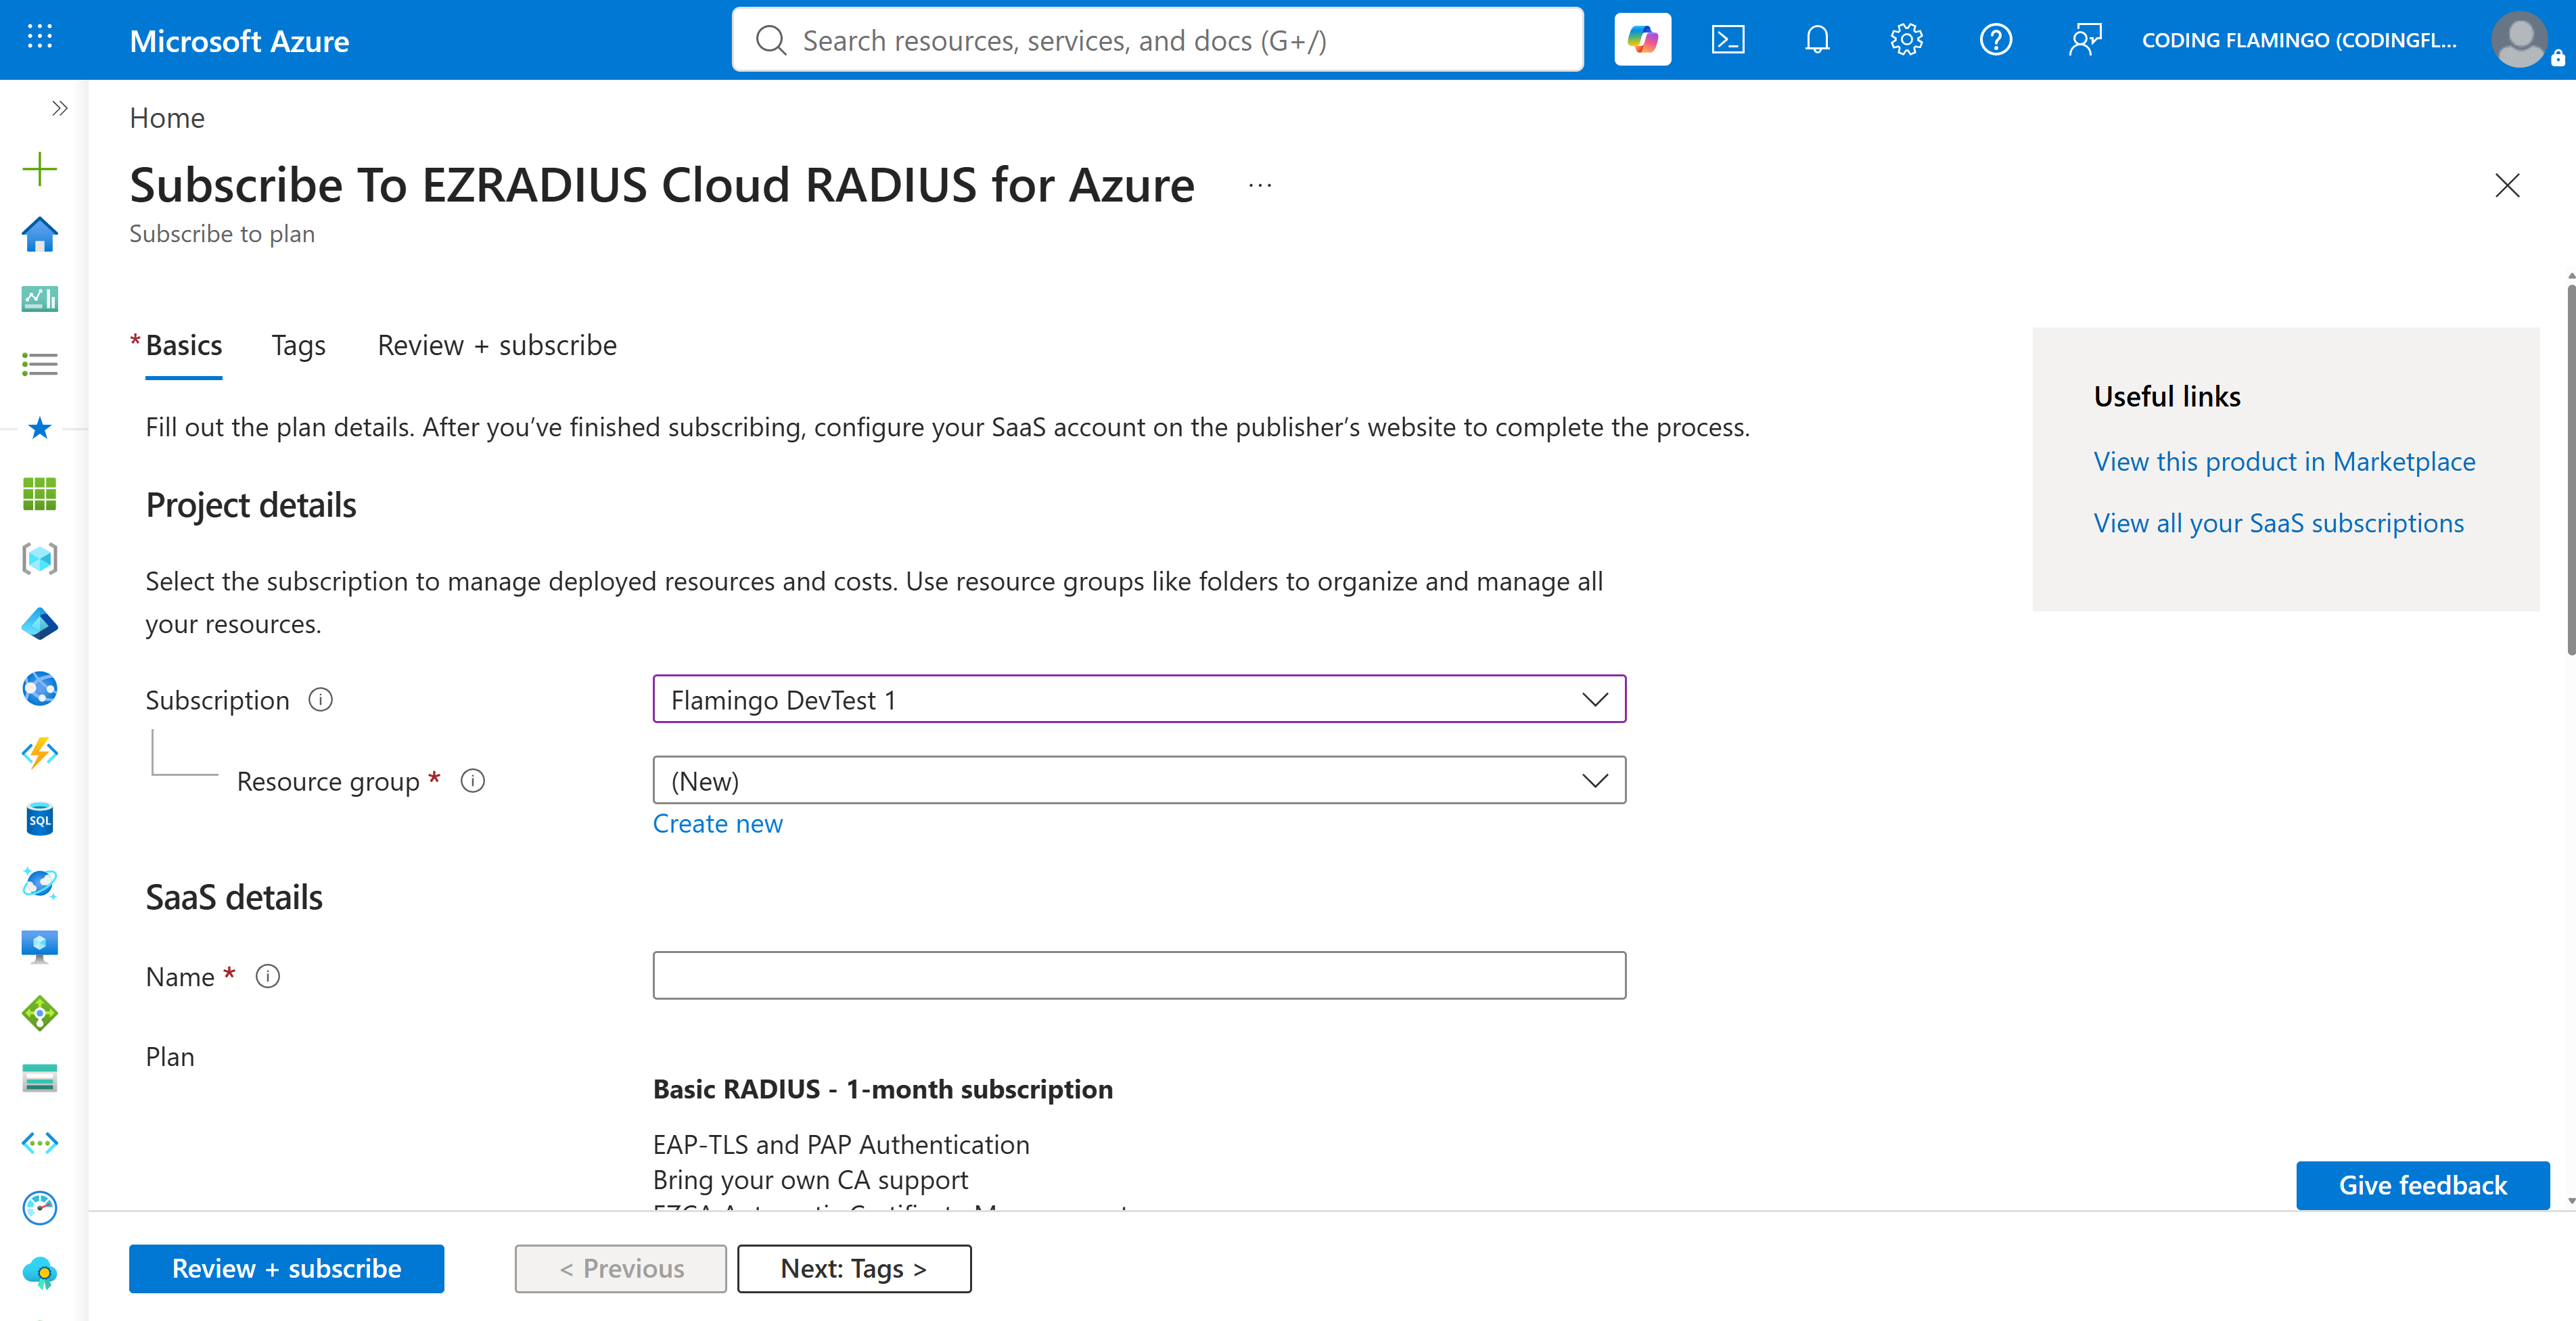
Open the EZRADIUS Cloud RADIUS listing in the Azure Marketplace.
-
Enter the Subscription and Resource group where you want to deploy your EZRADIUS cloud RADIUS SaaS subscription. This will be used for billing of your EZRADIUS subscription.
-
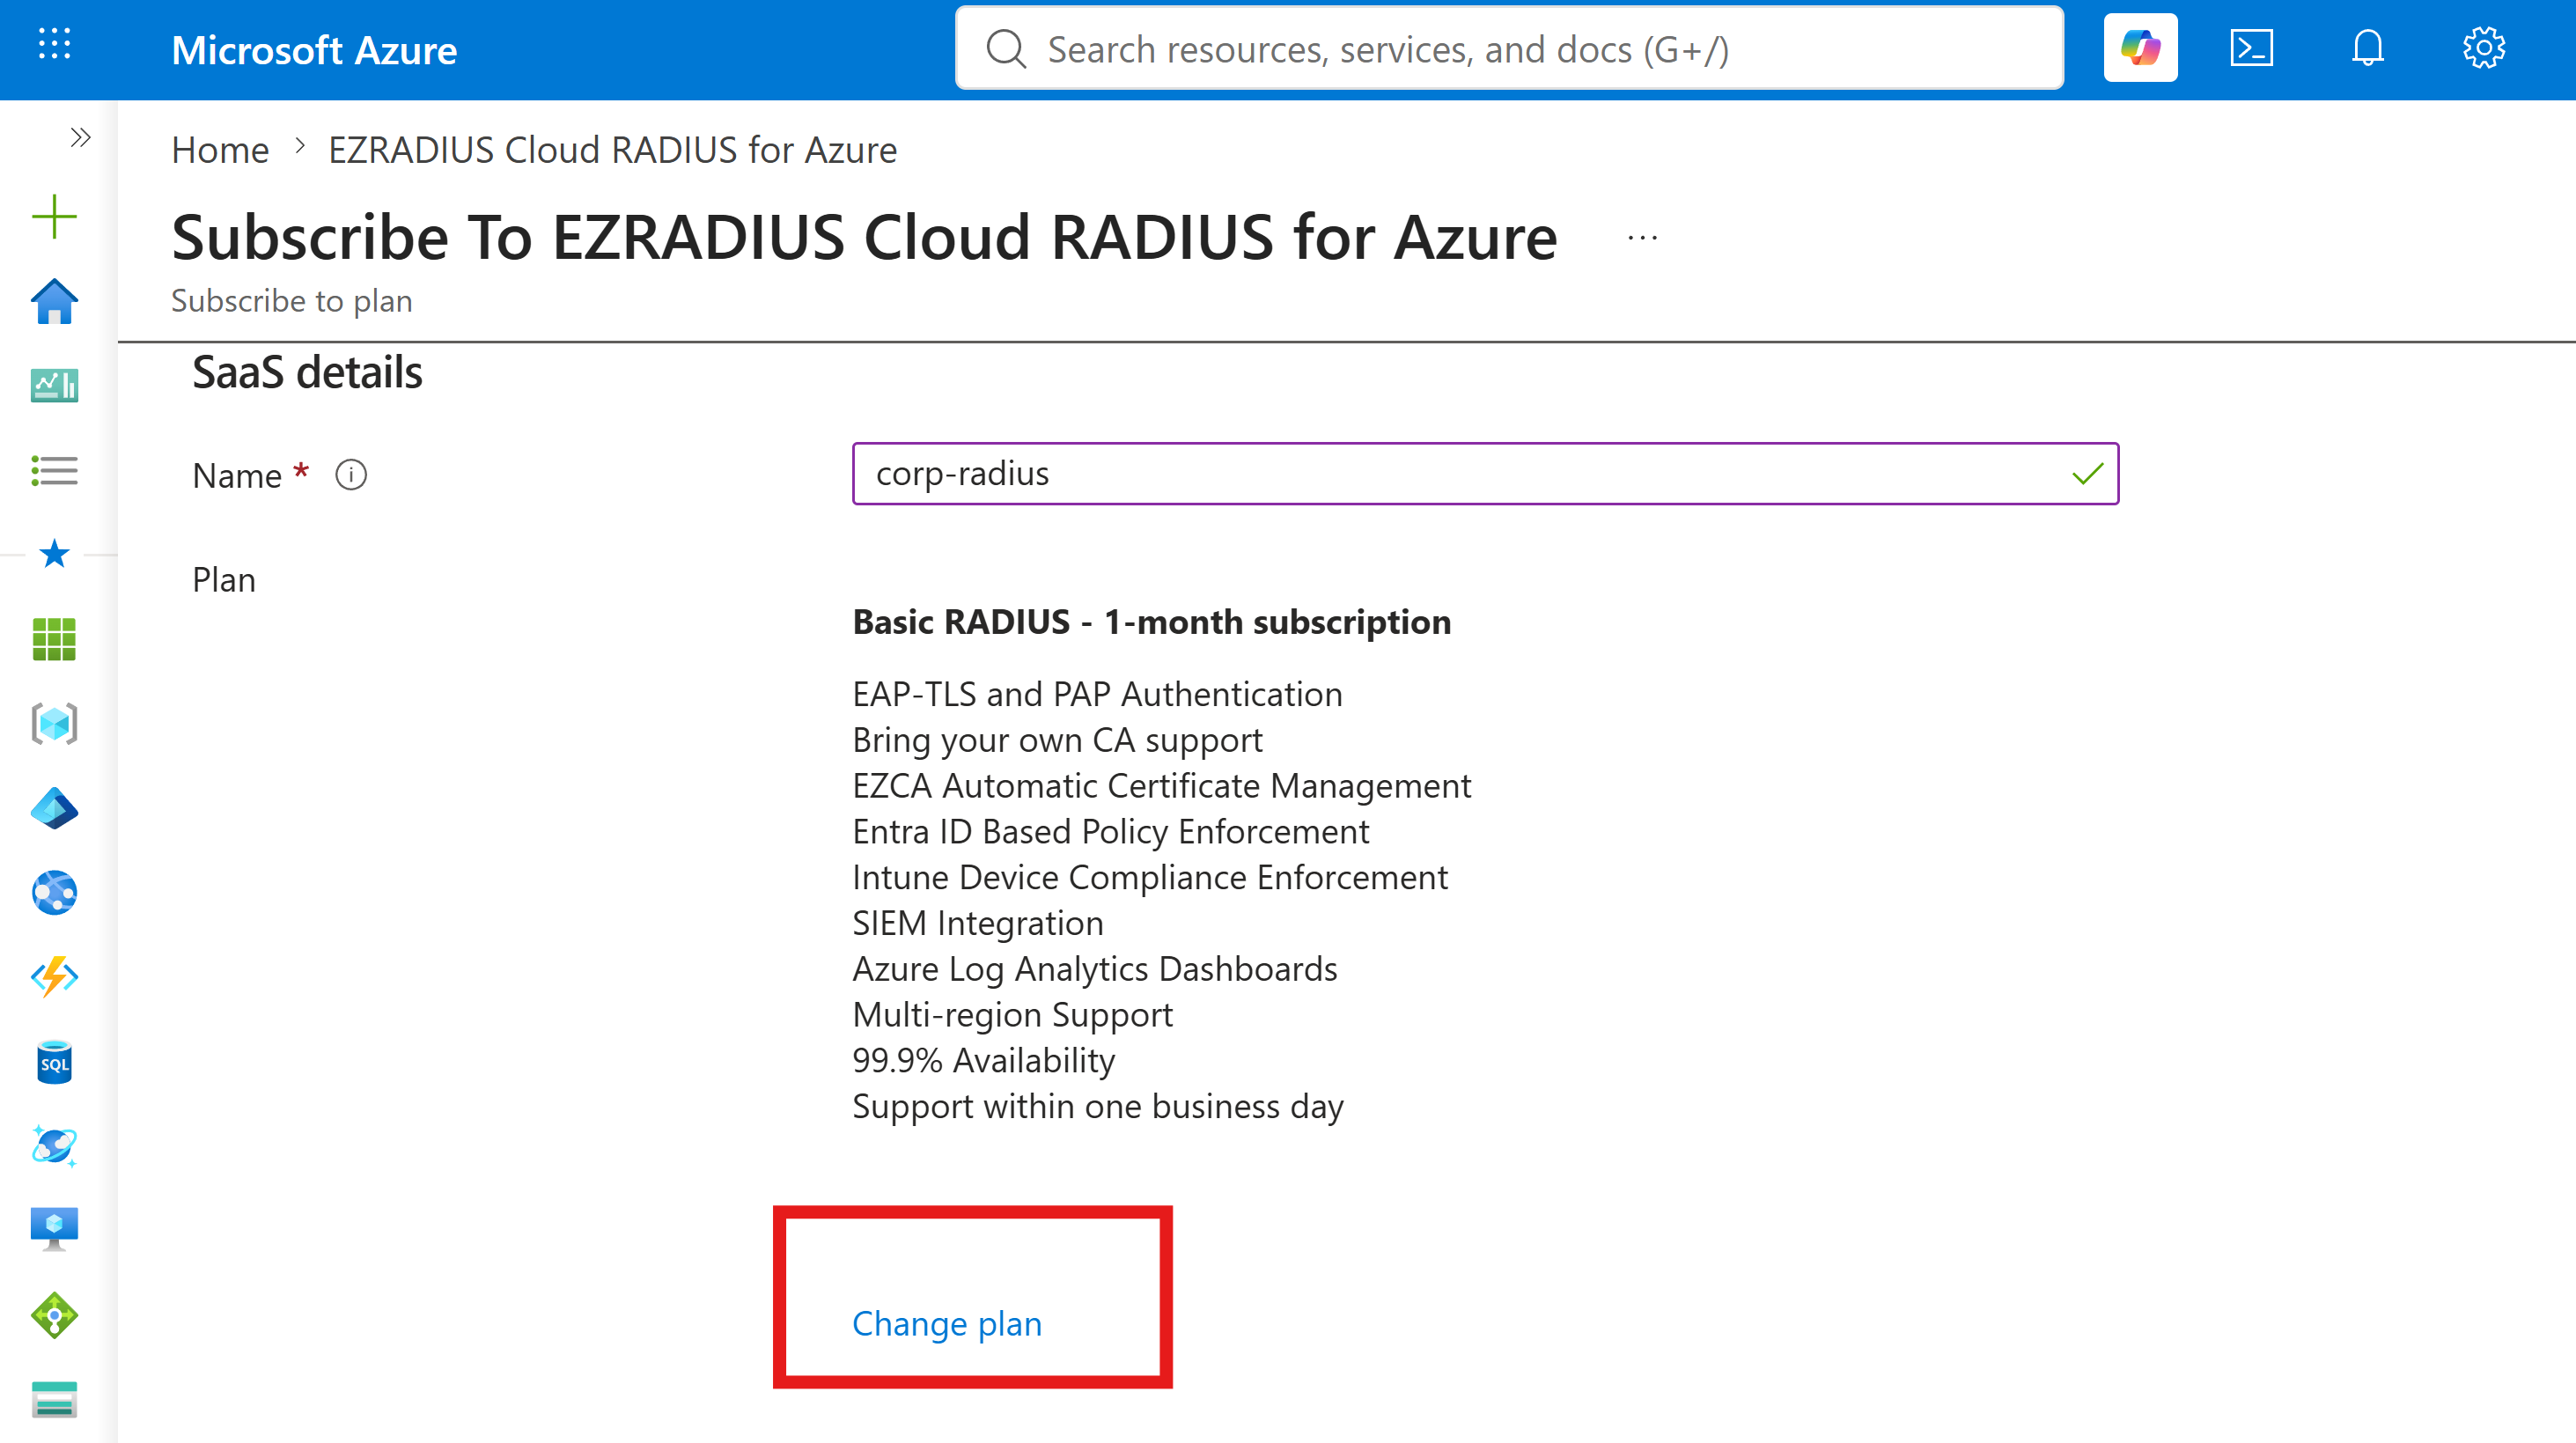
Enter a friendly Name for your EZRADIUS cloud RADIUS subscription. This will be used to identify your subscription in the Azure portal.
-
Click Change plan if you want to switch to a dedicated plan. Otherwise, keep it as Basic RADIUS - 1-month subscription.
-
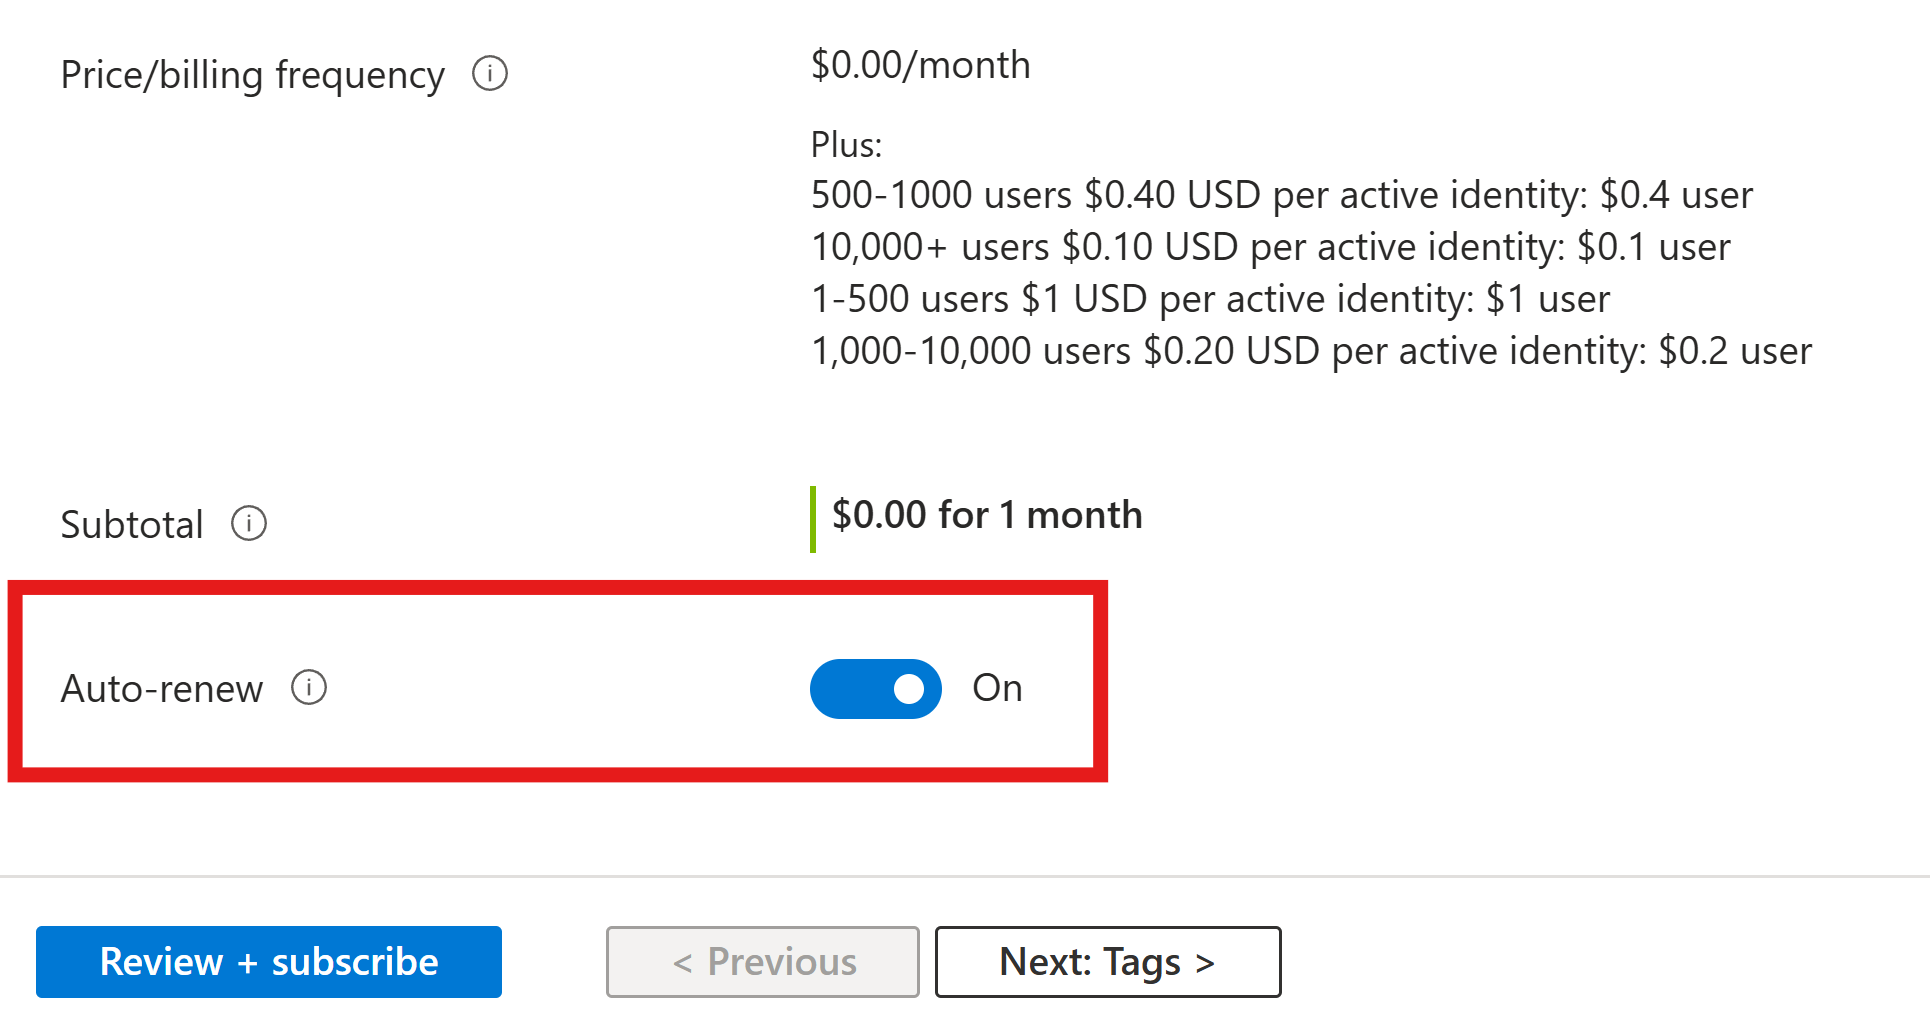
Make sure to enable Auto renew so that your subscription will automatically renew after the first month and you don’t break your Wi-Fi or VPN connections. You can still cancel your subscription at any time.
-
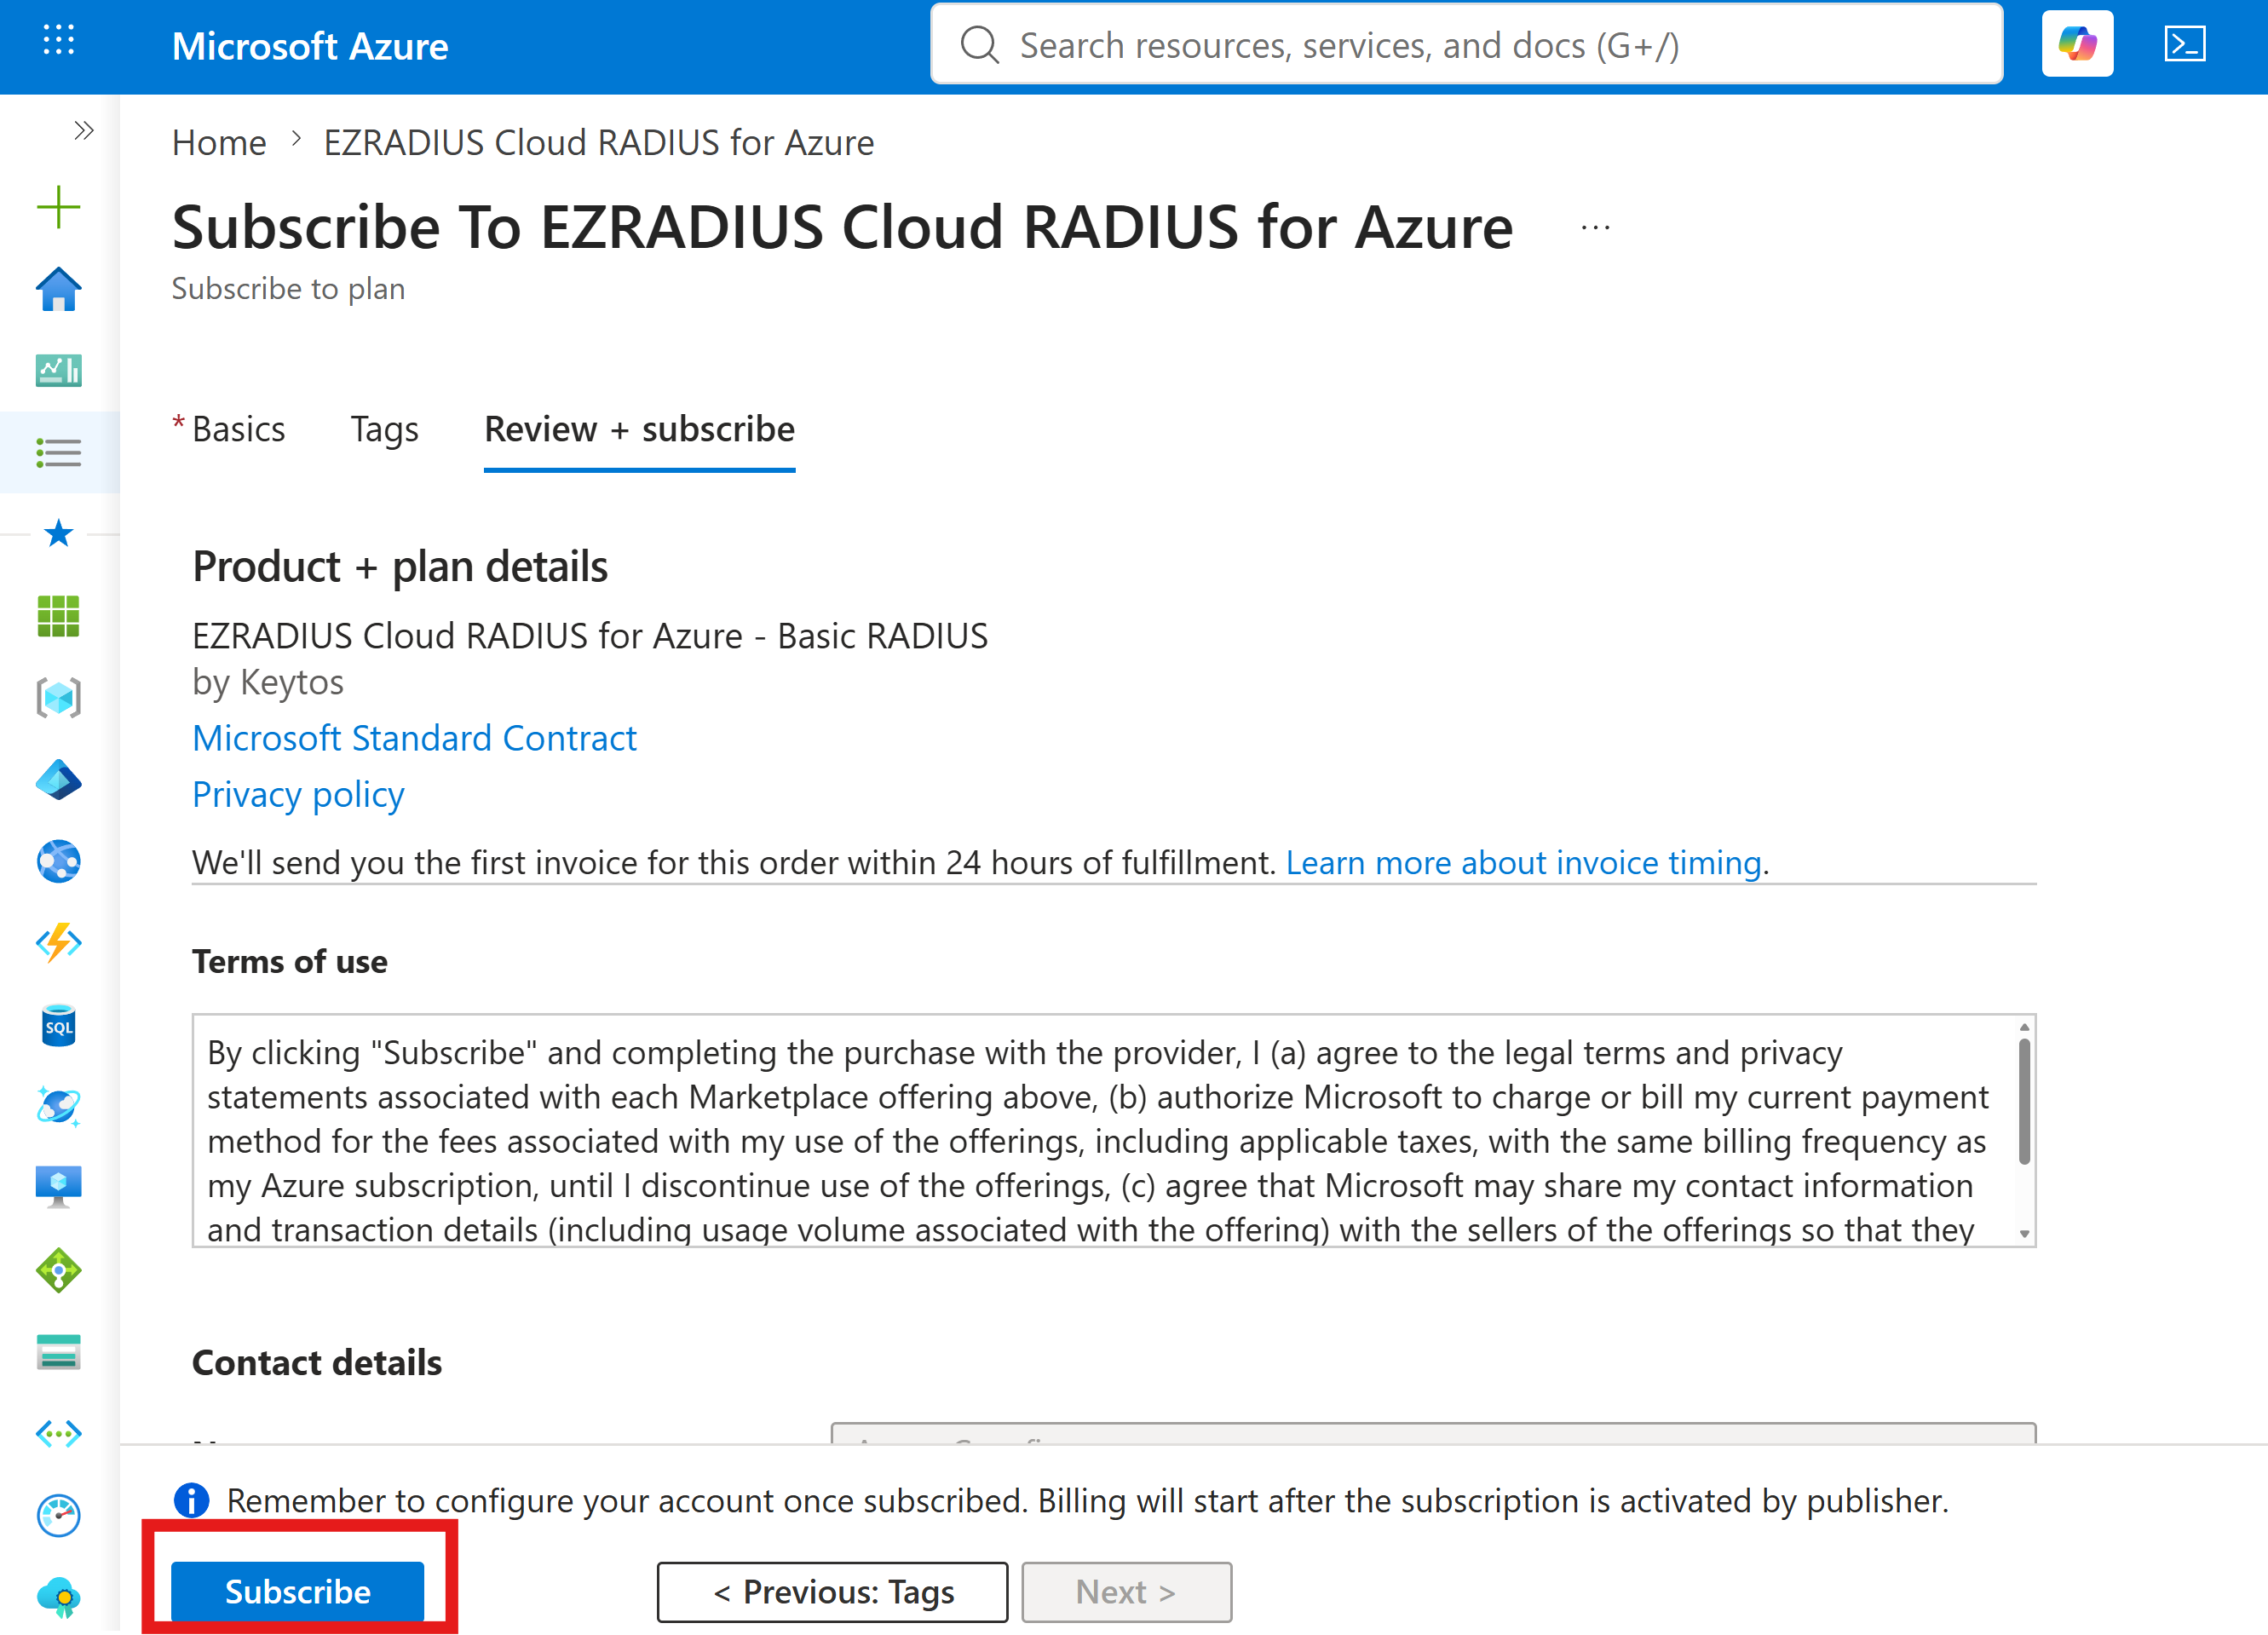
Click Review + subscribe to review your subscription details.
-
Click Subscribe to create your EZRADIUS cloud RADIUS subscription in Azure. This will take just a few seconds to complete.
-
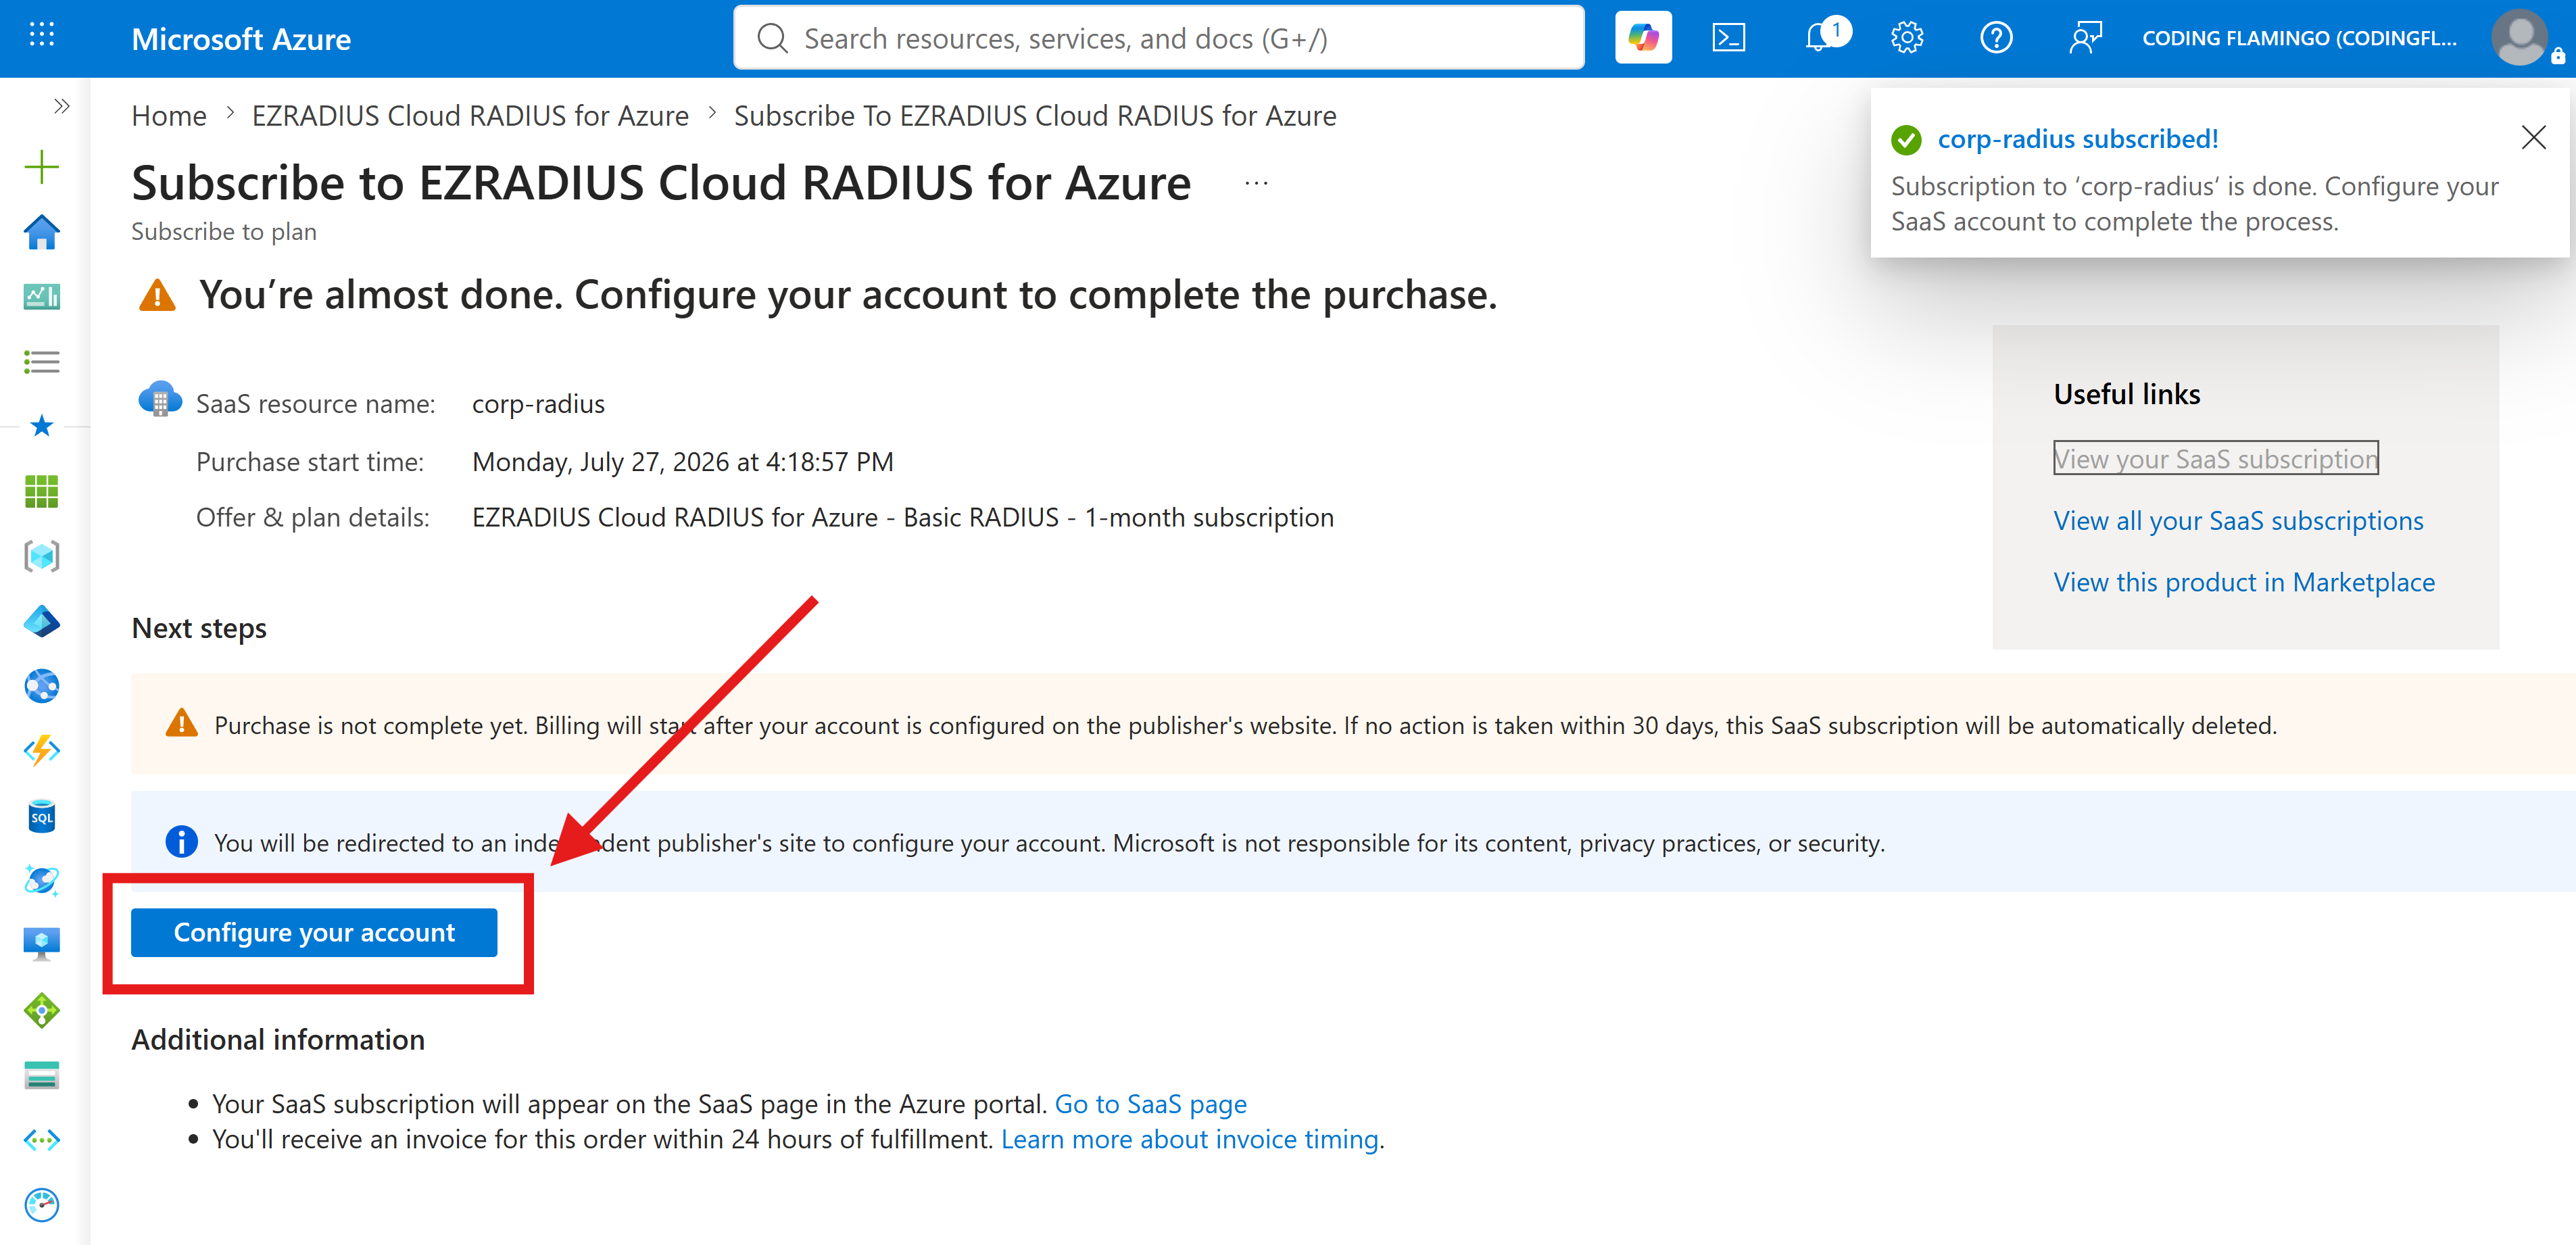
Once the subscription is complete, click the Configure your account button to launch the EZRADIUS portal.
How to Activate and Configure Your EZRADIUS Cloud RADIUS Subscription in EZCA
-
Make sure to sign-in to EZRADIUS with the same account you used to create your EZRADIUS subscription in Azure.
-
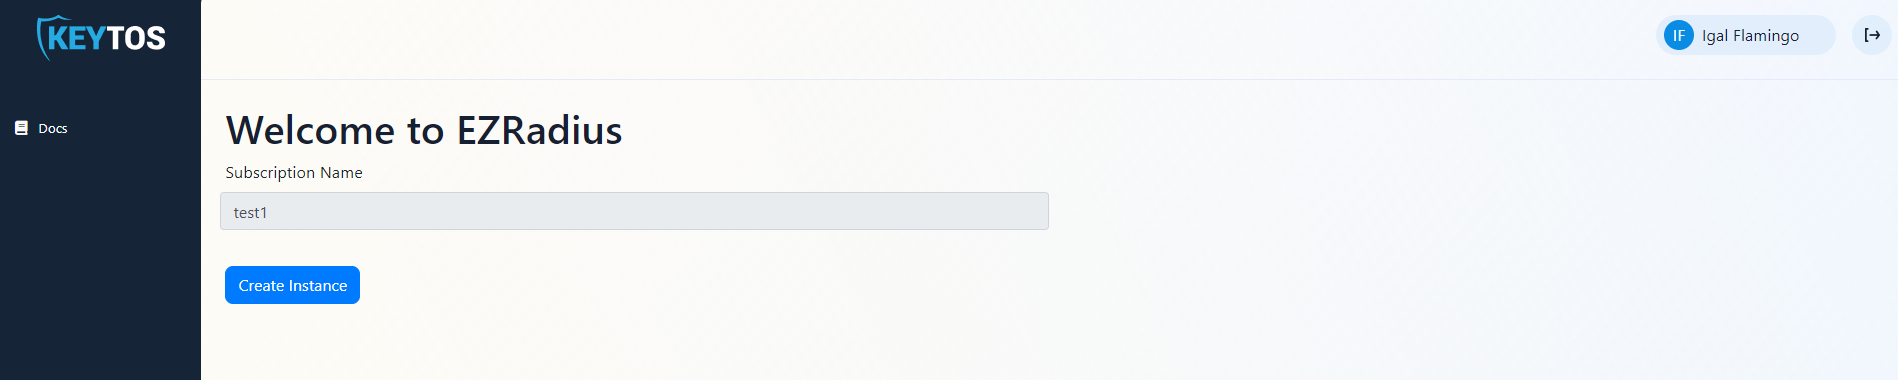
Select which EZRADIUS region you want your EZRADIUS infrastructure to run in. Note that this cannot be changed later, so make sure to select the region closest to your users for optimal performance.
-
If you selected a Dedicated plan, also choose your subdomain for your instance. This will be used to access your EZRADIUS instance and cannot be changed later, so make sure to select a subdomain that is easy to remember. (contoso.ezradius.io)
-
Click the Create Instance button to finish creating your EZRADIUS cloud RADIUS subscription.
 Dedicated Instances
If you selected a Dedicated plan, we will reach out with instructions on how to access your private instance once it is ready to use, usually within 24 hours. If you have any questions, please reach out to our support team at support@keytos.io.
-
Once your instance is ready, the instance URL will be displayed. This will be the URL you’ll use going forward to access EZRADIUS. It is recommended you bookmark this instance so you can enter it directly.

-
Done!
Follow these steps to create an EZRADIUS cloud RADIUS subscription in EZRADIUS, with a fully-featured free 1-month trial plan that allows you to test out the service before committing to a paid plan:
-
Navigate to portal.ezradius.io/Signup (or portal.ezradius.us/Signup for Azure Government GCC High users)
-
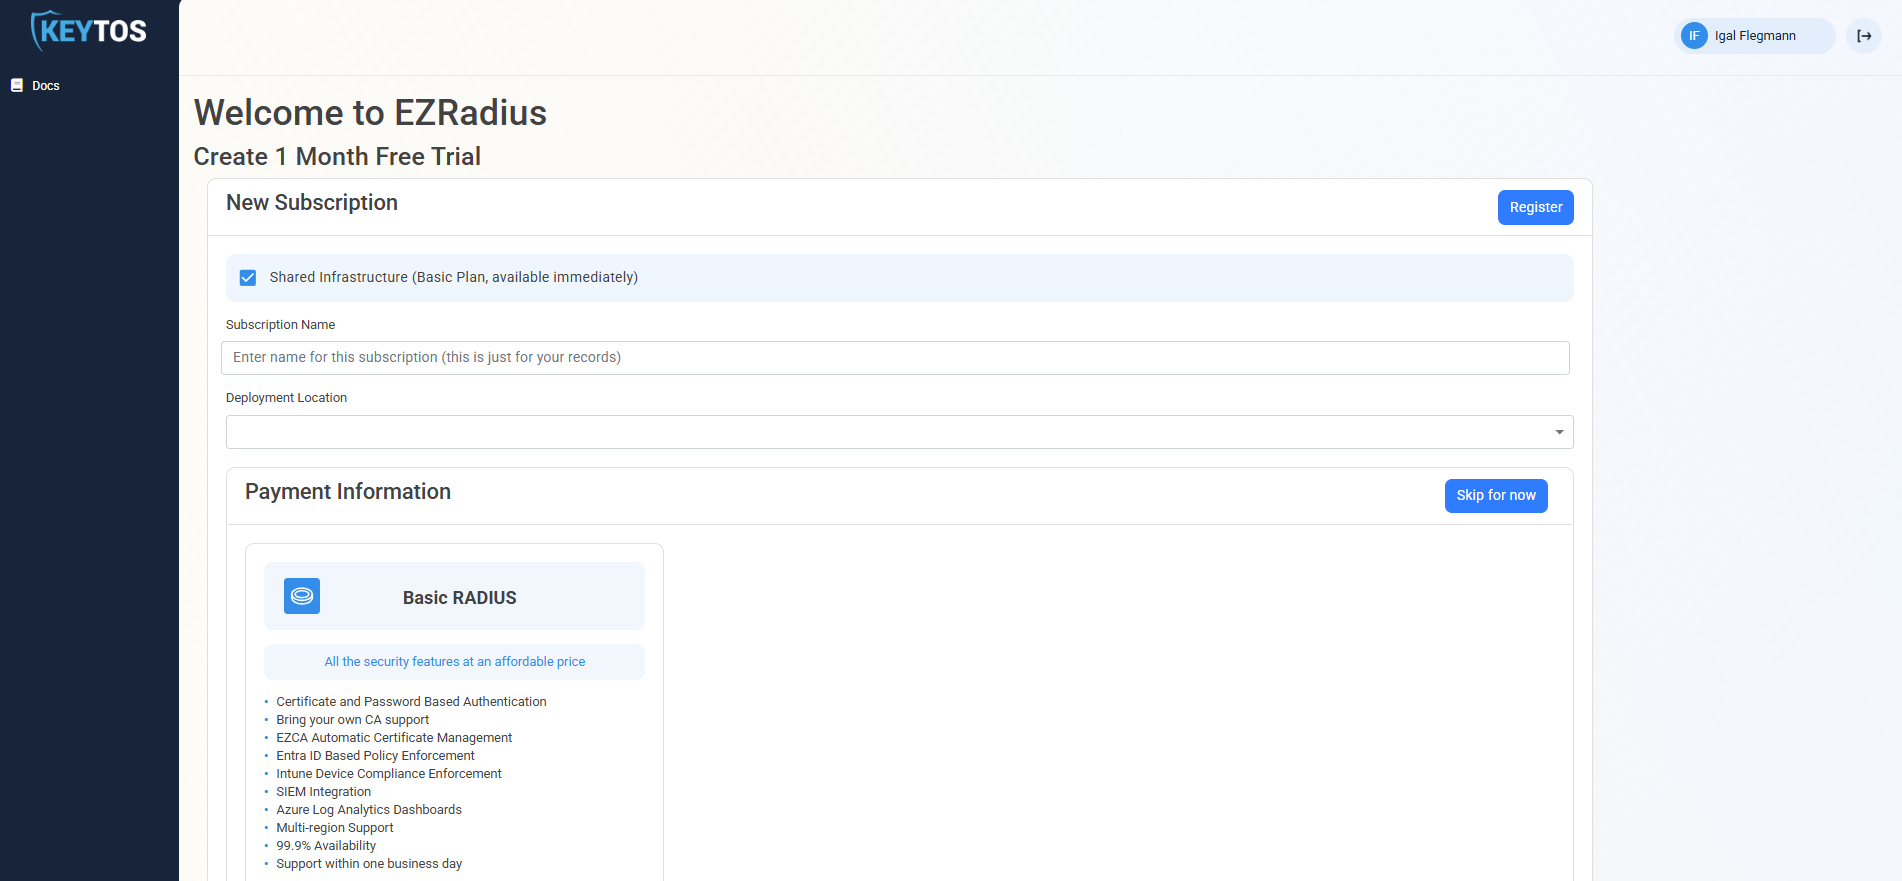
Enter the Subscription Name, which will be used to identify your subscription in the EZRADIUS portal.
-
Select the Deployment Location where you want to run your RADIUS service. Note that this cannot be changed later, so make sure to select the region closest to your users for optimal performance.
-
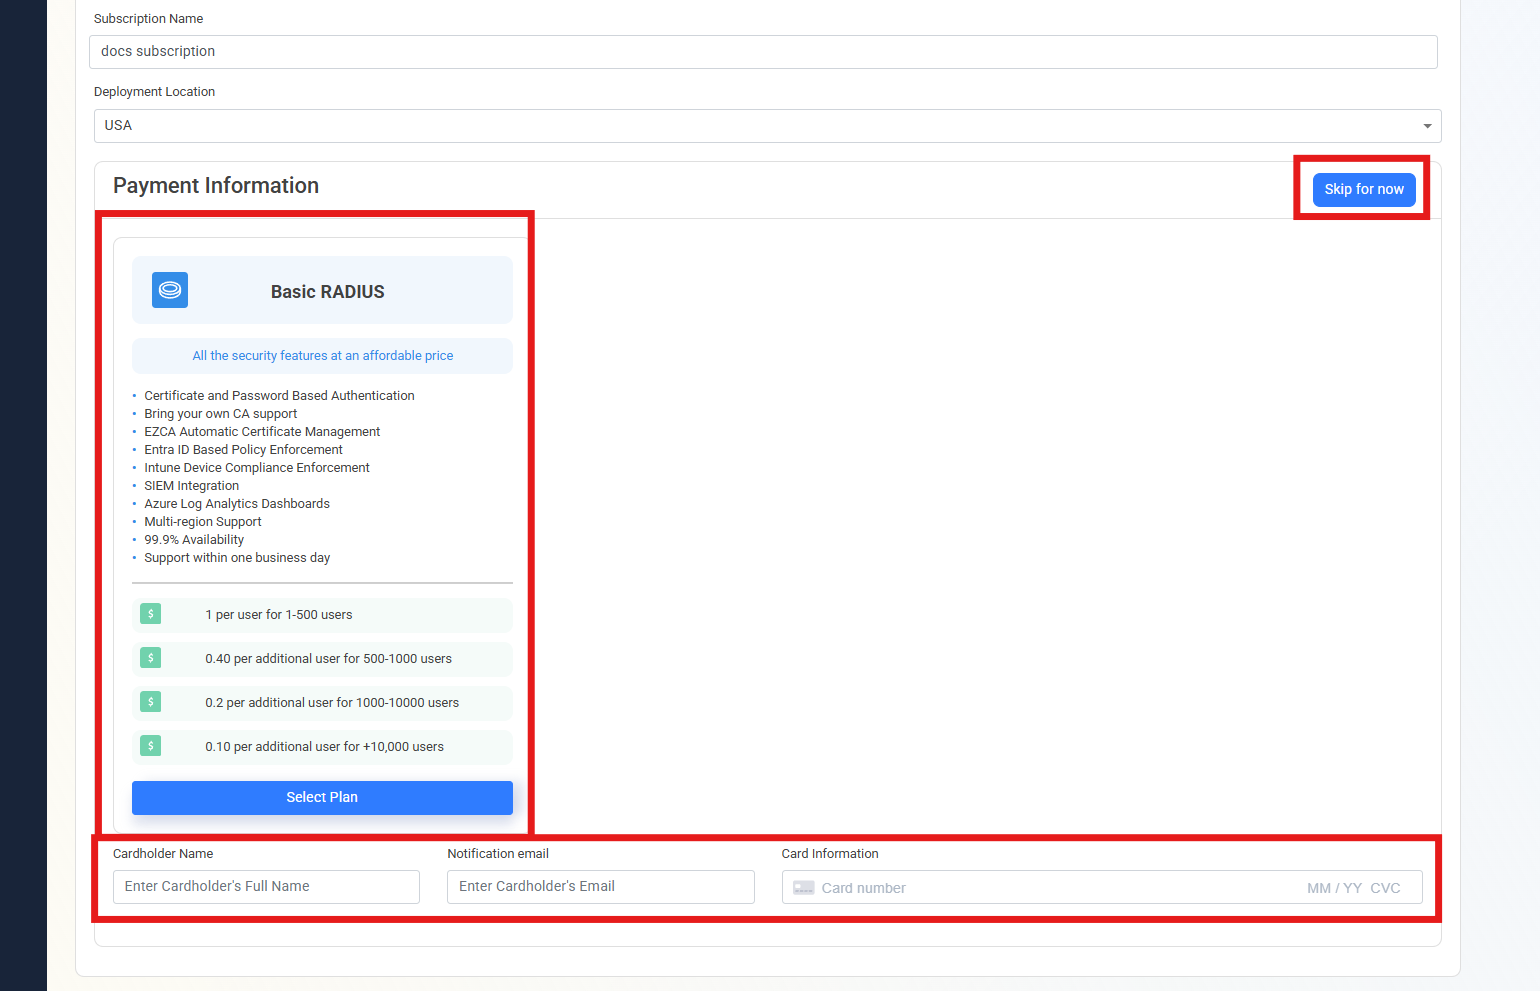
Click Select Plan on your desired plan. To view dedicated plans, uncheck Shared Infrastructure.
Note that a free trial is only available on the Basic RADIUS plan
-
Enter your credit card information, or click Skip for now to start your free 1-month trial. You will not be charged during the free trial period, but you can add your credit card information later in the EZRADIUS portal.
-
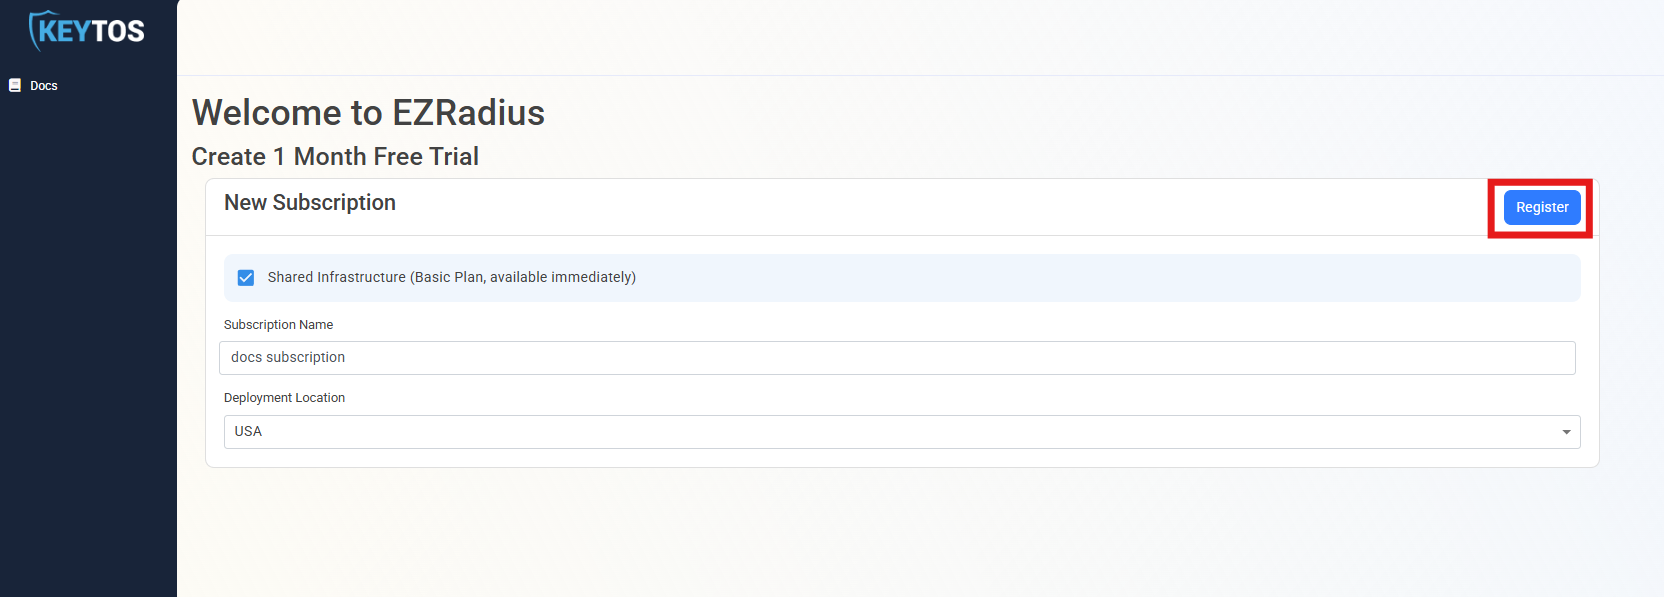
Scroll to the top of the page and click on the Register button.
Dedicated InstancesIf you selected a Dedicated plan, we will reach out with instructions on how to access your private instance once it is ready to use, usually within 24 hours. If you have any questions, please reach out to our support team at support@keytos.io.
-
Once your instance is ready, the instance URL will be displayed. This will be the URL you’ll use going forward to access EZRADIUS. It is recommended you bookmark this instance so you can enter it directly.

-
Done!
Collapses this section and completes the checkmark.
Now that you have created an EZRADIUS subscription and configured an access policy, you can continue with configuring a Wi-Fi profile for Intune devices.
Step 1 - How to Push Your Microsoft Cloud PKI CA Certificates as Trusted Certificates on Windows Devices via Intune
For your devices to establish a secure connection to EZRADIUS, you need to distribute the Cloud PKI CA certificates and the EZRADIUS Root CA certificate to your devices via Intune.
Follow the guide below to distribute the Cloud PKI Issuing and Root CA certificates.
How to Download Your Microsoft Cloud PKI Root and SCEP CA Certificates
Begin by downloading your Microsoft Cloud PKI Root and SCEP CA certificates.
- Sign in to the Microsoft Intune admin center.
- Go to Tenant administration > Cloud PKI.
- Select your root CA.
- Go to Properties.
- Select Download and save the certificate file to your local machine.
- Return to your Cloud PKI list.
- Select your issuing SCEP CA.
- Go to Properties.
- Select Download and save the certificate file to your local machine.
How to Push Your Microsoft Cloud PKI Root and SCEP CA Certificates to Your Devices via Intune
Now that you have downloaded your Microsoft Cloud PKI Root and SCEP CA certificates, you can push them to your devices via Intune.
- Sign in to the Microsoft Intune admin center.
- Go to Devices > Configuration profiles.
- Select Create > New policy.
- Select your policy basics and click Create.
- For Platform, select Windows 10 and later.
- For Profile type, select Templates.
- For Template name, select Trusted certificate.
- Enter a Name and Description for the profile and then select Next.
- Upload your Root CA certificate file.
- Set the Destination Store to Computer certificate store - Root and then select Next.
- Pick devices or device groups to which you want to deploy the profile and then select Next.
- Pick your Applicability Rules and then select Next.
- Review your settings and then select Create to deploy the profile.
- Repeat the previous steps for your SCEP CA certificate, but set the Destination Store to Computer certificate store - Intermediate instead of Root.
- Sign in to the Microsoft Intune admin center.
- Go to Devices > Configuration profiles.
- Select Create > New policy.
- Select your policy basics and click Create.
- For Platform, select macOS.
- For Profile type, select Templates.
- For Template name, select Trusted certificate.
- Enter a Name and Description for the profile and then select Next.
- Set the Deployment Channel to Device.
- Upload your Root CA certificate file.
- Pick devices or device groups to which you want to deploy the profile and then select Next.
- Pick your Applicability Rules and then select Next.
- Review your settings and then select Create to deploy the profile.
- Repeat the previous steps for your SCEP CA certificate, using the same Deployment Channel as the Root CA certificate.
- Sign in to the Microsoft Intune admin center.
- Go to Devices > Configuration profiles.
- Select Create > New policy.
- Select your policy basics and click Create.
- For Platform, select iOS/iPadOS.
- For Profile type, select Templates.
- For Template name, select Trusted certificate.
- Enter a Name and Description for the profile and then select Next.
- Upload your Root CA certificate file.
- Pick devices or device groups to which you want to deploy the profile and then select Next.
- Review your settings and then select Create to deploy the profile.
- Repeat the previous steps for your SCEP CA certificate.
- Sign in to the Microsoft Intune admin center.
- Go to Devices > Configuration profiles.
- Select Create > New policy.
- Select your policy basics and click Create.
- For Platform, select Android Enterprise.
- For Profile type, select Templates.
- For Template name, select Trusted certificate.
- Enter a Name and Description for the profile and then select Next.
- Upload your Root CA certificate file.
- Pick devices or device groups to which you want to deploy the profile and then select Next.
- Review your settings and then select Create to deploy the profile.
- Repeat the previous steps for your SCEP CA certificate.
You should now have successfully pushed your Microsoft Cloud PKI Root CA and SCEP CA certificates to your devices using Intune.
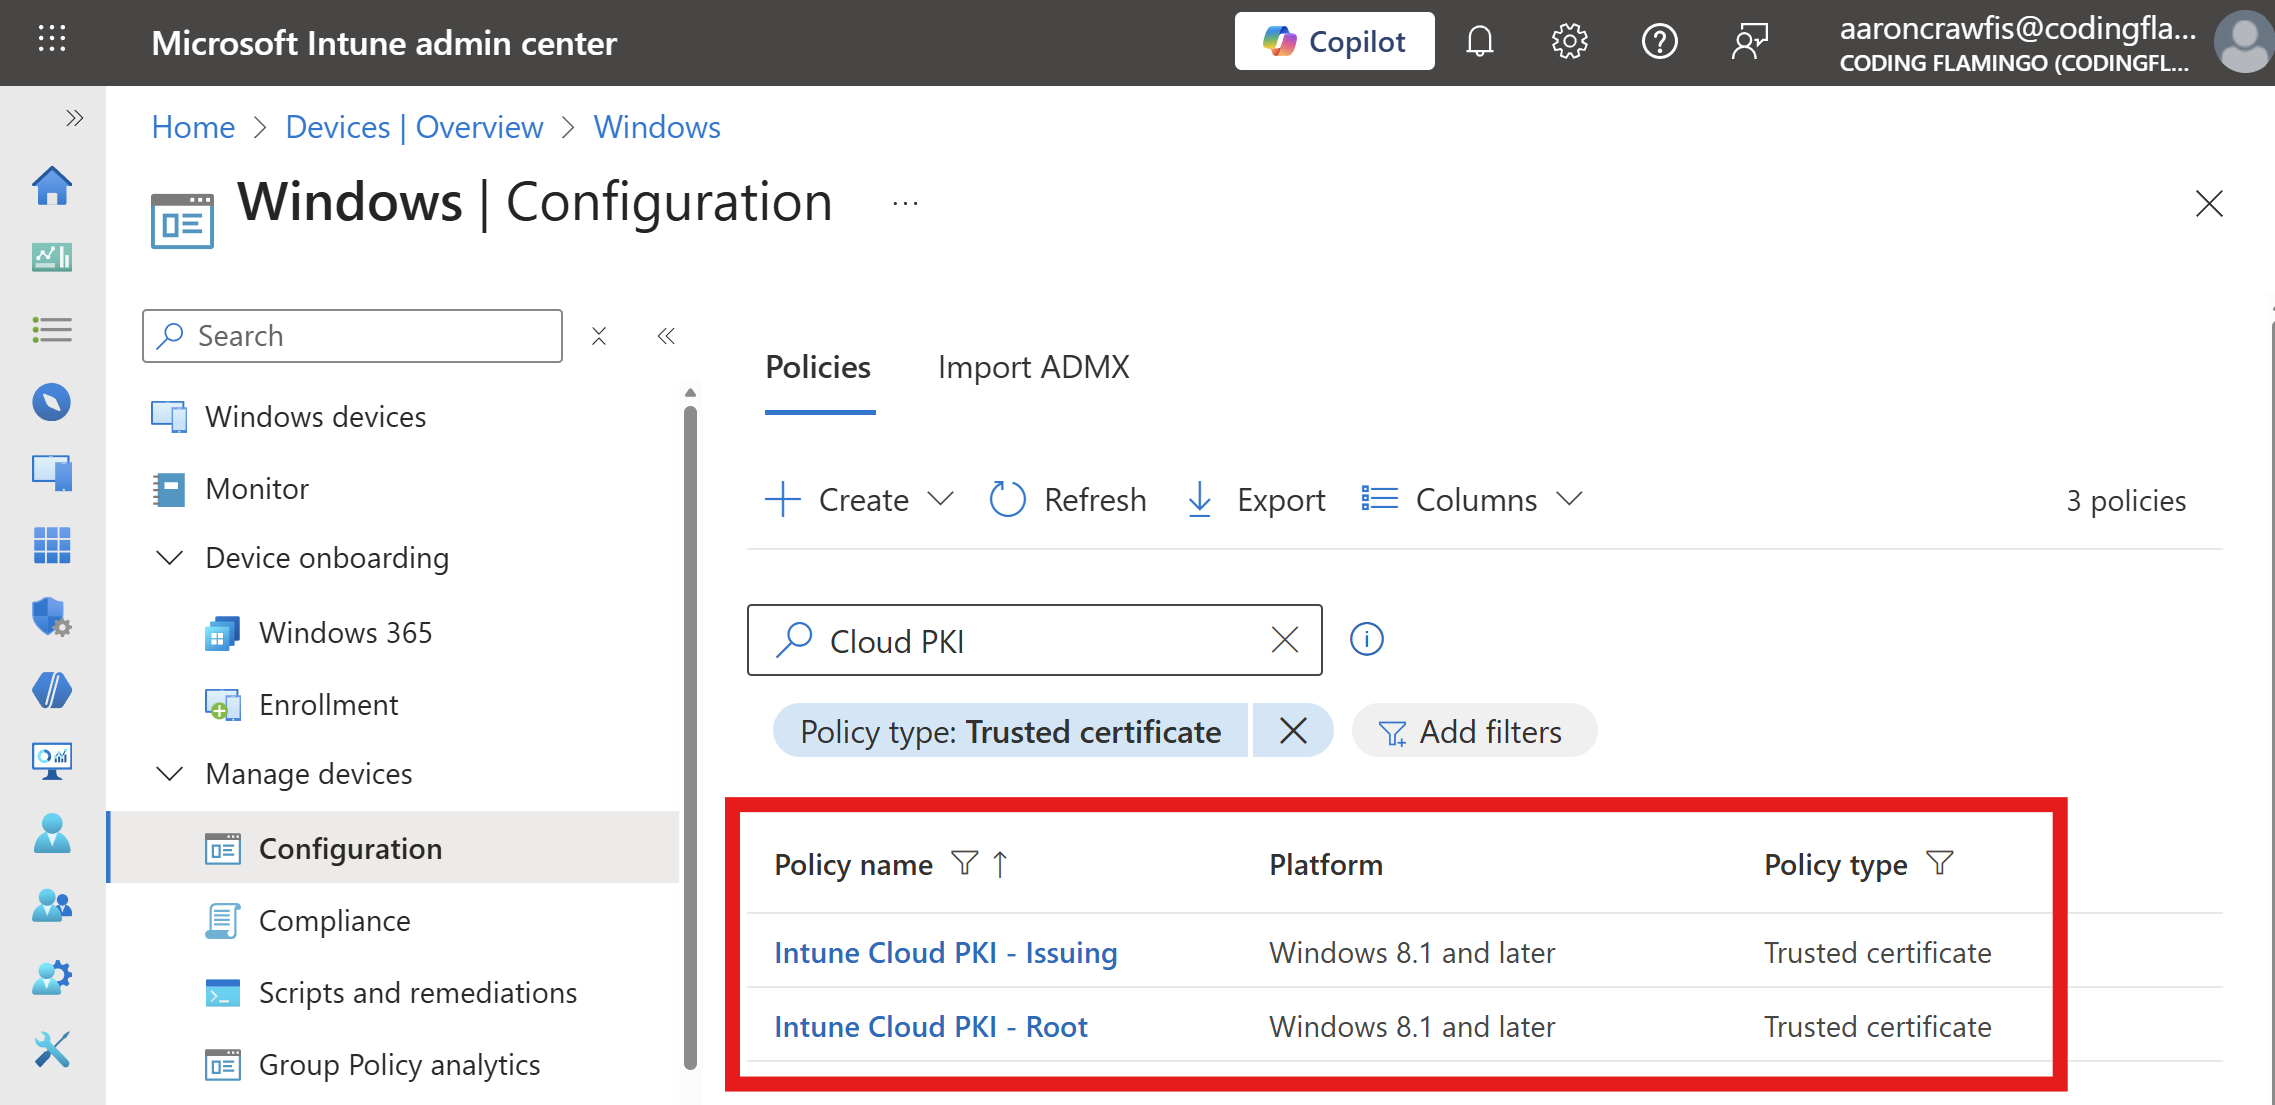
Step 2 - How to Issue SCEP Certificates to Your Intune Managed Devices
A SCEP (Simple Certificate Enrollment Protocol) certificate allows your Windows devices to authenticate with its own unique certificate, which can be used for secure network access and other authentication purposes.
The benefit of certificate-based authentication is that each user and/or device gets their own unique certificate. To generate these certificates using your Cloud PKI, you’ll need to set up SCEP certificate profiles in Intune.
How to Get Your Microsoft Cloud PKI SCEP URI
Begin by getting your Microsoft Cloud PKI SCEP URI.
- In Microsoft Intune, return to Tenant administration > Cloud PKI.
- Select your Issuing SCEP CA.
- Go to Properties.
- Next to the SCEP URI property, select Copy to clipboard.
How to Create a SCEP Certificate Profile in Intune
Now that you have obtained your Microsoft Cloud PKI SCEP URI, you can proceed to create a SCEP certificate profile in Intune.
When configuring SCEP certificate profiles, you have the option to issue either user certificates or device certificates. User certificates are tied to individual users and are ideal for scenarios where you want to control access on a per-user basis. Device certificates, on the other hand, are associated with the device itself and are useful for device-centric authentication such as shared devices or kiosks. Choose the option that best fits your organization’s authentication needs.
- Sign in to the Microsoft Intune admin center.
- Go to Devices > Configuration profiles.
- Select Create > New policy.
- Select your policy basics and click Create.
- For Platform, select Windows 10 and later.
- For Profile type, select Templates.
- For Template name, select SCEP certificate.
- Enter a Name and Description for the profile and then select Next.
- Enter the following configuration details for your SCEP certificate profile:
- Certificate type: Set this to Device (the rest of guide assumes device certificates; choose User if you want user certificates and adjust the subsequent steps accordingly).
- Subject name format: Leave this as
CN={{AAD_Device_ID}} - Subject alternative name: Set Attribute to
DNSand Value toIntuneDeviceId://{{DeviceId}} - Certificate validity period: Set this to the desired validity period for the certificate.
- Key storage provider (KSP): Set this to Enroll to Trusted Platform Module (TPM) KSP if present, otherwise Software KSP.
- Key usage: Set this to Digital signature and Key encipherment.
- Key size (bits): Set this to 2048.
- Hash algorithm: Set this to SHA-2.
- For Root Certificate, select the Root CA certificate that you previously uploaded.
- For Extended key usage, set the Predefined values to Client Authentication (1.3.6.1.5.5.7.3.2).
- For Renewal threshold, set this to the desired value for when the certificate should be renewed, such as 20% time before expiration.
- For SCEP server URLs, enter the URL of your SCEP server that you previously copied and select Next.
- Pick devices or device groups to which you want to deploy the profile and then select Next.
- Pick your Applicability Rules and then select Next.
- Review your settings and then select Create to deploy the profile.
- Sign in to the Microsoft Intune admin center.
- Go to Devices > Configuration profiles.
- Select Create > New policy.
- Select your policy basics and click Create.
- For Platform, select macOS.
- For Profile type, select Templates.
- For Template name, select SCEP certificate.
- Enter a Name and Description for the profile and then select Next.
- Enter the following configuration details for your SCEP certificate profile:
- Deployment Channel: Set this to Device Channel (the rest of guide assumes device certificates; choose User Channel if you want user certificates and adjust the subsequent steps accordingly).
- Certificate type: Set this to Device.
- Subject name format: Leave this as
CN={{AAD_Device_ID}} - Subject alternative name: Set Attribute to
DNSand Value toIntuneDeviceId://{{DeviceId}} - Certificate validity period: Set this to the desired validity period for the certificate.
- Key usage: Set this to Digital signature and Key encipherment.
- Key size (bits): Set this to 2048.
- For Root Certificate, select the Root CA certificate that you previously uploaded.
- For Extended key usage, set the Predefined values to Client Authentication (1.3.6.1.5.5.7.3.2).
- For Renewal threshold, set this to the desired value for when the certificate should be renewed, such as 20% time before expiration.
- For SCEP server URLs, enter the URL of your SCEP server that you previously copied.
- For Allow all apps access to private key, select Not configured (unless you have specific VPN requirements) and select Next.
- Pick devices or device groups to which you want to deploy the profile and then select Next.
- Pick your Applicability Rules and then select Next.
- Review your settings and then select Create to deploy the profile.
- Sign in to the Microsoft Intune admin center.
- Go to Devices > Configuration profiles.
- Select Create > New policy.
- Select your policy basics and click Create.
- For Platform, select iOS/iPadOS.
- For Profile type, select Templates.
- For Template name, select SCEP certificate.
- Enter a Name and Description for the profile and then select Next.
- Enter the following configuration details for your SCEP certificate profile:
- Certificate type: Set this to Device. (the rest of guide assumes device certificates; choose User if you want user certificates and adjust the subsequent steps accordingly).
- Subject name format: Leave this as
CN={{AAD_Device_ID}} - Subject alternative name: Set Attribute to
DNSand Value toIntuneDeviceId://{{DeviceId}} - Certificate validity period: Set this to the desired validity period for the certificate.
- Key usage: Set this to Digital signature and Key encipherment.
- Key size (bits): Set this to 2048.
- For Root Certificate, select the Root CA certificate that you previously uploaded.
- For Extended key usage, set the Predefined values to Client Authentication (1.3.6.1.5.5.7.3.2).
- For Renewal threshold, set this to the desired value for when the certificate should be renewed, such as 20% time before expiration.
- For SCEP server URLs, enter the URL of your SCEP server that you previously copied and select Next.
- Pick devices or device groups to which you want to deploy the profile and then select Next.
- Review your settings and then select Create to deploy the profile.
- Sign in to the Microsoft Intune admin center.
- Go to Devices > Configuration profiles.
- Select Create > New policy.
- Select your policy basics and click Create.
- For Platform, select Android Enterprise.
- For Profile type, select Templates.
- For Template name, select SCEP certificate under the type of Android management you use.
- Enter a Name and Description for the profile and then select Next.
- Enter the following configuration details for your SCEP certificate profile:
- Certificate type: Set this to Device. (the rest of guide assumes device certificates; choose User if you want user certificates and adjust the subsequent steps accordingly).
- Subject name format: Leave this as
CN={{AAD_Device_ID}} - Subject alternative name: Set Attribute to
DNSand Value toIntuneDeviceId://{{DeviceId}} - Certificate validity period: Set this to the desired validity period for the certificate.
- Key usage: Set this to Digital signature and Key encipherment.
- Key size (bits): Set this to 2048.
- For Root Certificate, select the Root CA certificate that you previously uploaded.
- For Extended key usage, set the Predefined values to Client Authentication (1.3.6.1.5.5.7.3.2).
- For Renewal threshold, set this to the desired value for when the certificate should be renewed, such as 20% time before expiration.
- For SCEP server URLs, enter the URL of your SCEP server that you previously copied and select Next.
- Pick devices or device groups to which you want to deploy the profile and then select Next.
- Review your settings and then select Create to deploy the profile.
After completing these steps, you should see your SCEP certificate profiles in Intune:
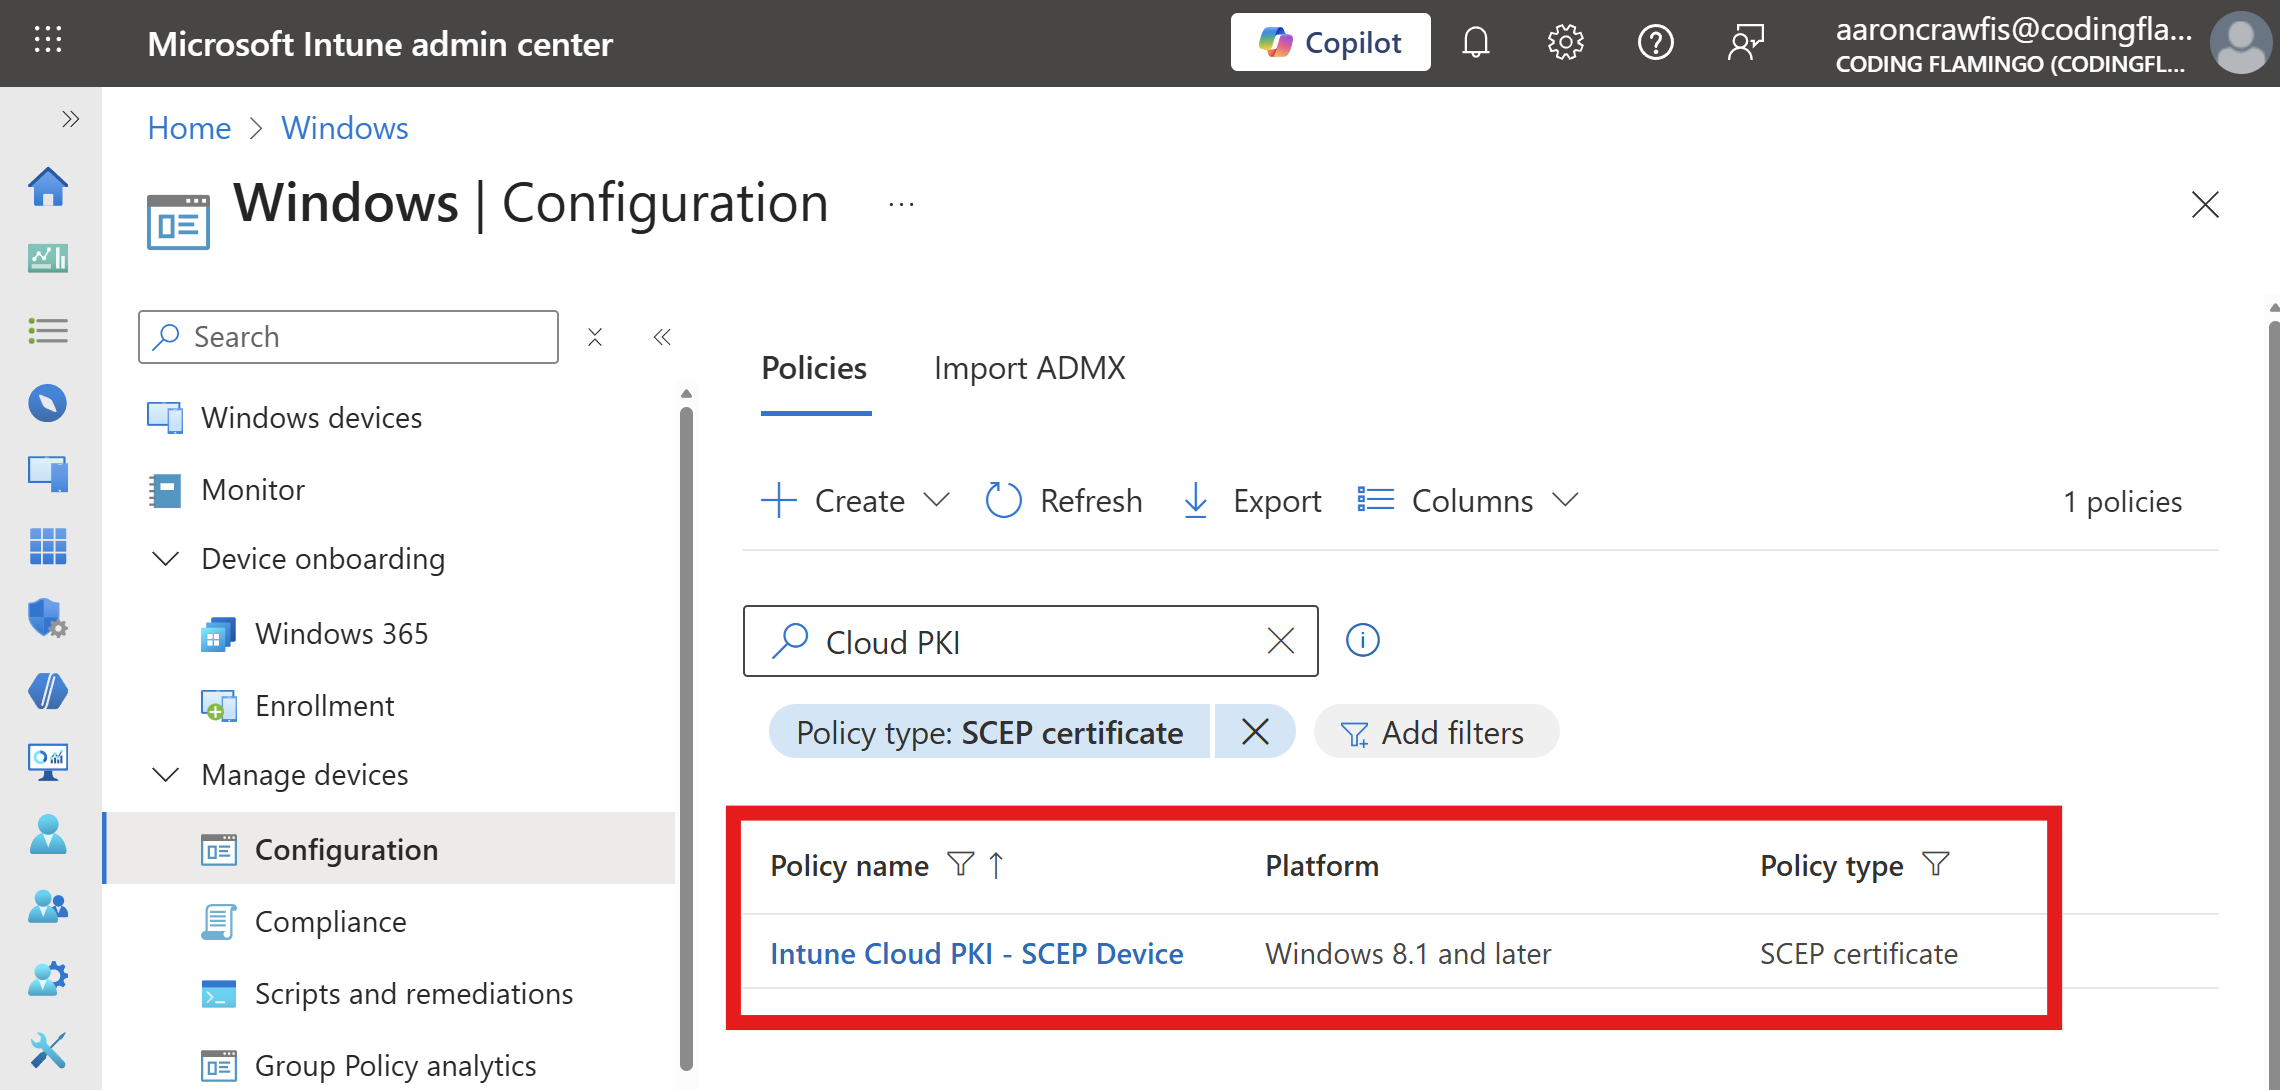
Step 3 - How To Create an EZRADIUS Policy for Microsoft Cloud PKI
Now that you have issued a SCEP certificate to your Windows devices via Intune, you can proceed to create an EZRADIUS policy for Microsoft Cloud PKI.
How to Create an EZRADIUS Policy for Microsoft Cloud PKI
- Navigate to the EZRADIUS portal and log in with your administrator credentials.
- From the left-hand menu, select Policies.
- Scroll down to RADIUS Server Policy.
- Enter a Policy Name, such as Cloud PKI Policy.
How to Configure RADIUS or RadSec in EZRADIUS
The following steps will guide you through configuring RADIUS or RadSec in EZRADIUS for your Cloud PKI policy. Since Cloud PKI cannot issue RadSec certificates, RADIUS is typically recommended.
How to Set Up Classic RADIUS for Cloud RADIUS
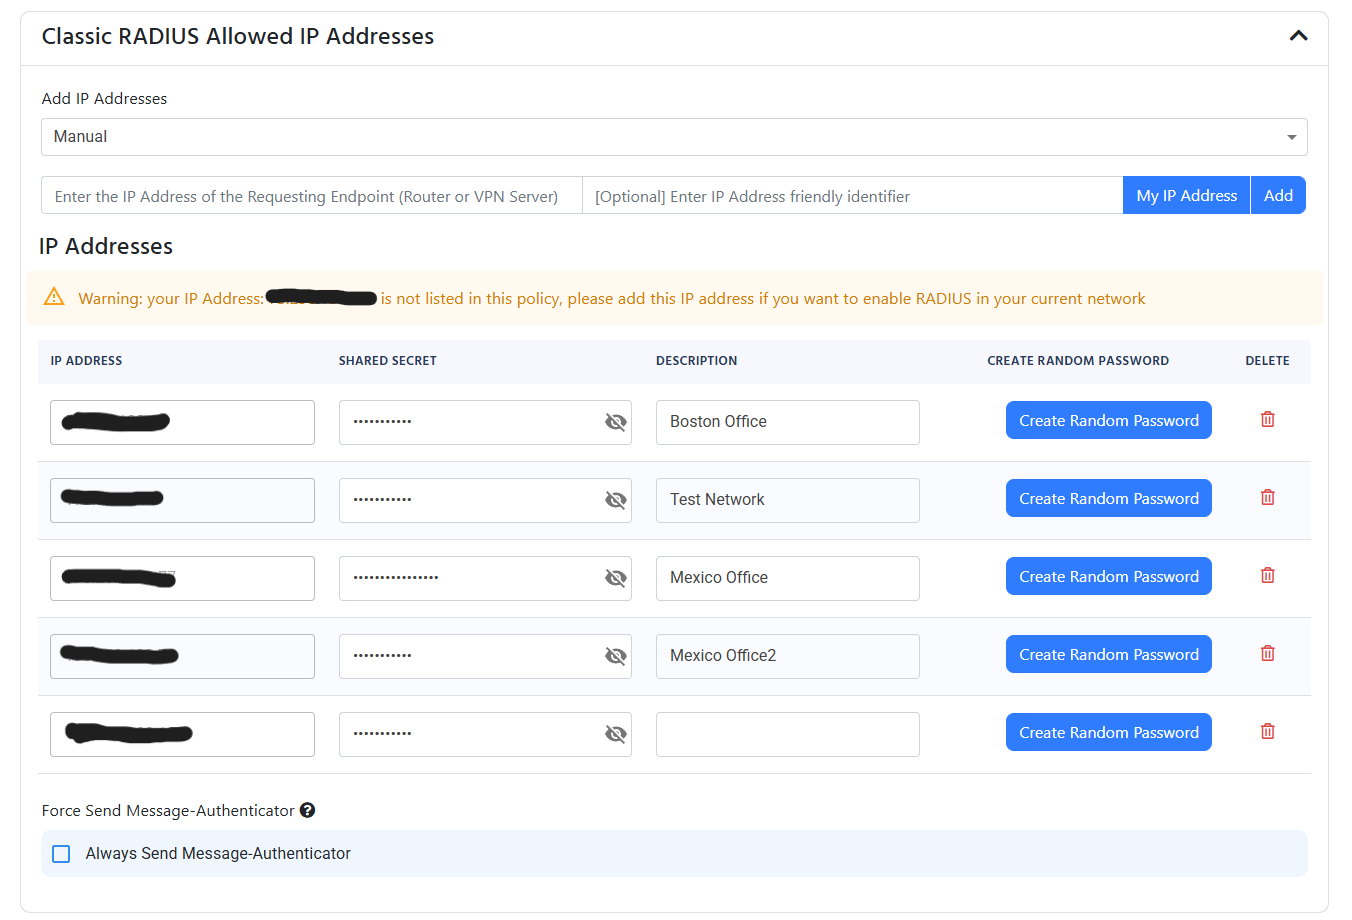
Classic RADIUS uses the public IP address of your RADIUS client (access point, switch, etc.) and a shared secret to authenticate incoming requests. In this section, you will add your public IP addresses and create a shared secret so we know which requests are coming from your authorized network devices.
When specifying an IP address, make sure to use the external IP address for your network. It should not start with 192.168.***, 10.0.***, 172.16.***, or any other private IP address range (the only exception is when you run a local RADIUS server, whose access points use private IP addresses). If you’re unsure, visit What is my IP to find your public IP address, or click the My IP Address button in the EZRADIUS portal to automatically add your current public IP address if you’re connecting from within your network.
There are two ways to add IP addresses to your RADIUS policy: either manually adding them one by one or uploading a CSV file for multiple IP addresses.
How To Manually Add Your IP Address(es)
To manually add your IP address(es) to the RADIUS policy, follow these steps:
-
Select Manual from the dropdown.
-
Enter the public IP address of your router or VPN server.
-
Provide a friendly name for the IP address (for your records).
-
Click Add to add the IP address to the list of allowed RADIUS clients.
-
A randomly generated shared secret will be created for the IP address. You can change this shared secret if needed.
-
Repeat the process for each additional public IP address that will connect to EZRADIUS. Make sure to include any backup/failover IP addresses as well.
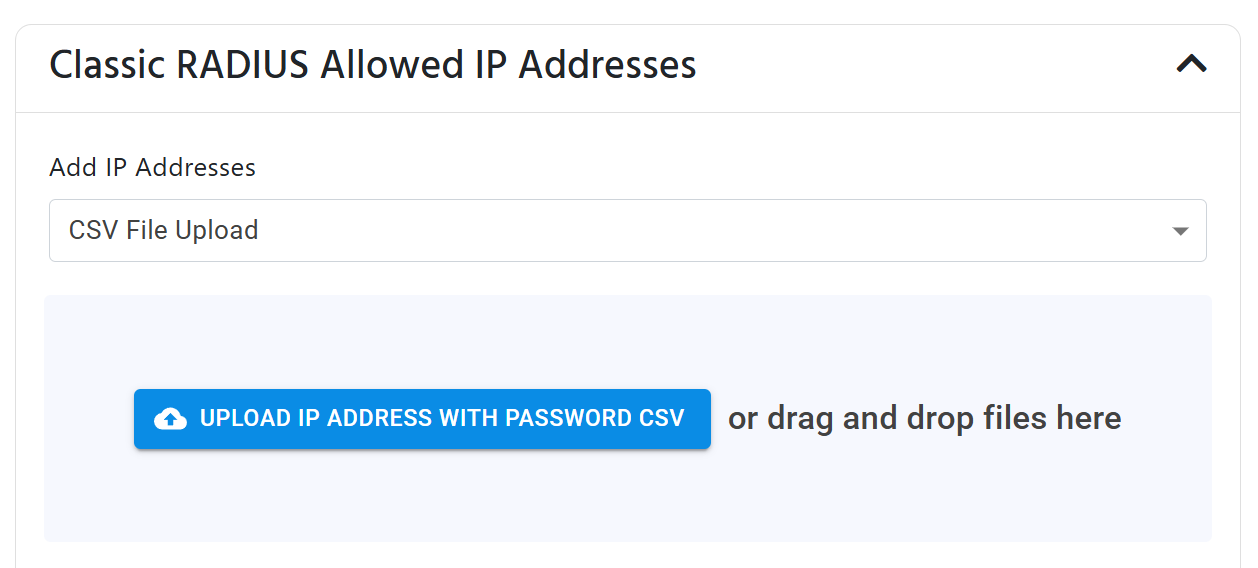
If you have multiple IP Addresses you can add them using a CSV file (if you have an CIDR range and want to convert it to IP range, use this site).
How To Create a CSV File for Uploading IP Addresses
Before uploading, you need to prepare a CSV file containing all the IP addresses you want to add. Follow the instructions below to create and upload the CSV file.
- Create a new file named
ip_addresses.csvon your computer. - Open the file in a text editor or spreadsheet application and enter your IP addresses, friendly names, and shared secrets following the format
IP Address,Friendly Name,Shared Secret. Don’t include headers in the file.
For example, a CSV file with two IP addresses would look like this:
12.12.12.12,First Name,SharedSecret1
12.12.12.13,Second Name,SharedSecret2
Make sure to save your CSV file before proceeding to the upload steps.
How to Upload the CSV File
Now that you have your CSV file, follow these steps to upload it:
-
Drop down the Add IP Addresses menu and select CSV File Upload.
-
Either drag-and-drop your CSV file into the upload area or click on the area to browse and select your CSV file.
How to Configure RadSec for Cloud RADIUS
RadSec (RADIUS over TLS) uses the incoming RadSec client certificate to authenticate the connecting device and associate it with your network profile. To configure RadSec for your network, you need to add a trusted CA which issues your RadSec client certificates (recommended), or specific certificate thumbprints (ok for testing/troubleshooting).
Certificate Authorities can only be associated with a single EZRADIUS network profile. If you are a Managed Service Provider (MSP) or have multiple customers sharing a public IP address, each customer must use a distinct RadSec CA in their EZRADIUS network profile. EZRADIUS identifies which profile a RadSec request belongs to by the CA that signed the client certificate, so it cannot be shared across multiple profiles. Instead, use distinct CAs for each customer’s network profile or create multiple access policies within one network profile.
How to Add Certificate Authorities to RadSec Using 3rd Party CA
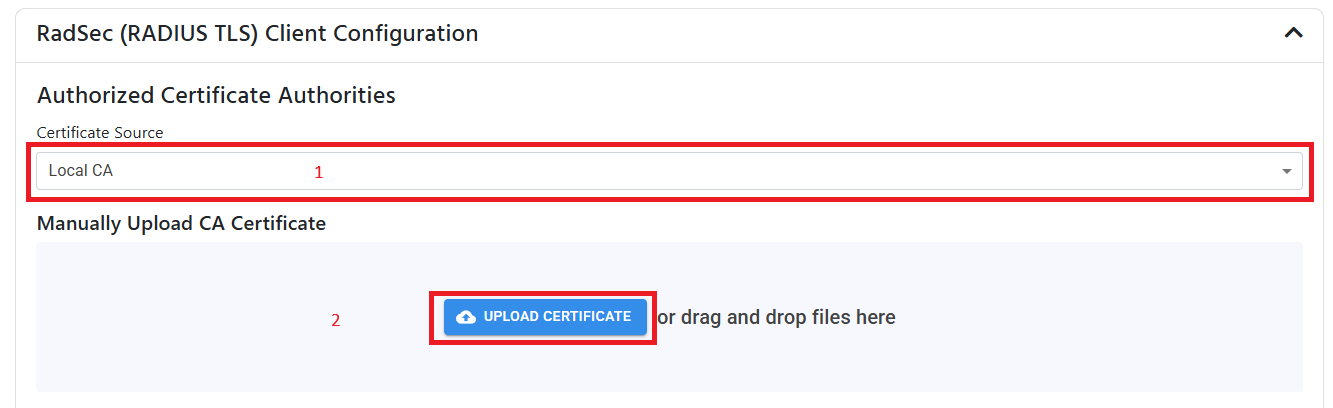
If your device uses a certificate from a 3rd party CA, you can add the CA to the cloud RADIUS server by following these steps:
-
From the Certificate Source dropdown, select Local CA.
-
Upload your CA certificate in PEM format.
-
Your CA will now be listed under the Trusted Certificate Authorities section.
How to Add a Self-Signed Certificate as a Trusted Certificate for RadSec
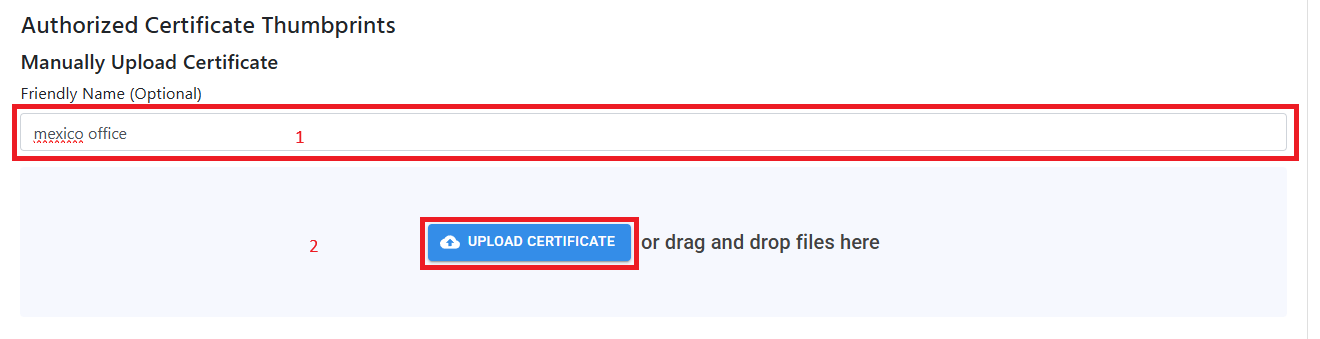
If your networking device only supports self-signed certificates for RadSec, you can upload the single certificate to your cloud RADIUS policy by following these steps:
-
Leave the Authorized Certificate Authorities section empty. You don’t need to add any CAs for self-signed certificates.
-
Under Authorized Certificate Thumbprints, enter a certificate Friendly Name (This is just for your records, useful if have multiple locations).
-
Upload the certificate in PEM format.
-
Your certificate will now be listed under the Trusted Certificates section.
How to Add Your Microsoft Cloud PKI Certificate Authorities to EZRADIUS
The next step is to add your Microsoft Cloud PKI Certificate Authorities to EZRADIUS so you can authenticate devices using certificates issued by your Cloud PKI certificate authorities.
-
Navigate to your EZRADIUS portal and go to the Policies page.
-
Scroll down to your existing RADIUS policy or begin creating a new one.
-
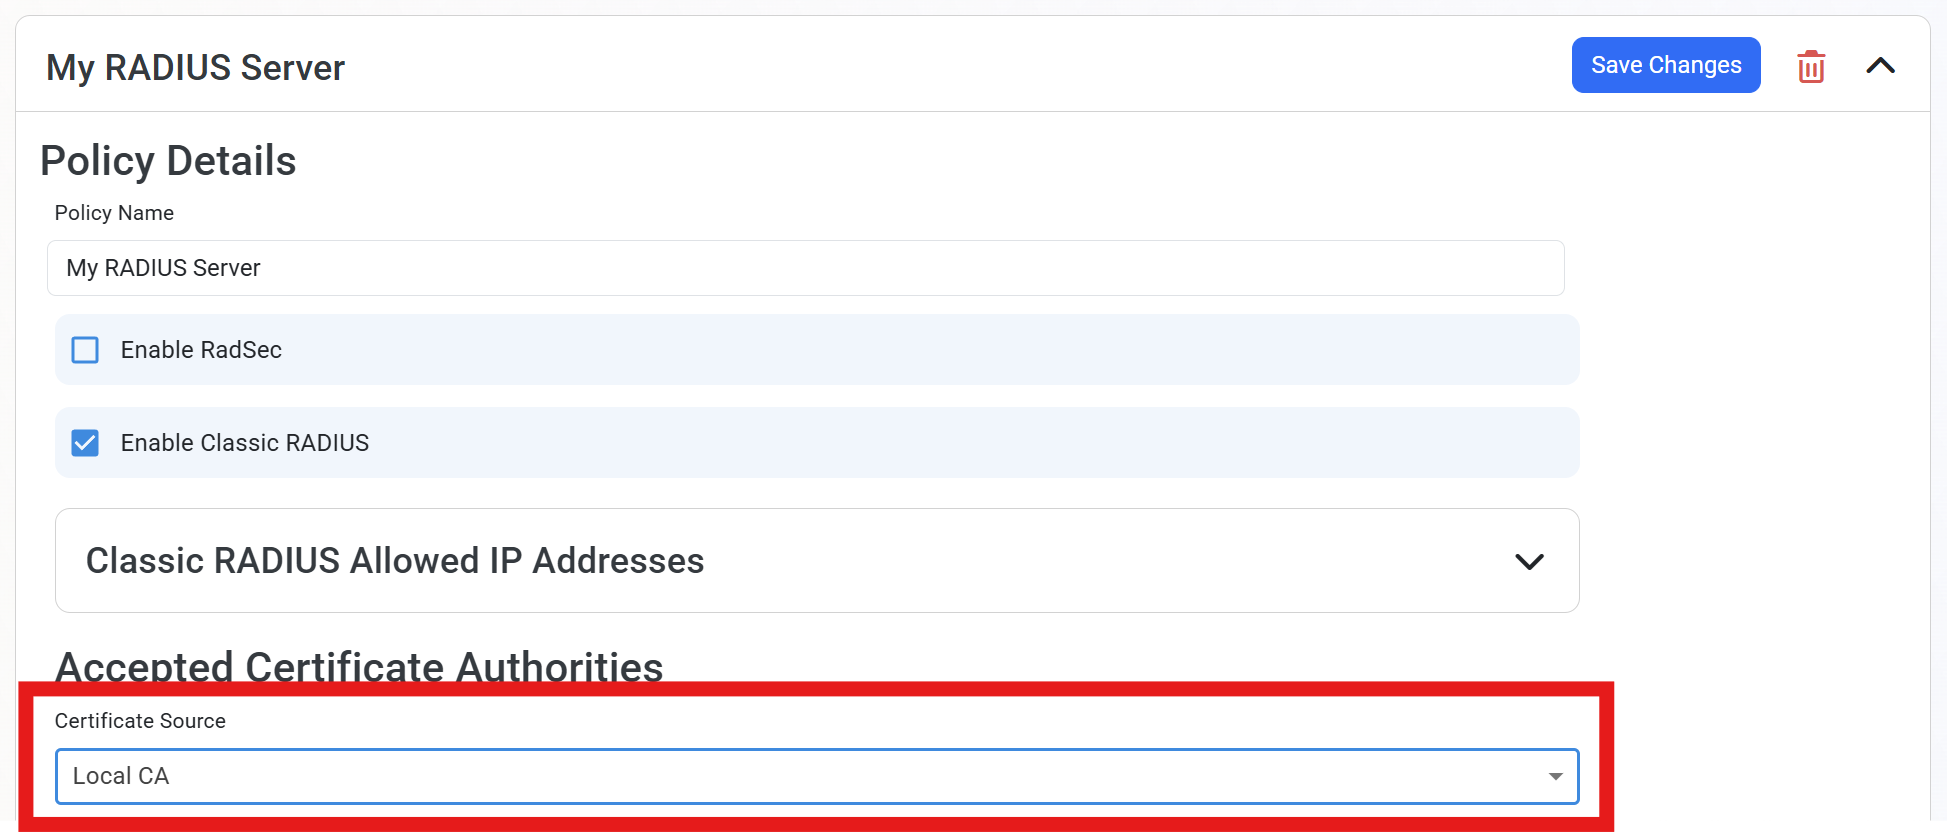
Under the Accepted Certificate Authorities section, dropdown the Certificate Source and select Local CA.
-
Check the Is Root CA box.
-
Upload your Root CA certificate that you obtained from your Cloud PKI.
-
Uncheck the Is Root CA box
-
Upload your Issuing SCEP CA certificate.
-
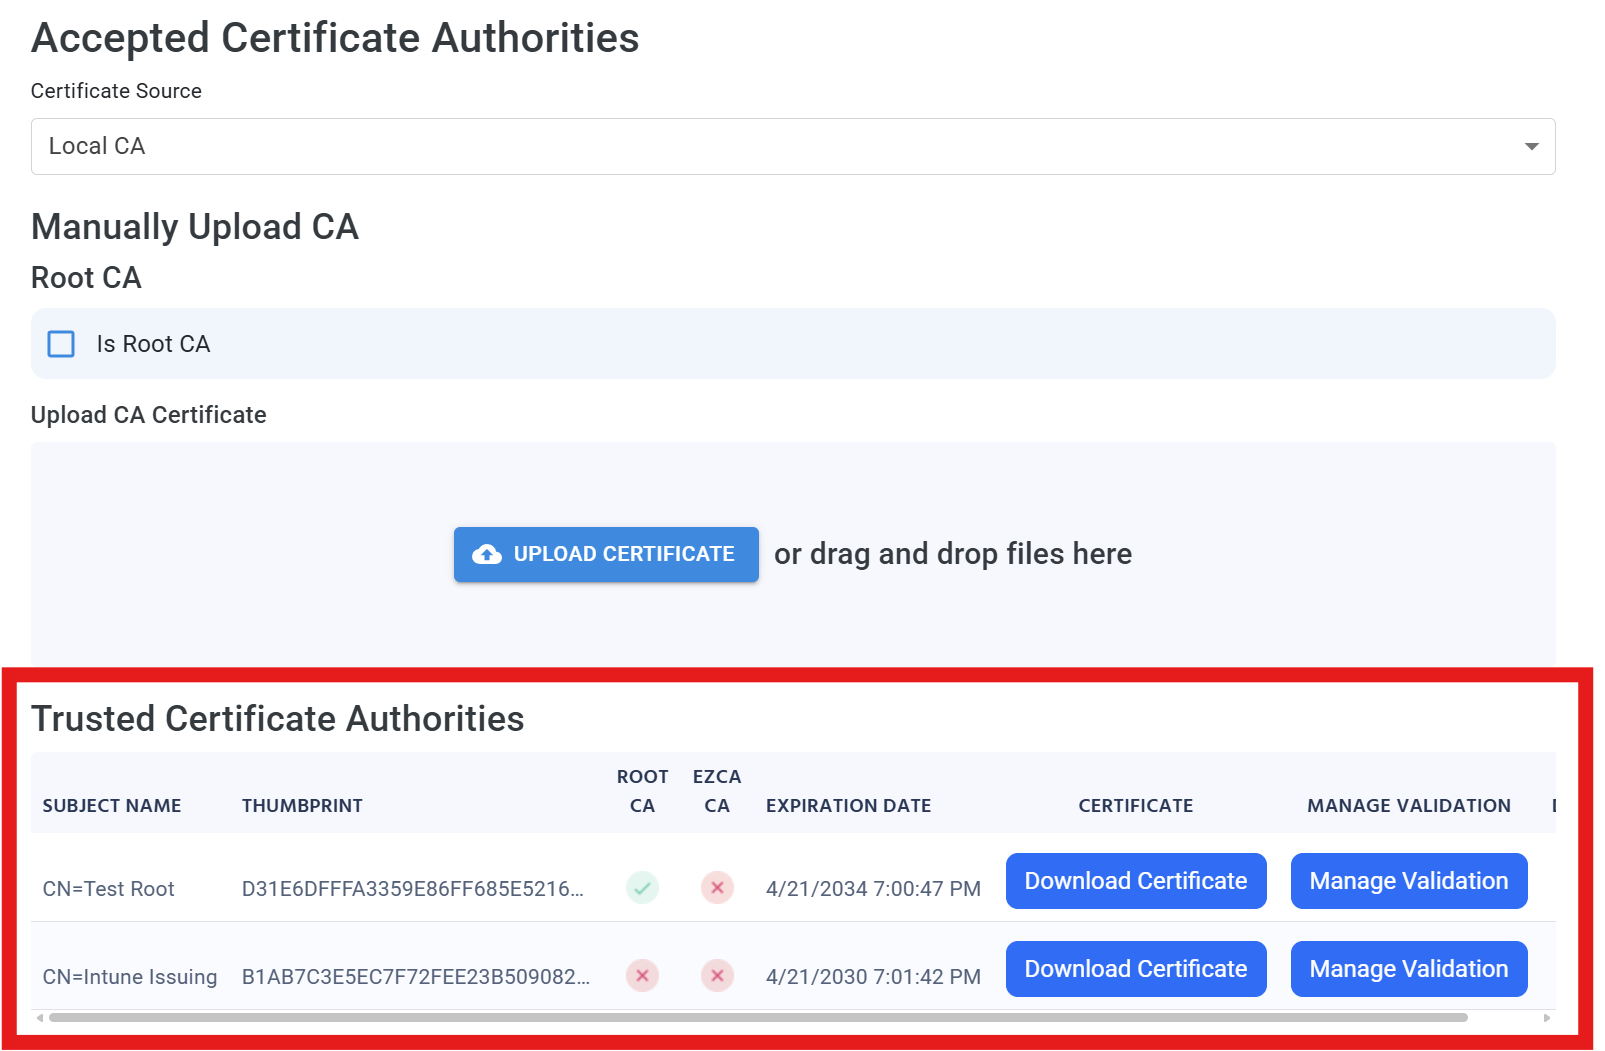
You should now see both CAs listed under Trusted Certificate Authorities.
How to Configure Your EZRADIUS Server Certificate
A server certificate uniquely identifies your EZRADIUS server to the devices connecting to the network. From the Certificate Source dropdown, select Auto-Generated Certificate. When selected, EZRADIUS will automatically create and manage the certificate for you, and automatically renew it before it expires.

How to Configure Your EZRADIUS Access Policy to Restrict Access to Intune-Managed Devices
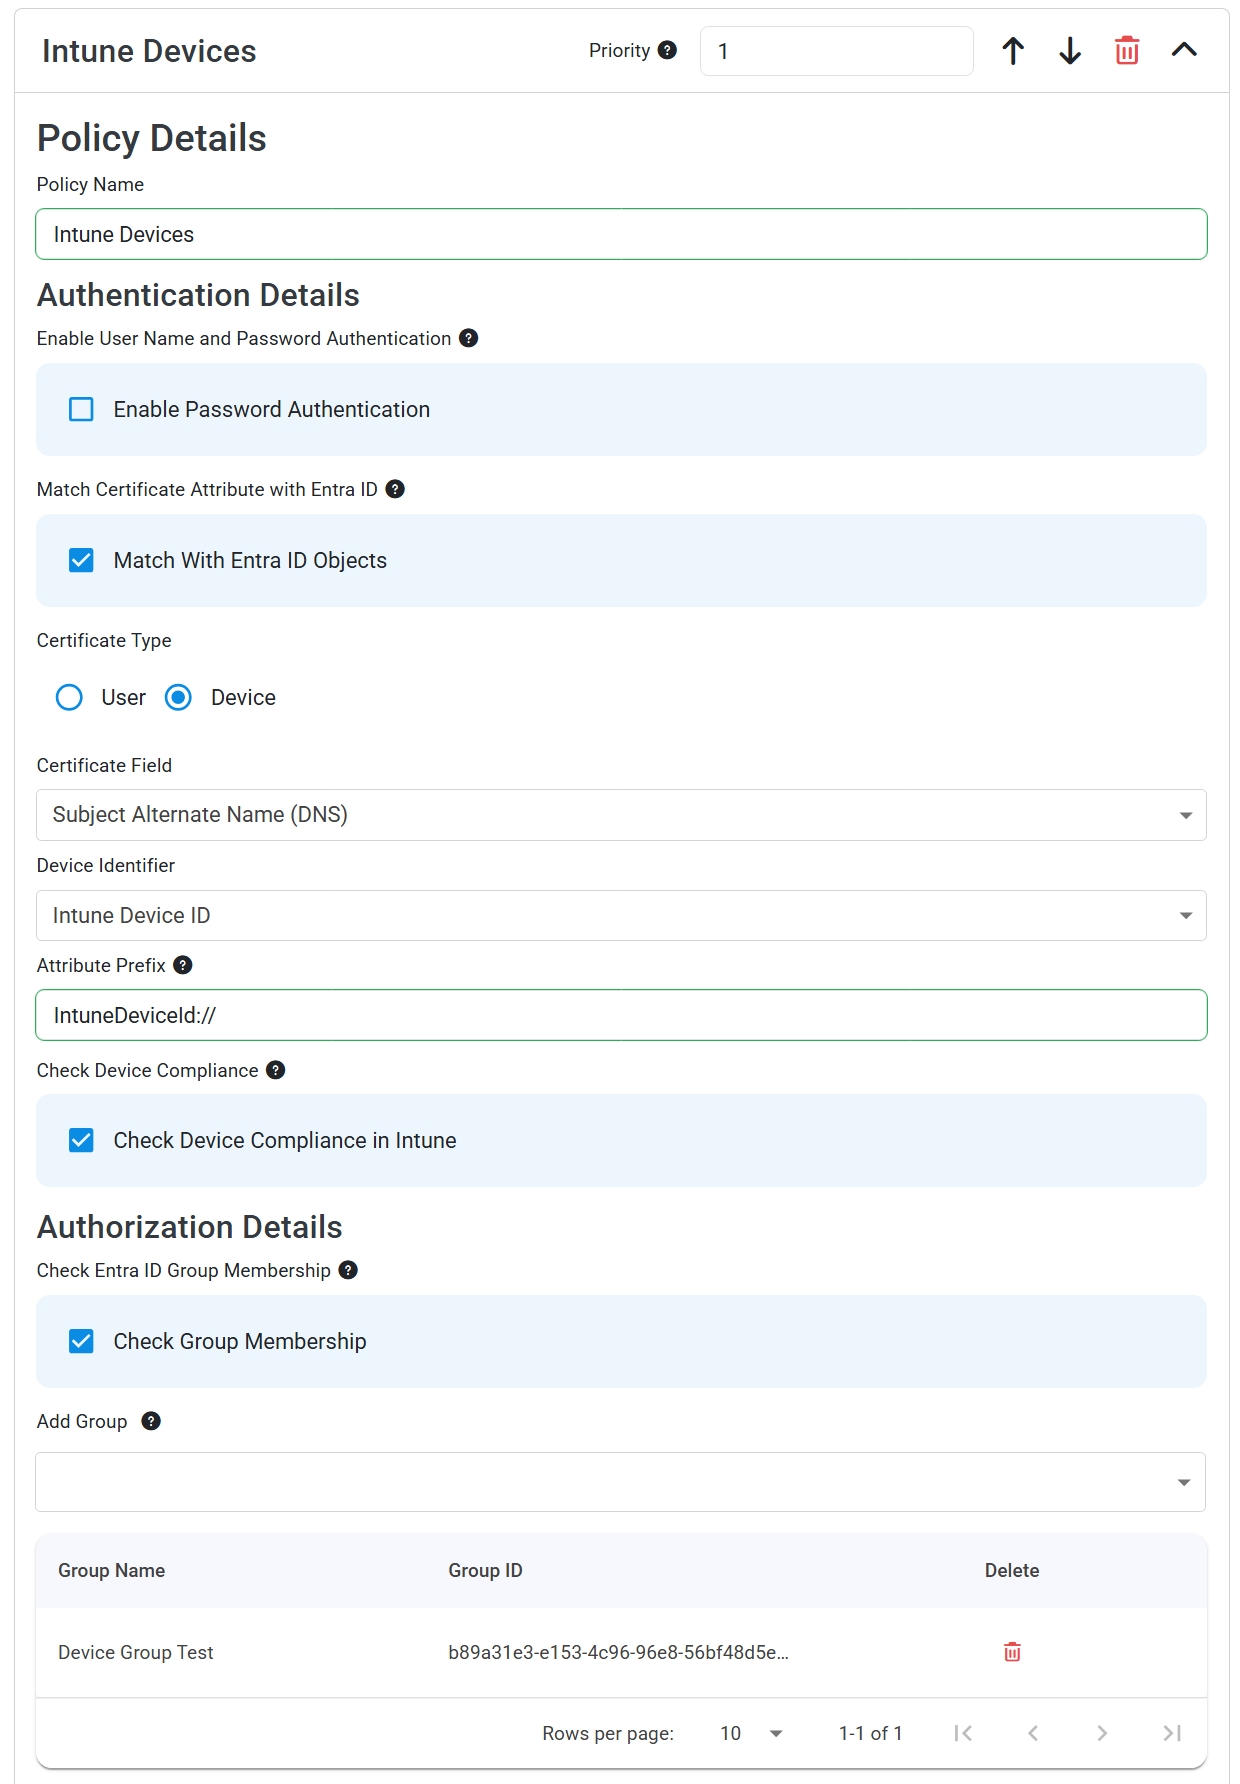
To configure your access policy to only allow device certificates from valid Intune-managed devices, follow these steps:
- Check the Match With Entra ID Objects checkbox.
- For Certificate Type, select Device.
- Under Certificate Field, select which certificate field contains the device’s ID. Usually this is Subject Alternative Name (DNS).
- For Device Identifier, set this to Intune Device ID, which is the Intune identifier for the device.
- Specify the Attribute Prefix as
IntuneDeviceId://to correctly extract the device ID from the certificate. (or leave blank if there is no prefix). - If you want to additionally restrict access based on device compliance in Intune, check the box for Check Device Compliance in Intune.
- If you want to additionally restrict access based on group membership, check the Check Group Membership checkbox and then specify the Entra ID group(s) which contain the devices you want to allow.
You should now have an access policy that only allows device certificates from valid Intune-managed devices, optionally restricted to specific Entra ID groups:
How to Assign VLANs Within an EZRADIUS Access Policy
By default, EZRADIUS will not set a Virtual LAN (VLAN), and your network will use its own default VLAN. However, you can specify a specific VLAN in each access policy to assign specific users and devices to their own VLAN and override the default.
This is useful for putting specific Entra ID users or groups into their own VLANs, or putting compliant devices into a separate VLAN from non-compliant devices.
If you do not want to assign a VLAN for this access policy, keep VLAN Management set to Do not assign VLAN. This will ensure that the network uses its default VLAN for all users and devices under this access policy.

If you want to assign a specific, static VLAN to all devices that match against this access policy, set VLAN Management to Assign Static VLAN and enter the VLAN ID in the VLAN Name field. This ensures that all matching devices are placed in the specified VLAN, overriding the network’s default VLAN.
If you want to assign different VLANs to different users or devices based on their attributes, you should either:
- Set up multiple access policies, each with a different static VLAN and different matching attributes.
- Use dynamic VLAN assignment based on certificate values to automatically assign VLANs according to the information contained in the user’s certificate.
More information on how to use this field is available in our reference architectures

VLANs can also be set based on a VLAN ID specified within the certificate authenticating to the network. To configure this:
-
From the VLAN Management dropdown, select Assign Dynamic VLAN (From Certificate Value).
-
Under Certificate Field, select the field in the certificate that contains the VLAN ID.
-
If there’s a prefix in front of the VLAN ID in the certificate, enter the prefix in the Prefix field. EZRADIUS will ignore this prefix when assigning VLANs.

Step 4 - How to Push the EZRADIUS Server CA Certificate to Your Devices in Intune
For your devices to establish a secure connection to EZRADIUS and prevent man-in-the-middle attacks, you need to distribute your EZRADIUS CA certificate to your devices via Intune.
How to Download Your EZRADIUS Root Certificates
Begin by downloading your EZRADIUS Root certificates from the EZRADIUS portal.
-
Login to your EZRADIUS portal.
-
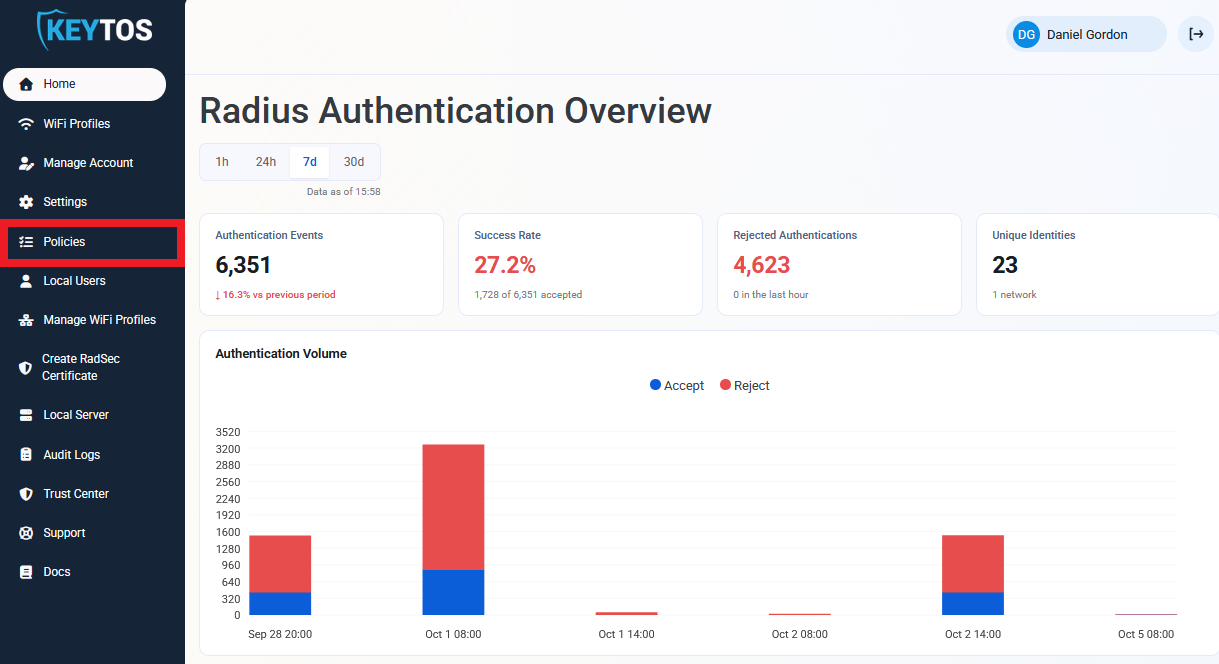
Using the left-hand menu, click on Policies.
-
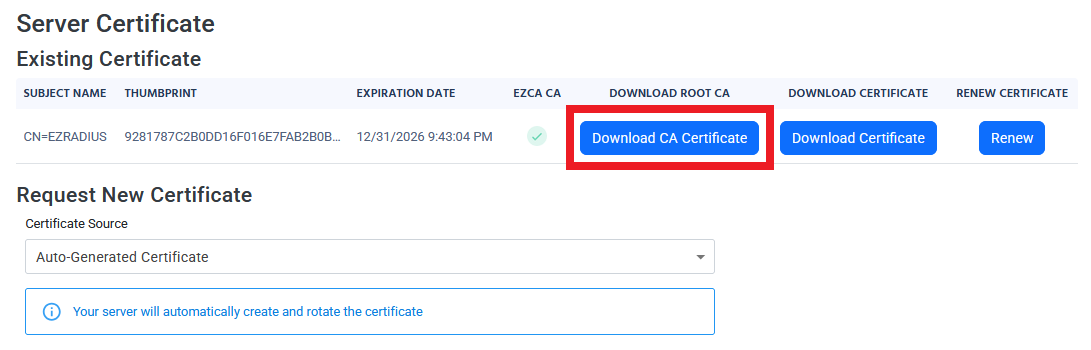
Scroll down to the Server Certificates > Existing Certificate section.
-
Click on the Download CA Certificate button to download your root CA certificate.
How to Push Your EZRADIUS CA Certificate to Your Devices via Intune
Now that you have your EZRADIUS CA certificate downloaded, the next step is to push it to your devices’ Trusted Store using Microsoft Intune.
-
Navigate to the Intune portal: https://aka.ms/Intune
-
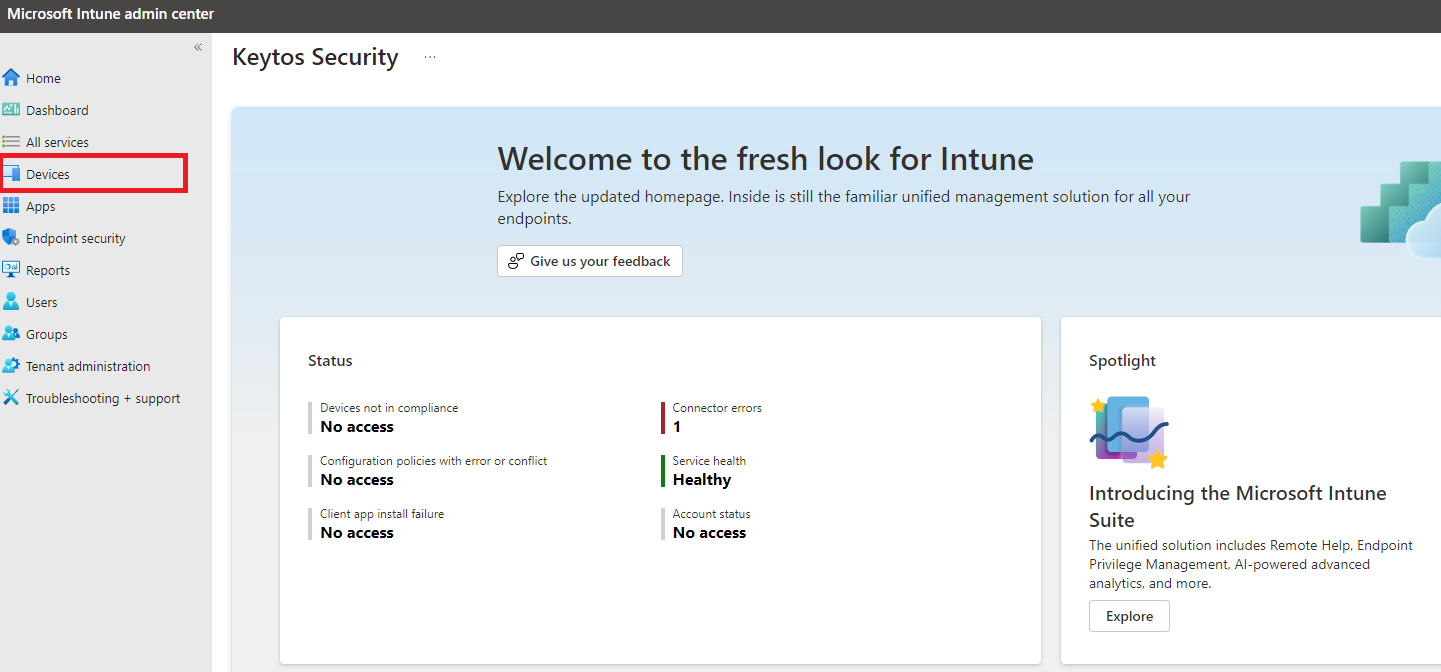
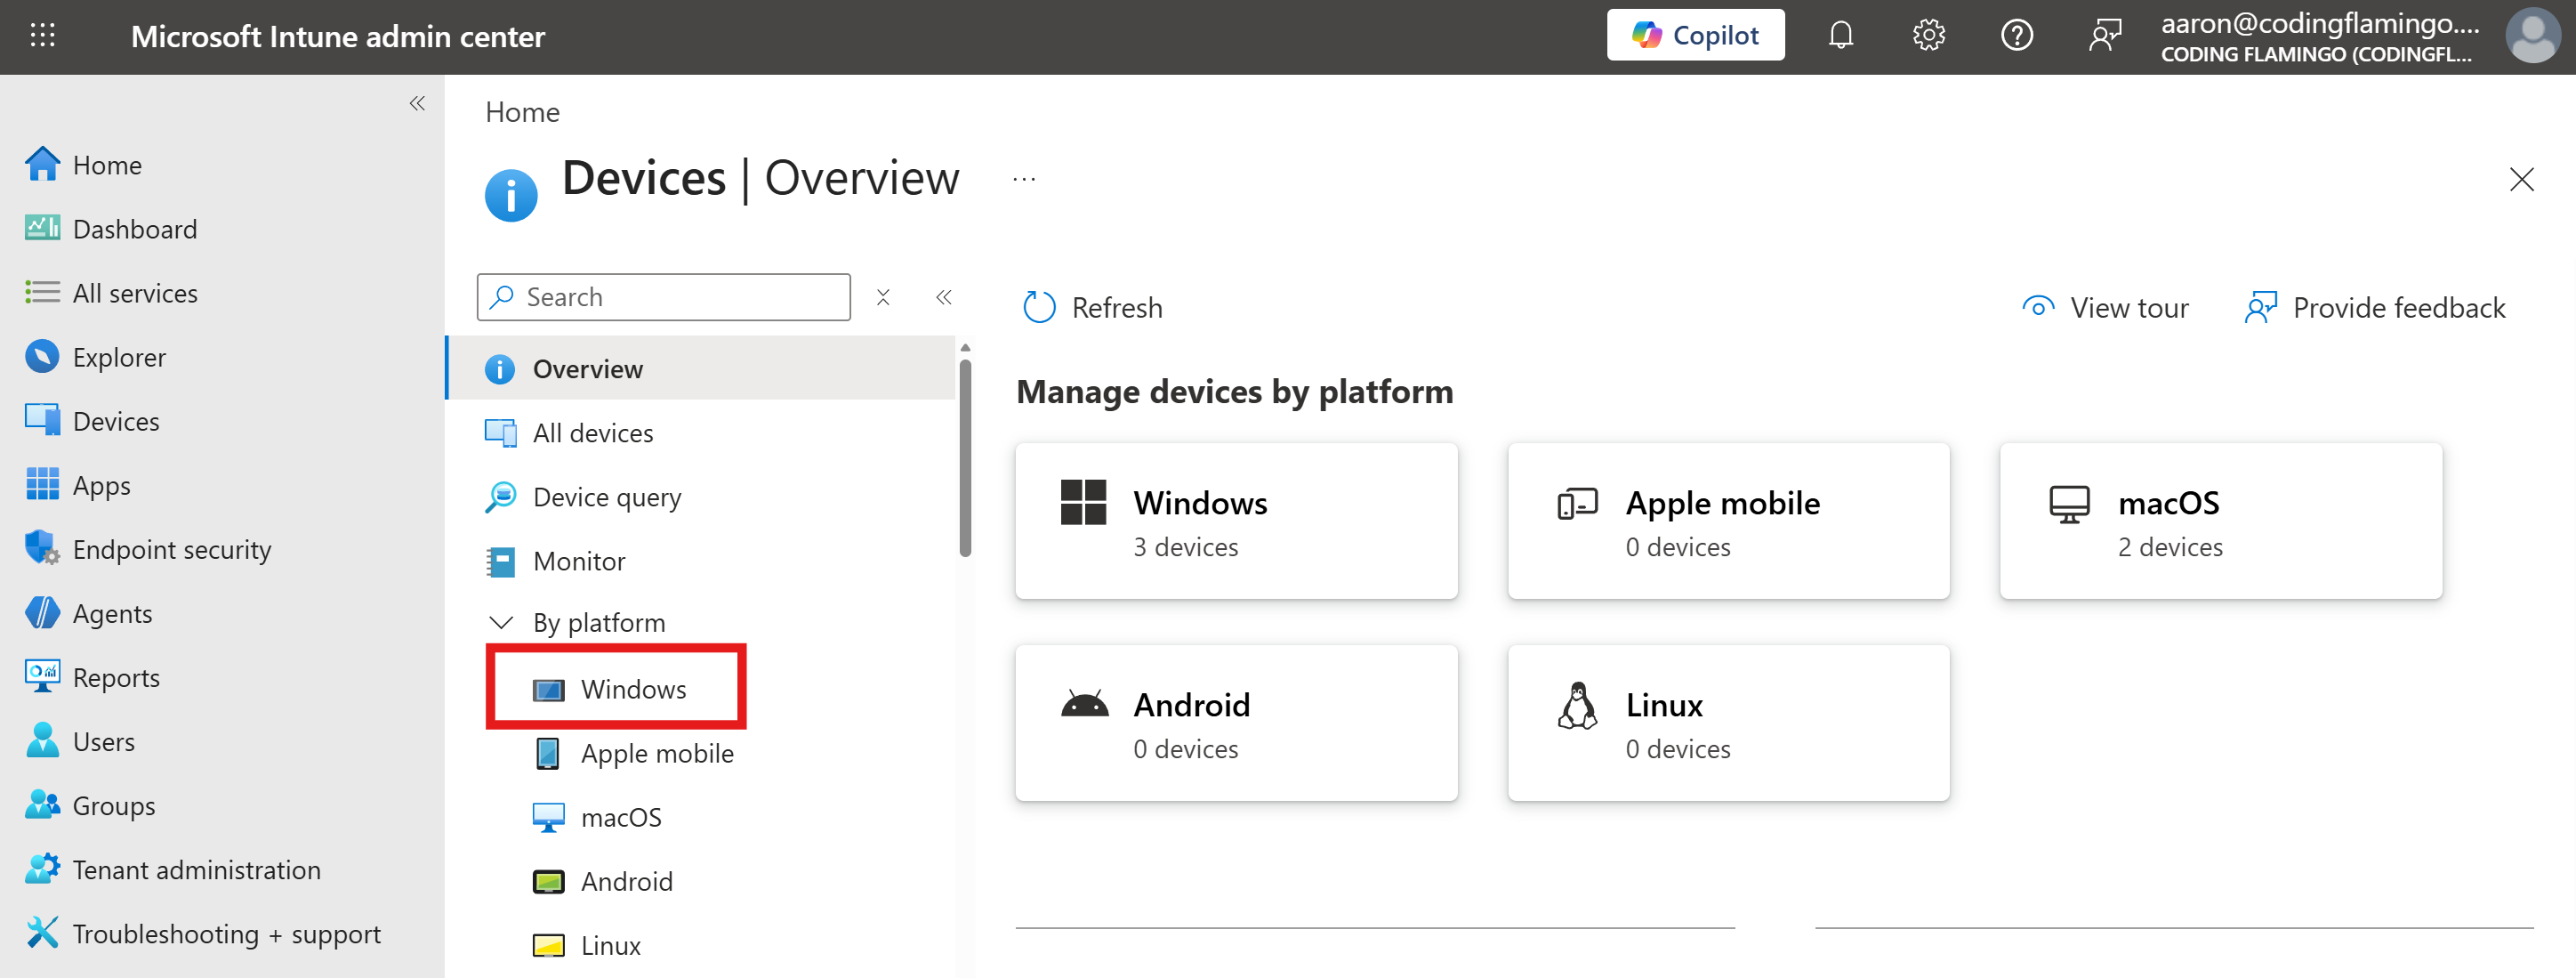
From the left-hand menu, click on Devices.
-
From the left-hand sub-menu, click Windows to manage Windows devices.
-
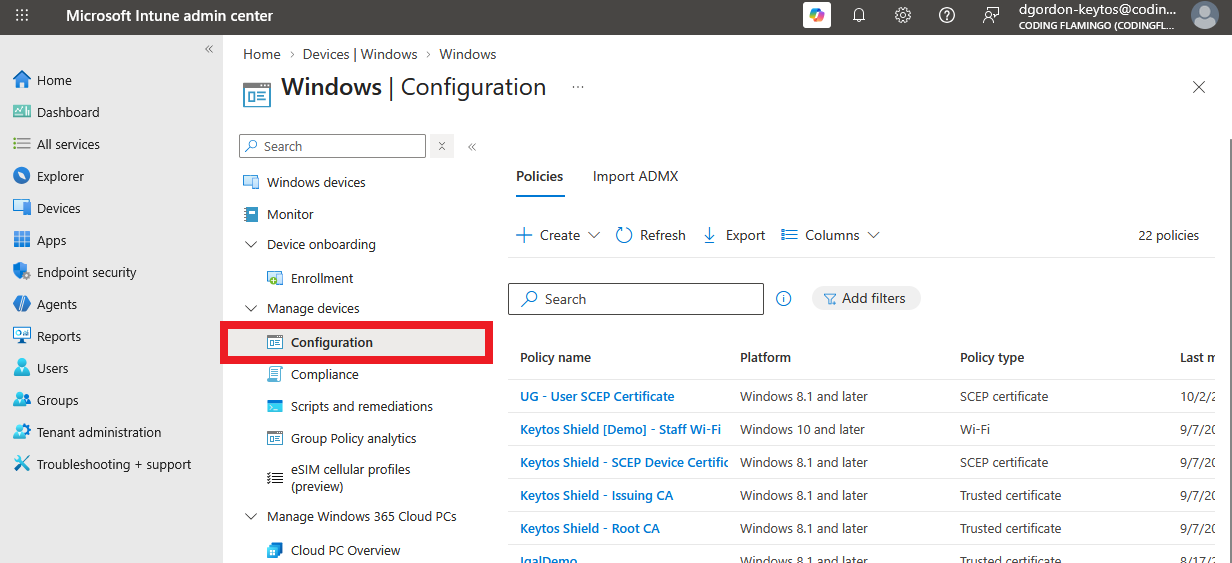
From the left-hand sub-menu, click on Configuration Profiles.
-
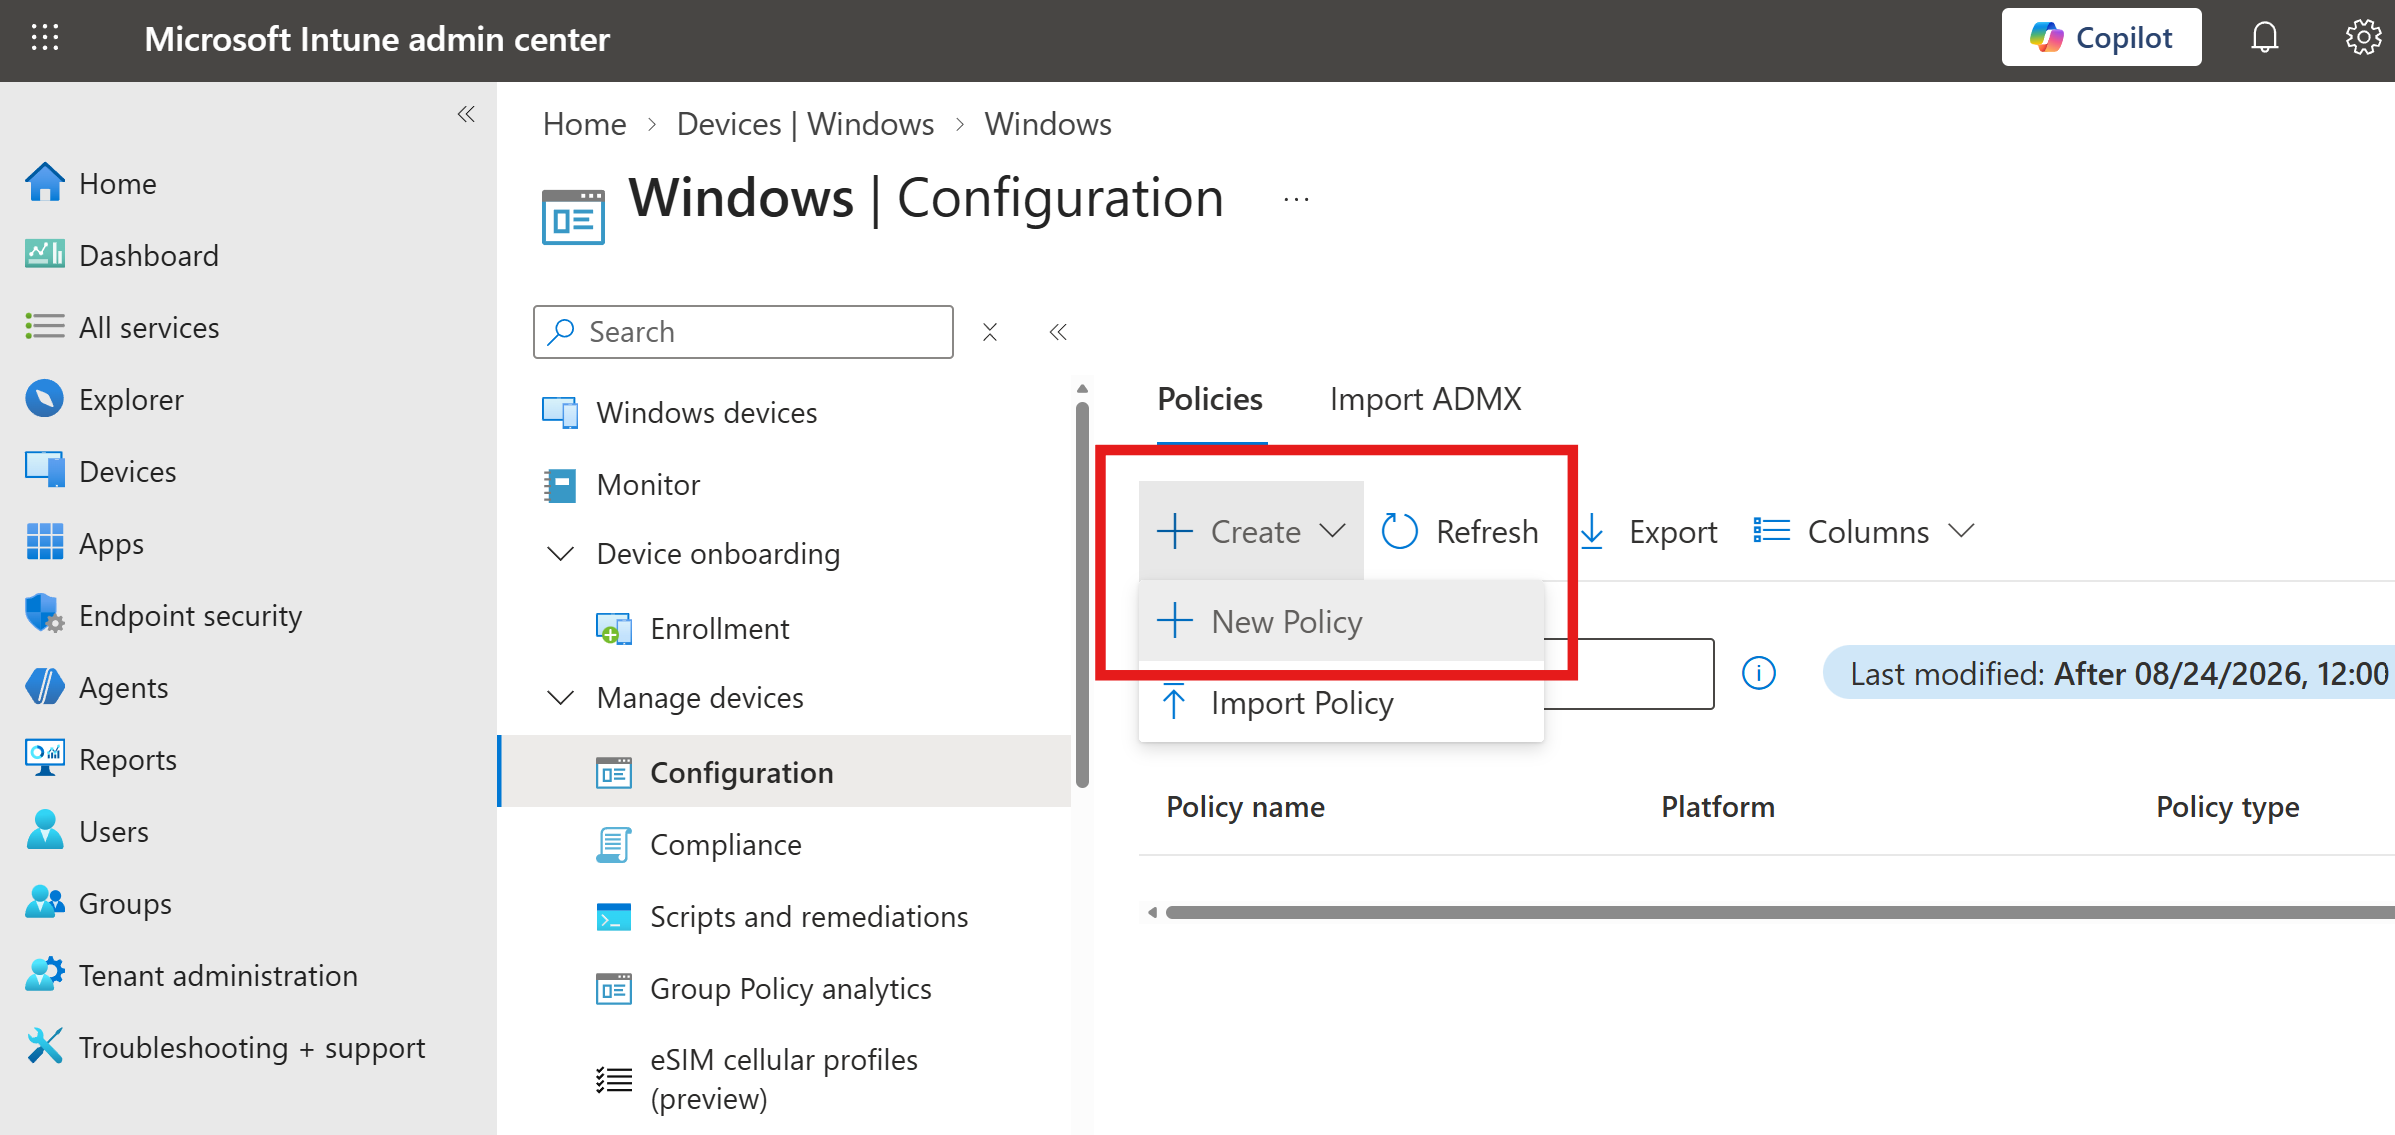
Click on the + Create button at the top of the list, then + New Policy.
-
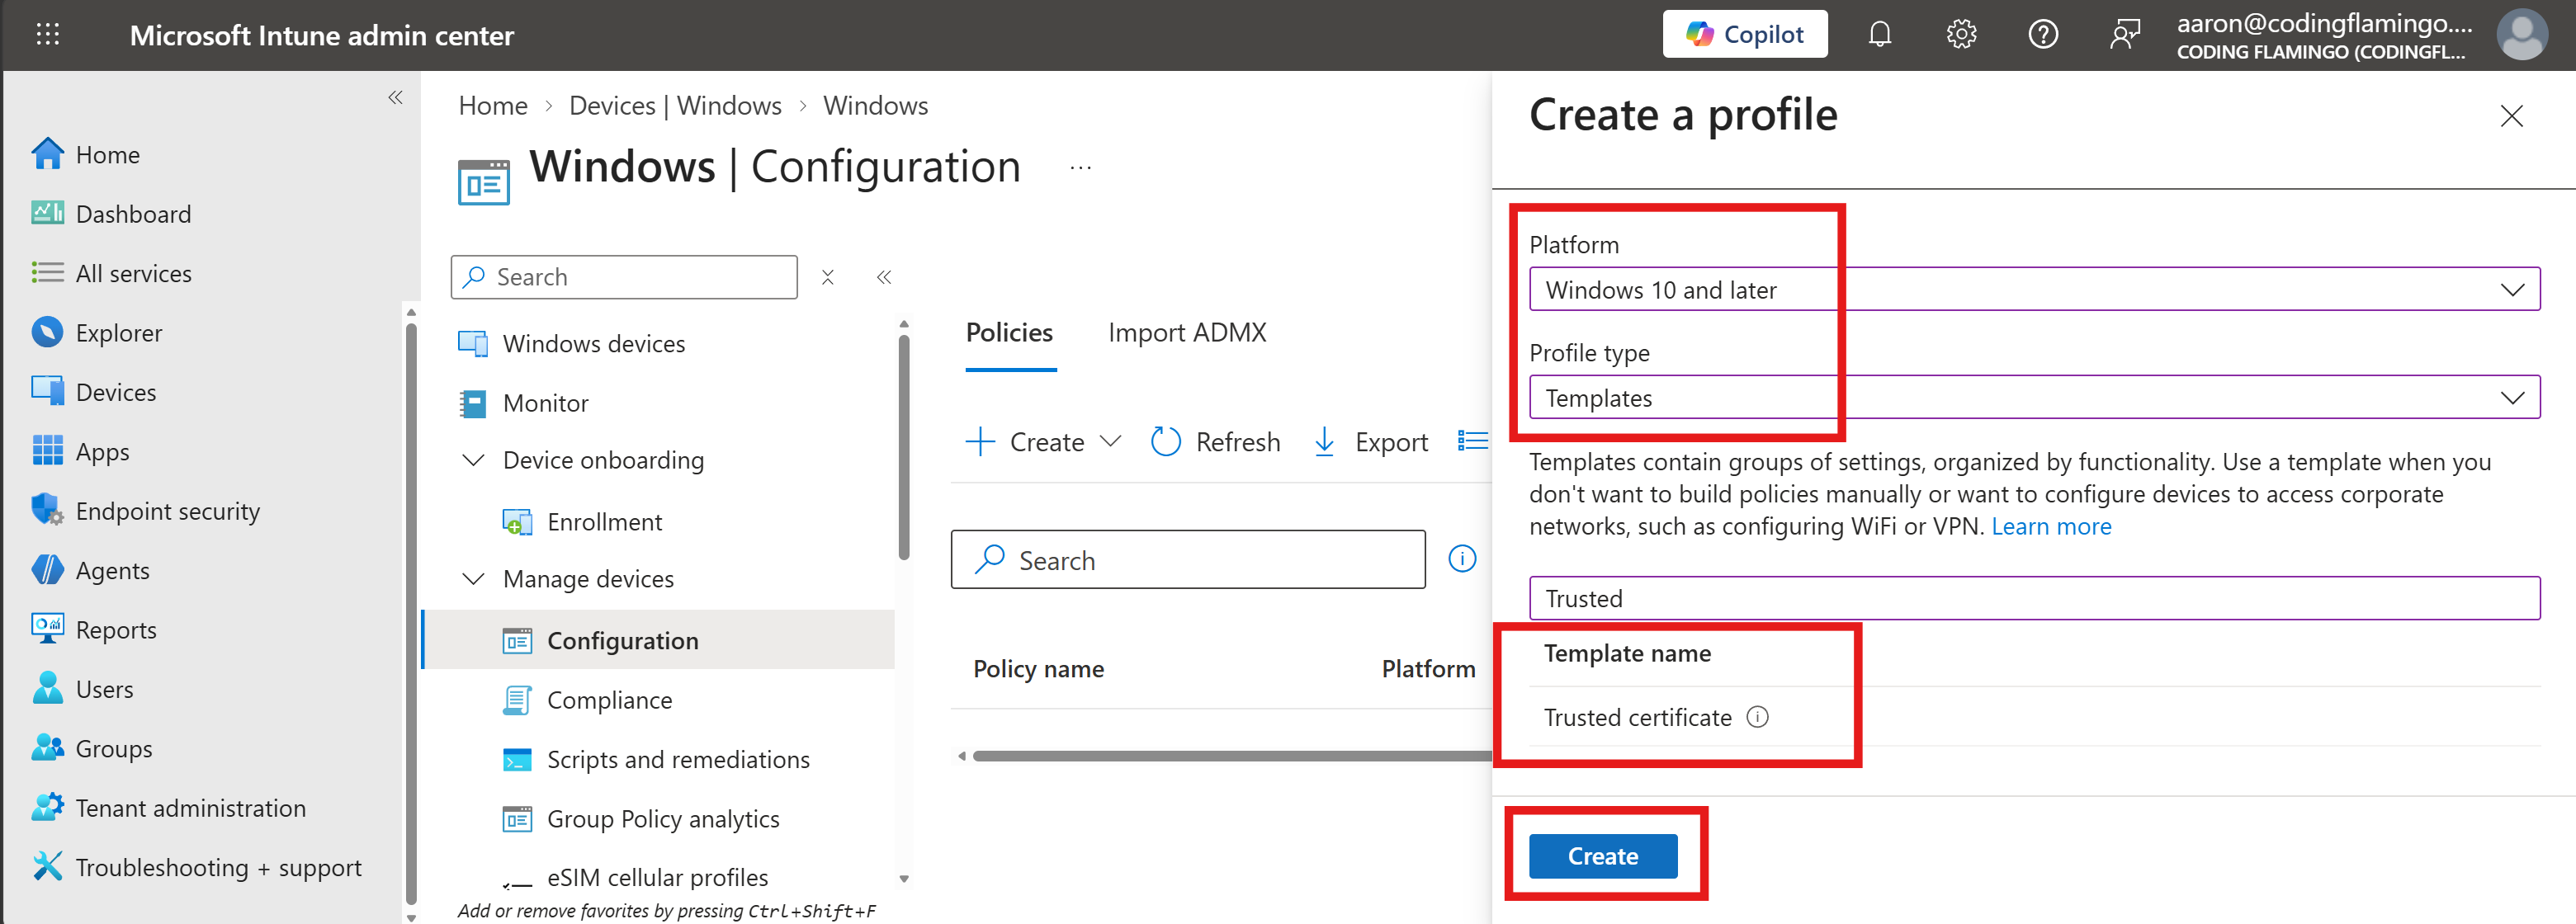
Under Create a profile, select the following options and click Create:
-
Platform: Windows 10 and later
-
Profile type: Templates
-
Template name: Trusted certificate
-
-
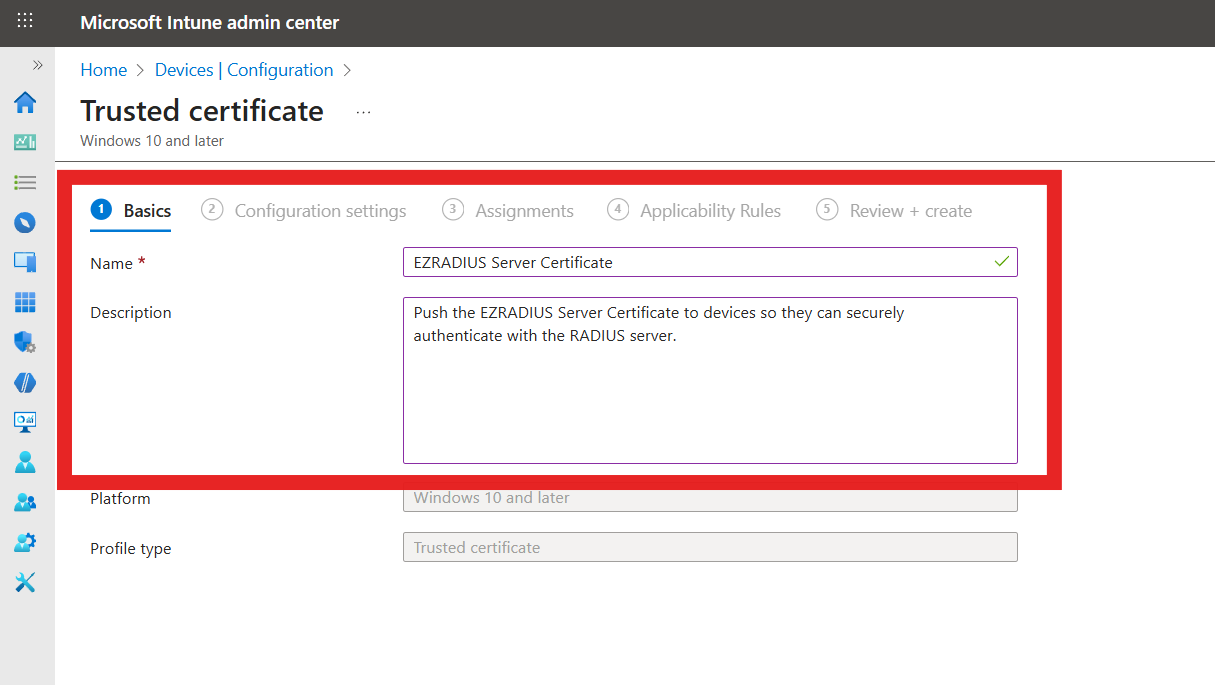
Within the Basics tab, fill out the fields:
-
Name: Friendly name for your organization
-
Description: Description for your organization
-
-
Click on Next.
-
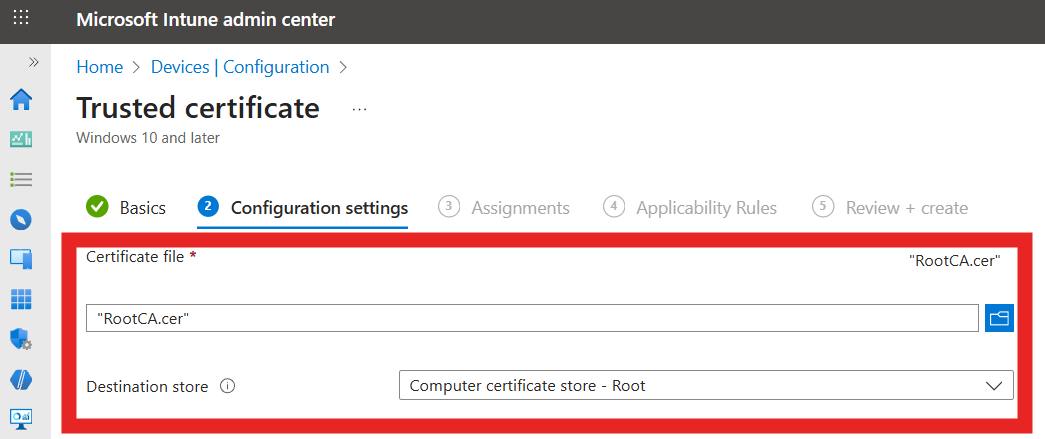
Within the Configuration settings tab, configure the following options:
-
Certificate file: Select the CA certificate you downloaded earlier from EZRADIUS (
rootCA.cer). -
Destination store: Select the appropriate store based on the type of CA certificate:
- Computer certificate store - Root
-
-
Click on Next.
-
Within the Assignments tab, select the users, groups or devices you want to deploy this profile to.
-
Click on Next.
-
Within the Applicability Rules tab, add any rules if needed, then click on Next.
-
Click on Create to finish creating the profile.
-
Navigate to the Intune portal: https://aka.ms/Intune
-
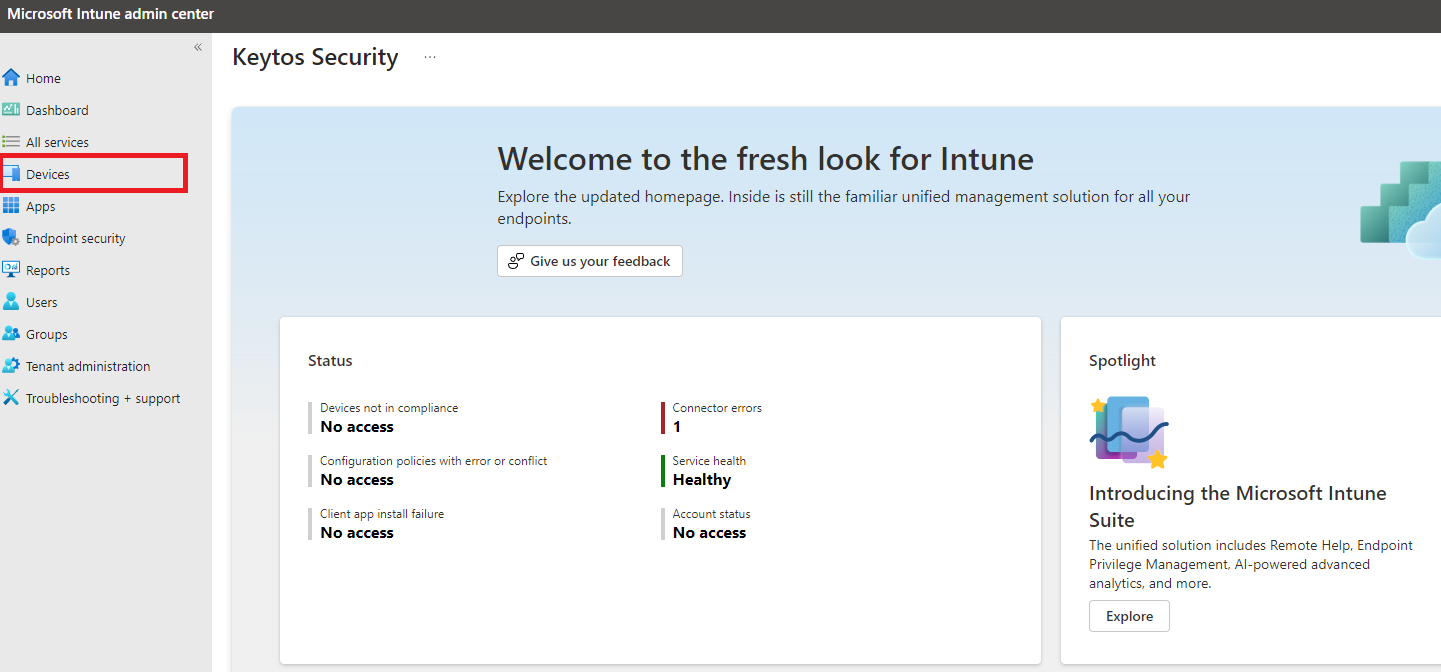
From the left-hand menu, click on Devices.
-
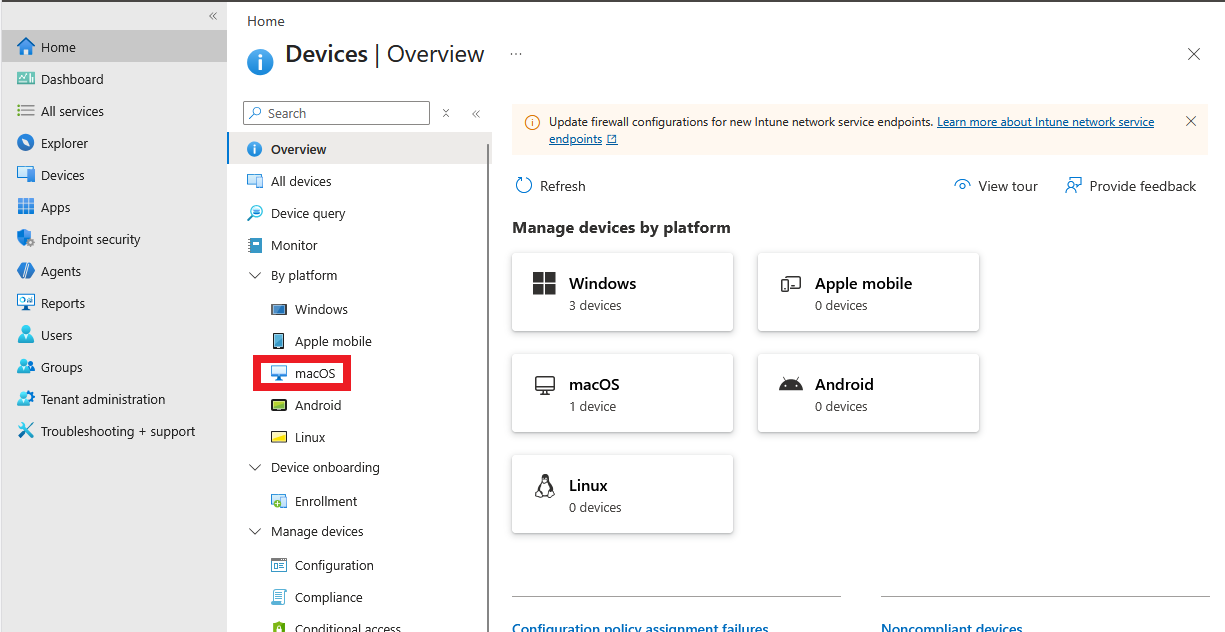
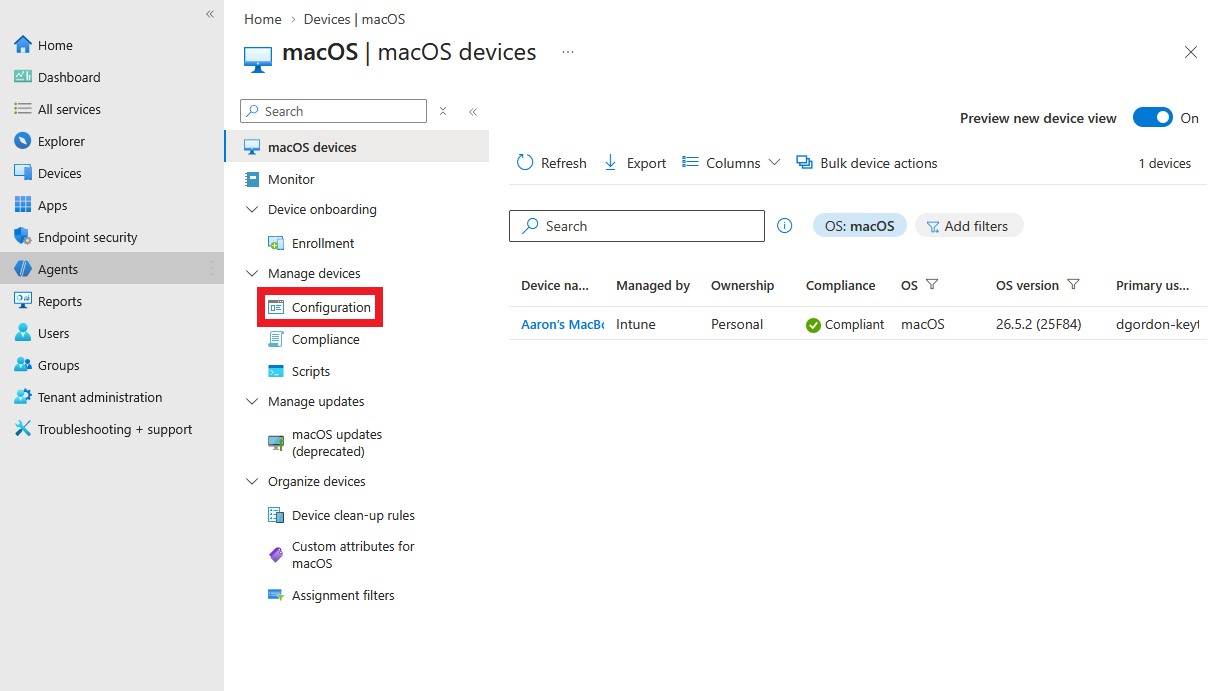
From the left-hand sub-menu, click macOS to manage macOS devices.
-
From the left-hand sub-menu, click on Configuration.
-
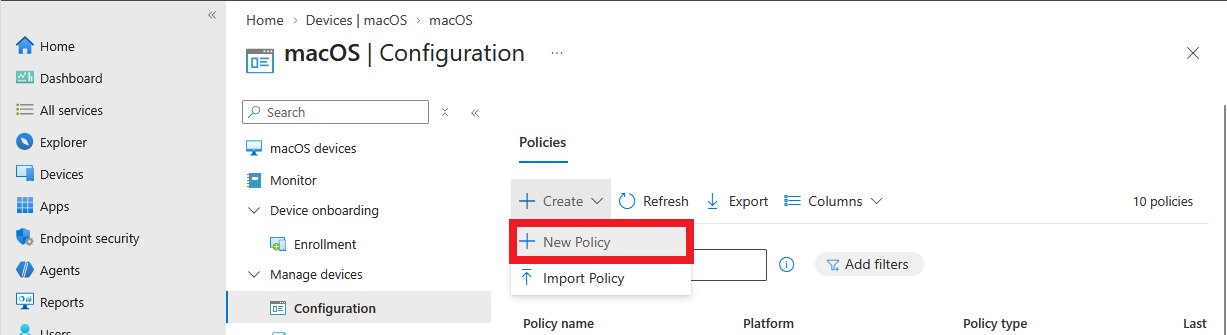
Click on the + Create button at the top of the list, then + New Policy.
-
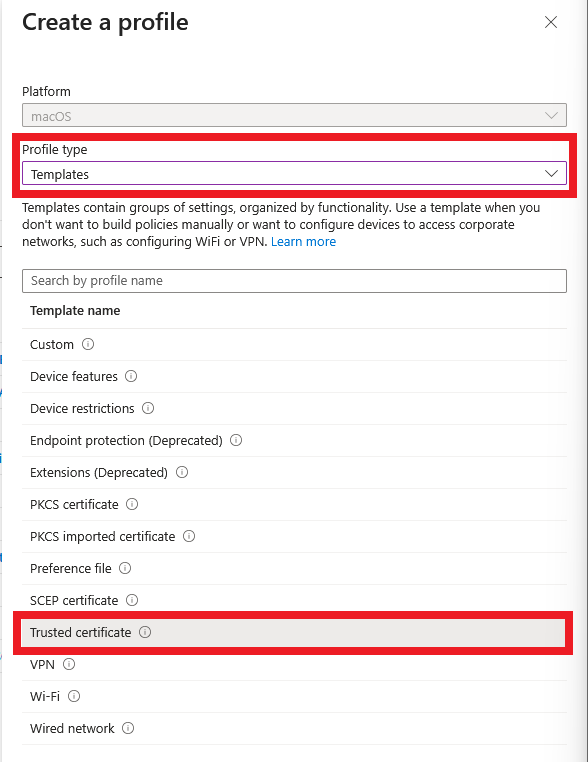
Under Create a profile, select the following options and click Create:
-
Profile type: Templates
-
Template name: Trusted certificate
-
-
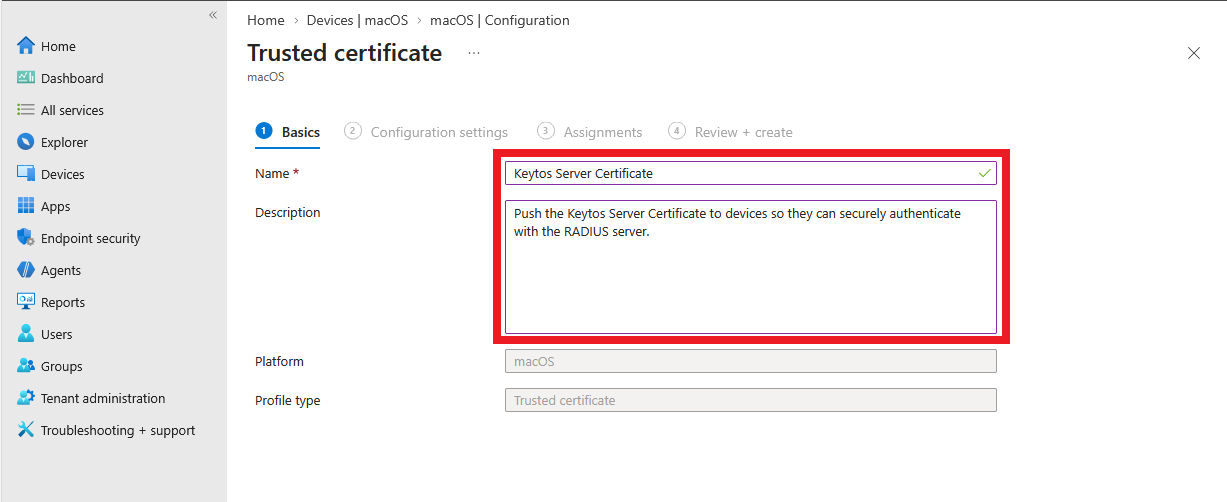
Within the Basics tab, fill out the fields:
-
Name: Friendly name for your organization
-
Description: Description for your organization
-
-
Click on Next.
-
Within the Configuration settings tab, configure the following options:
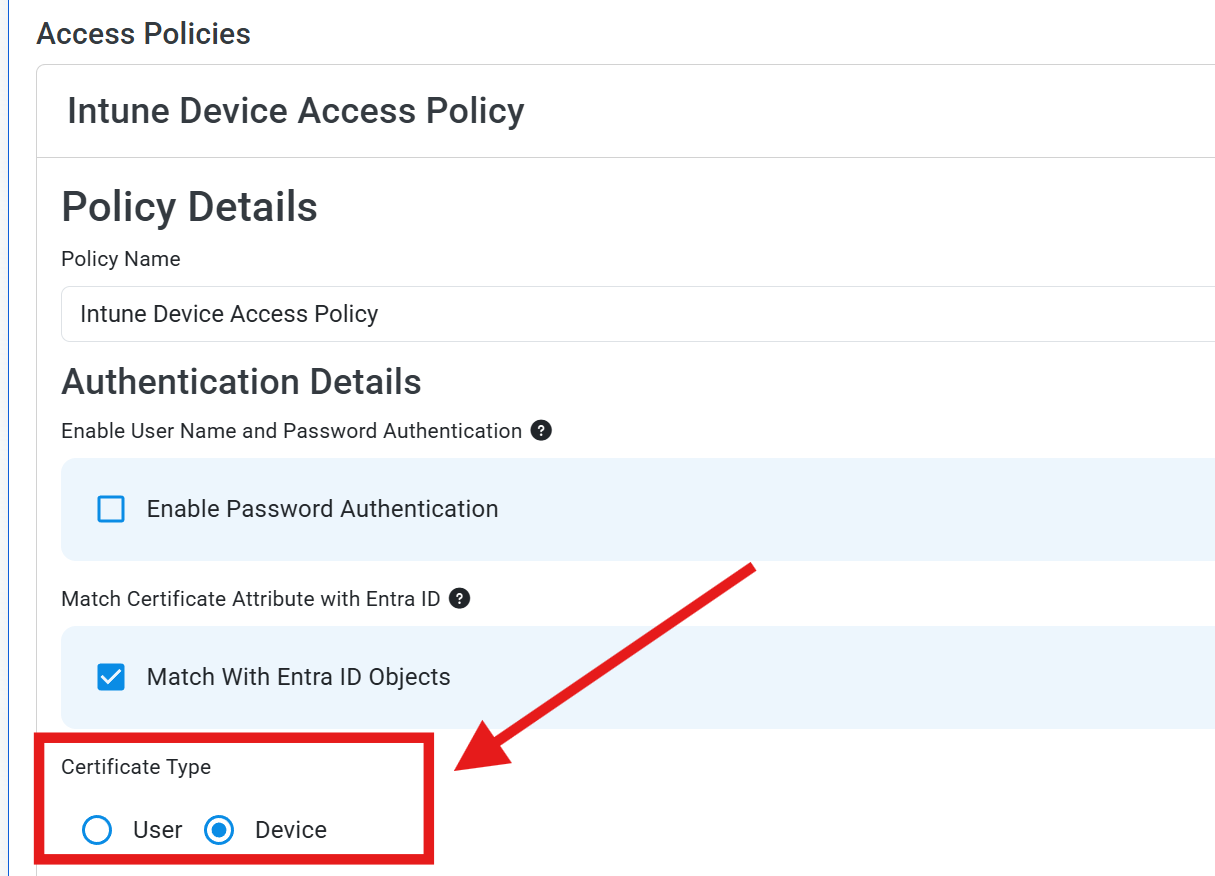
Make sure to choose the same deployment channel you set in your EZRADIUS access policyWhen selecting device or user channel, make sure you match the authentication type you set in your RADIUS policy. If you’re unsure, check your Access policies on the Policies page.
-
Certificate file: Select the CA certificate you downloaded earlier from EZRADIUS (
rootCA.cer).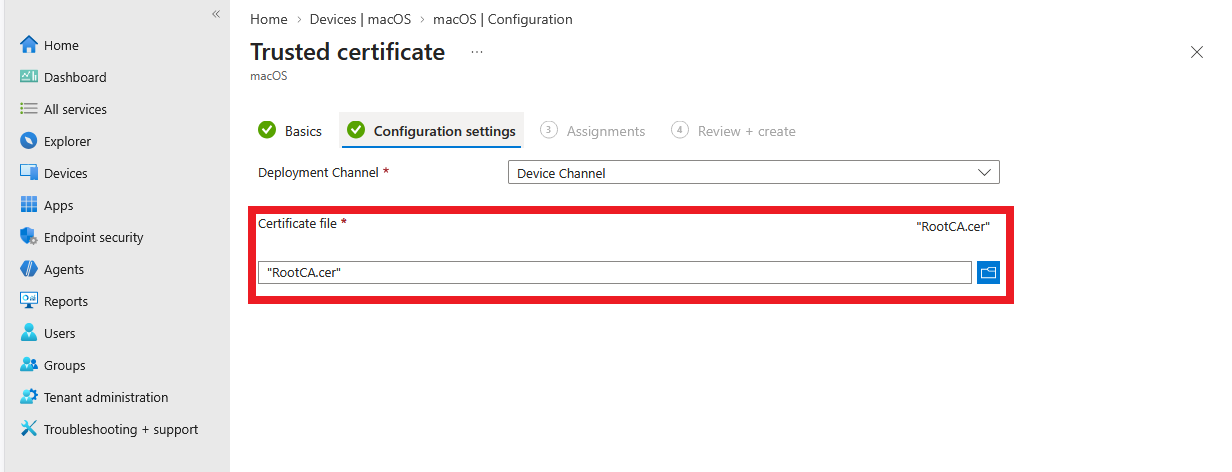
-
-
Click on Next.
-
Within the Assignments tab, select the users, groups or devices you want to deploy this profile to.
-
Click on Next.
-
Click on Create to finish creating the profile.
- Navigate to the Intune portal: https://aka.ms/Intune
- From the left-hand menu, click on Devices.
- From the left-hand sub-menu, click iOS/iPadOS to manage iOS/iPadOS devices.
- From the left-hand sub-menu, click on Configuration Profiles.
- Click on the + Create button at the top of the list, then + New Policy.
- Under Create a profile, select the following options and click Create:
- Platform: iOS/iPadOS
- Profile type: Templates
- Template name: Trusted certificate
- Within the Basics tab, fill out the fields:
- Name: Friendly name for your organization
- Description: Description for your organization
- Click on Next.
- Within the Configuration settings tab, configure the following options:
- Certificate file: Select the CA certificate you downloaded earlier from EZRADIUS (
rootCA.cer).
- Certificate file: Select the CA certificate you downloaded earlier from EZRADIUS (
- Click on Next.
- Within the Assignments tab, select the users, groups or devices you want to deploy this profile to.
- Click on Next.
- Click on Create to finish creating the profile.
- Navigate to the Intune portal: https://aka.ms/Intune
- From the left-hand menu, click on Devices.
- From the left-hand sub-menu, click Android to manage Android devices.
- From the left-hand sub-menu, click on Configuration Profiles.
- Click on the + Create button at the top of the list, then + New Policy.
- Under Create a profile, select the following options and click Create:
- Platform: Android
- Profile type: Templates
- Template name: Trusted certificate
- Within the Basics tab, fill out the fields:
- Name: Friendly name for your organization
- Description: Description for your organization
- Click on Next.
- Within the Configuration settings tab, configure the following options:
- Certificate file: Select the CA certificate you downloaded earlier from EZRADIUS (
rootCA.cer).
- Certificate file: Select the CA certificate you downloaded earlier from EZRADIUS (
- Click on Next.
- Within the Assignments tab, select the users, groups or devices you want to deploy this profile to.
- Click on Next.
- Click on Create to finish creating the profile.
Step 5 - How to Create a Wi-Fi Profile in Intune for Certificate Authentication
Now that your device has the necessary CA certificates and SCEP certificate installed, you can proceed to create a Wi-Fi profile in Intune for certificate-based authentication.
How to Get Your RADIUS Server Names in EZRADIUS
To make sure your devices only trust the correct RADIUS servers, you will need to obtain the list of RADIUS server names from your server certificate.
You will need to open your EZRADIUS server certificate. If you need to download this again, follow the steps below.
-
Login to your EZRADIUS portal.
-
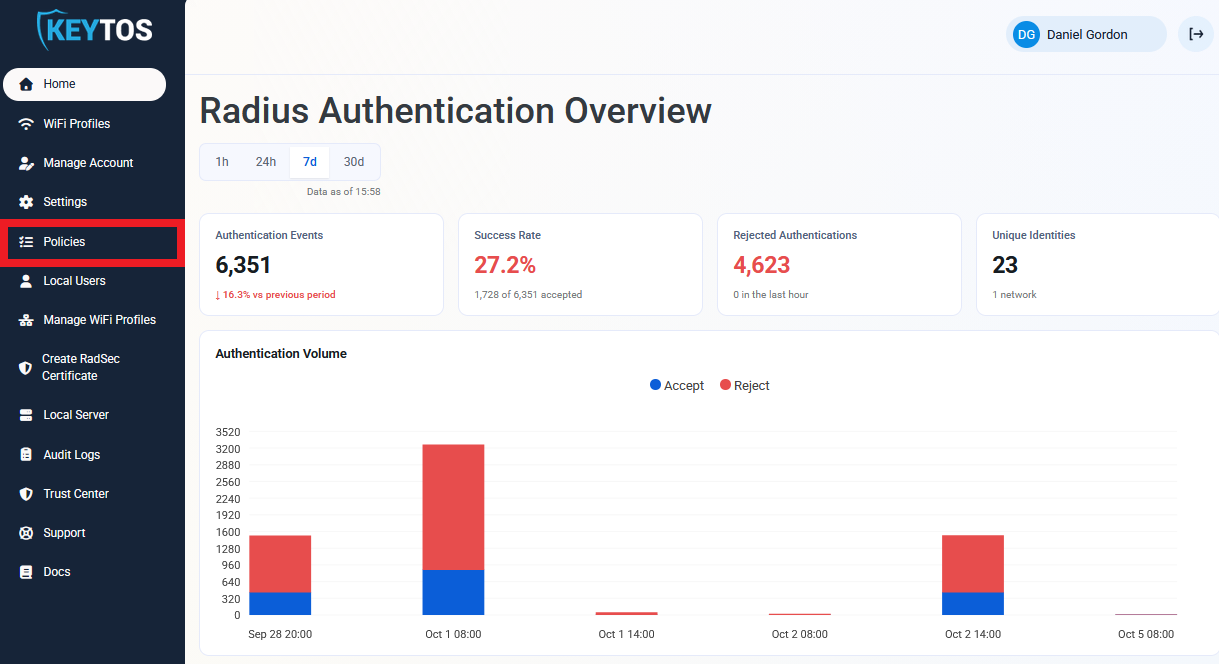
Using the left-hand menu, click on Policies.
-
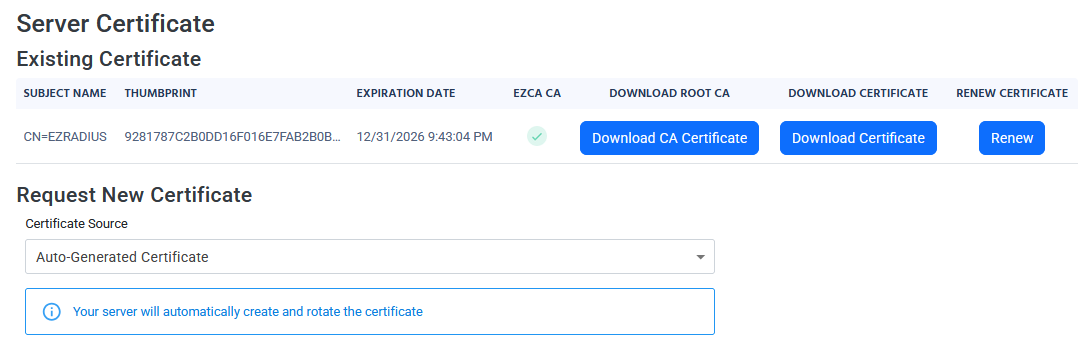
Scroll down to the Server Certificates > Existing Certificate section.
-
Click on the Download Certificate button to download your server CA certificate.
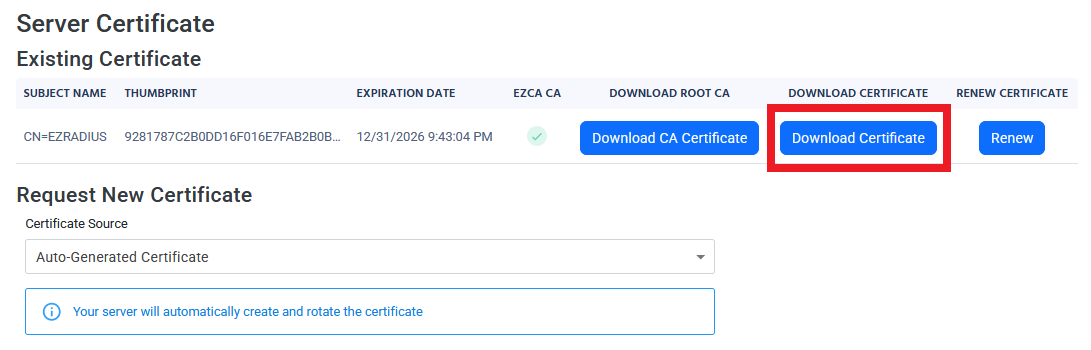
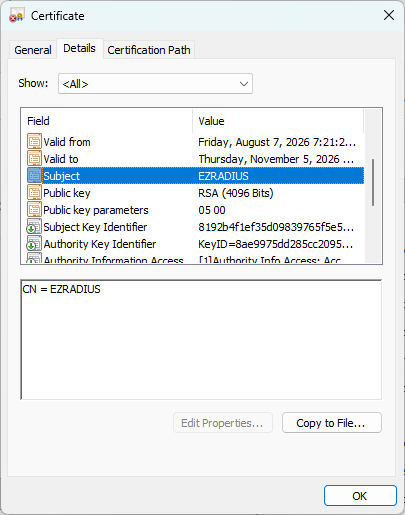
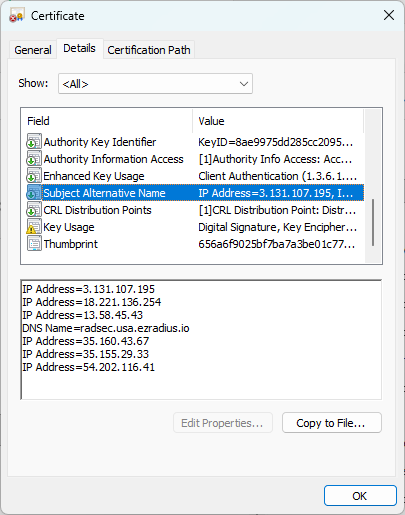
Once you have found your server certificate, you will need to copy the Subject Alternative Names and Subject from the certificate.
-
Open the server cert.
-
Click on the Details tab.
-
Scroll down until you find the Subject value. Copy this.
-
Scroll down until you find the Subject Alternative Name values. Copy all of these.
How to Create a WPA Enterprise Wi-Fi Profile in Intune
The final set of steps is to create a WPA Enterprise Wi-Fi profile in Intune that tells your device how to connect to your secure network using the certificates issued in the previous steps.
-
Go to your Intune portal: https://aka.ms/Intune
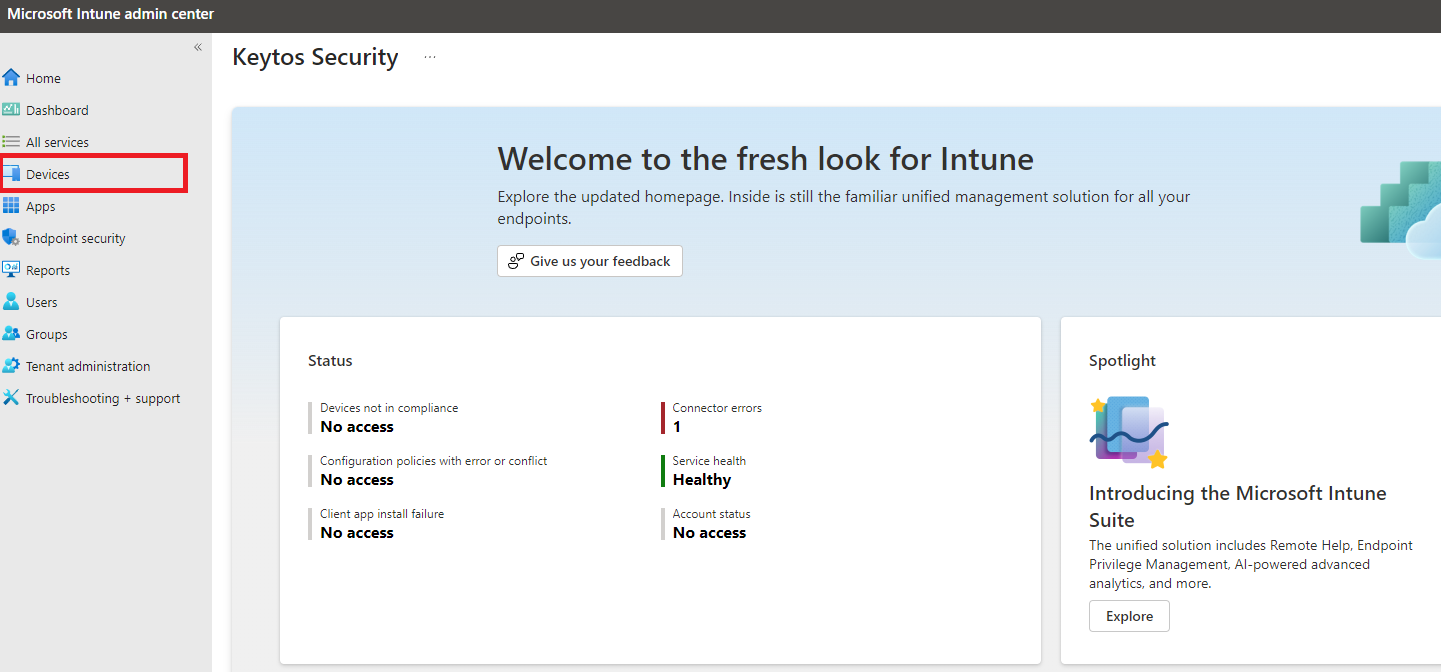
-
Click on Devices.
-
Select the OS/platform you want to configure. In this case we will select Windows, but the setup is similar for other OS platforms.
-
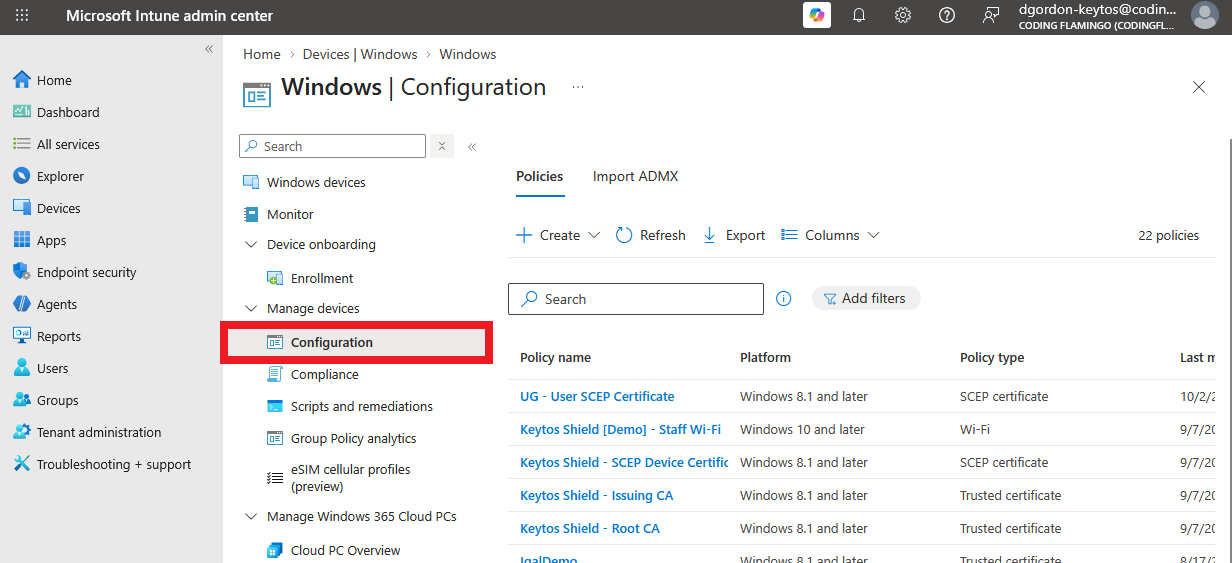
Click on Configuration.
-
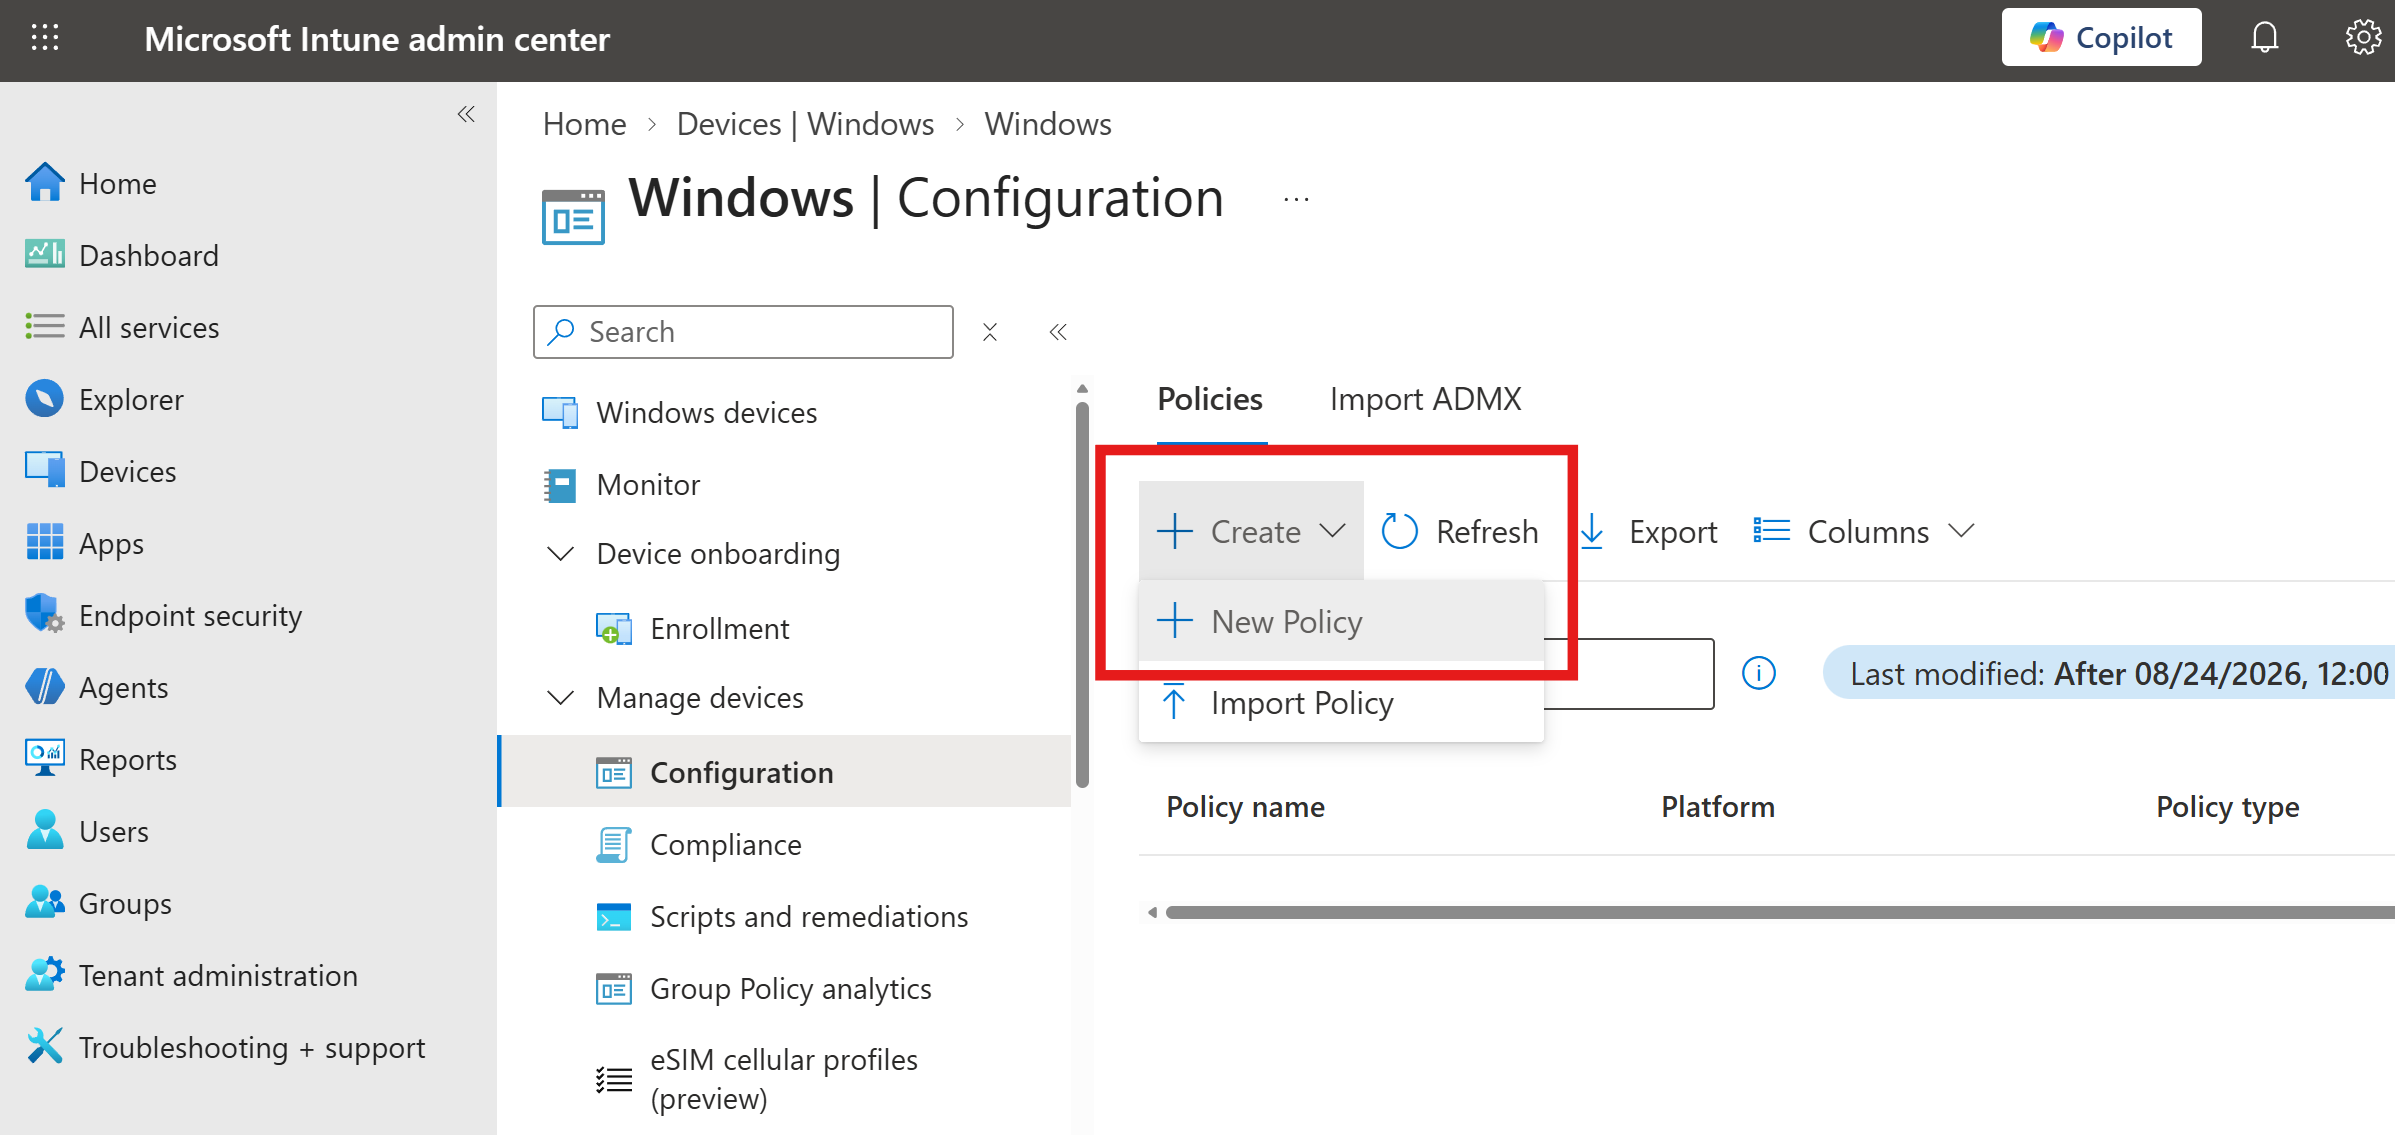
Click on + Create > + New Policy.
-
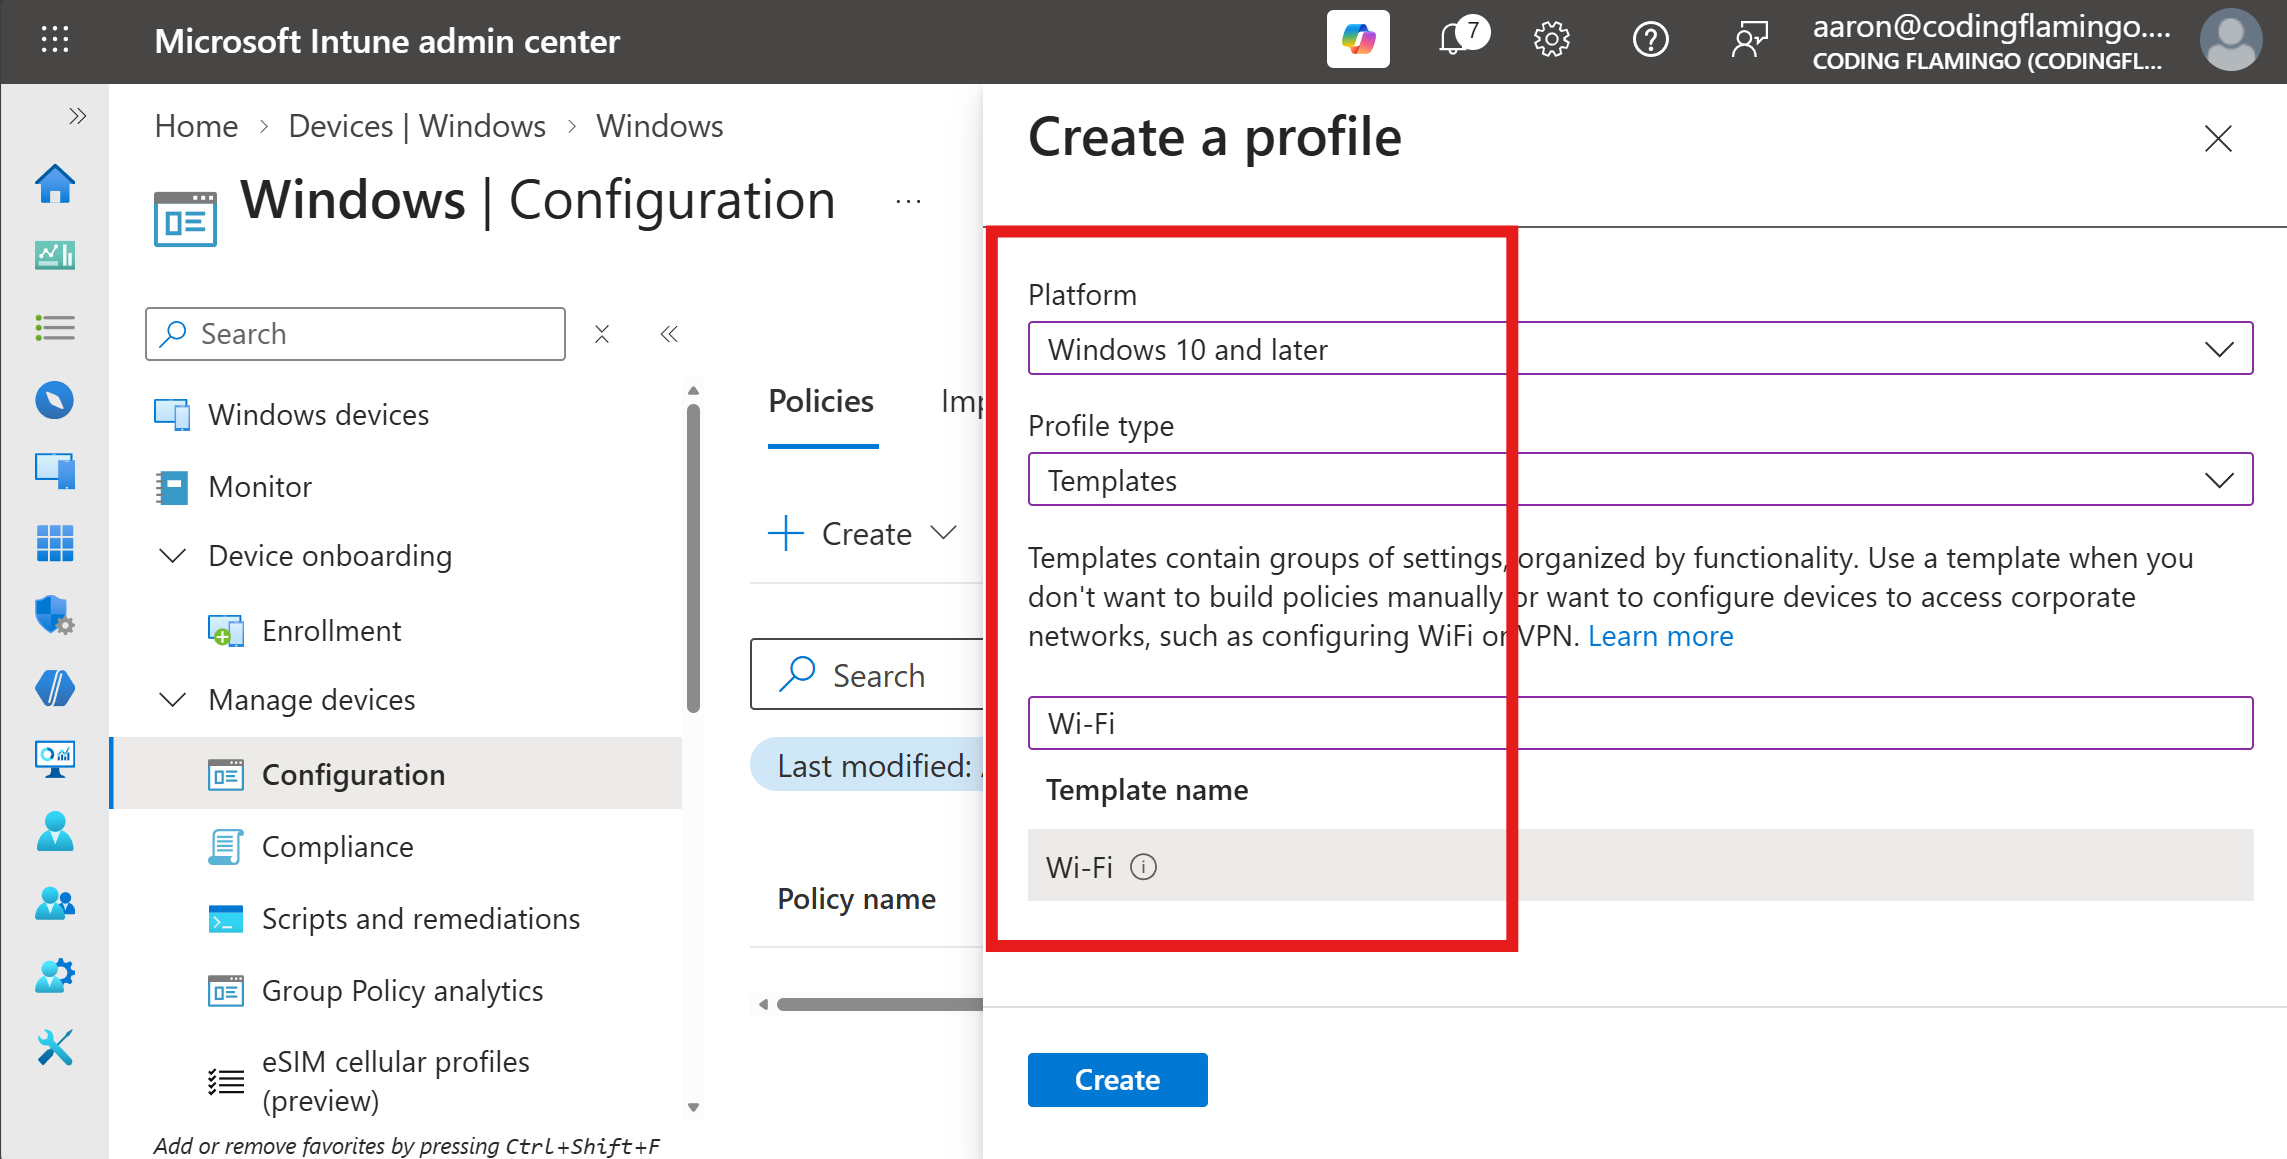
Enter the following fields:
-
Platform: select Windows 10 and later.
-
Profile type: select Templates.
-
Template name: select Wi-Fi.
-
-
Click on Create at the bottom of the page.
-
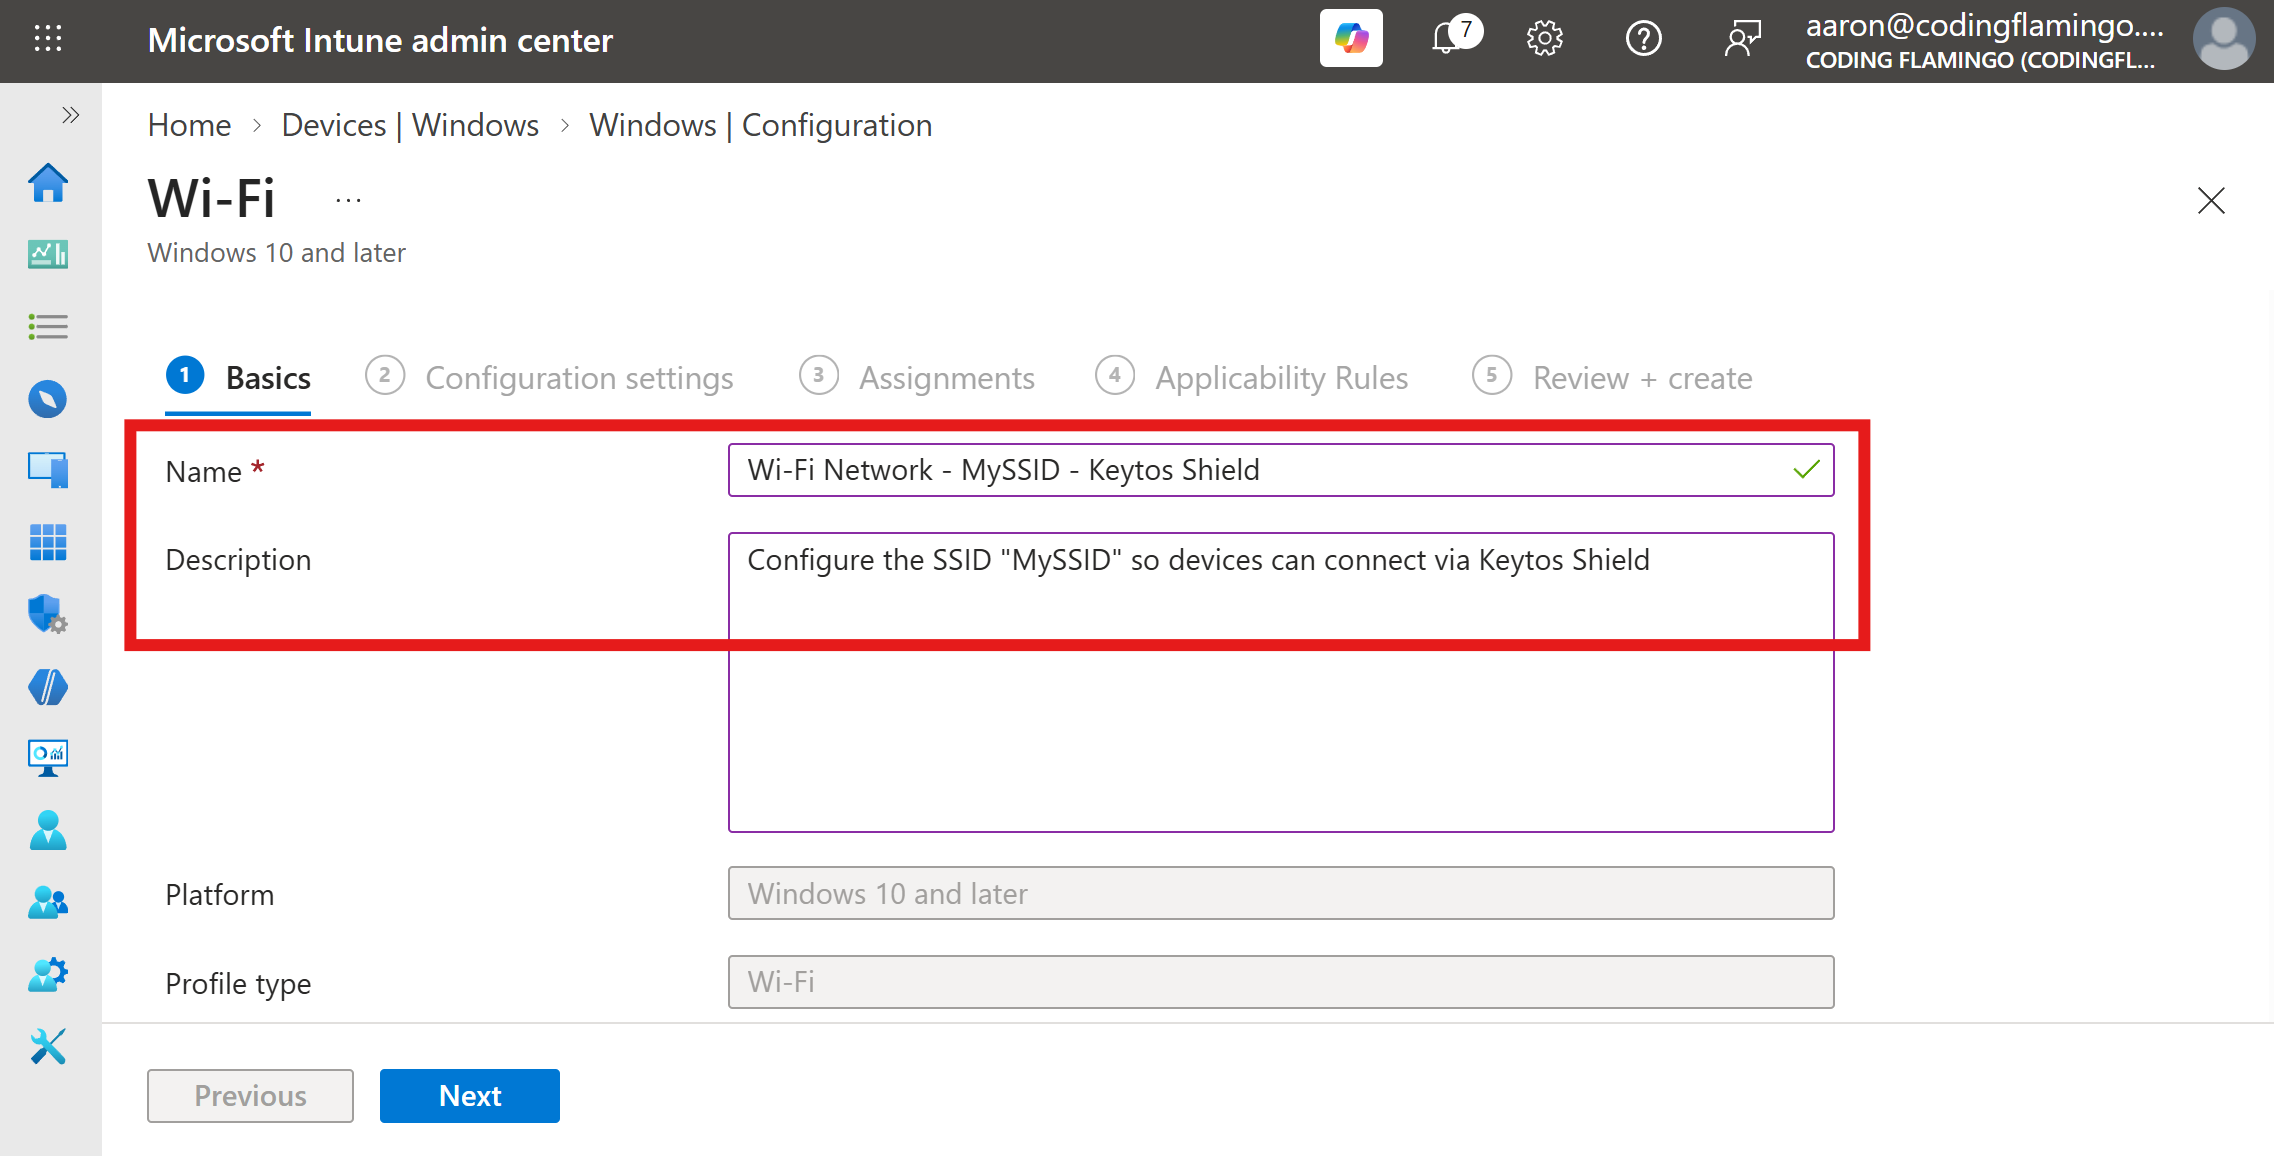
Under the Basics tab, enter the Name and Description for this Intune Wi-Fi profile and click Next to proceed.
-
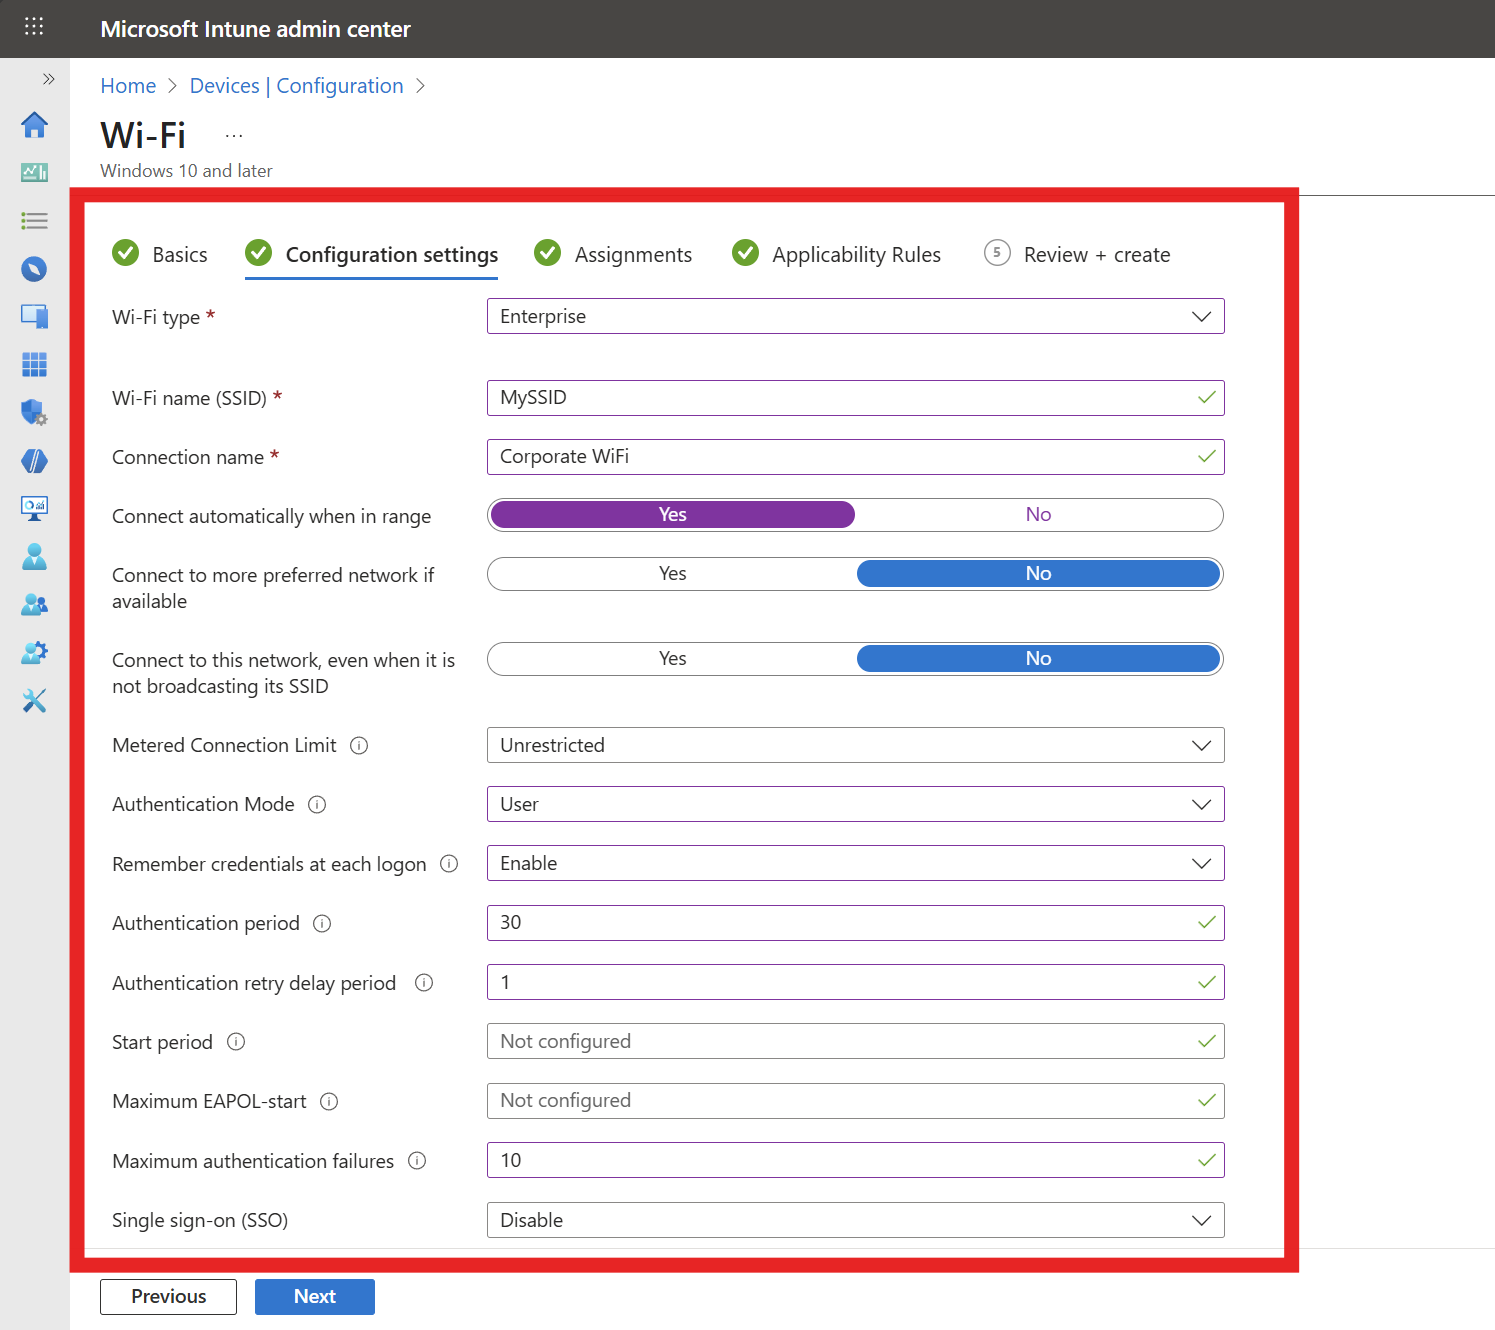
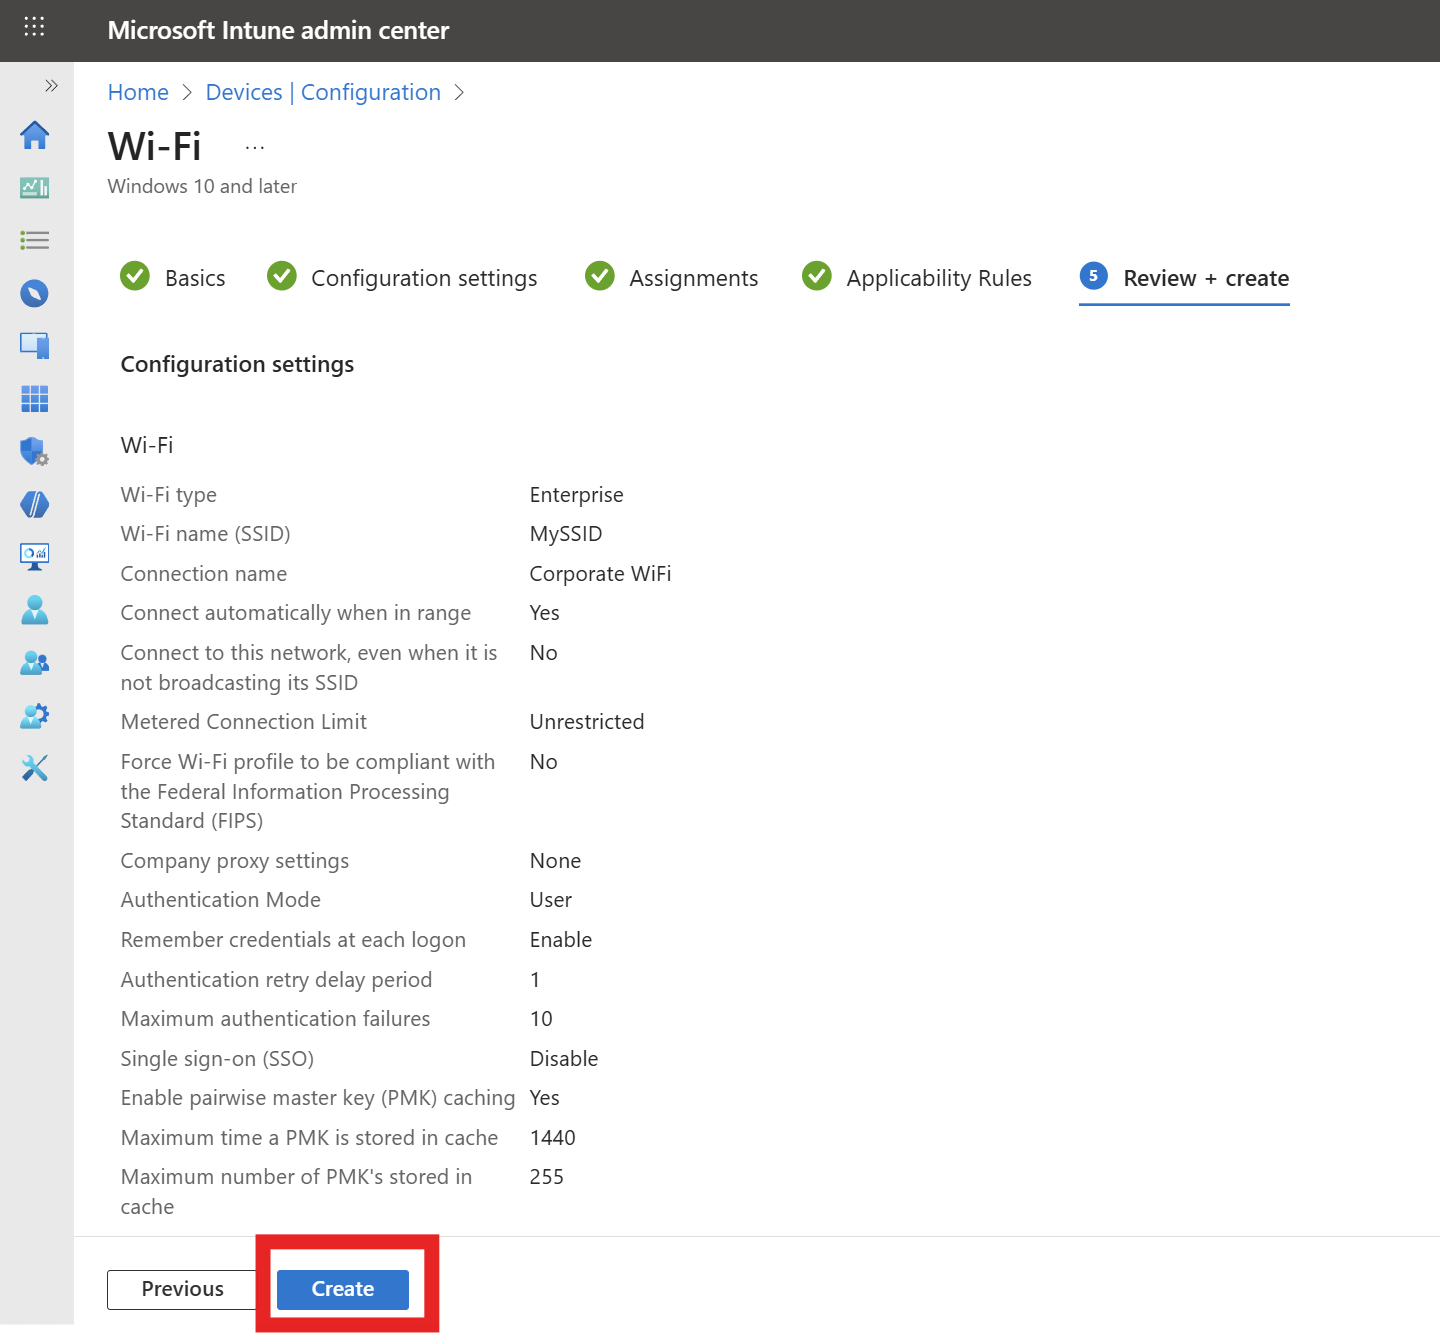
Enter the following required Configuration settings. Any field not mentioned below can be left as default or set to your organization’s preference:
-
Wi-Fi type: Enterprise
-
Wi-Fi name (SSID): Your Wi-Fi Network SSID (case sensitive)
-
Connection name: Friendly name for your users
-
Authentication mode: Select the mode based on whether your SCEP certificate is issued to the User or the Device.
-
Remember credentials: Set to No (not needed for certificate authentication).
-
Authentication period: 30 seconds is a recommended value we’ve seen work well for most environments.
-
Authentication retry delay: 1 second is a recommended value we’ve seen work well for most environments.
-
Maximum authentication failures: 10 is a recommended value we’ve seen work well for most environments.
-
Single sign-on (SSO): Disable
-
-
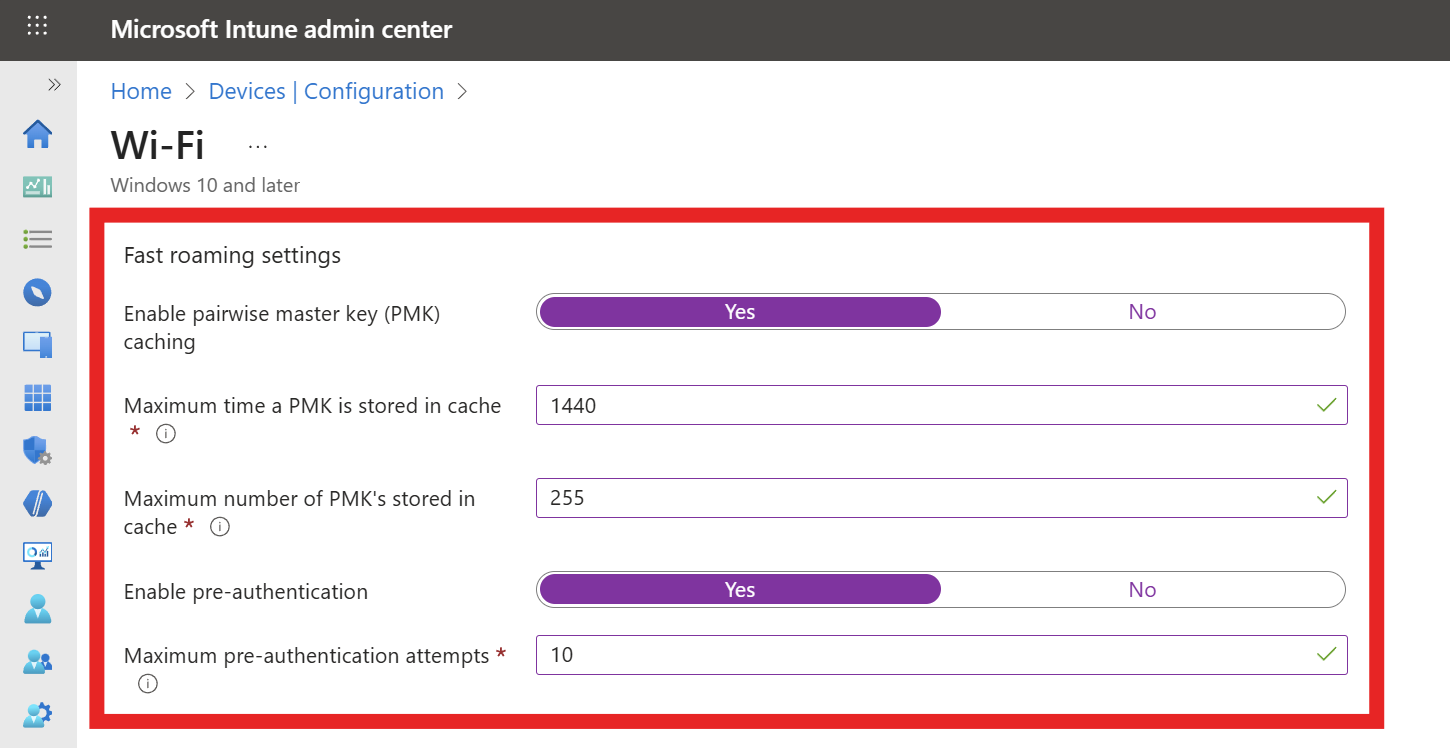
If your network controller supports Fast Roaming, fill out the Fast Roaming settings section with the following settings:
-
Enable pairwise master key (PMK) caching: Yes
-
Max PMK time stored in cache: We recommend setting this to the maximum (1440 minutes) to improve user experience.
-
Max number of PMKs in cache: We recommend setting this to the maximum (255) to improve user experience.
-
Enable pre-authentication: Yes
-
Max pre-authentication attempts: 10 is a recommended value we’ve seen work well for most environments.
-
-
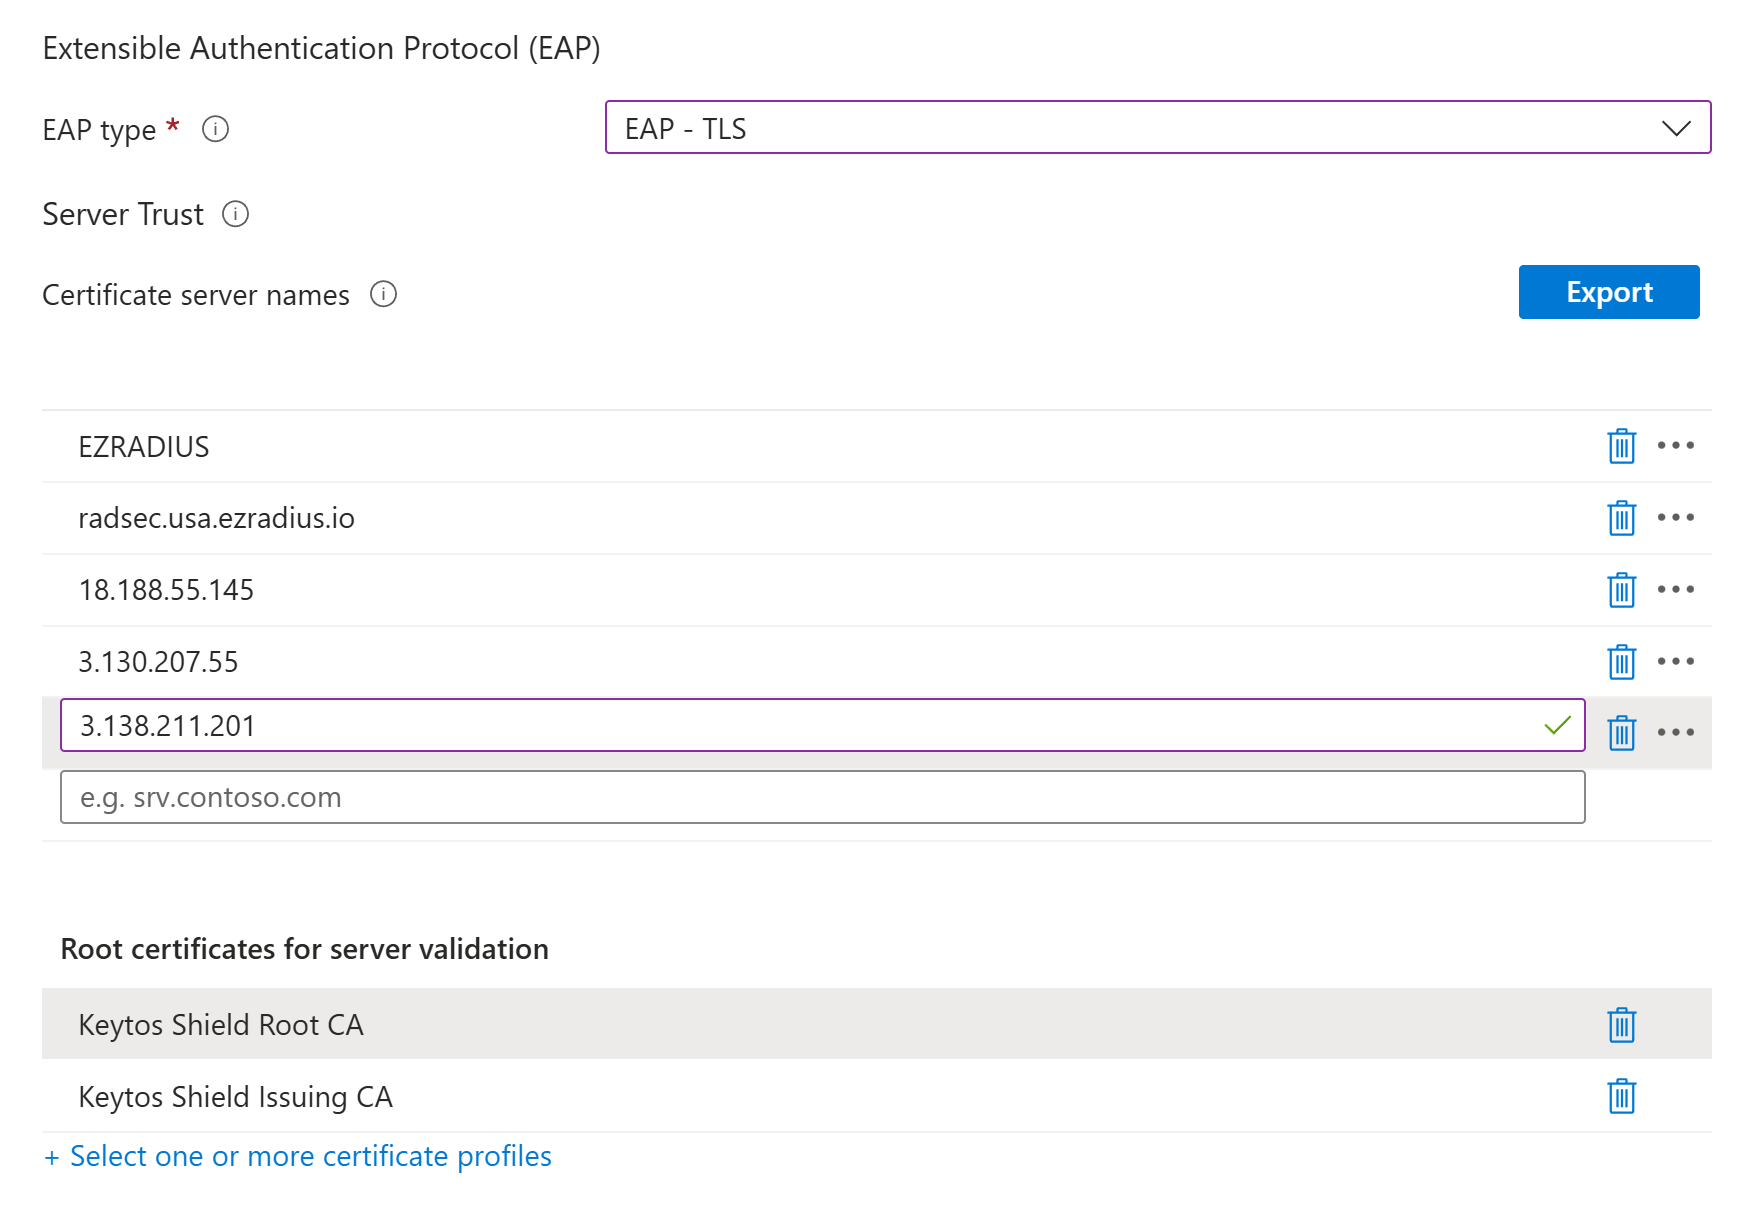
Fill out the Server Trust section with the following settings:
-
EAP type: EAP-TLS
-
Certificate server names: Enter the CN and SAN values from your RADIUS server certificate that you noted earlier. Remove
CN=,DNS Name=, andIP Address=prefixes when entering the values. -
Root Certificates for server validation: Select the trusted certificate profile(s) you just created.
-
-
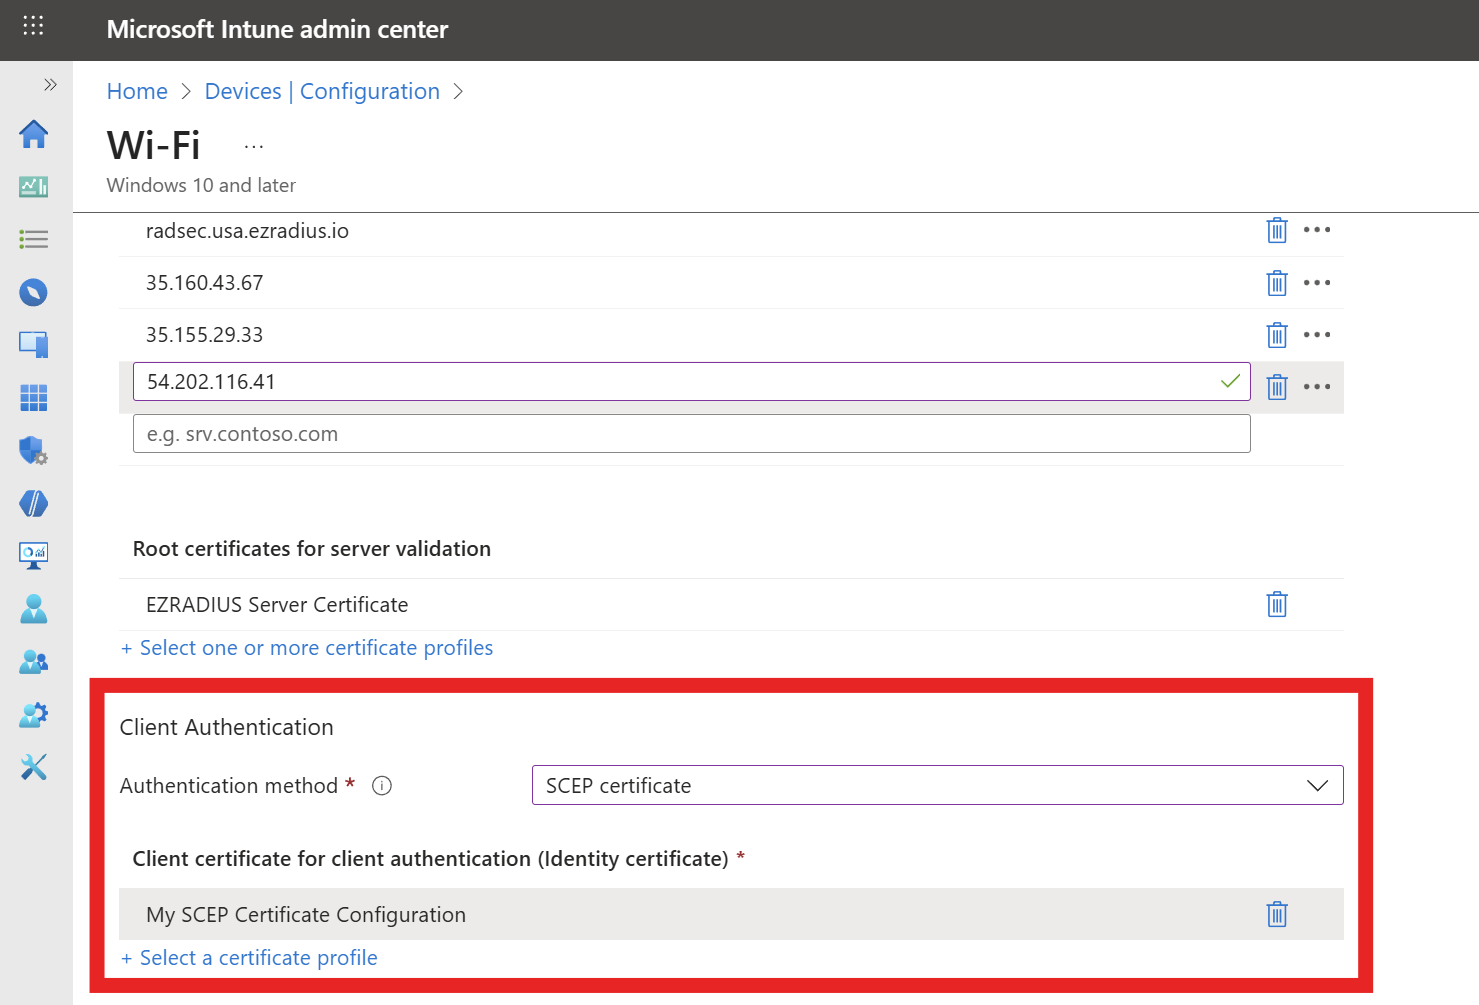
Fill out the Client Authentication section with the following settings:
-
Authentication Method: SCEP Certificate
-
Client certificate for client authentication: Select the SCEP profile created earlier for issuing client certificates to your devices.
-
-
Click on Next.
-
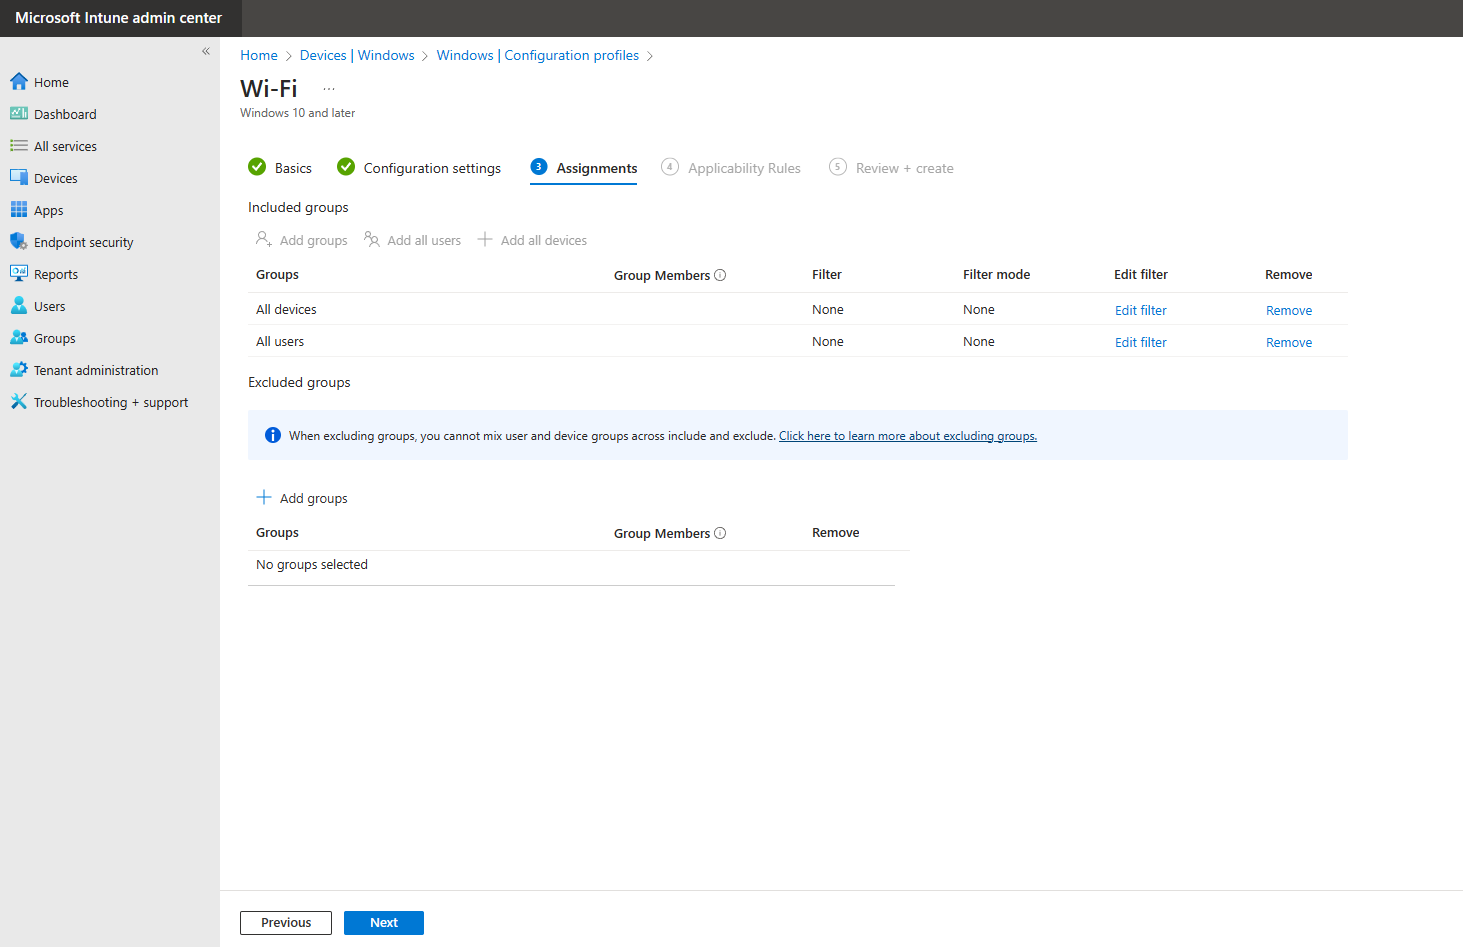
Select the users, groups or devices you want to deploy this profile to and click Next.
-
Add any applicability rules if needed, then click on Next.
-
Review your settings and click on Create.
-
Go to your Intune portal: https://aka.ms/Intune
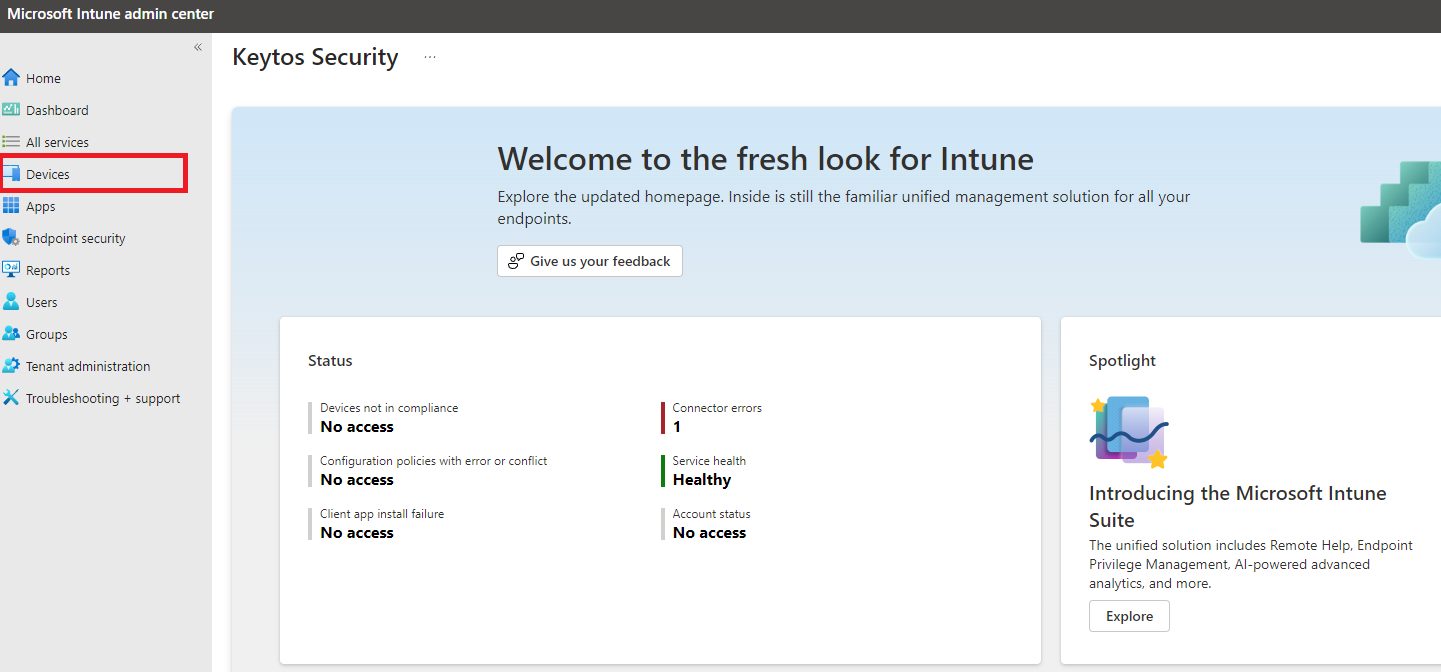
-
Click on Devices.
-
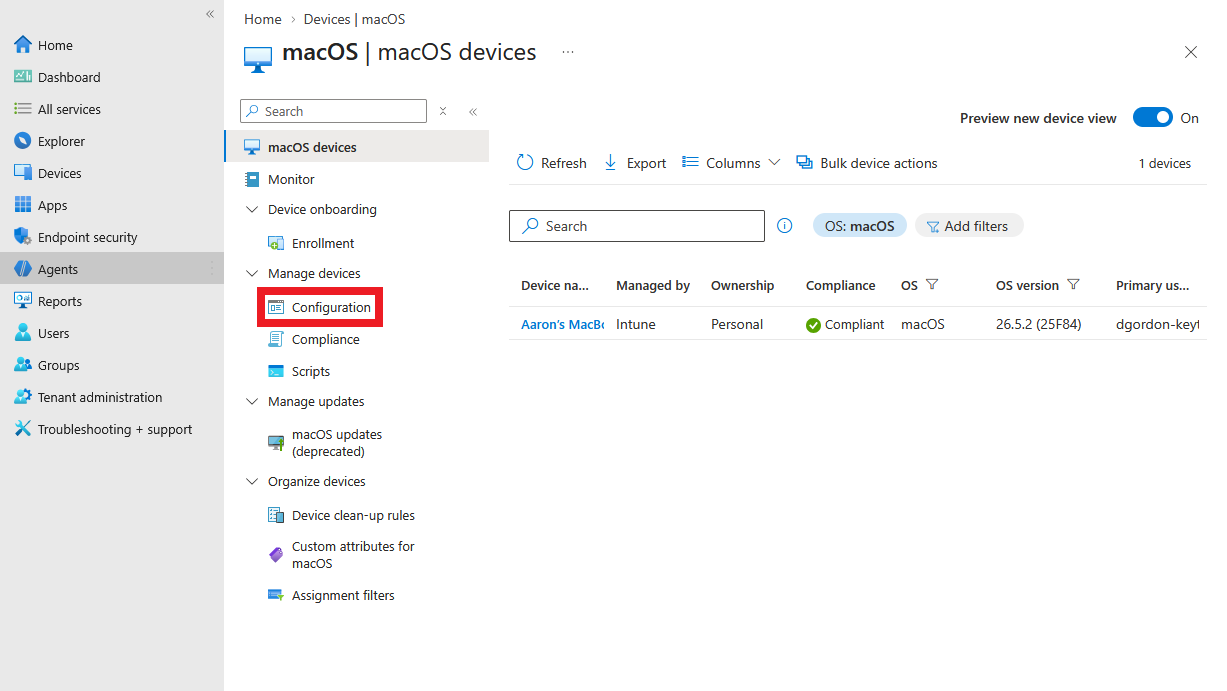
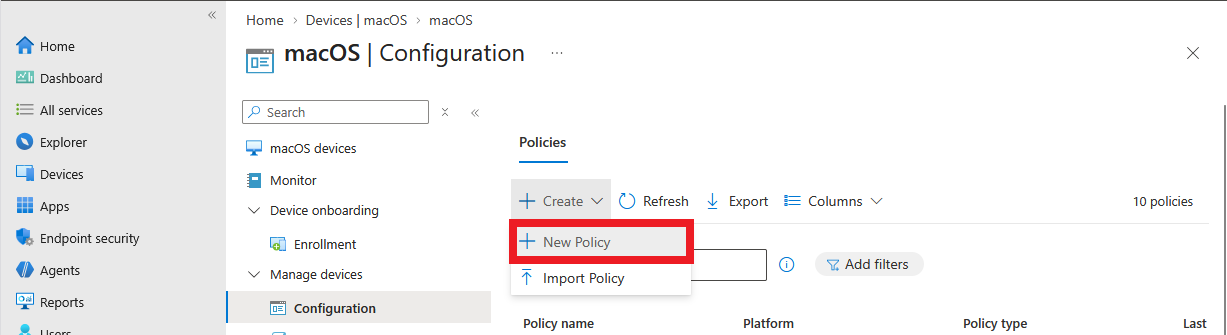
Select the OS/platform you want to configure. In this case we will select macOS, but the setup is similar for other OS platforms.
-
Click on Configuration.
-
Click on + Create > + New Policy.
-
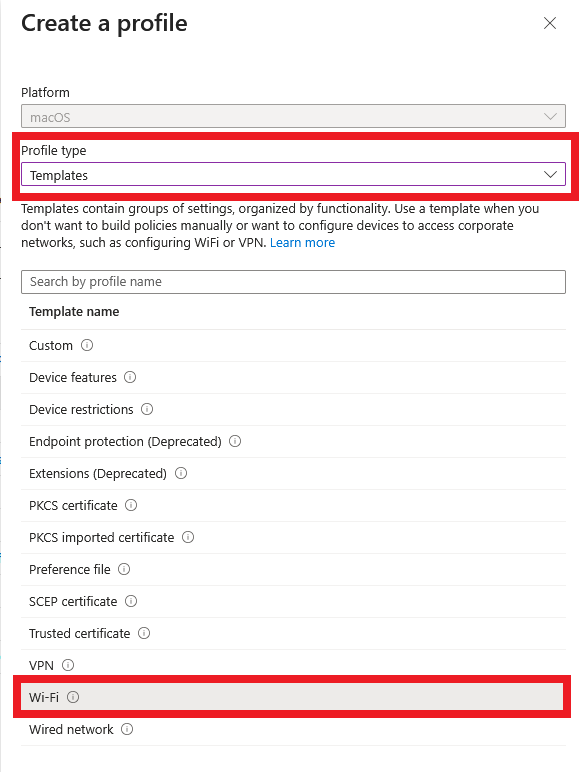
Enter the following fields:
-
Profile type: select Templates.
-
Template name: select Wi-Fi.
-
-
Click on Create at the bottom of the page.
-
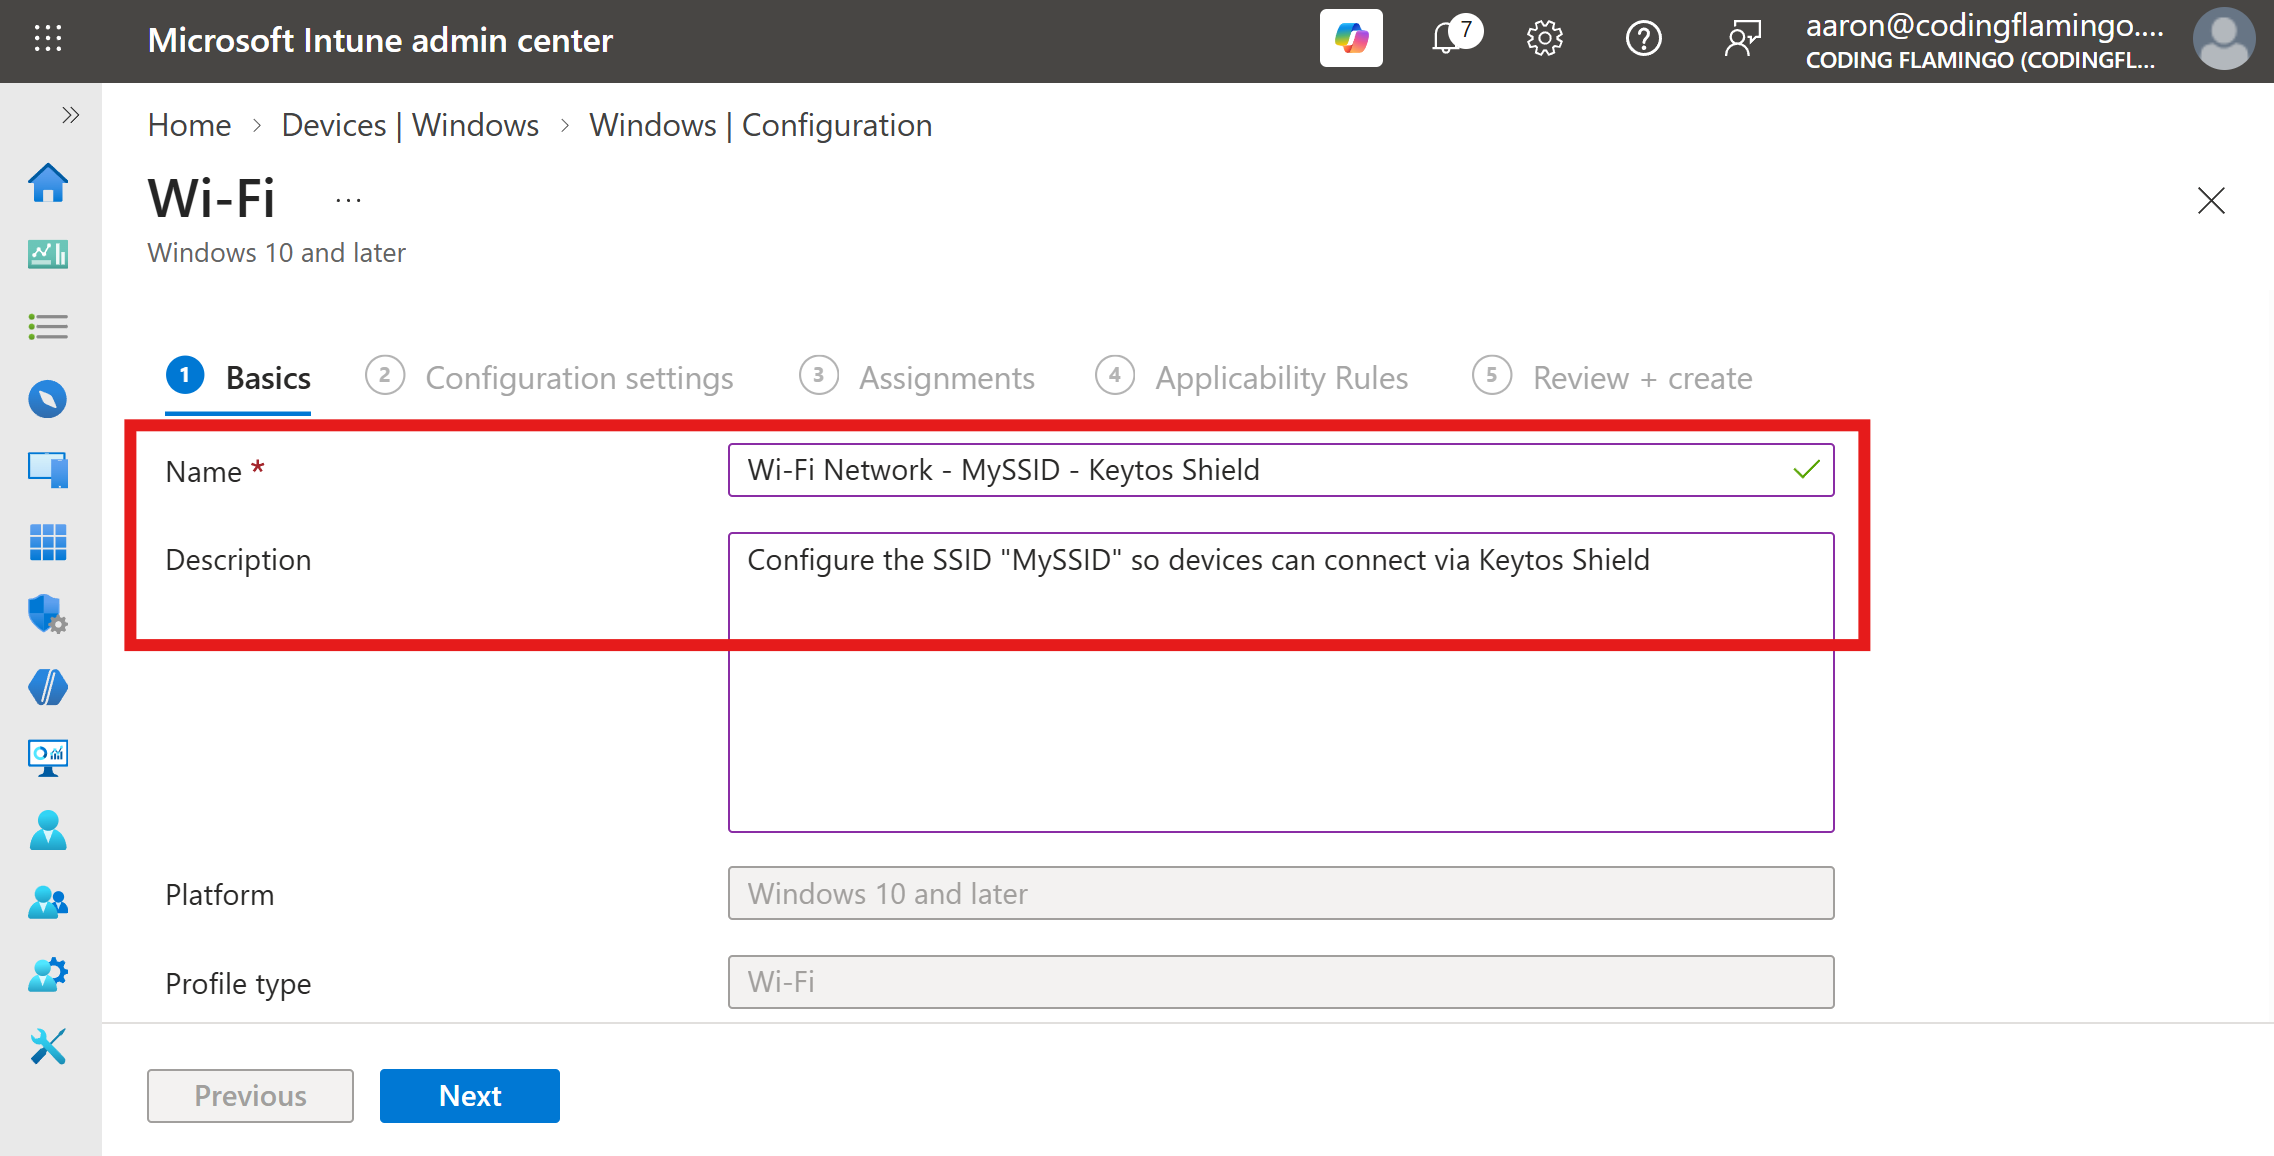
Under the Basics tab, enter the Name and Description for this Intune Wi-Fi profile and click Next to proceed.
-
Click on Next.
-
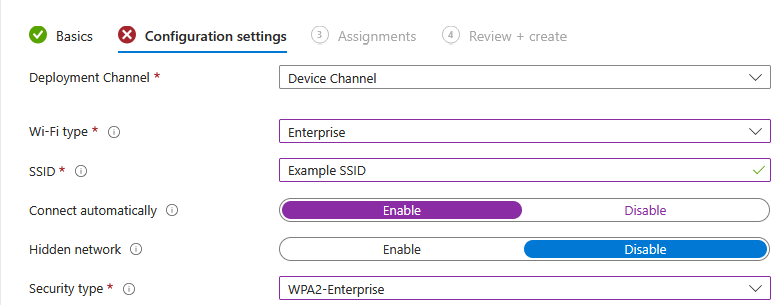
Enter the following required Configuration settings. Any field not mentioned below can be left as default or set to your organization’s preference:
Make sure to choose the same deployment channel you set in your EZRADIUS access policyWhen selecting device or user channel, make sure you match the authentication type you set in your RADIUS policy. If you’re unsure, check your Access policies on the Policies page.
-
Wi-Fi type: Enterprise
-
SSID: Your Wi-Fi Network SSID (Case Sensitive)
-
Security type: WPA2-Enterprise
-
-
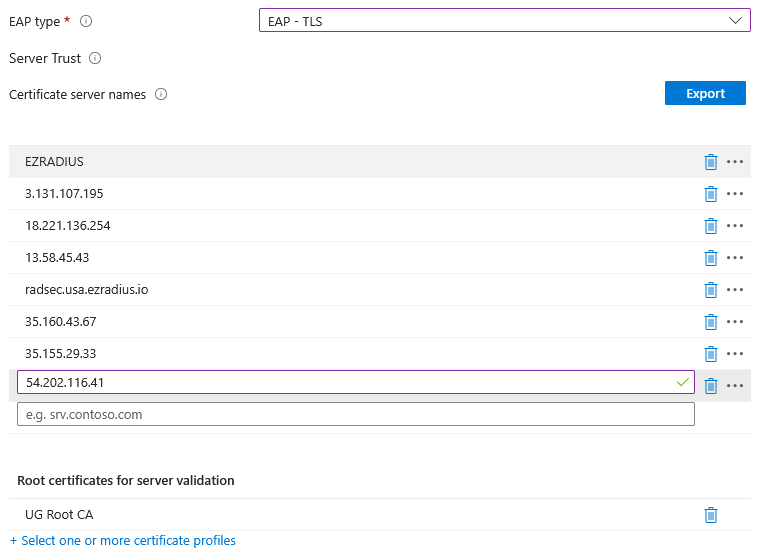
Fill out the Server Trust section with the following settings:
-
EAP type: EAP-TLS
-
Certificate server names: Enter the CN and SAN values from your RADIUS server certificate that you noted earlier. Remove
CN=,DNS Name=, andIP Address=prefixes when entering the values. -
Root certificate for server validation: Select the trusted certificate profile(s) you just created.
-
-
Fill out the Client Authentication section with the following settings:
- Certificates: Select the SCEP profile created earlier for issuing client certificates to your devices.
-
Click on Next.
-
Select the users, groups or devices you want to deploy this profile to and click Next.
-
Review your settings and click on Create.
- Go to your Intune portal: https://aka.ms/Intune
- Click on Devices.
- Click on Configuration.
- Click on + Create > + New Policy.
- Enter the following fields:
- Platform: select iOS/iPadOS.
- Profile type: select Templates.
- Template name: select Wi-Fi.
- Click on Create at the bottom of the page.
- Under the Basics tab, enter the Name and Description for this Intune Wi-Fi profile and click Next to proceed.
- Click on Next.
- Enter the following required Configuration settings. Any field not mentioned below can be left as default or set to your organization’s preference:
- **Wi-Fi type**: Enterprise - **Network name**: A friendly name for your Wi-Fi network (can be the same as the SSID) - **SSID**: Your Wi-Fi Network SSID (Case Sensitive) - **Connect automatically**: Enable this option to allow devices to connect to the Wi-Fi network automatically. - **Hidden network**: Enable this option if your Wi-Fi network is hidden. - **Security type**: WPA2-EnterpriseMake sure to choose the same deployment channel you set in your EZRADIUS access policy
When selecting device or user channel, make sure you match the authentication type you set in your RADIUS policy. If you’re unsure, check your Access policies on the Policies page.
- Fill out the Server Trust section with the following settings:
- EAP type: EAP-TLS
- Certificate server names: Enter the CN and SAN values from your RADIUS server certificate that you noted earlier. Remove
CN=,DNS Name=, andIP Address=prefixes when entering the values. - Root certificate for server validation: Select the EZRADIUS server CA certificate profile you created earlier.
- Fill out the Client Authentication section with the following settings:
- Authentication method: Select Certificates.
- Certificates: Select the SCEP profile created earlier for issuing client certificates to your devices.
- Click on Next.
- Select the users, groups or devices you want to deploy this profile to and click Next.
- Review your settings and click on Create.
- Go to your Intune portal: https://aka.ms/Intune
- Click on Devices.
- Click on Configuration.
- Click on + Create > + New Policy.
- Enter the following fields:
- Platform: select Android Enterprise.
- Profile type: select Templates.
- Template name: select Wi-Fi under the type of Android management that you employ.
- Click on Create at the bottom of the page.
- Under the Basics tab, enter the Name and Description for this Intune Wi-Fi profile and click Next to proceed.
- Click on Next.
- Enter the following required Configuration settings. Any field not mentioned below can be left as default or set to your organization’s preference:
- **Wi-Fi type**: Enterprise - **SSID**: Your Wi-Fi Network SSID (Case Sensitive) - **Hidden network**: Enable this option if your Wi-Fi network is hidden.Make sure to choose the same deployment channel you set in your EZRADIUS access policy
When selecting device or user channel, make sure you match the authentication type you set in your RADIUS policy. If you’re unsure, check your Access policies on the Policies page.
- Fill out the Server Trust section with the following settings:
- EAP type: EAP-TLS
- RADIUS server names: Enter the CN and SAN values from your RADIUS server certificate that you noted earlier. Remove
CN=,DNS Name=, andIP Address=prefixes when entering the values. - Root certificate for server validation: Select the EZRADIUS server CA certificate profile you created earlier.
- Fill out the Client Authentication section with the following settings:
- Certificates: Select the SCEP profile created earlier for issuing client certificates to your devices.
- Click on Next.
- Select the users, groups or devices you want to deploy this profile to and click Next.
- Review your settings and click on Create.
How to Troubleshoot RADIUS Authentication
If you are unable to connect to your network, refer to our troubleshooting guide.
EZRADIUS Troubleshooting GuideEnjoying EZRADIUS? Leave Us a Review!
We hope you’re enjoying using EZRADIUS to issue your SCEP certificates! If you have a moment, we would greatly appreciate it if you could leave us a review on G2. Your feedback helps other IT professionals discover EZRADIUS and helps us continue to improve our service. Thank you for your support!