









How-To: Set Up Certificate-Based Wi-Fi on Chromebooks with Keytos Shield and the Google Cloud Certificate Connector (GCCC)
Overview - How to Connect Chromebooks to Passwordless Wi-Fi with Keytos Shield
Chromebooks managed in Google Workspace can’t request certificates from Keytos Shield on their own. Google brokers every certificate request through the Google Cloud Certificate Connector (GCCC), a small Windows service that you run on a server in your environment. The connector receives each Chromebook’s certificate request from Google, sends it to your Keytos Shield static SCEP endpoint, and returns the signed certificate to the device. The private key never leaves the Chromebook.
This guide walks you through every piece: enabling static SCEP in Keytos Shield, preparing the Google Cloud project the connector uses, installing GCCC, and configuring Google Admin to push both the Shield CA certificates and an EAP-TLS Wi-Fi network. Once you’re done, your Chromebooks receive a certificate and connect to your Wi-Fi automatically, with no passwords.
How Chromebook Certificate Provisioning Works with Keytos Shield
- Google Admin sends a managed Chromebook your certificate provisioning profile and Wi-Fi network: at boot for device certificates, or when the user signs in for user certificates.
- The Chromebook generates a key pair and sends a certificate request to Google.
- Google publishes the request to a Pub/Sub topic in your Google Cloud project.
- The Google Cloud Certificate Connector on your Windows server picks up the request and sends it to your Keytos Shield static SCEP URL, using the Shield static SCEP password.
- Keytos Shield issues the certificate. The connector hands it back to Google, which installs it on the Chromebook.
- The Chromebook connects to your Wi-Fi with EAP-TLS. It trusts your Shield RADIUS servers because Google Admin pushed your Shield Root CA as the server CA.
Prerequisites for Issuing Keytos Shield Certificates to Chromebooks
Before you begin, make sure you have completed these prerequisites:
- The Keytos Entra ID applications are registered in your tenant.
- You have signed up for a Keytos Shield Plan.
- You are a Subscription Owner or Network Administrator.
- You have completed the Keytos Shield Network Security onboarding and have a network profile for the SSID your Chromebooks will join.
- You are a Google Workspace super administrator.
- Your Chromebooks are enrolled in Google Workspace with a Chrome Enterprise or Chrome Education Upgrade license, and run ChromeOS 138 or later.
- You can create a project with billing enabled in Google Cloud.
- You have a Windows Server (or Windows machine that stays on) with outbound HTTPS access to Google and to your Keytos Shield SCEP URL. GCCC runs there as a Windows service.
Step-by-Step Guide - How to Configure Chromebook Wi-Fi Certificates with Keytos Shield and GCCC
Step 1 - How to Enable Static SCEP in Keytos Shield
Keytos Shield only shows enrollment details for the MDMs you tell it about. Saving your selection also updates your certificate authority to support static SCEP.
- Log in to your Keytos Shield portal.
- From the left-hand menu, select Network profiles.
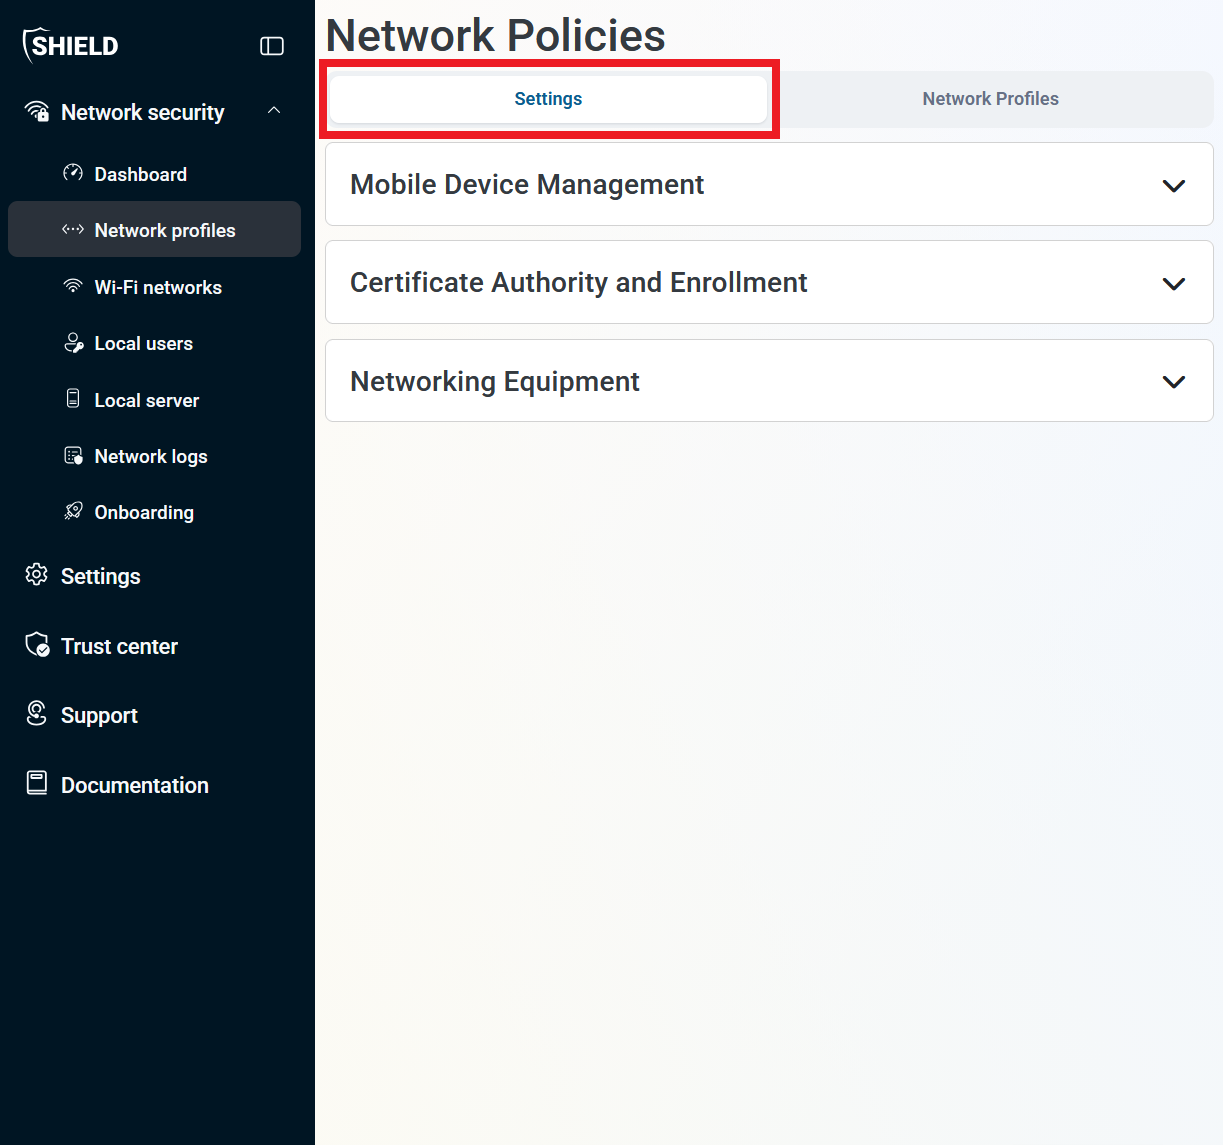
- At the top of the page, select the Settings tab.
- Expand Mobile Device Management.
- Check Other MDM, in addition to any other MDMs you already use.
- Click Save MDM Configuration.
Step 2 - How to Get Your Keytos Shield Static SCEP URL, Password, and CA Certificates
You need three things from Keytos Shield: the static SCEP URL and password for the connector, and your Shield CA certificates for Google Admin.
How to Copy Your Static SCEP URL and Password
-
Log in to your Keytos Shield portal.
-
From the left-hand menu, navigate to Network profiles.
-
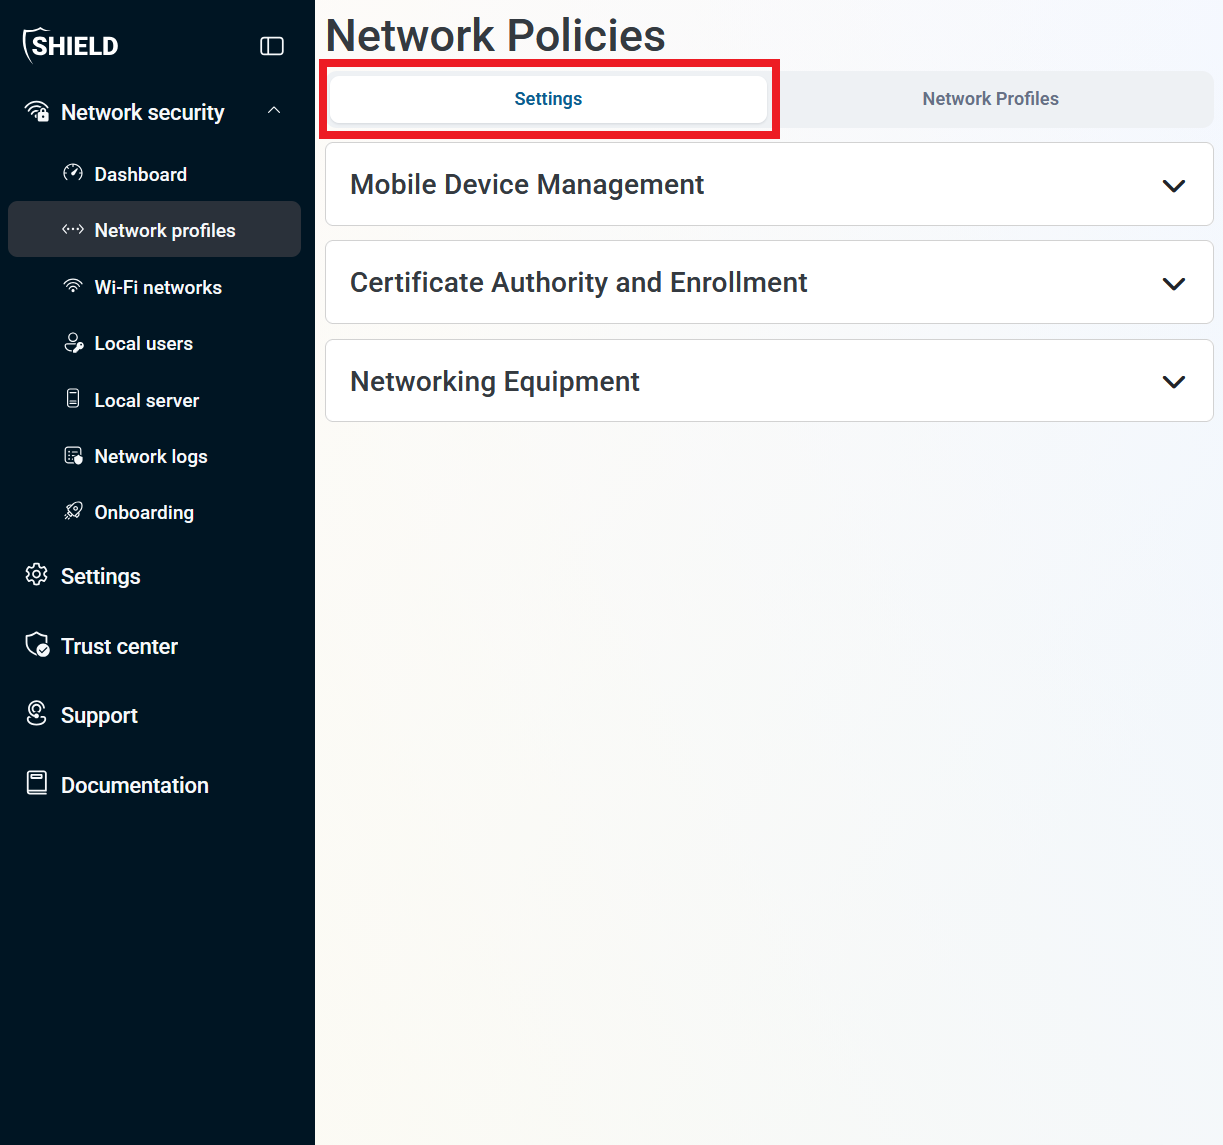
At the top of the page, select the Settings tab.
-
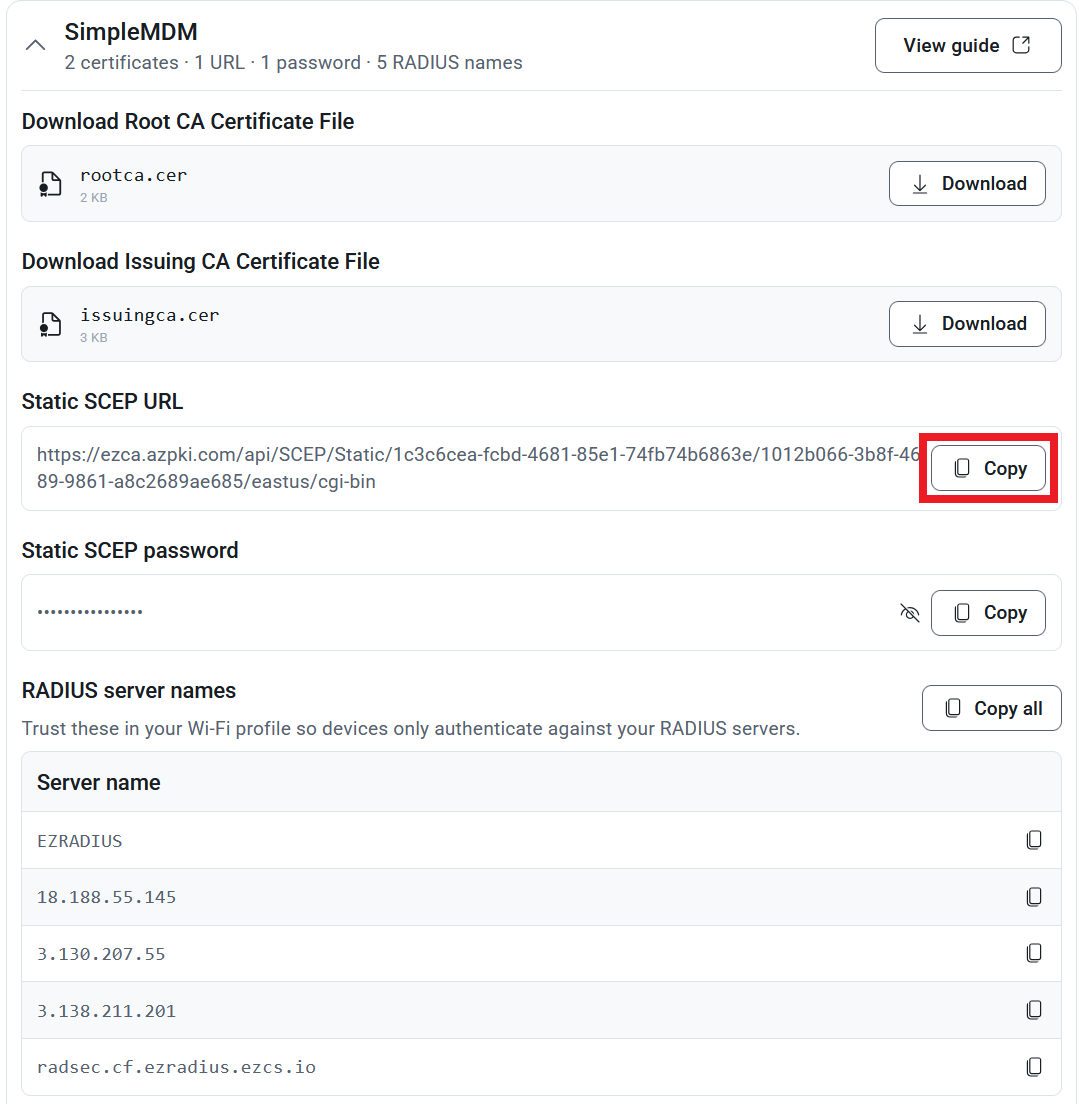
Expand Certificate Authority and Enrollment, and then expand your MDM, such as NinjaOne or SimpleMDM.
Not seeing your MDM? Make sure to enable it under the Mobile Device Management section further up on the page and save your changes.
-
Click the Copy button next to the Static SCEP URL.
-
Click the Copy button next to the Static SCEP password to copy the password without displaying it. You will need both values when you create the SCEP profile in your MDM.
Keep the password somewhere safe, such as your password manager. You’ll save it on the connector server in Step 5.
How to Download Your Keytos Shield Root and Issuing CA Certificates
-
Log in to your Keytos Shield portal.
-
From the left-hand navigation bar, click on Network Profiles.
-
At the top of the page, select the Settings tab.
-
Scroll down to the Certificate Authority and Enrollment section and expand the Other MDM subsection.
Not seeing the Other MDM subsection? Make sure to enable Other MDM under the Mobile Device Management section further up on the page and save your changes.
-
Next to
rootca.cer, click Download and save it to your local machine. -
Next to
issuingca.cer, click Download and save it to your local machine as well.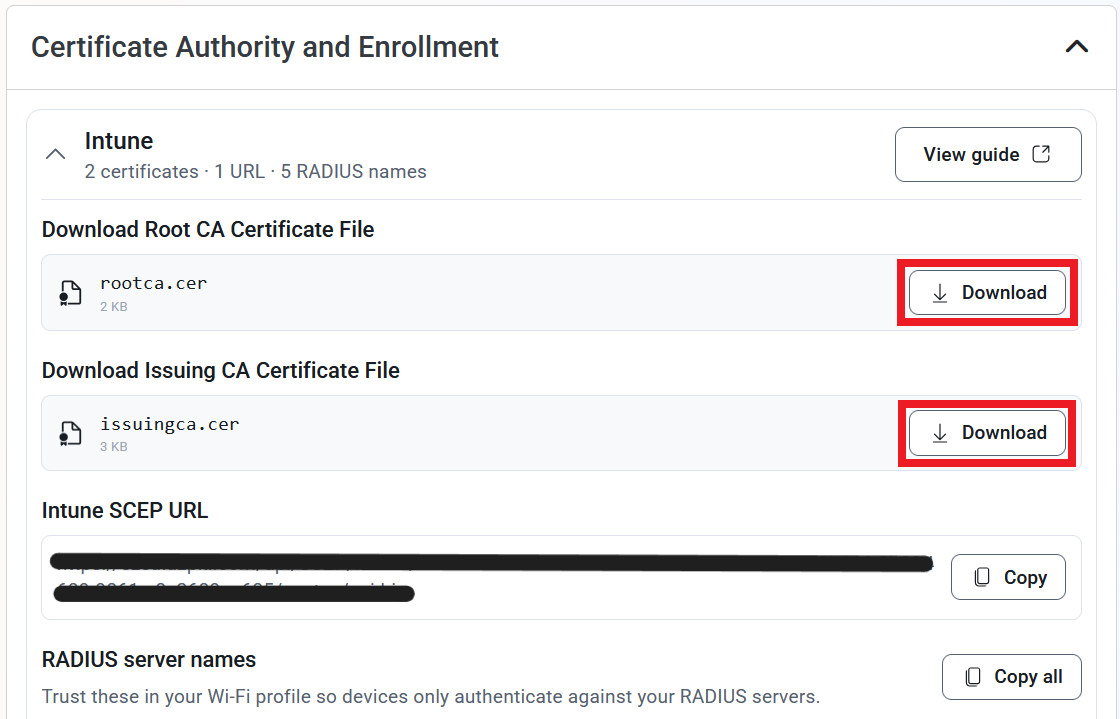
Step 3 - How to Create the Google Cloud Project and Pub/Sub Topic for GCCC
Google delivers Chromebook certificate requests to the connector through Pub/Sub in a Google Cloud project that you own. Create a dedicated project for the connector so its permissions stay separate from everything else.
New Google Cloud organizations enforce “Secure by Default” organization policies. Two of them block the connector, and the console shows an error when you hit them:
- Disable service account key creation (
iam.managed.disableServiceAccountKeyCreation) blocks the JSON key the connector signs in with. You’ll see “Service account key creation is disabled”. - Domain restricted sharing (
iam.allowedPolicyMemberDomains, or the managediam.managed.allowedPolicyMembers) blocks Google’s owncert-provisioning-api-pubsub-publisher@system.gserviceaccount.comservice account from your topic. You’ll see “IAM policy update failed”.
We recommend overriding these policies only on your GCCC project, so the rest of your organization stays protected. A user with the Organization Policy Administrator role on your organization opens IAM & Admin > Organization Policies in the GCCC project, opens each policy, clicks Manage policy, selects Override parent’s policy, and turns enforcement off (or sets the domain restriction to Allow All). Changes take about two minutes to apply.
How to Create the Google Cloud Project
-
Go to the Google Cloud console and sign in with your Google Workspace administrator account.
-
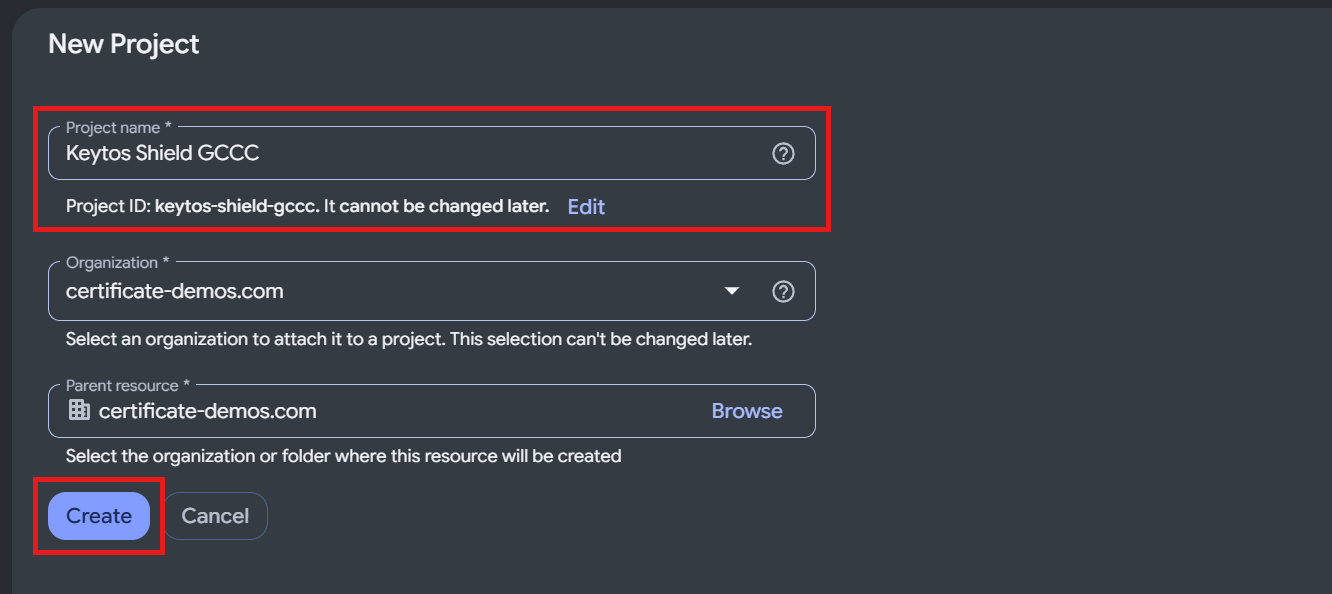
Enter a Project name, such as
Keytos Shield GCCC. Note the Project ID shown underneath; you’ll use it in the connector configuration. -
Make sure the Organization is your Google Workspace domain, and then click Create.
How to Create the Pub/Sub Topic and Subscription
-
With your new project selected, go to Pub/Sub > Topics. If prompted, let Google Cloud enable the Pub/Sub API.
-
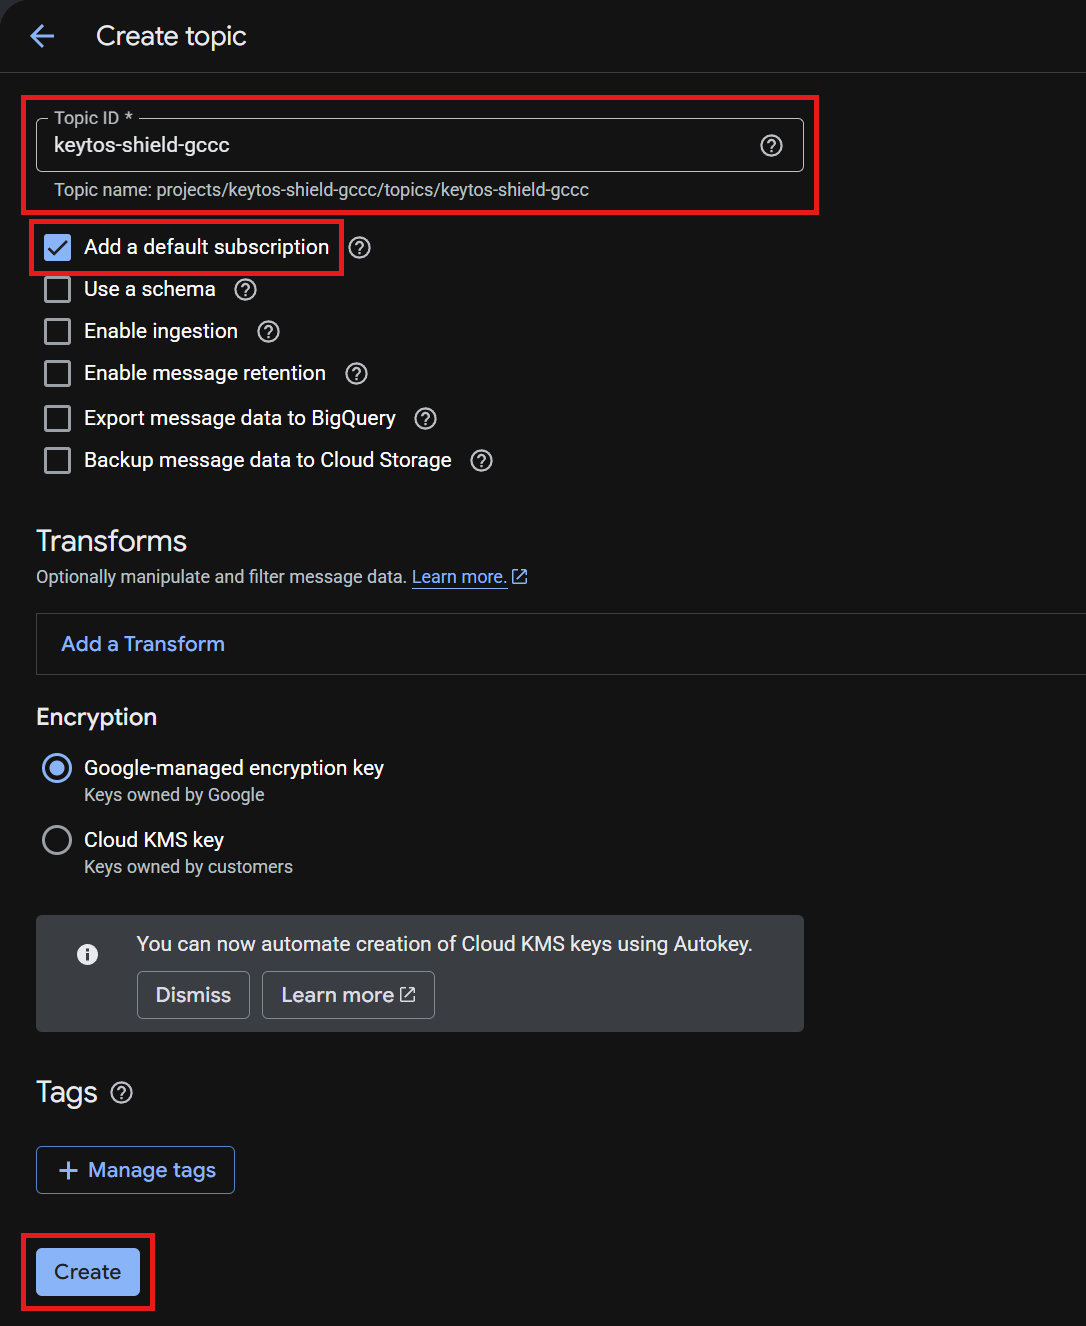
Click Create topic.
-
Enter a Topic ID, such as
keytos-shield-gccc, and copy the full Topic name shown underneath (projects/<project-id>/topics/<topic-id>). -
Keep Add a default subscription checked. Google creates a subscription named
<topic-id>-sub, which the connector listens to. -
Click Create.
How to Enable the Chrome Management API
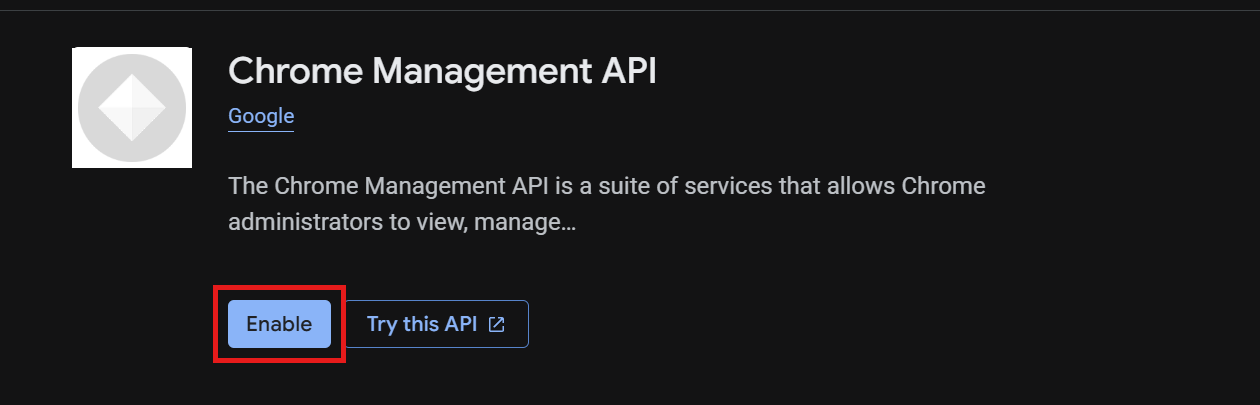
The connector returns issued certificates to Google through the Chrome Management API.
-
Go to APIs & Services > Library, and search for Chrome Management API.
-
Click Enable.
How to Create the Connector Service Account
-
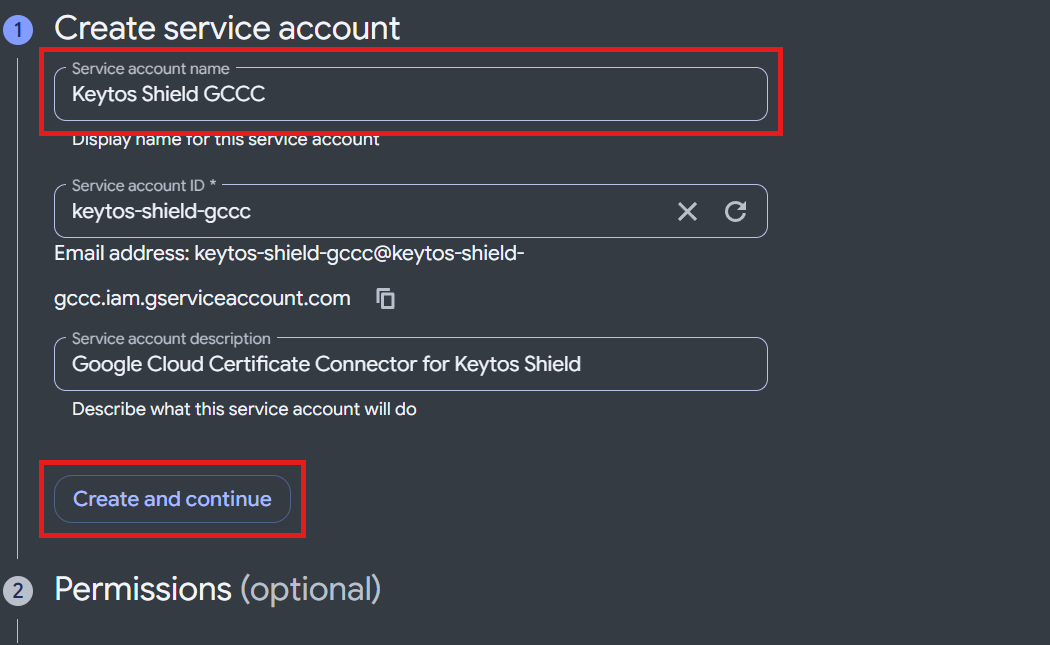
Go to IAM & Admin > Service Accounts, and click Create service account.
-
Enter a Service account name, such as
Keytos Shield GCCC, and copy the service account Email address. You’ll need it in Google Admin. -
Click Create and continue.
-
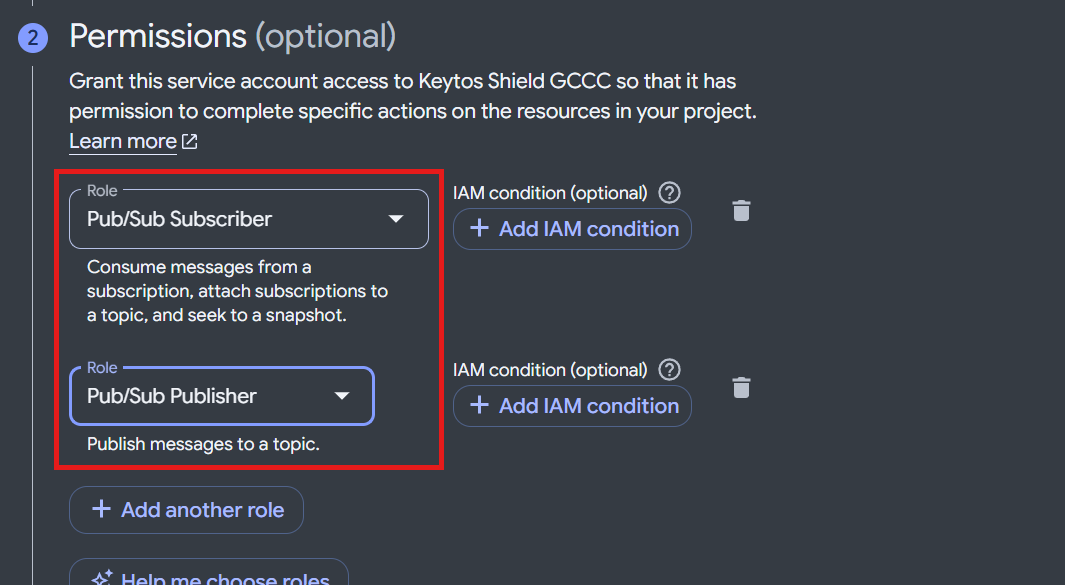
Under Permissions, add the Pub/Sub Subscriber and Pub/Sub Publisher roles, and then click Done.
How to Let Google Publish Certificate Requests to Your Topic
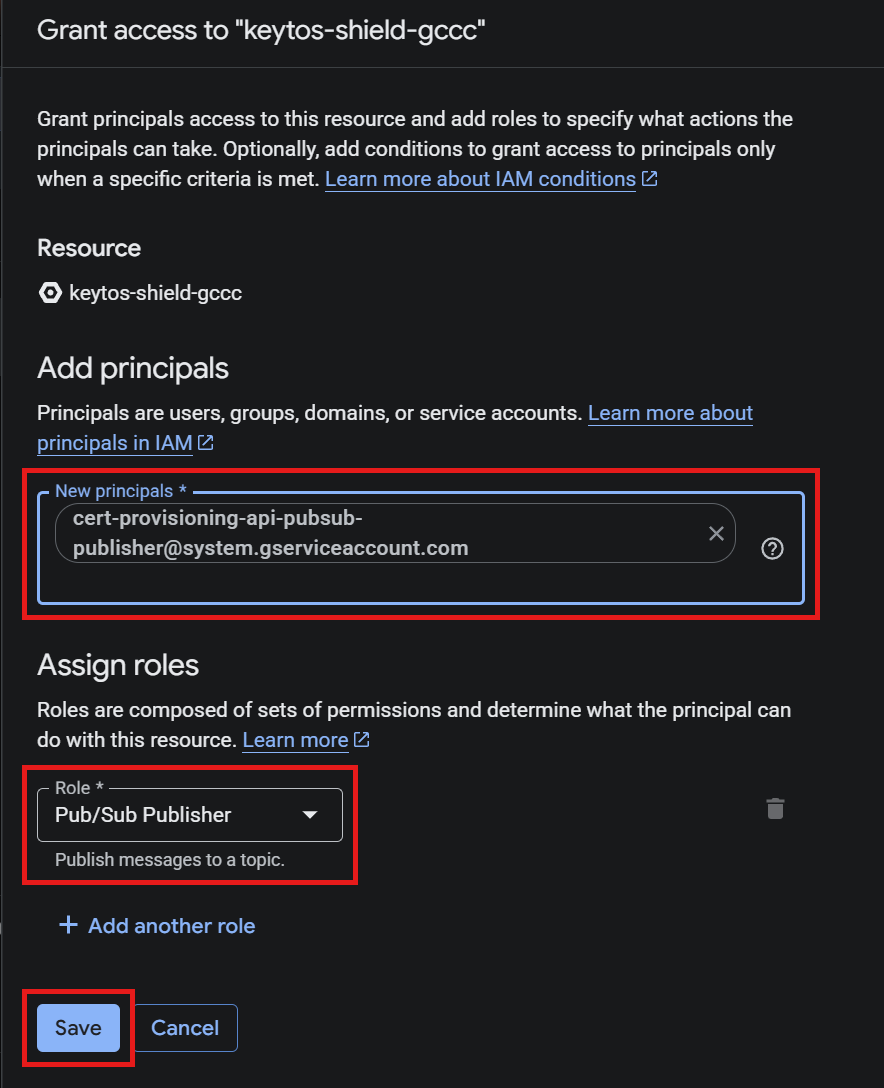
Google sends Chromebook requests from its own service account, so it needs permission to publish to your topic.
-
Go back to Pub/Sub > Topics and open your topic.
-
In the Permissions panel on the right, click Add principal.
-
In New principals, enter
cert-provisioning-api-pubsub-publisher@system.gserviceaccount.com. -
In Role, select Pub/Sub Publisher.
-
Click Save.
How to Create the Connector’s Service Account Key
-
Go to IAM & Admin > Service Accounts, and click your connector service account.
-
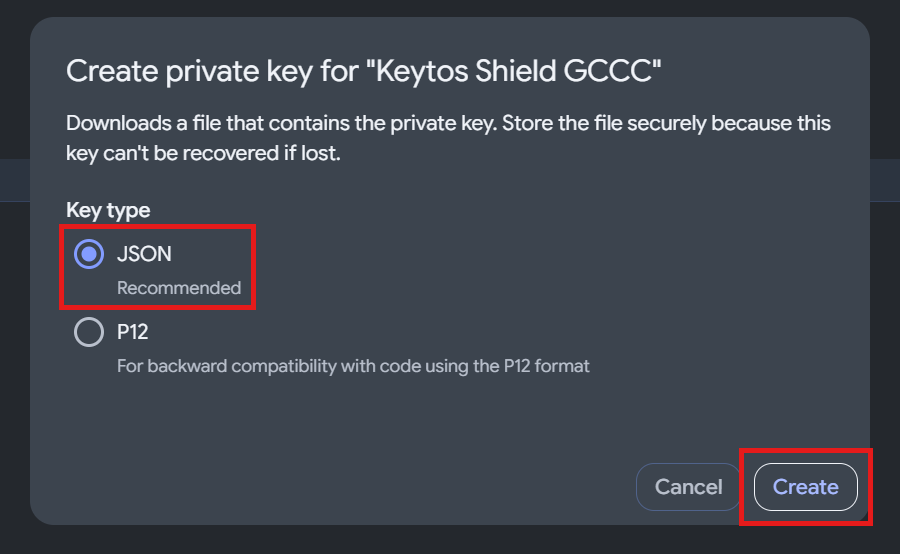
Open the Keys tab, and click Add key > Create new key.
-
Keep JSON selected, and click Create. Your browser downloads the key file.
Treat this file like a password. Anyone who has it can read your certificate requests. Copy it only to the connector server, and delete any other copies once the connector is running.
Step 4 - How to Download and Install the Google Cloud Certificate Connector
-
Sign in to the Google Admin console as a super administrator.
-
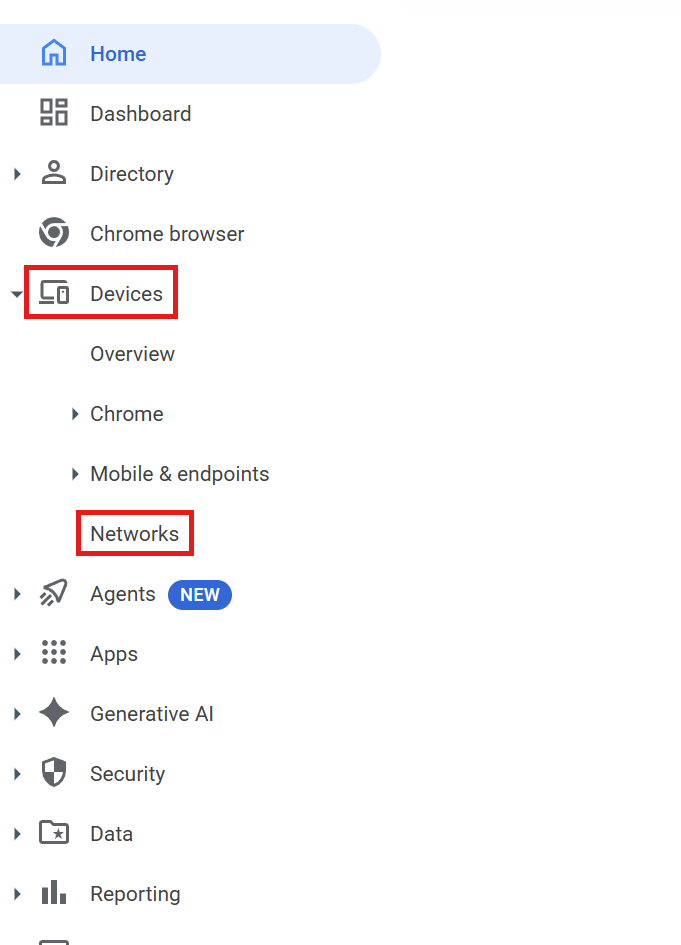
From the left-hand menu, navigate to Devices > Networks.
-
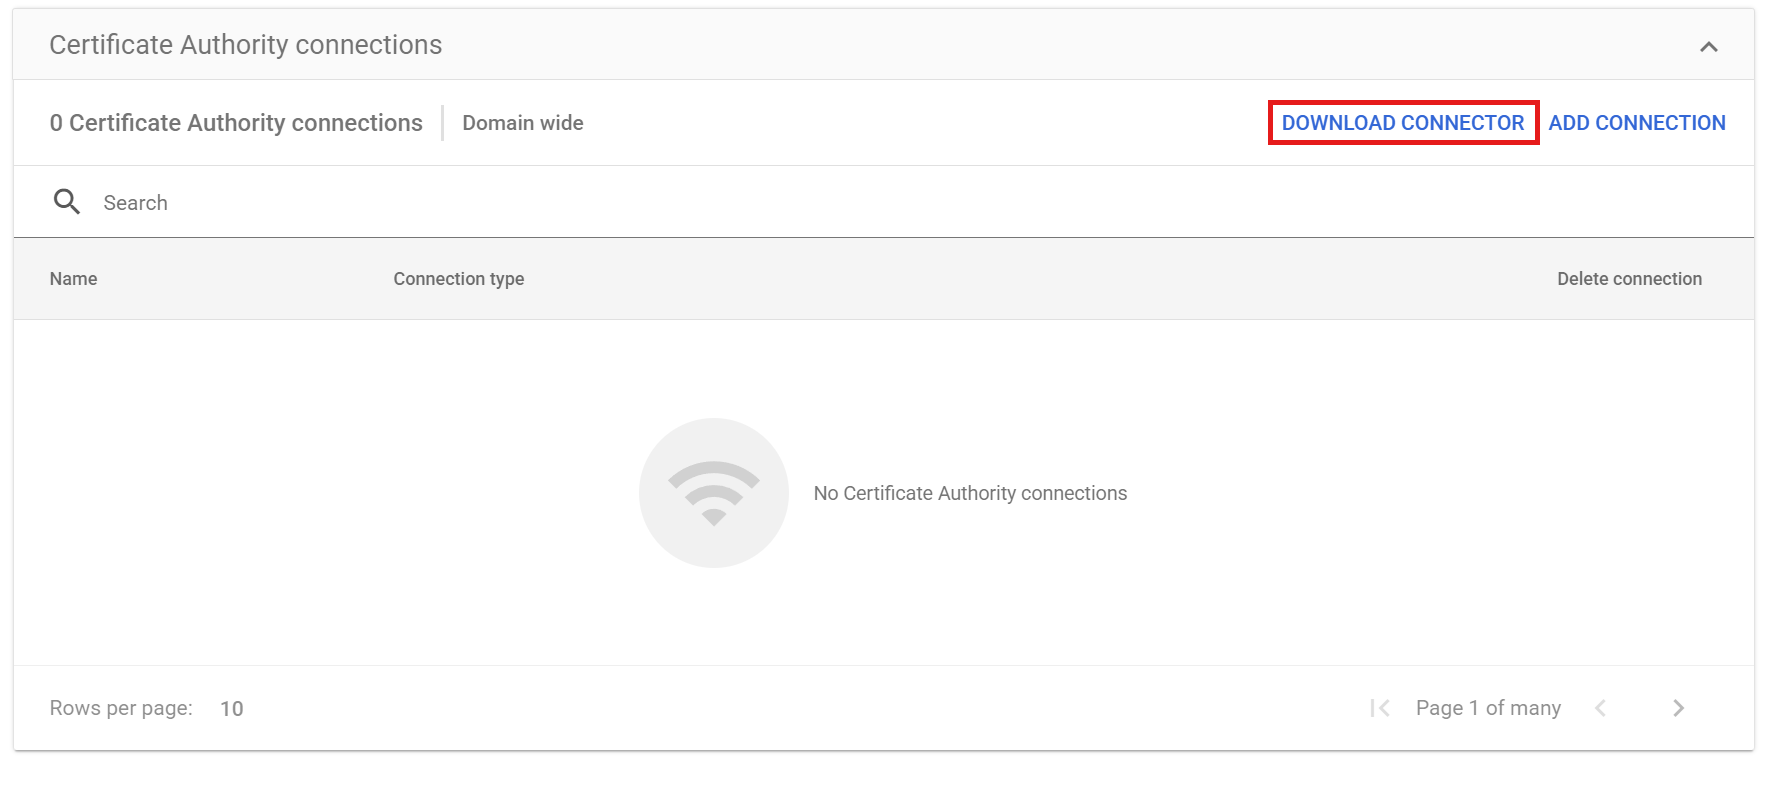
Expand Certificates, click Certificate Authority connections, and then click Download connector.
-
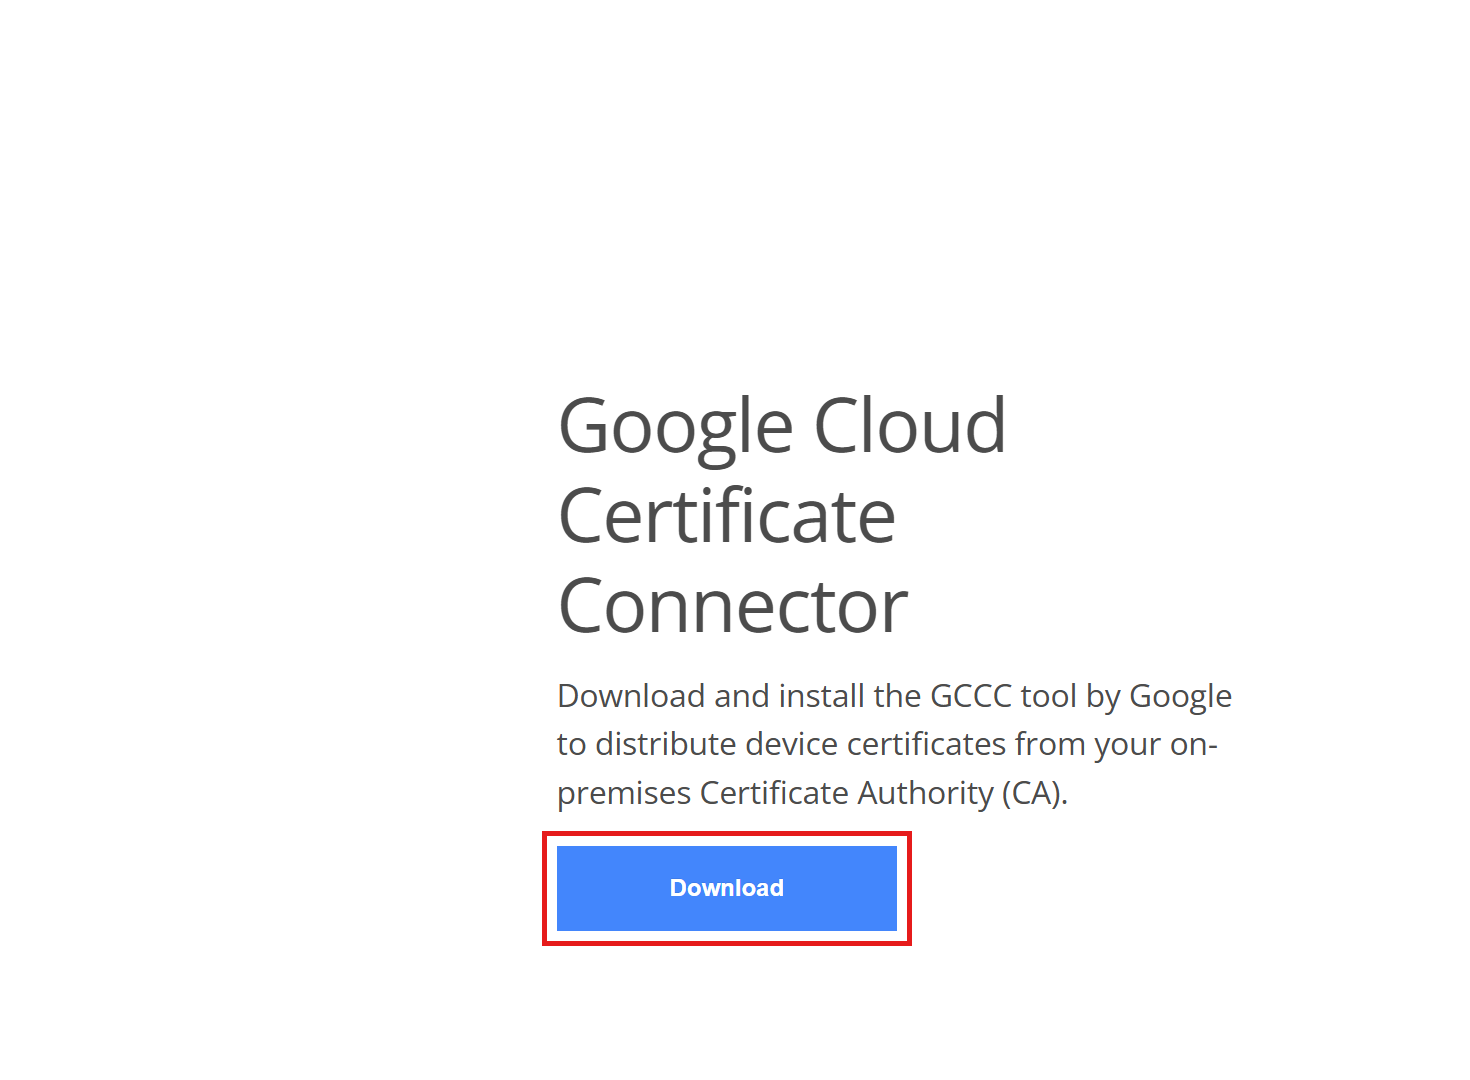
On the Google Cloud Certificate Connector page, click Download.
-
Copy the installer to your Windows server, and run it as an administrator. The installer adds the GoogleCloudCertificateConnector service to
C:\Program Files\Google\Google Cloud Certificate Connector.
The installer tries to start the connector right away, and it fails because the configuration files don’t exist yet. That’s expected. You’ll add them in the next step.
Step 5 - How to Configure and Start the Google Cloud Certificate Connector
The connector reads three files from its installation folder, C:\Program Files\Google\Google Cloud Certificate Connector.
-
Copy the service account key you downloaded in Step 3 into the folder, and rename it to
adapter_key.json. -
In the same folder, create
adapter_config.jsonwith the following content. Replace the project ID, subscription, and SCEP URL with your own values. Choose any value forca_connection_config_id; you’ll enter the same value in Google Admin in Step 7.{ "adapter_configuration": { "request_subscriptions": [ "projects/<project-id>/subscriptions/<topic-id>-sub" ], "key_filename": "adapter_key.json", "instance_id": "keytos-shield-gccc-connector-1", "log_level": "info" }, "ca_configurations": [ { "type": "SCEP", "ca_connection_config_id": "keytos-shield-static-scep", "ca_endpoint_url": "<your Keytos Shield Static SCEP URL>", "challenge_filename": "challenge.txt" } ] } -
Save your Keytos Shield static SCEP password to
challenge.txtin the same folder, with no trailing line break. In Keytos Shield, click Copy next to Static SCEP password, and then run the following in an elevated PowerShell window on the server. It also limits the file so only administrators and the connector’s LOCAL SERVICE account can read it.$d = 'C:\Program Files\Google\Google Cloud Certificate Connector' Get-Clipboard -Raw | ForEach-Object { $_.Trim() } | Set-Content -Path "$d\challenge.txt" -NoNewline -Encoding ascii icacls "$d\challenge.txt" /inheritance:r /grant "Administrators:F" /grant "SYSTEM:F" /grant "NT AUTHORITY\LOCAL SERVICE:R" -
Start the connector and set it to start automatically:
Set-Service GoogleCloudCertificateConnector -StartupType Automatic Start-Service GoogleCloudCertificateConnector -
Confirm the connector is listening. Open Event Viewer > Windows Logs > Application, and look for an event from GoogleCloudCertificateConnector that says
Listening to requests...for your subscription:Info: SubID:"keytos-shield-gccc-sub" Listening to requests...
To confirm the server can reach your SCEP URL, open <your Static SCEP URL>/pkiclient.exe?operation=GetCACaps in a browser on the server. Keytos Shield responds with a short list that includes SCEPStandard.
Step 6 - How to Upload the Keytos Shield CA Certificates to Google Admin
Chromebooks need to trust your Shield Root CA to validate your Shield RADIUS servers, and Google needs your Shield CAs to build the certificate chain.
-
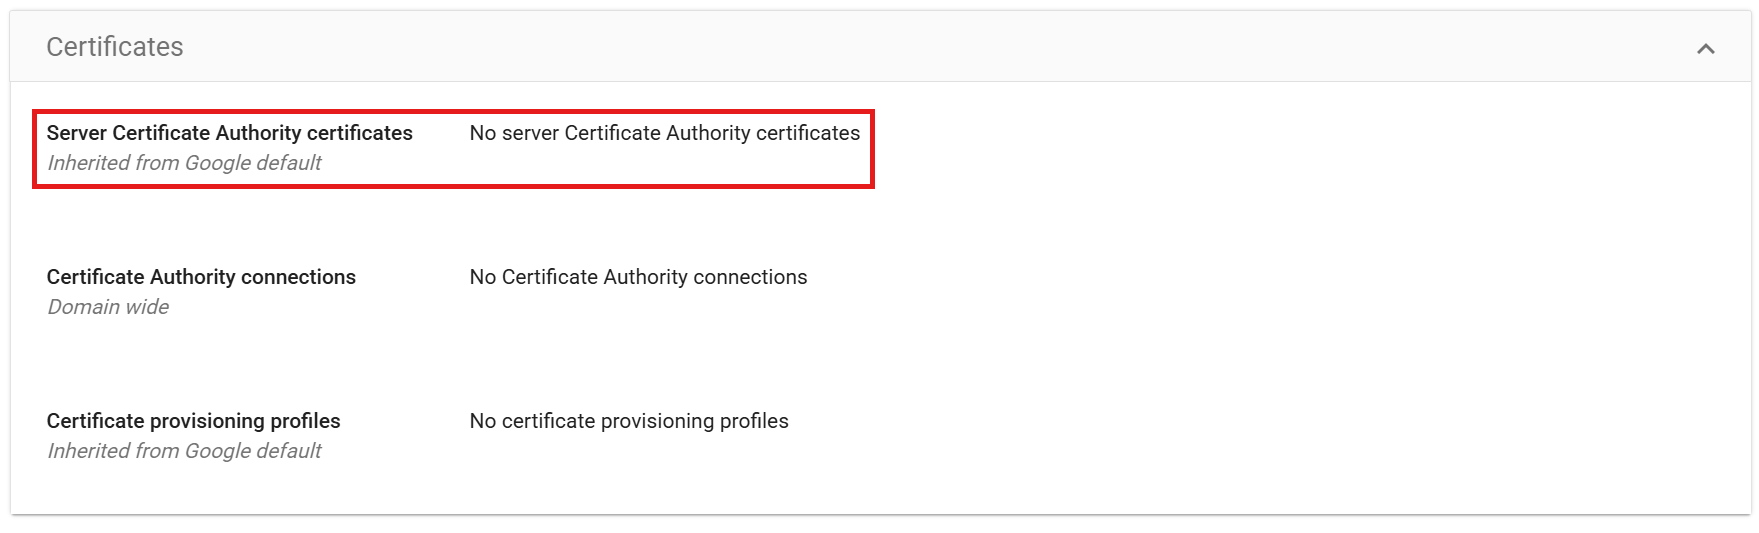
In the Google Admin console, go to Devices > Networks and expand Certificates.
-
Click Server Certificate Authority certificates.
-
Click Add certificate.
-
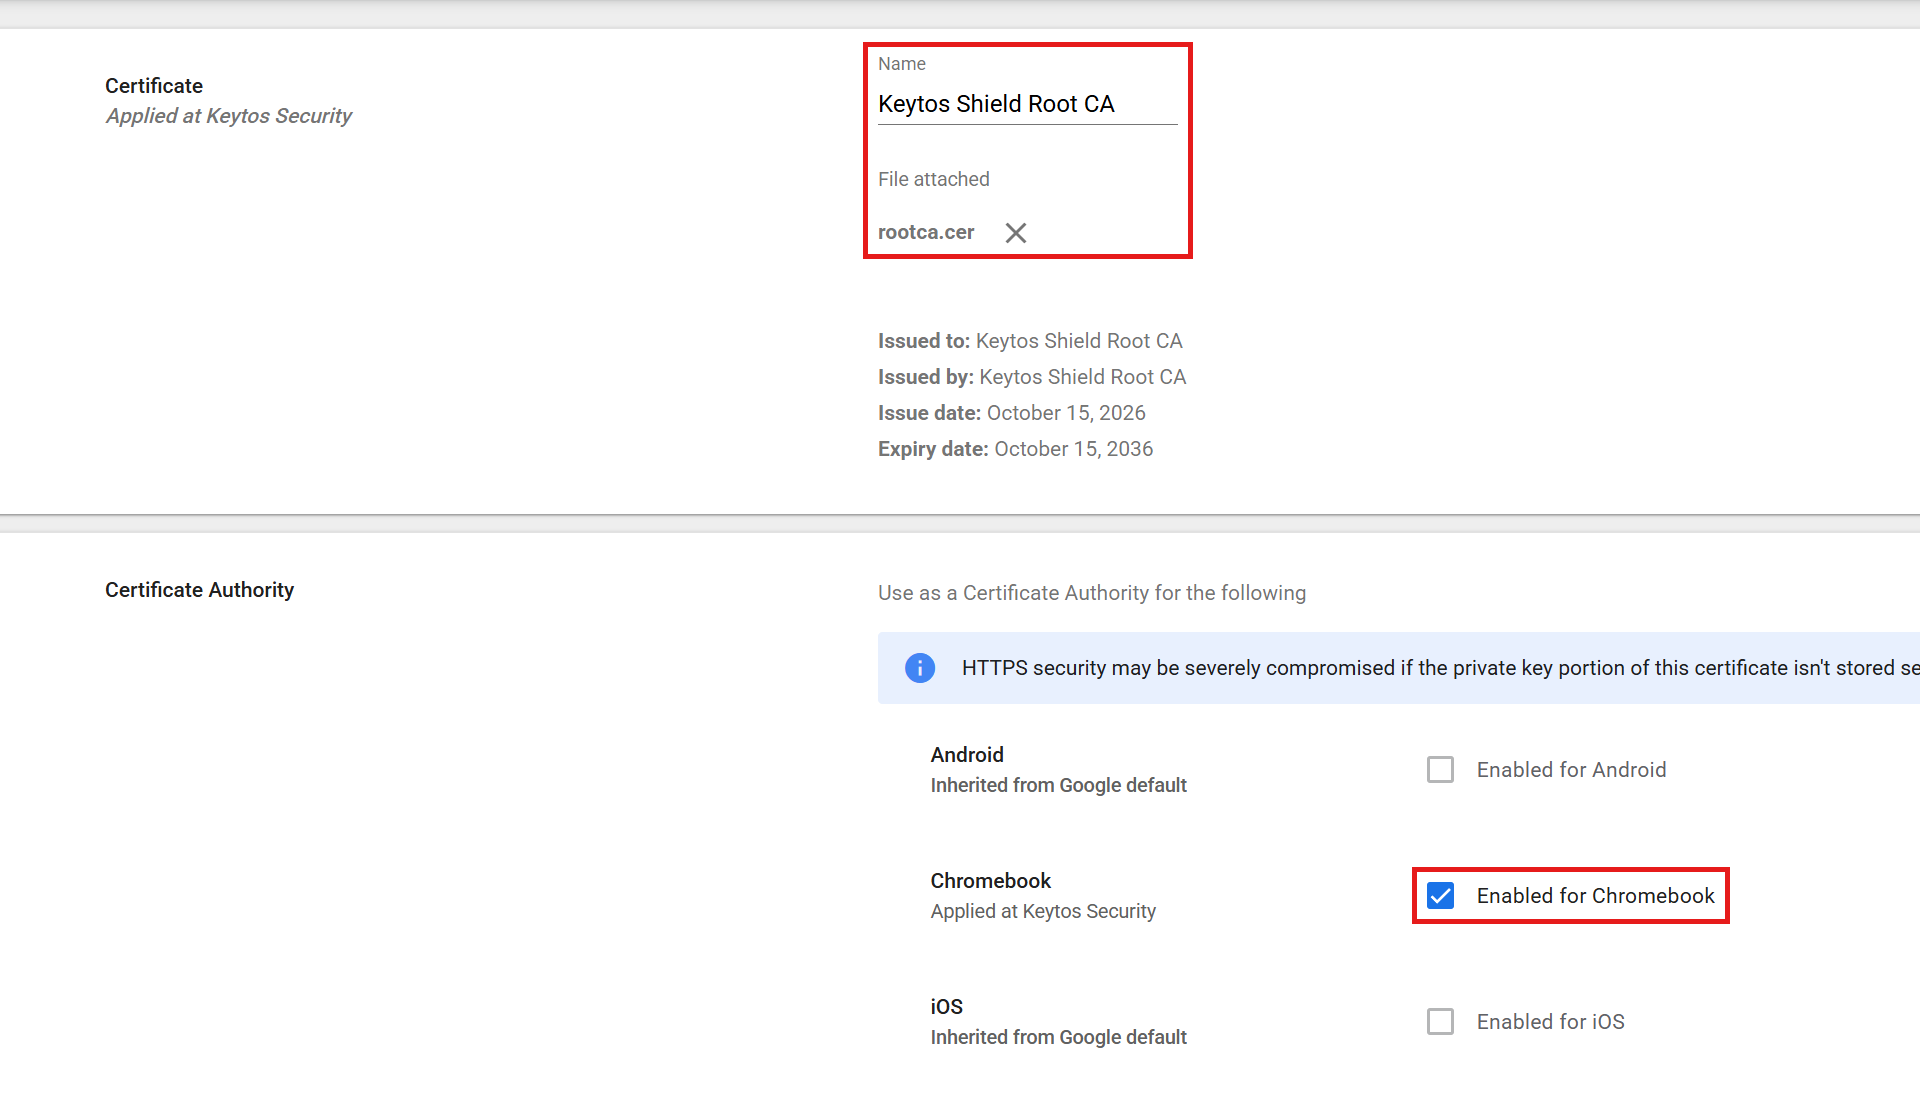
Enter a Name, such as
Keytos Shield Root CA, click Upload, and selectrootca.cer. -
Check Enabled for Chromebook, and then click Add.
-
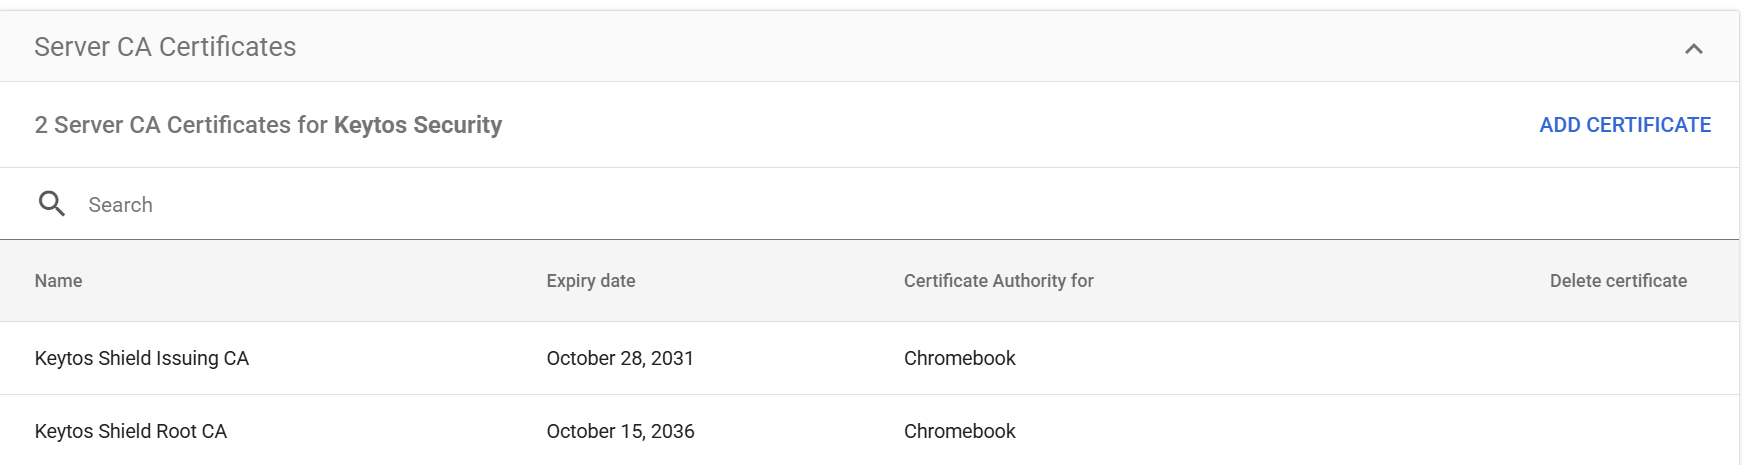
Repeat these steps for
issuingca.cer, naming itKeytos Shield Issuing CA.
When you’re done, both certificates show Chromebook in the Certificate Authority for column.
Step 7 - How to Add the Keytos Shield SCEP Certificate Authority Connection in Google Admin
The CA connection tells Google which Pub/Sub topic to send requests to, and which connector configuration should handle them.
-
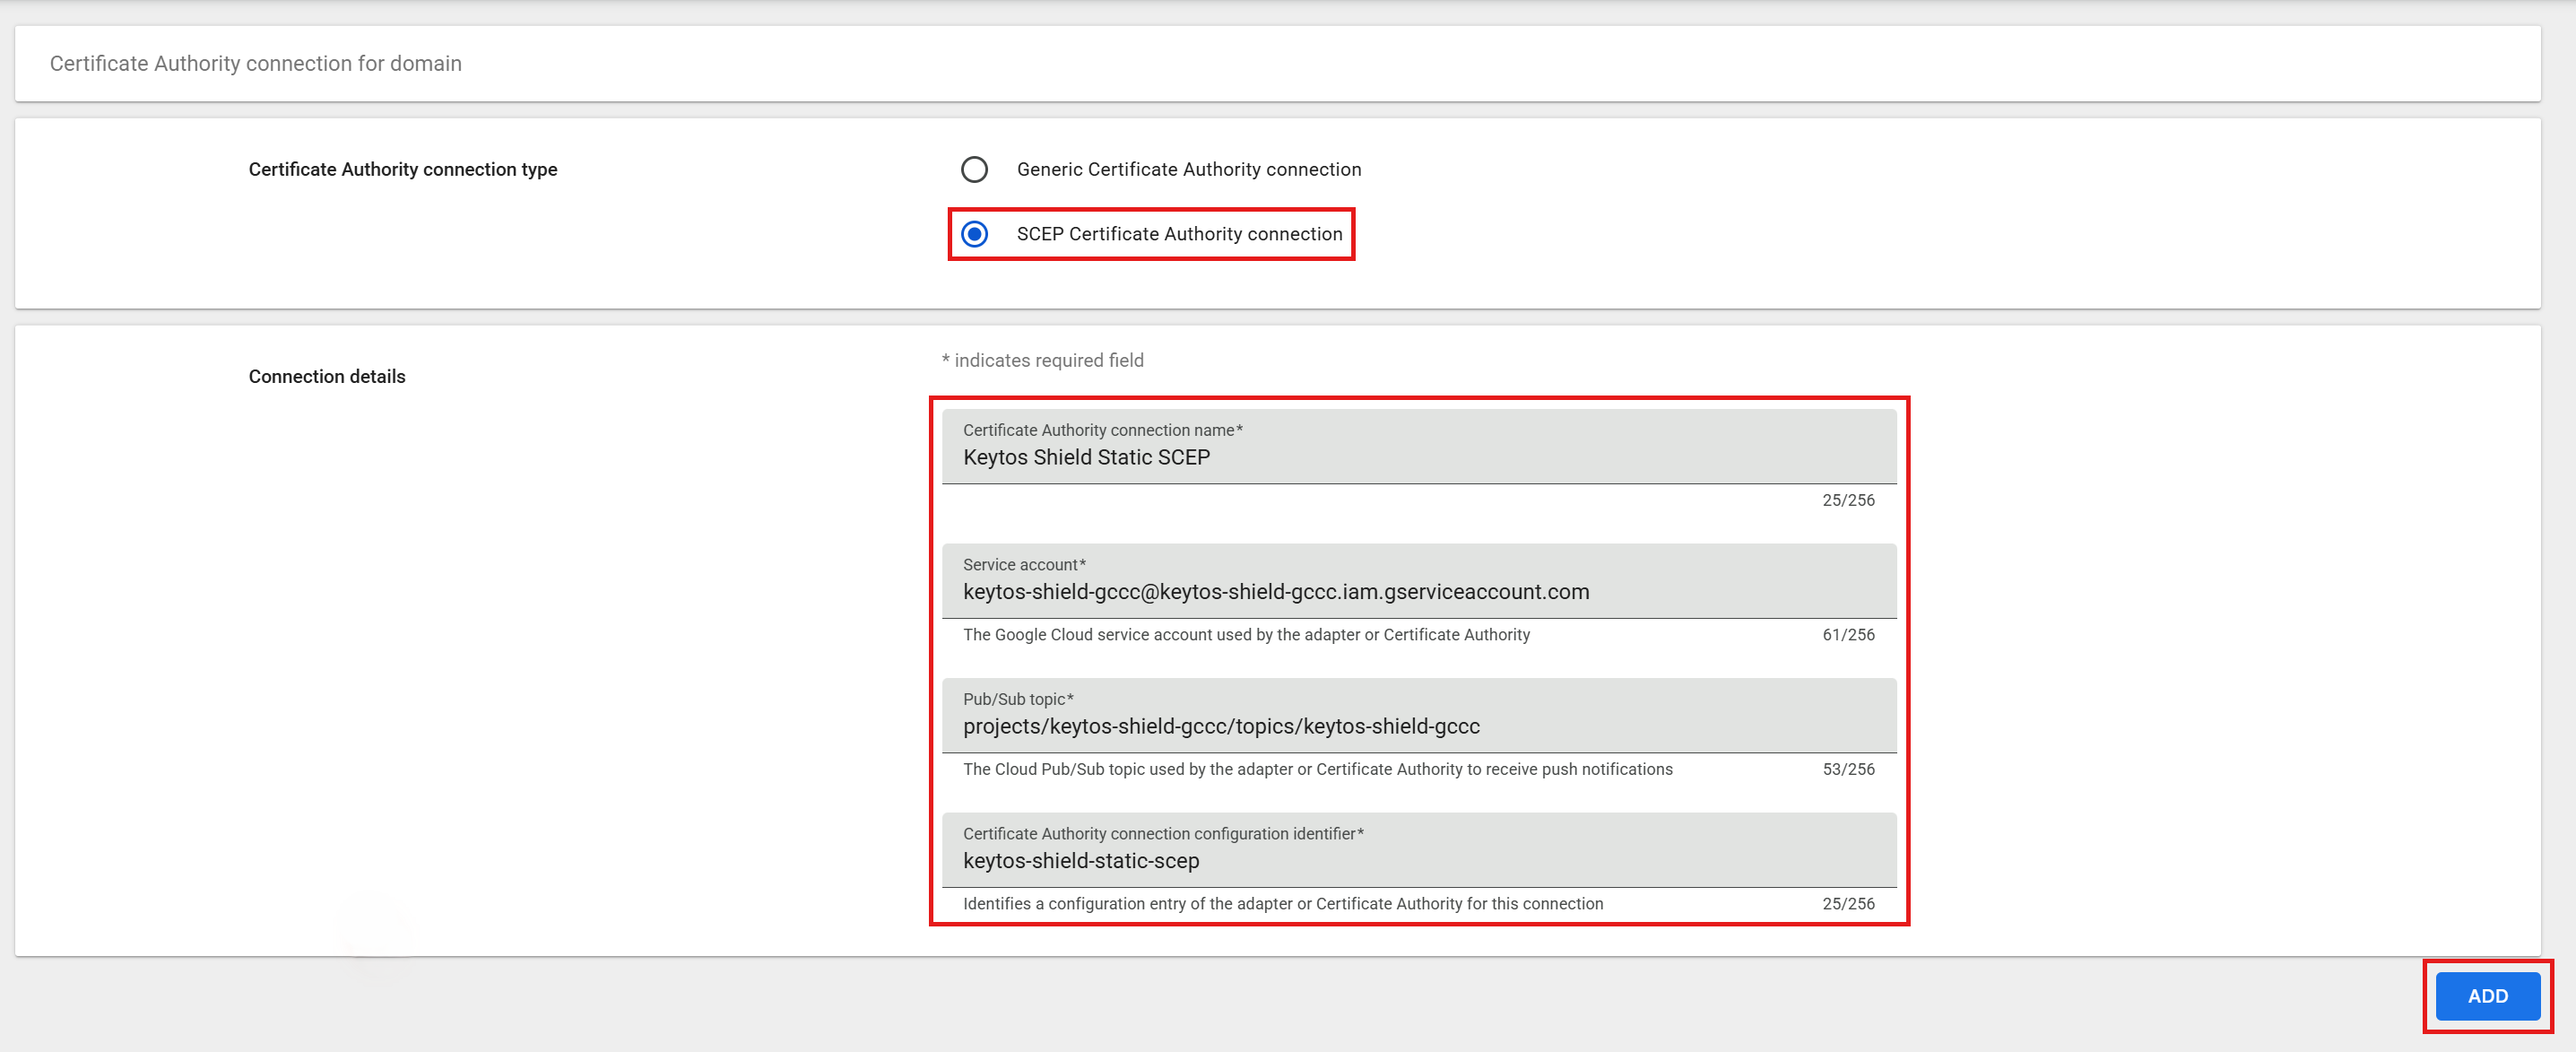
In Devices > Networks > Certificates, click Certificate Authority connections, and then click Add connection.
-
Select SCEP Certificate Authority connection.
-
Fill in the Connection details:
- Certificate Authority connection name: A friendly name, such as
Keytos Shield Static SCEP. - Service account: The email address of the connector service account you created in Step 3.
- Pub/Sub topic: The full topic name, such as
projects/<project-id>/topics/<topic-id>. - Certificate Authority connection configuration identifier: The exact
ca_connection_config_idfrom youradapter_config.json, such askeytos-shield-static-scep.
- Certificate Authority connection name: A friendly name, such as
-
Click Add.
Step 8 - How to Create the Certificate Provisioning Profile for Chromebooks
The certificate provisioning profile defines the certificate each Chromebook receives from Keytos Shield. Choose the type that fits how your Chromebooks are used:
- User certificate: Issued to each user after they sign in, with the user’s Google email in the certificate. Choose this when Chromebooks are assigned to people and you want to see who connected.
- Device certificate: Issued to the Chromebook itself, with its serial number in the certificate. Choose this for shared, kiosk, or classroom Chromebooks, or when devices need Wi-Fi on the sign-in screen before anyone signs in.
You can create both. Use the same type in this step and in Step 9.
How to Create a User Certificate Provisioning Profile
-
In Devices > Networks > Certificates, click Certificate provisioning profiles, and then click Add profile.
-
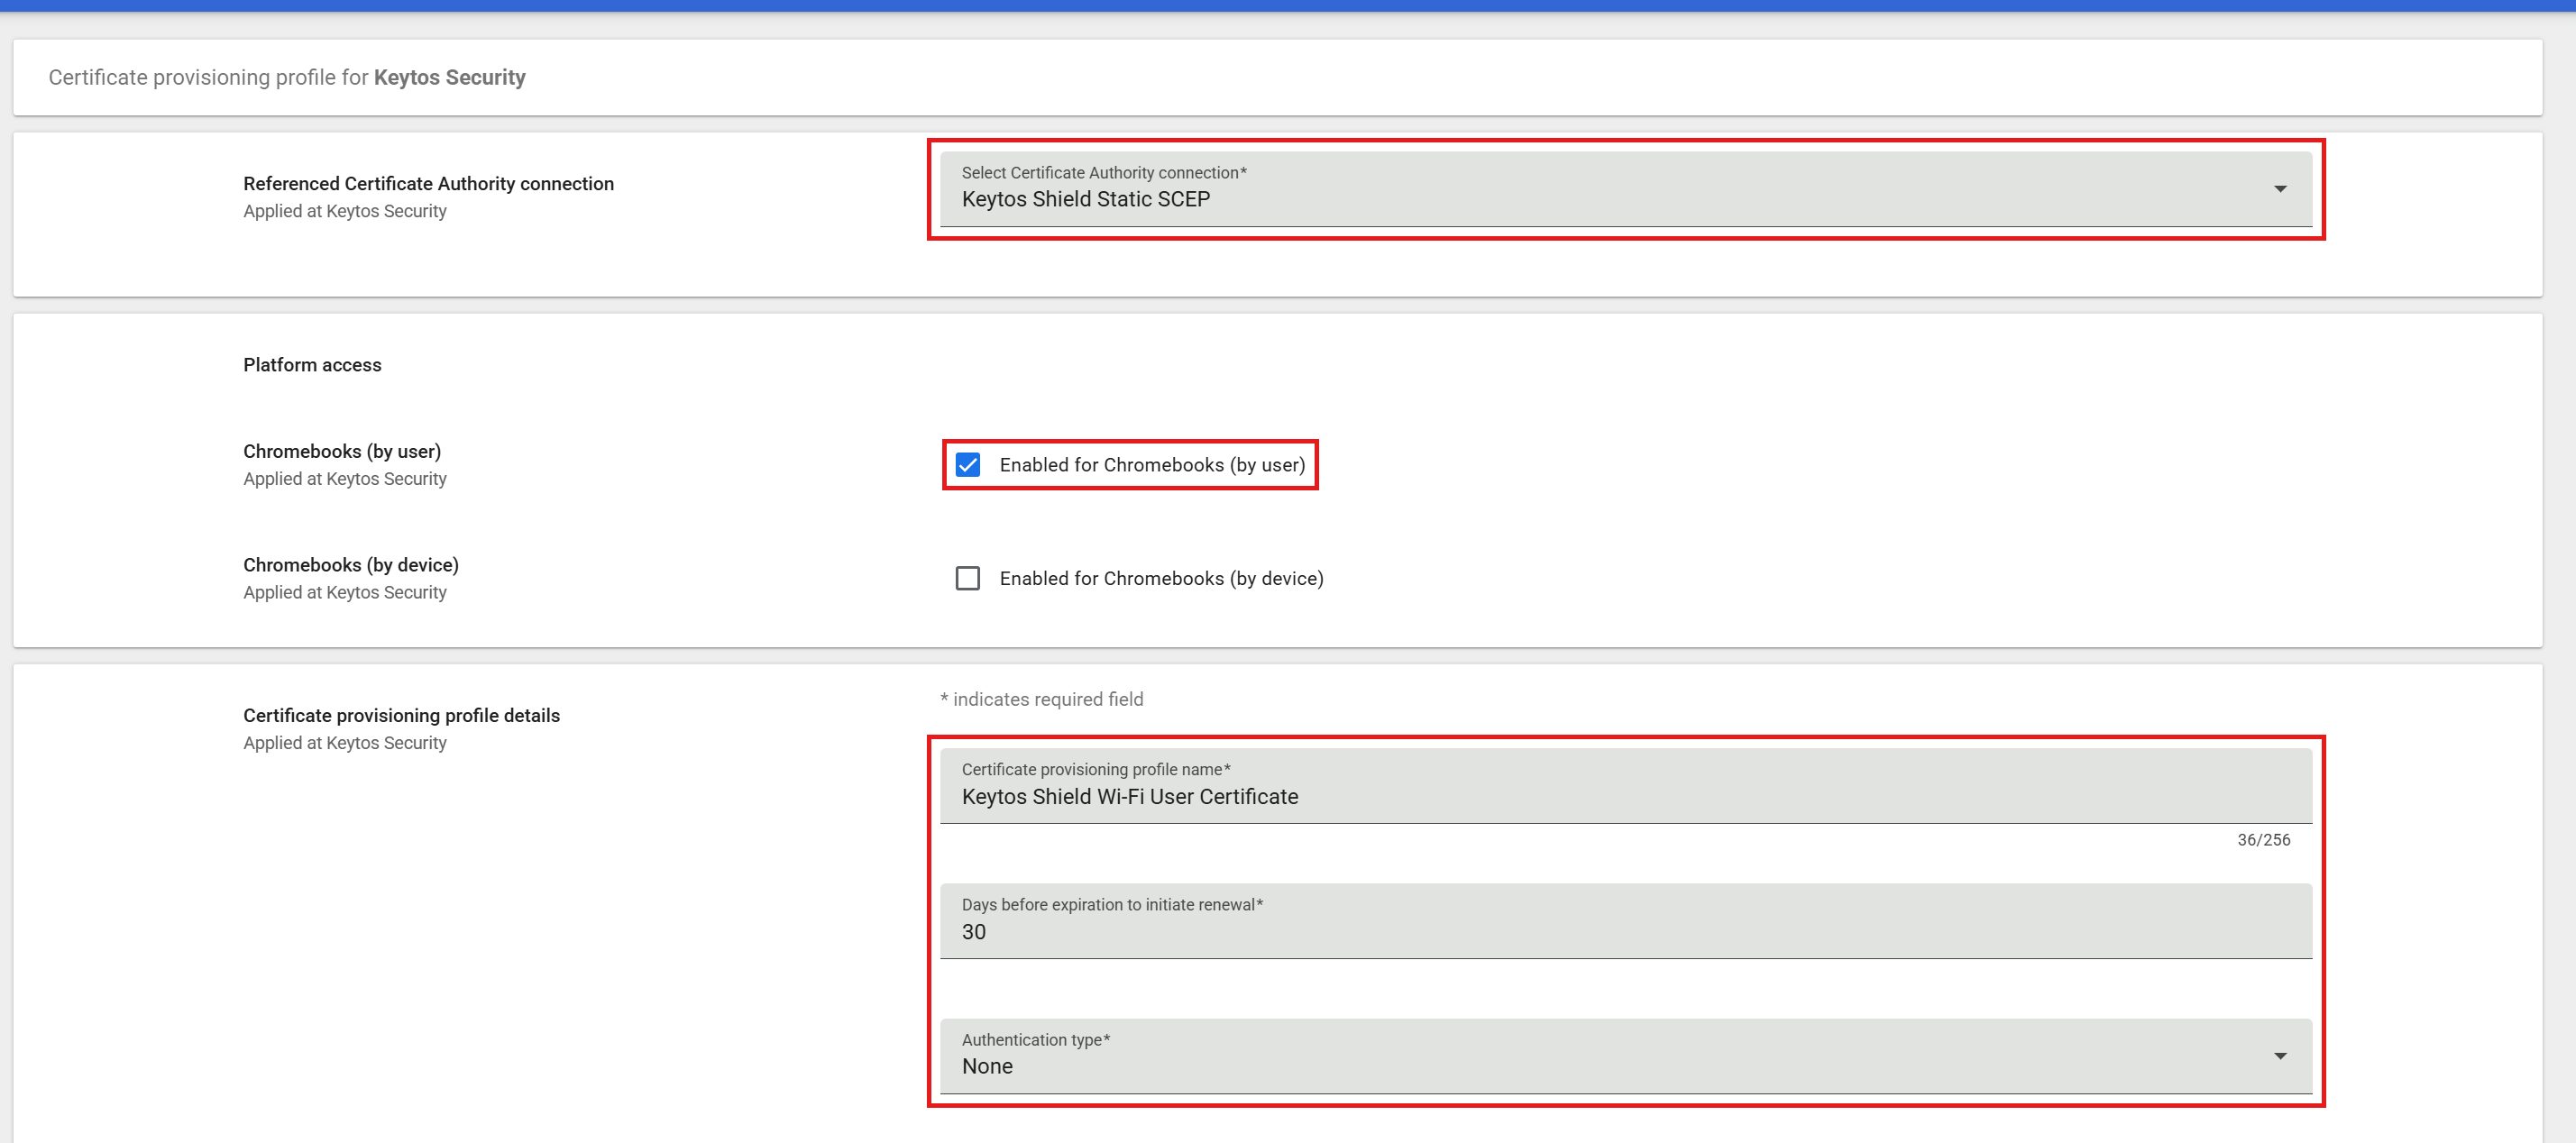
In Referenced Certificate Authority connection, select the connection you created in Step 7.
-
Under Platform access, check Enabled for Chromebooks (by user).
-
Enter a Certificate provisioning profile name, such as
Keytos Shield Wi-Fi User Certificate. -
Enter
30for Days before expiration to initiate renewal. We recommend 30 days so Chromebooks renew well before the certificate expires. If the value is too low, users can lose Wi-Fi access when a renewal is delayed. -
Set Authentication type to None.
-
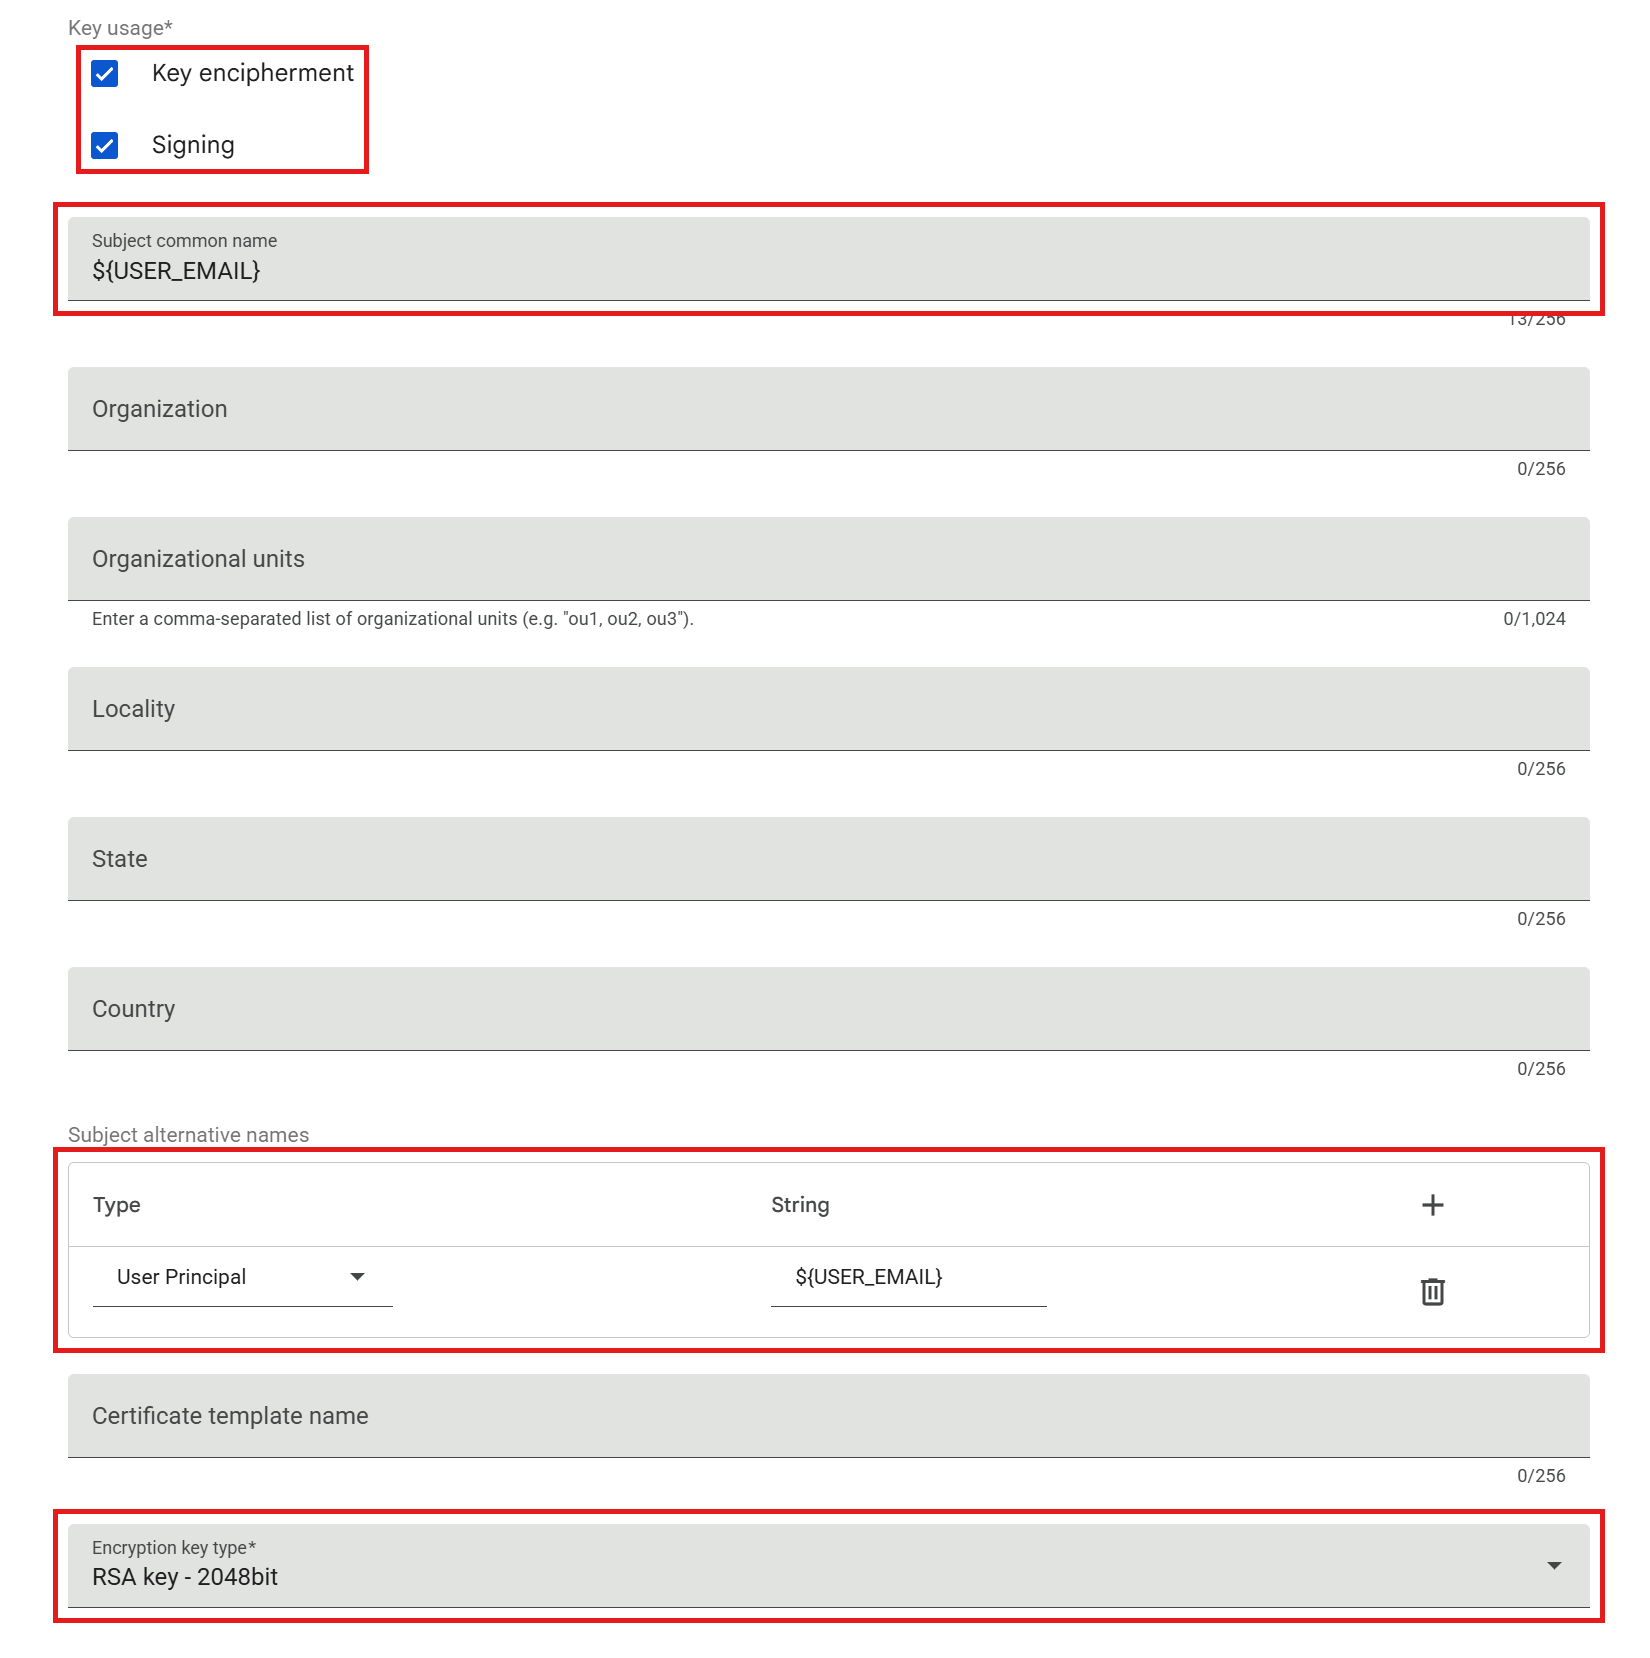
Under Key usage, check both Key encipherment and Signing.
-
Enter
${USER_EMAIL}for Subject common name. -
Under Subject alternative names, click +, keep the type User Principal, and enter
${USER_EMAIL}. We recommend always adding this subject alternative name (SAN). It puts the user’s Google email in the certificate, so you can see who connected in your Keytos Shield network logs. -
Set Encryption key type to RSA key - 2048bit.
-
Click Add.
How to Create a Device Certificate Provisioning Profile
-
In Devices > Networks > Certificates, click Certificate provisioning profiles, and then click Add profile.
-
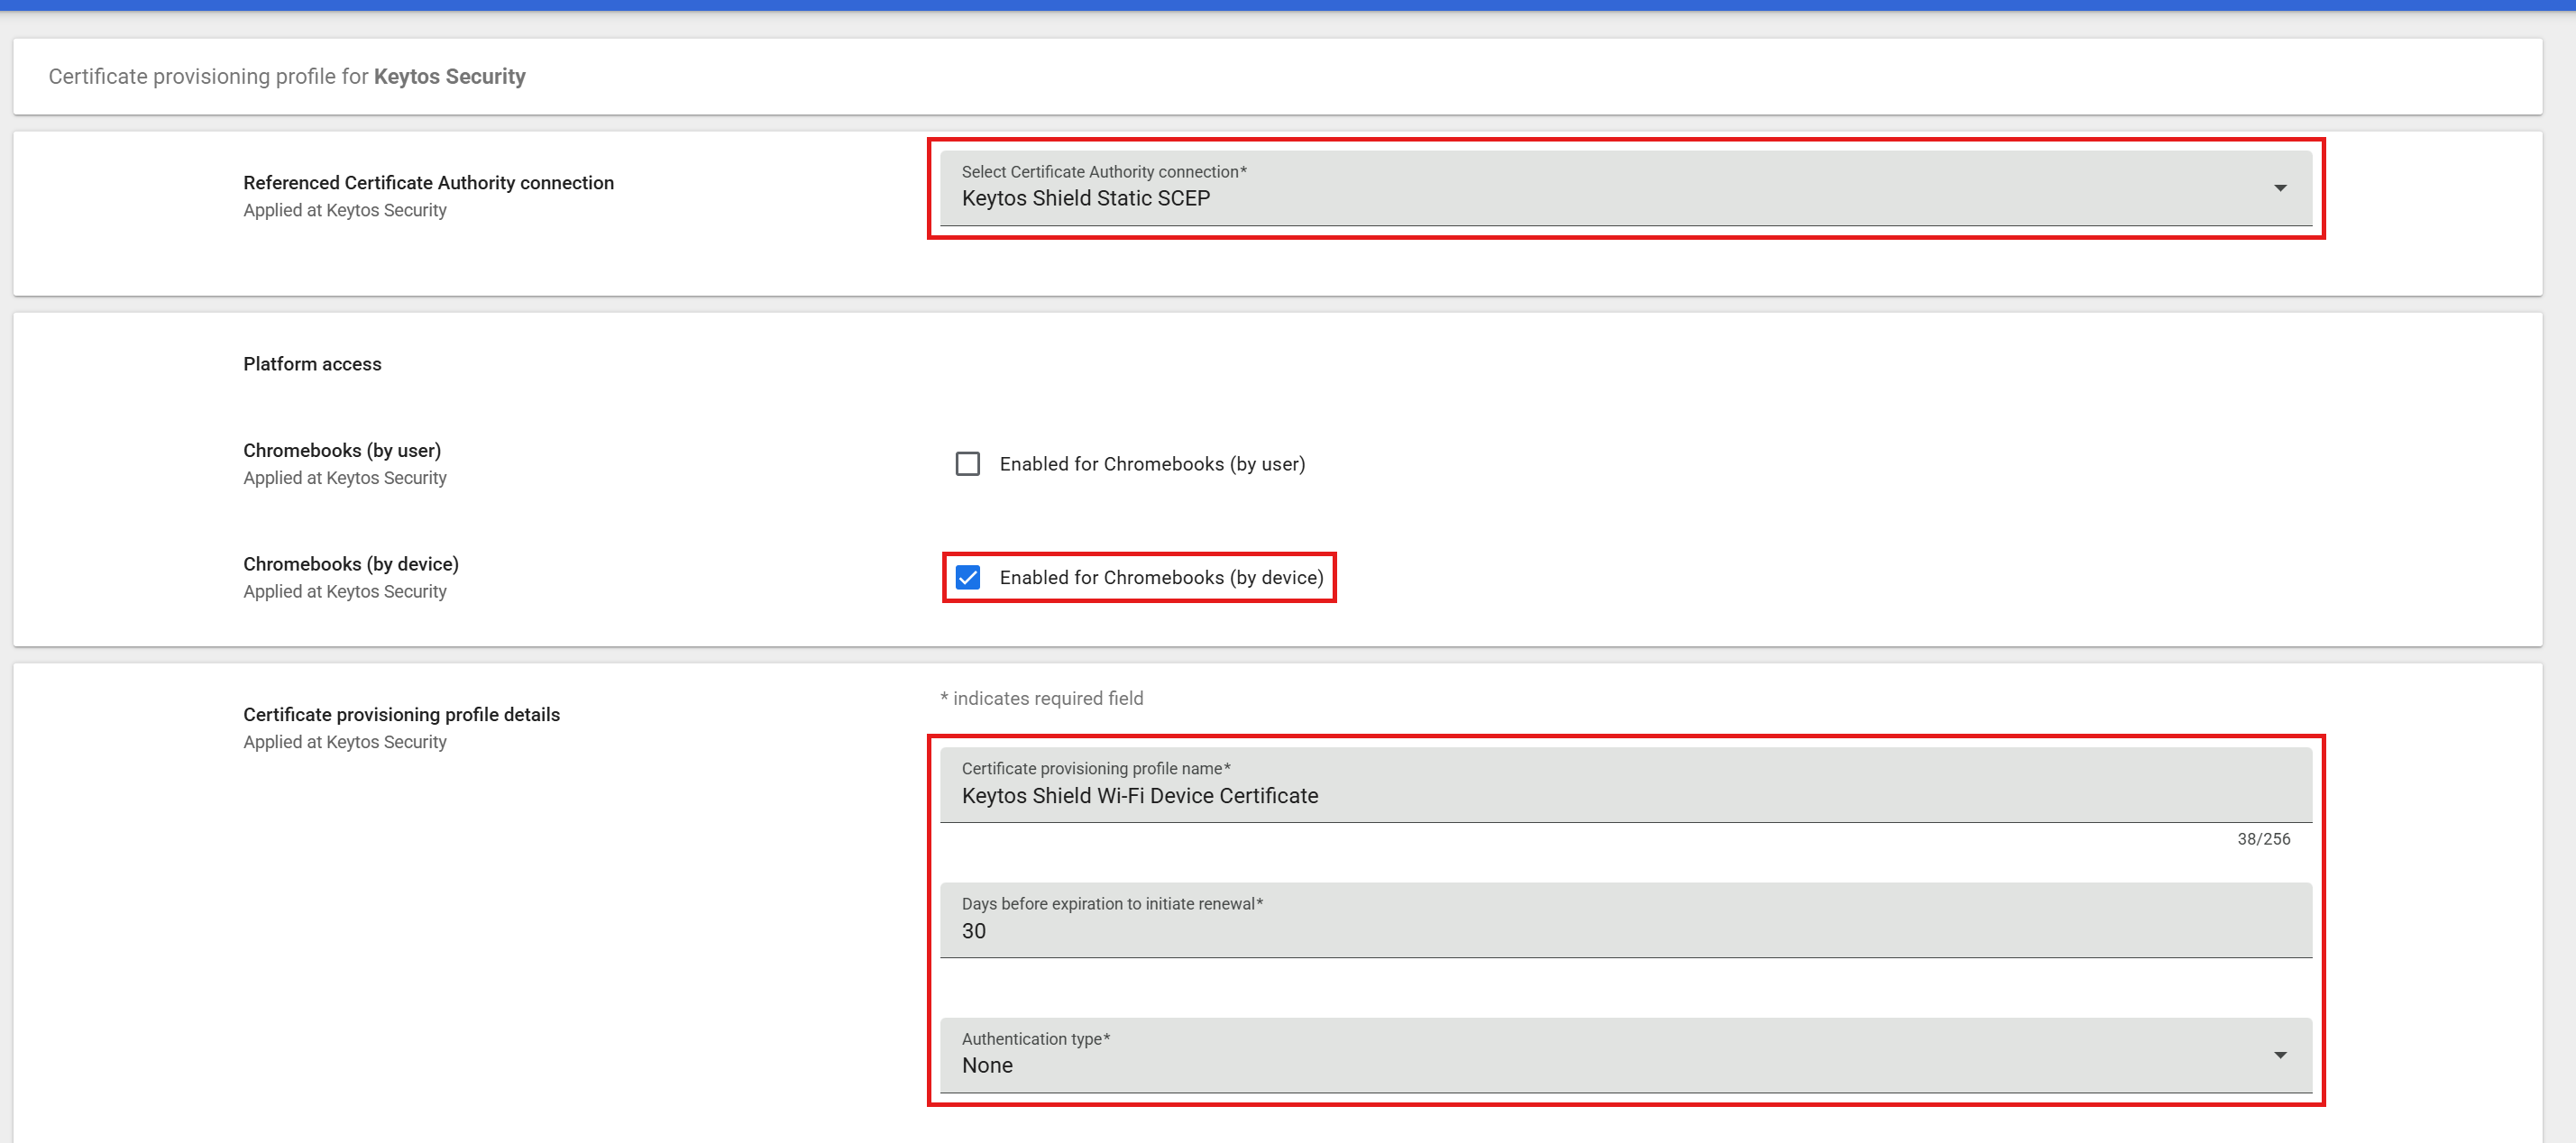
In Referenced Certificate Authority connection, select the connection you created in Step 7.
-
Under Platform access, check Enabled for Chromebooks (by device).
-
Enter a Certificate provisioning profile name, such as
Keytos Shield Wi-Fi Device Certificate. -
Enter
30for Days before expiration to initiate renewal. We recommend 30 days so Chromebooks renew well before the certificate expires. If the value is too low, devices can lose Wi-Fi access when a renewal is delayed. -
Set Authentication type to None.
-
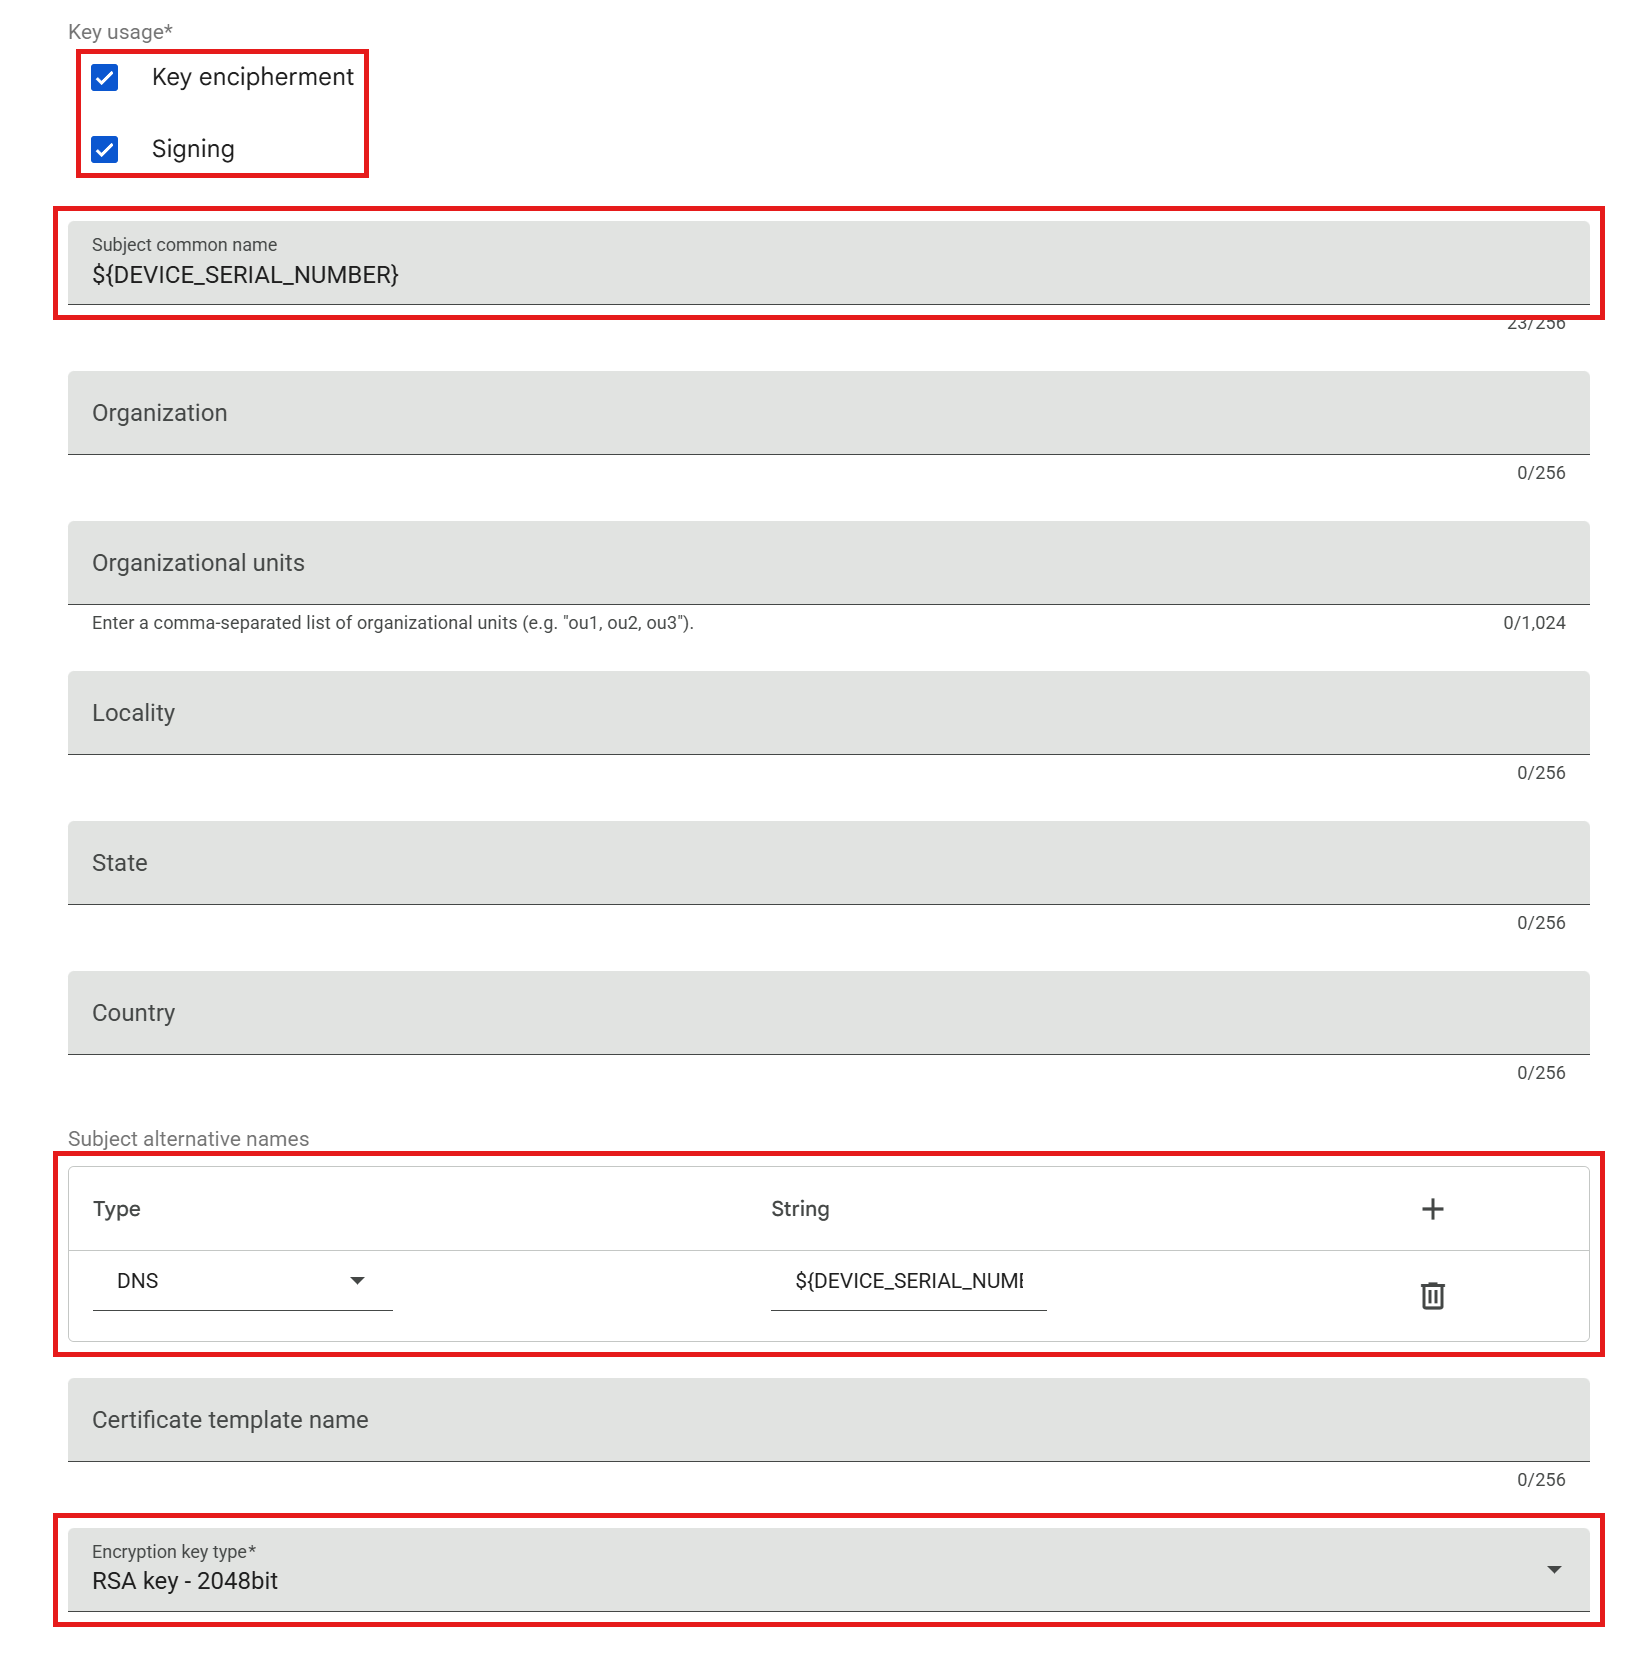
Under Key usage, check both Key encipherment and Signing.
-
Enter
${DEVICE_SERIAL_NUMBER}for Subject common name. -
Under Subject alternative names, click +, change the type to DNS, and enter
${DEVICE_SERIAL_NUMBER}. We recommend always adding this subject alternative name (SAN). It puts the Chromebook’s serial number in the certificate, so you can tell which device connected in your Keytos Shield network logs. -
Set Encryption key type to RSA key - 2048bit.
-
Click Add.
Step 9 - How to Push an EAP-TLS Wi-Fi Network to Chromebooks in Google Admin
Now create the Wi-Fi network that uses the certificate and trusts your Shield Root CA. Follow the tab that matches the certificate type you chose in Step 8.
Always set Server Certificate Authority to your Keytos Shield Root CA, and never choose Don’t check (insecure). Without a trusted server CA, a Chromebook could hand its credentials to a rogue access point.
How to Push a Wi-Fi Network That Uses User Certificates
-
Go to Devices > Networks, and click Create Wi-Fi network (or Wi-Fi > Add Wi-Fi).
-
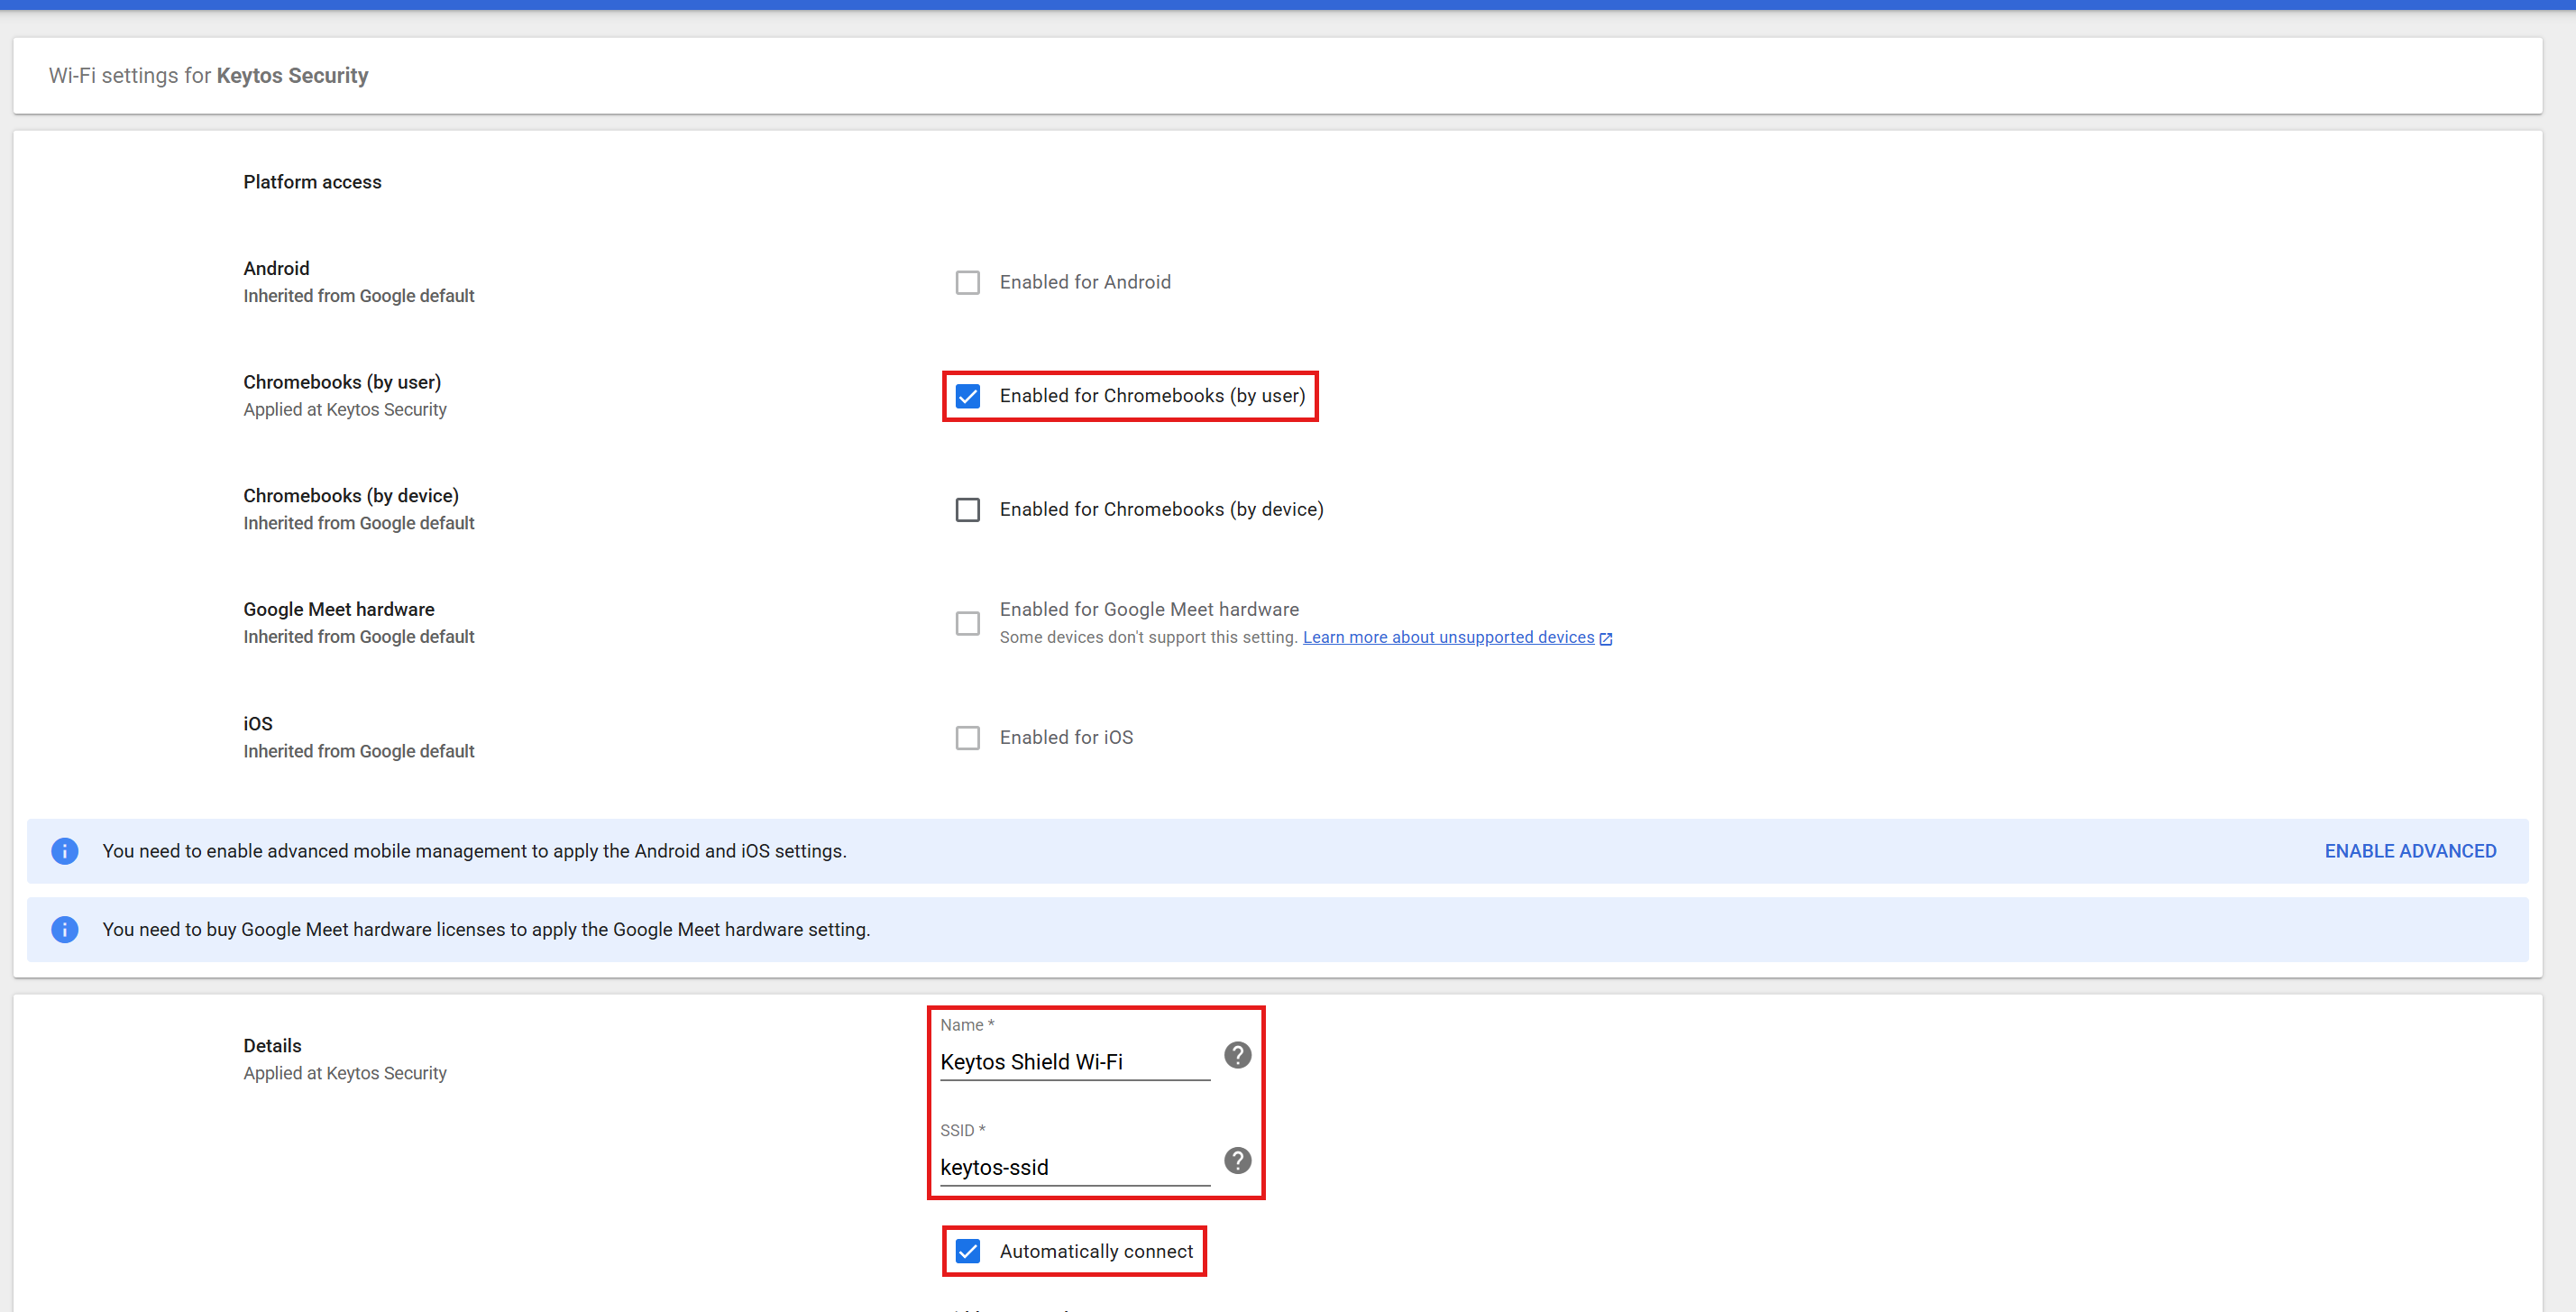
Under Platform access, check Enabled for Chromebooks (by user).
-
Enter a Name, and enter your network’s SSID exactly as it’s broadcast. It must match an SSID in your Keytos Shield network profile.
-
Check Automatically connect.
-
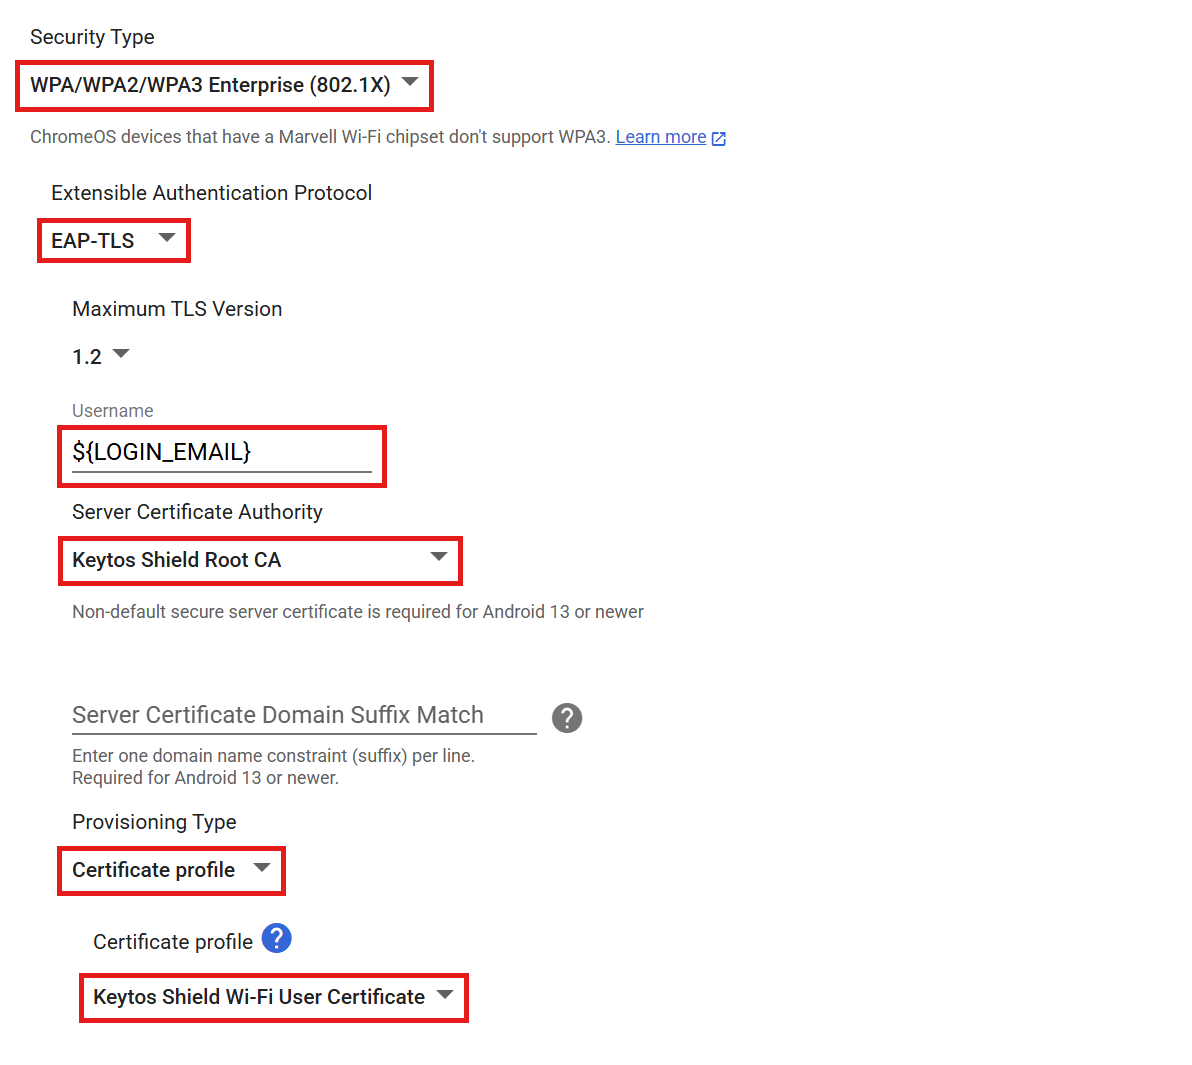
Configure the Security settings:
-
Security Type: WPA/WPA2/WPA3 Enterprise (802.1X).
-
Extensible Authentication Protocol: EAP-TLS.
-
Username:
${LOGIN_EMAIL}. This is the identity the Chromebook sends to Keytos Shield. -
Server Certificate Authority: Keytos Shield Root CA.
-
Provisioning Type: Certificate profile.
-
Certificate profile: Your user certificate profile from Step 8.
-
-
Click Save.
How to Push a Wi-Fi Network That Uses Device Certificates
-
Go to Devices > Networks, and click Create Wi-Fi network (or Wi-Fi > Add Wi-Fi).
-
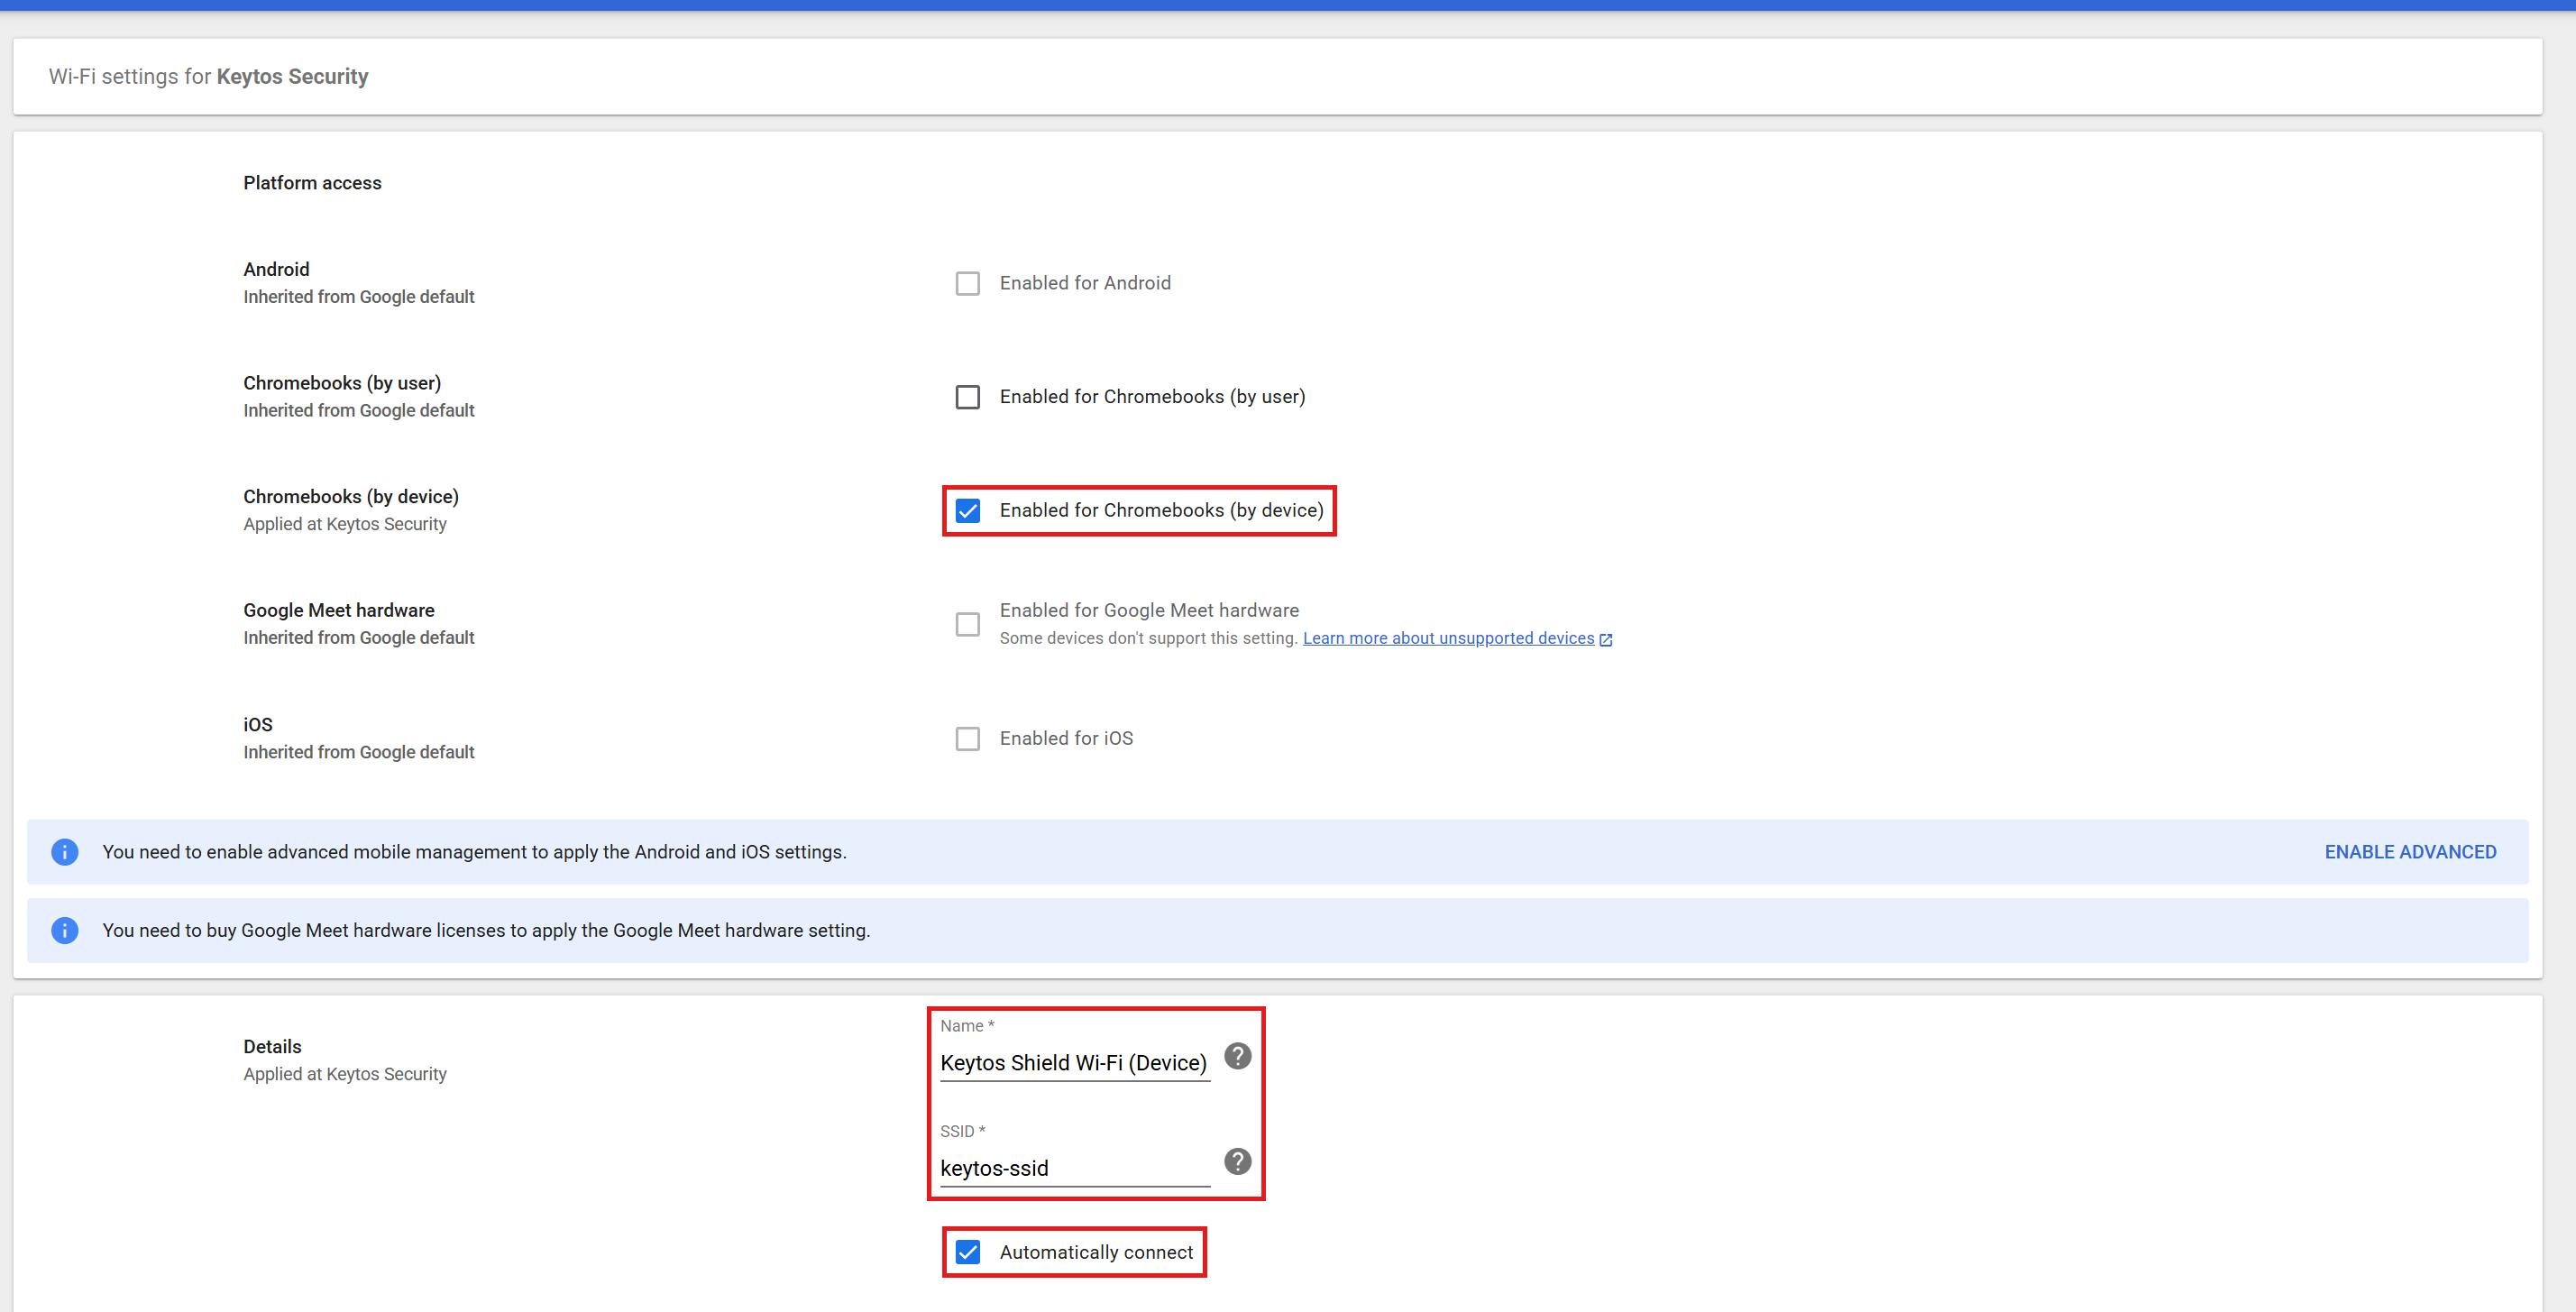
Under Platform access, check Enabled for Chromebooks (by device).
-
Enter a Name, and enter your network’s SSID exactly as it’s broadcast. It must match an SSID in your Keytos Shield network profile.
-
Check Automatically connect.
-
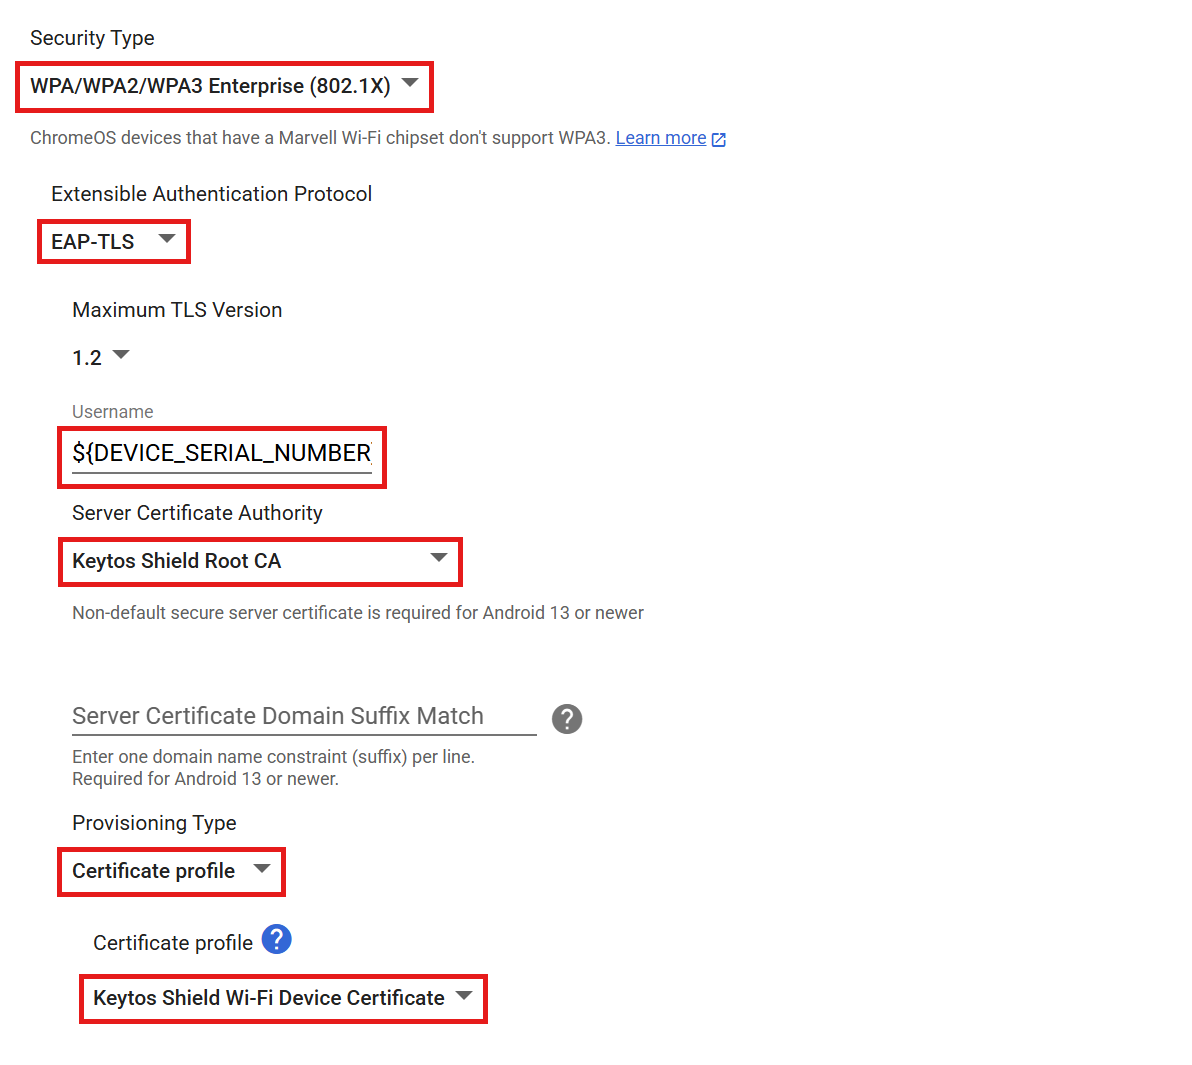
Configure the Security settings:
-
Security Type: WPA/WPA2/WPA3 Enterprise (802.1X).
-
Extensible Authentication Protocol: EAP-TLS.
-
Username:
${DEVICE_SERIAL_NUMBER}. This is the identity the Chromebook sends to Keytos Shield. -
Server Certificate Authority: Keytos Shield Root CA.
-
Provisioning Type: Certificate profile.
-
Certificate profile: Your device certificate profile from Step 8.
-
-
Click Save.
Google Admin pushes the Wi-Fi network and certificate profile to the users or Chromebooks in the organizational unit you selected. Your Chromebooks request a certificate from Keytos Shield, and they connect automatically once your Shield access policy allows them (Step 10).
Step 10 - How to Create a RADIUS Access Policy for Chromebook Certificates in Keytos Shield
Keytos Shield checks every connection against the access policies in your network profile, in priority order. Chromebook users and devices live in Google Workspace, not Entra ID, so a policy that matches certificates against Entra ID objects rejects them. Create an access policy that only runs the default certificate check: Shield accepts any valid, unrevoked certificate issued by your Shield CAs, without looking anything up in Entra ID.
-
In Keytos Shield, select Network profiles from the left-hand menu, and expand the network profile for the SSID your Chromebooks join.
-
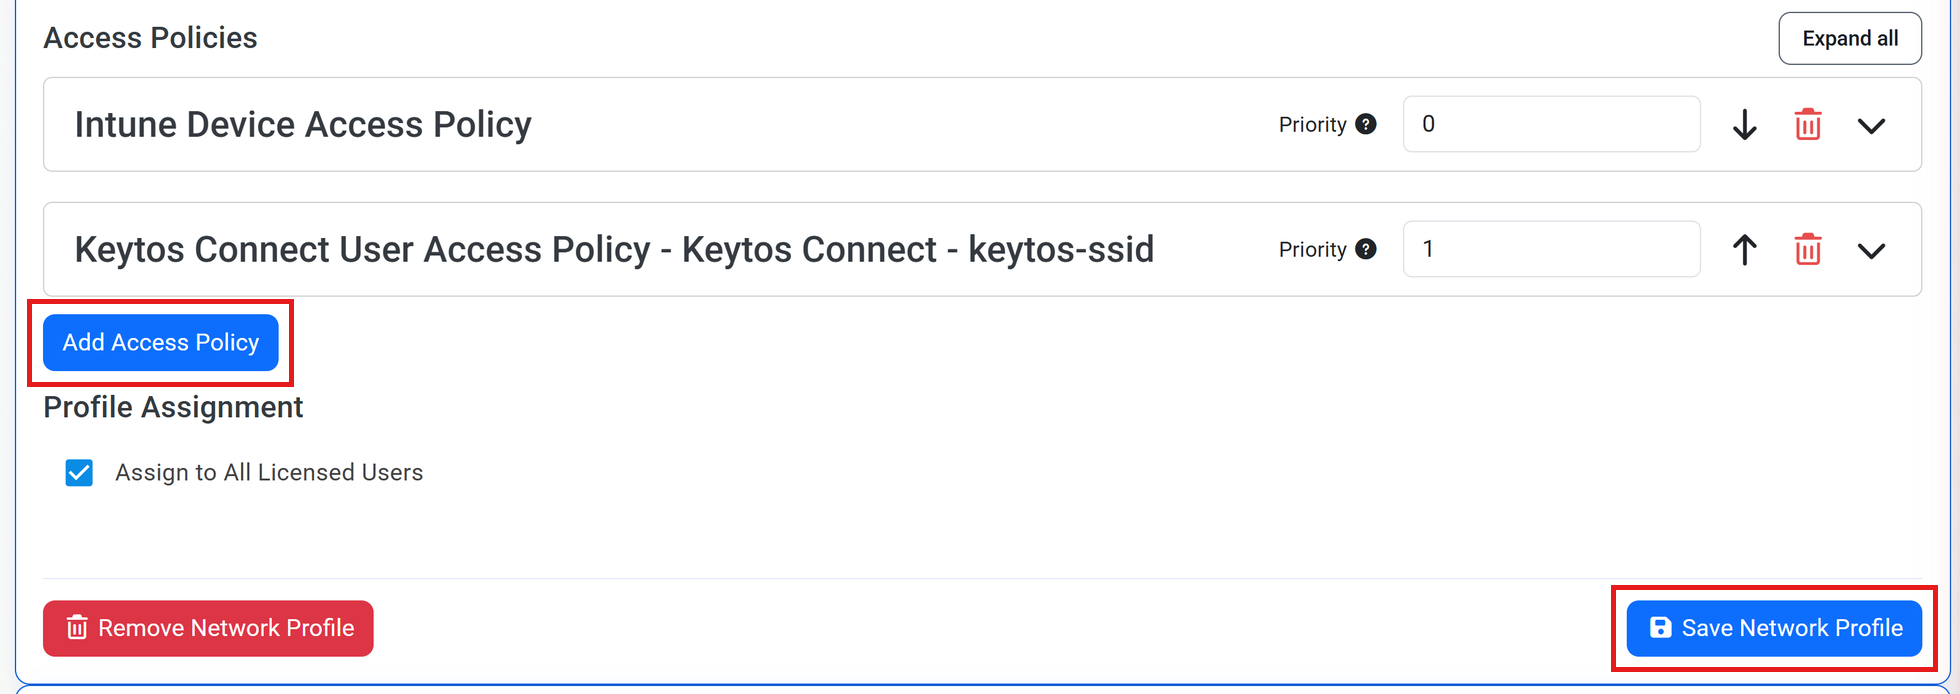
Scroll to Access Policies, and click Add Access Policy.
-
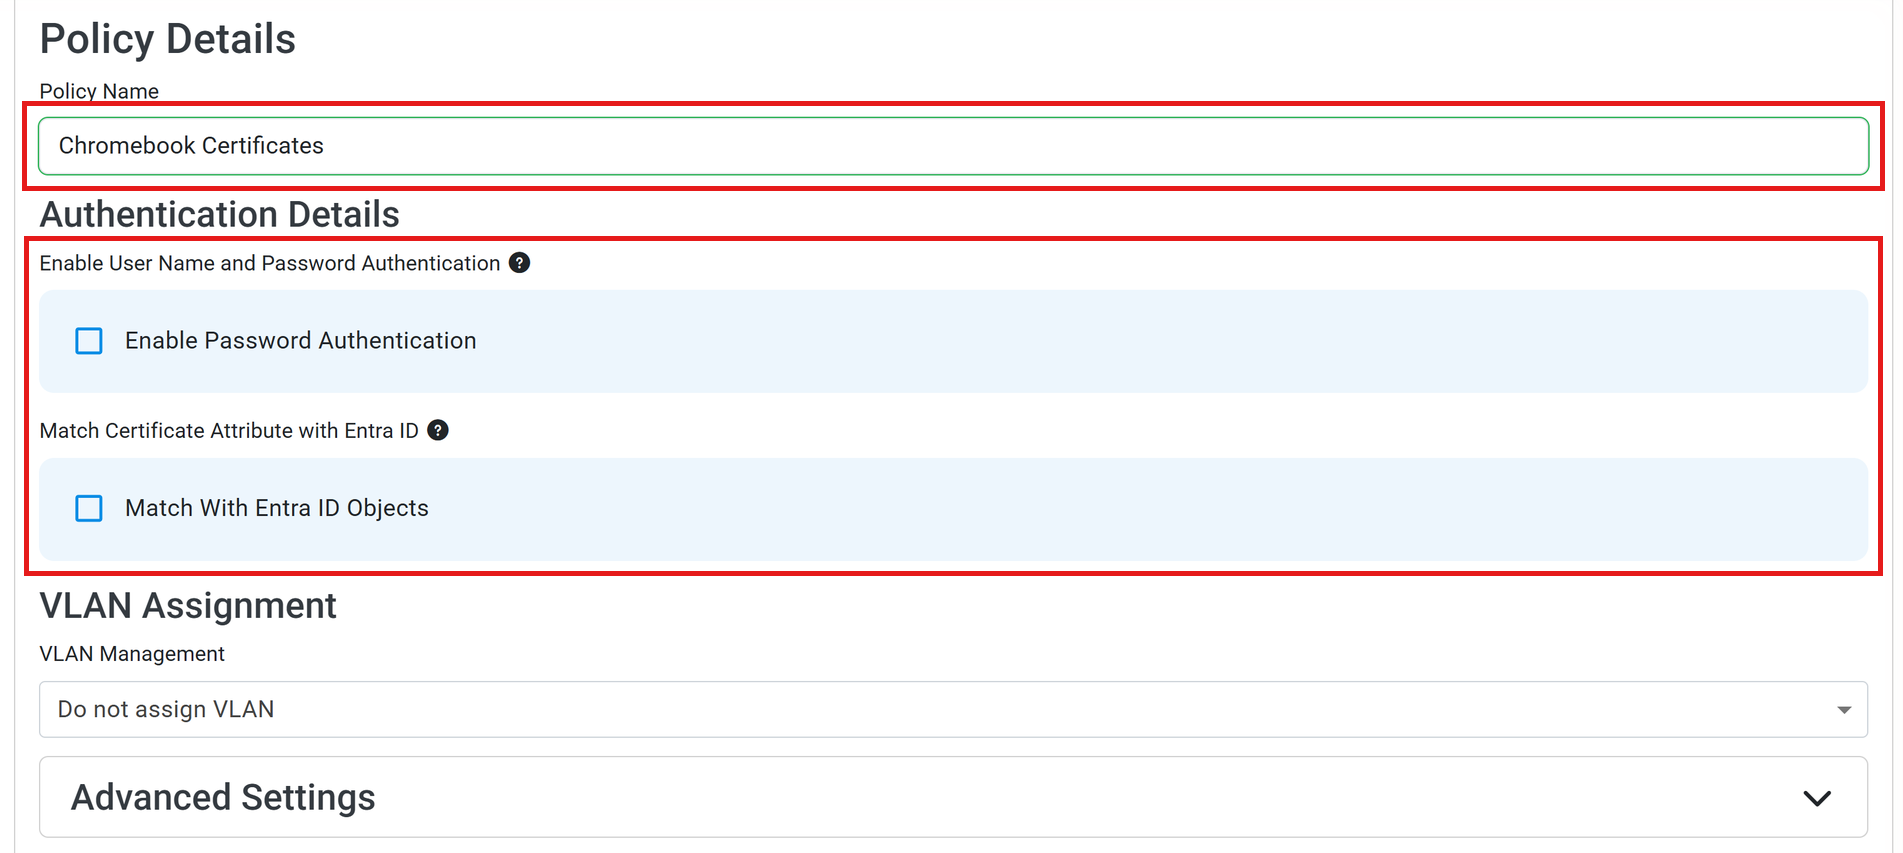
In the new policy, enter a Policy Name, such as
Chromebook Certificates. -
Leave Enable Password Authentication unchecked. Chromebooks authenticate with their certificate, so there’s no reason to allow passwords on this policy.
-
Leave Match With Entra ID Objects unchecked. This is what keeps Shield from looking up the certificate’s user or device in Entra ID.
-
(optional) Under VLAN Assignment, choose a VLAN for your Chromebooks.
-
Click Save Network Profile.
Without Entra ID matching, this policy accepts any unrevoked certificate issued by your Shield CAs, not only Chromebook certificates. That’s safe when Shield only issues certificates to devices you manage. To cut off a lost or retired Chromebook, revoke its certificate in Keytos Shield. If a more specific policy (for example, one that requires Intune compliance) should apply to other devices, give it a lower Priority number so Shield evaluates it first.
Learn more about access policies, priorities, and VLANs in our network profile guide.
How to Test and Verify Chromebook Certificate-Based Wi-Fi Authentication
- Start a managed Chromebook in the organizational unit you configured. For user certificates, sign in with a user in that organizational unit. If the Chromebook was already running, open
chrome://policyand click Reload policies. - Open
chrome://certificate-managerand check Your certificates. Within a few minutes, a certificate issued by your Keytos Shield CA appears, named after the user’s email (user certificate) or the device serial number (device certificate). - Open Settings > Network > Wi-Fi. The Chromebook connects to your SSID automatically.
- In Keytos Shield, open Certificate logs to see the request (Cert Location Type shows SCEP), and Network logs to see the successful authentication.
How to Troubleshoot Chromebook Certificate Provisioning with GCCC
- The Chromebook never receives a certificate: Check the Application event log on the connector server for GoogleCloudCertificateConnector errors. Make sure the subscription in
adapter_config.jsonmatches your topic’s subscription, and thatcert-provisioning-api-pubsub-publisher@system.gserviceaccount.comhas Pub/Sub Publisher on the topic. - The connector service stops right after starting: The event log shows
Cannot parse configurationswhenadapter_config.jsonis missing or isn’t valid JSON, or whenadapter_key.jsonisn’t in the installation folder. - Keytos Shield rejects the request: Make sure
challenge.txtcontains only your current static SCEP password, with no extra spaces or line breaks. If you rotate the password in Shield, update the file and restart the service. - The certificate is installed but Wi-Fi doesn’t connect: Make sure the SSID matches your Shield network profile, the Server Certificate Authority is your Shield Root CA, and your Shield access policy allows the certificate. For more help, see our RADIUS troubleshooting guide.
Frequently Asked Questions (FAQ) About Keytos Shield and Chromebooks
Does Keytos Shield Support Chromebooks?
Yes. Keytos Shield issues certificates to Chromebooks managed in Google Workspace through the Google Cloud Certificate Connector and static SCEP, and authenticates them with EAP-TLS. An Entra ID tenant is only required for management of your Keytos Shield subscription.
Why Can’t I Use the Secure SCEP Profile in Google Admin?
Google no longer supports Secure SCEP profiles for Chromebooks. Chromebooks now use Certificate Authority connections and Certificate provisioning profiles, which is the setup this guide walks you through.
Should I Use User Certificates or Device Certificates for Chromebooks?
It depends on how your Chromebooks are used. User certificates identify the person and only work after sign-in. Device certificates identify the Chromebook and connect on the sign-in screen, which suits shared, kiosk, and classroom devices. You can deploy both. Follow the User Certificate or Device Certificate tab in Step 8 and Step 9.
Next Steps - How to Connect Your Other Devices to Keytos Shield
Now that your Chromebooks are connecting with certificates, you can push network profiles to the rest of your fleet.
🚀 Distribute Network Profiles to Other Devices
View Certificate Logs