












How-To: Distribute Keytos Shield Network Profiles to Windows Devices with Iru (formerly Kandji)
Overview - How to Set Up Certificate-Based Wi-Fi for Iru Managed Windows Devices with Keytos Shield
Iru (formerly Kandji) manages Windows devices alongside your Apple devices. Pairing Iru with Keytos Shield lets every managed Windows device get its own certificate from your Shield Cloud PKI and use it to join your Wi-Fi with passwordless EAP-TLS authentication, so there is no shared Wi-Fi password to leak or rotate.
This guide walks you through enabling static SCEP in Keytos Shield, adding your Shield Root CA to Iru, and building an Iru Wi-Fi Library Item that requests a certificate from Shield and connects your Windows devices to your network automatically.
How Does Keytos Shield Work with Iru on Windows Devices?
Connecting an Iru managed Windows device to your Shield-protected network takes three pieces, which you will configure in this guide:
- Trusted certificate: Your Shield Root CA certificate is installed in each device’s Trusted Root Certification Authorities store, so devices trust your Shield RADIUS servers and the certificates Shield issues.
- SCEP certificate: Each device requests its own unique certificate from Keytos Shield using the Simple Certificate Enrollment Protocol (SCEP). Iru uses Shield’s static SCEP URL and password to request the certificate on the device’s behalf.
- Wi-Fi profile: The Wi-Fi profile tells the device which network to join, to authenticate with EAP-TLS using its SCEP certificate, and which RADIUS servers to trust.
As with Apple devices, the SCEP certificate is configured inside the Wi-Fi Library Item, so you don’t need a separate SCEP Library Item.
Prerequisites for Distributing Keytos Shield Network Profiles to Windows with Iru
Before you begin, make sure you have completed the following:
- The Keytos Entra ID applications are registered in your tenant.
- You have signed up for a Keytos Shield Plan.
- You have existing access policies in Keytos Shield.
- You are a Subscription Owner or Network Administrator.
- You are an Iru Administrator.
This guide creates device certificates containing a serial number, not an Entra ID user or device identifier. It requires the All Valid Certificates (CA matching) configuration described in Shield network access policies. This configuration accepts any valid certificate from a trusted CA without checking Entra ID identity, group membership, or Intune compliance. Only proceed if CA-based authorization meets your network’s access requirements. If you require those identity checks, use a certificate configuration that supplies the identifier your policy expects instead of following this serial-number recipe.
You also need your Windows devices enrolled in Iru, so Iru can push Library Items to them.
Step-by-Step Guide - How to Issue SCEP Certificates and Push a Wi-Fi Profile to Windows Devices with Keytos Shield and Iru
Step 1 - How to Enable Static SCEP for Iru in Keytos Shield
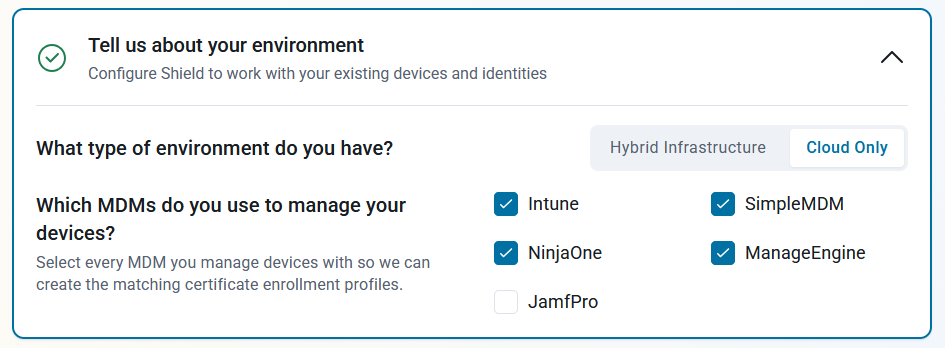
Iru requests certificates from Keytos Shield with static SCEP. To turn it on, tell Shield that you manage devices with an MDM other than the ones listed by name by enabling Other MDM. Enabling it also updates your certificate authority to support static SCEP.
In step 2, Tell us about your environment, of the Keytos Shield network security onboarding guide, ensure you have checked Other MDM, in addition to any other MDMs in your environment.
If you’ve already gone through the onboarding guide, you can update the list of MDMs you manage devices with.
-
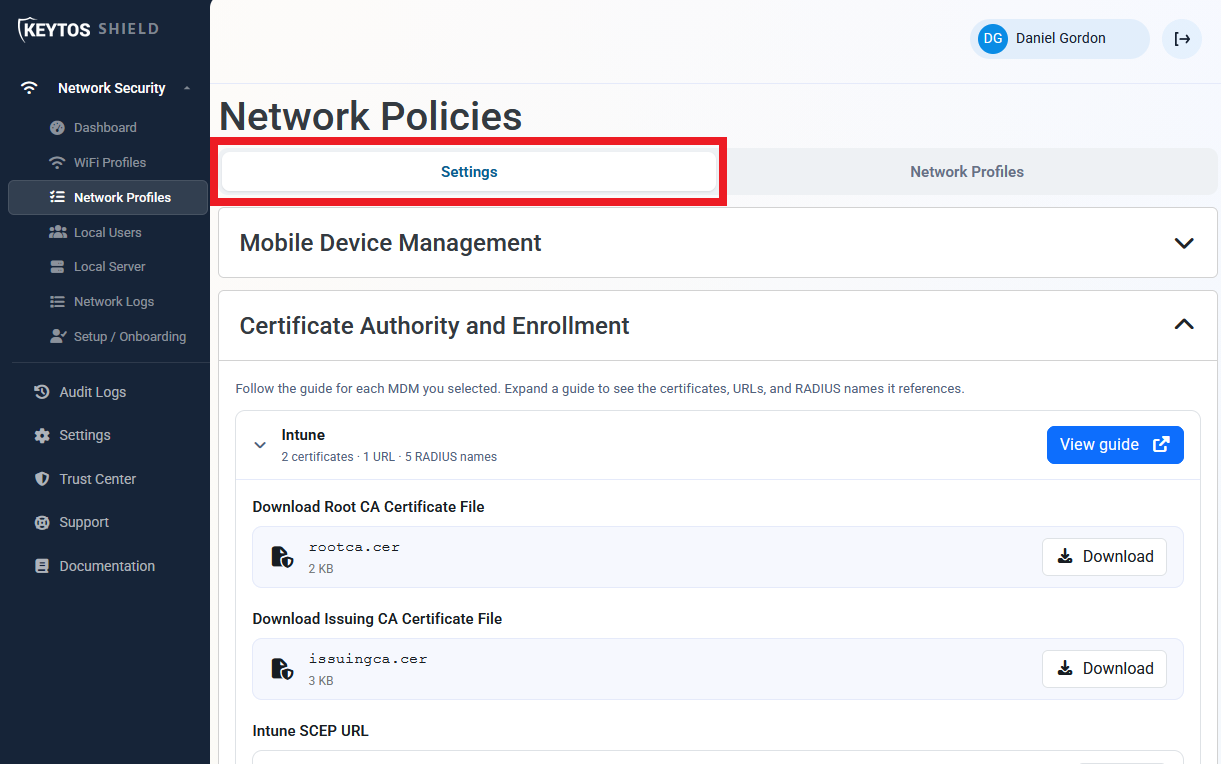
Navigate to the Keytos Shield Network profiles page from the left-hand menu.
-
At the top of the page, select the Settings tab.
-
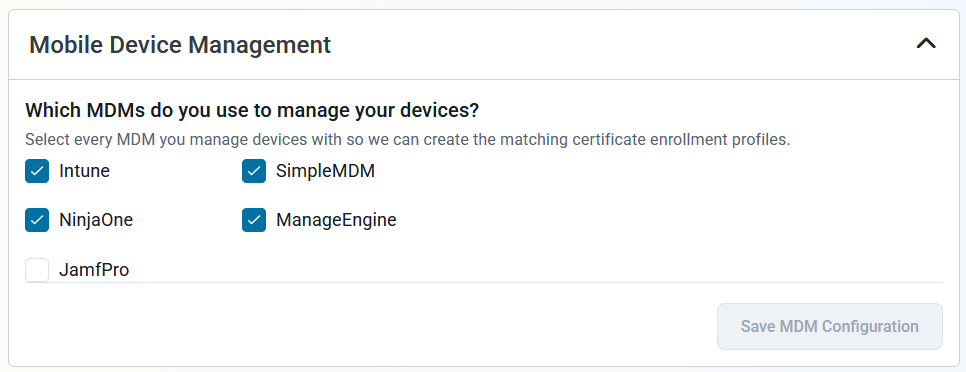
Scroll down to the bottom of the page and expand the Mobile Device Management section.
-
Ensure you have checked Other MDM in addition to any other MDMs in your environment.
Step 2 - How to Download Your Keytos Shield Root CA Certificate
Your devices need your Shield Root CA certificate so they trust your Shield RADIUS servers and the certificates Shield issues.
You can download your Shield Root CA certificate from the onboarding guide or from the network profiles page.
If you’re currently going through the onboarding guide, you can download your Shield Root CA certificate in step 6, Set Up Mobile Device Management (MDM).
-
In step 6 of the Keytos Shield onboarding guide, expand Other MDM.
-
Under Download Root CA Certificate File, click Download next to
rootca.cerand save it to your local machine.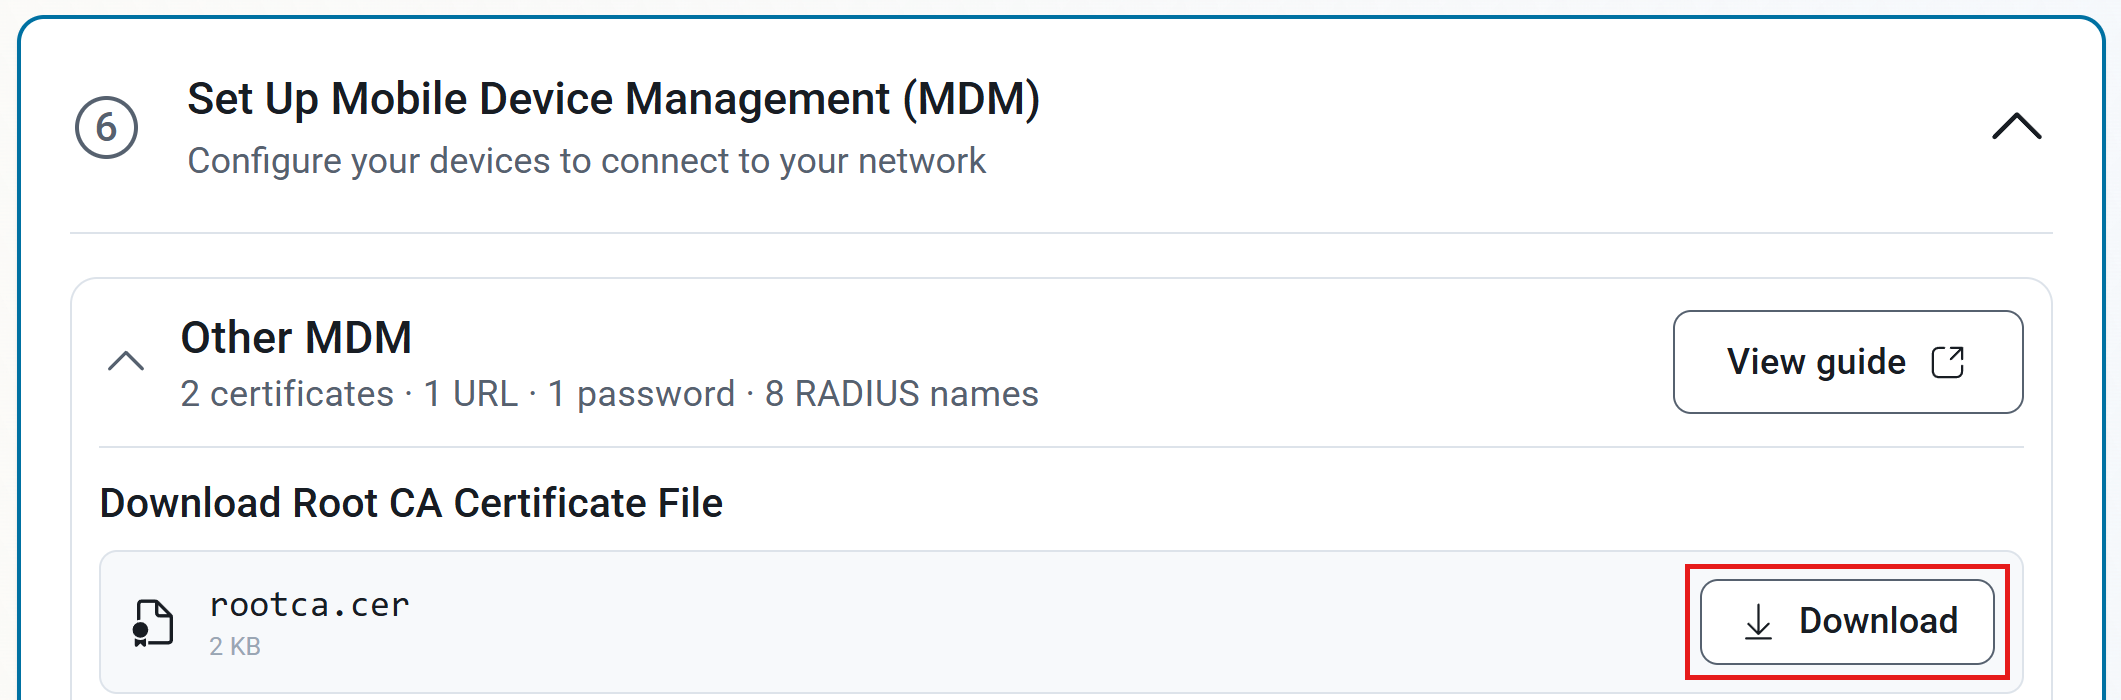
If you’ve already gone through the onboarding guide, you can download your Shield Root CA certificate from the network profiles page.
-
Log in to your Keytos Shield portal.
-
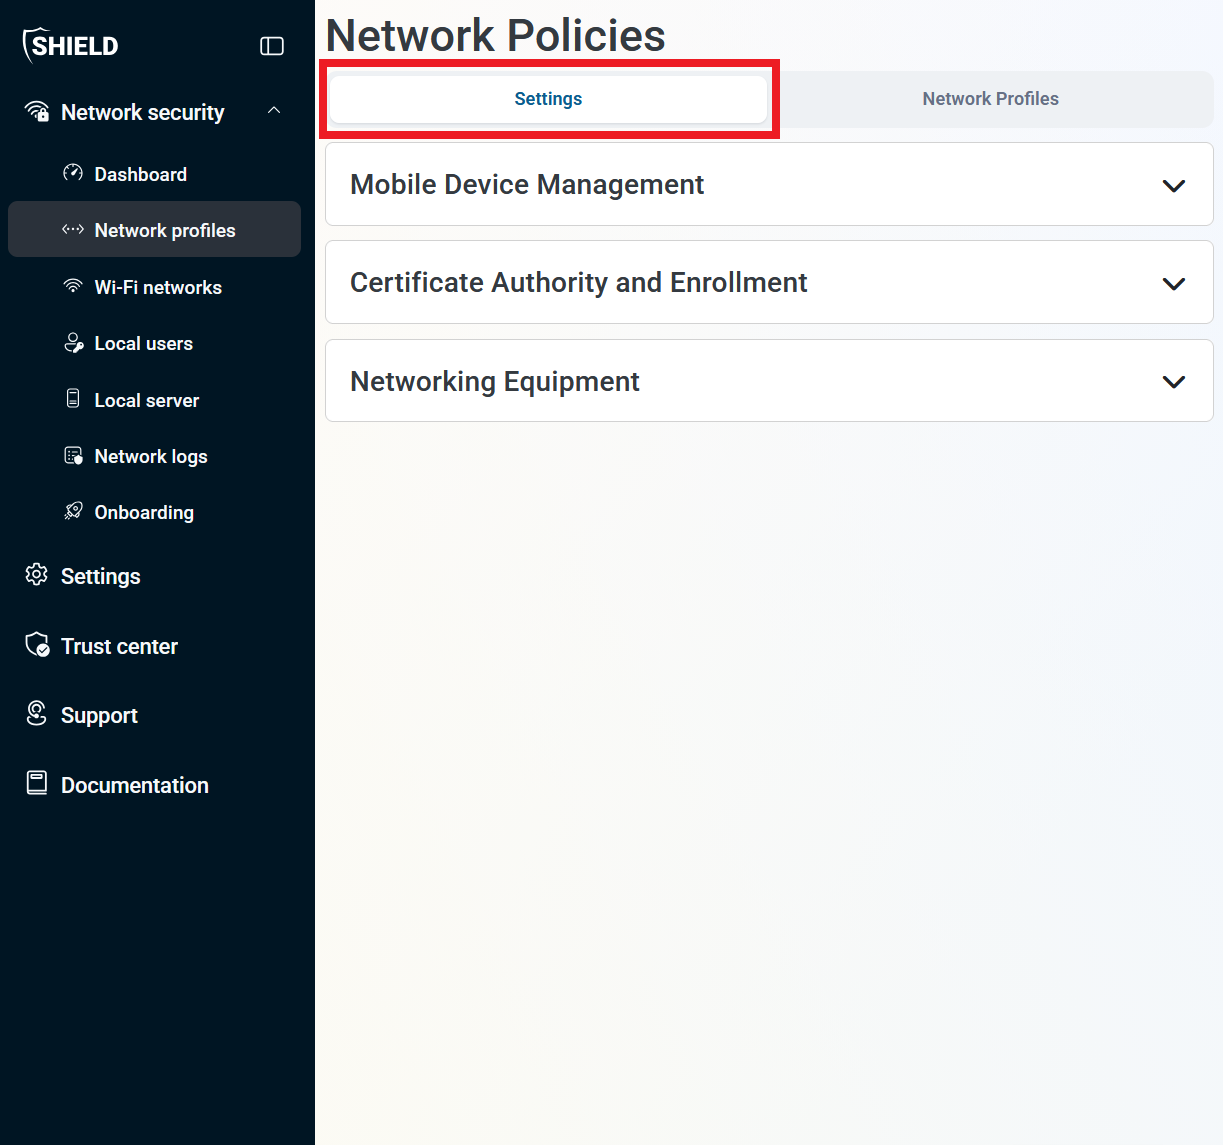
From the left-hand navigation bar, click on Network Profiles.
-
At the top of the page, select the Settings tab.
-
Scroll down to the Certificate Authority and Enrollment section and expand the Other MDM subsection.
Not seeing the Other MDM subsection? Make sure to enable Other MDM under the Mobile Device Management section further up on the page and save your changes.
-
Next to
rootca.cer, click Download and save it to your local machine. -
Next to
issuingca.cer, click Download and save it to your local machine as well.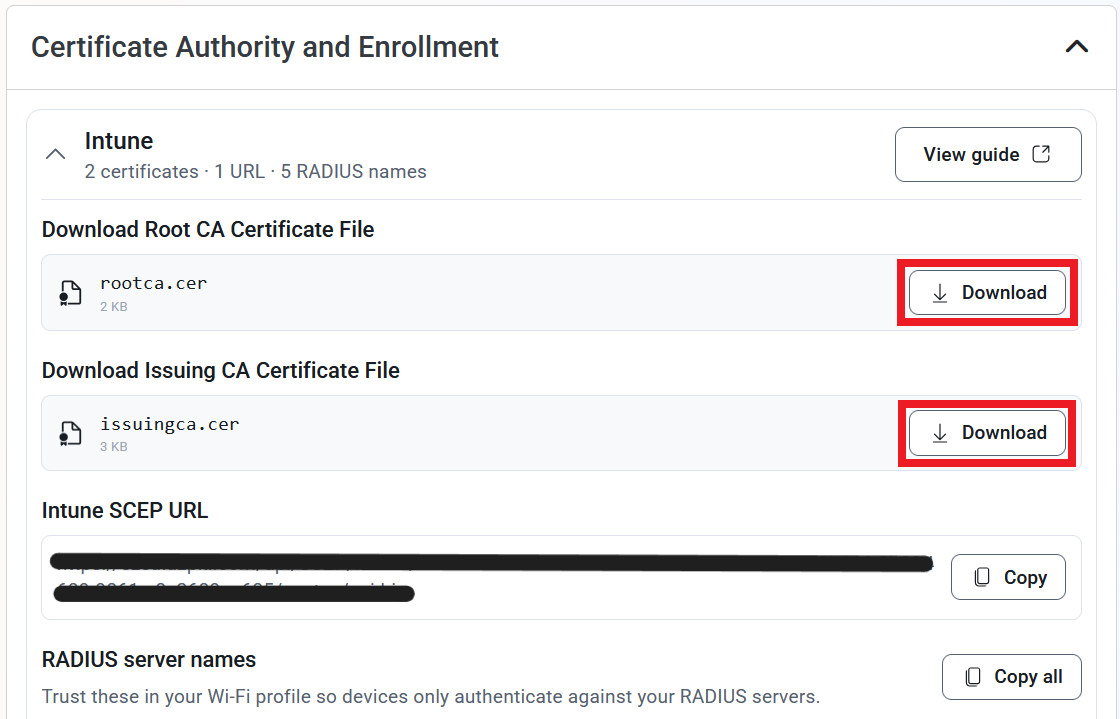
Iru only needs the rootca.cer file. You use it in the next steps and again when you configure RADIUS server trust in the Wi-Fi profile.
Step 3 - How to Get Your Keytos Shield Root CA Thumbprint
Windows devices check that the SCEP server’s certificate authority matches the one you expect before they request a certificate. For this, Iru requires the thumbprint (fingerprint) of your Shield Root CA certificate in the SCEP settings.
-
On a Windows machine, open PowerShell in the folder where you saved
rootca.cer. -
Run the following command and copy the thumbprint it returns:
(Get-PfxCertificate -FilePath .\rootca.cer).Thumbprint
You can also double-click rootca.cer, open the Details tab, and copy the Thumbprint value.
Step 4 - How to Add Your Keytos Shield Root CA as a Trusted Certificate for Windows in Iru
Now push your Shield Root CA to your Windows devices so they trust the certificates Shield issues. You do this with a Certificate Library Item in Iru.
-
Log in to your Iru tenant.
-
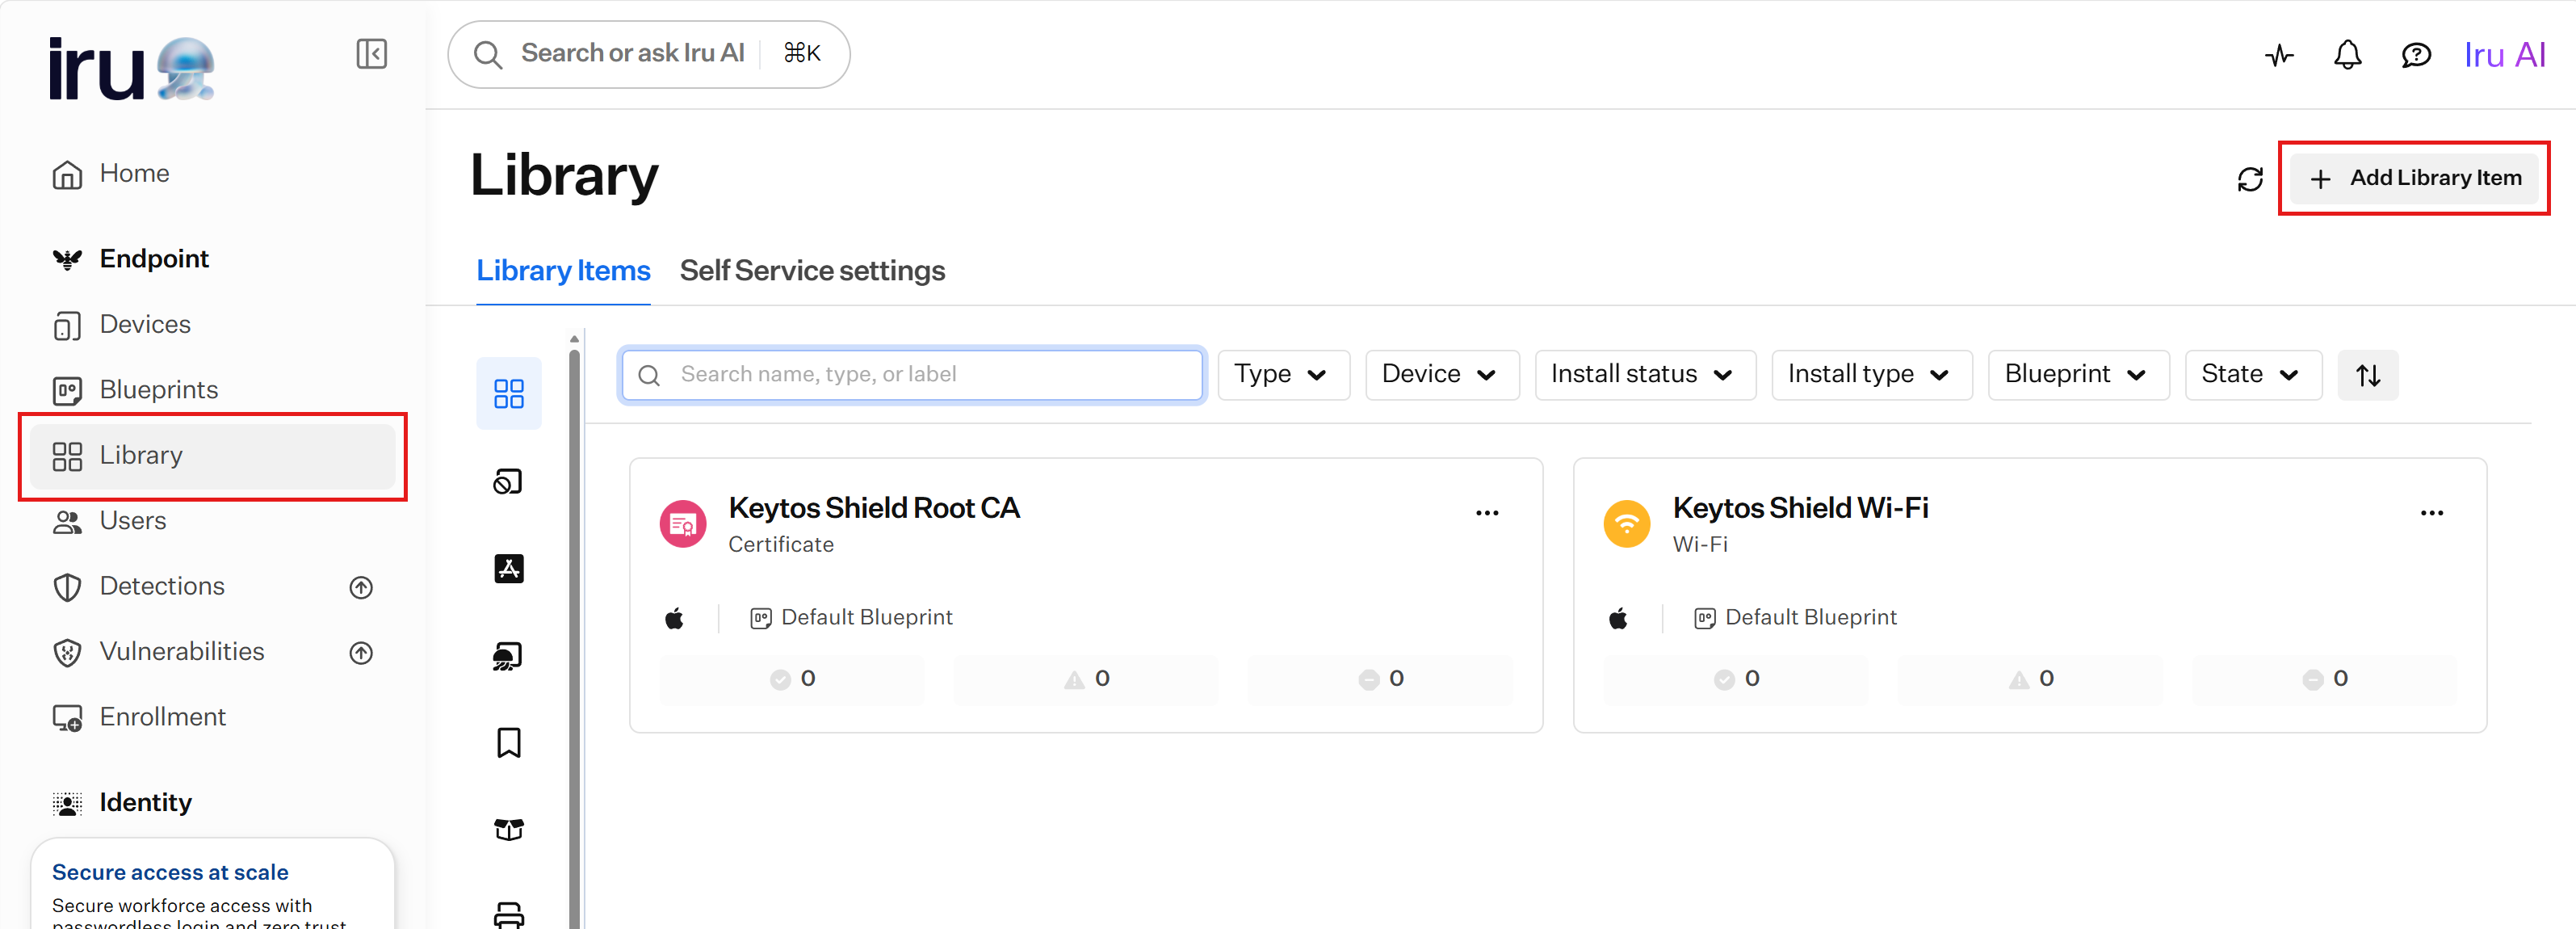
From the left-hand menu, click Library.
-
Click Add Library Item.
-
Search for
Certificate, select the Certificate profile, and click Add and configure.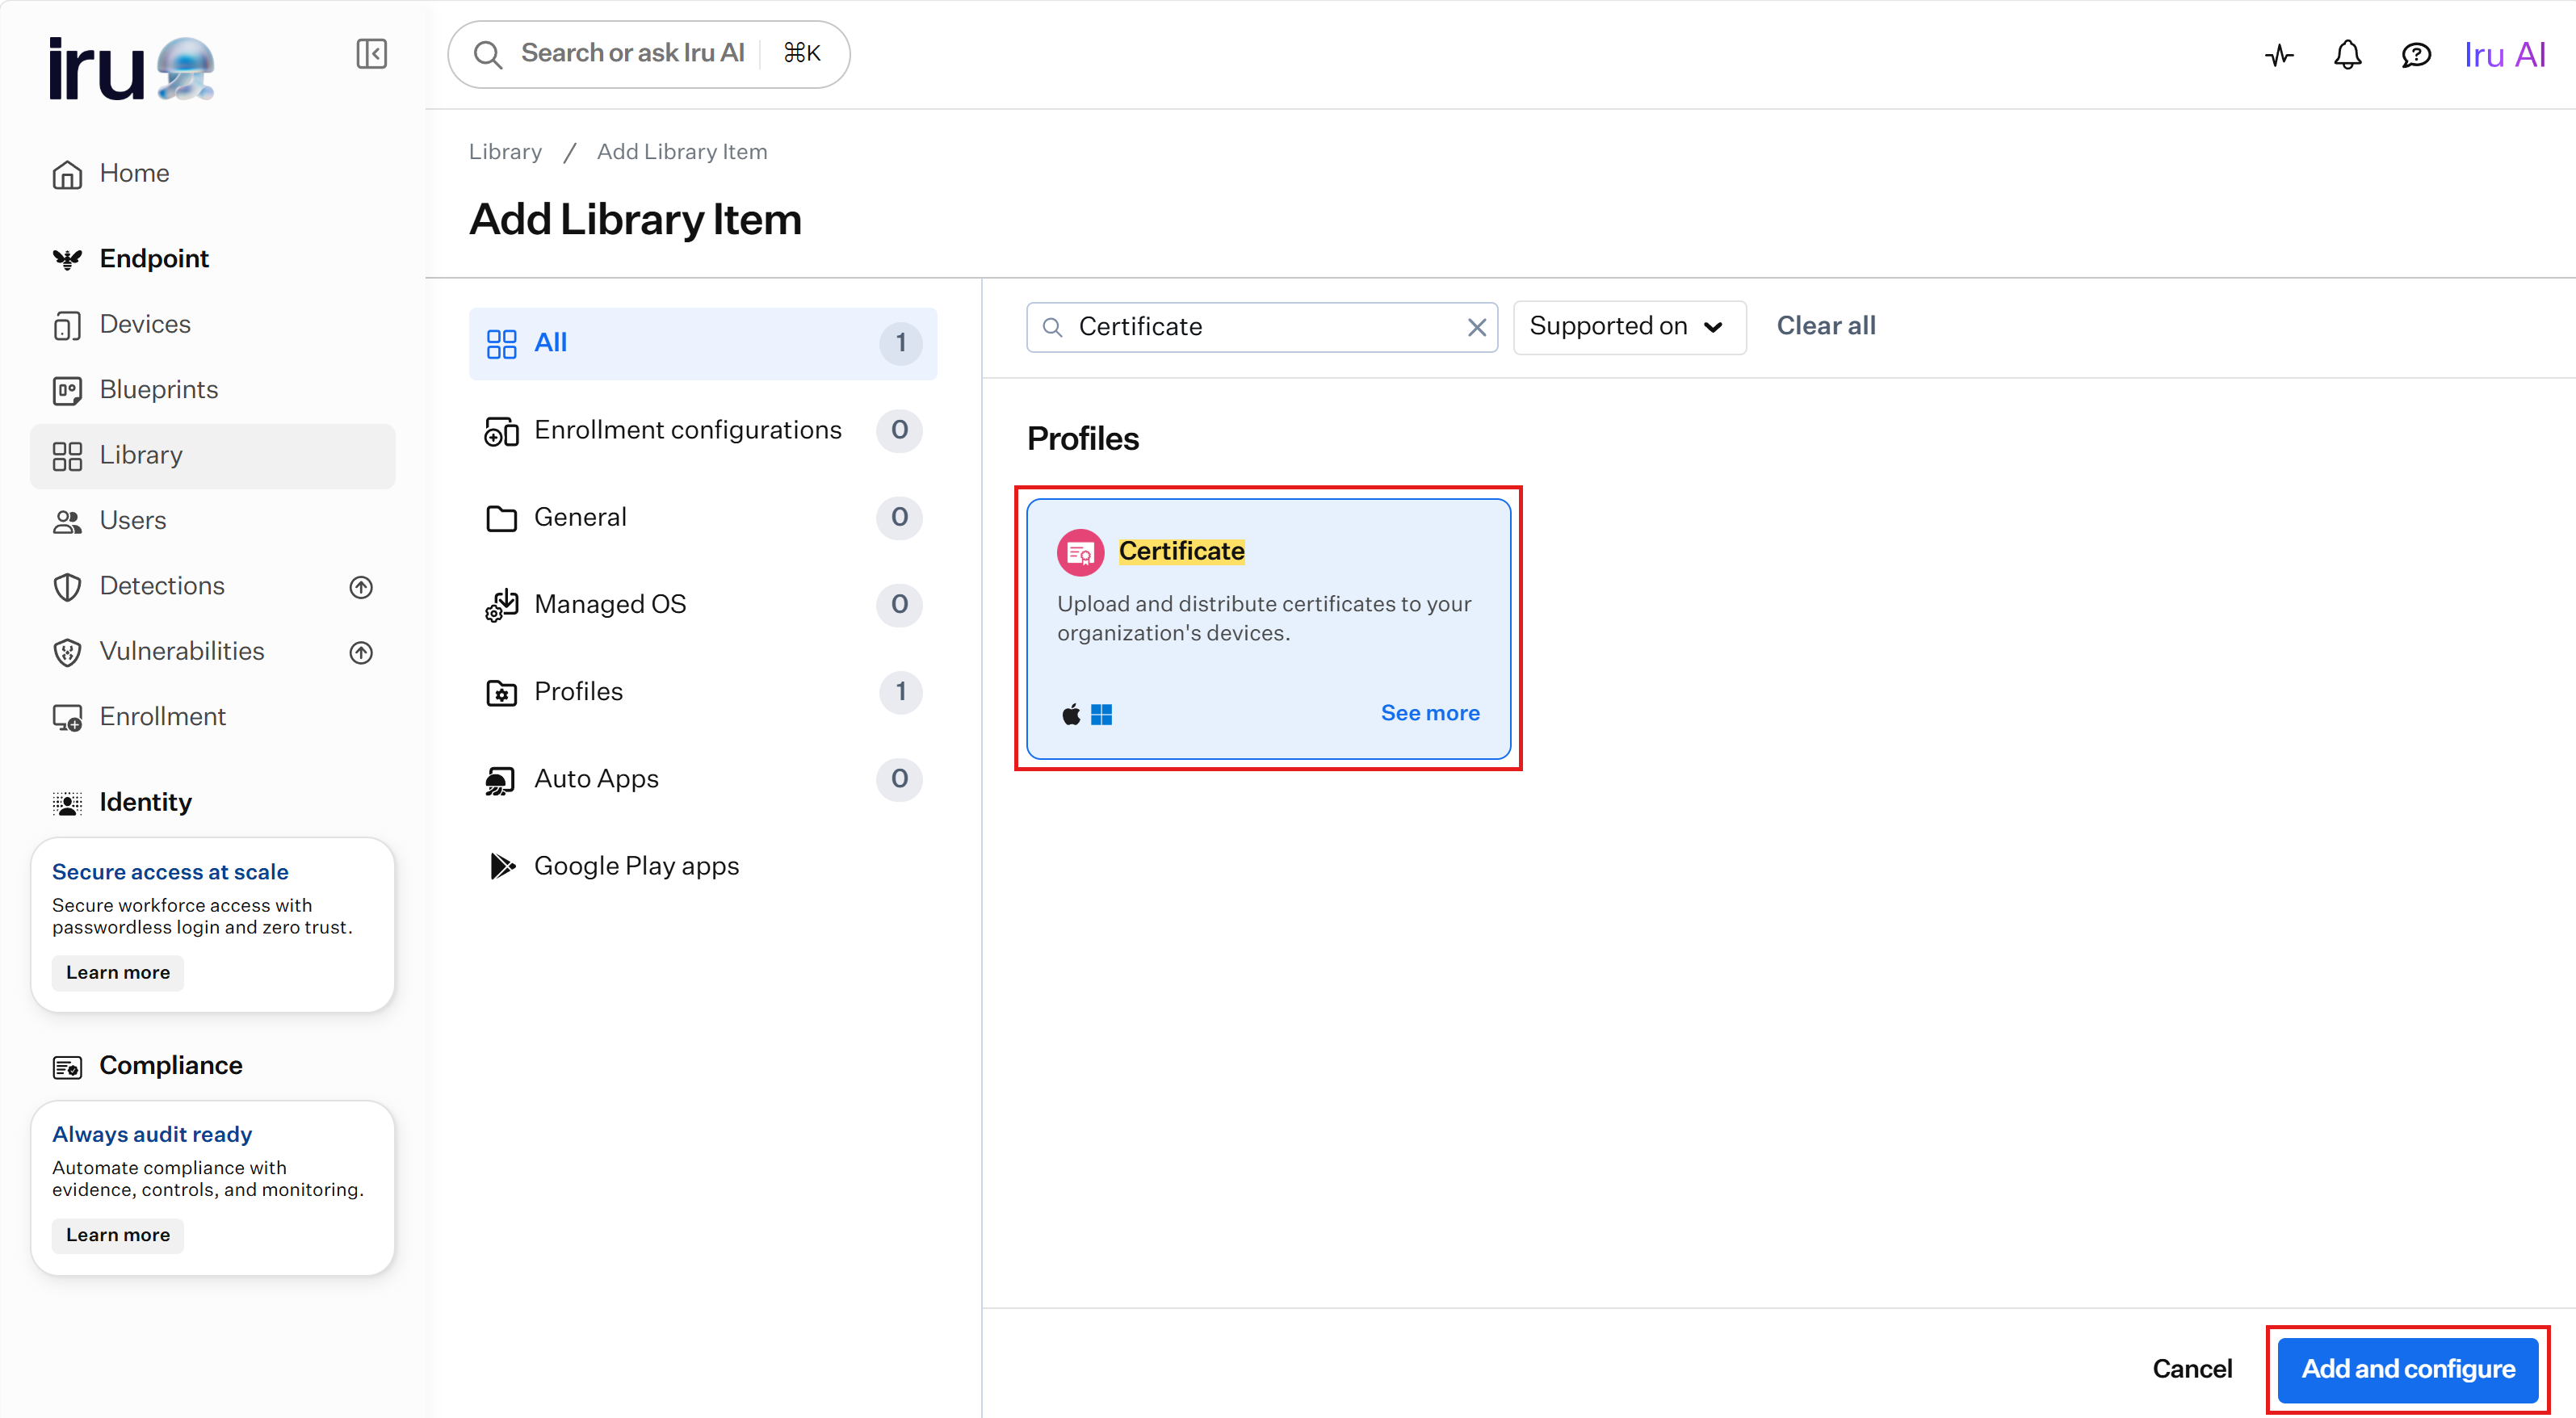
-
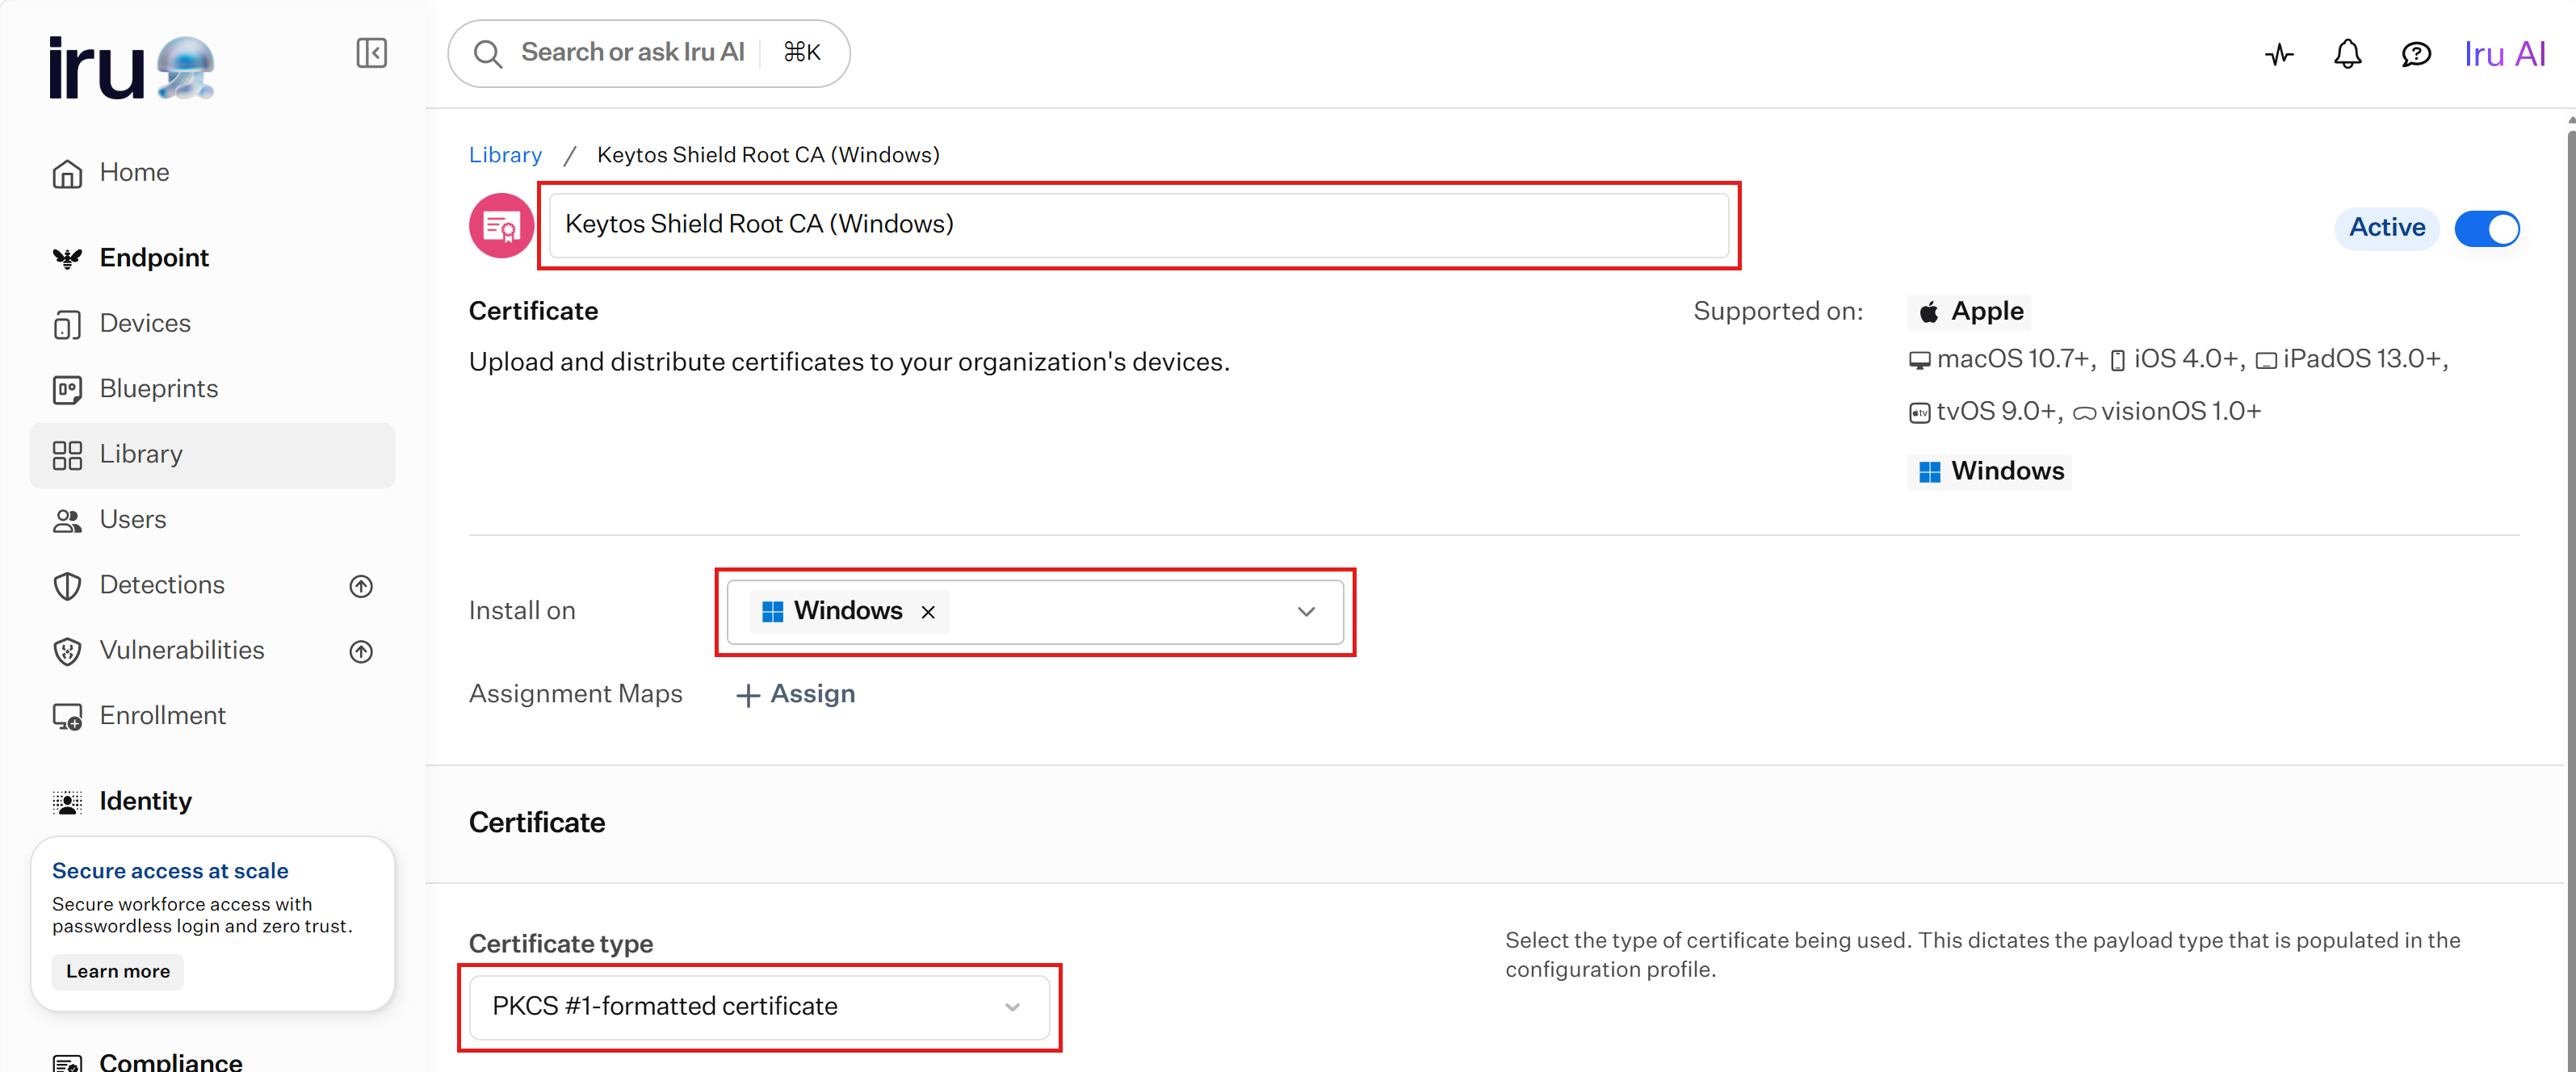
Enter a title for the Library Item, such as
Keytos Shield Root CA (Windows). -
Next to Install on, remove Apple so the item only installs on Windows.
-
For Certificate type, select PKCS #1-formatted certificate.
-
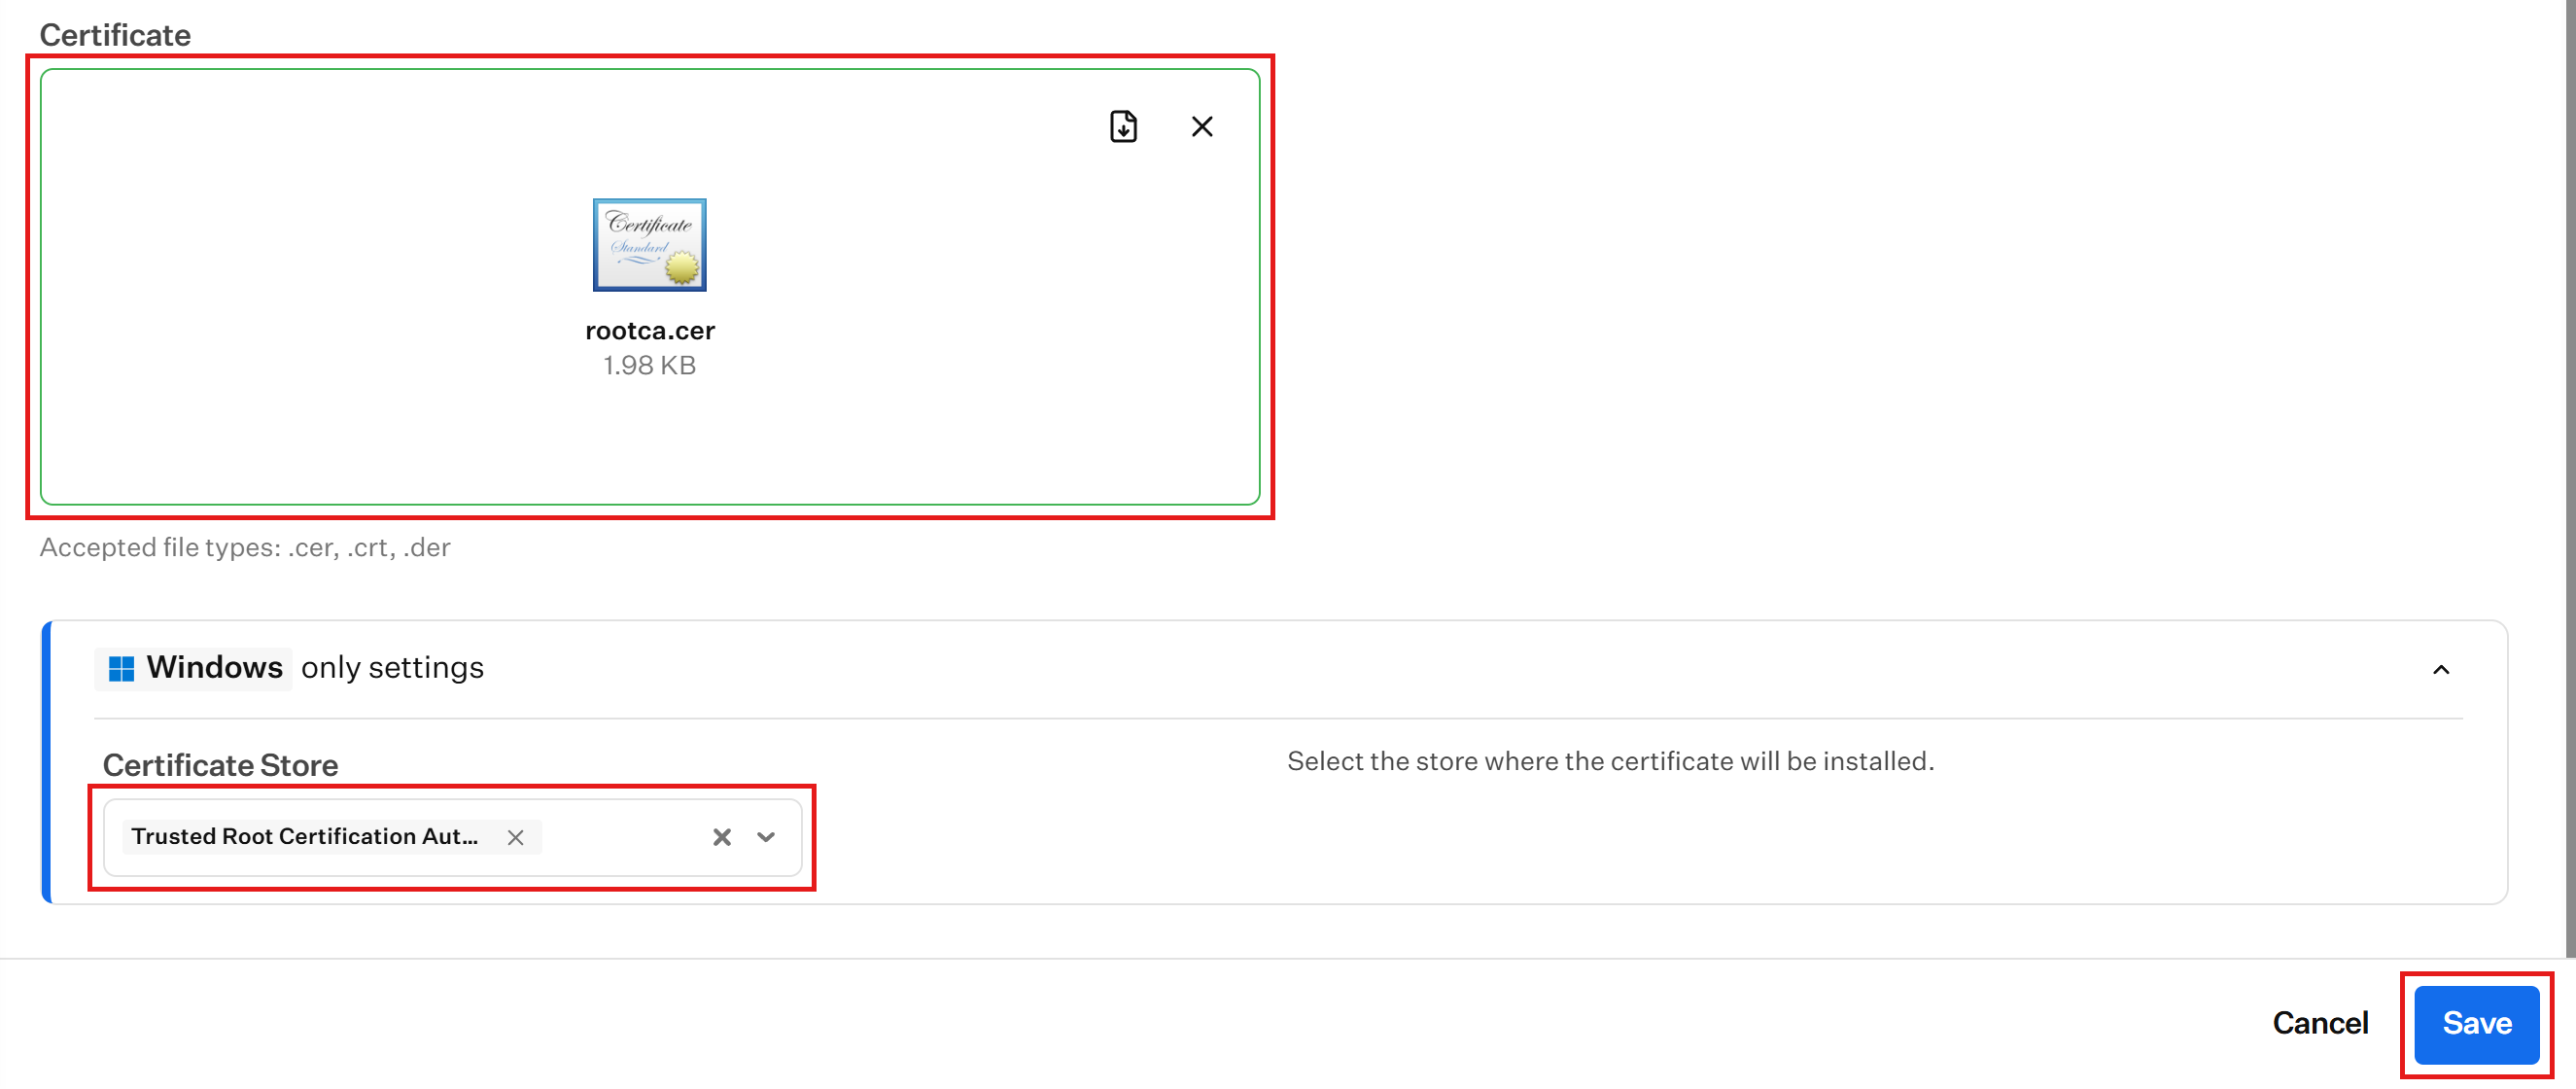
Under Certificate, upload the
rootca.cerfile you downloaded from Keytos Shield. -
Under Windows only settings, leave Certificate Store set to Trusted Root Certification Authorities.
-
Click Save.
Already pushing the Root CA to your Apple devices? You can add Windows to the Install on list of your existing Root CA Library Item instead of creating a new one.
Step 5 - How to Get Your Keytos Shield Static SCEP URL and Password
Iru uses your Shield static SCEP URL and password to request a certificate for each device, so you will paste both values into the Wi-Fi profile.
You can copy your static SCEP URL and password from the onboarding guide or from the network profiles page. Keep them handy for the next steps.
If you’re currently going through the onboarding guide, you can copy your static SCEP URL and password in step 6, Set Up Mobile Device Management (MDM).
-
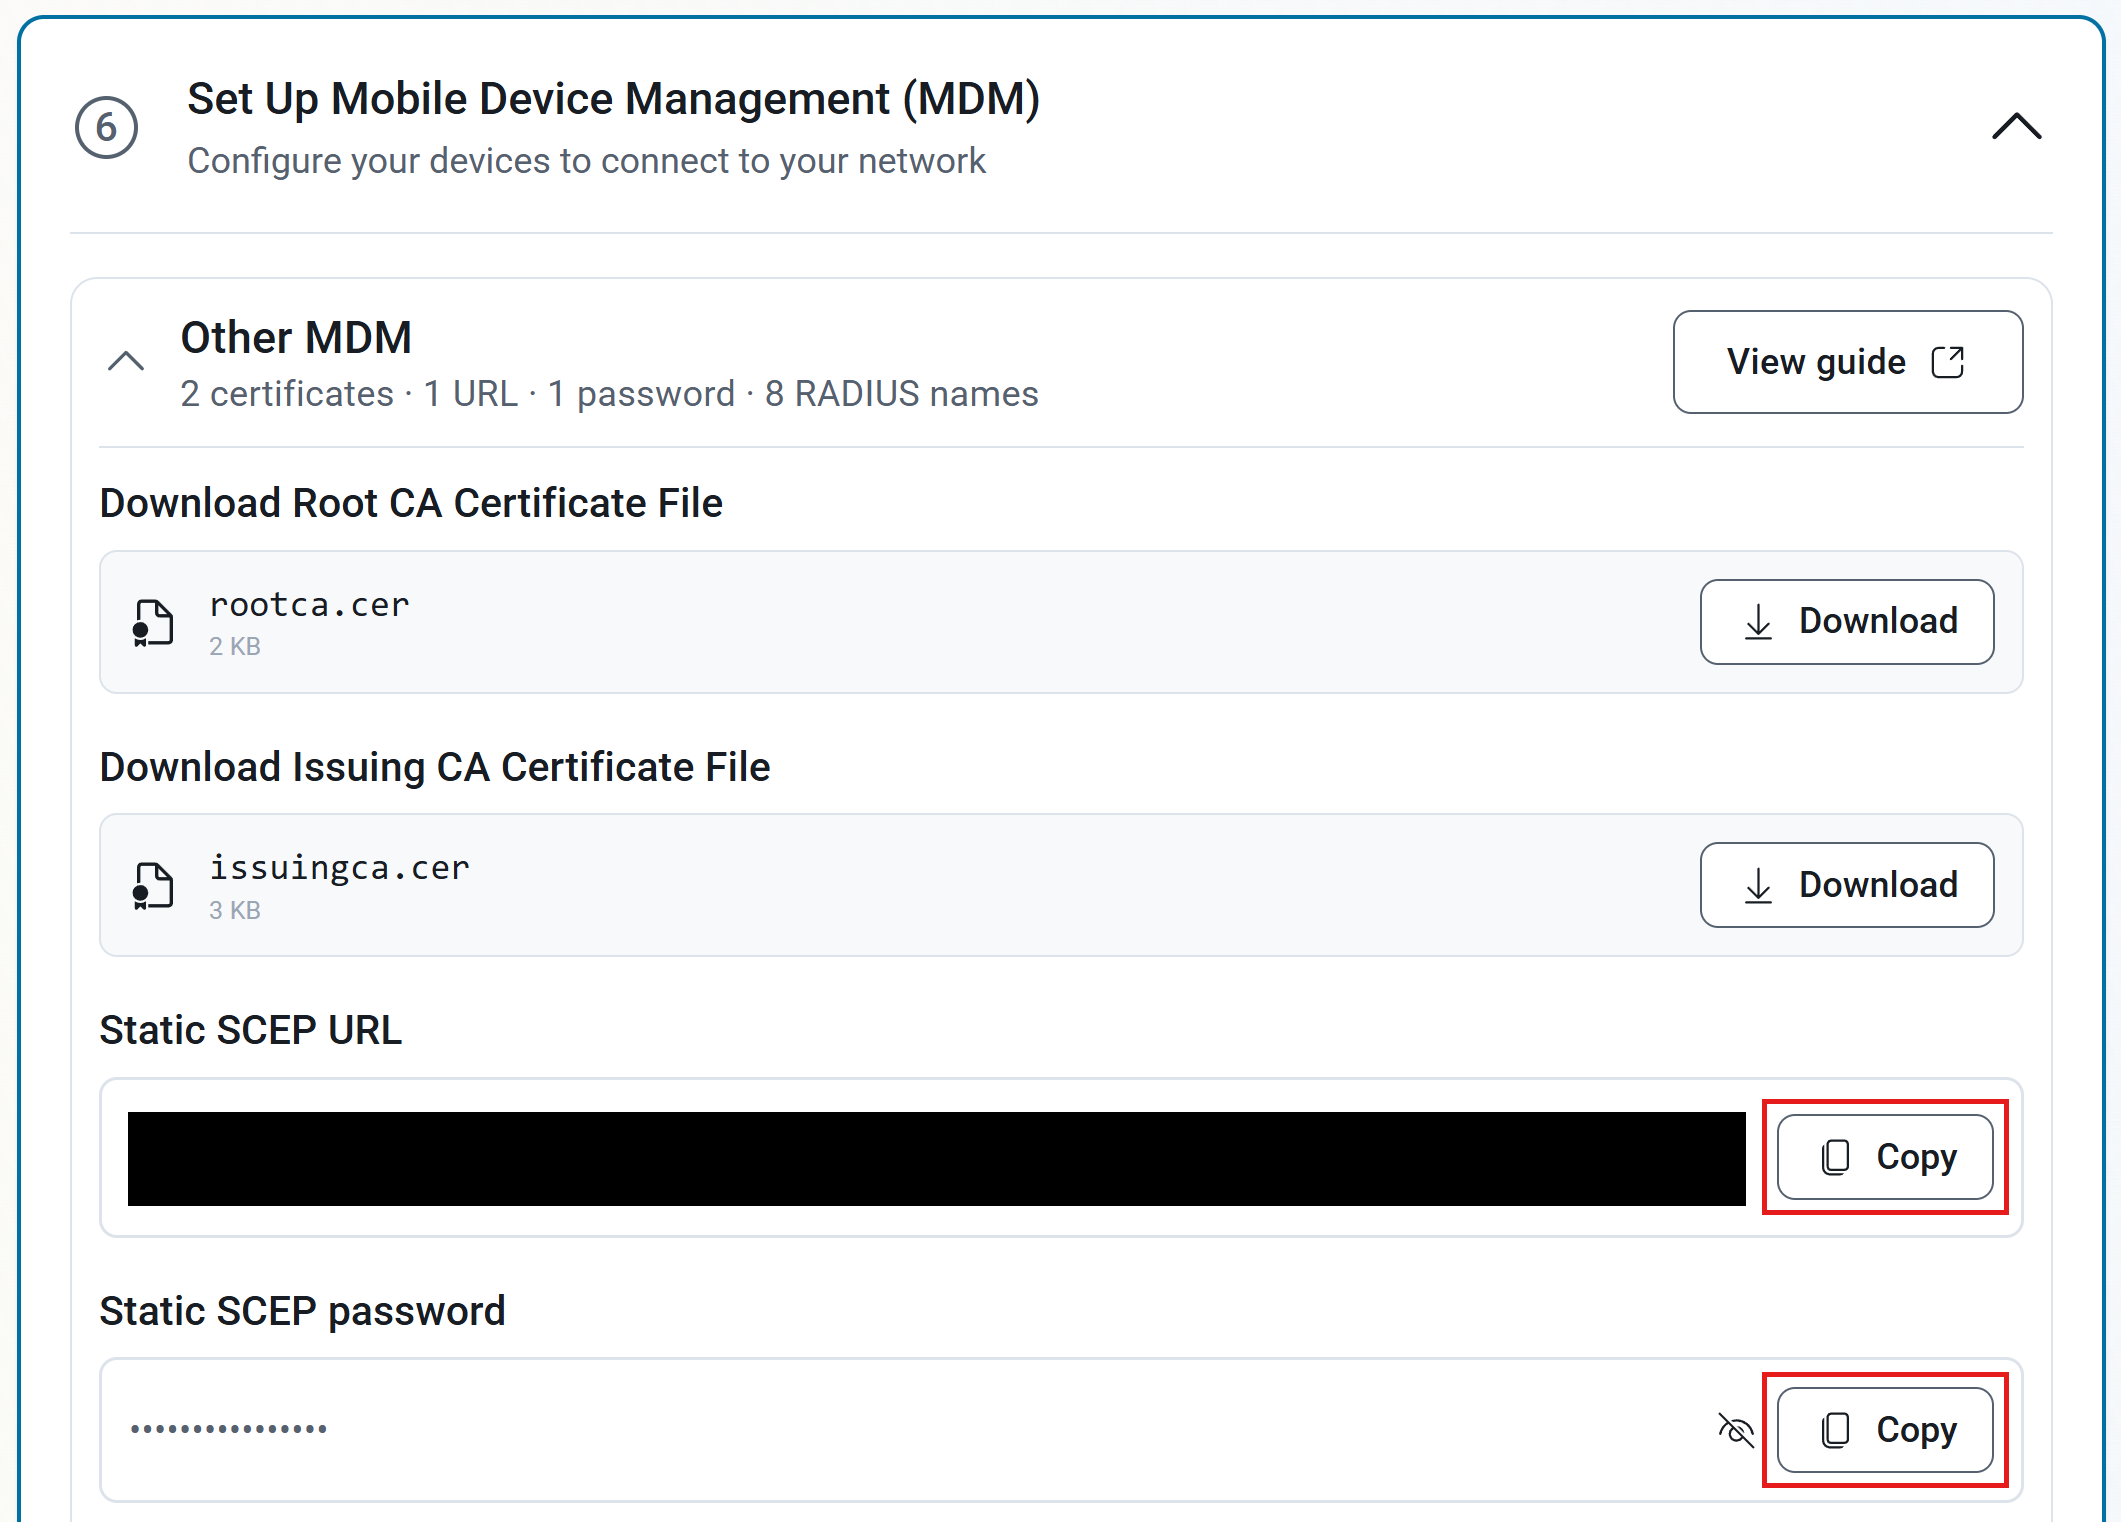
In step 6 of the Keytos Shield onboarding guide, expand Other MDM.
-
Click the Copy button next to the Static SCEP URL.
-
Click the Copy button next to the Static SCEP password to copy the password without displaying it.
If you’ve already gone through the onboarding guide, you can copy your static SCEP URL and password from the network profiles page. When you expand your MDM, select Other MDM.
-
Log in to your Keytos Shield portal.
-
From the left-hand menu, navigate to Network profiles.
-
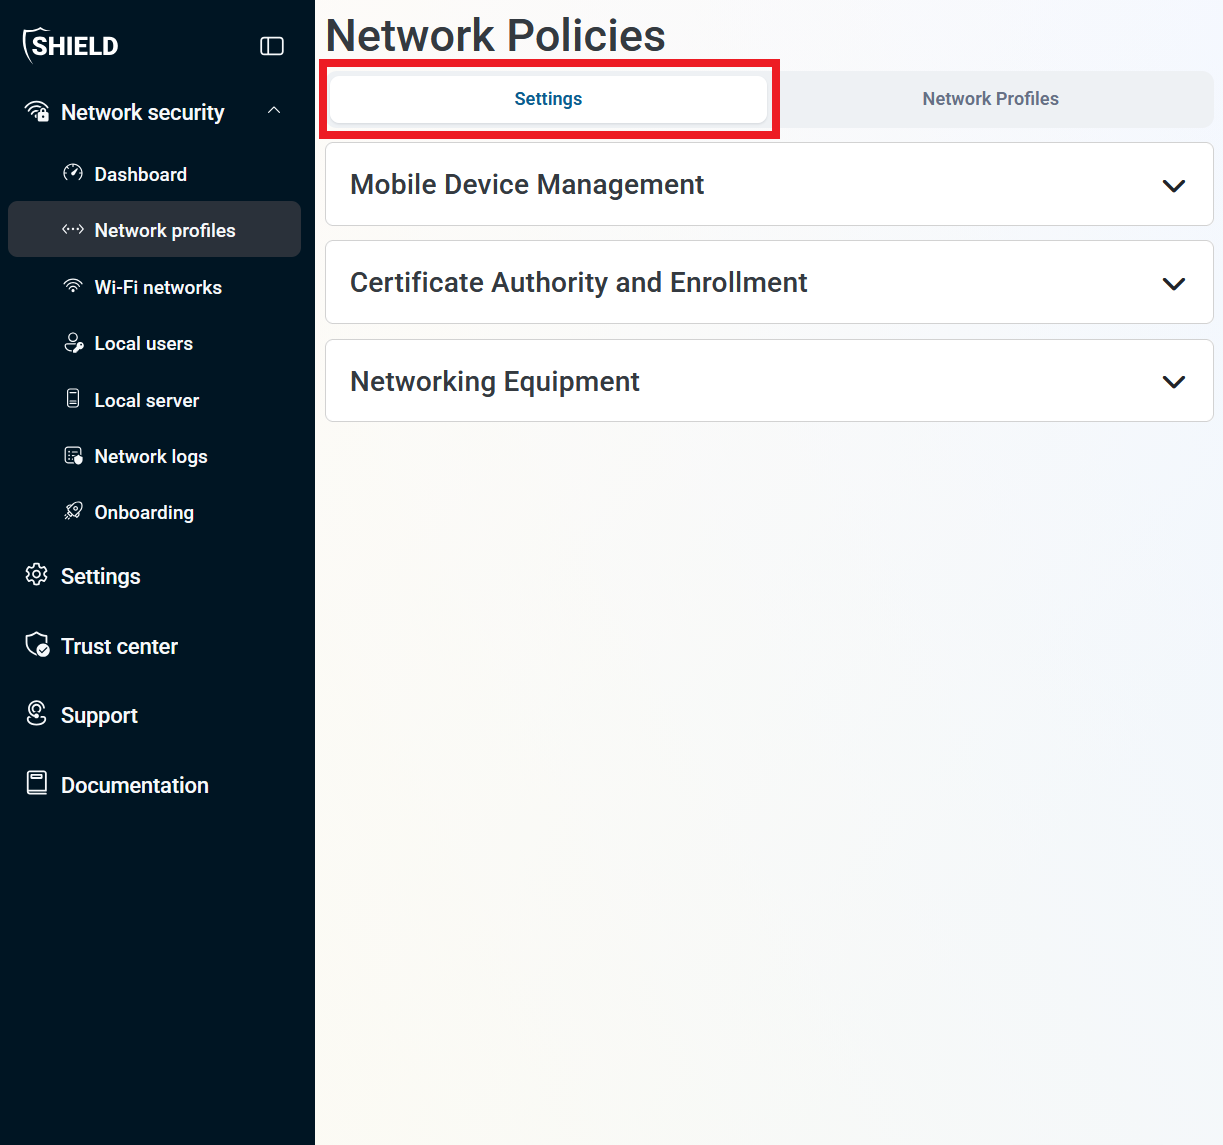
At the top of the page, select the Settings tab.
-
Expand Certificate Authority and Enrollment, and then expand your MDM, such as NinjaOne or SimpleMDM.
Not seeing your MDM? Make sure to enable it under the Mobile Device Management section further up on the page and save your changes.
-
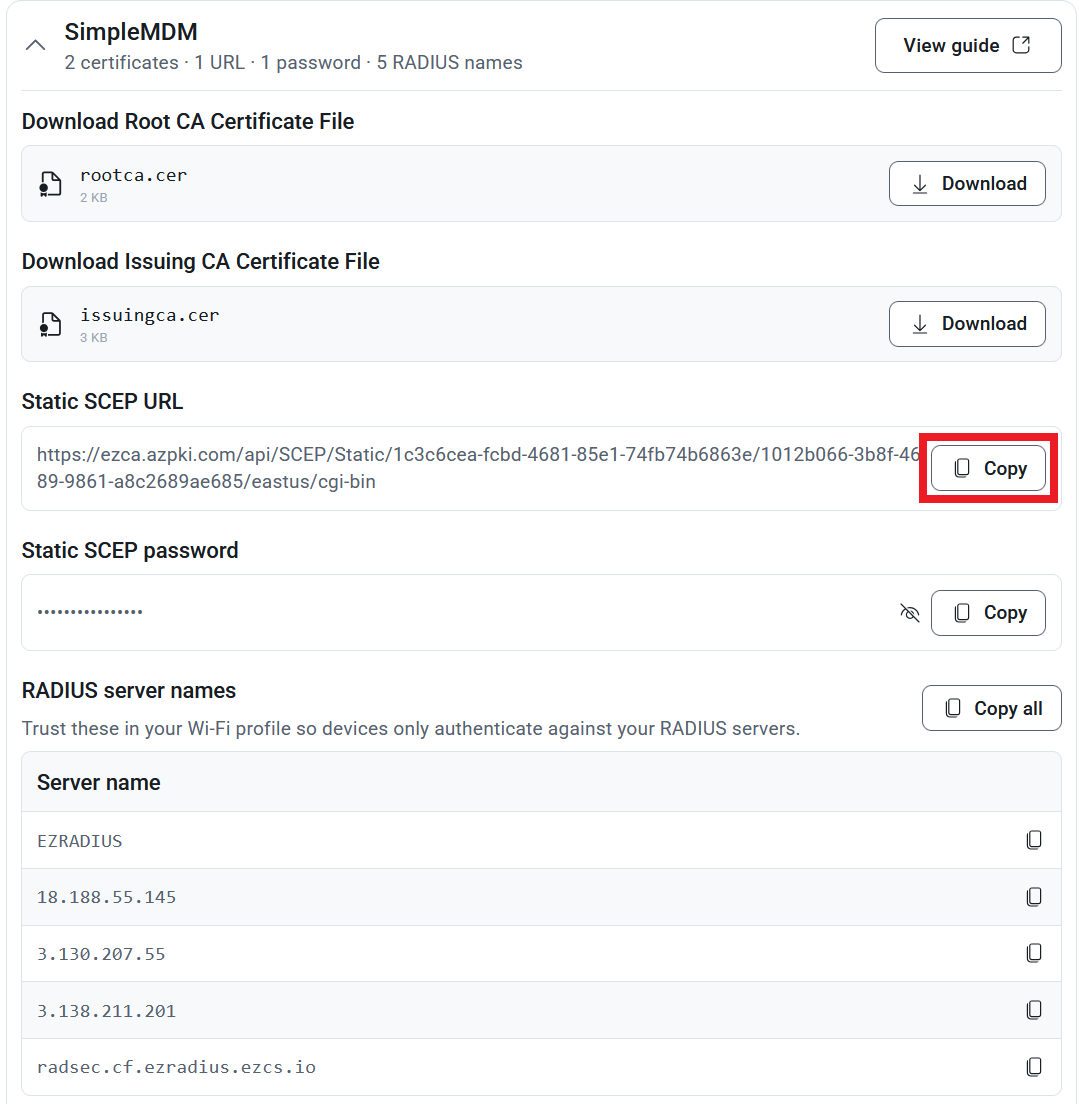
Click the Copy button next to the Static SCEP URL.
-
Click the Copy button next to the Static SCEP password to copy the password without displaying it. You will need both values when you create the SCEP profile in your MDM.
Anyone with your static SCEP URL and password can request a certificate from your Shield CA. Only paste it into your MDM, and don’t share it in email, chat, or tickets.
Step 6 - How to Get Your Keytos Shield RADIUS Server Names
To make sure your devices only send their certificate to your Shield RADIUS servers, the Wi-Fi profile needs the list of RADIUS server names.
You can copy your RADIUS server names from the onboarding guide or from the network profiles page.
If you’re currently going through the onboarding guide, you can copy your RADIUS server names in step 6, Set Up Mobile Device Management (MDM).
-
In step 6 of the Keytos Shield onboarding guide, expand Other MDM.
-
Scroll down to RADIUS server names and click Copy all to copy the full list.
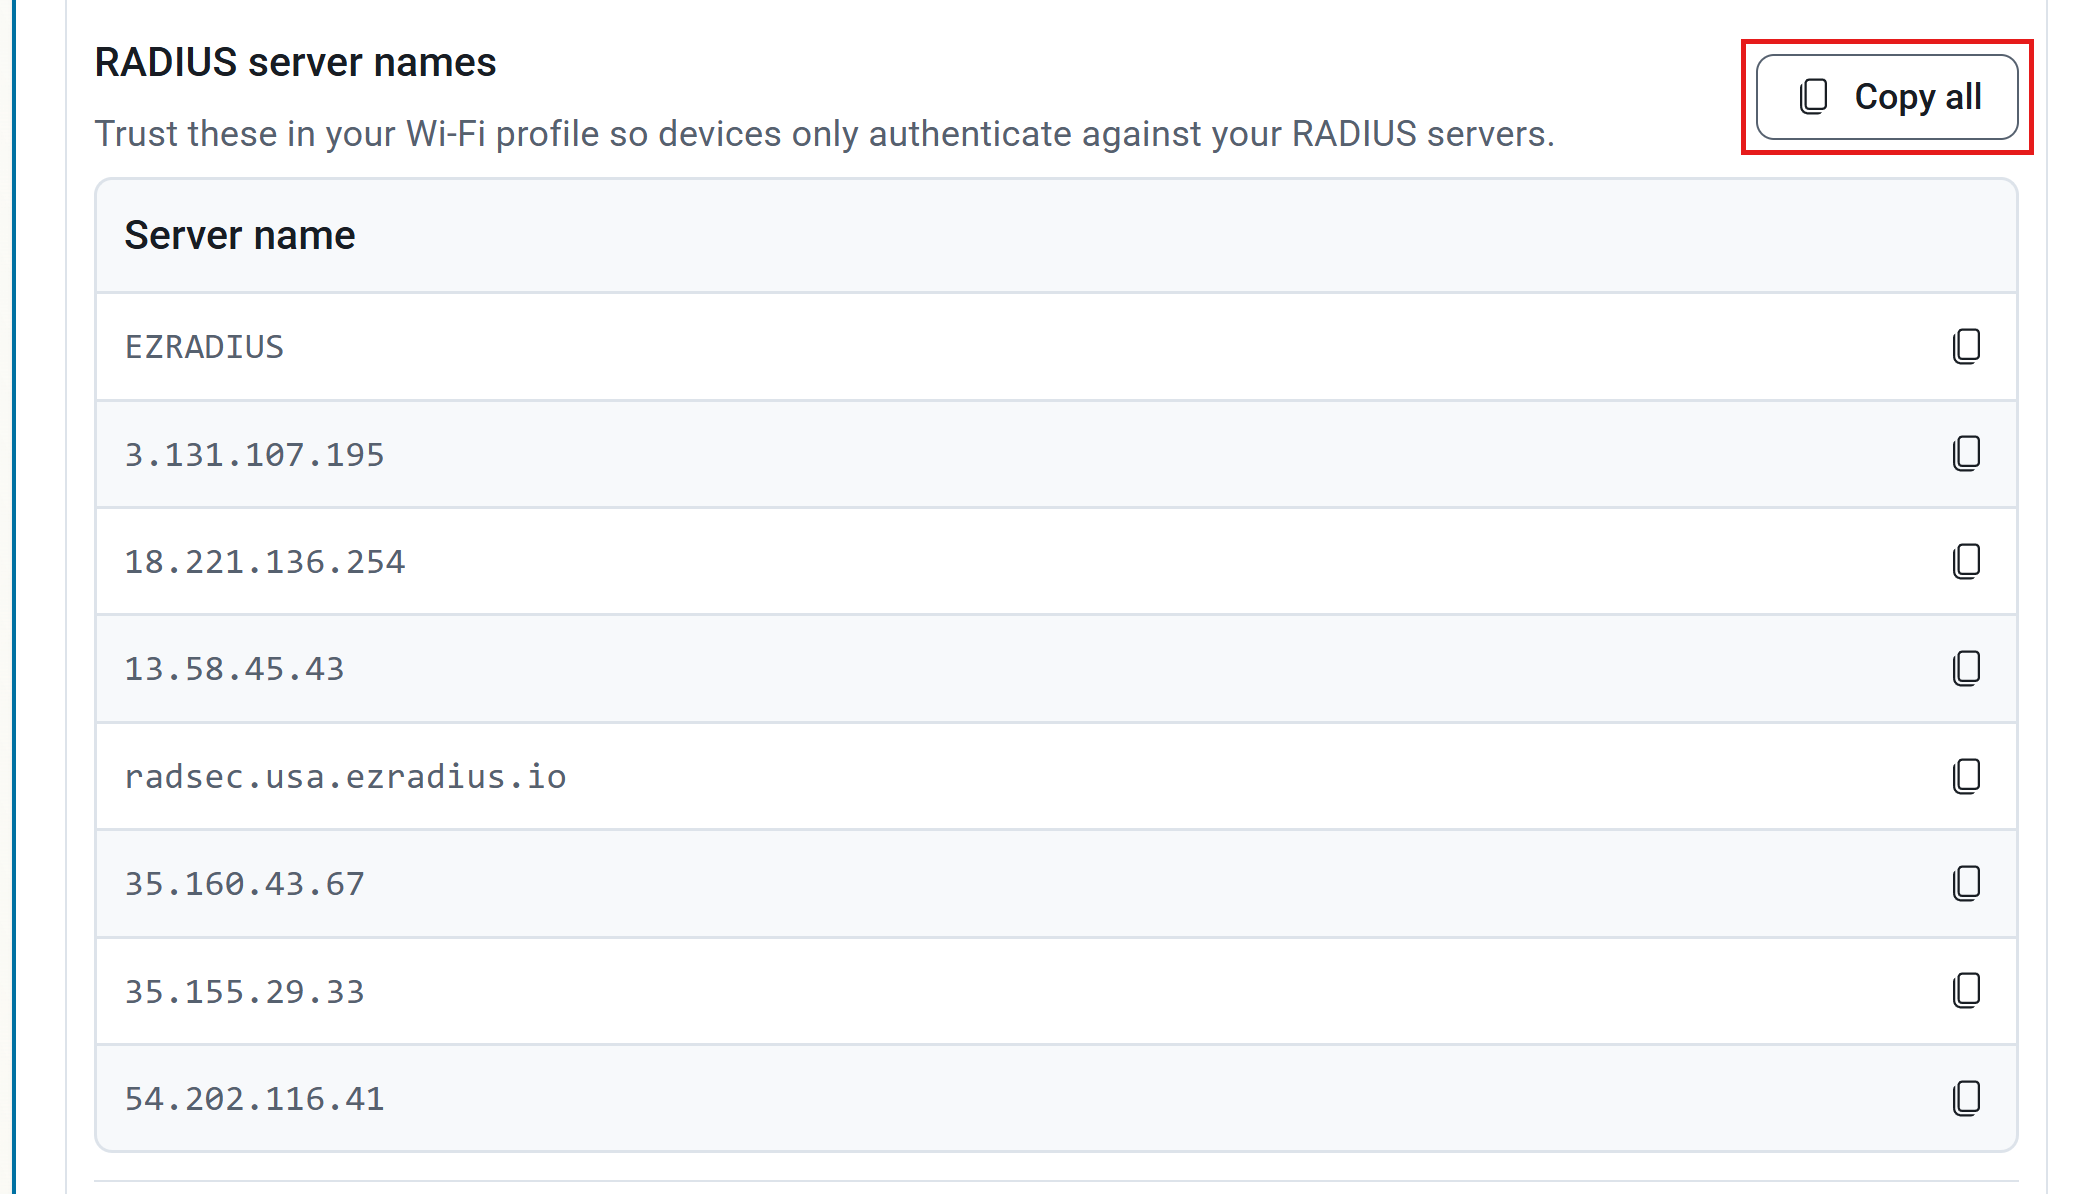
If you’ve already gone through the onboarding guide, you can copy your RADIUS server names from the network profiles page. When you expand your MDM’s section, select Other MDM.
-
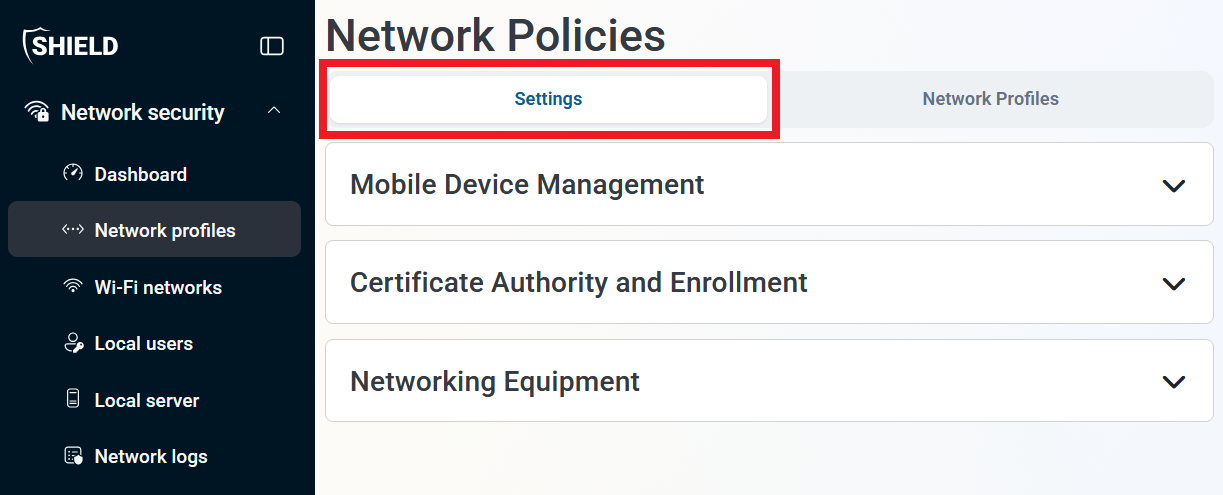
From within Network profiles > Settings in the Keytos Shield portal, expand Certificate Authority and Enrollment.
-
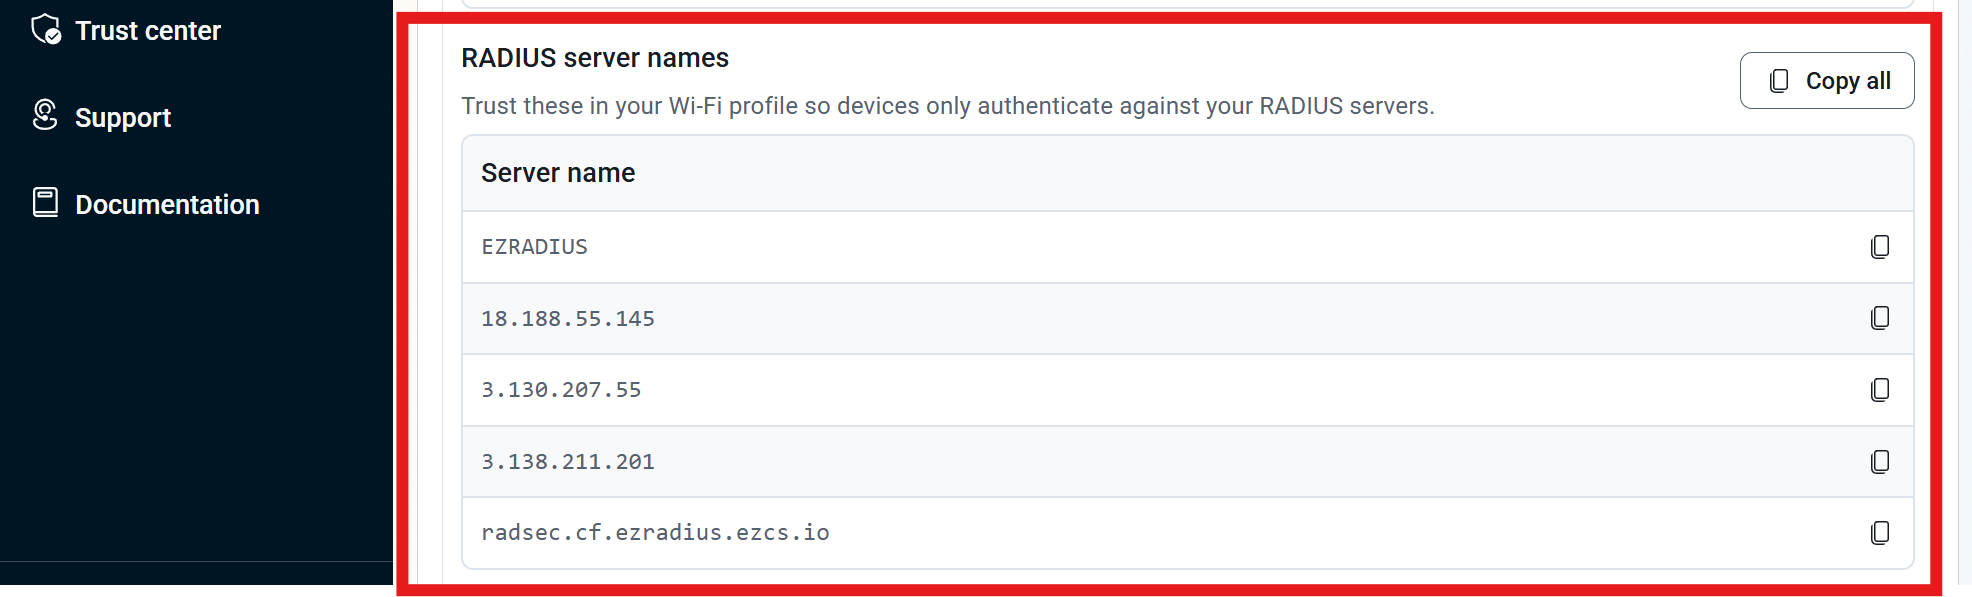
Expand your MDM’s section to view the available configuration options.
-
You will see a list of RADIUS server names for your network profile. You will need these in the next section.
Step 7 - How to Create a Windows Wi-Fi Profile with a Keytos Shield SCEP Certificate in Iru
Next, create the Wi-Fi Library Item. It tells your Windows devices which network to join, requests a unique certificate from Keytos Shield with SCEP, and uses that certificate to authenticate with EAP-TLS.
How to Configure the Wi-Fi Network Settings in Iru
-
In Iru, go to Library and click Add Library Item.
-
Search for
Wi-Fi, select the Wi-Fi profile, and click Add and configure. -
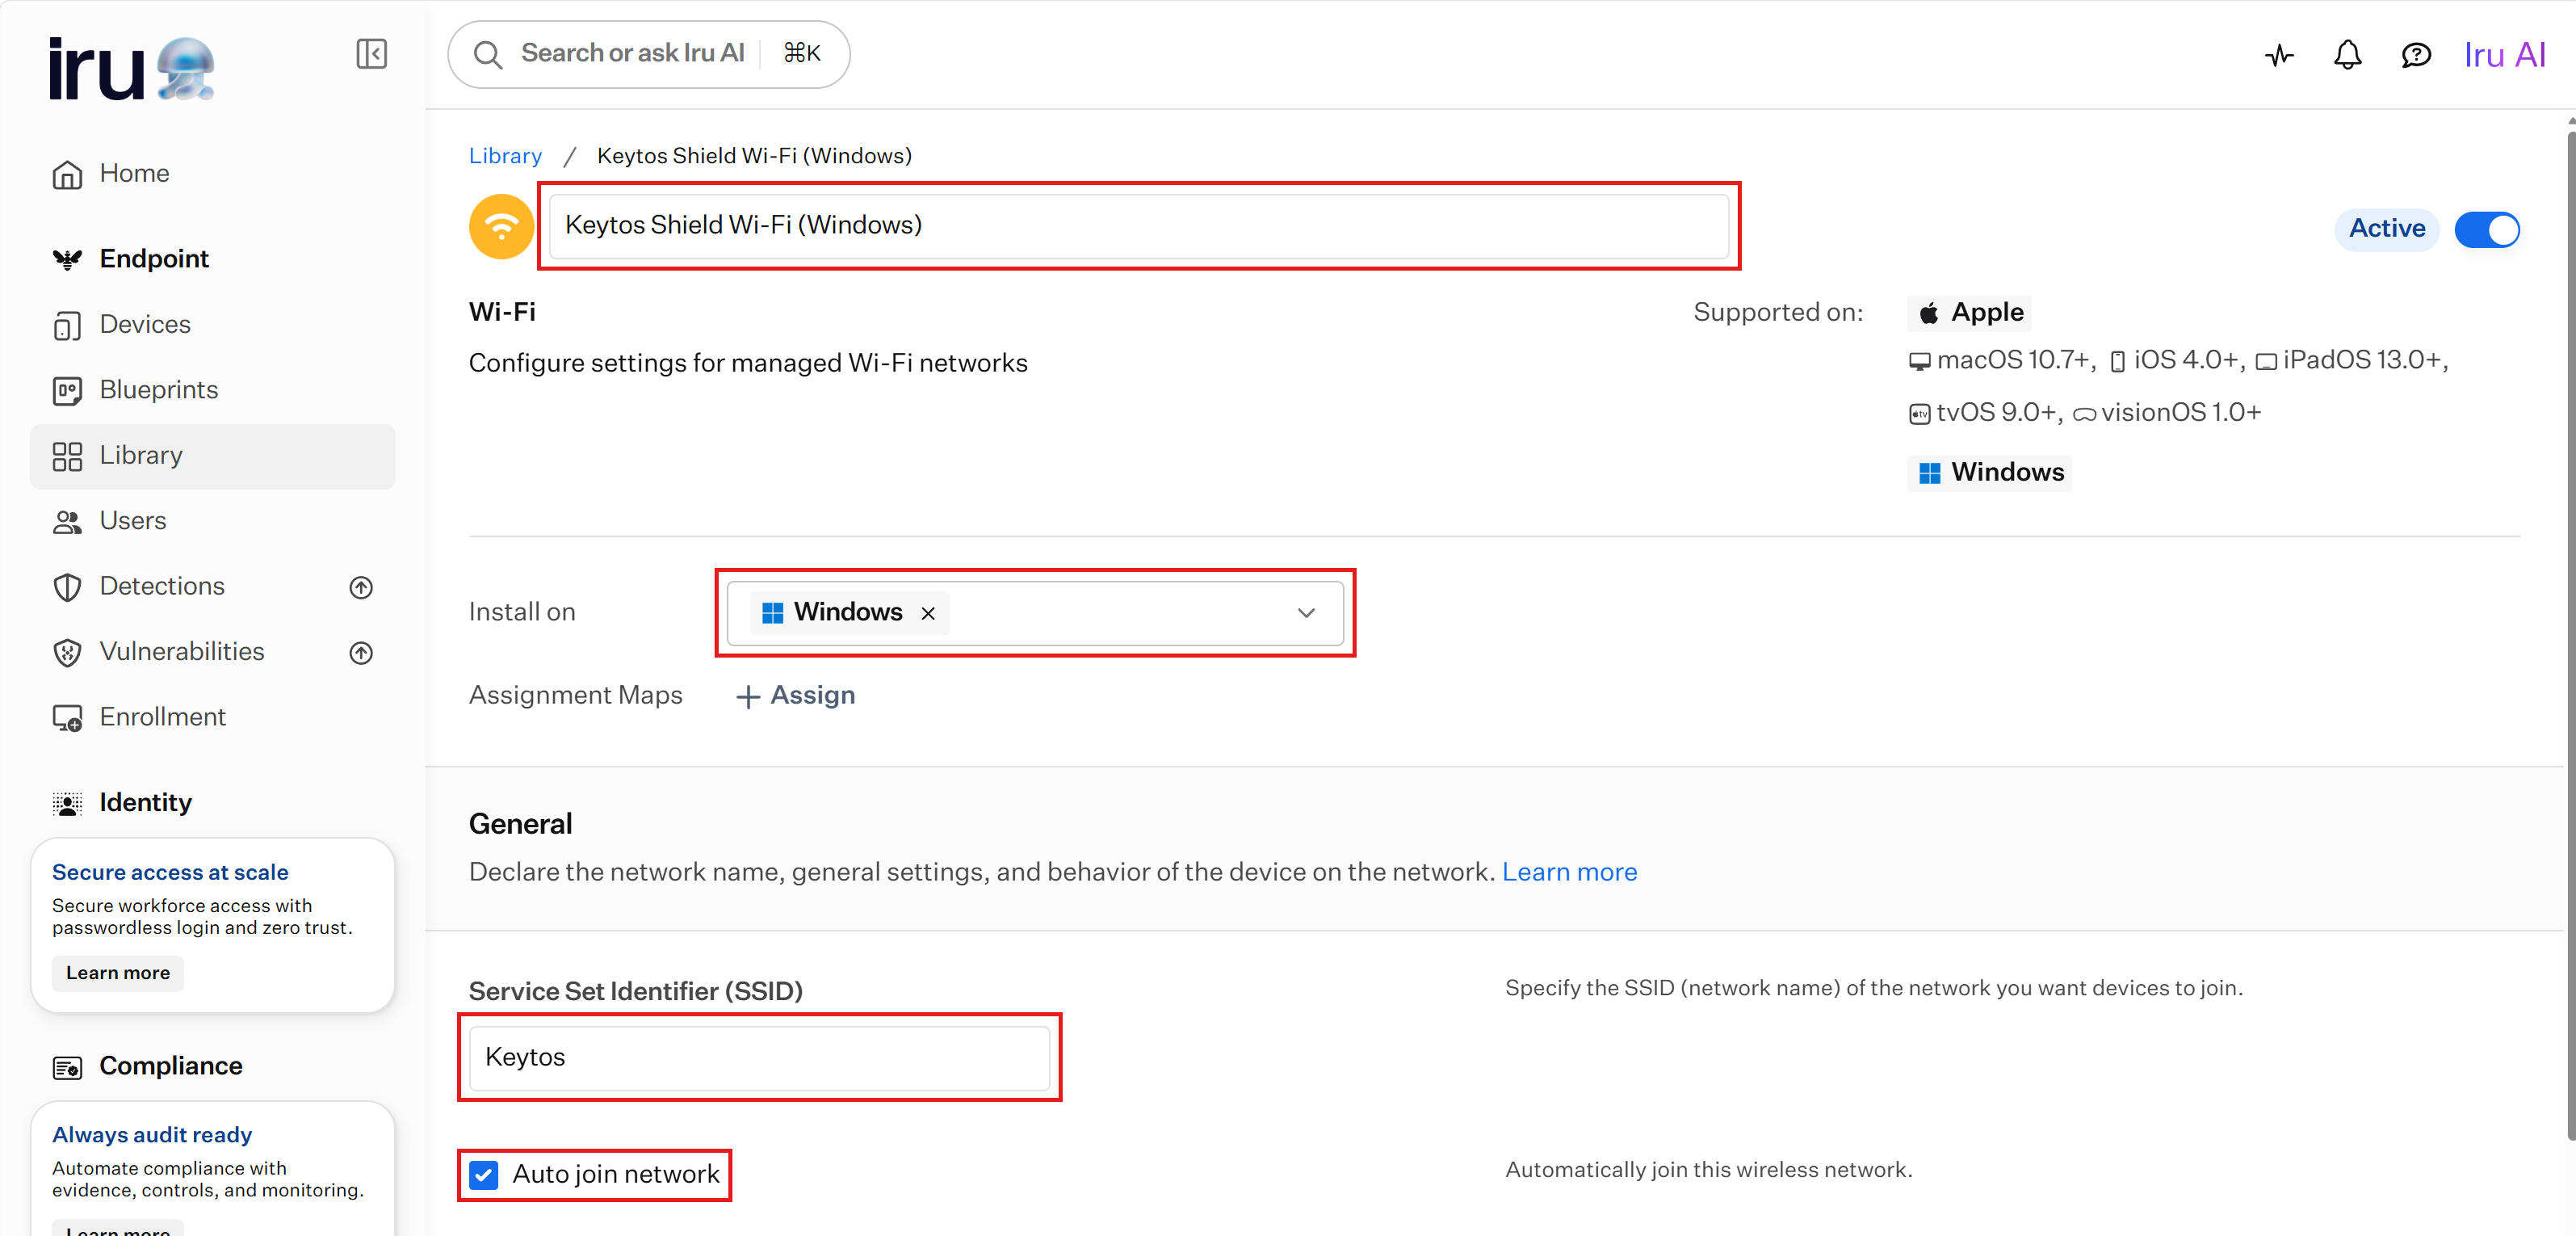
Enter a title for the Library Item, such as
Keytos Shield Wi-Fi (Windows). -
Next to Install on, remove Apple so the item only installs on Windows.
-
Under Service Set Identifier (SSID), enter the name of your Wi-Fi network exactly as it is broadcast. It is case-sensitive.
-
Leave Auto join network checked so devices connect on their own as soon as they are in range.
How to Configure EAP-TLS Authentication for Windows in Iru
-
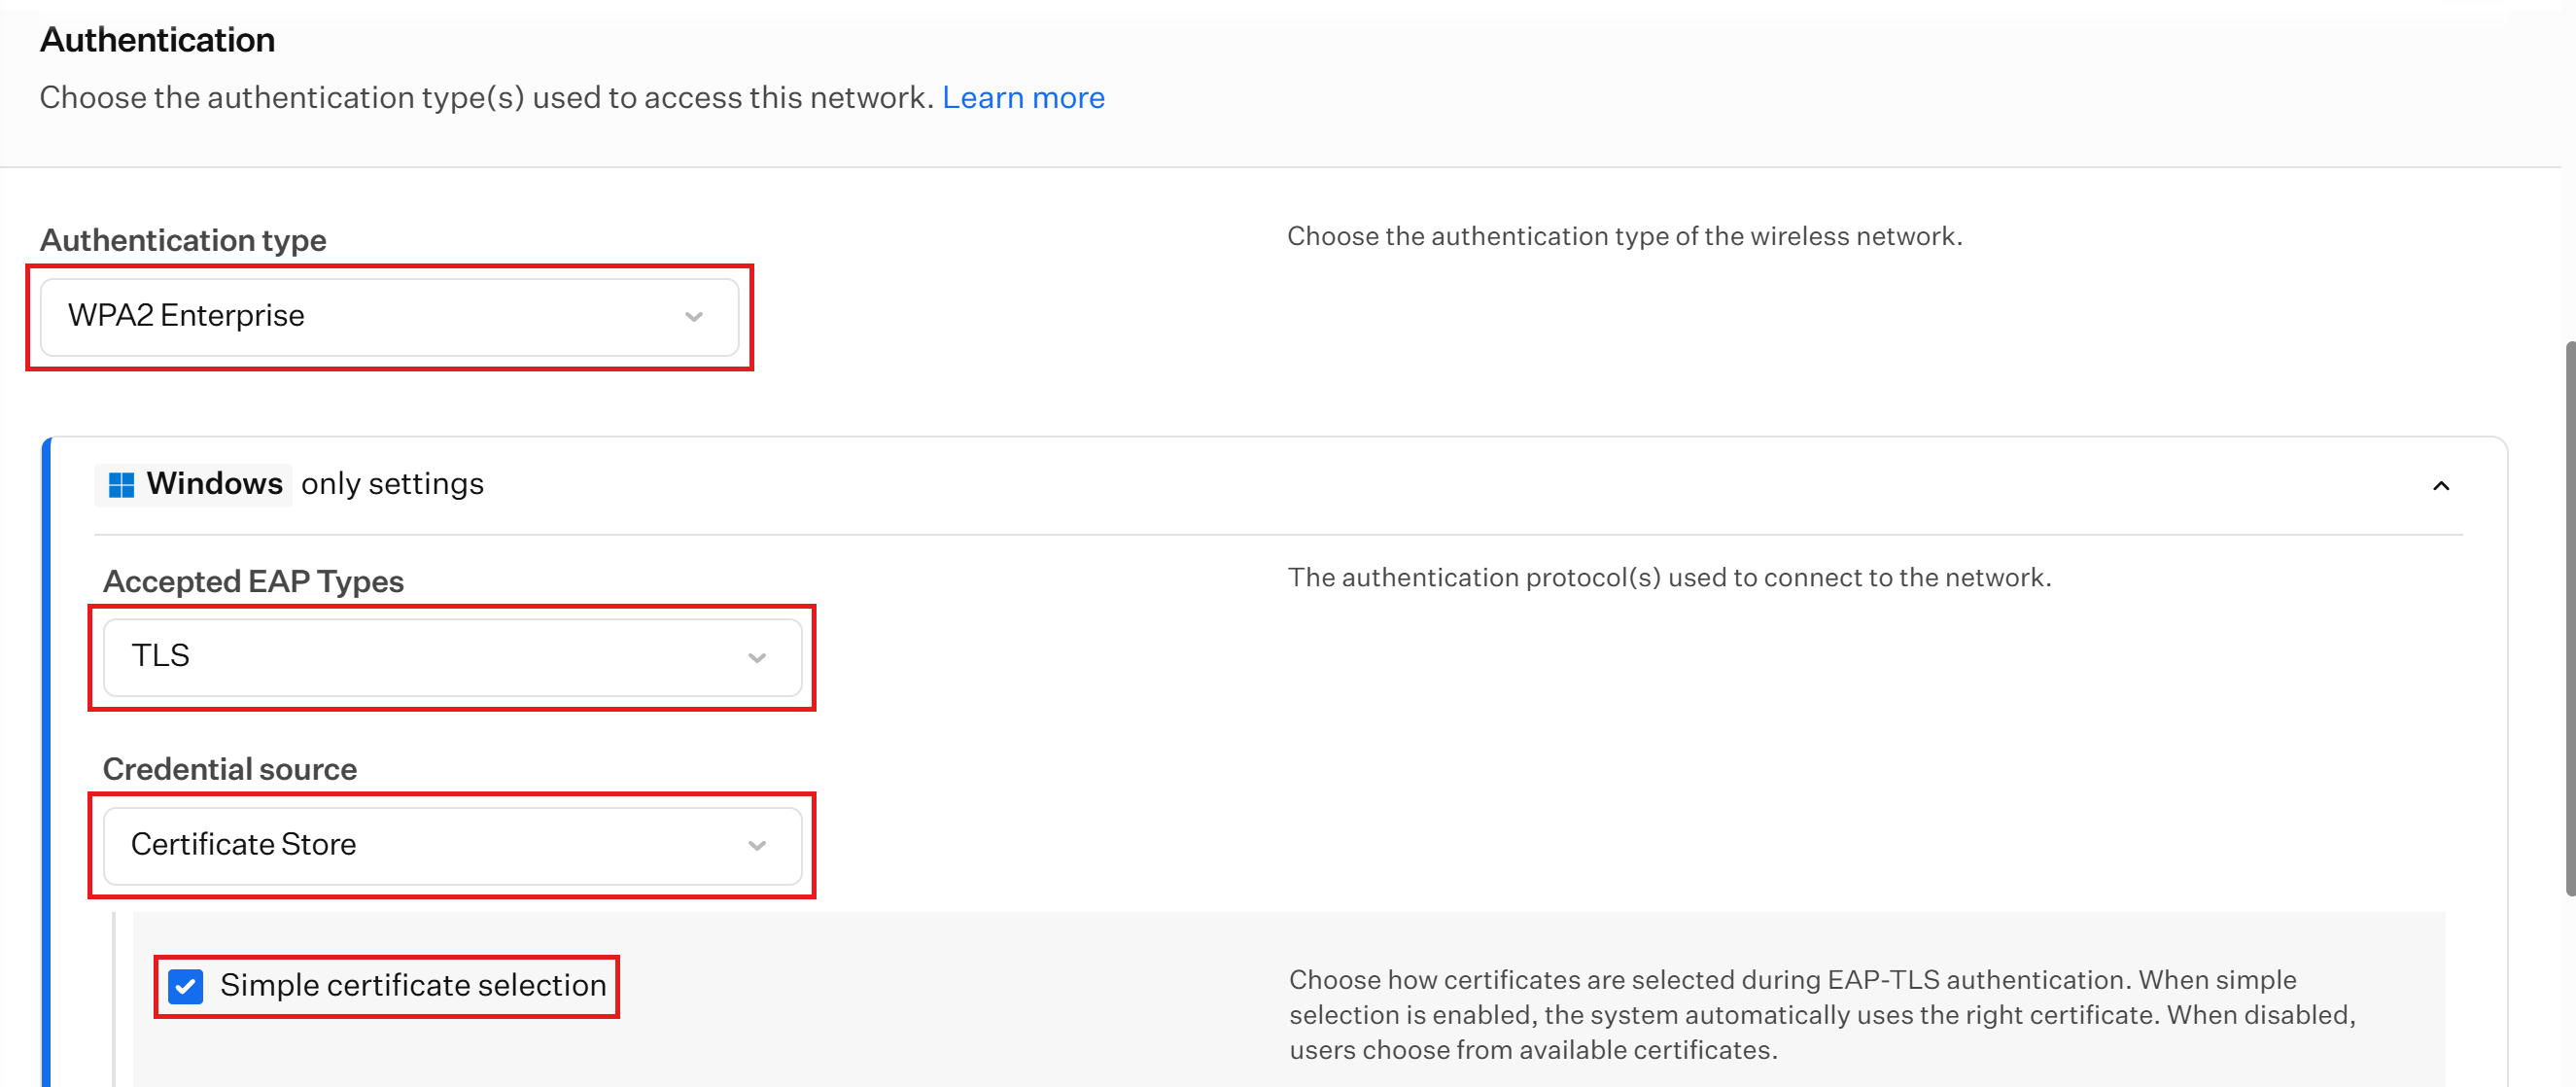
Scroll down to Authentication and set Authentication type to WPA2 Enterprise. Iru only offers WPA and WPA2 authentication types for Windows devices.
-
Under Windows only settings, leave Accepted EAP Types set to TLS and Credential source set to Certificate Store.
-
Leave Simple certificate selection checked, so Windows automatically picks the right certificate instead of asking the user to choose one.
-
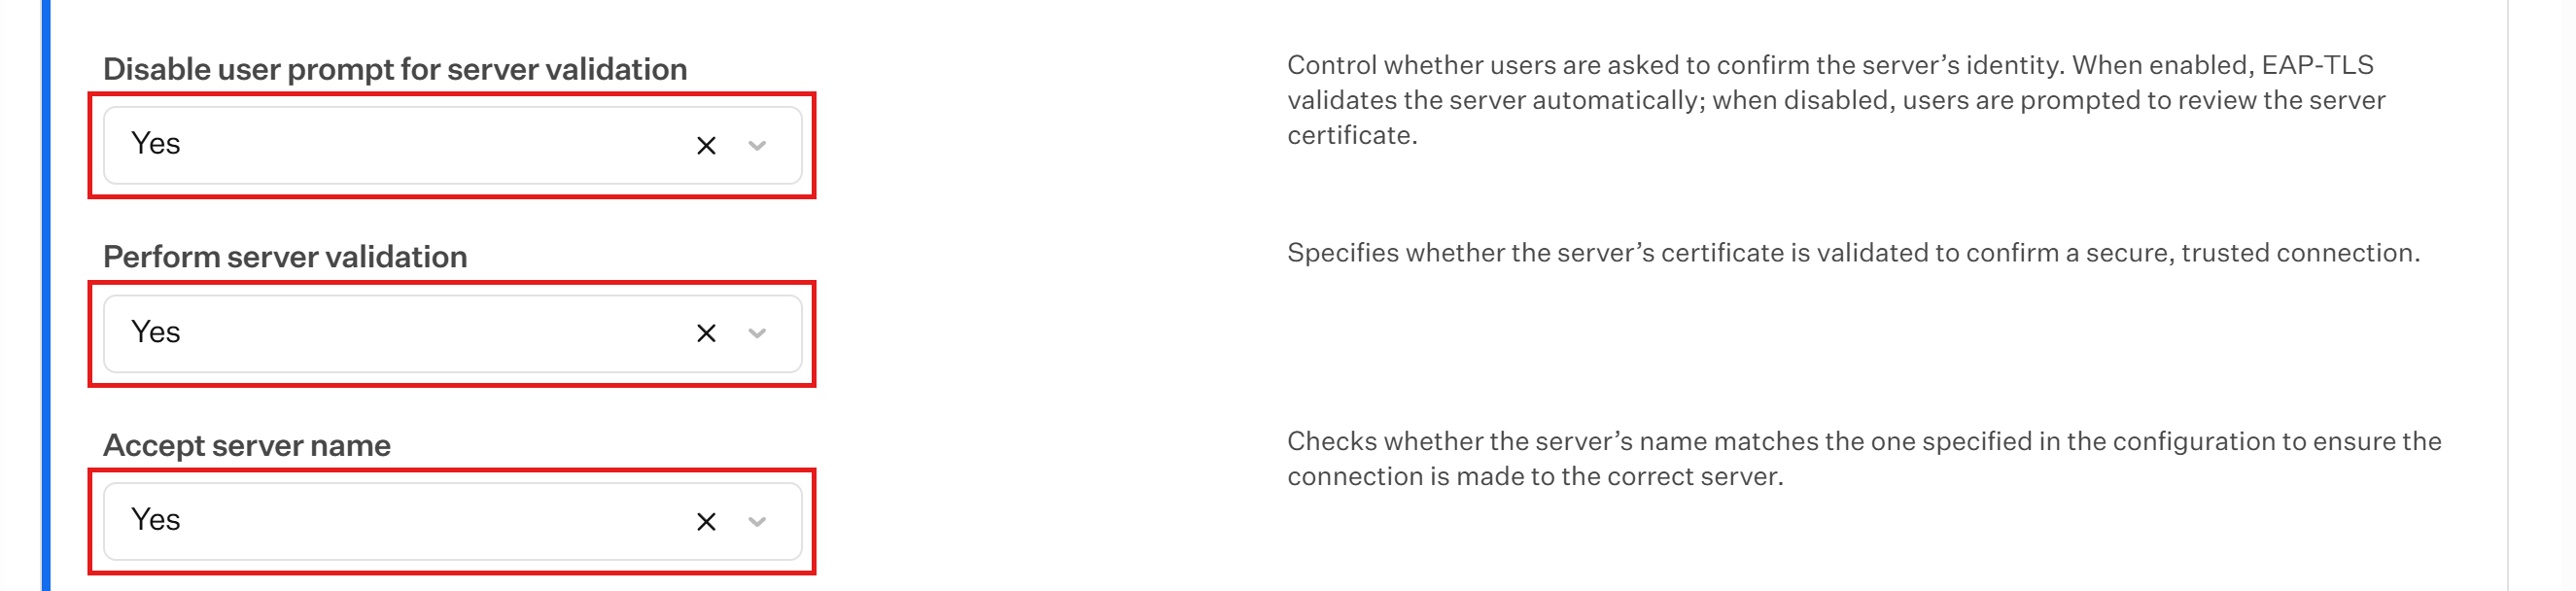
Set Disable user prompt for server validation, Perform server validation, and Accept server name to Yes. Together, these make Windows silently check that it’s talking to your Shield RADIUS servers, without asking users to approve the server certificate. If you leave them unset, users may be prompted to trust the server, or devices may connect without verifying it.
-
Leave the remaining EKU settings as Not configured.
How to Configure the Keytos Shield SCEP Certificate for Windows in Iru
-
Set Identity certificate to SCEP, then click Configure SCEP Certificate to open the Configure SCEP panel.
-
In URL, paste the Static SCEP URL you copied from Keytos Shield.
-
In Challenge, paste the Static SCEP password you copied from Keytos Shield.
-
In Fingerprint, paste the Shield Root CA thumbprint you copied in step 3. Iru requires this field for Windows.
-
In Subject, enter a subject name that identifies the device, such as
CN=$SERIAL_NUMBER. Iru replaces the variable with each device’s serial number. Use only device variables from the Iru global variables for all device families, such as$SERIAL_NUMBERor$DEVICE_ID.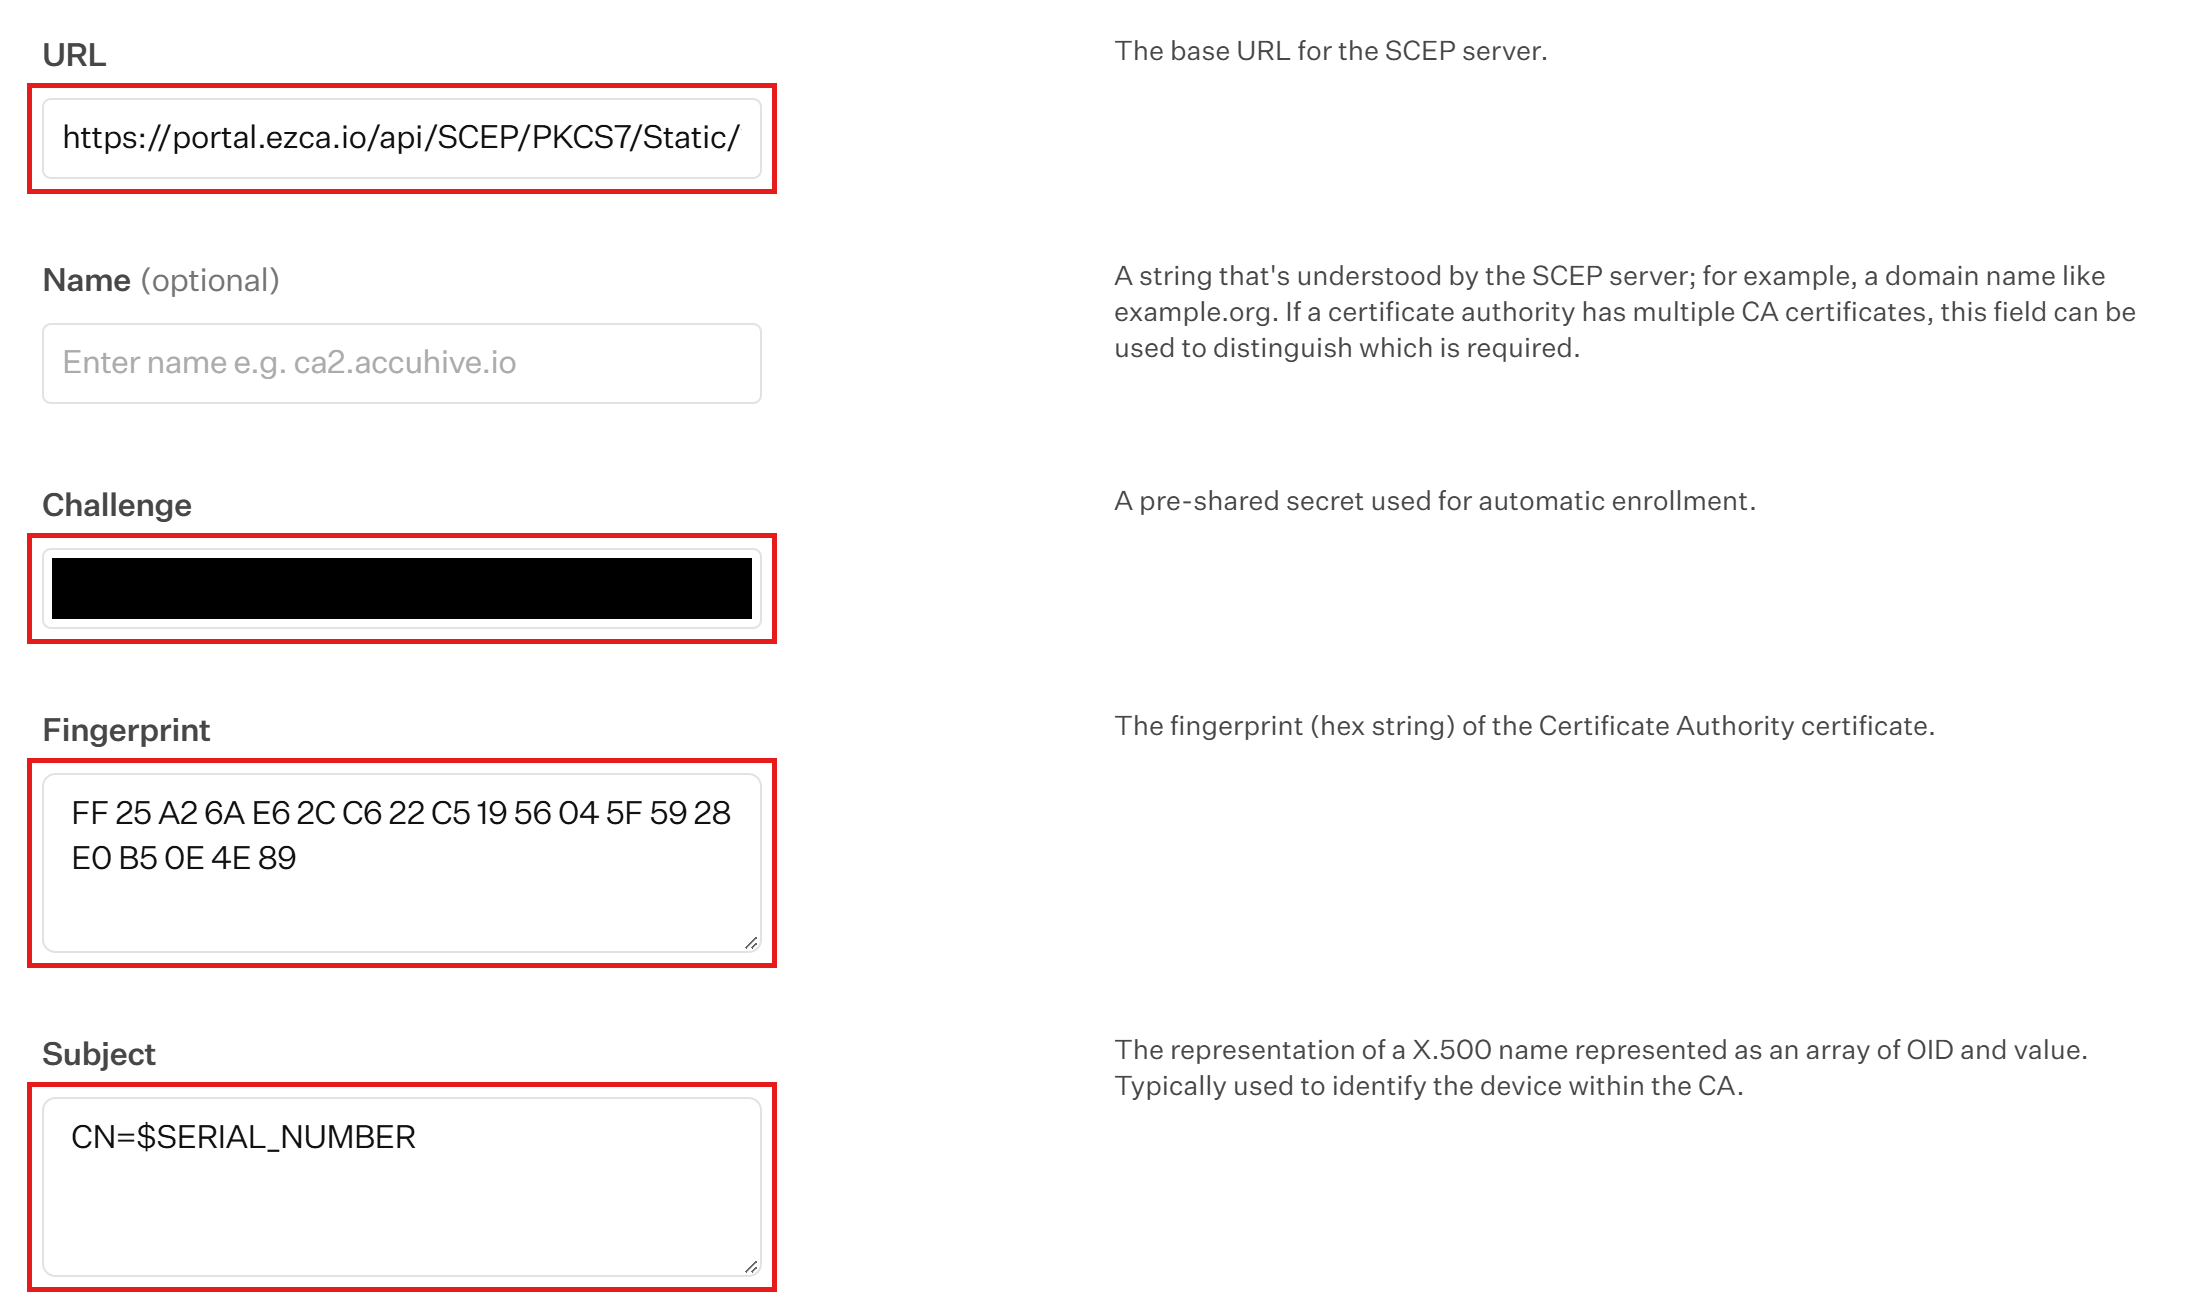
-
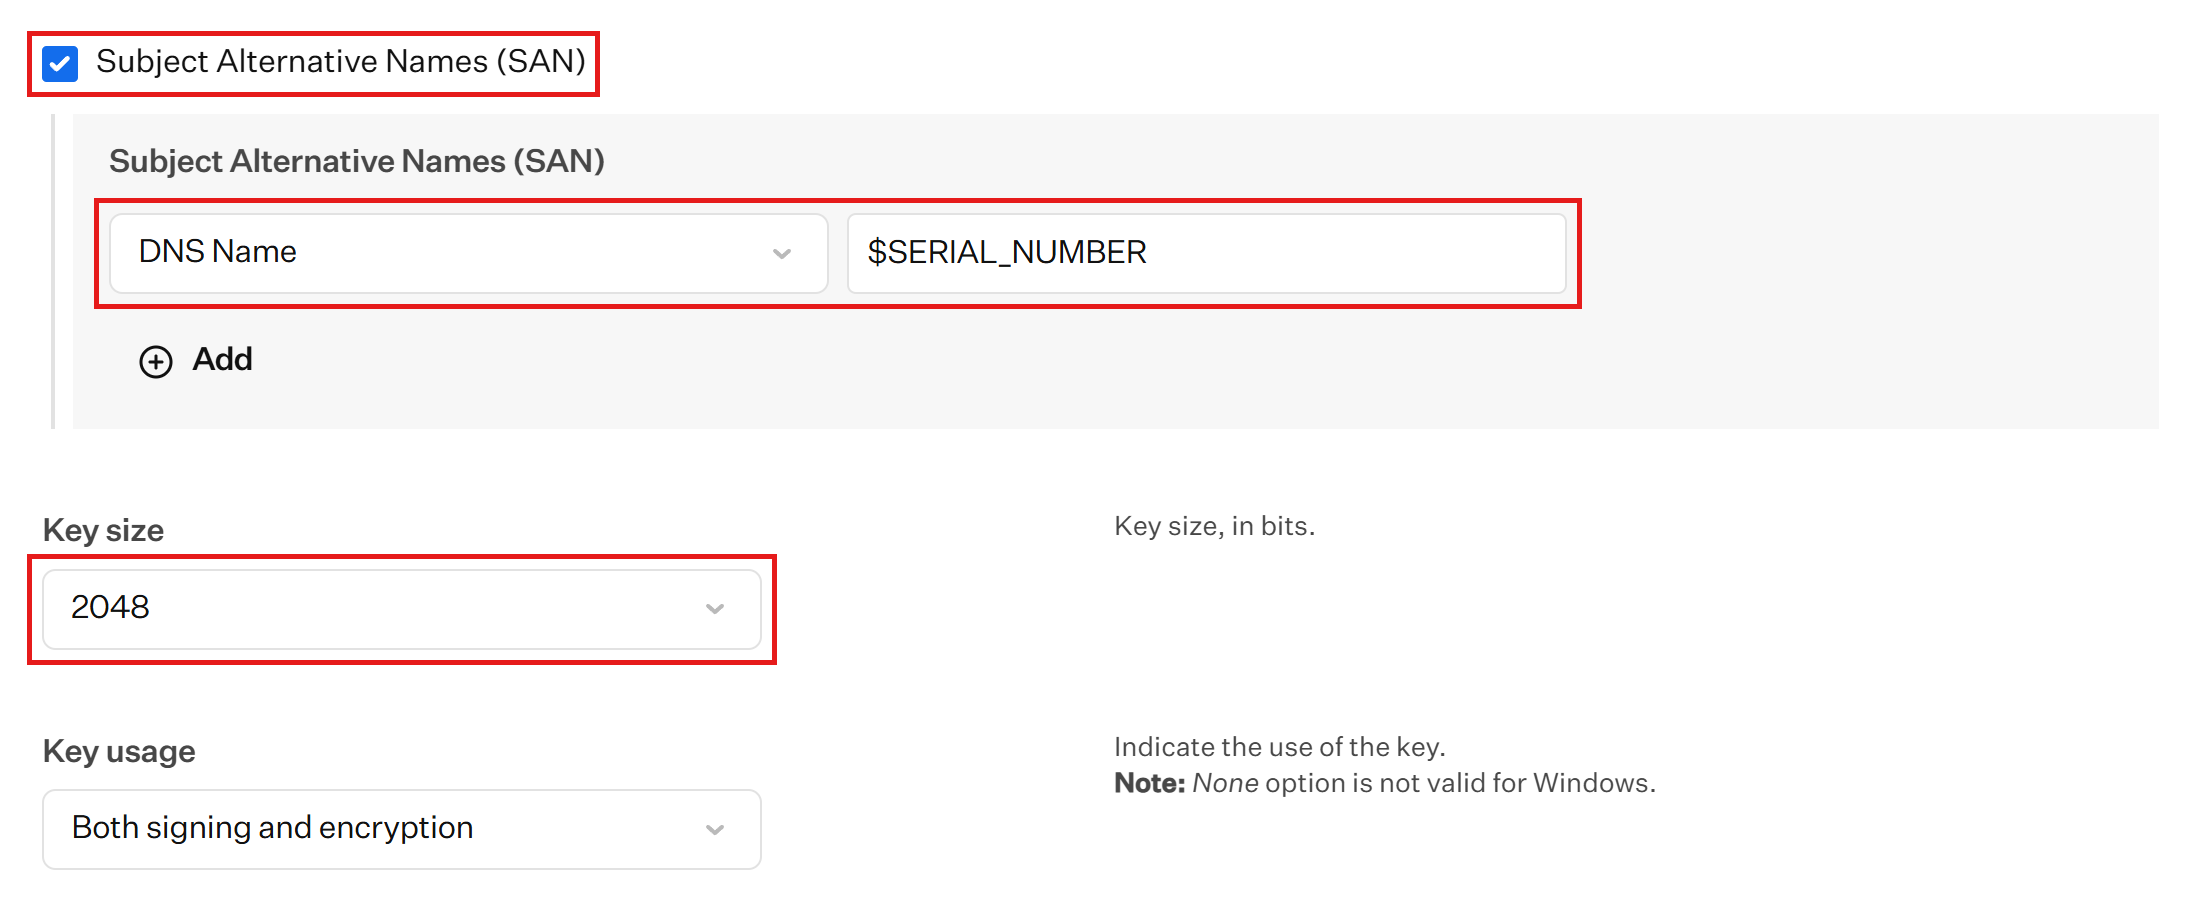
Check Subject Alternative Names (SAN), then set the SAN type to DNS Name and the value to
$SERIAL_NUMBER. This makes the certificate a device certificate that identifies the device, not its user. Don’t use user variables such as$EMAILor$USERNAME: they change when the device is reassigned and are empty when it has no assigned user. -
Set Key size to 2048 or higher. Leave Key usage as Both signing and encryption. Windows doesn’t accept None.
-
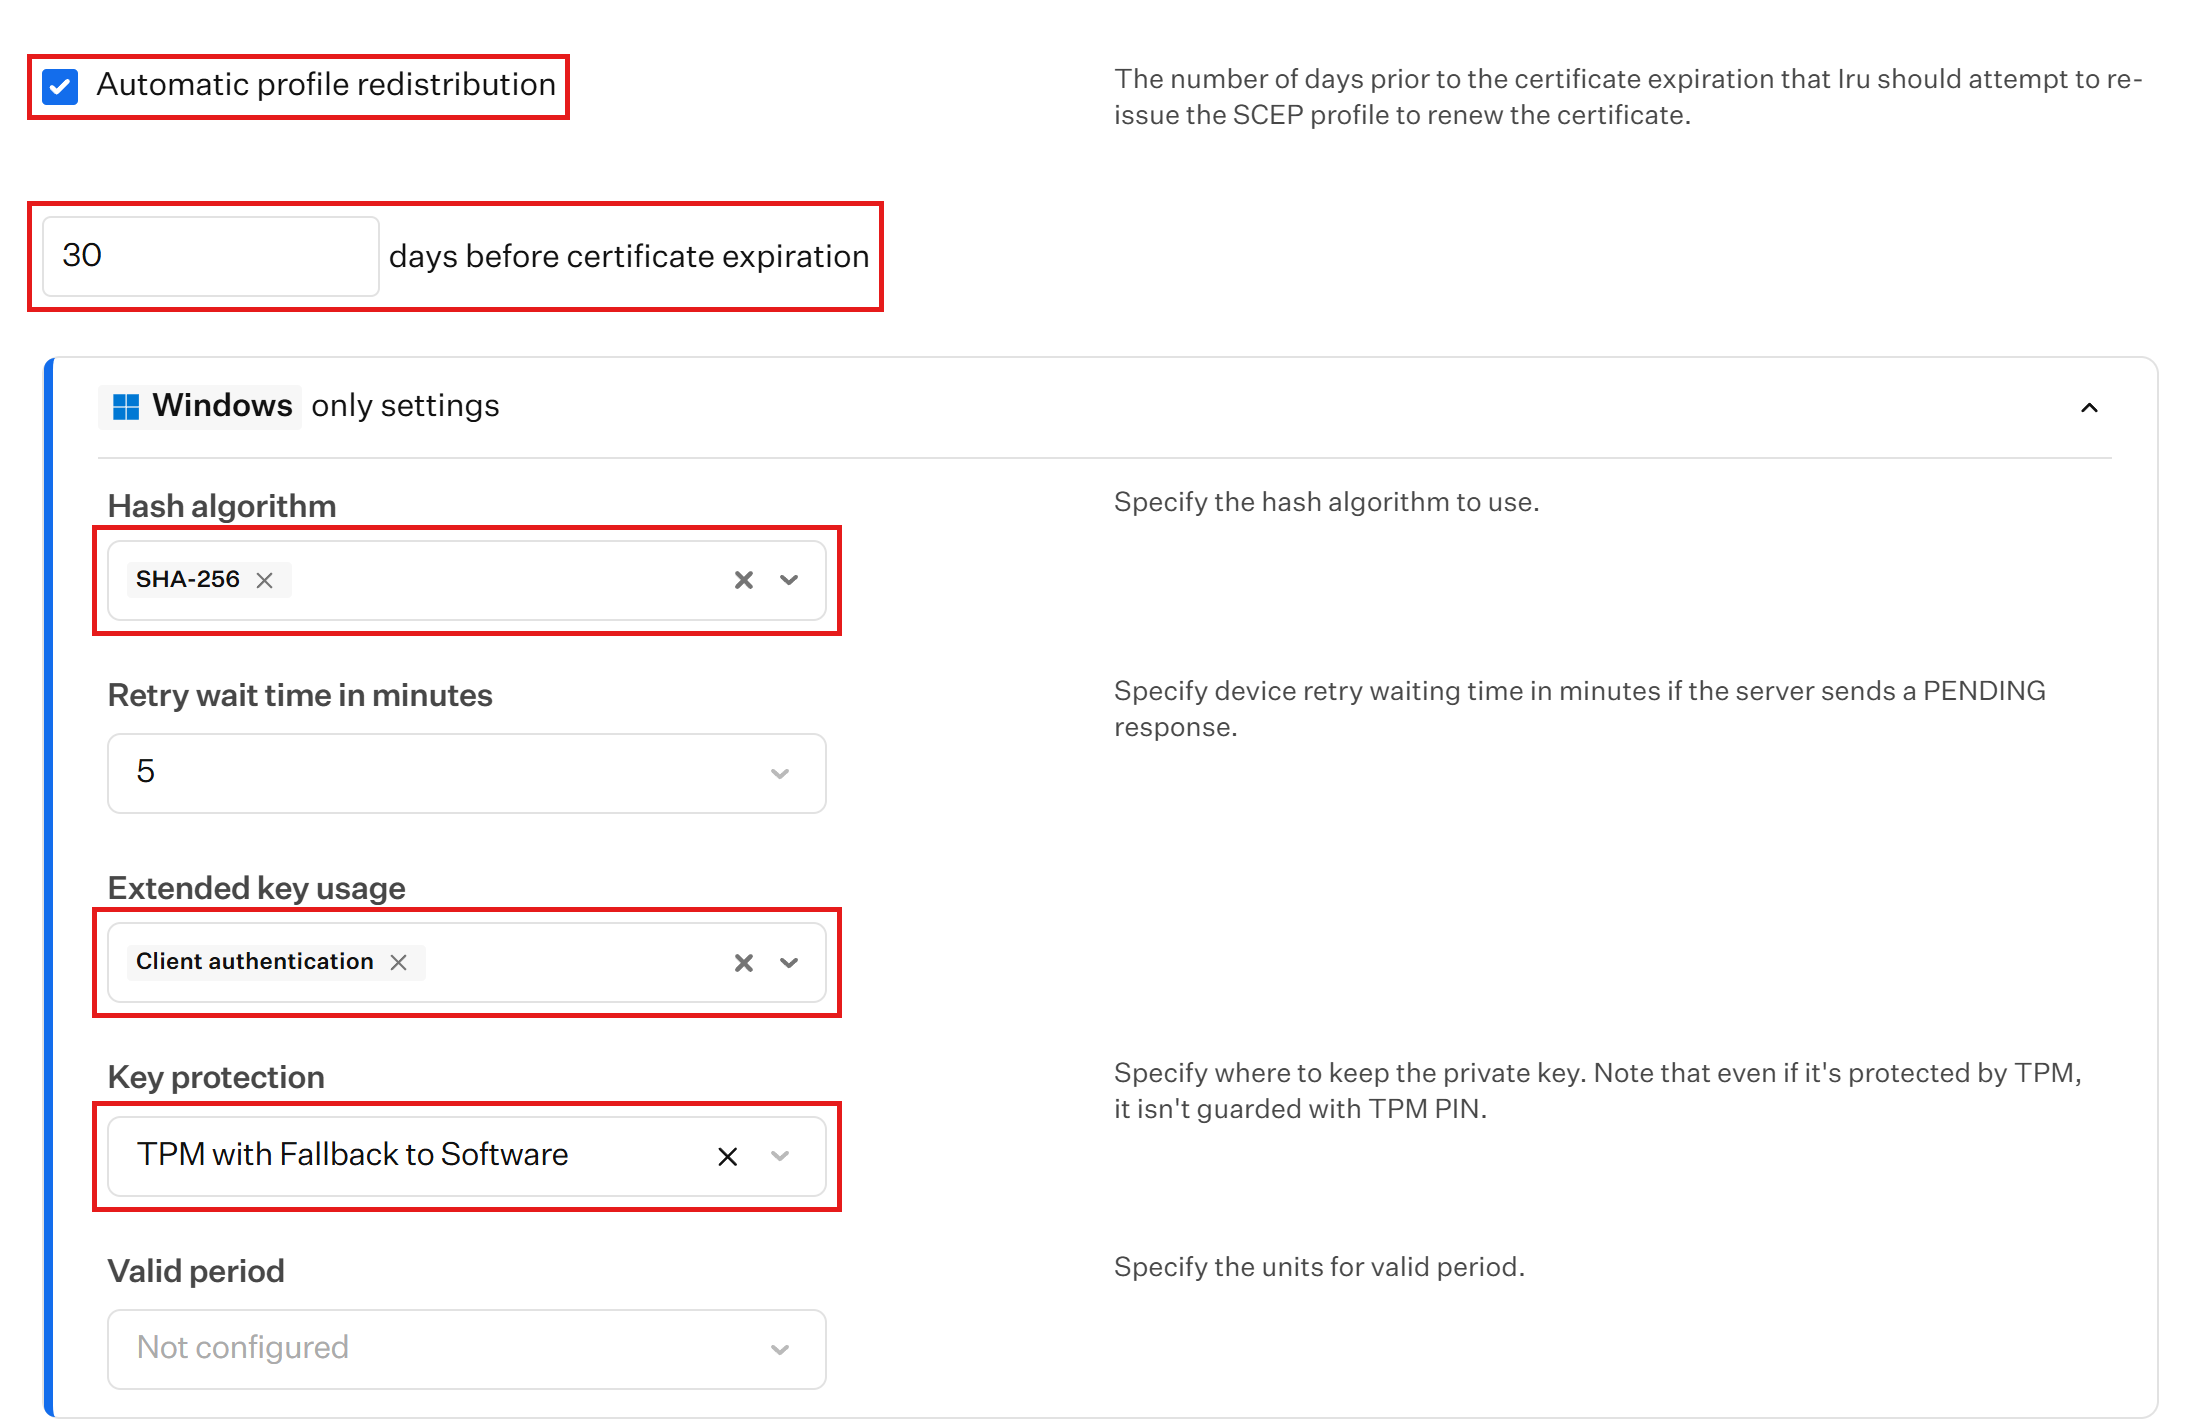
Under Additional options, check Automatic profile redistribution and enter
30days before certificate expiration. Iru requires this for Windows. It renews certificates before they expire, so your devices don’t lose Wi-Fi access. -
Under Windows only settings, leave Hash algorithm set to SHA-256 and Extended key usage set to Client authentication.
-
Set Key protection to TPM with Fallback to Software. We recommend this so the certificate’s private key is stored in the device’s TPM whenever the device has one. Choose TPM or Fail instead if every device has a TPM and you want enrollment to fail rather than fall back to a software key.
-
Click Done to close the panel. The SCEP Certificate now appears under Identity certificate.

How to Configure RADIUS Server Trust for Windows in Iru
-
Scroll down to Certificate trust and check Specify trusted certificates.
-
Upload the
rootca.cerfile you downloaded from Keytos Shield.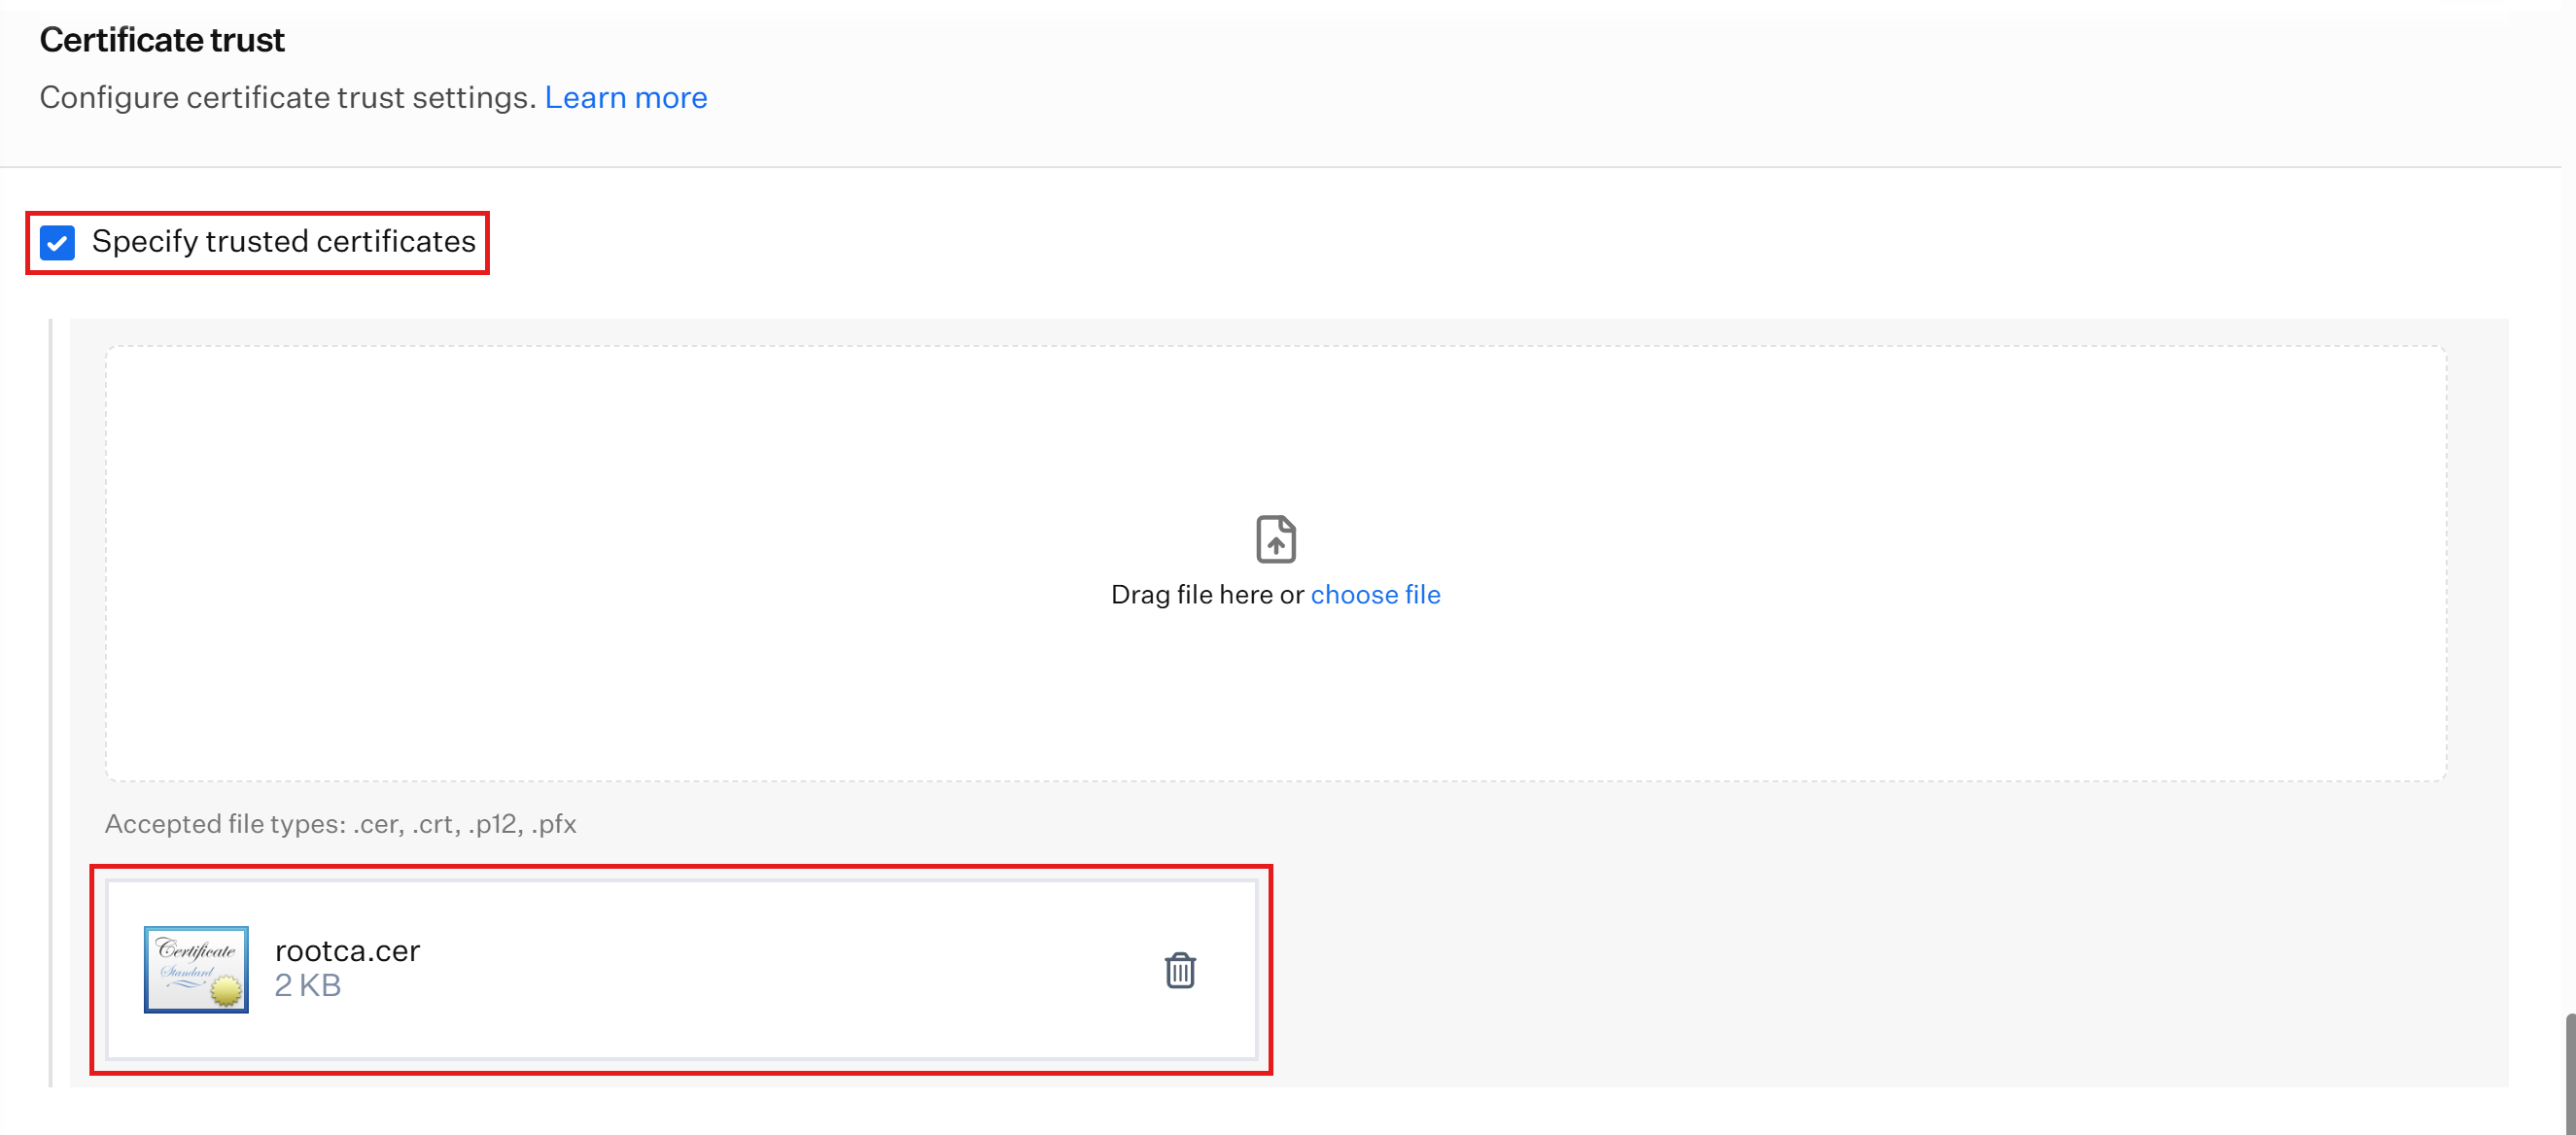
-
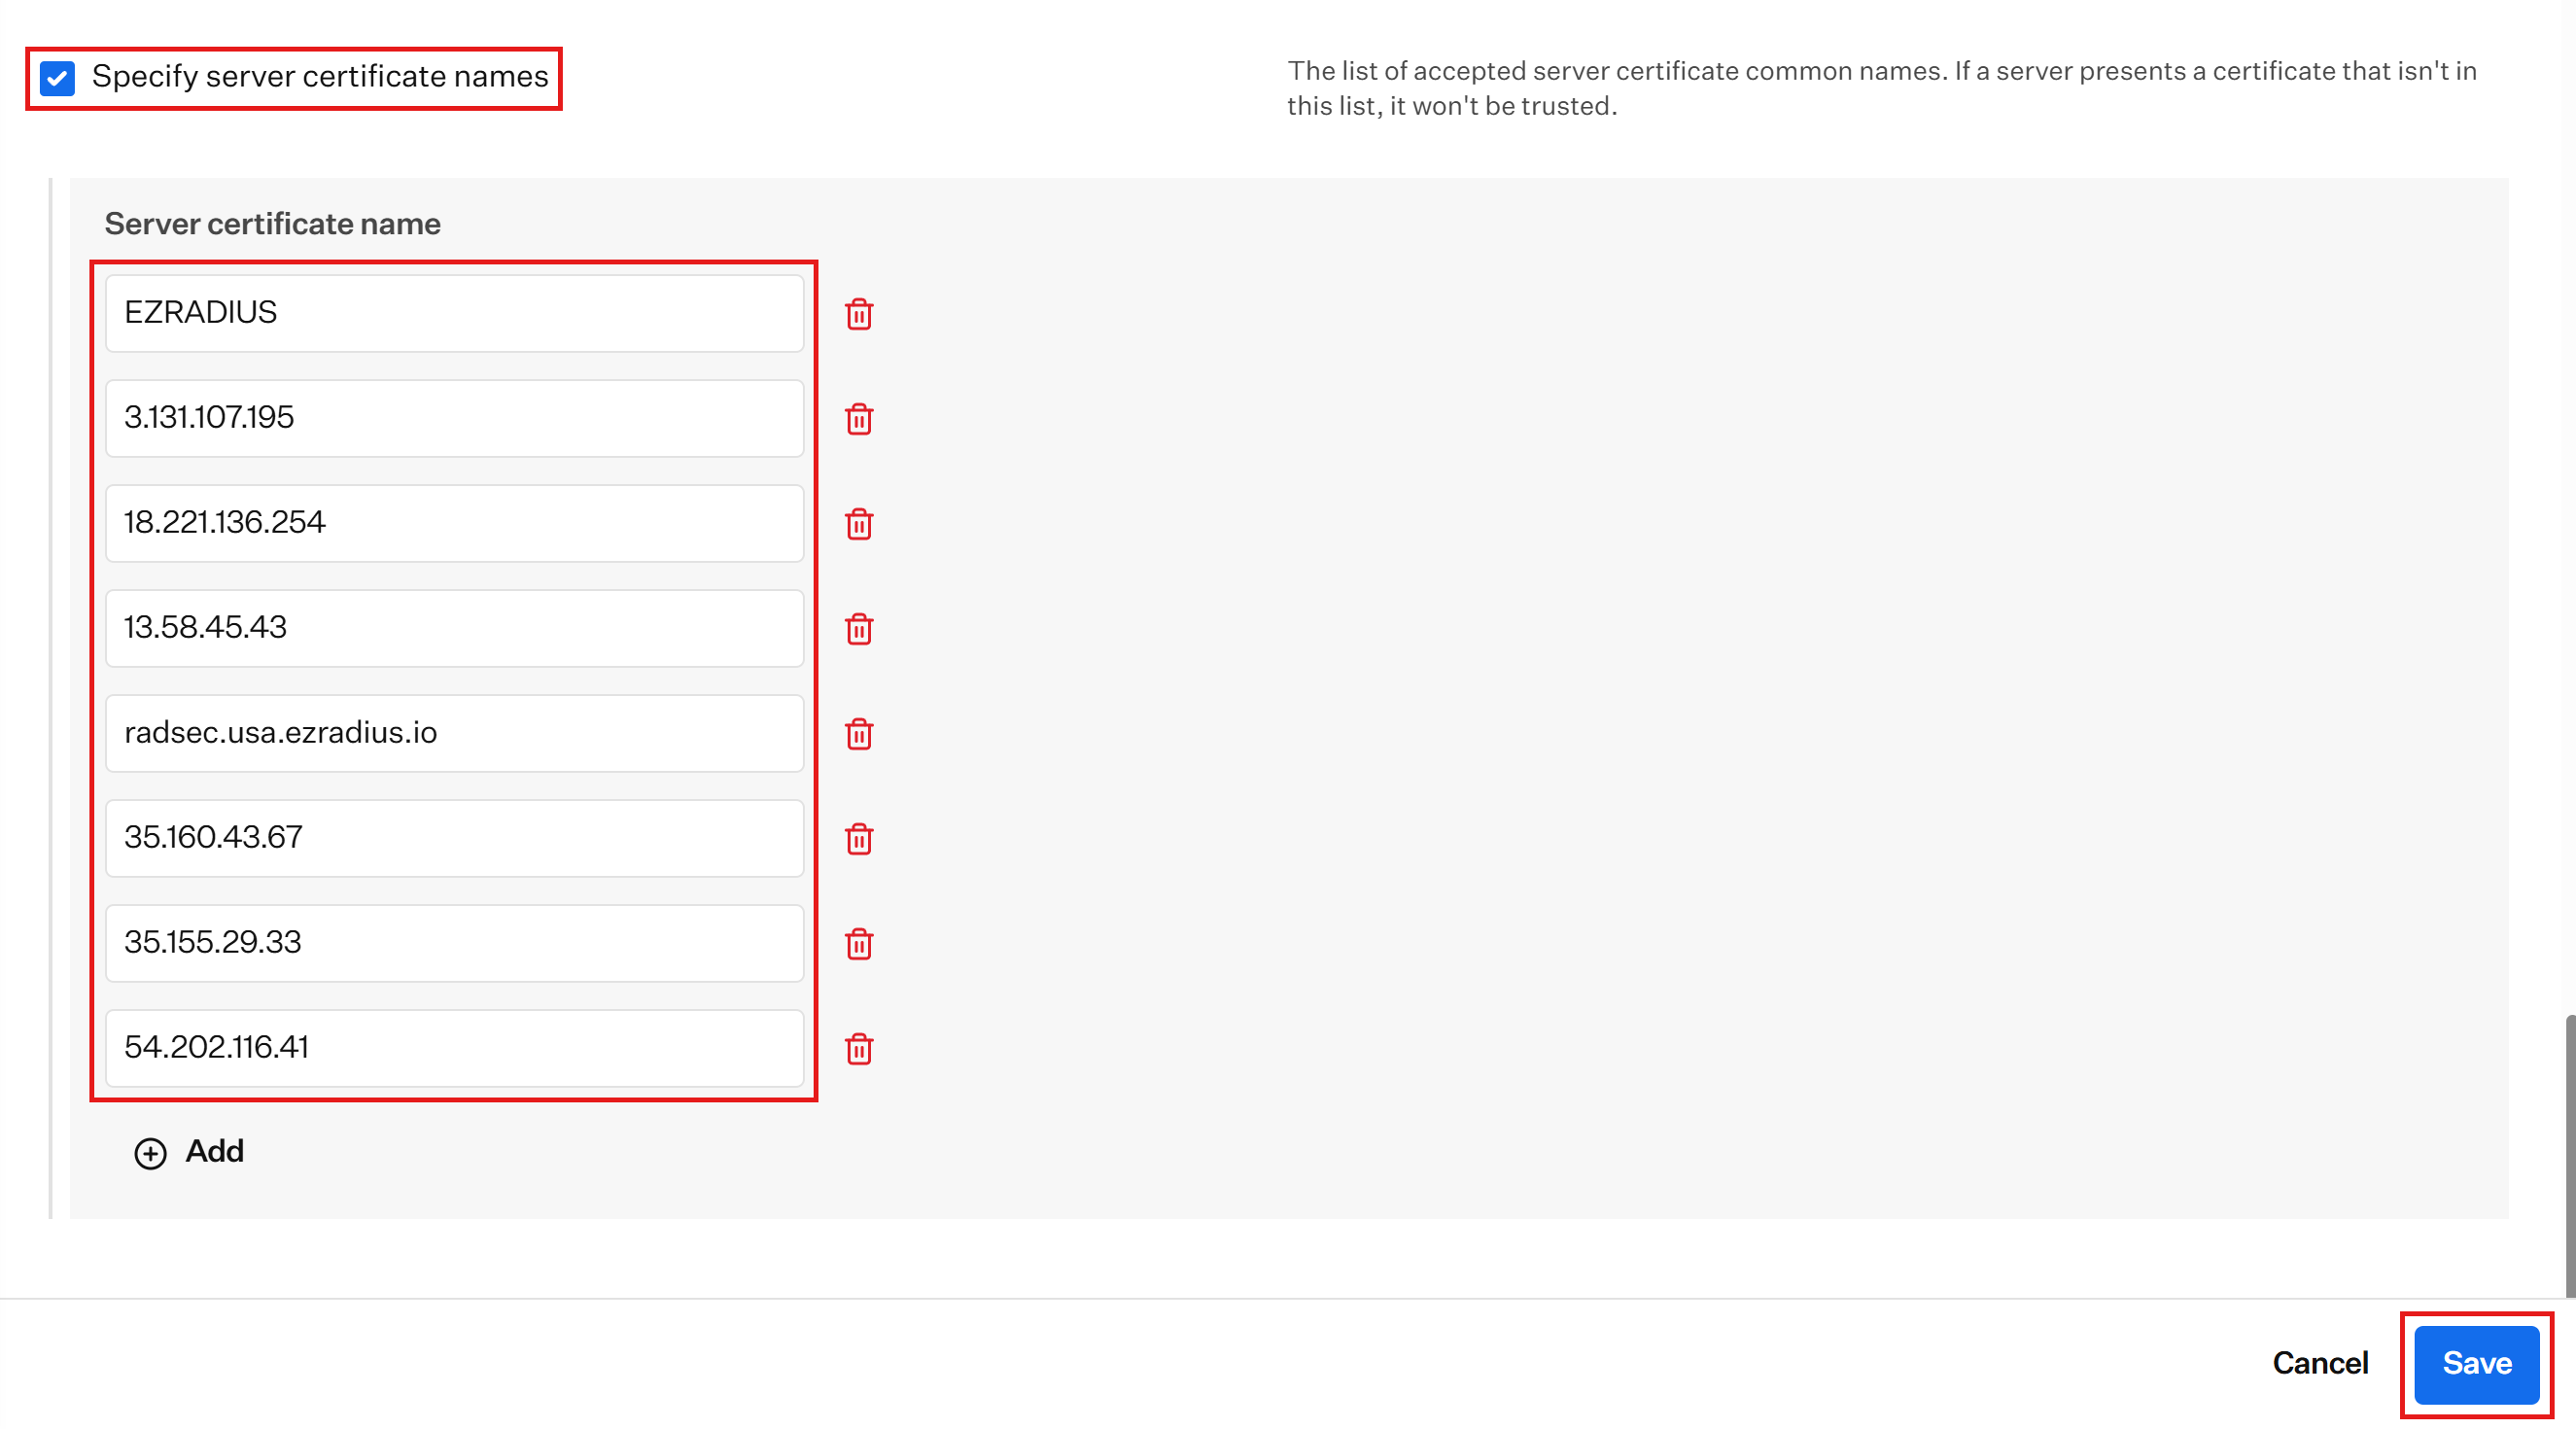
Check Specify server certificate names.
-
Click Add and enter each RADIUS server name you copied from Keytos Shield, one per row. Together with the trusted Root CA, this makes sure devices only send their certificate to your Shield RADIUS servers.
-
Click Save.
Step 8 - How to Assign the Keytos Shield Library Items to a Blueprint in Iru
Iru only installs Library Items that are assigned to a Blueprint. Assign both Windows Library Items to the Blueprint your Windows devices use.
-
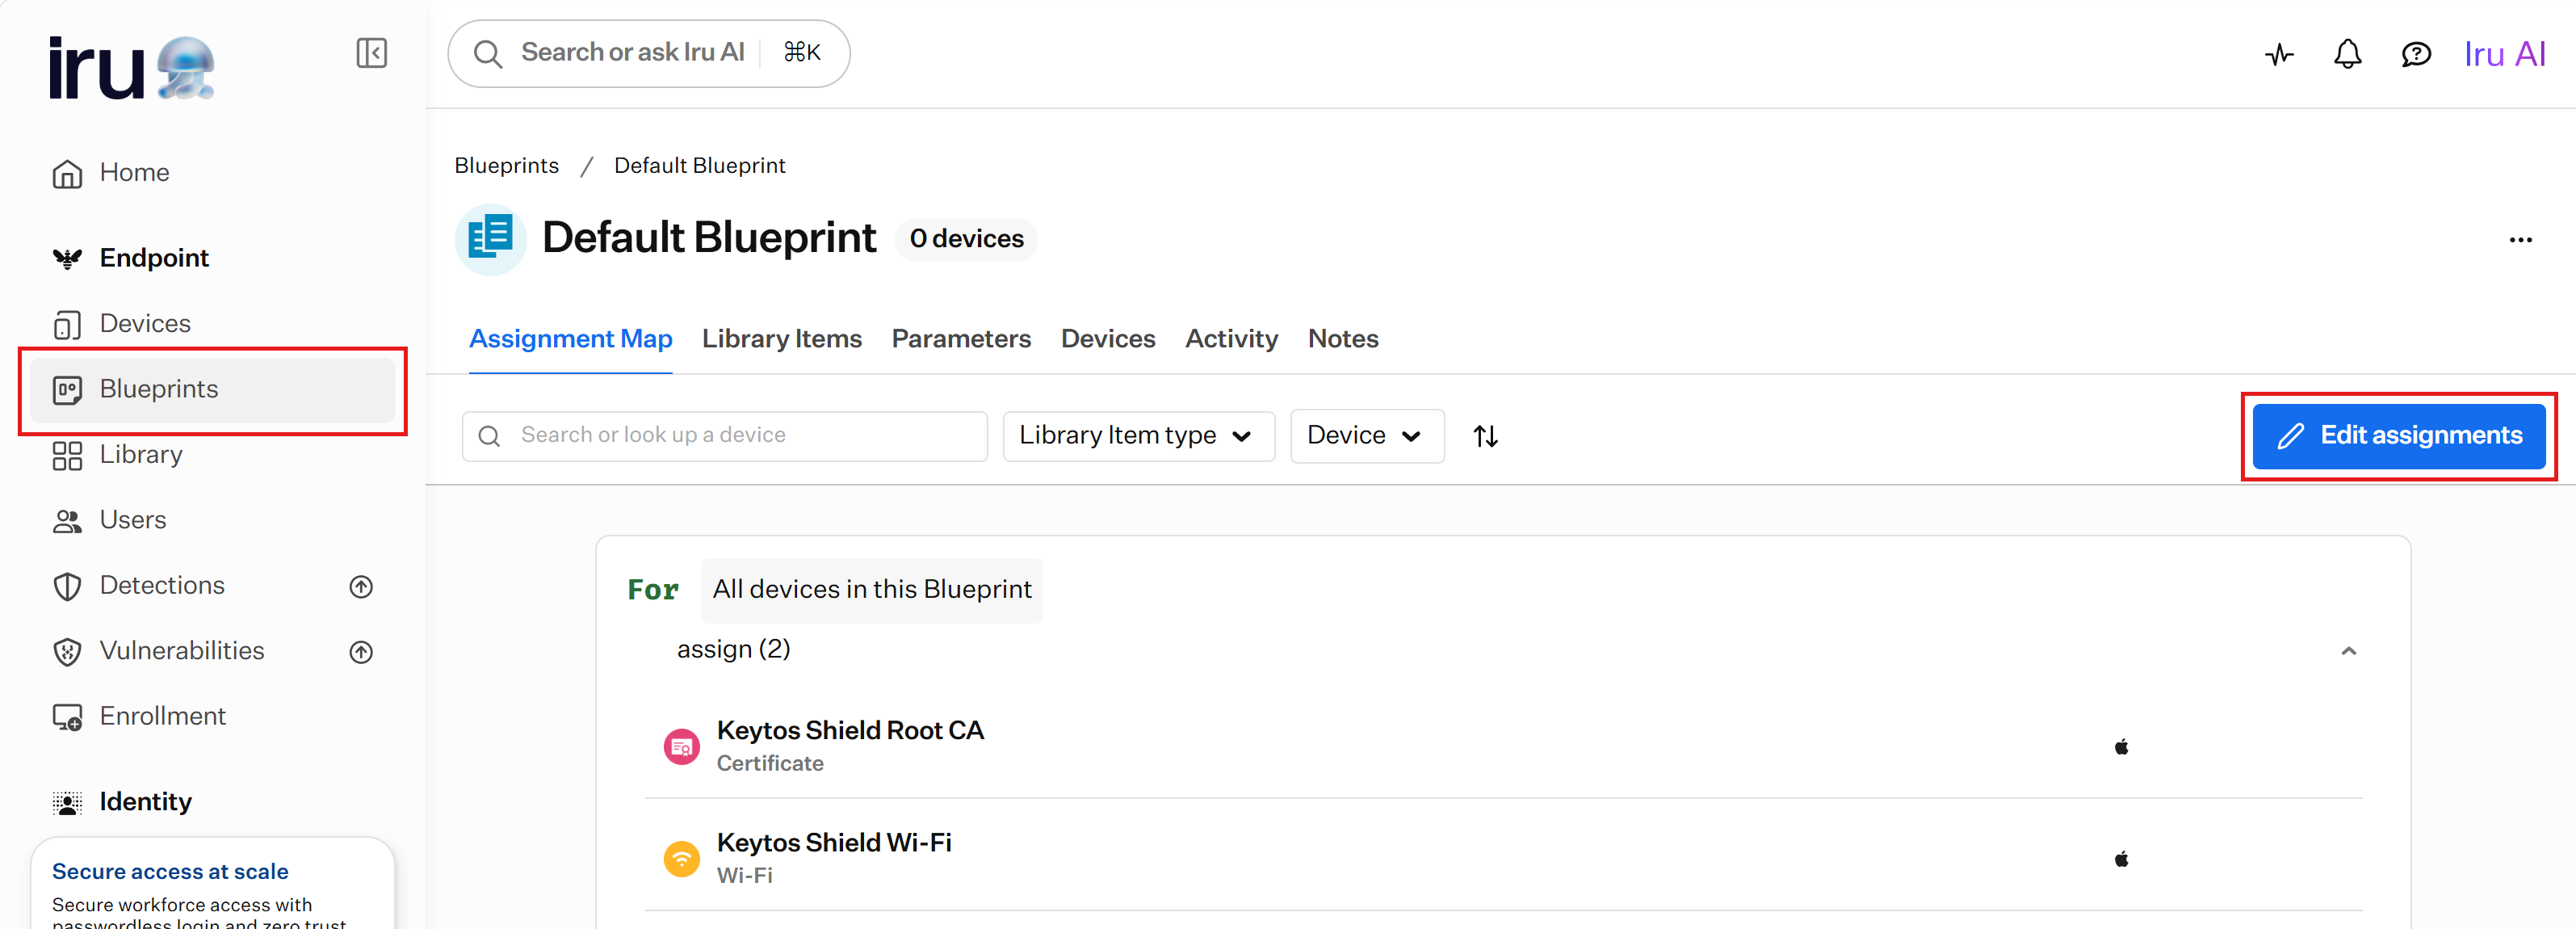
From the left-hand menu, click Blueprints and open the Blueprint your devices use, such as Default Blueprint.
-
On the Assignment Map tab, click Edit assignments.
-
Drag the Keytos Shield Root CA (Windows) and Keytos Shield Wi-Fi (Windows) Library Items from the Library Items list onto the map.
-
Click Save, then click Save again in the Save changes? dialog.
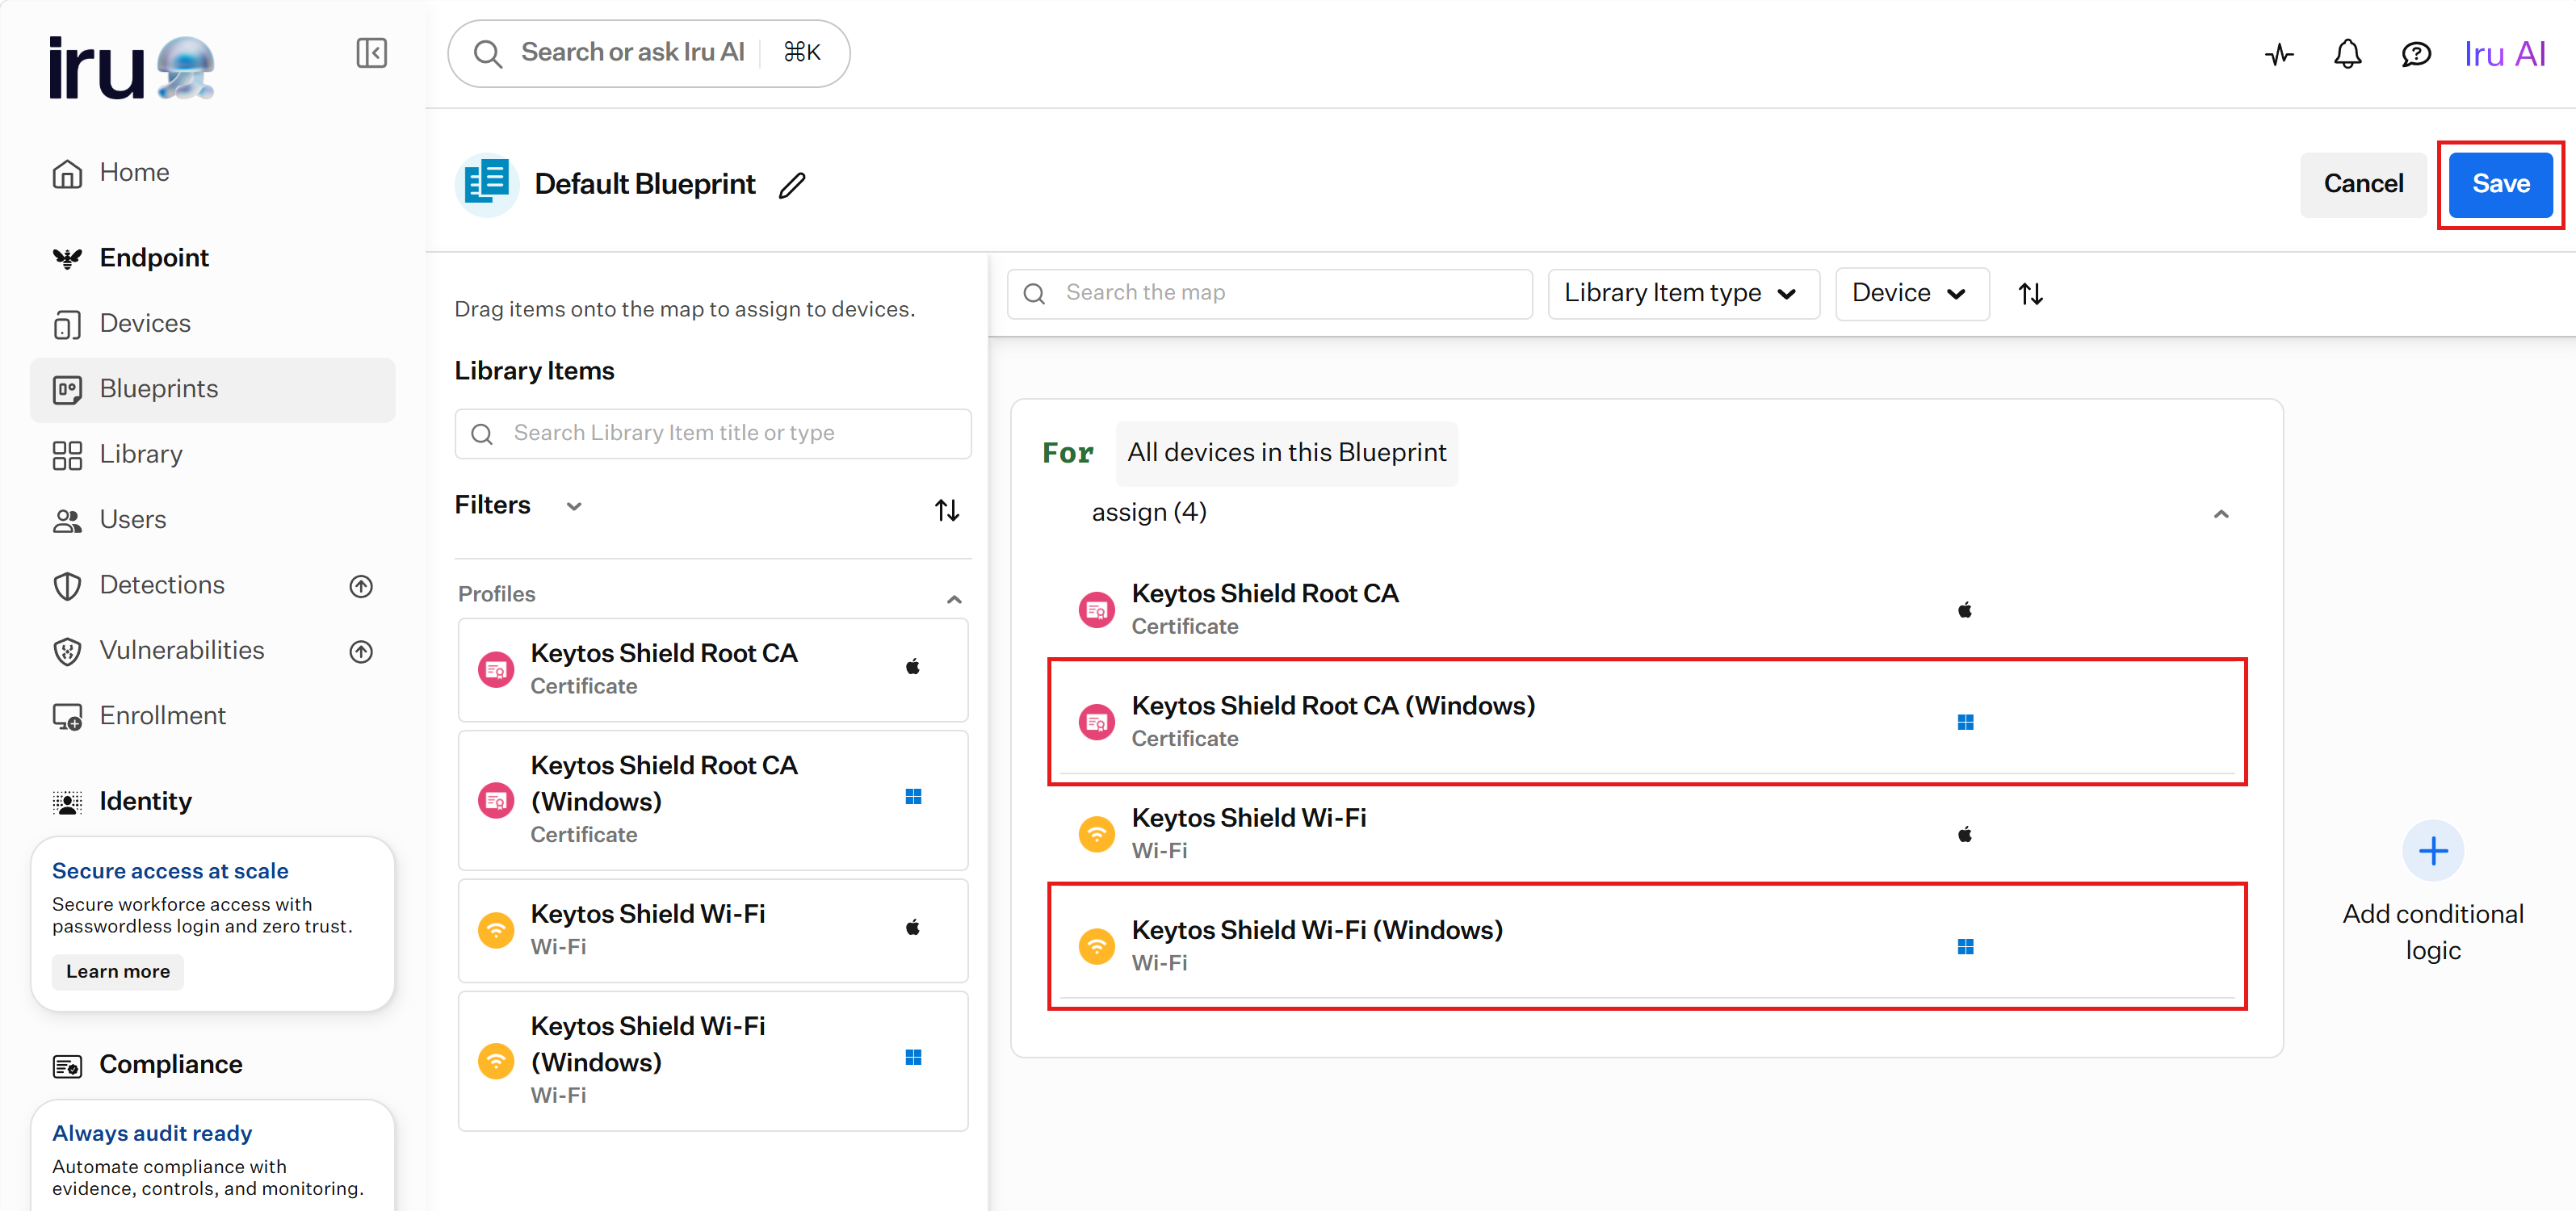
Done! The next time your Windows devices check in with Iru, they will install the Shield Root CA, request their own certificate from Keytos Shield, and join your Wi-Fi network automatically.
Step 9 - How to Test Your Keytos Shield Wi-Fi Configuration on Windows
Follow these steps on a Windows device assigned to the Blueprint:
- Trigger a sync with Iru by going to Settings > Accounts > Access work or school, selecting your Iru account, clicking Info, and then clicking Sync.
- Press Windows + R, type
certlm.msc, and press Enter to open the Local Computer certificate manager. - Go to Trusted Root Certification Authorities > Certificates and confirm your Shield Root CA is listed.
- Go to Personal > Certificates and confirm there is a certificate issued to the device’s serial number by your Shield CA.
- Go to Settings > Network & internet > Wi-Fi > Manage known networks and confirm your SSID is listed.
- Move into range of the network. The device should connect automatically, without prompting for a username, password, or server certificate.
You can also confirm in Keytos Shield that certificates are being issued. In your Shield portal, click Certificates in the left-hand menu to see each certificate Shield issued, or view your certificate logs.
Frequently Asked Questions About Keytos Shield and Iru on Windows
Does Keytos Shield Work with Iru Managed Windows Devices?
Yes. Keytos Shield issues certificates to Iru managed Windows devices with static SCEP, and Iru pushes the Wi-Fi profile that uses those certificates to connect to your network with EAP-TLS.
Why Does Iru Need a Fingerprint for Windows SCEP?
Windows requires the thumbprint of the certificate authority before it requests a SCEP certificate. It uses the thumbprint to confirm that the SCEP server belongs to the certificate authority you expect, so a device never enrolls with an impostor. Use the thumbprint of your Shield Root CA, as shown in step 3.
Can I Use WPA3 Enterprise with Iru on Windows?
Iru currently offers WPA and WPA2 authentication types for Windows Wi-Fi Library Items. Select WPA2 Enterprise.
Why Do I Need to Add My RADIUS Server Names?
Specifying trusted server certificate names, together with your Shield Root CA, makes sure your devices only authenticate against your Shield RADIUS servers. Without them, a device could send its certificate to a rogue access point that impersonates your network.
How to Troubleshoot RADIUS Authentication for Keytos Shield
If your devices can’t connect to your network, refer to our troubleshooting guide.
🔎 Shield RADIUS Troubleshooting Guide