












How-To: Create RADIUS Wi-Fi Profiles in Apple Configurator for EZRADIUS
EZRADIUS can generate an Apple Configuration Profile (.mobileconfig file) for you. In your EZRADIUS portal, go to Manage WiFi Profiles and use the Wi-Fi Profile Generator. You can push the generated file to your devices directly, or open it in Apple Configurator for further customization. Follow this guide if you want to build the profile yourself from scratch.
Overview - What is Apple Configurator?
Apple Configurator is a free macOS application from Apple that lets administrators create configuration profiles (.mobileconfig files) for macOS, iOS, iPadOS, and tvOS devices. A configuration profile can include your Wi-Fi network, the certificates your devices need to trust your RADIUS server, and a SCEP payload that requests a device certificate. This guide will walk you through creating a WPA Enterprise Wi-Fi profile in Apple Configurator that authenticates with EZRADIUS Cloud RADIUS.
Can I Use Apple Configurator to Create WPA Enterprise Wi-Fi Profiles for Cloud RADIUS?
Yes! Apple Configurator supports 802.1X Wi-Fi payloads for both EAP-TLS and EAP-TTLS. Once you save the profile, you can upload it to any MDM that accepts custom Apple configuration profiles, such as Microsoft Intune, Jamf Pro, NinjaOne, or SimpleMDM, or install it manually on a Mac for testing.
Which Authentication Method Should I Use?
- Certificates (EAP-TLS): (recommended) Devices authenticate with a certificate issued by your EZCA SCEP CA. There are no passwords to phish or rotate, and devices connect automatically without prompting the user.
- Entra ID Username/Password (EAP-TTLS): Users sign in with their Entra ID credentials. Because Entra ID does not support MS-CHAPv2, the profile must use EAP-TTLS with PAP as the inner authentication.
Which Certificates Does My Wi-Fi Profile Need?
This guide uses two different CA certificates, and it’s important to keep them apart:
- EZRADIUS Server CA certificate (EAP-TLS and EAP-TTLS): The CA that signed your EZRADIUS server certificate. You add it to the profile as a trusted certificate so devices can verify they’re talking to your RADIUS server. Where you get it depends on whether EZRADIUS auto-generated your server certificate or you uploaded your own.
- SCEP CA certificate (EAP-TLS only): Your EZCA CA that issues each device its own client certificate through the profile’s SCEP payload. Devices use that client certificate as their identity when they connect.
You’ll also open your EZRADIUS server certificate (the server’s own certificate, not a CA) to read the server names that devices should expect, but you don’t add it to the profile.
How to Create a WPA Enterprise Wi-Fi Profile in Apple Configurator - Step-by-Step Guide
The following steps will guide you through creating your Apple Configurator Wi-Fi profile for EZRADIUS. The steps vary slightly based on the authentication method you choose, so follow the tab for your preferred method.
Prerequisites for Creating Wi-Fi Profiles in Apple Configurator
Before you begin, ensure that you:
- Registered the Keytos and EZRADIUS applications in your Entra ID tenant.
- Created an EZRADIUS billing plan/subscription.
- Are a Subscription Owner or Network Administrator of your EZRADIUS subscription.
- Have a macOS device with Apple Configurator installed from the Mac App Store.
- (EAP-TLS only) Created an EZCA SCEP CA that will issue certificates to your devices.
Step 1 - How to Create an EZRADIUS Access Policy
The first step to set up cloud RADIUS for Apple devices is to create an EZRADIUS policy that defines how authentication requests from Apple devices will be handled. Refer to the following guides for the specific steps to configure your cloud RADIUS policy.
How to Create a Passwordless Certificate Access Policy
A certificate access policy allows you to accept X.509 certificates for authentication and determine which users or devices are allowed to connect to your network. View this guide to learn how to create a certificate access policy in EZRADIUS if you have not already done so.
How to Create an Entra ID Username and Password Access Policy
An Entra ID username and password access policy allows you to authenticate your Entra ID users using their existing credentials. View this guide to learn how to create an Entra ID username and password access policy in EZRADIUS if you have not already done so.
Step 2 - How to Download Your EZRADIUS Server CA Certificate
Your Wi-Fi profile needs your EZRADIUS Server CA certificate so your devices can verify the RADIUS server. Without it, devices will prompt users to trust the server, or refuse to connect.
How to Download Your EZRADIUS Server CA Certificate
If you used the EZRADIUS auto-generated certificate for your RADIUS server, you’ll just have a single CA certificate to download. Follow these steps:
-
Log in to your EZRADIUS portal.
-
Navigate to Policies.
-
Select the RADIUS policy that your network (access points or switches) is connected to.
-
Scroll down to the Server Certificate section.
-
Click on the Download CA Certificate button to download the certificate to your local machine. It will have a filename similar to
RootCA.cer.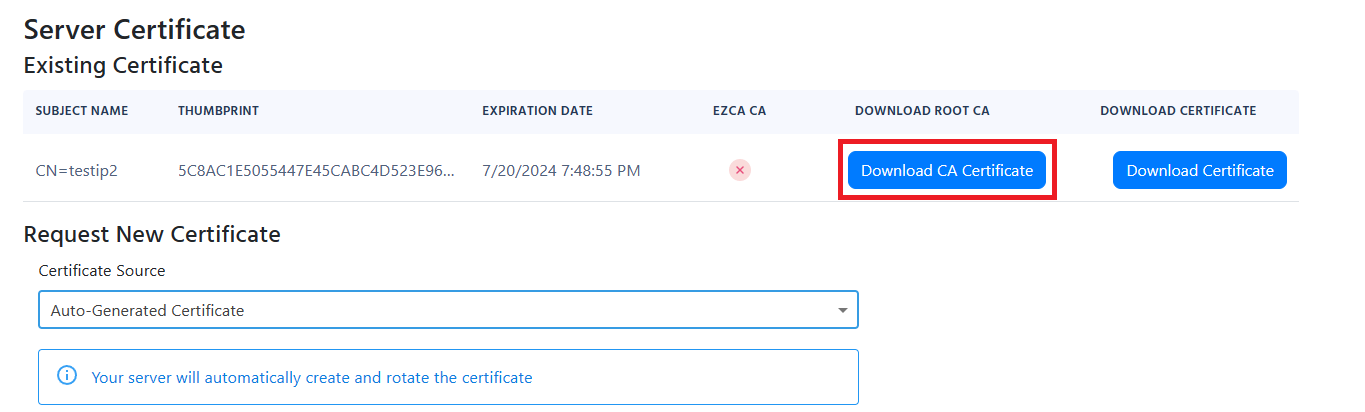
If you used EZCA to issue your RADIUS server certificate, you’ll need to download the CA certificate for your EZCA CA, plus the Root CA certificate, if applicable. Follow these steps:
- Log in to your EZCA portal.
- Navigate to Certificate Authorities.
- Select the CA that issued your RADIUS server certificate.
- Click on the View Details button.
- Click on the Download Certificate button to download the CA certificate to your local machine. It will have a filename similar to
<CA-NAME>.cer. - If your EZCA CA is an intermediate CA, make sure to also download the Root CA certificate by repeating the above steps for the Root CA.
Refer to your PKI documentation to download the CA certificate(s) that issued your RADIUS server certificate. Ensure you have the root CA and any intermediate CA certificates if applicable.
Step 3 - How to Enable a Static SCEP Challenge in EZCA for EAP-TLS
This step is only necessary if you’re using EAP-TLS certificate-based authentication. If you’re using EAP-TTLS with Entra ID credentials, you can skip to Step 4.
Before you can create a custom profile for SCEP in Apple Configurator, you need to ensure that your EZCA SCEP CA is configured to use a static challenge.
-
Navigate to your EZCA portal and sign in as a PKI Administrator.
-
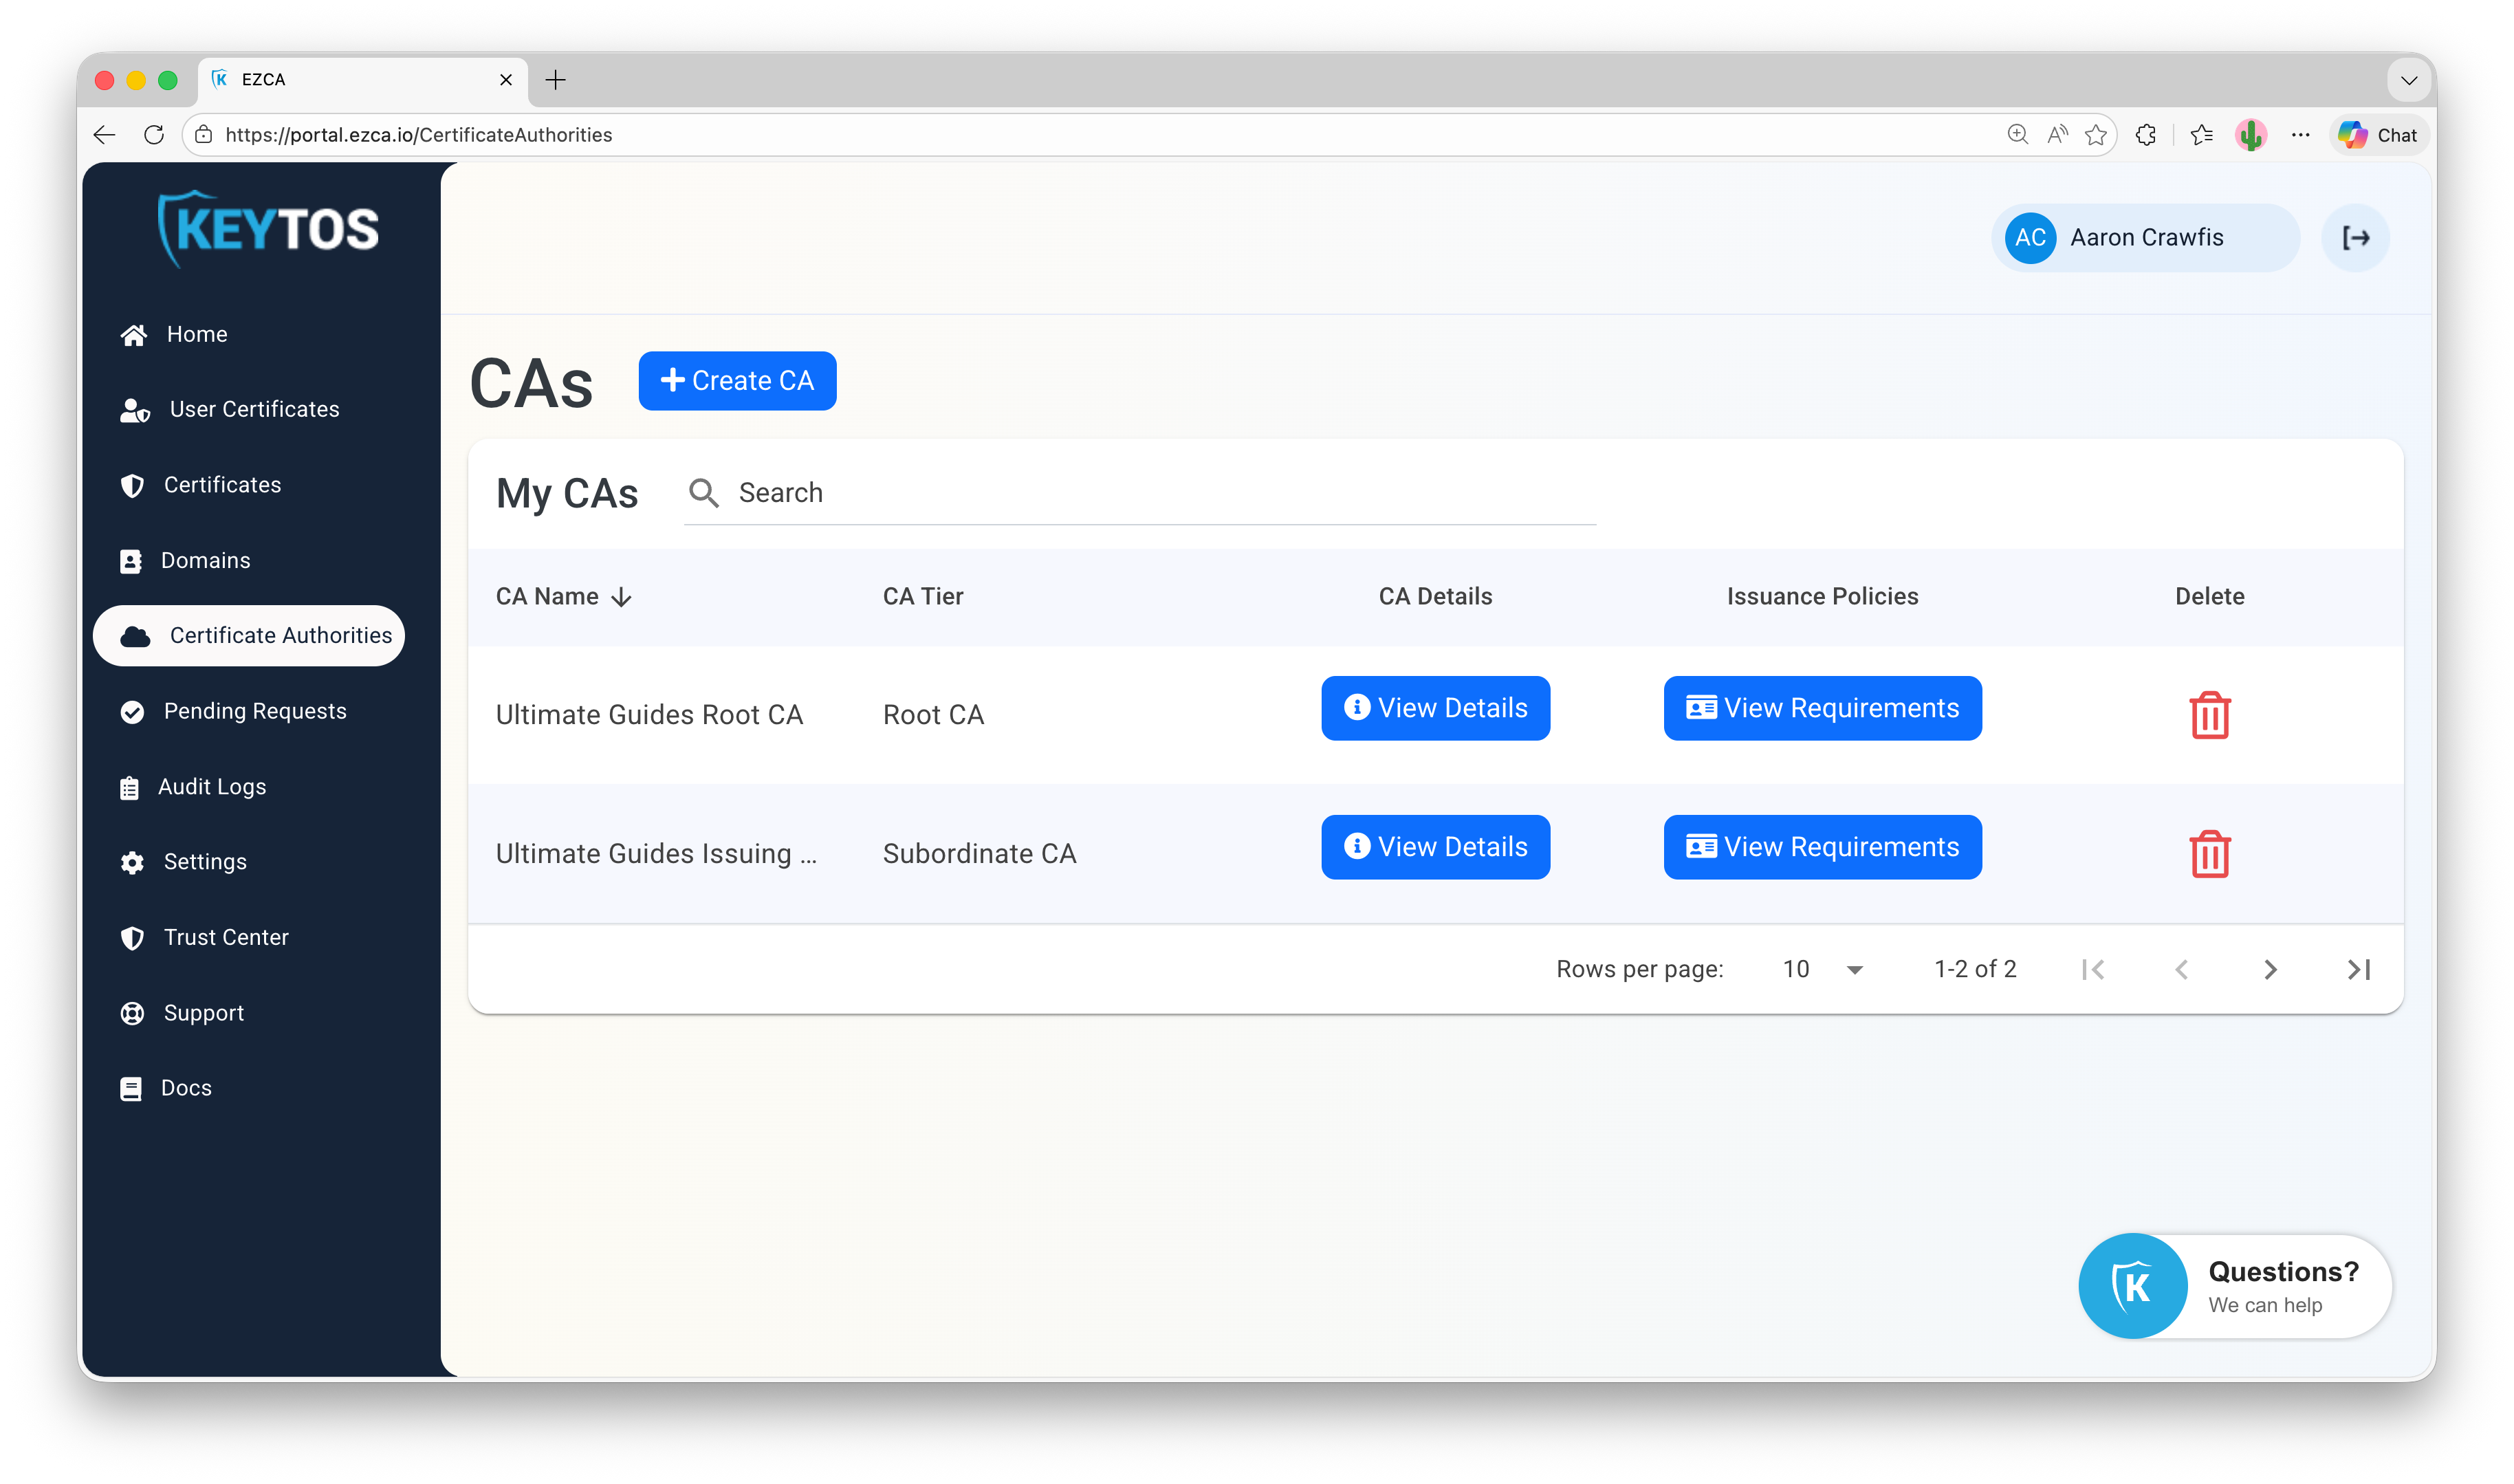
Click on the Certificate Authorities tab and scroll to your SCEP CA.
-
Click on View Requirements for your SCEP CA.
-
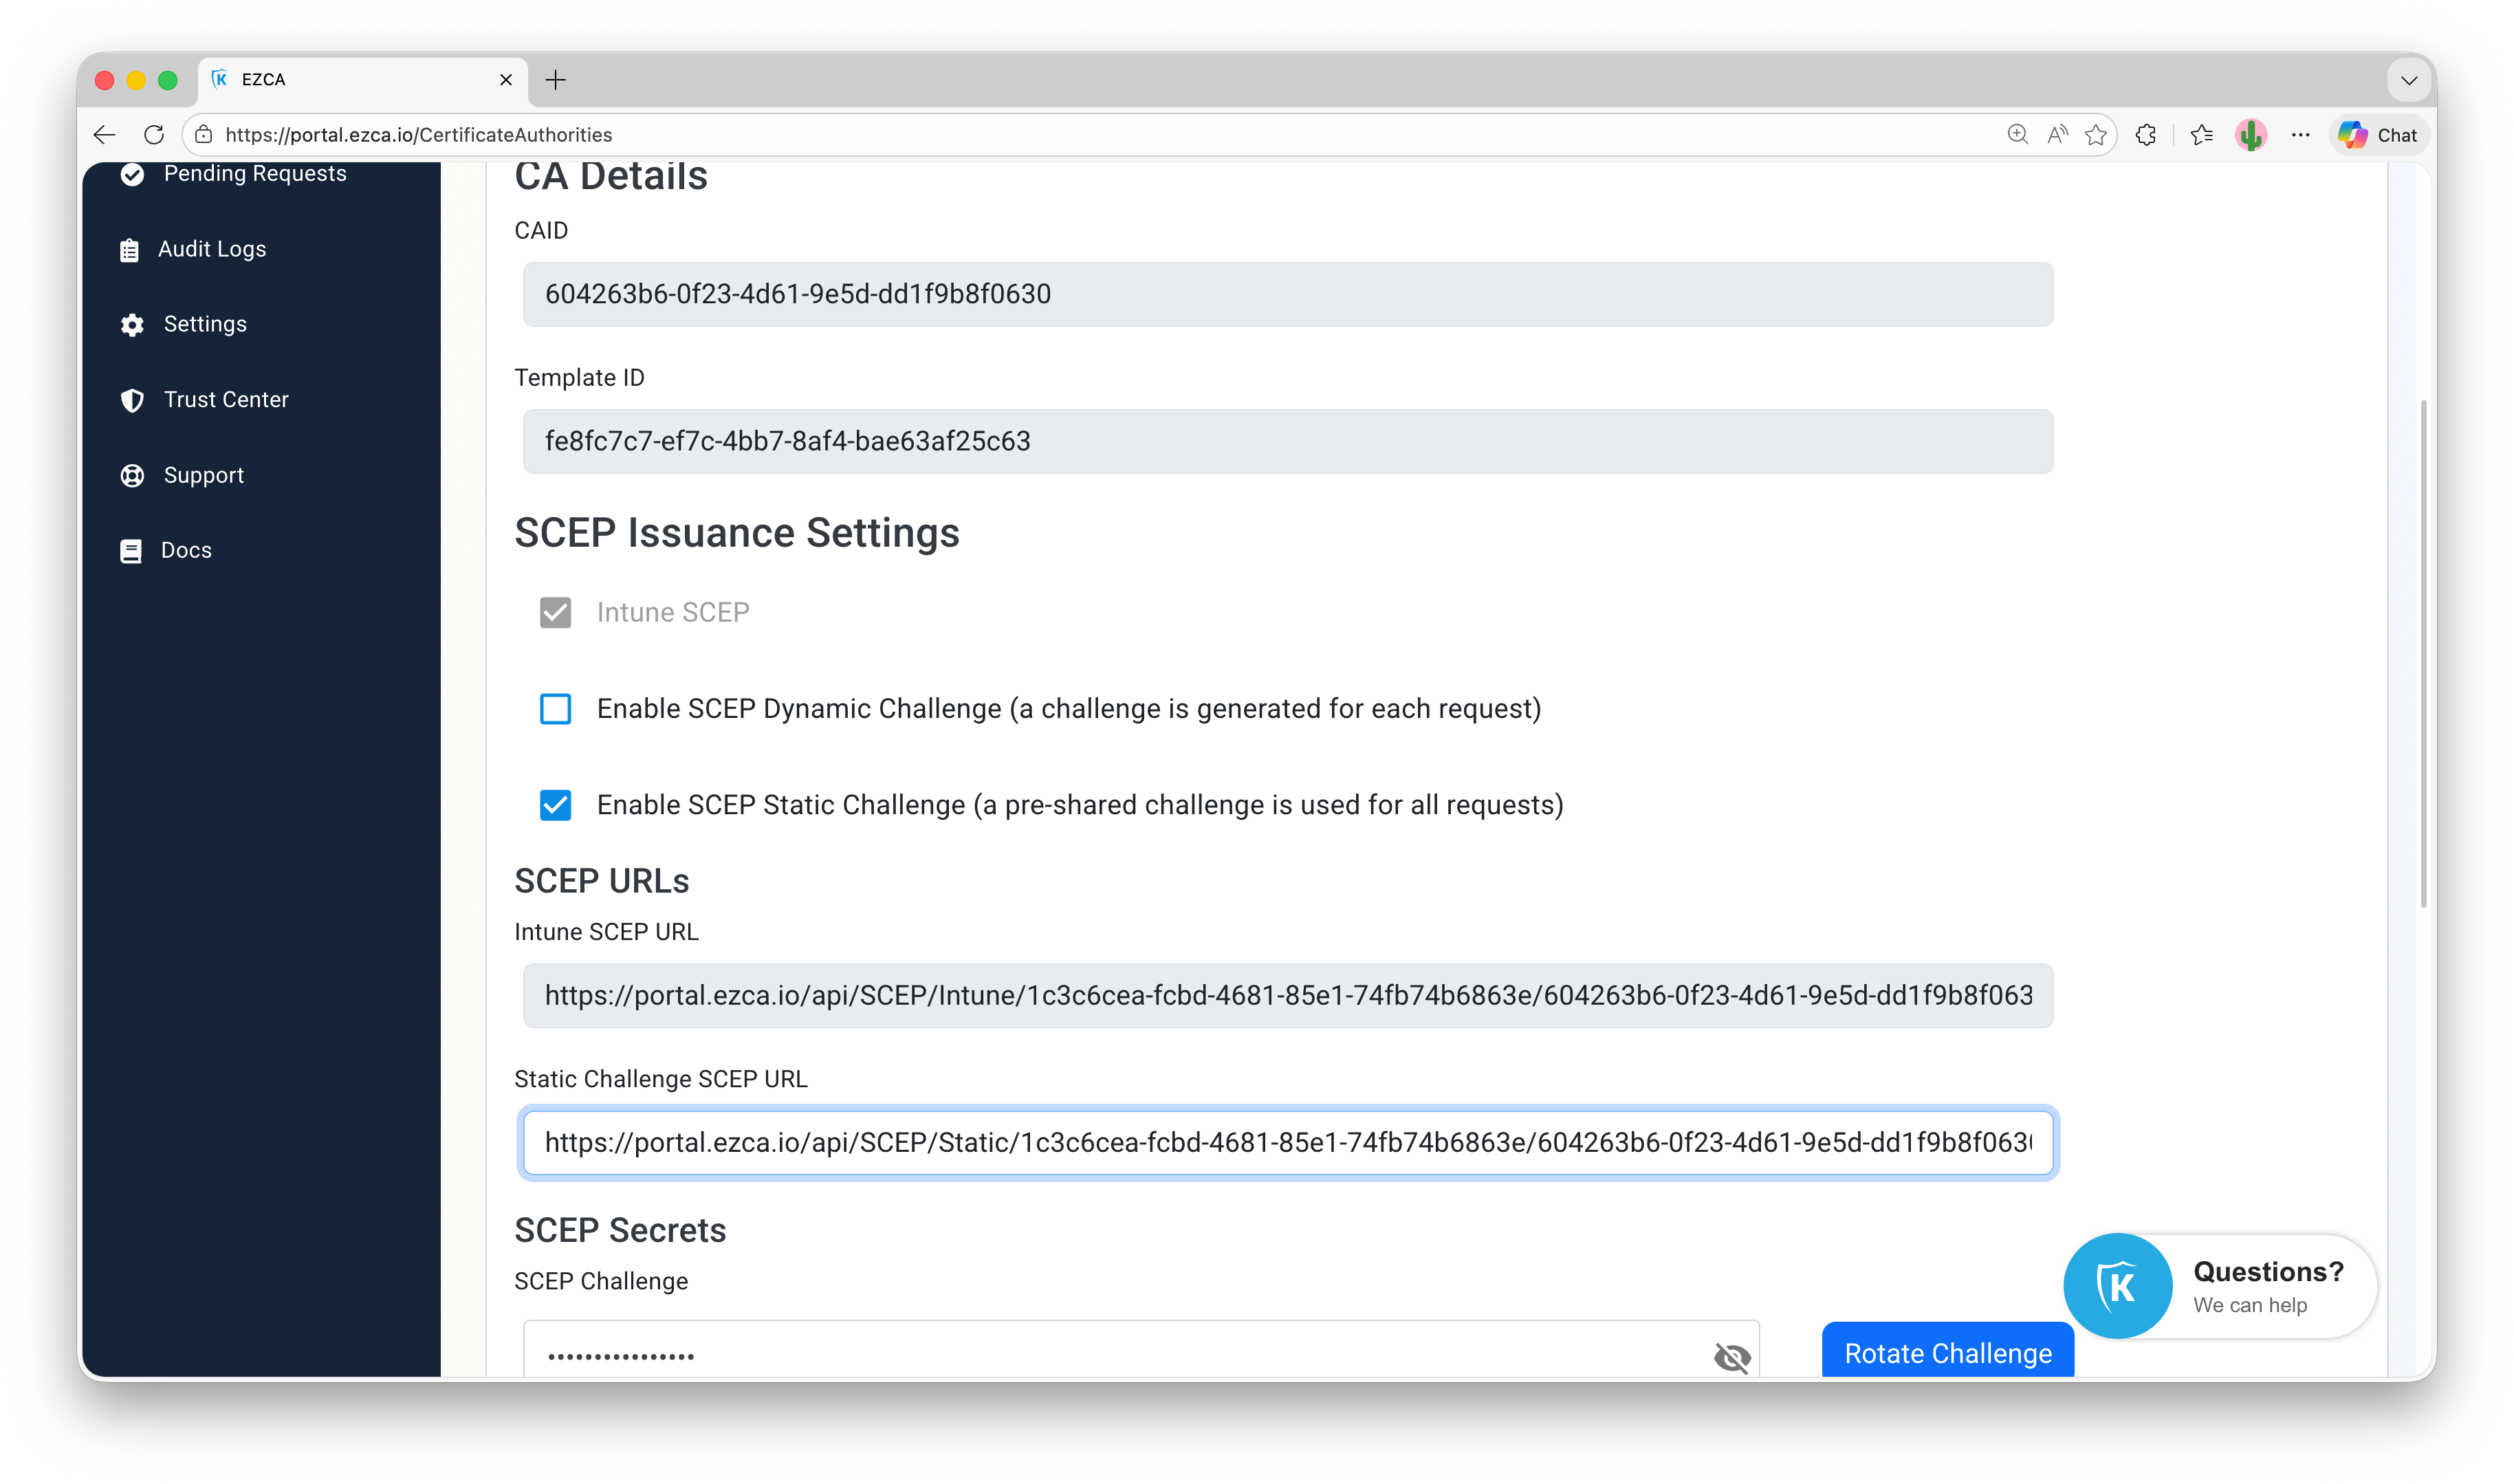
Check the box for Enable SCEP Static Challenge and click Save Changes. You will now see your Static Challenge SCEP URL and SCEP Challenge:
Step 4 - How to Create the Wi-Fi Configuration Profile in Apple Configurator
Now that you have your access policy and EZRADIUS Server CA certificate ready, you can build the Wi-Fi configuration profile. Use the tabs below to follow the steps for your preferred authentication method.
How to Create an EAP-TLS Wi-Fi Profile with SCEP Certificates in Apple Configurator
-
Download Apple Configurator from the App Store.
-
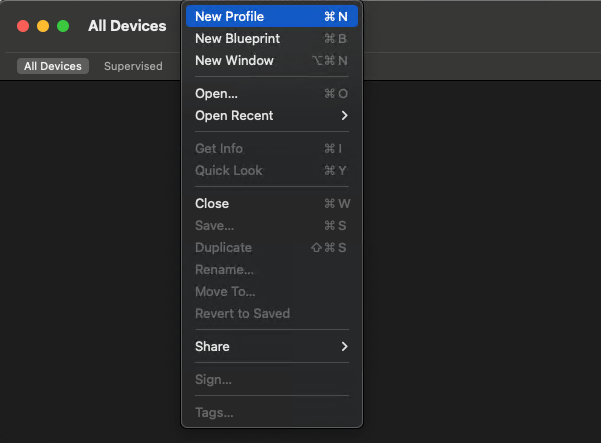
In Apple Configurator, click File > New Profile.
-
In the General settings, enter the name of the profile.
-
Click Certificates on the left.
-
Click Configure.
-
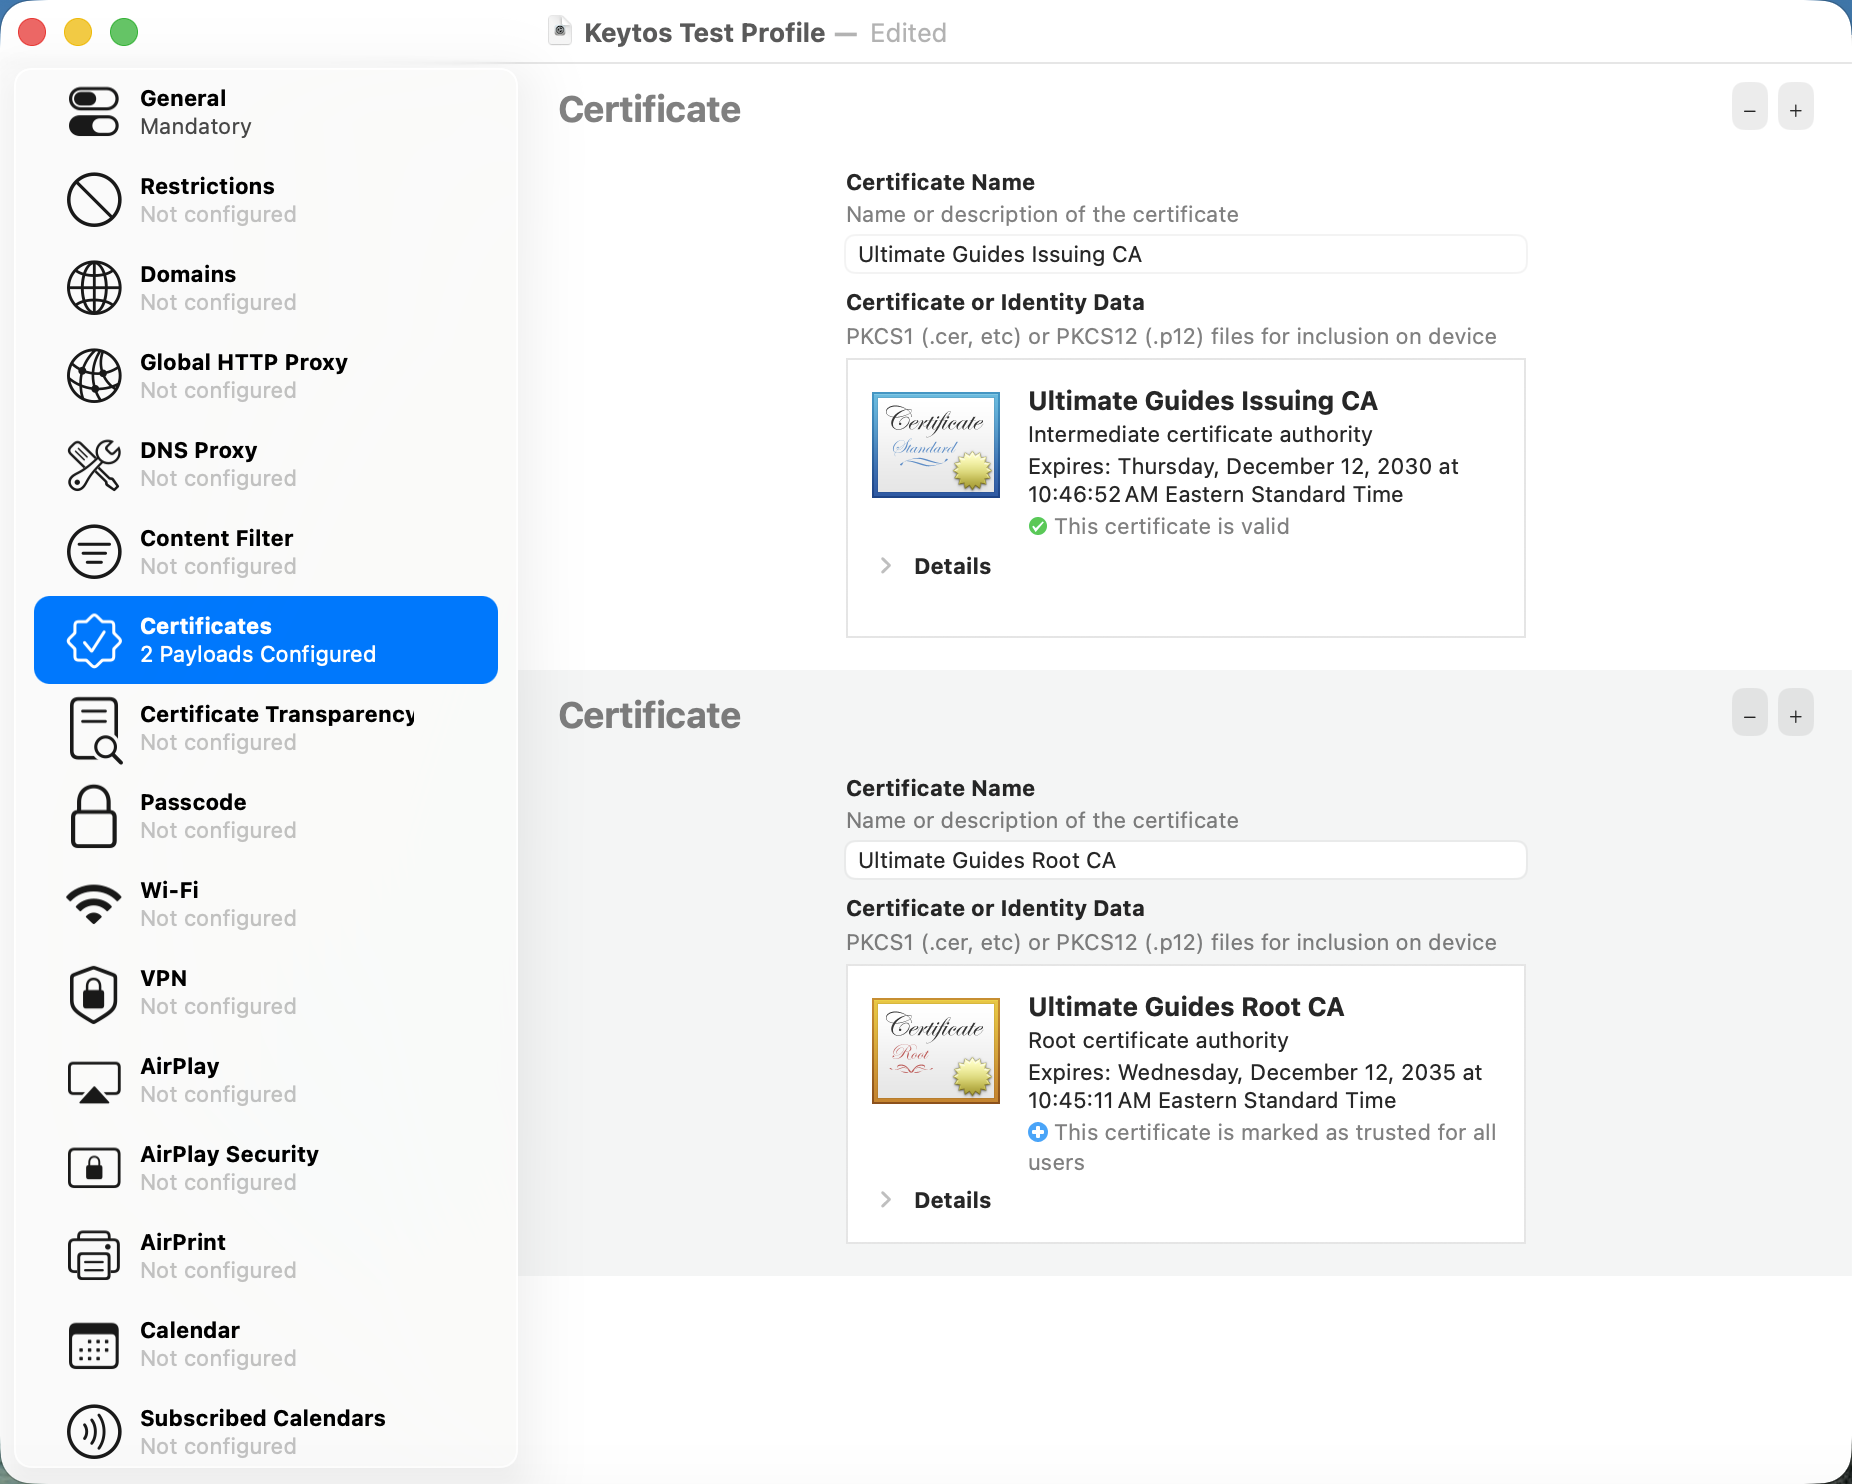
Upload your EZRADIUS Server CA certificate(s) that you downloaded from EZRADIUS. If your server certificate was issued by an intermediate CA, add both the intermediate and the Root CA certificate, each as its own certificate payload.
-
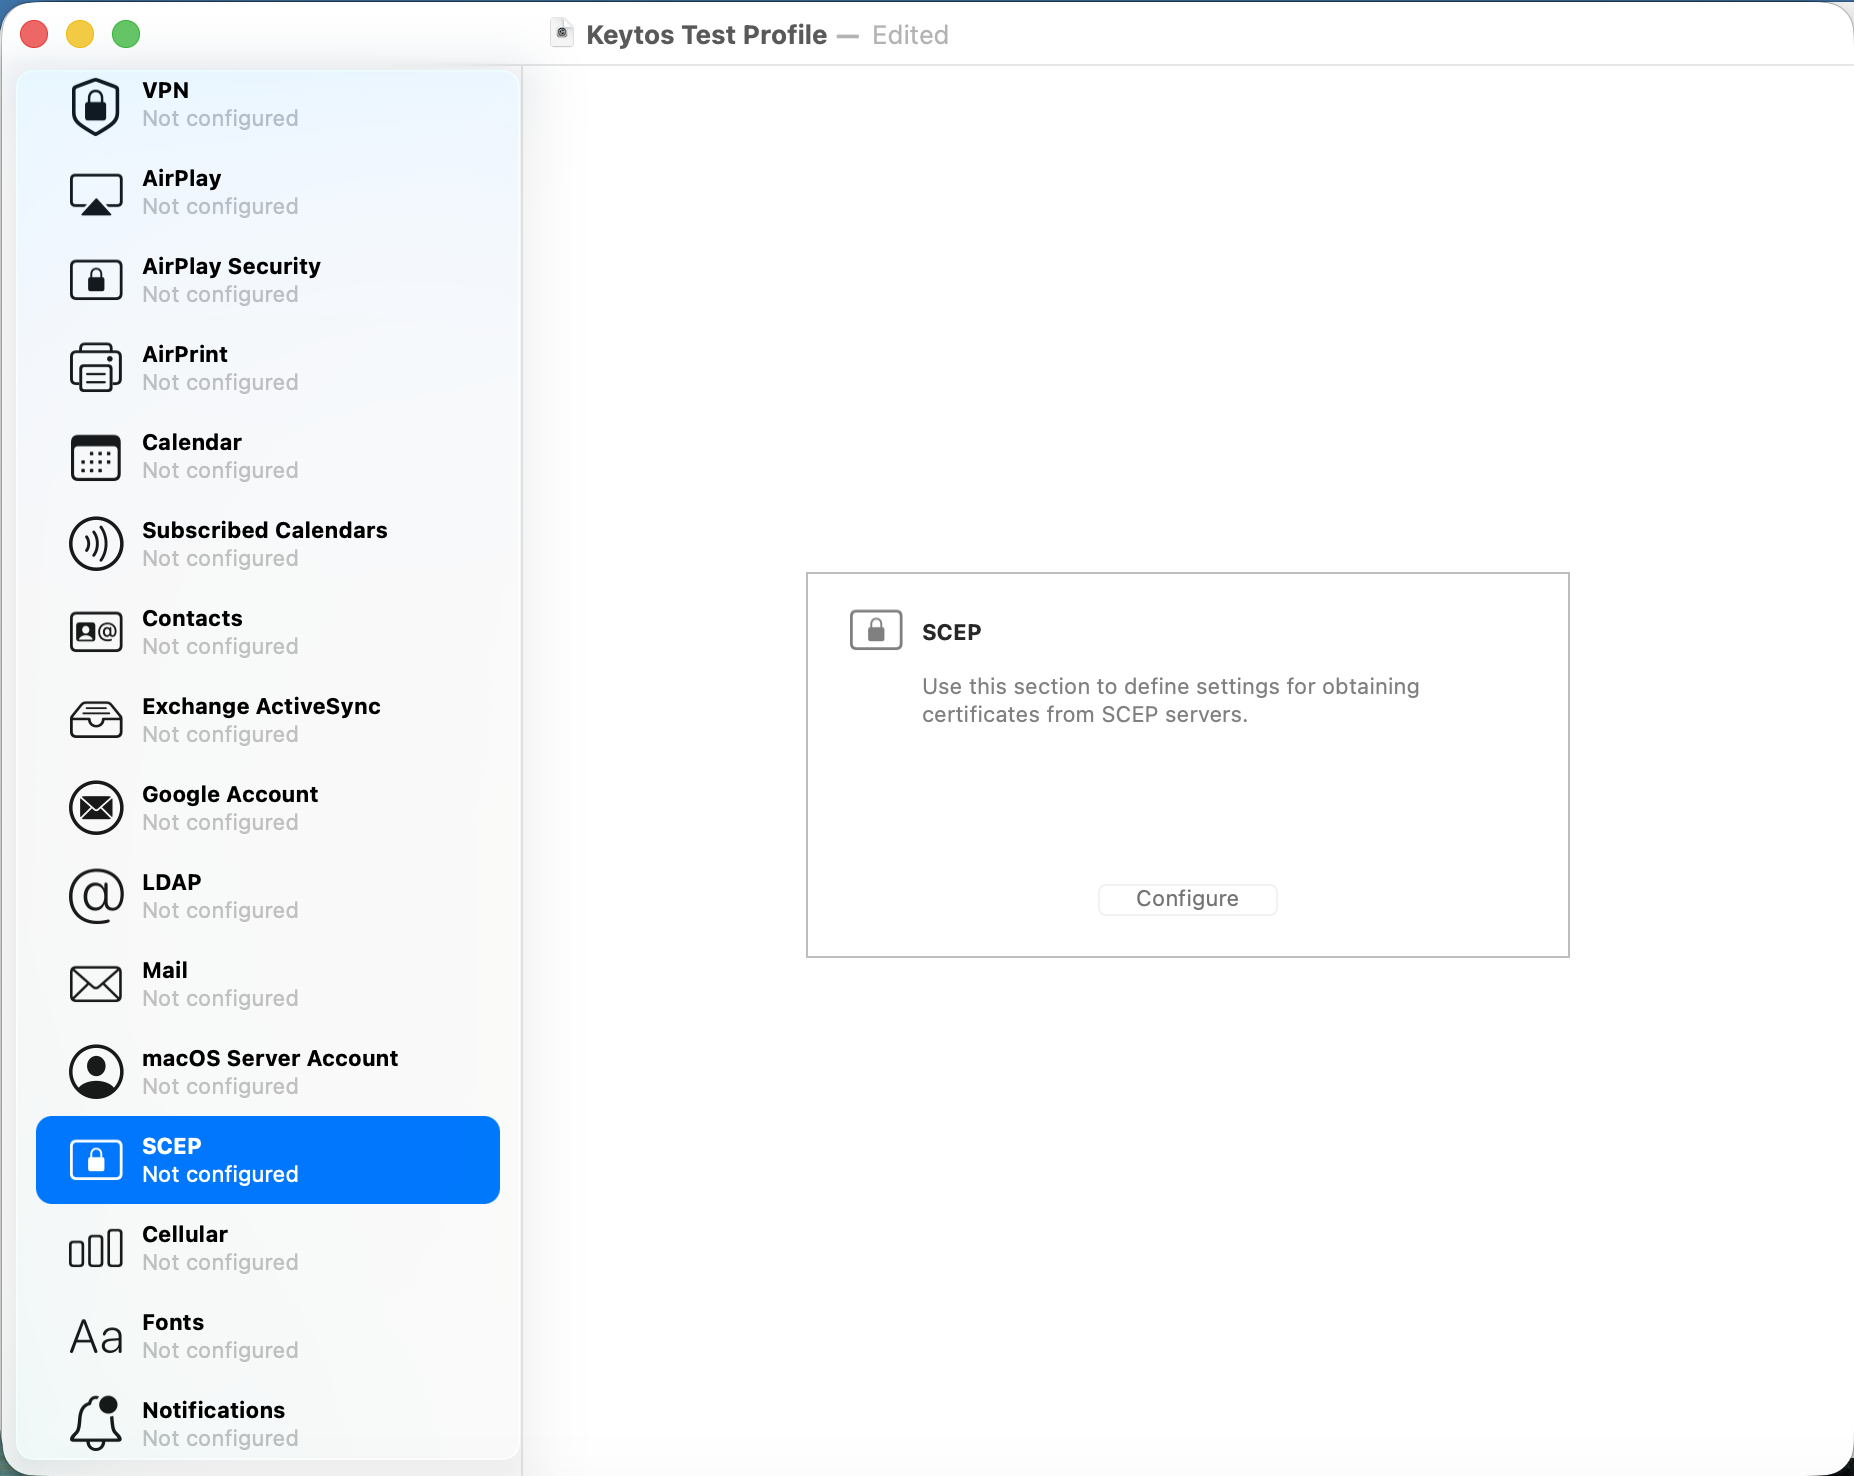
Click SCEP on the left.
-
Click Configure.
-
We will now get the SCEP URL and Challenge from EZCA.
How to Copy your SCEP URL and Challenge from EZCA
-
In your web browser, go back to your EZCA portal.
-
Click Certificate Authorities and find the SCEP CA you previously created.
-
Click View Requirements.
-
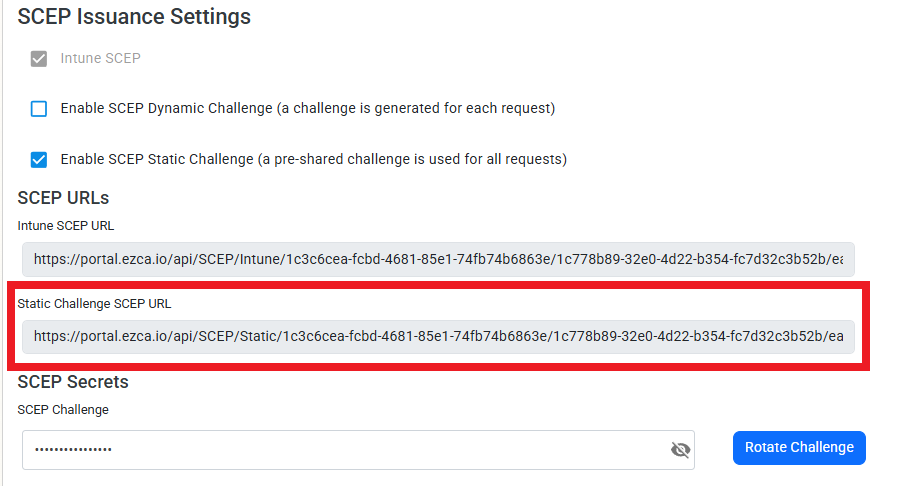
Copy the Static Challenge SCEP URL.
-
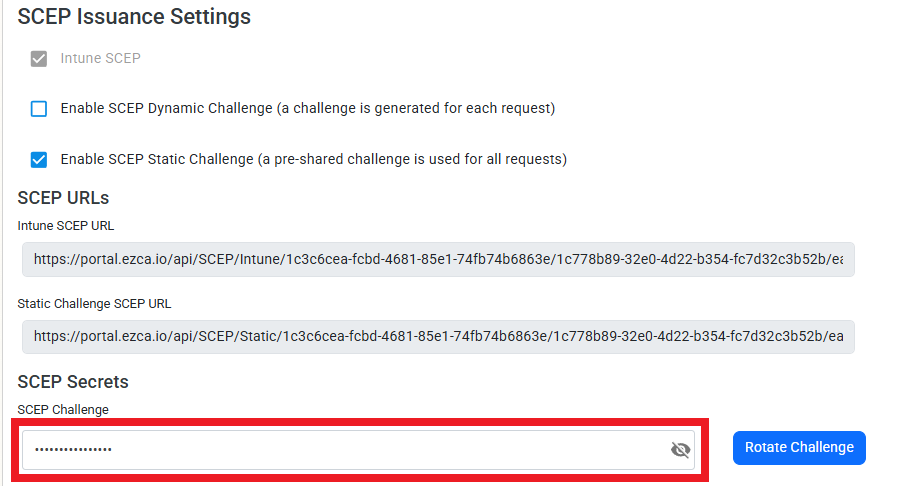
Copy the SCEP Challenge.
How to Configure SCEP in Apple Configurator
- Go back into Apple Configurator.
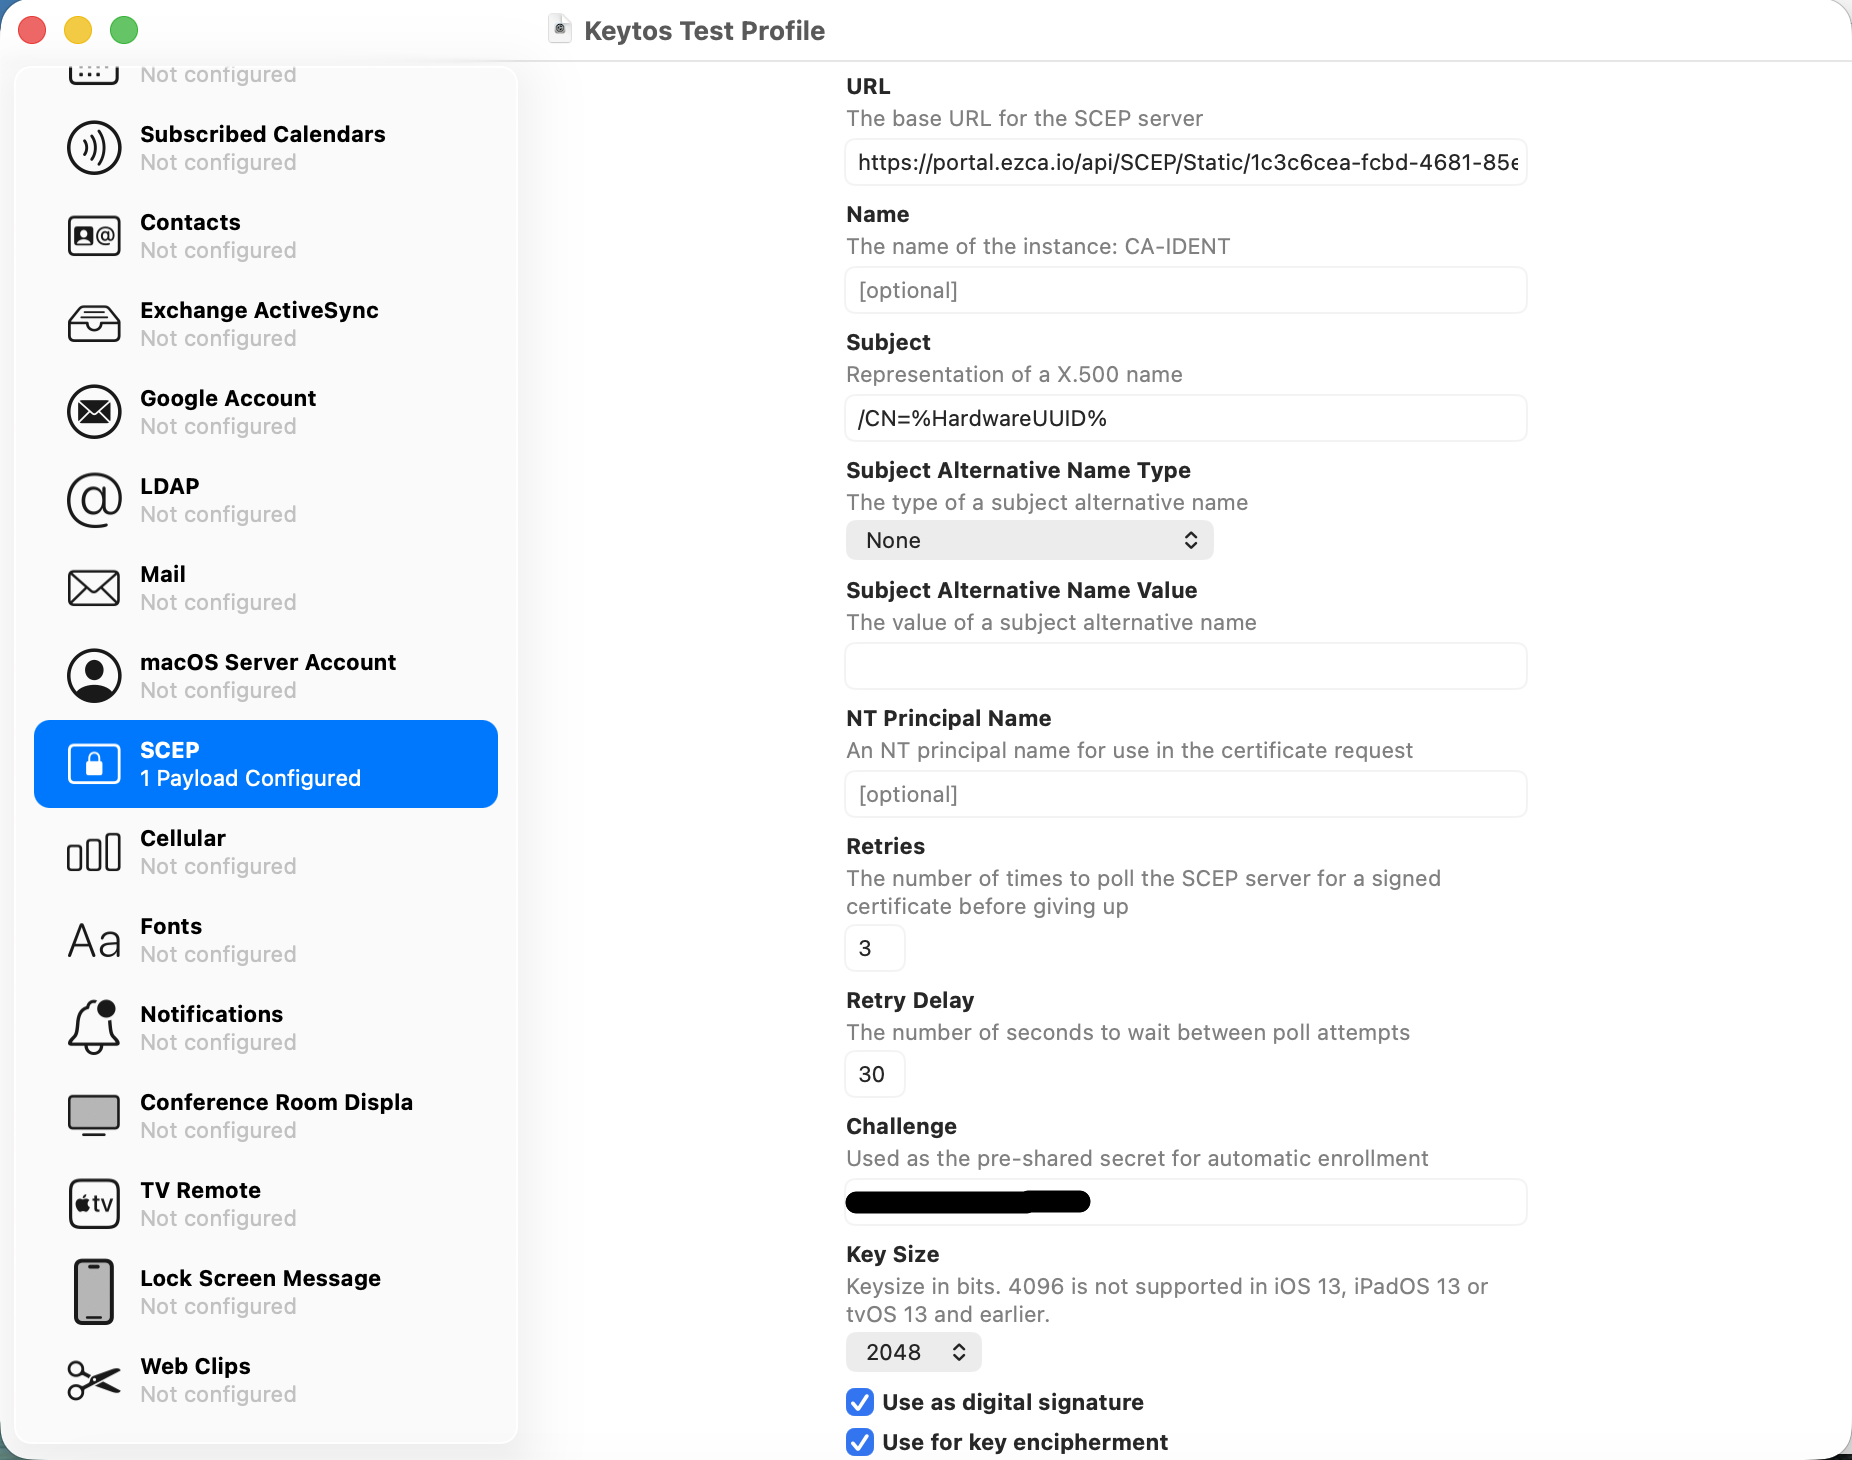
- Paste the SCEP URL you just copied into the URL field.
- Paste the SCEP Challenge you just copied into the Challenge field.
- Enter the following settings:
-
Subject: Use a static value or Apple’s built-in variables (e.g.,
CN=%ComputerName%). -
Subject Alternative Name Type: Set as DNS Name.
-
Subject Alternative Name Value: Use a static value or Apple’s built-in variables (e.g.,
%HostName%). -
In the Retries field, enter 3.
-
In the Retry Delay field, enter 30.
-
In the Key Size field, enter at least 2048.
-
In the Key Usage dropdown, select Both signing and encryption.
-
How to Configure Wi-Fi in Apple Configurator for EAP-TLS
-
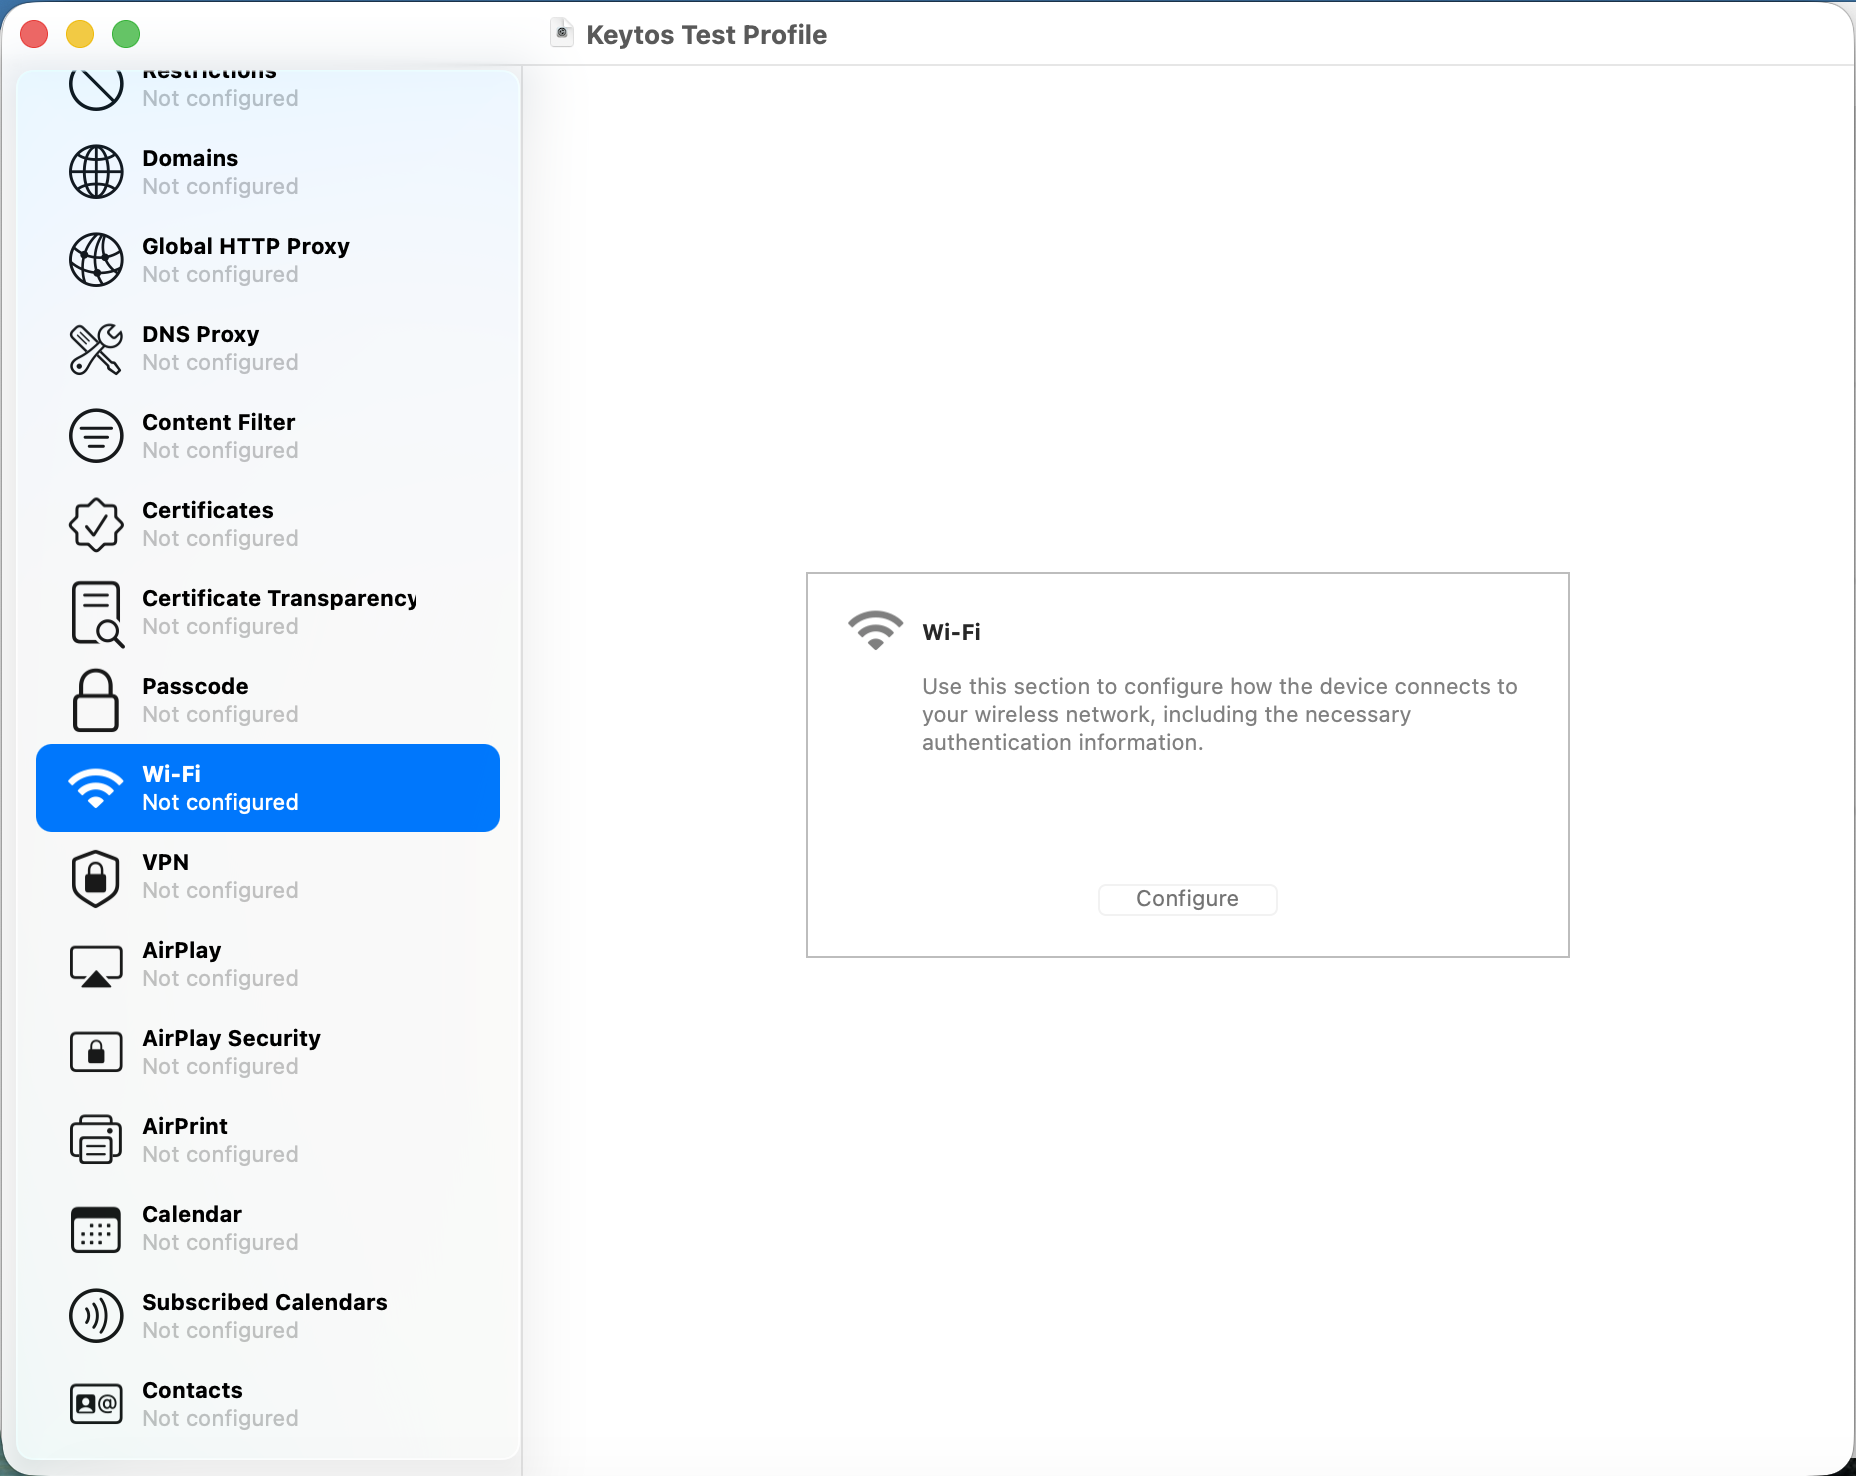
Click Wi-Fi on the left.
-
Click Configure.
-
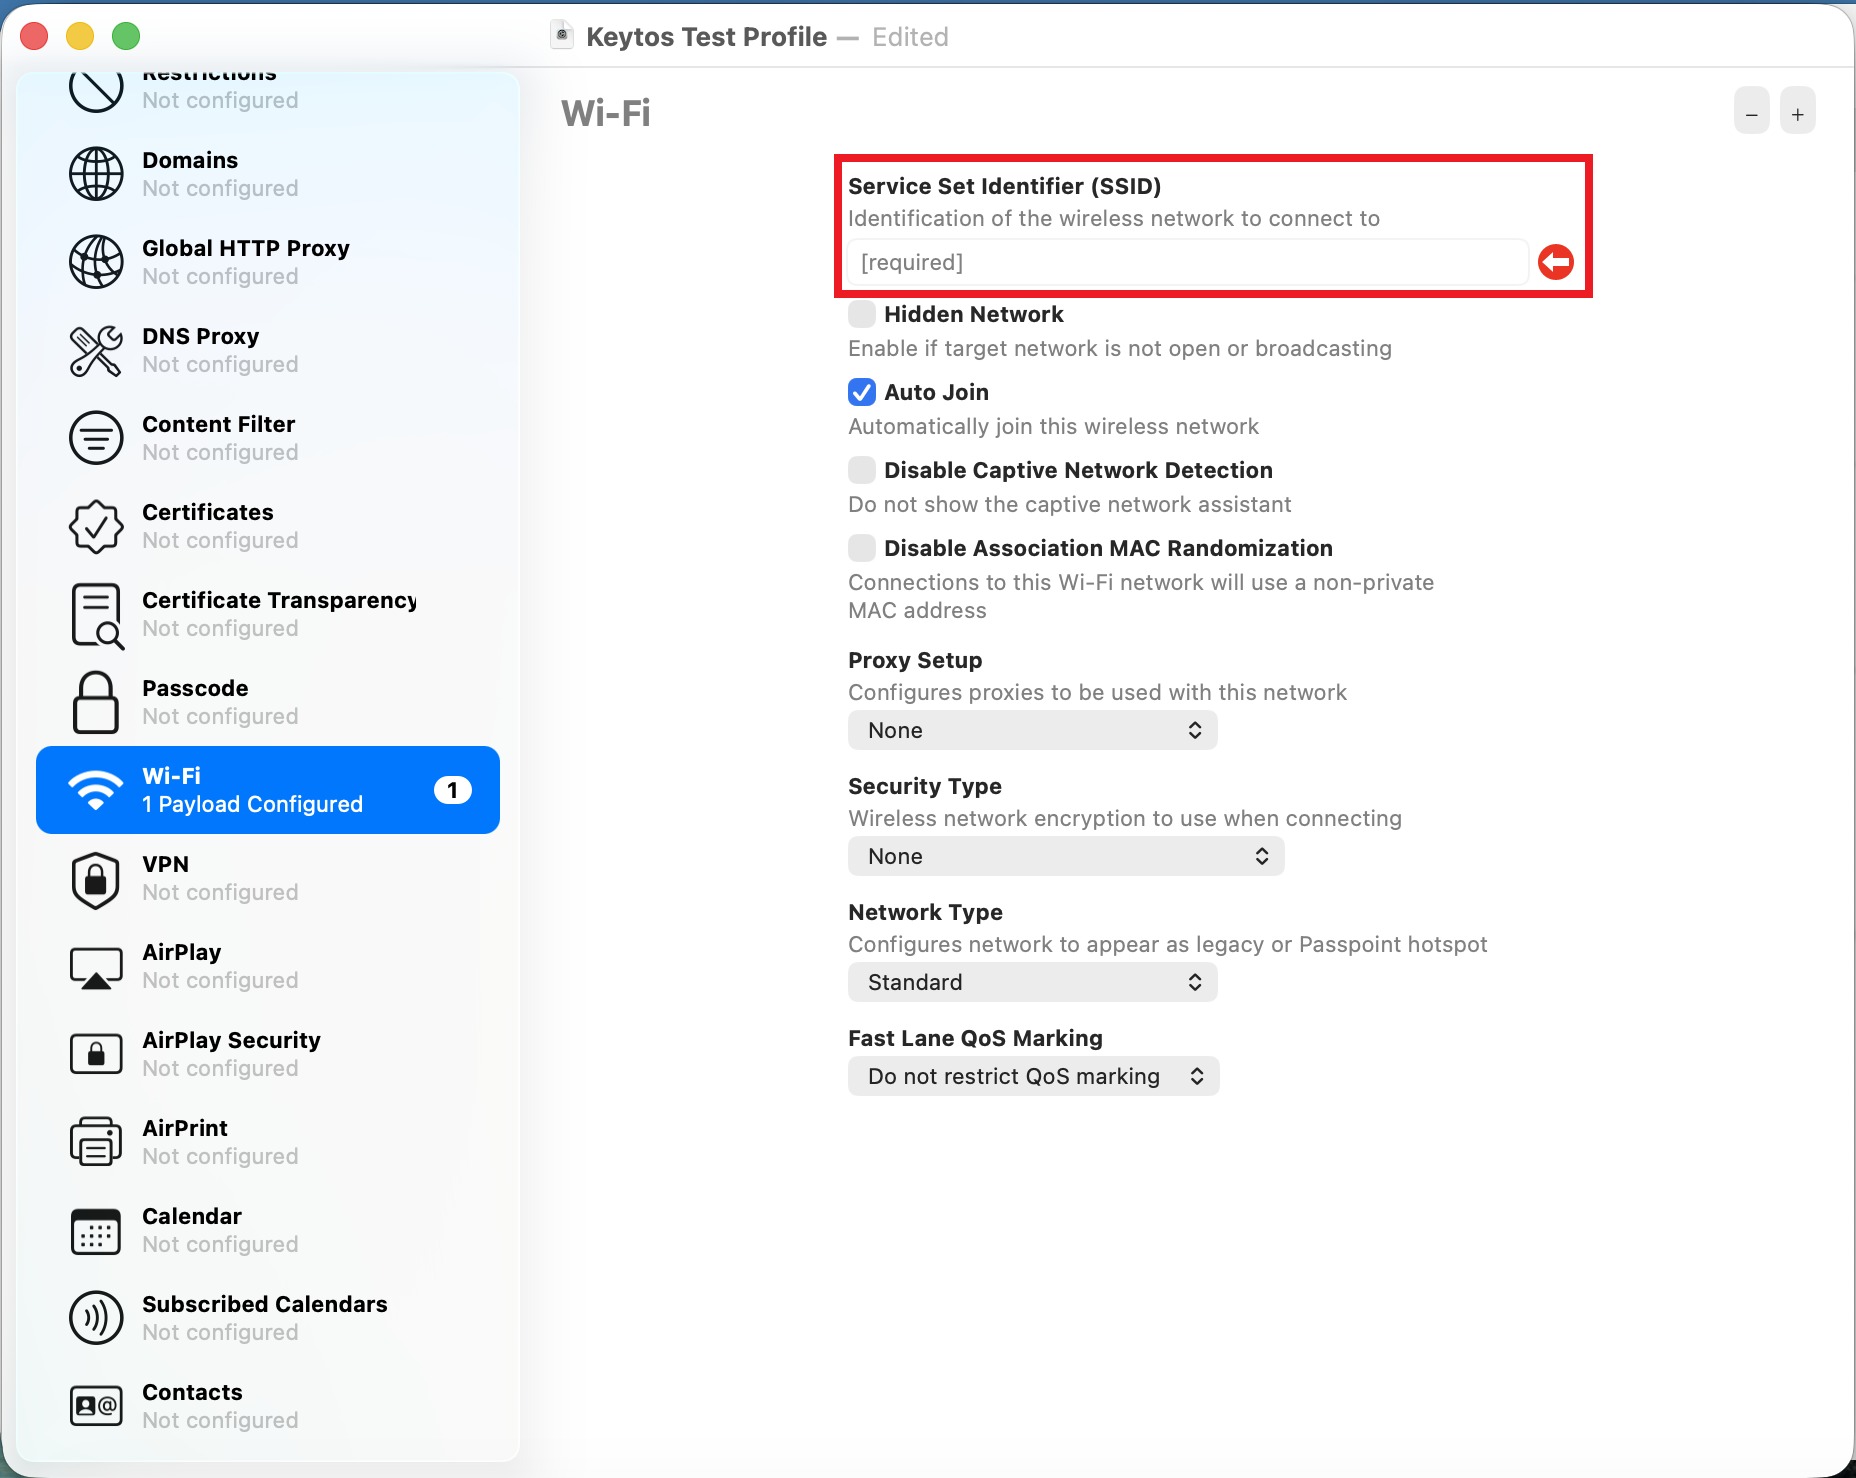
Enter the SSID of your network.
-
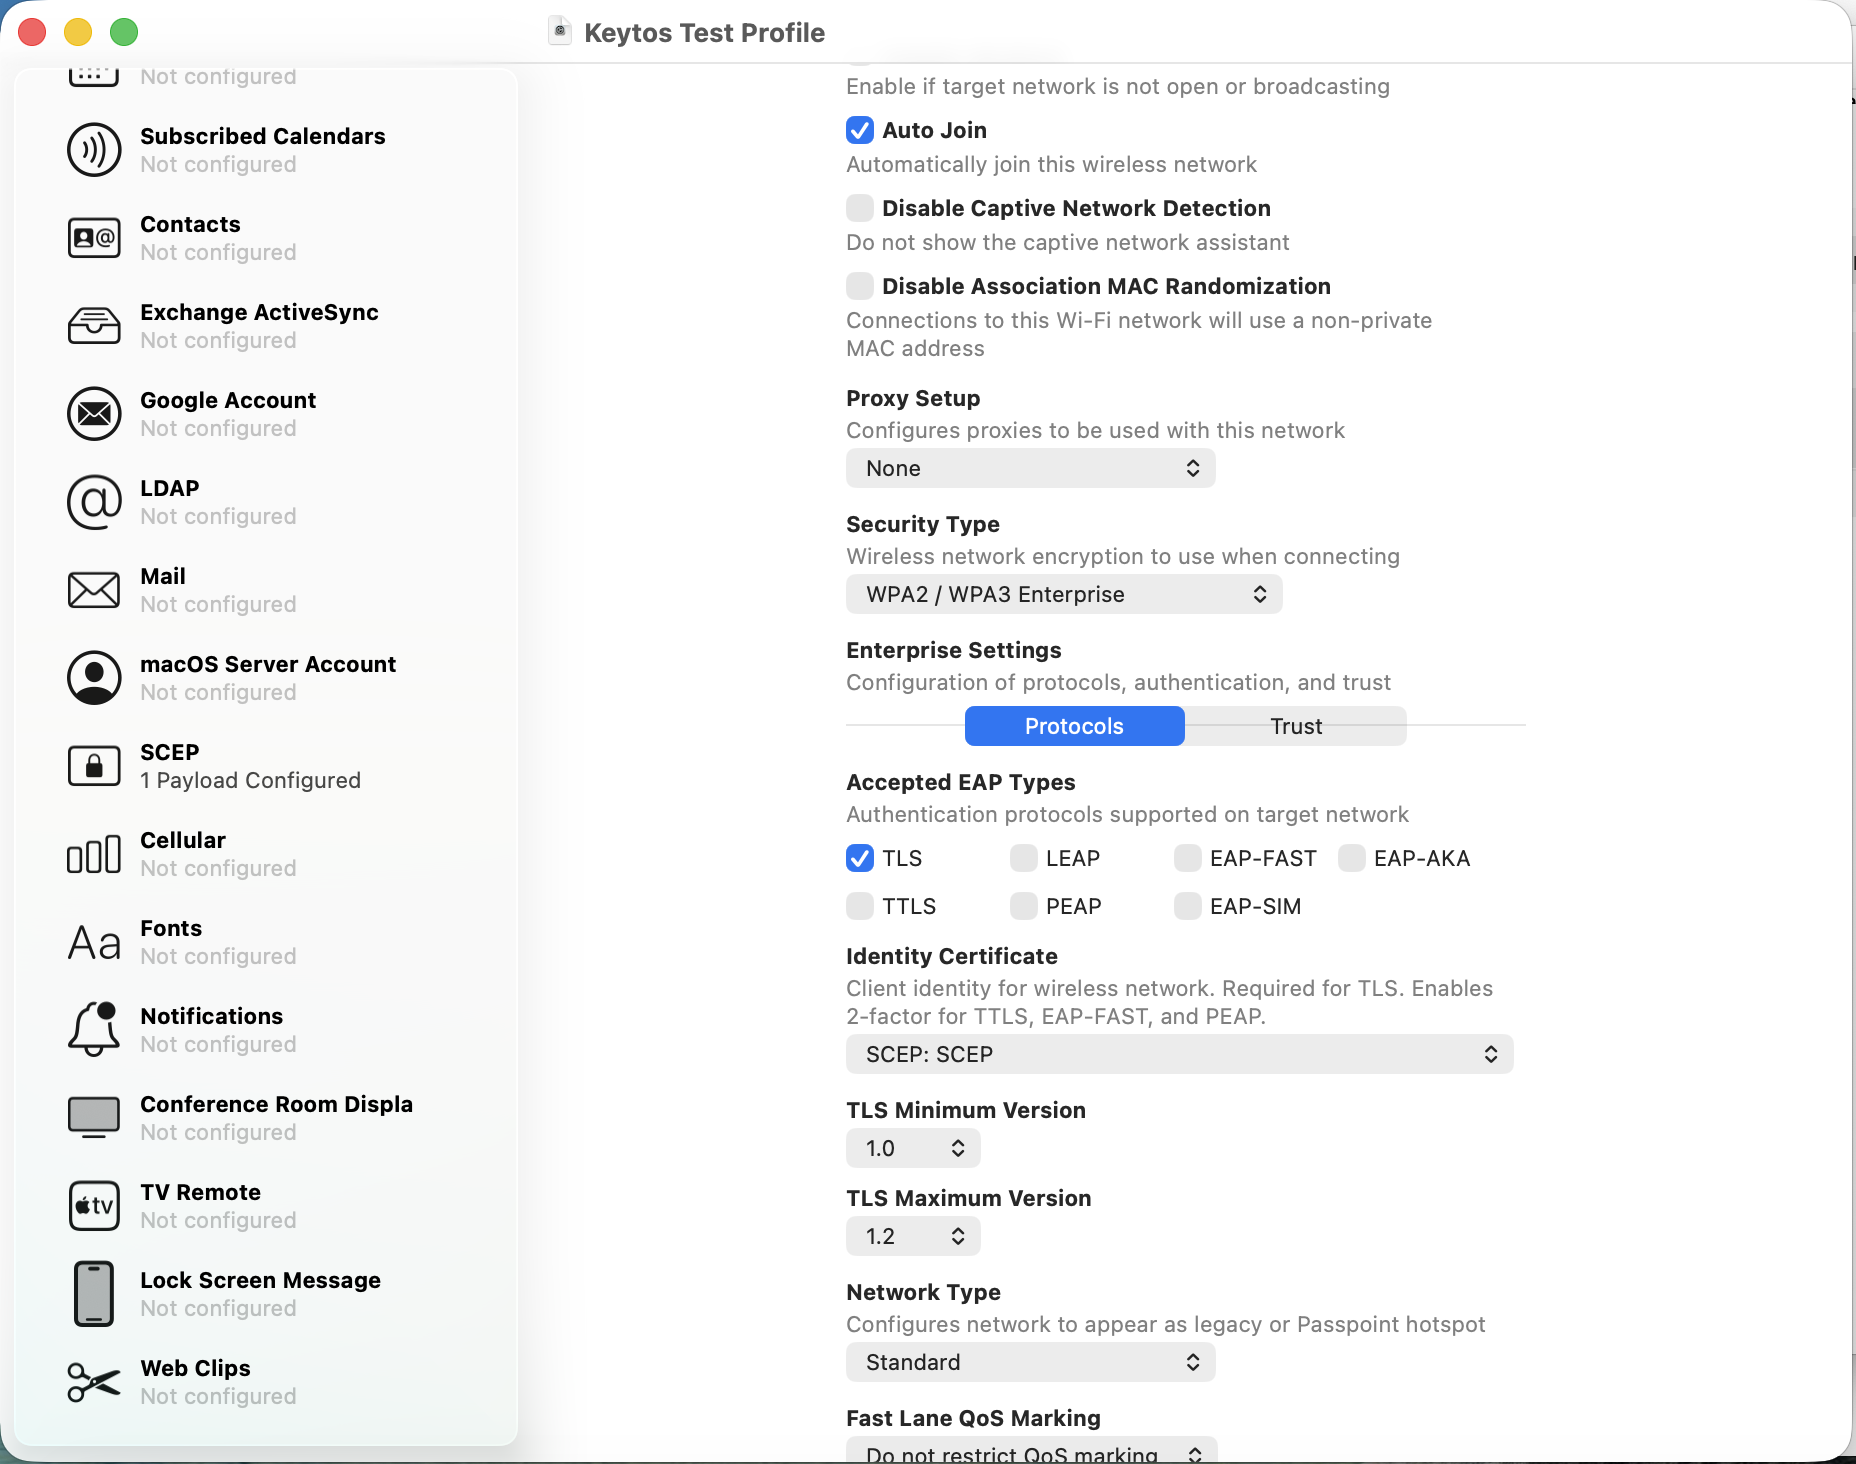
Select the Security type as WPA2 / WPA3-Enterprise.
-
Select the EAP Method as TLS.
-
Under Identity Certificate, select the SCEP payload you just created. This tells the Wi-Fi payload to use the client certificate issued by your SCEP CA as the device’s identity.
-
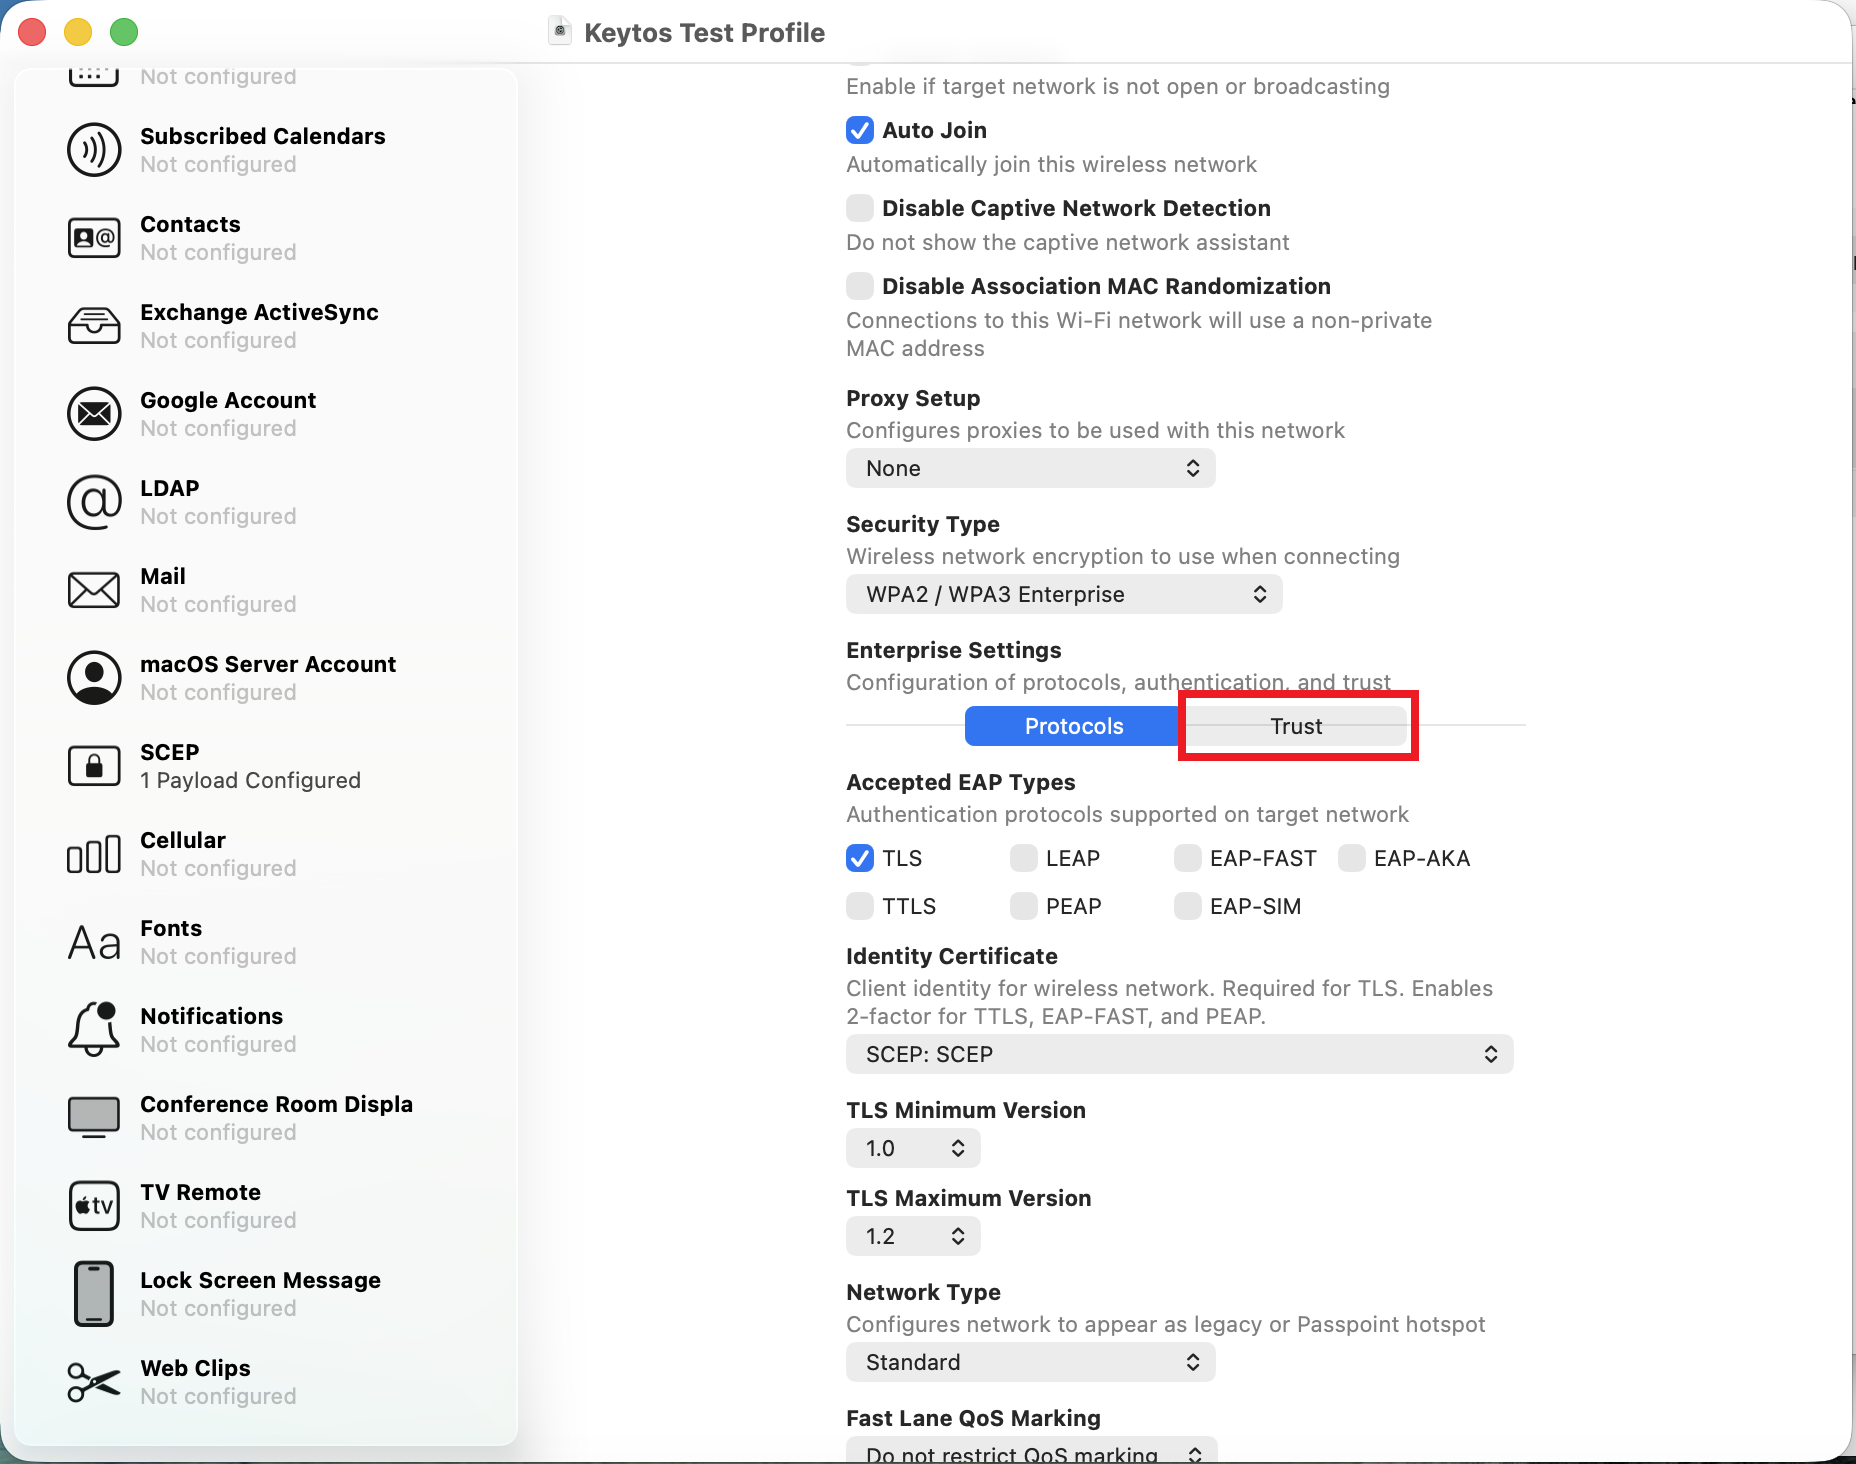
Switch from the Protocols tab to Trust.
-
Under Trusted Certificates, check the box next to each EZRADIUS Server CA certificate you added. Don’t select the SCEP payload here: it’s the device’s identity, not the CA that signed your RADIUS server certificate.
-
Scroll down until you see Trusted Server Certificate Names. We will get these values from EZRADIUS.
How to Get your RADIUS Server Names from EZRADIUS for EAP-TLS
The RADIUS Server certificate is required to establish a secure connection between your device and the RADIUS server. Follow the steps below to download the RADIUS Server certificate from the EZRADIUS portal.
- Log in to your EZRADIUS portal.
- Navigate to Policies.
- Find your network policy.
- Scroll down to the Server Certificate section.
- Click Download Certificate to download the RADIUS server certificate to your local machine. It will have a filename similar to
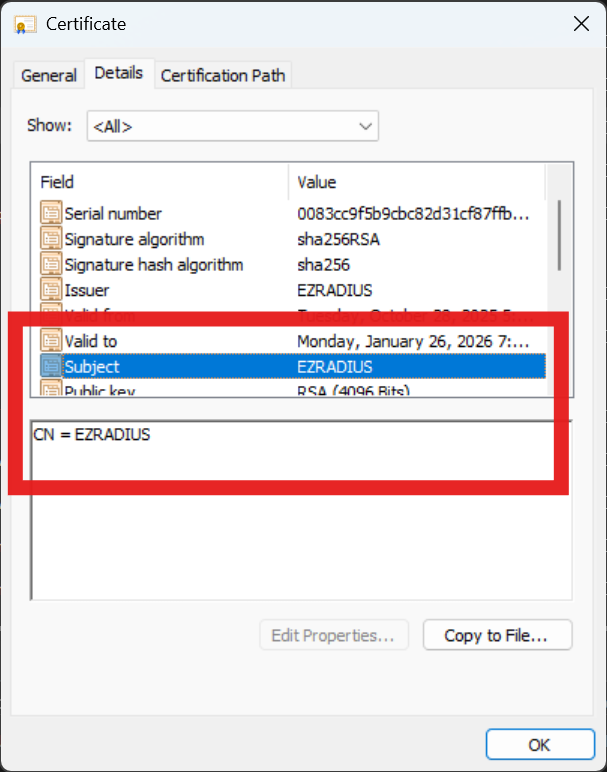
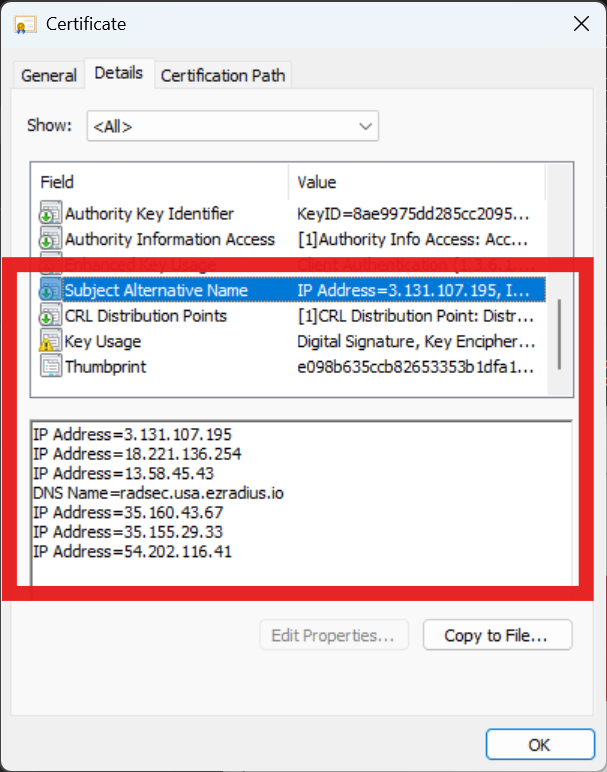
Server.cer. - Open the downloaded certificate on your local machine. Note the following details which you will need later.
-
The Subject Common Name (CN)
-
The Subject Alternative Name (SAN)
-
How to Add Your RADIUS Server Names in Apple Configurator for EAP-TLS
-
Go back into Apple Configurator.
-
Add the Subject common name and every Subject Alternative Name value (each DNS name and IP address, without the
DNS Name=orIP Address=label) as separate entries in the Trusted Server Certificate Names field. macOS and iOS are strict about this list, so missing entries can cause devices to reject the RADIUS server.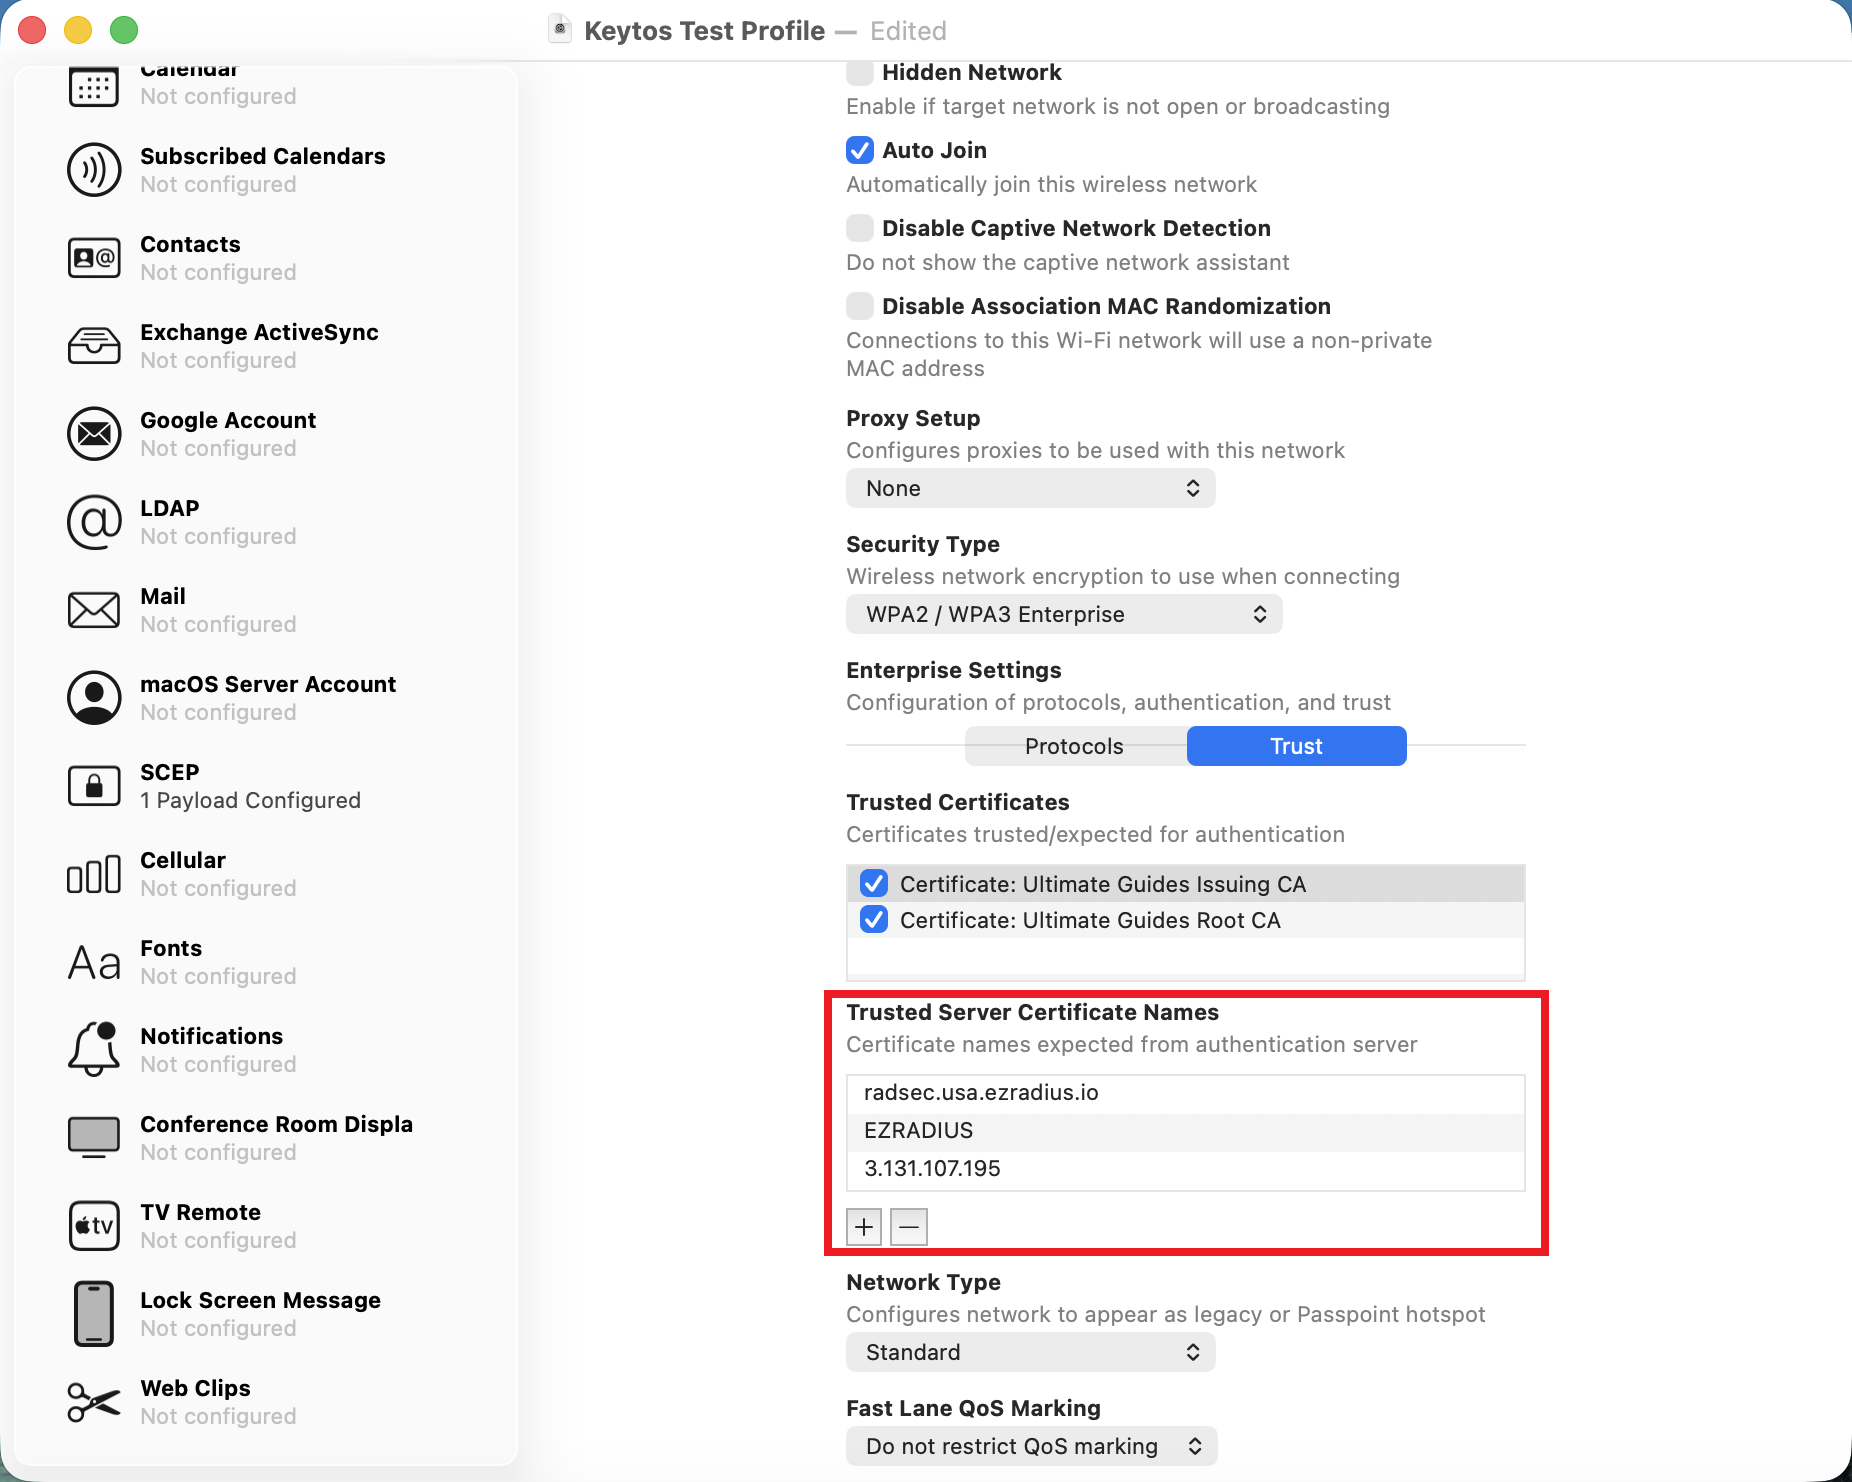
-
Click File > Save to save as a
.mobileconfigfile. -
Done!
Apple’s Built-In Variables for the SCEP Subject and Subject Alternative Name
| Variable | Substitution |
|---|---|
%ComputerName% |
The Mac computer’s name, as set in Sharing (in System Settings > General for macOS 13 or later, or in System Preferences for macOS 12.0.1 or earlier). |
%HardwareUUID% |
The Mac computer’s unique identifier. |
%HostName% |
The Mac computer’s DNS name, such as mac1.betterbag.com. |
%LocalHostName% |
The Mac computer’s local network name, such as Mac1.local. |
%MACAddress% |
The Mac computer’s Ethernet (en0) MAC address. |
%SerialNumber% |
The Mac computer’s serial number. |
A good set of values to use would be:
- Subject:
CN=%ComputerName% - URI SAN:
%HardwareUUID% - DNS SAN:
%HostName%
How to Create an EAP-TTLS/PAP Wi-Fi Profile in Apple Configurator
If you are using Entra ID passwords, you will need to configure the device to use EAP-TTLS/PAP, because Entra ID does not support MS-CHAPv2 identity delegation. To configure EAP-TTLS/PAP on macOS, follow these steps:
-
Download Apple Configurator from the App Store.
-
In Apple Configurator, click File > New Profile.
-
In the General settings, enter the name of the profile.
-
Click Certificates on the left.
-
Click Configure.
-
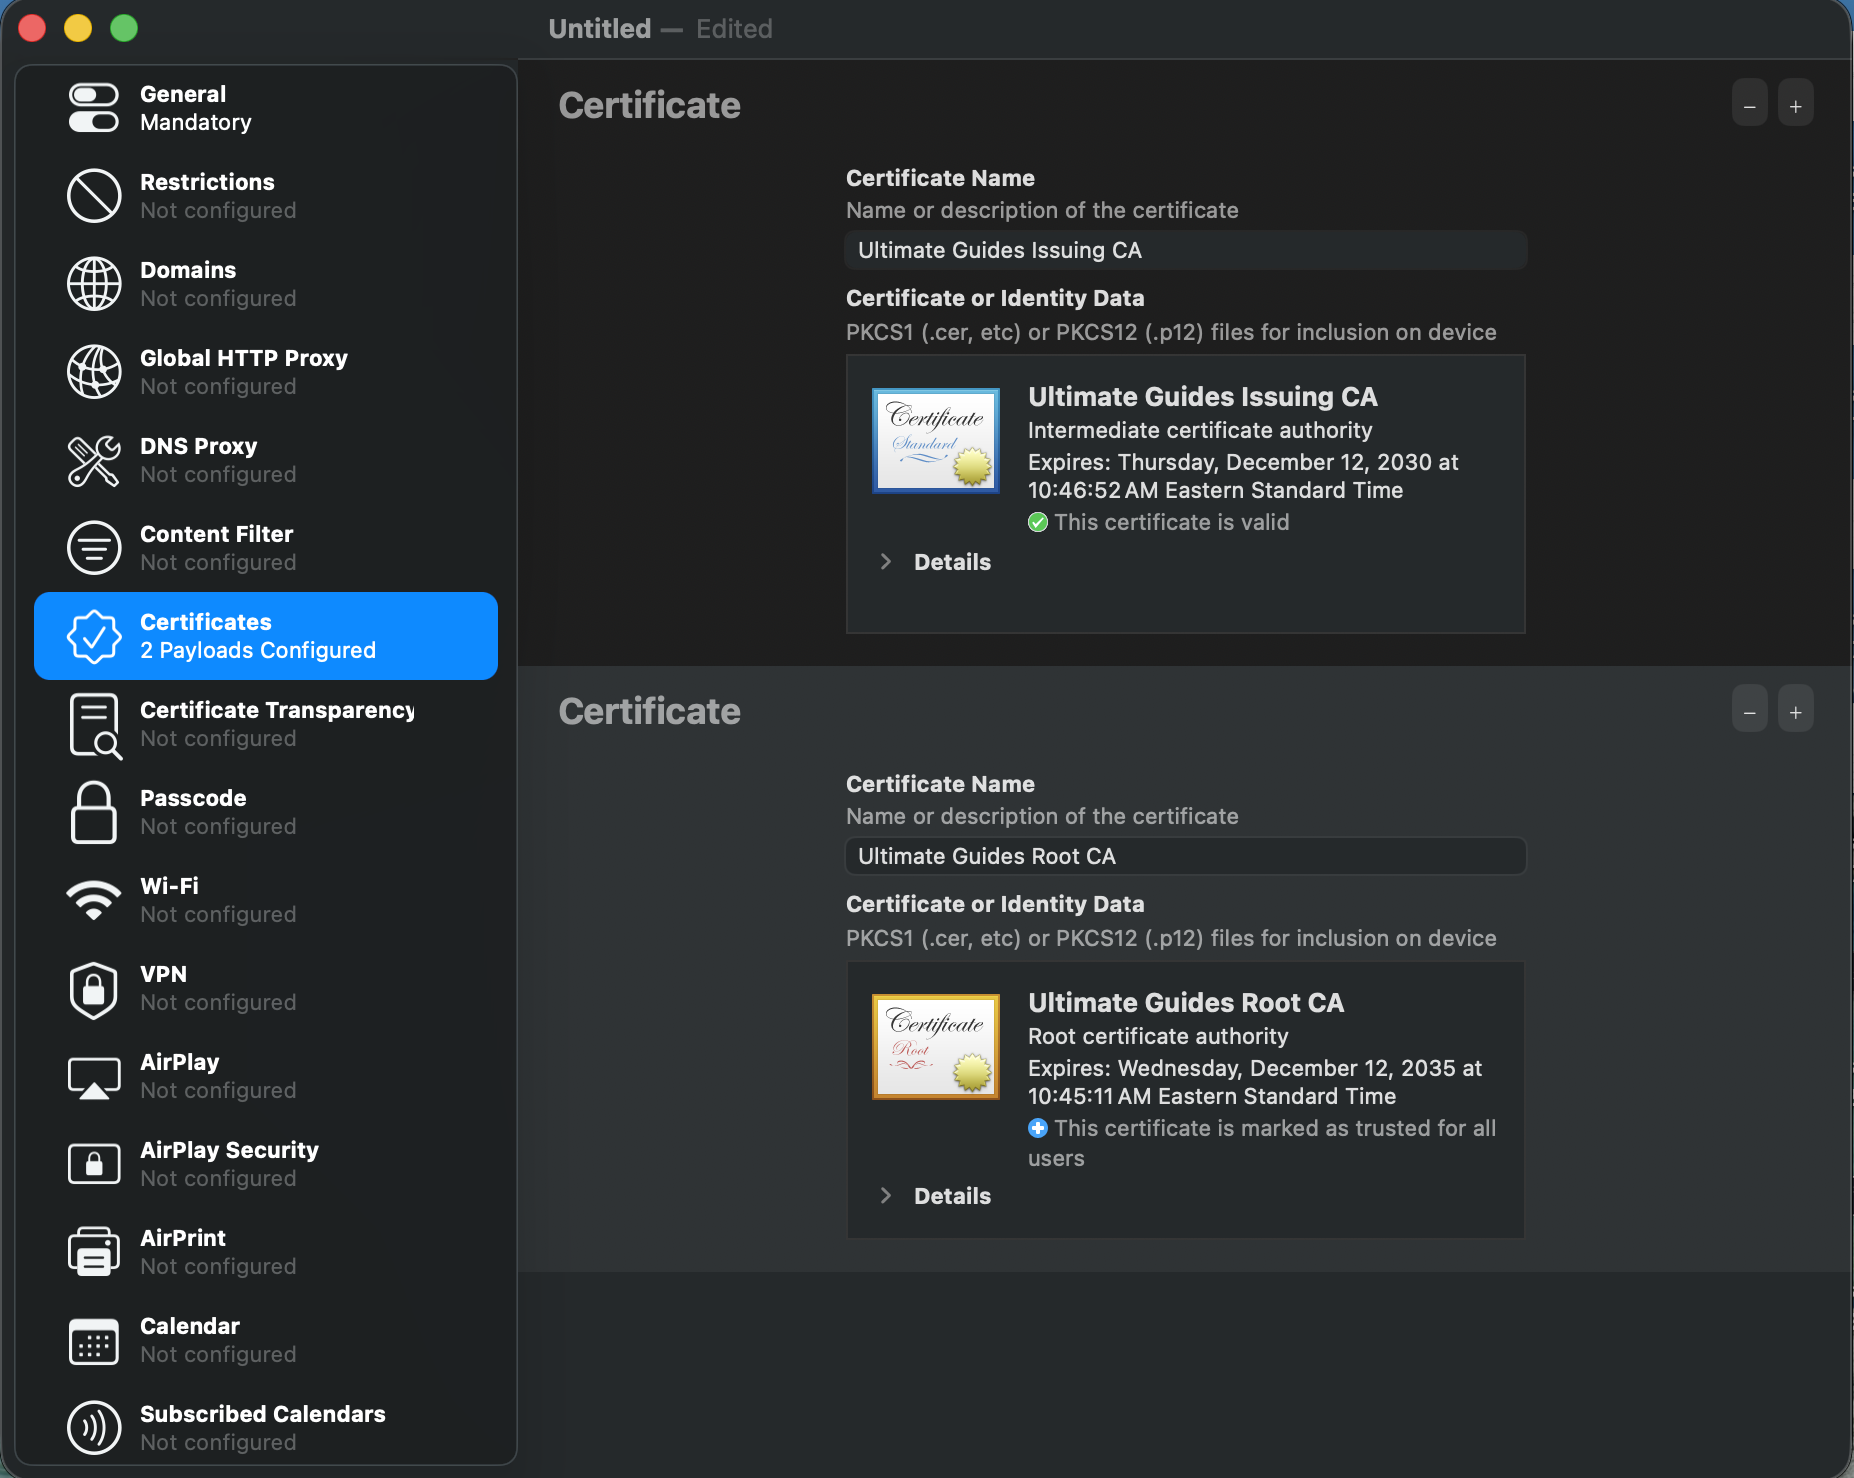
Upload your EZRADIUS Server CA certificate(s) that you downloaded from EZRADIUS. If your server certificate was issued by an intermediate CA, add both the intermediate and the Root CA certificate, each as its own certificate payload. Devices use these certificates to verify the RADIUS server before sending the user’s Entra ID password.
How to Configure Wi-Fi in Apple Configurator for EAP-TTLS
-
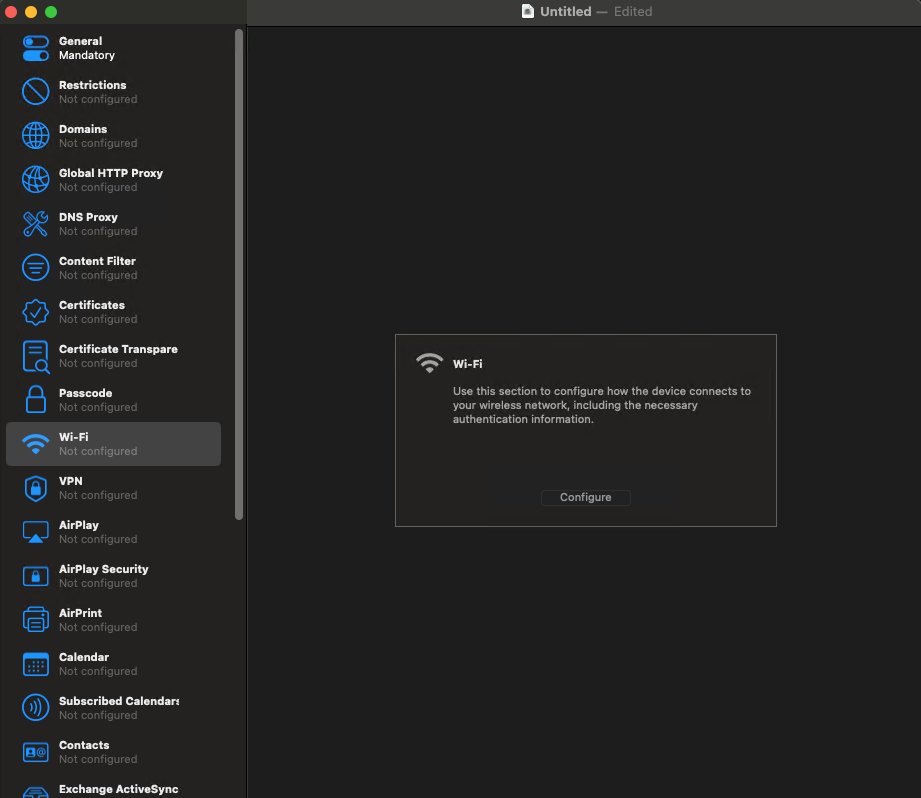
Click Wi-Fi on the left.
-
Click Configure.
-
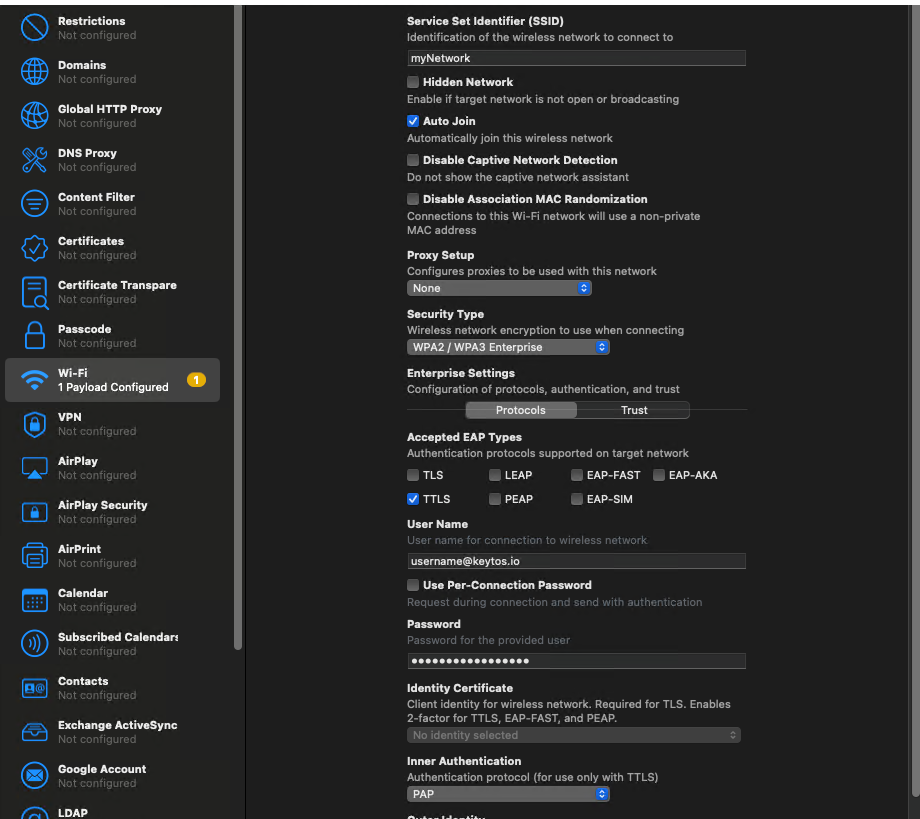
Enter the SSID of your network (this is case sensitive).
-
Select the Security type as WPA2 / WPA3-Enterprise.
-
Select the EAP Method as TTLS.
-
Enter your Entra ID user principal name (UPN, usually your email address) in the Identity field.
-
Enter your Entra ID password in the Password field.
-
Select PAP as the Inner Authentication.
-
Switch from the Protocols tab to Trust.
-
Under Trusted Certificates, check the box next to each EZRADIUS Server CA certificate you added. Without this, devices will ask users to trust the RADIUS server’s certificate the first time they connect.
-
Scroll down until you see Trusted Server Certificate Names. We will get these values from EZRADIUS.
How to Get your RADIUS Server Names from EZRADIUS for EAP-TTLS
The RADIUS Server certificate is required to establish a secure connection between your device and the RADIUS server. Follow the steps below to download the RADIUS Server certificate from the EZRADIUS portal.
- Log in to your EZRADIUS portal.
- Navigate to Policies.
- Find your network policy.
- Scroll down to the Server Certificate section.
- Click Download Certificate to download the RADIUS server certificate to your local machine. It will have a filename similar to
Server.cer. - Open the downloaded certificate on your local machine. Note the following details which you will need later.
-
The Subject Common Name (CN)
-
The Subject Alternative Name (SAN)
-
How to Add Your RADIUS Server Names in Apple Configurator for EAP-TTLS
-
Go back into Apple Configurator.
-
Add the Subject common name and every Subject Alternative Name value (each DNS name and IP address, without the
DNS Name=orIP Address=label) as separate entries in the Trusted Server Certificate Names field. macOS and iOS are strict about this list, so missing entries can cause devices to reject the RADIUS server.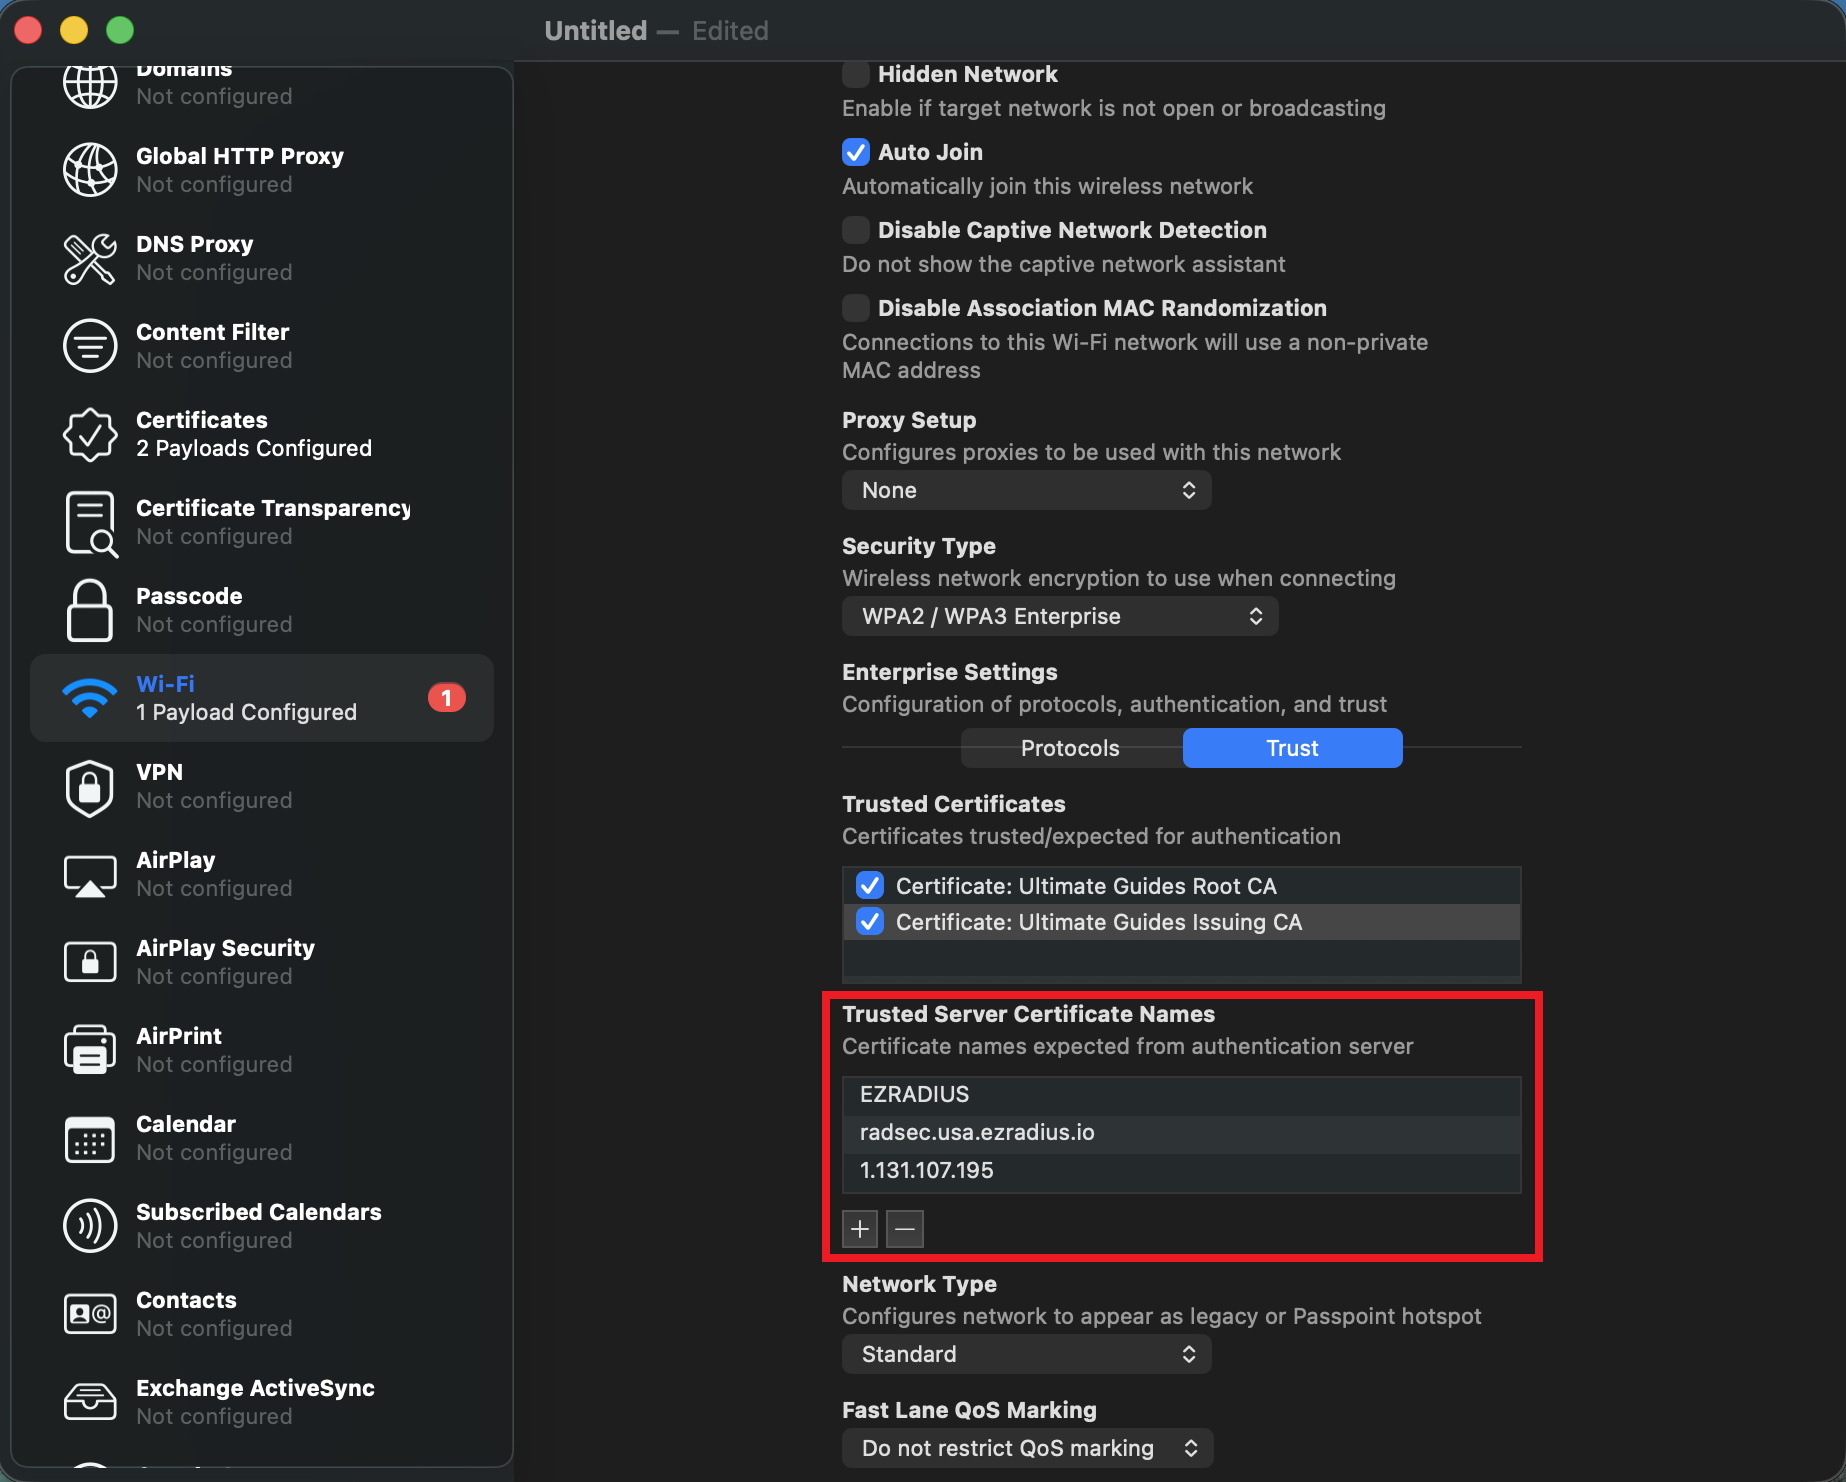
-
Click File > Save to save as a
.mobileconfigfile.
How to Deploy Your Apple Configurator Wi-Fi Profile to Your Devices
We recommend deploying your .mobileconfig file through your MDM. MDM-deployed profiles install certificates in the System keychain, so the device can join the network before a user signs in, and you can update every device at once. Follow the guide for your MDM:
How to Install the Configuration Profile Manually on macOS for Testing
Now that you have created a configuration profile for SCEP in Apple Configurator, you can install it on your device.
When a profile is manually installed on a device, it will issue the certificate to the User’s keychain and not the System keychain. Only MDM solutions can issue certificates to the System keychain. This means that if you manually install the profile created in Apple Configurator, the SCEP certificate will be issued to the User keychain and will only be available for that user. If you want the certificate to be available system-wide, you will need to upload the profile to an MDM solution like Intune or Jamf and deploy it to your devices.
-
Double-click the .mobileconfig file you saved from Apple Configurator.
-
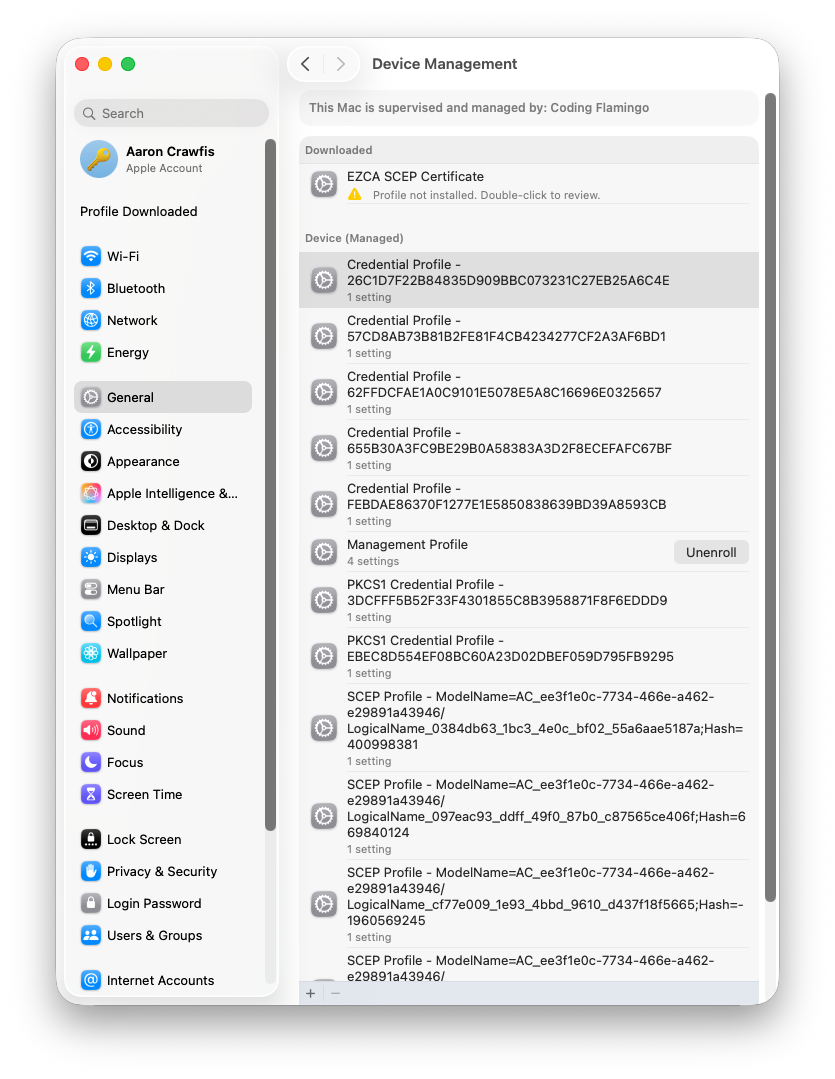
Open Settings. In the top-right of the page, click Profile Downloaded. You will see the profile you just created in Apple Configurator under Downloaded.
-
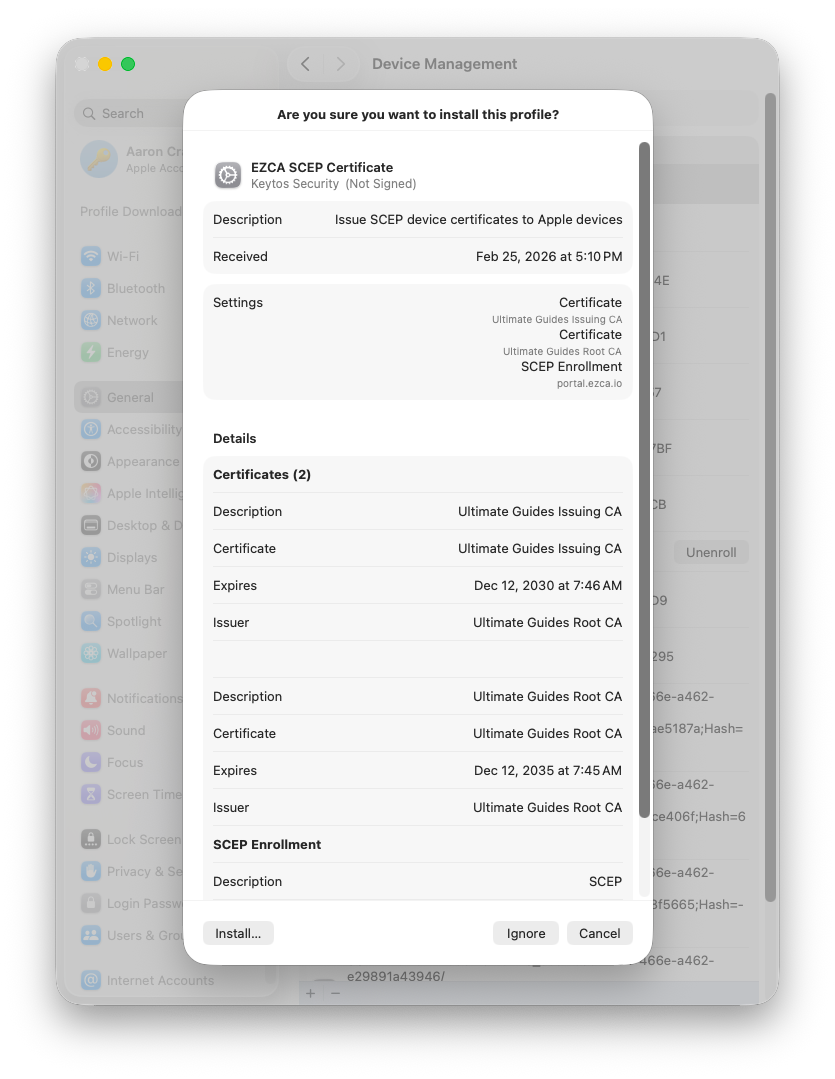
Double-click on the profile to view its contents and click Install….
-
Your trusted certificates will now be installed, and the device will attempt to enroll in SCEP and request a certificate from your EZCA SCEP CA.
How to Test Your Wi-Fi Configuration in macOS
Now that you have configured your Apple Configurator Wi-Fi profile to use Cloud RADIUS for authentication, the next step is to test the configuration on a managed macOS device. Follow these steps to test your Wi-Fi configuration:
-
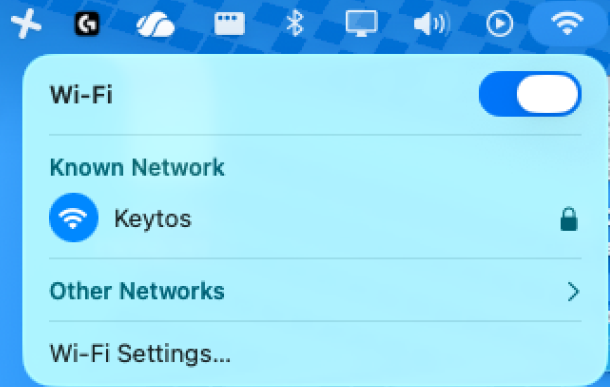
On a managed macOS device, click on the Wi-Fi icon in the menu bar and select the Wi-Fi network that you configured in your Apple Configurator Wi-Fi profile.
-
If your configuration is correct, the device should successfully connect to the Wi-Fi network without any prompts.
-
If you are prompted to select a certificate for the network, your Wi-Fi profile is not fully configured: usually the RADIUS server’s Subject and Subject Alternative Names are missing from the trusted server names, a CA in the server certificate chain is not trusted, or the SCEP certificate has not been issued to the device yet.
Now that you have configured your Apple Configurator Wi-Fi profile to use Cloud RADIUS for authentication, the next step is to test the configuration on a managed macOS device. Follow these steps to test your Wi-Fi configuration:
-
On a managed macOS device, click on the Wi-Fi icon in the menu bar and select the Wi-Fi network that you configured in your Apple Configurator Wi-Fi profile.
-
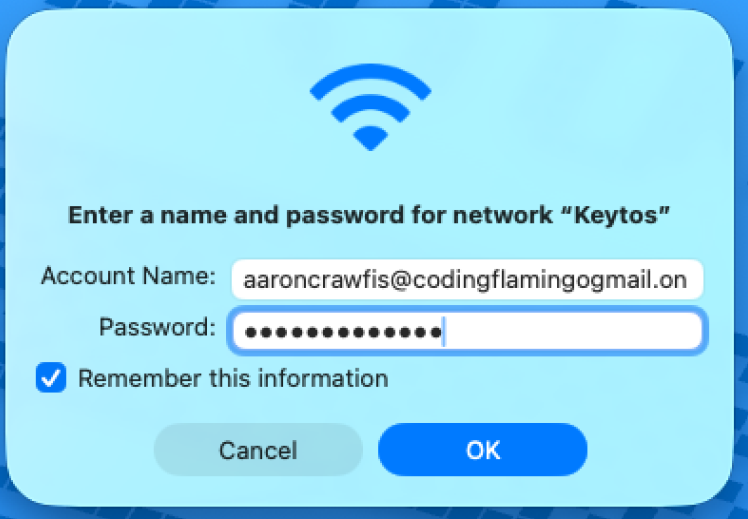
You will be prompted to enter your Entra ID username and password. Enter your Entra ID user principal name (UPN, usually your email address) as the username and your Entra ID password, then click OK.
-
If your configuration is correct, the device should successfully connect to the Wi-Fi network.
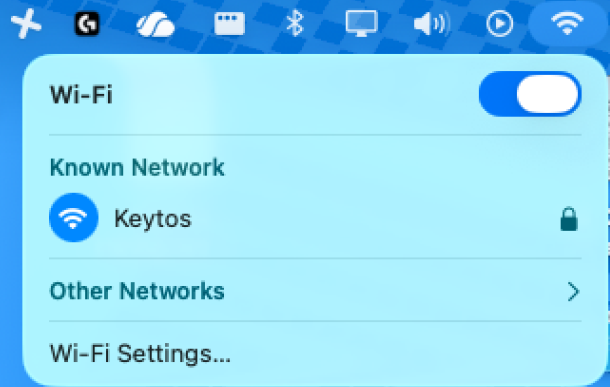
Now when the user connects to the Wi-Fi network, they will be prompted for their Entra ID password.
Having trouble connecting? Our troubleshooting guide covers the most common RADIUS errors and how to fix them.
🔎 Troubleshoot RADIUS AuthenticationEnjoying EZRADIUS? Leave Us a Review!
We hope you’re enjoying using EZRADIUS to secure your Wi-Fi network! If you have a moment, we would greatly appreciate it if you could leave us a review on G2. Your feedback helps other IT professionals discover EZRADIUS and helps us continue to improve our service. Thank you for your support!