












How-To: Set Up Cloud RADIUS for Azure Cloud PKI (Microsoft Intune Cloud PKI) With EZRADIUS
Microsoft Cloud PKI is included in Microsoft 365 E5 and G5. Without those licenses, you have to buy it as an Intune add-on and then pay for a RADIUS server on top, so Intune Cloud PKI only makes financial sense if you already own E5 or G5 and only use Intune. If you don’t (or use another MDM for Apple or Linux devices), Keytos Shield gives you PKI, Cloud RADIUS, and Passkey onboarding in a single subscription for less than the cost of Cloud PKI alone. See Keytos Shield pricing or follow the Keytos Shield network security getting started guide.
What Is Cloud RADIUS for Azure Cloud PKI?
Microsoft Cloud PKI (often called Azure Cloud PKI or Intune Cloud PKI) lets you issue certificates to your Intune-managed devices without running your own certificate authority servers. It’s a great way to get a unique certificate onto every laptop and phone in your organization. But a certificate on its own doesn’t get anyone onto your Wi-Fi. You still need a RADIUS server that checks those certificates every time a device connects.
That’s where EZRADIUS comes in. EZRADIUS is a Cloud RADIUS server that natively trusts your Cloud PKI certificates, so you can replace your shared Wi-Fi password with passwordless, phishing-resistant EAP-TLS authentication, without deploying Network Policy Server (NPS) or any other on-premises RADIUS infrastructure.
This reference architecture walks you through the complete setup from start to finish: creating your Cloud PKI certificate authorities, pushing trusted certificates and SCEP profiles with Intune, trusting Cloud PKI in EZRADIUS, building your RADIUS access policy, and pushing the Wi-Fi profile to your devices.
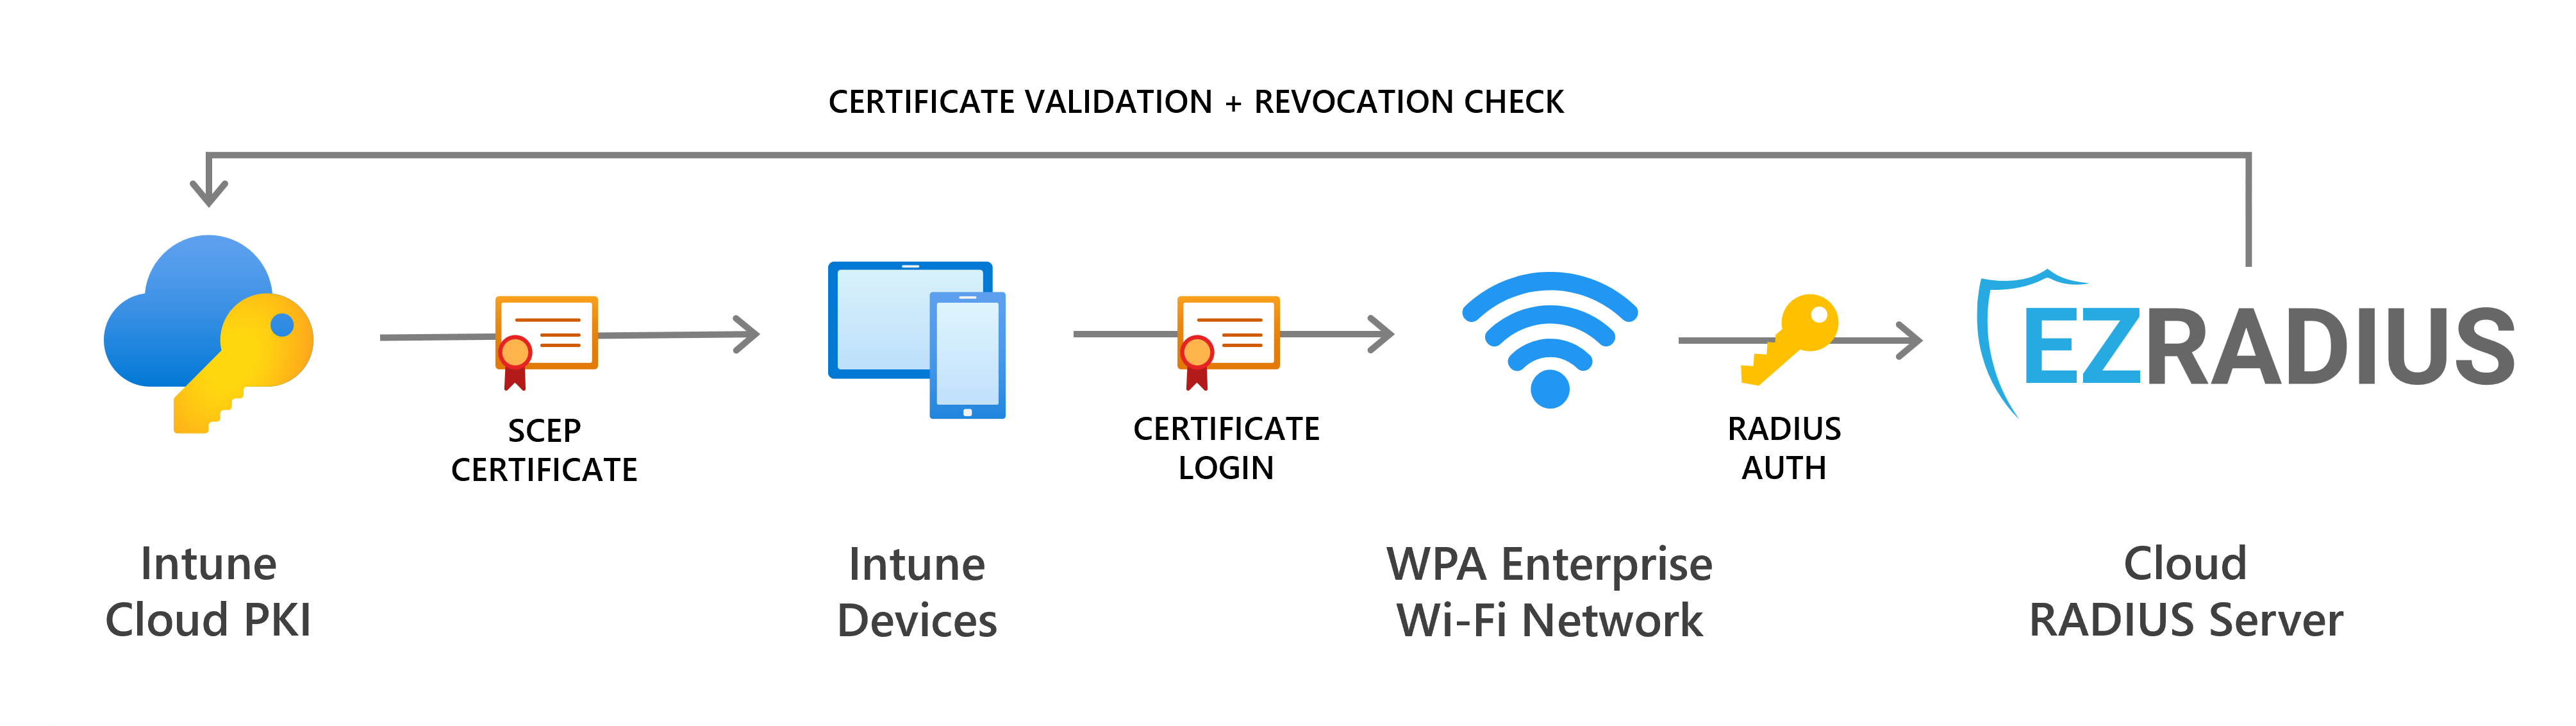
Already have Cloud PKI issuing certificates to your devices? You can skip directly to Step 5: How to Create Your EZRADIUS Cloud RADIUS Policy.
Does Microsoft Intune Cloud PKI Include a RADIUS Server?
No. Microsoft Cloud PKI is a certificate authority service. It issues, renews, and revokes certificates, but it doesn’t authenticate Wi-Fi, wired 802.1X, or VPN connections. Every access point or switch that uses WPA2/WPA3-Enterprise needs a RADIUS server to validate the certificate a device presents. EZRADIUS fills that gap as a fully managed Cloud RADIUS service, so your entire network authentication stack stays in the cloud.
How Does EAP-TLS Wi-Fi Authentication Work With Intune Cloud PKI and EZRADIUS Cloud RADIUS?
Once everything in this guide is configured, a device connects to your Wi-Fi like this:
- Intune pushes your Cloud PKI Root and Issuing CA certificates, a SCEP certificate profile, the EZRADIUS server CA certificate, and a Wi-Fi profile to the device.
- The device creates its own key pair and requests its client certificate from your Cloud PKI Issuing CA through SCEP.
- The device connects to your WPA2/WPA3-Enterprise SSID, and your access point forwards the authentication request to EZRADIUS over Classic RADIUS or RadSec.
- The device verifies that it’s talking to your real RADIUS server by checking the EZRADIUS server certificate against the EZRADIUS CA certificate and server names in its Wi-Fi profile.
- The Cloud RADIUS server validates the device’s certificate against your trusted Cloud PKI Root and Issuing CAs, checks that it hasn’t been revoked, and optionally looks up the device in Intune (for compliance) or the user/device in Entra ID (for group membership).
- If an access policy matches, EZRADIUS accepts the connection and depending on your configuration either puts the device on the default VLAN or dynamically assigns it to a VLAN based on the authentication attributes.
Which Certificates Are Involved in Cloud RADIUS for Intune Cloud PKI?
| Certificate | Issued By | Who Needs to Trust It | How It Gets There |
|---|---|---|---|
| Cloud PKI Root CA | Itself (self-signed) | Your devices and EZRADIUS | Intune trusted CA certificate profile, and uploaded to your EZRADIUS policy as a trusted CA |
| Cloud PKI Issuing CA | Cloud PKI Root CA | Your devices and EZRADIUS | Intune trusted CA certificate profile, and uploaded to your EZRADIUS policy as a trusted CA |
| Client certificate (one per user or device) | Cloud PKI Issuing CA | EZRADIUS | Intune SCEP certificate profile |
| EZRADIUS server certificate | EZRADIUS CA (auto-generated) | Your devices | EZRADIUS CA pushed with an Intune trusted certificate profile, and server names in the Intune Wi-Fi profile |
Should I Issue Device or User Certificates From Cloud PKI?
We recommend device certificates for most organizations. They let devices connect before anyone signs in, and they include the Intune device ID, so EZRADIUS can check whether the device is still managed and compliant in Intune every time it connects.
Choose user certificates when you want to control access based on who is using the device, for example by Entra ID group membership. Both options are covered in the steps below. You can also issue both and create one access policy for each.
Prerequisites for Cloud RADIUS With Microsoft Intune Cloud PKI
Before you begin, make sure that:
- You have a Microsoft Cloud PKI license (included in Microsoft 365 E5 and G5, or purchased as an Intune add-on). See Microsoft’s Cloud PKI overview for licensing details.
- You have the Intune Administrator role, or Cloud PKI permissions assigned through Intune role-based access control.
- Your devices are enrolled in Microsoft Intune.
- Your access points or switches support WPA2-Enterprise or WPA3-Enterprise (802.1X) with an external RADIUS server.
- The Keytos Entra applications are registered in your tenant
- You have an active EZRADIUS plan
- You are a Subscription Owner or Network Administrator on your EZRADIUS plan
Step-by-Step Guide - How to Set Up Cloud RADIUS for Azure Cloud PKI
The following steps will guide you through the full setup, from creating your first Cloud PKI CA to connecting your first device. Steps 1 to 4 happen in Microsoft Intune, steps 5 to 9 happen in EZRADIUS and your network controller, and steps 10 to 12 bring everything together on your devices.
Step 1: How to Create Your Microsoft Intune Cloud PKI Root and Issuing CAs
Microsoft Cloud PKI uses a two-tier hierarchy: a Root CA that acts as your trust anchor, and an Issuing CA that issues the certificates your Intune devices receive through SCEP. You need both before you can issue any certificates. You’ll need the Microsoft Intune Administrator role (or Cloud PKI permissions assigned through Intune RBAC) and a Cloud PKI license to create them.
Microsoft does not let you change a Cloud PKI CA once it is created. If you later need a different Extended Key Usage (EKU), key size, or subject, you have to create a new CA and redeploy your profiles. Double-check the settings below before you click Create.
How to Create Your Microsoft Cloud PKI Root CA
-
Sign in to the Microsoft Intune admin center.
-
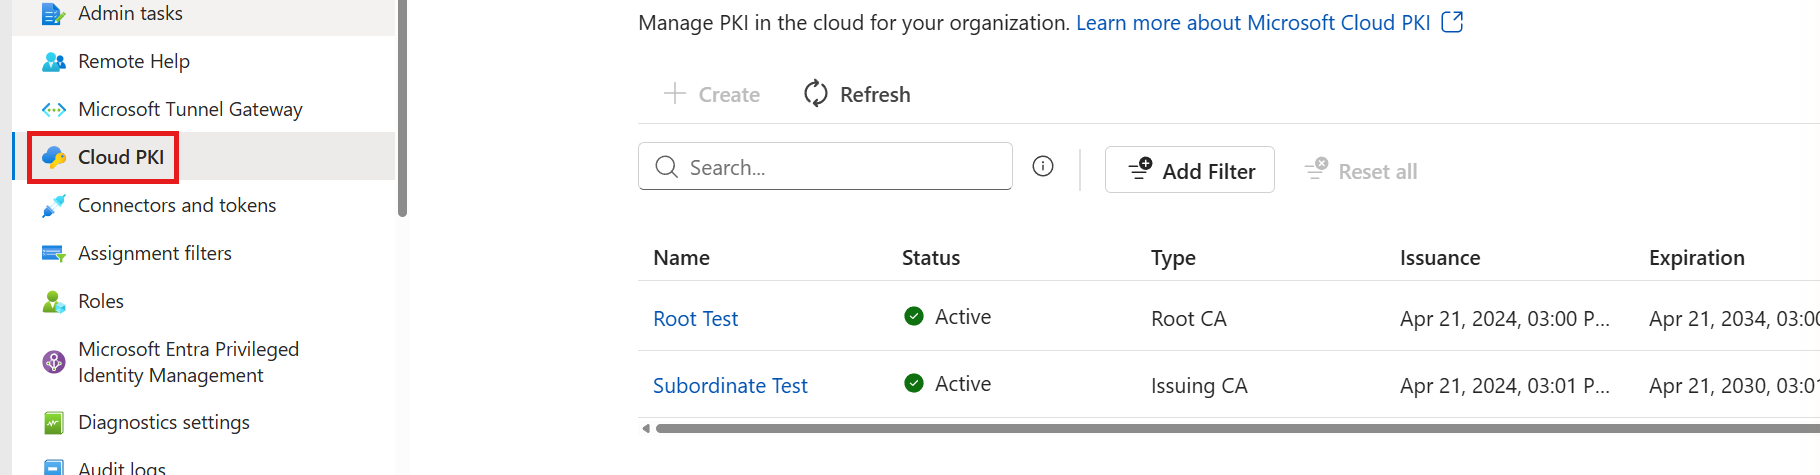
Navigate to Tenant administration > Cloud PKI, then click Create.
-
Under Basics, enter a Name that makes the CA easy to identify later (for example “Contoso Cloud PKI Root CA”) and an optional Description, then click Next.
-
Under Configuration settings, set CA type to Root CA.
-
Select a Validity period. Intune offers 5, 10, 15, 20, or 25 years for a Root CA.
-
Under Extended Key Usages, add Client Authentication. This is required for Wi-Fi certificates. The EKUs you select here are the only ones your Issuing CA can use later, so also add any other EKUs you plan to use with this hierarchy.
-
Under Subject attributes, enter a Common name (CN) for the Root CA, plus any optional attributes such as Organization (O) and Country (C).
-
Under Encryption, select the Key size and algorithm. This is the upper bound for the key size and hash algorithm your SCEP profiles can request, so we recommend choosing RSA-4096 and SHA-512 unless you have older devices that require smaller keys.
-
Click Next, optionally add Scope tags, and click Next again.
-
Review the summary and click Create.
-
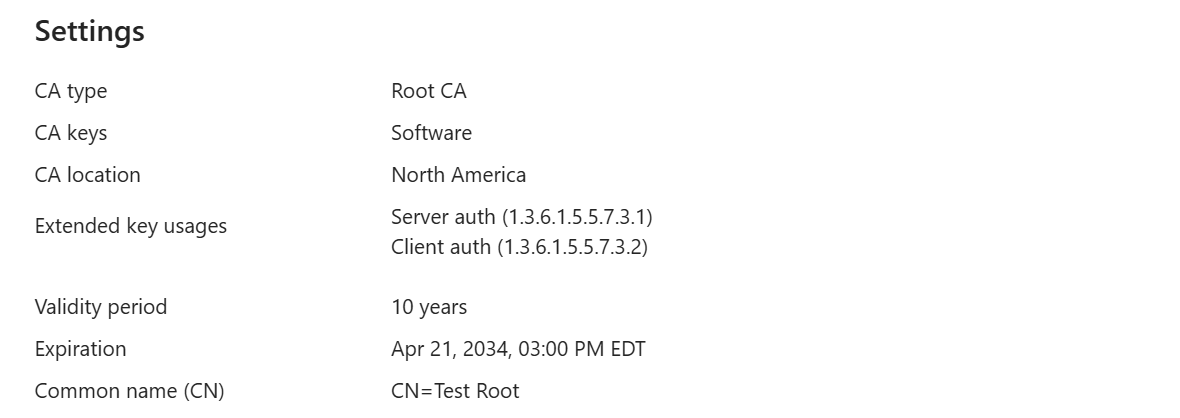
Open the new Root CA from the Cloud PKI list to confirm its settings. The Settings section shows the CA type, Extended Key Usages, validity period, and common name you chose.
How to Create Your Microsoft Cloud PKI Issuing CA
-
Back on the Cloud PKI page, click Create again.
-
Under Basics, enter a Name (for example “Contoso Cloud PKI Issuing CA”) and an optional Description, then click Next.
-
Under Configuration settings, set CA type to Issuing CA.
-
Set Root CA source to Intune, then select the Root CA you just created under Root CA.
-
Select a Validity period. Intune offers 2, 4, 6, 8, or 10 years, and it can’t be longer than the Root CA’s validity.
-
Under Extended Key Usages, add Client Authentication.
-
Under Subject attributes, enter a Common name (CN) for the Issuing CA.
-
Click Next, optionally add Scope tags, and click Next again.
-
Review the summary and click Create.
-
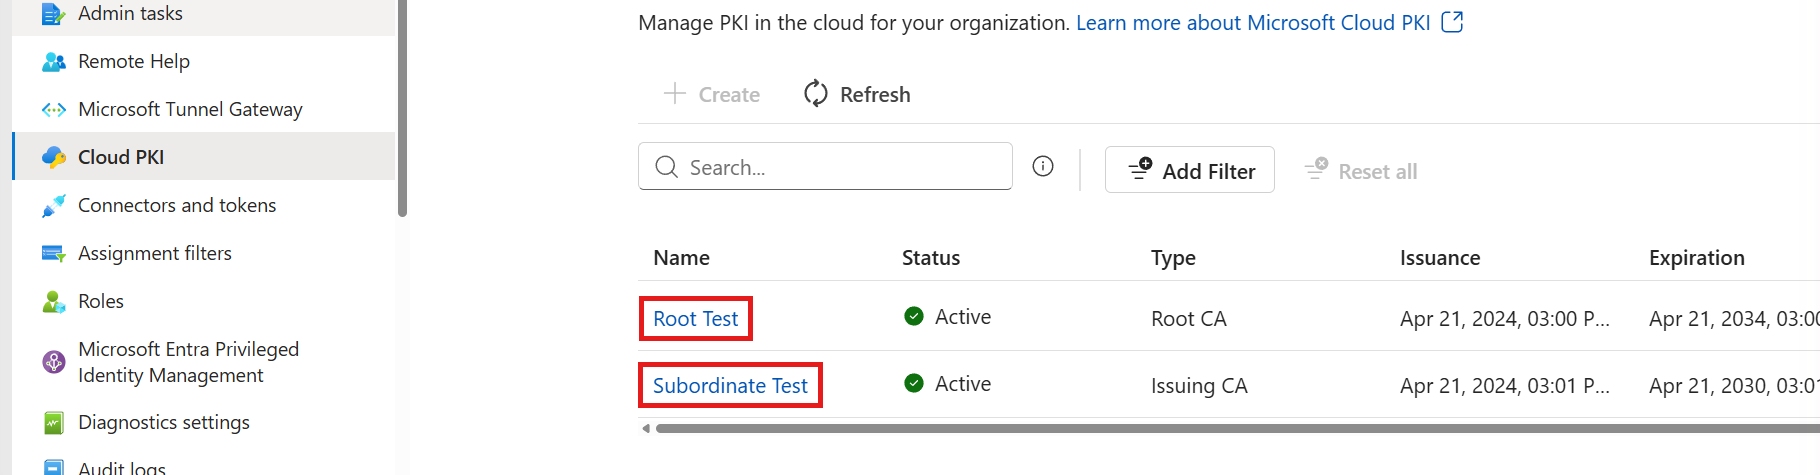
Click Refresh on the Cloud PKI page. You should now see both your Root CA and your Issuing CA with a status of Active.
For more details on each setting, see Microsoft’s guide to configuring Microsoft Cloud PKI root and issuing CAs.
Step 2: How to Download Your Cloud PKI Root and Issuing CA Certificates
You need the public certificates of both your Cloud PKI Root CA and Issuing CA. Your devices need them to trust the certificates Cloud PKI issues, and your RADIUS server needs them to validate the certificates your devices present when they connect.
-
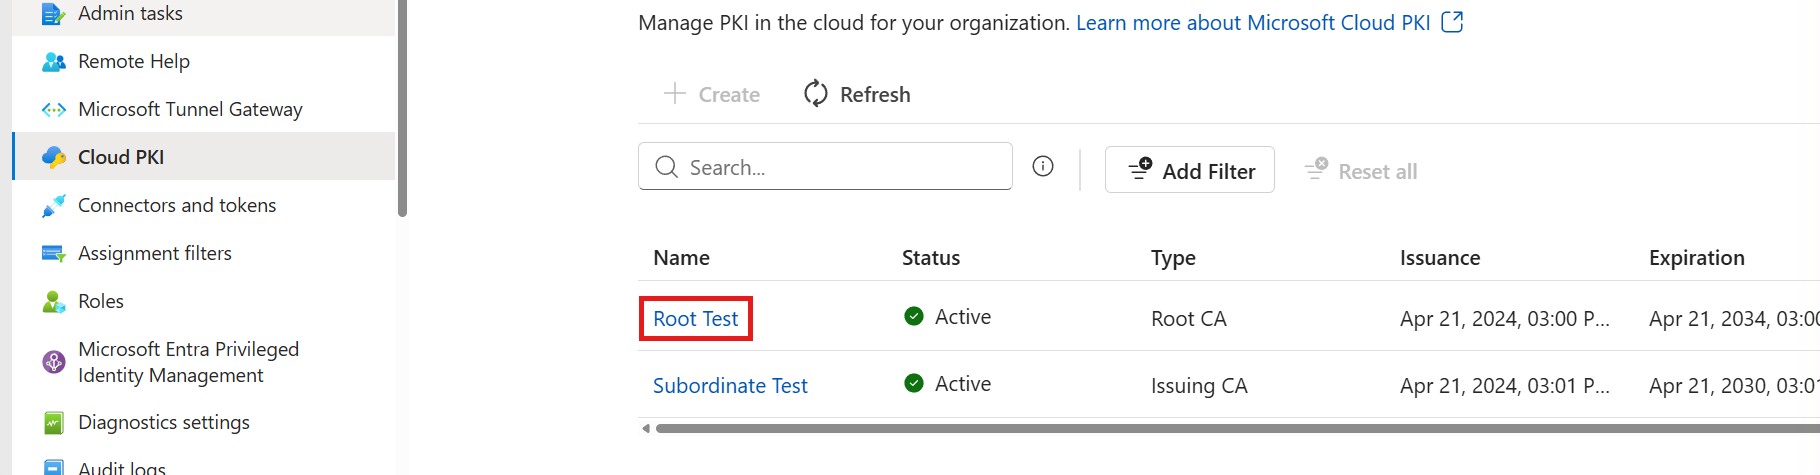
In the Microsoft Intune admin center, navigate to Tenant administration > Cloud PKI.
-
Click on your Root CA to open it.
-
Click the Properties tab, then scroll down and click Download next to Download certificate. The file name is based on the CA’s common name. If your browser warns you about downloading a
.cerfile, click Keep.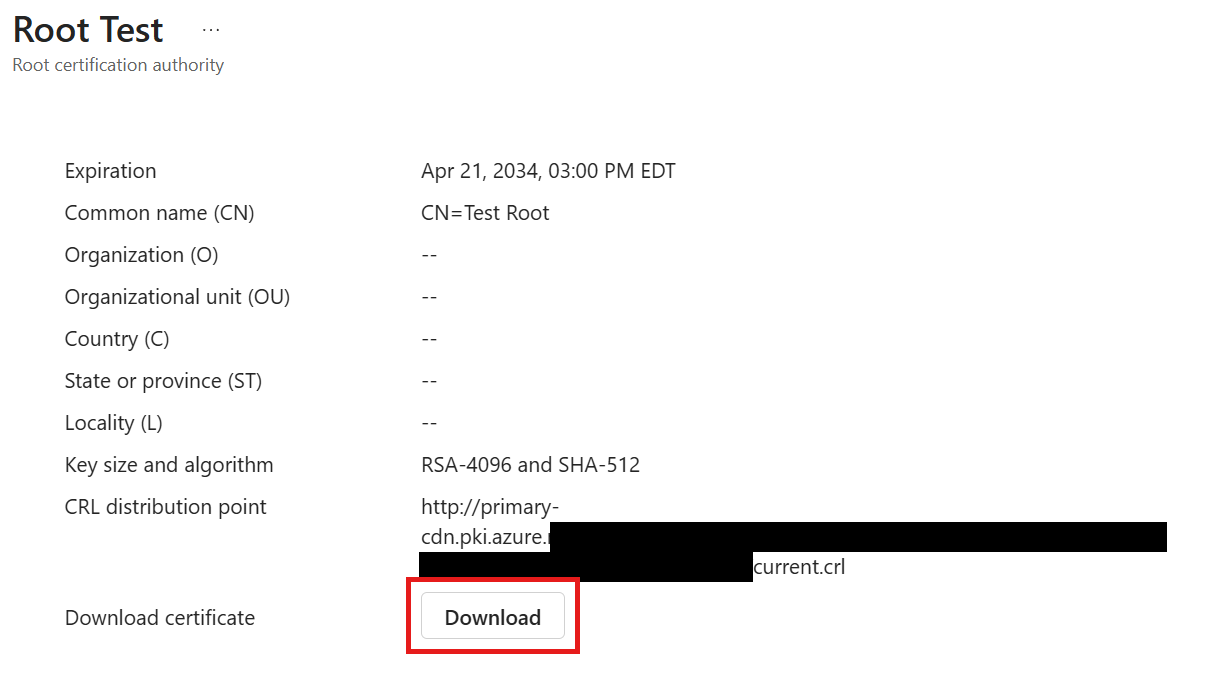
-
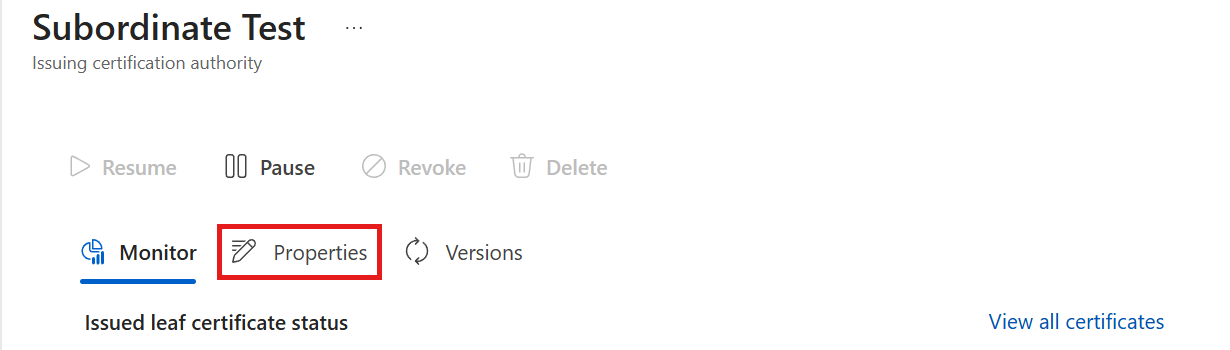
Go back to the Cloud PKI list and click on your Issuing CA. Issuing CAs open on the Monitor tab, so click the Properties tab.
-
Scroll down and click Download next to Download certificate to download the Issuing CA certificate.
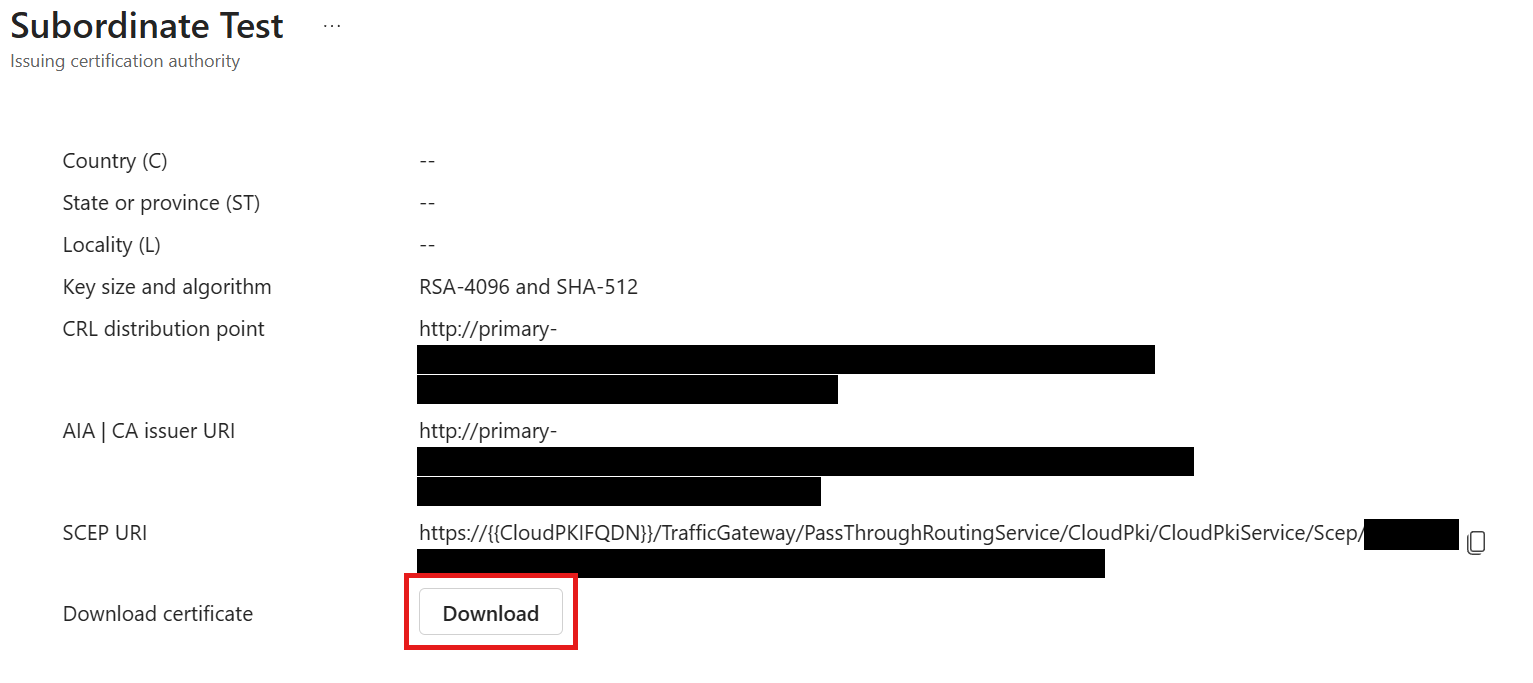
The same Properties tab of your Issuing CA shows the SCEP URI you’ll paste into your Intune SCEP certificate profiles. Use the copy icon next to it to copy the full value.
Step 3: How to Push Your Cloud PKI CA Certificates to Devices With Intune Trusted Certificate Profiles
Your devices need to trust your Cloud PKI hierarchy before Intune can deliver SCEP certificates to them. Create two trusted certificate profiles for each platform you support: one for the Root CA and one for the Issuing CA. Assign both profiles to the same groups you’ll target with your SCEP and Wi-Fi profiles. Intune profiles are platform-specific, so choose the tab for your devices and repeat the steps for every platform you manage:
On Windows, store the Root CA in the Root store and the Issuing CA in the Intermediate store.
-
Navigate to the Intune portal: https://aka.ms/Intune
-
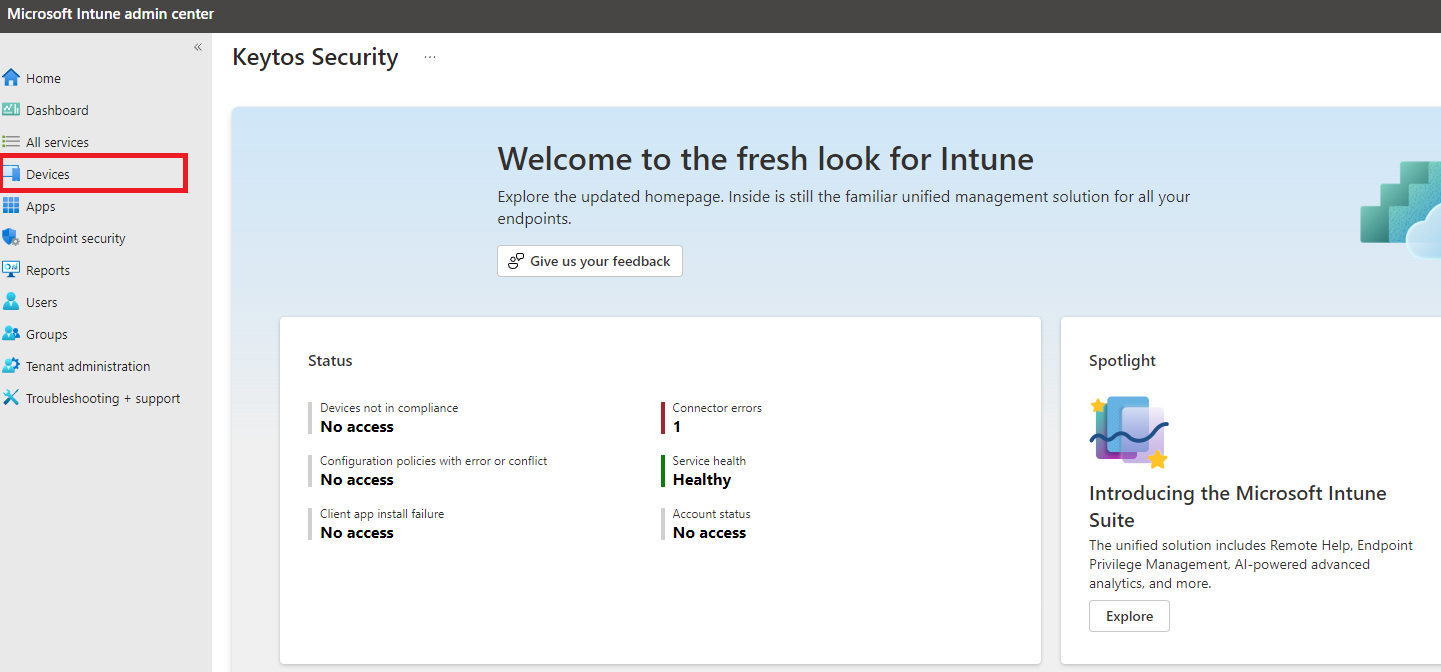
From the left-hand menu, click on Devices.
-
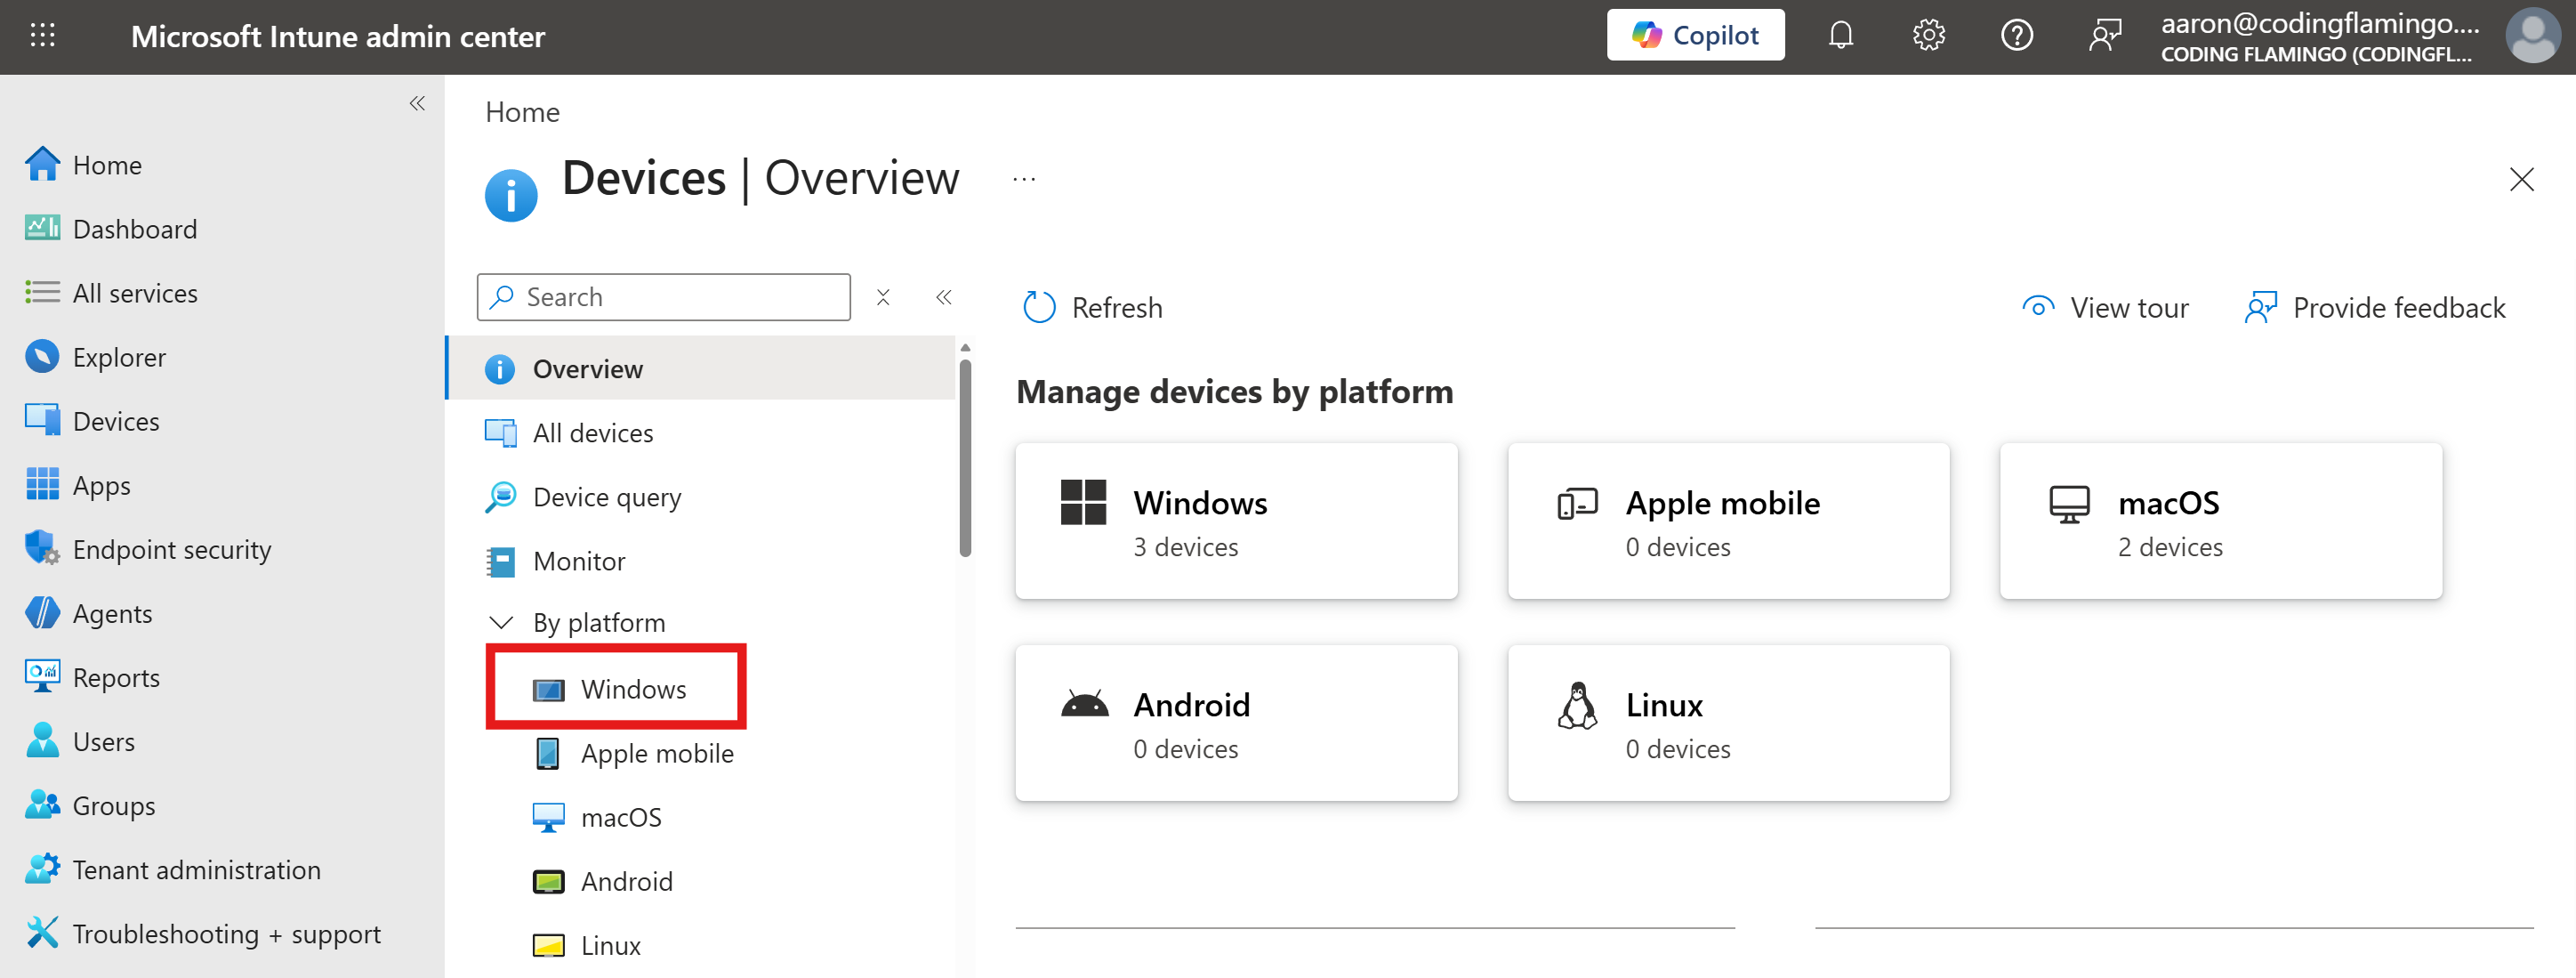
From the left-hand sub-menu, click Windows to manage Windows devices.
-
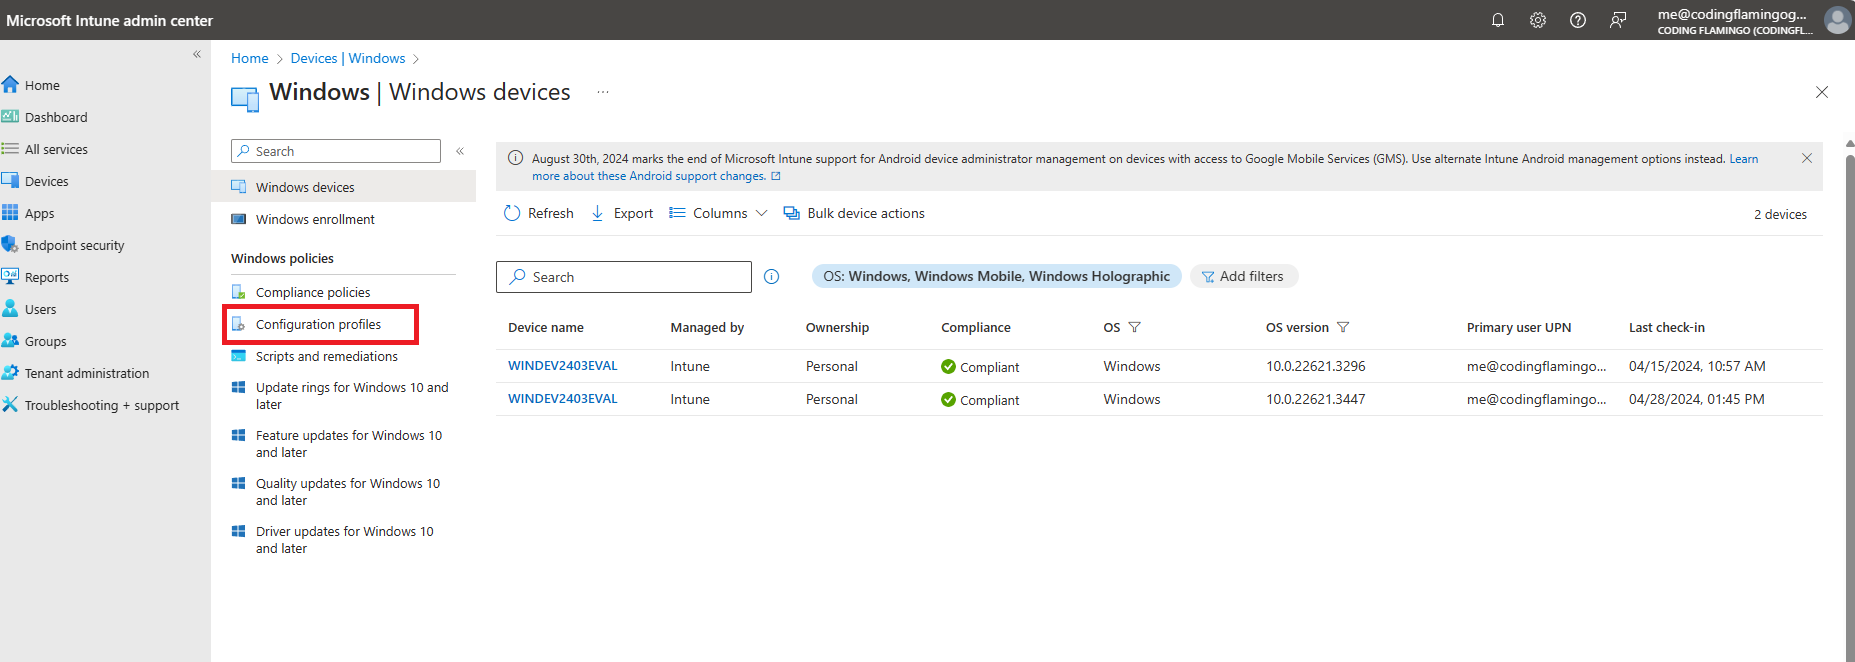
From the left-hand sub-menu, click on Configuration Profiles.
-
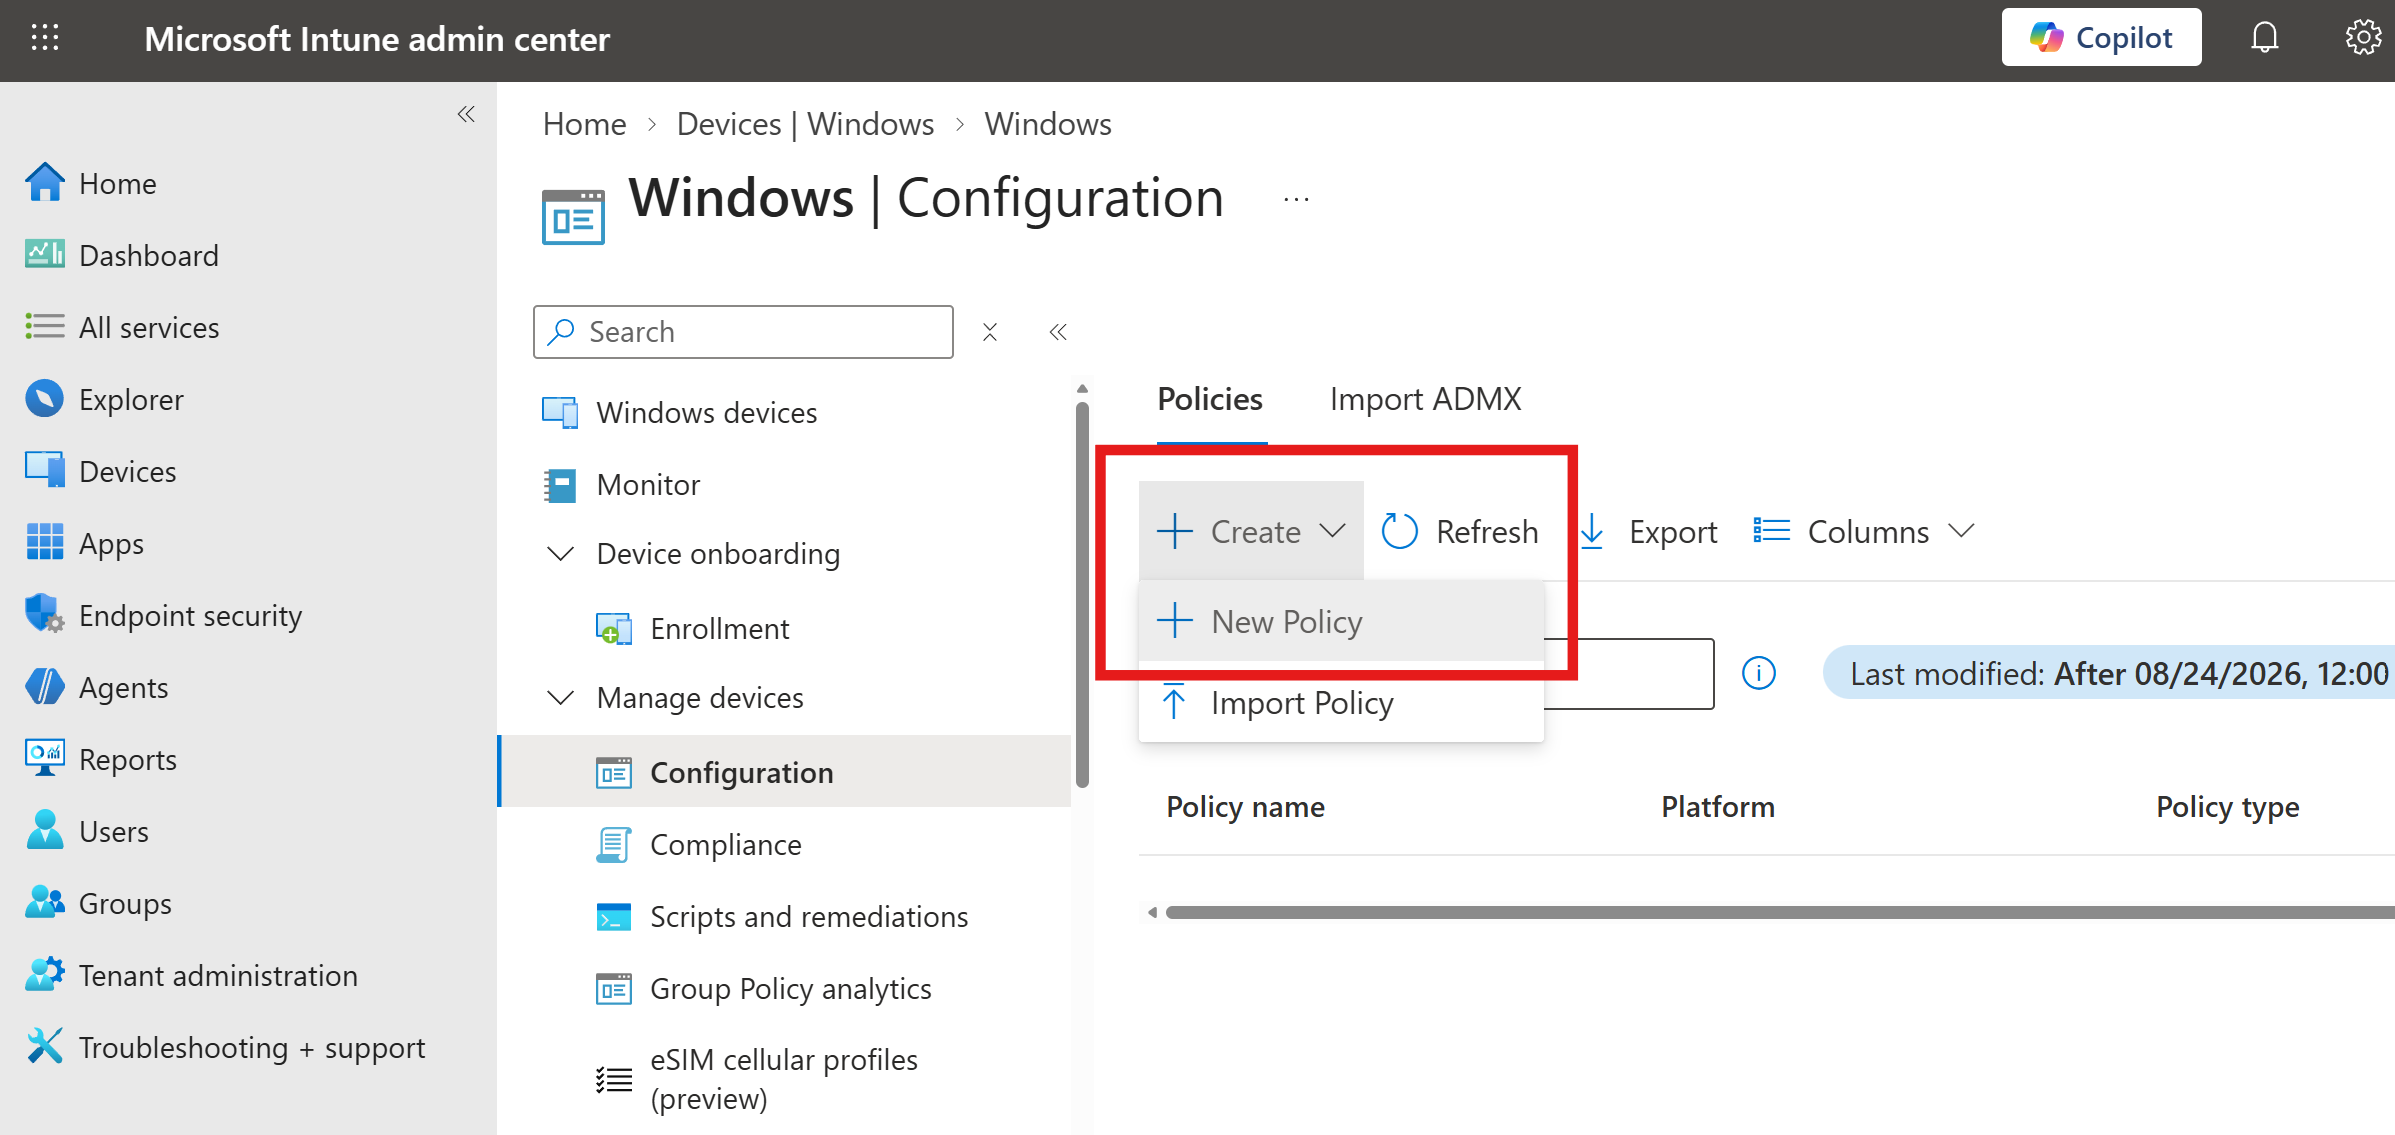
Click on the + Create button at the top of the list, then + New Policy.
-
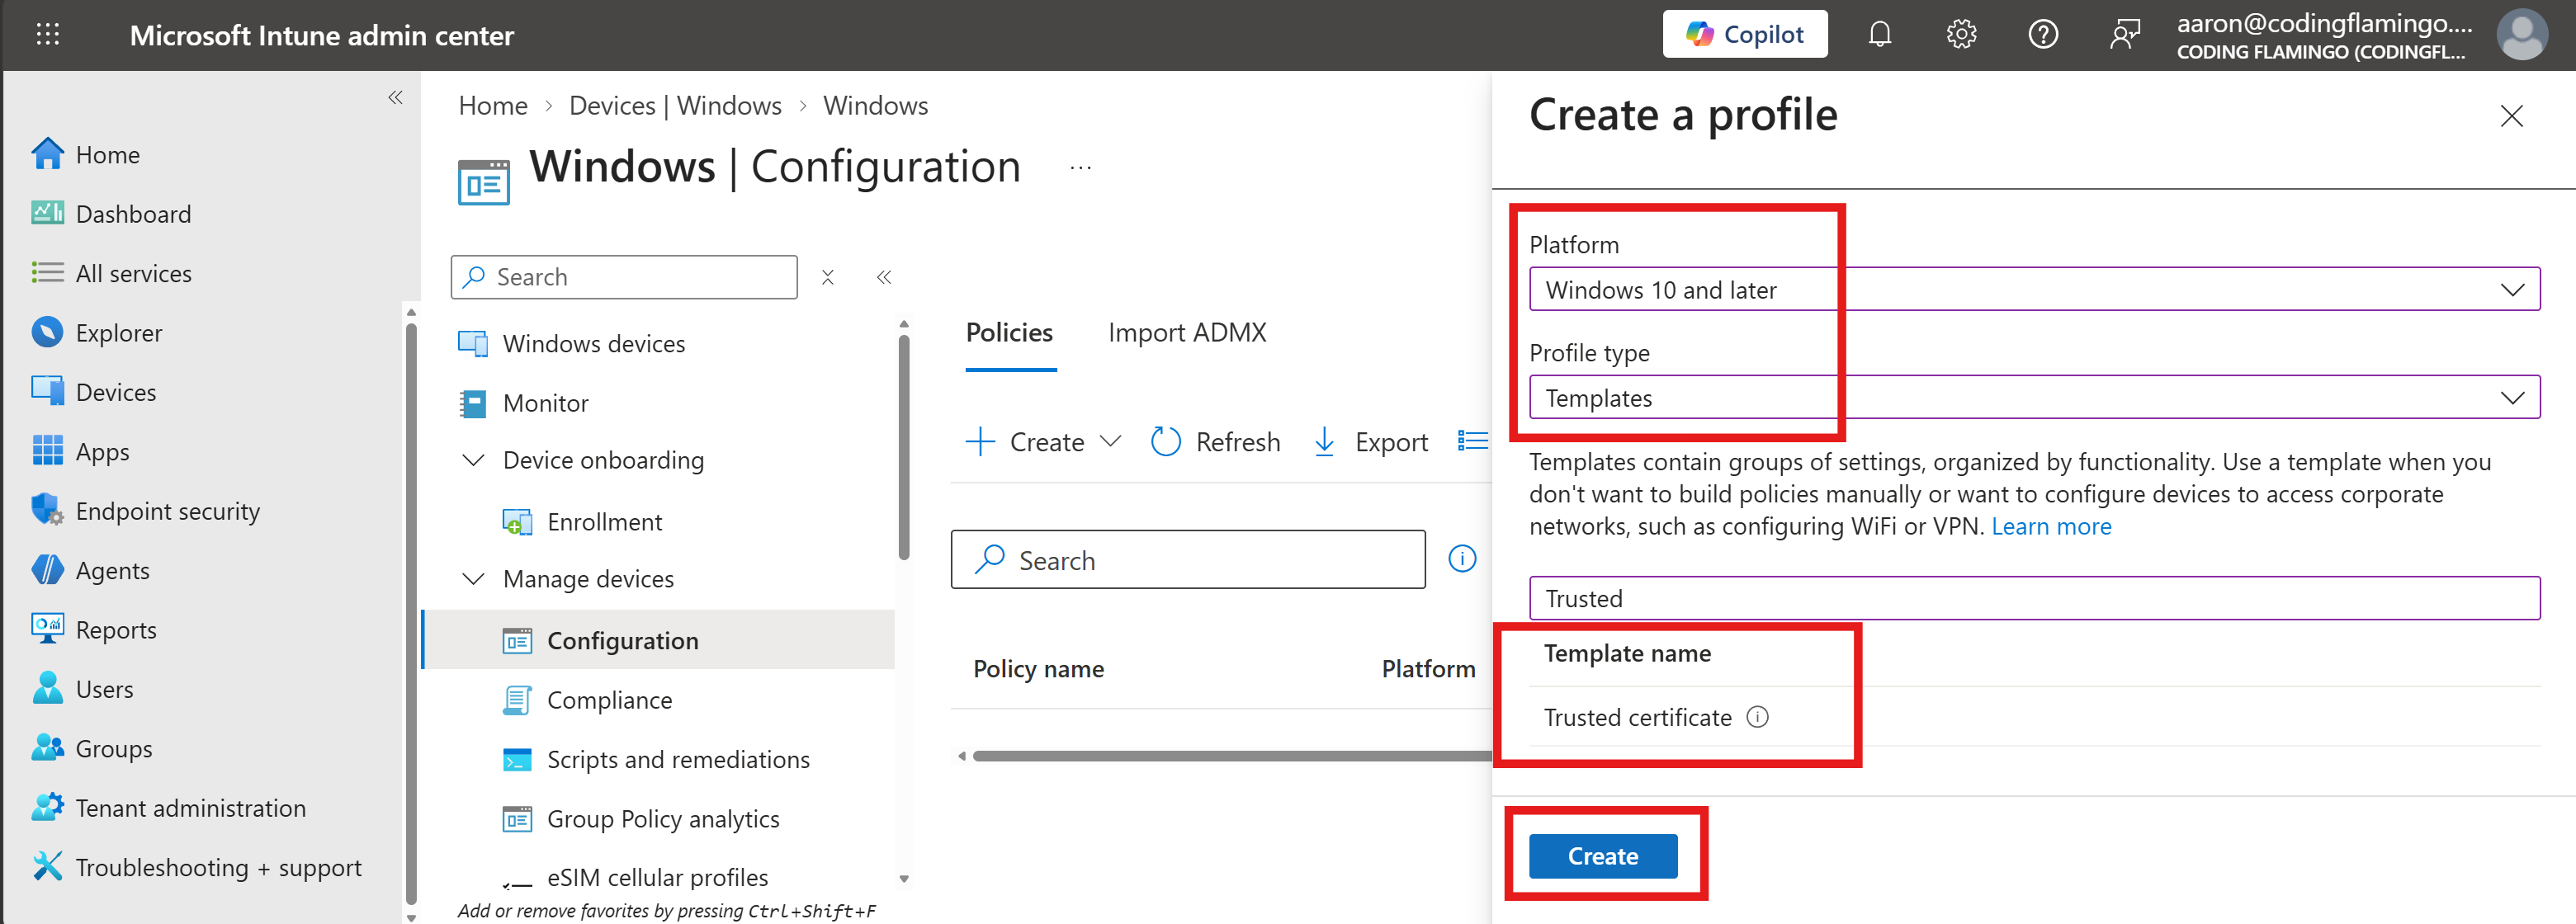
Under Create a profile, select the following options and click Create:
- Platform: Windows 10 and later
- Profile type: Templates
- Template name: Trusted certificate
-
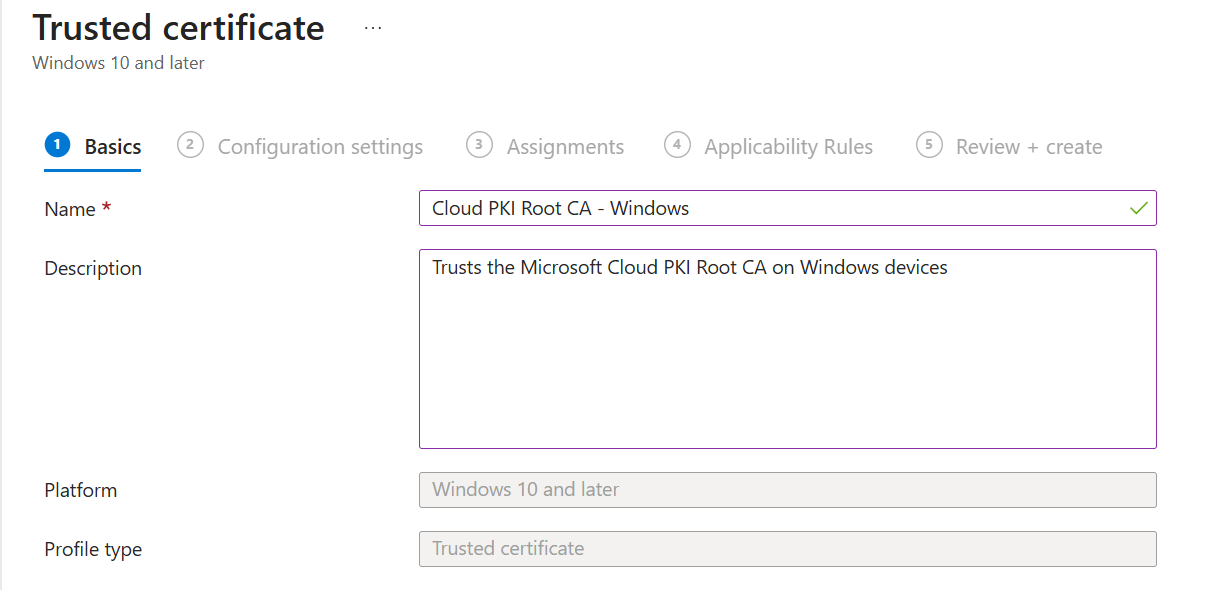
Within the Basics tab, fill out the fields:
- Name: Friendly name for your organization
- Description: Description for your organization
-
Click on Next.
-
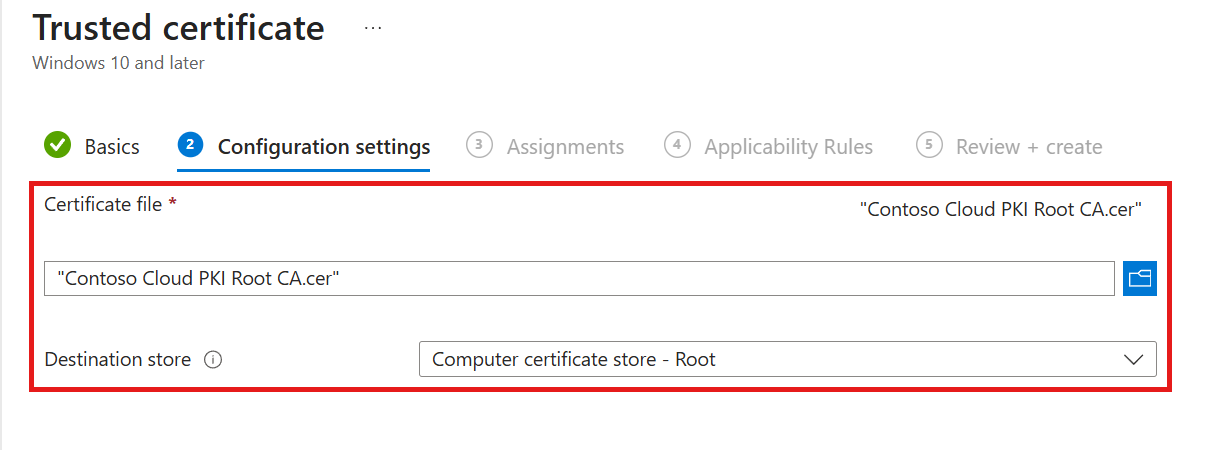
Within the Configuration settings tab, configure the following options:
- Certificate file: Select the CA certificate you downloaded earlier from Microsoft Cloud PKI.
- Destination store: Select the appropriate store based on the type of CA certificate:
- Computer certificate store - Root (if a root CA certificate)
- Computer certificate store - Intermediate (if an intermediate CA certificate).
-
Click on Next.
-
Within the Assignments tab, select the users, groups or devices you want to deploy this profile to.
-
Click on Next.
-
Within the Applicability Rules tab, add any rules if needed, then click on Next.
-
Click on Create to finish creating the profile.
-
Repeat the above steps to distribute all necessary CA certificates (both root and intermediate) to your Windows devices.
-
Navigate to the Intune portal: https://aka.ms/Intune
-
From the left-hand menu, click on Devices, then select macOS (or Apple mobile for iPhones and iPads).
-
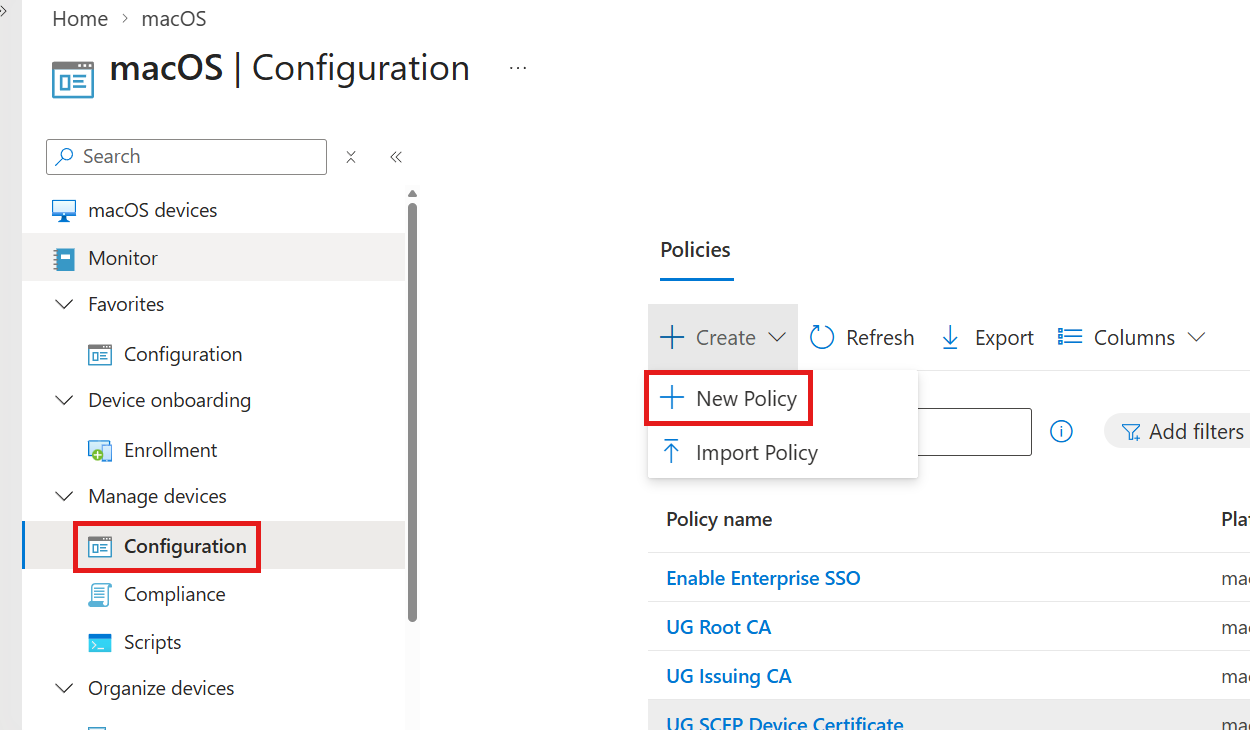
From the left-hand sub-menu, click on Configuration.
-
Click on the + Create button at the top of the list, then + New Policy.
-
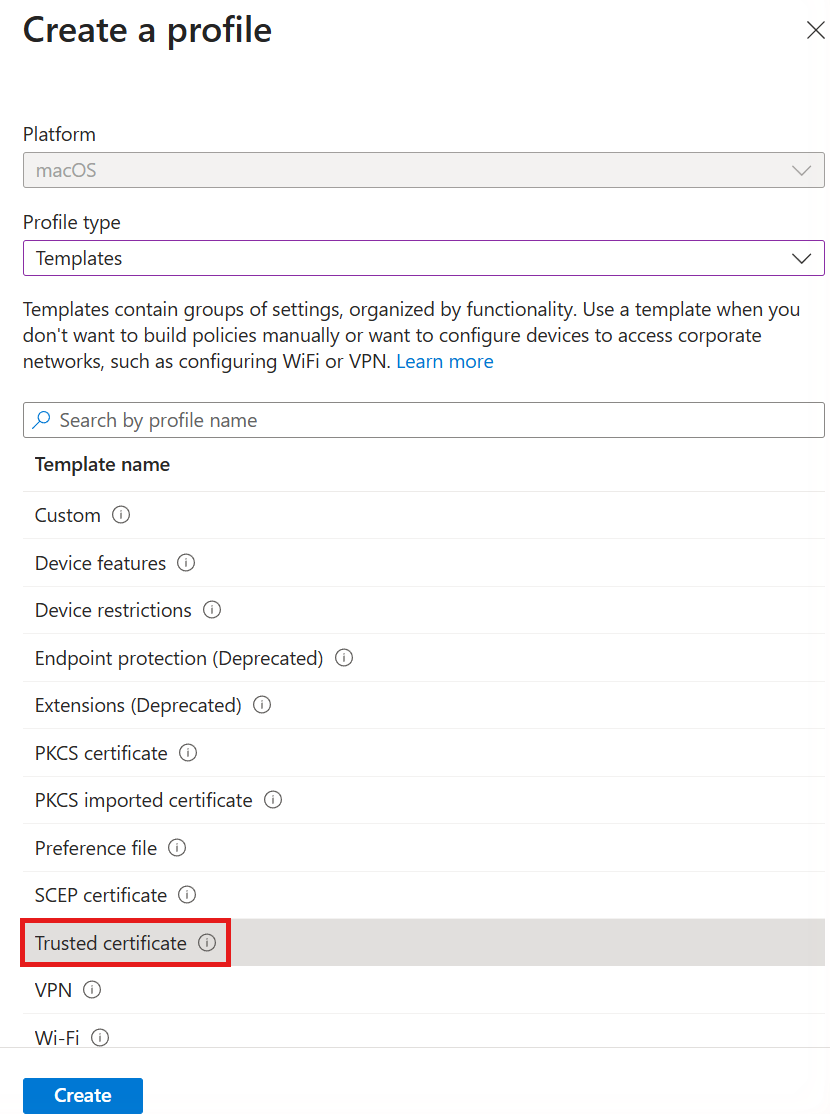
Under Create a profile, select the following options and click Create:
- Platform: macOS (or iOS/iPadOS)
- Profile type: Templates
- Template name: Trusted certificate
-
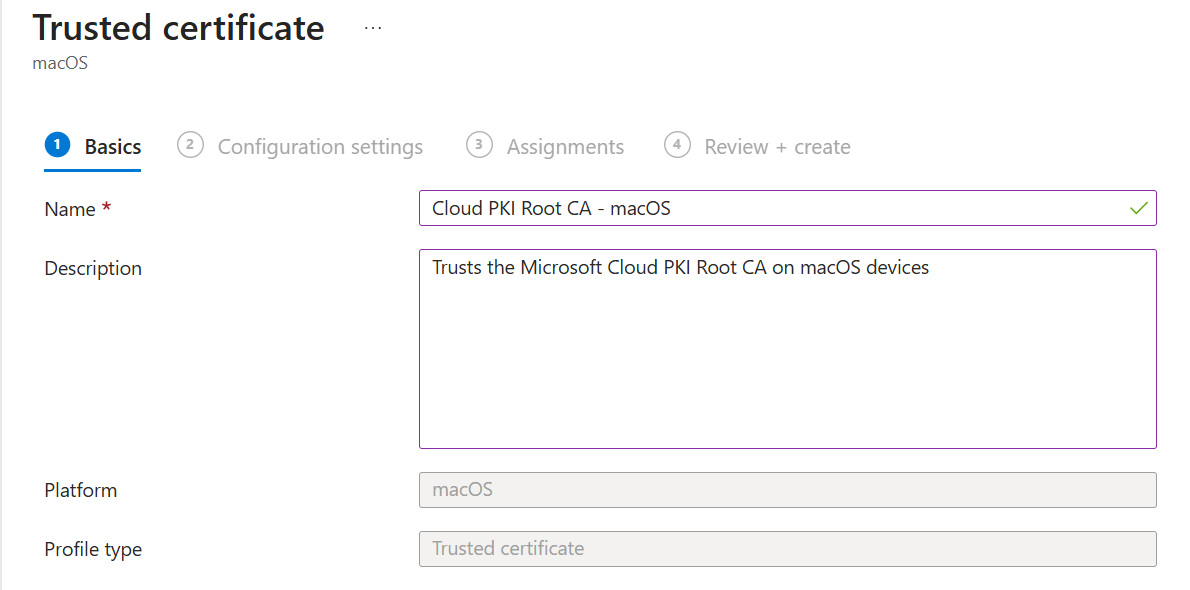
Within the Basics tab, fill out the fields:
- Name: Friendly name for your organization
- Description: Description for your organization
-
Click on Next.
-
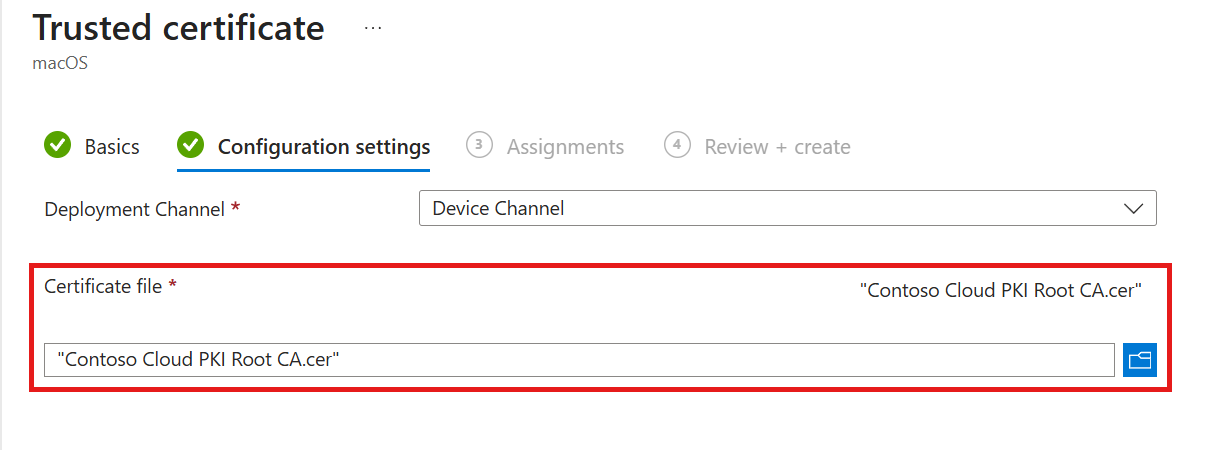
Within the Configuration settings tab, configure the following options:
- Deployment Channel (macOS only): Leave at Device Channel so the CA certificate is trusted for the whole device.
- Certificate file: Select the CA certificate you downloaded earlier from Microsoft Cloud PKI. Apple devices don’t use a destination store, so there’s nothing else to configure.
-
Click on Next.
-
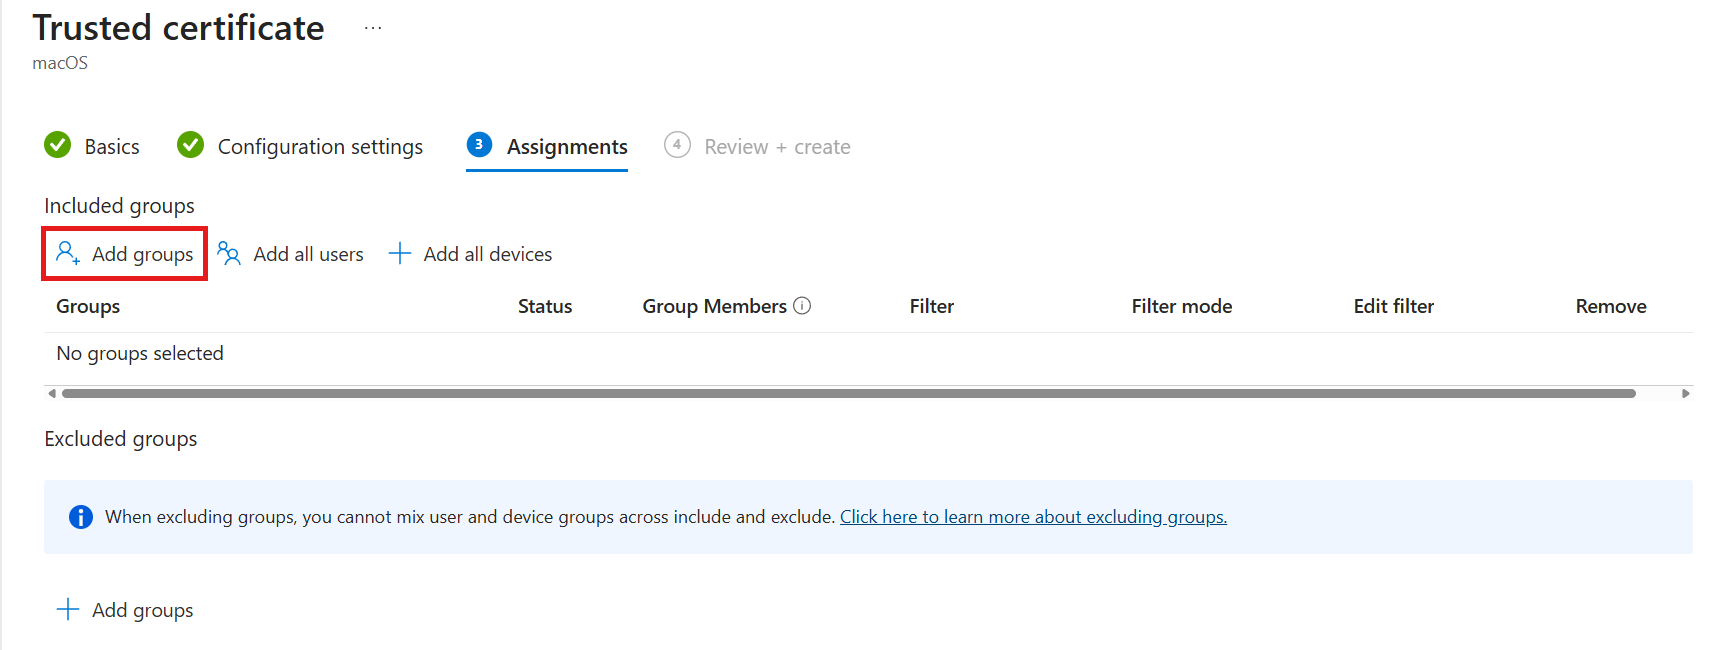
Within the Assignments tab, click Add groups and select the users, groups or devices you want to deploy this profile to.
-
Click on Next, review your settings on the Review + create tab, and click on Create to finish creating the profile.
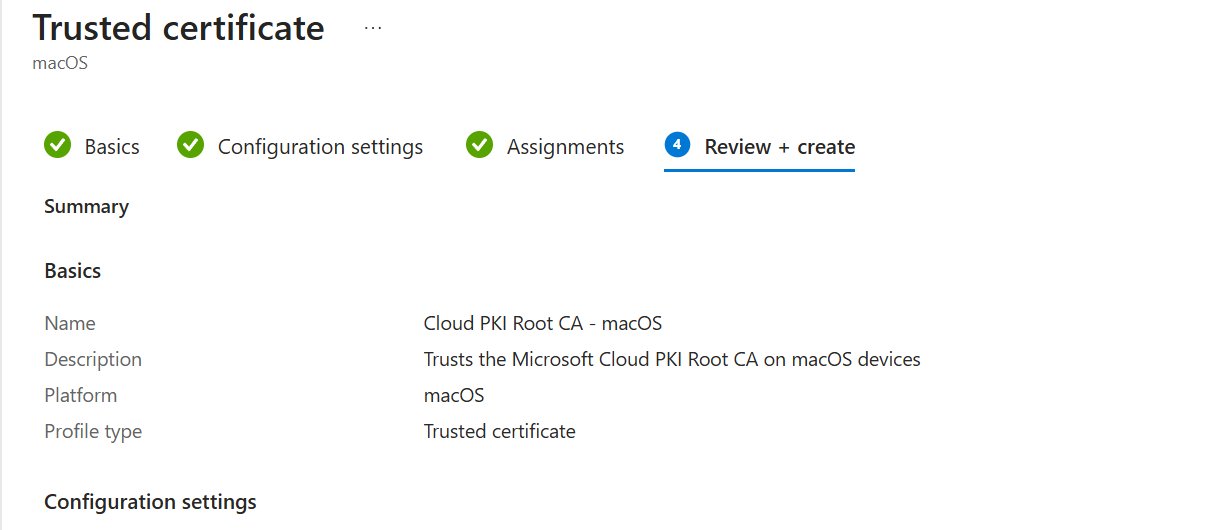
-
Repeat the above steps for every CA certificate you need to distribute (both root and intermediate), and again for each Apple platform you manage. Intune profiles are platform-specific, so a macOS profile doesn’t apply to iPhones or iPads.
Step 4: How to Create an Intune SCEP Certificate Profile for Cloud PKI
Choose the tab for the platform you’re configuring:
The SCEP certificate profile tells Intune to request a unique client authentication certificate from your Cloud PKI Issuing CA for every targeted user or device. Create one SCEP profile for each platform you support. The following steps are for Windows 10 and later.
-
In the Microsoft Intune admin center, navigate to Tenant administration > Cloud PKI, click on your Issuing CA, and open the Properties tab.
-
Click the copy icon next to SCEP URI to copy it. You’ll paste it into the profile later in these steps.
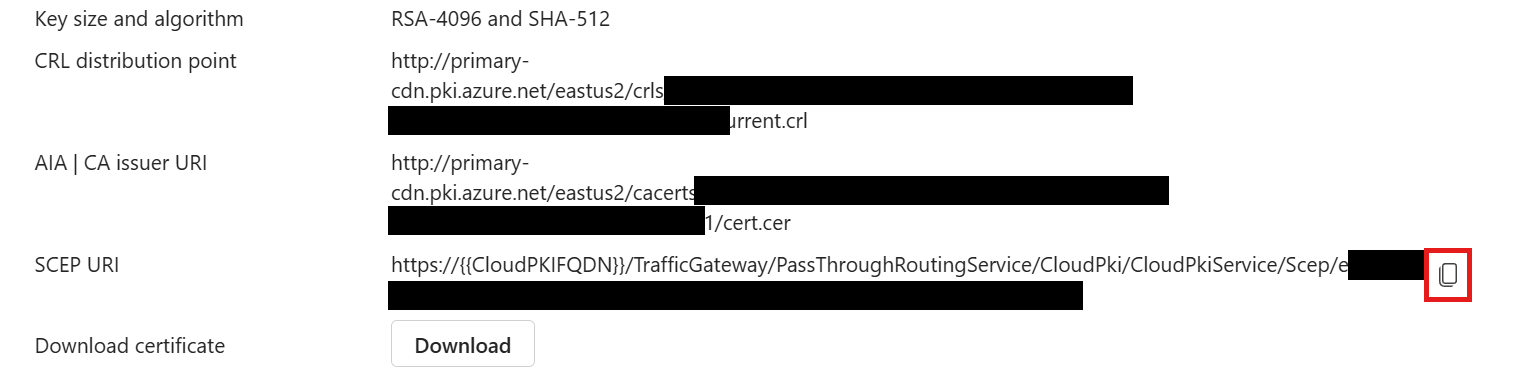
-
Navigate to Devices > Windows > Configuration, click + Create, then click + New Policy.
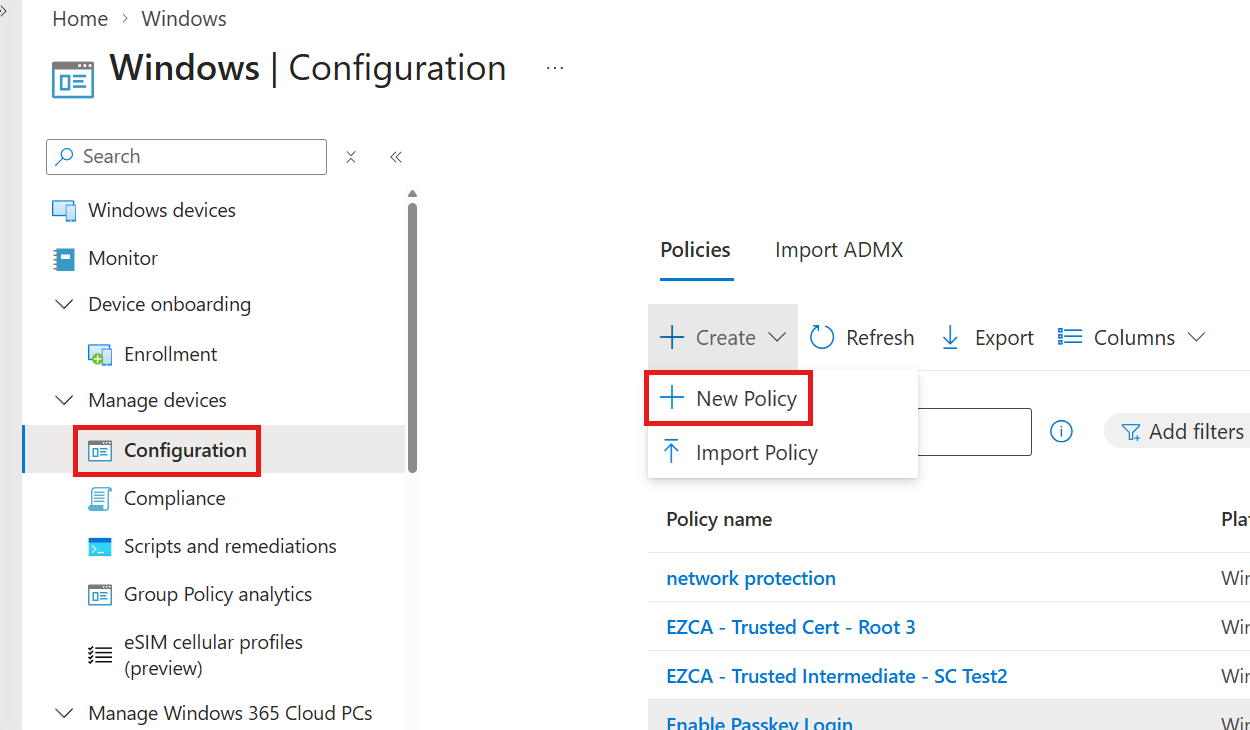
-
Under Create a profile, select the following options and click Create:
- Platform: Windows 10 and later
- Profile type: Templates
- Template name: SCEP certificate
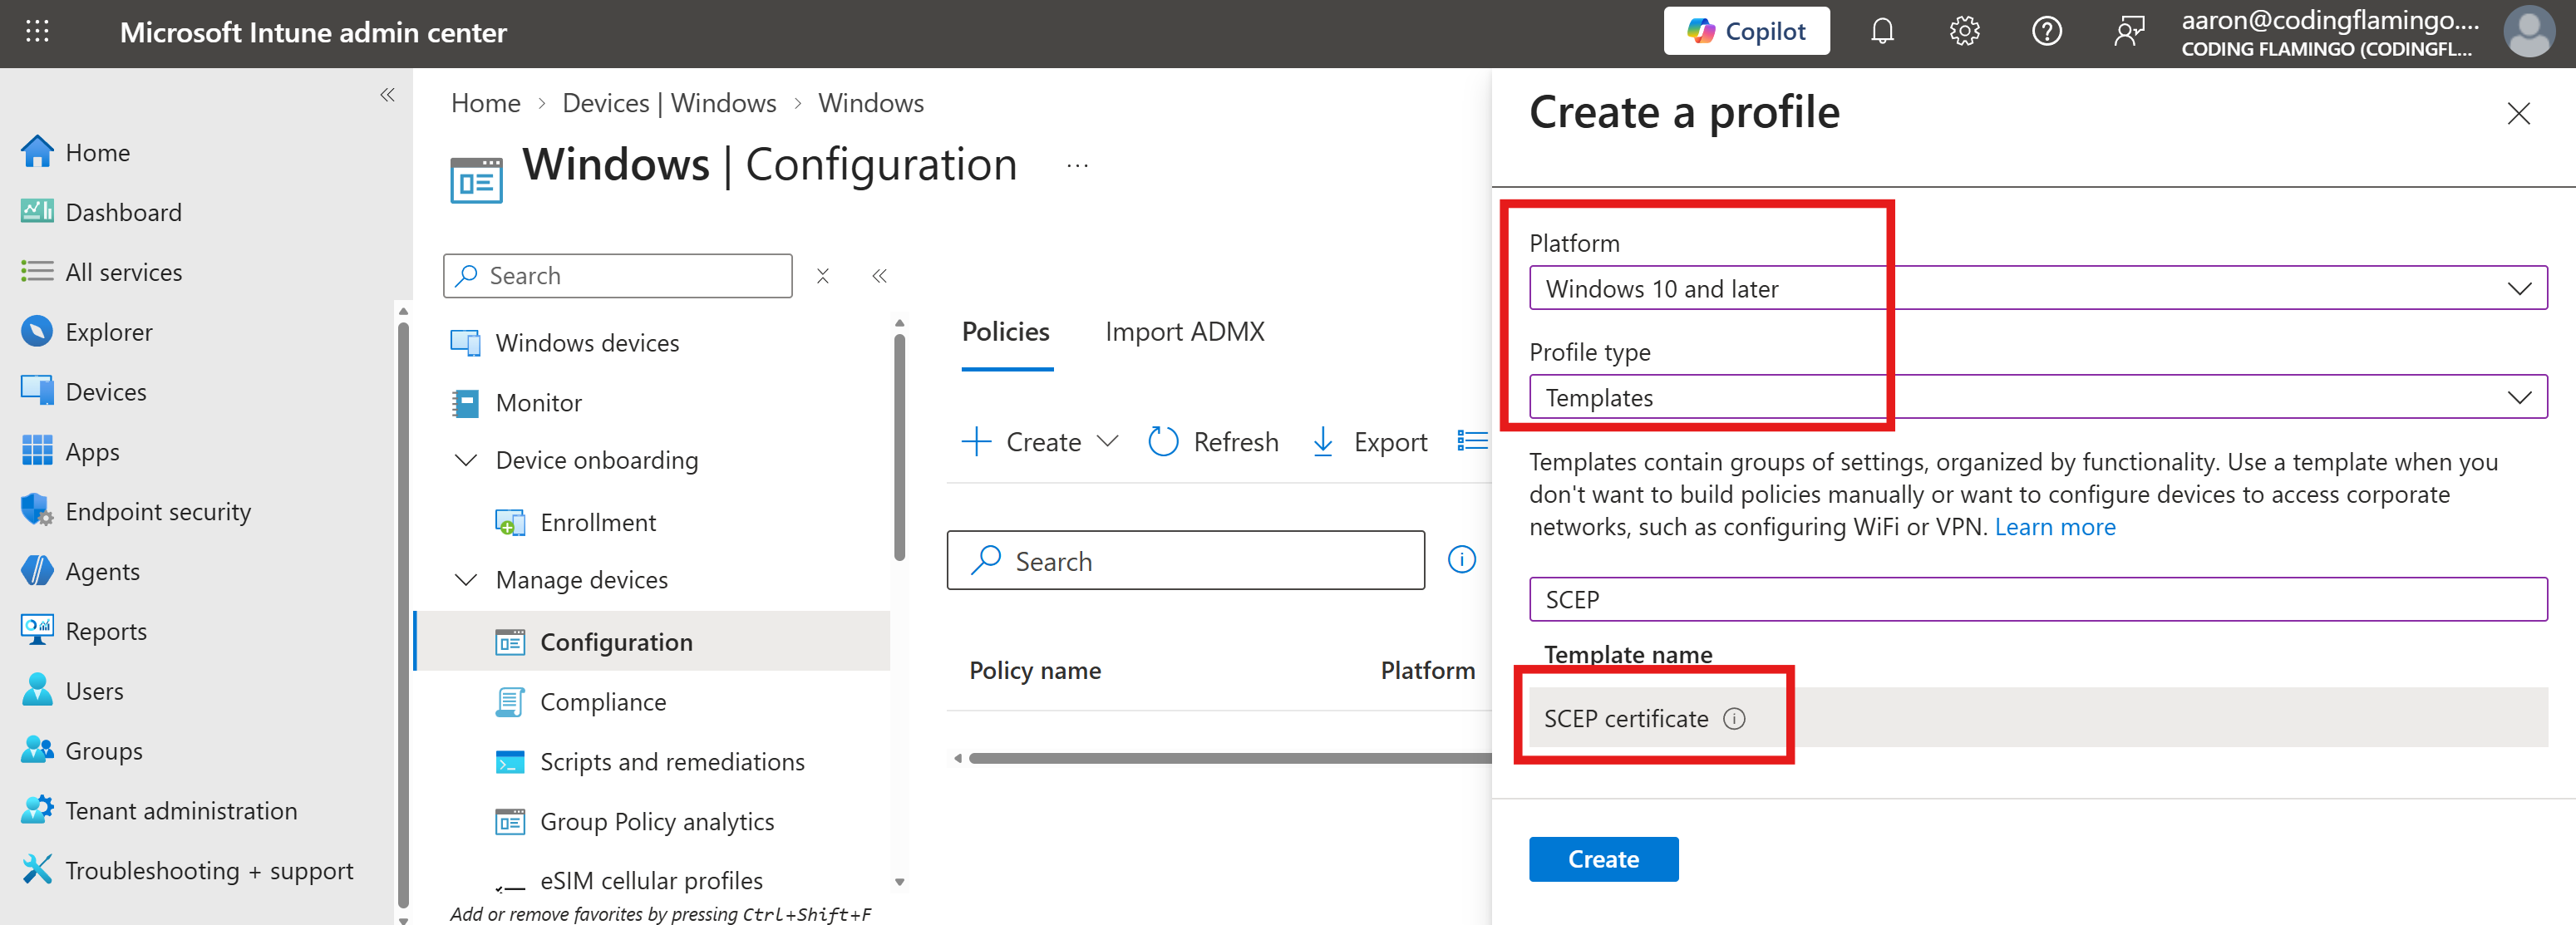
-
Under the Basics tab, enter a Name (for example “Cloud PKI Wi-Fi Device Certificate”) and an optional Description, then click Next.
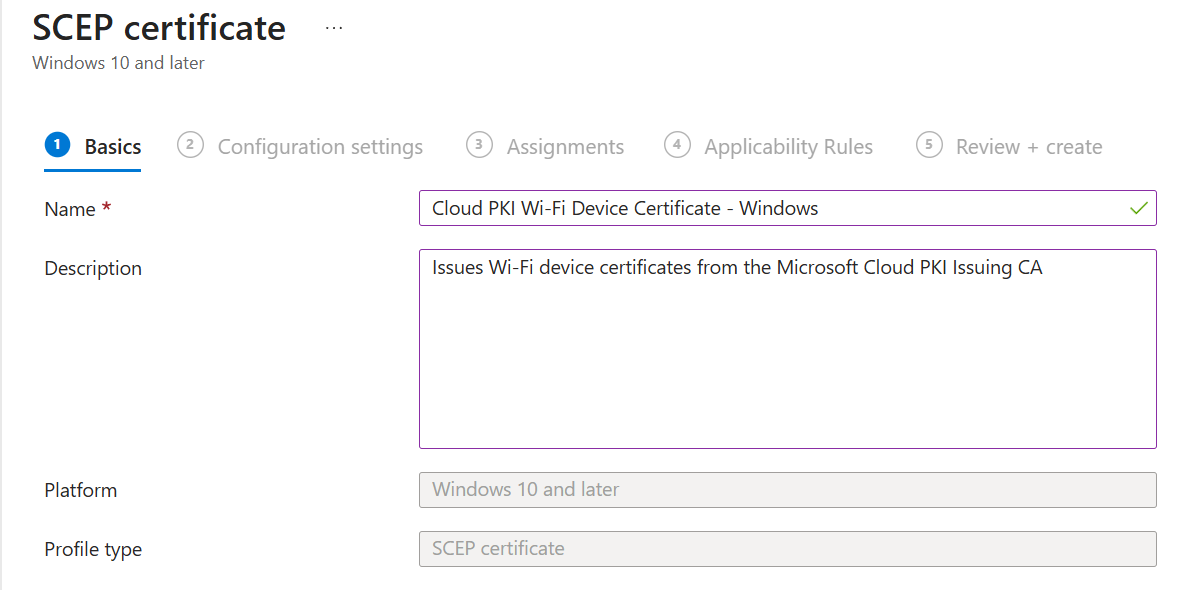
Under the Configuration settings tab, set the certificate type and subject values. Choose the tab that matches the type of certificate you want to issue:
Device certificates identify the device itself, so they work before a user signs in and let your RADIUS server check the device’s Intune compliance.
- Set Certificate type to Device.
- Set Subject name format to
CN={{AAD_Device_ID}}. - Under Subject alternative name, set Attribute to DNS and Value to
{{DeviceId}}. This places the Intune device ID in a DNS Subject Alternative Name, which EZRADIUS reads to look up the device in Intune.
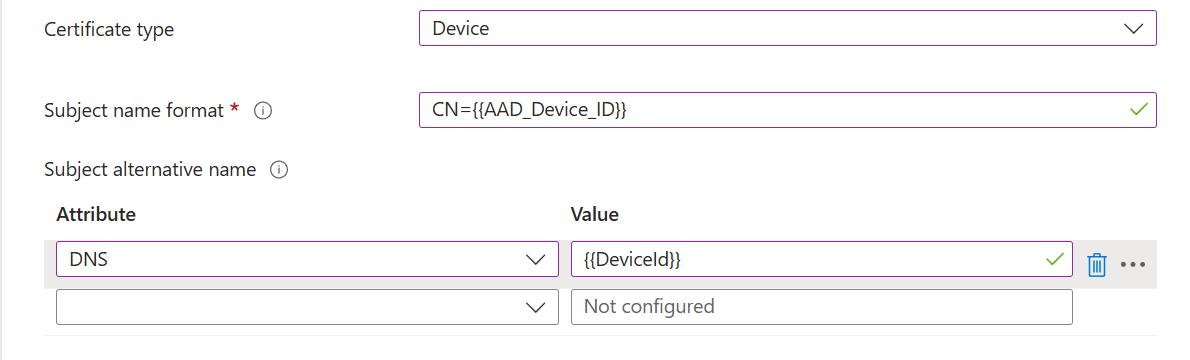
User certificates identify the signed-in user, so you can control Wi-Fi access with the user’s Entra ID group membership.
- Set Certificate type to User.
- Set Subject name format to
CN={{UserPrincipalName}}. Only use variables that are populated for all of your users. For example, if you addE={{EmailAddress}}and a user has no email address in Entra ID, Intune won’t issue that user a certificate. - Under Subject alternative name, set Attribute to User principal name (UPN) and Value to
{{UserPrincipalName}}. EZRADIUS reads this value to look up the user in Entra ID.
Now finish configuring the rest of the SCEP certificate profile:
-
Leave Certificate validity period at 1 year.
-
Set Key storage provider (KSP) to Enroll to Trusted Platform Module (TPM) KSP, otherwise fail so the private key can’t be exported from the device. If you need to support devices without a TPM, you can select a software fallback option instead, but the private key will be less protected.

-
Under Key usage, select both Digital signature and Key encipherment.

-
Set Key size (bits) to 2048. Cloud PKI only accepts key sizes up to the one configured on your CA.

-
Set Hash algorithm to SHA-256 (SHA-2).

-
Under Root Certificate, click + Root Certificate and select the trusted certificate profile for your Cloud PKI Root CA.
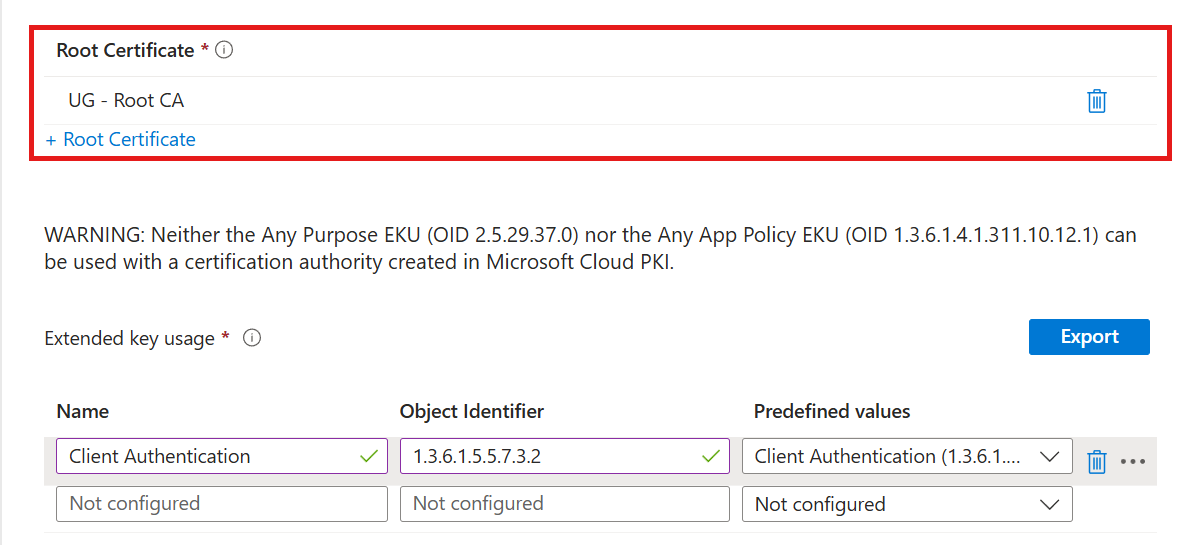 Select the Cloud PKI Root CA Profile
For Microsoft Cloud PKI, Microsoft requires the Root Certificate to be the trusted certificate profile of the Root CA that your Issuing CA is anchored to. This is different from EZCA and Keytos Shield SCEP profiles, where you select the Issuing CA. If you select the Issuing CA profile here, certificate requests can fail.
-
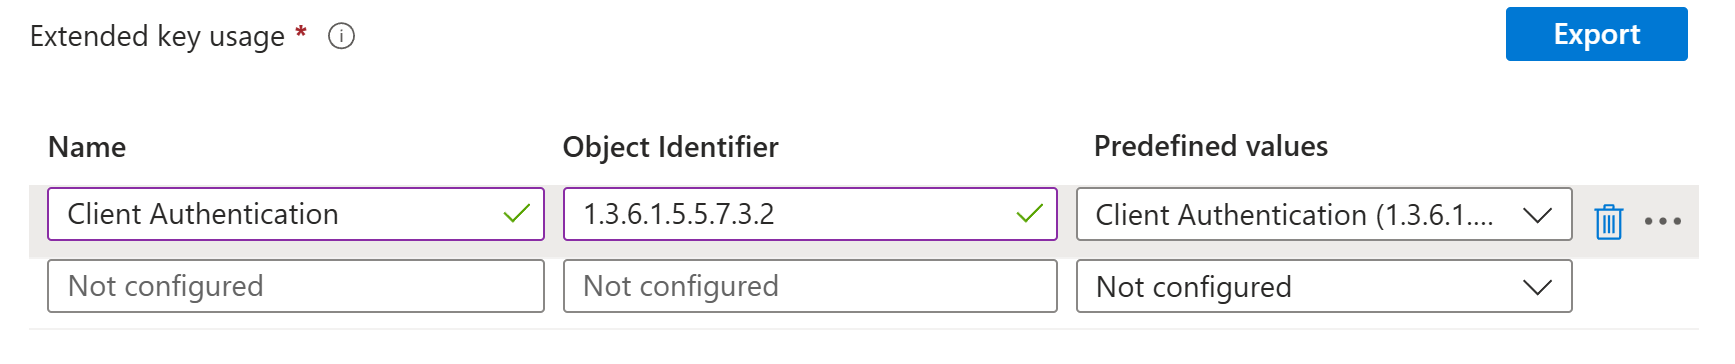
Under Extended key usage, add Client Authentication (1.3.6.1.5.5.7.3.2). Every EKU you add here must also be configured on your Cloud PKI Issuing CA, otherwise the certificate won’t be issued. Don’t use Any Purpose, since Cloud PKI doesn’t support it.
-
Leave Renewal threshold (%) at the default of 20 so certificates renew automatically before they expire.

-
Under SCEP Server URLs, paste the SCEP URI you copied from your Cloud PKI Issuing CA. Leave the
{{CloudPKIFQDN}}placeholder exactly as it is, because Intune replaces it with the correct address when it delivers the profile. Don’t add any NDES or other SCEP URLs to the same profile.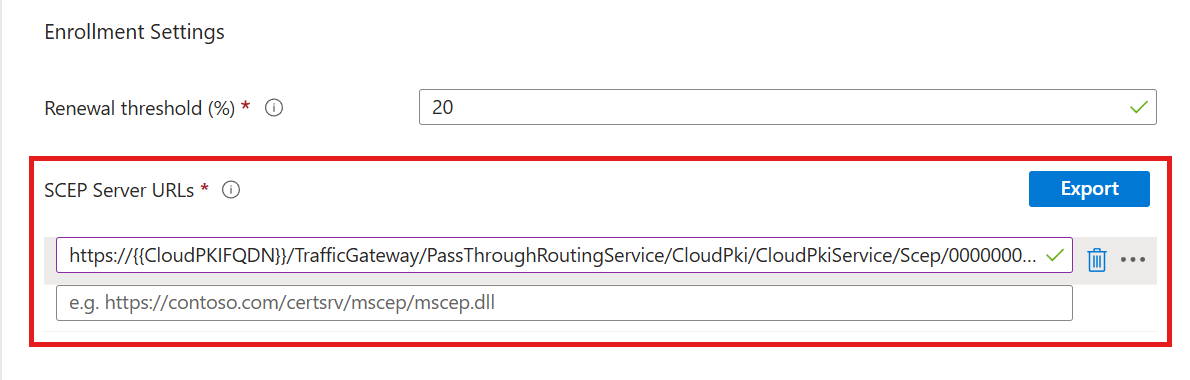
-
Click Next.
-
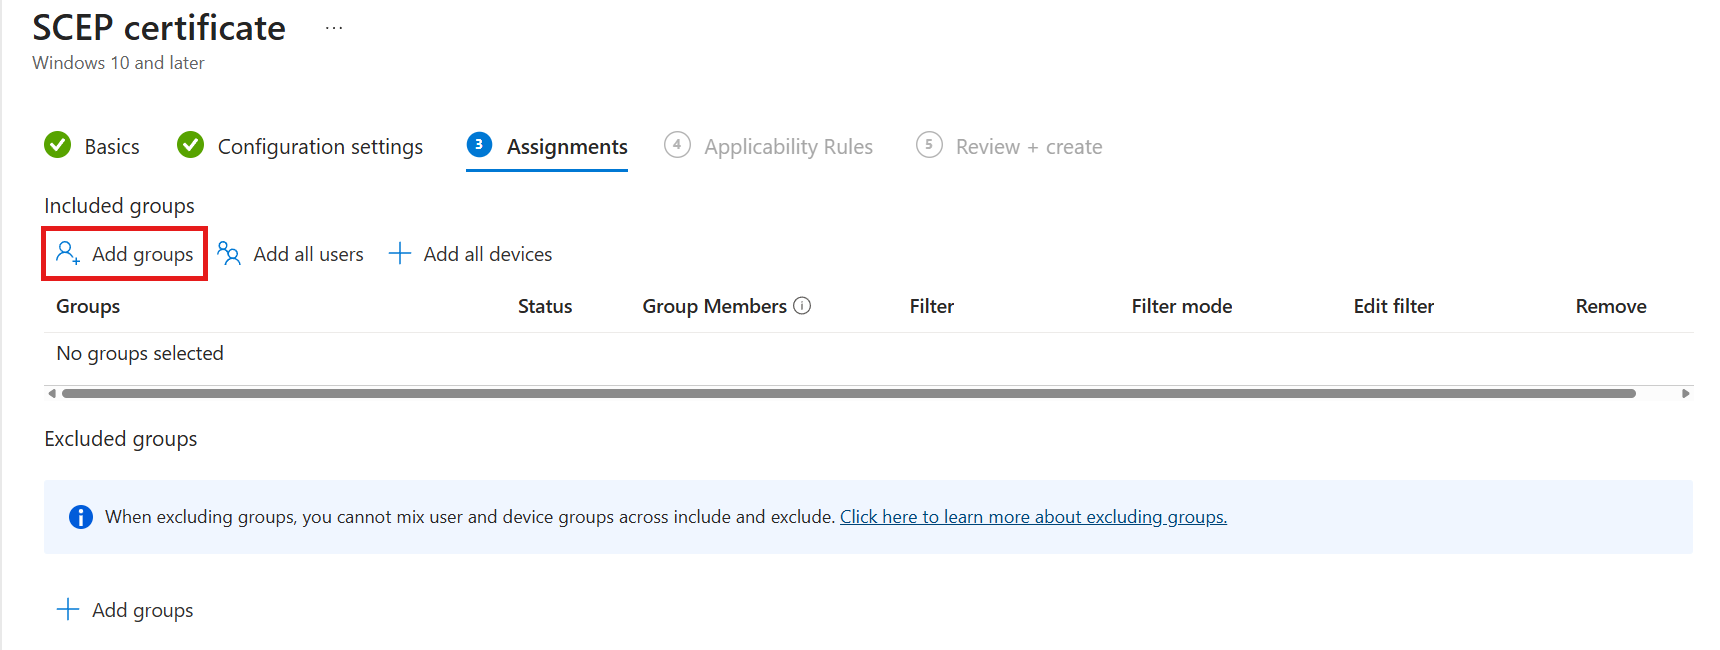
Under Assignments, click Add groups and select the device or user groups that should receive the certificate, then click Next. Use the same groups you assigned your Cloud PKI trusted certificate profiles to.
-
Add any Applicability Rules you need, click Next, review your settings, and click Create.
Done! Intune will now request a certificate from your Cloud PKI Issuing CA for every assigned user or device. You can see the issued certificates in your Issuing CA’s Monitor tab by clicking View all certificates.
The following steps create the SCEP certificate profile for macOS. The steps for iPhones and iPads are the same, except that you select iOS/iPadOS instead of macOS and there’s no Deployment Channel setting. Create one profile for each Apple platform you manage.
-
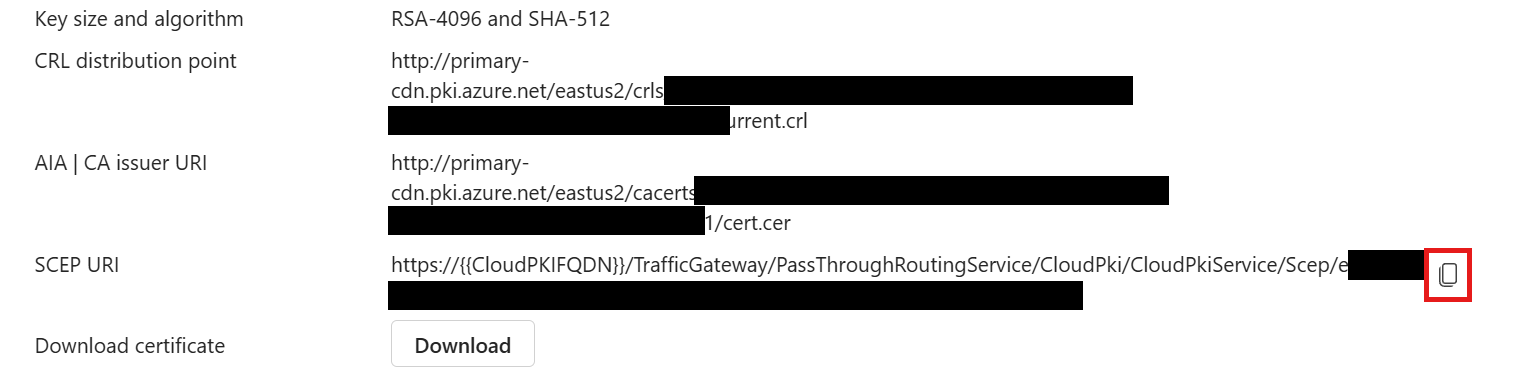
In the Microsoft Intune admin center, navigate to Tenant administration > Cloud PKI, click on your Issuing CA, and open the Properties tab.
-
Click the copy icon next to SCEP URI to copy it. You’ll paste it into the profile later in these steps.
-
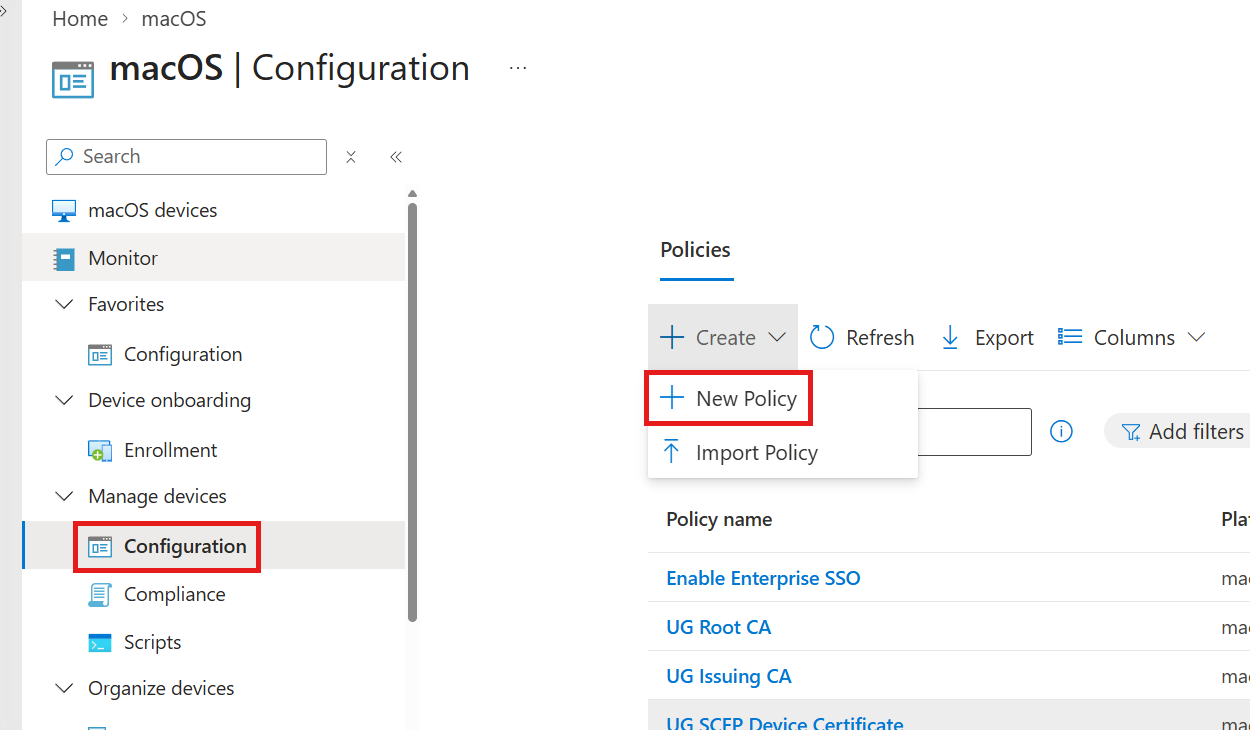
Navigate to Devices > macOS (or Apple mobile for iPhones and iPads) > Configuration, click + Create, then click + New Policy.
-
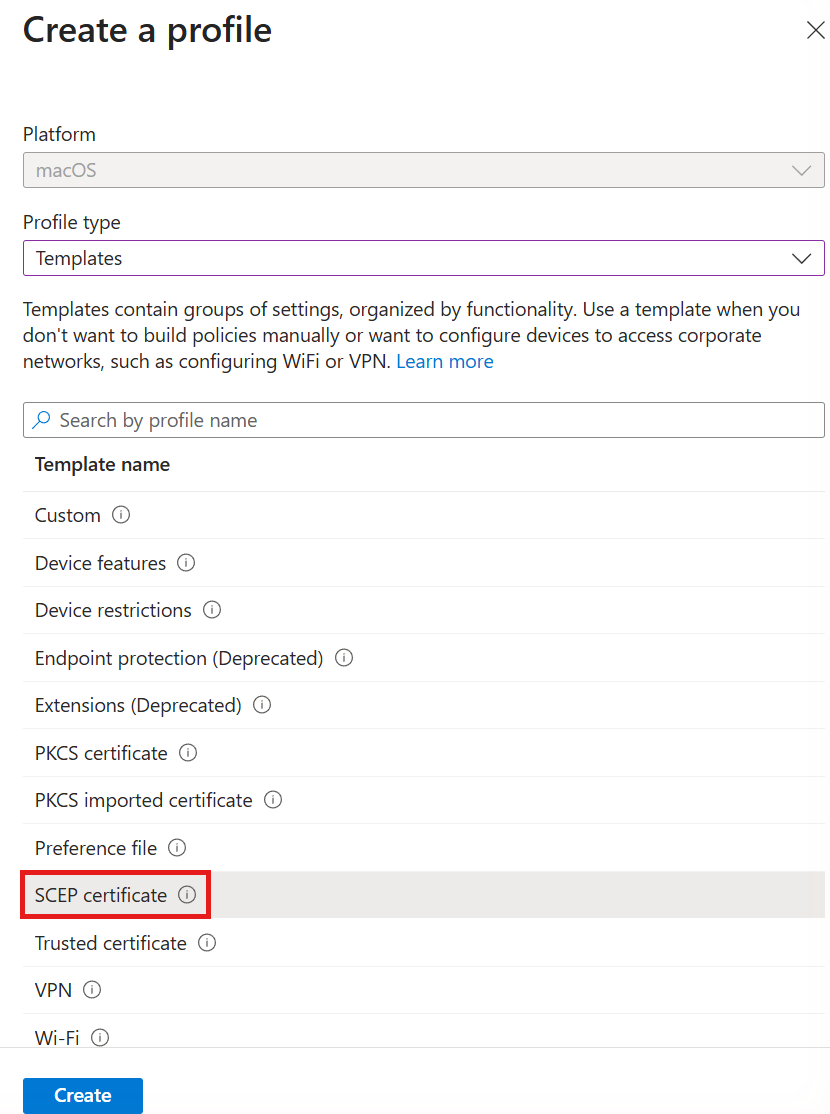
Under Create a profile, select the following options and click Create:
- Platform: macOS (or iOS/iPadOS)
- Profile type: Templates
- Template name: SCEP certificate
-
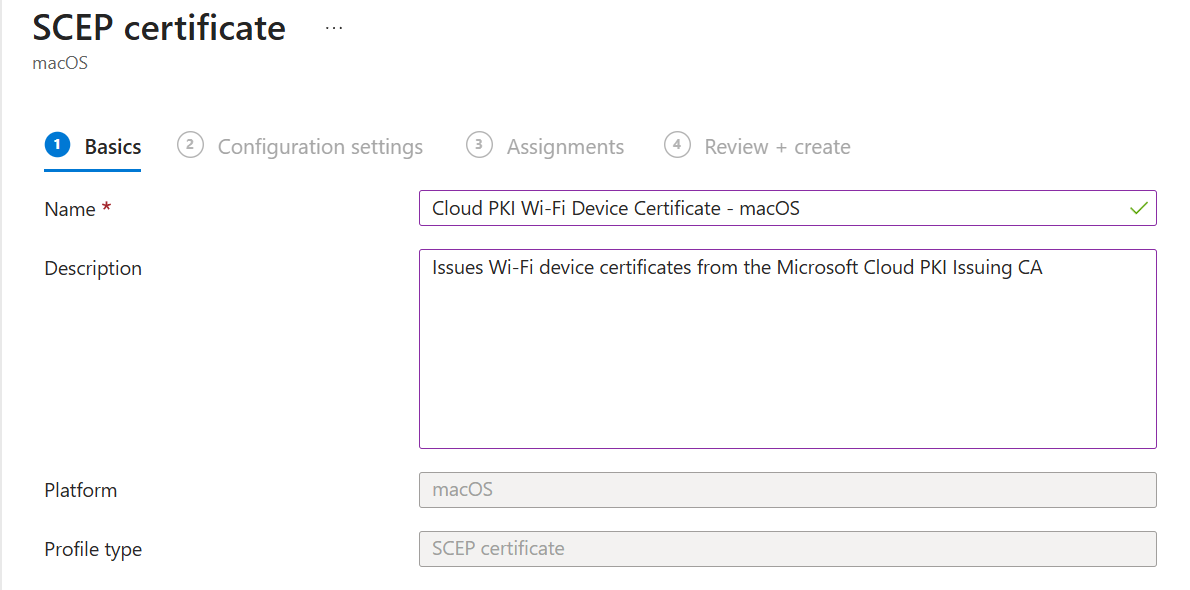
Under the Basics tab, enter a Name (for example “Cloud PKI macOS Wi-Fi Device Certificate”) and an optional Description, then click Next.
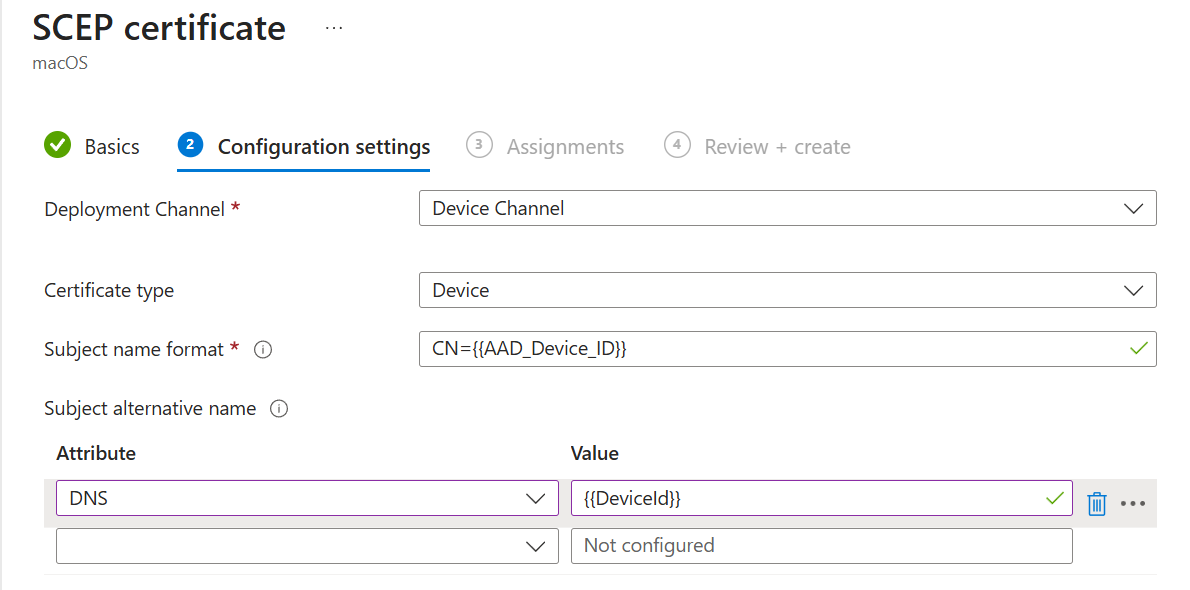
Under the Configuration settings tab, set the certificate type and subject values. Choose the tab that matches the type of certificate you want to issue:
Device certificates identify the device itself, so they work before a user signs in and let your RADIUS server check the device’s Intune compliance.
- On macOS, set Deployment Channel to Device Channel. This stores the certificate in the system keychain. You can’t change the deployment channel after you create the profile.
- Set Certificate type to Device.
- Set Subject name format to
CN={{AAD_Device_ID}}. - Under Subject alternative name, set Attribute to DNS and Value to
{{DeviceId}}. This places the Intune device ID in a DNS Subject Alternative Name, which EZRADIUS reads to look up the device in Intune.
User certificates identify the signed-in user, so you can control Wi-Fi access with the user’s Entra ID group membership.
- On macOS, set Deployment Channel to User Channel. This stores the certificate in the user’s keychain. You can’t change the deployment channel after you create the profile.
- Set Certificate type to User.
- Set Subject name format to
CN={{UserPrincipalName}}. Only use variables that are populated for all of your users. For example, if you addE={{EmailAddress}}and a user has no email address in Entra ID, Intune won’t issue that user a certificate. - Under Subject alternative name, set Attribute to User principal name (UPN) and Value to
{{UserPrincipalName}}. EZRADIUS reads this value to look up the user in Entra ID.
Now finish configuring the rest of the SCEP certificate profile:
-
Leave Certificate validity period at 1 year.
-
Under Key usage, select both Digital signature and Key encipherment.
-
Set Key size (bits) to 2048. Cloud PKI only accepts key sizes up to the one configured on your CA.
-
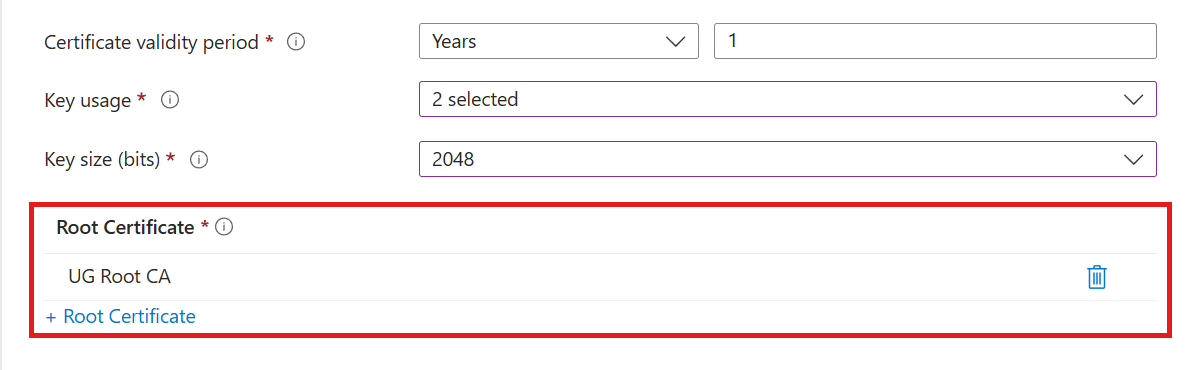
Under Root Certificate, click + Root Certificate and select the trusted certificate profile for your Cloud PKI Root CA on the same platform (the macOS Root CA profile for macOS, or the iOS/iPadOS Root CA profile for iPhones and iPads), then click OK.
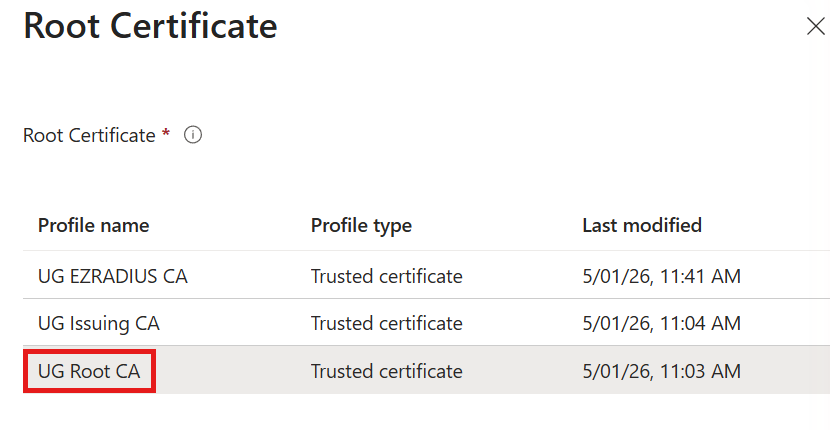
 Select the Cloud PKI Root CA Profile
For Microsoft Cloud PKI, Microsoft requires the Root Certificate to be the trusted certificate profile of the Root CA that your Issuing CA is anchored to. This is different from EZCA and Keytos Shield SCEP profiles, where you select the Issuing CA. If you select the Issuing CA profile here, certificate requests can fail.
-
Under Extended key usage, add Client Authentication (1.3.6.1.5.5.7.3.2). Every EKU you add here must also be configured on your Cloud PKI Issuing CA, otherwise the certificate won’t be issued. Don’t use Any Purpose, since Cloud PKI doesn’t support it.
-
Leave Renewal threshold (%) at the default of 20. Apple devices only renew certificates during this renewal window, and only when the device is unlocked while it syncs with Intune.
-
Under SCEP Server URLs, paste the SCEP URI you copied from your Cloud PKI Issuing CA. Leave the
{{CloudPKIFQDN}}placeholder exactly as it is, because Intune replaces it with the correct address when it delivers the profile. Don’t add any NDES or other SCEP URLs to the same profile.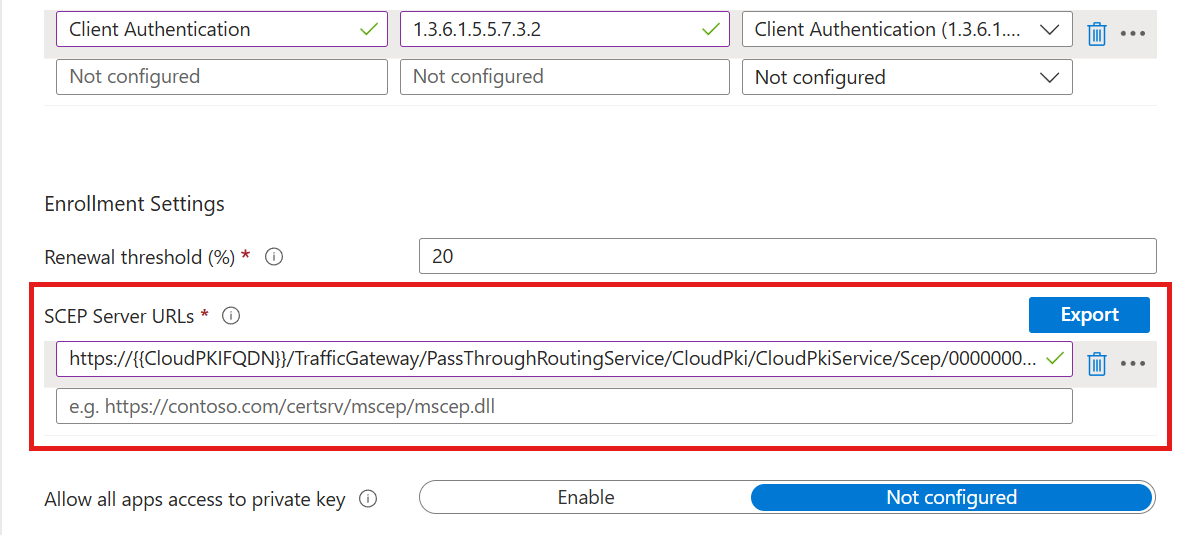
-
Click Next.
-
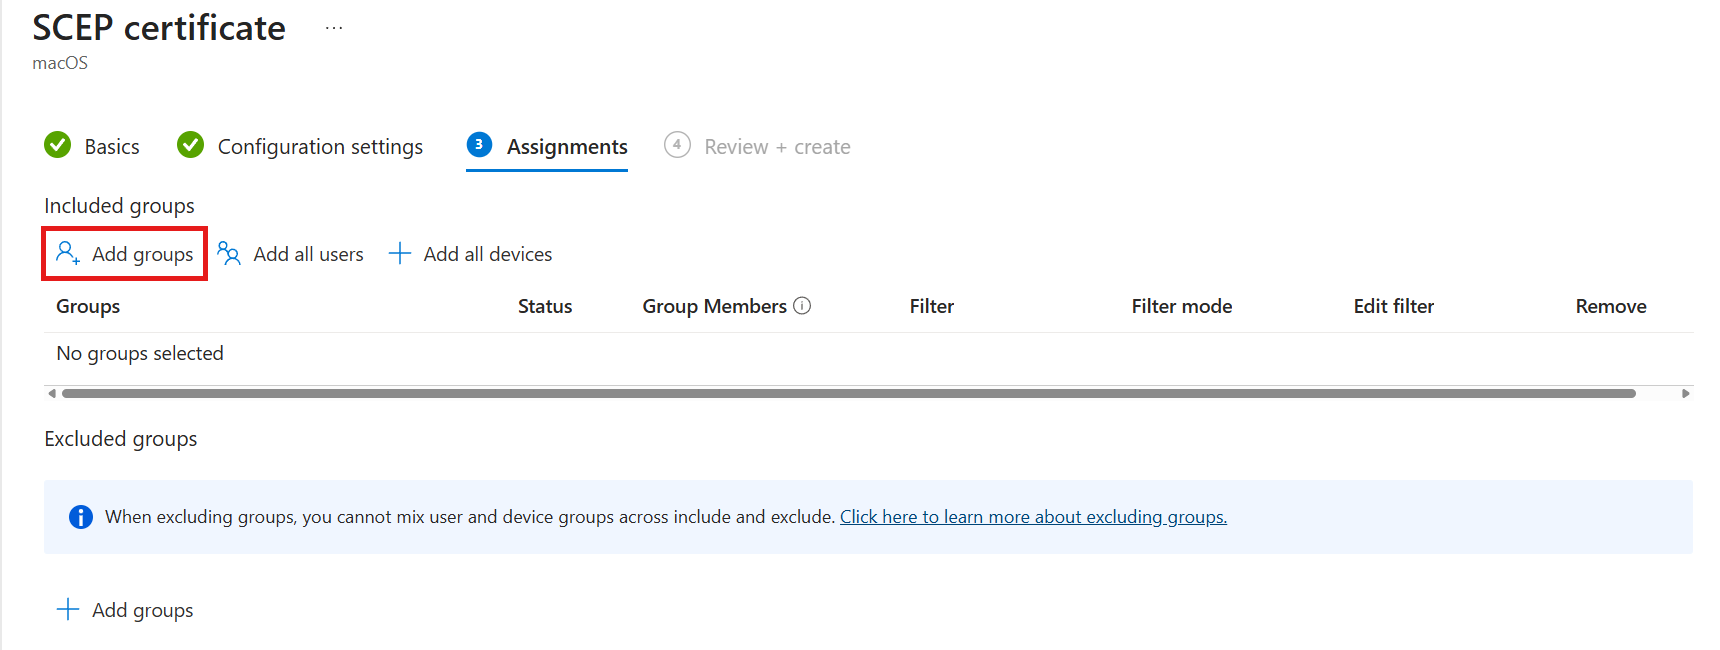
Under Assignments, click Add groups and select the device or user groups that should receive the certificate, then click Next. Use the same groups you assigned your Cloud PKI trusted certificate profiles to.
-
Review your settings and click Create.
Done! Intune will now request a certificate from your Cloud PKI Issuing CA for every assigned user or device. You can see the issued certificates in your Issuing CA’s Monitor tab by clicking View all certificates.
Step 5: How to Create Your EZRADIUS Cloud RADIUS Policy
Now that Cloud PKI is issuing certificates to your devices, it’s time to set up the RADIUS server that will check them. In EZRADIUS, a RADIUS policy (also called a network profile) holds your network connections, trusted CAs, server certificate, and access policies.
-
Sign in to your EZRADIUS portal (for example
https://usa.ezradius.ioorhttps://eu.ezradius.io, depending on your region). -
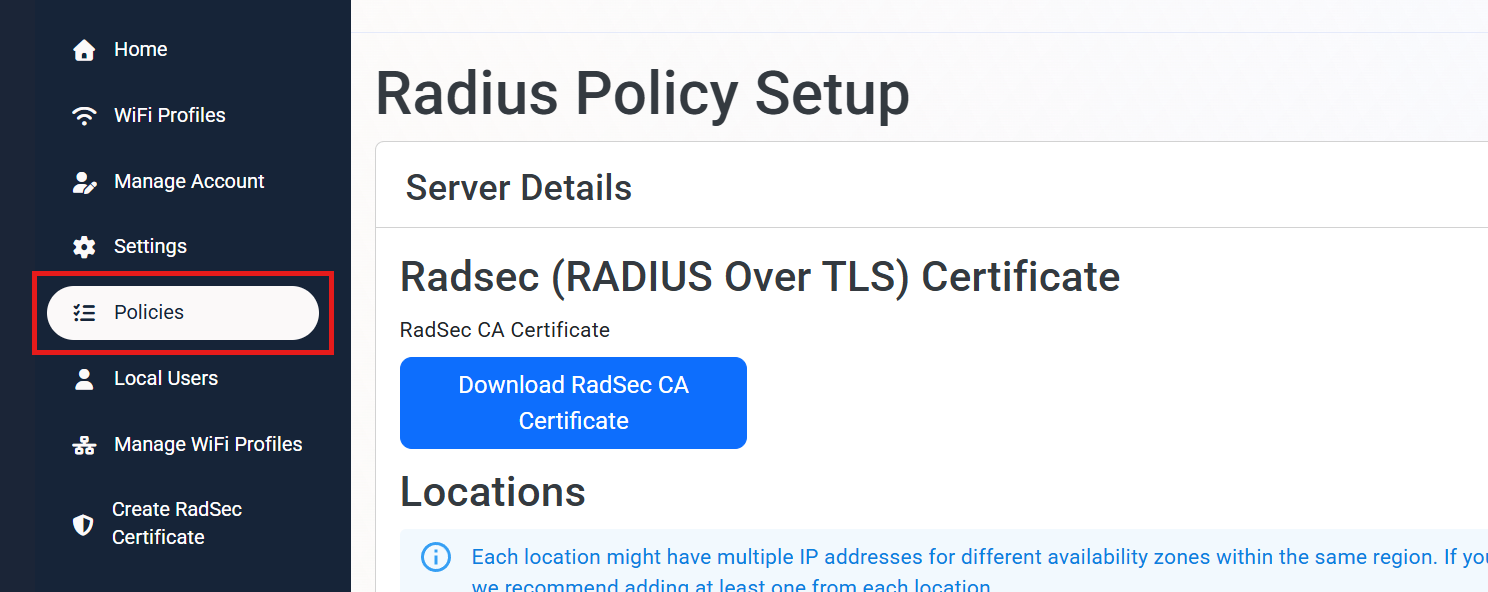
From the left-hand menu, click Policies.
-
Scroll down to Create New Network Profile.
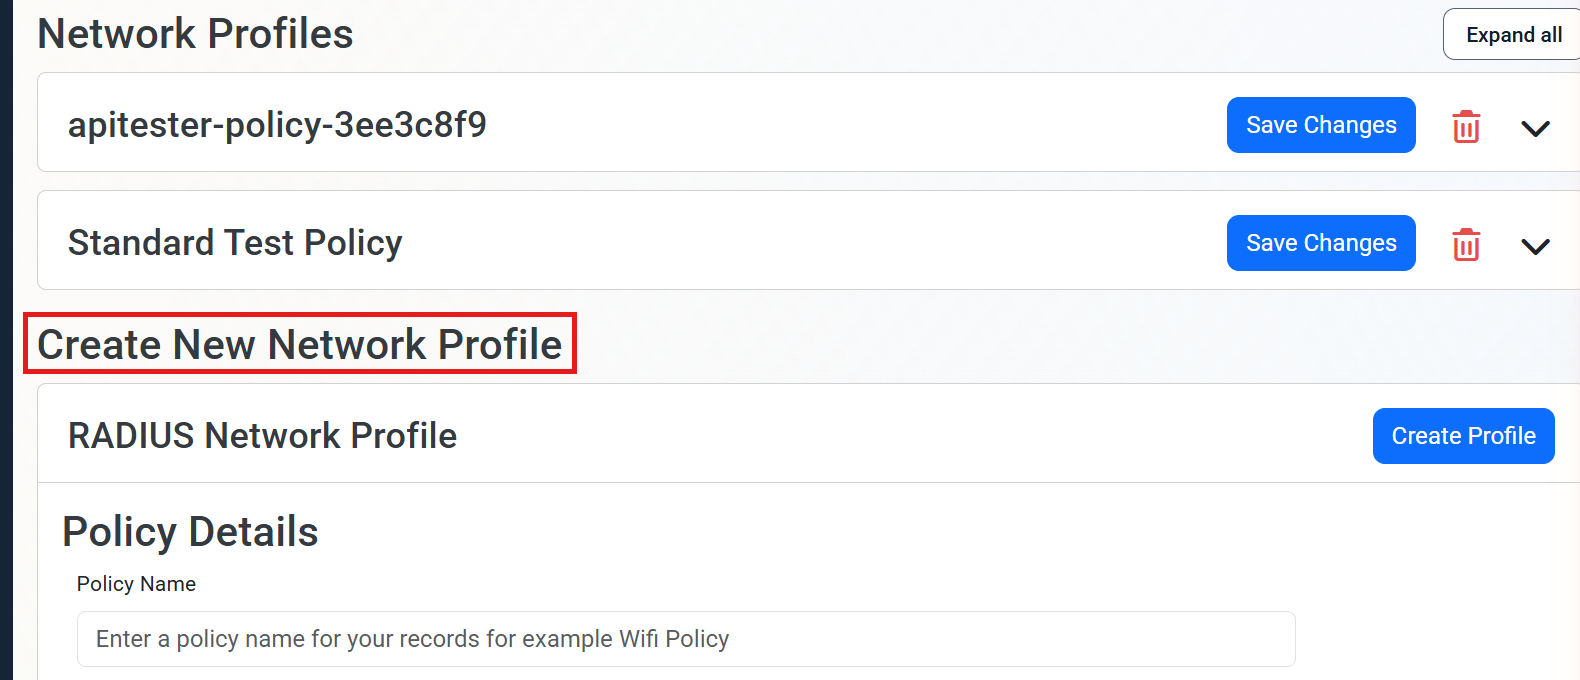
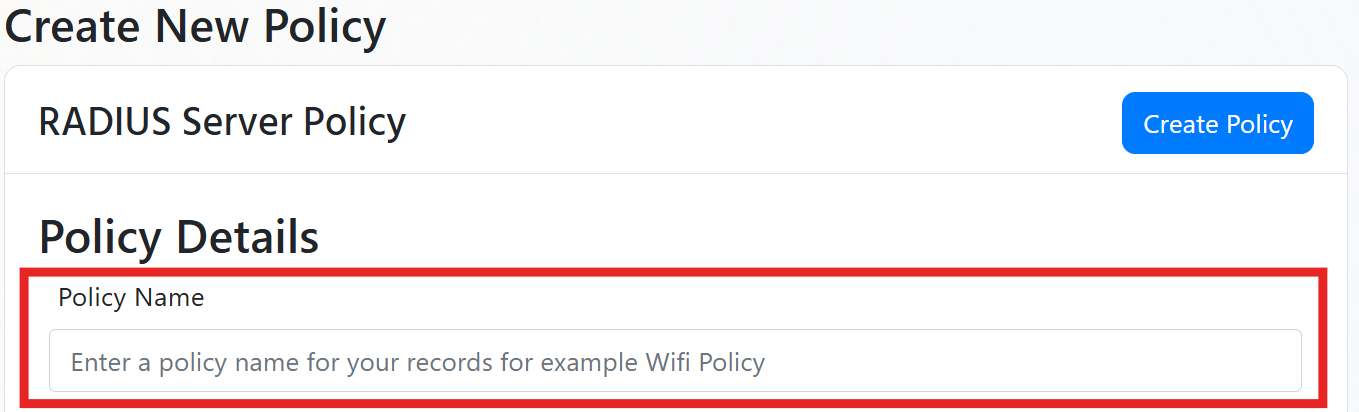
How to Name Your EZRADIUS RADIUS Policy
Begin by entering a friendly name for your RADIUS server policy. This name is for your records to help you identify the policy later. Behind the scenes, EZRADIUS will create a unique identifier for the policy, so feel free to choose a name that makes sense to you.
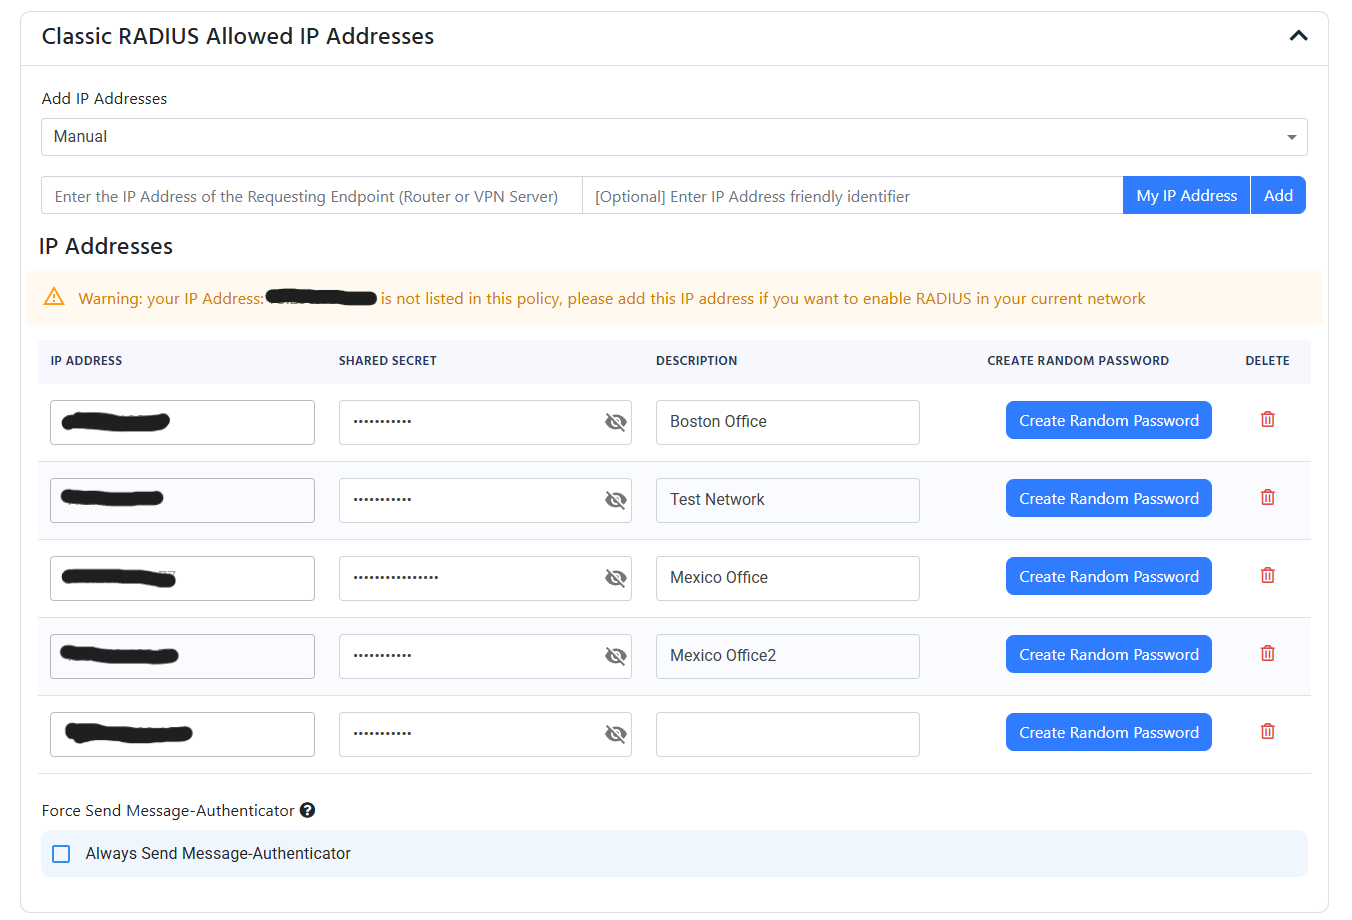
How to Allow Your Network to Connect to EZRADIUS With Classic RADIUS
Next, tell EZRADIUS which networks are allowed to send it authentication requests. Make sure Enable Classic RADIUS is checked. If your network equipment supports RadSec (RADIUS over TLS), you can also check Enable RadSec and follow the RadSec section of our certificate policy guide.
Classic RADIUS uses the public IP address of your RADIUS client (access point, switch, etc.) and a shared secret to authenticate incoming requests. In this section, you will add your public IP addresses and create a shared secret so we know which requests are coming from your authorized network devices.
When specifying an IP address, make sure to use the external IP address for your network. It should not start with 192.168.***, 10.0.***, 172.16.***, or any other private IP address range (the only exception is when you run a local RADIUS server, whose access points use private IP addresses). If you’re unsure, visit What is my IP to find your public IP address, or click the My IP Address button in the EZRADIUS portal to automatically add your current public IP address if you’re connecting from within your network.
There are two ways to add IP addresses to your RADIUS policy: either manually adding them one by one or uploading a CSV file for multiple IP addresses.
How To Manually Add Your IP Address(es)
To manually add your IP address(es) to the RADIUS policy, follow these steps:
-
Select Manual from the dropdown.
-
Enter the public IP address of your router or VPN server.
-
Provide a friendly name for the IP address (for your records).
-
Click Add to add the IP address to the list of allowed RADIUS clients.
-
A randomly generated shared secret will be created for the IP address. You can change this shared secret if needed.
-
Repeat the process for each additional public IP address that will connect to EZRADIUS. Make sure to include any backup/failover IP addresses as well.
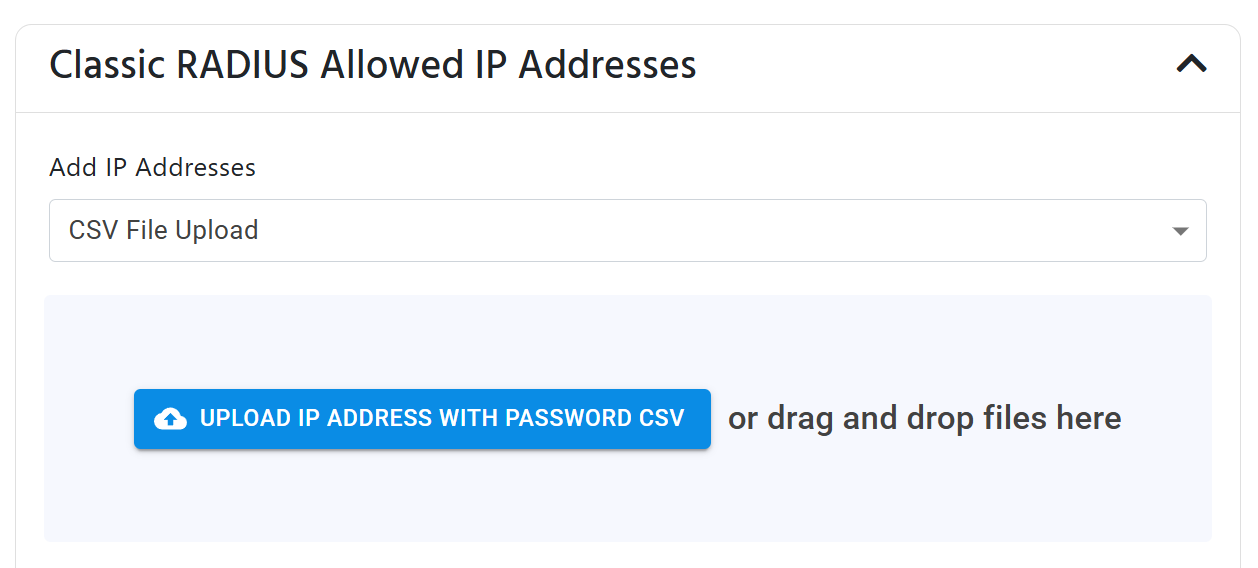
If you have multiple IP Addresses you can add them using a CSV file (if you have a CIDR range and want to convert it to IP range, use this site).
How To Create a CSV File for Uploading IP Addresses
Before uploading, you need to prepare a CSV file containing all the IP addresses you want to add. Follow the instructions below to create and upload the CSV file.
- Create a new file named
ip_addresses.csvon your computer. - Open the file in a text editor or spreadsheet application and enter your IP addresses, friendly names, and shared secrets following the format
IP Address,Friendly Name,Shared Secret. Don’t include headers in the file.
For example, a CSV file with two IP addresses would look like this:
12.12.12.12,First Name,SharedSecret1
12.12.12.13,Second Name,SharedSecret2
Make sure to save your CSV file before proceeding to the upload steps.
How to Upload the CSV File
Now that you have your CSV file, follow these steps to upload it:
-
Drop down the Add IP Addresses menu and select CSV File Upload.
-
Either drag-and-drop your CSV file into the upload area or click on the area to browse and select your CSV file.
Step 6: How to Add Your Cloud PKI CAs as Trusted CAs in EZRADIUS
EZRADIUS only accepts client certificates issued by the CAs you add in the Accepted Certificate Authorities section of your policy. Upload the Root CA and Issuing CA .cer files you downloaded in Step 2.
How to Add a Third-Party Certificate Authority as a Trusted CA
To add a third-party Certificate Authority as a trusted CA in your network profile, follow these steps:
-
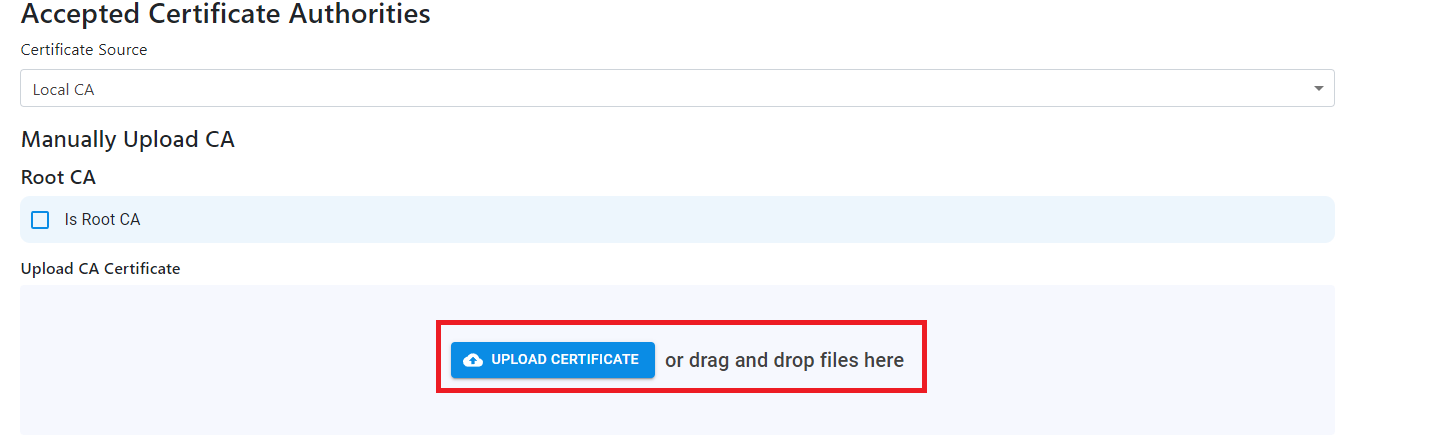
From the Certificate Source dropdown, select Local CA.
-
If you are uploading a Root CA, check the Is Root CA checkbox. If you are uploading an Intermediate/Issuing CA, leave the checkbox unchecked.
-
Click on the Upload Certificate button and select your CA certificate file.
-
If you have a multi-tier hierarchy, make sure to add both your Root CA and your Intermediate/Issuing CA(s).
-
Repeat the process for each additional CA chain you need to add.
Cloud PKI client certificates are signed by your Issuing CA, which is signed by your Root CA. EZRADIUS needs both to build the full chain, so upload the Root CA with Is Root CA checked and the Issuing CA with Is Root CA unchecked. If either one is missing, your devices’ certificates will be rejected.
When you’re done, you should see both your Cloud PKI Root CA and Issuing CA listed under Trusted Certificate Authorities.
Step 7: How to Configure the EZRADIUS Server Certificate
Your devices also need to verify the RADIUS server before they send it their certificate. Microsoft Cloud PKI doesn’t issue server certificates, since it only issues SCEP certificates to Intune-managed devices, so we’ll use the EZRADIUS auto-generated server certificate instead. EZRADIUS creates and renews this certificate for you, so there’s nothing to maintain.
-
Scroll down to the Server Certificate section of your policy.
-
Make sure the Certificate Source dropdown is set to Auto-Generated Certificate (this is the default).

Step 8: How to Create an EZRADIUS Access Policy for Cloud PKI Certificates
Now that you have configured Classic RADIUS and/or RadSec, set up your CAs, and added the server certificate, you can add your access policies. Access policies define the conditions under which a user or device can connect to your network. Each policy can have multiple access policies and they are evaluated in the order they are sorted.
-
Begin in the Access Policies section of the RADIUS network policy. By default, there will be no access policies listed.
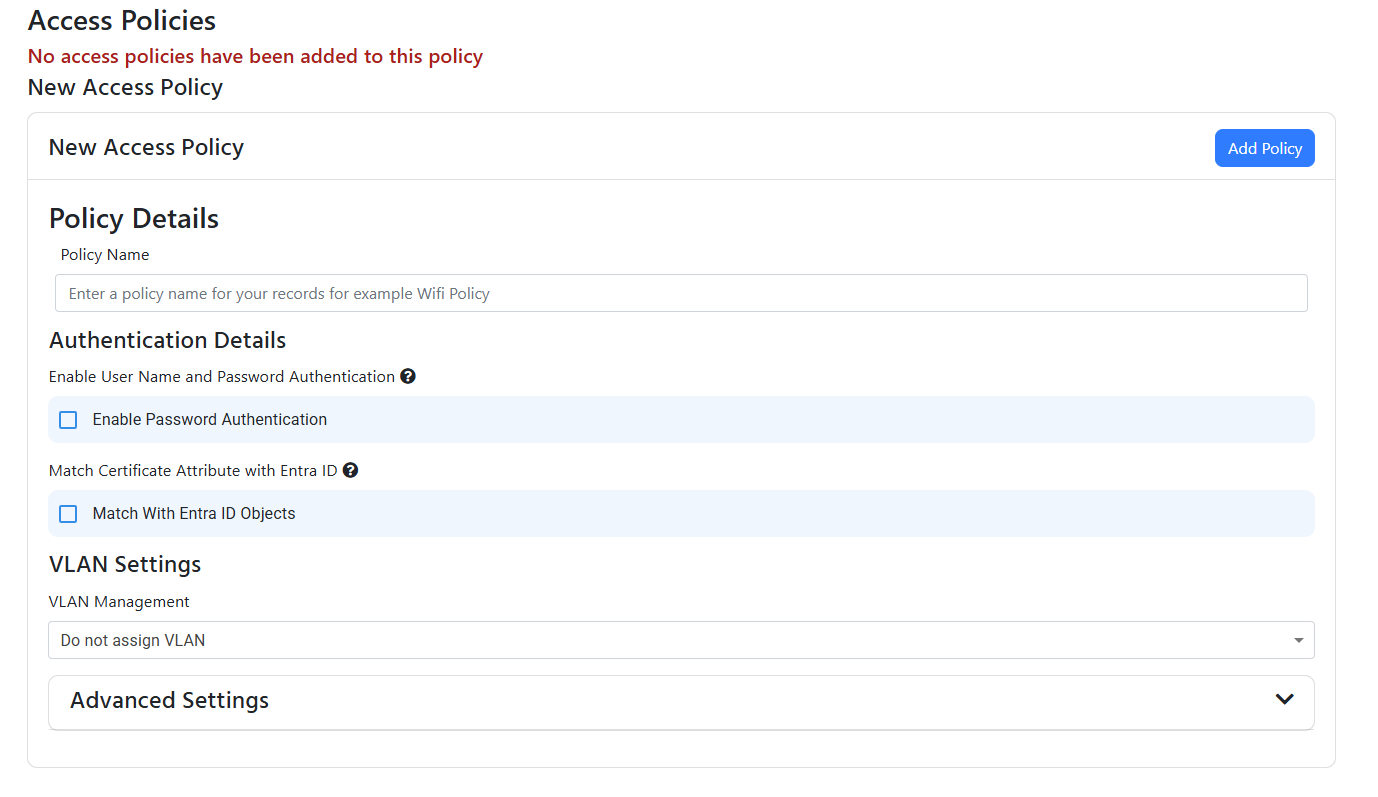
-
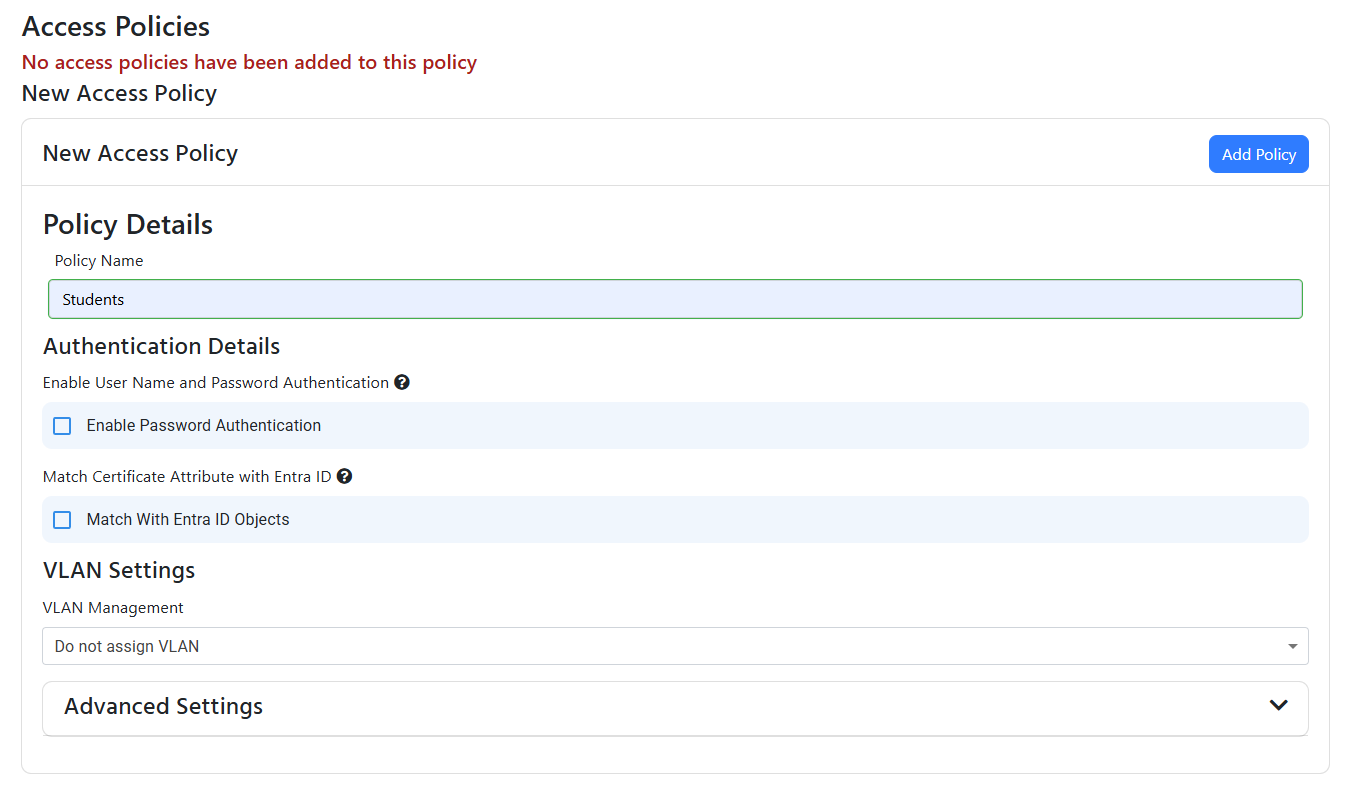
Enter the friendly name of the access policy which is used for your records to easily identify the policy. In this example we’ll configure the RADIUS server as if it was for a school, so we will name the access policy “Students”. Replace this with a name that makes sense for your use case.
-
For this policy we only want to enable EAP-TLS, so we will leave the Enable Password Authentication checkbox unchecked.
Configure Certificate Matching Options for Cloud RADIUS Policies
There are a few different ways you can match the certificate presented by the user or device to the access policy. In this guide we will focus on the four most common methods:
- CA Matching: If you only issue certificates for students from these CAs, then you can leave everything unchecked and just assign the VLAN if required.
- Entra ID User Matching: EZRADIUS can extract the user UPN or user ID from a field of the certificate and validate with Entra ID that the user exists and even assign VLAN based on the groups the user is a member of.
- Entra ID Device Matching: EZRADIUS can extract the Entra ID device ID from a field of the certificate and validate with Entra ID that the device exists and even assign VLAN based on the groups the device is a member of.
- Intune Device Matching: EZRADIUS can extract the Intune device ID from a field of the certificate and validate with Intune that the device exists and is compliant with your Intune policies.
Choose the tab that matches the certificate type you configured in your SCEP profile in Step 4:
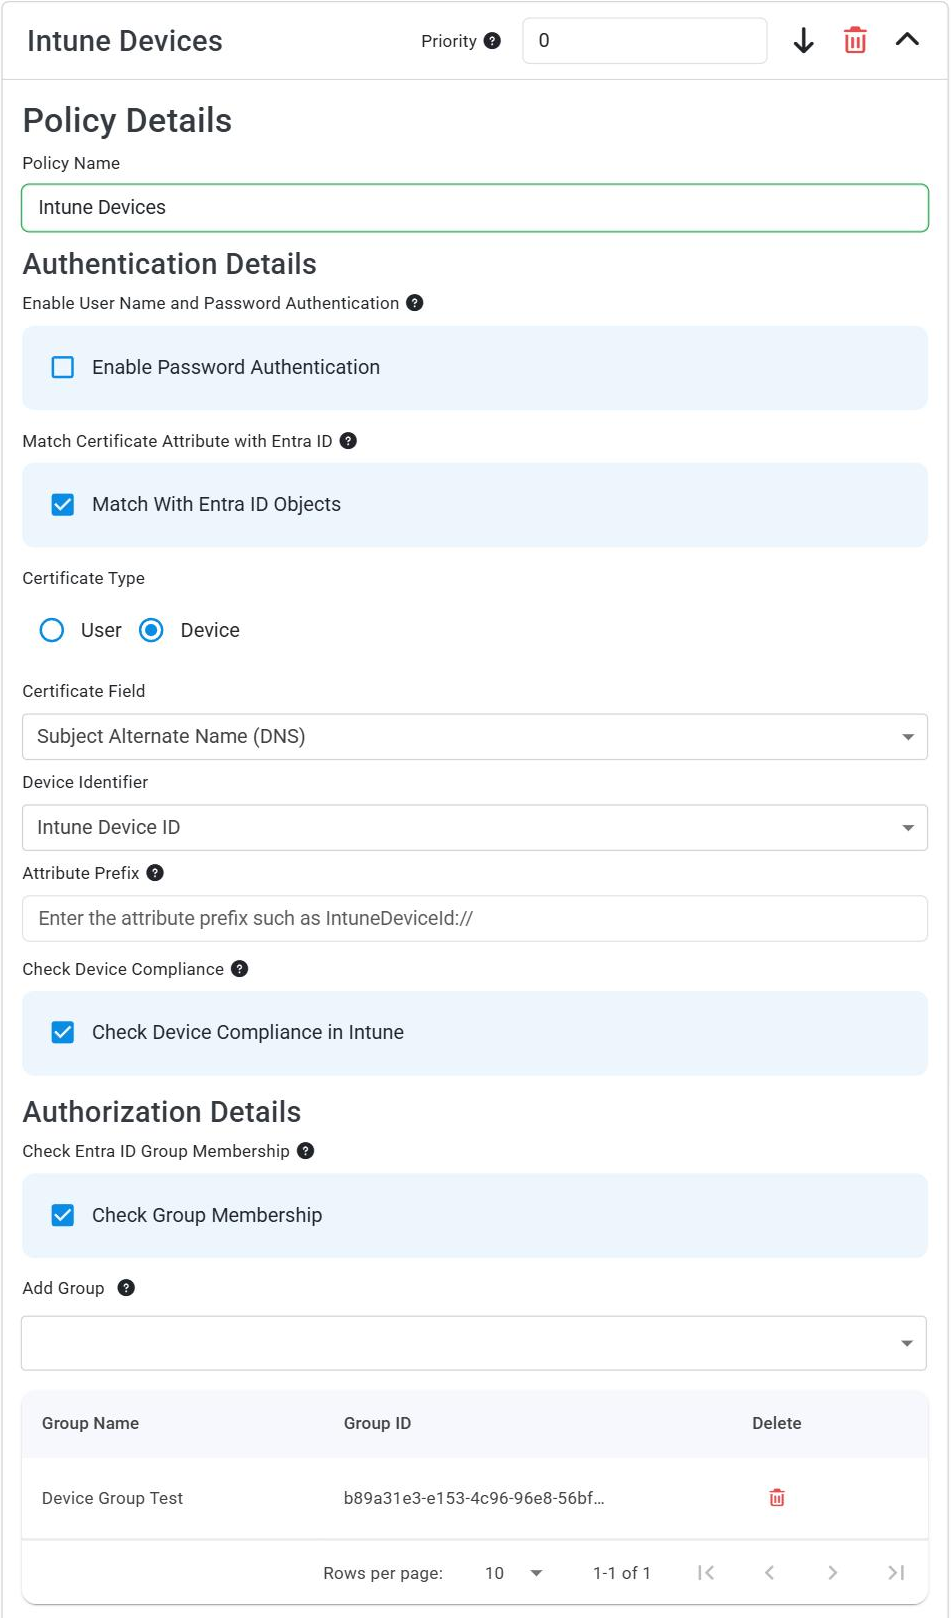
If you want to restrict an access policy to only allow device certificates from valid Intune-managed devices, follow these steps:
- Check the Match With Entra ID Objects checkbox.
- For Certificate Type, select Device.
- Under Certificate Field, select Subject Alternate Name (DNS). Our Intune SCEP guides add the Intune device ID to the certificate as a DNS Subject alternative name with the value
{{DeviceId}}. - For Device Identifier, set this to Intune Device ID, which is the Intune identifier for the device.
- Leave Attribute Prefix empty, since the Subject alternative name only contains the device ID.
Now that you have matched the certificate with a valid Intune-managed device, you can optionally check if the device is compliant in Intune before granting access. This ensures that only devices meeting your organization’s compliance requirements are allowed to match against this policy.
- Check the box for Check Device Compliance in Intune.
If you want to also restrict access based on group membership, follow these steps:
- Check the Check Group Membership checkbox.
- Under the Add Group section, type in the name of the Entra ID group you want to check for membership. Select it from the dropdown list. Note that this group has to contain the device itself, not the user who owns the device.
You should now have an access policy that only allows device certificates from valid Intune-managed devices, optionally restricted to specific Entra ID groups:
Intune and Entra ID device matching only work with certificates issued through an Intune SCEP profile, because other MDMs (such as Jamf, SimpleMDM, or NinjaOne) do not put an Intune or Entra ID device ID in the certificate. For devices managed by other MDMs, use All Valid Certificates (CA matching) or user certificate matching instead.
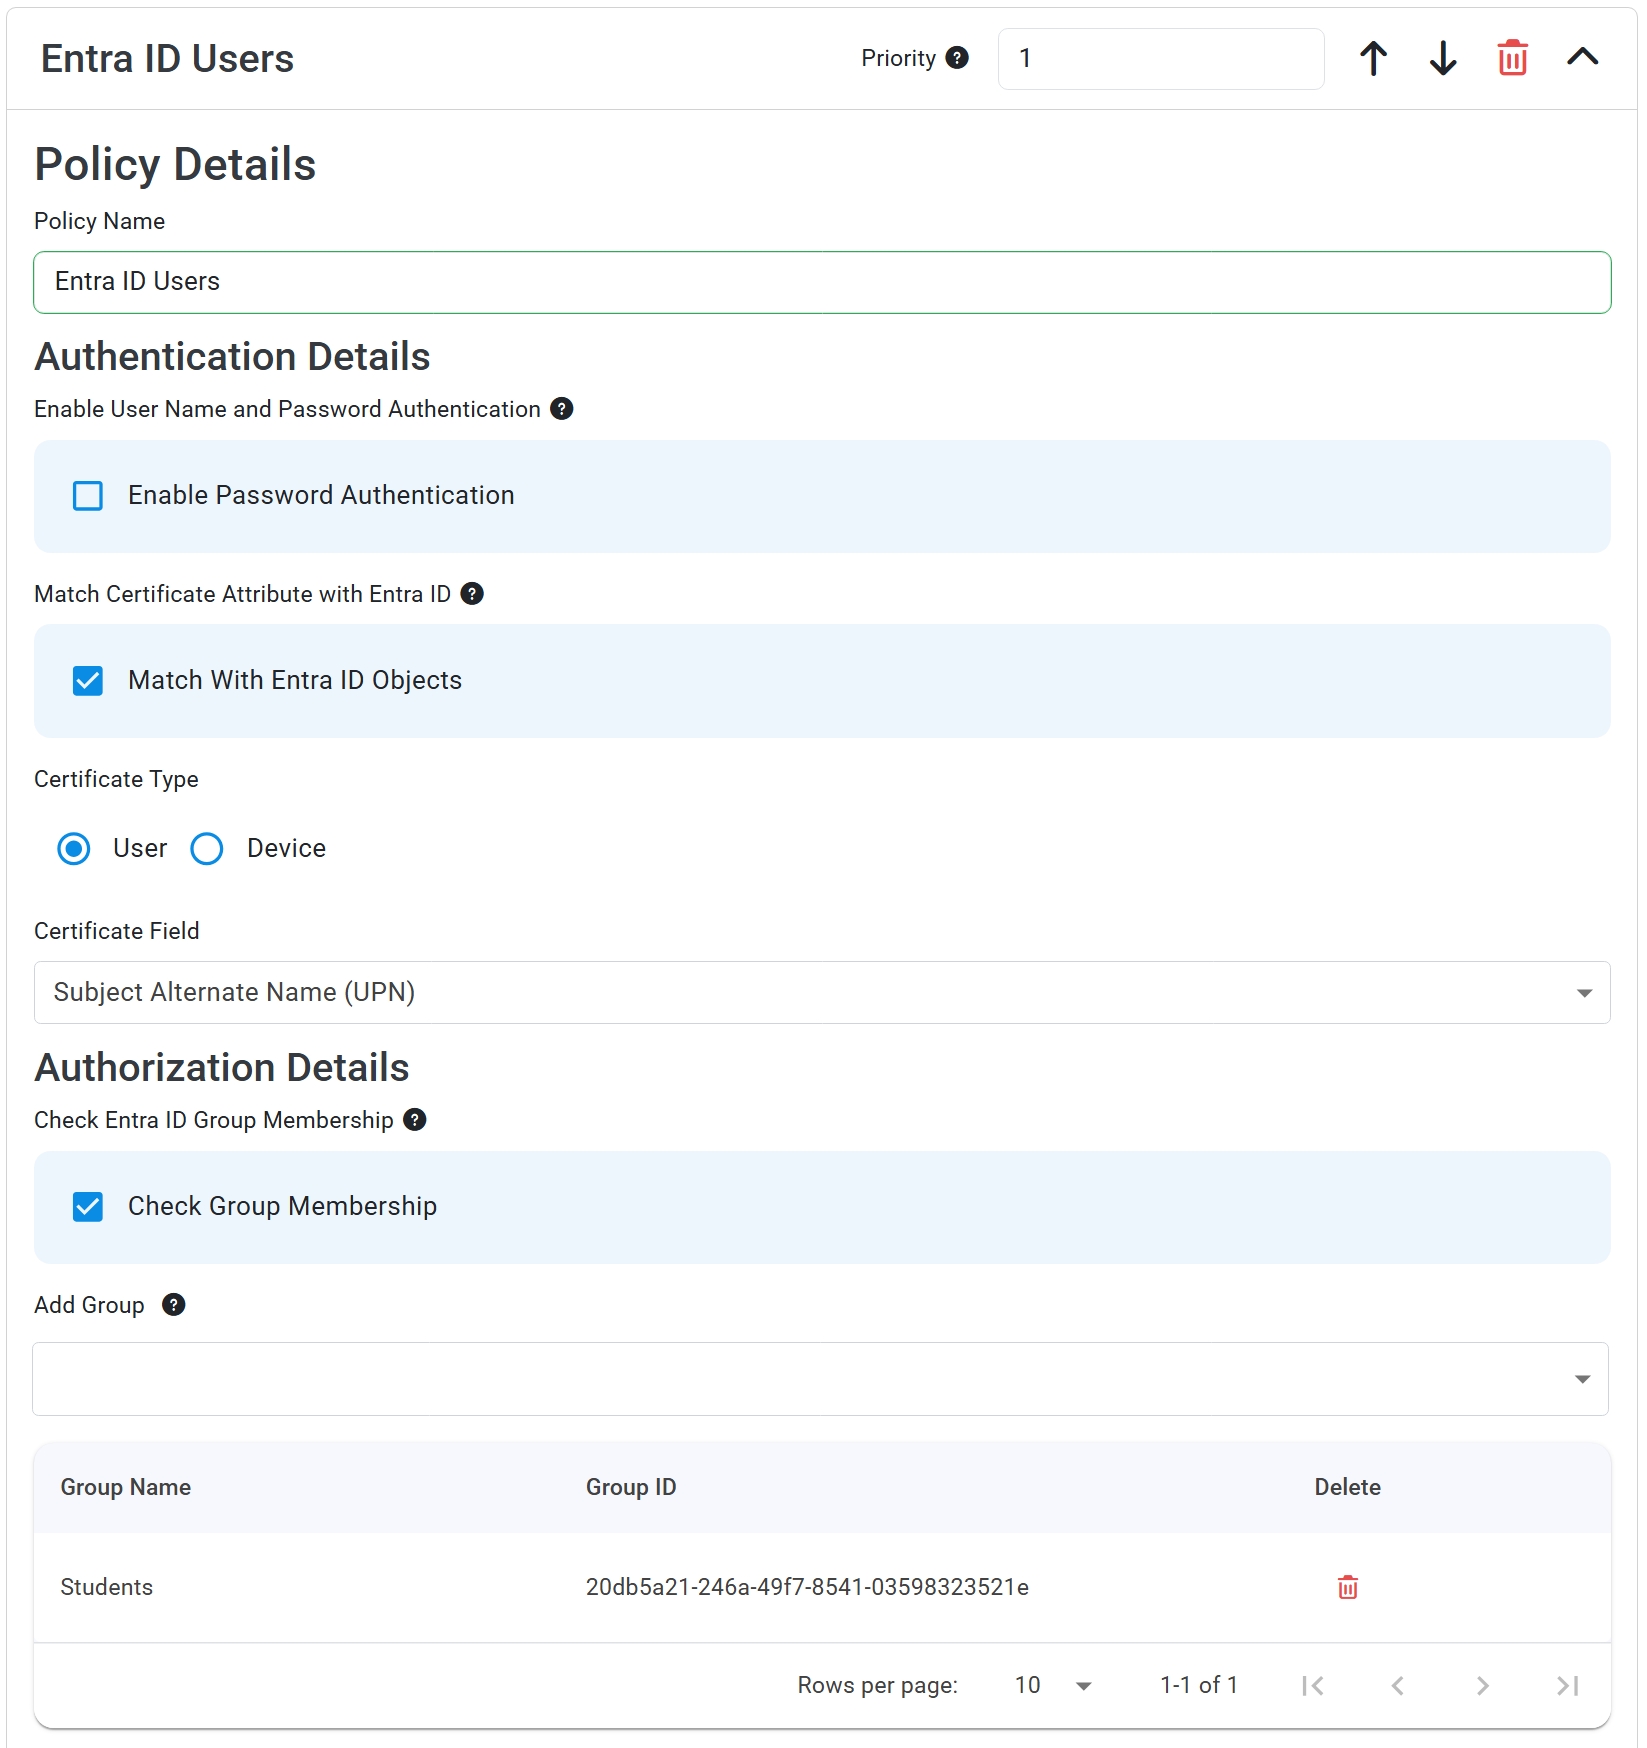
If you want to restrict an access policy to only allow user certificates from valid Entra ID users, follow these steps:
- Check the Match With Entra ID Objects checkbox.
- For Certificate Type, select User.
- Under Certificate Field, select which certificate field contains the user’s User Principal Name (UPN). Usually this is Subject Alternate Name (UPN), which is what our Intune SCEP and Keytos Connect guides configure. If your certificates only contain the user’s email address in an RFC822 Subject Alternative Name (for example Jamf
$EMAILADDRESScertificates), select Subject Alternate Name (Email) instead.
Now that you have matched the certificate with a valid Entra ID user, you can optionally also check that the user is in a specific Entra ID group.
- Check the Check Group Membership checkbox.
- Under the Add Group section, type in the name of the Entra ID group you want to check for membership. Select it from the dropdown list.
You should now have an access policy that only allows user certificates from valid Entra ID users, optionally restricted to specific Entra ID groups:
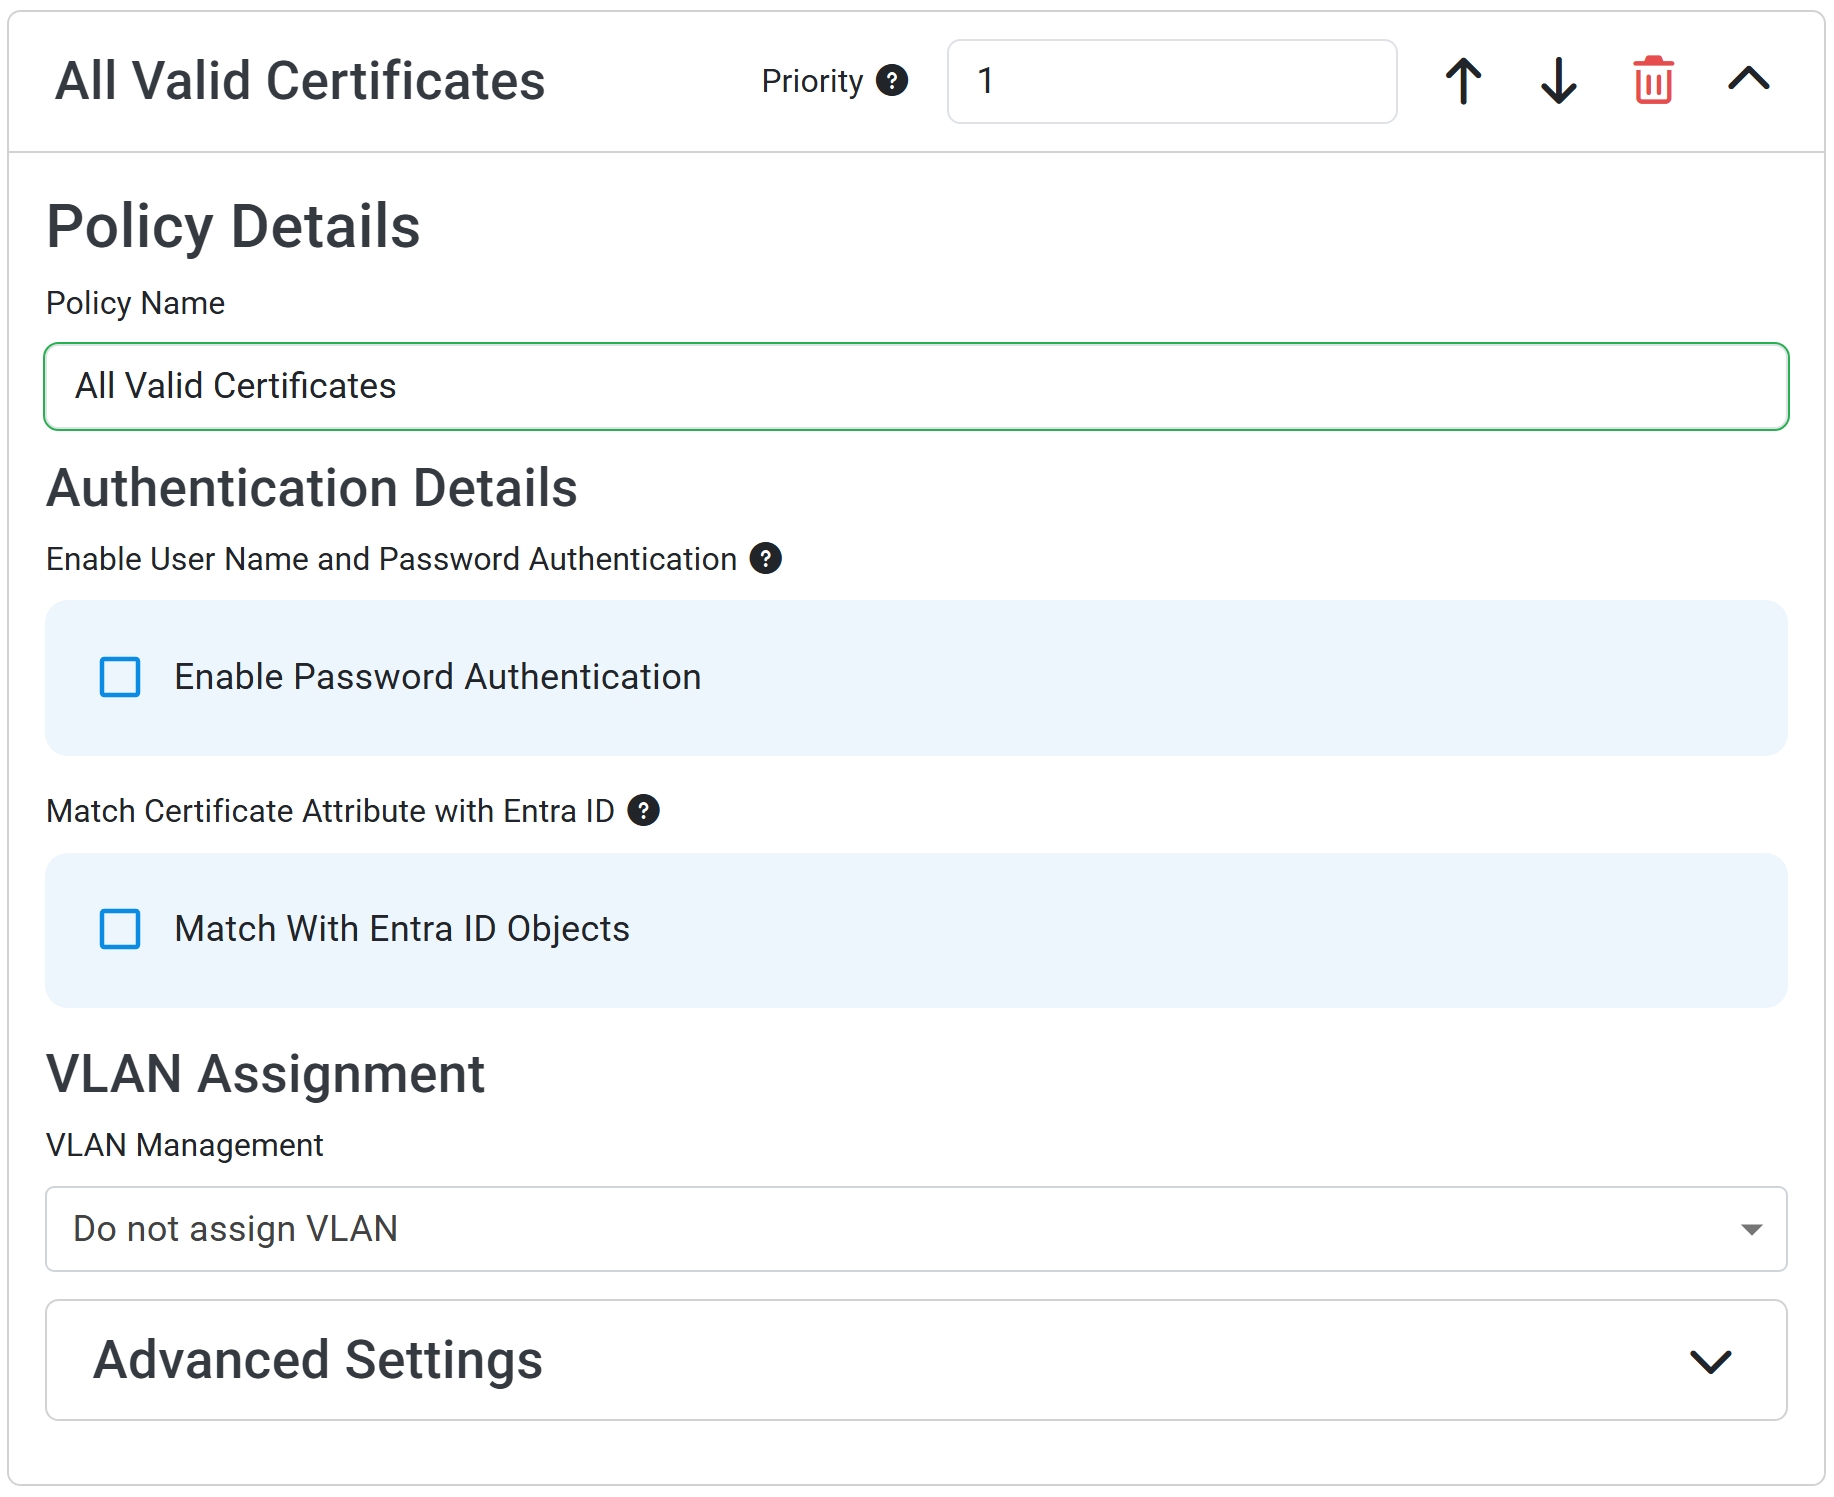
By default, EZRADIUS will allow any certificate issued by a Trusted CA to authenticate, without requiring any additional matching criteria. If you want all valid certificates to be accepted:
-
Click Add Access Policy to create a blank access policy.
-
Provide a Policy Name, such as “All Valid Certificates”.
-
Leave all fields unchecked and in their default state.
How to Assign a VLAN to Cloud PKI Devices
By default, EZRADIUS will not set a Virtual LAN (VLAN), and your network will use its own default VLAN. However, you can specify a specific VLAN in each access policy to assign specific users and devices to their own VLAN and override the default.
This is useful for putting specific Entra ID users or groups into their own VLANs, or putting compliant devices into a separate VLAN from non-compliant devices.
If you do not want to assign a VLAN for this access policy, keep VLAN Management set to Do not assign VLAN. This will ensure that the network uses its default VLAN for all users and devices under this access policy.

If you want to assign a specific, static VLAN to all devices that match against this access policy, set VLAN Management to Assign Static VLAN and enter the VLAN ID in the VLAN Name field. This ensures that all matching devices are placed in the specified VLAN, overriding the network’s default VLAN.
If you want to assign different VLANs to different users or devices based on their attributes, you should either:
- Set up multiple access policies, each with a different static VLAN and different matching attributes.
- Use dynamic VLAN assignment based on certificate values to automatically assign VLANs according to the information contained in the user’s certificate.
More information on how to use this field is available in our reference architectures

VLANs can also be set based on a VLAN ID specified within the certificate authenticating to the network. To configure this:
-
From the VLAN Management dropdown, select Assign Dynamic VLAN (From Certificate Value).
-
Under Certificate Field, select the field in the certificate that contains the VLAN ID.
-
If there’s a prefix in front of the VLAN ID in the certificate, enter the prefix in the Prefix field. EZRADIUS will ignore this prefix when assigning VLANs.

How to Configure Advanced Settings and Revocation Checking for Cloud PKI
Microsoft Cloud PKI publishes a Certificate Revocation List (CRL) and an Authority Information Access (AIA) endpoint for each CA, but no OCSP responder. EZRADIUS checks CRLs by default, so leave Check OCSP unchecked. Microsoft refreshes the Cloud PKI CRL every 3.5 days and every time you revoke a certificate.
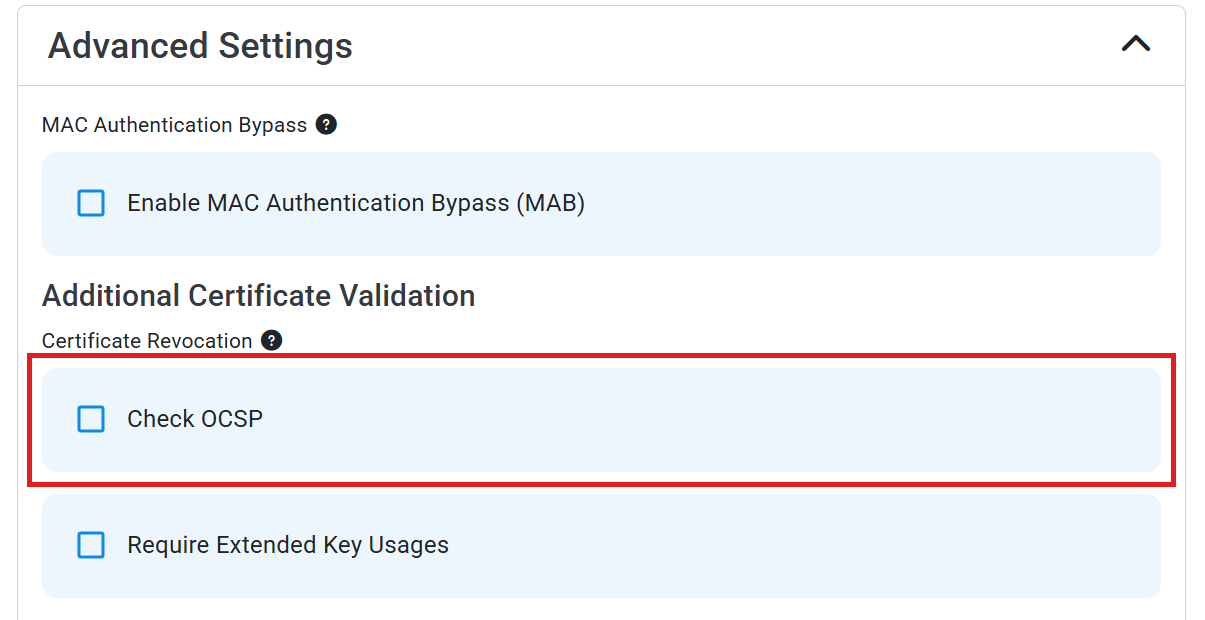
If you have more advanced requirements for your access policies, you can configure them by expanding the Advanced Settings tab and configuring the available options.
Advanced Access Policy Settings
Optionally configure advanced settings for your access policies
If you want to bypass authentication for devices based on their MAC address, you can:
- Check the box for Enable MAC Authentication Bypass (MAB).
- Either directly add your MAC addresses, or enable Bulk Upload Addresses to add multiple MAC addresses at once.
Collapses this section and completes the checkmark.
EZRADIUS checks CRLs (Certificate Revocations Lists) by default but if you also want to check OCSP, you can check the Enable OCSP checkbox. you can read more about the difference between CRL and OCSP here
Collapses this section and completes the checkmark.
If you want to require that the certificate being used for authentication has specific Extended Key Usages such as “Client Authentication”:
- Check the box for Require Extended Key Usage.
- Either select an EKU from Predefined Extended Key Usages, or enter a custom EKU in the Custom Extended Key Usage > Name and Object Identifier fields.
- Click Add Extended Key Usage to add the EKU configuration.
Collapses this section and completes the checkmark.
If you want to match attributes in the request (for example, matching the SSID name sent as a called station ID), you can add the attributes in the Match Attributes in Request and enter the value and the matching scheme (either contains or equals). Some common attributes to match are:
- Called-Station-ID: Usually set-up to contain the SSID of the network or the MAC address of a device when carrying out MAC-Authentication-Bypass.
- NAS Identifier (NAS-ID): Usually set-up to contain the SSID of the network or the MAC address of a device when carrying out MAC-Authentication-Bypass.
Collapses this section and completes the checkmark.
If you want to send attributes in the response (for example, sending the Filter-Id to the device), you can add the attributes in the Sent Attributes in Response and enter the value. Supported attributes are:
- Filter-Id: Can be used to assign a pre-defined access control list (ACL) to the user that successfully authenticates with the access policy
- Cisco-AVPair: Cisco-specific attribute
Collapses this section and completes the checkmark.
How to Order and Save Your Access Policies
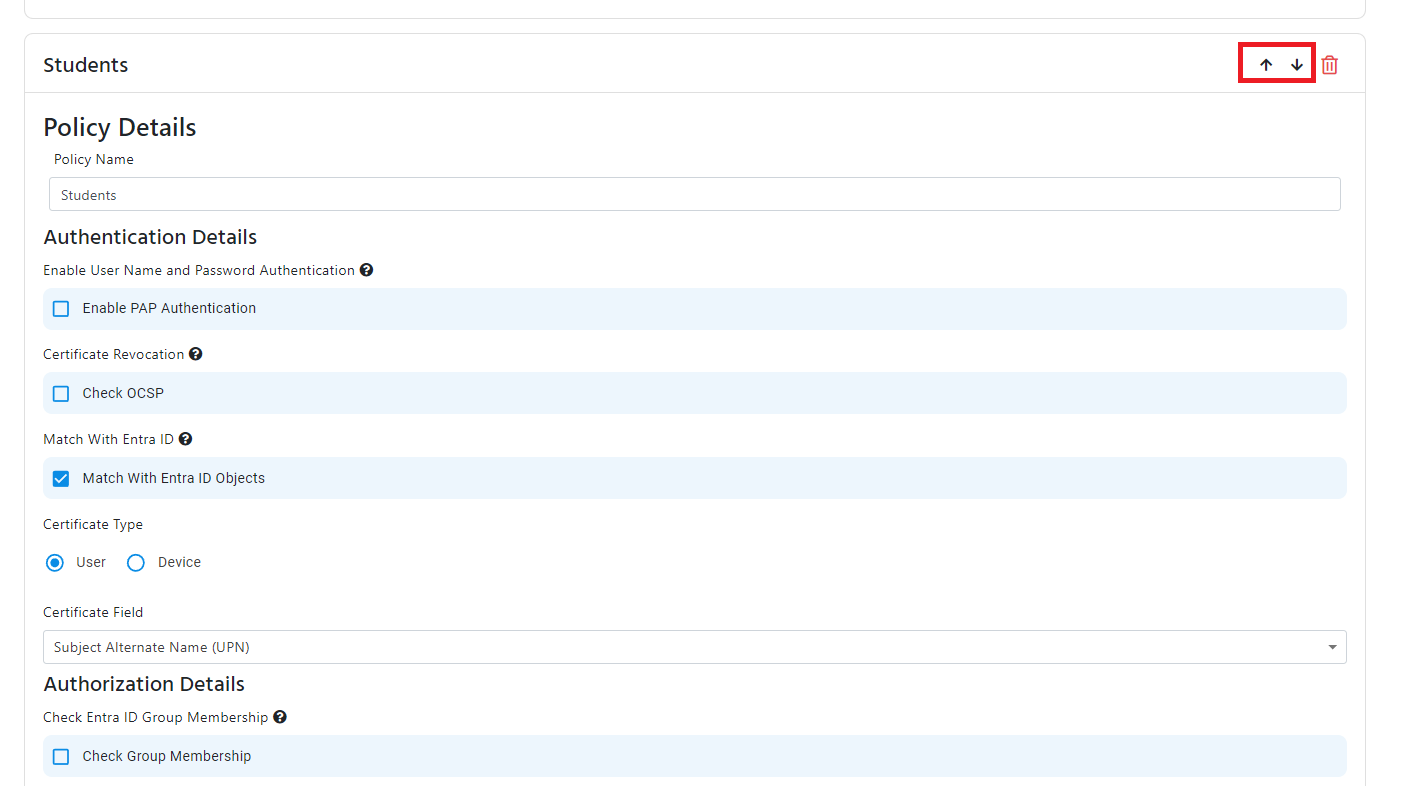
The access policies are checked in the order they are sorted, you can change the order of the access policies by clicking on the up and down arrows on the right side of the access policy.
- Once your policy is ready, save the policy.
When everything looks right, scroll back up and click Create Profile at the top of the RADIUS Network Profile form to save your new RADIUS policy. If you added the Cloud PKI configuration to an existing policy instead, click Save Changes next to that policy’s name. Done! EZRADIUS now trusts your Microsoft Cloud PKI certificates.
Step 9: How to Point Your Wi-Fi Network to EZRADIUS
Your access points or wireless controller need to know where to send authentication requests. You’ll need your EZRADIUS server IP addresses and the shared secret that was generated when you added your public IP address.
How to Get Your EZRADIUS Server IP Addresses
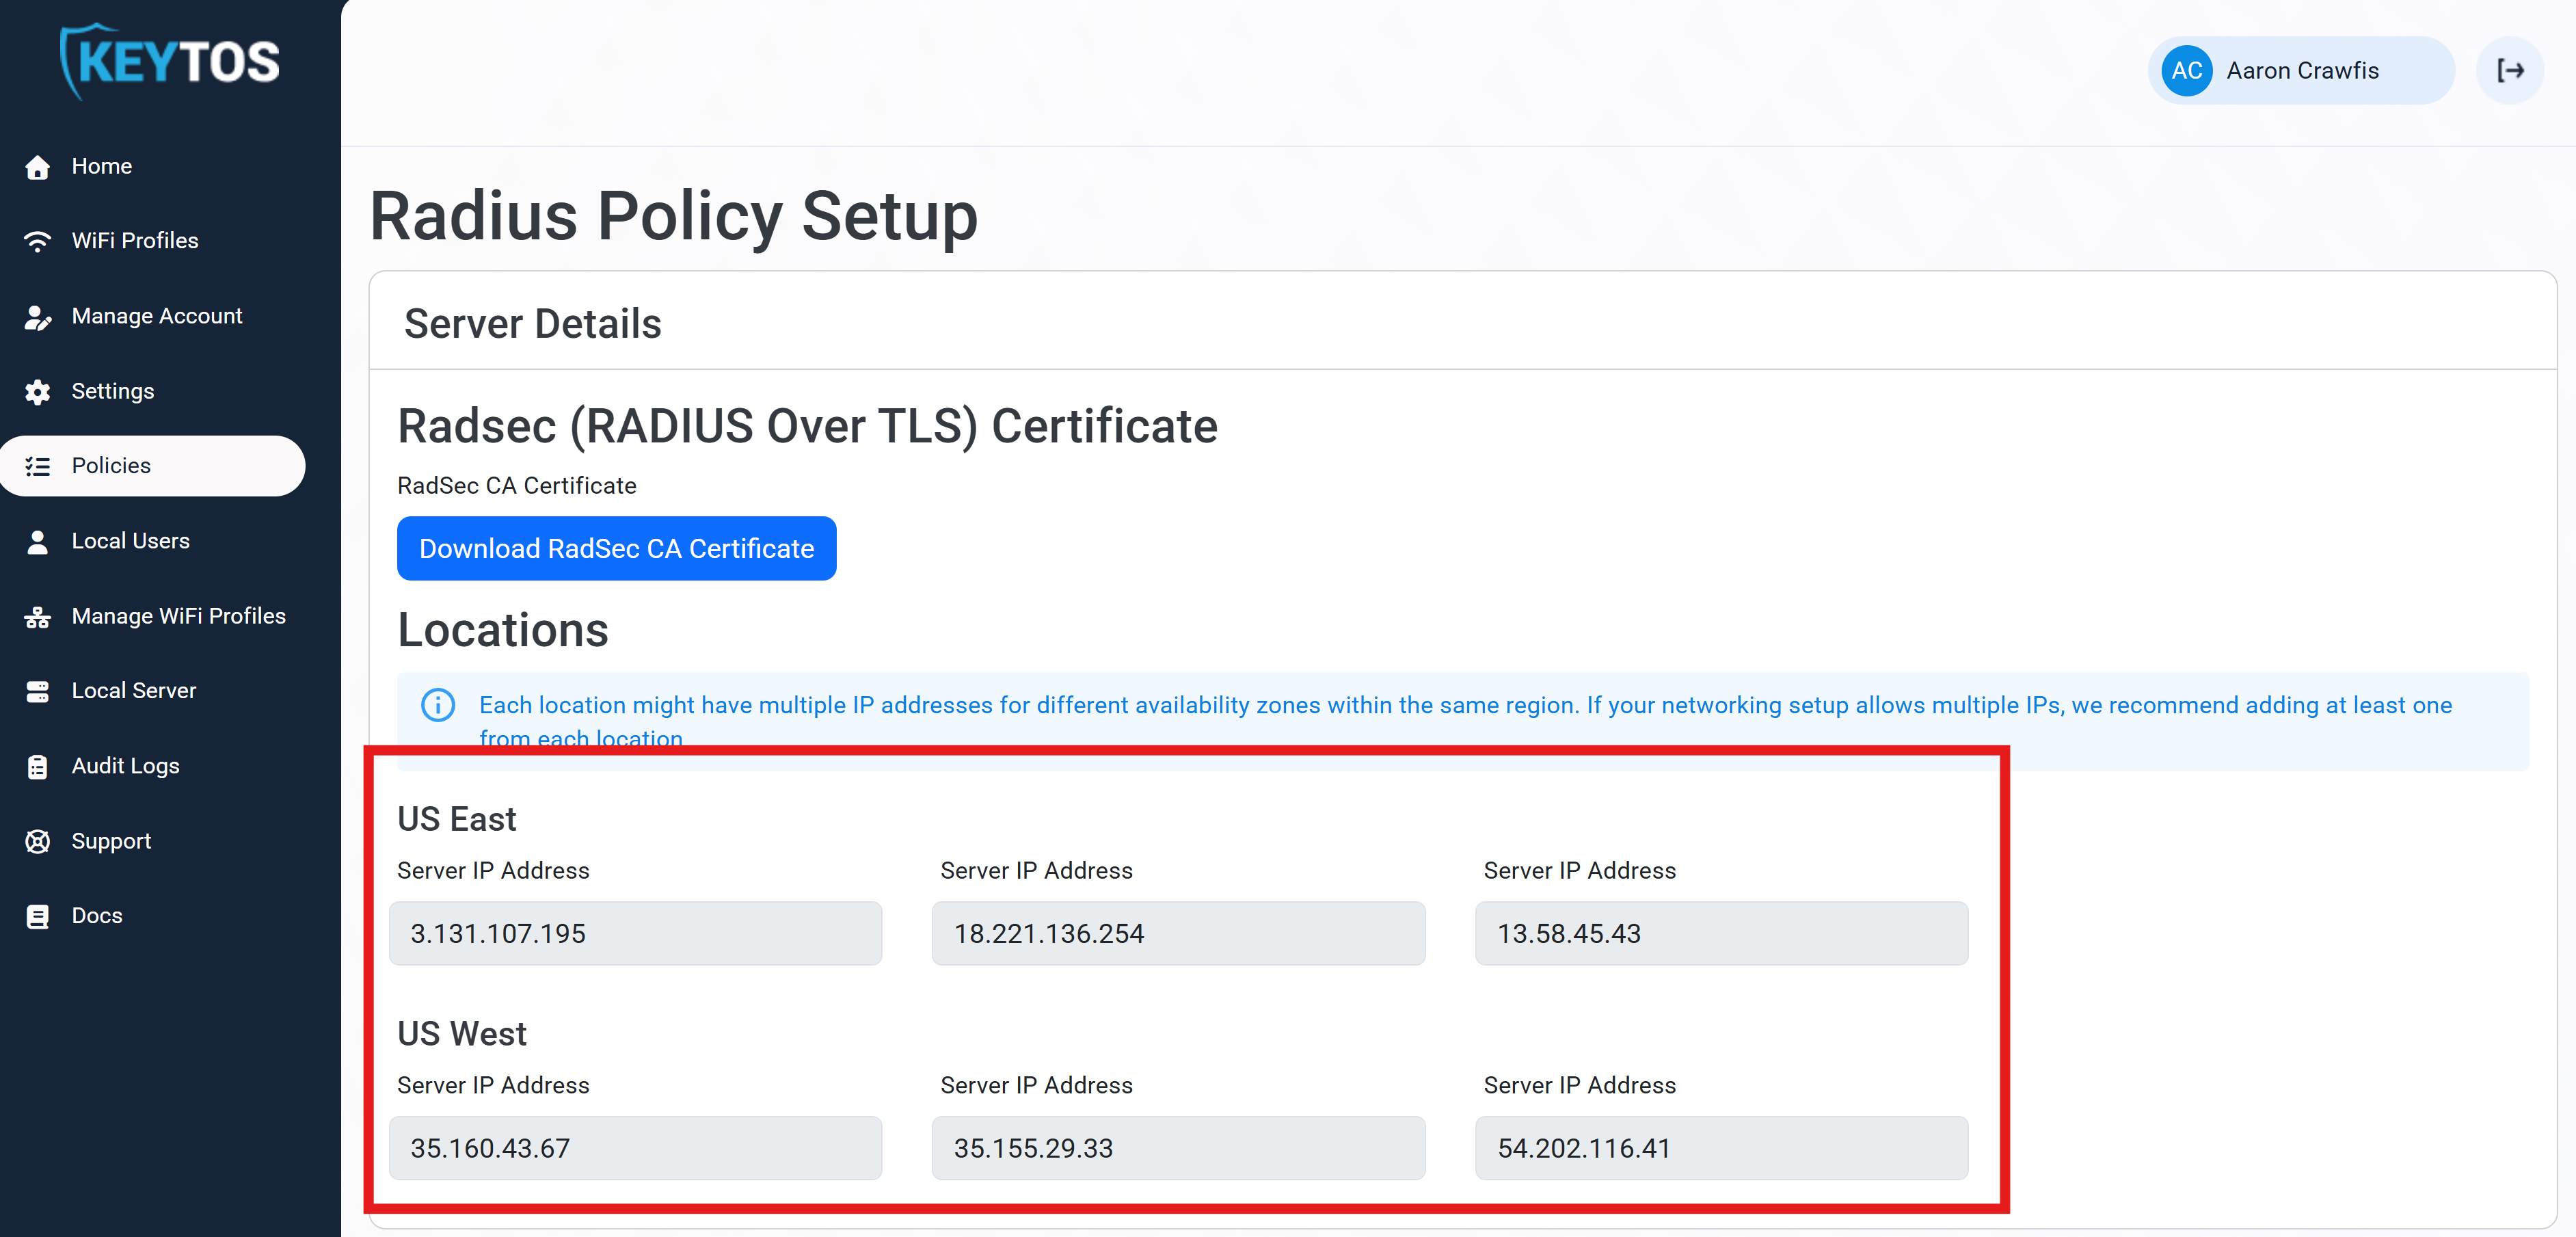
You can get your EZRADIUS Server IP addresses from the EZRADIUS dashboard. These IP addresses are needed to configure your network controller to communicate with the EZRADIUS service.
- Navigate to the EZRADIUS Policies page from the left-hand menu.
- At the top of the Policies page, you will find the EZRADIUS Server IP addresses. Copy one of the IP addresses from the region closest to your network controller (you’ll add the others later).
How to Get Your EZRADIUS Shared Secret
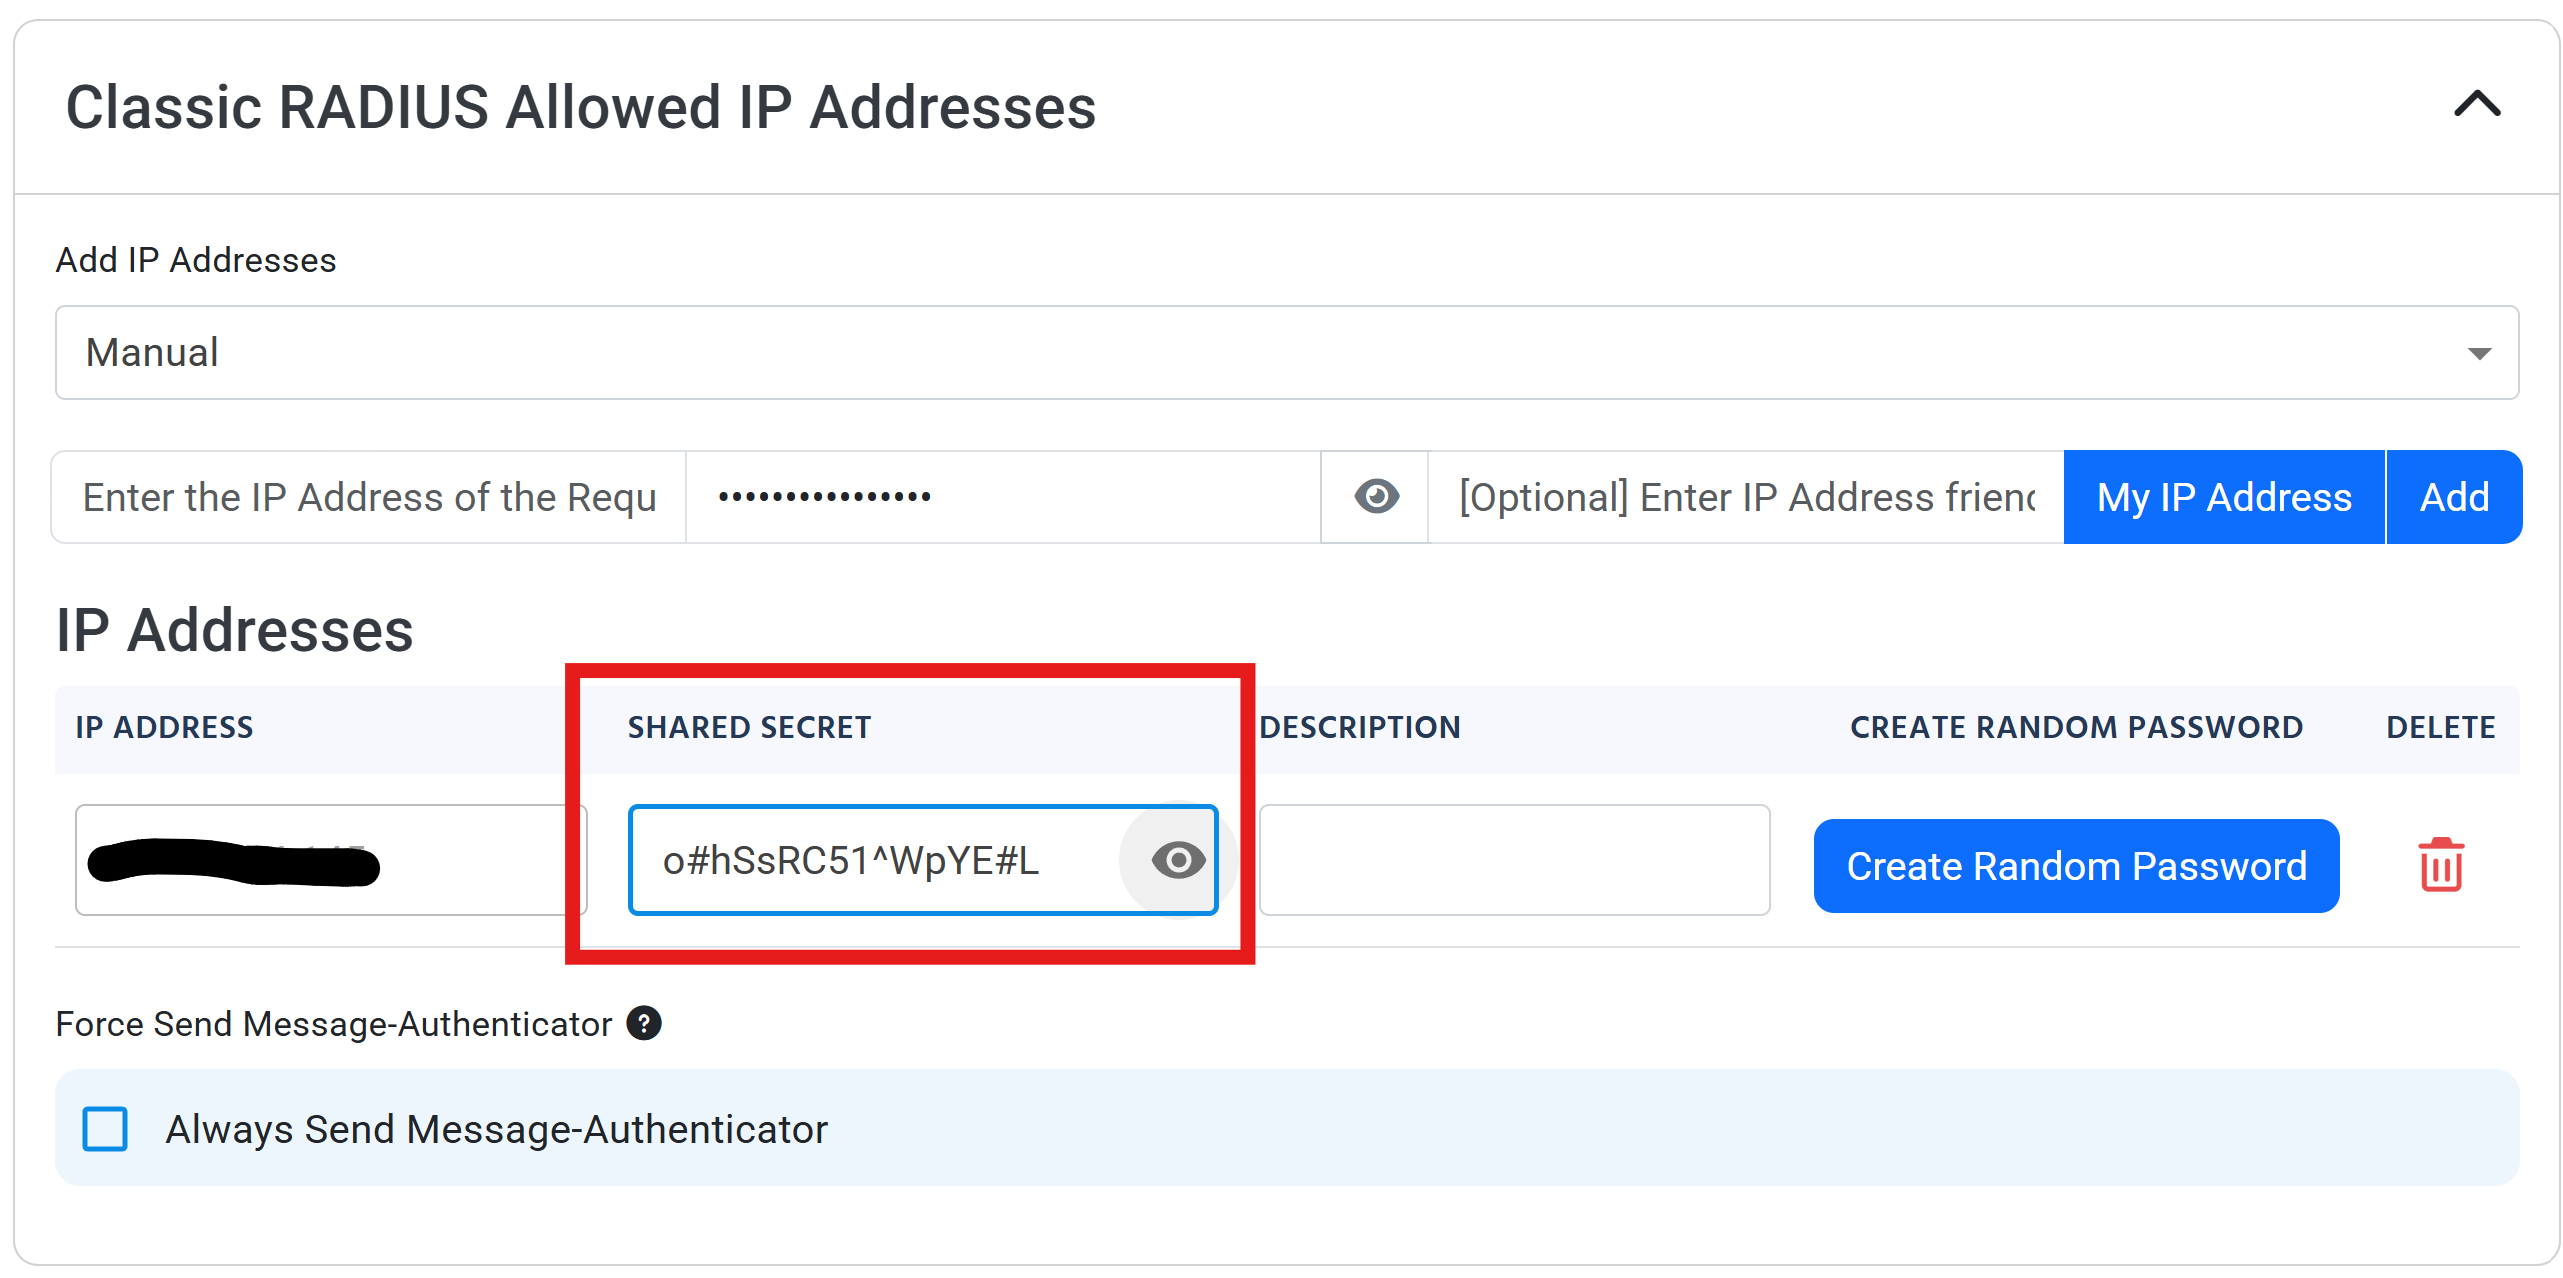
When you added your public IP address to your EZRADIUS policy, a shared secret was automatically generated for you. This shared secret is used to authenticate your network controller (RADIUS client) to the EZRADIUS server.
-
In the EZRADIUS portal, navigate to the EZRADIUS Policies page from the left-hand menu.
-
Scroll down to your RADIUS policy and find the Classic RADIUS Allowed IP Addresses section.
-
For your public IP address, click on the eye icon to reveal the shared secret.
How to Configure Your Access Points for EZRADIUS
Create (or edit) a WPA2-Enterprise or WPA3-Enterprise SSID and add EZRADIUS as its RADIUS server using the IP addresses and shared secret above. We have step-by-step guides for the most common network vendors:
🚀 See All Network Setup GuidesStep 10: How to Push the EZRADIUS Server CA Certificate to Your Devices With Intune
Just like your devices trust your Cloud PKI CAs, they also need to trust the CA that issued your EZRADIUS server certificate. Otherwise they’ll refuse to send their certificate to the RADIUS server. First, download the CA certificate from EZRADIUS:
If you used the EZRADIUS auto-generated certificate for your RADIUS server, you’ll just have a single CA certificate to download. Follow these steps:
- Log in to your EZRADIUS portal.
- Navigate to Policies.
- Select the RADIUS policy that your network (access points or switches) is connected to.
- Scroll down to the Server Certificate section.
- Click on the Download CA Certificate button to download the certificate to your local machine. It will have a filename similar to
RootCA.cer.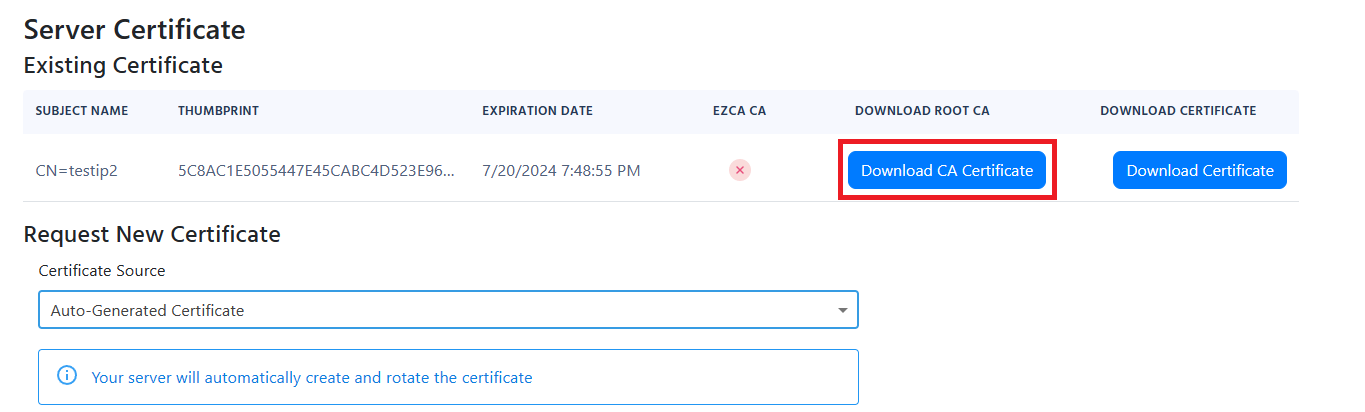
If you used EZCA to issue your RADIUS server certificate, you’ll need to download the CA certificate for your EZCA CA, plus the Root CA certificate, if applicable. Follow these steps:
- Log in to your EZCA portal.
- Navigate to Certificate Authorities.
- Select the CA that issued your RADIUS server certificate.
- Click on the View Details button.
- Click on the Download Certificate button to download the CA certificate to your local machine. It will have a filename similar to
<CA-NAME>.cer. - If your EZCA CA is an intermediate CA, make sure to also download the Root CA certificate by repeating the above steps for the Root CA.
Refer to your PKI documentation to download the CA certificate(s) that issued your RADIUS server certificate. Ensure you have the root CA and any intermediate CA certificates if applicable.
The EZRADIUS CA certificate file is named RootCA.cer. Don’t confuse it with your Cloud PKI Root CA certificate from Step 2: this is the CA that issued your RADIUS server’s certificate, so your devices need it to trust EZRADIUS. Now push RootCA.cer to your devices with an Intune trusted certificate profile for each platform you manage. When the steps below ask for the Certificate file, select RootCA.cer.
The EZRADIUS auto-generated CA is a root CA, so use the Root store.
-
Navigate to the Intune portal: https://aka.ms/Intune
-
From the left-hand menu, click on Devices.
-
From the left-hand sub-menu, click Windows to manage Windows devices.
-
From the left-hand sub-menu, click on Configuration Profiles.
-
Click on the + Create button at the top of the list, then + New Policy.
-
Under Create a profile, select the following options and click Create:
- Platform: Windows 10 and later
- Profile type: Templates
- Template name: Trusted certificate
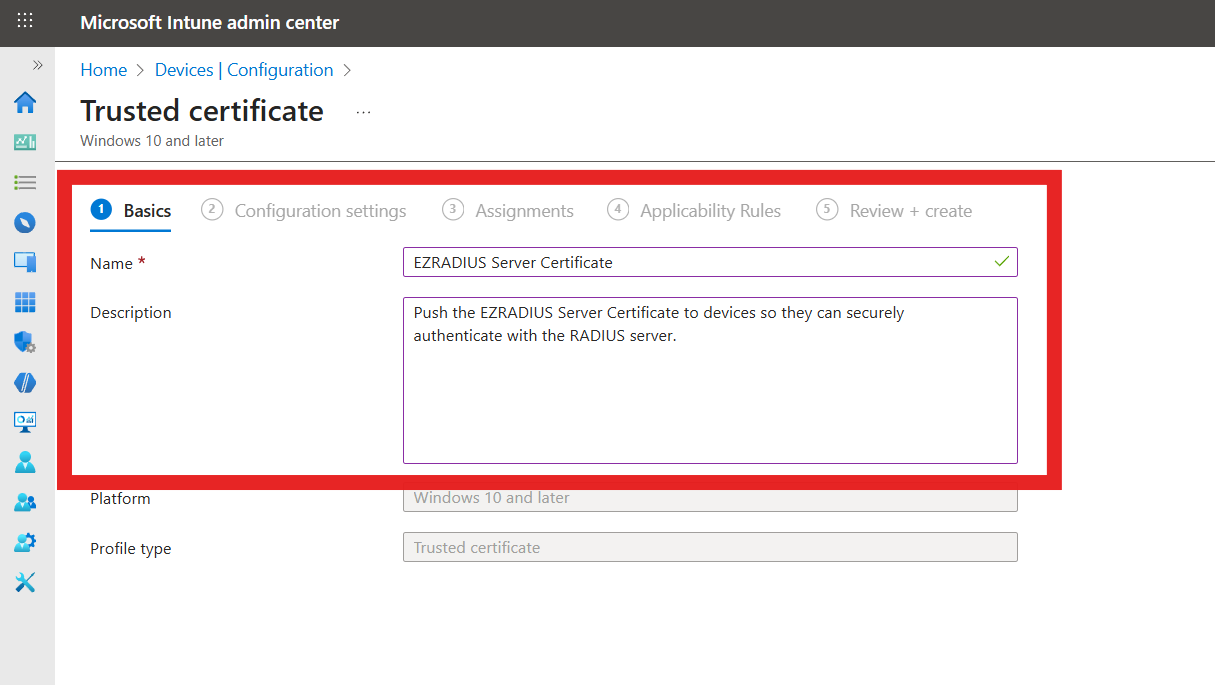
-
Within the Basics tab, fill out the fields:
- Name: Friendly name for your organization
- Description: Description for your organization
-
Click on Next.
-
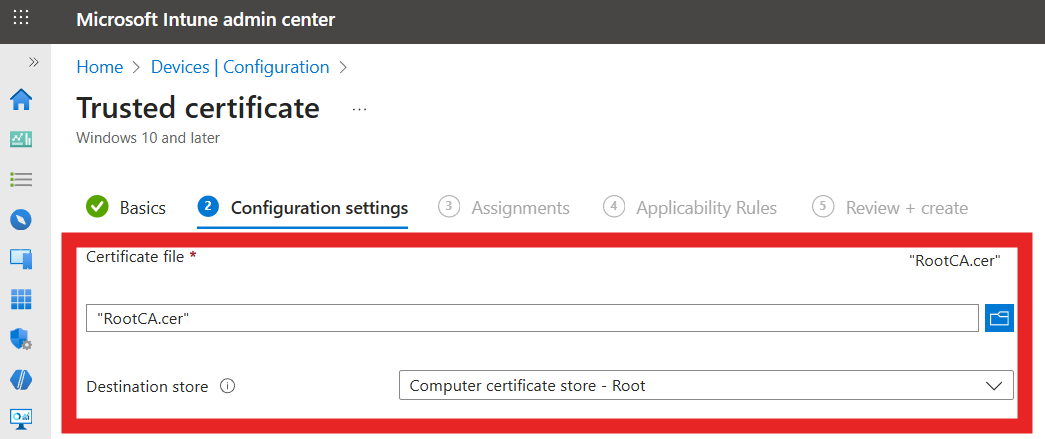
Within the Configuration settings tab, configure the following options:
- Certificate file: Select the CA certificate you downloaded earlier from EZRADIUS.
- Destination store: Select the appropriate store based on the type of CA certificate:
- Computer certificate store - Root (if a root CA certificate)
- Computer certificate store - Intermediate (if an intermediate CA certificate).
-
Click on Next.
-
Within the Assignments tab, select the users, groups or devices you want to deploy this profile to.
-
Click on Next.
-
Within the Applicability Rules tab, add any rules if needed, then click on Next.
-
Click on Create to finish creating the profile.
-
Repeat the above steps to distribute all necessary CA certificates (both root and intermediate) to your Windows devices.
-
Navigate to the Intune portal: https://aka.ms/Intune
-
From the left-hand menu, click on Devices, then select macOS (or Apple mobile for iPhones and iPads).
-
From the left-hand sub-menu, click on Configuration.
-
Click on the + Create button at the top of the list, then + New Policy.
-
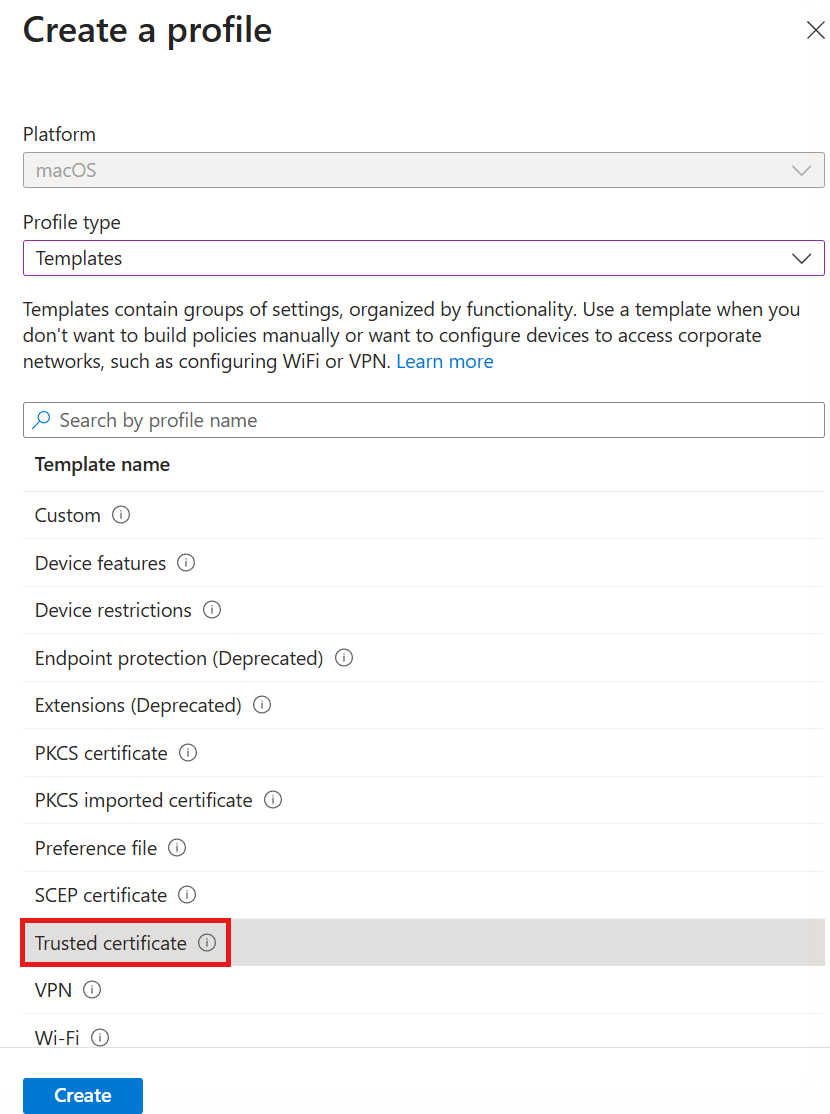
Under Create a profile, select the following options and click Create:
- Platform: macOS (or iOS/iPadOS)
- Profile type: Templates
- Template name: Trusted certificate
-
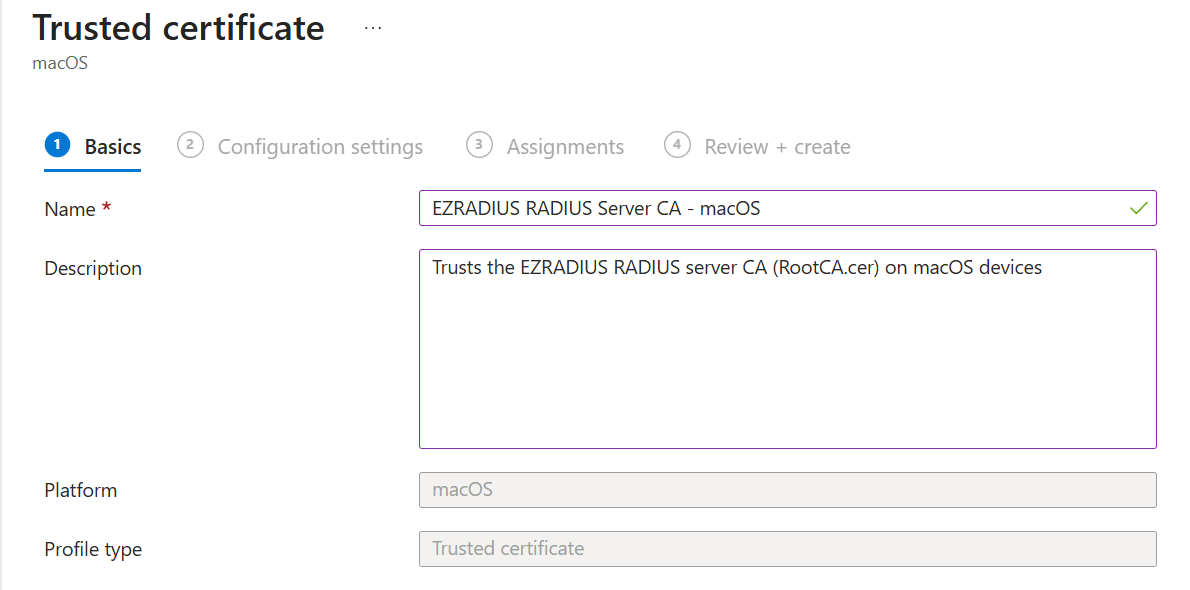
Within the Basics tab, fill out the fields:
- Name: Friendly name for your organization
- Description: Description for your organization
-
Click on Next.
-
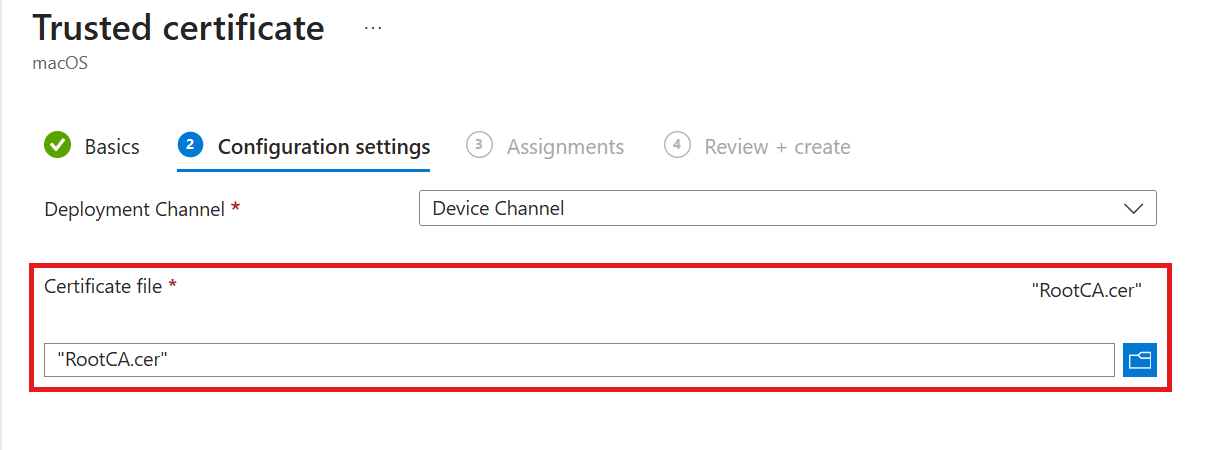
Within the Configuration settings tab, configure the following options:
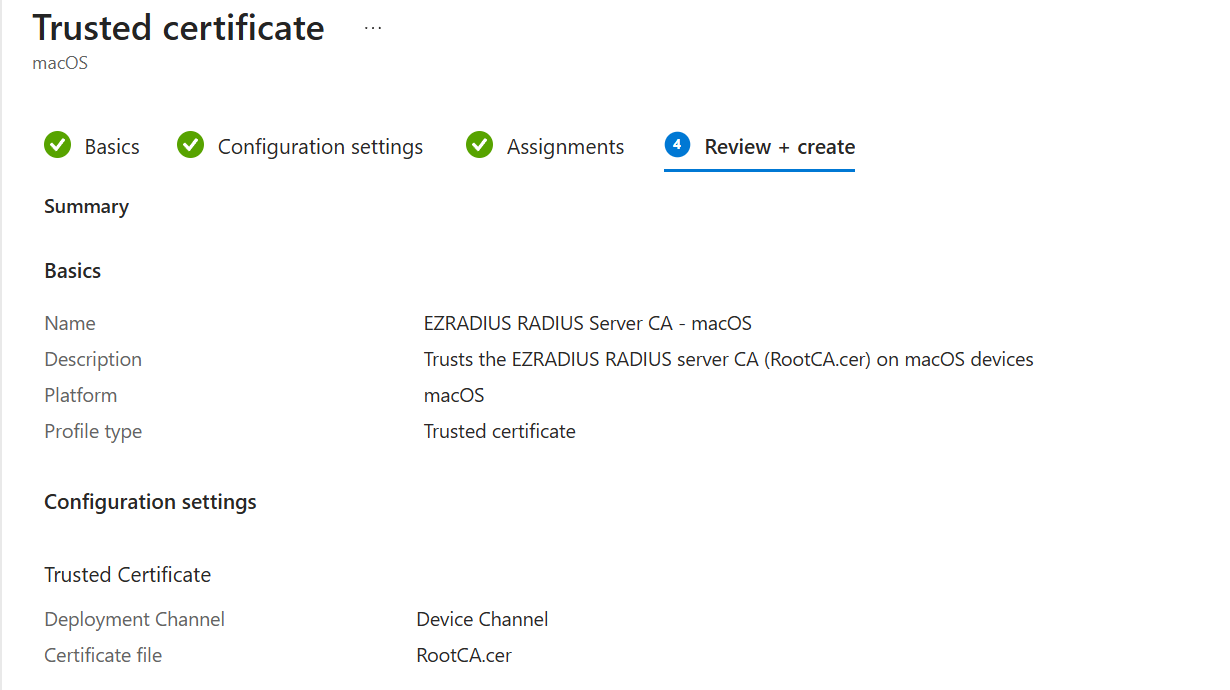
- Deployment Channel (macOS only): Leave at Device Channel so the CA certificate is trusted for the whole device.
- Certificate file: Select the CA certificate you downloaded earlier from EZRADIUS. Apple devices don’t use a destination store, so there’s nothing else to configure.
-
Click on Next.
-
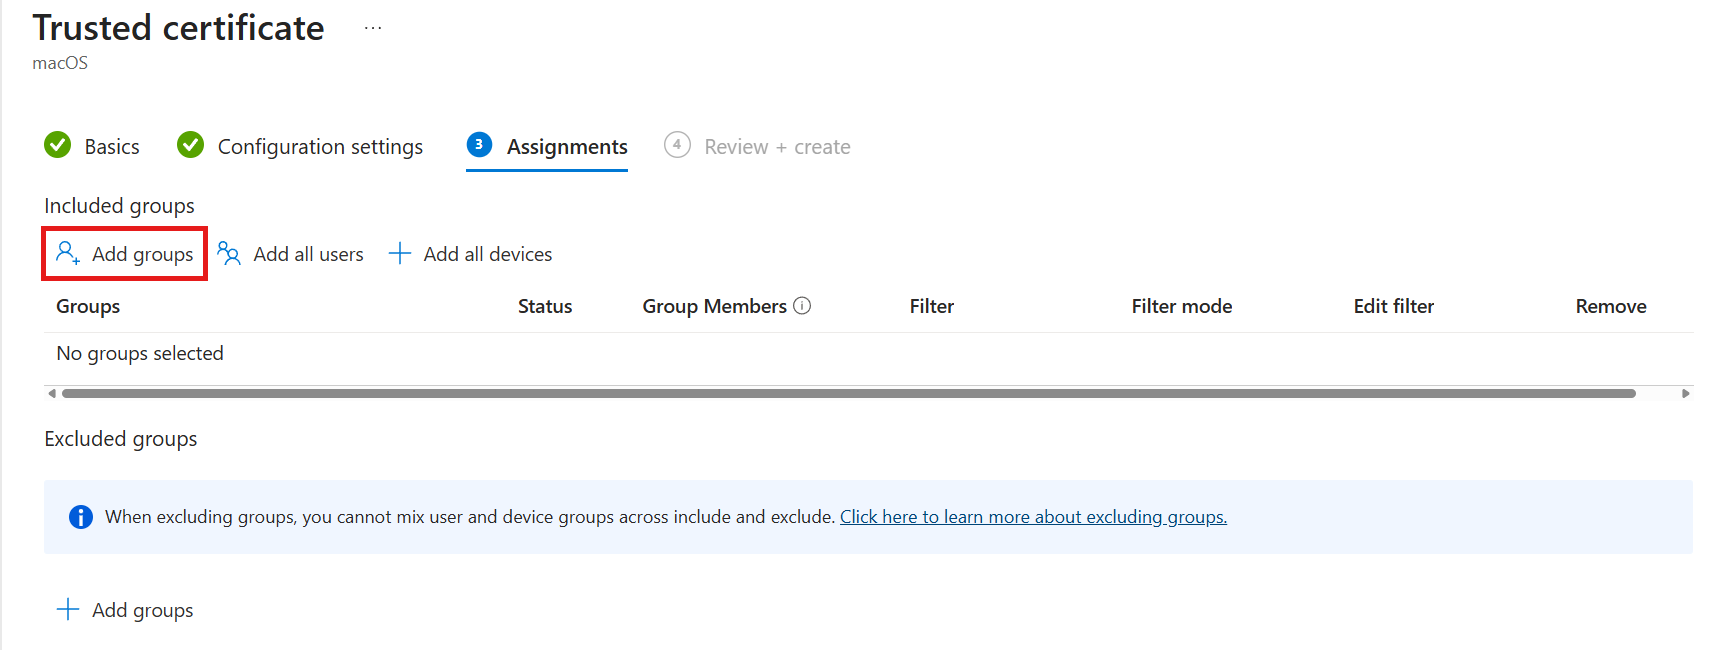
Within the Assignments tab, click Add groups and select the users, groups or devices you want to deploy this profile to.
-
Click on Next, review your settings on the Review + create tab, and click on Create to finish creating the profile.
-
Repeat the above steps for every CA certificate you need to distribute (both root and intermediate), and again for each Apple platform you manage. Intune profiles are platform-specific, so a macOS profile doesn’t apply to iPhones or iPads.
Step 11: How to Push an EAP-TLS Wi-Fi Profile With Intune Using Cloud PKI Certificates
The final configuration step is the Wi-Fi profile, which ties everything together: your SSID, the EZRADIUS server names your devices should trust, and the Cloud PKI SCEP certificate they should use to sign in.
How to Get Your EZRADIUS Server Names
The RADIUS Server certificate is required to establish a secure connection between your device and the RADIUS server. Follow the steps below to download the RADIUS Server certificate from the EZRADIUS portal.
-
Log in to your EZRADIUS portal.
-
Navigate to Policies.
-
Find your network policy.
-
Scroll down to the Server Certificate section.
-
Click Download Certificate to download the RADIUS server certificate to your local machine. It will have a filename similar to
Server.cer. -
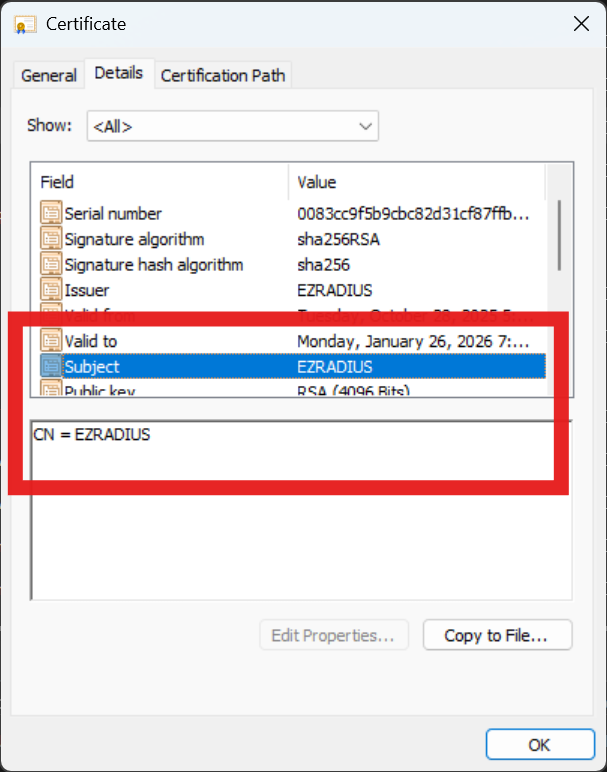
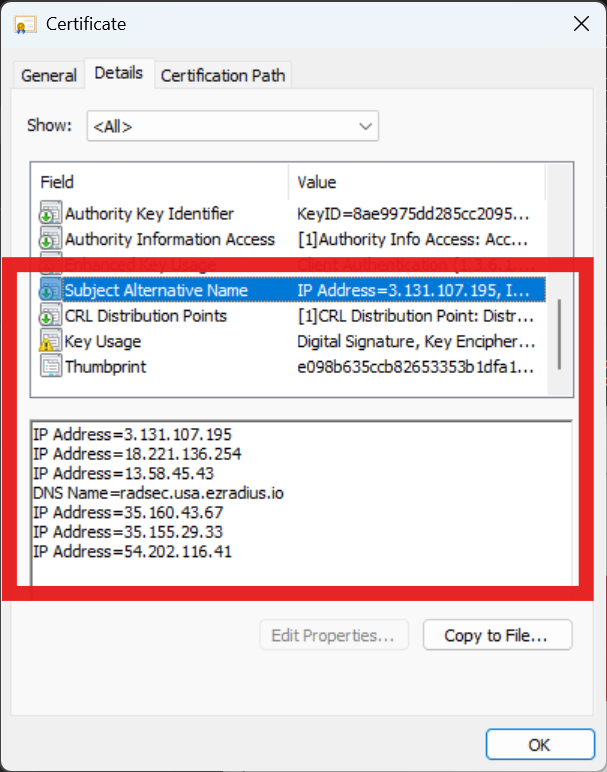
Open the downloaded certificate on your local machine. Note the following details which you will need later.
- The Subject Common Name (CN)
- The Subject Alternative Name (SAN)
How to Create the Intune Wi-Fi Profile
When you enter the Certificate server names, remove the CN=, DNS Name=, and IP Address= prefixes from the values you noted above. For the client certificate, select the Cloud PKI SCEP profile you created for the same platform in Step 4.
Set Authentication mode to Machine for device certificates or User for user certificates.
-
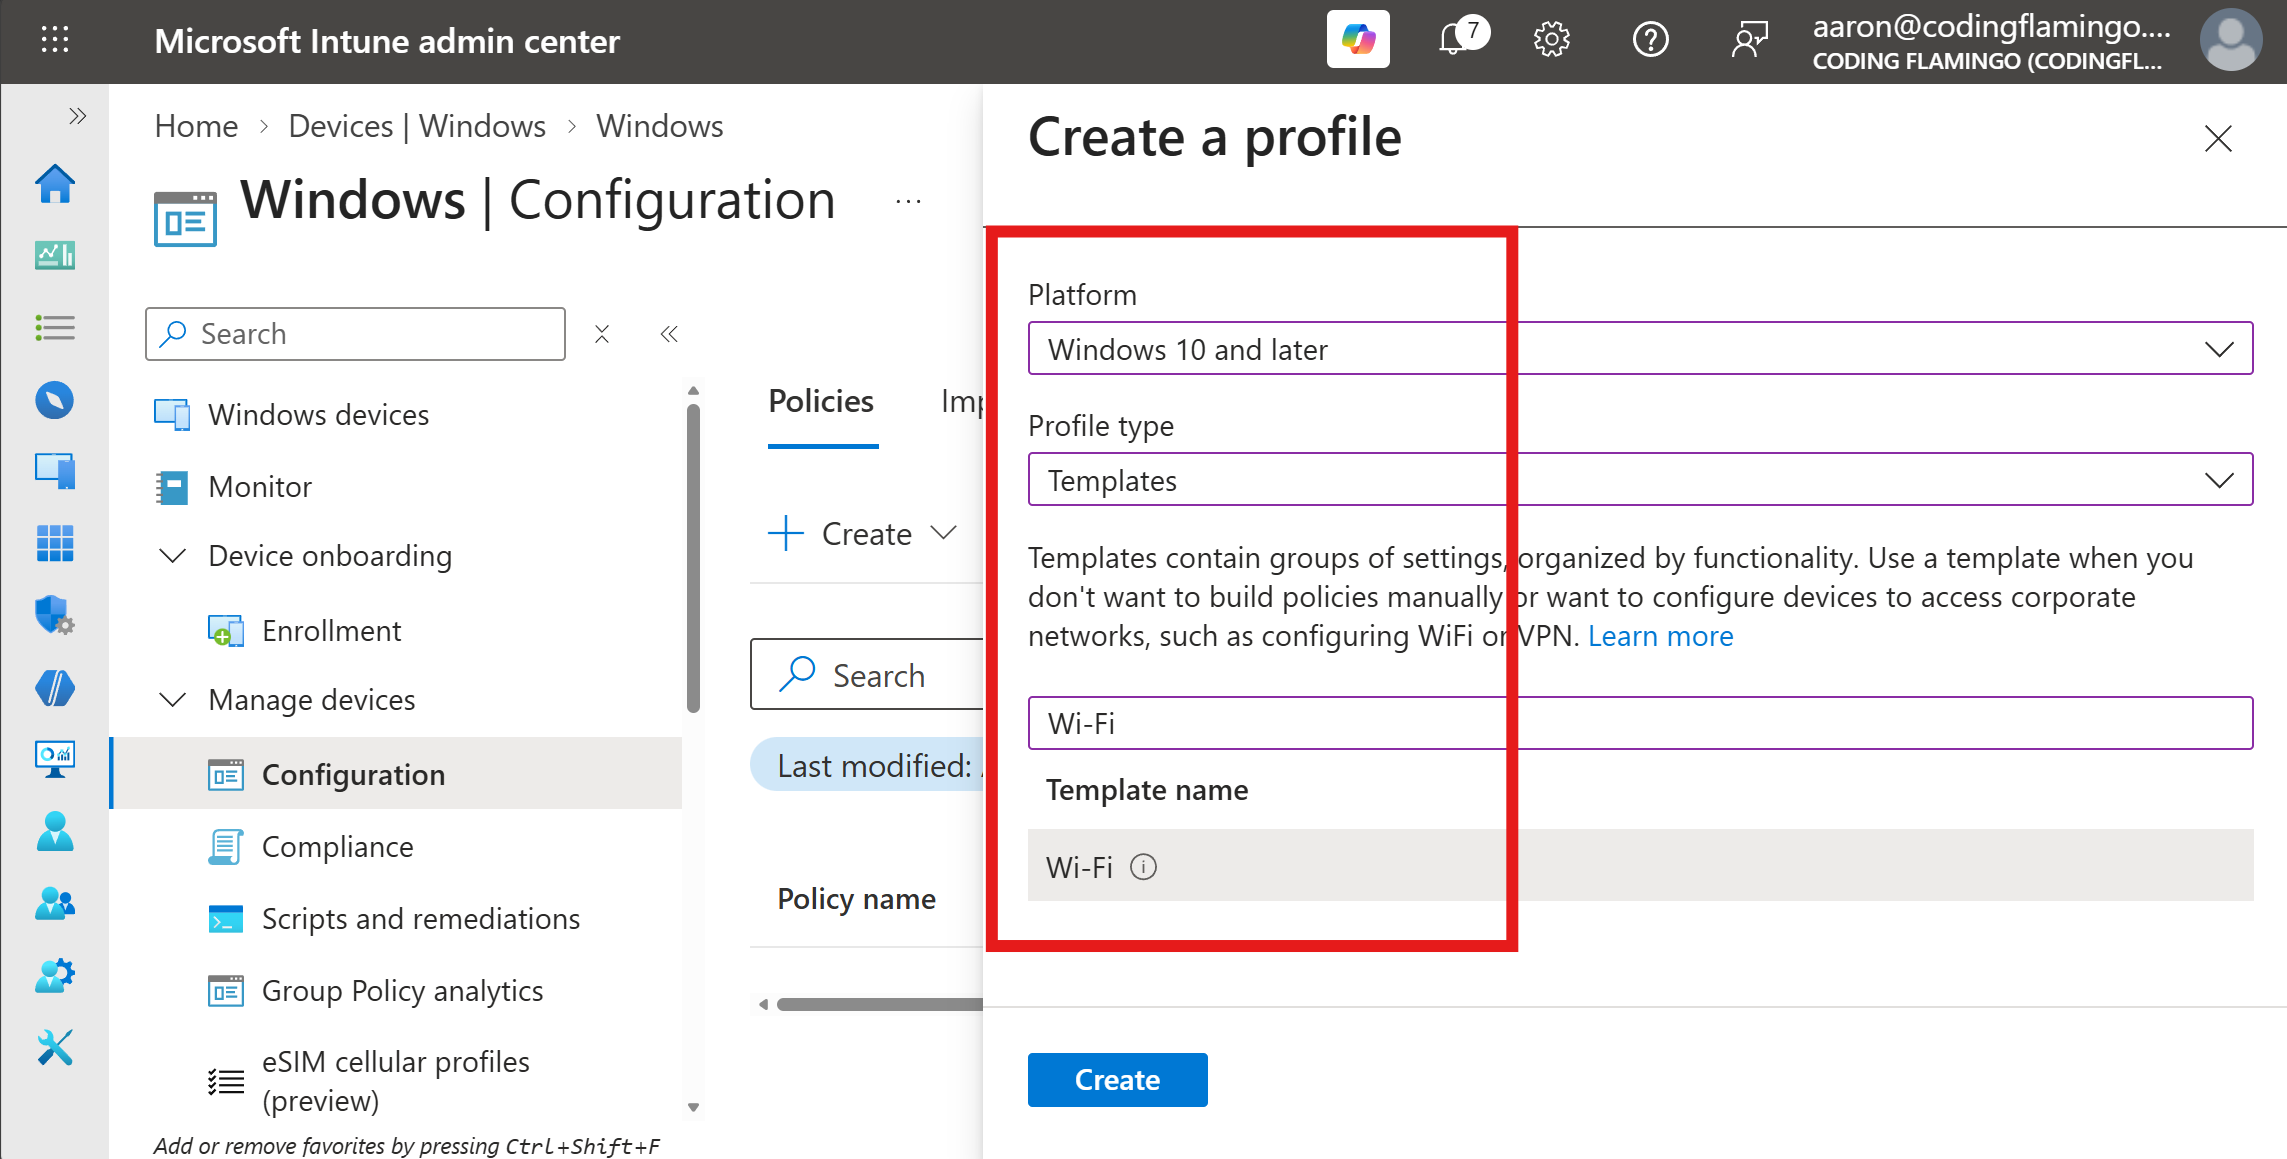
In the Intune Portal, click on + Create profile again to start creating a new configuration profile. Enter the following fields:
- Platform: select Windows 10 and later.
- Profile type: select Templates.
- Template name: select Wi-Fi.
-
Click on Create at the bottom of the page.
-
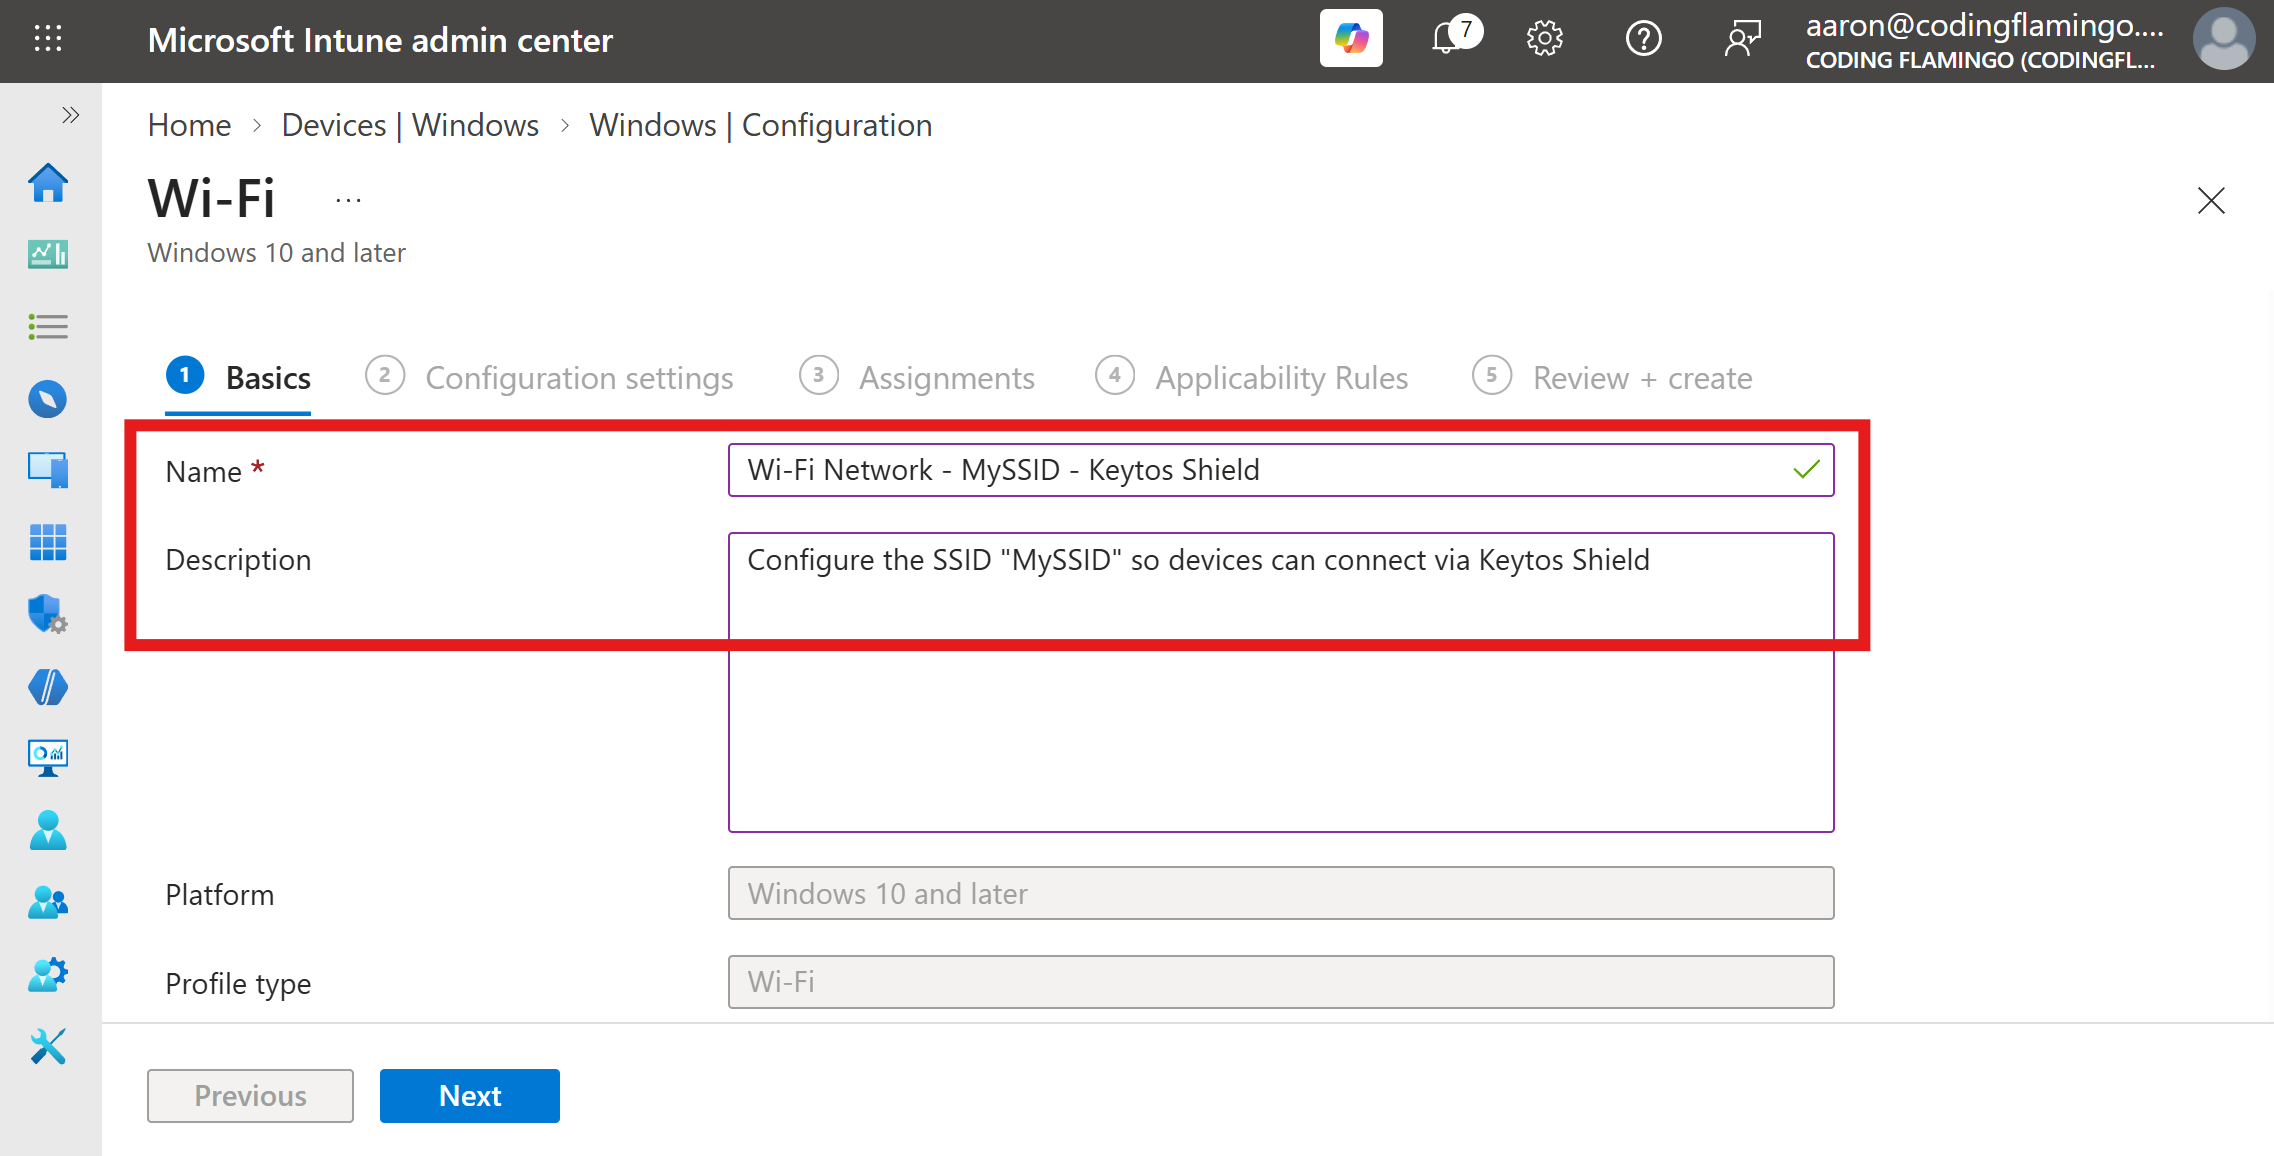
Under the Basics tab, enter the Name and Description for this Intune Wi-Fi profile and click Next to proceed.
-
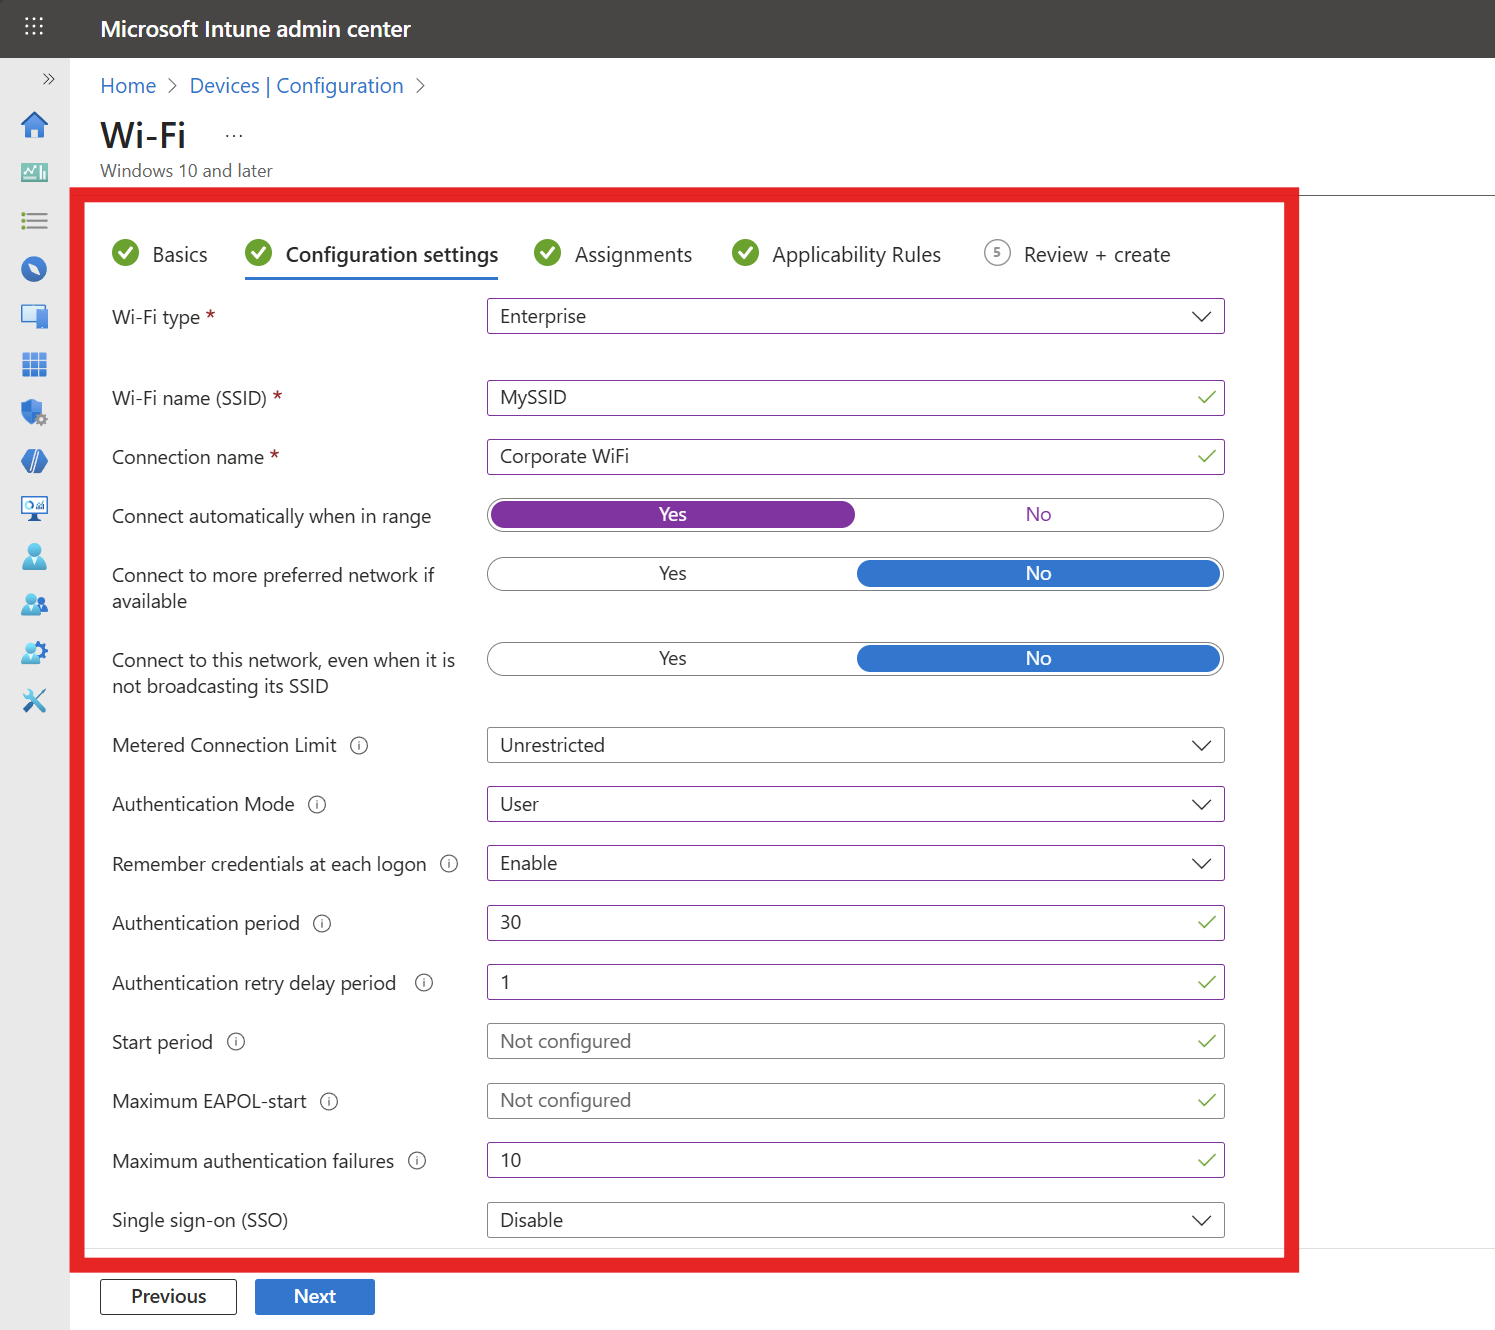
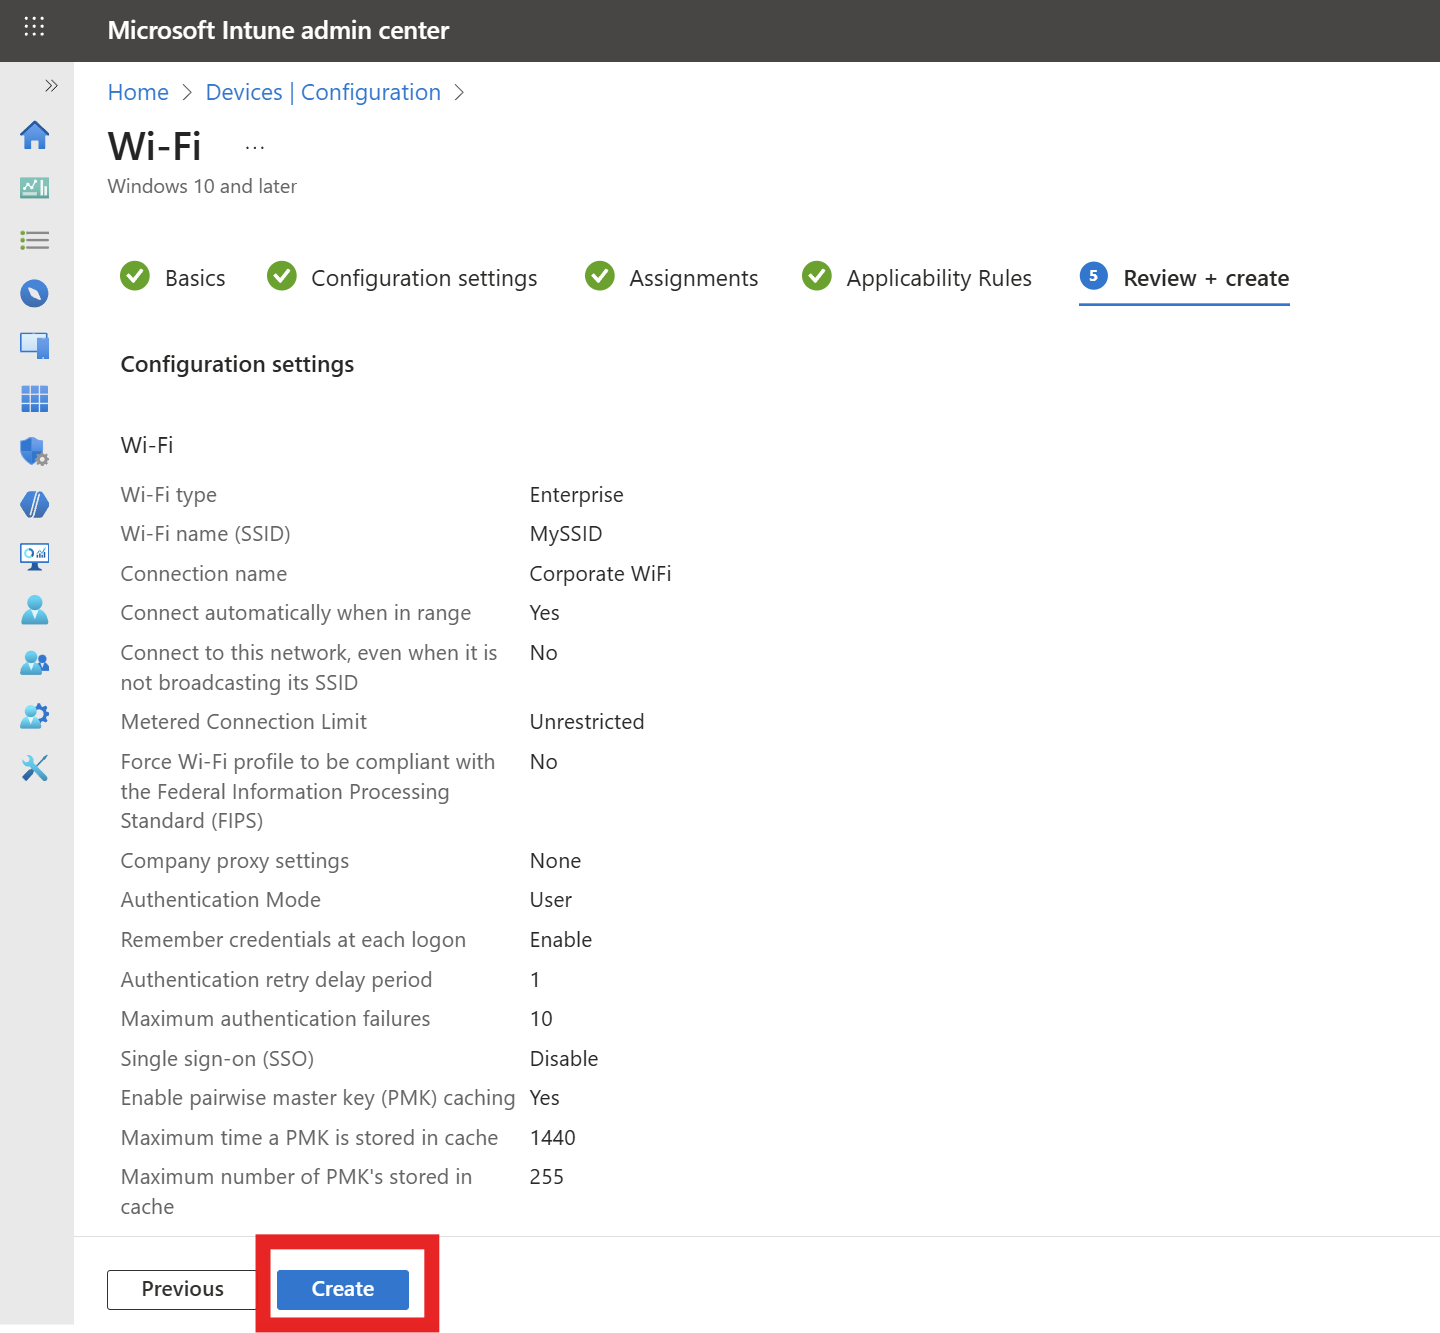
Enter the following required Configuration settings. Any field not mentioned below can be left as default or set to your organization’s preference:
- Wi-Fi type: Enterprise
- Wi-Fi name (SSID): Your Wi-Fi Network SSID (case sensitive)
- Connection name: Friendly name for your users
- Authentication mode: Select the mode based on whether your SCEP certificate is issued to the User or the Device.
- Remember credentials: Set to No (not needed for certificate authentication).
- Authentication period: 30 seconds is a recommended value we’ve seen work well for most environments.
- Authentication retry delay: 1 second is a recommended value we’ve seen work well for most environments.
- Maximum authentication failures: 10 is a recommended value we’ve seen work well for most environments.
- Single sign-on (SSO): Disable
-
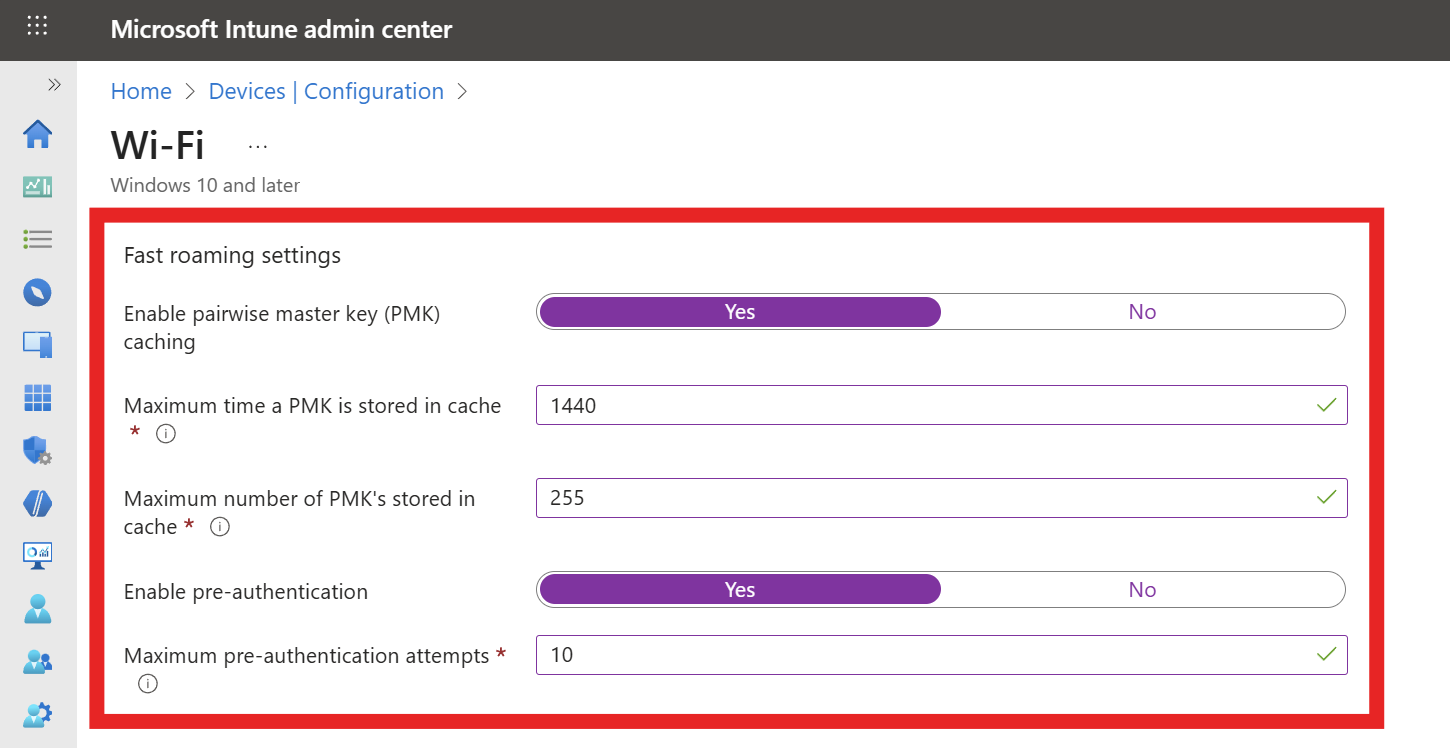
If your network controller supports Fast Roaming, fill out the Fast Roaming settings section with the following settings:
- Enable pairwise master key (PMK) caching: Yes
- Max PMK time stored in cache: We recommend setting this to the maximum (1440 minutes) to improve user experience.
- Max number of PMKs in cache: We recommend setting this to the maximum (255) to improve user experience.
- Enable pre-authentication: Yes
- Max pre-authentication attempts: 10 is a recommended value we’ve seen work well for most environments.
-
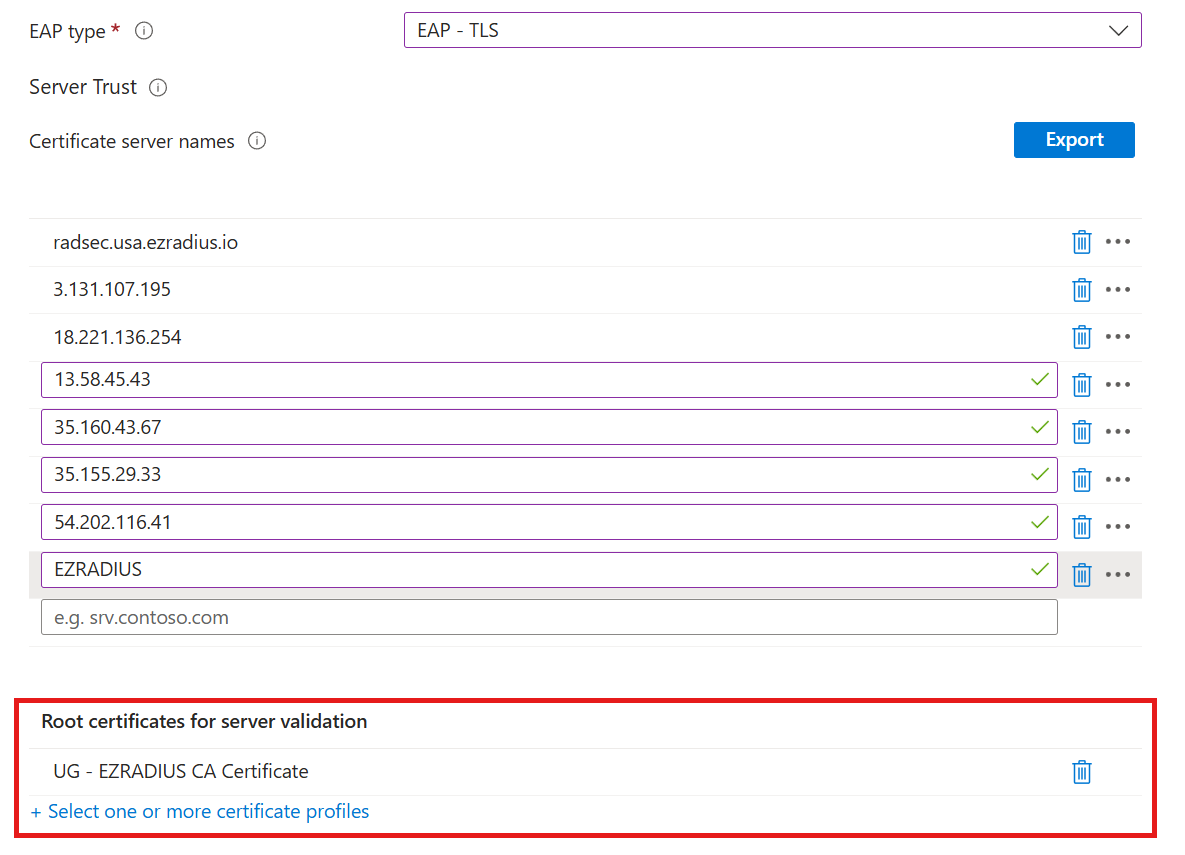
Fill out the Server Trust section with the following settings:
- EAP type: EAP-TLS
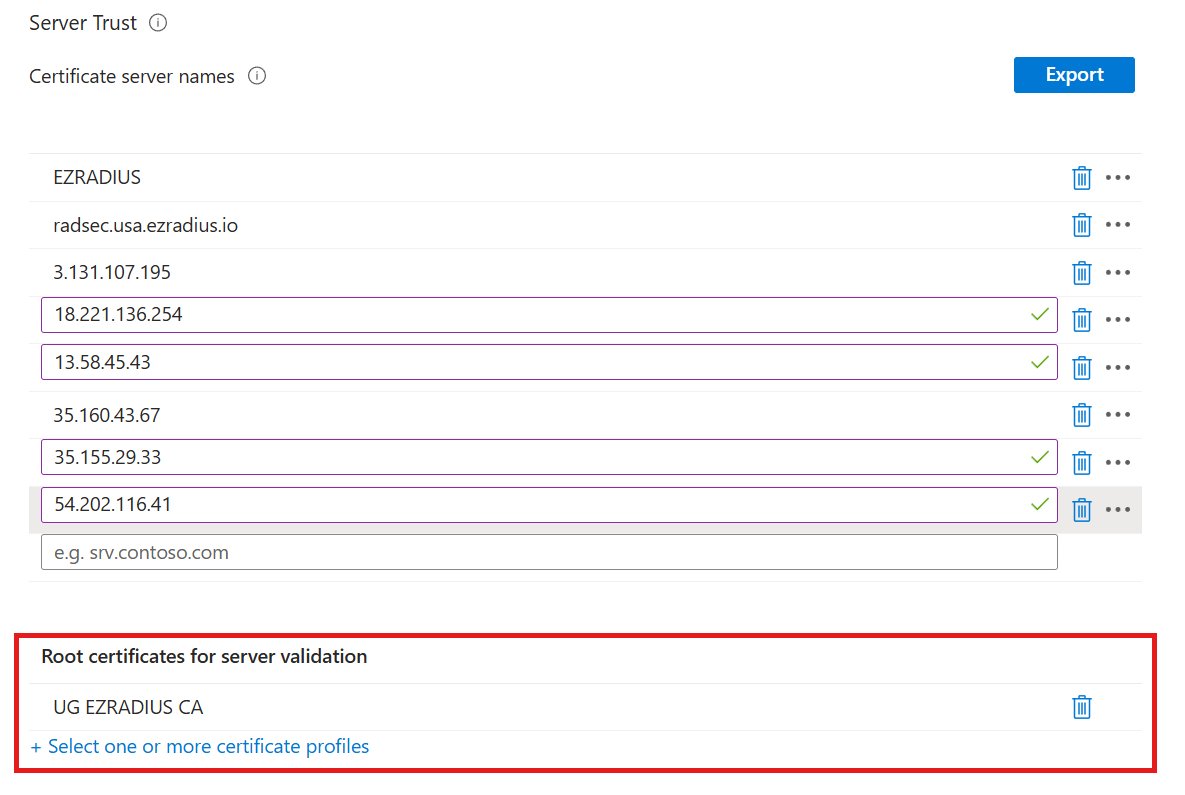
- Certificate server names: Enter every RADIUS server name that you copied from EZRADIUS earlier, one value per entry.
- Root Certificates for server validation: Select every trusted certificate profile you created for your EZRADIUS RADIUS server CA certificates (for example, both the Root CA and Issuing CA profiles).
-
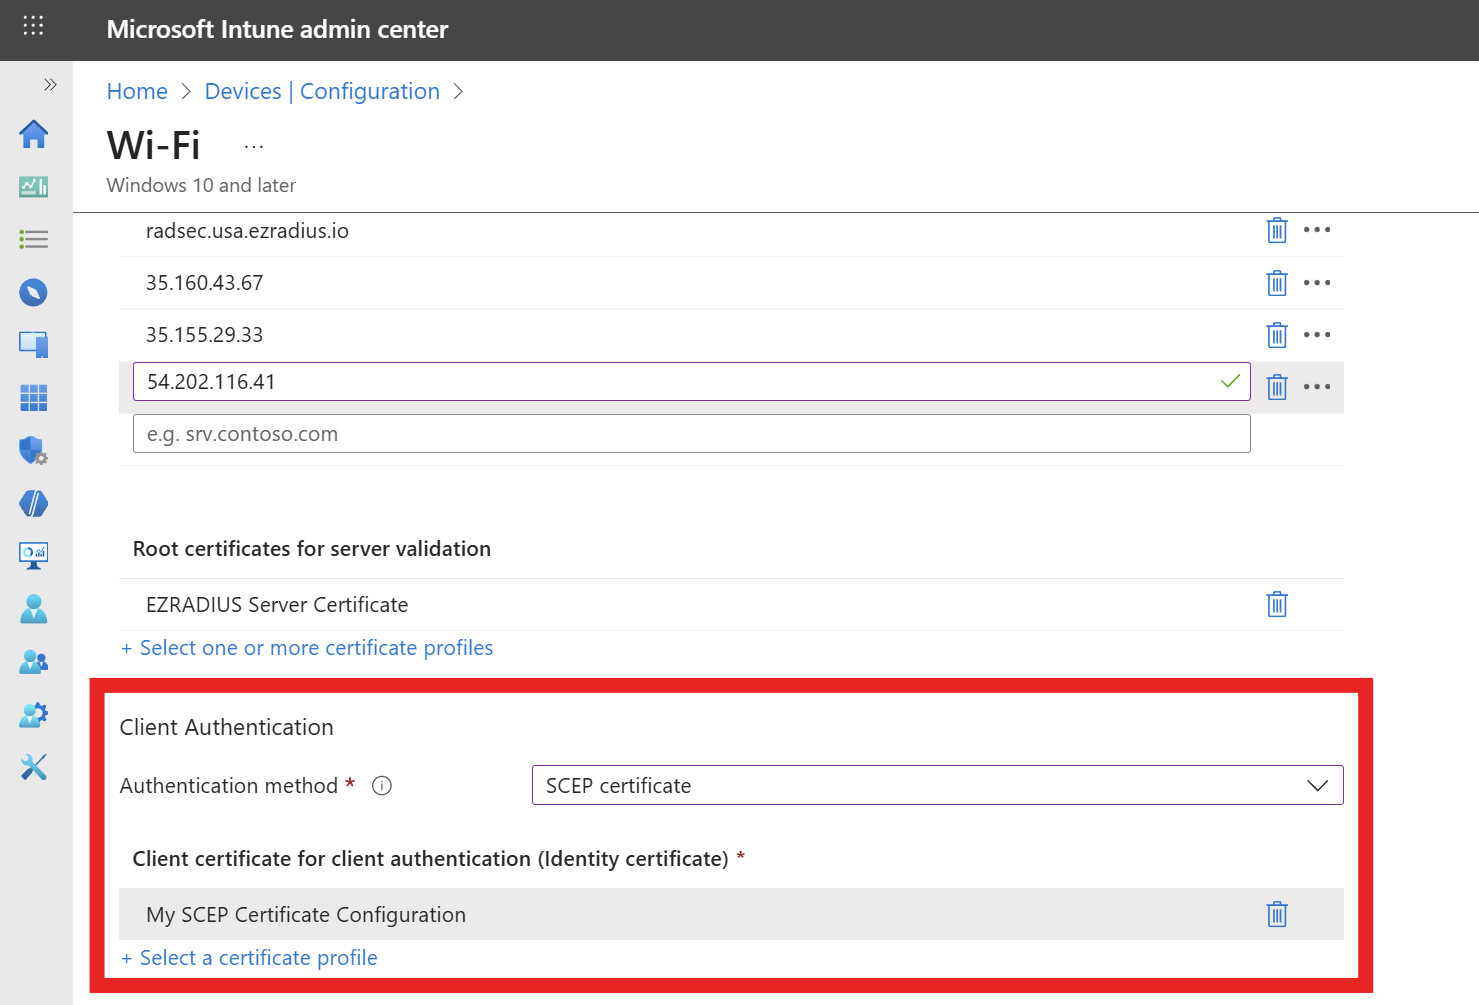
Fill out the Client Authentication section with the following settings:
- Authentication Method: SCEP Certificate
- Client certificate for client authentication: Select the SCEP profile created earlier for issuing client certificates to your devices.
-
Click on Next.
-
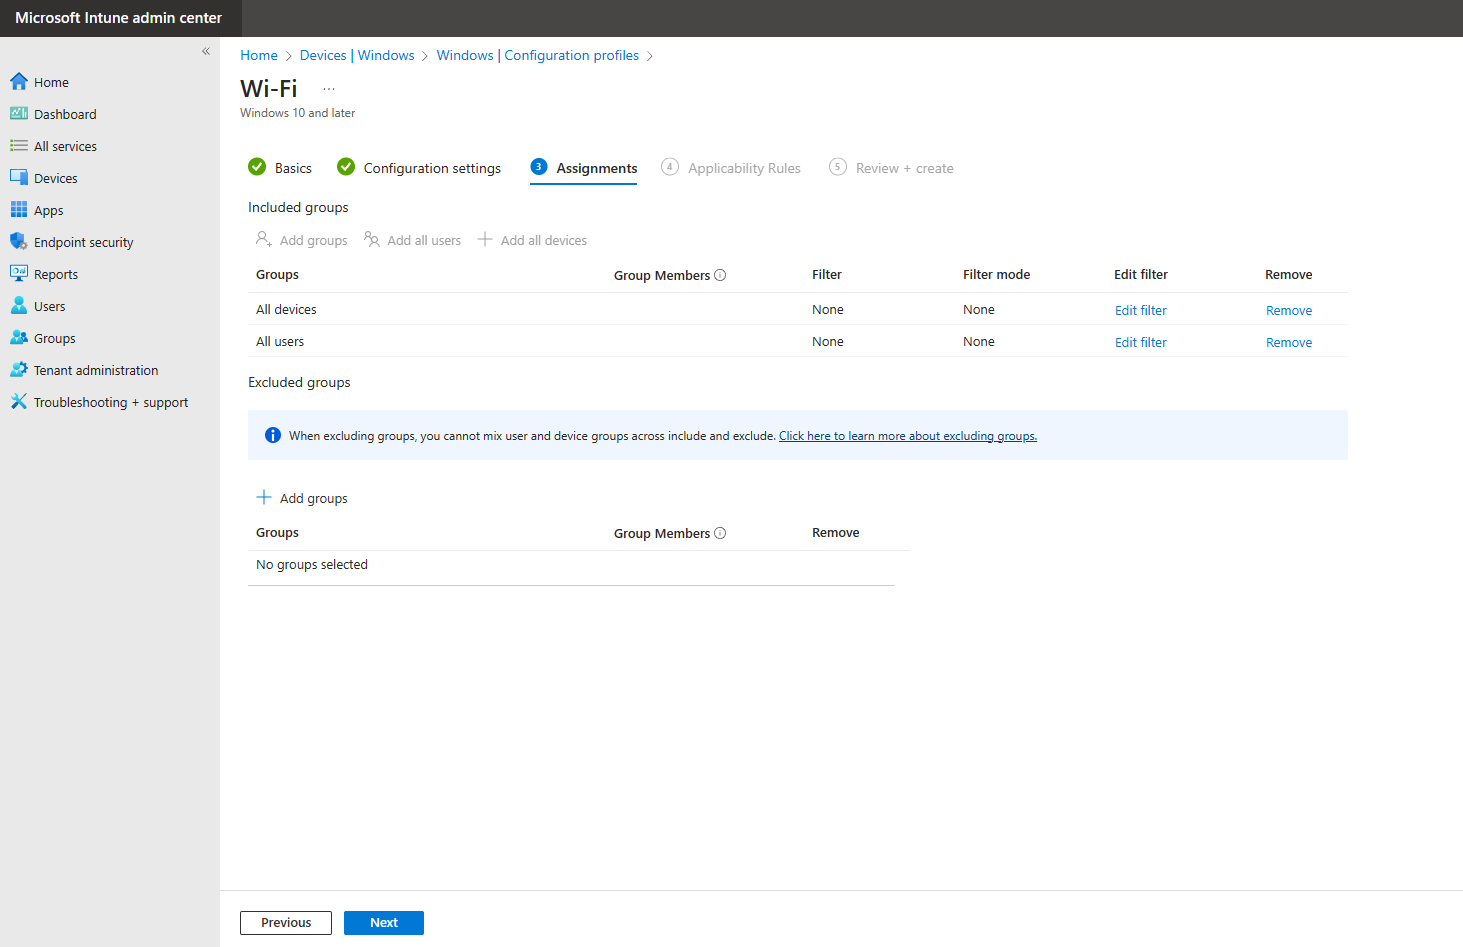
Select the users, groups or devices you want to deploy this profile to and click Next.
-
Add any applicability rules if needed, then click on Next.
-
Review your settings and click on Create.
-
Done! Your Wi-Fi profile is now created and will be pushed to your devices. Once the profile is applied, users will be able to connect to the Wi-Fi network using their SCEP-issued certificates.
-
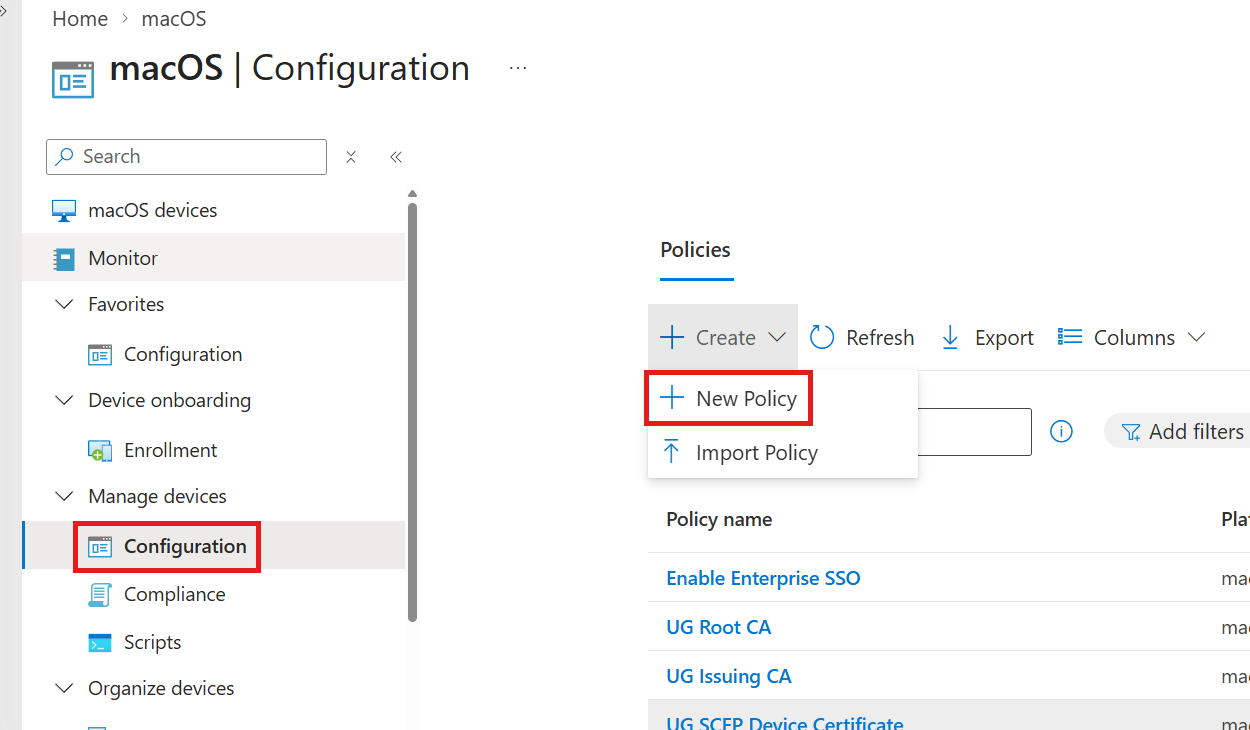
In the Intune portal, navigate to Devices > macOS (or Apple mobile for iPhones and iPads) > Configuration, click + Create, then click + New Policy.
-
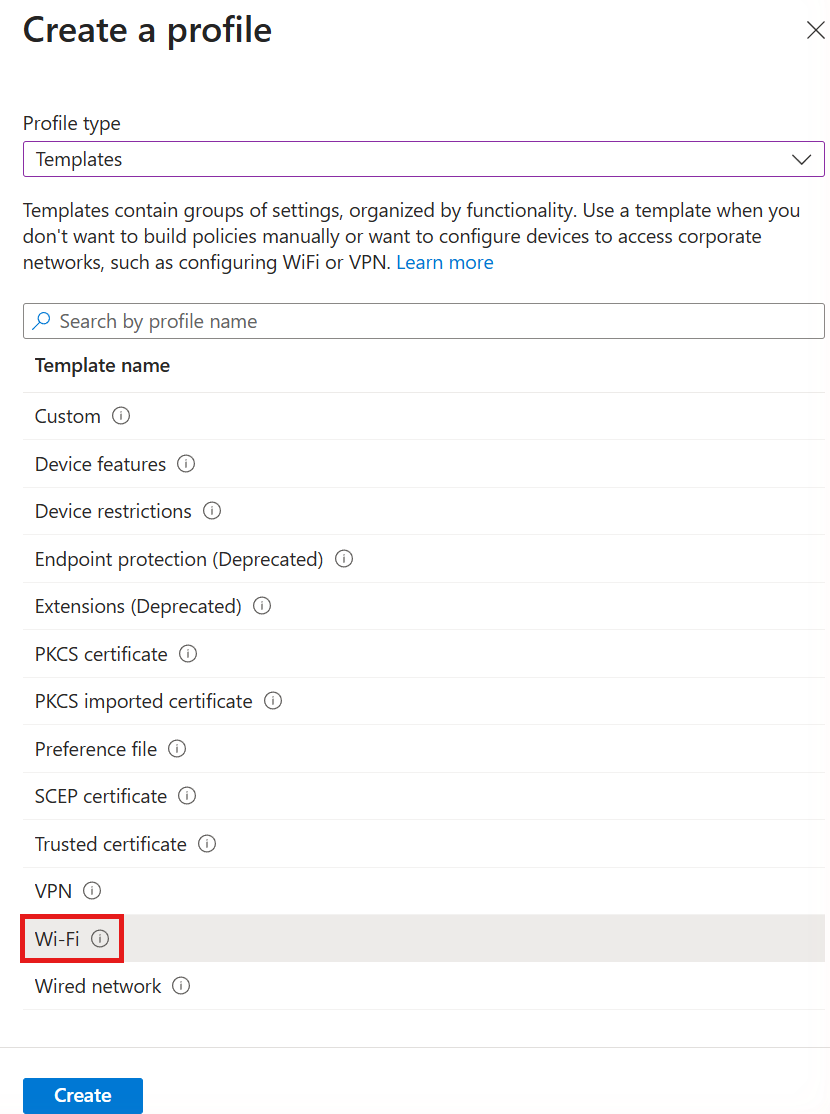
Under Create a profile, select the following options and click Create:
- Platform: macOS (or iOS/iPadOS)
- Profile type: Templates
- Template name: Wi-Fi
-
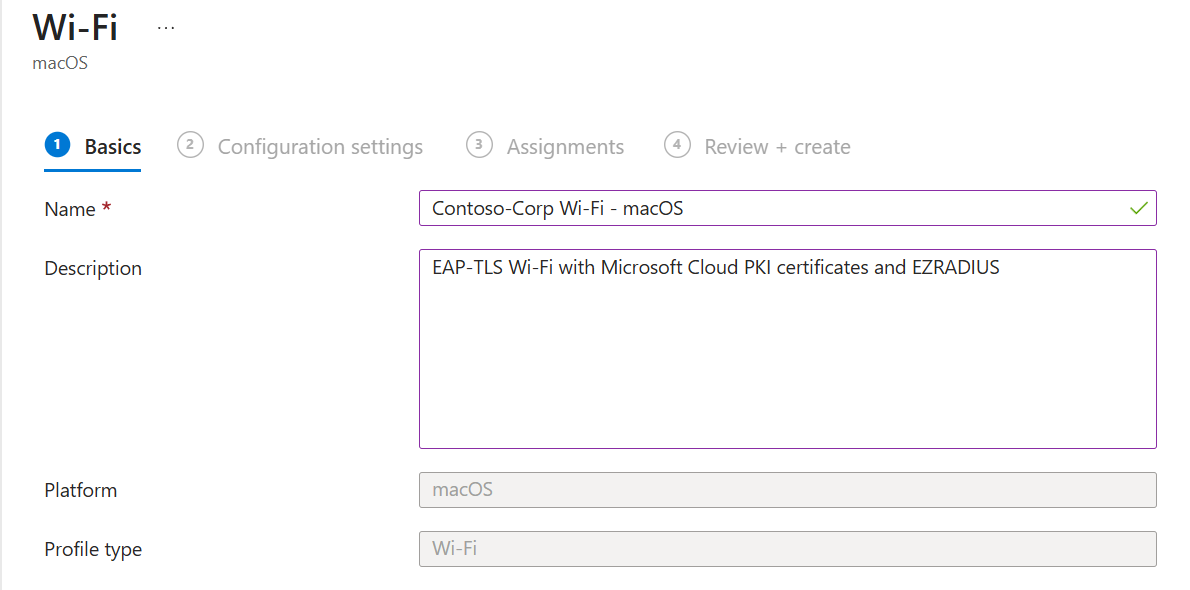
Under the Basics tab, enter the Name and Description for this Intune Wi-Fi profile and click Next to proceed.
-
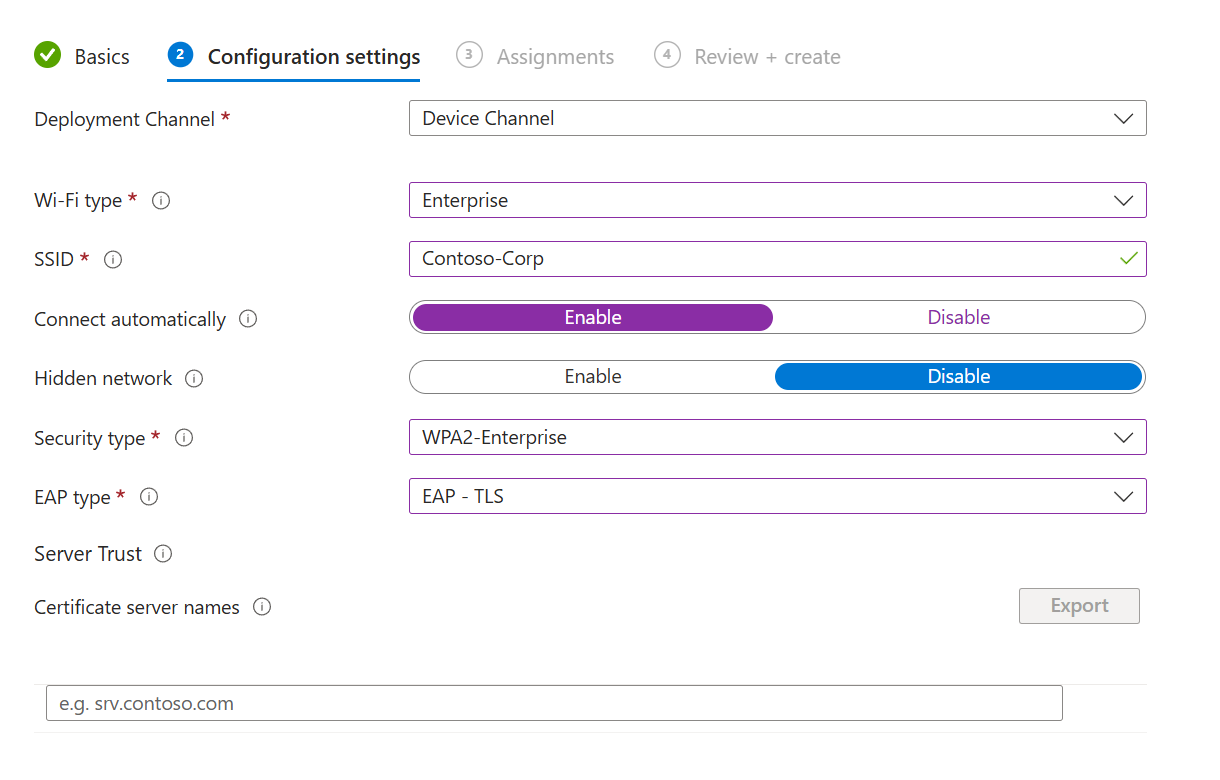
Enter the following required Configuration settings. Any field not mentioned below can be left as default or set to your organization’s preference:
- Deployment Channel (macOS only): Select Device Channel if your SCEP profile issues device certificates, or User Channel if it issues user certificates. This must match the deployment channel of your SCEP profile, and you can’t change it after you create the profile.
- Wi-Fi type: Enterprise
- Network name (iOS/iPadOS only): Friendly name for your users
- SSID: Your Wi-Fi Network SSID (case sensitive)
- Connect automatically: Enable
- Hidden network: Enable only if your SSID is hidden
- Security type: WPA2-Enterprise
- EAP type: EAP - TLS
-
Fill out the Server Trust and Client Authentication sections with the following settings:
- Certificate server names: Enter every RADIUS server name that you copied from EZRADIUS earlier, one value per entry: the subject common name (CN) and every DNS name and IP address listed in the certificate’s Subject Alternative Name.
- Root certificates for server validation: Click + Select one or more certificate profiles and select every trusted certificate profile you created for your EZRADIUS RADIUS server CA certificates on this platform (for example, both the Root CA and Issuing CA profiles).
- Authentication method (iOS/iPadOS only): Certificates
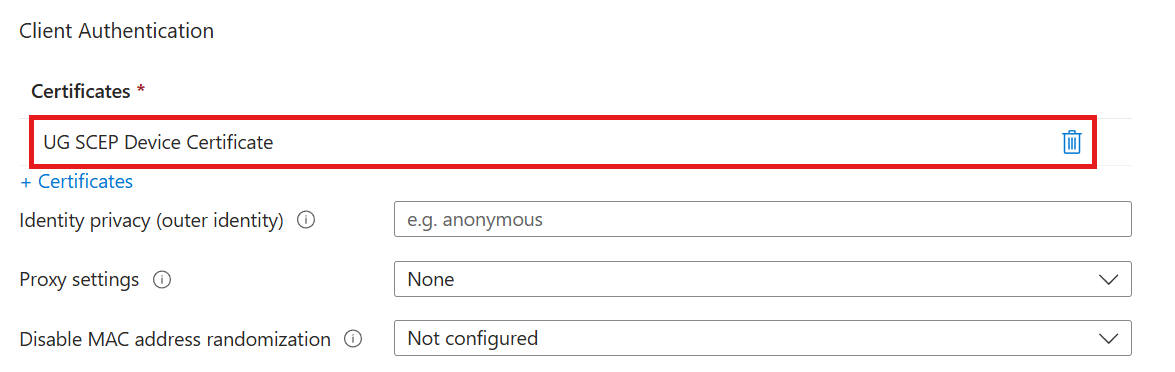
- Certificates: Click + Certificates and select the SCEP profile created earlier for issuing client certificates to your devices on this platform.
- Proxy settings: None, unless your network requires a proxy.
- Disable MAC address randomization: Leave at Not configured unless your network relies on device MAC addresses, for example for MAC Authentication Bypass (MAB).
-
Click on Next.
-
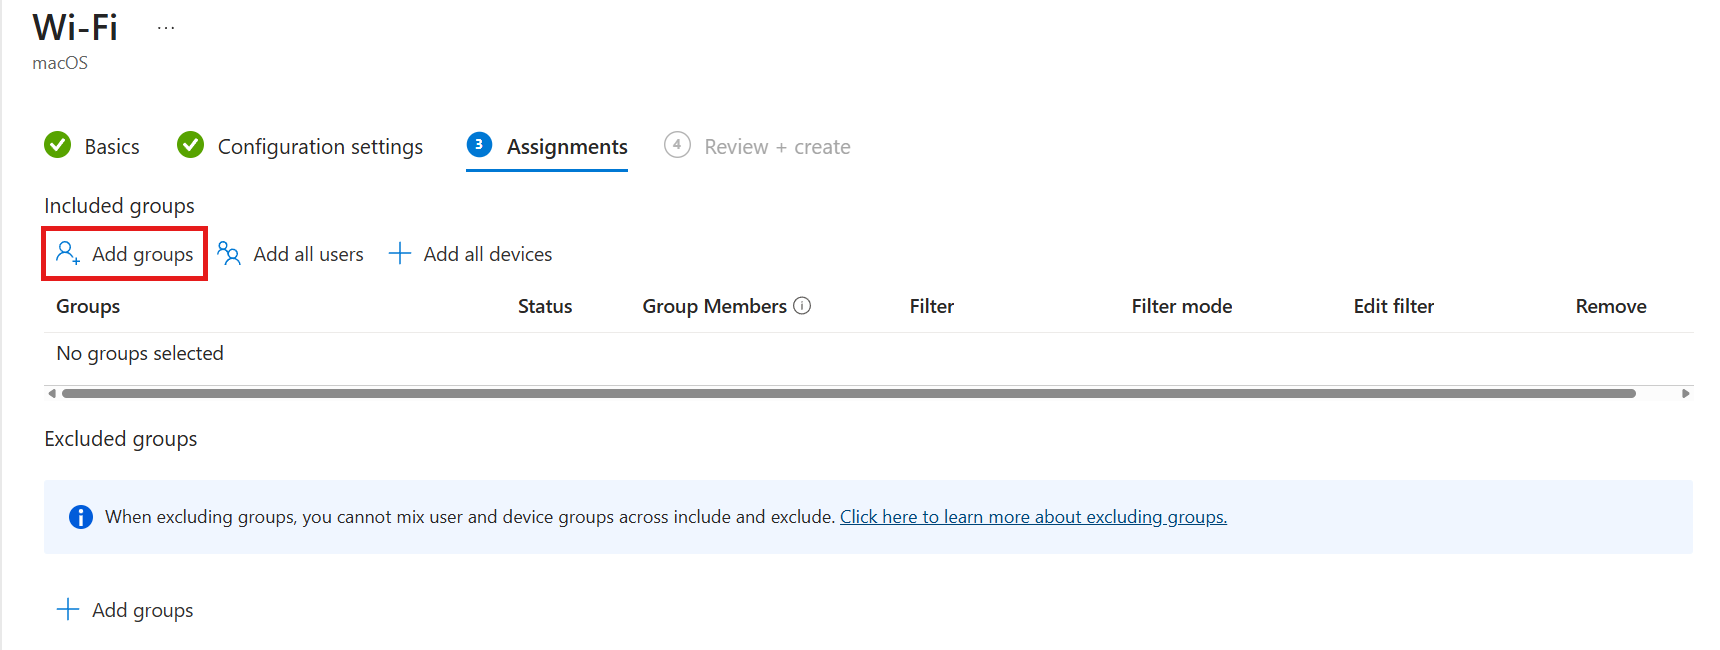
Click Add groups and select the users, groups or devices you want to deploy this profile to, then click Next. Use the same groups you assigned your SCEP and trusted certificate profiles to.
-
Review your settings and click on Create.
-
Done! Your Wi-Fi profile is now created and will be pushed to your Apple devices. Once the profile is applied, users will be able to connect to the Wi-Fi network using their SCEP-issued certificates.
Step 12: How to Test Your Cloud PKI Wi-Fi Connection
- Begin on a device that is targeted by the Intune Wi-Fi profile you created.
- Force a sync with Intune to ensure the latest profiles are applied. You can do this by going to Settings > Accounts > Access work or school, selecting your work account, and clicking on Sync.
- Once the sync is complete, check that the WiFi profile has been applied by going to Settings > Network & Internet > Wi-Fi > Manage known networks. You should see the SSID you configured in the list.
- If you use User-based certificate authentication, attempt to connect to the Wi-Fi network. You should be connected without being prompted for a username or password. If you use Device-based certificates, the device should connect automatically without user interaction. You may need to restart the device to trigger the connection.
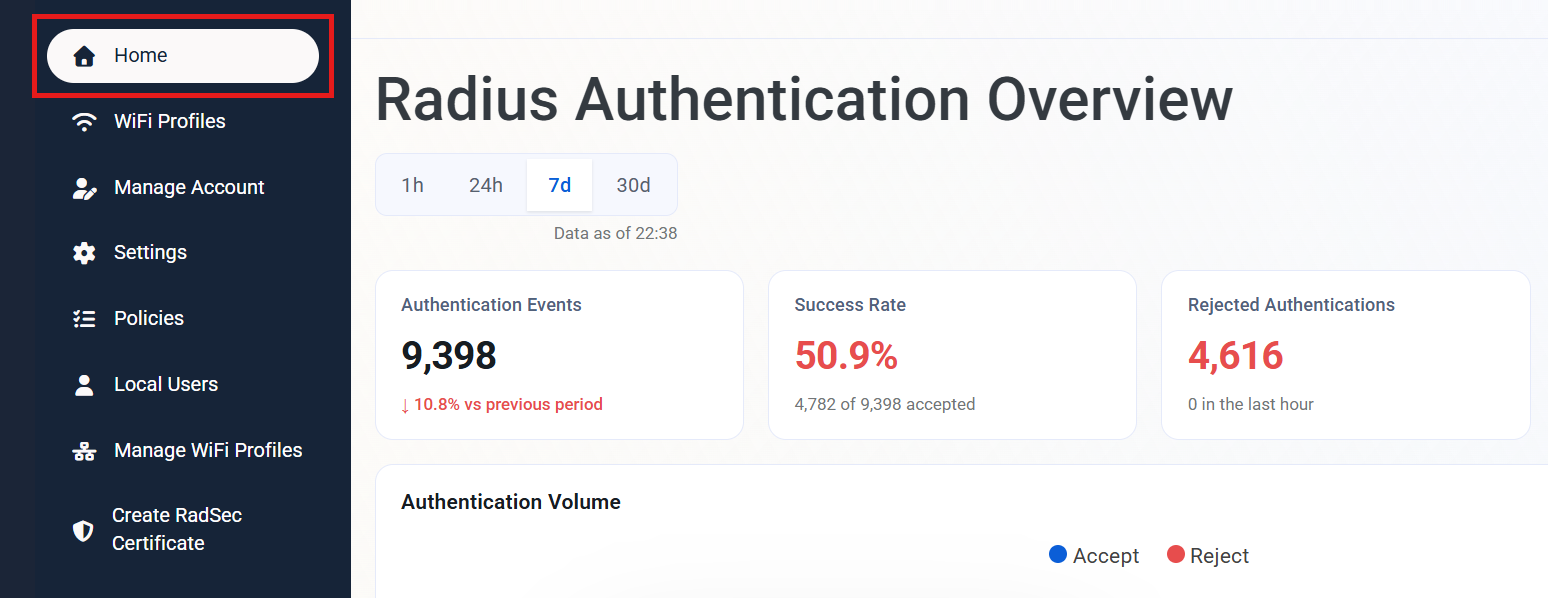
To confirm the request reached EZRADIUS, open your EZRADIUS portal and check the Radius Authentication Overview on the Home page, or look up the device’s request in Audit Logs.
What Intune Profiles Do I Need for Cloud RADIUS With Cloud PKI?
To recap, here are the Intune profiles you need for each platform you support:
| Intune Profile | Template | What It Does |
|---|---|---|
| Cloud PKI Root CA | Trusted certificate (Root store on Windows) | Makes devices trust your Cloud PKI hierarchy |
| Cloud PKI Issuing CA | Trusted certificate (Intermediate store on Windows) | Completes the Cloud PKI chain on your devices |
| Cloud PKI SCEP certificate | SCEP certificate | Issues each user or device its own client certificate |
| EZRADIUS server CA | Trusted certificate (Root store on Windows) | Makes devices trust your EZRADIUS RADIUS server |
| Enterprise Wi-Fi | Wi-Fi | Connects devices to your SSID with EAP-TLS and the SCEP certificate |
How to Troubleshoot Cloud RADIUS With Intune Cloud PKI
If a device can’t connect, work through this quick checklist of the most common Cloud PKI and EZRADIUS issues first:
- Did the device receive its certificate? Check your Cloud PKI Issuing CA’s Monitor tab by clicking View all certificates. If there’s no certificate, check that the SCEP profile’s Root Certificate is the Cloud PKI Root CA profile and that its EKUs exist on the Issuing CA.
- Are both Cloud PKI CAs trusted in EZRADIUS? Both the Root CA and the Issuing CA must be listed under Trusted Certificate Authorities in your EZRADIUS policy.
- Does the access policy match the certificate? The Certificate Type, Certificate Field, and Device Identifier in EZRADIUS must match the Subject alternative name in your SCEP profile (DNS
{{DeviceId}}for devices, UPN{{UserPrincipalName}}for users). - Is the device compliant? If you checked Check Device Compliance in Intune, non-compliant devices won’t match the policy.
- Does the device trust EZRADIUS? The EZRADIUS server CA trusted certificate profile must be assigned, and the Wi-Fi profile’s Certificate server names must match your EZRADIUS server certificate.
- Does the Wi-Fi Authentication mode match the certificate? Use Machine for device certificates and User for user certificates.
- Is your network allowed to reach EZRADIUS? Your access point’s public IP address and shared secret must match the ones in your EZRADIUS policy.
- Check the EZRADIUS logs Look for any errors or warnings that indicate why the connection might be failing.
Still stuck? Our RADIUS troubleshooting guide walks you through reading EZRADIUS audit logs and fixing the most common EAP-TLS errors.
🔎 Troubleshoot Cloud RADIUSFrequently Asked Questions (FAQ) About Cloud RADIUS for Azure Cloud PKI
Is Azure Cloud PKI the Same as Microsoft Intune Cloud PKI?
Yes. Microsoft’s product name is Microsoft Cloud PKI, and it’s managed from the Microsoft Intune admin center, so it’s often called Intune Cloud PKI. Because it runs in Microsoft’s cloud, many admins also search for it as Azure Cloud PKI. They all refer to the same service.
Can I Use Microsoft Cloud PKI Certificates for Wi-Fi Authentication?
Yes, but you need a RADIUS server to validate them. Cloud PKI issues the certificates, and a RADIUS server such as EZRADIUS checks them when a device connects to your WPA2/WPA3-Enterprise network using EAP-TLS.
Does Microsoft Cloud PKI Support OCSP?
No. Cloud PKI publishes a CRL and an AIA endpoint for each CA. EZRADIUS checks CRLs by default, so revoked Cloud PKI certificates are rejected once the updated CRL is published. See Microsoft’s Cloud PKI configuration guide for CRL publishing details.
Can I Check Intune Device Compliance With Cloud PKI Certificates?
Yes. As long as your SCEP profile issues device certificates with the Intune device ID in a DNS Subject Alternative Name, EZRADIUS can check the device’s compliance in Intune every time it connects. See our Intune compliance reference architecture to place compliant and non-compliant devices in separate VLANs.
Can Microsoft Cloud PKI Issue the Certificate for My RADIUS Server?
Not through SCEP. Cloud PKI SCEP profiles only issue certificates to Intune-managed devices. We recommend the free EZRADIUS auto-generated server certificate, which EZRADIUS renews automatically. If you have another PKI for server certificates, you can upload that certificate instead.
Can Microsoft Cloud PKI Issue Certificates To Linux Devices?
No. Cloud PKI only issues certificates to Intune-managed devices, that support the Intune SCEP protocol. Linux devices are not supported. If you need certificate for Linux devices managed by Intune, EZCA has support for Linux devices in Intune.
What About Devices That Aren’t Managed by Intune?
Cloud PKI can only issue certificates to Intune-managed devices. For personal or guest devices, you can add a second access policy that uses Entra ID usernames and passwords. See our BYOD reference architecture and our guide to mixing passwords and certificates in the same RADIUS policy.
Next Steps - How to Get More Out of Cloud RADIUS for Intune Cloud PKI
Now that your devices are connecting with their Cloud PKI certificates, you can use your RADIUS policy to segment your network based on who and what is connecting.
🚀 Separate Compliant and Non-Compliant Devices🚀 Assign VLANs by Entra ID Group
Prefer a shorter version? Our EZRADIUS and Microsoft Intune Cloud PKI quick start includes a video walkthrough of the same setup.
Enjoying EZRADIUS? Leave Us a Review!
We hope you’re enjoying using EZRADIUS to secure your Wi-Fi with Microsoft Cloud PKI certificates! If you have a moment, we would greatly appreciate it if you could leave us a review on G2. Your feedback helps other IT professionals discover EZRADIUS and helps us continue to improve our service. Thank you for your support!