








How-To: Bring Your Own HSM to EZCA Cloud PKI with Azure Key Vault or Managed HSM
Overview - How to Keep Your Cloud PKI CA Keys in Your Own HSM
By default, EZCA creates and protects your Certificate Authority (CA) private keys in HSMs that Keytos manages for you, so there is nothing for you to set up. Some organizations need more than that: a compliance framework, an auditor, or an internal key custody policy may require that CA keys live in a Hardware Security Module (HSM) that your own organization owns and controls. With a Premium EZCA subscription, you can bring your own Azure Key Vault (Premium tier) or Azure Managed HSM, and EZCA creates the keys of your new CAs in your vault instead.
Your keys never leave your HSM. EZCA creates each CA key as a non-exportable, HSM-backed key in your vault and asks your vault to sign with it, so you keep full control of the key, its access policies, and its audit logs in Azure.
This guide covers how bringing your own HSM works, how to give EZCA access to your Azure Key Vault or Managed HSM, and how to turn it on for your EZCA subscription.
How Does Bringing Your Own Key Vault or Managed HSM Work in EZCA?
Once you turn on Bring your own Key Vault or Managed HSM for a subscription, the following applies:
- New CAs in the subscription create their private keys in your Key Vaults or Managed HSMs.
- CA locations follow your vaults. When you create a CA, you can only pick the Azure regions where you added a vault, for both the primary location and any secondary (geo-redundant) locations. Add a vault in every region where you want a CA.
- Existing CAs keep their current keys. When an existing CA is renewed, EZCA creates its new key in your vault in the same region, if you added one there. If you didn’t add a vault in that region, the renewed key stays in Keytos’ HSMs.
- Post-quantum ML-DSA keys are not available for a subscription that brings its own vaults. Use an RSA or ECDSA key for these CAs.
- Vaults with CA keys can’t be removed. EZCA won’t let you remove a vault from the subscription while CAs still have keys in it. Delete those CAs first.
What Are the Requirements for Bringing Your Own HSM to EZCA?
| Requirement | Details |
|---|---|
| EZCA plan | A Premium EZCA subscription. The option is unavailable on Basic subscriptions. |
| Vault type | An Azure Key Vault on the Premium pricing tier, or an Azure Managed HSM. EZCA creates HSM-backed keys, which the Standard tier of Azure Key Vault doesn’t support. |
| Azure cloud | The vault must be in the same Azure cloud as your EZCA instance: commercial Azure for portal.ezca.io and the regional instances, or Azure US Government for portal.ezca.us. |
| Permissions | The Keytos application in your Entra ID tenant needs permission to create keys, sign with them, and delete them in each vault. Step 2 shows you how to grant it. |
Once your CA keys live in your vault, keeping them available is your responsibility. If a CA key is deleted, or EZCA loses access to the vault, that CA can no longer sign certificates or revocation lists. We recommend turning on soft-delete and purge protection on every vault you bring, and locking down who can change its access policies or role assignments.
Prerequisites for Bringing Your Own HSM to EZCA
- You have created a Premium EZCA subscription.
- You are a PKI Admin of the subscription.
- You have registered the Keytos applications in your Entra ID tenant.
- You have an Azure Key Vault on the Premium tier or an Azure Managed HSM, in each Azure region where you want to host CAs.
- You can assign roles or access policies on those vaults, for example as an Owner or User Access Administrator of the vault.
Step-by-Step Guide - How to Bring Your Own Key Vault or Managed HSM to EZCA
Step 1: How to Find Your Key Vault URI, Pricing Tier, and Region
EZCA needs the URI and the Azure region of each vault you bring. Start by collecting them from the Azure portal.
-
Sign in to the Azure portal and open the Key Vault you want EZCA to use.
-
On the Overview page, note the following values:
- Vault URI: the address EZCA connects to, such as
https://<vault-name>.vault.azure.net/. - SKU (Pricing tier): must be Premium.
- Location: the Azure region of the vault, such as East US. You’ll select the matching region (
eastus) in EZCA.

- Vault URI: the address EZCA connects to, such as
Using an Azure Managed HSM instead? Open it in the Azure portal and copy the HSM URI from its Overview page, such as https://<hsm-name>.managedhsm.azure.net/, along with its Location.
Step 2: How to Give EZCA Access to Your Key Vault or Managed HSM
EZCA signs with your vault as the Keytos application (Application ID 68554b48-233f-42b4-9aa7-2eadca4d7727), the back-end application you registered in your tenant. Don’t confuse it with the Keytos Client application, which is the portal that runs in your browser.
Azure Key Vault has two permission models, and the steps to give EZCA access depend on which one your vault uses. Check it first:
-
In your Key Vault, click Settings > Access configuration in the left-hand menu.
-
Note the selected Permission model: Azure role-based access control or Vault access policy.
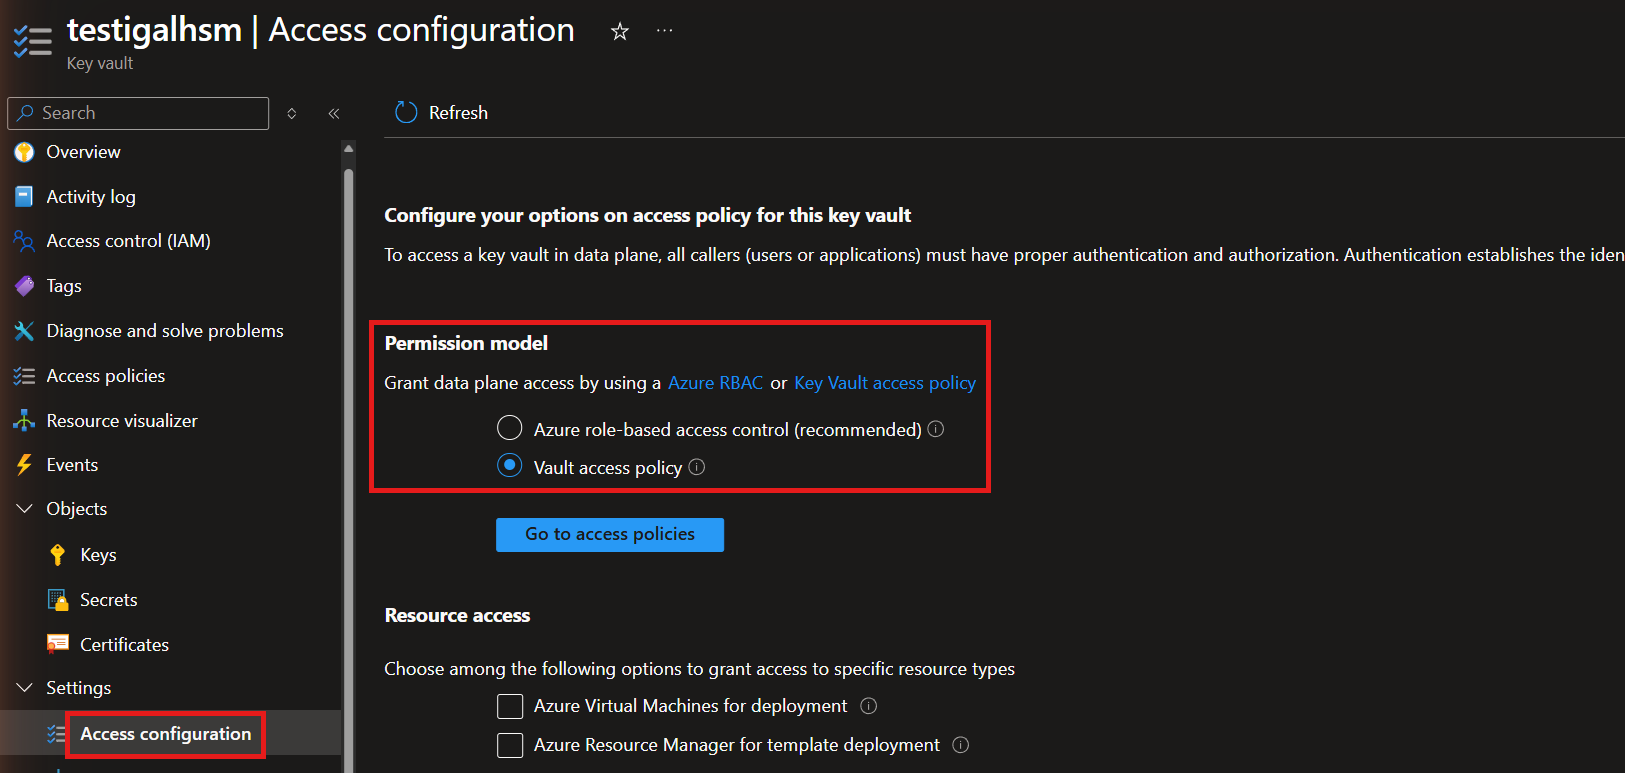
Then follow the tab that matches your vault’s permission model. If you use an Azure Managed HSM, follow the Azure Managed HSM tab.
How to Assign the Key Vault Crypto Officer Role to EZCA
We recommend Azure role-based access control (RBAC), which is also Microsoft’s recommended permission model. The Key Vault Crypto Officer role lets EZCA create keys, sign with them, and delete a key when you delete its CA.
-
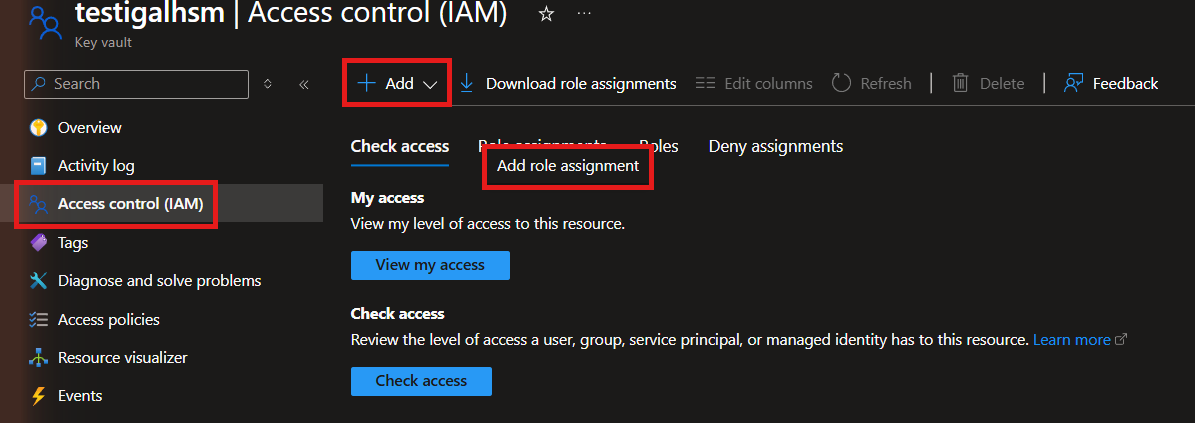
In your Key Vault, click Access control (IAM) in the left-hand menu.
-
Click + Add, then Add role assignment.
-
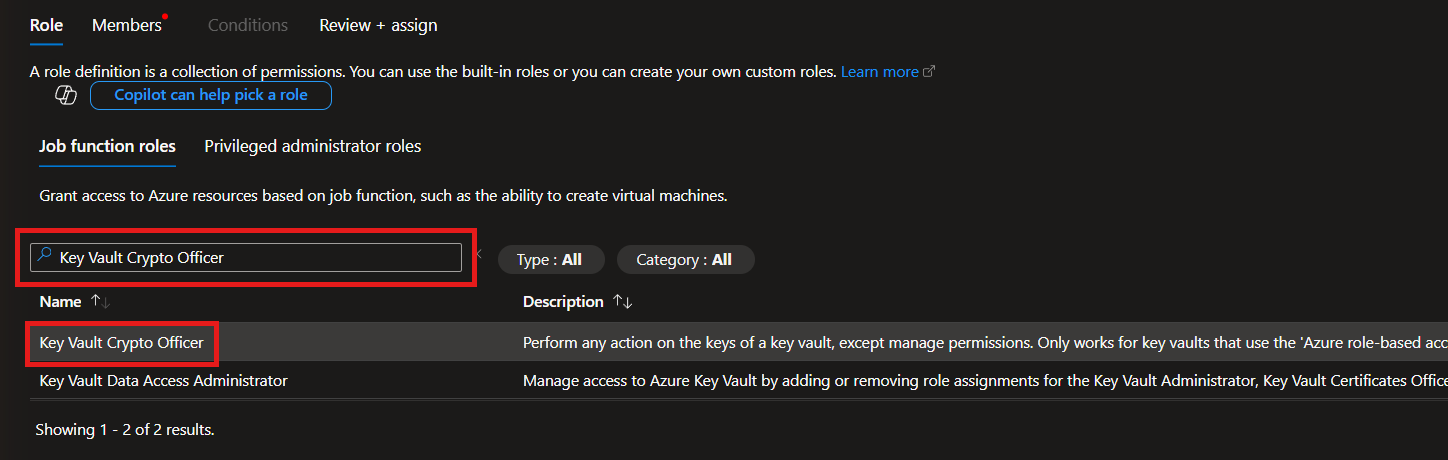
Search for “Key Vault Crypto Officer” and select the Key Vault Crypto Officer role.
-
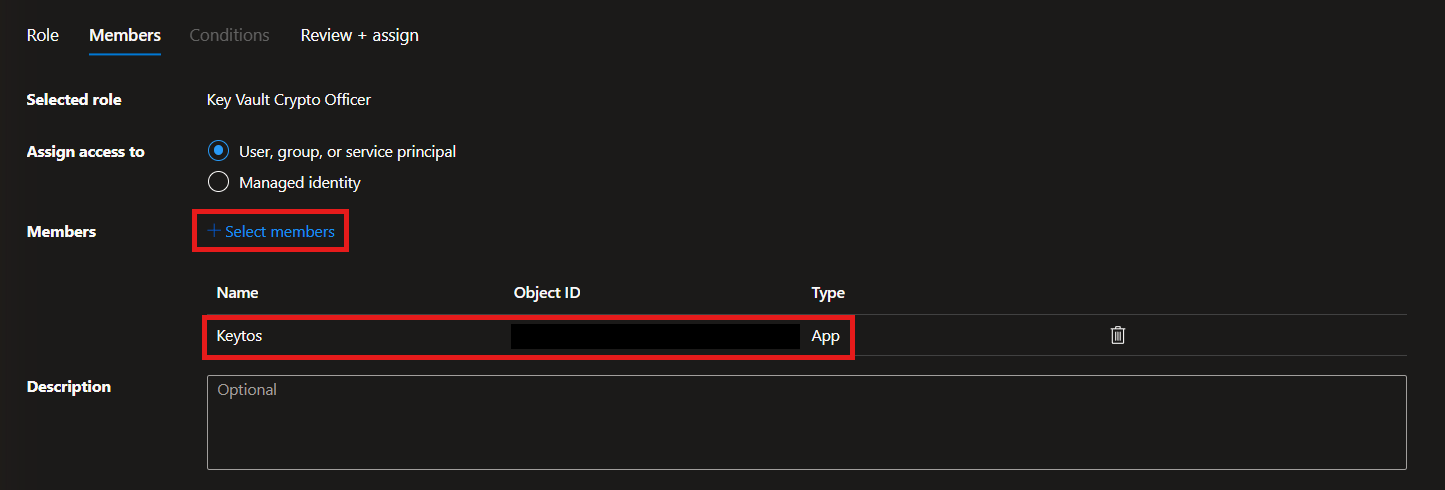
Click Next to open the Members tab, then click + Select members.
-
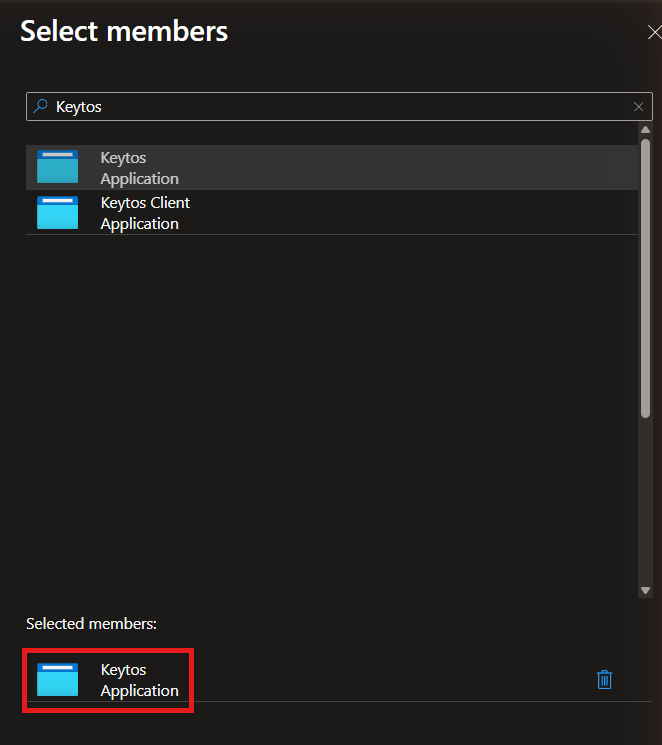
Search for “Keytos”, select the Keytos application (not Keytos Client), and click Select.
-
Confirm that the Keytos application appears under Members, then click Next.
-
Review the role assignment and click Review + assign.
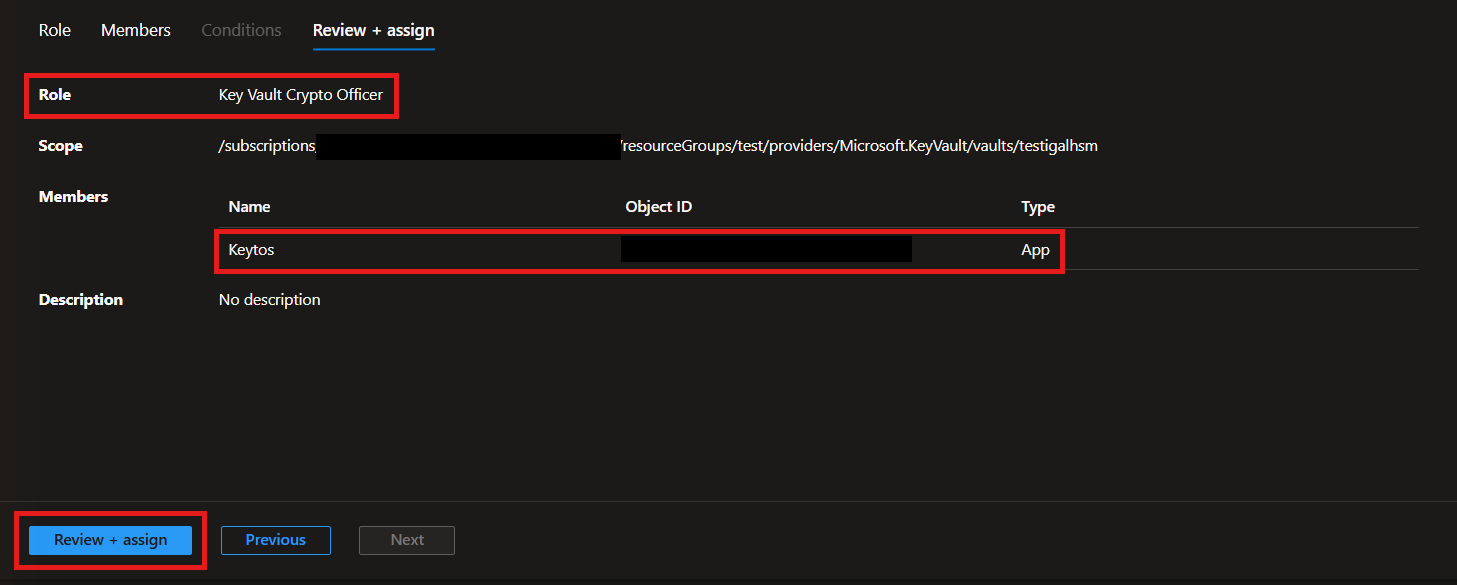
Azure role assignments can take a few minutes to apply. Wait a few minutes before you add the vault in EZCA.
How to Create a Key Vault Access Policy for EZCA
If your vault uses the Vault access policy permission model, create an access policy that gives the Keytos application the key permissions EZCA needs.
-
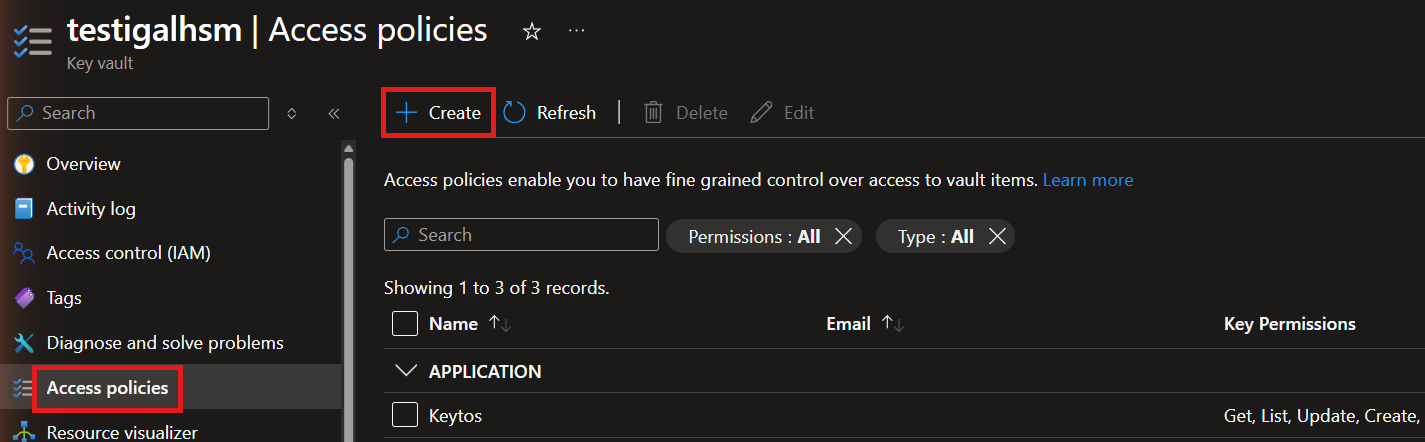
In your Key Vault, click Access policies in the left-hand menu, then click + Create.
-
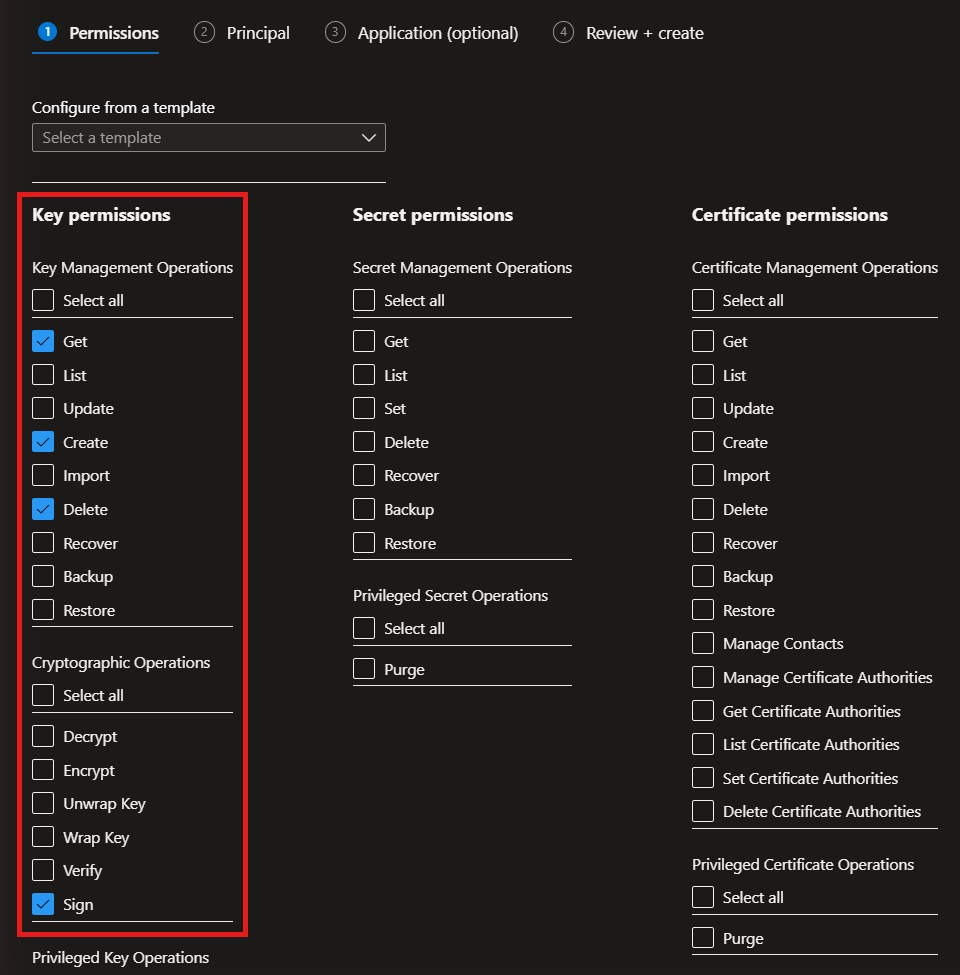
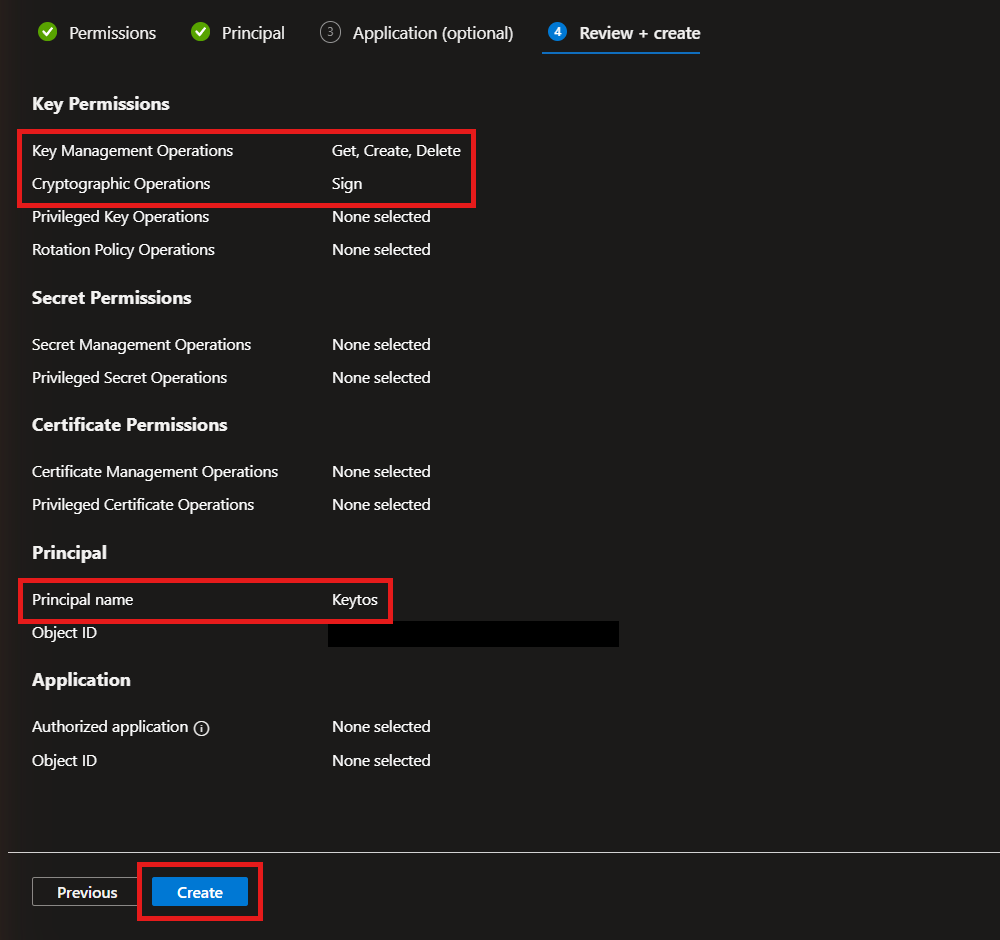
Under Key permissions, select Get, Create, and Delete under Key Management Operations, and Sign under Cryptographic Operations. EZCA doesn’t need any secret or certificate permissions.
-
Click Next. On the Principal tab, search for the Keytos application ID
68554b48-233f-42b4-9aa7-2eadca4d7727and select Keytos.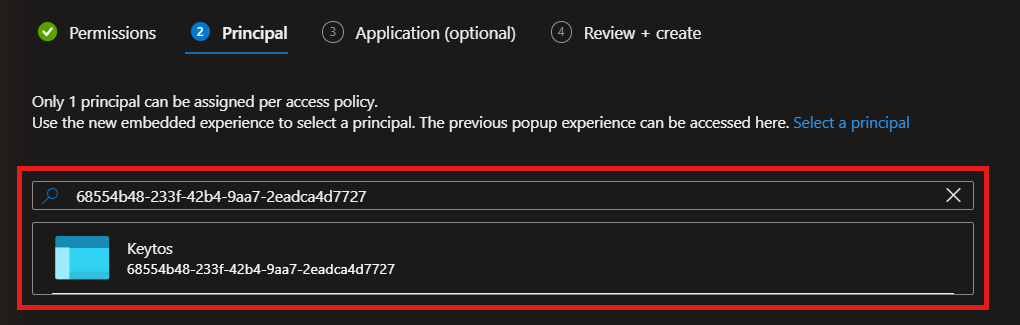
-
Click Next to skip the Application (optional) tab.
-
Review the policy and click Create.
How to Assign the Managed HSM Crypto User Role to EZCA
Azure Managed HSM uses its own local RBAC for keys, which you manage from the HSM itself rather than from Access control (IAM).
- In the Azure portal, open your Managed HSM and click Local RBAC in the left-hand menu.
- Click + Add to add a role assignment.
- Select the Managed HSM Crypto User role. It lets EZCA create keys, sign with them, and delete them.
- Set the scope to All Keys (/) or to /keys.
- Select the Keytos application (Application ID
68554b48-233f-42b4-9aa7-2eadca4d7727) as the security principal, then click Create.
Prefer the command line? Run the following Azure CLI command, replacing <your-hsm-name> with the name of your Managed HSM:
az keyvault role assignment create --hsm-name <your-hsm-name> --role "Managed HSM Crypto User" --assignee 68554b48-233f-42b4-9aa7-2eadca4d7727 --scope /keys
Step 3: How to Open Your EZCA Subscription Advanced Settings
-
Go to your EZCA portal, such as portal.ezca.io, and sign in with an account that is a PKI Admin of the subscription. (If you use a regional or private instance of EZCA, go to that portal instead.)
-
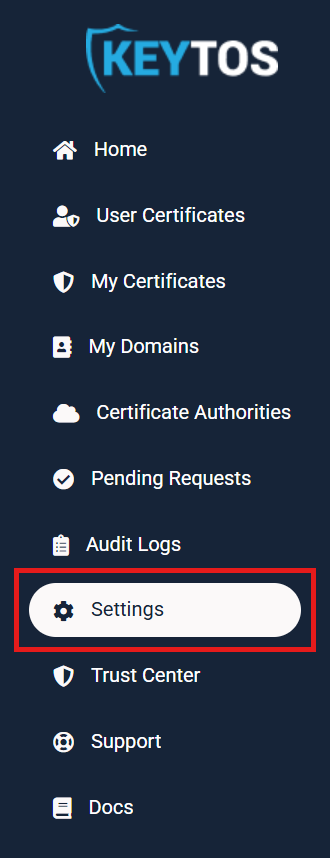
From the left-hand menu, click Settings.
-
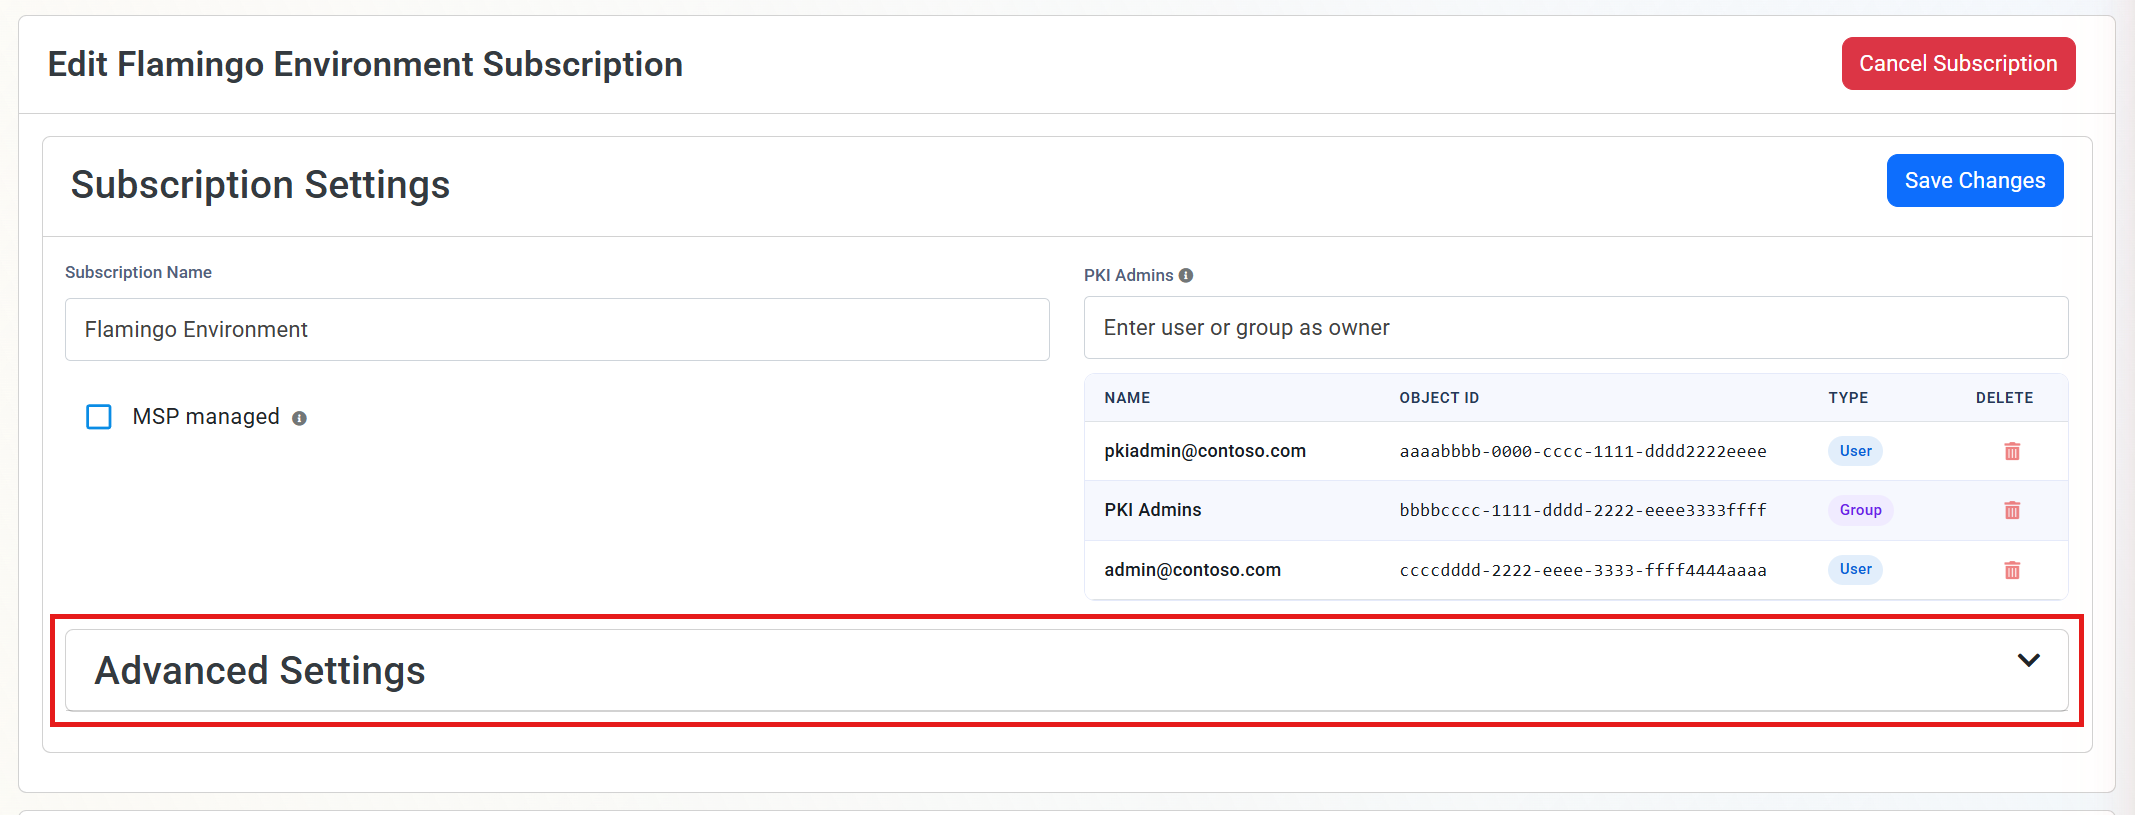
Find the Edit subscription name Subscription section of your Premium subscription, and click Advanced Settings to expand it.
Step 4: How to Add Your Key Vault or Managed HSM to EZCA
-
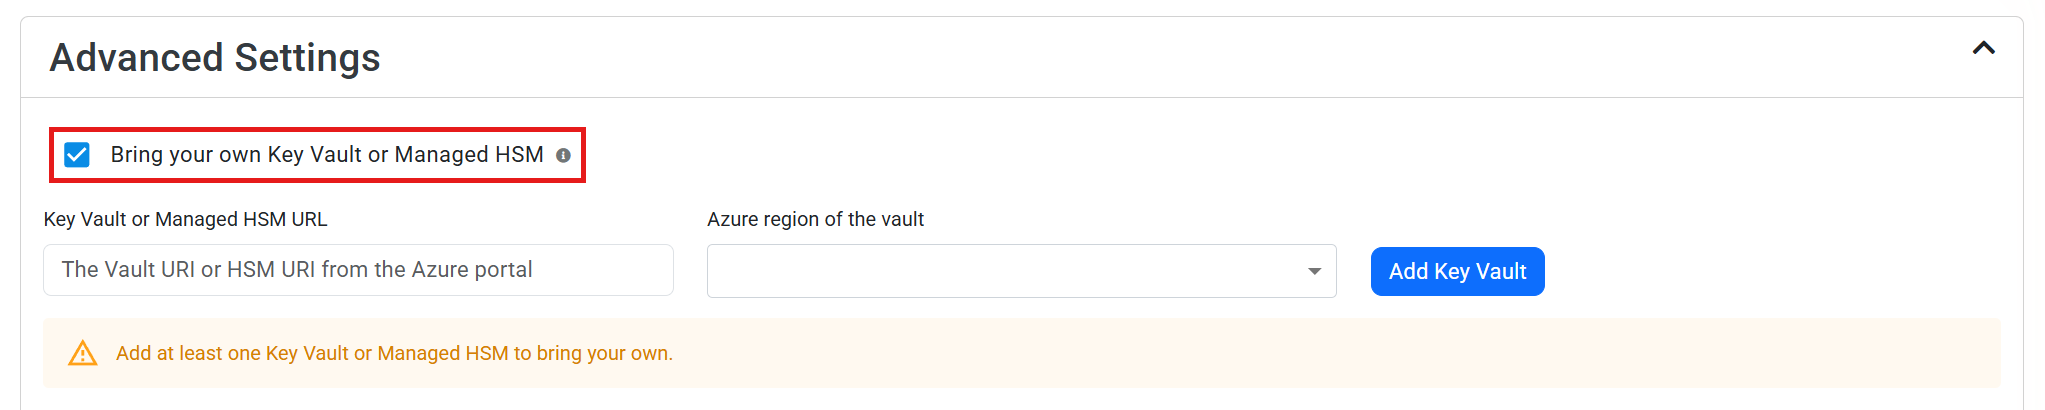
Check Bring your own Key Vault or Managed HSM. If the checkbox is unavailable, your subscription is not on a Premium plan.
-
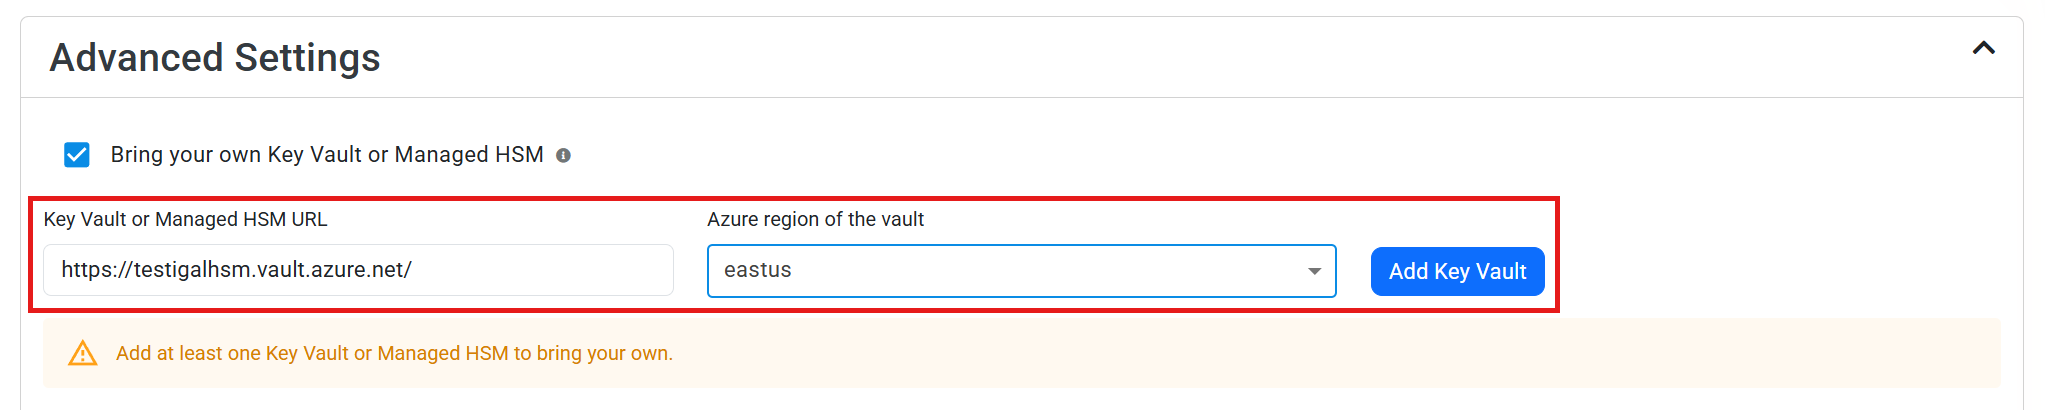
Enter the Key Vault or Managed HSM URL: the Vault URI or HSM URI you copied in Step 1.
-
Under Azure region of the vault, select the region your vault is in, such as
eastus. Make sure it matches the vault’s real location, because EZCA uses it to decide where it can create your CAs. -
Click Add Key Vault.
-
Repeat the previous three steps for each vault you want to add. You can add one vault per region, or several.
-
Check that your vaults appear in the list, then click Save Changes at the top of the Subscription Settings section.
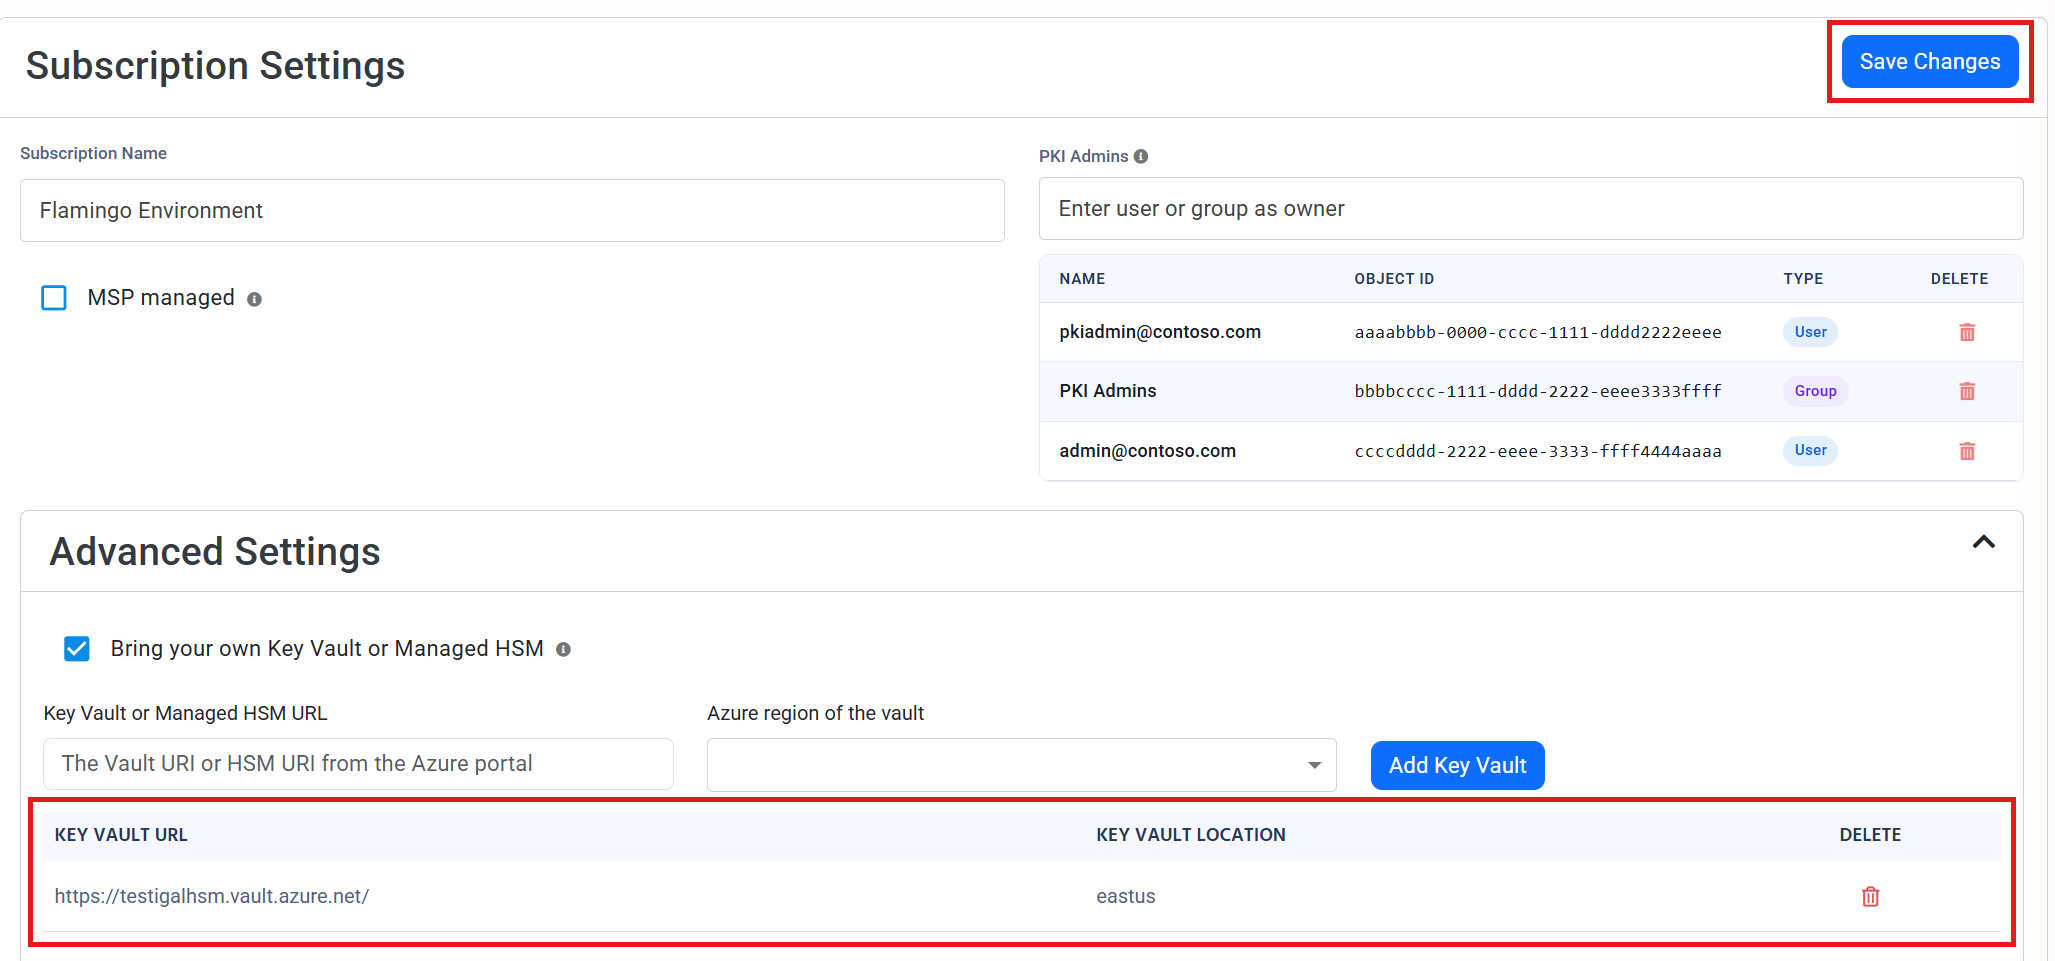
When you save, EZCA creates a test key in each new vault and signs with it, to confirm it has the access it needs. If this test fails, EZCA doesn’t save your changes and shows the following error:
Error [E4871]: EZCA could not create and sign with a key in <vault URL>. Make sure EZCA's application has permission to create keys and sign with them, that a Key Vault is on the Premium tier, and that the vault is in the same Azure cloud as this EZCA instance (commercial or US Government).
If you see it, review Step 2, give new role assignments a few minutes to apply, and save again.
Done! New CAs you create in this subscription now keep their private keys in your own Key Vault or Managed HSM.
How to Remove a Key Vault or Managed HSM From Your EZCA Subscription
You can only remove a vault that holds no CA keys. If CAs in the subscription still use keys in the vault, EZCA shows Error [E4875] with the names of those CAs, and keeps the vault. Delete those CAs before you remove the vault.
- Open Settings > Advanced Settings for the subscription, as in Step 3.
- In the vault list, click the delete icon next to the vault you want to remove.
- Click Save Changes.
Frequently Asked Questions (FAQ) About Bringing Your Own HSM to EZCA
Do I Need to Bring My Own HSM to Use EZCA?
No. EZCA keeps your CA keys in HSMs that Keytos manages by default, and that’s what most customers use. Bring your own Key Vault or Managed HSM only if a policy or regulation requires your organization to own the HSM that holds your CA keys.
Can I Use a Standard Tier Azure Key Vault?
No. EZCA creates HSM-backed keys, which need a Key Vault on the Premium pricing tier or an Azure Managed HSM. A Standard tier vault fails the test EZCA runs when you save, with Error [E4871].
Will My Existing CAs Move Into My Key Vault?
Not right away. Existing CAs keep their current keys. When you renew one of them, EZCA creates the new key in your vault in the same region, if you added one there. If you didn’t add a vault in that region, the renewed key stays in Keytos’ HSMs, so the renewal doesn’t fail.
Can I Create Post-Quantum (ML-DSA) CAs With My Own Key Vault?
Not yet. EZCA hides the ML-DSA key type when you create a CA in a subscription that brings its own vaults, and blocks it with Error [E4872] if requested through the API. Choose an RSA or ECDSA key for these CAs.
Can I Bring My Own HSM to a Keytos Shield Subscription?
No. Keytos Shield creates the CAs of its subscriptions in Keytos’ HSMs only, so this option applies to EZCA Premium subscriptions.
Next Steps - How to Create a CA With Its Key in Your Own HSM
Now that EZCA can use your own Key Vault or Managed HSM, you can create a CA whose private key lives in it. When you pick the CA location, select one of the regions where you added a vault.
🚀 Create Your Root CA in EZCAEnjoying EZCA? Leave Us a Review!
We hope you’re enjoying using EZCA to secure your organization with a cloud PKI! If you have a moment, we would greatly appreciate it if you could leave us a review on G2. Your feedback helps other IT professionals discover EZCA and helps us continue to improve our service. Thank you for your support!